Installation Guide for Cisco Hosted Collaboration Mediation · collaboration mediation release 1.1...
52
Americas Headquarters Cisco Systems, Inc. 170 West Tasman Drive San Jose, CA 95134-1706 USA http://www.cisco.com Tel: 408 526-4000 800 553-NETS (6387) Fax: 408 527-0883 Installation Guide for Cisco Hosted Collaboration Mediation Release 1.1 April 18, 2011 Text Part Number: OL-24026-01
Transcript of Installation Guide for Cisco Hosted Collaboration Mediation · collaboration mediation release 1.1...
Installation Guide for Cisco Hosted Collaboration MediationRelease 1.1
April 18, 2011
Americas HeadquartersCisco Systems, Inc.170 West Tasman DriveSan Jose, CA 95134-1706 USAhttp://www.cisco.comTel: 408 526-4000
800 553-NETS (6387)Fax: 408 527-0883
Text Part Number: OL-24026-01

THE SPECIFICATIONS AND INFORMATION REGARDING THE PRODUCTS IN THIS MANUAL ARE SUBJECT TO CHANGE WITHOUT NOTICE. ALL STATEMENTS, INFORMATION, AND RECOMMENDATIONS IN THIS MANUAL ARE BELIEVED TO BE ACCURATE BUT ARE PRESENTED WITHOUT WARRANTY OF ANY KIND, EXPRESS OR IMPLIED. USERS MUST TAKE FULL RESPONSIBILITY FOR THEIR APPLICATION OF ANY PRODUCTS.
THE SOFTWARE LICENSE AND LIMITED WARRANTY FOR THE ACCOMPANYING PRODUCT ARE SET FORTH IN THE INFORMATION PACKET THAT SHIPPED WITH THE PRODUCT AND ARE INCORPORATED HEREIN BY THIS REFERENCE. IF YOU ARE UNABLE TO LOCATE THE SOFTWARE LICENSE OR LIMITED WARRANTY, CONTACT YOUR CISCO REPRESENTATIVE FOR A COPY.
The Cisco implementation of TCP header compression is an adaptation of a program developed by the University of California, Berkeley (UCB) as part of UCB’s public domain version of the UNIX operating system. All rights reserved. Copyright © 1981, Regents of the University of California.
NOTWITHSTANDING ANY OTHER WARRANTY HEREIN, ALL DOCUMENT FILES AND SOFTWARE OF THESE SUPPLIERS ARE PROVIDED “AS IS” WITH ALL FAULTS. CISCO AND THE ABOVE-NAMED SUPPLIERS DISCLAIM ALL WARRANTIES, EXPRESSED OR IMPLIED, INCLUDING, WITHOUT LIMITATION, THOSE OF MERCHANTABILITY, FITNESS FOR A PARTICULAR PURPOSE AND NONINFRINGEMENT OR ARISING FROM A COURSE OF DEALING, USAGE, OR TRADE PRACTICE.
IN NO EVENT SHALL CISCO OR ITS SUPPLIERS BE LIABLE FOR ANY INDIRECT, SPECIAL, CONSEQUENTIAL, OR INCIDENTAL DAMAGES, INCLUDING, WITHOUT LIMITATION, LOST PROFITS OR LOSS OR DAMAGE TO DATA ARISING OUT OF THE USE OR INABILITY TO USE THIS MANUAL, EVEN IF CISCO OR ITS SUPPLIERS HAVE BEEN ADVISED OF THE POSSIBILITY OF SUCH DAMAGES.
Cisco and the Cisco Logo are trademarks of Cisco Systems, Inc. and/or its affiliates in the U.S. and other countries. A listing of Cisco's trademarks can be found at www.cisco.com/go/trademarks. Third party trademarks mentioned are the property of their respective owners. The use of the word partner does not imply a partnership relationship between Cisco and any other company. (1005R)
Any Internet Protocol (IP) addresses used in this document are not intended to be actual addresses. Any examples, command display output, and figures included in the document are shown for illustrative purposes only. Any use of actual IP addresses in illustrative content is unintentional and coincidental.
Installation Guide for Cisco Hosted Collaboration Mediation 1.1 © 2010–2011 Cisco Systems, Inc. All rights reserved.
OL-24026-01
C O N T E N T S
Preface v
Objectives v
Audience v
Conventions vi
Product Documentation vii
Obtaining Documentation and Submitting a Service Request vii
C H A P T E R 1 Introduction 1-1
HCM Dashboard 1-1
HCM Mediation Layer 1-2
C H A P T E R 2 Installing, Migrating, and Uninstalling HCM Dashboard 2-1
HCM Dashboard Server Requirements 2-2
HCM Dashboard Default Ports 2-2
Default Ports of HCM Dashboard 2-3
Default Ports of Domain Managers 2-3
HCM Dashboard Pre-Installation Steps 2-3
Installing and Starting HCM Dashboard in a Non-Cluster Setup 2-4
Installing HCM Dashboard in a Cluster Setup 2-7
HCM Dashboard Post-Installation Tasks 2-8
Checking Whether JBoss Service is Running 2-9
Checking Whether Apache Service is Running 2-9
Configuring for Asynchronous Communication Between Domain Managers and HCM Dashboard 2-9
HCM Dashboard Log Files 2-10
Starting and Stopping HCM Dashboard Server 2-10
Modifying Database User Password in HCM Dashboard Configuration File 2-11
Configuring a New Client and New User in ACS 5.1 2-12
Adding a New Client 2-12
Adding a New User 2-13
Modifying ACS Password in HCM Dashboard Configuration File 2-14
Installing MySQL Database Server 5.1 2-15
Migrating HCM Dashboard Data from Windows to Linux 2-15
iiiInstallation Guide for Cisco Hosted Collaboration Mediation
Contents
Migrating HCM Dashboard Data from Windows to Linux With Local Database 2-16
Migrating HCM Dashboard Data from Windows to Linux With Remote Database 2-18
Verifying Whether Data is Migrated Successfully 2-20
Uninstalling HCM Dashboard 2-21
C H A P T E R 3 Installing, Migrating, and Uninstalling HCM Mediation 3-1
HCM Mediation Server Requirements 3-1
HCM Mediation Default Ports 3-2
Default Ports of HCM Mediation 3-2
Default Ports Used by Domain Managers 3-2
Installing and Starting HCM Mediation 3-3
Modifying Database User Password in the HCM Mediation Configuration File 3-6
Configuring the application.properties File 3-7
HCM Mediation Post-Installation Tasks 3-7
Registering a Customer Manually 3-7
Configuring a Cron Job to Periodically Delete Mediation Data 3-8
Configuring for Asynchronous Communication Between Domain Managers and HCM Mediation 3-10
Migrating HCM Mediation Data from HCM 1.0 to HCM 1.1 3-11
Uninstalling HCM Mediation 3-12
G L O S S A R Y
I N D E X
ivInstallation Guide for Cisco Hosted Collaboration Mediation
OL-24026-01
Preface
This section explains the objectives and intended audience of this publication and describes the conventions that convey instructions and other information.
ObjectivesThis guide provides instructions for installing, migrating, and uninstalling Cisco Hosted Collaboration Mediation (HCM) Release 1.1 on a Linux system.
AudienceThe primary audience for this guide includes network operations personnel and system administrators. This guide assumes that you are familiar with the following products and topics:
• Basic internetworking terminology and concepts
• Red Hat Enterprise Linux
• Cisco Secure Access Control System (ACS) Server
• JBoss Application Server
• MySQL Administration
• Oracle database administration
vInstallation Guide for Cisco Hosted Collaboration Mediation
OL-24026-01
Preface
ConventionsThis document uses the following conventions:
Caution Means reader be careful. In this situation, you might do something that could result in equipment damage or loss of data.
Note Means reader take note. Notes contain helpful suggestions or references to material not covered in the manual.
Timesaver Means the described action saves time. You can save time by performing the action described in the paragraph.
Tip Means the following information will help you solve a problem.
Item Convention
Commands and keywords boldface font
Displayed session and system information screen font
Information that the user must enter boldface screen font
Variables that the user must supply italic screen font
Menu items and button names boldface font
Selecting a menu item Option > Network Preferences
viInstallation Guide for Cisco Hosted Collaboration Mediation
OL-24026-01
Preface
Product DocumentationTable 1 lists the HCM documentation set.
We sometimes update the documentation after original publication. Therefore, you should also review the documentation on Cisco.com for any updates. You must access the links in Table 1 for the most current HCM 1.1 documentation.
Obtaining Documentation and Submitting a Service RequestFor information on obtaining documentation, submitting a service request, and gathering additional information, see the monthly What’s New in Cisco Product Documentation, which also lists all new and revised Cisco technical documentation, at:
http://www.cisco.com/en/US/docs/general/whatsnew/whatsnew.html
Subscribe to the What’s New in Cisco Product Documentation as a RSS feed and set content to be delivered directly to your desktop using a reader application. The RSS feeds are a free service and Cisco currently supports RSS version 2.0.
Table 1 Product Documentation
Document Title Available Formats
User Guide for Cisco Hosted Collaboration Mediation 1.1
On Cisco.com:
http://www.cisco.com/en/US/products/ps11243/products_user_guide_list.html
Installation Guide for Cisco Hosted Collaboration Mediation 1.1 (this document)
On Cisco.com:
http://www.cisco.com/en/US/products/ps11243/prod_installation_guides_list.html
Release Notes for Cisco Hosted Collaboration Mediation 1.1
On Cisco.com:
http://www.cisco.com/en/US/products/ps11243/prod_release_notes_list.html
Programmer’s Guide for Cisco Hosted Collaboration Mediation Interface 1.1
On Cisco.com:
http://www.cisco.com/en/US/products/ps11243/prod_technical_reference_list.html
Open Source Used In Cisco Hosted Collaboration Mediation 1.1
On Cisco.com:
http://www.cisco.com/en/US/products/ps11243/products_licensing_information_listing.html
viiInstallation Guide for Cisco Hosted Collaboration Mediation
OL-24026-01

Preface
viiiInstallation Guide for Cisco Hosted Collaboration Mediation
OL-24026-01
InstallatiOL-24026-01
C H A P T E R 1
IntroductionThis guide describes how to install, migrate data from HCM 1.0, and uninstall HCM Dashboard and HCM Mediation. This chapter describes the Hosted Collaboration Mediation (HCM) software.
HCM is intended for use in a Managed Service Provider’s (MSP) Network Operations Center (NOC). HCM consists the following two components:
• HCM Dashboard
• HCM Mediation Layer
HCM DashboardHCM Dashboard provides a single pane view of assurance data in the hosted environment and provides various summaries and reports. HCM Dashboard acts as a bridge among customer-specific implementations of the following domain managers, in a virtualized environment:
• Cisco Unified Operations Manager (CUOM)
• VMware vCenter
• Cisco Fabric Manager Server (FMS)
• Cisco Unified Computing System Manager (UCSM)
HCM Dashboard aggregates data from multiple instances of these domain managers, so that when you log into HCM Dashboard, you can view aggregated customer data in a single window. HCM Dashboard comprises a set of Administration and Dashboard portlets and a Diagnostics portlet.
The Dashboard portlets enable you to aggregate data from each virtualized instance of CUOM, vCenter, FMS, and UCSM.
The Administration portlets enable you to cross-launch to the web pages of the individual instances of CUOM, vCenter, FMS, and UCSM for customer-centric views.
The portlets leverage the existing APIs and make API calls to retrieve information from domain managers. HCM Dashboard supports a VMWare-based deployment and can be installed and operated alongside other portal servers or applications.
See Chapter 2, “Installing, Migrating, and Uninstalling HCM Dashboard” for:
• HCM Dashboard Server Requirements
• HCM Dashboard Default Ports
• HCM Dashboard Pre-Installation Steps
• Installing and Starting HCM Dashboard in a Non-Cluster Setup
1-1on Guide for Cisco Hosted Collaboration Mediation
Chapter 1 Introduction HCM Mediation Layer
• Installing HCM Dashboard in a Cluster Setup
• HCM Dashboard Post-Installation Tasks
• Migrating HCM Dashboard Data from Windows to Linux
• Uninstalling HCM Dashboard
HCM Mediation Layer The HCM Mediation layer component uses the TM Forum Shared Information/Data Model (SID) as the foundation data model. HCM Mediation implements the SID as its common model to create and maintain the data interoperability layer in Hosted Communications Services. It provides SID-based normalized API to the underlying domain managers.
HCM 1.1 Mediation layer supports the VOSS connectors.
See Chapter 3, “Installing, Migrating, and Uninstalling HCM Mediation” for:
• HCM Mediation Server Requirements
• HCM Mediation Default Ports
• Installing and Starting HCM Mediation
• HCM Mediation Post-Installation Tasks
• Migrating HCM Mediation Data from HCM 1.0 to HCM 1.1
• Uninstalling HCM Mediation
1-2Installation Guide for Cisco Hosted Collaboration Mediation
OL-24026-01
InstallatiOL-24026-01
C H A P T E R 2
Installing, Migrating, and Uninstalling HCM DashboardThis chapter describes how to install, migrate data from HCM 1.0, and uninstall HCM Dashboard. It includes:
• HCM Dashboard Server Requirements, page 2-2
• HCM Dashboard Default Ports, page 2-2
• HCM Dashboard Pre-Installation Steps, page 2-3
• Installing and Starting HCM Dashboard in a Non-Cluster Setup, page 2-4
• Installing HCM Dashboard in a Cluster Setup, page 2-7
• HCM Dashboard Post-Installation Tasks, page 2-8
• HCM Dashboard Log Files, page 2-10
• Starting and Stopping HCM Dashboard Server, page 2-10
• Modifying Database User Password in HCM Dashboard Configuration File, page 2-11
• Configuring a New Client and New User in ACS 5.1, page 2-12
• Installing MySQL Database Server 5.1, page 2-15
• Migrating HCM Dashboard Data from Windows to Linux, page 2-15
• Verifying Whether Data is Migrated Successfully, page 2-20
• Uninstalling HCM Dashboard, page 2-21
2-1on Guide for Cisco Hosted Collaboration Mediation
Chapter 2 Installing, Migrating, and Uninstalling HCM Dashboard HCM Dashboard Server Requirements
HCM Dashboard Server RequirementsTable 2-1 lists the server requirements for the HCM Dashboard component.
HCM Dashboard Default PortsThis section lists the default ports of HCM Dashboard and domain managers. You must make sure that HCM Dashboard can communicate with the domain managers. It includes:
• Default Ports of HCM Dashboard, page 2-3
• Default Ports of Domain Managers, page 2-3
Table 2-1 HCM Dashboard Server Requirements
Requirement Notes
Operating System Red Hat Enterprise Linux 5.3 (64-bit).
It is recommended that you read the following guides while hardening Linux:
• Guide to the Secure Configuration of Red Hat Enterprise Linux 5
• Hardening Red Hat Enterprise Linux 5
CPU 2 vCPU
DRAM 8 GB RAM
CPU Cache 2 x 6 MB L2 cache.
Disk Space 200 GB hard drive.
Network Interface Card (NIC) One 1-Gigabit Ethernet, low-latency NIC with dedicated connectivity to all supported domain managers.
Structured Query Language (SQL) Server MySQL 5.1. This is not installed as a part of the HCM application package. MySQL Server is installed by default on the Red Hat Enterprise Linux operating system.
If MySQL is not installed, you must install it. See Installing MySQL Database Server 5.1, page 2-15.
Java Development Kit (JDK) Available as part of the HCM application package.
Web Server JBoss. This is available as part of the HCM application package.
2-2Installation Guide for Cisco Hosted Collaboration Mediation
OL-24026-01
Chapter 2 Installing, Migrating, and Uninstalling HCM Dashboard HCM Dashboard Pre-Installation Steps
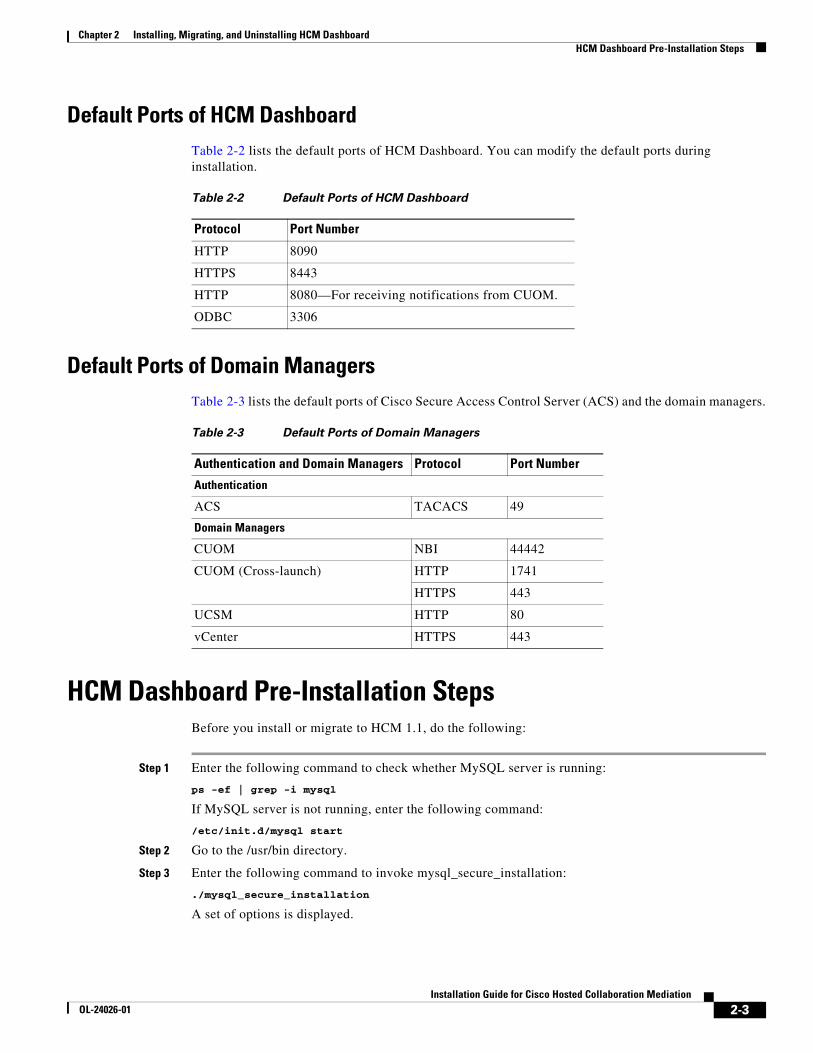
Default Ports of HCM DashboardTable 2-2 lists the default ports of HCM Dashboard. You can modify the default ports during installation.
Default Ports of Domain ManagersTable 2-3 lists the default ports of Cisco Secure Access Control Server (ACS) and the domain managers.
HCM Dashboard Pre-Installation StepsBefore you install or migrate to HCM 1.1, do the following:
Step 1 Enter the following command to check whether MySQL server is running:
ps -ef | grep -i mysql
If MySQL server is not running, enter the following command:
/etc/init.d/mysql start
Step 2 Go to the /usr/bin directory.
Step 3 Enter the following command to invoke mysql_secure_installation:
./mysql_secure_installation
A set of options is displayed.
Table 2-2 Default Ports of HCM Dashboard
Protocol Port Number
HTTP 8090
HTTPS 8443
HTTP 8080—For receiving notifications from CUOM.
ODBC 3306
Table 2-3 Default Ports of Domain Managers
Authentication and Domain Managers Protocol Port Number
Authentication
ACS TACACS 49
Domain Managers
CUOM NBI 44442
CUOM (Cross-launch) HTTP 1741
HTTPS 443
UCSM HTTP 80
vCenter HTTPS 443
2-3Installation Guide for Cisco Hosted Collaboration Mediation
OL-24026-01
Chapter 2 Installing, Migrating, and Uninstalling HCM Dashboard Installing and Starting HCM Dashboard in a Non-Cluster Setup
Step 4 Enter y for all options.
For example:
Set root password (y/n):y
Remove anonymous users (y/n):y
Disallow root login remotely (y/n):y
Remove test database and access to it (y/n):y
Reload privileges table now(y/n):y
Step 5 Enter the following command to log into MySQL with root credentials:
mysql -u root -p
Step 6 In the MySQL console window, enter the following command to grant remote access permission for root:
GRANT ALL PRIVILEGES ON *.* TO 'root'@'%' IDENTIFIED BY root_password
WITH GRANT OPTION;
Installing and Starting HCM Dashboard in a Non-Cluster SetupTo install and start HCM Dashboard in a non-cluster setup:
Step 1 Configure ACS. See Configuring a New Client and New User in ACS 5.1, page 2-12
If MySQL is not installed, you must install MySQL. See Installing MySQL Database Server 5.1, page 2-15.
Step 2 Copy hcm.bin to the installation server.
Step 3 Enter the following command:
./hcm.bin
The Hosted Collaboration Mediation InstallAnywhere Wizard appears.
Step 4 In the Introduction screen, click Next.
Step 5 In the License Agreement screen, select the I accept the terms of the license agreement radio button and click Next.
If a previous version of HCM Dashboard has been installed on the server, you will be taken to the Detect Previous Version screen where you can view the following details:
• Version that has been installed.
• Install directory path.
You must uninstall the installed version before continuing with the new installation. To do this, complete the steps in the Uninstalling HCM Dashboard section.
Step 6 In the Select Cisco Hosted Collaboration Mediation Component screen, select the Dashboard radio button and click Next.
The Choose Install Folder screen appears. The Default Destination Folder path is set to /opt/hcm/dashboard.
If you want to install HCM Dashboard in a different directory:
a. Click Choose.
2-4Installation Guide for Cisco Hosted Collaboration Mediation
OL-24026-01

Chapter 2 Installing, Migrating, and Uninstalling HCM Dashboard Installing and Starting HCM Dashboard in a Non-Cluster Setup
b. Select the install directory path.
c. Click Next.
Step 7 In the Database Configuration screen (See Figure 2-1), enter the:
a. IP address in the Server Address field.
b. Port number in the Port Number field.
The default database port is 3306, but you can change it if needed.
c. Username in the System User Name field.
d. Password in the System Password field.
e. Click Next.
Figure 2-1 Database Configuration Details
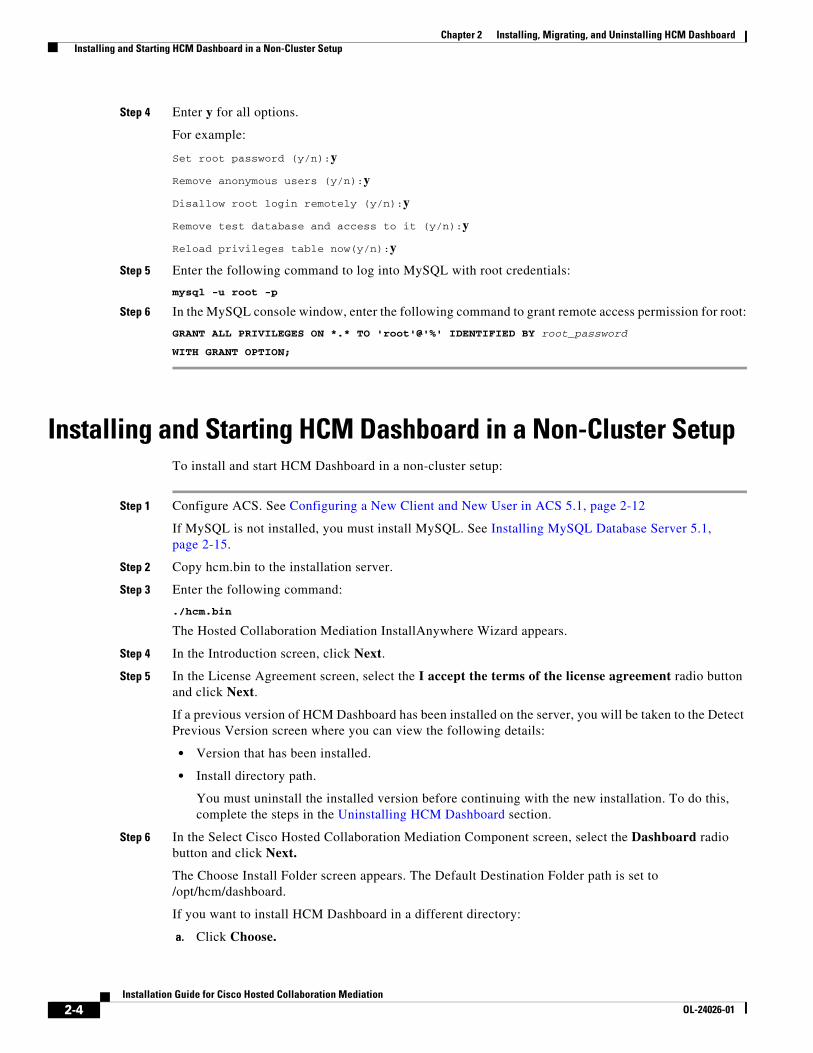
Step 8 In the Cisco Hosted Collaboration Mediation Database User screen (See Figure 2-2), enter the following details to create a user for Cisco Hosted Collaboration Mediation database:
a. Username in the User Name field.
b. Password in the Password field.
If you want to change the Dashboard database user’s password after installation, you must follow the steps in Modifying Database User Password in HCM Dashboard Configuration File section.
c. Re-enter the password in the Re-enter Password field.
d. Click Next.
2-5Installation Guide for Cisco Hosted Collaboration Mediation
OL-24026-01
Chapter 2 Installing, Migrating, and Uninstalling HCM Dashboard Installing and Starting HCM Dashboard in a Non-Cluster Setup
Figure 2-2 Database User Details
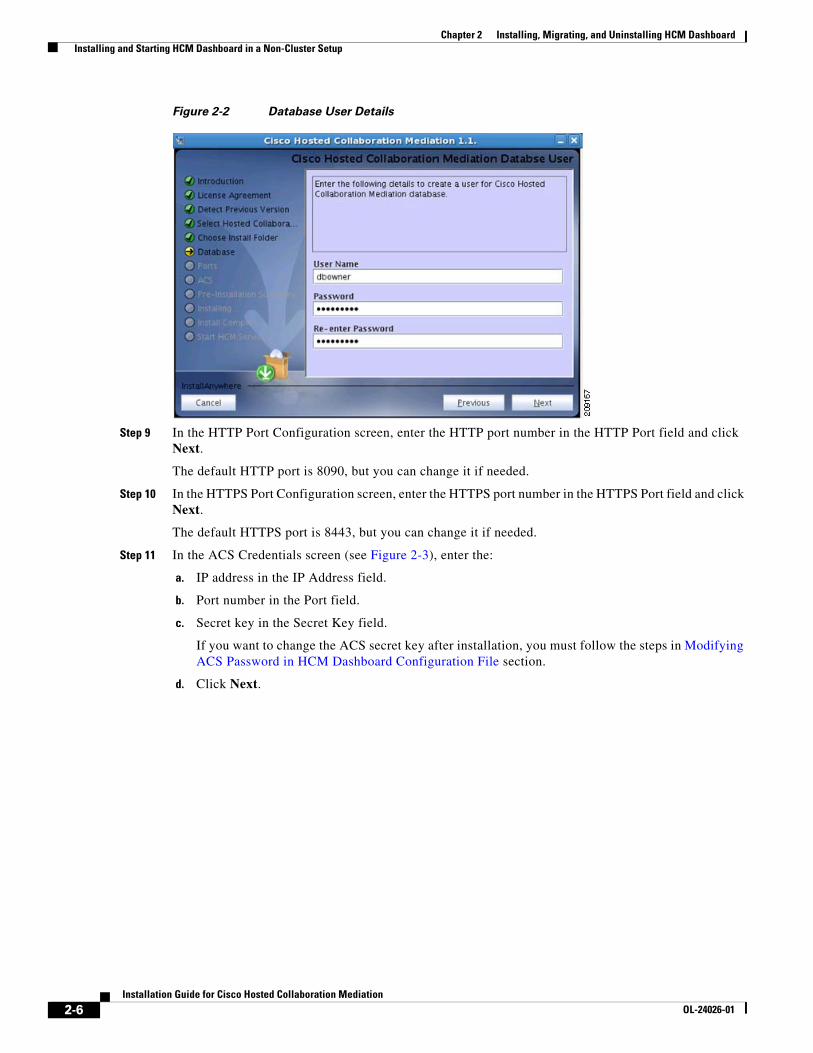
Step 9 In the HTTP Port Configuration screen, enter the HTTP port number in the HTTP Port field and click Next.
The default HTTP port is 8090, but you can change it if needed.
Step 10 In the HTTPS Port Configuration screen, enter the HTTPS port number in the HTTPS Port field and click Next.
The default HTTPS port is 8443, but you can change it if needed.
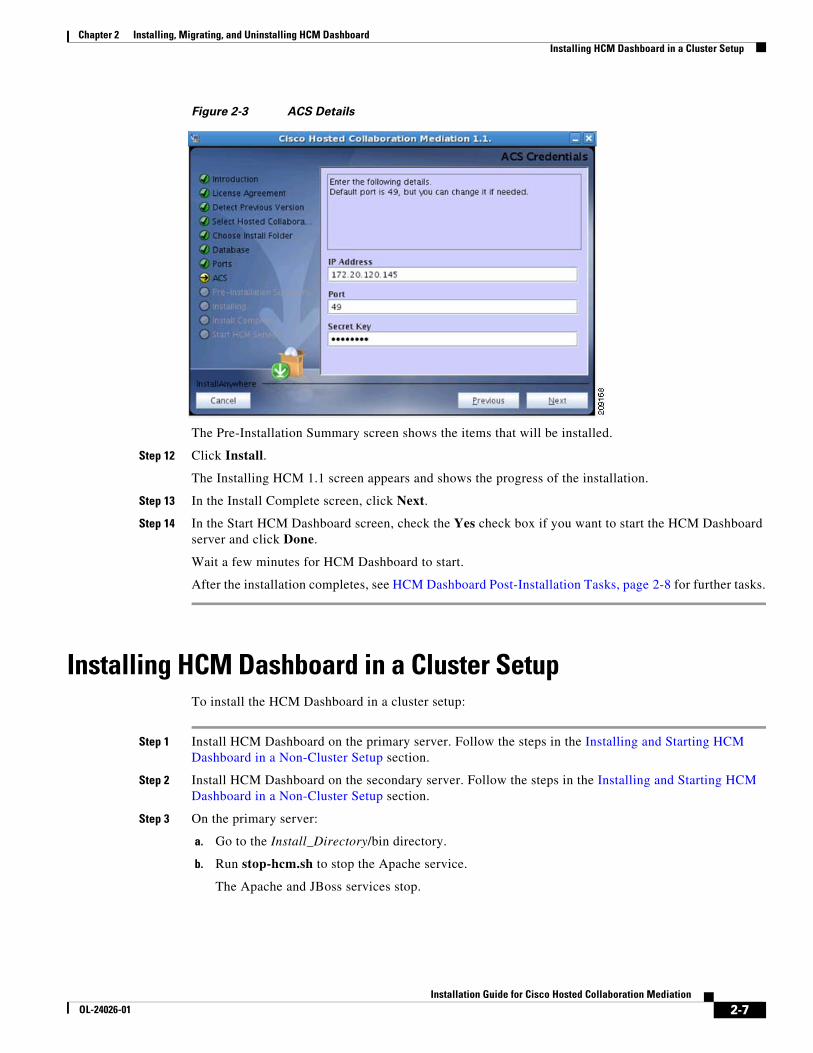
Step 11 In the ACS Credentials screen (see Figure 2-3), enter the:
a. IP address in the IP Address field.
b. Port number in the Port field.
c. Secret key in the Secret Key field.
If you want to change the ACS secret key after installation, you must follow the steps in Modifying ACS Password in HCM Dashboard Configuration File section.
d. Click Next.
2-6Installation Guide for Cisco Hosted Collaboration Mediation
OL-24026-01
Chapter 2 Installing, Migrating, and Uninstalling HCM Dashboard Installing HCM Dashboard in a Cluster Setup
Figure 2-3 ACS Details
The Pre-Installation Summary screen shows the items that will be installed.
Step 12 Click Install.
The Installing HCM 1.1 screen appears and shows the progress of the installation.
Step 13 In the Install Complete screen, click Next.
Step 14 In the Start HCM Dashboard screen, check the Yes check box if you want to start the HCM Dashboard server and click Done.
Wait a few minutes for HCM Dashboard to start.
After the installation completes, see HCM Dashboard Post-Installation Tasks, page 2-8 for further tasks.
Installing HCM Dashboard in a Cluster Setup To install the HCM Dashboard in a cluster setup:
Step 1 Install HCM Dashboard on the primary server. Follow the steps in the Installing and Starting HCM Dashboard in a Non-Cluster Setup section.
Step 2 Install HCM Dashboard on the secondary server. Follow the steps in the Installing and Starting HCM Dashboard in a Non-Cluster Setup section.
Step 3 On the primary server:
a. Go to the Install_Directory/bin directory.
b. Run stop-hcm.sh to stop the Apache service.
The Apache and JBoss services stop.
2-7Installation Guide for Cisco Hosted Collaboration Mediation
OL-24026-01
Chapter 2 Installing, Migrating, and Uninstalling HCM Dashboard HCM Dashboard Post-Installation Tasks
c. Add the following lines in the workers.properties file located in the /etc/httpd/conf directory in the primary server:
# Define Node2
# modify the host as your host IP or DNS name.
worker.node2.port=8009
worker.node2.host=<secondary server ip>
worker.node2.type=ajp13
worker.node2.lbfactor=1
Add node2 for the secondary server in the cluster and node3 for the third server.
d. Add node2 in the workers.properties file in the primary server.
For example, see the following code example:
worker.loadbalancer.balance_workers=node1, node2
e. Go to the Install_Directory/bin directory.
f. Run start-hcm.sh to start Apache service.
The Apache and JBoss services start.
Step 4 On the secondary server:
a. Go to the Install_Directory/bin directory.
b. Run stop-hcm.sh to stop the Apache and JBoss services.
The Apache and JBoss services stop.
c. Go to the Install_Directory\thirdparty\jboss\server\default\deploy\jboss-web.deployer directory.
d. In the server.xml file, change the jvmRoute value to node2.
For example, see the following code example:
Engine name="jboss.web" defaultHost="localhost" jvmRoute="node2"
e. Go to the Install_Directory/bin directory.
f. Run start-hcm.sh to start the Apache and JBoss services.
The Apache and JBoss services start.
Complete Step 1 to Step 4 to add more nodes.
HCM Dashboard Post-Installation TasksAfter you install HCM Dashboard, you must perform the following post-installation tasks:
• Check whether JBoss service is running—Checking Whether JBoss Service is Running, page 2-9
• Check whether Apache service is running—Checking Whether Apache Service is Running, page 2-9
• Configure for asynchronous communication between domain managers and HCM Dashboard—Configuring for Asynchronous Communication Between Domain Managers and HCM Dashboard, page 2-9
2-8Installation Guide for Cisco Hosted Collaboration Mediation
OL-24026-01
Chapter 2 Installing, Migrating, and Uninstalling HCM Dashboard HCM Dashboard Post-Installation Tasks
Checking Whether JBoss Service is RunningAfter you install HCM Dashboard, you must check whether JBoss service is running.
Enter the following command to check whether JBoss service is running:
ps -ef | grep -i jboss
Checking Whether Apache Service is RunningAfter you install HCM Dashboard, you must check whether Apache service is running.
Enter the following command to check whether Apache service is running:
ps -ef | grep -i httpd
Configuring for Asynchronous Communication Between Domain Managers and HCM Dashboard
Sometimes service requests to the domain managers may result in long-running transactions. Domain managers support asynchronous behavior. This helps clients such as HCM Dashboard to subscribe for asynchronous notifications and get notified when the operation is completed by the domain manager. In such a scenario, HCM Dashboard need not wait for a synchronous response.
Note You must configure the asynchronous details for executing Diagnostics Test in HCM Dashboard.
You must perform the following configuration to ensure asynchronous communication between the domain managers and HCM Dashboard. Before proceeding with the configuration, you must make sure that the IP address, hostname, and the port used by HCM Dashboard are accessible from the domain managers.
To configure for asynchronous communication between domain managers and HCM Dashboard:
Step 1 Go to the HCM_Dashboard_Install_Directory.
For example, /opt/hcm/dashboard
Step 2 Enter the following command and change the directory to bin:
cd bin
Step 3 Run stop-hcm.sh and stop HCM Dashboard server.
Step 4 Go to the HCM_Dashboard_Install_Directory/thirdparty/jboss/server/default/conf/portal_props directory.
Step 5 Open monitor.properties file.
Step 6 Modify the IP address on which HCM Dashboard is installed.
The following is a code example of the property name tag before modifying:
WSN_CONSUMER_IPADDRESS=$HCM_IP$"
The following is a code example of the property name tag after modifying. This example assumes that the IP address of the server on which HCM Dashboard is installed is 192.168.0.1:
WSN_CONSUMER_IPADDRESS="192.168.0.1"
2-9Installation Guide for Cisco Hosted Collaboration Mediation
OL-24026-01
Chapter 2 Installing, Migrating, and Uninstalling HCM Dashboard HCM Dashboard Log Files
Step 7 Go to the HCM_Dashboard_Install_Directory.
For example, /opt/hcm/dashboard.
Step 8 Enter the following command and change the directory to bin:
cd bin
Step 9 Run start-hcm.sh and start HCM Dashboard server.
HCM Dashboard Log FilesHCM Dashboard maintains separate log files for UI, Schedulers, CUOM, synchronous and notification Web Services components. The log files are stored in the JBOSS_HOME\server\default\log\msdtportal directory.
The following log files are available:
• msliferay.log—UI
• msscheduler.log—Scheduler
• mswsomclient.log—Web services OM logs
• mswsnotifyclient.log—Web services OM notification
• mswsvcclient.log—Web services vCenter logs
• mswsucsmclient.log—Web services UCSM logs
The default size of a log file is 10 MB. A separate log file is created when a log file exceeds 10 MB. A maximum of two log files are maintained and older log files are recycled.
Starting and Stopping HCM Dashboard ServerAfter installing HCM Dashboard and completing the post-installation tasks, you can start the HCM Dashboard server.
To start the HCM Dashboard server:
Step 1 Enter the following command and go to the bin directory:
cd Install_Directory/bin
Step 2 Enter the following command to run the start-hcm.sh file:
./start-hcm.sh
The HCM Dashboard server starts.
2-10Installation Guide for Cisco Hosted Collaboration Mediation
OL-24026-01
Chapter 2 Installing, Migrating, and Uninstalling HCM Dashboard Modifying Database User Password in HCM Dashboard Configuration File
To stop HCM Dashboard server:
Step 1 Enter the following command and go to the bin directory:
cd Install_Directory/bin
Step 2 Enter the following command to run the stop-hcm.sh file:
./stop-hcm.sh
The HCM Dashboard server stops.
Modifying Database User Password in HCM Dashboard Configuration File
You can modify the database user password by editing the configuration file. To do this:
Step 1 From the JBoss home directory, enter the following command and change the password instance with the new password:
../jdk/bin/java -cp lib/jboss-common.jar:lib/jboss-jmx.jar:server/default/lib/jbosssx.jar:server/default/lib/jboss-jca.jar org.jboss.resource.security.SecureIdentityLoginModule password
The encoded password appears.
For example, encoded password—5dfc52b51bd35553df8592078de921bc.
Step 2 Copy the encoded password that is generated.
Step 3 Go to the HCM_Root_Directory/thirdparty/jboss/server/default/conf directory.
Step 4 Open the login-config.xml file.
Step 5 Edit the value and paste the encoded password that you copied within the <module-option name="password"> and </module-option> tags.
Note The <module-option name="password"> and </module-option> tags appear twice in the login-config.xml file. You must edit the value at both instances.
The following is a code example of the login-config.xml file after the encoded password is modified. The <module-option name="password"> and </module-option> tags have been highlighted.
<!-- Security domains for HCM encrypted database password jca framework -->
<application-policy name="HCMEncryptDBPassword">
<authentication>
<login-module code="org.jboss.resource.security.SecureIdentityLoginModule" flag="required">
<module-option name="username">db_username</module-option>
<module-option name="password">5dfc52b51bd35553df8592078de921bc </module-option>
<module-option name="managedConnectionFactoryName">jboss.jca:name=HCM_PORTAL,service=LocalTxCM</module-option>
2-11Installation Guide for Cisco Hosted Collaboration Mediation
OL-24026-01
Chapter 2 Installing, Migrating, and Uninstalling HCM Dashboard Configuring a New Client and New User in ACS 5.1
</login-module>
</authentication>
</application-policy>
<!-- Security domains for HCM encrypted database password jca framework -->
<application-policy name="HCMEncryptLocalDBPassword">
<authentication>
<login-module code="org.jboss.resource.security.SecureIdentityLoginModule" flag="required">
<module-option name="username">db_username</module-option>
<module-option name="password">5dfc52b51bd35553df8592078de921bc </module-option>
<module-option name="managedConnectionFactoryName">jboss.jca:name=HCM_LOCAL,service=LocalTxCM</module-option>
</login-module>
</authentication>
</application-policy>
Configuring a New Client and New User in ACS 5.1This section explains how to add a new client and a new user. It also explains how to modify ACS password after installation, if needed. It includes:
• Adding a New Client, page 2-12
• Adding a New User, page 2-13
• Modifying ACS Password in HCM Dashboard Configuration File, page 2-14
Adding a New ClientTo add a new client in ACS 5.1
Step 1 Log into ACS 5.1 as an admin user.
Step 2 From the navigation pane, choose Network Resources > Network Devices and AAA Clients.
The Network Devices page appears.
Step 3 Click Create.
The Create page appears.
Step 4 In the General pane:
a. Enter the DNS name of the client system in the Name field.
For example, sol-tm-portal1.
b. (Optional) Enter the description of the HCM server in the Description field.
Do not select the Location details or the Device type in the Network Device Groups pane.
2-12Installation Guide for Cisco Hosted Collaboration Mediation
OL-24026-01
Chapter 2 Installing, Migrating, and Uninstalling HCM Dashboard Configuring a New Client and New User in ACS 5.1
Step 5 In the IP Address pane:
a. Select the Single IP Address radio button.
b. Enter the IP address of the client system in the IP field.
Step 6 In the Authentication Options pane:
a. Click the node to expand these Authentication Options:
– TACACS+
– RADIUS
b. Check the TACACS+ check box:
c. Enter a value in the Shared Secret field.
You can enter any key value.
Do not select any of the following radio buttons under the Single Connect Device check box:
• Legacy TACACS+ Single Connect Support
• TACACS+ Draft Compliant Single Connect Support
Do not select the RADIUS check box.
For more information, see the Network Devices and AAA Clients section of the User Guide for the Cisco Secure Access Control System 5.1.
Adding a New UserTo add a new user in Cisco ACS 5.1:
Step 1 Log into ACS 5.1 as an admin user.
Step 2 From the navigation pane, choose Users and Identity Stores > Internal Identity Stores > Users.
The Internal Users page appears.
Step 3 Click Create.
The Create page appears.
Step 4 In the General pane, enter the following details:
a. Name—Enter the name of the user. This username will be mapped in HCM.
For example, admin001.
b. Description—(Optional) Enter the description for the user.
For example, HCM Admin User.
c. Status—Select Enabled from the Status drop-down list. This is the default status.
d. Identity Groups—Select All Groups from the Identity Groups drop-down list. This is the default identity group.
Step 5 In the Authentication Information pane, enter the following details:
a. Password—Enter the password.
For example, admin123.
2-13Installation Guide for Cisco Hosted Collaboration Mediation
OL-24026-01
Chapter 2 Installing, Migrating, and Uninstalling HCM Dashboard Configuring a New Client and New User in ACS 5.1
b. Confirm Password—The password must match the password entered, earlier.
c. Enable Password—(Optional) The internal user's TACACS+ enable password, from 4 to 32 characters.
d. Confirm Password—(Optional) The internal user's TACACS+ enable password must match the enable password entered, earlier.
Step 6 Click Submit to save the user details.
To create multiple users, go to Step 3 and repeat the subsequent steps.
For more information, see the Managing Internal Identity Stores section of the User Guide for the Cisco Secure Access Control System 5.1.
Modifying ACS Password in HCM Dashboard Configuration FileYou can modify the ACS password by editing the configuration file. To do this:
Step 1 Enter the following command and change the password instance with the new password:
../jdk/bin/java -cp server/default/lib/msdtportal.jar:server/default/lib/bcprov-jdk15-142.jar com.cisco.util.Encryptor password
The encoded password appears.
For example, encoded password—47|-112|-52|126|-82|31|-15|46|-40|32|-87|45|72|-65|18|-15.
Step 2 Copy the encoded password that is generated.
Step 3 Go to the HCM_Root_Directory//thirdparty/jboss/server/default/deploy/ROOT.war/WEB-INF directory.
Step 4 Open the acs.properties file.
Step 5 Paste the encoded password that you copied in the ACS_SECRETKEY parameter.
The following is a code example of the acs.properties file after the encoded password is modified. The ACS_SECRETKEY parameter has been highlighted.
#ip address of the ACS server
ACS_IPADDRESS=172.20.120.145
#port number of the ACS Server
ACS_PORTNUMBER=49
#Secret Key Used for ACS Communication
ACS_SECRETKEY=47|-112|-52|126|-82|31|-15|46|-40|32|-87|45|72|-65|18|-15
2-14Installation Guide for Cisco Hosted Collaboration Mediation
OL-24026-01
Chapter 2 Installing, Migrating, and Uninstalling HCM Dashboard Installing MySQL Database Server 5.1
Installing MySQL Database Server 5.1This section describes how to install MySQL Database Server 5.1. MySQL Server is installed by default on the Red Hat Enterprise Linux operating system.
The overall installation process takes approximately ten minutes. MySQL Database Server can be installed on the same server on which HCM Dashboard is installed or it can be installed on a different server.
If there are more than 60 customers, we recommend that you install MySQL Database Server on a separate server.
Note After you do a fresh install of MySQL Database Server, you must follow the steps in the HCM Dashboard Pre-Installation Steps section and verify whether MySQL server is running.
If MySQL is not installed on the server, perform the following steps to download and install MySQL:
Step 1 From the Linux server, go to http://dev.mysql.com/downloads/mysql/.
The MySQL Community Server page appears.
Step 2 From the Select Platform drop-down list, select Red Hat & Oracle Enterprise Linux.
Step 3 Download the following packages:
• MySQL-client-community-5.1.53-1.rhel3.x86_64.rpm
• MySQL-server-community-5.1.53-1.rhel5.x86_64.rpm
Step 4 Enter the following command to install MySQL client:
rpm -ivh MySQL-client-community-5.1.53-1.rhel3.x86_64.rpm
The MySQL client is installed on the server.
Step 5 Enter the following command to install MySQL server:
rpm -ivh MySQL-server-community-5.1.53-1.rhel5.x86_64.rpm
The MySQL server is installed on the server.
Migrating HCM Dashboard Data from Windows to LinuxThis section describes how to migrate HCM Dashboard data from Windows to Linux. MySQL database can be installed on the same server on which HCM Dashboard is installed or it can be installed on a different server.
If you have installed MySQL database on the same server on which HCM Dashboard is installed, you must follow the steps in Migrating HCM Dashboard Data from Windows to Linux With Local Database section for migrating the data.
If you have installed MySQL database on a different server, you must follow the steps in Migrating HCM Dashboard Data from Windows to Linux With Remote Database section for migrating the data.
2-15Installation Guide for Cisco Hosted Collaboration Mediation
OL-24026-01

Chapter 2 Installing, Migrating, and Uninstalling HCM Dashboard Migrating HCM Dashboard Data from Windows to Linux
Migrating HCM Dashboard Data from Windows to Linux With Local DatabaseThis section assumes that MySQL database has been installed on the same server on which HCM Dashboard is installed.
To migrate HCM Dashboard data from Windows to Linux with local database:
Step 1 Log into the Windows server on which MySQL is installed.
Step 2 Choose Start > Programs > Accessories > Command Prompt to open a Windows DOS Command Prompt window.
Step 3 At the command prompt, go to the MySQL_Install_Directory\bin directory.
The following represents a typical MySQL bin directory path:
C :\Program Files (x86)\MySQL\MySQL Server 5.1\bin
Step 4 Enter the following command:
mysqldump --user root --password=db-root-password --no-create-info portaldatabase> portaldatabase.sql
Step 5 Enter the following command:
mysqldump --user root --password=db-root-password --no-create-info portalservices> portalservices.sql
The backup file is created and you can view it in the MySQL_Install_Directory\bin directory.
Step 6 Transfer the portalservices.sql and portaldatabase.sql files to the destination Linux server that you configured as the database server in Step 7 of Installing and Starting HCM Dashboard in a Non-Cluster Setup section. You can use FTP to transfer the files.
Step 7 Paste the SQL dump in the Install_Directory/install/hcm/db directory.
Step 8 Check whether JBoss server is running on the Linux server, by entering the following command:
ps -ef | grep -i jboss
Step 9 Check whether JBoss instance is running. If JBoss instance is not running, you must start the JBoss server manually.
To start the JBoss server manually:
a. Go to the Install_Directory/bin directory.
b. Run ./start-hcm.sh.
Step 10 Convert the portaldatabase.sql and portalservices.sql files to Unix format:
a. Go to the Install_Directory/install/hcm/db directory.
b. Enter the following commands:
dos2unix portaldatabase.sql
dos2unix portalservices.sql
This converts the portaldatabase.sql and portalservices.sql files to Unix format.
Step 11 Enter the following command to run the migrate.sh file on the portaldatabse.sql file:
./migrate.sh portaldatabase.sql
The migrate.sh file is available in the Install_Directory/install/hcm/db directory.
2-16Installation Guide for Cisco Hosted Collaboration Mediation
OL-24026-01
Chapter 2 Installing, Migrating, and Uninstalling HCM Dashboard Migrating HCM Dashboard Data from Windows to Linux
Step 12 Verify whether portaldatabase_migrated.sql is created by entering ls.
If portaldatabase_migrated.sql is created successfully, the file appears in the list.
Step 13 Enter the following command to ensure that MySQL is running:
ps -ef | grep -i mysql
Step 14 Clean up the tables:
a. Stop the JBoss server:
1. Go to the Install_Directory/bin directory.
2. Run ./stop-hcm.sh.
b. Go to the Install_Directory/install/hcm/db directory.
c. Enter the following command:
dos2unix cleanuptables.sh
d. Enter either one of the following commands to run the cleanuptables.sh script:
If MySQL root does not have a password:
./cleanuptables.sh
Or
If MySQL root has a password:
./cleanuptables.sh mysql-root-password
The following message appears if the tables have been successfully cleaned up:
Completed
Step 15 Enter either one of the following commands to log into MySQL:
If MySQL server does not have a password:
mysql -u root -p
Or
If MySQL server does not have a password:
mysql -u root
Step 16 Enter the following command to use portaldatabase:
use portaldatabase
Step 17 Enter the following command to populate the portaldatabase:
source Install_Directory/install/hcm/db/portaldatabase_migrated.sql
Step 18 Enter the following command to change the database to portalservices:
use portalservices
Step 19 Enter the following command to populate the portalservices database:
source Install_Directory/install/hcm/db/portalservices.sql
Step 20 Restart the HCM Dashboard server:
a. Go to the Install_Directory/bin directory.
b. Enter the following command to run the start-hcm.sh file:
./start-hcm.sh
The HCM Dashboard server starts.
You can verify the migrated data using SQL queries.
2-17Installation Guide for Cisco Hosted Collaboration Mediation
OL-24026-01
Chapter 2 Installing, Migrating, and Uninstalling HCM Dashboard Migrating HCM Dashboard Data from Windows to Linux
You can verify whether the data has migrated successfully by performing the steps in the Verifying Whether Data is Migrated Successfully section.
Migrating HCM Dashboard Data from Windows to Linux With Remote DatabaseThis section assumes that MySQL database is not installed on the same server on which HCM Dashboard is installed.
To migrate HCM Dashboard data from Windows to Linux with remote database:
Step 1 Log into the Windows server on which MySQL is installed.
Step 2 Choose Start > Programs > Accessories > Command Prompt to open a Windows DOS Command Prompt window.
Step 3 At the command prompt, go to the MySQL_Install_Directory\bin directory.
The following represents a typical MySQL bin directory path:
C :\Program Files (x86)\MySQL\MySQL Server 5.1\bin
Step 4 Enter the following command:
mysqldump --user root --password=db-root-password --no-create-info portaldatabase> portaldatabase.sql
Step 5 Enter the following command:
mysqldump --user root --password=db-root-password --no-create-info portalservices> portalservices.sql
The backup file is created and you can view it in the MySQL_Install_Directory\bin directory.
Step 6 Transfer the portalservices.sql and portaldatabase.sql files to a temporary location (for example, /tmp/portal_dbfiles) on the remote database server.
This is the remote database server that you configured in Step 7 of the Installing and Starting HCM Dashboard in a Non-Cluster Setup section. You can use FTP to transfer the files.
Step 7 Check whether JBoss server is running in the Linux server, by entering the following command:
ps -ef | grep -i jboss
Step 8 Check whether JBoss instance is running. If JBoss instance is not running, you must start the JBoss server manually.
To start the JBoss server manually:
a. Go to Install_Directory/bin.
b. Run ./start-hcm.sh.
Step 9 Transfer all files in the Install_Directory/install/hcm/db directory to a temporary location (for example, /tmp/portal_dbfiles) on the remote database server.
This is the remote database server that you configured in Step 7 of the Installing and Starting HCM Dashboard in a Non-Cluster Setup section.
Step 10 Stop the JBoss server:
a. Go to the Install_Directory/bin directory.
b. Run ./stop-hcm.sh.
Step 11 Go to the remote database server and complete the subsequent steps (Step 12 to Step 21).
2-18Installation Guide for Cisco Hosted Collaboration Mediation
OL-24026-01

Chapter 2 Installing, Migrating, and Uninstalling HCM Dashboard Migrating HCM Dashboard Data from Windows to Linux
Step 12 Go to the /tmp/portal_dbfiles directory.
This step assumes that you have transferred the migrate.sh, portaldatabse.sql, and portalservices.sql files to the /tmp/portal_dbfiles directory on the remote database server.
If you have transferred the migrate.sh, portaldatabse.sql, and portalservices.sql files to a different location on the remote database server, you must replace /tmp/portal_dbfiles with the actual directory path.
a. Enter the following commands to convert the portaldatabase.sql and portalservices.sql files to Unix format:
dos2unix portaldatabase.sql
dos2unix portalservices.sql
This converts the portaldatabase.sql and portalservices.sql files to Unix format.
b. Enter the following command to run the migrate.sh file on the portaldatabse.sql file:
./migrate.sh portaldatabase.sql
Step 13 Check whether portaldatabase_migrated.sql is created in the /tmp/portal_dbfiles directory by entering ls.
If portaldatabase_migrated.sql is created successfully, the file appears in the the /tmp/portal_dbfiles directory.
Step 14 Enter the following command to ensure that MySQL is running:
ps -ef | grep -i mysql
Step 15 Clean up the tables:
a. Go to the /tmp/portal_dbfiles directory.
This step assumes that you have transferred the cleanuptables.sh file to the /tmp/portal_dbfiles directory on the remote database server.
If you have transferred the cleanuptables.sh file to a different location on the remote database server, you must replace /tmp/portal_dbfiles with the actual directory path.
b. Enter the following command:
dos2unix cleanuptables.sh
c. Enter either one of the following commands to run the cleanuptables.sh script:
If MySQL root has no password:
./cleanuptables.sh
Or
If MySQL root has a password:
./cleanuptables.sh mysql-root-password
The following message appears if the tables have been successfully cleaned up:
Completed
Step 16 Enter either one of the following commands to log into MySQL:
If MySQL server has password:
mysql -u root -p
Or
If MySQL server does not have a password:
mysql -u root
Step 17 Enter the following command to use portaldatabase:
2-19Installation Guide for Cisco Hosted Collaboration Mediation
OL-24026-01
Chapter 2 Installing, Migrating, and Uninstalling HCM Dashboard Verifying Whether Data is Migrated Successfully
use portaldatabase
Step 18 Enter the following command to populate the portaldatabase:
source /tmp/portal_dbfiles/portaldatabase_migrated.sql
This command assumes that the portaldatabase_migrated.sql that was created in Step 12 is stored in the /tmp/portal_dbfiles directory on the remote database server.
If the portaldatabase_migrated.sql file is not stored in the /tmp/portal_dbfiles directory, you must replace /tmp/portal_dbfiles with the actual directory path.
Step 19 Enter the following command to change the database to portalservices.
use portalservices
Step 20 Enter the following command to populate the portalservices database:
source /tmp/portal_dbfiles/portalservices.sql
This command assumes that you have transferred the portalservices.sql file to the /tmp/portal_dbfiles directory on the remote database server.
If you have transferred the portalservices.sql file to a different location on the remote database server, you must replace /tmp/portal_dbfiles with the actual directory path.
Step 21 Go to the Linux server on which HCM Dashboard is installed and restart it:
a. Go to the Install_Directory/bin directory.
b. Enter the following command to run the start-hcm.sh file:
./start-hcm.sh
The HCM Dashboard server restarts.
You can verify the migrated data using SQL queries.
You can verify whether the data has migrated successfully by performing the steps in Verifying Whether Data is Migrated Successfully section.
Verifying Whether Data is Migrated SuccessfullyTo verify whether the data has migrated successfully from the Windows server to the Linux server, do the following:
Step 1 Launch HCM Dashboard from a Linux machine by entering http://Portal_Server:Port_Number.
Portal_Server is the IP address or the machine name of the server on which HCM Dashboard is installed and Port_Number is the port number used.
Step 2 Log into HCM Dashboard using valid credentials.
2-20Installation Guide for Cisco Hosted Collaboration Mediation
OL-24026-01
Chapter 2 Installing, Migrating, and Uninstalling HCM Dashboard Uninstalling HCM Dashboard
Step 3 Verify whether the data configured in the Windows server is populated correctly.
For example, you can verify the following:
• Users
• Configured domain managers
• Customers
• Quick Launch URLs
Uninstalling HCM DashboardTo uninstall HCM Dashboard:
Step 1 Navigate to the Root_Directory. This is the directory that you selected during installation.
The default directory is /opt/hcm/dashboard.
Step 2 Enter the following command to change the directory to uninstall_hcm:
cd uninstall_hcm
Step 3 Enter the following command to open the Uninstall HCM InstallAnywhere wizard:
./uninstall
Step 4 In the Uninstall Dashboard screen, click Next.
In the Database screen (See Figure 2-4), the values that you entered in the following fields during installation, populate automatically:
• Server Address
• Port
• System User Name
• System User Password
2-21Installation Guide for Cisco Hosted Collaboration Mediation
OL-24026-01

Chapter 2 Installing, Migrating, and Uninstalling HCM Dashboard Uninstalling HCM Dashboard
Figure 2-4 Database Screen
If you have changed the values in any of the above-mentioned fields after installation, modify the details and enter the updated values.
Step 5 After the details appear, click Next.
Step 6 In the Uninstall Confirmation screen, click the Uninstall check box.
Step 7 Click Uninstall.
The uninstall process starts.
Step 8 In the Uninstall Complete screen, click Done to exit.
2-22Installation Guide for Cisco Hosted Collaboration Mediation
OL-24026-01
InstallatiOL-24026-01
C H A P T E R 3
Installing, Migrating, and Uninstalling HCM MediationThis chapter describes how to install, migrate data from HCM 1.0, and uninstall HCM Mediation. It contains the following sections:
• HCM Mediation Server Requirements, page 3-1
• HCM Mediation Default Ports, page 3-2
• Installing and Starting HCM Mediation, page 3-3
• Modifying Database User Password in the HCM Mediation Configuration File, page 3-6
• Configuring the application.properties File, page 3-7
• HCM Mediation Post-Installation Tasks, page 3-7
• Migrating HCM Mediation Data from HCM 1.0 to HCM 1.1, page 3-11
• Uninstalling HCM Mediation, page 3-12
HCM Mediation Server RequirementsTable 3-1 lists the server requirements for the HCM Mediation component.
Table 3-1 HCM Mediation Server Requirements
Requirement Notes
Operating System (VM on UCS) VM on UCS:
Red Hat Enterprise Linux 5.3 (64-bit).
It is recommended that you read the following guides while hardening Linux:
• Guide to the Secure Configuration of Red Hat Enterprise Linux 5
• Hardening Red Hat Enterprise Linux 5
Hardware • 8GB RAM
• 2.33GHz
Database Oracle Database 10g Express Edition. You need not install Oracle Database 10g Express Edition on the same server on which HCM Mediation is installed.
Web Server JBoss—jboss-4.2.23.GA
3-1on Guide for Cisco Hosted Collaboration Mediation
Chapter 3 Installing, Migrating, and Uninstalling HCM Mediation HCM Mediation Default Ports
HCM Mediation Default PortsThis section lists the default ports used by HCM Mediation and the domain managers. You must make sure that HCM Mediation can communicate with the domain managers. It includes:
• Default Ports of HCM Mediation, page 3-2
• Default Ports Used by Domain Managers, page 3-2
Default Ports of HCM MediationTable 3-2 lists the default ports used by HCM Mediation. You can modify the default ports during installation.
Default Ports Used by Domain ManagersTable 3-3 lists the default ports of external components.
Domain Managers VOSS 7.3
CPU 2 vCPU
Disk Space 200 GB hard drive.
Table 3-1 HCM Mediation Server Requirements (continued)
Requirement Notes
Table 3-2 Default HCM Mediation Ports
Protocol Port Number
HTTP 8090
HTTPS 8443
ODBC 1521
Table 3-3 Default Ports of Domain Managers
Domain Managers Protocol Port Number
CUOM HTTP 8080
3-2Installation Guide for Cisco Hosted Collaboration Mediation
OL-24026-01
Chapter 3 Installing, Migrating, and Uninstalling HCM Mediation Installing and Starting HCM Mediation
Installing and Starting HCM MediationTo install and start HCM Mediation:
Step 1 Copy hcm.bin to the installation server.
Step 2 Enter the following command:
./hcm.bin
The Hosted Collaboration Mediation InstallAnywhere Wizard appears.
Step 3 In the Introduction screen, click Next.
Step 4 In the License Agreement screen, select the I accept the terms of the license agreement radio button and click Next.
If a previous version of HCM Mediation has been installed on the server, you will be taken to the Detect Previous Version screen where you can view the following details:
• Version that has been installed.
• Install directory path.
You must uninstall the installed version before continuing with the new installation. To do this, complete the steps in the Uninstalling HCM Mediation section.
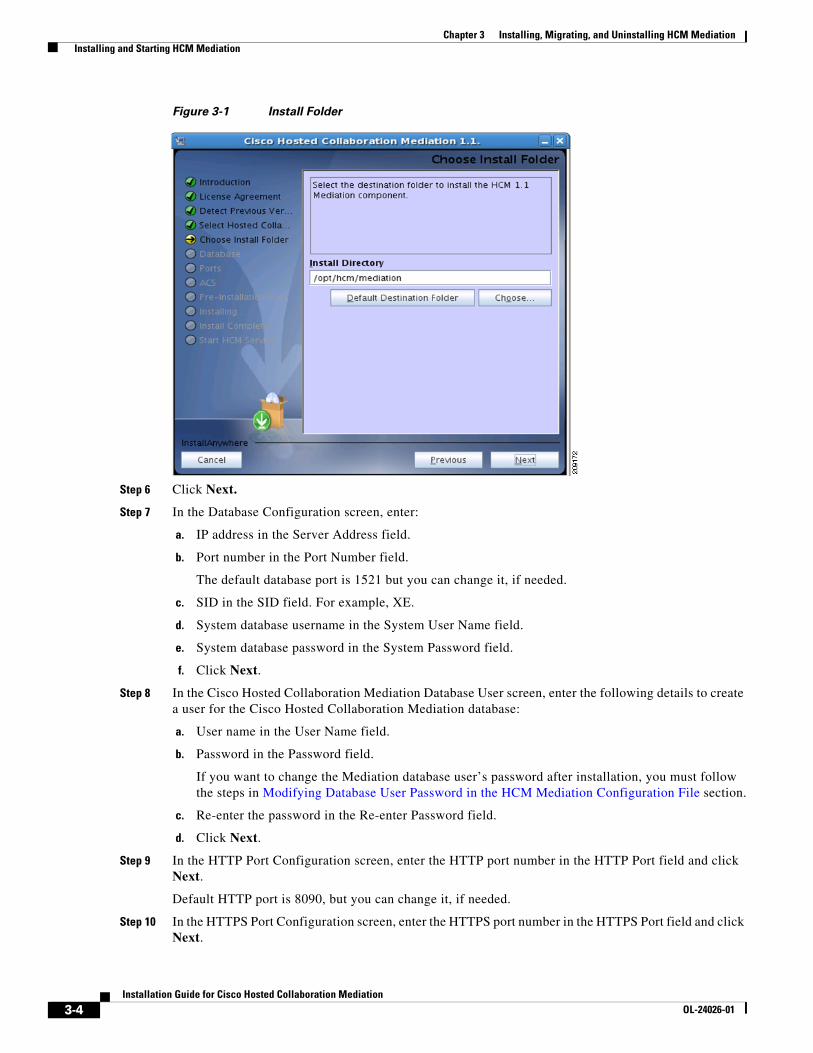
Step 5 In the Select Cisco Hosted Collaboration Mediation Component screen, select the Mediation radio button and click Next.
The Choose Install Folder screen (See Figure 3-1) appears. The Default Destination Folder path is set to /opt/hcm/mediation.
If you want to install HCM Mediation in a different directory:
a. Click Choose.
b. Select the install directory path.
c. Click Next.
3-3Installation Guide for Cisco Hosted Collaboration Mediation
OL-24026-01
Chapter 3 Installing, Migrating, and Uninstalling HCM Mediation Installing and Starting HCM Mediation
Figure 3-1 Install Folder
Step 6 Click Next.
Step 7 In the Database Configuration screen, enter:
a. IP address in the Server Address field.
b. Port number in the Port Number field.
The default database port is 1521 but you can change it, if needed.
c. SID in the SID field. For example, XE.
d. System database username in the System User Name field.
e. System database password in the System Password field.
f. Click Next.
Step 8 In the Cisco Hosted Collaboration Mediation Database User screen, enter the following details to create a user for the Cisco Hosted Collaboration Mediation database:
a. User name in the User Name field.
b. Password in the Password field.
If you want to change the Mediation database user’s password after installation, you must follow the steps in Modifying Database User Password in the HCM Mediation Configuration File section.
c. Re-enter the password in the Re-enter Password field.
d. Click Next.
Step 9 In the HTTP Port Configuration screen, enter the HTTP port number in the HTTP Port field and click Next.
Default HTTP port is 8090, but you can change it, if needed.
Step 10 In the HTTPS Port Configuration screen, enter the HTTPS port number in the HTTPS Port field and click Next.
3-4Installation Guide for Cisco Hosted Collaboration Mediation
OL-24026-01
Chapter 3 Installing, Migrating, and Uninstalling HCM Mediation Installing and Starting HCM Mediation
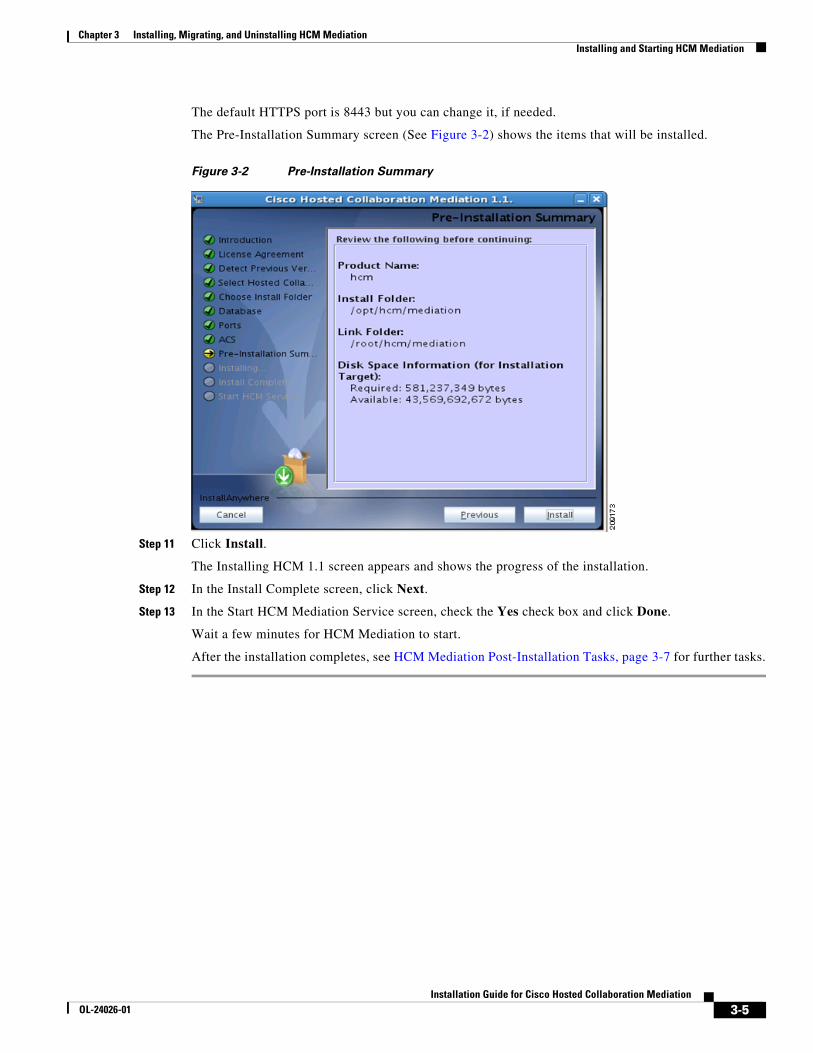
The default HTTPS port is 8443 but you can change it, if needed.
The Pre-Installation Summary screen (See Figure 3-2) shows the items that will be installed.
Figure 3-2 Pre-Installation Summary
Step 11 Click Install.
The Installing HCM 1.1 screen appears and shows the progress of the installation.
Step 12 In the Install Complete screen, click Next.
Step 13 In the Start HCM Mediation Service screen, check the Yes check box and click Done.
Wait a few minutes for HCM Mediation to start.
After the installation completes, see HCM Mediation Post-Installation Tasks, page 3-7 for further tasks.
3-5Installation Guide for Cisco Hosted Collaboration Mediation
OL-24026-01
Chapter 3 Installing, Migrating, and Uninstalling HCM Mediation Modifying Database User Password in the HCM Mediation Configuration File
Modifying Database User Password in the HCM Mediation Configuration File
You can modify the database user password by editing the configuration file. To do this:
Step 1 From the JBoss home directory, enter the following command and change the password instance with the new password:
HCM_Root_Directory/thirdparty/jdk/bin/java -cp lib/jboss-common.jar:lib/jboss-jmx.jar:server/default/lib/jbosssx.jar:server/default/lib/jboss-jca.jar org.jboss.resource.security.SecureIdentityLoginModule password
The encoded password appears.
For example, encoded password—5dfc52b51bd35553df8592078de921bc.
Step 2 Copy the encoded password that is generated.
Step 3 Go to the HCM_Root_Directory/thirdparty/jboss/server/hcm/conf directory.
Step 4 Open the login-config.xml file.
Step 5 Paste the encoded password that you copied within the <module-option name="password"> and </module-option> tags.
The following is a code example of the login-config.xml file after the encoded password is modified. The <module-option name="password"> and </module-option> tags have been highlighted.
<!-- Security domains for HCM encrypted database password jca framework -->
<application-policy name="HCMEncryptDBPassword">
<authentication>
<login-module code="org.jboss.resource.security.SecureIdentityLoginModule" flag="required">
<module-option name="username">username</module-option>
<module-option name="password">5dfc52b51bd35553df8592078de921bc </module-option>
<module-option name="managedConnectionFactoryName">jboss.jca:name=HCSDatabaseDS,service=LocalTxCM</module-option>
</login-module>
</authentication>
</application-policy>
3-6Installation Guide for Cisco Hosted Collaboration Mediation
OL-24026-01
Chapter 3 Installing, Migrating, and Uninstalling HCM Mediation Configuring the application.properties File
Configuring the application.properties FileThe application.properties file in the HCM_Mediation_Install_Directory/mediation/config/dxsi directory. You can edit the application.properties file and configure the ProvisionAsyncResponse properties.
ProvisionAsyncResponse Properties
You must configure the following properties only if the replyToName attribute is not added as part of the XML request:
• DefaultProvisionAsyncResponseUrl—URL used by HCM to send asynchronous notifications to the NBI client.
• DefaultProvisionAsyncResponseUserName—Username of the NBI client for notification service.
• DefaultProvisionAsyncResponsePassword—Password of the NBI client for notification service.
HCM Mediation Post-Installation TasksAfter you install HCM Mediation, complete the following tasks:
• Register a customer manually—Registering a Customer Manually, page 3-7
• Configure a cron job to periodically delete Mediation data—Configuring a Cron Job to Periodically Delete Mediation Data, page 3-8
• Configure for asynchronous communication between domain managers and HCM Mediation—Configuring for Asynchronous Communication Between Domain Managers and HCM Mediation, page 3-10
Registering a Customer ManuallyYou can register a customer manually by executing the following SQL statements against the HCM database.
Run the following sqlplus command:
sqlplus hcm_user_name/hcm_user_password
Execute the following statements to register a customer manually:
Step 1 Insert into CUSTOMER_INSTANCE (CUSTOMERID,NAME,LOCATION,PREFIX,DESCRIPTION) values ('HCSDefaultCustomer','HCSDefaultCustomer','HCS
Location','HCSDefaultCustomer_','Default Customer');
Step 2 Insert into CUSTOMER_INSTANCE_ADDRESS (CUSTOMERID,INSTANCEID,INSTANCEURL,ISACTIVE,TARGETDOMAIN) values
('HCSDefaultCustomer','VOSSDomainManager','https://VOSS_IP_ADDRESS:VOSS_WEBSERVICE_PORT/voss_webservices/v7_3_api_1/vossMs2WebService','Y','UnifiedCommunications');
Note • VOSS_IP_ADDRESS - IP address of a VOSS instance.
• VOSS_WEBSERVICE_PORT - Port Number on which VOSS webservices are accessible.
3-7Installation Guide for Cisco Hosted Collaboration Mediation
OL-24026-01

Chapter 3 Installing, Migrating, and Uninstalling HCM Mediation HCM Mediation Post-Installation Tasks
Step 3 Insert into CUSTOMER_INSTANCE_SECURITY (CUSTOMERID,SECURITYID,USERNAME,PASSWORD) values ('HCSDefaultCustomer','VOSSDomainManager','VOSS_WEBSERVICE_USERNAME','VOSS_WEBSERVICE_PASSWORD');
Note • VOSS_WEBSERVICE_USERNAME - Username used for VOSS webservice authentication.
• VOSS_WEBSERVICE_PASSWORD - Password used for VOSS webservice authentication.
Step 4 Insert into CUSTOMER_ASYNC_ADDRESS (CUSTOMERID,RESULTID,LISTENERURL,ISACTIVE) values ('HCSDefaultCustomer','VOSSDomainManager','http://HCM_IP_ADDRESS:HCM_PORT/services/VossNotificationWebService','Y');
Note • HCM_IP_ADDRESS - IP address on which HCM is installed.
• HCM_PORT - Port number on which HCM is installed.
Step 5 Commit.
Configuring a Cron Job to Periodically Delete Mediation DataAfter you install HCM Mediation, you must create a cron job to call the hcm_execute_cleanup.sql script periodically on a given schedule. Before creating the cron job, you must make sure that you are able to access the database through SQL*Plus. You can decide the frequency and create the cron job accordingly.
The hcm_execute_cleanup.sql script is available in the HCM_Root_Directory/scripts directory. You should run the hcm_execute_cleanup.sql script on the server on which the database is installed.
The hcm_execute_cleanup.sql script deletes the asynchronous notifications that cannot be delivered within the configured time (NO_OF_DAYS) from the REPLYTO_MESSAGE table.
You can configure the script and modify the number of days for which you want to delete the data. This script does not modify any other tables.
For example, to delete data for the past five days, modify the NO_OF_DAYS parameter to 5.
You must make sure that the ORACLE_HOME, ORACLE_SID, and PATH is set.
If ORACLE_HOME, PATH, and ORACLE_SID is not set, you can set it as follows. The following paths will vary according to the Oracle installation directory, so you must make the necessary changes.
• export ORACLE_HOME=/usr/lib/oracle/xe/app/oracle/product/10.2.0/server
• export PATH=$PATH:/usr/lib/oracle/xe/app/oracle/product/10.2.0/server/bin
• export ORACLE_SID=XE
To run the hcm_execute_cleanup.sql script:
Step 1 Copy the hcm_execute_cleanup.sql script to the database server on which HCM Mediation is installed.
Step 2 Enter the following command to run hcm_execute_cleanup.sql:
sqlplus hcm_user_name/hcm_user_password @hcm_execute_cleanup.sql
3-8Installation Guide for Cisco Hosted Collaboration Mediation
OL-24026-01

Chapter 3 Installing, Migrating, and Uninstalling HCM Mediation HCM Mediation Post-Installation Tasks
You must replace hcm_user_name with the actual username and hcm_user_password with the actual password.
3-9Installation Guide for Cisco Hosted Collaboration Mediation
OL-24026-01
Chapter 3 Installing, Migrating, and Uninstalling HCM Mediation HCM Mediation Post-Installation Tasks
Configuring for Asynchronous Communication Between Domain Managers and HCM Mediation
Sometimes service requests to the domain managers may result in long-running transactions. Domain managers support asynchronous behavior. This helps clients such as HCM Mediation to subscribe for asynchronous notifications and get notified by the domain manager when the operation is completed. In such a scenario, HCM Mediation need not wait for a synchronous response.
You must perform the following configuration to ensure asynchronous communication among the domain managers and HCM Mediation. Before proceeding with the configuration, you must make sure that the IP address, hostname, and the port used by HCM Mediation are accessible from the domain managers.
To configure for asynchronous communication between domain managers and HCM Mediation:
Step 1 Go to the HCM_Mediation_Root_Directory.
For example, /opt/hcm/bin.
Step 2 Run stop-hcm.sh and stop HCM Mediation server.
Step 3 Go to the HCM_Mediation_Root_Directory/config directory.
Step 4 Open registryContext.xml.
Step 5 Modify the hostname/IP address on which HCM Mediation is installed.
The following is a code example of the property name tag before modifying:
<!-- HOST or IP Address of HCM Server -->
<property name="hcmHost" value="$HCM_IP$"/>
The following is a code example of the property name tag after modifying. This example assumes that the IP address of the server on which HCM Mediation is installed is 192.168.0.1,
<!-- HOST or IP Address of HCM Server -->
<property name="hcmHost" value="192.168.0.1"/>
Step 6 Go to the HCM_Mediation_Root_Directory.
For example, /opt/hcm/bin.
Step 7 Run start-hcm.sh and start HCM Mediation server.
3-10Installation Guide for Cisco Hosted Collaboration Mediation
OL-24026-01

Chapter 3 Installing, Migrating, and Uninstalling HCM Mediation Migrating HCM Mediation Data from HCM 1.0 to HCM 1.1
Migrating HCM Mediation Data from HCM 1.0 to HCM 1.1You can migrate HCM Mediation data from HCM 1.0 to HCM 1.1 using Oracle Export/Import utility. You must make sure that the ORACLE_HOME, ORACLE_SID, and PATH is set.
If ORACLE_HOME, PATH, and ORACLE_SID is not set, you can set it as follows. The following paths will change according to the Oracle installation directory, so you must make the necessary changes.
• export ORACLE_HOME=/usr/lib/oracle/xe/app/oracle/product/10.2.0/server
• export PATH=$PATH:/usr/lib/oracle/xe/app/oracle/product/10.2.0/server/bin
• export ORACLE_SID=XE
The following sections assume that the same user is performing the import and export operations.
Exporting Data from Existing Schema
To export data from existing schema, enter the following command:
exp hcm_db_user/hcm_db_pwd FILE=hcm-mediation.dmp LOG=hcm-export.log CONSTRAINTS=n
You must replace hcm_db_user with the actual username and hcm_db_pwd with the actual password.
After you execute the export command, the hcm-mediation.dmp file will be generated. This file is stored in the same directory from which you executed the export command.
Importing Data to New Schema
To import data to new schema, enter the following commands sequentially:
1. imp hcm_db_user/hcm_db_pwd FILE=hcm-mediation.dmp TABLES=(CUSTOMER_INSTANCE,CUSTOMER_INSTANCE_ADDRESS, CUSTOMER_INSTANCE_SECURITY) IGNORE=y LOG=hcm-import-core.log CONSTRAINTS=n
2. imp hcm_db_user/hcm_db_pwd FILE=hcm-mediation.dmp TABLES=(CUSTOMER_ASYNC_ADDRESS) IGNORE=y LOG=hcm-import-async.log CONSTRAINTS=n
You must replace hcm_db_user with the actual username and hcm_db_pwd with the actual password.
You must use the hcm-mediation.dmp file that was generated after you executed the export command to import data to the new schema.
3-11Installation Guide for Cisco Hosted Collaboration Mediation
OL-24026-01
Chapter 3 Installing, Migrating, and Uninstalling HCM Mediation Uninstalling HCM Mediation
Uninstalling HCM MediationTo uninstall HCM Mediation:
Step 1 Navigate to the HCM_Root_Directory. This is the directory that you selected during installation.
The default directory is /opt/hcm/mediation.
Step 2 Enter the following command to change the directory to uninstall_hcm:
cd uninstall_hcm
Step 3 Enter the following command to open the Uninstall HCM InstallAnywhere wizard:
./uninstall
Step 4 In the Uninstall Mediation screen, click Next.
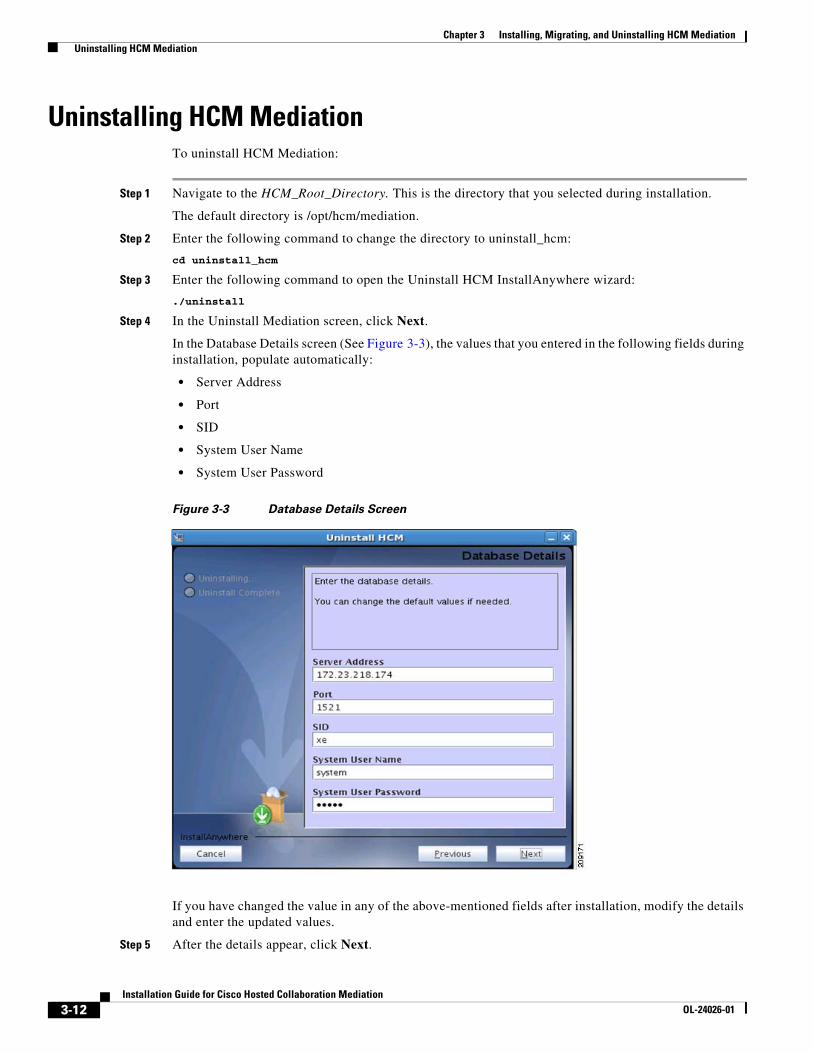
In the Database Details screen (See Figure 3-3), the values that you entered in the following fields during installation, populate automatically:
• Server Address
• Port
• SID
• System User Name
• System User Password
Figure 3-3 Database Details Screen
If you have changed the value in any of the above-mentioned fields after installation, modify the details and enter the updated values.
Step 5 After the details appear, click Next.
3-12Installation Guide for Cisco Hosted Collaboration Mediation
OL-24026-01

Chapter 3 Installing, Migrating, and Uninstalling HCM Mediation Uninstalling HCM Mediation
Step 6 In the Uninstall Confirmation screen, click the Uninstall check box.
Step 7 Click Uninstall.
The uninstall process starts.
Step 8 In the Uninstall Complete screen, click Done to exit.
3-13Installation Guide for Cisco Hosted Collaboration Mediation
OL-24026-01

Chapter 3 Installing, Migrating, and Uninstalling HCM Mediation Uninstalling HCM Mediation
3-14Installation Guide for Cisco Hosted Collaboration Mediation
OL-24026-01
InstallatiOL-24026-01
G L O S S A R Y
A
C
D
F
G
ACL access control list
ACS Access Control Server
API application program interface
AS application server
ASCII American Standard Code for Information Interchange
Cisco IOS Cisco Internetwork Operating System
CLI command-line interface
CPU central processing unit
CUOM Cisco Unified Operations Manager
DIMM dual in-line memory module
DRAM Dynamic Random Access Memory
FMS Fabric Manager Server
GUI graphical user interface
GL-1on Guide for Cisco Hosted Collaboration Mediation
Glossary
H
I
J
L
M
N
HCM Hosted Collaboration Mediation
HTTP Hypertext Transfer Protocol
HTTPS Hypertext Transfer Protocol Secure
IP Internet Protocol
IP SLA IP Service Level Agreement
JDK Java Development Kit
JTAPI Java Telephony API
LAN local area network
MAC Media Access Control
MSP Managed Service Provider
N-2-N none-to-node
NAT Network Address Translation
NBI Northbound Interface
NE network element
NIC Network Interface Card
NMS network management system
NOC Network Operations Center
GL-2Installation Guide for Cisco Hosted Collaboration Mediation
OL-24026-01
Glossary
O
P
Q
R
S
T
ODBC Open Database Connectivity
OS 1. operating system
2. operations system
PDU protocol data unit
PSTN public switched telephone network
QoS quality of service
RAM random-access memory
RHEL Red Hat Enterprise Linux
RIP Routing Information Protocol
SID Shared Information/Data Model
SNMP Simple Network Management Protocol
SQL Structured Query Language
SDRAM Synchronous Dynamic Random Access Memory
TCP Transmission Control Protocol
TCP/IP Transmission Control Protocol/Internet Protocol
GL-3Installation Guide for Cisco Hosted Collaboration Mediation
OL-24026-01
Glossary
U
V
W
X
UCSM Unified Computing System Manager
UI user interface
URL Uniform Resource Locator
VLAN virtual local area network
VoIP Voice over IP
VOSS Vision OSS
WAN wide area network
WAP Wireless Application Protocol
XML Extensible Markup Language
GL-4Installation Guide for Cisco Hosted Collaboration Mediation
OL-24026-01
InstallatiOL-24026-01
I N D E X
A
Apache service 2-8
C
Cisco Secure Access Control Server (ACS)
ACS Credentials 2-6
adding a new client 2-12
adding a new user 2-13
modifying ACS password 2-14
acs.properties 2-14
ACS_SECRETKEY 2-14
CPU 2-2, 3-2
cron job
hcm_execute_cleanup.sql 3-8
D
domain managers
CUOM 3-2
H
HCM Dashboard
default ports 2-2
installing in a cluster setup 2-7
installing in a non-cluster setup 2-4
post-installation tasks 2-8
pre-installation steps 2-3
server requirements 2-2
uninstalling HCM Dashboard 2-21
HCM Mediation
default ports 3-2
exporting data from existing schema 3-11
importing data to new schema 3-11
installing HCM Mediation 3-3
migrating data 3-11
post-installation tasks 3-7
server requirements 3-1
uninstalling HCM Mediation 3-12
J
Java Development Kit (JDK) 2-2
JBoss service 2-8
M
migrating HCM Dashboard data
cleanuptables.sh 2-17
different server 2-15
portaldatabase.sql 2-16
portaldatabase_migrated.sql 2-17
portalservices.sql 2-16
same server 2-15
modifying HCM Dashboard database password
login-config.xml 2-11
modifying HCM Mediation database password
login-config.xml 3-6
N
Network Interface Card (NIC) 2-2
IN-1on Guide for Cisco Hosted Collaboration Mediation
Index
O
Oracle Database 10g Express Edition 3-1
R
Red Hat Enterprise Linux 5.3
hardening Linux 2-2
S
Structured Query Language (SQL) Server
installing MySQL Database Server 5.1 2-15
MySQL 5.1 2-2
V
VOSS 1-2
W
Web Server
JBoss 2-2
IN-2Installation Guide for Cisco Hosted Collaboration Mediation
OL-24026-01