Installation and User Manual Guide de l’utilisateur ...
38
Installation and User Manual Instructions d’installation et Guide de l’utilisateur Instrucciones de instalación y Manual del usuario HPP08XCR, HPP10XCT, HPP10XCT-E, QPCD05AXMW Portable Air Conditioner Climatiseur portatif Acondicionador de aire portatil 49-7780 11-17 GEA
Transcript of Installation and User Manual Guide de l’utilisateur ...

Installation and User Manual Instructions d’installation et
Guide de l’utilisateur Instrucciones de instalación y
Manual del usuario HPP08XCR, HPP10XCT, HPP10XCT-E,
QPCD05AXMWPortable Air Conditioner Climatiseur portatifAcondicionador de aire portatil
49-778011-17 GEA


TABLE OF CONTENTS
ENG
LISH
1
RECORD KEEPING
Thank you for purchasing this Haier product. This user manual will help you get the best performance from your new air conditioner.
For future reference, record the model and serial number located on the label on the side of your air conditioner, and the date of purchase.
Staple your proof of purchase to this manual to aid in obtaining war-ranty service if needed.
_______________________________________ Model number
_______________________________________ Serial number
_______________________________________ Date of purchase
AIR CONDITIONER SAFETY . . . . . . . . . . . . . . . . . . . . . . . . . . . . . . . . . . . . . . . . . . . . . . . . . . . . . . . . . . . . . . . . . . . . . . . . . . . . . . . . . 2
PARTS AND FEATURES . . . . . . . . . . . . . . . . . . . . . . . . . . . . . . . . . . . . . . . . . . . . . . . . . . . . . . . . . . . . . . . . . . . . . . . . . . . . . . . . . . . . . . 3
INSTALLATION REQUIREMENTS . . . . . . . . . . . . . . . . . . . . . . . . . . . . . . . . . . . . . . . . . . . . . . . . . . . . . . . . . . . . . . . . . . . . . . . . . . . . 3 Tools and Parts . . . . . . . . . . . . . . . . . . . . . . . . . . . . . . . . . . . . . . . . . . . . . . . . . . . . . . . . . . . . . . . . . . . . . . . . . . . . . . . . . . . . . . . . . . . . . . 3 Location Requirements . . . . . . . . . . . . . . . . . . . . . . . . . . . . . . . . . . . . . . . . . . . . . . . . . . . . . . . . . . . . . . . . . . . . . . . . . . . . . . . . . . . . . 4 Electrical Requirements . . . . . . . . . . . . . . . . . . . . . . . . . . . . . . . . . . . . . . . . . . . . . . . . . . . . . . . . . . . . . . . . . . . . . . . . . . . . . . . . . . . . . . 4
INSTALLATION INSTRUCTIONS . . . . . . . . . . . . . . . . . . . . . . . . . . . . . . . . . . . . . . . . . . . . . . . . . . . . . . . . . . . . . . . . . . . . . . . . . . . . . 5 Step 1 - Unpack Air Conditioner . . . . . . . . . . . . . . . . . . . . . . . . . . . . . . . . . . . . . . . . . . . . . . . . . . . . . . . . . . . . . . . . . . . . . . . . . . . . . . 5 Step 2 - Install Exhaust Nozzle to Main Window Panel . . . . . . . . . . . . . . . . . . . . . . . . . . . . . . . . . . . . . . . . . . . . . . . . . . . . . . . . . 5 Step 3 - Install Main Window Panel and Extension Panels . . . . . . . . . . . . . . . . . . . . . . . . . . . . . . . . . . . . . . . . . . . . . . . . . . . . . . . 5 Step 4 - Attach Exhaust Hose to the Exhaust Nozzle . . . . . . . . . . . . . . . . . . . . . . . . . . . . . . . . . . . . . . . . . . . . . . . . . . . . . . . . . . 6 Step 5 - Connect Exhaust Hose to the Air Conditioner . . . . . . . . . . . . . . . . . . . . . . . . . . . . . . . . . . . . . . . . . . . . . . . . . . . . . . . . 7Step 6 - Complete Installation . . . . . . . . . . . . . . . . . . . . . . . . . . . . . . . . . . . . . . . . . . . . . . . . . . . . . . . . . . . . . . . . . . . . . . . . . . . . . . . 7
CONTROL PANEL . . . . . . . . . . . . . . . . . . . . . . . . . . . . . . . . . . . . . . . . . . . . . . . . . . . . . . . . . . . . . . . . . . . . . . . . . . . . . . . . . . . . . . . . . . . 8 Buttons . . . . . . . . . . . . . . . . . . . . . . . . . . . . . . . . . . . . . . . . . . . . . . . . . . . . . . . . . . . . . . . . . . . . . . . . . . . . . . . . . . . . . . . . . . . . . . . . . . . . 8 Remote Control . . . . . . . . . . . . . . . . . . . . . . . . . . . . . . . . . . . . . . . . . . . . . . . . . . . . . . . . . . . . . . . . . . . . . . . . . . . . . . . . . . . . . . . . . . . . 8Indicator Lights . . . . . . . . . . . . . . . . . . . . . . . . . . . . . . . . . . . . . . . . . . . . . . . . . . . . . . . . . . . . . . . . . . . . . . . . . . . . . . . . . . . . . . . . . . . . . 8
AIR CONDITIONER USE . . . . . . . . . . . . . . . . . . . . . . . . . . . . . . . . . . . . . . . . . . . . . . . . . . . . . . . . . . . . . . . . . . . . . . . . . . . . . . . . . . . . . 9
AIR CONDITIONER CARE . . . . . . . . . . . . . . . . . . . . . . . . . . . . . . . . . . . . . . . . . . . . . . . . . . . . . . . . . . . . . . . . . . . . . . . . . . . . . . . . . . . 9Cleaning . . . . . . . . . . . . . . . . . . . . . . . . . . . . . . . . . . . . . . . . . . . . . . . . . . . . . . . . . . . . . . . . . . . . . . . . . . . . . . . . . . . . . . . . . . . . . . . . . . . . 9 Air Filters . . . . . . . . . . . . . . . . . . . . . . . . . . . . . . . . . . . . . . . . . . . . . . . . . . . . . . . . . . . . . . . . . . . . . . . . . . . . . . . . . . . . . . . . . . . . . . . . . . . . 9 Internal Water Tank . . . . . . . . . . . . . . . . . . . . . . . . . . . . . . . . . . . . . . . . . . . . . . . . . . . . . . . . . . . . . . . . . . . . . . . . . . . . . . . . . . . . . . . . . . 9 Storage . . . . . . . . . . . . . . . . . . . . . . . . . . . . . . . . . . . . . . . . . . . . . . . . . . . . . . . . . . . . . . . . . . . . . . . . . . . . . . . . . . . . . . . . . . . . . . . . . . . . . 9
TROUBLESHOOTING . . . . . . . . . . . . . . . . . . . . . . . . . . . . . . . . . . . . . . . . . . . . . . . . . . . . . . . . . . . . . . . . . . . . . . . . . . . . . . . . . . . . . . 10
LIMITED WARRANTY . . . . . . . . . . . . . . . . . . . . . . . . . . . . . . . . . . . . . . . . . . . . . . . . . . . . . . . . . . . . . . . . . . . . . . . . . . . . . . . . . . . . . . 11
RECORD KEEPING . . . . . . . . . . . . . . . . . . . . . . . . . . . . . . . . . . . . . . . . . . . . . . . . . . . . . . . . . . . . . . . . . . . . . . . . . . . . . . . . . . . . . . . . . 1
AIR CONDITIONER SAFETY
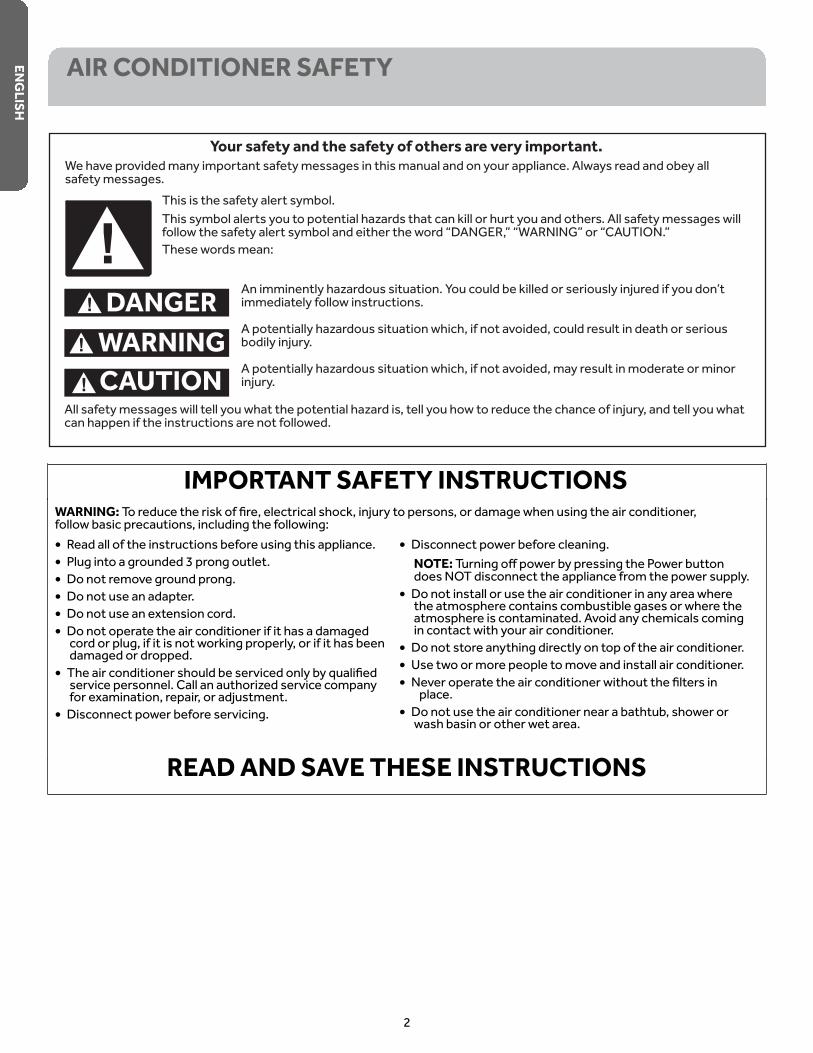
IMPORTANT SAFETY INSTRUCTIONS WARNING: follow basic precautions, including the following: • Read all of the instructions before using this appliance. • Plug into a grounded 3 prong outlet. • Do not remove ground prong. • Do not use an adapter. • Do not use an extension cord. • Do not operate the air conditioner if it has a damaged
cord or plug, if it is not working properly, or if it has been damaged or dropped.
• service personnel. Call an authorized service company
• Disconnect power before servicing.
• Disconnect power before cleaning. NOTE: does NOT disconnect the appliance from the power supply.
• Do not install or use the air conditioner in any area where the atmosphere contains combustible gases or where the atmosphere is contaminated. Avoid any chemicals coming in contact with your air conditioner.
• Do not store anything directly on top of the air conditioner. • Use two or more people to move and install air conditioner. •
place. • Do not use the air conditioner near a bathtub, shower or
wash basin or other wet area.
READ AND SAVE THESE INSTRUCTIONS ENG
LISH
Your safety and the safety of others are very important. We have provided many important safety messages in this manual and on your appliance. Always read and obey all safety messages.
This is the safety alert symbol. This symbol alerts you to potential hazards that can kill or hurt you and others. All safety messages will follow the safety alert symbol and either the word “DANGER,” “WARNING” or “CAUTION.” These words mean:
DANGER WARNING CAUTION
immediately follow instructions.
A potentially hazardous situation which, if not avoided, could result in death or serious
A potentially hazardous situation which, if not avoided, may result in moderate or minor
can happen if the instructions are not followed.
2

E Casters F Center Drain Cap G Power Cord Storage H Air Filter I Real Air Discharge J Lower Drain Cap
A Control Panel B Side Handle C Vertical Air Vent
Louver D Horizontal Air Vent
Louver
TOOLS AND PARTS Gather the required tools and parts before starting installation.
TOOLS NEEDED •Flat-blade Screwdriver •Phillips Screwdriver
PARTS SUPPLIED
• Main Window Panel
• Extension Panels (2)
• Flat Screws (6) 4 for extension panels 2 for nozzles
• Pointed Screws (7) 2 for top window brackets 1 for security brack-et 4 for main window panel
• Top Window Bracket (2)
• Exhaust Nozzle
• Bottom Window Bracket (2)
• Exhaust Hose (1 or 2 depend-ing on model)
• Security Bracket
INSTALLATION REQUIREMENTS
PARTS AND FEATURES
ENG
LISH
3
A
B C
D
E
F G
H
I
H
J

WARNING
Electrical Shock Hazard Plug into a grounded 3 prong outlet. Do not remove the ground prong from the power cord plug. Do not use an adapter. Do not use an extension cord.
shock.
RESET
TEST
ENGLISH
• Top Foam Strip (10 mm x 10 mm x 102 cm)
• Remote Control • Bottom Foam Strip (3 mm x 10 mm x 102 cm)
• Batteries (2)
4
ELECTRICAL REQUIREMENTS
POWER SUPPLY CORD Wiring Requirements • 115 Volt, 60Hz, 15-amp fused grounded 3 prong outlet • The use of a time-delay fuse or time-delay circuit breaker
is recommended. • Use a dedicated circuit only.
NOTE: Do not operate any other electrical appliances on this circuit or you may trip the circuit breaker/fuse.
If this power supply cord is damaged, it cannot be repaired. It must be replaced with a cord from the product manufactur-er. If the power supply cord is damaged call Haier Customer Service: 1-877-337-3639.
To test the power supply cord before operation: 1. Plug the power cord into a grounded 3 prong outlet. 2. Press the Test button, and then press and release the
Reset button to restore power.
20” (51 CM)
20” (51 CM)
REQUIRED GROUNDING METHOD This air conditioner must be grounded. The air conditioner is equipped with a power supply cord that has a 3 prong grounding plug. The power supply cord must be plugged into a mating, grounded 3 prong outlet, and grounded in accordance with all local codes and ordinances.
115V 15 Amp
LOCATION REQUIREMENTS •
location that is at least 20” (51 cm) from any wall. NOTE: The recommended distance from the window for optimal performance is 30” (76 cm).
• Maintain a minimum 20” (51 cm) clearance around the air
• Keep the air conditioner free of any obstructions such as drapes, curtains, blinds, etc.
• The exhaust hose should be free of any obstructions. • Do not place the air conditioner on an unstable or raised
• Do not place the air conditioner in direct sunlight or near a heat source such as baseboard heaters, stoves, etc.
• The window panel can be installed in a window with a minimum 20” (51 cm) to a maximum 40” (101.6 cm) opening.
INSTALLATION INSTRUCTIONS
WARNING Excessive Weight Hazard
Use two or more people to move and install air conditioner.
A
A
B EN
GLI
SH
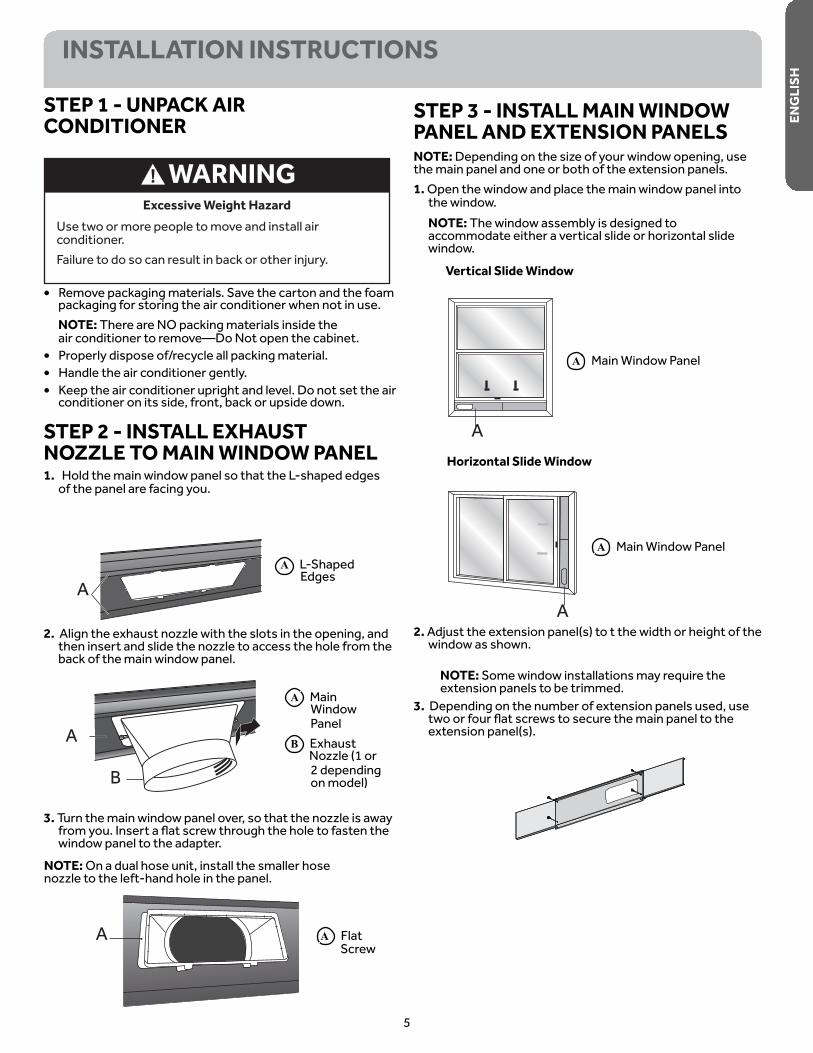
STEP 1 - UNPACK AIR CONDITIONER
• Remove packaging materials. Save the carton and the foam packaging for storing the air conditioner when not in use. NOTE: There are NO packing materials inside the air conditioner to remove—Do Not open the cabinet.
• Properly dispose of/recycle all packing material. • Handle the air conditioner gently. • Keep the air conditioner upright and level. Do not set the air
conditioner on its side, front, back or upside down.
STEP 2 - INSTALL EXHAUST NOZZLE TO MAIN WINDOW PANEL 1. Hold the main window panel so that the L-shaped edges
of the panel are facing you.
A L-Shaped Edges
2. Align the exhaust nozzle with the slots in the opening, and then insert and slide the nozzle to access the hole from the back of the main window panel.
A Main Window Panel
B Exhaust Nozzle (1 or 2 depending on model)
3. Turn the main window panel over, so that the nozzle is away
window panel to the adapter.
5
NOTE: On a dual hose unit, install the smaller hose nozzle to the left-hand hole in the panel.
A A Flat Screw
STEP 3 - INSTALL MAIN WINDOW PANEL AND EXTENSION PANELS NOTE: Depending on the size of your window opening, use the main panel and one or both of the extension panels. 1. Open the window and place the main window panel into
the window. NOTE: The window assembly is designed to accommodate either a vertical slide or horizontal slide window.
Vertical Slide Window
A
A Main Window Panel
Horizontal Slide Window
A Main Window Panel
2.window as shown.
A
NOTE: Some window installations may require the extension panels to be trimmed.
3. Depending on the number of extension panels used, use
extension panel(s).

A A Exhaust Nozzle (1 or
B
C
2 depending on model)
B Hose (open end) C Hose (connector
end)
NOTE: Do not attach additional hoses to extend the
damage the air conditioner. 2. Using a counterclockwise motion, attach the open end
of the exhaust hose to the exhaust nozzle.
STEP 4 - ATTACH EXHAUST HOSE TO THE EXHAUST NOZZLE 1. Grasp both ends of the exhaust hose and gently pull to
expand the hose.
B
A
ENGLISH
NOTE: There are many window types on the market today. Use the foam strips and brackets (provided) to secure the extension panels that ll the window opening.
4. Place the two top window brackets and two bottom window brackets where they will best support the extension panels.
Before Assembly
A
B
A
A Top Window Brackets B Bottom Window Brackets
After Assembly
B
5. Apply the top foam strip (provided) across the top of the window panel assembly, and then apply the bottom foam strip (provided) across the bottom front edge of the window panel assembly, as shown.
A B
C
D
A Top Foam Strip B Top Bracket C Extension Panel
E
D Bottom Bracket E Bottom Foam Strip
6. Place the window panel assembly in the window, and using the screws provided, fasten the assembly to the window sill and window frame.
7. Using one pointed screw, install the Security bracket to the window.
6
NOTE: The security bracket prevents the window from being opened from the outside.
A Security Bracket B Pointed Screw (1)
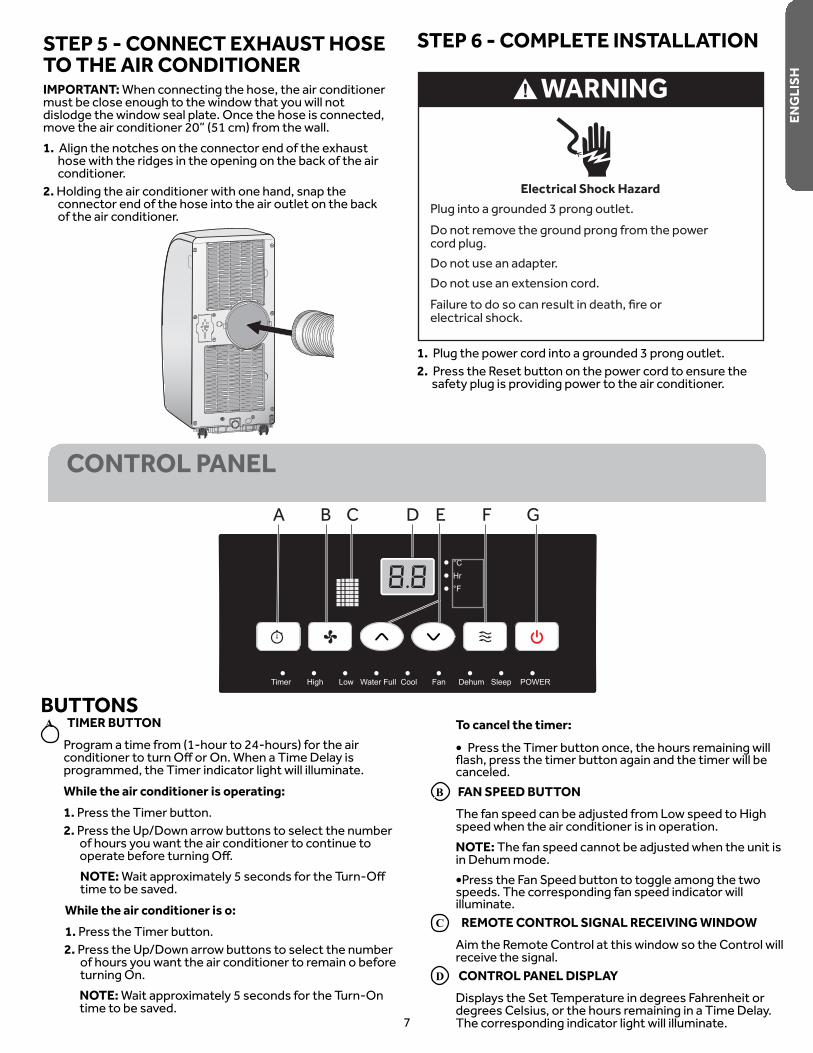
STEP 5 - CONNECT EXHAUST HOSE TO THE AIR CONDITIONER IMPORTANT: When connecting the hose, the air conditioner must be close enough to the window that you will not dislodge the window seal plate. Once the hose is connected, move the air conditioner 20” (51 cm) from the wall.1. Align the notches on the connector end of the exhaust
hose with the ridges in the opening on the back of the air conditioner.
2. Holding the air conditioner with one hand, snap the connector end of the hose into the air outlet on the back of the air conditioner.
CONTROL PANEL
WARNING
Electrical Shock Hazard Plug into a grounded 3 prong outlet. Do not remove the ground prong from the power cord plug. Do not use an adapter. Do not use an extension cord.
electrical shock.
ENG
LISH
STEP 6 - COMPLETE INSTALLATION
1. Plug the power cord into a grounded 3 prong outlet. 2. Press the Reset button on the power cord to ensure the
safety plug is providing power to the air conditioner.
7
Timer
°C Hr °F
High Low Water Full Cool Fan Dehum Sleep POWER
A B C D E F G
BUTTONS A TIMER BUTTON
Program a time from (1-hour to 24-hours) for the air
programmed, the Timer indicator light will illuminate. While the air conditioner is operating: 1. Press the Timer button. 2. Press the Up/Down arrow buttons to select the number
of hours you want the air conditioner to continue to
NOTE: time to be saved.
While the air conditioner is o: 1. Press the Timer button. 2. Press the Up/Down arrow buttons to select the number
of hours you want the air conditioner to remain o before turning On. NOTE: Wait approximately 5 seconds for the Turn-On time to be saved.
To cancel the timer: • Press the Timer button once, the hours remaining will
canceled. B FAN SPEED BUTTON
speed when the air conditioner is in operation. NOTE: in Dehum mode. •Press the Fan Speed button to toggle among the two speeds. The corresponding fan speed indicator will illuminate.
C REMOTE CONTROL SIGNAL RECEIVING WINDOW Aim the Remote Control at this window so the Control will receive the signal.
D CONTROL PANEL DISPLAY Displays the Set Temperature in degrees Fahrenheit or degrees Celsius, or the hours remaining in a Time Delay. The corresponding indicator light will illuminate.

ENGLISH
8
E UP AND DOWN ARROW BUTTONS
To Set the Temperature: The temperature can be set between 62ºF and 86º F (17ºC and 30º C) when the air conditioner is in Cool mode. 1. Press the Mode button until the Cool mode is selected. 2. Press the Up Arrow or Down Arrow buttons to
select the Temperature. NOTE: The temperature cannot be set when the air conditioner is in either Fan or Dry mode.
F MODE BUTTON Press the Mode button to toggle among the three operating modes. The corresponding indicator will illuminate.Cool – Cools the room to the set temperature.
Dehum – Reduces the humidity in the room
Fan – Circulates the air in the room without cooling
G POWER BUTTON Turns ON/OFF power to the air conditioner. NOTE: Turning o power by pressing the Power button does NOT disconnect the appliance from the power supply. •Press the Power button. The Power indicator will illuminate.
A
REMOTE CONTROL
1. Insert the two batteries (provided). 2. Aim the remote control at the signal receiver on the
control panel to operate the air conditioner.
A SLEEP BUTTON Increases the set temperature by 2ºF (1ºC) after 2-hours, and then increases the temperature by an additional 2ºF (1ºC) after another 2-hours. NOTE: The fan will operate at Low speed and cannot
Press the Sleep button to enter Sleep mode. The Sleep indicator will illuminate.
To Cancel Sleep Mode: •Press the Sleep button or the Mode button (Cool, Fan or Dry) on the remote control.
B
B ºC/ºF BUTTON •Press the ºC/ºF button to toggle between displaying the temperature in degrees Fahrenheit or degrees Celsius. The corresponding indicator will illuminate.
INDICATOR LIGHTS
A Illuminate to indicate the selected mode, speed or condition. A WATER FULL
The Water Full indicator illuminates, when the internal
conditioner will turn o automatically. To drain the water tank, see “Air Conditioner Care” for instructions.
Timer High Low Water Full Cool Fan Dehum Sleep POWER

AIR CONDITIONER CARE
WARNING
Electrical Shock Hazard Disconnect power before cleaning. Failure to do so can result in death or electrical shock.
CLEANING 1. Unplug or disconnect power. 2. Use only a soft cloth dampened with water to clean the
cabinet. NOTE: •Do not use a liquid or spray cleaner to clean the air conditioner. •DO NOT use chemicals, abrasives, ammonia, chlorine bleach, concentrated detergents, solvents or scouring pads. Some of these chemicals/items may damage and/or discolor your air conditioner.
3. Dry thoroughly with a soft cloth. 4. Plug in or reconnect power.
AIR FILTERS
IMPORTANT: Do Not operate the air conditioner without air
1. Unplug or disconnect power. 2.
the air conditioner. NOTE:
3.NOTE:
4.5. Plug in or reconnect power.
INTERNAL WATER TANK The Water Full indicator illuminates, when the internal water
To Empty the Internal Water Tank: 1. Unplug or disconnect power. 2. Place a shallow 1 quart or larger pan (not included) below
the lower drain located on the back (near the bottom) of the air conditioner.
3. Remove the cap and the rubber plug and drain the water tank.
4. Re-insert the drain plug and screw the cap snugly into place.
5. Plug in or reconnect power.
STORAGE If the unit is not being used for a long period of time: 1. Unplug or disconnect power. 2. Drain the water from the water tank. See “Air
Conditioner Care.” 3. Use the original packaging to repack the unit to avoid a
buildup of dust or dirt. 4. Store the air conditioner in a cool, dry location.
AIR CONDITIONER USE
ENG
LISH
IMPORTANT: If the air conditioner has been tilted on its side, wait 24 hours before turning on the air conditioner to allow the oil to return to the compressor. This will prevent the air conditioner from failing prematurely. • Allow 20” (51 cm) of space around the unit for proper air
circulation. •
place. • Do not spill liquid on the control panel; it may cause an
electrical short to the interior electronic parts that would either disable them or cause them to function improperly.
• after plugging it into an electrical outlet, the unit will start in Cooling mode set at 75ºF (24°C), and at High fan speed. The control panel will display the current room temperature.
9
• When turning on the unit after previous use, it will remember the last settings used.
• After a normal shut down, please wait for 3 minutes before restarting the unit.
• In Cooling mode, this unit should not require water to be removed. This model has a unique design that continuously evaporates the water.
• When the unit is operated in high humidity conditions, you may need to empty the water tank periodically.
• The unit will shut down automatically when the water tank is full. The Water Full indicator illuminates to alert you of this condition.
ENGLISH
10
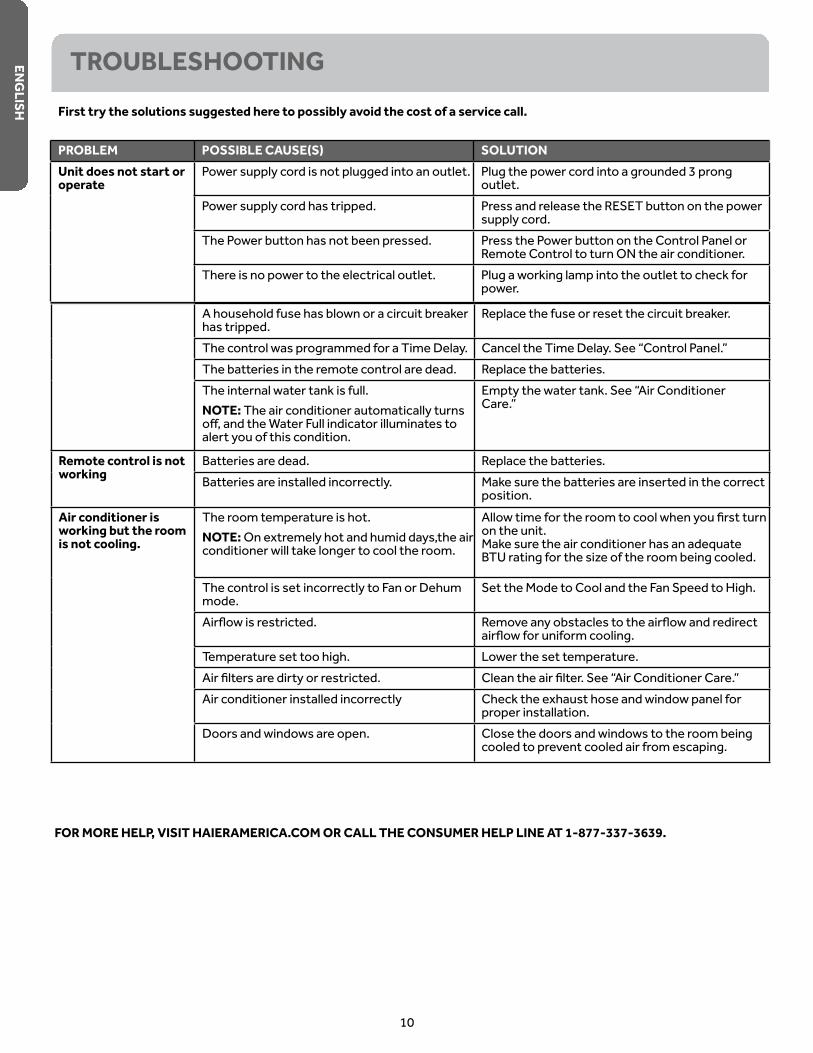
FOR MORE HELP, VISIT HAIERAMERICA.COM OR CALL THE CONSUMER HELP LINE AT 1-877-337-3639.
TROUBLESHOOTING First try the solutions suggested here to possibly avoid the cost of a service call.
PROBLEM POSSIBLE CAUSE(S) SOLUTIONUnit does not start or operate
Power supply cord is not plugged into an outlet. Plug the power cord into a grounded 3 prong outlet.
Power supply cord has tripped. Press and release the RESET button on the power supply cord.
The Power button has not been pressed. Press the Power button on the Control Panel orRemote Control to turn ON the air conditioner.
There is no power to the electrical outlet. Plug a working lamp into the outlet to check for power.
A household fuse has blown or a circuit breaker has tripped.
Replace the fuse or reset the circuit breaker.
The control was programmed for a Time Delay. Cancel the Time Delay. See “Control Panel.”The batteries in the remote control are dead. Replace the batteries.The internal water tank is full. NOTE: The air conditioner automatically turns
alert you of this condition.
Empty the water tank. See “Air ConditionerCare.”
Remote control is not working
Batteries are dead. Replace the batteries.Batteries are installed incorrectly. Make sure the batteries are inserted in the correct
position.Air conditioner is working but the room is not cooling.
The room temperature is hot.NOTE: On extremely hot and humid days,the air conditioner will take longer to cool the room.
on the unit.Make sure the air conditioner has an adequateBTU rating for the size of the room being cooled.
The control is set incorrectly to Fan or Dehum mode.
Set the Mode to Cool and the Fan Speed to High.
Temperature set too high. Lower the set temperature.
Air conditioner installed incorrectly Check the exhaust hose and window panel for proper installation.
Doors and windows are open. Close the doors and windows to the room being cooled to prevent cooled air from escaping.

ENG
LISH
11
LIMITED WARRANTY
EXCLUSION OF IMPLIED WARRANTIES - Your sole and exclusive remedy is product repair as provided in this Limited
are limited to one year or the shortest period allowed by law.For US Customers: This warranty is extended to the original purchaser and any succeeding owner for products purchased for home use within the USA. If the product is located in an area where service by a GE Appliances Authorized Servicer is not available, you may be responsible for a trip charge or you may be required to bring the product to an Authorized GE Appliances Service location for service. In Alaska, the warranty excludes the cost of shipping or service calls to your home.
legal rights, and you may also have other rights which vary from state to state. To know what your legal rights are, consult your
Warrantor US: GE Appliances, a Haier company
Customer instruction. This owner’s manual provides information regarding operating instructions and user controls. Improper installation. If you have an installation problem, or if the air conditioner is of improper capacity, contact your dealer or installer. You are responsible for providing adequate electrical connecting facilities. Failure of the product resulting from modifications to the product or due to unreasonable use including failure to provide reasonable and necessary maintenance.
Replacement of house fuses or resetting of circuit breakers. Failure due to corrosion on models not corrosion-protected. Damage to the product caused by improper power supply voltage, accident, fire, floods or acts of God. Incidental or consequential damage caused by possible defects with this air conditioner. Damage caused after delivery.
What Will Not Cover:
For The Period Of: Will Replace:One YearFrom the date of the original purchase
Replacement, repair, or refund of the original retail price for any product which fails due to a de-fect in materials or workmanship. If the unit is exchanged, the replacement unit is warranted for
replace the product with a product of the same or comparable functionality and quality or refund the original retail price.
Properly pack your unit. We recommend using the original carton and packing materials.Return the product to the retail location where it was purchased.
Include in the package a copy of the sales receipt or other evidence of date of original purchase. Also print your name and address and a description of the defect.
In Order to Make a Warranty Claim During the First 90 Days from the Date of Original Purchase:
Locate your original sales receipt and make a note of your model and serial number. Call 1.877.337.3639 (in the United States) to initiate the product replacement process. In Canada, call 1.877.470.9174.You will be asked to provide your name, address, date of purchase, model and serial number.GE Appliances will arrange for a carton to be sent to your home to recover the product.
Please return all requested materials (postage pre-paid) in the carton provided. Please include a description of the defect.You should receive your replacement product or refund within 7 to 10 business days after your package is received.
In Order to Make a Warranty Claim During the Remainder of the One-Year Warranty:

DOCUMENTS À CONSERVER
-dera à obtenir la meilleure performance possible de votre climatiseur.
_______________________________________
_______________________________________
_______________________________________
12
FRANÇAIS
TABLE DES MATIÈRES
SÉCURITÉ DU CLIMATISEUR . . . . . . . . . . . . . . . . . . . . . . . . . . . . . . . . . . . . . . . . . . . . . . . . . . . . . . . . . . . . . . . . . . . . . . . . . . . . . . . . . 13
PIÈCES ET CARACTÉRISTIQUES . . . . . . . . . . . . . . . . . . . . . . . . . . . . . . . . . . . . . . . . . . . . . . . . . . . . . . . . . . . . . . . . . . . . . . . . . . . . . 14
EXIGENCES D’INSTALLATION . . . . . . . . . . . . . . . . . . . . . . . . . . . . . . . . . . . . . . . . . . . . . . . . . . . . . . . . . . . . . . . . . . . . . . . . . . . . . . . . 14 . . . . . . . . . . . . . . . . . . . . . . . . . . . . . . . . . . . . . . . . . . . . . . . . . . . . . . . . . . . . . . . . . . . . . . . . . . . . . . . . . . . . . . . . . . . 14
. . . . . . . . . . . . . . . . . . . . . . . . . . . . . . . . . . . . . . . . . . . . . . . . . . . . . . . . . . . . . . . . . . . . . . . . . . . . . . . . . . . . 15 . . . . . . . . . . . . . . . . . . . . . . . . . . . . . . . . . . . . . . . . . . . . . . . . . . . . . . . . . . . . . . . . . . . . . . . . . . . . . . . . . . . . . 15
INSTRUCTIONS D’INSTALLATION . . . . . . . . . . . . . . . . . . . . . . . . . . . . . . . . . . . . . . . . . . . . . . . . . . . . . . . . . . . . . . . . . . . . . . . . . . . . 16 . . . . . . . . . . . . . . . . . . . . . . . . . . . . . . . . . . . . . . . . . . . . . . . . . . . . . . . . . . . . . . . . . . . . . . . . . . . . . 16
. . . . . . . . . . . . . . . . . . . . . . . . . . . . . . . . 16 . . . . . . . . . . . . . . . . . . . . . . . . . . . . . . . 16
. . . . . . . . . . . . . . . . . . . . . . . . . . . . . . . . . . . . . . . . . . 18 . . . . . . . . . . . . . . . . . . . . . . . . . . . . . . . . . . . . . . . . . . . . . . . . . . . 18
. . . . . . . . . . . . . . . . . . . . . . . . . . . . . . . . . . . . . . . . . . . . . . . . . . . . . . . . . . . . . . . . . . . . . . . . . . . . . . . . . . 18
TABLEAU DE COMMANDE . . . . . . . . . . . . . . . . . . . . . . . . . . . . . . . . . . . . . . . . . . . . . . . . . . . . . . . . . . . . . . . . . . . . . . . . . . . . . . . . . . . 19 Boutons . . . . . . . . . . . . . . . . . . . . . . . . . . . . . . . . . . . . . . . . . . . . . . . . . . . . . . . . . . . . . . . . . . . . . . . . . . . . . . . . . . . . . . . . . . . . . . . . . . . . . 19
. . . . . . . . . . . . . . . . . . . . . . . . . . . . . . . . . . . . . . . . . . . . . . . . . . . . . . . . . . . . . . . . . . . . . . . . . . . . . . . . . . . . . . . . . . . . . . . 20 . . . . . . . . . . . . . . . . . . . . . . . . . . . . . . . . . . . . . . . . . . . . . . . . . . . . . . . . . . . . . . . . . . . . . . . . . . . . . . . . . . . . . . . . . . . . 20
UTILISATION DU CLIMATISEUR . . . . . . . . . . . . . . . . . . . . . . . . . . . . . . . . . . . . . . . . . . . . . . . . . . . . . . . . . . . . . . . . . . . . . . . . . . . . . . 20
ENTRETIEN DU CLIMATISEUR . . . . . . . . . . . . . . . . . . . . . . . . . . . . . . . . . . . . . . . . . . . . . . . . . . . . . . . . . . . . . . . . . . . . . . . . . . . . . . . . 21 Nettoyage . . . . . . . . . . . . . . . . . . . . . . . . . . . . . . . . . . . . . . . . . . . . . . . . . . . . . . . . . . . . . . . . . . . . . . . . . . . . . . . . . . . . . . . . . . . . . . . . . . . 21 Filtres à air . . . . . . . . . . . . . . . . . . . . . . . . . . . . . . . . . . . . . . . . . . . . . . . . . . . . . . . . . . . . . . . . . . . . . . . . . . . . . . . . . . . . . . . . . . . . . . . . . . . 21
. . . . . . . . . . . . . . . . . . . . . . . . . . . . . . . . . . . . . . . . . . . . . . . . . . . . . . . . . . . . . . . . . . . . . . . . . . . . . . . . . . . . . . . 21 Rangement . . . . . . . . . . . . . . . . . . . . . . . . . . . . . . . . . . . . . . . . . . . . . . . . . . . . . . . . . . . . . . . . . . . . . . . . . . . . . . . . . . . . . . . . . . . . . . . . . . . 21
DÉPANNAGE . . . . . . . . . . . . . . . . . . . . . . . . . . . . . . . . . . . . . . . . . . . . . . . . . . . . . . . . . . . . . . . . . . . . . . . . . . . . . . . . . . . . . . . . . . . . . . . . 21
GARANTIE LIMITÉE . . . . . . . . . . . . . . . . . . . . . . . . . . . . . . . . . . . . . . . . . . . . . . . . . . . . . . . . . . . . . . . . . . . . . . . . . . . . . . . . . . . . . . . . . . 23
DOCUMENTS À CONSERVER . . . . . . . . . . . . . . . . . . . . . . . . . . . . . . . . . . . . . . . . . . . . . . . . . . . . . . . . . . . . . . . . . . . . . . . . . . . . . . . . 12

FRAN
ÇAIS
13
SÉCURITÉ DU CLIMATISEUR
IMPORTANTES INSTRUCTIONS DE SÉCURITÉ AVERTISSEMENT :
• • • Ne pas enlever la prise de liaison à la terre. • • Ne pas utiliser de rallonge. • Ne pas faire fonctionner le climatiseur si la prise ou le
•
••
nettoyage.
REMARQUE :
•
produit chimique et le climatiseur. •Ne rien remiser directement au-dessus du climatiseur. •
climatiseur. •
pas en place. •
humide.
LIRE ET CONSERVER CES INSTRUCTIONS
Votre sécurité et celle des autres est très importante.
“DANGER,” “AVERTISSEMENT” ou “ATTENTION.”
DANGER AVERTISSEMENT
ATTENTION provoquer la mort ou des blessures graves.
blessure et ce qui peut se produire en cas de non-respect des instructions.
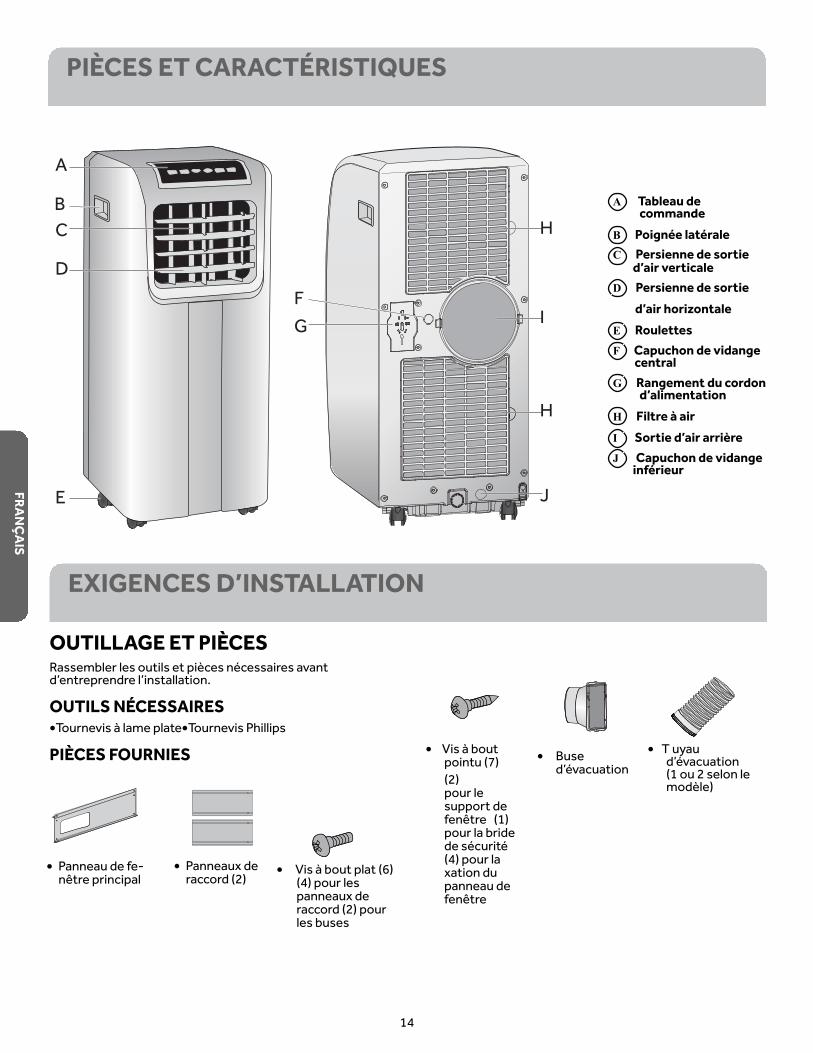
• Vis à bout plat (6) (4) pour les panneaux de raccord (2) pour les buses
• Vis à bout pointu (7) (2) pour le support de
pour la bride
(4) pour la xation du panneau de
• Buse
• T uyau
(1 ou 2 selon le FRANÇAIS
14
D Persienne de sortie d’air horizontale
E Roulettes F Capuchon de vidange central G Rangement du cordon
d’alimentation H Filtre à air I Sortie d’air arrière J Capuchon de vidange
inférieur
A Tableau de commande
B Poignée latérale C Persienne de sortie
d’air verticale
A
B C
D
E
F G
H
I
H
J
PIÈCES ET CARACTÉRISTIQUES
EXIGENCES D’INSTALLATION
OUTILLAGE ET PIÈCES
OUTILS NÉCESSAIRES •Tournevis à lame plate•Tournevis Phillips
PIÈCES FOURNIES
• Panneau de fe- • Panneaux de raccord (2)
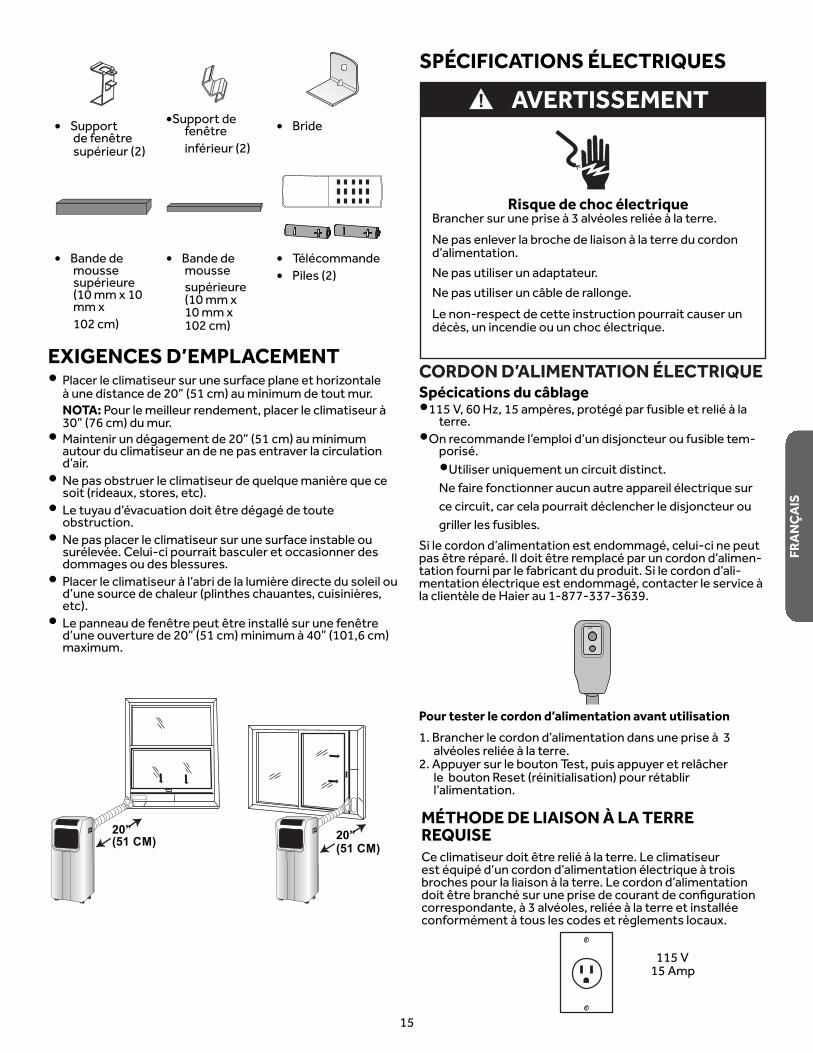
• Support
• Bande de mousse
(10 mm x 10 mm x 102 cm)
•Support de
• Bande de mousse
(10 mm x 10 mm x 102 cm)
• Bride
• • Piles (2)
20” (51 CM) 20”
(51 CM)
EXIGENCES D’EMPLACEMENT • Placer le climatiseur sur une surface plane et horizontale
à une distance de 20” (51 cm) au minimum de tout mur. NOTA: Pour le meilleur rendement, placer le climatiseur à 30” (76 cm) du mur. • autour du climatiseur an de ne pas entraver la circulation
• soit (rideaux, stores, etc). • obstruction. • Ne pas placer le climatiseur sur une surface instable ou
dommages ou des blessures. • etc). • maximum.
SPÉCIFICATIONS ÉLECTRIQUES
Risque de choc électrique
Ne pas enlever la broche de liaison à la terre du cordon
Ne pas utiliser un adaptateur. Ne pas utiliser un câble de rallonge. Le non-respect de cette instruction pourrait causer un
CORDON D’ALIMENTATION ÉLECTRIQUE Spécications du câblage •
terre. • -
•Utiliser uniquement un circuit distinct. REMARQUE :
griller les fusibles.
--
Pour tester le cordon d’alimentation avant utilisation :
2. Appuyer sur le bouton Test, puis appuyer et relâcher le
AVERTISSEMENT
MÉTHODE DE LIAISON À LA TERRE REQUISE
115 V 15 Amp
FRAN
ÇAIS
15
INSTRUCTIONS D’INSTALLATION
AVERTISSEMENT Risque du poids excessif
installer le climatiseur. Le non-respect de cette instruction peut causer une
A A Bords en L
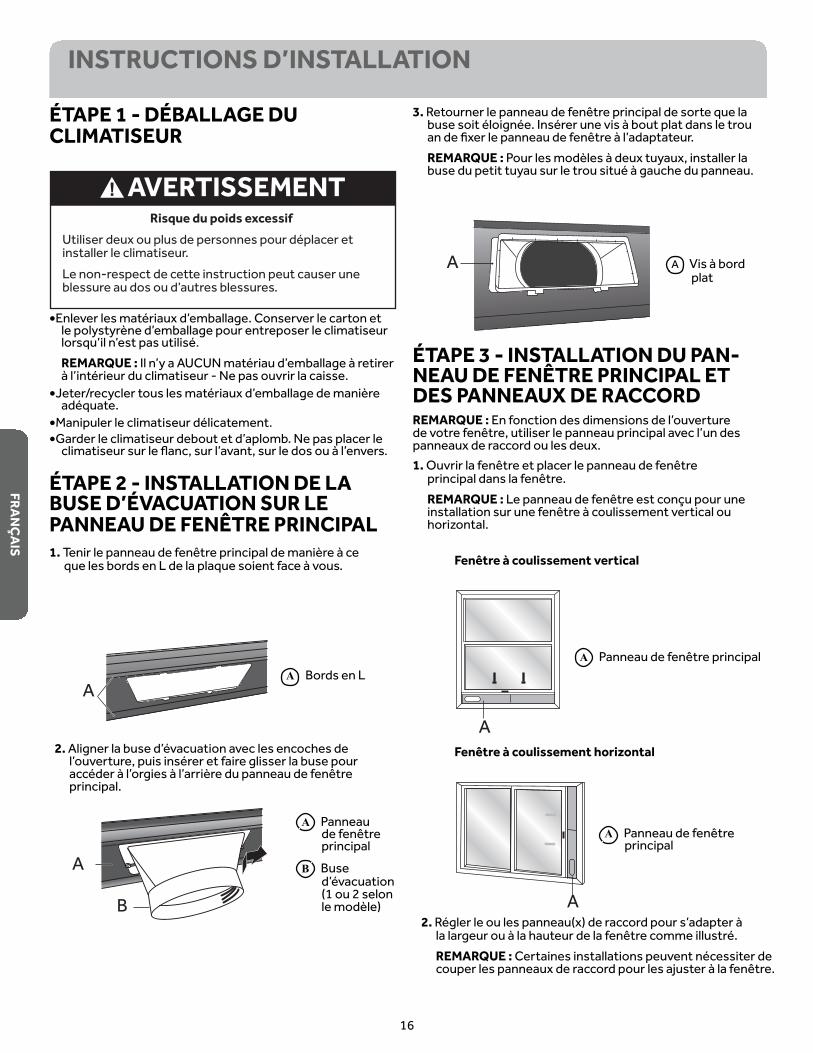
ÉTAPE 1 - DÉBALLAGE DU CLIMATISEUR
•
REMARQUE :
•
••
ÉTAPE 2 - INSTALLATION DE LA BUSE D’ÉVACUATION SUR LE PANNEAU DE FENÊTRE PRINCIPAL 1.
que les bords en L de la plaque soient face à vous.
3.
REMARQUE :
A A Vis à bord plat
ÉTAPE 3 - INSTALLATION DU PAN-NEAU DE FENÊTRE PRINCIPAL ET DES PANNEAUX DE RACCORD REMARQUE :
panneaux de raccord ou les deux. 1.
REMARQUE :
horizontal.
B Buse
2.
principal.
A Panneau
principal
(1 ou 2 selon
Fenêtre à coulissement vertical
A
Fenêtre à coulissement horizontal
A principal
2.
REMARQUE :
A
A
A
B
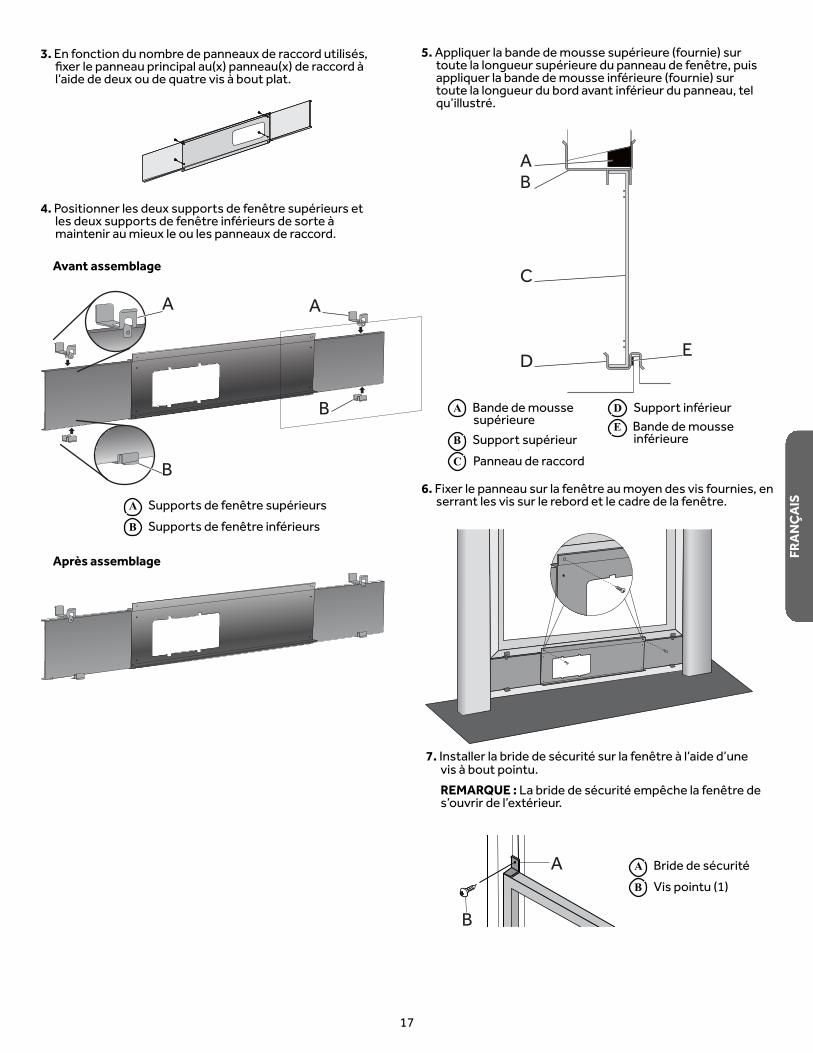
7.vis à bout pointu. REMARQUE :
B
A A
B Vis pointu (1)
Avant assemblage
A
B
A
B
A
B
Après assemblage
4.
maintenir au mieux le ou les panneaux de raccord.
6.
5.
A B
C
D
A Bande de mousse
B
C Panneau de raccord
E
D E Bande de mousse
3.
FRAN
ÇAIS
17
A Buse
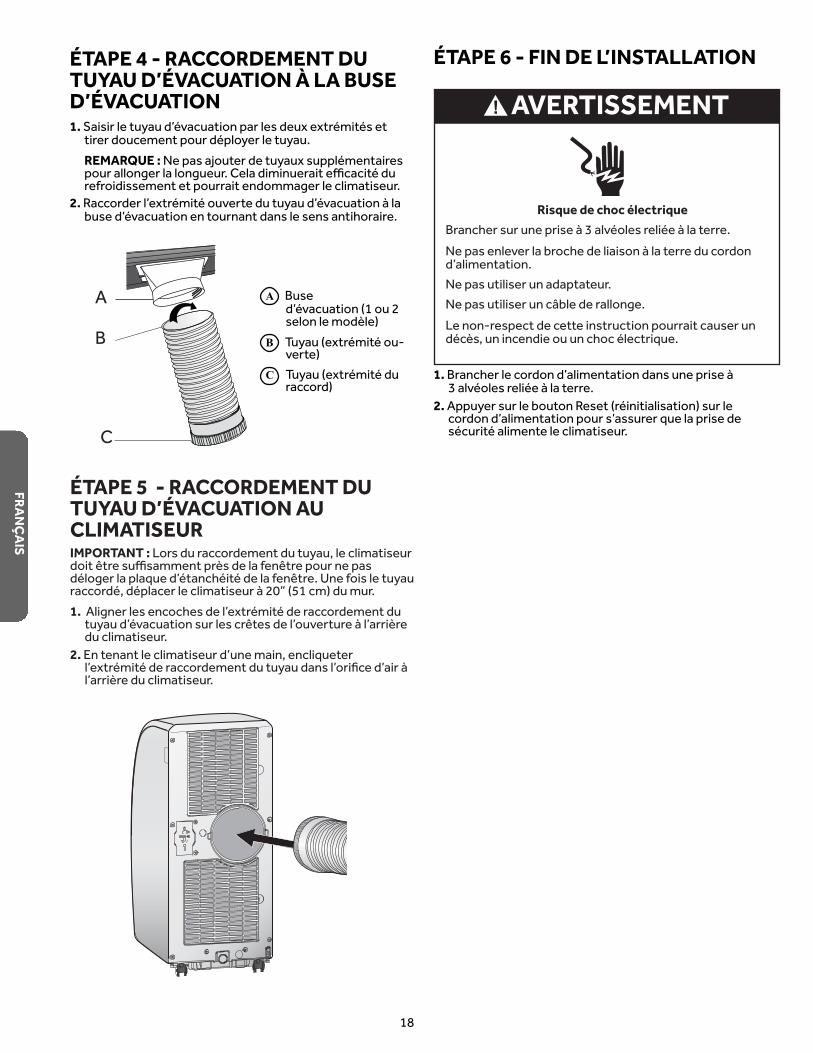
ÉTAPE 4 - RACCORDEMENT DU TUYAU D’ÉVACUATION À LA BUSE D’ÉVACUATION 1.
REMARQUE :
refroidissement et pourrait endommager le climatiseur. 2.
B -verte)
C raccord)
A
B
C
AVERTISSEMENT
Risque de choc électrique
Ne pas enlever la broche de liaison à la terre du cordon
Ne pas utiliser un adaptateur. Ne pas utiliser un câble de rallonge. Le non-respect de cette instruction pourrait causer un
1.
2.
ÉTAPE 6 - FIN DE L’INSTALLATION
FRANÇAIS
18
ÉTAPE 5 - RACCORDEMENT DU TUYAU D’ÉVACUATION AU CLIMATISEURIMPORTANT : Lors du raccordement du tuyau, le climatiseur
1.
du climatiseur.2.

TABLEAU DE COMMANDE
BOUTONS A BOUTON DE MINUTERIE
-
Lorsque le climatiseur fonctionne : 1. Appuyer sur le bouton Timer (minuterie). 2.
REMARQUE : Attendre environ 5 secondes pour
Lorsque le climatiseur ne fonctionne pas : 1. Appuyer sur le bouton Timer (minuterie). 2.
REMARQUE : Attendre environ 5 secondes
mettre en marche. Annulation de la minuterie : •bouton de minuterie pour annuler la minuterie.
B BOUTON DE VITESSE DU VENTILATEUR selon que le climatiseur est en fonctionnement. REMARQUE : La vitesse du ventilateur ne peut pas
•Appuyer sur le bouton Fan Speed (vitesse du ventilateur)
C FENÊTRE DE SIGNAL DE LA TÉLÉCOMMANDE
D AFFICHAGE DU TABLEAU DE COMMANDE
-
19
E BOUTONS DE FLÈCHES HAUT/BAS
Réglage de la température :
30 ºC) lorsque le climatiseur est en mode de refroidisse-ment.
1.
2.
REMARQUE : lorsque le climatiseur est en mode Fan (ventilateur) ou
REMARQUE : -
F BOUTON DE SÉLECTION DU MODE
-
refroidir G BOUTON POWER (MISE SOUS TENSION)
Appuyer sur le bouton de mise sous tension pour mettre en marche le climatiseur. REMARQUE :
•
FRAN
ÇAIS
Timer
°C Hr °F
High Low Water Full Cool Fan Dehum Sleep POWER
A B C D E F G
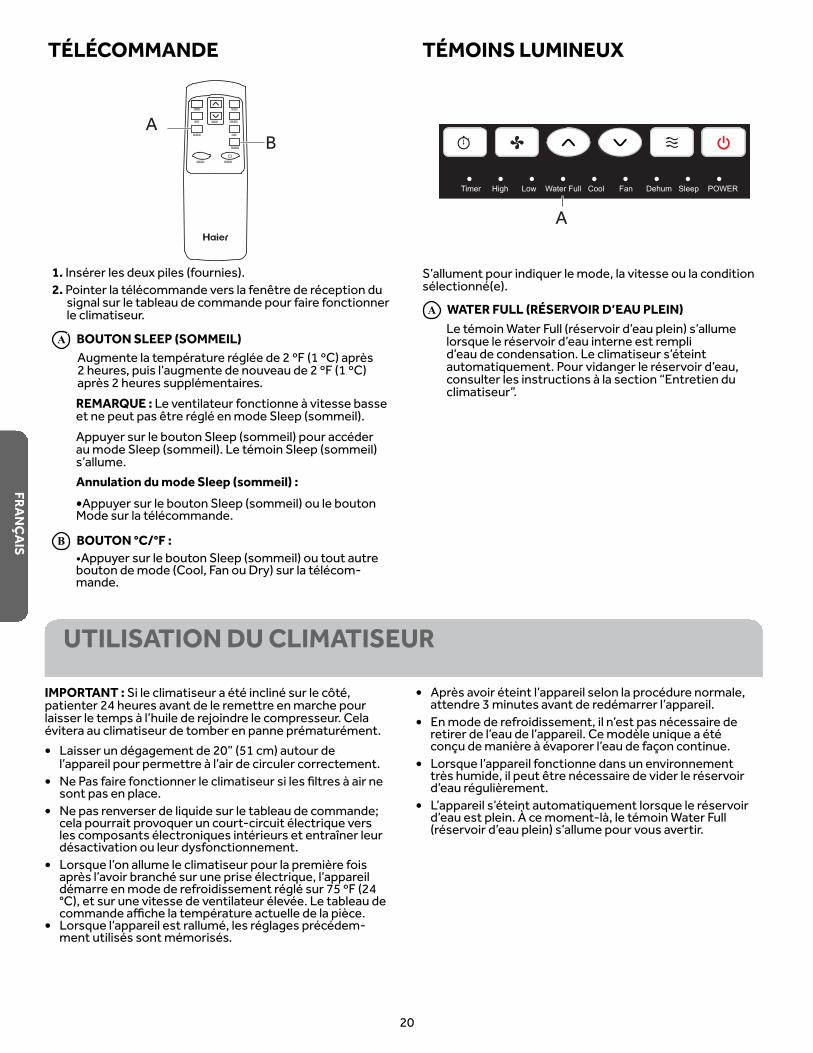
TÉMOINS LUMINEUX
A WATER FULL (RÉSERVOIR D’EAU PLEIN)
consulter les instructions à la section “Entretien du climatiseur”.
20
UTILISATION DU CLIMATISEUR
IMPORTANT : patienter 24 heures avant de le remettre en marche pour
•
• sont pas en place.
• Ne pas renverser de liquide sur le tableau de commande;
•
• -
•
•
•
•
A B
A
FRANÇAIS
TÉLÉCOMMANDE
1.2.
signal sur le tableau de commande pour faire fonctionner le climatiseur.
A BOUTON SLEEP (SOMMEIL)
REMARQUE : Le ventilateur fonctionne à vitesse basse
Annulation du mode Sleep (sommeil) : •Appuyer sur le bouton Sleep (sommeil) ou le bouton
����
���
�����
����� �����
����
����
�����
���
�����
B BOUTON °C/°F : •Appuyer sur le bouton Sleep (sommeil) ou tout autre
-mande.
Timer High Low Water Full Cool Fan Dehum Sleep POWER

ENTRETIEN DU CLIMATISEUR
AVERTISSEMENT
Risque de choc électrique
nettoyage. -
NETTOYAGE 1.
2.uniquement. REMARQUE : •nettoyer le climatiseur. •NE PAS utiliser de produits chimiques, de produits
3.4.
FILTRES À AIR
IMPORTANT : Ne Pas faire fonctionner le climatiseur si les
1.
DÉPANNAGE
2.
REMARQUE :
3.aspirateur. REMARQUE : -
4.5.
RÉSERVOIR D’EAU INTERNE
Vidage du réservoir d’eau interne : 1.
2.
3. Retirer le capuchon et le bouchon en caoutchouc et vidan-
4.capuchon.
5.
RANGEMENT Lors de longues périodes infantilisation de l’appareil : 1.
2.climatiseur”.
3.
4. Entreposer le climatiseur dans un endroit frais et sec.
Essayez tout d’abord les solutions suggérées ici et évitez les couts pour le service de reparation.
PROBLÈME CAUSE(S) POSSIBLE(S) SOLUTIONL’appareil ne se met pas en marche ou ne fonctionne pas
une prise murale.
FRAN
ÇAIS
21

POUR OBTENIR DE L’AIDE SUPPLÉMENTAIRE, VISITER HAIERAMERICA.COM OU CONTACTER LA LIGNE D’ASSISTANCE À LA CLIENTÈLE AU 1-877-337-3639.
PROBLÈME CAUSE(S) POSSIBLE(S) SOLUTION
-tion.
Appuyer et relâcher le bouton RESET
Appuyer sur le bouton de mise sous tension sur le
ALLUMER le climatiseur.
de commande”. Remplacer les piles.
REMARQUE : --
tiseur”.
La télécommande ne fonctionne pas.
Remplacer les piles.
sens.Le climatiseur fonc-tionne mais la pièce ne refroidit pas. REMARQUE :
et humides, le climatiseur met plus longtemps à -dir.
le mode Fan (ventilateur) ou Dehum
-seur”.
-
FRANÇAIS
22
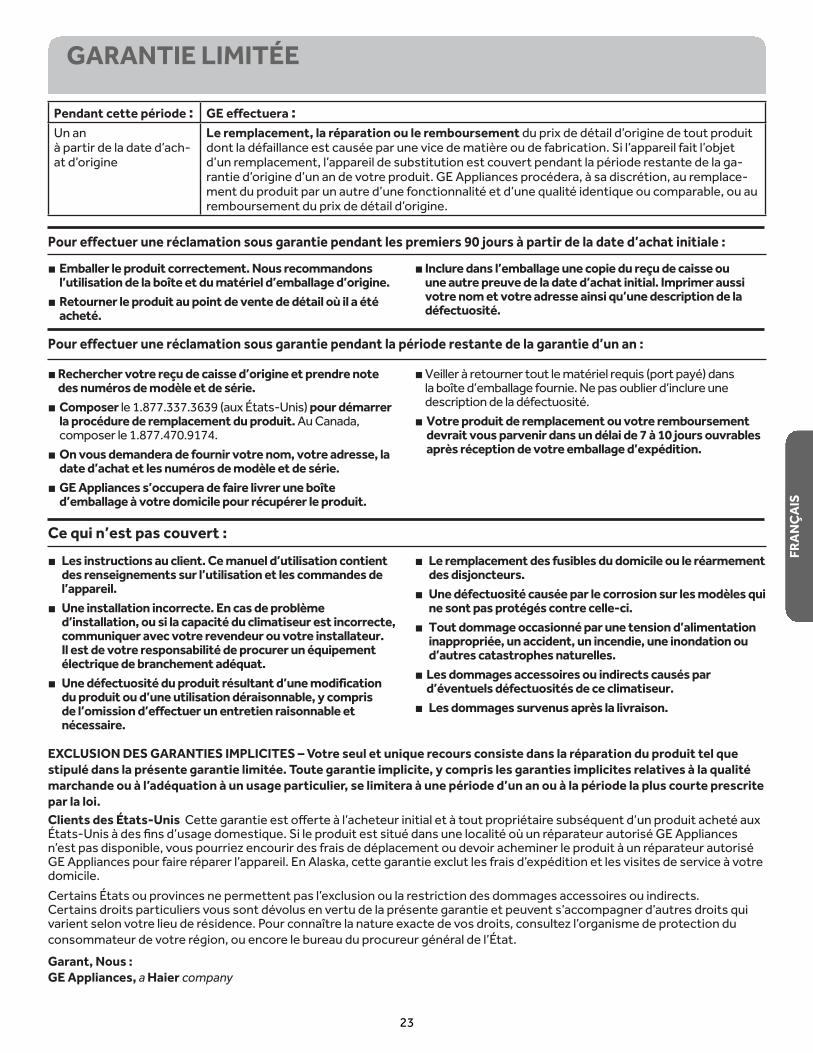
GARANTIE LIMITÉE
EXCLUSION DES GARANTIES IMPLICITES – Votre seul et unique recours consiste dans la réparation du produit tel que stipulé dans la présente garantie limitée. Toute garantie implicite, y compris les garanties implicites relatives à la qualité marchande ou à l’adéquation à un usage particulier, se limitera à une période d’un an ou à la période la plus courte prescrite par la loi.Clients des États-Unis
domicile.
Garant, Nous : GE Appliances, a Haier company
Les instructions au client. Ce manuel d’utilisation contient des renseignements sur l’utilisation et les commandes de l’appareil. Une installation incorrecte. En cas de problème d’installation, ou si la capacité du climatiseur est incorrecte, communiquer avec votre revendeur ou votre installateur. Il est de votre responsabilité de procurer un équipement électrique de branchement adéquat. Une défectuosité du produit résultant d’une modification du produit ou d’une utilisation déraisonnable, y compris de l’omission d’effectuer un entretien raisonnable et nécessaire.
Le remplacement des fusibles du domicile ou le réarmement des disjoncteurs. Une défectuosité causée par le corrosion sur les modèles qui ne sont pas protégés contre celle-ci. Tout dommage occasionné par une tension d’alimentation inappropriée, un accident, un incendie, une inondation ou d’autres catastrophes naturelles. Les dommages accessoires ou indirects causés par d’éventuels défectuosités de ce climatiseur. Les dommages survenus après la livraison.
Ce qui n’est pas couvert :
Pendant cette période : GE effectuera :Un an
-Le remplacement, la réparation ou le remboursement
--
Emballer le produit correctement. Nous recommandons l’utilisation de la boîte et du matériel d’emballage d’origine.Retourner le produit au point de vente de détail où il a été acheté.
Inclure dans l’emballage une copie du reçu de caisse ou une autre preuve de la date d’achat initial. Imprimer aussi votre nom et votre adresse ainsi qu’une description de la défectuosité.
Pour effectuer une réclamation sous garantie pendant les premiers 90 jours à partir de la date d’achat initiale :
Rechercher votre reçu de caisse d’origine et prendre note des numéros de modèle et de série. Composer le 1.877.337.3639 (aux États-Unis) pour démarrer la procédure de remplacement du produit. Au Canada, composer le 1.877.470.9174.On vous demandera de fournir votre nom, votre adresse, la date d’achat et les numéros de modèle et de série.GE Appliances s’occupera de faire livrer une boîte d’emballage à votre domicile pour récupérer le produit.
Votre produit de remplacement ou votre remboursement devrait vous parvenir dans un délai de 7 à 10 jours ouvrables après réception de votre emballage d’expédition.
Pour effectuer une réclamation sous garantie pendant la période restante de la garantie d’un an :
FRAN
ÇAIS
23
ESPAÑOL
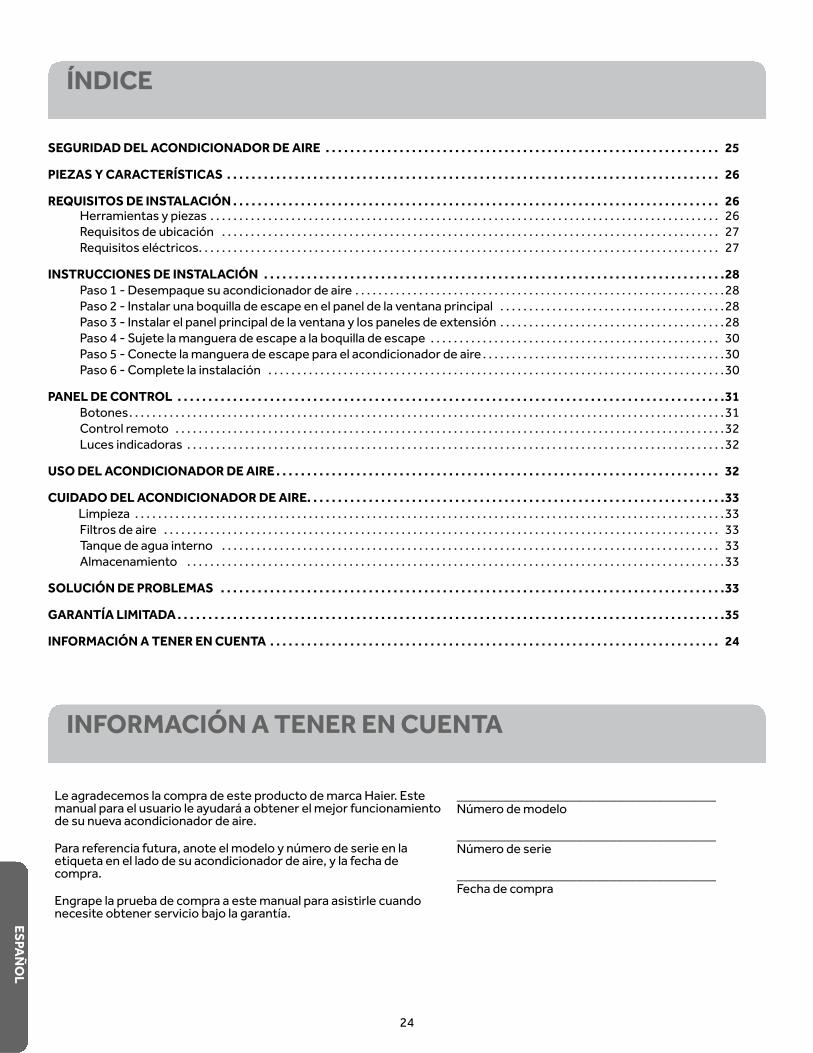
ÍNDICE
SEGURIDAD DEL ACONDICIONADOR DE AIRE . . . . . . . . . . . . . . . . . . . . . . . . . . . . . . . . . . . . . . . . . . . . . . . . . . . . . . . . . . . . . . . . 25
PIEZAS Y CARACTERÍSTICAS . . . . . . . . . . . . . . . . . . . . . . . . . . . . . . . . . . . . . . . . . . . . . . . . . . . . . . . . . . . . . . . . . . . . . . . . . . . . . . . . 26
REQUISITOS DE INSTALACIÓN . . . . . . . . . . . . . . . . . . . . . . . . . . . . . . . . . . . . . . . . . . . . . . . . . . . . . . . . . . . . . . . . . . . . . . . . . . . . . . . 26 Herramientas y piezas . . . . . . . . . . . . . . . . . . . . . . . . . . . . . . . . . . . . . . . . . . . . . . . . . . . . . . . . . . . . . . . . . . . . . . . . . . . . . . . . . . . . . . . . 26 Requisitos de ubicación . . . . . . . . . . . . . . . . . . . . . . . . . . . . . . . . . . . . . . . . . . . . . . . . . . . . . . . . . . . . . . . . . . . . . . . . . . . . . . . . . . . . . . 27
. . . . . . . . . . . . . . . . . . . . . . . . . . . . . . . . . . . . . . . . . . . . . . . . . . . . . . . . . . . . . . . . . . . . . . . . . . . . . . . . . . . . . . . . . . 27
INSTRUCCIONES DE INSTALACIÓN . . . . . . . . . . . . . . . . . . . . . . . . . . . . . . . . . . . . . . . . . . . . . . . . . . . . . . . . . . . . . . . . . . . . . . . . . . .28 Paso 1 - Desempaque su acondicionador de aire . . . . . . . . . . . . . . . . . . . . . . . . . . . . . . . . . . . . . . . . . . . . . . . . . . . . . . . . . . . . . . . .28 Paso 2 - Instalar una boquilla de escape en el panel de la ventana principal . . . . . . . . . . . . . . . . . . . . . . . . . . . . . . . . . . . . . . .28 Paso 3 - Instalar el panel principal de la ventana y los paneles de extensión . . . . . . . . . . . . . . . . . . . . . . . . . . . . . . . . . . . . . . .28
. . . . . . . . . . . . . . . . . . . . . . . . . . . . . . . . . . . . . . . . . . . . . . . . . . 30 Paso 5 - Conecte la manguera de escape para el acondicionador de aire . . . . . . . . . . . . . . . . . . . . . . . . . . . . . . . . . . . . . . . . . .30 Paso 6 - Complete la instalación . . . . . . . . . . . . . . . . . . . . . . . . . . . . . . . . . . . . . . . . . . . . . . . . . . . . . . . . . . . . . . . . . . . . . . . . . . . . . . .30
PANEL DE CONTROL . . . . . . . . . . . . . . . . . . . . . . . . . . . . . . . . . . . . . . . . . . . . . . . . . . . . . . . . . . . . . . . . . . . . . . . . . . . . . . . . . . . . . . . . .31 Botones . . . . . . . . . . . . . . . . . . . . . . . . . . . . . . . . . . . . . . . . . . . . . . . . . . . . . . . . . . . . . . . . . . . . . . . . . . . . . . . . . . . . . . . . . . . . . . . . . . . . . . .31 Control remoto . . . . . . . . . . . . . . . . . . . . . . . . . . . . . . . . . . . . . . . . . . . . . . . . . . . . . . . . . . . . . . . . . . . . . . . . . . . . . . . . . . . . . . . . . . . . . . .32 Luces indicadoras . . . . . . . . . . . . . . . . . . . . . . . . . . . . . . . . . . . . . . . . . . . . . . . . . . . . . . . . . . . . . . . . . . . . . . . . . . . . . . . . . . . . . . . . . . . . .32
USO DEL ACONDICIONADOR DE AIRE . . . . . . . . . . . . . . . . . . . . . . . . . . . . . . . . . . . . . . . . . . . . . . . . . . . . . . . . . . . . . . . . . . . . . . . . 32
CUIDADO DEL ACONDICIONADOR DE AIRE . . . . . . . . . . . . . . . . . . . . . . . . . . . . . . . . . . . . . . . . . . . . . . . . . . . . . . . . . . . . . . . . . . . .33 Limpieza . . . . . . . . . . . . . . . . . . . . . . . . . . . . . . . . . . . . . . . . . . . . . . . . . . . . . . . . . . . . . . . . . . . . . . . . . . . . . . . . . . . . . . . . . . . . . . . . . . . . . .33 Filtros de aire . . . . . . . . . . . . . . . . . . . . . . . . . . . . . . . . . . . . . . . . . . . . . . . . . . . . . . . . . . . . . . . . . . . . . . . . . . . . . . . . . . . . . . . . . . . . . . . . 33 Tanque de agua interno . . . . . . . . . . . . . . . . . . . . . . . . . . . . . . . . . . . . . . . . . . . . . . . . . . . . . . . . . . . . . . . . . . . . . . . . . . . . . . . . . . . . . . 33 Almacenamiento . . . . . . . . . . . . . . . . . . . . . . . . . . . . . . . . . . . . . . . . . . . . . . . . . . . . . . . . . . . . . . . . . . . . . . . . . . . . . . . . . . . . . . . . . . . . .33
SOLUCIÓN DE PROBLEMAS . . . . . . . . . . . . . . . . . . . . . . . . . . . . . . . . . . . . . . . . . . . . . . . . . . . . . . . . . . . . . . . . . . . . . . . . . . . . . . . . . .33
GARANTÍA LIMITADA . . . . . . . . . . . . . . . . . . . . . . . . . . . . . . . . . . . . . . . . . . . . . . . . . . . . . . . . . . . . . . . . . . . . . . . . . . . . . . . . . . . . . . . . .35
INFORMACIÓN A TENER EN CUENTA . . . . . . . . . . . . . . . . . . . . . . . . . . . . . . . . . . . . . . . . . . . . . . . . . . . . . . . . . . . . . . . . . . . . . . . . . 24
INFORMACIÓN A TENER EN CUENTA
Le agradecemos la compra de este producto de marca Haier. Este
de su nueva acondicionador de aire.
Para referencia futura, anote el modelo y número de serie en la etiqueta en el lado de su acondicionador de aire, y la fecha de compra.
Engrape la prueba de compra a este manual para asistirle cuando
_______________________________________ Número de modelo
_______________________________________ Número de serie
_______________________________________ Fecha de compra
24

SEGURIDAD DEL ACONDICIONADOR DE AIRE
INSTRUCCIONES IMPORTANTES DE SEGURIDAD ADVERTENCIA: acondicionador de aire, siga precauciones básicas, incluyendo las siguientes: •Lea todas las instrucciones antes de usar este
•Conecte a un contacto de pared de conexión a tierra de 3 terminales.
•No quite el terminal de conexión a tierra. •No use un adaptador. ••No ponga a funcionar el acondicionador de aire si
•El acondicionador de aire solo debe ser reparado por
•
•NOTA: Si apaga la unidad presionando el botón Power
•No instale ni utilice el acondicionador de aire en áreas donde la atmósfera contenga gases combustibles o donde la
•No almacene nada directamente encima del acondicionador de aire.
•Con la ayuda de dos o más personas, mueva e instale el acondicionador de aire.
•de aire no están colocados en su lugar.
•No utilice el acondicionado de aire cerca de una tina, ducha o lavabo ni otra zona húmeda.
LEA Y GUARDE ESTAS INSTRUCCIONES
Su seguridad y la seguridad de los demás es muy importante.
-vertencia de seguridad y de la palabra “PELIGRO”, “ADVERTENCIA” o “PRECAUCIÓN”.
PELIGRO ADVERTENCIA PRECAUCIÓN
Se trata de una situación de peligro inminente. Si no sigue las instrucciones de inmediato, usted puede morir o sufrir una lesión grave.
causar la muerte o una lesión grave.
causar lesiones moderadas o leves.
que puede suceder si no se siguen las instrucciones.
ESPA
ÑOL
25
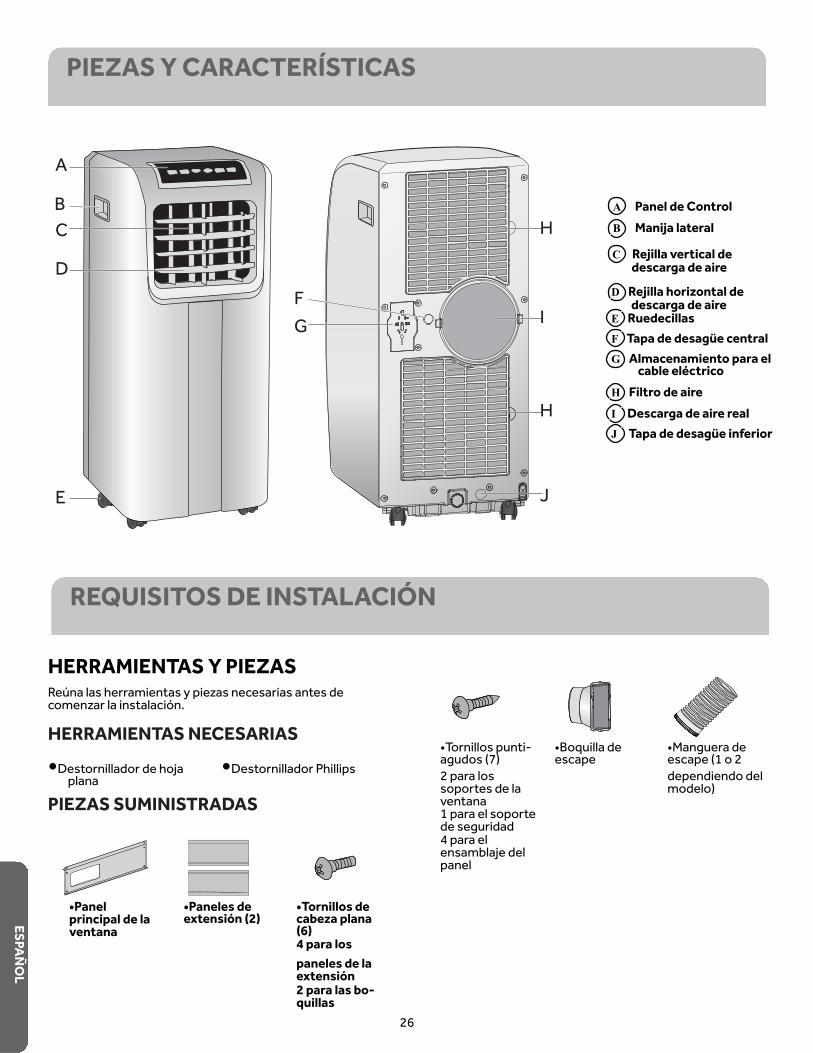
PIEZAS Y CARACTERÍSTICAS
REQUISITOS DE INSTALACIÓN
HERRAMIENTAS Y PIEZAS Reúna las herramientas y piezas necesarias antes de comenzar la instalación.
HERRAMIENTAS NECESARIAS •
plana •Destornillador Phillips
PIEZAS SUMINISTRADAS
•Panel principal de la ventana
•Paneles de extensión (2)
•Tornillos de cabeza plana (6) 4 para los paneles de la extensión 2 para las bo-quillas
•Tornillos punti-agudos (7) 2 para los soportes de la ventana 1 para el soporte de seguridad 4 para el
panel
•Boquilla de escape
•Manguera de escape (1 o 2 dependiendo del modelo)
ESPAÑOL
26
A
B C
D
E
F G
H
I
H
J
A Panel de ControlB Manija lateral
D Rejilla horizontal de descarga de aire
E Ruedecillas F Tapa de desagüe central G Almacenamiento para el
cable eléctrico H Filtro de aire I Descarga de aire real J Tapa de desagüe inferior
C Rejilla vertical de descarga de aire
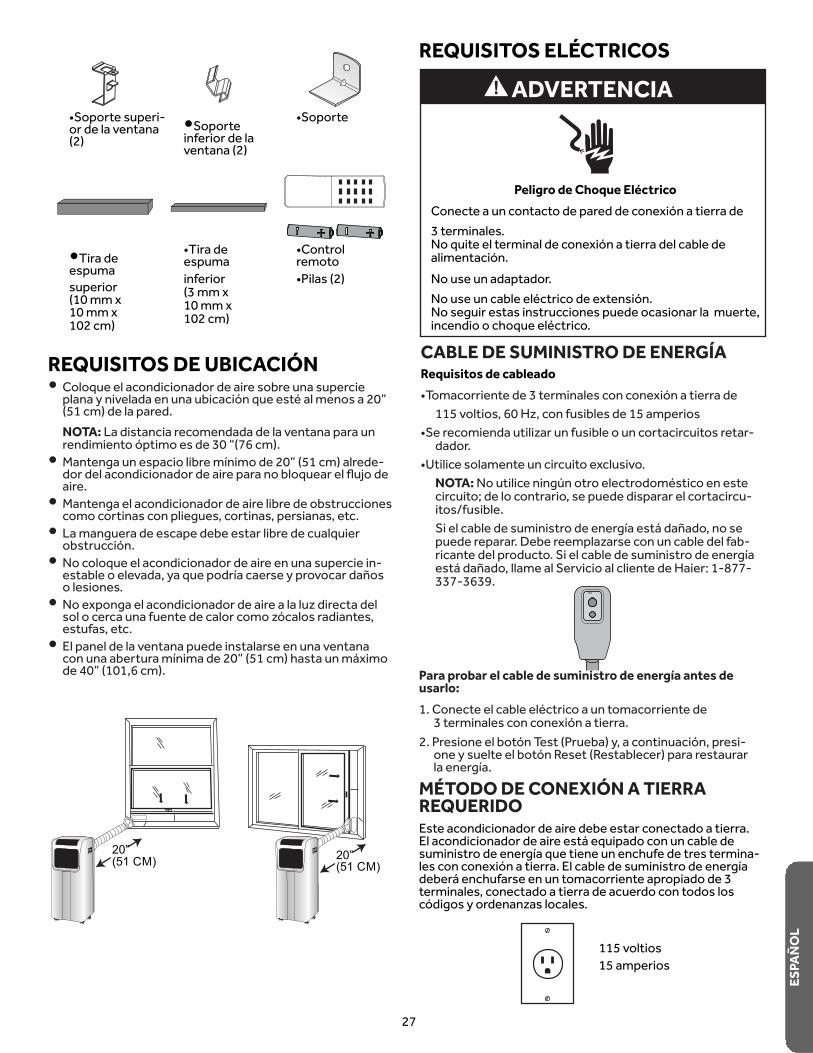
•Soporte superi-or de la ventana (2)
•Tira de espuma superior (10 mm x 10 mm x 102 cm)
•Soporte inferior de la ventana (2)
•Tira de espuma inferior (3 mm x 10 mm x 102 cm)
•Soporte
•Control remoto •Pilas (2)
20” (51 CM) 20”
(51 CM)
REQUISITOS ELÉCTRICOS
ADVERTENCIA
Peligro de Choque Eléctrico Conecte a un contacto de pared de conexión a tierra de 3 terminales. No quite el terminal de conexión a tierra del cable de alimentación. No use un adaptador.
No seguir estas instrucciones puede ocasionar la muerte,
CABLE DE SUMINISTRO DE ENERGÍA Requisitos de cableado •Tomacorriente de 3 terminales con conexión a tierra de
115 voltios, 60 Hz, con fusibles de 15 amperios •Se recomienda utilizar un fusible o un cortacircuitos retar-
dador. •Utilice solamente un circuito exclusivo.
NOTA: circuito; de lo contrario, se puede disparar el cortacircu-itos/fusible.
puede reparar. Debe reemplazarse con un cable del fab-
337-3639.
Para probar el cable de suministro de energía antes de usarlo:
3 terminales con conexión a tierra. 2. Presione el botón Test (Prueba) y, a continuación, presi-
one y suelte el botón Reset (Restablecer) para restaurar
MÉTODO DE CONEXIÓN A TIERRA REQUERIDO Este acondicionador de aire debe estar conectado a tierra. El acondicionador de aire está equipado con un cable de
-
deberá enchufarse en un tomacorriente apropiado de 3 terminales, conectado a tierra de acuerdo con todos los códigos y ordenanzas locales.
115 voltios 15 amperios
REQUISITOS DE UBICACIÓN • Coloque el acondicionador de aire sobre una supercie
(51 cm) de la pared. NOTA: La distancia recomendada de la ventana para un rendimiento óptimo es de 30 “(76 cm).• -
aire. • Mantenga el acondicionador de aire libre de obstrucciones como cortinas con pliegues, cortinas, persianas, etc. • La manguera de escape debe estar libre de cualquier obstrucción. • No coloque el acondicionador de aire en una supercie in-
o lesiones. • No exponga el acondicionador de aire a la luz directa del sol o cerca una fuente de calor como zócalos radiantes, estufas, etc. • El panel de la ventana puede instalarse en una ventana
de 40” (101,6 cm).
ESPA
ÑOL
27

ESPAÑOL
INSTRUCCIONES DE INSTALACIÓN
ADVERTENCIA Peligro de Peso Excesivo
Use dos o más personas para mover e instalar el acondicionador de aire. No seguir esta instrucción puede ocasionar una lesión en la espalda u otro tipo de lesiones.
A
A Panel
PASO 1 - DESEMPAQUE SU ACONDICIONADOR DE AIRE
• -que de espuma para almacenar el acondicionador de aire
NOTA: NO hay materiales de empaque internos dentro del acondicionador de aire para quitar. No abra el gabinete.
• Deshágase adecuadamente de todos los materiales de
• Manipule el acondicionador de aire con cuidado. • Mantenga el acondicionador de aire en posición vertical y
nivelado. No coloque el acondicionador de aire de costado,
PASO 2 - INSTALAR UNA BOQUILLA DE ESCAPE EN EL PANEL DE LA VENTANA PRINCIPAL 1. Sostenga el panel de la ventana de manera que los
bordes en forma de L de la placa queden frente a usted.
A Bordes en forma de L
2. Alinee la boquilla de escape con las ranuras en la aper-tura y luego, inserte y deslice la boquilla para acceder al
ventana.
principal de la ventana
B Boquilla de escape (1 o 2
dependiend o del modelo)
3. -
NOTA: En una unidad de manguera doble, instale una boquilla
A ATornillo plano
PASO 3 - INSTALAR EL PANEL PRINCIPAL DE LA VENTANA Y LOS PANELES DE EXTENSIÓN NOTA: el panel principal y uno o ambos paneles de extensión. 1. Abra la ventana y coloque el panel principal de la ventana
en esta. NOTA: una ventana deslizable vertical u horizontal.
28
A
B

ESPA
ÑOL
Antes del montaje
A Panel principal de la ventana
Ventana deslizable horizontal
A Panel principal de la ventana
A Soportes superiores de la ventana B Soportes inferiores de la ventana
Después de la asamblea
2.ancho o altura de la ventana, como se muestra. NOTA: La instalación de algunas ventanas requiere que se corten los paneles de extensión.
3. Según el número de paneles de extensión usado, utilice
principal a los paneles de extensión.
NOTA: Actualmente existen numerosos tipos de ventanas en el mercado. Use las tiras de espuma y los
de extensión y rellenar las aberturas de la ventana. 4.
de la ventana a la repisa y el marco de la ventana.
5. Coloque la tira de espuma superior (incluida) a lo largo de la
tira de espuma inferior (incluida) a lo largo de borde frontal
muestra.
29
A Tira de espuma su-perior
B Soporte superior C Panel de extensión
D Soporte inferior E Tira de espuma inferior
6.
marco de la ventana.
A
B
A
B
A
A
A B
C
D E
Ventana deslizable vertical
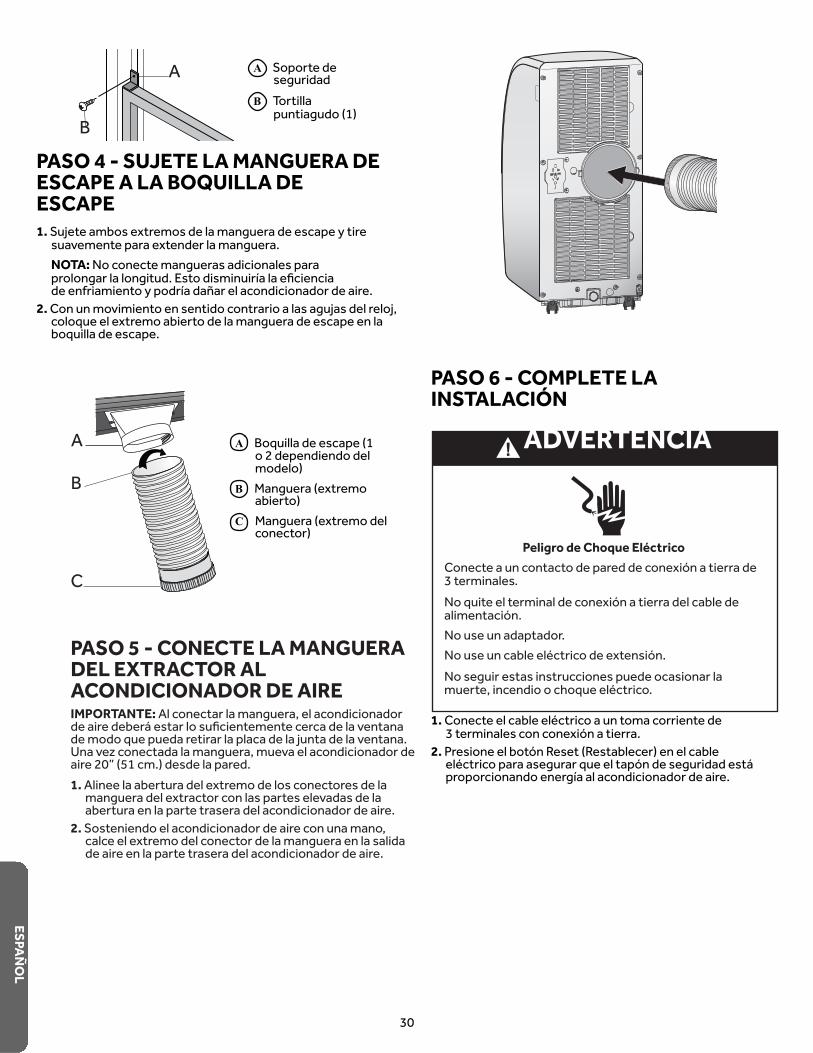
7. Con un tornillo puntiagudo, instale el soporte de seguridad a la ventana. NOTA: El soporte de seguridad evita que la ventana se abra desde el exterior.
ESPAÑOL
B
A B Tortilla
A
B
C
ADVERTENCIA
Peligro de Choque Eléctrico Conecte a un contacto de pared de conexión a tierra de 3 terminales. No quite el terminal de conexión a tierra del cable de alimentación. No use un adaptador.
No seguir estas instrucciones puede ocasionar la
1.3 terminales con conexión a tierra.
2. Presione el botón Reset (Restablecer) en el cable
A Soporte de seguridad
puntiagudo (1)
PASO 4 - SUJETE LA MANGUERA DE ESCAPE A LA BOQUILLA DE ESCAPE 1.
suavemente para extender la manguera. NOTA: No conecte mangueras adicionales para
2.coloque el extremo abierto de la manguera de escape en la boquilla de escape.
A Boquilla de escape (1 o 2 dependiendo del modelo)
B Manguera (extremo abierto)
C Manguera (extremo del conector)
PASO 6 - COMPLETE LA INSTALACIÓN
30
PASO 5 - CONECTE LA MANGUERA DEL EXTRACTOR AL ACONDICIONADOR DE AIRE IMPORTANTE: Al conectar la manguera, el acondicionador
Una vez conectada la manguera, mueva el acondicionador de aire 20” (51 cm.) desde la pared.1. Alinee la abertura del extremo de los conectores de la
manguera del extractor con las partes elevadas de la abertura en la parte trasera del acondicionador de aire.
2. Sosteniendo el acondicionador de aire con una mano, calce el extremo del conector de la manguera en la salida de aire en la parte trasera del acondicionador de aire.
Timer
°C Hr °F
High Low Water Full Cool Fan Dehum Sleep POWER
A B C D E F G
PANEL DE CONTROL
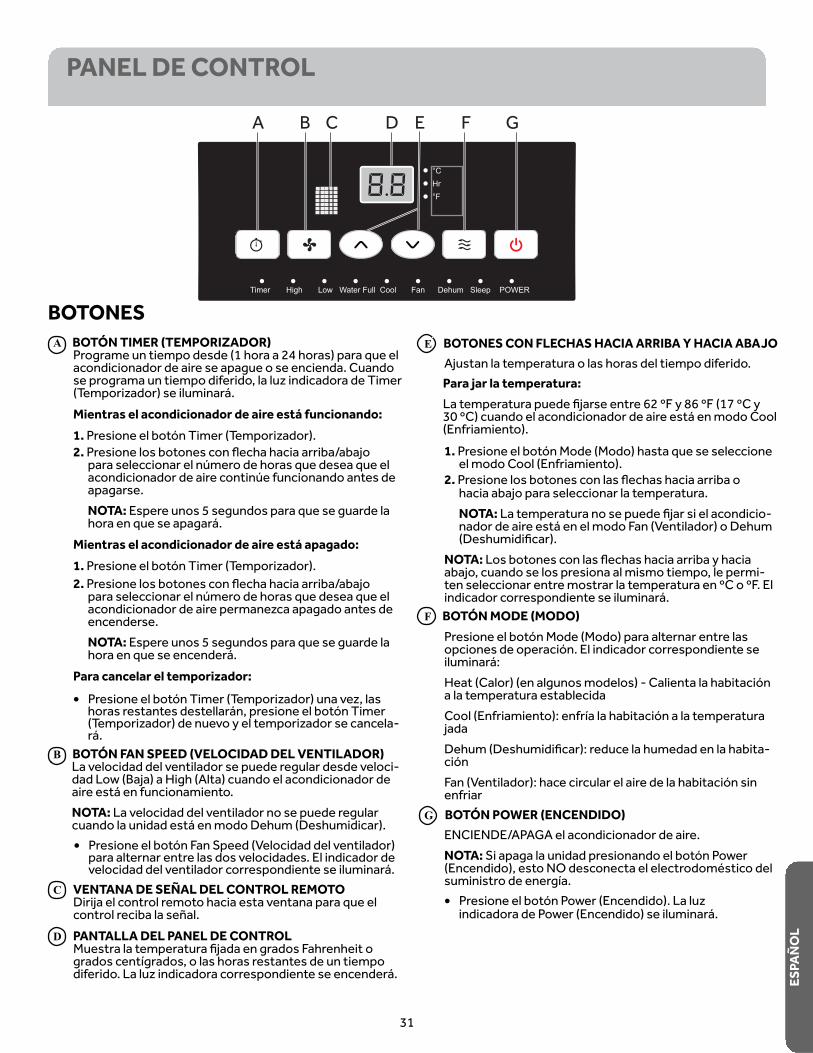
BOTONES A BOTÓN TIMER (TEMPORIZADOR)
Programe un tiempo desde (1 hora a 24 horas) para que el acondicionador de aire se apague o se encienda. Cuando se programa un tiempo diferido, la luz indicadora de Timer (Temporizador) se iluminará. Mientras el acondicionador de aire está funcionando: 1. Presione el botón Timer (Temporizador). 2.
para seleccionar el número de horas que desea que el acondicionador de aire continúe funcionando antes de apagarse. NOTA: Espere unos 5 segundos para que se guarde la hora en que se apagará.
Mientras el acondicionador de aire está apagado: 1. Presione el botón Timer (Temporizador). 2.
para seleccionar el número de horas que desea que el acondicionador de aire permanezca apagado antes de encenderse. NOTA: Espere unos 5 segundos para que se guarde la hora en que se encenderá.
Para cancelar el temporizador: • Presione el botón Timer (Temporizador) una vez, las
horas restantes destellarán, presione el botón Timer (Temporizador) de nuevo y el temporizador se cancela-rá.
B BOTÓN FAN SPEED (VELOCIDAD DEL VENTILADOR) La velocidad del ventilador se puede regular desde veloci-
aire está en funcionamiento. NOTA: La velocidad del ventilador no se puede regular cuando la unidad está en modo Dehum (Deshumidicar). • Presione el botón Fan Speed (Velocidad del ventilador)
para alternar entre las dos velocidades. El indicador de velocidad del ventilador correspondiente se iluminará.
C VENTANA DE SEÑAL DEL CONTROL REMOTO
D PANTALLA DEL PANEL DE CONTROL
diferido. La luz indicadora correspondiente se encenderá.
31
E BOTONES CON FLECHAS HACIA ARRIBA Y HACIA ABAJO
Para jar la temperatura:
30 ºC) cuando el acondicionador de aire está en modo Cool (Enfriamiento). 1. Presione el botón Mode (Modo) hasta que se seleccione
el modo Cool (Enfriamiento). 2.
NOTA: -nador de aire está en el modo Fan (Ventilador) o Dehum
NOTA: -
ten seleccionar entre mostrar la temperatura en ºC o ºF. El indicador correspondiente se iluminará.
F BOTÓN MODE (MODO) Presione el botón Mode (Modo) para alternar entre las opciones de operación. El indicador correspondiente se iluminará: Heat (Calor) (en algunos modelos) - Calienta la habitación a la temperatura establecida
-ción Fan (Ventilador): hace circular el aire de la habitación sin enfriar
G BOTÓN POWER (ENCENDIDO) ENCIENDE/APAGA el acondicionador de aire. NOTA: Si apaga la unidad presionando el botón Power
• Presione el botón Power (Encendido). La luz indicadora de Power (Encendido) se iluminará.
ESPA
ÑOL

USO DEL ACONDICIONADOR DE AIRE
CONTROL REMOTO
1. Inserte dos pilas (provistas). 2.
panel de control para hacer funcionar el acondicionador de aire.
A BOTÓN SLEEP (SUSPENSIÓN)
2 horas y, a continuación, aumenta la temperatura en
NOTA: -de regularse mientras está en modo Sleep (Suspensión). Presione el botón de Sleep (Suspensión) para ingresar al modo Sleep (Suspensión). La luz indicadora de Sleep (Suspensión) se iluminará. Para cancelar el modo Sleep (Suspensión): •Presione el botón Sleep (Suspensión) o el botón Mode (Modo) en el control remoto.
B BOTÓN °C/°F •Presione el botón °C/°F para alternar entre la visual-ización de la temperatura en grados Fahrenheit y grados
IMPORTANTE: Si el acondicionador de aire se ha inclinado hacia un lado, espere 24 horas antes de encender el
al compresor. Esto evitará que el acondicionador de aire falle antes de tiempo. •
permitir una circulación adecuada de aire. • No haga funcionar el acondicionador de aire si los ltros de
aire no están colocados en su lugar. •
un cortocircuito a las piezas electrónicas del interior que
• Al encender el acondicionador de aire por primera vez
la unidad comenzará a funcionar en el modo Cooling
del ventilador. El panel de control mostrará la temperatura actual de la habitación.
•
LUCES INDICADORAS
Se iluminarán para indicar el modo, la velocidad o el estado que se seleccionó. A WATER FULL (MÁXIMO NIVEL DE AGUA)
El indicador Water Full (Máximo nivel de agua) se ilumina cuando el tanque de agua interno se llena de agua condensada. El acondicionador de aire se apagará automáticamente. Para obtener las instrucciones para desagotar el tanque de agua, vea la sección “Cuidado del acondicionador de aire”.
• de volver a poner en marcha la unidad.
• En el modo de enfriamiento, esta unidad no deberá requerir que se elimine el agua. Este modelo cuenta con un
• Cuando la unidad funciona en condiciones de alta humedad, es posible que usted tenga que vaciar periódicamente el tanque de agua.
• La unidad se apagará automáticamente cuando el tanque
agua) se iluminará para avisarle acerca de esta condición.
32
ESPAÑOL
A B
A
����
���
�����
����� �����
����
����
�����
���
�����
Timer High Low Water Full Cool Fan Dehum Sleep POWER
CUIDADO DEL ACONDICIONADOR DE AIRE
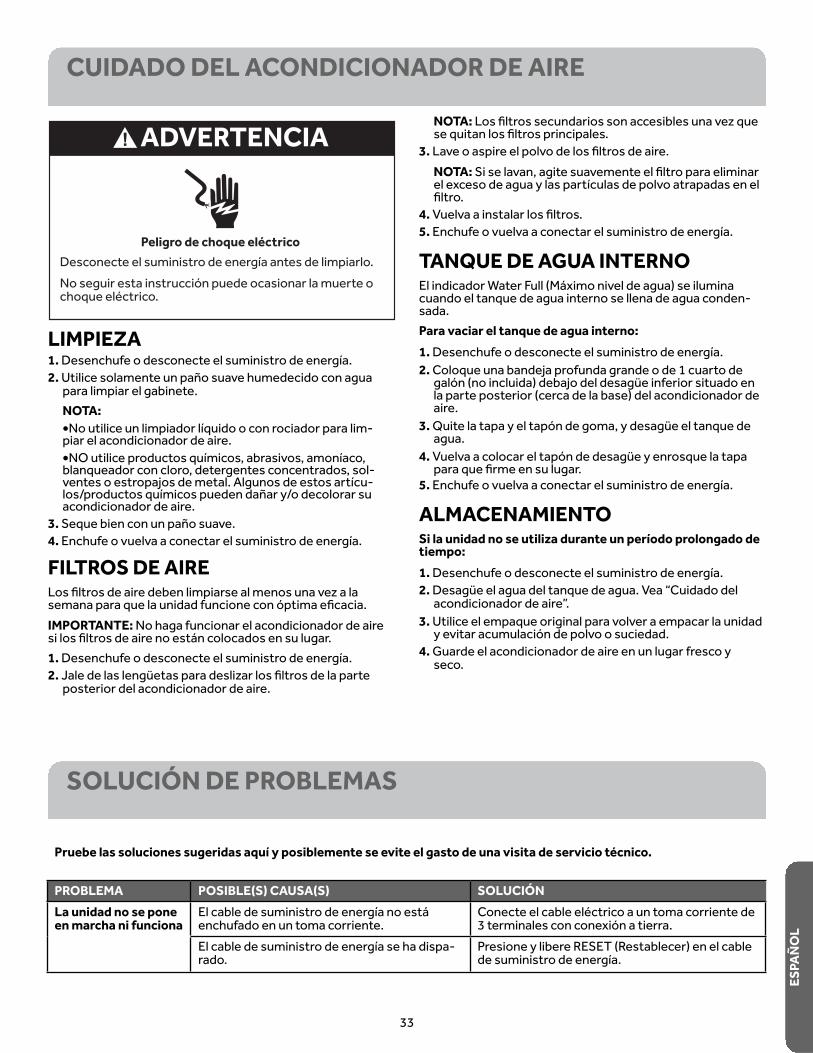
ADVERTENCIA
Peligro de choque eléctrico
No seguir esta instrucción puede ocasionar la muerte o
LIMPIEZA 1.2.
para limpiar el gabinete. NOTA: • -piar el acondicionador de aire. •blanqueador con cloro, detergentes concentrados, sol-
-
acondicionador de aire. 3.4.
FILTROS DE AIRE
IMPORTANTE: No haga funcionar el acondicionador de aire
1.2.
posterior del acondicionador de aire.
SOLUCIÓN DE PROBLEMAS
NOTA:
3.NOTA:
4.5.
TANQUE DE AGUA INTERNO El indicador Water Full (Máximo nivel de agua) se ilumina cuando el tanque de agua interno se llena de agua conden-sada. Para vaciar el tanque de agua interno: 1.2.
la parte posterior (cerca de la base) del acondicionador de aire.
3. Quite la tapa y el tapón de goma, y desagüe el tanque de agua.
4. Vuelva a colocar el tapón de desagüe y enrosque la tapa
5.
ALMACENAMIENTO Si la unidad no se utiliza durante un período prolongado de tiempo: 1.2. Desagüe el agua del tanque de agua. Vea “Cuidado del
acondicionador de aire”. 3. Utilice el empaque original para volver a empacar la unidad
y evitar acumulación de polvo o suciedad. 4. Guarde el acondicionador de aire en un lugar fresco y
seco.
Pruebe las soluciones sugeridas aquí y posiblemente se evite el gasto de una visita de servicio técnico.
33
ESPA
ÑOL
PROBLEMA POSIBLE(S) CAUSA(S) SOLUCIÓNLa unidad no se pone en marcha ni funciona enchufado en un toma corriente. 3 terminales con conexión a tierra.
-rado.
Presione y libere RESET (Restablecer) en el cable
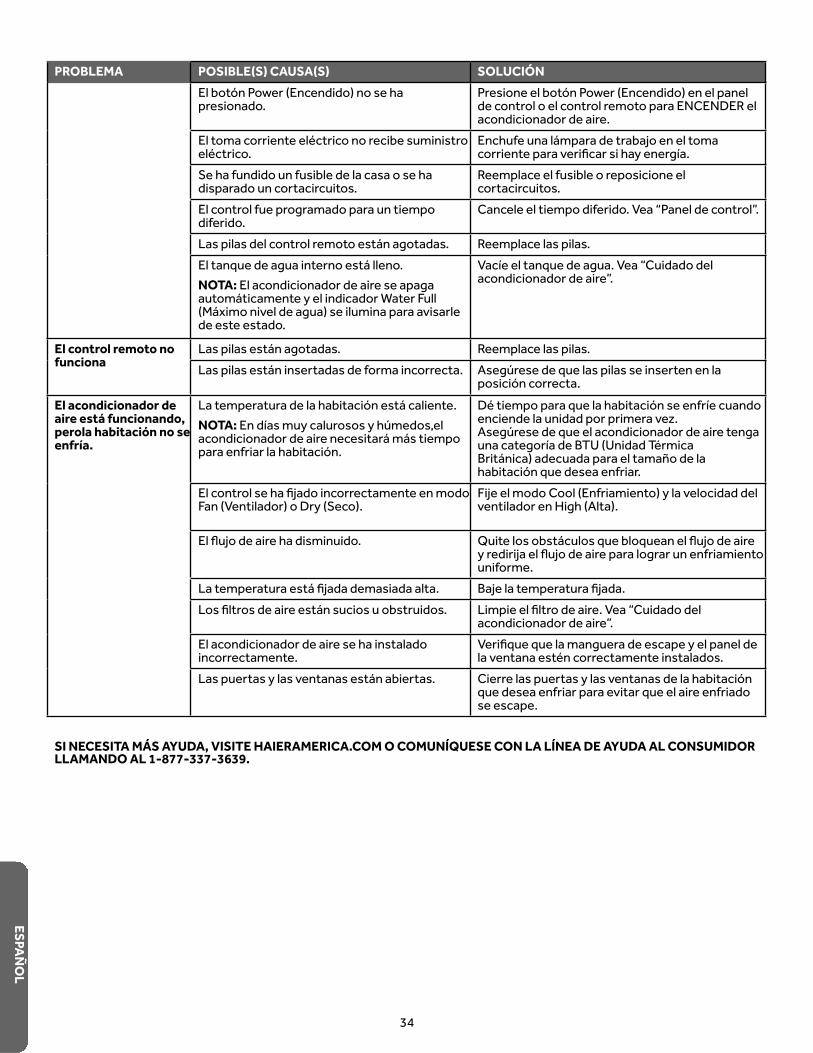
SI NECESITA MÁS AYUDA, VISITE HAIERAMERICA.COM O COMUNÍQUESE CON LA LÍNEA DE AYUDA AL CONSUMIDOR LLAMANDO AL 1-877-337-3639.
34
ESPAÑOL
PROBLEMA POSIBLE(S) CAUSA(S) SOLUCIÓN
El botón Power (Encendido) no se ha presionado.
Presione el botón Power (Encendido) en el panel de control o el control remoto para ENCENDER el acondicionador de aire.
Se ha fundido un fusible de la casa o se ha disparado un cortacircuitos.
Reemplace el fusible o reposicione el cortacircuitos.
El control fue programado para un tiempo diferido.
Cancele el tiempo diferido. Vea “Panel de control”.
Las pilas del control remoto están agotadas. Reemplace las pilas.El tanque de agua interno está lleno.NOTA: El acondicionador de aire se apaga automáticamente y el indicador Water Full(Máximo nivel de agua) se ilumina para avisarle de este estado.
acondicionador de aire”.
El control remoto no funciona
Las pilas están agotadas. Reemplace las pilas.Las pilas están insertadas de forma incorrecta. Asegúrese de que las pilas se inserten en la
posición correcta.El acondicionador de aire está funcionando, perola habitación no se enfría.
La temperatura de la habitación está caliente.NOTA: acondicionador de aire necesitará más tiempo para enfriar la habitación.
enciende la unidad por primera vez.Asegúrese de que el acondicionador de aire tenga
habitación que desea enfriar.
Fan (Ventilador) o Dry (Seco). ventilador en High (Alta).
uniforme.
acondicionador de aire”. El acondicionador de aire se ha instalado incorrectamente.Las puertas y las ventanas están abiertas. Cierre las puertas y las ventanas de la habitación
que desea enfriar para evitar que el aire enfriado se escape.

GARANTÍA LIMITADA
EXCLUSIÓN DE GARANTÍAS IMPLÍCITAS—Su única y exclusiva alternativa es la reparación del producto, como se indica en la Garantía Limitada. Las garantías implícitas, incluyendo garantías implícitas de comerciabilidad o conveniencia sobre un propósito particular, se limitan a un año o al período más corto permitido por la ley.
Para Clientes de EE.UU:
Garante en EE.UU: GE Appliances, a Haier company
Instrucción al cliente. Este manual del propietario brinda información relacionada con instrucciones de funcionamiento y controles del usuario. Instalación inadecuada. Si tiene un problema de instalación o el acondicionador de aire no posee la capacidad adecuada, contacte a su vendedor minorista o instalador. Usted es responsable de brindar instalaciones de conexión eléctrica adecuadas. Falla del producto como resultado de modificaciones sobre el mismo o debido a un uso irrazonable, incluyendo la falta de mantenimiento razonable o necesario.
Reemplazo de fusibles del hogar o reinicio de disyuntores. Fallas como consecuencia de corrosión en modelos sin protección contra ésta. Daños ocasionados sobre el producto por nivel de suministro de voltaje inadecuado, accidente, incendio, inundaciones o catástrofes naturales. Daños consecuentes o incidentales causados por posibles defectos del acondicionador de aire. Daño causado después de la entrega.
Qué No Será Cubierto:
Por el Período de: Reemplazaremos:
Desde la fecha de la compra original
Reemplazo, reparación o reembolso del costo minorista original de cualquier producto que falle debido a un defecto en los materiales o la fabricación. Si la unidad es cambiada, la unidad de reem-
GE Appliances reemplazará, a su exclusivo criterio, el producto por otro de la misma o de una funcionalidad y calidad comparable o hará un reembolso por el precio minorista original.
Embale la unidad correctamente. Le recomendamos usar la caja de cartón y los materiales de embalaje originales.Entregue el producto en la ubicación del vendedor minorista donde fue adquirido.
Incluya en el paquete una copia del receptor de la venta u otro comprobante de la fecha de compra original. También escriba su nombre y domicilio y una descripción del defecto.
A Fin de Realizar una Reclamo sobre la Garantía Durante los Primeros 90 Días desde la Fecha Original de Compra:
Ubique su recibo de venta original y haga una nota de su modelo y número de serie. Llame al 1.877.337.3639 (en Estados Unidos) para iniciar el proceso de reemplazo del producto. En Canadá, llame al 1.877.470.9174.Se solicitará su nombre, domicilio, fecha de compra, y números de modelo y serie.GE Appliances hará arreglos para que se envíe una caja de cartón a su hogar para recuperar el producto.
una descripción del defecto.Debería recibir el producto de reemplazo o un reembolso entre los 7 y 10 días hábiles una vez que hayamos recibido su paquete.
A Fin de Realizar un Reclamo sobre la Garantía Durante el Resto de la Garantía de un Año:
35
ESPA
ÑOL

Printed in China
IMPORTANTENo regrese este producto a la tienda
Si tiene un problema con este producto, por favor comuníquese al 1-877-337-3639 para solicitar el nombre y número telefónico del centro de servicio al cliente
autorizado más cercano.NECESITA UNA PRUEBA DE COMPRA FECHADA, NÚMERO DE MODELO
Y DE SERIE PARA EL SERVICIO DE LA GARANTÍA
IMPORTANTDo Not Return This Product To The Store
If you have a problem with this product, please call 1-877-337-3639 for the name and telephone number of the nearest authorized service center.
DATED PROOF OF PURCHASE REQUIRED FOR WARRANTY SERVICE
IMPORTANTNe pas Réexpédier ce Produit au Magasin
En cas de problème avec ce produit, veuillez composer le 1-877-337-3639 pour connaître le nom et le numéro de téléphone du centre de service autorisé le plus proche.
PREUVE D’ACHAT DÁTÉE, NUMÉRO DE MODÈLE ET LE NUMÉRO DE SÉRIE REQUIS POUR LE SERVICE DE GARANTIE