
Installation and user guide - Alcad.com€¦ · BaSiCs helps you to find easily and quickly the...
15
BaSiCs, Sizing software for stationary applications Installation and user guide
Transcript of Installation and user guide - Alcad.com€¦ · BaSiCs helps you to find easily and quickly the...
BaSiCs,
Sizing software for
stationary applications
Installation and user guide

BaSiCs, guide d’installation et d’utilisation Page 2 sur 15
Summary
OVERVIEW 3
HOW TO INSTALL BASICS? 4
HOW TO ACTIVATE YOUR LICENSE (FROM TRIAL TO FULL VERSION) 5
PERFORM A QUICK IEEE/UPS SIZING, SAVE IT AND EDIT DOCUMENTS 7
PERFORM A QUICK STARTING SIZING, SAVE IT AND EDIT DOCUMENTS 8
PERFORM A QUICK PHOTOVOLTAIC SIZING, SAVE IT AND EDIT DOCUMENTS 10
PERFORM A QUICK LAYOUT SIZING, SAVE IT AND EDIT DOCUMENTS 11
DISPLAY A CELL DATA SHEET (FULL VERSION ONLY) 12
APPLICATION UPDATES 13
BUG REPORTING 14
KEYBOARD SHORTCUTS 15
BaSiCs, guide d’installation et d’utilisation Page 3 sur 15
Overview
BaSiCs Standalone Customer version is the new version of the battery sizing software used for a number of years by Alcad for stationary applications. BaSiCs helps you to find easily and quickly the right battery from Alcad wide range of nickel–cadmium stationary batteries. With BaSiCs, you have a direct access to:
• IEEE and UPS sizing method for stationary floating applications,
• starting sizing method for engine starting applications,
• photovoltaic sizing method for solar applications,
• layout to define one or several stands and the battery layout,
• cell data sheets to obtain details on a particular cell types BaSiCs exists in different applications:
• Web application, accessible at: http://basics.alcad.com
• Standalone version: you have to install it on your computer and which works
without Internet connection

BaSiCs, guide d’installation et d’utilisation Page 4 sur 15
How to install BaSiCs?
To install BaSiCs, unzip the file and save it in a folder on your computer.
Double click on the AlcadBaSiCsSetup.exe and follow the different steps (To be able to install BaSiCs, you needs an administrator’s profile)
By default, you will access to a trial version (for 30 days). This trial version will make you able to perform battery and layout sizing.
A lot of more functionalities exists in the full version (sizing saving, cell data sheets, battery and layout proposal details…) To request an access to the full version, please use the Activation menu on BaSiCs standalone version. BaSiCs standalone version for customer has been developed to work on:
• Win XP SP3 32 bits
• Win7 32 bits et 64 bits
• Win 8 32 bits et 64 bits

BaSiCs, guide d’installation et d’utilisation Page 5 sur 15
How to activate your license (from trial to full version)
By default, BaSiCs is installed as a trial version. This version is available during 30 days but you can request for a full version to access more functionalities.
NB: during all the trial phase, the Activation screen will be launched at your first connection of the day. To activate your full version, please go to Activation menu.
You are already a BaSiCs web user and you are connected to Internet
1 Just enter your login (e-mail address) and your BaSiCs password in the area “I
already have a BaSiCs account” and validate.
2 You will be automatically recognized and your license validated. NB: You have forgotten your BaSiCs password, please connect to Basics web to request it. (http://basics.alcad.com ).
You are not yet a BaSiCs web user and you are connected to Internet
1 Please complete the fields in the area “I’m a new customer” and click on
“create an account”. Your request will be automatically sent to a sales representative.
2 Once your request is accepted, your account will be created and your BaSiCs application will be updated during next launch.
NB: you can also verify your license status by clicking on Activation on BaSiCs menu. NB: if you License status is not updated 15 days after your request, you will be able to renew this request with a new button on the Activation screen.
You don’t have an Internet connection but have access to an e-mail box
1 Create a new account by completing the fields in the area “I’m a new
customers” and click on “create an account”
Or
Complete the fields Login/password in the area “I already have a BaSiCs account” and validate
2 Follow the steps:
BaSiCs, guide d’installation et d’utilisation Page 6 sur 15
a. Copy the address [email protected] which appears in the instruction screen
b. Click Ok to go to the next step c. Save the lic-request-PC.lics (1) file on your computer.
3 Next time you have access to an e-mail box send the license request file to: [email protected] . NB: If you forget the e-mail address, it is accessible on the activation screen.
4 You will receive few days after your License validation file (Lic-response-PC.lics (1)) by e-mail. You have to import this file on BaSiCs:
a. Save the license validation file on your computer b. Launch BaSiCs c. Click on Activation d. In the area “I have requested a full version”, click on “Import my file”,
select it and then click on “Validate”
Congratulation! You have now access to the full version of BaSiCs standalone version.
(1) Lic-request-PC.lics and Lic-response-PC.lics : in the name of these files, PC will be automatically renamed with the name of your PC

BaSiCs, guide d’installation et d’utilisation Page 7 sur 15
Perform a quick IEEE/UPS sizing, save it and edit
documents
Stage 1: Click on “IEEE / UPS” in the “New Sizing” menu to create a sizing or open an existing bzf or bzfs file. You can also click on the IEEE/UPS icon in the shortcuts menu.
Stage 2: Complete the basics criteria in Step 1 (General) and Step 2 (Profile).
• The General tab requires a minimum of voltages to be entered.
• The Profile tab defines the discharge profile data.
Stage 3: click on “Size it“ to generate a battery sizing result. Tick the cells you want to keep and click Select. If there is no result, then please check that there are no errors in your input.
Stage 4 : Actions on configuration.
• Delete a configuration.( red cross in the column "Actions" of the results table)
• Add a layout to your configuration. For each result configuration you can associate a layout. In the edit/modify column, click on “Layout“, complete the fields and click on “Keep stand“.
• View Packaging.information (column « Edit/modify »)
• Edit documents (Full version only). In the « view details” column, click on a link to open a pdf file with battery or layout proposal.
Stage 5 (Full version only): save your system in your computer. It will be saved in a file with the extension .bzfs.
• Select « Save » on the menu Folder or click on the “Save” icon in the shortcuts menu
Remarks:
• A folder can be composed by multiple sizing: multiple systems with multiple configurations.
• You can save your sizing result in PDF files: click on « View details » in the results table.
• Once you have saved your folder, you can save all documents relative to you sizing in pdf format by clicking on the “Send to” button.

BaSiCs, guide d’installation et d’utilisation Page 8 sur 15
Perform a quick starting sizing, save it and edit documents
Stage 1: Select starting on the « New sizing” menu or open an existing .bzf or .bzfs file. You can also click on the “Starting” icon in the shortcuts menu.
Stage 2: Complete the basic criteria in Step 1 (General) and Step 2 (Advanced).
Stage 2.1: General tab
• Choose a manufacturer and model. Choosing this will automatically complete the type, engine displacement and base cranking current. Note that it is possible to override all these values and/or add a new manufacturer/model to the database.
• Choose a starting voltage, this will be 12 V, 24 V or 32 V.
• Choose the number of starting motors. The default and normal value is one starter motor.
• Choose a sizing standard. The normal options are STANDARD (for a main powered charger) and ALERNATOR CHARGING (for an alternator charger). The named standards are used if required by the application specifications.
Stage 2.2: Advanced tab The Advanced tab is completed with standard values. Unless there are specific considerations in the application, these can be left at the default values.
Stage 3: Click on “Size it“ to generate a battery sizing result. If there is no result, then please check that there are no errors in your input.
Stage 4 : Actions on configuration.
• Delete a configuration.( red cross in the column "Actions" of the results table)
• Add a layout to your configuration. For each result configuration you can associate a layout. In the edit/modify column, click on “Layout“, complete the fields and click on “Keep stand“.
• View Packaging.information (column « Edit/modify »)
• Edit documents (Full version only). In the « view details” column, click on a link to open a pdf file with battery or layout proposal.
Stage 5 (Full version only): save your system in your computer. It will be saved in a file with the extension .bzfs.
• Select « Save » on the “Folder” menu or click on the “Save” icon in the shortcuts menu
Remarks:
• A folder can be composed by multiple sizing: multiple systems with multiple configurations.
• You can save your sizing result in PDF files: click on « View details » in the results table.

BaSiCs, guide d’installation et d’utilisation Page 9 sur 15
• Once you have saved your folder, you can save all documents relative to you sizing in pdf format by clicking on the “Send to” button.

BaSiCs, guide d’installation et d’utilisation Page 10 sur 15
Perform a quick photovoltaic sizing, save it and edit
documents
Stage 1: Select “Photovoltaic“ on the sizing menu or open an existing .bzfs or .bzf file. You can also click on the “Photovoltaïc” icon in the shortcuts menu.
Stage 2: Complete the basic criteria in Step 1 (General) and Step 2 (Environment).
• The General tab with the required information: daily energy need, back-up time and nominal load voltage.
• The Environment tab (all data are optional).
Stage 3: Click on “Size it“ to generate a battery sizing result. If there is no result, then please check that there are no errors in your input.
Stage 4 : Actions on configuration.
• Delete a configuration.( red cross in the column "Actions" of the results table)
• Add a layout to your configuration. For each result configuration you can associate a layout. In the edit/modify column, click on “Layout“, complete the fields and click on “Keep stand“.
• View Packaging.information (column « Edit/modify »)
• Edit documents (Full version only). In the « view details” column, click on a link to open a pdf file with battery or layout proposal.
Stage 5 (Full version only): save your system in your computer. It will be saved in a file with the extension .bzfs.
• Select « Save » on the “Folder” menu or click on the “Save” icon in the shortcuts menu
Remarks:
• A folder can be composed by multiple sizing: multiple systems with multiple configurations.
• You can save your sizing result in PDF files: click on « View details » in the results table.
• Once you have saved your folder, you can save all documents relative to you sizing in pdf format by clicking on the “Send to” button.

BaSiCs, guide d’installation et d’utilisation Page 11 sur 15
Perform a quick layout sizing, save it and edit documents
Stage 1: Configuration. 2 options:
• Option 1: you have already sized a battery, so you don’t have to defined the cell configuration, just go on Stage 2.
• Option 2: click on the “Layout“ icon on the shortcuts menu to create a sizing or select an existing .bzfs file. Enter the range, the cell type and the number of cells.
click Ok.
Stage 2: Decide if the battery is on floor mounted (no stand), need a normal stand, or a seismic stand.
• For “no stand“, you have to define the number of rows.
• For “normal or seismic stands“, you have to choose a model in a list of stand models proposed according to the chosen cell type.
Stage 3 (optional): define the available space. Click on “Size it”.
Stage 4: actions on layout sizing results.
• View details – Stand graphics – gives an outline drawing of the chosen stand.
• View details – Battery layout - gives the connection configuration and arrangement of the battery.
• Actions – Delete allows the sizing result to be deleted.
• Actions – Modify allows modifications to be made to the result if needed.
Stage 5 (Full version only): save your system in your computer. It will be saved in a file with the extension .bzfs.
• Select « Save » on the “Folder” menu or click on the “Save” icon in the shortcuts menu
Remarks:
• A folder can be composed by multiple sizing: multiple systems with multiple configurations.
• You can save your sizing result in PDF files: click on « View details » in the results table.
• Once you have saved your folder, you can save all documents relative to you sizing in pdf format by clicking on the “Send to” button.
BaSiCs, guide d’installation et d’utilisation Page 12 sur 15
Display a cell data sheet (Full version only)
Stage 1: Click on “Cell data sheet” on the top menu or in the shortcuts menu
Stage 2: Choose the range and the cell type.
Stage 3: Click on “Search” to display the datasheet of the chosen product. The cell data sheet can be printed or saved as a pdf document.

BaSiCs, guide d’installation et d’utilisation Page 13 sur 15
Application updates
You are connected to Internet
When a data update is available, a Microsoft Windows notification will appear in the bottom bar of your computer. Update will be done automatically after the next launch of the application.
When application update is available, a Microsoft Windows will appear in the bottom of your computer. The message will ask you to download the new installation kit, to close the application and will automatically update BaSiCs. Please, follow the instruction.
You don’t have an Internet connection
Updates will be sent to you by e-mail in a new installation kit.

BaSiCs, guide d’installation et d’utilisation Page 14 sur 15
Bug reporting
If you find a bug please, send us the information below at the e-mail address: [email protected] . We will contact you as soon as possible to find a solution or we will send you a patch to correct the problem. The files we need to identify and correct the problem:
• Screen shot of the error message
• Screen shot of the « About” windows to know the version of the application
• The files Refdata-alcad.sdf et Basics.lics. You will find them on the folder: o For Windows 7 et 8: C:\ProgramData\Basics o For Windows XP : C:\Documents and Settings\All Users\Application
Data\basics
• The files Basics.prfs, Basics.mmds, Trace-alcad_yymmjj.log, You will find them on the folder:
o For Windows 7 and Windows 8: C:\users\[nomutilisateur]\appdata\roaming\basics
o For Windows XP, dans le répertoire : C:\Documents and Settings\[username]\Application Data\basics
Thanks for your understanding.
BaSiCs, guide d’installation et d’utilisation Page 15 sur 15
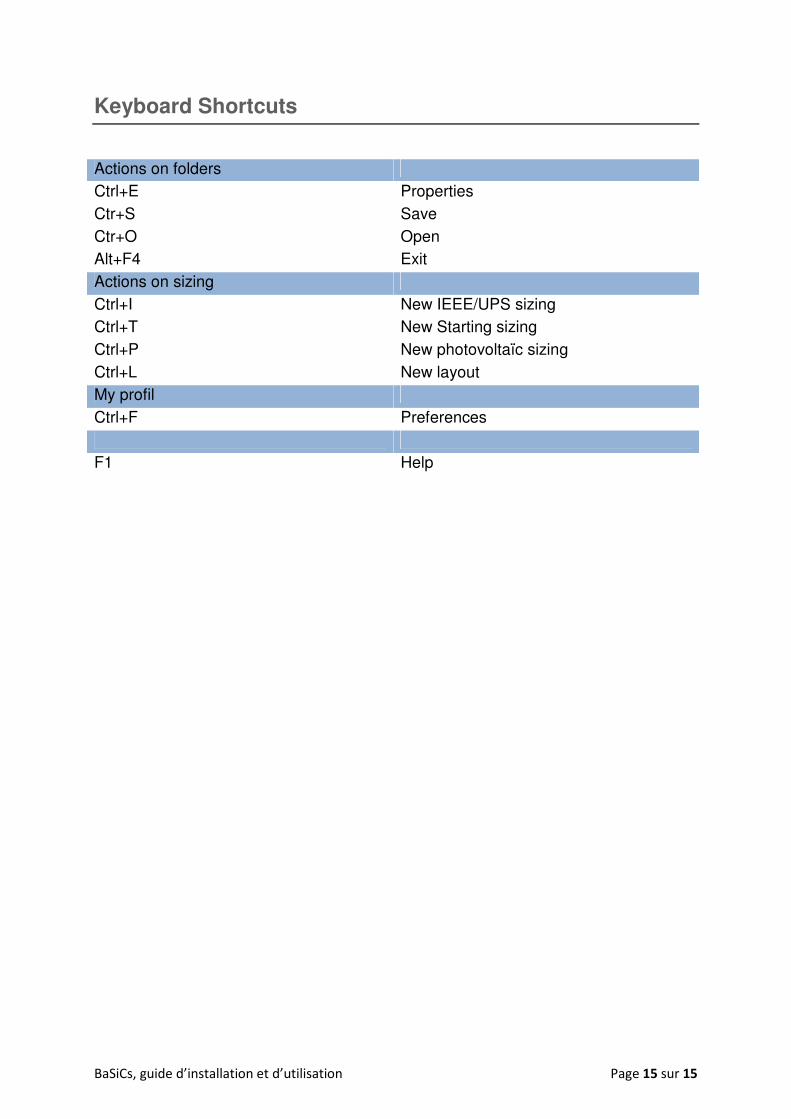
Keyboard Shortcuts
Actions on folders
Ctrl+E Properties
Ctr+S Save
Ctr+O Open
Alt+F4 Exit
Actions on sizing
Ctrl+I New IEEE/UPS sizing
Ctrl+T New Starting sizing
Ctrl+P New photovoltaïc sizing
Ctrl+L New layout
My profil
Ctrl+F Preferences
F1 Help