Installation • Finishing • Maintenance...manufacture of Southern Pine flooring. When selecting...
20
Southern Pine Flooring Installation • Finishing • Maintenance SouthernPine.com
Transcript of Installation • Finishing • Maintenance...manufacture of Southern Pine flooring. When selecting...

Southern Pine FlooringInstallation • Finishing • Maintenance
SouthernPine.com

Copyright © 2012. Southern Forest Products Association. All rights reserved.
The content of this publication has been compiled by the SouthernForest Products Association (SFPA) as a service to buyers, users, andspecifiers of wood building materials. SFPA is a nonprofit trade promo-tional group supported by Southern Pine lumber manufacturers. SFPAneither grades, tests, manufactures, nor treats lumber products.Information pertaining to Southern Pine products, grades, sizes, andmoisture content requirements is based on the Standard Grading Rulesfor Southern Pine Lumber, published by the Southern Pine InspectionBureau (SPIB). Accordingly, SFPA does not warrant the information andassumes no liability for damage caused or contributed to by the use ofsuch information.
The conditions under which lumber is used in construction mayvary widely, as does the quality of workmanship. Neither the SouthernForest Products Association (SFPA), nor its members, have knowledge ofthe quality of materials, workmanship or construction methods used onany construction project and, accordingly, do not warrant the technicaldata, design or performance of the lumber in completed structures.
SFPA is a nonprofit trade association that has representedmanufacturers of Southern Pine lumber since 1915.
SouthernPine.com
6660 RIVERSIDE DRIVE, SUITE 212 METAIRIE, LA 70003504/443-4464 • FAX 504/[email protected]

Three primary surfaces enclose every room: walls, aceiling and a floor. Of the three, it’s the floor that is sub-jected to persistent wear: friction from footsteps and themovement of furni-ture, as well as theweight and use ofappliances andother equipment.Choosing a flooringmaterial, therefore,demands properknowledge of thematerial and its per-formance character-istics. And a longservice life dependson a completeunderstanding ofinstallation, finish-ing, and mainte-nance requirements,too. Any investmentin wood flooringcan be justifiedwhen the material selected provides long-term resistanceto wear, general utility, and a decorative appearance.
Properly installed and cared for, high-quality SouthernPine flooring products meet the challenges of the mostdemanding applications.
Southern Pine Floors:Attractive, Durable, Versatile
Since Colonial Times, Southern Pine floors haveproven to be extremely durable, serviceable, and attrac-tive options to homes and all kinds of other structures
including schools,churches, sportsvenues and com-mercial buildings.
Dramaticimprovements inthe seasoning ofSouthern Pineflooring material, aswell as refinedmanufacturing andmachining process-es, have been com-bined to assure asmooth, stable floorsurface. With itsdistinctive grainpattern, the goldenbeauty of aSouthern Pine flooris a feature well
known to designers, builders, and homeowners.This publication is a compilation of information need-
ed to specify, select, install and maintain Southern Pineflooring products, for both interior and protected exteriorapplications.
Product DescriptionGrades. . . . . . . . . . . . . . . . . . . . . 2 Sizes and Patterns . . . . . . . . . . . . . . . . 3
Product ApplicationWood and Water Relationships . . . . . . . . . . . 4Proper Storage and Handling. . . . . . . . . . . . 4Jobsite Acclimation . . . . . . . . . . . . . . . . 5
Subfloor InstallationOver Concrete . . . . . . . . . . . . . . . . . . 6Over Wood Floor Joists . . . . . . . . . . . . . . . 8
Flooring InstallationStrip Flooring . . . . . . . . . . . . . . . . . . 9Plank Flooring. . . . . . . . . . . . . . . . . 10
Finishing and Care . . . . . . . . . . . . . . . 11
Maintenance . . . . . . . . . . . . . . . . . . 13
Troubleshooting Guide . . . . . . . . . . . . . 14
Porch Flooring . . . . . . . . . . . . . . . . . 15
Additional Information . . . . . . . . . . . . 17
Contents
1SOUTHERN PINE FLOORING2 0 1 2 E d i t i o n
Southern Forest Products Associat ionSouthernPine.com
Copyright © 2012. Southern Forest Products Association. All rights reserved.

GradesFlooring grades are based upon appearance criteria,
limiting defects such as tight knots, splits, pitch, shake,stain, or wane. The Southern Pine Inspection Bureau(SPIB) has established a variety of lumber grades for themanufacture of Southern Pine flooring.
When selecting Southern Pine flooring, individualtastes or perhaps a design requirement will govern whichgrade best suits a given application. Knot sizes, and over-all content of knots may or may not be desirable to aspecifier or homeowner in a given application.
Refer to Table 1 below for a brief description ofSouthern Pine flooring grades. For more detailed informa-tion regarding specific lumber characteristics — size, con-dition and limitations of knots, splits and checks permit-ted — refer to Section 200 of SPIB’s Standard GradingRules for Southern Pine Lumber.
Product Description
Table 1: Southern Pine Flooring Grade Descriptions
GRADE
*B&B
C
C&BTR
D
No.1
No.2
CHARACTERISTICS
Highest recognized grade of flooring. Generally clear, although a limited number of pin knots are permitted. Finest quality for natural finishes or stains.
Excellent for painted or natural finishes where requirements are less exacting. Reasonably clear, but permits limited number ofsurface checks and small tight knots.
Combination of B&B and C grades. Satisfies requirements for high-quality finishes.
This grade requires a face as good as D Finish grade except scant width of face not permitted and only medium warp allowed.Economical, serviceable grade for natural or painted finishes.
No. 1 Flooring is not provided under SPIB Grading Rules as a separate grade but, if specified, will be designated and graded asD flooring.
This grade requires a face as good as No.2 Boards. Economical; provides a rustic appearance.
* Most mills do not manufacture all products and all grade separations.SOURCE: Standard Grading Rules for Southern Pine Lumber, published by the Southern Pine Inspection Bureau; www.spib.org.
At the mill, flooring is sorted accordingto grade and length.
2 SOUTHERN PINE FLOORING2 0 1 2 E d i t i o n
Southern Forest Products Associat ionSouthernPine.com
Copyright © 2012. Southern Forest Products Association. All rights reserved.

Sizes and Patterns The most common thicknesses of Southern Pine flooring are 1˝ and 1-1/4˝
nominal (3/4˝ and 1˝ actual ). The general information and recommendationscontained in this publication are applicable for these thicknesses.Standard widths range from 2˝ nominal (1-1/8˝ actual) to 6˝ nomi-nal (5-1/8˝ actual). Wider widths are also manufactured. Typically,strip flooring is a term given to material that is 3-1/2˝ or narrowerand plank flooring is classified as material that is 4˝ and wider.
Southern Pine flooring is widely available in lengths rangingfrom 8 to 16 feet. Longer or custom lengths maybe available on aspecial order basis. Increasingly, finger-jointing is being used toproduce longer lengths, making more efficient use of high-gradestock. If not otherwise specified, Southern Pine flooring will havetongue-and-groove (T&G) edges with plain ends.
A specification option is end-matched flooring. End-matchedfloor boards have a tongue or a groove on each end. Refer toFigure 1. This tongue-and-groove pattern on the strip flooring sidesand ends provides load-bearing capabilities for screed installationsystems where end joints occur between the screeds (the subfloor-ing nailing base; refer to page 7). End-matching also reducesthe amount of strip end cuts in comparison to plain-endflooring, and somewhat reduces waste and labor.
As a log is sawn, the position of the log relative to thesaw cut determines the wood grain’s orientation relative tothe flooring wear surface. Refer to Figure 2.
Flat or mixed grain flooring is commonly referred to asflat-sawn flooring. It has a growth ring configuration parallelto the wearing surface but, in general, it is graded and sortedirrespective of the wood grain orientation and consequentlyis considered mixed grain flooring.
Another grain configuration that can be specified is edgeor vertical grain flooring, where the growth rings are per-pendicular to the flooring wear surface. This product isequivalent to quarter-sawn material in hardwood flooring.Edge-grain flooring has a harder wearing surface than flat-grain material, and is desirable for high-traffic areas such askitchens, hallways, or family rooms. Commercial or institu-tional floors for offices, schools, retail or industrial environ-ments resist wear and indentations better by using SouthernPine edge-grain material.
Typically, Southern Pine flooring is manufactured with astress-relief pattern on the underside of each piece to mini-mize the effects of moisture-related dimensional changes.Relief types include a shallow, wide groove known as a hol-low back, or a series of grooves commonly referred to asscratch-back. Refer to Figure 1.
Prior to final product selection, consult a knowledgeableflooring dealer who can describe flooring grades and pat-terns, as well as provide samples of Southern Pine flooring.
Figure 1: Flooring Patterns
Figure 2: Wood Grain
END-MATCHED
PLAIN-END
SCRATCH BACK
VERTICAL GRAIN (A) A
B
FLAT GRAIN (B)
HOLLOW BACK
Flat grain Vertical grain
3SOUTHERN PINE FLOORING2 0 1 2 E d i t i o n
Southern Forest Products Associat ionSouthernPine.com
Copyright © 2012. Southern Forest Products Association. All rights reserved.

Wood and Water RelationshipsWood is hygroscopic – it will absorb moisture and expand when exposed to
high humidity. Conversely, wood also expels moisture and shrinks in low humid-ity environments, changing and balancing with its general surroundings. Onaverage, wood will change 1% in dimension for every 4% change in its ambientmoisture content. A door that periodically “sticks” is a good example of thisexpansion and contraction behavior.
Before it can be used for interior purposes, a majority of the water in woodmust be removed. To achieve proper moisture content levels, Southern Pinelumber is kiln dried prior to its manufacture into flooring. A kiln is a closed sys-tem having temperature, humidity, and air flow controls that lower the wood’smoisture content to desirable levels. Adjusting the heat, steam and air flow speedduring the kiln-drying process conditions the wood for its intended use, whilereducing defects such as splitting, warping, checking, and casehardening.
Moisture content is a measure of the weight of the water in wood, expressedas a percentage of the oven-dry wood. According to SPIB Grading Rules,Southern Pine flooring must have a maximum moisture content of 15% for Dand Better grades in 1˝ and 1-1/4˝ nominal thicknesses (3/4˝ and 1˝ actualthicknesses). However, if specified, represented, or grade marked as “kiln-dried”flooring, the maximum moisture content shall be 12% for 90% of the pieces, and15% moisture content for the remainder. Refer to SFPA’s Southern Pine Use Guidefor more information.
Proper Storage and HandlingMoisture will damage flooring. Careful adherence to some reasonable,
time-tested practices during the distribution and delivery process from sawmill todistributor, to dealer, to final installation site will prevent moisture problems andvisual damage to the flooring. Proper storage andhandling practices are paramount for assuring aSouthern Pine floor’s readiness and suitability forinstallation.
An appropriate storage site at the distributor ordealer would be a dry, enclosed building having alevel floor, with flooring stored in a clean location.A wrapping of paper or plastic will further protectthe flooring from moisture and dirt. Using a firstin/first out inventory method will minimize flooringstorage time and reduce exposure to excess dustand humidity. Flooring should always be deliveredto the jobsite under dry weather conditions.
Product Application
Properly drying and conditioningSouthern Pine in a kiln helps reduce
warping, splits and checks.
Once delivered from the mill to the dealer,Southern Pine flooring should be stored in
a clean, dry, enclosed building.
4 SOUTHERN PINE FLOORING2 0 1 2 E d i t i o n
Southern Forest Products Associat ionSouthernPine.com
Copyright © 2012. Southern Forest Products Association. All rights reserved.

Jobsite AcclimationAssuming the flooring has been properly stored and transported, it is equally
important that the builder conduct a regimented construction timetable, complet-ing the tasks necessary to assure all of the following jobsite conditions exist priorto flooring delivery.
The building’s interior must be thoroughly dry. If the average moisture con-tent of drywall, subfloors, ceilings, and framing is below 12 to 14%, the buildingcomponents are considered to be dry.
Areas to receive wood flooring must have suitable ventilation.
If jobsite conditions 1, 2 and 3 have been met, sufficient preparation iscomplete and the delivery of flooring may take place.
If any of the construction steps are incomplete prior to delivery, the floorhas a greater likelihood for installation-related problems due to excessive mois-ture conditions.
Acclimating a Southern Pine floor allows time for the wood to adjust itselfdimensionally, enabling the floor to reach a balancing point — a state in whichit neither absorbs nor evaporates water vapor. This state is commonly referred toas its equilibrium moisture content, or EMC. The acclimation time period is gen-erally between five to fourteen days for Southern Pine flooring, depending uponhumidity and/or jobsite conditions among rooms.
It is recommended that the material be sorted and stacked in each roomreceiving flooring. Acclimating the material in this manner takes into considera-tion varying ambient conditions that may exist between rooms.
Stack the flooring in unopened bundles, spacing it evenly and neatly.Use clean, dry spacer sticks between each bundle level, allowing spacefor air circulation between the bundles. Do not open the package band-ing, but remove and dispose of any plastic or paper wrapping.
A wood moisture meter is a tool every installer of wood floors shouldown. Guessing is virtually eliminated from flooring acclimation whenusing a moisture meter.
After five days of acclimation, moisture meter readings should betaken and recorded of the subfloor, the flooring and of the walls in eachroom. Twenty-four hours later, take another reading. If the readingsshow any consistency, the flooring has reached its equilibrium moisture contentand is ready for installation. If the moisture content readings fluctuate either upor down, do not install the floor, as more acclimation time will be required. Waitat least another day and take additional sets of readings. Until the Southern Pineflooring, the subfloor nailing base, and the walls are neither gaining nor losingmoisture, acclimation is incomplete.
When the equilibrium moisture content is attained, the Southern Pine flooringhas been properly acclimated. It is now ready for installation.
Required Jobsite Conditions:
The building is fully enclosed; all windows and exterior doors are installed.
The proper subfloor nailing base is installed.
The heating/cooling system is operational.
1
2
3
Proper jobsite acclimation is essential for the installationof a high-quality, serviceable Southern Pine floor!
With a fully enclosed building, windows,doors and nailing base installed, and the
HVAC system operational, flooring deliverycan occur. Material is neatly stacked in
each room to receive flooring.
Consistent readings from a moisture meterwill indicate that the flooring has reached
its equilibrium moisture content and isready for installation.
5SOUTHERN PINE FLOORING2 0 1 2 E d i t i o n
Southern Forest Products Associat ionSouthernPine.com
Copyright © 2012. Southern Forest Products Association. All rights reserved.

Subfloors Over ConcreteConcrete is a porous material that allows the migration of water vapor from
the ground into the structure. Concrete hardens over time, but it can still containwater up to 60 days after installation, and sometimes longer.
Proper construction practices require that a vapor barrier be installed prior tothe concrete installation to reduce the moisture absorption process. SouthernPine flooring can be installed on concrete subfloors, either on or above grade.
Once the concrete is determined to be dry, a moisture barrier and nailingbase can be installed. Refer to Figures 5 and 6.
To create a nailing base over concrete, two methods can be used: either alayer of dimension lumber strips (called “screeds”) or a layer of plywood. Whenusing the screed method, it is recommended that 2x4 material be used, cut intolengths varying from 18˝ to 48˝.
Screeds must be dry. If pressure-treated screeds are used, they must be kilndried after treatment (KDAT).
Clean the concrete, removing any oils or other foreign material. For a screednailing base, apply a cold cutback asphalt adhesive mastic to the surface at aspread rate of 35 square feet per gallon and embed screeds on the wide face,12˝ on center, perpendicular to the direction the flooring will lay. End wallsshould have a continuous screed run. A 3/4˝ gap should be left between wallsand screed ends. Apply the moisture barrier, overlapping sides 4˝ and touchingend walls.
For a plywood nailing base over concrete, spread cold cutback mastic at a 50sq.ft. per gallon rate. Allow two hours setting time; lay the moisture barrier witha 4˝ side overlap and touching the end walls. When using a 15 lb. felt moisturebarrier, an additional layer of a cold cutback asphalt adhesive mastic and felt isapplied. Stagger felt seams to prevent direct alignment with the first layer. Layingplywood diagonally to the direction of the flooring will offset plywood jointswith floor nailing.
Start with a 4�x4� section every other course, staggering plywood joints. Allowa gap of 1/4˝ to 1/2˝ between panels, and a 3/4˝ gap at walls. Use at least 9nails per panel, nailing outward from the center, flattening the panels. Refer toFigures 5 and 6.
A suitable moisture barrier and subfloor nailing base (over concrete slab orwood joists) must be installed to provide adequate protection and support forthe flooring.
Remember: the nailing base should be in place prior to flooring delivery andthe acclimation period.
Recommended Moisture BarriersTwo types of moisture barrier material are recommended beneath Southern
Pine flooring:Polyethylene: A 6-mil thickness is preferred; 4-mil is acceptable. The 6-mil
material has a perm rating of 0.08. A perm rating below 1.0 for polyethylene isrequired to retard moisture.
Roofing felt paper: Two layers of 15 lb. paper, or one layer of 30 lb. paper.
Subfloor Installation
Figure 3: Moisture Barrier
Figure 4: Screed Method
Figure 5: Subfloor Detail
MASTIC
MOISTUREBARRIER
2x4SCREEDS
12” O.C.
MASTIC
OVERLAPPINGLAYERS OF15 LB. ROOF-ING FELT
BASE MOULDING
3/4” PLYWD. NAILING BASE
MOISTURE BARRIER
VAPOR BARRIERBELOW SLAB
�1⁄2”
�3⁄4”
6 SOUTHERN PINE FLOORING2 0 1 2 E d i t i o n
Southern Forest Products Associat ionSouthernPine.com
Copyright © 2012. Southern Forest Products Association. All rights reserved.

Concrete Condition Check
If a moisture meter is unavailable to check the condition of the concrete,
a sheet of polyethylene cut to 24”x24” will reveal the slab’s moisture
condition. Secure the polyethylene to the concrete with duct tape (A), forming an air-sealingbond. Wait 24 hours. If condensation develops between the concrete and the polyethylene
sheet (B), do not install flooring; the concrete is too wet for wood flooring and must be permit-ted more time to cure. If the structure is several months old and the concrete has cured, yet
the poly test still reveals condensation formation, inspect the site for moisture problems caused
by improper drainage. Slower percolating soils do not drain as efficiently, causing hydrostatic
water pressure. Correct a drainage problem by upgrading or adding drain tiles at the founda-
tion footings.
A similar moisture test for concrete is the “rubber mat” test. Lay a rubber mat flat on
the concrete floor. Place a concrete block, tool box or other heavy object on top of the mat,
(C) trapping any air from escaping. After 24 hours, lift the mat. If the concrete is darkerbeneath the mat on a lighter background concrete, then moisture has formed, indicating the
concrete is too wet for flooring. Dark concrete surfaces tend to camouflage wetness; therefore,
use the rubber mat test on light-colored concrete surfaces for best results.
Until the concrete is noticeably dry on the underside of the polyethylene or the rubber
mat, do not install the subfloor. Should wet concrete still be evident, fans and dehumidifiers
will improve air circulation and lower the humidity.
When the concrete is determined to be dry, a moisture barrier and nailing base can be
installed.
A
B
C
Figure 6: Plywood Nailing Base Over Concrete Slab
MOISTUREBARRIERS
CONCRETESLAB
3/4” PLYWOODNAILINGBASE
1/4” - 1/2”GAP BETWEEN
PANELS
VAPOR BARRIER BELOW SLAB
3⁄4” GAPAT WALLS
45o
7SOUTHERN PINE FLOORING2 0 1 2 E d i t i o n
Southern Forest Products Associat ionSouthernPine.com
Copyright © 2012. Southern Forest Products Association. All rights reserved.

Subfloors Over Wood Joists For installation of flooring over wood floor joists, a subfloor nailing base
consisting of a minimum 5/8˝ plywood or 3/4˝ oriented-strand-board (OSB)is required. Lay the subfloor panels perpendicularto the joists.
Use of a caulk-typeconstruction adhesivebetween plywood sub-floor and joists providesadditional anchoringsupport. Starting with asingle 4�x4� panel inone corner, alternatingcourses of 4�x8� panelsare to be staggered, offsetting the end seams. An 1/8˝ space between panelsallows for panel expansion and prevents panel squeaks. Position all seamsbetween panels directly over the joists. A 6d screw or ring-shank nail is recom-mended every 6˝ for fastening panels to floor joists.
Lay the moisture barrier atop the plywood, overlapping edges 4˝ and touchingall walls. If 15 lb. felt is chosen, stagger the edges of the second layer in relationto the first.
Check local building codes to verify subfloor requirements for your area.
Rows of plywood panels are staggeredover floor joists (typically 16˝ o.c.).Begin in one corner with a 4�x4�panel. Allow 1/8˝ space between
panels; seams are positioneddirectly over joists.
Figure 7: Plywood Subfloor Over Wood Joists
4x4 4x8
16”O.C.TYP.
1/8” GAPBETWEENPANELS
�
8 SOUTHERN PINE FLOORING2 0 1 2 E d i t i o n
Southern Forest Products Associat ionSouthernPine.com
Copyright © 2012. Southern Forest Products Association. All rights reserved.

Strip Flooring
Inspect plywood nailing bases for evenness and sand anypeaking edges, leveling the seams. Flooring should lay per-pendicular to the floor joists. It should also lay with the stripsspanning the longer room dimension end-to-end. It is advan-tageous if the overall strip layout runs lengthwise the samedirection as traffic lanes rather than at right angles across thestrip widths. (See Figure 9)
Begin with the “starter strip” of flooring alongside an exte-rior wall, preferably the longest room dimension. Refer toFigure 8. If flooring will be installed in several rooms, locatethe starter strip in a hallway that includes the longest end-to-end span. The starter strip will be the beginning strip inrooms either to the left or right of it.
Strike a chalk line one strip wide plus 1/2˝ from the start-ing wall, making certain chalk lines are square. This 1/2˝ gap is a buffer zonefor expansion. Mouldings will conceal the 1/2˝ gap between finished flooring andend walls. Allow a 1/8˝ space around door jambs and wall partitions. Refer toFigure 10. Face-nail starter strip tongue side out, with 6d or 8d finishing nails, 1˝from tongue side. Countersink nail heads and align groove side with chalk line.Refer to Figure 8.
Each course will be nailed with your back to the starter wall, working fromleft to right. Recommended nail spacing is 8˝ to 10˝ and double-nailed 1˝ to 3˝from ends. Use strips 8˝ or longer on the ending wall and begin the next coursewith the remaining piece. Loosely lay the next 7 or 8 rows. Do not use stripsshorter than 6˝. Arrange lengths randomly, avoiding clusters of short strips. Usinga tapping block, insert each strip groove to tongue. Blind-nail the tongue into thesubfloor. (See Figure 11) Avoid nailing into subfloor seams, as nails will notanchor properly. Nail and countersink 2 to 3 rows, clearing the starter wall for
Flooring Installation
SET UP LINE
START HERE
DININGBEDROOM C KITCHEN (TILE)
BATH (TILE)
LIVING ROOMBEDROOM ABEDROOM B
LAY IN THIS DIRECTION
LOCATION OF
SPLINES
Lengths of flooring are arranged randomly.Using a power nailer, the tongue is blind-
nailed to the subfloor nailing base.
Figure 8: Starter Strip
Figure 9: Flooring Layout Plan
1/2”GAP
DOUBLENAILEDAT ENDS
MOISTUREBARRIER
8” - 10”
STARTE
R WALL
CHALK LINE
TONGUE
9SOUTHERN PINE FLOORING2 0 1 2 E d i t i o n
Southern Forest Products Associat ionSouthernPine.com
Copyright © 2012. Southern Forest Products Association. All rights reserved.

the use of a power nailer. Countersinkall face nails and nail each strip end.Nail strip sides using an 8˝ spacing.
If necessary, rip the last row leav-ing a 1/2˝ space between the wall andflooring. Face-nail the last runs of thefloor when unable to blind-nail byhand.
Proper nailing should incorporateusing enough nails, proper spacing,and the correct nail type. It will alsoreduce the likelihood of floor squeaks.
Plank Flooring
The installation of plank flooring(4˝ and wider) is similar to that ofstrip floor installations, with a fewnoteworthy exceptions.
Generally, recommended fastenerspacing is 8˝; however, consult theflooring manufacturer’s instructions forspecific fastener information.
The wider width of plank flooringincreases the amount of expansionand shrinkage related to moistureabsorption and evaporation, magnify-ing board separations and cupping.Applying a sealer to the plankingunderside prior to installation mayreduce the impact of potential mois-ture change problems. Experiencedflooring installers recommend face-nailing plank flooring that is 8˝ and wider. Face nailingcan further reduce cupping.
In addition, plank floors are not recommended forinstallation over radiant-heated subfloors.
Radiant-Heated Floors
Installation of the subfloor nailing base over radiant-heated systems is slightly different. Plywood panels cut in4�x 4� sections and saw-kerfed on the underside with a12˝ grid 3/8˝ inches deep will adhere to a radiant-heatedfloor using a 35 sq.ft. per gallon cutback mastic spreadrate. Gluing the plywood in place avoids damage nailingmay cause.
Starter strip is face-nailed 1˝ from tongue side, leaving 1/2˝ gap atwall to permit seasonal expansion of the floor. After 2 or 3 rows, a
power nailer can begin blind-nailing through the tongue.
Proper flooring fasteners areessential: Power gun nails
Cut nails 8d (2-1/2”)screw nails
1/2˝ to 3-1/2˝
4˝ and wider
7d or 8d cut nail
or screw nail
7d or 8d cut nail
or screw nail
8˝ to 10˝ and double-nailed
1˝ to 3˝ from ends
every 8˝
NOTE: DO NOT glue Southern Pine flooring.
Lay the main area of flooring even with room projections � Extend the next course across the room � Align the extend-ed strip to a chalk line and face-nail it � Fashion a tongue for the grooved edge by inserting a spline � Flooring maybe installed in either direction from the spline
AB C
A B C
Figure 10: Laying Flooring Around Walls and Partitions
Figure 11: Nailing Detail
RECOMMENDED NAILING FORT & G SOUTHERN PINE FLOORING
1˝ and 1-1/4˝ thicknesses
FLOORINGWIDTH
NAILTYPE
TONGUE ORBLIND NAIL
SPACING
Table 2: Nailing Schedule
50o�1/2” �
1”
�3/4” NAILING BASE
FACENAILW
ALL
BLINDNAIL
10 SOUTHERN PINE FLOORING2 0 1 2 E d i t i o n
Southern Forest Products Associat ionSouthernPine.com
Copyright © 2012. Southern Forest Products Association. All rights reserved.

Finishing and Care
Proper finishing begins with thorough removal of all construction debris fromthe newly installed floor. Nail all loose flooring and replace any damagedboards. Countersink and fill any exposed nail heads, then inspect thefloor for any other surface imperfections or obstructions.
Sanding the FloorAlways sand lengthwise in the direction of the strips,
never across. With two-thirds the room length in front ofyou, begin walking a drum sander forward while slowlylowering the drum to the floor surface. Before stopping theforward pass, slowly raise the drum and stop. Walk thedrum sander in the opposite direction, slowly lowering thedrum, walking backwards along the same path. Repeat thestopping and drum lifting or starting and drum loweringprocedures on each directional change. Begin a new passforward every 3˝ to 4˝ (about the width of one strip) intothe unsanded area. After completing the entire room width,walk forward in the opposite direction to sand the remain-ing area. In other words, you will be walking forward fac-ing the opposite wall. Overlap the passes two to three feet.Refer to Figure 12.
Use an edge sander in closets and in areas the drumsander will not reach. Generally, recommended sandingresults can be achieved with three sanding cuts (progres-sively using grits of coarse, medium and fine). Finally, theuse of a screen disk (same grit as the fine cut) on a buffingmachine blends the telltale marks of edge and drumsanders.
Stains & SealersFloor finishes provide both a protective and decorative surface. A stain is one
option, adding warmth and charm. Stains are available in a wide range of colors.If the new floor is not stained, it is recommended that a protective sealer be
applied. The two types of sealers are penetrating sealers and surface sealers. Penetrating sealers are floor waxes that prevent the penetration of liquids
and dirt into the flooring. Chips and scratches are maintainable with smallamounts of wax. On new floors, a liquid buffing wax applied to a wax finishforms an additional barrier to dirt and stains. Read the buffing wax label careful-ly, making certain it is suitable for wood floors. Do not use any product contain-ing water.
Refinishing existing flooring generally does not require a preliminary sandingbut, rather, a thorough cleaning and another coat of wax, without leaving anyevidence of wax overlap in heavy traffic areas. Penetrating sealers have a lowerluster (or a more moderate shine). As the patina sheen wears away, a reapplica-tion of wax will restore it.
Surface sealers, on the other hand, do not penetrate the wood-wearing sur-face. Instead, they create a wood-bonding surface layer. Different types includingpolyurethanes, moisture-cured urethanes, and acid-cured urethanes.
Polyurethanes are the more popular surface sealers. They provide both dura-
Figure 12: Sanding the Finished Floor
Ideally, the entire sanding operation shouldremove no more than 1/32˝ of wood.
ABOVE: All sanding is done in the same direction as flooring strips. Starting at theright-hand wall of the room’s longest dimension, sand two-thirds the length of the room.Continue passes, moving forward, then backward. Reposition the machine to your left afew inches and begin another pass.
BELOW: Once two-thirds of the room is sanded, turn around and sand the remaining third.
11SOUTHERN PINE FLOORING2 0 1 2 E d i t i o n
Southern Forest Products Associat ionSouthernPine.com
Copyright © 2012. Southern Forest Products Association. All rights reserved.

bility and moisture resistance. They are available in oil and water-basedformulations, in addition to high-gloss, semi-gloss, matte, and satin finishes.
Polyurethane sealers offer excellent resistance to water, scuff marks andscratches, and provide a durable finish for high-traffic areas such as hall-ways, kitchens, bathrooms and family rooms. However, polyurethane finish-es have a tendency to discolor as they age, slightly tinting the floor color.When regular maintenance no longer provides satisfactory floor surfaceappearance, sanding is recommended before applying a new coat.
Moisture-cure urethanes are the hardest of the surface sealers. Theseurethane sealers are extremely prone to errors. Do not attempt to applyurethane sealers without the supervision of an experienced floor finisher.
Acid-cured urethanes, also known as Swedish finishes, provide a clearer andsomewhat harder surface finish than polyurethanes. Again, due to the tech-nical intricacies of application, consult a floor finishing professional.
The finish selected will affect how often the floor needs cleaning. Alighter floor will hide dust better; however, dirt, spills, and grit may remainmore visible leading to more frequent sweeping. A lighter floor coloringenhances room size; a room appears larger and brighter.
On the other hand, darker colors of finishes tend to conceal scratches,cracks, grit, and sediment, and are more forgiving than lighter colors. Darkfloor colors help to camouflage the visual damages of heel marks, gouges,and furniture scratches. Since dark colors absorb light rather than reflect it,a dark floor color may make a room appear smaller than lighter colors.
Finish ApplicationWhen applying penetrating stains and finishes, begin by applying
enough of the finish lengthwise to cover about one foot from the side wallto the mouldings. Using cloth rags, a brush, or a lambswool pad, wipeevenly to the wall. Apply the stain or wax, then remove and wipe away theexcess. To begin a new run, overlap about 3˝ (one strip wide) taking careto remove any excess and preventing lap marks. Water, perspiration, handprints, and knee imprints are impenetrable by stains and waxes. Preventthese common causes of discoloration and spotting by avoiding allunnecessary contact with the floor.
Allow overnight drying, returning the next day for a power buff with afiber buffing or No.1 steel wool. Clean the floor to remove all dust. Apply asecond wax layer, or if a stain was applied on the first pass, apply the firstlayer of wax.
With polyurethane finishes, apply along the length of the room, main-taining a wet edge and feathering brush-stroke overlaps. If edges tack dry,do not overlap brush strokes. Any minor mistakes can be corrected with abuffer.
Allow polyurethane layer to dry (usually overnight) then buff with 120grit screen or No.2 steel wool pad. Three coats provide optimum floorprotection and durability. Remember to buff between each coat.
During finishing, avoid unnecessary contact with the floorby using a fabric runner. Stains and waxes cannot penetrate perspiration, hand and knee imprints.
Darker color finishes tend to conceal minor scratchesand gouges better than lighter colors, and are
well-suited for commercial applications.
A finish is applied in the same direction as the flooring,using a lambswool pad. New runs overlap about 3˝.
When using a brush, maintain a wet edge, featheringoverlaps. Buffing will correct minor errors.
12 SOUTHERN PINE FLOORING2 0 1 2 E d i t i o n
Southern Forest Products Associat ionSouthernPine.com
Copyright © 2012. Southern Forest Products Association. All rights reserved.

Maintenance
With proper care of the finish, a Southern Pine floor is easily maintained andwill keep its new look for many years.
If the builder, floor installer, or previous owner does not provide a recordindicating whether a surface sealer or a penetrating sealer was applied, a simpletest will determine what type of finish was used. In a closet or other inconspicu-ous location, use a coin or knife to scratch the floor surface. If the finish flakes,it is likely to be a surface sealer. If it does not flake, it is most likely a wax fin-ish.
Penetrating SealersSweep the floor regularly or vacuum, but do not use a beater-bar type.Wipe liquid spills promptly. Use No.2 steel wool on stains caused by water,
cigarette burns, ink, or pets. Rewax the area.Do not use water to maintain wax finishes. For stains, use vinegar, wood
floor cleaners, mineral spirits or ammonia. Use very fine steel wool to cleanthe area, then dry it. Reapply the same color and brand of stain wax, if nec-essary.
Small repairs can be made by applying a small amount of wax to theaffected area, then buffing.
Surface SealersSurface sealers require very different care and cleaning procedures
than do penetrating sealers. Wipe spills promptly with a dry cloth. Use a damp cloth on sticky spills, then
wipe dry with another clean cloth.Sweeping regularly reduces scratching. Do not use beater-bar vacuums on
wood floors.Never use ammonia, oil soap, or any other household cleaner on surface
sealers; surface damage and dulling will result. For general maintenance, use a solution of 1/4 cup vinegar to 4 cups of warm
water, dipping it with a clean cloth andwringing dry. Wipe or mop the floor. Using a second cloth, wipe the floor dry.
Do not use waxes to restore the shine on surface sealers. To restore originalluster, remove room contents, clean thoroughly, then steel wool the entire sur-face. Use only the same brand surface sealer as on the existing floor (or readcarefully the recommended finish instructions of the sealer manufacturer).
GENERAL MAINTENANCE TIPS – KEEP YOUR SOUTHERN PINE FLOORS LOOKING NEW
Use door mats at entryways. Do not usecocoa fiber or rubber-backed mats.
Do not slide refrigerators or other heavy appliances on the floor. Place aclean sheet of plywood on the floor forprotection from scratches and gouges.
Use area rugs in high-traffic lanes.
Avoid wearing high-heeled shoes.
Use floor protectors beneath furniture.
Sweeping regularly prevents scratchingfrom dirt and grit. Daily sweeping is recommended in homes with small children or large families.
Avoid using water on wood floors. Water causes wood to expand.
Direct sunlight can discolor wood. Use draperies or blinds to shield thefloor from direct sunlight.
Like any woodflooring material,Southern Pine is equallysusceptible to the telltaleindentations produced byhigh heels, and for good rea-son. Consider the loading condi-tions, in pounds per square inch(psi):
Average car: 28 to 30 psi
Adult Elephant: 50 to 100 psi
125 lb. woman wearinghigh heels: 2,000 psi.
Pets’claws Wheeled toys
Furniture legs
HIGH�HEELS!
1sq. in.
13SOUTHERN PINE FLOORING2 0 1 2 E d i t i o n
Southern Forest Products Associat ionSouthernPine.com
Copyright © 2012. Southern Forest Products Association. All rights reserved.
PROBLEM CAUSE(S) REMEDY
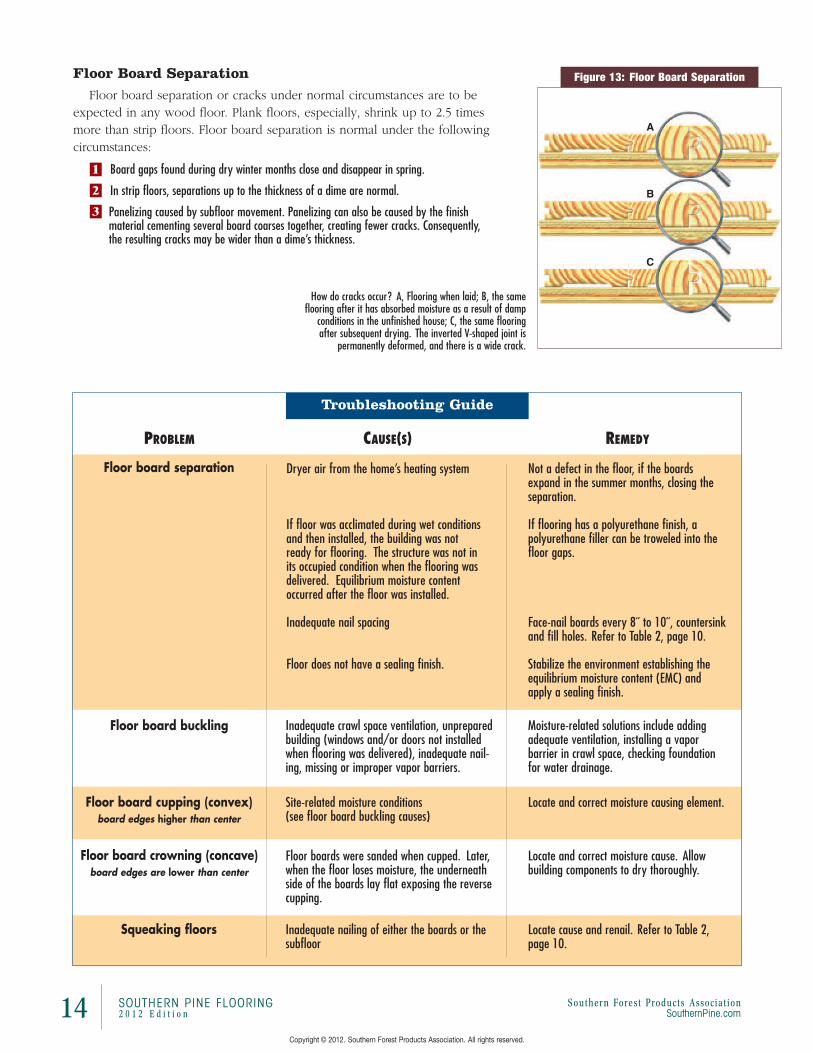
Floor Board SeparationFloor board separation or cracks under normal circumstances are to be
expected in any wood floor. Plank floors, especially, shrink up to 2.5 timesmore than strip floors. Floor board separation is normal under the followingcircumstances:
Board gaps found during dry winter months close and disappear in spring.
In strip floors, separations up to the thickness of a dime are normal.
Panelizing caused by subfloor movement. Panelizing can also be caused by the finish material cementing several board coarses together, creating fewer cracks. Consequently, the resulting cracks may be wider than a dime’s thickness.
Troubleshooting Guide
1
2
3
How do cracks occur? A, Flooring when laid; B, the sameflooring after it has absorbed moisture as a result of damp
conditions in the unfinished house; C, the same flooringafter subsequent drying. The inverted V-shaped joint is
permanently deformed, and there is a wide crack.
Figure 13: Floor Board Separation
Floor board separation Dryer air from the home’s heating system
If floor was acclimated during wet conditionsand then installed, the building was notready for flooring. The structure was not inits occupied condition when the flooring wasdelivered. Equilibrium moisture contentoccurred after the floor was installed.
Inadequate nail spacing
Floor does not have a sealing finish.
Not a defect in the floor, if the boardsexpand in the summer months, closing theseparation.
If flooring has a polyurethane finish, apolyurethane filler can be troweled into thefloor gaps.
Face-nail boards every 8˝ to 10˝, countersinkand fill holes. Refer to Table 2, page 10.
Stabilize the environment establishing theequilibrium moisture content (EMC) andapply a sealing finish.
Floor board buckling Inadequate crawl space ventilation, unpreparedbuilding (windows and/or doors not installedwhen flooring was delivered), inadequate nail-ing, missing or improper vapor barriers.
Moisture-related solutions include addingadequate ventilation, installing a vaporbarrier in crawl space, checking foundationfor water drainage.
Floor board cupping (convex) board edges higher than center
Site-related moisture conditions (see floor board buckling causes)
Locate and correct moisture causing element.
Floor board crowning (concave)board edges are lower than center
Floor boards were sanded when cupped. Later,when the floor loses moisture, the underneathside of the boards lay flat exposing the reversecupping.
Locate and correct moisture cause. Allowbuilding components to dry thoroughly.
Squeaking floors Inadequate nailing of either the boards or thesubfloor
Locate cause and renail. Refer to Table 2,page 10.
A
B
C
14 SOUTHERN PINE FLOORING2 0 1 2 E d i t i o n
Southern Forest Products Associat ionSouthernPine.com
Copyright © 2012. Southern Forest Products Association. All rights reserved.

Preservatively Treated Porch Flooring
The porch has withstood the test of time as an icon ofAmerican architecture, adding comfort, distinction andvalue. Today’s home designs incorporate the porch as anatural extension of the family’s living space.
Southern Pine flooring has enjoyed a long history inporch construction. As with indoor flooring material, theeffect of moisture in contact with wood is a top concernwhen designing andbuilding a porch.
Southern Pine, com-bined with the technol-ogy of wood preserva-tion, is a superiorporch flooring choice.With its built-in resis-tance to decay and ter-mites, pressure-treatedSouthern Pine porchflooring, properlyinstalled, will providedecades of satisfyingservice.
This section pro-vides information relat-ed to material specifi-cation, handling andstorage, installation,finishing, and general construction considerations forporch floors using preservatively treated Southern Pine.
Sizes, Grades and PatternsThe size, grade and pattern of flooring utilized in
porches will depend upon the type of protection given tothe structure. Porches without complete roof protectionare generally constructed in the same manner as outdoordecks, incorporating a surface of either 2˝x 6˝ nominalsize or 5/4x6 radius-edge pressure-treated Southern Pine.A dimension (2x) lumber grade of No.1 provides optimumappearance. Radius-edge decking is available in Premiumor Standard grades.
The recommendations outlined in this section refer toflooring for fully-covered porches. Porch flooring is similarin sizes, grades, and patterns as the interior flooringdescribed earlier in this booklet.
Typically, nominal thicknesses are 1˝ and 1-1/4˝ (3/4˝and 1˝ actual) with the tongue-and-groove pattern, avail-able in widths of 4˝ to 6˝ nominal (3-1/8˝ to 5-1/8˝ actu-
al). The grade of C&Better is most-often specified forporch flooring applications. Refer to Table 1 on page 2 forcomplete descriptions of flooring grades.
Protective Preservative TreatmentTo combat the deteriorating effects of outdoor expo-
sure, moisture, decay and termite attack, pressure treat-ment with a water-borne preservative isstrongly recommendedfor all wood compo-nents of the porch (e.g.framing, flooring, steps,railings, balusters).These preservatives areodorless and paintable,offering superior pro-tection to SouthernPine products in severeoutdoor exposure con-ditions.
Standards devel-oped by the AmericanWood ProtectionAssociation (AWPA)govern the use andspecification of woodpreservatives used in
pressure-treating processes. Building codes require thatwood in close proximity to exposed earth be pressure-treated to specific preservative retention levels, accordingto AWPA Standards. Generally, porch flooring and floorjoists are treated for above-ground contact while support-ing posts are treated for ground contact.
For complete details about products, preservative typesand retentions, consult the booklet Pressure-TreatedSouthern Pine, available from the Southern ForestProducts Association.
Moisture Content and Material Acclimation
Prior to pressure treatment, a package of Southern PineT&G porch flooring is at a moisture content of 12% forthe majority of pieces if specified, represented, and grademarked as kiln-dried (KD). Refer to important informationunder the section “Wood and Water Relationships” onpage 4. With a waterborne preservative, water is part of
15SOUTHERN PINE FLOORING2 0 1 2 E d i t i o n
Southern Forest Products Associat ionSouthernPine.com
Copyright © 2012. Southern Forest Products Association. All rights reserved.

the pressure-treating process, greatly increasing the mois-ture content of the wood, often to a moisture content of50% and higher.
For porch flooring, the specification of material that iskiln-dried-after-treatment (KDAT) is highly recommended.Redrying the treated material will return each piece to aworkable moisture content, generally to 19% or less. Theadvantages of KDAT flooring material include enhanceddimensional stability, plus reduced tendencies to warp,twist, and cup.
The same basic rules for proper storage, handling, andshipping as discussed earlier for interior flooring alsoapply here; see page 4. Remember, the pressure treatmentof wood does not prevent the normal passage of moisturein and out of lumber. KDAT Southern Pine flooring willreact the same as untreated interior flooring whenexposed to moisture prior to installation and finishing.
A period of acclimation should be given to both theporch framing components and the pressure-treated porchflooring. Upon completion of the porch framing, it is com-mon for experienced builders to allow one to two weeksfor the framing materials to reach an equilibrium moisturecontent (EMC) with the exterior conditions, prior to floor-ing installation. This practice will reduce potential prob-lems of buckling or separation of the flooring if installedon the framing too soon.
Proper acclimation of the flooring begins with its deliv-ery to the job site. The material should be unloaded in adry place and stacked on stringers to permit adequate aircirculation. A layer of polyethylene should be positioneddirectly under all packages of flooring to prevent moistureabsorption from the ground. If the temporary storage areais not fully protected from precip-itation, the flooring must beloosely covered for protectionfrom moisture (4-mil polyethyl-ene is commonly used), yetallowing adequate circulation ofair within the package. If at allpossible, do not store the flooringin an area that receives directsunlight most of the day, or in anenclosed, heated space. Theseconditions can allow the flooringto equalize at a moisture contenttoo low for its intended use.
Generally, one to two weeksis considered an adequate accli-mation period for KDAT porchflooring. The average moisturecontent of wood materials usedin exterior applications is 12% formost areas of the U.S.
Porch Flooring Installation and Finishing
Reducing the opportunities for dimensional changes tothe material due to moisture fluctuations is the key tolong-term performance of the porch floor. Proper porchflooring installation actually involves applying the finishprior to installation.
Many builders begin with a coat of a water-repellentsealer on the top of all floor joists, providing added pro-tection against joist expansion due to excessive collectionof moisture.
For the porch flooring, begin with a coat of paintablewater-repellent sealer to all four sides and the ends, fol-lowed by (after adequate drying time) a coat of high-qual-ity, mildew-resistant oil-based primer for exterior use.Consider applying a coat of the final oil-based porchenamel to the tongue and grooves (also to the end of anypiece that will be adjacent to the house) and installing itwhile the paint is still wet. This procedure not onlyassures an effective seal against moisture penetration, butalso provides a good bond between floor boards.
Unlike interior flooring, T&G porch flooring is fasteneddirectly to the floor joists. No additional nailing base isneeded. A minimum 1/2˝ expansion space is maintainedbetween the flooring area and house (or wall) to allow fordimensional change. This space can be concealed withdecorative exterior trim (also acclimated).
Each piece of flooring is blind-nailed at every joist,using hot-dip galvanized 8d ring-shank nails. Extend floorto create a 1˝ overhang beyond the band joist.
Upon completion of the flooring installation, two coatsof the oil-based porch enamel to the surface and exposedends is recommended. Solid-color stains should never be
used on a porch floor due totheir low resin content.
To maintain the optimumperformance of a porch follow-ing proper design, material spec-ification, installation and finish-ing, a regular maintenance pro-gram should be undertaken.Inspection for water accumula-tion, integrity of the soil barrier,and any raised fasteners are justa few items to include in a peri-odic examination of the struc-ture. Take necessary correctiveaction as soon as possible.Refinishing porch flooring canbe expected every 3 to 5 years,depending upon weather condi-tions and the amount of expo-sure to direct sunlight.
16 SOUTHERN PINE FLOORING2 0 1 2 E d i t i o n
Southern Forest Products Associat ionSouthernPine.com
Copyright © 2012. Southern Forest Products Association. All rights reserved.

Figure 14: Porch Flooring Details
ADDITIONAL INFORMATION
The Southern Forest ProductsAssociation offers a wide variety ofhelpful publications for design-build professionals. The titles list-ed below are available online inPDF. Visit SouthernPine.com todownload.
Southern Pine Use Guidegrade descriptions, design values,applications, specification guidelines
Pressure-Treated Southern Pinepreservative types, standards,specifications, applications
Southern Pine Decks & Porchesproduct selection, constructionguidelines, maintenance
Porch Design Considerations
Attention to proper porch design is as important tothe longevity of the structure as are the details of porchflooring specification and installation. Inadequate aircirculation beneath the porch and trapped moisturebetween framing components will greatly reduce theserviceability and long-term appearance of the porch.
The following recommendations are key elements tothe proper design and construction of a fully-coveredporch:
Slope the exposed soil underneath the porch away from thecenter to permit runoff of any water that may accumulate.
To reduce the upward migration of moisture from the exposed soil beneath the porch, cover with a moisture barrier (4-mil polyethylene is acceptable), leaving two feet of exposed soil inside the perimeter of the porch. Anchor edges of this barrier with gravel.
Encourage air flow beneath the porch by using ornamental vents or lattice skirting.
Slope the porch framing 1/4” per foot away from the house to permit adequate water runoff.
Vent columns and newell posts at top and bottom.
Check with your local building code department to be sure all code requirements are satisfied within your porch design.
TRIM MOULDING
1” OVERHANG MOISTUREBARRIER
LATTICESKIRT
1/2” GAPAT WALL
17SOUTHERN PINE FLOORING2 0 1 2 E d i t i o n
Southern Forest Products Associat ionSouthernPine.com
OnlinePRODUCT LOCATOR
Sourcing Southern Pine products?
Visit the online Product Locator at
SouthernPine.com
to find SFPA member producers.
Copyright © 2012. Southern Forest Products Association. All rights reserved.

SFPA #705 3-12
6660 Riverside Drive, Suite 212 Metairie, LA 70003504/443-4464 Fax 504/[email protected]
SouthernPine.com