Install
36
Oracle Endeca Commerce Tools and Frameworks Installation Guide Version 3.1.0 • July 2012
-
Upload
avinash-csj -
Category
Documents
-
view
48 -
download
2
Transcript of Install

Oracle Endeca CommerceTools and Frameworks Installation Guide
Version 3.1.0 • July 2012


Contents
Preface.............................................................................................................................7About this guide............................................................................................................................................7Who should use this guide............................................................................................................................7Conventions used in this guide.....................................................................................................................7Contacting Oracle Support...........................................................................................................................8
Chapter 1: Before You Install.....................................................................9About Oracle Endeca Tools and Frameworks...............................................................................................9System requirements....................................................................................................................................9Endeca software requirements...................................................................................................................11
Chapter 2: Installing Oracle Endeca Tools and Frameworks................13Installing Oracle Endeca Tools and Frameworks on Windows....................................................................13
Creating the Endeca Tools Service......................................................................................................14Configuring the Endeca Tools Service to run under an endeca user..................................................15Starting and stopping the Endeca Tools Service on Windows.............................................................15Running Oracle Endeca Tools and Frameworks from the included batch files....................................16
Installing Oracle Endeca Tools and Frameworks on UNIX..........................................................................16Starting the Workbench process automatically on UNIX.....................................................................17Starting and stopping the Workbench process on UNIX.....................................................................18
Package contents.......................................................................................................................................18Deploying a reference application...............................................................................................................20
Deploying the Discover Electronics reference application...................................................................20About multichannel support in the Discover Electronics reference application...................................21Verifying your Tools and Frameworks configuration.............................................................................22
Troubleshooting Oracle Endeca Tools and Frameworks.............................................................................23
Chapter 3: Uninstalling Oracle Endeca Tools and Frameworks...........25Uninstalling a deployed application.............................................................................................................25Uninstalling Oracle Endeca Tools and Frameworks on Windows...............................................................26Uninstalling Oracle Endeca Tools and Frameworks on UNIX.....................................................................26
Appendix A:Endeca Environment Variables and Endeca Tools Service Scripts.27Endeca environment variables....................................................................................................................27Endeca Tools Service scripts......................................................................................................................27
Appendix B: Endeca Tools Service and EAC Ports Reference.............29About the Endeca Tools Service ports........................................................................................................29
Changing the Endeca Tools Service port............................................................................................29Changing the Endeca Tools Service Promotion port...........................................................................30Changing the Endeca Tools Service SSL port.....................................................................................31Changing the Endeca Tools Service shutdown port............................................................................31
Updating Workbench to use non-default EAC settings...............................................................................32
Appendix C: Communicating with the MDEX Engine............................33Setting up a cross-domain policy file..........................................................................................................33
iii

Copyright and disclaimer
Copyright © 2003, 2012, Oracle and/or its affiliates. All rights reserved.
Oracle and Java are registered trademarks of Oracle and/or its affiliates. Other names may betrademarks of their respective owners.
This software and related documentation are provided under a license agreement containing restrictionson use and disclosure and are protected by intellectual property laws. Except as expressly permittedin your license agreement or allowed by law, you may not use, copy, reproduce, translate, broadcast,modify, license, transmit, distribute, exhibit, perform, publish or display any part, in any form, or byany means. Reverse engineering, disassembly, or decompilation of this software, unless required bylaw for interoperability, is prohibited.
The information contained herein is subject to change without notice and is not warranted to beerror-free. If you find any errors, please report them to us in writing.
If this is software or related documentation that is delivered to the U.S. Government or anyone licensingit on behalf of the U.S. Government, the following notice is applicable:
U.S. GOVERNMENT END USERS: Oracle programs, including any operating system, integratedsoftware, any programs installed on the hardware, and/or documentation, delivered to U.S. Governmentend users are "commercial computer software" pursuant to the applicable Federal Acquisition Regulationand agency-specific supplemental regulations. As such, use, duplication, disclosure, modification, andadaptation of the programs, including any operating system, integrated software, any programs installedon the hardware, and/or documentation, shall be subject to license terms and license restrictionsapplicable to the programs. No other rights are granted to the U.S. Government.
This software or hardware is developed for general use in a variety of information managementapplications. It is not developed or intended for use in any inherently dangerous applications, includingapplications that may create a risk of personal injury. If you use this software or hardware in dangerousapplications, then you shall be responsible to take all appropriate fail-safe, backup, redundancy, andother measures to ensure its safe use. Oracle Corporation and its affiliates disclaim any liability forany damages caused by use of this software or hardware in dangerous applications.
This software or hardware and documentation may provide access to or information on content,products and services from third parties. Oracle Corporation and its affiliates are not responsible forand expressly disclaim all warranties of any kind with respect to third-party content, products, andservices. Oracle Corporation and its affiliates will not be responsible for any loss, costs, or damagesincurred due to your access to or use of third-party content, products, or services.
Rosette® Linguistics Platform Copyright © 2000-2011 Basis Technology Corp. All rights reserved.
v


Preface
Oracle Endeca's Web commerce solution enables your company to deliver a personalized, consistentcustomer buying experience across all channels — online, in-store, mobile, or social. Whenever andwherever customers engage with your business, the Oracle Endeca Web commerce solution delivers,analyzes, and targets just the right content to just the right customer to encourage clicks and drivebusiness results.
Oracle Endeca Commerce is the most effective way for your customers to dynamically explore yourstorefront and find relevant and desired items quickly. An industry-leading faceted search and GuidedNavigation solution, Oracle Endeca Commerce enables businesses to help guide and influencecustomers in each step of their search experience. At the core of Oracle Endeca Commerce is theMDEX Engine,™ a hybrid search-analytical database specifically designed for high-performanceexploration and discovery. The Endeca Content Acquisition System provides a set of extensiblemechanisms to bring both structured data and unstructured content into the MDEX Engine from avariety of source systems. Endeca Assembler dynamically assembles content from any resource andseamlessly combines it with results from the MDEX Engine.
Oracle Endeca Experience Manager is a single, flexible solution that enables you to create, deliver,and manage content-rich, cross-channel customer experiences. It also enables non-technical businessusers to deliver targeted, user-centric online experiences in a scalable way — creating always-relevantcustomer interactions that increase conversion rates and accelerate cross-channel sales. Non-technicalusers can control how, where, when, and what type of content is presented in response to any search,category selection, or facet refinement.
These components — along with additional modules for SEO, Social, and Mobile channel support —make up the core of Oracle Endeca Experience Manager, a customer experience management platformfocused on delivering the most relevant, targeted, and optimized experience for every customer, atevery step, across all customer touch points.
About this guideThis guide contains installation instructions for setting up Oracle Endeca Tools and Frameworks onWindows and UNIX.
Who should use this guideThis guide is intended for users installing Oracle Endeca Tools and Frameworks on Windows or UNIX.
Conventions used in this guideThis guide uses the following typographical conventions:
Code examples, inline references to code elements, file names, and user input are set in monospacefont. In the case of long lines of code, or when inline monospace text occurs at the end of a line, thefollowing symbol is used to show that the content continues on to the next line: ¬

When copying and pasting such examples, ensure that any occurrences of the symbol and thecorresponding line break are deleted and any remaining space is closed up.
Contacting Oracle SupportOracle Support provides registered users with important information regarding Oracle Endeca software,implementation questions, product and solution help, as well as overall news and updates.
You can contact Oracle Support through Oracle's Support portal, My Oracle Support athttps://support.oracle.com.
Endeca ConfidentialOracle Endeca Commerce Tools and Frameworks Installation Guide
| Preface8

Chapter 1
Before You Install
This section provides an overview of Oracle Endeca Tools and Frameworks, including systemrequirements, package contents, and other information that you need to know before installing.
About Oracle Endeca Tools and FrameworksOracle Endeca Tools and Frameworks enable the dynamic presentation of content across all channels.
Deployments that use Oracle Endeca Experience Manager require the Tools and Frameworks packagefor Oracle Endeca Commerce with Experience Manager. Deployments that do not include ExperienceManager require the Tools and Frameworks package for Oracle Endeca Commerce with GuidedSearch.
Both versions of the package include the following:
• Oracle Endeca Workbench, a tools suite that enables merchandising, Content Spotlighting, andsearch configuration for cross-channel applications
• The Endeca Assembler, an API for controlling the presentation of commerce sites across allchannels
• The Endeca Tools Service• The Endeca Deployment Template, a collection of operational components that provides a starting
point for developing and deploying Endeca applications.• The Discover Electronics reference application
System requirementsThis section describes the operating system and software requirements for installing and using OracleEndeca Tools and Frameworks.
Supported operating systems
The Oracle Endeca Tools and Frameworks package is supported on the following 64-bit operatingsystems:
• Oracle Linux 5• Red Hat Enterprise Linux Server (version 5 for x64)• Red Hat Enterprise Linux Advanced Platform (version 5 for x64)
• SUSE Enterprise Linux 11• Windows Server 2008 R2 Enterprise
Oracle Exalogic Elastic Cloud 11gR1 support
The Oracle Endeca Tools and Frameworks package is supported in Oracle Exalogic 11gR1environments on the following guest operating systems:
• Oracle Linux 5
VMware vSphere 4.1 support
The Oracle Endeca Tools and Frameworks package is supported in VMware vSphere 4.1 environmentson the following guest operating systems:
• Oracle Linux 5• Red Hat Enterprise Linux Server (version 5 for x64)• Red Hat Enterprise Linux Advanced Platform (version 5 for x64)• SUSE Enterprise Linux 11• Windows Server 2008 R2 Enterprise
Amazon Elastic Compute Cloud (EC2) support
The Oracle Endeca Tools and Frameworks package is supported in Amazon EC2 environments onthe following guest operating systems:
• Oracle Linux 5• Amazon Linux AMI• SUSE Enterprise Linux 11• Windows Server 2008 R2 Enterprise
Workbench requirements
Endeca Workbench requires the following:
• Internet Explorer 8 or higher, or Firefox 3.6 or higher• Flash Player 10.2 or higher
Reference application requirements
The Discover Electronics reference application and APIs require the following:
• A J2EE application server, such as Oracle WebLogic Server 11g or Apache Tomcat• Java 1.5 or higher (the Java 2 SDK, version 1.6.0_17 is included with the Tools and Frameworks)• Internet Explorer 8 or higher, or Firefox 3.6 or higher
Endeca Assembler requirements
The Endeca Assembler relies on the following libraries:
• AOP Alliance 1.0• Apache Commons Logging 1.1.1• Endeca Navigation API 6.3.0• Endeca Logging API 6.3.0• Spring AOP 3.0.1• Spring ASM 3.0.1
Endeca ConfidentialOracle Endeca Commerce Tools and Frameworks Installation Guide
Before You Install | System requirements10

• Spring Beans 3.0.1• Spring Context 3.0.1• Spring Core 3.0.1• Spring Expression 3.0.1• Spring Web 3.0.1
These modules are packaged in the %ENDECA_TOOLS_ROOT%\assembler\lib directory.You mustinclude them in any custom application that uses the Assembler.
Endeca software requirementsThis section lists the Endeca components that must be installed on your machine prior to installingthe Tools and Frameworks.
The Oracle Endeca Tools and Frameworks require the following Endeca components:
• MDEX Engine• Platform Services
To determine the compatibility of your Endeca components, see the Oracle Endeca CommerceCompatibility Matrix, available on the Oracle Technology Network.
Oracle Endeca Commerce Tools and Frameworks Installation GuideEndeca Confidential
11Before You Install | Endeca software requirements


Chapter 2
Installing Oracle Endeca Tools andFrameworks
This section describes the process for installing Oracle Endeca Tools and Frameworks on your machine.The steps in this guide are based on all Endeca components being installed on the same machine.
Installing Oracle Endeca Tools and Frameworks onWindows
To install Oracle Endeca Tools and Frameworks, extract the ZIP archive to your Endeca directory andcreate the included Windows service.
To install the Oracle Endeca Tools and Frameworks:
1. If you have an earlier version of Endeca Workbench, follow the steps in the Oracle EndecaWorkbench Installation Guide to remove it before installing the Tools and Frameworks.
2. If you have an earlier version of Oracle Endeca Tools and Frameworks, follow the steps inUninstalling Oracle Endeca Tools and Frameworks on Windows on page 26 to remove it beforeinstalling the Tools and Frameworks.
3. Download the Tools and Frameworks package from the Oracle Software Delivery Cloud.
4. Extract the Tools and Frameworks package to a local directory.
Depending on what you downloaded, this results in one of the following installation files.
• gs-<version>-windows.zip (Oracle Endeca Guided Search)• xmgr-<version>-windows.zip (Oracle Endeca Experience Manager)
5. Extract the installation file into C:\Endeca.The archive extracts to C:\Endeca\ToolsAndFrameworks\<version>. This is your Tools andFrameworks installation directory.
6. If you are going to install the Content Acquisition System (CAS) after Tools and Frameworks,perform the following modifications:
a) Navigate to %ENDECA_TOOLS_CONF%\conf.b) Open webstudio.properties in a text editor.c) Locate the com.endeca.webstudio.hostname property and change the value from local¬
host to the fully qualified name of the machine running Workbench.d) Save and close webstudio.properties.

After extracting the Tools and Frameworks archive, you must create and configure the Endeca ToolsService, or alternately run the Tools and Frameworks from the included batch files.
Related LinksAbout the Endeca Tools Service ports on page 29
You can change the default ports for the Endeca Tools Service, as long as you choose anew port that is not being used.
Creating the Endeca Tools Service on page 14You can choose to run the Tools and Frameworks as a Windows service.
Running Oracle Endeca Tools and Frameworks from the included batch files on page 16If you do not wish to create the Endeca Tools Service, you can start or stop the Tools andFrameworks directly by running the included batch files.
Creating the Endeca Tools ServiceYou can choose to run the Tools and Frameworks as a Windows service.
Before starting the Endeca Tools Service, Endeca recommends creating an "endeca" user for whomyou can control permissions, and modifying your Endeca Tools Service to run under that user. Theuser running install_service.bat and the Endeca Tools Service must have administratorprivileges.
To create the Endeca Tools Service:
1. Navigate to your Endeca installation directory.
By default, this should be C:\Endeca\ToolsAndFrameworks\<version>.
2. Install the Endeca Tools Service by running server\bin\install_service.bat.
This creates the Endeca Tools Service and configures it to run under the current user profile.
After you have created the Endeca Tools Service, you must configure it to run under the endeca user.
Note: By default, Workbench runs on port 8006 of your machine. If port 8006 is unavailable onyour machine, you must change this to a different port. Additionally, if you are not running theEndeca Application Controller on localhost:8888, you must update the EAC configurationfor Workbench.
Related LinksUpdating Workbench to use non-default EAC settings on page 32
If the Endeca Application Controller is not running at the default location of localhost:8888,you must update this information in the%ENDECA_TOOLS_CONF%\conf\webstudio.properties file($ENDECA_TOOLS_CONF/conf/webstudio.properties on UNIX).
Endeca Environment Variables and Endeca Tools Service Scripts on page 27This section covers the Endeca environment variables and the Endeca Tools Service scripts.
Endeca Tools Service and EAC Ports Reference on page 29This section covers the steps required to change the Endeca Tools Service and EAC portsfrom the default values.
Endeca ConfidentialOracle Endeca Commerce Tools and Frameworks Installation Guide
Installing Oracle Endeca Tools and Frameworks | Installing Oracle Endeca Tools and Frameworks onWindows
14

Configuring the Endeca Tools Service to run under an endeca userYou can modify the Endeca Tools Service to run under a designated endeca user, rather than usingthe current user profile.
Once you have initialized your Endeca Tools Service you can create a new user and configure theservice to run under that user. Doing so automatically grants the user permission to log on as a service.
Oracle recommends that you create a user account called endeca that has the proper file and directorypermissions to access all necessary files for your application, and that you set up your Endeca ToolsService to run under this account. However, you can use any user that you prefer, as long as it meetsthese requirements.
To configure the Endeca Tools Service to run under an endeca user:
1. Create an endeca user:
a) Ensure that you have administrator privileges on the local machine.b) Go to Start > Administrative Tools > Computer Management > System Tools > Local
Users and Groups > Users.c) Right click and select New User...d) Create an Administrator user named endeca.
Important: To run the Endeca Tools service under the endeca user, you must set apassword for the user.
2. Configure the Endeca Tools Service to run under the endeca user:
a) Go to Start > Control Panel > Administrative Tools > Services.b) In the Windows Services editor, select the Endeca Tools Service.c) From the Endeca Tools Service, right-click and select Properties from the drop-down menu.
The Endeca Tools Service Properties window appears.d) Switch to the Log On tab.e) Select the This account: radio button.f) Enter endeca in the This account: field and the password you set for the endeca user in the
Password: and Confirm Password: fields.A dialog box appears, notifying you that the endeca user has been given service permissions.
g) Click OK to close the dialog box.h) Click OK to save your changes to the Endeca Tools Service.
3. Start the Endeca Tools Service.
After you have configured the Endeca Tools Service, you can provision the Discover Electronicsreference application using the Deployment Template.
Starting and stopping the Endeca Tools Service on WindowsOnce you have created the Endeca Tools Service, it starts automatically when you boot up Windows.You must stop and later restart the service to make certain modifications to your Tools and Frameworksinstallation.
When you first install the service, you must manually start it. Afterwards, the service is set to start upautomatically when the computer boots up.
To manage the Endeca Tools Service after installation:
Oracle Endeca Commerce Tools and Frameworks Installation GuideEndeca Confidential
15Installing Oracle Endeca Tools and Frameworks | Installing Oracle Endeca Tools and Frameworks onWindows

1. Go to Start > Control Panel > Administrative Tools > Services.
2. In the Windows Services editor, select the Endeca Tools Service.
3. Click Stop or Restart.
Running Oracle Endeca Tools and Frameworks from the included batchfiles
If you do not wish to create the Endeca Tools Service, you can start or stop the Tools and Frameworksdirectly by running the included batch files.
Note: For any topics that refer to starting or stopping the Endeca Tools Service, run thecorresponding batch script instead.
To start or stop the Tools and Frameworks from the included batch files:
1. Navigate to your Endeca installation directory.
By default, this should be C:\Endeca\ToolsAndFrameworks\<version>.
2. Navigate to the server\bin directory.
3. To start the Tools and Frameworks, run run.bat.
This script sets the Endeca environment variables in the current command window and initializesthe Apache Tomcat Web server, with Workbench running on localhost:8006.
4. To stop the Tools and Frameworks, run stop.bat.
This script shuts down the Apache Tomcat Web server.
Once the Tools and Frameworks are running, you can provision the Discover Electronics referenceapplication using the Deployment Template.
Note: By default, Workbench runs on port 8006 of your machine. If port 8006 is unavailable onyour machine, you must change this to a different port. Additionally, if you are not running theEndeca Application Controller on localhost:8888, you must update the EAC configurationfor Workbench.
Installing Oracle Endeca Tools and Frameworks on UNIXTo install Oracle Endeca Tools and Frameworks, extract the package to your Endeca directory andrun the included startup script.
If you have an earlier version of Oracle Endeca Workbench, you must follow the steps in the OracleEndeca Workbench Installation Guide to remove it before installing the Tools and Frameworks.
To install Oracle Endeca Tools and Frameworks:
1. Download the Tools and Frameworks package from the Oracle Software Delivery Cloud.
2. Extract the Tools and Frameworks package to a local directory.
Depending on what you downloaded, this results in one of the following installation files.
• gs-<version>-linux.zip (Oracle Endeca Guided Search)
Endeca ConfidentialOracle Endeca Commerce Tools and Frameworks Installation Guide
Installing Oracle Endeca Tools and Frameworks | Installing Oracle Endeca Tools and Frameworks onUNIX
16

• xmgr-<version>-linux.zip (Oracle Endeca Experience Manager)
3. Extract the Tools and Frameworks installation into /usr/local/endeca.The archive extracts to /usr/local/endeca/ToolsAndFrameworks/<version>.This is yourTools and Frameworks installation directory.
4. If you are going to install the Content Acquisition System (CAS) after Tools and Frameworks,perform the following modifications:
a) Navigate to $ENDECA_TOOLS_CONF/conf.b) Open webstudio.properties in a text editor.c) Locate the com.endeca.webstudio.hostname property and change the value from local¬
host to the fully qualified name of the machine running Workbench.d) Save and close webstudio.properties.
5. Navigate to the server/bin directory.
6. Run startup.sh.
This script sets the environment variables for your Tools and Frameworks installation and initializesthe Apache Tomcat Web server, with Workbench running on localhost:8006 as a backgroundprocess.
To manage the Workbench process after installation:
• Start the Workbench process with the startup.sh script.• Stop the Workbench process with the shutdown.sh script.
Once the Tools and Frameworks are running, you can provision the Discover Electronics referenceapplication using the Deployment Template.
Note: By default, Workbench runs on port 8006 of your machine. If port 8006 is unavailable onyour machine, you must change this to a different port. Additionally, if you are not running theEndeca Application Controller on localhost:8888, you must update the EAC configurationfor Workbench.
Related LinksAbout the Endeca Tools Service ports on page 29
You can change the default ports for the Endeca Tools Service, as long as you choose anew port that is not being used.
Starting the Workbench process automatically on UNIX on page 17In a UNIX development environment, the Workbench process can be started from thecommand line. In a UNIX production environment, however, Oracle recommends configuringthe included workbench-init.d.sh script to start Workbench automatically.
Starting the Workbench process automatically on UNIXIn a UNIX development environment, the Workbench process can be started from the command line.In a UNIX production environment, however, Oracle recommends configuring the includedworkbench-init.d.sh script to start Workbench automatically.
To start the Workbench process automatically on UNIX:
1. Navigate to the server/bin directory within your Tools and Frameworks installation directory.
By default, this is /usr/local/endeca/ToolsAndFrameworks/<version>/server/bin.
Oracle Endeca Commerce Tools and Frameworks Installation GuideEndeca Confidential
17Installing Oracle Endeca Tools and Frameworks | Installing Oracle Endeca Tools and Frameworks onUNIX

2. Open the workbench-init.d.sh script.
3. Follow the instructions within the script to configure it for your environment.
Starting and stopping the Workbench process on UNIXYou must stop and later restart the Workbench process to make certain modifications to your Toolsand Frameworks installation.
You must configure the workbench-init-d.sh script before using the commands outlined below.
When using the following commands, you may be prompted to enter the password for the system userthat Workbench runs under.
• Start the Workbench process with the following command:
/sbin/service workbench start
• Stop the Workbench process with the following command:
/sbin/service workbench stop
Package contentsOracle Endeca Tools and Frameworks are available for both Oracle Endeca Guided Search and OracleEndeca Experience Manager.
Core package components
Both distribution packages contain the following resources on Windows and UNIX:
ContentsFile / Directory
assembler/apidoc
Javadoc for the Assembler and the URLOptimization API for Java.
assembler/apidoc
Contains the Assembler and its dependencies,including the URL Optimization API for Java.
assembler/lib
Contains the Deployment Template andaccompanying Javadoc.
deployment_template
The Oracle Endeca Third-Party Software Usageand Licenses document. Additional documentation
doc
is available from the Oracle Technology Network(OTN).
Contains the data and Endeca applicationconfiguration for the Discover Electronics reference
reference/discover-data
application. This application is configured toprocess the source data using Forge.
Endeca ConfidentialOracle Endeca Commerce Tools and Frameworks Installation Guide
Installing Oracle Endeca Tools and Frameworks | Package contents18

ContentsFile / Directory
Additional templates designed to enable contentadministrators to configure pages for mobileapplications.
reference/discover-data/cartridge_templates
Additional sample content for the referenceapplication including a mobile-specific results page
reference/discover-data/ifcr
that demonstrates reuse of content configurationacross channels.
Contains data and Endeca application configurationfor the Deployment Template Module for Product
reference/discover-data-pci
Catalog Integration. This application integratesdata records, dimension values, precedence rules,and schema information from product catalogsystems into Endeca search applications.
The source code for a live instance of the DiscoverElectronics application including renderers andconfiguration files, provided for reference purposes.
reference/discover-electronics
The source code for an authoring instance of theDiscover Electronics application including
reference/discover-electronics-authoring
renderers and configuration files, provided forreference purposes.
Contains the Assembler service as configured fora live instance of the Discover Electronicsapplication.
reference/discover-service
Contains the Assembler service as configured foran authoring instance of the Discover Electronicsapplication.
reference/discover-service-authoring
A data explorer Web application that you can useto verify and browse your data.
reference/endeca_jspref
The Apache Tomcat Web application container forEndeca Workbench.
server/apache-tomcat-6.0.32
Contains batch or shell scripts for running theEndeca Tools Service, which sets environment
server/bin
variables and initializes the Tomcat applicationcontainer.
The Java 2 Software Development Kit, version1.6.0_17.
server/j2sdk
Contains the Workbench, Endeca ConfigurationRepository, and related tools.
server/webapps
The workspace into which you deploy applicationsto run in the Endeca Tools Service.
server/workspace
Oracle Endeca Commerce Tools and Frameworks Installation GuideEndeca Confidential
19Installing Oracle Endeca Tools and Frameworks | Package contents
Oracle Endeca Experience Manager components
In addition to the contents described above, the Tools and Frameworks package specific to OracleEndeca Experience Manager also includes the following resources:
ContentsFile / Directory
Contains the SDK for developing custom editorsfor use with the Experience Manager tool in OracleEndeca Workbench.
editor_sdk
Contains the data and Endeca applicationconfiguration for populating the Media MDEXEngine with Discover Electronics media using CAS.
reference/media-mdex-cas
Related LinksEndeca Tools Service scripts on page 27
The Windows and UNIX versions of the Tools and Frameworks archive contain scripts forrunning the Endeca Tools Service.
Deploying a reference applicationAfter installing Oracle Endeca Commerce, you can deploy a reference application to process a sampledata set and display it in an Endeca front-end application.
Deploying the Discover Electronics reference applicationTools and Frameworks provides a reference application called the Discover Electronics referenceapplication.You can deploy the Discover Electronics reference application using the DeploymentTemplate, then provision the application, run a baseline update, and view the data set in the front-endapplication.
As part of the deployment process the source data inToolsAndFrameworks\<version>\reference\discover-data is copied to the <installationpath>\Endeca\apps\Discover, and Forge processes the source data as part of the baselineupdate.
The indexed data is loaded into two separate Dgraph instances. One is an authoring Dgraph and theother is a live Dgraph for the application.
To deploy the Discover Electronics reference application:
1. Ensure that the Endeca Tools Service is running.
2. If you haven't already, create a directory for deployed Endeca applications, such asC:\Endeca\apps on Windows, or /usr/local/endeca/apps on UNIX.
3. Run the Deployment Template to deploy the application:
a) Open a command prompt or command shell.b) Navigate to the <installation
path>\ToolsAndFrameworks\<version>\deployment_template\bin directory onWindows, or <installationpath>/ToolsAndFrameworks/<version>/deployment_template/bin on UNIX.
Endeca ConfidentialOracle Endeca Commerce Tools and Frameworks Installation Guide
Installing Oracle Endeca Tools and Frameworks | Deploying a reference application20

c) Run the deploy script with the --app flag and an argument that specifies the path to thedeploy.xml descriptor file for Discover Electronics:
For example:
C:\Endeca\ToolsAndFrameworks\3.1.0\deployment_template\bin>deploy --app C:\Endeca\ToolsAndFrameworks\3.1.0\reference\discover-data\de¬ploy.xml
d) Confirm the Platform Services installation directory.e) Select y to install a base application.f) Specify Discover as the application name.
Note: The application configuration depends on this name and case sensitivity is important.
g) Specify the application directory previously created for Endeca applications. This is typically adirectory, such as C:\Endeca\apps on Windows or /usr/local/endeca/apps on UNIX.
h) Oracle recommends using the default options for subsequent prompts.
4. Navigate to the control directory of your new deployed application.
This is located under your application directory, for example:C:\Endeca\apps\Discover\control on Windows.
5. Initialize the application and load the baseline data and templates:
a) Run the initialize_services script.
This script does the following:
• Provisions the application in the Endeca Application Controller.• Uploads sample templates and configuration to the application.• Uploads sample content and media to the application. (This action occurs only if you are
using Experience Manager.)
b) Run the load_baseline_test_data script.c) Run the baseline_update script.d) Run the promote_content script.
6. Confirm that the Discover Electronics reference applications are running:
• Navigate to http://localhost:8006/discover-authoring to view the authoring versionof the Discover application.
• Navigate to http://localhost:8006/discover to view the live version of the Discoverapplication.
About multichannel support in the Discover Electronics referenceapplication
In Tools and Frameworks 3.1.0 and later, the Discover Electronics reference application has beenaugmented to demonstrate best practices for multichannel implementations.
Supported devices
The Discover Electronics reference application is supported on the following mobile browsers:
• Mobile Safari• Google Android
Oracle Endeca Commerce Tools and Frameworks Installation GuideEndeca Confidential
21Installing Oracle Endeca Tools and Frameworks | Deploying a reference application
• BlackBerry (OS 6 or later)• Skyfire (iOS/Android)
The following browsers are partially supported (some features such as JavaScript, auto-suggest, andcosmetic issues may not work as designed):
• BlackBerry (OS 5)• Firefox Mobile (Android)
Verifying your Tools and Frameworks configurationOnce you have deployed the Discover Electronics reference application, you should verify that allincluded Tools and Frameworks components are correctly configured for your environment.
To verify that your Tools and Frameworks installation is correctly configured:
1. Confirm that the Discover Electronics reference application is running by navigating tohttp://<hostname>:8006/discover-authoring in your browser, or to the appropriate portif you changed the default value. In this release, be sure to replace <hostname> with the actualhost name rather than localhost.
Note the Customer Favorites spotlight in the right column contains the following records:
• .LINK™ Digital Interface Cable• IXUS 210 Camera• EF 50mm f/1.2L USM Lens
2. Confirm that Oracle Endeca Workbench is running by navigating to http://localhost:8006in your browser, or to the appropriate port if you changed the default value.
3. Confirm that the Discover Electronics reference application has been deployed.
The Application specified below the Username and Password fields should be "Discover".
4. Log in to Workbench.
Note: The default login is Username "admin" with Password "admin".
5. Open the Rule Manager or Experience Manager tool.
6. If you are running Tools and Frameworks for the Oracle Endeca Commerce with ExperienceManager package, confirm that the Experience Manager editors are available and able to sendand receive information from the MDEX Engine:
a) In the Experience Manager Content tree, expand the Web view.b) Expand Category Spotlights.c) Select Top Rated Bags.d) Verify the editors, confirming that all editors display correctly and do not show warning messages.
7. In the Experience Manager or Rule Manager Content tree, navigate to the Default Spotlightcartridge:
• In Experience Manager, expand Web > Web Browse Pages and select Default Browse Page.Select Spotlight Records in the tree view of the Content Details Panel.
• In Rule Manager, expand Right Column Spotlights and select Default Spotlight.
8. Change the selection of spotlighted records:
a) In the editor panel, click the Edit Query button.b) In the Filter State panel, click the Remove All link.
Endeca ConfidentialOracle Endeca Commerce Tools and Frameworks Installation Guide
Installing Oracle Endeca Tools and Frameworks | Deploying a reference application22

c) Click the Price Range dimension.d) Select the 100-250 Price Range.e) Increase the Maximum Number of Records value to 5.f) Click Save Filter State.
9. Click the Save Changes button in the upper-right corner of the screen to publish changes to theMDEX Engine.This displays the following message at the bottom of the Rule Manager or Experience Managerpane:
Success: Last publish to the MDEX Engine completed at <date> <time>
10. Navigate to http://localhost:8006/discover-authoring in your browser and confirmthat the Customer Favorites spotlight now includes the following:
• EF 50mm f/1.2L USM Lens• Camera PowerShot A550 Camera• Digital IXUS 120 IS Camera• Dioptric Adjustment Lens• EOS 5D + EF Camera
Troubleshooting Oracle Endeca Tools and FrameworksThis section provides an overview of how to address possible problems with your Tools and Frameworksinstallation.
SolutionError
If your MDEX Engine is not running on localhost:15002, you mustmodify the Assembler context files so that the Assembler can query theMDEX for data. See "Communicating with the MDEX Engine" for details.
Discover Electronicsreference application notdisplaying data
If you are not accessing Workbench from the same hostname specifiedfor the MDEX, you must create a cross-domain policy file.
Experience Managereditors display but areinactive or "Loading..."
Additionally, both the EAC configuration in the<App_Dir>\config\script\AuthoringDgraphCluster.xml fileand the data service configuration in the<App_Dir>\config\editors_config\services\dataservice.jsonfile must have the same host and port configuration in order for ExperienceManager editors to function correctly.
This behavior indicates that required editors are either not present or areincorrectly configured in the editor configuration file, located in the deployed
Experience Managerdisplays red warningboxes instead of editors application directory under
<App_Dir>\config\editors_config\editors.xml. Updates tothis file can be pushed to the deployed application by running the<App_Dir>\control\set_editors_config script.
Oracle Endeca Commerce Tools and Frameworks Installation GuideEndeca Confidential
23Installing Oracle Endeca Tools and Frameworks | Troubleshooting Oracle Endeca Tools and Frameworks


Chapter 3
Uninstalling Oracle Endeca Tools andFrameworks
This section covers the steps required to uninstall Oracle Endeca Tools and Frameworks from Windowsand UNIX.
Uninstalling a deployed applicationYou should remove any deployed applications from the Endeca Application Controller prior to deletingthe application directory.
The steps provided below outline the removal of a deployed application from Oracle Endeca Toolsand Frameworks.
To remove a deployed application:
1. Remove the application from the Endeca Application Controller:
a) In a command prompt window, list the current applications by running eaccmd list-apps.b) Navigate to the <App_Dir>\control directory.
For the Discover Electronics reference application installed using the suggested directory paths,this is C:\Endeca\apps\Discover\control (on Windows) or/usr/local/endeca/apps/Discover/control (on UNIX).
c) Remove the application by running runcommand --remove-app.This removes the specified application and its configuration in Workbench.
d) List the current applications again by running eaccmd list-apps.
The selected application should no longer display.
2. Navigate to C:\Endeca\apps (on Windows) or /usr/local/endeca/apps (on UNIX).
3. Delete the selected application directory.
For the Discover Electronics reference application, this is the Discover directory.

Uninstalling Oracle Endeca Tools and Frameworks onWindows
Oracle Endeca Tools and Frameworks must be manually uninstalled, including removing the EndecaTools Service.
Before uninstalling the Tools and Frameworks, you should remove any deployed applications.
To uninstall Oracle Endeca Tools and Frameworks on Windows:
1. Remove the Endeca Tools Service:
a) Stop the Endeca Tools Service.b) Navigate to your %ENDECA_TOOLS_ROOT% directory.
By default, this is C:\Endeca\ToolsAndFrameworks\<version>.
c) Navigate to the server\bin directory.d) Run uninstall_service.bat to remove the service.
Note: If you leave the Services window open after removing the Endeca Tools Service,it does not update to show that the service has been removed until you close and re-openit.
2. Copy the ToolsAndFrameworks\<version>\server\workspace directory to a back uplocation that is outside the Endeca installation directory.
(You may use this content later in migration scenarios.)
3. Navigate to the Endeca installation directory, for example C:\Endeca.
4. Delete the ToolsAndFrameworks directory.
Uninstalling Oracle Endeca Tools and Frameworks on UNIXOracle Endeca Tools and Frameworks must be manually uninstalled.
Before uninstalling the Tools and Frameworks, you should remove any deployed applications.
To uninstall Oracle Endeca Tools and Frameworks on UNIX:
1. Navigate to /usr/local/endeca.
2. Delete your ToolsAndFrameworks directory.
Endeca ConfidentialOracle Endeca Commerce Tools and Frameworks Installation Guide
Uninstalling Oracle Endeca Tools and Frameworks | Uninstalling Oracle Endeca Tools and Frameworkson Windows
26

Appendix A
Endeca Environment Variables and EndecaTools Service Scripts
This section covers the Endeca environment variables and the Endeca Tools Service scripts.
Endeca environment variablesThe Endeca Tools Service uses the following environment variables:
SettingValueEnvironmentVariable
Sets JAVA_HOME to the includedJava 2 SDK.
<ENDECA_TOOLS_ROOT>\server\j2sdkJAVA_HOME
Sets the value to the Tools andFrameworks installation directory.
<Tools and Frameworks directory>ENDE¬CA_TOOLS_ROOT
Sets the value to the Tools andFrameworks server\workspacedirectory.
<ENDECA_TOOLS_ROOT>\server\workspaceENDE¬CA_TOOLS_CONF
Sets the location of the Tomcatinstance to the Endeca workspacedirectory.
ENDECA_TOOLS_CONFCATALINA_BASE
Note: If you are not running the Tools and Frameworks from the Endeca Tools Service onWindows, you should set the above environment variables manually.
Endeca Tools Service scriptsThe Windows and UNIX versions of the Tools and Frameworks archive contain scripts for running theEndeca Tools Service.
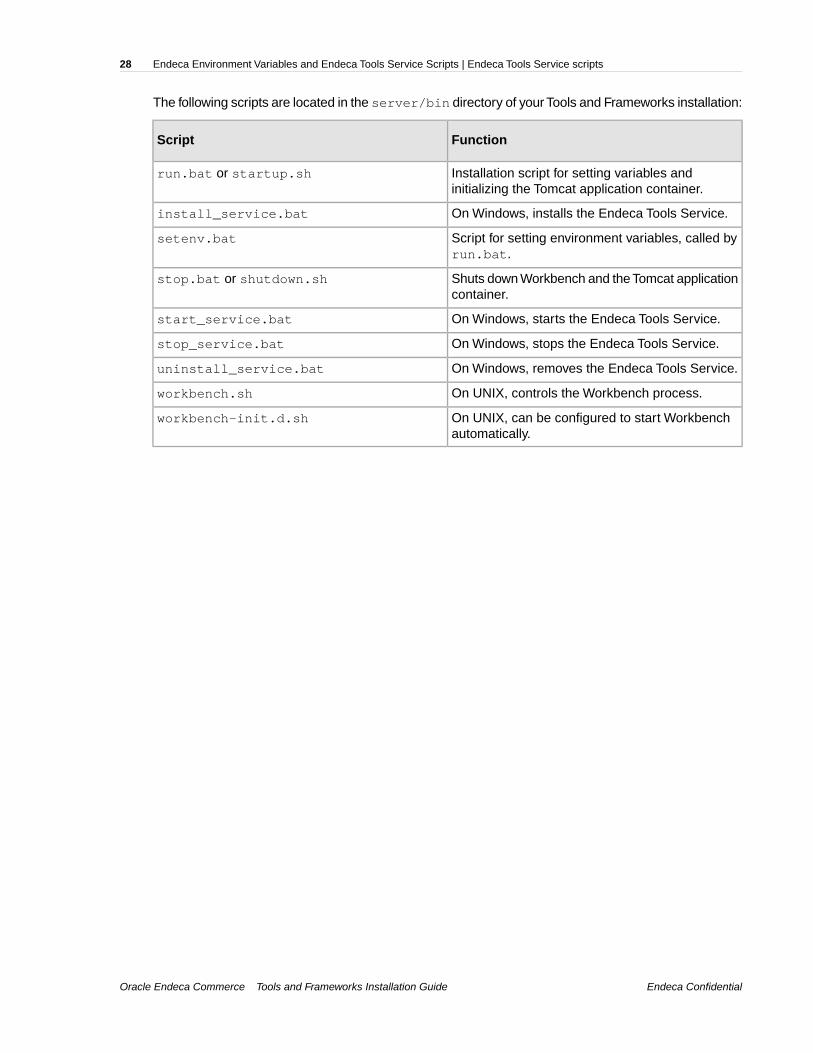
The following scripts are located in the server/bin directory of your Tools and Frameworks installation:
FunctionScript
Installation script for setting variables andinitializing the Tomcat application container.
run.bat or startup.sh
On Windows, installs the Endeca Tools Service.install_service.bat
Script for setting environment variables, called byrun.bat.
setenv.bat
Shuts down Workbench and the Tomcat applicationcontainer.
stop.bat or shutdown.sh
On Windows, starts the Endeca Tools Service.start_service.bat
On Windows, stops the Endeca Tools Service.stop_service.bat
On Windows, removes the Endeca Tools Service.uninstall_service.bat
On UNIX, controls the Workbench process.workbench.sh
On UNIX, can be configured to start Workbenchautomatically.
workbench-init.d.sh
Endeca ConfidentialOracle Endeca Commerce Tools and Frameworks Installation Guide
Endeca Environment Variables and Endeca Tools Service Scripts | Endeca Tools Service scripts28

Appendix B
Endeca Tools Service and EAC PortsReference
This section covers the steps required to change the Endeca Tools Service and EAC ports from thedefault values.
About the Endeca Tools Service portsYou can change the default ports for the Endeca Tools Service, as long as you choose a new portthat is not being used.
The ports on which the Endeca Tools Service and Endeca Workbench listen are specified in theserver.xml file, which is located in the %ENDECA_TOOLS_CONF%\conf directory ($ENDE¬CA_TOOLS_CONF/conf for UNIX).
The server.xml file also specifies the default server port. The default values are:
• Port 8006 for the Endeca Tools Service port.• Port 8007 for the Endeca Tools Service Promotion port.• Port 8446 for the Endeca Tools Service SSL port.• Port 8084 for the Endeca Tools Service shutdown port.
Additionally, the Endeca Tools Service port is listed in the%ENDECA_TOOLS_CONF%\conf\webstudio.properties file($ENDECA_TOOLS_CONF/conf/webstudio.properties on UNIX).
Changing the Endeca Tools Service portYou can change the Endeca Tools Service port by editing the server.xml file located in the%ENDECA_TOOLS_CONF%\conf directory ($ENDECA_TOOLS_CONF/conf on UNIX).You must alsoupdate this information in the %ENDECA_TOOLS_CONF%\conf\webstudio.properties file.
To change the Endeca Tools Service port:
1. Stop the Endeca Tools Service.
2. Open the %ENDECA_TOOLS_CONF%\conf\server.xml file in a text editor.
3. Find the non-SSL HTTP/1.1 Connector element:
<!-- Define a non-SSL HTTP/1.1 Connector on port 8006 --> <Connector port="8006" maxHttpHeaderSize="8192"

maxThreads="150" minSpareThreads="25" maxSpareThreads="75" enableLookups="true" redirectPort="8446" acceptCount="10" connectionTimeout="60000" disableUploadTimeout="true" debug="0" URIEncoding="UTF-8"/>
4. Change the number in the port attribute to the new port you want Workbench to use.
Note: You must choose a port not already in use.
5. Save and close the server.xml file.
6. Open the %ENDECA_TOOLS_CONF%\conf\webstudio.properties file in a text editor($ENDECA_TOOLS_CONF/conf/webstudio.properties on UNIX).
7. Find the line that specifies com.endeca.webstudio.port:
# This must be set to a non-SSL port, even if you are using the# SSL version of Endeca Workbenchcom.endeca.webstudio.port=8006
8. Change the port number to the new port that you specified in Step 4.
9. Save and close the file.
10. In your application, and the Discover Electronics reference application, change the Endeca ToolsService Promotion port by doing the following:
a) Open the <application name>\WEB-INF\assembler.properties file in a text editor.For example, in the Discover Electronics reference application (on Windows) this file is inC:\Endeca\ToolsAndFrameworks\3.1.0\reference\discover-electronics-authoring\WEB-INF\assembler.properties
b) Find the workbench.publishing.serverPort property and change the value to the newport you want to use.
c) Save and close the assembler.properties file.
11. Start the Endeca Tools Service.
Changing the Endeca Tools Service Promotion portYou can change the Endeca Tools Service Promotion port by editing the server.xml file located inthe %ENDECA_TOOLS_CONF%\conf directory ($ENDECA_TOOLS_CONF/conf on UNIX).You mustalso update this information in the %ENDECA_TOOLS_CONF%\conf\webstudio.properties file.
To change the Endeca Tools Service Promotion port:
1. Stop the Endeca Tools Service.
2. Open the %ENDECA_TOOLS_CONF%\conf\webstudio.properties file in a text editor($ENDECA_TOOLS_CONF/conf/webstudio.properties on UNIX).
3. Find the line that specifies com.endeca.webstudio.promotion.port:
# Port opened for promotion of content from Workbench to# Live Environments.com.endeca.webstudio.promotion.port=8007
4. Change the port number to the new port you want Workbench to use.
5. Save and close the file.
6. In your application, and the Discover Electronics reference application, change the Endeca ToolsService Promotion port by doing the following:
Endeca ConfidentialOracle Endeca Commerce Tools and Frameworks Installation Guide
Endeca Tools Service and EAC Ports Reference | About the Endeca Tools Service ports30

Open the <application name>\WEB-INF\assembler.properties file in a text editor.For example, in the Discover Electronics reference application (on Windows) this file is inC:\Endeca\ToolsAndFrameworks\3.1.0\reference\discover-electronics-authoring\WEB-INF\assembler.properties
a)
b) Find the workbench.publishing.serverPort property and change the value to the newport you want to use.
c) Save and close the assembler.properties file.
7. Start the Endeca Tools Service.
Changing the Endeca Tools Service SSL portYou can change the Endeca Tools Service SSL port by editing the server.xml file located in the%ENDECA_TOOLS_CONF%\conf directory ($ENDECA_TOOLS_CONF/conf on UNIX).You must alsoupdate this information in the %ENDECA_TOOLS_CONF%\conf\webstudio.properties file.
To change the Endeca Tools Service SSL port:
1. Stop the Endeca Tools Service.
2. Open the %ENDECA_TOOLS_CONF%\conf\server.xml file in a text editor.
3. Find the SSL HTTP/1.1 Connector element:
<Connector port="8446" SSLEnabled="true" protocol="org.apache.coyote.http11.Http11Protocol" maxPostSize="0" maxThreads="150" scheme="https" secure="true" clientAuth="false" sslProtocol="TLS" keystoreFile="conf/eac.ks" keystorePass="eacpass" truststoreFile="conf/ca.ks" truststorePass="eacpass" />
4. Change the number in the port attribute to the new SSL port you want the Endeca Tools Serviceto use.
Note: You must choose a port not already in use.
5. Save and close the server.xml file.
6. Save and close the file.
7. Start the Endeca Tools Service.
Changing the Endeca Tools Service shutdown portYou can change the Endeca Tools Service shutdown port by editing the server.xml file located inthe %ENDECA_TOOLS_CONF%\conf directory ($ENDECA_TOOLS_CONF/conf on UNIX). This port isused internally by the Endeca Tools service software. It is typically only necessary to change it incases where you have port number conflicts.
To change the Endeca Tools Service shutdown port:
1. Stop the Endeca Tools Service.
2. Open the server.xml file in a text editor.
Oracle Endeca Commerce Tools and Frameworks Installation GuideEndeca Confidential
31Endeca Tools Service and EAC Ports Reference | About the Endeca Tools Service ports

3. Find the Server element in the file:
<!-- Note: A "Server" is not itself a "Container", so you may not define subcomponents such as "Valves" at this level. Documentation at /docs/config/server.html --><Server port="8084" shutdown="SHUTDOWN">
4. Change the number in the port attribute to the new port you want to use.
Note: You must choose a port not already in use.
5. Save and close the server.xml file.
6. Start the Endeca Tools Service.
Updating Workbench to use non-default EAC settingsIf the Endeca Application Controller is not running at the default location of localhost:8888, youmust update this information in the %ENDECA_TOOLS_CONF%\conf\webstudio.properties file($ENDECA_TOOLS_CONF/conf/webstudio.properties on UNIX).
To update the Workbench EAC information:
1. Stop the Endeca Tools Service.
2. Open the webstudio.properties file in a text editor.
3. Find the lines that specify the EAC server and port:
# The EAC Central Server that this Workbench usescom.endeca.webstudio.eac.hostname=localhostcom.endeca.webstudio.eac.port=8888
4. Replace localhost with the hostname of the EAC host.
5. Replace 8888 with the EAC port.
6. Save and close the file.
7. Start the Endeca Tools Service.
Endeca ConfidentialOracle Endeca Commerce Tools and Frameworks Installation Guide
Endeca Tools Service and EAC Ports Reference | Updating Workbench to use non-default EAC settings32

Appendix C
Communicating with the MDEX Engine
This section covers configuring the Tools and Frameworks to communicate with the MDEX Engineand MDEX Web services.
Setting up a cross-domain policy fileBy default, MDEX Web services are accessible from Experience Manager and other Endeca Workbenchtools only if the MDEX Engine and Workbench are hosted on the same domain.
For example, if Workbench is hosted on apps.example.com, the MDEX must also be accessible atapps.example.com, and Experience Manager must be configured to access the MDEX Engine at"apps.example.com". Using the host's IP address or an alias hostname, such as "localhost"causes a "Security Error" alert box to appear in Experience Manager when an editor attempts to accessthe MDEX Engine.
If the MDEX Engine is hosted on a different domain from Workbench, you must set up a cross-domainpolicy file on the MDEX Engine server. These steps apply to any Flex client application thatcommunicates with an MDEX Engine via Web services.
To configure cross-domain access to MDEX Web services from a Flex client:
1. Navigate to the /conf/dtd/xform directory of your MDEX Engine installation, for example:
C:\Endeca\MDEX\6.3.0\conf\dtd\xform
2. Create an Adobe Flash cross-domain policy file, crossdomain.xml.
3. Configure your crossdomain.xml file to grant access to all domains hosting instances ofWorkbench.
An example is provided below:
<?xml version="1.0"?><!DOCTYPE cross-domain-policy SYSTEM "http://www.macrome¬dia.com/xml/dtds/cross-domain-policy.dtd"><cross-domain-policy> <allow-access-from domain="*.example.com" /> <allow-http-request-headers-from domain="*" headers="SOAPAction" /></cross-domain-policy>
• The <allow-access-from> element grants access to the local MDEX Web service from aset of domains. The domain attribute may be specific, or may include a wildcard, as shownabove.You can include any number of <allow-access-from> elements, each for a differentdomain.

• The <allow-http-request-headers-from> element as specified above is required. Itenables Flash clients to communicate with the MDEX using the SOAP protocol.
For a complete specification of the cross-domain policy file format, please see the Adobe documentationat http://www.adobe.com/devnet/articles/crossdomain_policy_file_spec.html.
Endeca ConfidentialOracle Endeca Commerce Tools and Frameworks Installation Guide
Communicating with the MDEX Engine | Setting up a cross-domain policy file34

Index
A
Adobe Flash 9
C
cross-domain policy file 33crossdomain.xml 33
E
EAC port, updating 32Endeca software requirements 11Endeca Tools Service
batch files 16changing user 15configuring 15creating a user 15default ports 29installing 14scripts 28starting 15stopping 15
environment variablesENDECA_TOOLS_CONF 27ENDECA_TOOLS_ROOT 27
I
installingEndeca Tools Service 14UNIX 16verifying 22Windows 13
J
Java 9
O
Oracle Endeca Tools and Frameworksabout 9installing 13, 16packaging 18requirements 9
P
packaging 28prerequisites 9, 11
R
reference applicationuninstalling 25
requirementsEndeca software requirements 11operating system 9software 9
S
software requirements 9, 11
T
troubleshooting 23
U
uninstallingreference application 25UNIX 26Windows 26
UNIXstarting Workbench automatically 17
V
verifying the installation 22
W
Windows, creating Endeca Tools Service on 14Workbench port 29Workbench process
starting 18starting automatically 17stopping 18