
Inserting System r96bda424cfcc34d9dd1a-0a7f10f87519dba22d2dbc6233a731e5.r41.cf2.rackcdn.com/...load...
49
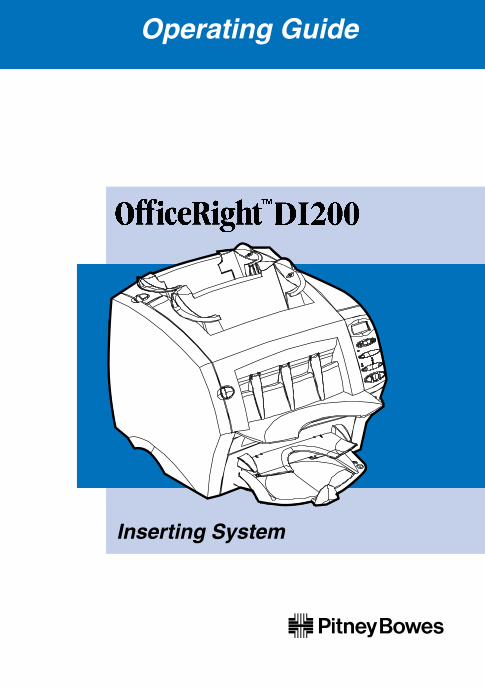
Operating Guide Inserting System
Transcript of Inserting System r96bda424cfcc34d9dd1a-0a7f10f87519dba22d2dbc6233a731e5.r41.cf2.rackcdn.com/...load...
rating Guide Operating Guide
Inserting System
00 Front/Back Covers 6/16/03, 4:32 PM3
SV40189-OG Revision B June 2003 ©2003 Pitney Bowes Inc.
All rights reserved. This book may not be reproduced in whole or in part in any fashionor stored in a retrieval system of any type or transmitted by any means, electronicallyor mechanically, without the express, written permission of Pitney Bowes.
We have made every reasonable effort to ensure the accuracy and usefulness of thismanual; however, we cannot assume responsibility for errors or omissions or liabilityfor the misuse or misapplication of our products.
Due to our continuing program of product improvement, equipment and materialspecifications as well as performance features are subject to change without notice.
OfficeRight is a trademark and E-Z Seal is a registered trademark of PitneyBowes.
Statement of FCC ComplianceThis equipment has been tested and found to comply with the limits for a Class Adigital device, pursuant to part 15 of the FCC rules. These limits are designed toprovide reasonable protection against interference when the equipment is operatedin a commercial environment. This equipment generates, uses, and can radiate radiofrequency energy and, if not installed and used in accordance with the instructionmanual, may cause interference to radio communications. Operation of this equipmentin a residential area is likely to cause interference, in which case the user will berequired to correct the interference at his own expense.
CanadaThis class A digital apparatus complies with Canadian ICES-003.
Cet appareil numérique de la classe A est conforme á la norme NMB-003 du Canada.
CAUTION: Changes or modifications to this equipment not expressly approved bythe party responsible for compliance (Pitney Bowes) could void the user’s authorityto operate the equipment.
01 Inside Front Cover 6/16/03, 4:32 PM2
1OfficeRight™ DI200 Operator’s Guide
Contents1. Introduction
Important Safety Information ...................................................... 2About Your Machine .................................................................... 3Machine Configurations .............................................................. 3Machine Controls, Indicators and Features ................................ 4The Controls ............................................................................... 6
2. Preparing and LoadingConnecting Power and Turning On ............................................. 8Filling the Moistener ................................................................... 9Loading the Sheet Feeders (Feeders A1 and A2) .................... 10Loading the Envelope Feeder (Feeder B) ................................. 11Loading the Insert Feeder (Feeder C) ...................................... 12
3. Running JobsJob Listing ................................................................................ 13Job 1: One Folded Sheet into an Envelope ............................ 15Job 2: One Folded Sheet, No Envelope (Fold Only) .............. 16Job 3: One Folded Sheet + One Insert into an Envelope ....... 17Job 4: One Insert into an Envelope ........................................ 19Job 5: Two Folded Sheets into an Envelope ........................... 20Job 6: Two Collated, Folded Sheets into an Envelope ........... 21Job 7: Two Folded Sheets, No Envelope (Fold Only) ............. 22Job 8: Two Collated, Folded Sheets, No Envelope
(Fold Only) ................................................................... 23Job 9: Two Folded Sheets and an Insert into an Envelope .... 24Job 10: Two Collated, Folded Sheets and an Insert into an
Envelope ...................................................................... 26The Manual Feeder M .............................................................. 28
4. Advanced Menu OptionsReset Counter .......................................................................... 29Change Paper Size ................................................................... 30Move the Address in the Window ............................................. 30Sheet Double Detect On/Off ..................................................... 31Insert Double Detect On/Off ..................................................... 32Safe Seal On/Off ....................................................................... 32
5. ReferenceError Messages ................................................................... 33-36General Troubleshooting ........................................................... 37Clearing Material Jams ............................................................. 38Getting Help ............................................................................. 39Ordering Supplies ..................................................................... 40Material Specifications .............................................................. 41Machine Specifications ............................................................. 42Index ....................................................................................... 43
Page
02 A5 p1-10 6/16/03, 4:32 PM1

2 OfficeRight™ DI200 Operator’s Guide
Safety
• Please read all the instructions in this manual before you attempt tooperate your OfficeRight™ DI200. Save all instructions for future use.
WARNING! Always use the power cord supplied withyour machine and plug it into a properly grounded walloutlet that's located near the machine and easilyaccessible. Failure to properly ground the machine canresult in severe personal injury and/or fire.
• DO NOT use a wall outlet controlled by a wall switch or one that isshared with other equipment.
• Do not use an adapter plug on the line cord or wall outlet.• Do not remove the ground pin from the line cord.• Make sure the area in front of the wall outlet into which the machine is
plugged is free from obstruction.• DO NOT route the power cord over sharp edges or trap it between
pieces of furniture. Make sure there is no strain on the power cord.• To reduce the risk of fire or electrical shock, DO NOT attempt to
remove covers or disassemble the inserter. The cabinet encloseshazardous parts. Refer servicing to qualified personnel.
• Keep fingers, long hair, jewelry and loose clothing away from movingparts at all times.
• Never reach into the machine while it is running. Avoid touchingmoving parts or materials while the machine is in use. Before clearinga jam, be sure all machine mechanisms come to a complete stop.
• Know your equipment, especially how to stop it in the event of anemergency.
• When removing jammed material, avoid using too much force toprotect against minor personal injury and damage to the equipment.
• Use the equipment only for its intended purpose.• Always follow the specific occupational safety and health standards
prescribed for your workplace.CAUTION! If you relocate an OfficeRight™ DI200 thathas the optional Second Sheet Feeder A2 installed,remove it from the Second Sheet Feeder first—that is,as you lift it clear, make sure it fully disengages fromthe Second Sheet Feeder. Obtain help if necessary.
Important Safety Information
1. INTRODUCTION
3OfficeRight™ DI200 Operator’s Guide
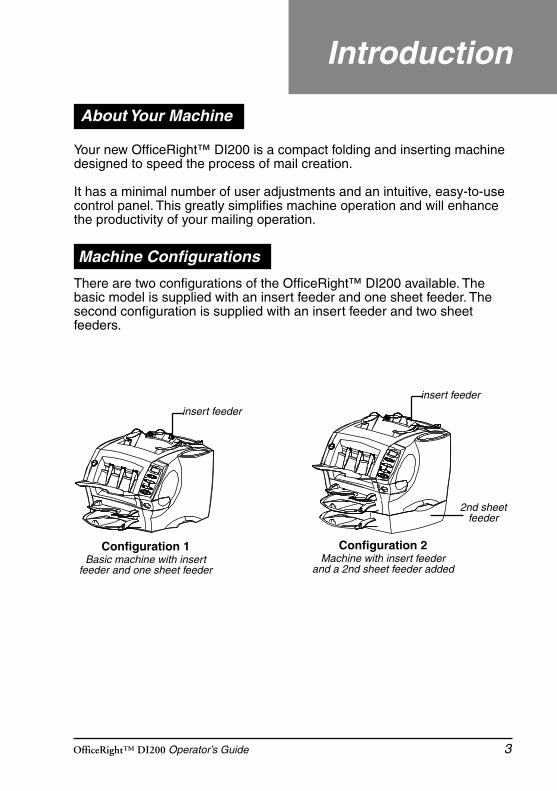
Your new OfficeRight™ DI200 is a compact folding and inserting machinedesigned to speed the process of mail creation.
It has a minimal number of user adjustments and an intuitive, easy-to-usecontrol panel. This greatly simplifies machine operation and will enhancethe productivity of your mailing operation.
There are two configurations of the OfficeRight™ DI200 available. Thebasic model is supplied with an insert feeder and one sheet feeder. Thesecond configuration is supplied with an insert feeder and two sheetfeeders.
Introduction
Machine Configurations
About Your Machine
Configuration 1Basic machine with insert
feeder and one sheet feeder
insert feeder
Configuration 2Machine with insert feeder
and a 2nd sheet feeder added
2nd sheetfeeder
insert feeder
02 A5 p1-10 6/16/03, 4:32 PM3

4 OfficeRight™ DI200 Operator’s Guide
1 2
3
4
5
6
7
12
11
10
9
8
1. Insert Cover E Release Button (Blue Button Marked E)Press this button to release the insert cover if a jam occurs in thisarea of the machine. The display prompts you if you need to open thiscover to remove jammed material.
2. Insert Feeder (Not on All Models)Use this feeder to add additional inserts to your envelope. Materialfed from this feeder cannot be folded by the inserter. However, thisfeeder is especially suited to feeding pre-folded or thicker inserts.
3. Operating Guide SlotStore this Operating Guide in the slot provided so that it doesn’t getlost and is readily available when you need it.
4. Control PanelThis is where you enter commands and where the machine informsyou of its status. See pages 6 and 7 for a full explanation of whateach button does.
Machine Controls, Indicators and Features
Introduction
02 A5 p1-10 6/16/03, 4:32 PM4
5OfficeRight™ DI200 Operator’s Guide
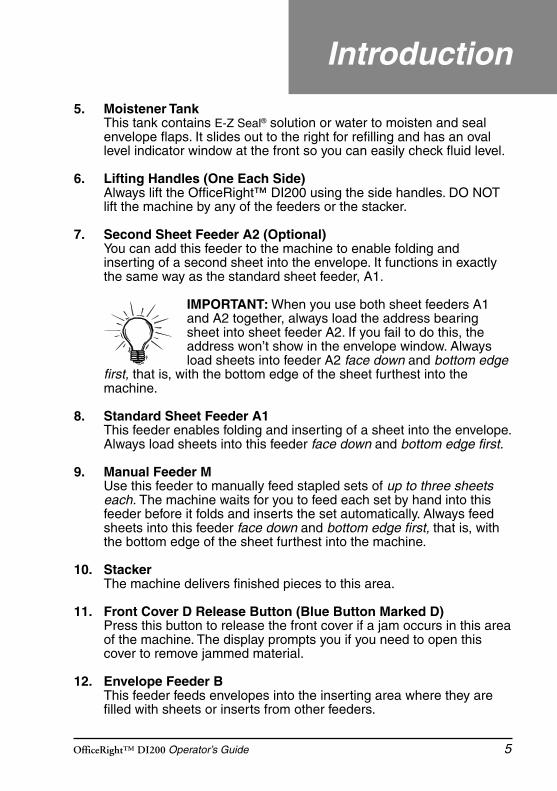
5. Moistener TankThis tank contains E-Z Seal® solution or water to moisten and sealenvelope flaps. It slides out to the right for refilling and has an ovallevel indicator window at the front so you can easily check fluid level.
6. Lifting Handles (One Each Side)Always lift the OfficeRight™ DI200 using the side handles. DO NOTlift the machine by any of the feeders or the stacker.
7. Second Sheet Feeder A2 (Optional)You can add this feeder to the machine to enable folding andinserting of a second sheet into the envelope. It functions in exactlythe same way as the standard sheet feeder, A1.
IMPORTANT: When you use both sheet feeders A1and A2 together, always load the address bearingsheet into sheet feeder A2. If you fail to do this, theaddress won’t show in the envelope window. Alwaysload sheets into feeder A2 face down and bottom edge
first, that is, with the bottom edge of the sheet furthest into themachine.
8. Standard Sheet Feeder A1This feeder enables folding and inserting of a sheet into the envelope.Always load sheets into this feeder face down and bottom edge first.
9. Manual Feeder MUse this feeder to manually feed stapled sets of up to three sheetseach. The machine waits for you to feed each set by hand into thisfeeder before it folds and inserts the set automatically. Always feedsheets into this feeder face down and bottom edge first, that is, withthe bottom edge of the sheet furthest into the machine.
10. StackerThe machine delivers finished pieces to this area.
11. Front Cover D Release Button (Blue Button Marked D)Press this button to release the front cover if a jam occurs in this areaof the machine. The display prompts you if you need to open thiscover to remove jammed material.
12. Envelope Feeder BThis feeder feeds envelopes into the inserting area where they arefilled with sheets or inserts from other feeders.
Introduction
02 A5 p1-10 6/16/03, 4:32 PM5
6 OfficeRight™ DI200 Operator’s Guide
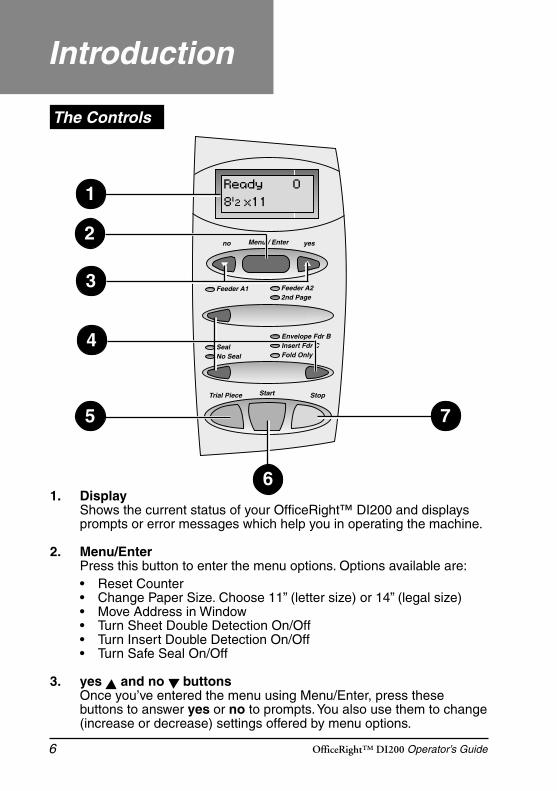
Feeder A1
Menu / Enterno yes
Feeder A2 2nd Page
SealNo Seal
Trial Piece StopStart
Envelope Fdr B Insert Fdr CFold Only
1. DisplayShows the current status of your OfficeRight™ DI200 and displaysprompts or error messages which help you in operating the machine.
2. Menu/EnterPress this button to enter the menu options. Options available are:• Reset Counter• Change Paper Size. Choose 11” (letter size) or 14” (legal size)• Move Address in Window• Turn Sheet Double Detection On/Off• Turn Insert Double Detection On/Off• Turn Safe Seal On/Off
3. yes and no buttonsOnce you’ve entered the menu using Menu/Enter, press thesebuttons to answer yes or no to prompts. You also use them to change(increase or decrease) settings offered by menu options.
1
2
3
4
5 7
6
The Controls
Introduction
02 A5 p1-10 6/16/03, 4:32 PM6
7OfficeRight™ DI200 Operator’s Guide
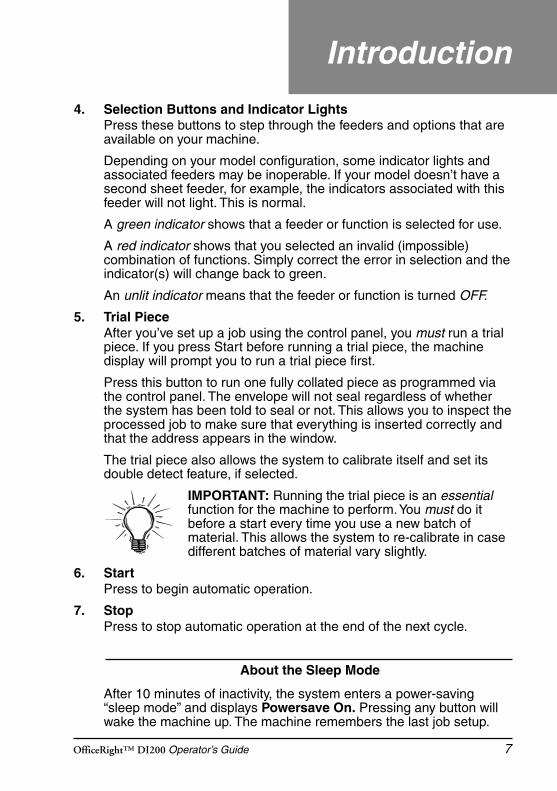
4. Selection Buttons and Indicator LightsPress these buttons to step through the feeders and options that areavailable on your machine.
Depending on your model configuration, some indicator lights andassociated feeders may be inoperable. If your model doesn’t have asecond sheet feeder, for example, the indicators associated with thisfeeder will not light. This is normal.
A green indicator shows that a feeder or function is selected for use.
A red indicator shows that you selected an invalid (impossible)combination of functions. Simply correct the error in selection and theindicator(s) will change back to green.
An unlit indicator means that the feeder or function is turned OFF.
5. Trial PieceAfter you’ve set up a job using the control panel, you must run a trialpiece. If you press Start before running a trial piece, the machinedisplay will prompt you to run a trial piece first.
Press this button to run one fully collated piece as programmed viathe control panel. The envelope will not seal regardless of whetherthe system has been told to seal or not. This allows you to inspect theprocessed job to make sure that everything is inserted correctly andthat the address appears in the window.
The trial piece also allows the system to calibrate itself and set itsdouble detect feature, if selected.
IMPORTANT: Running the trial piece is an essentialfunction for the machine to perform. You must do itbefore a start every time you use a new batch ofmaterial. This allows the system to re-calibrate in casedifferent batches of material vary slightly.
6. StartPress to begin automatic operation.
7. StopPress to stop automatic operation at the end of the next cycle.
About the Sleep Mode
After 10 minutes of inactivity, the system enters a power-saving“sleep mode” and displays Powersave On. Pressing any button willwake the machine up. The machine remembers the last job setup.
Introduction
02 A5 p1-10 6/16/03, 4:32 PM7
8 OfficeRight™ DI200 Operator’s Guide
This chapter explains how to connect and load the machine.
Once you understand the subjects covered in this chapter, you can quicklyset up and use the machine for a variety of jobs as explained later inChapter 3, Running Jobs.
IMPORTANT: Before running a job, make sure your material meets ourpublished specifications (see Specifications on page 41). This helpsassure reliable operation and greatest productivity.
WARNING! Read all the safety information on page 2 before connectingthe machine.
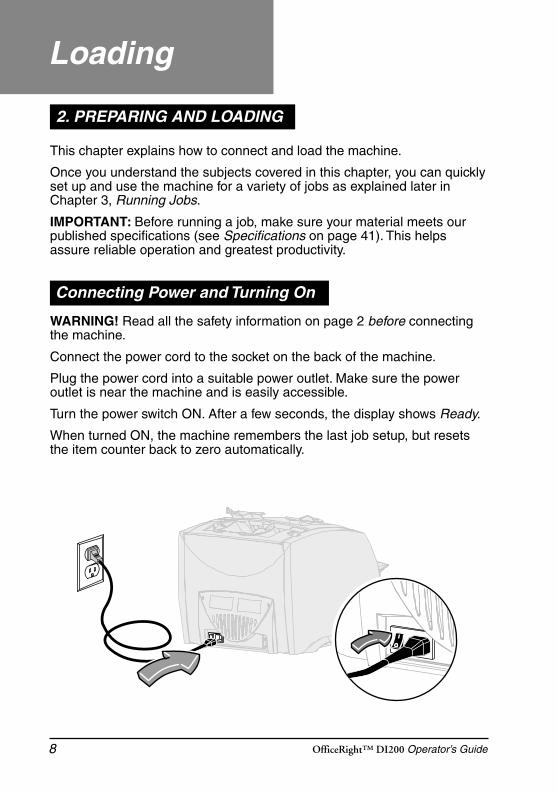
Connect the power cord to the socket on the back of the machine.
Plug the power cord into a suitable power outlet. Make sure the poweroutlet is near the machine and is easily accessible.
Turn the power switch ON. After a few seconds, the display shows Ready.
When turned ON, the machine remembers the last job setup, but resetsthe item counter back to zero automatically.
Loading
2. PREPARING AND LOADING
Connecting Power and Turning On
02 A5 p1-10 6/16/03, 4:32 PM8
9OfficeRight™ DI200 Operator’s Guide
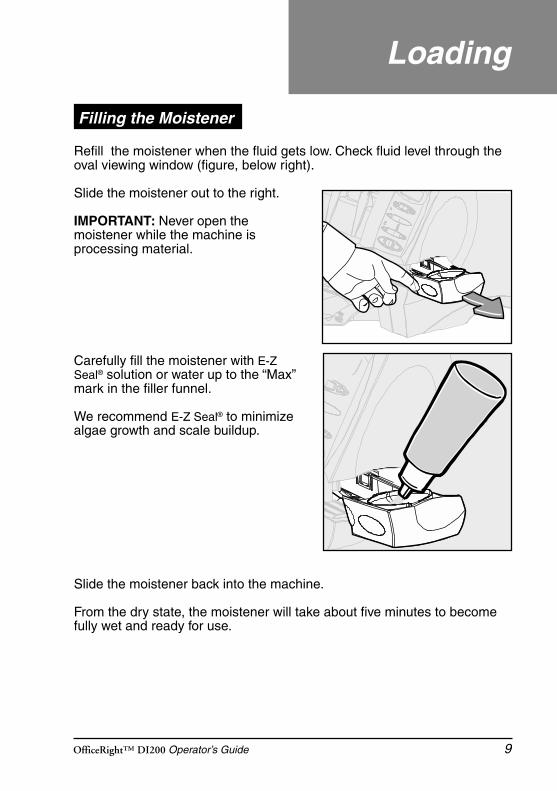
Refill the moistener when the fluid gets low. Check fluid level through theoval viewing window (figure, below right).
Slide the moistener out to the right.
IMPORTANT: Never open themoistener while the machine isprocessing material.
Carefully fill the moistener with E-ZSeal® solution or water up to the “Max”mark in the filler funnel.
We recommend E-Z Seal® to minimizealgae growth and scale buildup.
Slide the moistener back into the machine.
From the dry state, the moistener will take about five minutes to becomefully wet and ready for use.
Loading
Filling the Moistener
02 A5 p1-10 6/16/03, 4:32 PM9
10 OfficeRight™ DI200 Operator’s Guide
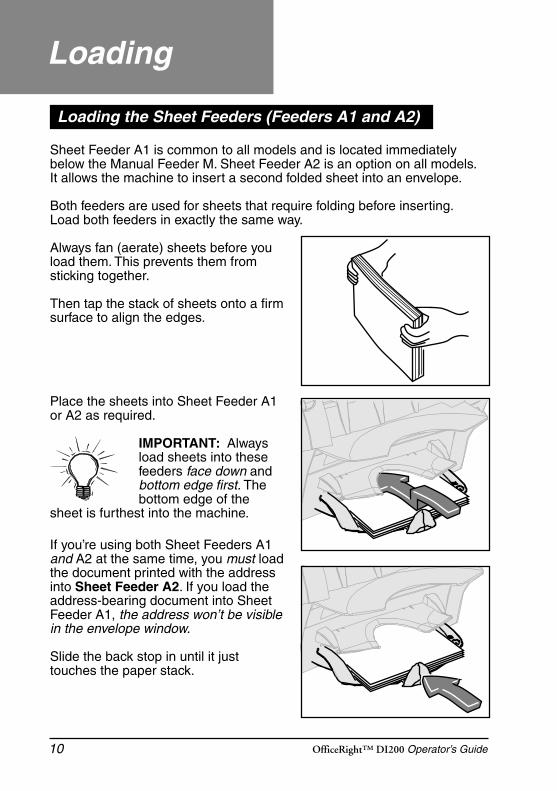
Sheet Feeder A1 is common to all models and is located immediatelybelow the Manual Feeder M. Sheet Feeder A2 is an option on all models.It allows the machine to insert a second folded sheet into an envelope.
Both feeders are used for sheets that require folding before inserting.Load both feeders in exactly the same way.
Always fan (aerate) sheets before youload them. This prevents them fromsticking together.
Then tap the stack of sheets onto a firmsurface to align the edges.
Place the sheets into Sheet Feeder A1or A2 as required.
IMPORTANT: Alwaysload sheets into thesefeeders face down andbottom edge first. Thebottom edge of the
sheet is furthest into the machine.
If you’re using both Sheet Feeders A1and A2 at the same time, you must loadthe document printed with the addressinto Sheet Feeder A2. If you load theaddress-bearing document into SheetFeeder A1, the address won’t be visiblein the envelope window.
Slide the back stop in until it justtouches the paper stack.
Loading
Loading the Sheet Feeders (Feeders A1 and A2)
02 A5 p1-10 6/16/03, 4:32 PM10
11OfficeRight™ DI200 Operator’s Guide
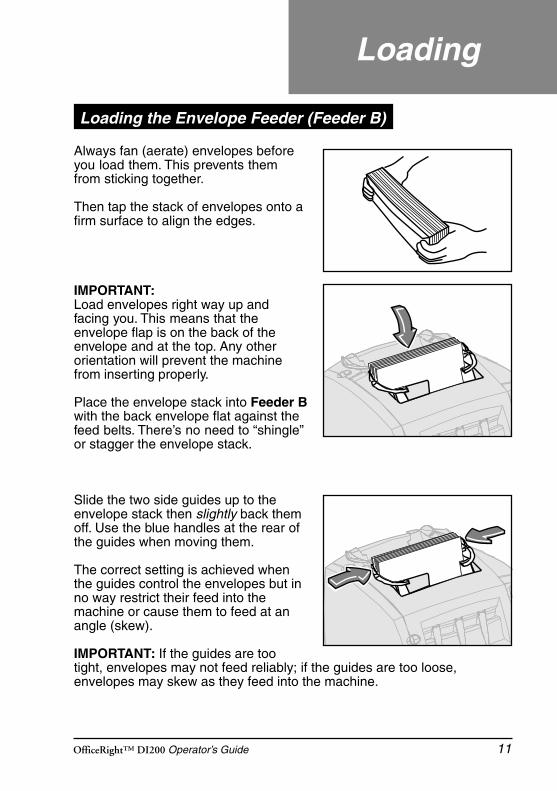
Always fan (aerate) envelopes beforeyou load them. This prevents themfrom sticking together.
Then tap the stack of envelopes onto afirm surface to align the edges.
IMPORTANT:Load envelopes right way up andfacing you. This means that theenvelope flap is on the back of theenvelope and at the top. Any otherorientation will prevent the machinefrom inserting properly.
Place the envelope stack into Feeder Bwith the back envelope flat against thefeed belts. There’s no need to “shingle”or stagger the envelope stack.
Slide the two side guides up to theenvelope stack then slightly back themoff. Use the blue handles at the rear ofthe guides when moving them.
The correct setting is achieved whenthe guides control the envelopes but inno way restrict their feed into themachine or cause them to feed at anangle (skew).
IMPORTANT: If the guides are tootight, envelopes may not feed reliably; if the guides are too loose,envelopes may skew as they feed into the machine.
Loading
Loading the Envelope Feeder (Feeder B)
03 A5 p11-18 6/16/03, 4:32 PM11
12 OfficeRight™ DI200 Operator’s Guide
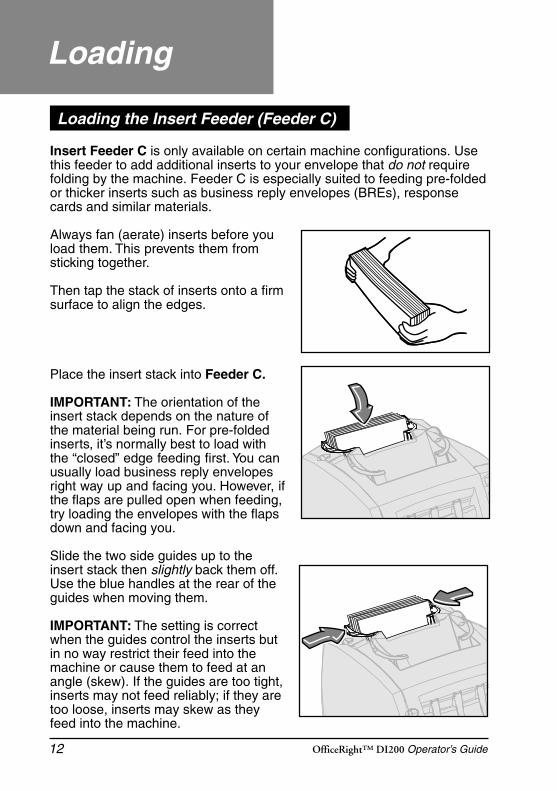
Insert Feeder C is only available on certain machine configurations. Usethis feeder to add additional inserts to your envelope that do not requirefolding by the machine. Feeder C is especially suited to feeding pre-foldedor thicker inserts such as business reply envelopes (BREs), responsecards and similar materials.
Always fan (aerate) inserts before youload them. This prevents them fromsticking together.
Then tap the stack of inserts onto a firmsurface to align the edges.
Place the insert stack into Feeder C.
IMPORTANT: The orientation of theinsert stack depends on the nature ofthe material being run. For pre-foldedinserts, it’s normally best to load withthe “closed” edge feeding first. You canusually load business reply envelopesright way up and facing you. However, ifthe flaps are pulled open when feeding,try loading the envelopes with the flapsdown and facing you.
Slide the two side guides up to theinsert stack then slightly back them off.Use the blue handles at the rear of theguides when moving them.
IMPORTANT: The setting is correctwhen the guides control the inserts butin no way restrict their feed into themachine or cause them to feed at anangle (skew). If the guides are too tight,inserts may not feed reliably; if they aretoo loose, inserts may skew as theyfeed into the machine.
Loading
Loading the Insert Feeder (Feeder C)
03 A5 p11-18 6/16/03, 4:32 PM12
13OfficeRight™ DI200 Operator’s Guide
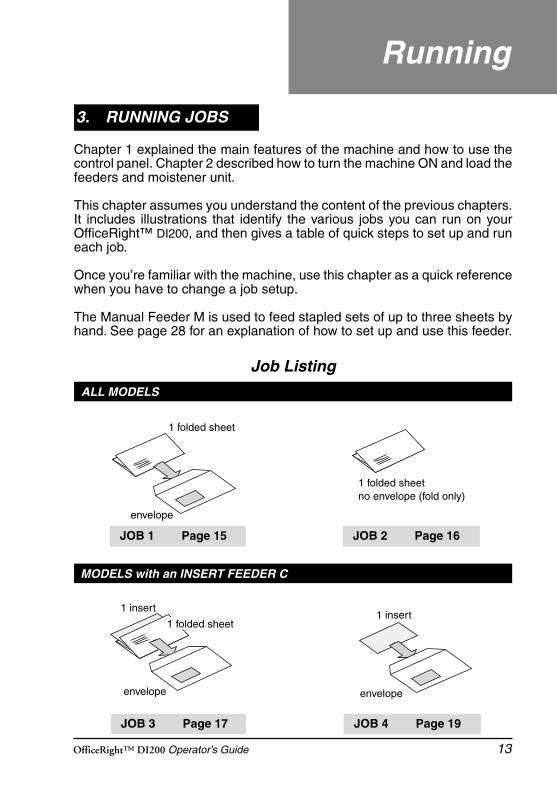
Chapter 1 explained the main features of the machine and how to use thecontrol panel. Chapter 2 described how to turn the machine ON and load thefeeders and moistener unit.
This chapter assumes you understand the content of the previous chapters.It includes illustrations that identify the various jobs you can run on yourOfficeRight™ DI200, and then gives a table of quick steps to set up and runeach job.
Once you’re familiar with the machine, use this chapter as a quick referencewhen you have to change a job setup.
The Manual Feeder M is used to feed stapled sets of up to three sheets byhand. See page 28 for an explanation of how to set up and use this feeder.
envelope
1 folded sheet
JOB 1 Page 15
1 folded sheetno envelope (fold only)
JOB 2 Page 16
JOB 3 Page 17 JOB 4 Page 19
envelope
1 insert
1 folded sheet
envelope
1 insert
Running
ALL MODELS
MODELS with an INSERT FEEDER C
3. RUNNING JOBS
Job Listing
03 A5 p11-18 6/16/03, 4:32 PM13

14 OfficeRight™ DI200 Operator’s Guide
MODELS with an OPTIONAL SECOND SHEET FEEDER A2
JOB 5 Page 20 JOB 6 Page 21
MODELS with an INSERT FEEDER C and SECOND SHEETFEEDER A2
JOB 9 Page 24 JOB 10 Page 26
envelope
2 folded sheets
envelope
2 folded sheets (collated)
JOB 7 Page 22 JOB 8 Page 23
2 folded sheetsno envelope (fold only)
2 folded sheets (collated)no envelope (fold only)
envelope
1 insert2 folded sheets
envelope
1 insert2 folded sheets (collated)
* see note below
* see note below
NOTE: Jobs marked with an asterisk (*) use the second sheet feeder, A2,in “2nd Page” mode to feed 2-sheet collated sets. You must load sheetsinto the feeder in their collated sequence: first page, second page, firstpage, second page, etc., just as they are printed by a typical office laserprinter.
Running
* see note below
03 A5 p11-18 6/16/03, 4:32 PM14

15OfficeRight™ DI200 Operator’s Guide
Model Required: Any OfficeRight™DI200
Notes: If your machine has the optional 2nd sheetfeeder A2, you can use it instead of A1, as long asyou load and select it as described in steps 1 and 3below.
Step Action Tips More Details…
1 Make sure paper size Choose 11” or 14” Page 30setting is correct
2 Load sheets Load face down Page 10into Sheet Feeder and bottom edge firstA1
3 Load envelopes Load right way up Page 11into Feeder B and facing you
4 Press button Make sure green Page 6, 7to select Feeder A1 indicator lights
5 Press button to Make sure green Page 6, 7select Envelope indicator lightsFdr B
6 Press button to Make sure moistener has Page 6, 7choose Seal or E-Z Seal® or waterNo Seal
7 Press Trial Piece Trial piece will not Page 6, 7button and check seal—this is normaltrial piece
8 Press Start button Stop button will stop Page 6, 7to run job machine at end of cycle
Problems? See Error Messages, page 33, and Troubleshooting, page 37
Job 1
envelope
1 folded sheetOne Folded Sheet into an Envelope
03 A5 p11-18 6/16/03, 4:32 PM15
16 OfficeRight™ DI200 Operator’s Guide
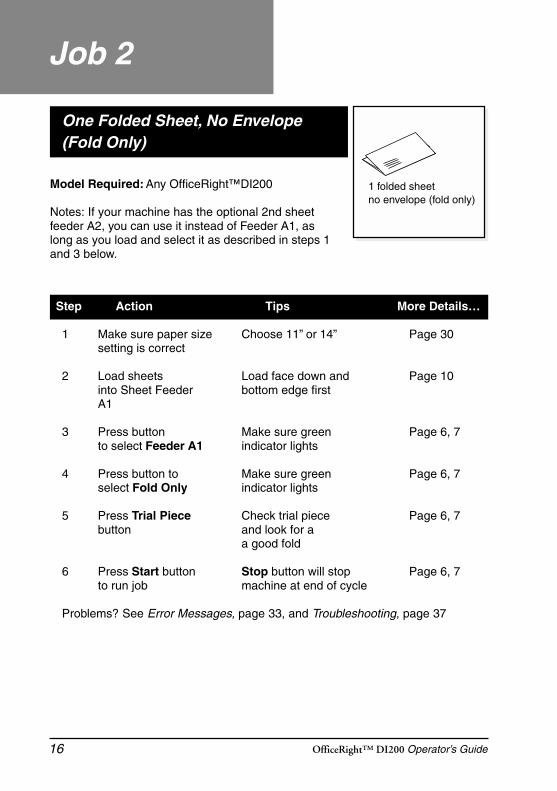
Job 2
One Folded Sheet, No Envelope(Fold Only)
Model Required: Any OfficeRight™DI200
Notes: If your machine has the optional 2nd sheetfeeder A2, you can use it instead of Feeder A1, aslong as you load and select it as described in steps 1and 3 below.
Step Action Tips More Details…
1 Make sure paper size Choose 11” or 14” Page 30setting is correct
2 Load sheets Load face down and Page 10into Sheet Feeder bottom edge firstA1
3 Press button Make sure green Page 6, 7to select Feeder A1 indicator lights
4 Press button to Make sure green Page 6, 7select Fold Only indicator lights
5 Press Trial Piece Check trial piece Page 6, 7button and look for a
a good fold
6 Press Start button Stop button will stop Page 6, 7to run job machine at end of cycle
Problems? See Error Messages, page 33, and Troubleshooting, page 37
1 folded sheetno envelope (fold only)
03 A5 p11-18 6/16/03, 4:32 PM16
17OfficeRight™ DI200 Operator’s Guide
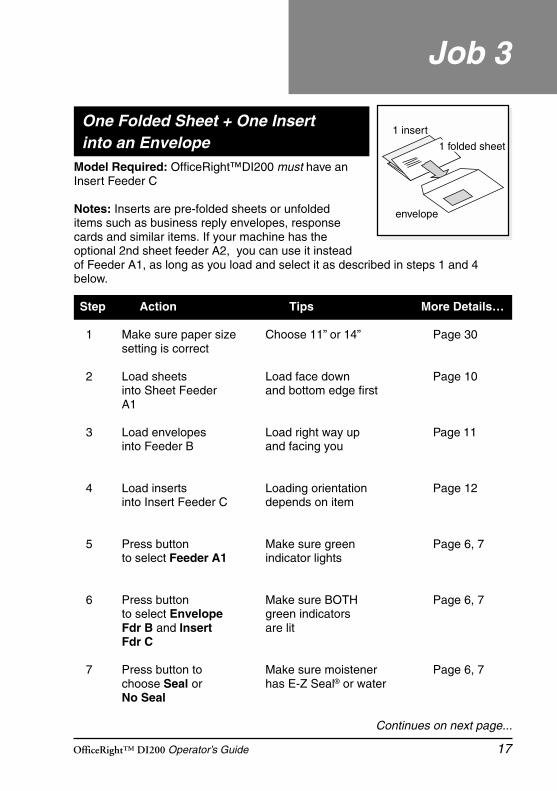
Model Required: OfficeRight™DI200 must have anInsert Feeder C
Notes: Inserts are pre-folded sheets or unfoldeditems such as business reply envelopes, responsecards and similar items. If your machine has theoptional 2nd sheet feeder A2, you can use it insteadof Feeder A1, as long as you load and select it as described in steps 1 and 4below.
Step Action Tips More Details…
1 Make sure paper size Choose 11” or 14” Page 30setting is correct
2 Load sheets Load face down Page 10into Sheet Feeder and bottom edge firstA1
3 Load envelopes Load right way up Page 11into Feeder B and facing you
4 Load inserts Loading orientation Page 12into Insert Feeder C depends on item
5 Press button Make sure green Page 6, 7to select Feeder A1 indicator lights
6 Press button Make sure BOTH Page 6, 7to select Envelope green indicatorsFdr B and Insert are litFdr C
7 Press button to Make sure moistener Page 6, 7choose Seal or has E-Z Seal® or waterNo Seal
Job 3
envelope
1 insert
1 folded sheet
Continues on next page...
One Folded Sheet + One Insertinto an Envelope
03 A5 p11-18 6/16/03, 4:32 PM17
18 OfficeRight™ DI200 Operator’s Guide
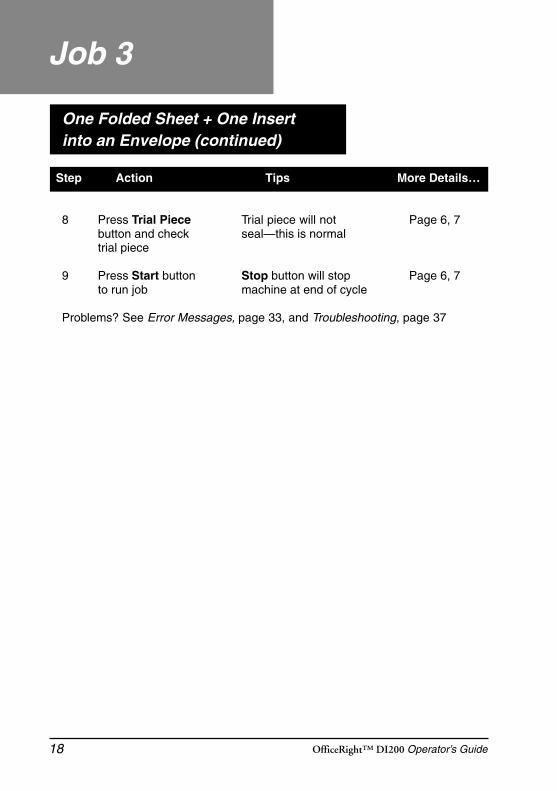
Job 3
Step Action Tips More Details…
8 Press Trial Piece Trial piece will not Page 6, 7button and check seal—this is normaltrial piece
9 Press Start button Stop button will stop Page 6, 7to run job machine at end of cycle
Problems? See Error Messages, page 33, and Troubleshooting, page 37
One Folded Sheet + One Insert into an Envelope (continued)
03 A5 p11-18 6/16/03, 4:32 PM18
19OfficeRight™ DI200 Operator’s Guide
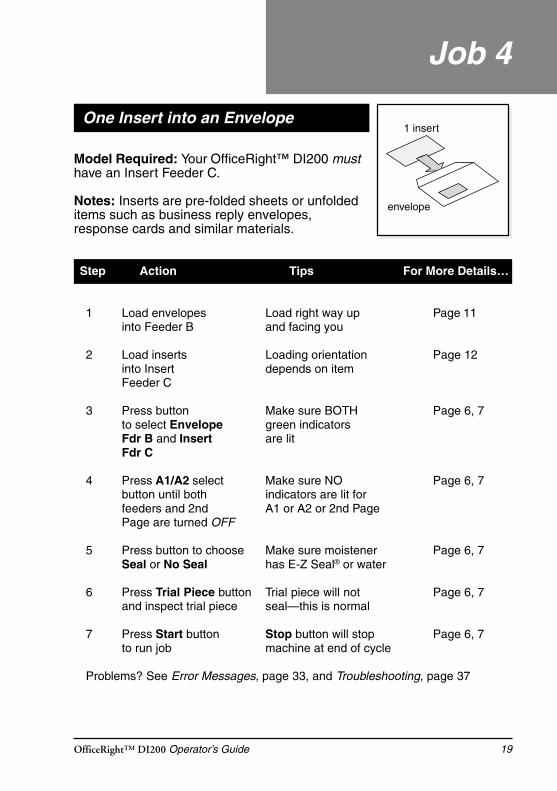
One Insert into an Envelope
Model Required: Your OfficeRight™ DI200 musthave an Insert Feeder C.
Notes: Inserts are pre-folded sheets or unfoldeditems such as business reply envelopes,response cards and similar materials.
Step Action Tips For More Details…
1 Load envelopes Load right way up Page 11into Feeder B and facing you
2 Load inserts Loading orientation Page 12into Insert depends on itemFeeder C
3 Press button Make sure BOTH Page 6, 7to select Envelope green indicatorsFdr B and Insert are litFdr C
4 Press A1/A2 select Make sure NO Page 6, 7button until both indicators are lit forfeeders and 2nd A1 or A2 or 2nd PagePage are turned OFF
5 Press button to choose Make sure moistener Page 6, 7Seal or No Seal has E-Z Seal® or water
6 Press Trial Piece button Trial piece will not Page 6, 7and inspect trial piece seal—this is normal
7 Press Start button Stop button will stop Page 6, 7to run job machine at end of cycle
Problems? See Error Messages, page 33, and Troubleshooting, page 37
envelope
1 insert
Job 4
04 A5 p19-32 6/16/03, 4:33 PM19
20 OfficeRight™ DI200 Operator’s Guide
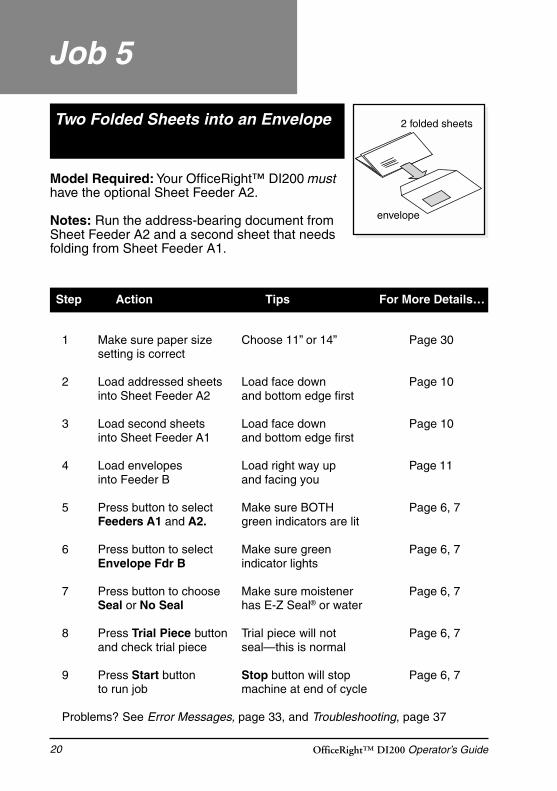
Model Required: Your OfficeRight™ DI200 musthave the optional Sheet Feeder A2.
Notes: Run the address-bearing document fromSheet Feeder A2 and a second sheet that needsfolding from Sheet Feeder A1.
Step Action Tips For More Details…
1 Make sure paper size Choose 11” or 14” Page 30setting is correct
2 Load addressed sheets Load face down Page 10into Sheet Feeder A2 and bottom edge first
3 Load second sheets Load face down Page 10into Sheet Feeder A1 and bottom edge first
4 Load envelopes Load right way up Page 11into Feeder B and facing you
5 Press button to select Make sure BOTH Page 6, 7Feeders A1 and A2. green indicators are lit
6 Press button to select Make sure green Page 6, 7Envelope Fdr B indicator lights
7 Press button to choose Make sure moistener Page 6, 7Seal or No Seal has E-Z Seal® or water
8 Press Trial Piece button Trial piece will not Page 6, 7and check trial piece seal—this is normal
9 Press Start button Stop button will stop Page 6, 7to run job machine at end of cycle
Problems? See Error Messages, page 33, and Troubleshooting, page 37
Job 5
envelope
2 folded sheetsTwo Folded Sheets into an Envelope
04 A5 p19-32 6/16/03, 4:33 PM20
21OfficeRight™ DI200 Operator’s Guide
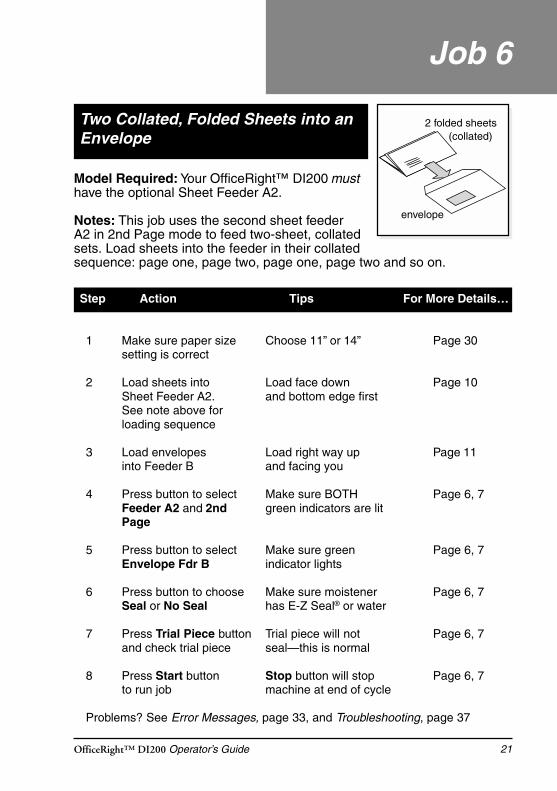
Model Required: Your OfficeRight™ DI200 musthave the optional Sheet Feeder A2.
Notes: This job uses the second sheet feederA2 in 2nd Page mode to feed two-sheet, collatedsets. Load sheets into the feeder in their collatedsequence: page one, page two, page one, page two and so on.
Step Action Tips For More Details…
1 Make sure paper size Choose 11” or 14” Page 30setting is correct
2 Load sheets into Load face down Page 10Sheet Feeder A2. and bottom edge firstSee note above forloading sequence
3 Load envelopes Load right way up Page 11into Feeder B and facing you
4 Press button to select Make sure BOTH Page 6, 7Feeder A2 and 2nd green indicators are litPage
5 Press button to select Make sure green Page 6, 7Envelope Fdr B indicator lights
6 Press button to choose Make sure moistener Page 6, 7Seal or No Seal has E-Z Seal® or water
7 Press Trial Piece button Trial piece will not Page 6, 7and check trial piece seal—this is normal
8 Press Start button Stop button will stop Page 6, 7to run job machine at end of cycle
Problems? See Error Messages, page 33, and Troubleshooting, page 37
Job 6
envelope
2 folded sheets (collated)
Two Collated, Folded Sheets into anEnvelope
04 A5 p19-32 6/16/03, 4:33 PM21
22 OfficeRight™ DI200 Operator’s Guide
Job 7
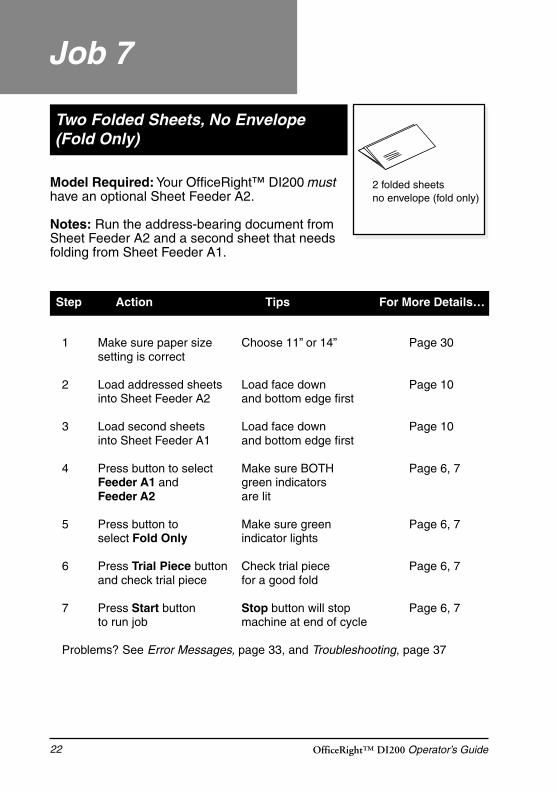
Model Required: Your OfficeRight™ DI200 musthave an optional Sheet Feeder A2.
Notes: Run the address-bearing document fromSheet Feeder A2 and a second sheet that needsfolding from Sheet Feeder A1.
Step Action Tips For More Details…
1 Make sure paper size Choose 11” or 14” Page 30setting is correct
2 Load addressed sheets Load face down Page 10into Sheet Feeder A2 and bottom edge first
3 Load second sheets Load face down Page 10into Sheet Feeder A1 and bottom edge first
4 Press button to select Make sure BOTH Page 6, 7Feeder A1 and green indicatorsFeeder A2 are lit
5 Press button to Make sure green Page 6, 7select Fold Only indicator lights
6 Press Trial Piece button Check trial piece Page 6, 7and check trial piece for a good fold
7 Press Start button Stop button will stop Page 6, 7to run job machine at end of cycle
Problems? See Error Messages, page 33, and Troubleshooting, page 37
2 folded sheetsno envelope (fold only)
Two Folded Sheets, No Envelope(Fold Only)
04 A5 p19-32 6/16/03, 4:33 PM22
23OfficeRight™ DI200 Operator’s Guide
Model Required: Your OfficeRight™ DI200 musthave an optional Sheet Feeder A2.
Notes: This job uses the second sheet feederA2 in 2nd Page mode to feed two-sheet collatedsets. Load sheets into the feeder in collated sequence: first page, secondpage, first page, second page and so on.
Step Action Tips For More Details…
1 Make sure that paper Choose 11” or 14” Page 30size setting is correct
2 Load sheets into Load face down Page 10Sheet Feeder A2. and bottom edgeSee note above for firstloading sequence
3 Press button to select Make sure BOTH Page 6, 7Feeder A2 and green indicators2nd Page are lit
4 Press button to Make sure green Page 6, 7select Fold Only indicator lights
5 Press Trial Piece button Check trial piece Page 6, 7and check trial piece for a good fold
6 Press Start button Stop button will stop Page 6, 7to run job machine at end of
cycle
Problems? See Error Messages, page 33, and Troubleshooting, page 37
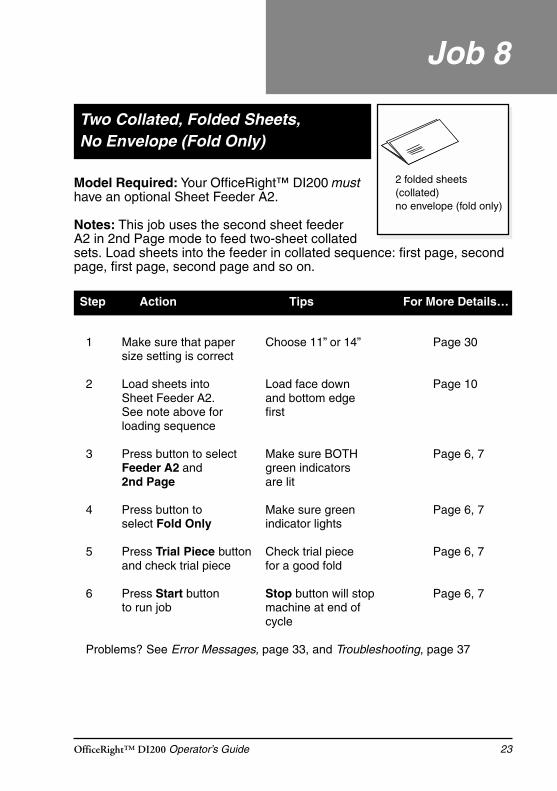
Job 8
2 folded sheets (collated)no envelope (fold only)
Two Collated, Folded Sheets,No Envelope (Fold Only)
04 A5 p19-32 6/16/03, 4:33 PM23

24 OfficeRight™ DI200 Operator’s Guide
Model Required: Your OfficeRight™ DI200 musthave the optional Sheet Feeder A2 and an InsertFeeder C
Notes: Run the address-bearing document fromSheet Feeder A2 and a second sheet that needsfolding from Sheet Feeder A1. Inserts are pre-folded sheets or unfoldeditems such as business reply envelopes, response cards and similarmaterials.
Step Action Tips For More Details…
1 Make sure that paper Choose 11” or 14” Page 30size setting is correct
2 Load addressed sheets Load face down Page 10into Sheet Feeder A2 and bottom edge first
3 Load second sheets Load face down Page 10into Sheet Feeder A1 and bottom edge first
4 Load envelopes Load right way up Page 11into Feeder B and facing you
5 Load inserts Loading orientation Page 12into Insert Feeder C depends on item
6 Press button to select Make sure BOTH Page 6, 7Feeder A1 and green indicatorsFeeder A2 are lit
7 Press button to Make sure BOTH Page 6, 7select Envelope Fdr green indicatorsB and Insert Fdr C are lit
8 Press button to choose Make sure moistener Page 6, 7Seal or No Seal has E-Z Seal® or water
Job 9
envelope
1 insert2 folded sheets
Two Folded Sheets and an Insertinto an Envelope
04 A5 p19-32 6/16/03, 4:33 PM24

25OfficeRight™ DI200 Operator’s Guide
9 Press Trial Piece button Trial piece will not Page 6, 7and check trial piece seal—this is normal
10 Press Start button Stop button will stop Page 6, 7to run job machine at end of
cycle
Problems? See Error Messages, page 33, and Troubleshooting, page 37
Job 9
Two Folded Sheets and an Insertinto an Envelope (continued)
Step Action Tips For More Details…
04 A5 p19-32 6/16/03, 4:33 PM25
26 OfficeRight™ DI200 Operator’s Guide
Model Required: Your OfficeRight™ DI200 musthave the optional Sheet Feeder A2 and an InsertFeeder C.
Notes: This job uses the second sheet feederA2 in 2nd Page mode to feed two-sheet, collated sets. Load sheets intothe feeder in collated sequence: first page, second page, first page,second page and so on. Inserts are pre-folded sheets or unfolded itemssuch as business reply envelopes, response cards and so on.
Step Action Tips For More Details…
1 Make sure that paper Choose 11” or 14” Page 30size setting is correct
2 Load sheets into Load face down Page 10Sheet Feeder A2. and bottom edge firstSee note above forloading sequence
3 Load envelopes Load right way up Page 11into Feeder B and facing you
4 Load inserts Loading orientation Page 12into Insert Feeder C depends on item
5 Press button to select Make sure BOTH Page 6, 7Feeder A2 and green indicators2nd Page are lit
6 Press button to Make sure BOTH Page 6, 7select Envelope green indicatorsFdr B and are litInsert Fdr C
7 Press button to choose Make sure moistener Page 6,7Seal or No Seal has E-Z Seal® or water
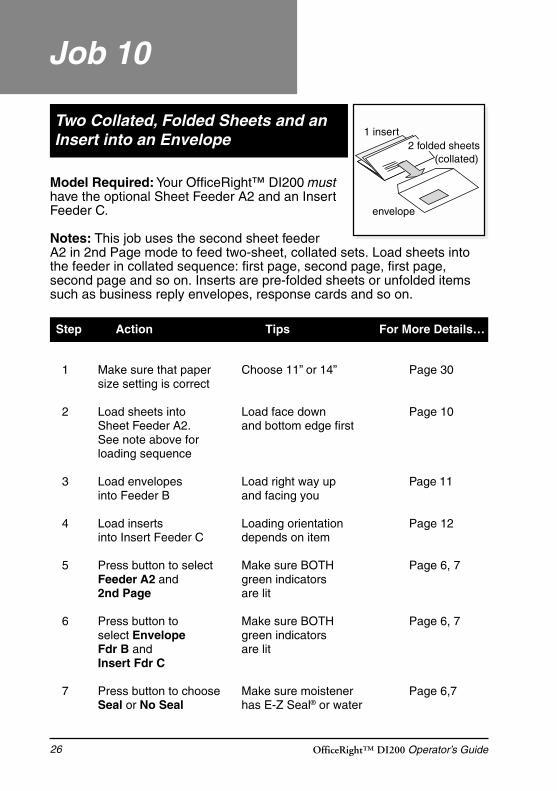
Job 10
envelope
1 insert2 folded sheets (collated)
Two Collated, Folded Sheets and anInsert into an Envelope
04 A5 p19-32 6/16/03, 4:33 PM26
27OfficeRight™ DI200 Operator’s Guide
8 Press Trial Piece button Trial piece will not Page 6, 7and check trial piece seal—this is normal
9 Press Start button Stop button will stop Page 6, 7to run job machine at end of
cycle
Problems? See Error Messages, page 33, and Troubleshooting, page 37
Job 10
Two Collated, Folded Sheets and anInsert into an Envelope (continued)
Step Action Tips For More Details…
04 A5 p19-32 6/16/03, 4:33 PM27
28 OfficeRight™ DI200 Operator’s Guide
All OfficeRight™ DI200 models have a Manual Feeder M that allows youto feed stapled sets of up to three sheets, one set at a time, for processingby the machine.
Using the manual feeder automatically turns off both sheet feeders. Youcan, however, use the manual feeder along with the envelope, insert, fold-only and sealer selections to run a variety of jobs manually.
To use the manual feeder, set up the machine as you normally would forthe job you’re running. The selections shown by the indicators for SheetFeeders A1 and/or A2 will be ignored by the machine. All other selectionsapply to the manual job.
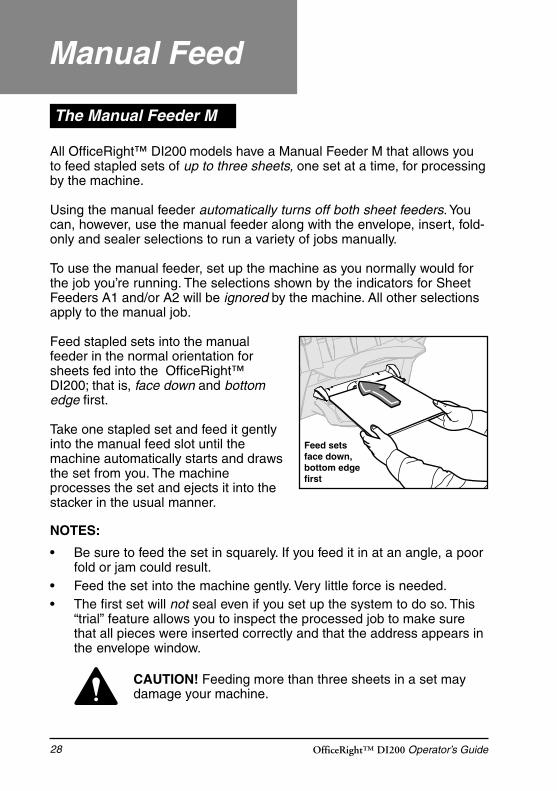
Feed stapled sets into the manualfeeder in the normal orientation forsheets fed into the OfficeRight™DI200; that is, face down and bottomedge first.
Take one stapled set and feed it gentlyinto the manual feed slot until themachine automatically starts and drawsthe set from you. The machineprocesses the set and ejects it into thestacker in the usual manner.
NOTES:
• Be sure to feed the set in squarely. If you feed it in at an angle, a poorfold or jam could result.
• Feed the set into the machine gently. Very little force is needed.• The first set will not seal even if you set up the system to do so. This
“trial” feature allows you to inspect the processed job to make surethat all pieces were inserted correctly and that the address appears inthe envelope window.
Manual Feed
The Manual Feeder M
CAUTION! Feeding more than three sheets in a set maydamage your machine.
Feed setsface down,bottom edgefirst
04 A5 p19-32 6/16/03, 4:33 PM28
29OfficeRight™ DI200 Operator’s Guide
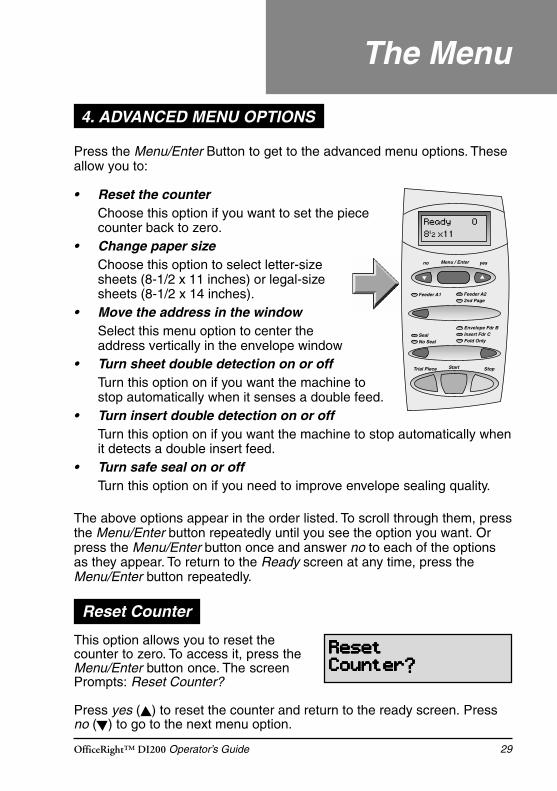
Press the Menu/Enter Button to get to the advanced menu options. Theseallow you to:
• Reset the counterChoose this option if you want to set the piececounter back to zero.
• Change paper sizeChoose this option to select letter-sizesheets (8-1/2 x 11 inches) or legal-sizesheets (8-1/2 x 14 inches).
• Move the address in the windowSelect this menu option to center theaddress vertically in the envelope window
• Turn sheet double detection on or offTurn this option on if you want the machine tostop automatically when it senses a double feed.
• Turn insert double detection on or offTurn this option on if you want the machine to stop automatically whenit detects a double insert feed.
• Turn safe seal on or offTurn this option on if you need to improve envelope sealing quality.
The above options appear in the order listed. To scroll through them, pressthe Menu/Enter button repeatedly until you see the option you want. Orpress the Menu/Enter button once and answer no to each of the optionsas they appear. To return to the Ready screen at any time, press theMenu/Enter button repeatedly.
Feeder A1
Menu / Enterno yes
Feeder A2 2nd Page
SealNo Seal
Trial Piece StopStart
Envelope Fdr B Insert Fdr CFold Only
ResetResetResetResetResetCounter?Counter?Counter?Counter?Counter?
The Menu
4. ADVANCED MENU OPTIONS
Reset Counter
This option allows you to reset thecounter to zero. To access it, press theMenu/Enter button once. The screenPrompts: Reset Counter?
Press yes ( ) to reset the counter and return to the ready screen. Pressno ( ) to go to the next menu option.
04 A5 p19-32 6/16/03, 4:33 PM29
30 OfficeRight™ DI200 Operator’s Guide
Move the Address in the Window
This menu option allows you to change the length of the fold panel so thatthe address is centered in the envelope window. Make this adjustment ifthe address in your trial piece appears to be too high or too low in thewindow.
Make the adjustment by entering a number from 1 to 9. The higher thenumber, the lower the address will appear in the window.
The Menu
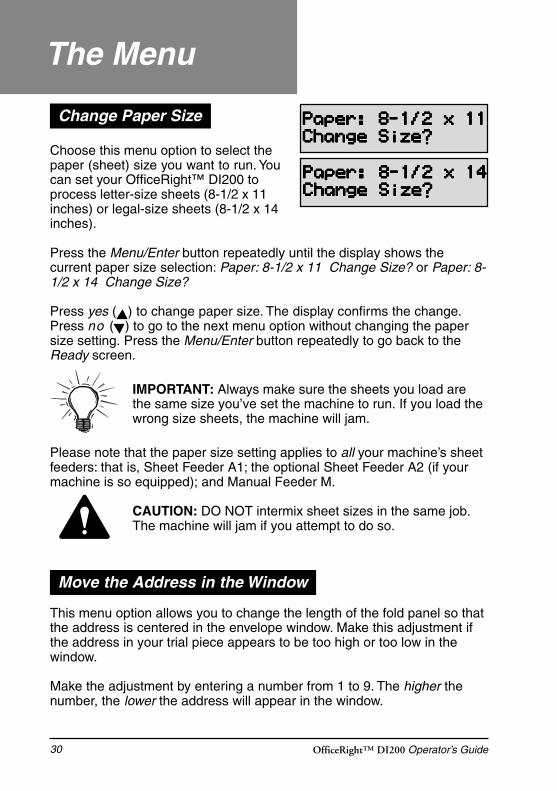
Change Paper Size Paper: 8-1/2 x 11Paper: 8-1/2 x 11Paper: 8-1/2 x 11Paper: 8-1/2 x 11Paper: 8-1/2 x 11Change Size?Change Size?Change Size?Change Size?Change Size?
Paper: 8-1/2 x 14Paper: 8-1/2 x 14Paper: 8-1/2 x 14Paper: 8-1/2 x 14Paper: 8-1/2 x 14Change Size?Change Size?Change Size?Change Size?Change Size?
Choose this menu option to select thepaper (sheet) size you want to run. Youcan set your OfficeRight™ DI200 toprocess letter-size sheets (8-1/2 x 11inches) or legal-size sheets (8-1/2 x 14inches).
Press the Menu/Enter button repeatedly until the display shows thecurrent paper size selection: Paper: 8-1/2 x 11 Change Size? or Paper: 8-1/2 x 14 Change Size?
Press yes ( ) to change paper size. The display confirms the change.Press no ( ) to go to the next menu option without changing the papersize setting. Press the Menu/Enter button repeatedly to go back to theReady screen.
IMPORTANT: Always make sure the sheets you load arethe same size you’ve set the machine to run. If you load thewrong size sheets, the machine will jam.
Please note that the paper size setting applies to all your machine’s sheetfeeders: that is, Sheet Feeder A1; the optional Sheet Feeder A2 (if yourmachine is so equipped); and Manual Feeder M.
CAUTION: DO NOT intermix sheet sizes in the same job.The machine will jam if you attempt to do so.
04 A5 p19-32 6/16/03, 4:33 PM30
31OfficeRight™ DI200 Operator’s Guide
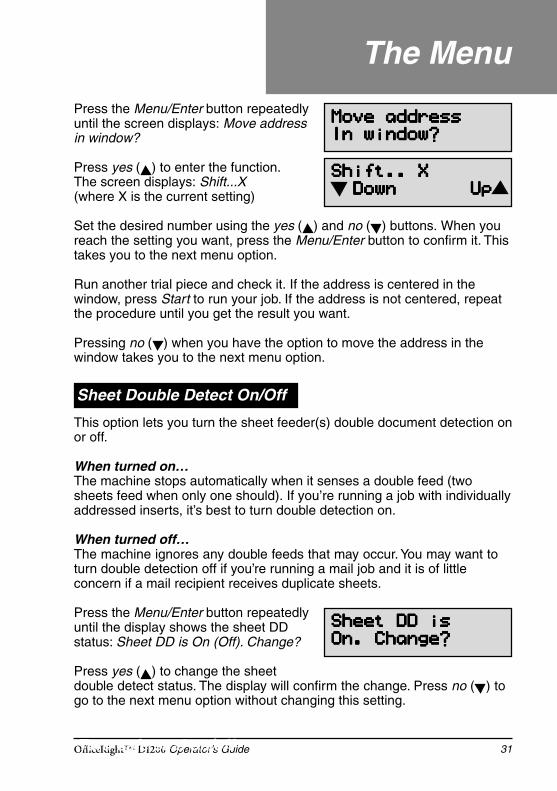
Press the Menu/Enter button repeatedlyuntil the screen displays: Move addressin window?
Press yes ( ) to enter the function.The screen displays: Shift...X(where X is the current setting)
Set the desired number using the yes ( ) and no ( ) buttons. When youreach the setting you want, press the Menu/Enter button to confirm it. Thistakes you to the next menu option.
Run another trial piece and check it. If the address is centered in thewindow, press Start to run your job. If the address is not centered, repeatthe procedure until you get the result you want.
Pressing no ( ) when you have the option to move the address in thewindow takes you to the next menu option.
This option lets you turn the sheet feeder(s) double document detection onor off.
When turned on…The machine stops automatically when it senses a double feed (twosheets feed when only one should). If you’re running a job with individuallyaddressed inserts, it’s best to turn double detection on.
When turned off…The machine ignores any double feeds that may occur. You may want toturn double detection off if you’re running a mail job and it is of littleconcern if a mail recipient receives duplicate sheets.
Press the Menu/Enter button repeatedlyuntil the display shows the sheet DDstatus: Sheet DD is On (Off). Change?
Press yes ( ) to change the sheetdouble detect status. The display will confirm the change. Press no ( ) togo to the next menu option without changing this setting.
Turn safe seal on/off
Move addressMove addressMove addressMove addressMove addressIn window?In window?In window?In window?In window?
Shift.. XShift.. XShift.. XShift.. XShift.. X Down Down Down Down Down Up Up Up Up Up
Sheet DD isSheet DD isSheet DD isSheet DD isSheet DD isOn. Change?On. Change?On. Change?On. Change?On. Change?
The Menu
Sheet Double Detect On/Off
04 A5 p19-32 6/16/03, 4:33 PM31
32 OfficeRight™ DI200 Operator’s Guide
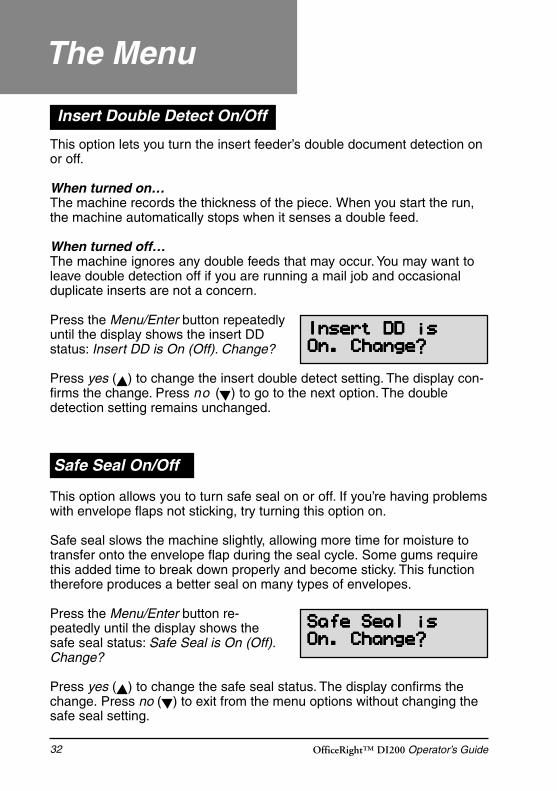
This option allows you to turn safe seal on or off. If you’re having problemswith envelope flaps not sticking, try turning this option on.
Safe seal slows the machine slightly, allowing more time for moisture totransfer onto the envelope flap during the seal cycle. Some gums requirethis added time to break down properly and become sticky. This functiontherefore produces a better seal on many types of envelopes.
Press the Menu/Enter button re-peatedly until the display shows thesafe seal status: Safe Seal is On (Off).Change?
Press yes ( ) to change the safe seal status. The display confirms thechange. Press no ( ) to exit from the menu options without changing thesafe seal setting.
Safe Seal isSafe Seal isSafe Seal isSafe Seal isSafe Seal isOn. Change?On. Change?On. Change?On. Change?On. Change?
The Menu
Insert DD isInsert DD isInsert DD isInsert DD isInsert DD isOn. Change?On. Change?On. Change?On. Change?On. Change?
This option lets you turn the insert feeder’s double document detection onor off.
When turned on…The machine records the thickness of the piece. When you start the run,the machine automatically stops when it senses a double feed.
When turned off…The machine ignores any double feeds that may occur. You may want toleave double detection off if you are running a mail job and occasionalduplicate inserts are not a concern.
Press the Menu/Enter button repeatedlyuntil the display shows the insert DDstatus: Insert DD is On (Off). Change?
Press yes ( ) to change the insert double detect setting. The display con-firms the change. Press no ( ) to go to the next option. The doubledetection setting remains unchanged.
Insert Double Detect On/Off
Safe Seal On/Off
04 A5 p19-32 6/16/03, 4:33 PM32
33OfficeRight™ DI200 Operator’s Guide
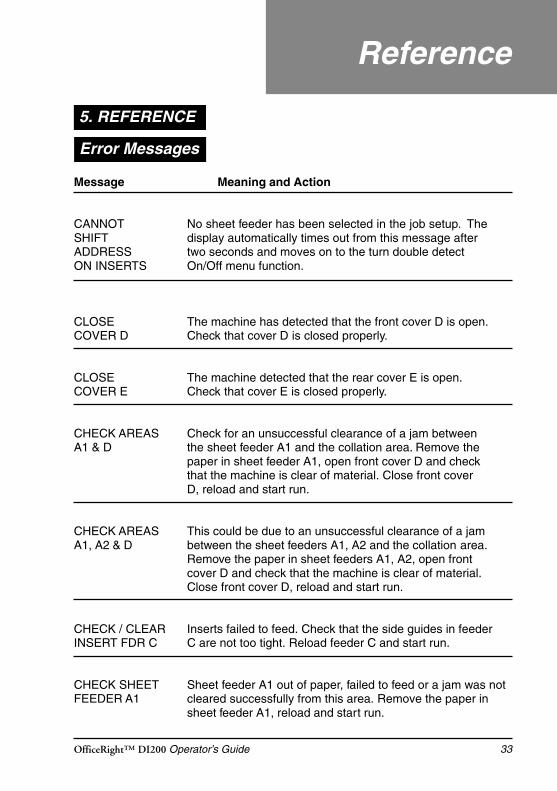
Message Meaning and Action
CANNOT No sheet feeder has been selected in the job setup. TheSHIFT display automatically times out from this message afterADDRESS two seconds and moves on to the turn double detectON INSERTS On/Off menu function.
CLOSE The machine has detected that the front cover D is open.COVER D Check that cover D is closed properly.
CLOSE The machine detected that the rear cover E is open.COVER E Check that cover E is closed properly.
CHECK AREAS Check for an unsuccessful clearance of a jam betweenA1 & D the sheet feeder A1 and the collation area. Remove the
paper in sheet feeder A1, open front cover D and checkthat the machine is clear of material. Close front coverD, reload and start run.
CHECK AREAS This could be due to an unsuccessful clearance of a jamA1, A2 & D between the sheet feeders A1, A2 and the collation area.
Remove the paper in sheet feeders A1, A2, open frontcover D and check that the machine is clear of material.Close front cover D, reload and start run.
CHECK / CLEAR Inserts failed to feed. Check that the side guides in feederINSERT FDR C C are not too tight. Reload feeder C and start run.
CHECK SHEET Sheet feeder A1 out of paper, failed to feed or a jam was notFEEDER A1 cleared successfully from this area. Remove the paper in
sheet feeder A1, reload and start run.
Reference
5. REFERENCE
Error Messages
05 A5 p33-46 6/16/03, 4:33 PM33

34 OfficeRight™ DI200 Operator’s Guide
Reference
Message Meaning and Action
CHECK SHEET Sheet feeder A2 out of paper, failed to feed or a jam was notFEEDER A2 cleared successfully from this area. Remove the paper in
sheet feeder A2, reload and start run.
CHECK SHEET The machine has detected a material jam between sheetFEEDER A2 feeder A2 and the collation area. Open the front coverLIFT COVER D cover D and remove all material inside. Close front coverREMOVE ALL D. Remove material from sheet feeder A2. Reload and
start run.
CLEAR FEEDER This is due to the Manual Feeder M being blocked prior toM powering the machine up or starting it up. Check that there’s
no material in the feeder. If there is, remove it and restart.
CLEAR This could be due either to a previous jam not beingSTACKER AREA cleared correctly in the stacker area or there is a jam
in the stacker area. Check that stacker area is clear.Remove any material and resume run.
DOUBLE FEED The machine has detected a double feed from sheet feederCHECK FDR A1 A1. Remove the paper in sheet feeder A1, reload and start
run.
DOUBLE FEED The machine has detected a double feed from sheet feederCHECK FDR A2 A2. Remove the paper in sheet feeder A2, reload and start
run.
FOLD ONLY Fold only has been selected but no sheets, eitherREQUIRES from feeder A1 or A2 (if applicable), have been selected.SHEETS In this state the indicators for sheet feeder A1 will be red,
not green. Press the sheet feeder selection button until therequired feeder is selected.
05 A5 p33-46 6/16/03, 4:33 PM34
35OfficeRight™ DI200 Operator’s Guide
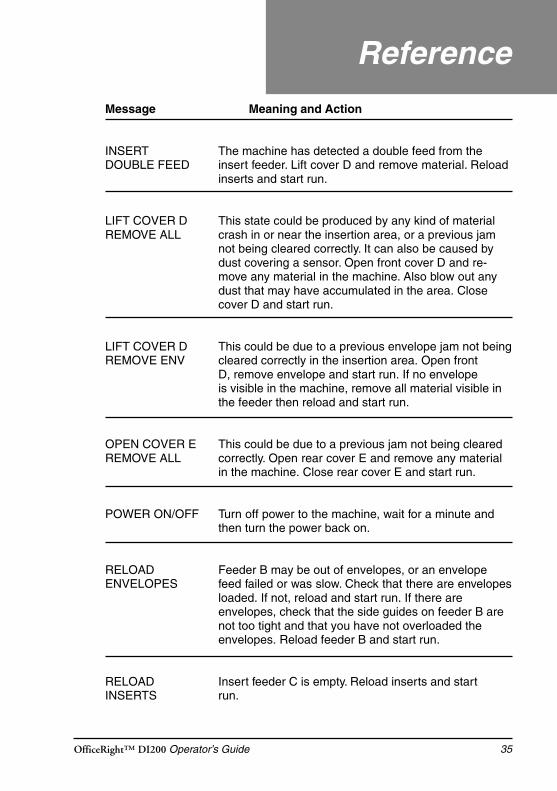
Message Meaning and Action
INSERT The machine has detected a double feed from theDOUBLE FEED insert feeder. Lift cover D and remove material. Reload
inserts and start run.
LIFT COVER D This state could be produced by any kind of materialREMOVE ALL crash in or near the insertion area, or a previous jam
not being cleared correctly. It can also be caused bydust covering a sensor. Open front cover D and re-move any material in the machine. Also blow out anydust that may have accumulated in the area. Closecover D and start run.
LIFT COVER D This could be due to a previous envelope jam not beingREMOVE ENV cleared correctly in the insertion area. Open front
D, remove envelope and start run. If no envelopeis visible in the machine, remove all material visible inthe feeder then reload and start run.
OPEN COVER E This could be due to a previous jam not being clearedREMOVE ALL correctly. Open rear cover E and remove any material
in the machine. Close rear cover E and start run.
POWER ON/OFF Turn off power to the machine, wait for a minute andthen turn the power back on.
RELOAD Feeder B may be out of envelopes, or an envelopeENVELOPES feed failed or was slow. Check that there are envelopes
loaded. If not, reload and start run. If there areenvelopes, check that the side guides on feeder B arenot too tight and that you have not overloaded theenvelopes. Reload feeder B and start run.
RELOAD Insert feeder C is empty. Reload inserts and startINSERTS run.
Reference
05 A5 p33-46 6/16/03, 4:33 PM35
36 OfficeRight™ DI200 Operator’s Guide
Reference
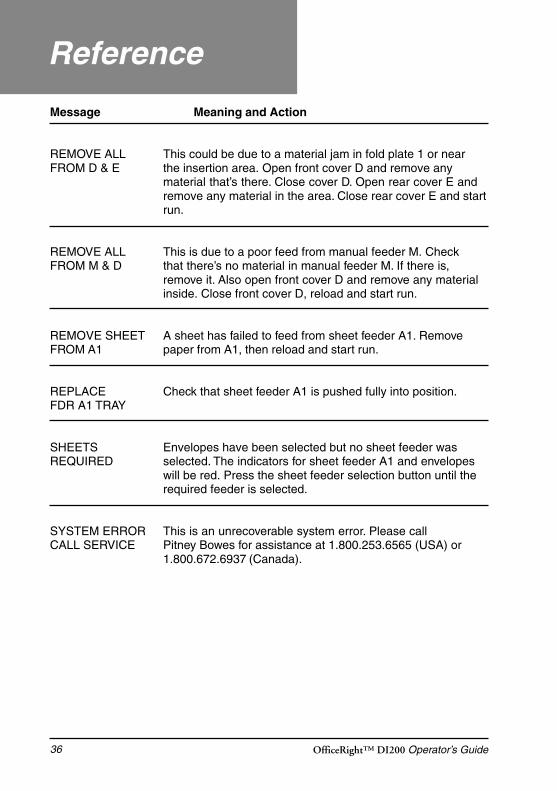
Message Meaning and Action
REMOVE ALL This could be due to a material jam in fold plate 1 or nearFROM D & E the insertion area. Open front cover D and remove any
material that’s there. Close cover D. Open rear cover E andremove any material in the area. Close rear cover E and startrun.
REMOVE ALL This is due to a poor feed from manual feeder M. CheckFROM M & D that there’s no material in manual feeder M. If there is,
remove it. Also open front cover D and remove any materialinside. Close front cover D, reload and start run.
REMOVE SHEET A sheet has failed to feed from sheet feeder A1. RemoveFROM A1 paper from A1, then reload and start run.
REPLACE Check that sheet feeder A1 is pushed fully into position.FDR A1 TRAY
SHEETS Envelopes have been selected but no sheet feeder wasREQUIRED selected. The indicators for sheet feeder A1 and envelopes
will be red. Press the sheet feeder selection button until therequired feeder is selected.
SYSTEM ERROR This is an unrecoverable system error. Please callCALL SERVICE Pitney Bowes for assistance at 1.800.253.6565 (USA) or
1.800.672.6937 (Canada).
05 A5 p33-46 6/16/03, 4:33 PM36
37OfficeRight™ DI200 Operator’s Guide
Poor foldingIf you’re running perforated material, the machine may have problemsfolding. If a machine fold almost corresponds with the perforation, a “boxfold” may occur. This happens when another fold is created just off of theperforation and buckles slightly, creating, in effect, a third fold.
If this happens, adjust the machine fold slightly. Run a trial piece andinspect the fold. If there is a box fold, access the advanced menu optionsand select move address in window. Change the setting higher or lowerand re-run a trial piece. Inspect the fold again and, if required, change themove address in window function until the box fold is eliminated.
Machine stops for doubles that aren’t thereIf you have a problem with incorrect double detection, it may be due to thefact that you are using a new batch of material that is slightly thicker. Tryrunning a new trial piece.
When you ran the original trial piece, the machine calibrated itself to theoriginal material thickness. When it senses the new, thicker material, thesystem thinks that a double was fed. You can turn double detection off ifan occasional duplicate insert is not important (see pages 31 and 32).
Machine feeds doubles without stoppingCheck that double detection is turned on. See page 31. Make sure you’verun a trial piece. This automatically sets the double detector. See page 7.
Envelope flaps won’t seal• Check that Seal is selected (green indicator lit). See page 7.• Check that the moistener isn’t empty. See page 9.• Try selecting safe seal mode. See page 32.
Address position wrong or address doesn’t appear in envelopewindow• Is the addressed sheet loaded properly? See page 10.• Is the addressed sheet in Sheet feeder A2 (if installed)?• Try adjusting the address position. See page 30.
General Troubleshooting
Reference
05 A5 p33-46 6/16/03, 4:33 PM37
38 OfficeRight™ DI200 Operator’s Guide
Reference
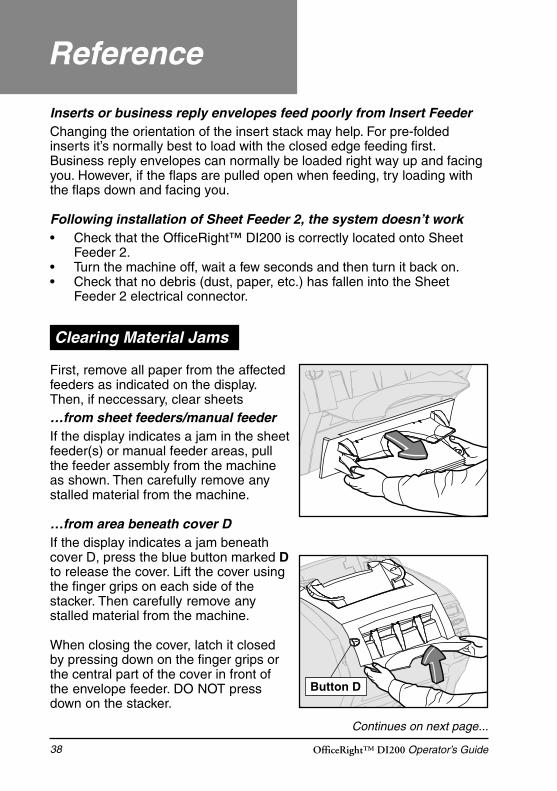
First, remove all paper from the affectedfeeders as indicated on the display.Then, if neccessary, clear sheets…from sheet feeders/manual feederIf the display indicates a jam in the sheetfeeder(s) or manual feeder areas, pullthe feeder assembly from the machineas shown. Then carefully remove anystalled material from the machine.
…from area beneath cover DIf the display indicates a jam beneathcover D, press the blue button marked Dto release the cover. Lift the cover usingthe finger grips on each side of thestacker. Then carefully remove anystalled material from the machine.
When closing the cover, latch it closedby pressing down on the finger grips orthe central part of the cover in front ofthe envelope feeder. DO NOT pressdown on the stacker.
Button D
Inserts or business reply envelopes feed poorly from Insert FeederChanging the orientation of the insert stack may help. For pre-foldedinserts it’s normally best to load with the closed edge feeding first.Business reply envelopes can normally be loaded right way up and facingyou. However, if the flaps are pulled open when feeding, try loading withthe flaps down and facing you.
Following installation of Sheet Feeder 2, the system doesn’t work• Check that the OfficeRight™ DI200 is correctly located onto Sheet
Feeder 2.• Turn the machine off, wait a few seconds and then turn it back on.• Check that no debris (dust, paper, etc.) has fallen into the Sheet
Feeder 2 electrical connector.
Clearing Material Jams
Continues on next page...
05 A5 p33-46 6/16/03, 4:33 PM38
39OfficeRight™ DI200 Operator’s Guide
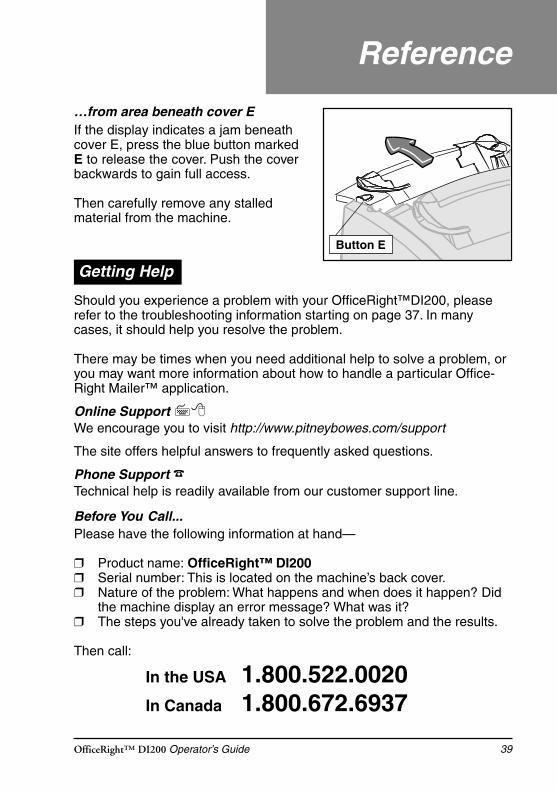
…from area beneath cover EIf the display indicates a jam beneathcover E, press the blue button markedE to release the cover. Push the coverbackwards to gain full access.
Then carefully remove any stalledmaterial from the machine.
Button E
Getting Help
Should you experience a problem with your OfficeRight™DI200, pleaserefer to the troubleshooting information starting on page 37. In manycases, it should help you resolve the problem.
There may be times when you need additional help to solve a problem, oryou may want more information about how to handle a particular Office-Right Mailer™ application.
Online Support ��We encourage you to visit http://www.pitneybowes.com/support
The site offers helpful answers to frequently asked questions.
Phone Support ☎Technical help is readily available from our customer support line.
Before You Call...Please have the following information at hand—
❒ Product name: OfficeRight™ DI200❒ Serial number: This is located on the machine’s back cover.❒ Nature of the problem: What happens and when does it happen? Did
the machine display an error message? What was it?❒ The steps you've already taken to solve the problem and the results.
Then call:
In the USA 1.800.522.0020In Canada 1.800.672.6937
Reference
05 A5 p33-46 6/16/03, 4:33 PM39

40 OfficeRight™ DI200 Operator’s Guide
Reference
Pitney Bowes has made it easier than ever to order supplies—such as E-ZSeal® (Item Code 601-0, USA only) and Moistener Wick Replacement(Item Code 639-0)—that are designed specifically for your OfficeRight™DI200.
Ordering Online (USA Only)Just point your browser to http://www.pitneybowes.com/supplies
You'll find a complete, easy-to-navigate online store that offers a wideassortment of genuine Pitney Bowes supplies at attractive prices. Be sureto take advantage of special quantity pricing and online discounts.
Ordering by PhoneOur representatives will be happy to answer your questions and take yourorder.
☎ In the USA, call 1.800.243.7824☎ In Canada, call 1.800.672.6937
Requesting a PB Supply Catalog (USA Only)Call the number above or e-mail us at [email protected].
Ordering Supplies
05 A5 p33-46 6/16/03, 4:33 PM40
41OfficeRight™ DI200 Operator’s Guide
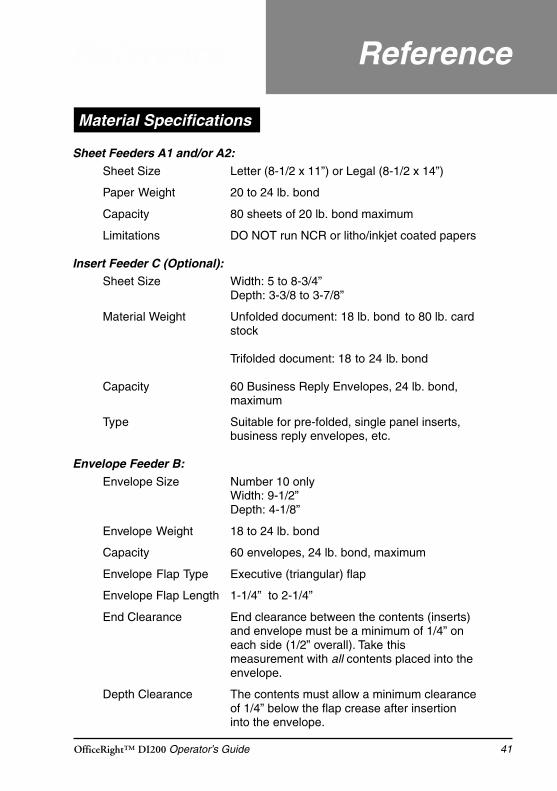
Sheet Feeders A1 and/or A2:Sheet Size Letter (8-1/2 x 11”) or Legal (8-1/2 x 14”)
Paper Weight 20 to 24 lb. bond
Capacity 80 sheets of 20 lb. bond maximum
Limitations DO NOT run NCR or litho/inkjet coated papers
Insert Feeder C (Optional):Sheet Size Width: 5 to 8-3/4”
Depth: 3-3/8 to 3-7/8”
Material Weight Unfolded document: 18 lb. bond to 80 lb. cardstock
Trifolded document: 18 to 24 lb. bond
Capacity 60 Business Reply Envelopes, 24 lb. bond,maximum
Type Suitable for pre-folded, single panel inserts,business reply envelopes, etc.
Envelope Feeder B:Envelope Size Number 10 only
Width: 9-1/2”Depth: 4-1/8”
Envelope Weight 18 to 24 lb. bond
Capacity 60 envelopes, 24 lb. bond, maximum
Envelope Flap Type Executive (triangular) flap
Envelope Flap Length 1-1/4” to 2-1/4”
End Clearance End clearance between the contents (inserts)and envelope must be a minimum of 1/4” oneach side (1/2” overall). Take thismeasurement with all contents placed into theenvelope.
Depth Clearance The contents must allow a minimum clearanceof 1/4” below the flap crease after insertioninto the envelope.
Material Specifications
Reference“ Reference
05 A5 p33-46 6/16/03, 4:33 PM41
42 OfficeRight™ DI200 Operator’s Guide
Reference
Physical DimensionsWidth 17-3/8”Depth 20-3/4”Height 14-3/8” (without optional sheet feeder 2)
17-3/8” (with optional sheet feeder 2)Weight 38 lb. (17.5kg)
Electrical115V, 60Hz, 1A
SpeedUp to a maximum of 900 cycles per hour
Due to our continuing program of product improvement, equipment and material specifica-tions are subject to change without notice. Physical dimensions are approximate.
Reference
Machine Specifications
Manual Feeder MYou can process stapled sets of up to three sheets of 20 lb. bondpaper. Sheet Feeders A1 and A2 are not designed to work inconjunction with the Manual Feeder. We DO NOT recommend usingglossy/coated sheets.
Sealer CapacityThe machine can seal up to a maximum of 1,000 envelopesbetween refills.
StackerStacker capacity is up to 60 filled envelopes, depending on thecontents of envelope.
Material RequirementsMaterials should be of good quality and properly stored.Recommended storage conditions: 18 to 25°C; 40 to 60% relativehumidity.
05 A5 p33-46 6/16/03, 4:33 PM42
43OfficeRight™ DI200 Operator’s Guide
Index
A
AddressNot Centered in Window 37Position Wrong 37
Address-Bearing SheetConsiderations when Using Sheet
Feeder A2 5
C
Cannot shift address on InsertsError Message 33
Check Areas A1 & DError Message 33
Check Areas A1, A2 & DError Message 33
Check Sheet Feeder A1Error Message 33
Check Sheet Feeder A2Error Message 34
Check/Clear Insert Fdr CError Message 33
Clear Feeder MError Message 34
Clear Stacker AreaError Message 34
Close Cover DError Message 33
Close Cover EError Message 33
Configurations, Machine 3Control Panel
Location and Function of 4Controls, Front Panel
Illustration and explanation of 6Controls, Machine 4Counter
Resetting the Piece 29
D
Display, Front Panel 6Double Detection
InsertTurning On and Off 32
SheetTurning On and Off 31
Double Feed Check Fdr A2Error Message 34
Doubles (Double Feed)False Detection of 37Machine Fails to Stop for 37
E
E-Z Seal®Importance of 9
Envelope FeederLoading 11
Envelope Feeder BLocation and Function of 5
Equipment Specifications 41Error Message
Check Areas A1 & D 33Close Cover D 33Replace Fdr A1 Tray 36
Error MessagesCannot Shift Address on Inserts 33Check Areas A1, A2 & D 33Check Sheet Feeder A1 33Check Sheet Feeder A2 34Check/Clear Insert Fdr C 33Clear Feeder M 34Clear Stacker Area 34Double Feed Check Fdr A2 34Fold Only Requires Sheets 34Insert Double Feed 35Lift Cover D Remove All 35Lift Cover D Remove Env 35Open Cover E Remove All 35Power On/Off 35Reload Envelopes 35Reload Inserts 35
05 A5 p33-46 6/16/03, 4:33 PM43
44 OfficeRight™ DI200 Operator’s Guide
Index
Remove All from D & E 36Remove All from M & D 36Remove Sheet from A1 36Sheets Required 36System Error 36
F
Feed, Manual 28Fold Only Requires Sheets
Error Message 34Folds Poor 37Front Cover D Release Button
Location and Function of 5
H
Help, Getting 39
I
Indicator Lights, Control Panel 7Insert Cover E Release Button
Location and Function of 4Insert Double Feed
Error Message 35Insert Feeder
Loading the 12Insert Feeder (Optional)
Location and Function of 4Inserts Feed Poorly 38
J
Jam Clearance 38Jams
Clearing from Area Beneath Cover D38
Clearing from Sheet Feeders 38Job Setup
One Folded Sheet + One Insert intoan Envelope 17, 18
One Folded Sheet into an Envelope15
One Folded Sheet, no Envelope(Fold Only) 16
One Insert into an Envelope 19Two Collated, Folded Sheets and an
Insert into an 26, 27Two Collated, Folded Sheets into an
Envelope 21Two Collated, Folded Sheets, No
Envelope (Fold Only) 23Two Folded Sheets and an Insert
into an Envelope 24Two Folded Sheets and an Insert
into an Envelope (c 25Two Folded Sheets into an Envelope
20Two Folded Sheets, No Envelope
(Fold Only) 22Job Setups
Illustrated Guide to 13, 14Jobs, Running 13
L
Lift Cover D Remove AllError Message 35
Lift Cover D Remove EnvError Message 35
Lifting HandlesLocation and Function of 5
LoadingEnvelope Feeder 11Insert Feeder 12Sheet Feeders 10
M
Machine Configurations 3Machine Controls, Indicators and
Features 4Machine Specifications 42Manual Feed 28Manual Feeder M
Location and Function of 5Material Specifications 41Menu Options
Address, Centering in Window 30
05 A5 p33-46 6/16/03, 4:33 PM44
45OfficeRight™ DI200 Operator’s Guide
Index
Advanced 29Double Detection
Turning On and Off 32Double Detection , Sheet
Turning On and Off 31Paper Size, Changing 30Reset Counter 29Safe Seal Feature
Turning On and Off 32Menu/Enter Button 6Moistener
Filling the 9Moistener Tank
Location and Function of 5
N
No Button, Function of 6
O
Open Cover E Remove AllError Message 35
Operating Guide SlotLocation of 4
Ordering Supplies 40
P
Paper Size, Changing 30Perforations
Problems Cause By 37Phone Support 39Power Connection 8Power On/Off
Error Message 35Problems. See Troubleshooting
R
Reload EnvelopesError Message 35
Reload InsertsError Message 35
Remove All from D & EError Message 36
Remove All from M & DError Messages 36
Remove Sheet from A1Error Message 36
Replace Fdr A1 TrayError Message 36
Running Jobs 13
S
Safe Seal FeatureTurning On and Off 32
Safety Information 2Sealing
PoorHow to correct 32
Sealing, EnvelopePoor 37
Second Sheet Feeder A2Location and Function of 5
Selection Buttons, Control Panel 7Setting Up a Job. See Job Setups:
Illustrated Guide toSheet Feeders A1 and A2
Loading 10Sheets Required
Error Message 36Sleep Mode, Explained 7Specifications
Machine 42Material 41
Standard Sheet Feeder A1Location and Function of 5
Start Button, Control Panel 7Stop Button, Control Panel 7Supplies, Ordering 40System Error
Error Message 36System Won't Work with Sheet Feeder
2 38
05 A5 p33-46 6/16/03, 4:33 PM45
46 OfficeRight™ DI200 Operator’s Guide
Index
T
Technical Support 39Trial Piece, Purpose of 7Troubleshooting 37
Address Position Wrong 37Double Feeds Don't Stop Machine
37Envelope Seals Bad 37False Doubles 37Folds Bad 37Inserts Feed Poorly 38System Won't Work 38
Turning Machine On 8
W
Web Address, Pitney Bowes 39
Y
Yes Button, Function of 6
05 A5 p33-46 6/16/03, 4:33 PM46

© 2003 Pitney Bowes Inc.
One Elmcroft RoadStamford, Connecticut 06926-0700www.pitneybowes.com
Pitney Bowes Canada2200 Yonge Street Suit 100Toronto, Ontario M4S 3E11.800.672.6937
SV40189-OG Rev. B 6/03 Printed in England
Operating Guide
*SV40189-OGREVB*
00 Front/Back Covers 6/16/03, 4:32 PM2