Innovative Lighting R-Series Vertical Refrigerat ion Door ... · PDF fileInnovative Lighting...
11
R-Series Vertical Refrigeration Do Innovative L Refrigeration For Commerc Sa WARNING Risk of fire or electrical shock. Di power before installing or servici BEFO Read to foll oor LED Conversion Kits Installation Guide, Rev. CAUTION Use caution when handling a p Always wear protective eyewea Installation Guide Lighting ® R-Series Ver n Door LED Conversion cial Refrigerators and Freez ave these instructions for reference isconnect ing product. ORE YOU BEGIN INSTALLATION d these instructions carefully. Failure low these instructions will invalidate the warranty on this product. . 1.0, Date: 09/19/13 N power tool. ar. rtical n Kits zers
Transcript of Innovative Lighting R-Series Vertical Refrigerat ion Door ... · PDF fileInnovative Lighting...

R-Series Vertical Refrigeration Door
Innovative Lighting
Refrigeration
For Commercial Refrigerators and Freezers
Save these instructions
WARNING
Risk of fire or electrical shock. Disconnect
power before installing or servicing product.
BEFORE YOU BEGIN INSTALLATION
Read theseto follow these instructions will invalidate
Series Vertical Refrigeration Door LED Conversion Kits Installation Guide, Rev.
CAUTION
Use caution when handling a power tool.
Always wear protective eyewear.
Installation Guide
Innovative Lighting® R-Series Vertical
ion Door LED Conversion
Commercial Refrigerators and Freezers
Save these instructions for reference
electrical shock. Disconnect
power before installing or servicing product.
BEFORE YOU BEGIN INSTALLATION
Read these instructions carefully. Failure to follow these instructions will invalidate
the warranty on this product.
Rev. 1.0, Date: 09/19/13
CAUTION Use caution when handling a power tool.
Always wear protective eyewear.
Series Vertical
Conversion Kits
Commercial Refrigerators and Freezers

Innovative Lighting® R-Series Vertical Refrigeration Door LED Conversion Kits
refrigerators and freezers to be convertedsystems. Kits include two or more vertical LED light clips. The vertical LED light fixtures are completely assembled location as the existing light source. Innovative Lighting
® R-Series Vertical LED Light Fixture
the center of a refrigerated case, between two doors (750/751 refrigerated case, next to a single door (733/734 Series). left side (73Z-50XX-1A) end models.
WARNING – Risk of fire or electric shock. Refrigeration Door LED light fixtures in Listed features shown in the photographs and/or drawings
Series Vertical Refrigeration Door LED Conversion Kits allow to be converted to using energy efficient Innovative Lighting
®
vertical LED light fixtures, low voltage power suppliess are completely assembled modules that can be mounted in the .
Series Vertical LED Light Fixtures are available in models for both ase, between two doors (750/751 Series), and installation at the
case, next to a single door (733/734 Series). Kits include both right side (73Zmodels.
R-Series Vertical LED Light Fixture Center Model (750/751
R-Series Vertical End Light LED Light
Fixture End Model (733/734 Series)
Mounting Clip
fire or electric shock. Innovative Lighting® R-Series Vertical
LED Conversion Kits are only intended for use in replacing existing Listed commercial refrigerators and freezers having the construction
features shown in the photographs and/or drawings.
2
allow commercial LED lighting
low voltage power supplies, and mounting modules that can be mounted in the same
for both installation in Series), and installation at the end of a
73Z-50XX-1) and
Series Vertical LED Light Fixture odel (750/751 Series)
Series Vertical End Light LED Light (733/734 Series)
Mounting Clip
Series Vertical d for use in replacing existing
having the construction
3
Several Innovative Lighting
® R-Series Vertical Refrigeration Door LED Conversion Kits are available. See
the kit description below for LED light fixture length and quantity. Verify the contents of the conversion kit before installation.
Where:
XX indicates the length of the included light fixtures in inches (60 = 5’, 72 = 6’).
Y indicates the power level of the conversion kit and center light fixtures (0 = standard power, 1 = low power).
Z indicates the power level of the end light fixtures (3 = standard power, 4 = low power).
Note that standard power conversion kits use 750 and 733 Series fixtures, while low power conversion kits use 751
and 734 Series fixtures. See the R-Series 750/751 and R-Series 733/734 specification sheets for information on
differences between the standard and low power models.
1 Door Vertical Refrigeration Door LED Conversion Kit - 75Y-50XX-4 (1) Vertical End Light Fixture - Right (PN 73Z-50XX-1) (1) Vertical End Light Fixture - Left (PN 73Z-50XX-1A) (1) 12VDC Class 2 Power Supply (PN 750-9995-1) (4) Mounting Clips (PN 730-9910-1)
2 Door Vertical Refrigeration Door LED Conversion Kit - 75Y-50XX-4-2 (1) Center Vertical Light Fixture (PN 75Y-50XX-1) (1) Vertical End Light Fixture - Right (PN 73Z-50XX-1) (1) Vertical End Light Fixture - Left (PN 73Z-50XX-1A)
(1) 12VDC Class 2 Power Supply (PN 750-9995-1) (6) Mounting Clips (PN 730-9910-1)
3 Door Vertical Refrigeration Door LED Conversion Kit - 75Y-50XX-4-3 (2) Center Vertical Light Fixture (PN 75Y-50XX-1) (1) Vertical End Light Fixture - Right (PN 73Z-50XX-1) (1) Vertical End Light Fixture - Left (PN 73Z-50XX-1A)
(2) 12VDC Class 2 Power Supply (PN 750-9995-1) (8) Mounting Clips (PN 730-9910-1) 4 Door Vertical Refrigeration Door LED Conversion Kit - 75Y-50XX-4-4 (3) Center Vertical Light Fixture (PN 75Y-50XX-1) (1) Vertical End Light Fixture - Right (PN 73Z-50XX-1) (1) Vertical End Light Fixture - Left (PN 73Z-50XX-1A)
(2) 12VDC Class 2 Power Supply (PN 750-9995-1) (10) Mounting Clips (PN 730-9910-1) 5 Door Vertical Refrigeration Door LED Conversion Kit - 75Y-50XX-4-5 (4) Center Vertical Light Fixture (PN 75Y-50XX-1) (1) Vertical End Light Fixture - Right (PN 73Z-50XX-1) (1) Vertical End Light Fixture - Left (PN 73Z-50XX-1A)
(2) 12VDC Class 2 Power Supply (PN 750-9995-1) (12) Mounting Clips (PN 730-9910-1) 5 Door 6’ Vertical Refrigeration Door LED Conversion Kit – 750-5072-4-5 (4) Center Vertical Light Fixture (PN 750-5072-1) (1) Vertical End Light Fixture - Right (PN 733-5072-1) (1) Vertical End Light Fixture - Left (PN 733-5072-1A)
(3) 12VDC Class 2 Power Supply (PN 750-9995-1) (12) Mounting Clips (PN 730-9910-1)
Required tools and components Tape Measure Pencil Power Drill Screwdriver Bit or Standard Screwdriver 1/8” Drill Bit Wire Stripper Electrical Tape or Cable Ties Listed Wire Nuts or Other Listed Connectors #8 Sheet Metal Screws
WARNING – Risk of fire or electric shockRefrigeration Door LED electrical systems. If not qualified, do not attempt installation. Contact a licensed electrician.
WARNING – Innovative LightingKits are for use in converting or 240VAC only. Do not use with commercial refrigerators or freezers277VAC.
Removal of Existing Components
1. TURN OFF POWER TO THE SERVICE PANEL AND FOLLOW APPROPRIATE LOCK OUT / TAG OUT SAFETY PROCEDURES. DO NOT ATTEMPT INSTHE POWER IS OFF.
2. Remove the existing light sourceProperly dispose of these after
3. Disconnect the lampholders
4. Open the covers of the electrical racewaysand secondary wiring. These are typically refrigerator or freezer, or in the mullions between the doors.
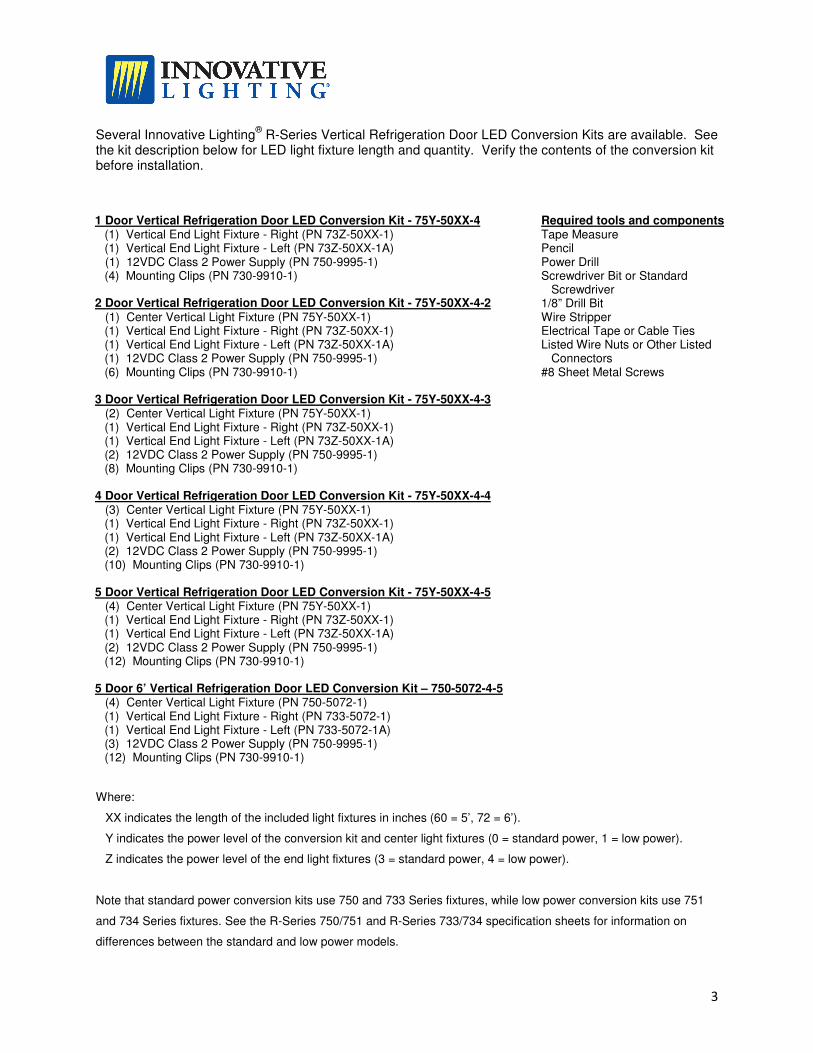
5. Disconnect the wiring from the ballasts and remove the ballasts from the electrical raceways along with the secondary wiring.
Risk of fire or electric shock. Innovative Lighting® R-Series Vertical
LED Conversion Kit installation requires knowledge of luminaire systems. If not qualified, do not attempt installation. Contact a licensed
Innovative Lighting® R-Series Vertical Refrigeration Door LED Conversion
are for use in converting commercial refrigerators and freezers supplied by 110VAC nly. Do not use with commercial refrigerators or freezers supplied by
Removal of Existing Components:
TURN OFF POWER TO THE COMMERCIAL REFRIGERATOR OR FREEZERSERVICE PANEL AND FOLLOW APPROPRIATE LOCK OUT / TAG OUT SAFETY
. DO NOT ATTEMPT INSTALLATION UNTIL IT IS VERIFIED THAT
light sources, such as fluorescent lamps, from the refrigerator or freezer.after installing the conversion kit.
lampholders from their wiring.
electrical raceways enclosing the ballasts and their associatedThese are typically located below the doors, running the length of the
refrigerator or freezer, or in the mullions between the doors.
Disconnect the wiring from the ballasts and from the electrical
along with the secondary wiring.
4
Series Vertical ires knowledge of luminaire
systems. If not qualified, do not attempt installation. Contact a licensed
Series Vertical Refrigeration Door LED Conversion supplied by 110VAC
supplied by
COMMERCIAL REFRIGERATOR OR FREEZER AT THE SERVICE PANEL AND FOLLOW APPROPRIATE LOCK OUT / TAG OUT SAFETY
IT IS VERIFIED THAT
from the refrigerator or freezer.
associated primary the length of the

Installation of New Components:
6. When installing Innovative Lighting
exit the top of the light fixture. The lenses in the light fixture use a lap joint that prevents moisture
from getting into the light fixture when oriented with the cable exiting the top of the fixture.
7. When installing Innovative Lighting
the light fixtures are oriented as shown below
8. Inspect the location where a new installed and determine the location of the mounting clipsshould be installed approximately 12 inches from each end of eacha pencil to mark the pilot holes for the mounting clip
WARNING – Risk of fire or electric shock. Prior to drilling, ensure that there are no components behind the mounting surface in the areas marked off for the mounting holes
Only those open holes indicated in the photographs and/or drawings may made or altered as a result of kit installation. Do not leave any other open holes in an enclosure of wiring or electrical components
Innovative Lighting® R-Series Vertical LED Light Fixtures, the power cable should
exit the top of the light fixture. The lenses in the light fixture use a lap joint that prevents moisture
from getting into the light fixture when oriented with the cable exiting the top of the fixture.
ng Innovative Lighting® R-Series Vertical End Light LED Light Fixtures, make sure
oriented as shown below for proper light distribution:
location where a new Innovative Lighting® R-Series Vertical LED Light Fixture
and determine the location of the mounting clips. One mounting clip (PN 730should be installed approximately 12 inches from each end of each vertical LED light fixturea pencil to mark the pilot holes for the mounting clips.
Risk of fire or electric shock. Prior to drilling, ensure that there are no components behind the mounting surface in the areas marked off for the mounting holes.
Only those open holes indicated in the photographs and/or drawings may made or altered as a result of kit installation. Do not leave any other open holes in an enclosure of wiring or electrical components.
5
power cable should
exit the top of the light fixture. The lenses in the light fixture use a lap joint that prevents moisture
from getting into the light fixture when oriented with the cable exiting the top of the fixture.
Series Vertical End Light LED Light Fixtures, make sure
Series Vertical LED Light Fixture is to be (PN 730-9910-1)
vertical LED light fixture. Use
Risk of fire or electric shock. Prior to drilling, ensure that there are no components behind the mounting surface in the areas marked
Only those open holes indicated in the photographs and/or drawings may be made or altered as a result of kit installation. Do not leave any other open
6
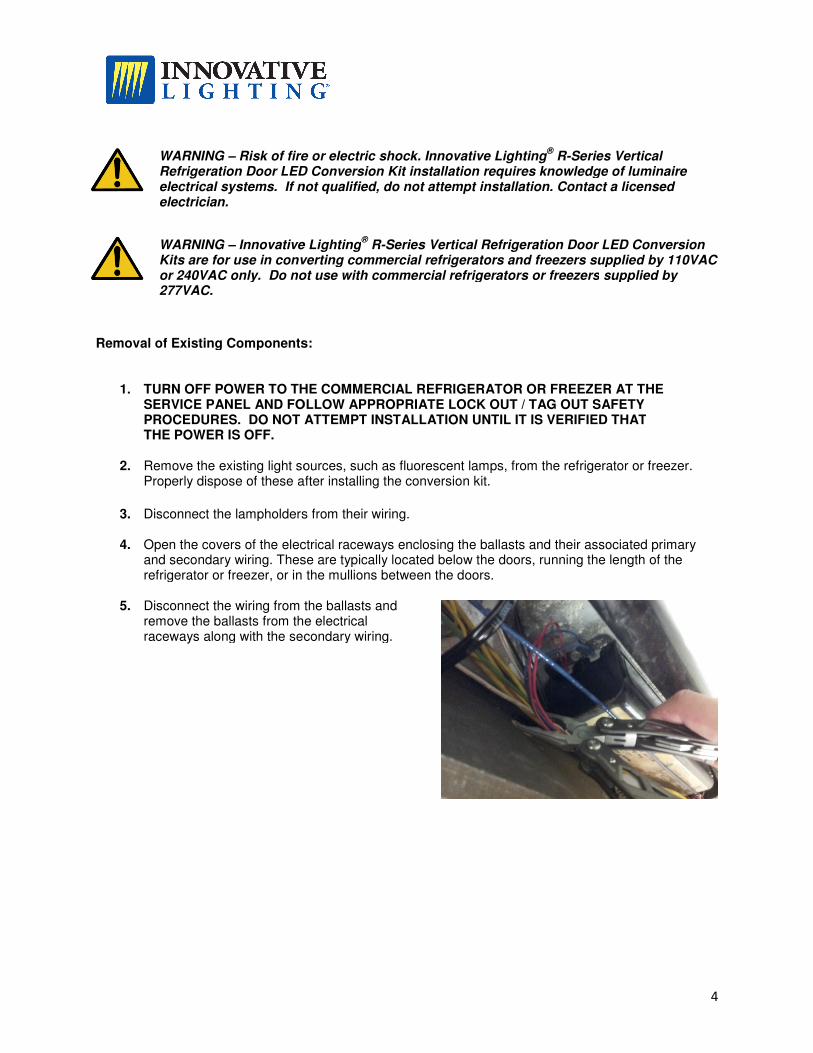
9. Drill a 1/8” diameter pilot hole into the mounting surface at each of the marks made in step 8 and
attach the mounting clips with #8 sheet metal screws in the pilot holes. See figure below:
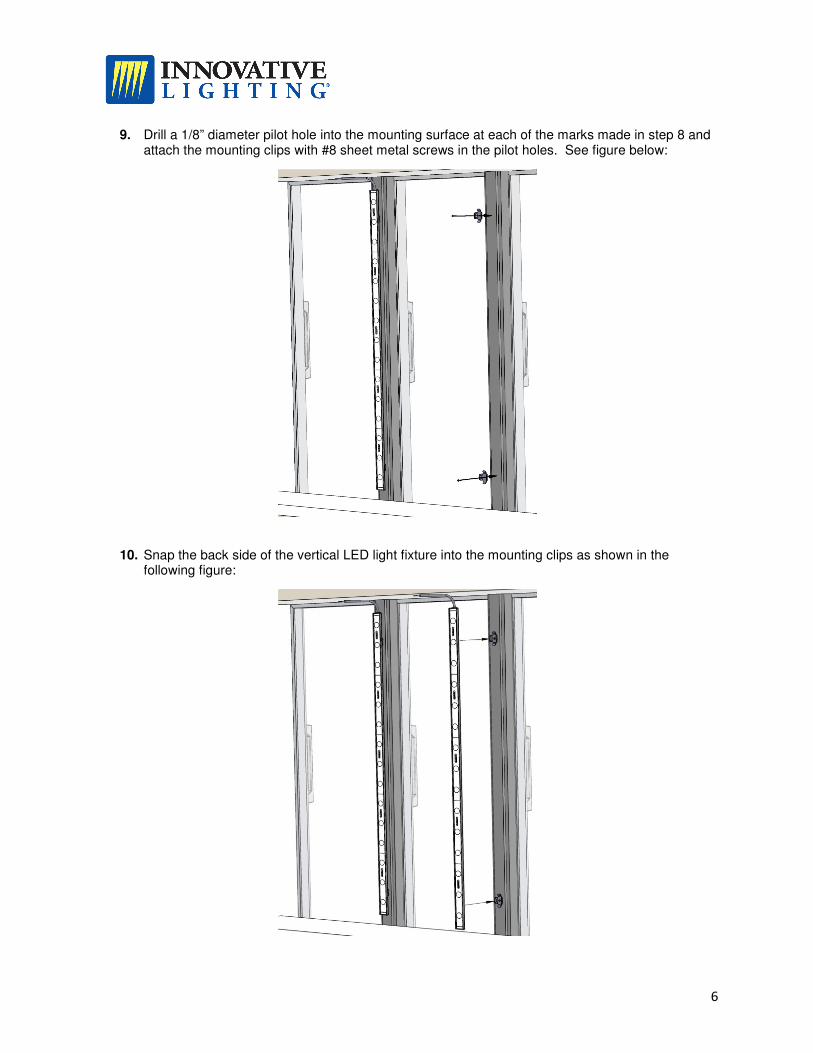
10. Snap the back side of the vertical LED light fixture into the mounting clips as shown in the following figure:

11. Each Innovative Lighting® R
the appropriate number of regulated 12VDC Class 2 power svertical LED light fixtures that come with that kit. can support up to a 5A load when supplied by a 2 power supply should be placed in a location previously occupied by one of the each power supply using #8 sheet metal screws through the mounting holes at the ends of each power supply.
One regulated 12VDC Class 2 power sR-Series Vertical LED Light Fixture
(2) Vertical End Light (1) Vertical End Light Fixture and (2) Vertical End Light Fixtures and (2) Center Vertical Light Fixtures (1) Vertical End Light Fixture (except for (1)
Vertical Light Fixtures
12. Connect the AC input wires of each wires previously connected to the input of the ballast. Use UL Listed wire nutsconnectors, or other Listed connectorsTerminate any unused AC primary wires with a UL Listed wire nut or other that they are not exposed.
Regulated 12VDC Class 2 Power Suppl
Black wire - Connect to White wire - Connect to
13. Run new secondary wiring through the electrical raceways between each 2 power supply and the Innovative Lightingintended to power. Connect theto the new secondary wires
Regulated 12VDC Class 2 Power SupplRed wire - Connect to Blue wire - Connect to
Each regulated 12VDC Class 2 power s
WARNING – To prevent wiring damage or abrasion, do not expose wiring to edges of sheet metal or other sharp objects.
All wiring must be in compliance with NEC and local codes. This light fixture
is suitable for damp locations. When used in a damp location, ensure that all
connection points are sealed for d
per the NEC or local electrical code.
R-Series Vertical Refrigeration Door LED Conversion Kitregulated 12VDC Class 2 power supplies (PN 750-9995
s that come with that kit. Each power supply has an output of 12VDC and 5A load when supplied by a 100-240VAC input. Each regulated 12VDC Class
upply should be placed in a location previously occupied by one of the each power supply using #8 sheet metal screws through the mounting holes at the ends of each
regulated 12VDC Class 2 power supply will drive the following combinations of Series Vertical LED Light Fixtures :
Light Fixtures End Light Fixture and (1) Center Vertical Light Fixture
Light Fixtures and (1) Center Vertical Light Fixture (2) Center Vertical Light Fixtures
End Light Fixture and (2) Center Vertical Light Fixtures 734-5072-1 Vertical End Light Fixture and (2) 750-5072
Light Fixtures – these cannot be driven from a single power supply
input wires of each regulated 12VDC Class 2 power supply to thewires previously connected to the input of the ballast. Use UL Listed wire nuts, qu
, or other Listed connectors following the connector manufacturer’s instructions.Terminate any unused AC primary wires with a UL Listed wire nut or other Listed
Regulated 12VDC Class 2 Power Supply Primary Side Connections: Connect to AC Line wire. Connect to AC Neutral wire.
Run new secondary wiring through the electrical raceways between each regulated 12VDC Class Innovative Lighting
® R-Series Vertical LED Light Fixture
Connect the DC output wires of each regulated 12VDC Class 2 power sto the new secondary wires using a UL Listed wire nut or other Listed connector.
Regulated 12VDC Class 2 Power Supply Secondary Side Connections:Connect to positive (+) secondary wire. Connect to negative (-) secondary wire.
regulated 12VDC Class 2 power supply should be connected as shown:
To prevent wiring damage or abrasion, do not expose wiring to edges of sheet metal or other sharp objects.
All wiring must be in compliance with NEC and local codes. This light fixture
is suitable for damp locations. When used in a damp location, ensure that all
connection points are sealed for damp location using the appropriate method
per the NEC or local electrical code.
7
Conversion Kit comes with 9995-1) for the
has an output of 12VDC and regulated 12VDC Class
upply should be placed in a location previously occupied by one of the ballasts. Secure each power supply using #8 sheet metal screws through the mounting holes at the ends of each
combinations of
5072-1 Center power supply)
upply to the AC primary quick disconnect
manufacturer’s instructions. Listed connector so
regulated 12VDC Class Series Vertical LED Light Fixtures that it is
regulated 12VDC Class 2 power supply using a UL Listed wire nut or other Listed connector.
ary Side Connections:
To prevent wiring damage or abrasion, do not expose wiring to
All wiring must be in compliance with NEC and local codes. This light fixture
is suitable for damp locations. When used in a damp location, ensure that all
amp location using the appropriate method

8
14. Connect the input wires of each R-Series Vertical LED Light Fixture to the new secondary wires
that have been run to the light fixture through the electrical raceways using UL Listed wire nuts or other Listed connectors.
R-Series Vertical LED Light Fixture Input Wire Connections:
Red wire - Connect to positive (+) secondary wire. Blue wire - Connect to negative (-) secondary wire.
Optional Linear Dimming Control: An optional 0-10V dimming module may be installed between the regulated 12VDC Class 2 power supply and the R-Series Vertical LED Light Fixtures to provide linear dimming. Dimming modules sold separately. Optional Occupancy Sensor Control: An optional power pack may be installed before the regulated 12VDC Class 2 power supply for controlling the R-Series Vertical LED Light Fixtures with an occupancy sensor or other control input. Power packs and occupancy sensors sold separately.
15. Gather any slack wires and secure them together with electrical tape or cable ties.
16. Close the covers of the electrical raceways. Be sure no wires are pinched or touch sharp edges
and all high voltage AC primary wiring is enclosed within the electrical raceways.
17. Place the label stating that the original luminaire has been modified near the light fixtures where it
will be readily visible during normal maintenance. This label is included with the conversion kit.
18. Turn the power back on to the commercial refrigerator or freezer at the service panel and verify
that all R-Series Vertical LED Light Fixtures are powered and operating properly.
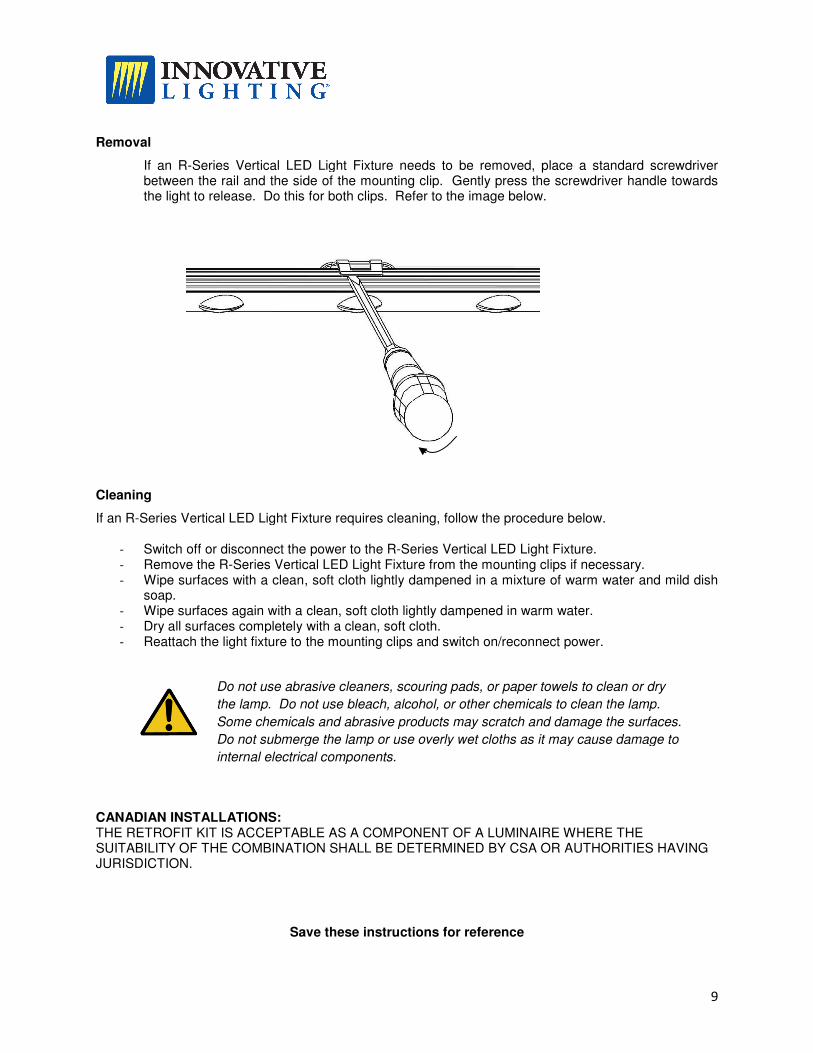
Removal
If an R-Series Vertical LED Light Fixturebetween the rail and the side of the the light to release. Do this for
Cleaning
If an R-Series Vertical LED Light Fixture
- Switch off or disconnect the power to the - Remove the R-Series Vertical LED Light Fixture- Wipe surfaces with a clean
soap. - Wipe surfaces again with a clean- Dry all surfaces completely with a clean, soft cloth.- Reattach the light fixture to the mounting clips and switch on/reconnect power.
CANADIAN INSTALLATIONS: THE RETROFIT KIT IS ACCEPTABLE AS A COMPONENT OF A LUMINAIRE WHERE THE SUITABILITY OF THE COMBINATION SHALL BE DETERMINED BY CSA OR AUTHORITIES HAVING JURISDICTION.
Save these instructions
Do not use abrasive cleaners, scouring pads, or paper towels to clean or dry
the lamp. Do not use bleach,
Some chemicals and abrasive products may scratch and damage the surfaces.
Do not submerge the lamp or use overly wet cloths as it may cause damage to
internal electrical components.
Series Vertical LED Light Fixture needs to be removed, place a standardrail and the side of the mounting clip. Gently press the screwdriver handle towards
Do this for both clips. Refer to the image below.
Series Vertical LED Light Fixture requires cleaning, follow the procedure below.
Switch off or disconnect the power to the R-Series Vertical LED Light Fixture. Series Vertical LED Light Fixture from the mounting clips if necessary.
Wipe surfaces with a clean, soft cloth lightly dampened in a mixture of warm water and mild dish
Wipe surfaces again with a clean, soft cloth lightly dampened in warm water. Dry all surfaces completely with a clean, soft cloth.
to the mounting clips and switch on/reconnect power.
IS ACCEPTABLE AS A COMPONENT OF A LUMINAIRE WHERE THE SUITABILITY OF THE COMBINATION SHALL BE DETERMINED BY CSA OR AUTHORITIES HAVING
Save these instructions for reference
Do not use abrasive cleaners, scouring pads, or paper towels to clean or dry
the lamp. Do not use bleach, alcohol, or other chemicals to clean the lamp.
Some chemicals and abrasive products may scratch and damage the surfaces.
Do not submerge the lamp or use overly wet cloths as it may cause damage to
internal electrical components.
9
tandard screwdriver the screwdriver handle towards
from the mounting clips if necessary. dampened in a mixture of warm water and mild dish
IS ACCEPTABLE AS A COMPONENT OF A LUMINAIRE WHERE THE SUITABILITY OF THE COMBINATION SHALL BE DETERMINED BY CSA OR AUTHORITIES HAVING
Do not use abrasive cleaners, scouring pads, or paper towels to clean or dry
alcohol, or other chemicals to clean the lamp.
Some chemicals and abrasive products may scratch and damage the surfaces.
Do not submerge the lamp or use overly wet cloths as it may cause damage to

10
This page intentionally left blank
Purchase Date: ________________________
Warranty Expiration Date: _______________
Thank you for your purchase of an Innovative Lighting® R-Series Vertical Refrigeration Door LED
Conversion Kit. Please keep the top portion of this page for your records and mail the bottom portion to
the address provided to register your product.
WARRANTY INFORMATION
Innovative Lighting LLC., Limited Product Warranty is FIVE (5) YEARS from date of purchase on R-Series
Refrigeration Door LED Conversion Kits and their components. Any product developing such defect in
material or workmanship within this period will be repaired or replaced with a like product, at our
option (IL) providing it is sent to us, transportation charges prepaid. Proof-of-Purchase date must
accompany return to IL at our Roland, Iowa facility. IL does not warrant contractor’s installation work or
performance.
This warranty is void if the product warranted has been damaged by accident or unreasonable use,
neglect, improper installation or service, or other cause not arising out of defects in material or
workmanship.
This FIVE (5) YEAR limited product warranty is not transferable and applies to the original installation of
the R-Series Refrigeration Door LED Conversion Kits for as long as the original purchaser owns them.
SHIPPING DAMAGE
The Innovative Lighting® R-Series Refrigeration Door LED Conversion Kits should be examined for
shipping damage upon receipt. The components in the kits have been carefully inspected before
shipment. Any claim for loss or damage must be made to the carrier, which will provide any necessary
inspection reports and/or claim forms.
PRODUCT REGISTRATION
PRODUCT INFORMATION
R-Series Refrigeration Door LED Conversion Kit Model: ___________________
R-Series Refrigeration Door LED Light Fixture Date Code (YYMMDD on lamp label): ________________
Date of Purchase: _______________
Number of units purchased: _______
Mail to: Innovative Lighting, LLC., P.O. Box 366, Roland, Iowa 50236
OWNER INFORMATION
Name: _________________________________
Company: ______________________________
Address: _______________________________
City: ________________________ State: _____
Zip: __________ Phone: ___________________
E-mail: _________________________________
Owner Signature: ________________________
INSTALLER INFORMATION
Name: _________________________________
Company: ______________________________
Address: _______________________________
City: ________________________ State: _____
Zip: __________ Phone: ___________________
E-mail: _________________________________
Installer Signature: ________________________