Innovative Column Options for the 21st Century - Ron Blank
54
Course Number: hbg06c HB&G Building Products Tim Bobo PO BOX 589 1015 Brundidge Blvd. Troy, AL 36081 800-264-4424 334-670-6512 [email protected] www.hbgcolumns.com An American Institute of Architects (AIA) Continuing Education Program Innovative Column Options for the 21 st Century Credit for this course is 1 AIA HSW CE Hour © Ron Blank and Associates, Inc.® 2006 Please note: you will need to complete the conclusion quiz online at RonBlank.com to receive credit
Transcript of Innovative Column Options for the 21st Century - Ron Blank

Innovative Column Options for the 21st Century
Course Number:
hbg06c
HB&G Building Products
Tim Bobo
PO BOX 589
1015 Brundidge Blvd.
Troy, AL 36081
800-264-4424
334-670-6512
www.hbgcolumns.com
An American Institute of Architects (AIA)
Continuing Education Program
Innovative Column Options for the 21st Century Credit for this course is 1 AIA HSW CE Hour
© Ron Blank and Associates, Inc.® 2006
Please note: you will need to complete the conclusion
quiz online at RonBlank.com to receive credit

Approved Promotional Statement:
Ron Blank & Associates, Inc. is a registered provider with The American Institute of
Architects Continuing Education System. Credit earned upon completion of this program will be reported to CES Records for AIA members. Certificates of Completion are available for all course participants upon completion of the course conclusion quiz with +80%.
Please view the following slide for more information on Certificates of Completion through RBA
This program is registered with the AIA/CES for continuing
professional education. As such, it does not include content that may be deemed or construed to be an approval or endorsement
by the AIA or Ron Blank & Associates, Inc. of any material of construction or any method or manner of handling, using, distributing, or dealing in any material or product.
An American Institute of Architects (AIA)
Continuing Education Program

Course Format: This is a structured, web-based, self study course with a final exam.
Course Credit: 1 AIA Health Safety & Welfare (HSW) CE Hour
Completion Certificate: A confirmation is sent to you by email and you can print one upon successful completion of a course or from your RonBlank.com transcript. If you have any difficulties printing or receiving your Certificate please send requests to [email protected]
Design professionals, please remember to print your certificate of completion after successfully completing a course conclusion quiz. All AIA and non-AIA members will be sent a copy of their certificate to the email address they have provided in their RonBlank.com account.
An American Institute of Architects (AIA)
Continuing Education Program
Please note: you will need to complete the conclusion quiz online
at RonBlank.com to receive credit

Discover the innovative column options that are available
today and the variety of materials that are used to create this
classic product. Learn about the current trends that have
affected columns in the construction industry.
Course Description

Become aware of the column design options and the materials they are made from.
Describe the manufacturing process for column materials.
Explain the construction process of the different column material options.
Identify the characteristics of the materials used in column construction.
Explain the current trends and construction standards that have affected column design in the construction industry today
Upon completion of this course the Design Professional will be
able to:
Course Objectives

Columns and the Materials They are Made From
Weatherability
Application
Ease of Installation
Warranty
Quality
Price
Things to Consider When
Selecting a Column:

The five classical orders are:
• Tuscan
• Doric
• Ionic
• Corinthian
• Composite
Since ancient Greek and Roman
times, columns have signified
importance and power. During
these times, decorative columns
were strictly made of stone and
are still impressive today
His
tory
Columns and the Materials
They are Made From

An
cie
nt
Gre
ec
e
& R
om
e
Mo
de
rn
Da
y
Prestige Facade Entry
His
tory
Pantheon Temple of Athena Roman Coliseum
Today, columns are made from a variety of different materials, and are
one of the most important millwork elements in the residential building
industry. Drive through any residential development and it seems like
columns are on every other house.
Example: Current day residential USA. Notice the resemblance of Greek and Roman ideology in modern day architecture.
Columns and the Materials
They are Made From

The majority of current day columns are made from five basic materials:
• Wood
• Aluminum
• Fiberglass
• FRP (Fiber Reinforced Polymer)
• Stone
Let’s review these materials independently, to understand the history, manufacturing, and installation procedures required for each.
His
tory
Columns and the Materials
They are Made From

Throughout history wood has been the
material of choice for millwork use.
Alternative options did not become
available until the 1960’s. Wood columns
were first introduced to America with a style
of architecture known as Neoclassicism
(circa 1780’s).
Today wood columns, as well as most other
wood millwork elements are being surpassed
with the new synthetic products. Most
column manufacturers would agree that
wood is a small percentage of sales to what
it was only 20 years ago. Wood columns can
be found in any shape, even their knotted,
twisted natural form.
Wood Columns H
isto
ry

Strips of wood called staves are cut to the desired length of the column.
The strips are notched on each side to allow them to be placed together.
Glue is applied between the staves, and a band is place around the
attached staves. The glue is then allowed to dry.
Wood Columns M
an
ufa
ctu
rin
g P
roc
ess
The manufacturing process of round wood columns is a fairly straight forward process.
1 2 3 4

Once dry, the bands are removed and the column is placed on a lathe.
During this process the column is turned on the lathe, and the column
becomes smooth, close to the look of the finished product. Once the
column is turned, some light patch work is performed, and the column is
ready to be packaged.
Square wood columns are simply four boards, some with surface
etchings, that are glued and nailed together on the job sight.
Wood Columns M
an
ufa
ctu
rin
g P
roc
ess
5 6

Let’s take some time and look into the installation of round wood columns.
Step 1 - Measure full opening less the height of the cap and base. Columns must be installed on level surface or shimmed to level. To get the
height of the cap and base simply place cap on top of base and
measure.
Step 2 - Locate saw kerft at top of column and trim using hand saw or circular saw. Sand or rasp smooth to guarantee even contact with
capital.
Step 3 - Measure from newly trimmed top of shaft to desired length placing marks every inch around column. Next, place a mark around
shaft using a straight edge (something that will bend).
Step 4 - Trim column with a hand saw or circular saw. Slowly rotating column will insure a level cut.
Wood Columns In
sta
lla
tio
n

Step 5 - For exterior applications, paint inside of column shaft with non- fibrous, asphaltum- type roof coating. Application must reach a minimum
of 4’ up column shaft. Next, paint the bottom end of shaft with an oil base
wood primer. Also paint top end of column with oil base primer.
Step 6 - Using a jack post lift beam, remove existing column or post. Beam should not be lifted more than ½’’ inch.
Step 7 - Determine top centerline and mark on beam using a straight edge. Next, hang a plumb line from top center line to determine bottom
center line. Mark center point of column. Using a large square, draw a
center line perpendicular to the outside edge of substrate. Draw another
line parallel to outside edge.
Step 8 - Place marks at center line of all four sides of each capital and base. When installing shaft, capital and base, all four sides will line up
evenly insuring a perfectly aligned column.
Wood Columns In
sta
lla
tio
n
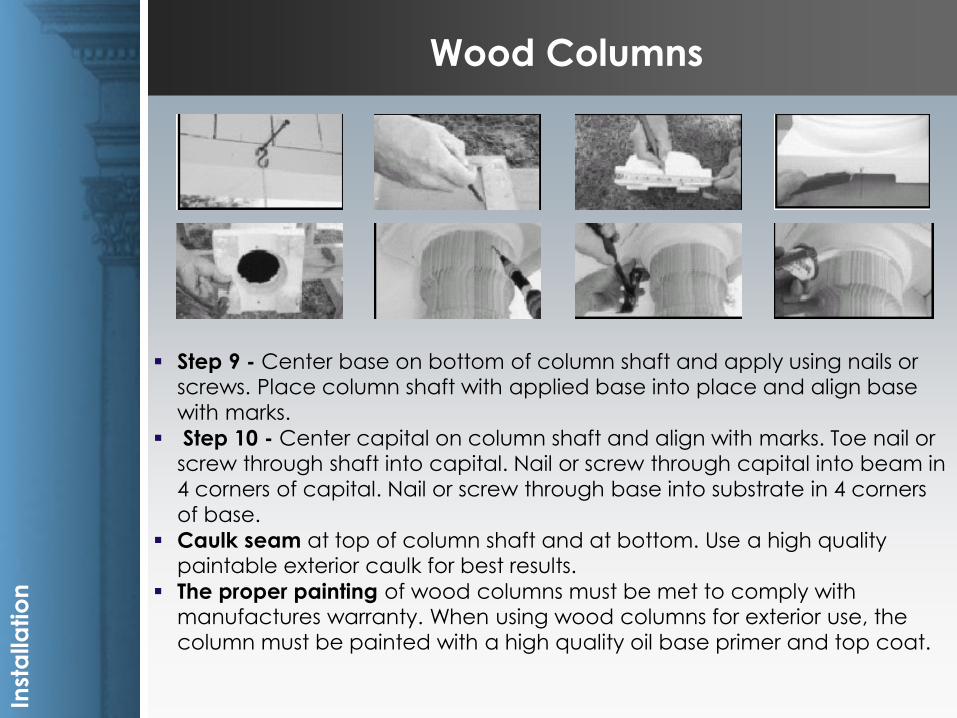
Step 9 - Center base on bottom of column shaft and apply using nails or screws. Place column shaft with applied base into place and align base
with marks.
Step 10 - Center capital on column shaft and align with marks. Toe nail or screw through shaft into capital. Nail or screw through capital into beam in
4 corners of capital. Nail or screw through base into substrate in 4 corners
of base.
Caulk seam at top of column shaft and at bottom. Use a high quality paintable exterior caulk for best results.
The proper painting of wood columns must be met to comply with manufactures warranty. When using wood columns for exterior use, the column must be painted with a high quality oil base primer and top coat.
Wood Columns In
sta
lla
tio
n

Aluminum Columns
Aluminum is the most abundant
element in the Earth’s crust and
constitutes 7.3% by mass. Aluminum
was discovered in 1808 by Sir
Humphry Davy and today is produced
more than all other nonferrous metals
combined.
Aluminum was introduced to the
construction market in the mid- 1960’s
and is featured in a variety of different
millwork applications including siding,
rail systems and columns. The
following picture showcases
aluminum columns in every day
applications.
His
tory

Aluminum columns are produced by a process known as sheet and plate. Sheet and plate manufacturing occurs when aluminum is passed between rolls under pressure. When the raw aluminum is rolled, it becomes thinner in the direction in which it is moving. Sheet is the most widely used form of aluminum.
Construction applications also include siding and gutters. The following pictures show the sheet and plate process; Picture one is the raw aluminum billets. Picture two showcases the rolling machine rolling the billets into a sheet form. The last pictures shows aluminum once it is rolled.
Aluminum Columns M
an
ufa
ctu
rin
g P
roc
ess

Although available in pre-manufactured shafts, aluminum columns are traditionally sold in sheet form with locking or mechanical joints. These columns are generally acceptable to load bearing or wrap around installations. To assemble an aluminum column in a load bearing application:
Step 1- measure the required height and cut aluminum staves with a hacksaw prior to assembly. ( add ¼ inch to measurement for new construction and subtract ¼ inch for wrap around construction.
Step 2- assemble staves by rotating together Step 3- assemble final interlock by rapping with the hands, starting at one
end of the column. For a wrap around assembly steps 2 and 3 are preformed around support.
Aluminum Columns In
sta
lla
tio
n
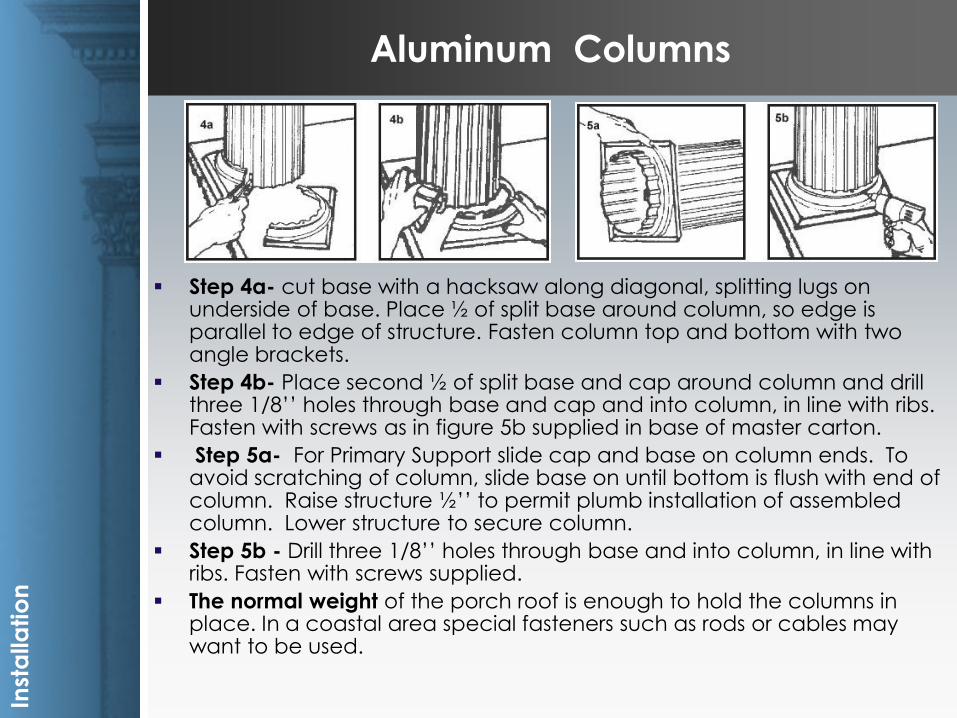
Step 4a- cut base with a hacksaw along diagonal, splitting lugs on underside of base. Place ½ of split base around column, so edge is parallel to edge of structure. Fasten column top and bottom with two angle brackets.
Step 4b- Place second ½ of split base and cap around column and drill three 1/8’’ holes through base and cap and into column, in line with ribs. Fasten with screws as in figure 5b supplied in base of master carton.
Step 5a- For Primary Support slide cap and base on column ends. To avoid scratching of column, slide base on until bottom is flush with end of column. Raise structure ½’’ to permit plumb installation of assembled column. Lower structure to secure column.
Step 5b - Drill three 1/8’’ holes through base and into column, in line with ribs. Fasten with screws supplied.
The normal weight of the porch roof is enough to hold the columns in place. In a coastal area special fasteners such as rods or cables may want to be used.
Aluminum Columns In
sta
lla
tio
n
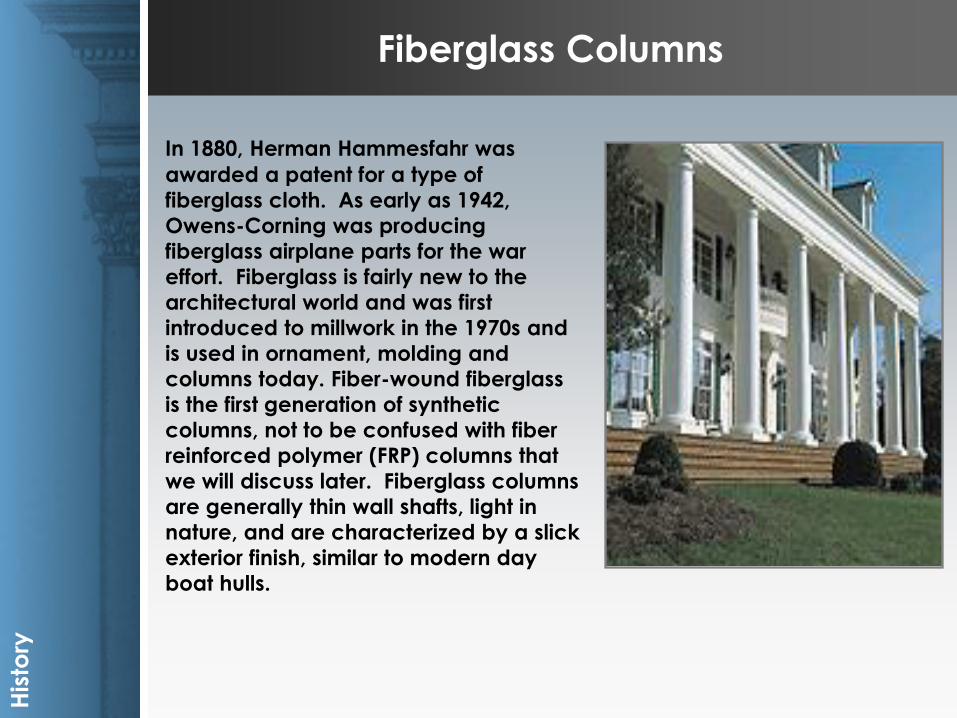
In 1880, Herman Hammesfahr was
awarded a patent for a type of
fiberglass cloth. As early as 1942,
Owens-Corning was producing
fiberglass airplane parts for the war
effort. Fiberglass is fairly new to the
architectural world and was first
introduced to millwork in the 1970s and
is used in ornament, molding and
columns today. Fiber-wound fiberglass
is the first generation of synthetic
columns, not to be confused with fiber
reinforced polymer (FRP) columns that
we will discuss later. Fiberglass columns
are generally thin wall shafts, light in
nature, and are characterized by a slick
exterior finish, similar to modern day
boat hulls.
Fiberglass Columns H
isto
ry

Fiberglass columns are manufactured using a filament winding process.
During this process, continuous glass fibers, epoxy and/or resin, are spun
up and down a column shaped lathe in two directions at 90 and 45
degrees (notice this process in the first two pictures). This allows for
strength, durability and the light weight nature of fiberglass columns. The
epoxy or resin is the glue that holds the glass strands in place and
provides a workable finish (bottom right picture shows the fiberglass
column once the spinning process is complete).
Fiberglass Columns M
an
ufa
ctu
rin
g P
roc
ess

In 1936, Carlton Ellis of DuPont was awarded a patent for polyester
resin. Resin was introduced to the construction market in the early
1990’s and is used mainly for columns and some large décor. Resin is
the main component in FRP columns. As mentioned earlier, FRP
columns differ from fiberglass. FRP (Fiber Reinforced Polymer)
columns can also be specified as GFRC (Glass Fiber Reinforced
Composite), using ¼ to ½’’ chopped fiberglass as a tensile
reinforcement, not as a structural component. The following pictures
show resin columns in the field.
FRP Columns H
isto
ry

FRP columns are manufactured by a process know as spun cast.
During the spun cast process, the resin material is spun inside a mold
housed by a cage. Centrifugal force takes the resin to the outside of
the mold. The process starts with a positive mold made from wood or a
polymer product. (left.) The negative mold is made from the positive
mold. (middle.) The bottom right picture shows the cage that houses
the negative mold.
FRP Columns M
an
ufa
ctu
rin
g P
roc
ess

FRP Columns
The FRP composite (containing resin, filler, chopped glass, and a
catalyst) is poured into the mold and allowed to spin. It typically
takes around 15 minutes to spin an 8x8 FRP column. Larger columns
take a greater amount of time.
After the spinning process is complete, the mold is then opened,
and the shaft is allowed to cool. (note center picture.) Keep in
mind, resin columns are a chemical reaction between the plastic
and catalyst producing heat. After cooling, the column is taken to
the finishing stage where it is patched, sanded, and packaged for
shipping. Bottom right picture shows a typical finishing procedure.
Ma
nu
fac
turi
ng
P
roc
ess

When installing FRP, as well as fiberglass columns,
Step 1- measure the opening in four places; front, back, left and right. Mark column accordingly. If column is too long, shorten length from
bottom.
Step 2- Use an abrasive saw (masonry or carbide tip blade). Fine trim top and bottom with rasp to assure flat surface contact.
Step 3- Slip base over top of column shaft and allow to slide to base of shaft. Slip cap over shaft and allow to rest on neck mold. Some
sanding may be required.
Step 4- Apply construction adhesive to top and bottom surfaces of column.
Inst
alla
tio
n
FRP Columns

Step 5- Put assembly in place and plumb. Make sure load is centered over column shaft and evenly distributed around the bearing surface.
(Ensure concentric loading of the column 100% of bottom must contact
substrate and 75% of the top)
Step 6- Mark and drill holes in floor and column shaft for corner brackets. Install brackets at bottom and top of column.
Step7- Apply construction adhesive to top of cap, press against structure, and screw or nail into place.
Step 8- Also apply construction adhesive to bottom of base and nail or screw to floor. Cap and base will cover up angle brackets on column
shaft.
Inst
alla
tio
n
FRP Columns

On square FRP columns, the neck mold is mitered and glued with
construction adhesive and screwed to the column shaft. Cover
screw holes with latex caulk. Resin and fiberglass columns can also
be split to wrap around existing load bearing structures, and once
split, are not load bearing.
FRP columns require priming and finish painting. Most column
manufacturers recommend a high quality latex primer and finish
coats per paint manufacturer’s recommendations.
Inst
alla
tio
n
FRP Columns

Stone Columns
Cast stone is basically a manmade limestone and dates back to around
500 BC. Structures from the Roman Empire were built using cast stone
parts and are still in existence today. Cast stone columns are primarily
used in upper scale homes, commercial buildings, and churches. This is
because of the higher price associated with cast stone columns. I will
discuss this further when we cover column comparisons.
His
tory
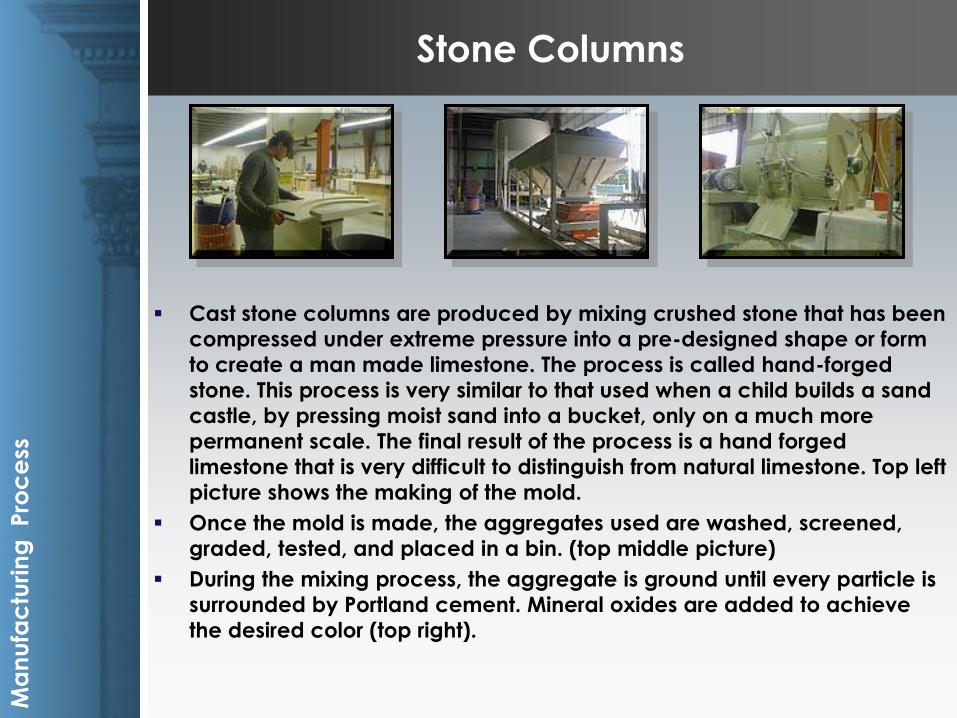
Cast stone columns are produced by mixing crushed stone that has been
compressed under extreme pressure into a pre-designed shape or form
to create a man made limestone. The process is called hand-forged
stone. This process is very similar to that used when a child builds a sand
castle, by pressing moist sand into a bucket, only on a much more
permanent scale. The final result of the process is a hand forged
limestone that is very difficult to distinguish from natural limestone. Top left
picture shows the making of the mold.
Once the mold is made, the aggregates used are washed, screened,
graded, tested, and placed in a bin. (top middle picture)
During the mixing process, the aggregate is ground until every particle is
surrounded by Portland cement. Mineral oxides are added to achieve
the desired color (top right).
Ma
nu
fac
turi
ng
P
roc
ess
Stone Columns

In the casting stage, the mix is placed into a mold and vibro-tamped
by machine to include every detail of the mold (bottom left). The curing
stage is the last step in the order. During this time, hot steam, carbon
monoxide, and carbon dioxide are applied to speed up the curing
process (bottom right).
Ma
nu
fac
turi
ng
P
roc
ess
Stone Columns
Stone Columns
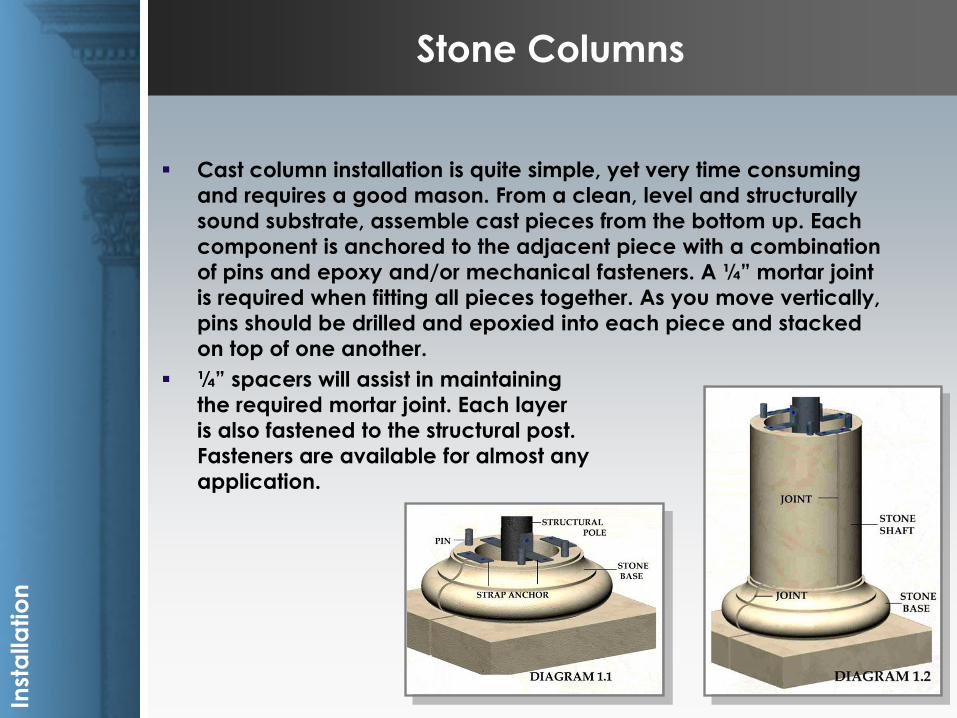
Cast column installation is quite simple, yet very time consuming
and requires a good mason. From a clean, level and structurally
sound substrate, assemble cast pieces from the bottom up. Each
component is anchored to the adjacent piece with a combination
of pins and epoxy and/or mechanical fasteners. A ¼” mortar joint
is required when fitting all pieces together. As you move vertically,
pins should be drilled and epoxied into each piece and stacked
on top of one another.
¼” spacers will assist in maintaining
the required mortar joint. Each layer
is also fastened to the structural post.
Fasteners are available for almost any
application.
Inst
alla
tio
n

Stone Columns
Wood, two steel spacers, and concrete are indicated in the bottom middle photo. The process described should be repeated for all remaining pieces. A
few finishing notes need to be pointed out.
Most manufactures require a variation of 3 finishing requirements:
(1.) Extreme care should be taken to cover and seal the top of the column if it is exposed to weather and elements.
(2.) When joints abut other materials, a sandable caulk should be used
instead of grout to eliminate excessive cracking during expansion and contraction of the adjacent materials;
(3.) A sealer should be applied to all exposed surfaces according to manufacturer’s recommendations
Inst
alla
tio
n

Comparison of Materials
Wood Aluminum Fiberglass
FRP Stone
Comparison of Materials
So far we have explored the manufacturing and installation
processes of the different column materials. The next couple of
slides will showcase the comparison between column
materials with a series of graphs and field pictures, both good
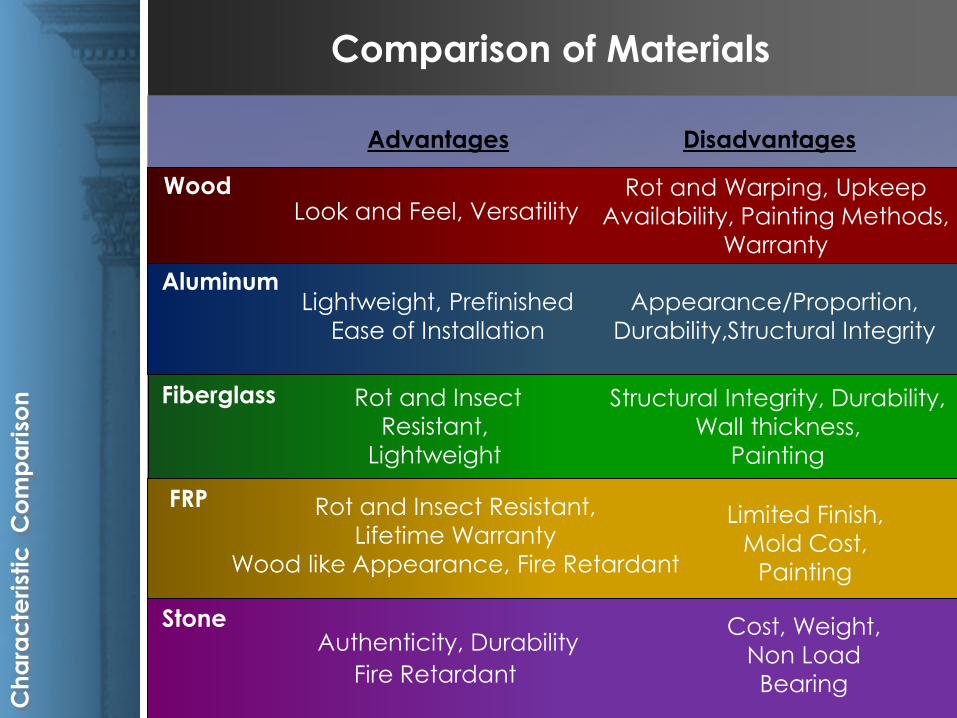
and bad. All of today’s column materials have their
advantages and disadvantages. One material might be strong
in a certain area but weak in another. The following
characteristics all need to be considered when specifying a
column.
Wood columns have the look, feel and versatility, but lack the
durability. With wood, rotting and warping are quite common
unless proper installation and upkeep are met.
Aluminum columns are lightweight, easy to install, and prefinished.
With aluminum however, appearance and proportion are not
always correct. Aluminum columns also scratch and dent fairly
easy.
Fiberglass columns are rot and insect resistant, lightweight and
have an appealing price. On the downside, fiberglass columns
have a thin wall that bring structural integrity and durability into
play. Because of the slick finish associated with fiberglass, the
columns can be difficult to paint.
Comparison of Materials

FRP columns are also rot and insect resistant, carry a lifetime
warranty, and have a wood like feel. FRP materials were also one
of the first fire retardant elements to come out of the plastics
industry. On a negative note, resin columns have limited finishes,
and must be painted with a light color paint. Mold cost and
painting are also issues when working with resin columns. It can
cost upward of 10 thousand dollars to produce a new mold. All
dust must be removed prior to painting a resin column.
Stone columns have the authenticity and durability, as well as fire
retardant capabilities. With stone, cost, weight and installation time
are all negative factors to be considered.
Comparison of Materials
Disadvantages
Advantages
Aluminum
Fiberglass
FRP
Wood
Stone
Lightweight, Prefinished
Ease of Installation
Rot and Insect
Resistant,
Lightweight
Rot and Insect Resistant,
Lifetime Warranty
Wood like Appearance, Fire Retardant
Limited Finish,
Mold Cost,
Painting
Look and Feel, Versatility Rot and Warping, Upkeep
Availability, Painting Methods,
Warranty
Appearance/Proportion,
Durability,Structural Integrity
Structural Integrity, Durability,
Wall thickness,
Painting
Authenticity, Durability Cost, Weight,
Non Load
Bearing Fire Retardant
Comparison of Materials C
ha
rac
teri
stic
C
om
pa
riso
n
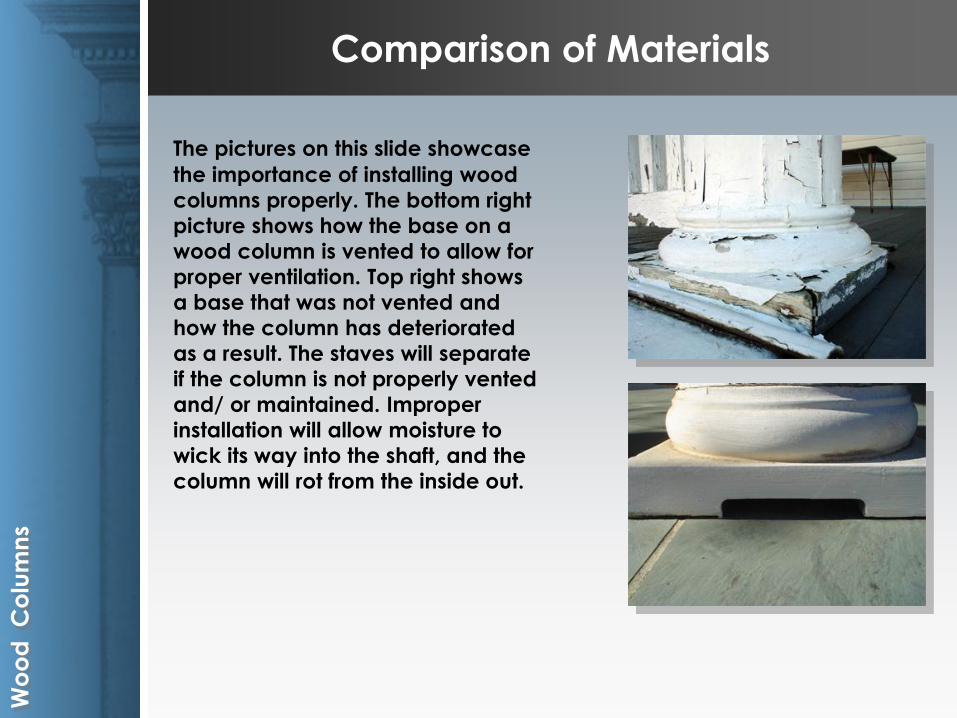
The pictures on this slide showcase
the importance of installing wood
columns properly. The bottom right
picture shows how the base on a
wood column is vented to allow for
proper ventilation. Top right shows
a base that was not vented and
how the column has deteriorated
as a result. The staves will separate
if the column is not properly vented
and/ or maintained. Improper
installation will allow moisture to
wick its way into the shaft, and the
column will rot from the inside out.
Comparison of Materials W
oo
d C
olu
mn
s

With wood, rotting and warping is
inevitable unless proper
maintenance is met, as the top left
picture shows. Wood square
columns built in the field are also
common and tend to separate
very quickly. An 8x8 stone column
tips the scales at around 400
pounds and can split as a result if
not installed properly as the bottom
image demonstrates. Compare this
to a 8x8 FRP column that weighs
around 65 pounds, wood 35
pounds, and an aluminum column
at a feather weight of around 15
pounds.
Comparison of Materials W
oo
d a
nd
Sto
ne
C
olu
mn
s

I want to point out some extreme characteristics associated with the
different column materials in the form of application pictures. The top left
picture shows an aluminum column and the lack of proportion. Notice how
the shaft diameter does not match the size of the cap and base. Top middle
also shows an aluminum column with the noticeable seam in the middle
and unsightly hardware holding on the base. Top right picture shows a
fiberglass column. Notice how thin the wall thickness is when compared to
the FRP column in the bottom left picture. The last picture shows paint
peeling on a FRP column. The only time paint will not adhere to a FRP
column is if the resin dust is not completely removed from the column.
Comparison of Materials A
lum
inu
m C
olu
mn
s

This slide showcases examples of FRP columns installed in the field. Top left
shows a column that is not concentrically loaded. Notice how the left side
of the column is not contacting the substrate. Top middle shows the same
column, and the cracks that have occurred as a result. Top right picture
shows how a resin column will also bow if not concentrically loaded.
Comparison of Materials FR
P
Co
lum
ns

Bottom left shows a square column that has not been properly cut to
match the substrate. Notice the shim at the bottom that has been installed
to make it work. This column will more than likely crack over time. Middle
picture shows a stone base that has been installed around a square FRP
column. This is not a recommended installation procedure. Over time, the
stone acted like an oven and caused the column to bow inward from
corner to corner. Last picture shows how to install a threaded rod in the
middle of a column if it is installed in a hurricane zone. This allows for
hurricane code, 120 mile per hour wind uplift. The rod runs through the
entire length of the column, and pulls the roof into the substrate. The
increased number of hurricanes over the last several years have raised the
standards of national building code, and columns are no exception.
Comparison of Materials FR
P
Co
lum
ns

0
0.5
1
1.5
2
2.5
3
3.5
Aluminum Fiberglass Wood FRP Stone Wood Site Built
In the construction business, time is money. Builders are seeking products
that install quickly and easily to reduce labor cost. This chart shows
installation time of the different columns and does not include finishing.
Wood site built columns are the most time consuming of the bunch, with a
time around 3.5 hours. Site built columns are wood square that are built and
installed on the job site. Aluminum columns are put together in staves and
take around an hour and a half to install. Resin and fiberglass columns both
come in one piece with separate cap and base. Both take about 45 minutes
to install. Both round wood and stone columns take around an hour and forty
five minutes to install. We consider stone installation time to be a very
conservative number taken from a stone manufacturer.
Comparison of Materials In
sta
lla
tio
n Ti
me

0
20
40
60
80
100
Aluminum Fiberglass Wood FRP Stone
The warranty of a product is very important in today’s construction
market, and columns are no exception. Callbacks are the worst enemy to
the contractor that, in turn, can point back to the design professional. A
one year warranty is the norm throughout the industry on wood columns.
Aluminum and fiberglass both carry a standard 10 year warranty. Stone
and FRP columns are the leaders in the group with a standard lifetime
warranty.
Comparison of Materials W
arr
an
ty C
om
pa
riso
n

$0.00
$50.00
$100.00
$150.00
$200.00
$250.00
$300.00
$350.00
$400.00
$450.00
$500.00
Aluminum Fiberglass Wood FRP Stone
The retail price of an 8x8 aluminum column is around $ 85, the least
expensive of the bunch. Fiberglass comes in next with a retail price
around $120. Wood 8x8 columns retail around $135 followed by FRP at
around $150. Stone columns are very expensive and retail around $450.
FRP columns offer the look and feel of wood without the maintenance.
Comparison of Materials Pro
du
ct
Co
st

Market Trends
In the early 1980’s traditional architectural forms reappeared in
mass with the idea of Urbanism. The idea of Urbanism portrays the
community as a whole. This translates into equality between all
demographics. Where the 1950-70 Suburban neighborhoods
sought space, particularly private rear lawns, as a feature of
necessity, Urbanism’s direction is toward the public street. Unity, in
lieu of individualism, is a primary focus. A front porch and columns
are a major factor associated with these developments. Someone
has done something right since Traditional Neighborhood
Developments, or TND’s, are appearing throughout the U.S. in
staggering numbers. The poster child for the TND movement was
Seaside built outside of Panama City Florida in the early 1980’s.
According to The New Urban News, today there are over 400
developments in 48 states, including Canada.
Other examples: Argon in Pensacola, in Florida, and The Waters
outside of Montgomery, Alabama.
The following slide displays images of these developments.
Ne
w U
rba
nis
m N
eig
hb
orh
oo
ds

Seaside
Argon The Waters
Market Trends N
ew
Urb
an
ism
N
eig
hb
orh
oo
ds
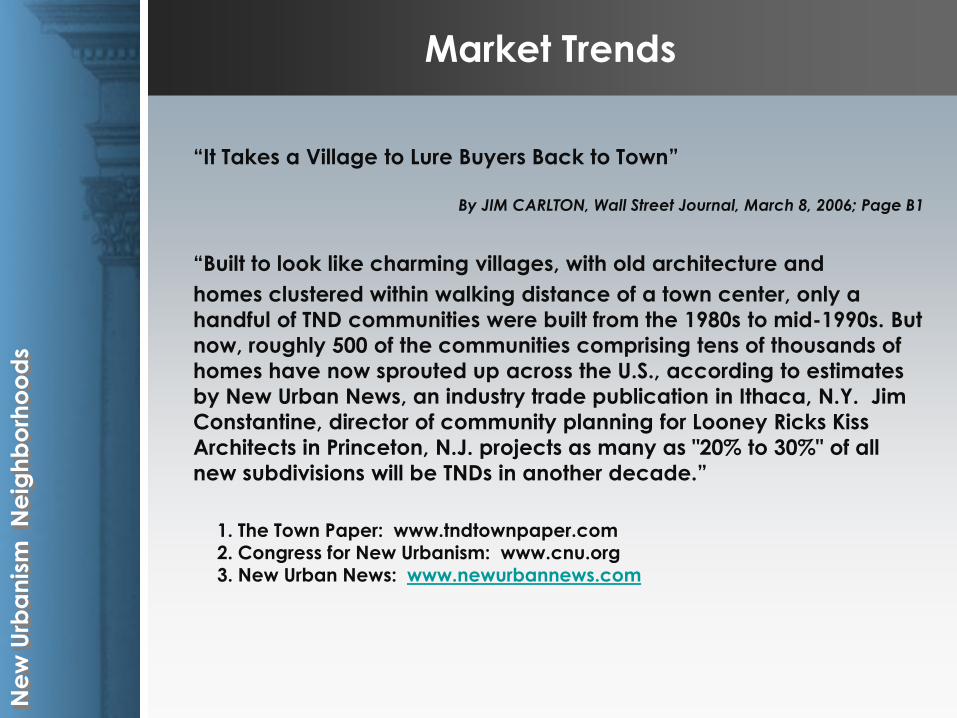
“It Takes a Village to Lure Buyers Back to Town”
By JIM CARLTON, Wall Street Journal, March 8, 2006; Page B1
“Built to look like charming villages, with old architecture and
homes clustered within walking distance of a town center, only a
handful of TND communities were built from the 1980s to mid-1990s. But
now, roughly 500 of the communities comprising tens of thousands of
homes have now sprouted up across the U.S., according to estimates
by New Urban News, an industry trade publication in Ithaca, N.Y. Jim
Constantine, director of community planning for Looney Ricks Kiss
Architects in Princeton, N.J. projects as many as "20% to 30%" of all
new subdivisions will be TNDs in another decade.”
Market Trends
1. The Town Paper: www.tndtownpaper.com 2. Congress for New Urbanism: www.cnu.org
3. New Urban News: www.newurbannews.com
Ne
w U
rba
nis
m N
eig
hb
orh
oo
ds

Hanley-Wood (Largest publisher of building related magazines and
home plans) annually publishes the BUILDER 1001 Plans from The Finest
Designers which details the best selling plans of the year.
Total of 1004 home plans from across the country
87% of the homes (875 plans) used columns (round and square)
A total of 6092 columns were used in these plans
37.3 % were ROUND
62.7% were SQUARE (including square posts)
25.6% (round and square) were used in the interior of the homes
Conclusion: 87% of the homes featured as top sellers across the U.S.,
ranging from $100,000 to $2-$3 million residences, continue to use columns in their design.
2005 Publication
Market Trends N
ew
Urb
an
ism
N
eig
hb
orh
oo
ds
14%
23%
35%
49%
56%
0% 10% 20% 30% 40% 50% 60%
Landscape wall (avg.
length: 48 ft.)
Fencing (avg. length:
139 ft.)
Deck
Patio
Front Porch
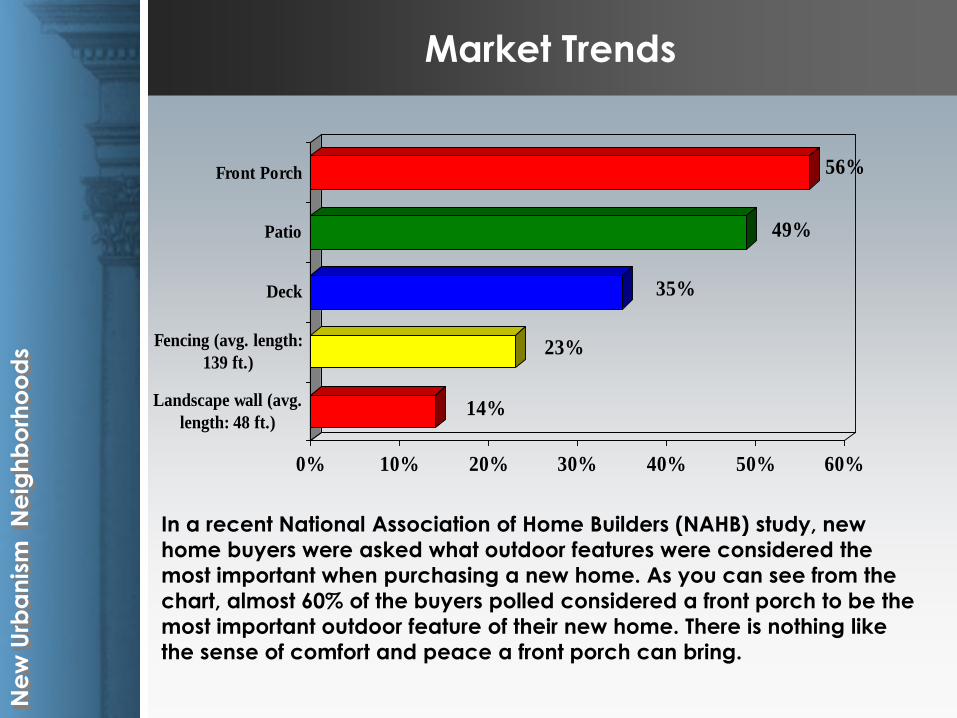
In a recent National Association of Home Builders (NAHB) study, new
home buyers were asked what outdoor features were considered the
most important when purchasing a new home. As you can see from the
chart, almost 60% of the buyers polled considered a front porch to be the
most important outdoor feature of their new home. There is nothing like
the sense of comfort and peace a front porch can bring.
Market Trends N
ew
Urb
an
ism
N
eig
hb
orh
oo
ds

PVC columns
PVC columns are an up and coming material in the column
industry.
PVC box columns are prefinished and available in preassembled
or wrap around applications.
PVC columns are non load bearing, wrapping around a structural
post and are ideal for remodeling or hurricane zones.
Preassembled columns are prebuilt around an existing structural
component.
PVC column’s can be manufactured to fit a variety of different
looks from panel square, to tapered square columns.
PVC columns are less expensive than comparable square
fiberglass columns and easier to install.
Look for PVC columns to become a major factor in the column
industry over the next several years.
Ne
w U
rba
nis
m N
eig
hb
orh
oo
ds

PVC Box Columns
PVC columns N
ew
Urb
an
ism
N
eig
hb
orh
oo
ds

Become aware of the column design options and the materials they are made from.
Describe the manufacturing process for column materials.
Explain the construction process of the different column material options.
Identify the characteristics of the materials used in column construction.
Explain the current trends and construction standards that have affected column design in the construction industry today
The Design Professional will now be able to:
Course Summary

Innovaive Column Options for the 21st Century
Course Number:
hbg06c
HB&G Building Products
Tim Bobo
PO BOX 589
1015 Brundidge Blvd.
Troy, AL 36081
800-264-4424
334-670-6512
www.hbgcolumns.com
An American Institute of Architects (AIA)
Continuing Education Program
Innovative Column Options for the 21st Century Credit for this course is 1 AIA HSW CE Hour
© Ron Blank and Associates, Inc.® 2006
Please note: you will need to complete the conclusion
quiz online at RonBlank.com to receive credit