
Injector Windows Server 2012 Configuration Guide - · PDF fileWindows Server 2012...
25
www.nrgglobal.com © NRG Global, Inc. Injector Windows Server 2012
Transcript of Injector Windows Server 2012 Configuration Guide - · PDF fileWindows Server 2012...
Windows Server 2012 Configuration for Injector
© 2017 NRG Global, Inc. All rights reserved. Page 2

Windows Server 2012 Configuration for Injector
© 2017 NRG Global, Inc. All rights reserved. Page 3
CONTENTS
INTRODUCTION ............................................................................................................................................................ 4
PREREQUISITES .............................................................................................................................................................. 4
INJECTOR OPTIMIZATIONS ...................................................................................................................................... 4
GROUP POLICY CONFIGURATIONS ................................................................................................................................. 4
Internet Explorer - Disable AutoComplete and HTTP Error Message Pop-Ups.............................................. 4
Internet Explorer - Enable Sending of Non-Encrypted Data (without “Warning” Message)...................... 8
Internet Explorer - Empty Temporary Internet Files Folder ................................................................................ 9
Internet Explorer - Prevent IE “Welcome” Message .............................................................................................. 11
SERVER MANAGER CONFIGURATIONS ........................................................................................................................ 13
Internet Explorer - Disable IE Enhanced Security Configuration ..................................................................... 13
Allow Remote Desktop Connections to the Injector Server ............................................................................... 14
Enable “Remote Desktop Services” (known as “Terminal Services” in Windows Server 2008) ........... 15
ADVANCED OPTIMIZATIONS ....................................................................................................................................... 19
Settings for Best Performance and Disabling Paging ............................................................................................ 19
CLONING INJECTORS ON VIRTUAL SERVERS ................................................................................................... 24
UPDATE VSTATION.INI FILE ....................................................................................................................................... 24
GETTING HELP AND SUPPORT ............................................................................................................................. 25
Windows Server 2012 Configuration for Injector
© 2017 NRG Global, Inc. All rights reserved. Page 4
INTRODUCTION
This document will outline the steps to properly configure Windows Server 2012 for optimal use as an
Injector.
When working with Virtual Machines, we recommend completing the configuration steps outlined in this
document and running a typical load test to see how many rUsers your server can handle. Once you are happy
with the performance of this prototypical server, clone the server to create additional Injectors. For details and
tips on cloning Injectors, please refer to the Cloning Injectors on Virtual Servers section of this guide.
PREREQUISITES
Before proceeding ensure that the following NRG Global products are installed:
AppLoader
Injector
ScenarioBuilder
Note that these applications may all be installed on the same Windows Server or on separate machines.
INJECTOR OPTIMIZATIONS
GROUP POLICY CONFIGURATIONS
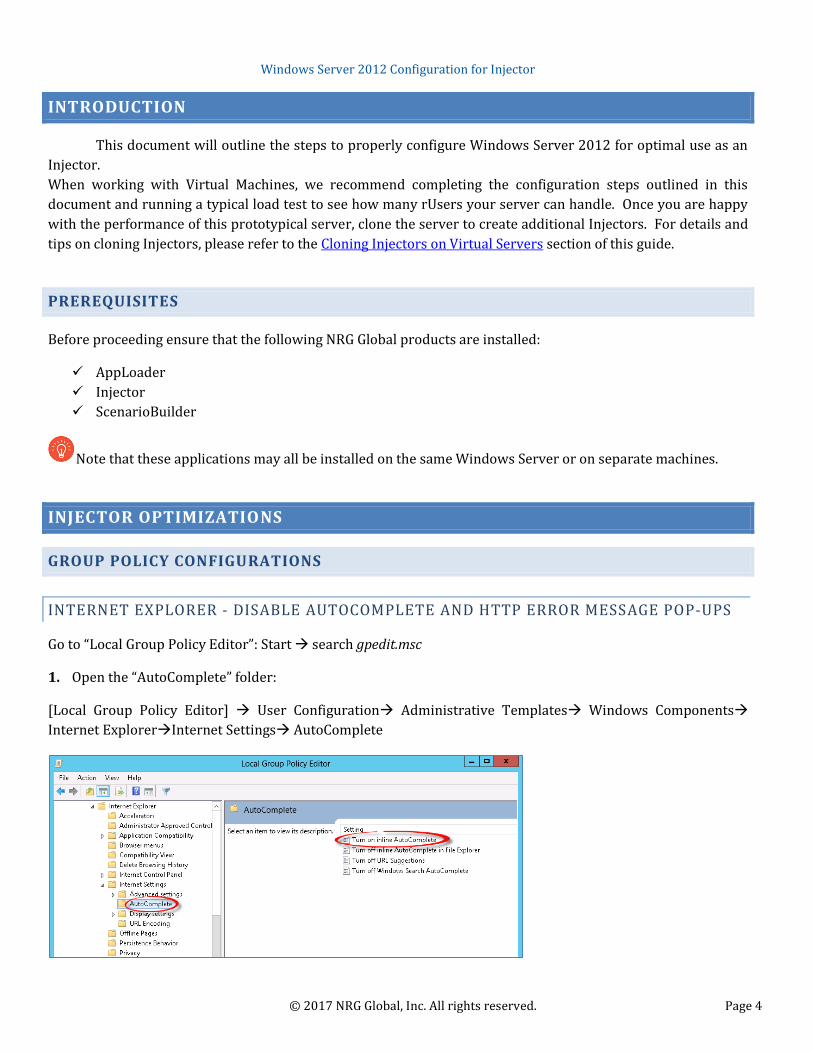
INTERNET EXPLORER - DISABLE AUTOCOMPLETE AND HTTP ERROR MESSAGE POP-UPS
Go to “Local Group Policy Editor”: Start search gpedit.msc
1. Open the “AutoComplete” folder:
[Local Group Policy Editor] User Configuration Administrative Templates Windows Components
Internet ExplorerInternet Settings AutoComplete

Windows Server 2012 Configuration for Injector
© 2017 NRG Global, Inc. All rights reserved. Page 5
2. Double-click on “Turn on inline AutoComplete”, check “Disabled” then click on “Next Setting”.
3. For “Turn off inline AutoComplete in File Explorer” setting, check “Enabled” then click “Next Setting”.
4. For “Turn off URL Suggestions” setting, check “Enabled” then click “Next Setting”.
5. For “Turn off Windows Search AutoComplete” setting, check “Enabled”, click “Apply” then click “OK”.

Windows Server 2012 Configuration for Injector
© 2017 NRG Global, Inc. All rights reserved. Page 6
6. Open the “Internet Explorer” folder
[Local Group Policy Editor] User Configuration Administrative Templates Windows Components
Internet Explorer
7. Double-click on “Turn off the auto-complete feature for web addresses” setting on the right pane, check
“Enabled”, click “Apply” then click “OK”.

Windows Server 2012 Configuration for Injector
© 2017 NRG Global, Inc. All rights reserved. Page 7
8. Double-click on “Disable AutoComplete for forms” setting check “Enabled”, click “Apply” then click “OK”

Windows Server 2012 Configuration for Injector
© 2017 NRG Global, Inc. All rights reserved. Page 8
INTERNET EXPLORER - ENABLE SENDING OF NON-ENCRYPTED DATA (WITHOUT
“WARNING” MESSAGE)
Prevent the following pop-up from occurring in Internet Explorer:
In “Local Group Policy Editor”, navigate to “Internet Zone” settings and enable “Submit non-encrypted form
data”:
User Configuration Administrative TemplatesWindows Components Internet Explorer Internet Control
PanelSecurity Page Internet Zone
In the right pane, double-click “Submit non-encrypted form data”
Check “Enabled”, then in Options Section, click on pull down menu under “Submit non-encrypted form data”
and select “Enabled”. Click “Apply” then “OK”.

Windows Server 2012 Configuration for Injector
© 2017 NRG Global, Inc. All rights reserved. Page 9
INTERNET EXPLORER - EMPTY TEMPORARY INTERNET FILES FOLDER
Enable “Empty Temporary Internet Files folder when browser is closed” setting in Group Policy Object Editor to clear the browser cache.
Go to “Local Group Policy Editor”: Start search gpedit.msc
From “Administrative Templates” drill down to “Windows Components” “Internet Explorer” ”Internet
Control Panel” “Advanced Page”.
Click on “Advanced Page” to bring up the list of settings in the right pane. Find “Empty Temporary Internet
Files folder when browser is closed” and double-click on it.

Windows Server 2012 Configuration for Injector
© 2017 NRG Global, Inc. All rights reserved. Page 10
Select “Enabled” then click “Apply”.
Click “OK” and close “Local Group Policy Editor”.

Windows Server 2012 Configuration for Injector
© 2017 NRG Global, Inc. All rights reserved. Page 11
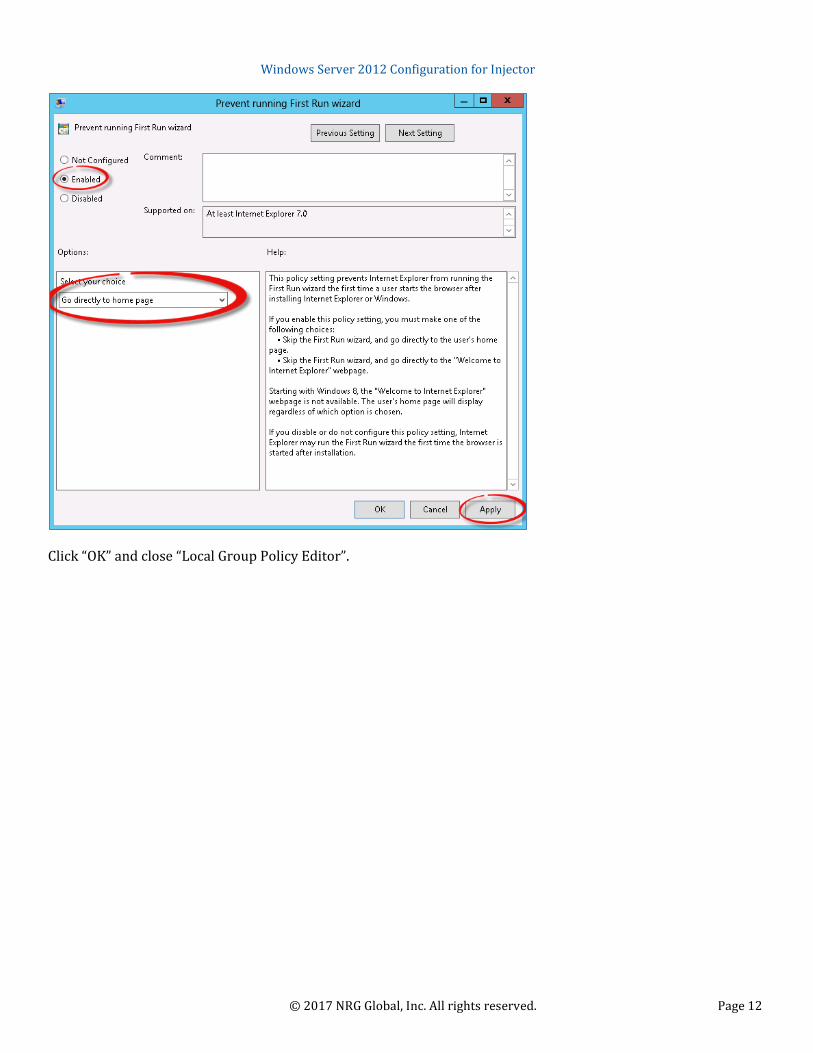
INTERNET EXPLORER - PREVENT IE “WELCOME” MESSAGE
Prevent the following pop-up from occurring when opening Internet Explorer:
Go to “Local Group Policy Editor”: Start search gpedit.msc
From “Administrative Templates” drill down to “Windows Components” “Internet Explorer”.
Click on “Internet Explorer” to bring up the list of settings in the right pane. Find “Prevent Running First Run
Wizard” and double-click on it.
Select “Enabled”. In the “Options” pane choose “Go directly to home page” from the drop down list Click “Apply”.
Windows Server 2012 Configuration for Injector
© 2017 NRG Global, Inc. All rights reserved. Page 12
Click “OK” and close “Local Group Policy Editor”.

Windows Server 2012 Configuration for Injector
© 2017 NRG Global, Inc. All rights reserved. Page 13
SERVER MANAGER CONFIGURATIONS
INTERNET EXPLORER - DISABLE IE ENHANCED SECURITY CONFIGURATION
Disable “IE Enhanced Security Configuration” to eliminate the majority of Internet Explorer pop-up messages.
Click “On” next to IE Enhanced Security Configuration
Open “Server Manager”: Start Server Manager (pinned to Start menu) Local Server
Turn off “IE Enhanced Security Configuration” for “Administrators” and “Users”

Windows Server 2012 Configuration for Injector
© 2017 NRG Global, Inc. All rights reserved. Page 14
ALLOW REMOTE DESKTOP CONNECTIONS TO THE INJECTOR SERVER
Injectors require that Remote Desktop Connections to be allowed. Failure to enable this feature will prevent
rUsers from starting and logging into Windows Server.
Open “Server Manager”
Click “Local Server” Enable Remote Desktop
In the “Remote” section, click on the radio button “Allow connections from computers”, then click “Apply” and
“OK”.

Windows Server 2012 Configuration for Injector
© 2017 NRG Global, Inc. All rights reserved. Page 15
ENABLE “REMOTE DESKTOP SERVICES” (KNOWN AS “TERMINAL SERVICES” IN WINDOWS
SERVER 2008)
In order for multiple user accounts to login simultaneously on the Injector server, Terminal Services / Remote
Desktop Services must be enabled. Terminal Services and Remote Desktop Services provide a 120 day grace
period during which no license server is required. During this grace period, your server can accept connections
from unlicensed clients without contacting a license server.
To enable Terminal Services / Remote Desktop Services, complete the following steps on your Windows 2012
“Injector” Server:
“Server Manager” “Local Server” “Roles and Features” section Click on “Tasks” drop down menu click
“Add Roles and Features”
Click “Next”
Windows Server 2012 Configuration for Injector
© 2017 NRG Global, Inc. All rights reserved. Page 16
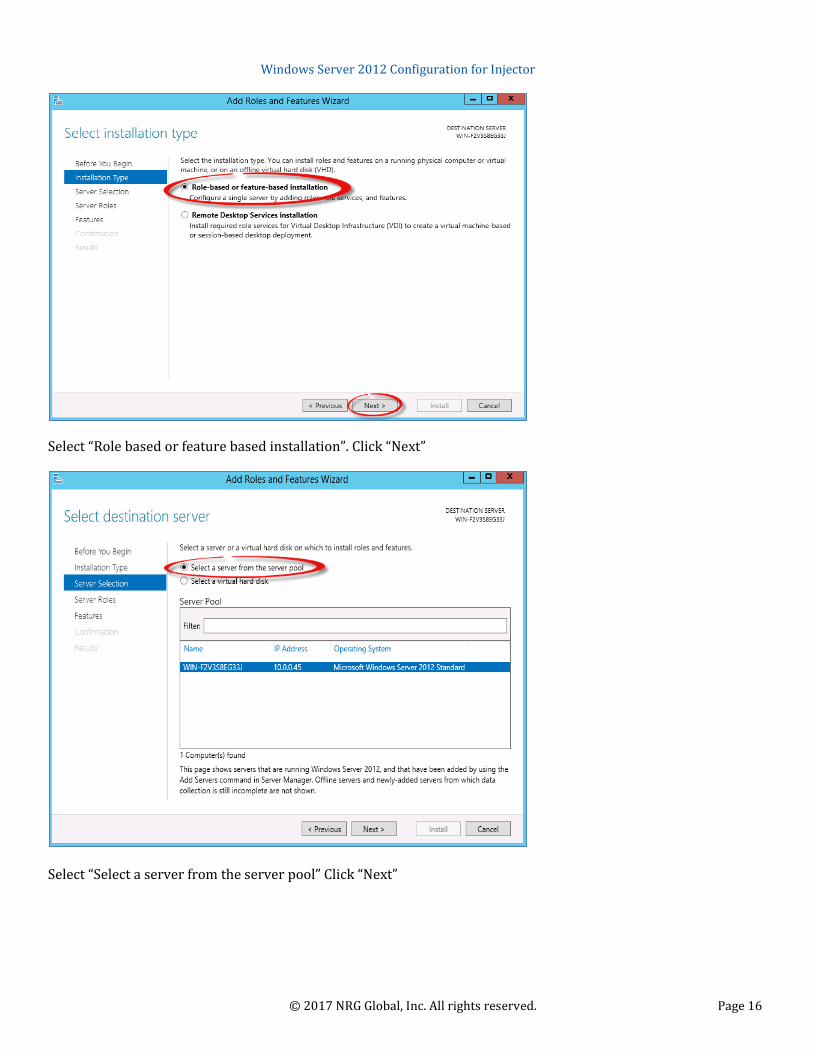
Select “Role based or feature based installation”. Click “Next”
Select “Select a server from the server pool” Click “Next”

Windows Server 2012 Configuration for Injector
© 2017 NRG Global, Inc. All rights reserved. Page 17
Click the box next to “Remote Desktop Services”; Click “Next”
Make sure .NET Framework 4.5 Feautres is installed. Click “Next”

Windows Server 2012 Configuration for Injector
© 2017 NRG Global, Inc. All rights reserved. Page 18
Click “Next”
Click on box next to “Remote Desktop Licensing” click “Add Features”, and then click on box next to “Remote
Desktop Session Host”, click “Add Features” then Click “Next”
Click “Install”, when finished installing click “Close”.

Windows Server 2012 Configuration for Injector
© 2017 NRG Global, Inc. All rights reserved. Page 19
ADVANCED OPTIMIZATIONS
SETTINGS FOR BEST PERFORMANCE AND DISABLING PAGING [OPTIONAL]
Optimizing your server to use more physical memory and less disk I/O and CPU can be a performance enhancer.
However, disabling Page Filing on systems with low RAM can cause degradation in performance.
This step should only be taken by advanced users with a comprehensive understanding of their system’s
resources.
Right click on “Computer””Properties”
Click on “Change Settings”.

Windows Server 2012 Configuration for Injector
© 2017 NRG Global, Inc. All rights reserved. Page 20
Click on “Advanced” tab and click on “Settings” under “Performance”

Windows Server 2012 Configuration for Injector
© 2017 NRG Global, Inc. All rights reserved. Page 21
Click on the radio button “Adjust for best performance”.
Click on the “Advanced” tab and under that category click “Change” (Optional)
Windows Server 2012 Configuration for Injector
© 2017 NRG Global, Inc. All rights reserved. Page 22
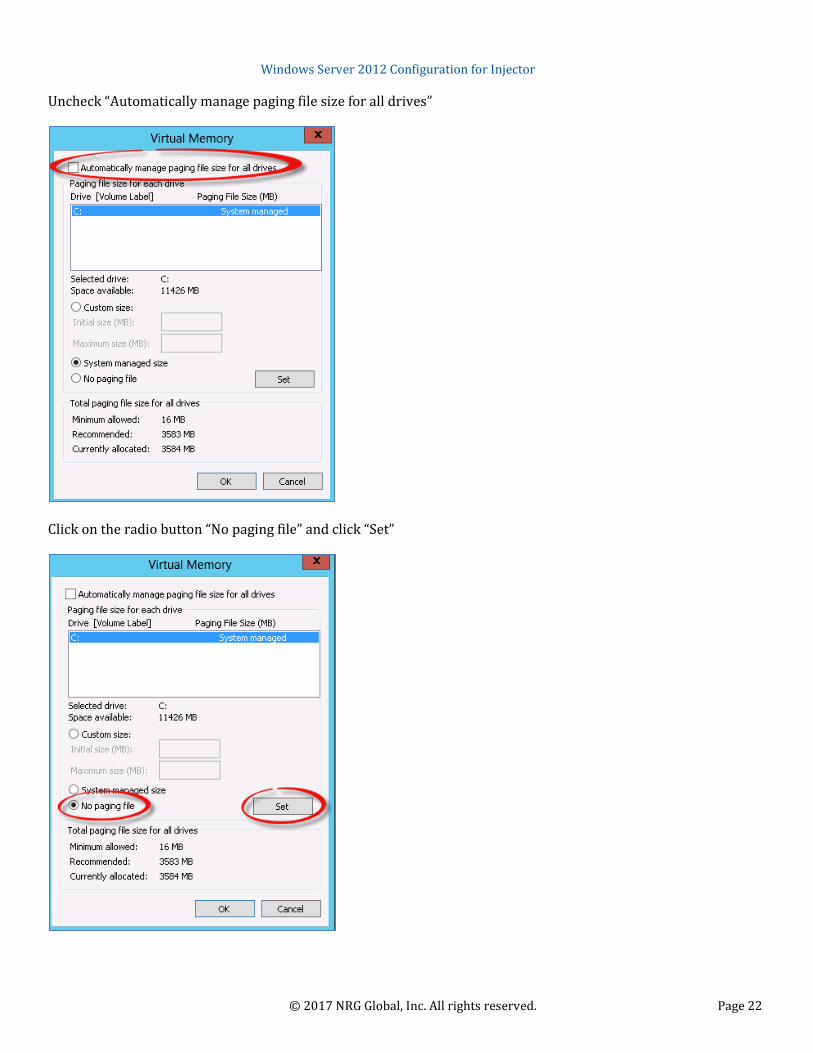
Uncheck “Automatically manage paging file size for all drives”
Click on the radio button “No paging file” and click “Set”

Windows Server 2012 Configuration for Injector
© 2017 NRG Global, Inc. All rights reserved. Page 23
A warning message will display. Click “Yes”.
A system restart will be required for the paging changes to take effect.
After making any of the recommended configuration changes in this document, you will need to reboot your
Injector server for your changes to take effect. Be sure that the AppLoader process is running on the Controller
machine, and the Injector and Vstation processes are running on the Injector machine prior to creating rUsers.
The process icons should appear in the Windows taskbar.

Windows Server 2012 Configuration for Injector
© 2017 NRG Global, Inc. All rights reserved. Page 24
CLONING INJECTORS ON VIRTUAL SERVERS
Virtual Servers are a cost effective alternative to expensive physical hardware. Additionally, they offer the
flexibility to customize and duplicate configurations with ease. But to fully maximize the benefits of virtual
servers, it is imperative that you create the most efficient server possible before cloning. We can’t stress enough,
the importance of taking the time to optimize your server as outlined in this document and creating and running
sample test cases prior to cloning. Once you have optimized your prototypical server, clone away!
UPDATE VSTATION.INI FILE
To register each Injector with the AppLoader Controller you will need to execute the following steps on each
cloned server:
From the Windows Task Manager, look for the Injector.exe process. If running, End Process.
Browse to …\NrgGlobal\Injector\ and find the vstation.ini file. Open it with Notepad. Overwrite the following
parameters with the Injector IP address and Name (the file will show the IP address and Name of the prototypical
server from which you cloned):
//vstation's own IP address- this is the ip used to communicate with the Controller ipaddress=192.168.0.1 //host of the injector host=Injector1 //alias of the injector to be shown on Controller alias=Injector1 //location of injector for display on Controller location=Injector1 – 192.168.0.1 //description of injector description=Injector Injector1 added via Injector Installer
Save and close the vstation.ini file. The Injector will restart automatically.
Each successfully registered Injector will appear in the “Injectors” page in the AppLoader Controller.

Windows Server 2012 Configuration for Injector
© 2017 NRG Global, Inc. All rights reserved. Page 2
GETTING HELP AND SUPPORT
Support Team
If at any point during your trial you need more help,
our technicians are waiting to help you! Don’t
hesitate to call our experts at +1 844-674-4562 or
email NRG Global Support [email protected].
Help Center
For one-on-one help, create a support request at
NRGGlobal Help Center. A support engineer will
follow up with you quickly. If you don't have an
account, you can create one - just follow the prompts.
When submitting your support request, please
provide as much detail as possible. This will help us
resolve your issue faster.
Online Help
If you can't find what you need in the documentation,
you can ask questions, search for answers, exchange
comments and suggestions on
our Help Center, find answers to your Frequently
Asked Questions, watch Training Videos and take
part in NRG Global Training Services.