INJ 2003 Manual HP60 EricRev - Dixie Steamway
14
OWNER’S MANUAL HP60i SYSTEM Injectidry Systems, Inc. 825 7th Ave Suite B, Kirkland, WA. 98033 Mailing Address PO Box 9 Kirkland, WA. 98083-0009 Phone 425.822.3851 Fax 425.822.4103 Toll Free 800.257.0797 www.injectidry.com PATENT#US5893216 AND PATENT PENDING
Transcript of INJ 2003 Manual HP60 EricRev - Dixie Steamway

OWNER’S MANUAL
HP60i SYSTEM
Injectidry Systems, Inc. 825 7th Ave Suite B, Kirkland, WA. 98033 Mailing Address PO Box 9 Kirkland, WA. 98083-0009
Phone 425.822.3851 Fax 425.822.4103 Toll Free 800.257.0797 www.injectidry.com
PATENT#US5893216 AND PATENT PENDING

TABLE OF CONTENTS
THANK YOU FOR YOUR PURCHASE Model # HP60i Purchase Date: _____________________________ Dealer: ______________________________ Serial Number : ______________________________ We think you will find it to be the best quality and most innovative system available. INTRODUCTION Injectidry Systems was founded in 1996 when I realized that no one had equipment like the HP60i in the market place. I have been in general contracting for over 25 years, and strive to understand your needs. Our mission is to provide you with the highest quality product along with the best technical support and excellent customer service and continue to lead the way with our innovations in drying technology! Thank you for buying Injectidry products! Ernie Storrer President
THANK YOU FOR YOUR PURCHASE 1
INTRODUCTION 1
SAFETY PRECAUTIONS 2
ABOUT YOUR HP60i AND ITS PARTS 3,4
HOW TO OPERATE Positive Drying Negative Drying Mold Setting up your Equipment Walls and Ceilings Cabinets Hardwood & Other Specialty Floors
5 5 6 6 7 7 7 8
SPECIFICATIONS 9
REPAIRS 9
MAINTENANCE Trouble Shooting Guide
10 11
WARRANTY 12
CUSTOMER SERVICE Incomplete Shipments Freight Damage
13 13 13
CONTACT US 13
Page 1

SAFETY PRECAUTIONS The HP60i System was designed to be used by water damage professionals who dry structures damaged by water. Like all electrical equipment it can become dangerous if damaged, abused or misused. If you do not observe the warnings found in this manual, then the risk of electrical shock, fire, or personal injury can occur. Read, understand and follow the directions found in this manual or contact us immediately for assistance. • The supplied power cord is 12 gauge and should be inspected often to ensure there
are no signs of fraying or removed insulation. • Do not use more than one 50 foot extension cord (10-12 gauge). ! • Before you plug your HP60i into any power supply. ensure that the AIR IN Main Hose
Line (Grey Hose) with the Pre-Filter, Pressure Relief Valve and the Main QCT is in-stalled on the AIR IN Port pipe located on the HP60i unit. Failure to do this may cause the system to ingest foreign material and ruin the unit VOIDING THE WAR-RANTY.
• Never use the HP60i as a vacuum cleaner or shop vac. Allowing bulk water to pass
through the HP60i WILL VOID THE WARRANTY. • If your PRV is not being used with your set up—you must have a minimum of 40 air
openings (4 Manifolds or 4 Active Hoselines). • DO NOT REMOVE OR ALTER THE GROUNDING OF THE PLUG. YOU RISK SERI-
OUS PERSONAL INJURY AND/OR FIRE. • Install the air lines in a safe manner. Keep aisles clear if possible and always reduce
any unnecessary trip hazards. • Never unplug the unit by pulling on the cord; remove the plug at the outlet. • Make sure that you place the HP60i on a stable surface to avoid any issues of falling.
Do not place the HP60i unit close to any open fire or flame source. • Clean the Pre-Filter often to avoid clogging of the filter and overheating of the HP60i. • Inspect the AIR IN Port pipe; there is a strainer located on the pipe itself and is visi-
ble when the Air In Main Hose is not installed. It limits the possibility of large mate-rial being ingested. If you see any lint or other foreign material—remove the debris and ensure that the proper fitting is reinstalled onto the Air In Main Hose. The Main hoses are both labeled and they should be matched with the appropriate fitting.
• Do not modify or attempt to repair your unit. You must contact our service de-
partment and we will assist you with your repairs (800) 257.0797. • Keep your HP60i unit away from space heaters. • If you loan or rent out your unit, be sure to include this manual.
Page 2

ABOUT YOUR HP60i AND ITS PARTS All the parts we have given you will be explained in this section. Refer to it when call-ing to place an order for replacement parts as it will save you time.
CONTENTS QTY PART #
Box 1 Contains: HP60i Unit Main AIR IN Quick Connects Installed Main AiIR OUT Quick Connects Installed WARNING - DO NOT REMOVE THEM EXCEPT TO CLEAN
1 1 1
INJ01-I PTFC PTMA
Box 2 Contains: Carry Bag Rolling Duffle Bag Active Hoselines (each having 2 hosecuffs and 1 QC-Hose Connector)
AIR OUT Main Hose with factory-set PRV and Main Quick Connect T AIR IN Main Hose with factory-set PRV and Main Quick Connect T Parts Bag: Quick Connect - Manifolds Quick Connect - Hose Connectors Quick Connect - Small T’s Hosecuffs Endcap Plugs Tubing Connectors Tubing Stoppers Wall Injectors
1 1 12 1 1
10 3 2 10 4 50 50 170
CB1 CB2 AH3
AOMH AIMH
QCM01 QCC01 QCT01 HC3
QCPO1 RHO7A
RP1 IMO6A
Box 3 Contains: Safety Yellow Blank Hose (1 ½” x 50’) Safety Yellow Tubing (3/8” x 200’)
1 2
PLO3 RH05A
Page 3

ABOUT YOUR HP60 AND ITS PARTS (Continued)
* AOMH
*AOMH. Air Out Main Hose, used for Positive Drying. Hose length 2” x 6’2”, high temperature hose, factory set Pressure Relief Valve (PRV) and a Quick Connect Main T (QCT02). The fitting installed on this unit can only be used with the Air Out Main Hose. It is impossible to use with the Air In Main Hose. **AIMH. AIR IN Main Hose used on the Air In side of the HP60i must be used every time re-gardless of drying Negatively or Positively (because it contains the System’s Pre-Filter). Hose length 2” x 5’, high temperature hose, Pre-Filter, factory set Pressure Relief Valve (PRV) and a Quick Connect Main T (QCT02). WARNING: You must always attach the AIMH to the AIR IN Port pipe before connecting to electrical supply. Failure to do so can cause your HP60 to ingest foreign materials which will VOID YOUR WARRANTY. *** PL03 is 50’ of 1 1/2” Safety Yellow Blank Hose (not pictured above).
**AIMH
CB2 CB1
HC3
RH05A
AH3
IMO6A
RP1
HP60
QCM01
**AIMH
* AOMH
***PL03
RH07A QCEP01
QCT01
QCT02
Pre-Filter
PRV
Page 4
Page 5
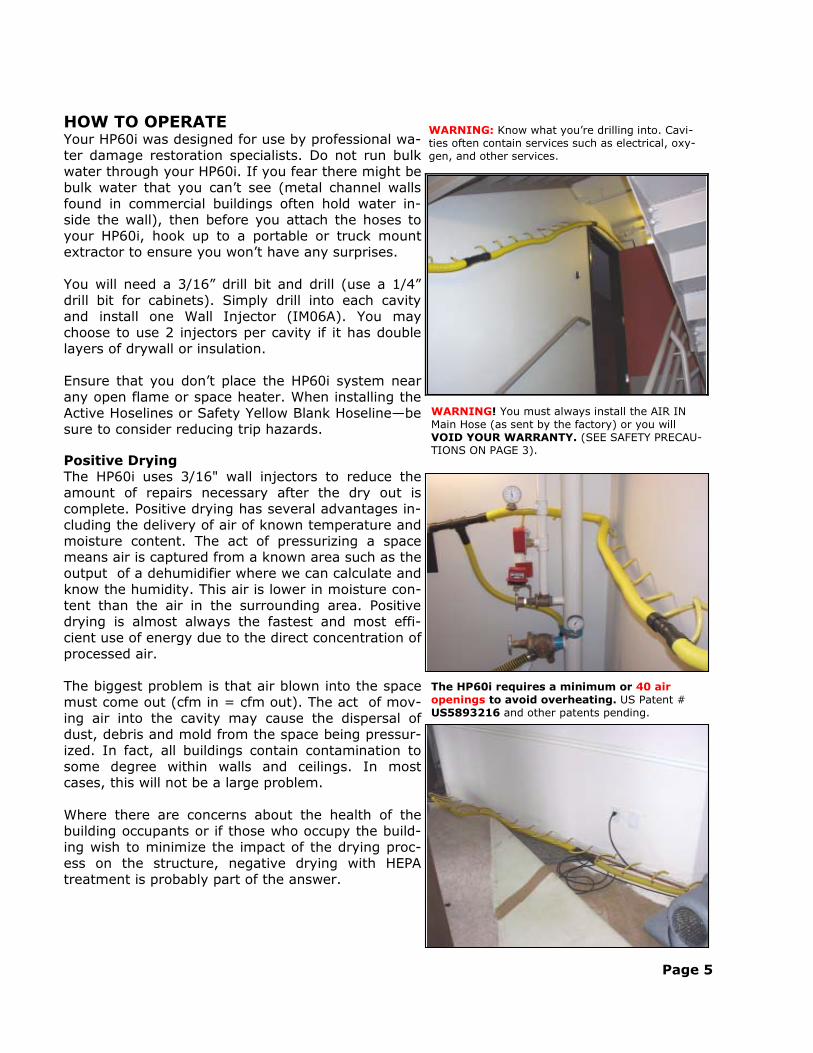
HOW TO OPERATE Your HP60i was designed for use by professional wa-ter damage restoration specialists. Do not run bulk water through your HP60i. If you fear there might be bulk water that you can’t see (metal channel walls found in commercial buildings often hold water in-side the wall), then before you attach the hoses to your HP60i, hook up to a portable or truck mount extractor to ensure you won’t have any surprises. You will need a 3/16” drill bit and drill (use a 1/4” drill bit for cabinets). Simply drill into each cavity and install one Wall Injector (IM06A). You may choose to use 2 injectors per cavity if it has double layers of drywall or insulation. Ensure that you don’t place the HP60i system near any open flame or space heater. When installing the Active Hoselines or Safety Yellow Blank Hoseline—be sure to consider reducing trip hazards. Positive Drying The HP60i uses 3/16" wall injectors to reduce the amount of repairs necessary after the dry out is complete. Positive drying has several advantages in-cluding the delivery of air of known temperature and moisture content. The act of pressurizing a space means air is captured from a known area such as the output of a dehumidifier where we can calculate and know the humidity. This air is lower in moisture con-tent than the air in the surrounding area. Positive drying is almost always the fastest and most effi-cient use of energy due to the direct concentration of processed air. The biggest problem is that air blown into the space must come out (cfm in = cfm out). The act of mov-ing air into the cavity may cause the dispersal of dust, debris and mold from the space being pressur-ized. In fact, all buildings contain contamination to some degree within walls and ceilings. In most cases, this will not be a large problem. Where there are concerns about the health of the building occupants or if those who occupy the build-ing wish to minimize the impact of the drying proc-ess on the structure, negative drying with HEPA treatment is probably part of the answer.
WARNING! You must always install the AIR IN Main Hose (as sent by the factory) or you will VOID YOUR WARRANTY. (SEE SAFETY PRECAU-TIONS ON PAGE 3).
The HP60i requires a minimum or 40 air openings to avoid overheating. US Patent # US5893216 and other patents pending.
WARNING: Know what you’re drilling into. Cavi-ties often contain services such as electrical, oxy-gen, and other services.

Negative Drying With the goal of trapped moisture drying being the removal of moisture from an area of en-trapment, negative drying can accomplish the air exchanges necessary to dry. Air movement, whether positive or negative, supplies a vehicle for moisture. Absent an airflow through the trapped area, the ambient humidity within the space will rise to saturation. With suction ap-plied to the airspace, the wet air will be drawn out of the airspace. The results will be lower humidity acting as an absorbent sponge to which the moisture can move from the surface. If moving the possible contamination outside the built environment is not possible, standard positive air movement is not the answer. The effort should be to move the moisture and con-tamination to a known location where no damage can happen. This can be accomplished by negatively pressurizing the interstitial space by removing air from the area. The air can then be processed either through a HEPA filter system, or moved to the exterior of the built envi-ronment. This transport can be achieved by attaching the Interceptor Inline HEPA filter sys-tem to the HP intake. This approach is the preferred one by most Industrial Hygienists, archi-tects and building engineers. The goals of structural drying should include containing contamination or without making the damage situation worse. The situation that exists when we arrive at the job should not be de-graded as a result of our actions or inactivity. Mold Molds are fungi. Molds grow throughout the natural and built environment. Tiny particles of mold are present in indoor and outdoor air. In nature, molds help break down dead materials and can be found growing on soil, foods, plant matter, and other items. Molds produce micro-scopic cells called "spores" which are very tiny and spread easily through the air. Live spores act like seeds, forming new mold growths (colonies) when they find the right conditions. Mold only needs a few simple things to grow and multiply: Moisture Nutrients Favorable temperatures Take minimum steps to ensure that every job you dry is proactively protecting your custom-ers and the structure. Perform all work to minimize the amount of dust generated. Using the Interceptor HEPA filter on every job can help minimize the spread of mold spores.
99.97% Efficient Durable enclosure
Easy to use
HP60i, shown with Interceptor and Vac-It Panels ..
PATENT#US5893216 .Patent Page 6

Setting up your equipment We ship your tubing un-cut for your conven-ience. A general purpose length we recommend is 18”-20”. Use 6” if you wish to hang your Ac-tive Hoselines from the ceiling. Installing the Wall Injectors on the tubing lengths you cut is next. When you have a large area to be dried, place your unit in the middle of the “run” so that the difference will be split and help the HP60i sys-tem to distribute the air equally. Walls and Ceilings Remove baseboard when you can to hide your holes and reduce repairs. You will need a 3/16” drill and bit to make the opening into the needed cavities. Cabinets You will need a 1/4” drill and bit for this opera-tion. If you can’t remove the kick plate, then you may wish to drill holes inside the cabinet (which will be out of sight and can be repaired later).
Page 7

Hardwood & Other Specialty Floors Your Injectidry HP60i system is capable of dry-ing specialty floors such as hardwoods, marble,tile, subfloors, etc.. We are the FIRST to offer NEW Vac-It Panels (patent pending), a unique way in which you are now able to dry these types of floors. The Vac-It Panel is sold in units of 10 or 20 Panels. Each 8 Point Panel is 46" x 30" and is made to be divisible into separate smaller Panels. These smaller pieces can be used for smaller areas such as beside toilets or inside closets. We also have a 5 Point Panel that allows for less clutter in drying out larger spaces. Please use the pressure relief valve when drying hardwoods. The Panels can also be used to dry plaster walls and other dense materials. Every job varies as to the amount of Panels needed. Additionally, the length of time needed to dry will depend on factors such as: • The amount of water the floor was exposed
to • The length of time the wood has sat since
initial wetting • The thickness and quality of finish on the
surface • The type of substrate. Whether or not the
substrate is affected and to what degree. Drying times can range from 1 day to over 10 depending on the above variables. Clear panels are available for display / demon-stration purposes. Water can be seen leaving the wood and coming out via vacuum. This is a great demonstration tool for agents / adjusters. Please call your distributor or Injectidry Sys-tems for more information. Clear Panels are sold in paks of 2, measuring 23” x 30” 4 Point.
Page 8

SPECIFICATIONS
DATA DETAILED INFO
Total System Airflow 108 CFM (cubic feet per minute)
Static Pressure (Maximum) 60 inches (water lift) and still has 55 CFM
Weight (blower unit only) 50 lbs
Air Injector Hole 3/16“ (wall) 1/4” (cabinet)
Capacity 134 linear feet (using 1 injector every 16”)
Safety Yellow Flexible Tubing 400 ft of 3/8’ ID
Power Draw (115 Volts) 5.6 amps—11 amps (depending on load)
Carrying / Storage System 1 Rolling Duffle & 1 Carry Bag
Drying Modes Negatively or Positively
Parts See page 4
Dimensions 18x13x16.2 inches (with pipes) 13x13x16.2 inches (without pipes)
Warranty See page 12
Accessories • Interceptor HEPA Filter • Vac-It Panels
REPAIRS The production and repair personnel pride themselves on producing quality restoration equipment. We know that getting you back into operation is time sensitive and crucial. We ask that you have the technician call us to describe the operating circumstances and be able to follow our instructions over the phone, as we may be able to trouble shoot simply with an assistant. If the unit does need to be sent to us, we will need you to fill out and return a RETURN MATERIALS REQUEST FORM so that we can serve your needs quickly. Charges 1. Inspection & cleaning per item. Call for rates 2. Hourly Shop Rate. 3. We can ship containers to package HP units to you. Each: 4. Shipping is paid by Injectidry if warranted. Customer pays if not warranted. Please do not send any materials to Injectidry without a RMA # placed on the outside of the unit as we cannot accept any returns/repairs without one.
Page 9

MAINTENANCE Your system will require very little maintenance. The AIR IN hose has an Inline Filter which should be inspected before each job, and cleaned if needed.
Remove the amber colored top to the filter and look inside for large debris and then clean any debris.
Look inside filter housing and wipe clean. Also, wipe clean the amber colored cap.
When ready to replace, install screen first, then before replacing cap, make sure the black ring is in the bottom of amber colored cap. Gently tighten and you are done.
You may blow out the screen with com-pressed air and wash clean. Wear safety glass.
Page 10

Trouble Shooting Guide
System won’t turn on:
1. Check the power supply with another piece of equipment. 2. Inspect the power cord. 3. Breaker may have tripped. Do you have too many pieces of equip-
ment on the circuit?
System makes a humming sound, but won’t run:
1. STOP use of the system immediately. Something might be in-gested in the blade housing. System needs to be returned to our Repair Department (see page 10).
2. Rotation Test: Something might be lodged in the impeller hous-ing—call us for the procedure.
3. Low voltage or wrong voltage—have a qualified electrician inspect.
System runs, but cycles off and on:
1. Check your Inline Filter, it may be clogged. 2. Your PRV may have failed. It protects the system from overheat-
ing due to back pressure. Check to see if it is stuck or closed. 3. Ensure that the cooling slots on the roto-molded housing are free
and clear of obstructions. 4. Low voltage or wrong voltage—have a qualified electrician inspect.
The Pressure Relief Valve is making a loud hissing sound:
The Pressure Relief Valve (PRV) is designed to protect the HP60i sys-tem in the event that air flow is inadequate. The PRV makes a loud noise when operating. It may be that you do not have enough open-ings on your air delivery run. Add more hoses until the PRV stops releasing air.
CAUTION
• Place the unit on a stable, dry surface. • Only qualified service personnel should access the unit for servicing. • Keep away from all open flames or heat sources. • Keep roto-mold cooling slots free & clear. Allow for proper cooling. • The unit must have a minimum of 40 air openings. • See manual for detailed instructions.
120 Volts / 240 Volts 5.6—11 / 2.8—5.5 amperes
50 / 60 HZ
Page 11

Page 12
WARRANTY HP60 Roto-Molded Housing Warranty - 7 Years Injectidry Systems guarantees the HP60i & HP90i housing to be free from defects in materials and workmanship for a period of seven (7) years from the original purchase date. This warranty is subject to the conditions listed below. Blower Warranty - 3 Years Injectidry Systems guarantees the blower to be free from defects in materials and workmanship for a period of three (3) years from the original purchase date. This warranty is subject to the conditions listed below. Active Hoseline - 1 Year
CONDITIONS OF WARRANTY
Roto-Molded Housing Warranty: Injectidry Systems will repair or replace for the original purchaser (at Injec-tidry's option), the parts necessary to correct any defects in materials and workmanship for a period of seven (7) years. During the first year, Injectidry Systems will cover all material, labor, and shipping costs to and from the ser-vice center. The customer is responsible for all labor and shipping costs after one (1) year from the original date of purchase. Blower Warranty: Injectidry Systems promises to the original purchaser to repair or replace, at the decision of Injectidry, the parts necessary to correct any blower unit found to be defective in materials or workmanship for a period of three (3) years from the date of purchase. During the first year, Injectidry Systems will cover all material, labor, and shipping costs to and from the service center. The customer is responsible for all labor, and shipping charges after one (1) year. Take such precautions as necessary to keep bulk water* from being sucked into blower. The unit is not warranted against damage caused by bulk water* passing through the blower. Take precau-tions to install the Main Hoses as stated in this manual. The unit is not warranted against damage caused by in-gested materials passing through the blower. Active Hoseline: Warranted for one (1) year. Limitations: This warranty will not extend to Injectidry products showing any accidental damage, alteration, nor-mal wear, disassembly, lack of proper maintenance, damage from fire or flood, damage from corrosive or other chemicals, improper voltage use, unauthorized repairs, use of non-genuine parts and materials, misuse, or any other causes beyond the control of Injectidry. The warranty obligation extends only to the repairs or replacement of parts found to be defective upon the examination and the decision of Injectidry Systems. The preceding limitations constitute the entire warranty. No other warranty or responsibility is expressed or implied. The warranty includes legal rights to the original purchaser, and additional rights may be available, varying state to state. In addition, Injectidry Systems Repair Department must authorize all incoming products and/or repair work to be completed by an authorized repair center. Injectidry Systems is not responsible for any repairs or modifica-tions to any of its products, unless completed by Injectidry Systems or an authorized service center. We are not responsible for subsequent damaged caused by the user and or its agents. Bulk Water*: It is particularly important for the user not to allow bulk water to pass through the unit. This can hap-pen on negative suction if water is present in the area of the injectors. Mist is not considered Bulk Water.

Page 13
CONTACT US Our address is: 825 7th Ave, Suite B, Kirkland, WA. 98033 Our mailing address is: PO Box 9, Kirkland, WA. 98083-0009 Our phone number: 425.822.3851 Our fax number: 425.822.4103 Our toll free number in the US and Canada: 800.257.0797 On the Web at: www.injectidry.com
CUSTOMER SERVICE If you need technical support or to order parts—please call one of our customer service reps. Our commitment is to taking care of your needs in a fast and courteous fashion.
Incomplete Shipments All shortages must be reported within five business days.
Be sure to check the number of cartons or packages. You can compare this count with the total listed on Bill of Lading. Confirm that you have received all cartons or packages per-taining to this shipment.
If quantities do not match, have the delivery driver note shortage. If the missing cartons or packages do not show up in the next few days, contact the Shipping Department and we will reship on a new order.
You must file a Freight Claim for shorted packages if the count differs from the Bill of Lad-ing. For your protection, the carrier who delivers merchandise to your door is responsible for any loss or damages. Acceptance of the shipment by the carrier company is acknowl-edgement that the articles were delivered to them were in good condition and properly packaged.
Freight Damage Orders are shipped Freight on Board (F.O.B.) from our warehouse in Kirkland, WA. Once the product has shipped to the customer, it is the customer’s responsibility. We will assist the customer in filing for any freight damage claims but these claims must be filed by the recipient.
We suggest that you carefully inspect your shipment upon receipt. If there are is visible damage, note this on the waybill before you sign and notify the carrier immediately.
We want to know if there are any freight damages, so please contact our shipping depart-ment right away.


![imageserv11.team-logic.com...ONETOUCH TEST STRIPS; ULTRA, VERIO ONEXTON OPSUMIT ORACEA ORFADIN ORTHOVISC [INJ] oseltamivir OTEZLA OTOVEL OTREXUP [INJ] OVIDREL [INJ] oxcarbazepine oxybutynin](https://static.fdocuments.in/doc/165x107/604de3e06a6bae6edd6eaa2d/-onetouch-test-strips-ultra-verio-onexton-opsumit-oracea-orfadin-orthovisc.jpg)


![Ministry of Public Health · (tnj) OK. (tnj) (Inj) ob. (Ini) (Inj) od. (IthXj) (Inj) 100. (Ini) 190. (Inj) (Ini) lob. (In]) (Ini) Ism. ('tnj) (Ini) bd. (Inj) bd. (tni) (Inj)](https://static.fdocuments.in/doc/165x107/5f0f92947e708231d444d415/ministry-of-public-tnj-ok-tnj-inj-ob-ini-inj-od-ithxj-inj-100.jpg)