Information Guide - Corporate · Information Guide . 1 Introduction 2 RENASYS GO 3 RENASYS EZ PluS...
31
Information Guide
Transcript of Information Guide - Corporate · Information Guide . 1 Introduction 2 RENASYS GO 3 RENASYS EZ PluS...

Information Guide

1 Introduction
2 RENASYS GO
3 RENASYS EZ PluS
4 Dressing kits and consumables
5 Cleaning instructions
6 Support and educational material
7 Case studies / clinical papers
8 Ordering information
9 latest information / Product updates
RENASYS™ GORENASYS™ EZ PluS
information GUiDE
CONTENTS
™Trademark of Smith & Nephew SN8886 (10/11) ®TMTrademarks Acknowledged

Introduction1
Negative Pressure Wound Therapy (NPWT) refers to the use of negative pressure to promote healing in acute and chronic wounds.
The therapeutic benefits of NPWT include the reduction in bacterial load, an increase in blood flow to the wound and stimulation of granulation tissue formation.1,2,3
the principles of negative Pressure Wound therapy
NPWT delivers vacuum-assisted pressure below the wound surface to help promote healing. NPWT consists of a wound filler (foam or gauze), a drainage tube inserted into the dressing, and a transparent film to seal the site before being connected to a suction device.
indications for negative Pressure Wound therapy (nPWt)
NPWT is suitable for a range of wound types including pressure ulcers, diabetic/ neuropathic ulcers, venous insufficiency ulcers, and traumatic wounds, post operative and dehisced surgical incisions, explored fistulas, skin grafts and flaps.
With the RENASYS range of devices and accessories, Smith & Nephew provide a quality offering to facilitate NPWT supported by a 24 hour emergency telephone line, credible and indication-specific clinical information and easy to understand patient guides.
references1. Saxena V, Hwang CW, Huang S, Eichbaum Q, Ingber D, Orgill DP. Vacuum-assisted closure: microdeformations of wounds
and cell proliferation. Plast Reconstr Surg. 2004; 114(5):1086-96; discussion 1097-8.2. Wackenfors A, Sjögren J, Gustafsson R, Algotsson l, Ingemansson R, Malmsjö M. Effects of vacuum-assisted closure
therapy on inguinal wound edge microvascular blood flow. Wound Repair Regen. 2004; 12(6):600-6.3. Armstrong DG, lavery lA; Diabetic Foot Study Consortium. 2005 Negative pressure wound therapy after partial diabetic
foot amputation: a multicentre, randomised controlled trial. lancet. 366(9498):1704-10.

RENASYS™ GO2
Introducing RENASYS GORENASYS GO combines sleek design and quiet operation for added comfort and peace of mind. Patients can continue treatment at home with more mobility than ever before.
The RENASYS GO device will provide the following:
• Stylised design, small and light weight
• Improved alarm options and functionality
• Compact size allowing excellent portability for the patient
• Integrated and subtle (frosted) canister
• Patient lock out function for extra protection
• Easy to use operating controls
• Quiet operation, helping patients to live with their treatment
features of the rEnasys Go deviceHighly Confidential – for internal use only
A L A R M S The alarms that have now been incorporated into this device are:
- Low Battery Alarm (Battery symbol indication) - Extremely low battery (Battery symbol indication) - Canister full (Text on the screen + audible sound) - Line blockage alarm (Text on the screen + audible sound) - Low Vacuum (Text on the screen + audible sound) - High Vacuum (Text on the screen + audible sound)
There are detailed instructions of the various features of this device in the draft IFU that is enclosed at the end of this section in the launch pack. This gives detailed descriptions of the warning messages and how to rectify them if this occurs. The strap can be used to attach the device to and IV Pole/Bed and wheelchair. In-situ shots are available within the RENASYS Toolkit. F e a t u r e s , a d v a n t a g e s a n d b e n e f i t s Feature: New, more portable design, smaller & light weight Advantage: User friendly design for the patient Benefit: Improved quality of life for the patient and hopefully better compliance Feature: Improved alarm functionality Advantage: Troubleshooting of the device will be easier

2
RENASYS GO device informationPressure settingsRENASYS GO pressure ranges from -40mmHg to -200mmHg, providing both continuous and intermittent therapy; with a toggle selector switch on the front fascia.
CanistersTwo integrated canister sizes are available for the RENASYS GO depending on requirements:
• 300 ml canister
• 750 ml canister
Protecting your patientRange of safety alarms when:
• low battery
• Canister full
• Full canister/ line blockage
• low vacuum
• Extremely low battery
In addition, there is a lock function to avoid patient changes to pressure settings.
Portability• lightweight, only 1.2kgs which can be easily carried with a shoulder strap
• Compact size (210mm x 175mm x 85mm)
• Removable cover protecting the patient’s dignity
Quiet device• low noise levels enable patients to relax
• Discreet treatment increases patient confidence and compliance

2
RENASYS GO Specifications
Description rEnasys Go
size HxWxD (mm) 210 x 175 x 85
Weight (kg) 1.2 without the bag
Vacuum range (mm Hg) 40 to 200; cont. and inter. therapy
Battery Life (hrs) 20
recharge time (hrs) 4
Waste Canister 300ml, 750ml integral
Display Digital
Patient lock out Yes
iV Pole attachment Via Strap
Bed attachment Via Strap
Carry bag Yes

2
rEQUirEmEnt sPECifiCation notEs
Portable Yes Provided with a carry bag. Strap can be used to attach to IV pole or foot of bed
Pressure Range -40 to -200mmHg 40, 50, 60, 70, 80, 90, 100, 120, 130, 140, 150, 160, 170, 180, 200mmHg
Free Air displacement of pump
4 l/Min. Equivalent performance to other available styles
Battery life Approximately 20hrs Battery life is dependent on amount of exudate and wound volume.
Available Cycles Continuous or Intermittent
Displays Digital Displays information on the pressure setting, the mode of operation and information about any alarm which is active at the time.
Status lED The main lED at the top of the device is the first place to look to check if everything is OK. If it is not illuminated the device is either switched off or in standby mode. If the lED is green then therapy is being applied in a controlled manner. If this lED is amber, an alarm is active and the nature of the alarm can be found on the lCD screen.
Other lEDs There are also lEDs to show the battery charge status and to indicate if the alarm mute or keypad locks are active.
Auto lockout Yes Display locks out after 10 minutes
Canister sizes 300ml or 750ml Sealed opaque integral bacterial filter
Solidifier with canister Yes
Canister markings Yes 300ml canister – 50, 100, 200, 300ml 750ml canister – 150, 300, 450, 600, 750ml)level markers which can be used when the device is hung in the vertical orientation.
Antibacterial Filter Yes
low battery alarm Yes
low vacuum alarm Yes If the vacuum is 15mmHg below the set point for more than 2 minutes this alarm will activate
High vacuum alarm Yes If the vacuum is 15mmHg above the set point for more than 2 minutes this alarm will activate
Full canister alarm Yes
line blockage alarm Yes
Inactive pump alarm No
Alarm Mute Button Yes To silence alarm for 2 minutes while problem is rectified.
Tubing clamps Yes Bespoke tubing connector with isolating plug/cap to connector
Mains power option Yes
Power Input Internal Battery or 110-240 VAC
RENASYS GO Technical Specifications
3
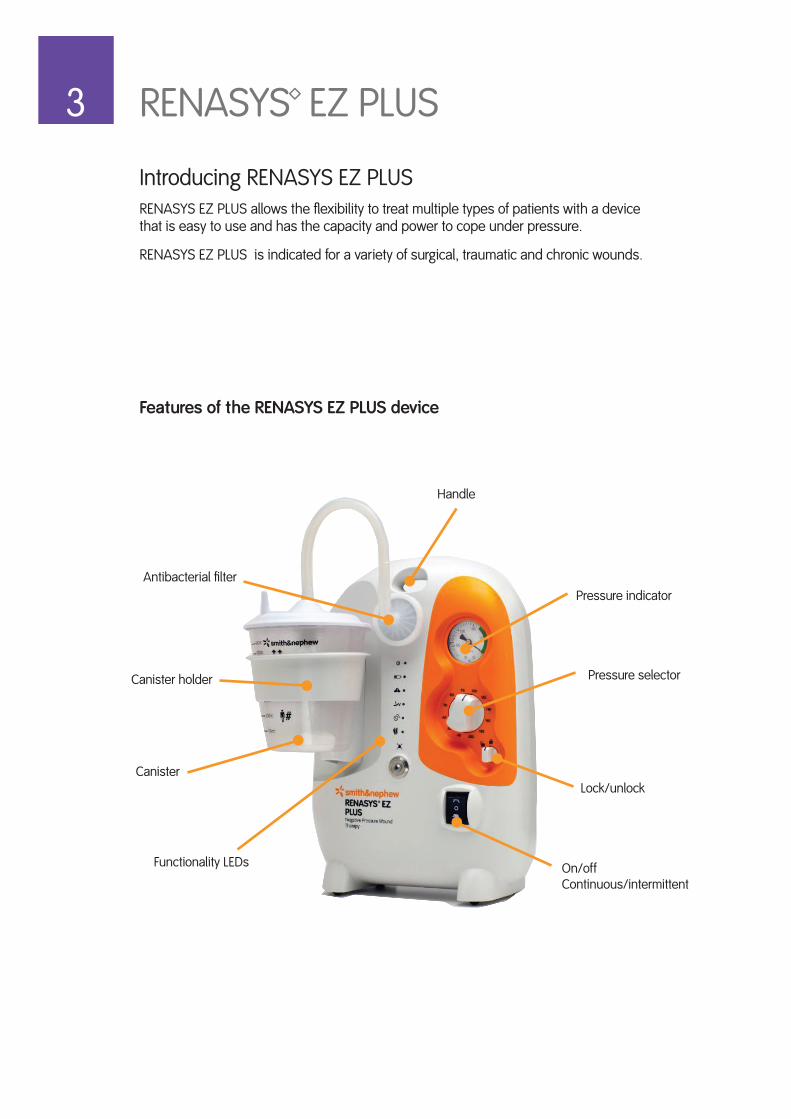
Introducing RENASYS EZ PluSRENASYS EZ PluS allows the flexibility to treat multiple types of patients with a device that is easy to use and has the capacity and power to cope under pressure.
RENASYS EZ PluS is indicated for a variety of surgical, traumatic and chronic wounds.
features of the rEnasys Ez PLUs device
Pressure indicator
Pressure selector
lock/unlock
On/offContinuous/intermittent
Handle
Antibacterial filter
Canister holder
Canister
Functionality lEDs
RENASYS™ EZ PluS

Attaching to a bed rail
3Highly Confidential – for internal use only
Attaching to an IV pole Attaching to a bed rail
800ml Canister 250ml Canister
Power on
Battery Indicator
High Vacuum Alarm
Leak Alarm
Low Vacuum Alarm
Full Canister/Blockage Alarm
Audio Pause button
Power on
Battery Indicator
High Vacuum Alarm
leak Alarm
low Vacuum Alarm
Full Canister/Blockage Alarm
Audio Pause button
Highly Confidential – for internal use only
Attaching to an IV pole Attaching to a bed rail
800ml Canister 250ml Canister
Power on
Battery Indicator
High Vacuum Alarm
Leak Alarm
Low Vacuum Alarm
Full Canister/Blockage Alarm
Audio Pause button
Highly Confidential – for internal use only
Attaching to an IV pole Attaching to a bed rail
800ml Canister 250ml Canister
Power on
Battery Indicator
High Vacuum Alarm
Leak Alarm
Low Vacuum Alarm
Full Canister/Blockage Alarm
Audio Pause button
Attaching to an IV pole
800ml Canister 250ml Canister

3
RENASYS EZ PluS device information
Pressure settingsRENASYS EZ PluS pressure ranges from -40mmHg to -200mmHg, providing both continuous and intermittent therapy; with a toggle selector switch on the front fascia.
CanistersSelection of two canister sizes is available for the RENASYS EZ PluS depending on requirements.
• 250 ml canister• 750 ml canister
Protecting your patientRange of safety alarms when:
• low battery• Canister full• Full canister/ line blockage• low vacuum• Extremely low battery
In addition, there is a lock function to avoid patient changes to pressure settings.
attachments to make you life easier• No special docking station needed as the device easily attaches to a bed, wheelchair or
IV pole.• Tilting does not affect performance of pump
flexibility• A powerful device with high flow rate that performs under pressure• Two canister sizes give you the capacity to deal with a wide range of exudate levels
Quiet device• low noise levels enable patients to relax• Discreet treatment increases patient confidence and compliance

3
RENASYS EZ PluS Specifications
Description rEnasys Ez PLUs
size HxWxD (mm) 361 x 240 x 170
Weight (kgs) 3.7
Vacuum range (mm Hg) 40 to 200; cont. and inter. therapy
Battery Life (hrs) 40
recharge time (hrs) 6
Waste Canister 250ml and 800ml
Display Analogue
Patient lock out Yes
iV Pole attachment New design – Integrated system
Bed attachment New design – Integral hooks
Carry bag Smith & Nephew Bag

3
rEQUirEmEnt sPECifiCation notEs
Portable Can be carried but should remain static if possible.
Integral hook for bed mounting and clamp to permit IV pole attachment.
Pressure range -40 to -200mmHg 12 possible preset values (40, 50, 60, 70, 80, 90, 100, 120, 140, 160, 180, 200mmHg)
Free air displacement 9 litres per min.
Battery life Approximately 40 hrs Battery life is dependent on amount of exudate and wound volume.
Available cycles Continuous or Intermittent
Display Analogue display Simple and intuitive controls mean fewer troubleshooting problems.
lockout Yes Prevents patient tampering with pressure controls.
Canister size 250ml or 800ml Sealed opaque with solidifier. Choice of two options
Solidifier with canister Yes
Canister markings Yes 250ml canister – 10ml increments800ml canister – 100ml increments.
Antibacterial Filter Yes
low battery alarm Yes Green \ Amber lED indications plus audible alarm
low vacuum alarm Yes If the vacuum is 15mmHg below the set point an Amber lED indications plus audible alarm will activate.
Full canister alarm Yes Amber lED indications plus audible alarm.
High vacuum alarm Yes If the vacuum is greater than 235mmHg an Amber lED indications plus audible alarm will activate. The device will stop delivering therapy
line blockage alarm Yes Amber lED indications plus audible alarm.
Excessive leak alarm Yes Amber lED indications plus audible alarm.
Inactive pump alarm No
Alarm mute button Yes To silence alarm for two minutes while the problem is rectified, button illuminates during activations.
Tubing clamps Yes Bespoke tubing connectors with integral sealing plug/cap to connector
Carrying bag Smith & Nephew Bag
Mains power option Yes
Power input Internal Battery or 100-240 VAC
RENASYS EZ PluS Technical Specifications

4 Dressing kits and consumables
RENASYS-G (Kit components)
™Trademark of Smith & Nephew
Gauze kit components KitsSmall Medium Large X-Large Wooding - Scott
Product codes 66800216 - Round66800217 - Flat
66800218 - Channel66800219 - Flat
66800220 - Round66800221- Flat
66800222 - Round 66800212
Drain Flat or 10fr Flat or channel Flat or 19fr 19 fr Irrigation aspiration
Non-adherent gauze 1 – 3in x 3in (7cm x 7cm) 1 – 3in x 8in (7cm x 20cm) 3 – 3in x 8in (7cm x 20cm) 3 – 3in x 8in (7cm x 20cm) 3 – 3in x 8in (7cm x 20cm)
Antimicrobial gauze 1 – package 4 x 4s 1 – package Kerlix fluff 6 x 6s
1 – Kerlix roll 2 – Kerlix roll 2 – Kerlix roll
Transparent film 2 – 4in x 4.75in (10cm x 12cm) sheets
2 – 6in x 8in (15cm x 20cm) sheets
2 – 8in x 12in (20cm x 30cm) sheets
2 – 8in x 12in (20cm x 30cm) sheets
2 – 8in x 12in (20cm x 30cm) sheets
Connective tubing 1 each 1 each 1 each 1 each 1 each
Saline bullet 1 bullet 1 bullet 2 bullets 2 bullets 2 bullets
Skin prep 1 packet 1 packet 2 packets 2 packets 3 packets
Strip paste 1 strip 1 strip 1 strip 1 strip 1 strip
Wound ruler 1 each 1 each 1 each 1 each 1 each
Waterproof tape 2 strips 2 strips 4 strips 4 strips 4 strips
** The examples are just guidelines. It will not be exact guidelines for all wounds.
Rarely used – tiny wounds Example: 5.0 x 5.0 x 1.5 cm 38 cm³ or smaller.
Small to moderate wounds with moderate depth Example: 8cm x 8cm x 2.5cm - 160 cm³ Most common kit sold.
Large surface area or full thickness wounds with significant depth Example: 10cm x 10cm x 5.0cm - 500 cm³
Xtra large surface area or full thickness wounds with significant depth. Example: 18cm x 18cm x 6.5cm - 2106 cm³
Same example as wound size for the XL kit. High Output wounds and/or with sediment. Indicated for fistulas and large abdominal wounds.
Gauze kit contents Kitssmall medium X-large
Product codes 66800491 – Round 66800493 – Channel66800494 – Flat 66800497 – Round
Drain Flat or 10fr Flat or channel 19 fr
Non-adherent gauze 1 – 3in x 3in (7cm x 7cm)
1 – 3in x 8in (7cm x 20cm)
3 – 3in x 8in (7cm x 20cm)
Antimicrobial gauze 1 – package 4 x 4s 1 – package Kerlix fluff 6 x 6s 2 – Kerlix roll
Transparent film 2 – 4in x 4.75in(10cm x 12cm) sheets
2 – 6in x 8in(15cm x 20cm) sheets
2 – 8in x 12in(20cm x 30cm) sheets
Connective tubing 1 each 1 each 1 each
Saline bullet 1 bullet 1 bullet 2 bullets
SKIN-PREP™ 1 packet 1 packet 2 packets
Strip paste 1 strip 1 strip 1 strip
Wound ruler 1 each 1 each 1 each
Waterproof tape 2 strips 2 strips 4 strips
** The examples are just guidelines. They will not be exact for all wounds.
Small wounds. Example: 5.0 x 5.0 x 1.5 cm38 cm³ or smaller.
Small to moderate wounds with moderate depth.Example: 8cm x 8cm x 2.5cm- 160 cm³Most common kit sold.
Extra large surface area or full thickness wounds with significant depth.Example: 18cm x 18cm x6.5cm - 2106 cm³
RENASYS-G (Kit components)

4
Kit contents Kitssmall medium Large
Product codes 66800639 66800640 66800641
Foam dimensions 10cm x 8cm x 3cm 20cm x 12.5cm x 3cm 25cm x 15cm x 3cm
Port 1 x Port Connector
1 x Port Connector
1 x Port Connector
Drape 8in x 12in (20cm x 30cm)
8in x 12in (20cm x 30cm)
8in x 12in (20cm x 30cm)
Number of drapes per pack 1 2 3
Tube fixation film 2 per kit 2 per kit 2 per kit
Ifu In kit In kit In kit
Case size 5 5 5
Case size 5 5 5
RENASYS-F/P Foam Port (Kit components)

4NPWT wound sealing kits
The Smith & Nephew Negative Pressure Wound Therapy (NPWT) sealing kits contain the necessary components to successfully prepare a wound for NPWT using the RENASYS™ EZ or RENASYS GO NPWT system.
The type of wound sealing kit required depends on the size and depth of the wound and the drainage requirements.
Drain guide (gauze kits only)
flat Multipurpose, standard drain for deep or shallow wounds where low or heavy drainage is required. No sediment present.
round 10 French – For shallow wounds where minimal or no drainage is required. No sediment present.
19 French – For deeper wounds (at least 1cm of depth) where moderate to heavy drainage is required. No sediment present.
Channel For medium depth wounds where nil to moderate drainage is required. The channel can be inserted into tunnels and curled into undermining space.
Kit name Description
Medium flat drain
Multipurpose standard drain
Deep or shallow wounds
Minimal to heavy drainage without sediment
Channel drain
Non-hollow, non-perforated designMinimal to moderate drainageCan be inserted into tunnels and curled into undermining space
Small round drain
May be curled into the wound bed or used in a linear fashion 10 fr: Shallow wounds with minimal to moderate drainage
Extra large round drain
May be curled into the wound bed or used in a linear fashion 19 fr: heavy to moderate drainage with no sediment and at least 1cm of depth

4Wound sealing selection guide
Wound size Drainage Dressing selection
up to
15cm x 10cm
lowMedium Kit with flat drainMedium Kit with channel drain
Moderate to heavyMedium Kit with flat drainMedium Kit with channel drain
up to
30cm x 20cm
Medium large Kit with flat drain
Sediment present Medium Kit with channel drain
up to
30cm x 20cm
low to heavy X-large Kit with round drain
Sediment present large or X-large with round drain

5 RENASYS™
Cleaning and disinfecting instructions The instructions supplied with all cleaning agents must be followed. Canister Kits are not reusable. A new disposable canister kit must be used for each patient.
Disconnect the unit from the power socket before cleaning is commenced. use a high-level disinfection solution or wipe as described in your local equipment decontamination protocol.
While cleaning, always wear the appropriate protective equipment as described in your local protocol for handling clinical waste. As a minimum, gloves should be worn throughout this process.
Please ensure wound vacuum systems have been cleaned and disinfected before returning to smith & nephew
1. As directed in your local protocol for the handling and disposal of biological contaminated equipment, remove the canister and discard it.
2. Carefully wipe all surfaces of the device with the disposable wipe. Particular attention should be made to the handle (RENASYS EZ) and areas close to the canister connection port.
3. Carefully wipe all surfaces of the power cord and power adaptor (RENASYS GO).
4. use second wipe with the disinfectant solution to thoroughly clean all external surfaces.
5. Allow to air dry (do NOT dry with towel / cloth.
PLEasE notE: RENASYS GO carry straps should be replaced with each new patient usage.

6RENASYS-G Quick reference dressing guidelines
RENASYS™ -G Quick reference dressing guidelines
1. Clean wound bed with normal saline if indicated 2. Apply skin protection wipe to periwound skin 3. Cut a single layer of non-adherent wound contact layer to fit the wound dimensions
4. Lay non-adherent wound contact layer into wound bed
5. Moisten gauze with saline 6. Place a layer of moistened gauze into wound bed
7. If required, cut drain to fit wound dimensions. As a guide the drain should be at least 1–2cm shorter than the wound size
8. Secure drain using strip paste beneath and on top of drain as shown
9. Fill remaining defect to skin level with additional moistened gauze
10. Cover wound and drain with drape with approx 3–5cm overlap onto surrounding skin
11. Attach canister to the device, secure dressing tubing to the canister tubing
12. Ensure tubing clamps are open
NPWT 24hr Helpline
UK: 0845 1200 167 Ireland: 01217 0484
13. Turn on machine. Set desired negative pressure and start therapy
14. Dressing should collapse and appear firm to touch and have a ‘raisin-like’ appearance
Support and educational material
5. Moisten gauze with saline and squeeze out excess

6RENASYS-G Quick reference dressing guidelinesRENASYS™ -G specialist dressing techniques
Undermining
Option 1 – Follow instructions overleaf making sure that all undermined areas are filled with saline moistened gauze. The drain should also be inserted as described overleaf.
Option 2 – Wrap your selected drain in moistened gauze and coil into the wound. Fill remaining defect with saline moistened gauze, secure drain with strip paste and seal with drape
Tunnelled wounds
Option 1 – When the tunnel is only slightly larger than the drain circumference – insert channel drain directly into the tunnel until resistance is felt and then draw back at least 1cm to prevent excess pressure at the wound base. Coil the remaining drain into the wound bed then fill the defect with saline moistened gauze, secure drain with strip paste and seal with drape
Option 2 – When the tunnel is larger than the drain circumference, wrap your chosen drain in saline moistened gauze, insert into the tunnel until resistance is felt and then draw back at least 1cm to prevent excess pressure at the wound base. Coil the remaining drain into the wound bed then fill the defect with saline moistened gauze, secure drain with strip paste, and seal with drape
Bridging technique
Option 1 – Treating two wounds in close proximity with one pump – fill both wounds with saline moistened gauze, protect intact skin between the wounds with drape then connect both wounds with a strip of gauze, place drain between the wounds on the strip of gauze connecting the two wounds, secure the drain with strip paste, seal all wounds and the drain with drape
Option 2 – Where only one wound is present this technique can be used to move the drain tubing from wound’s periphery to a non-weight bearing area. Fill the wound defect with gauze, apply drape onto the skin to create a protective bridge between the wound and the upper body surface. Run a strip of gauze on top of the drape in a continuous strip from the wound to the non-weight bearing surface. Secure the drain with strip paste, cover the wound and all gauze and the drain with drape
Skin grafts Skin flaps
Cover graft with non-adherent wound contact layer extending at least 1cm beyond the suture/staple line, place a single layer of moistened wound filler over the prepared area, then place a flat drain as close to the middle of the wound as possible. Cut to fit the wound dimensions if required. Place a single layer of moistened wound filler over the drain and seal
Cover the intact skin of the flap with transparent film to within approximately 1cm of the suture line. Cover the opposite side of the suture line with transparent film to within approximately 1cm of the suture line (creating a ‘ring’ of exposed skin around the suture line). Cover this with non-adherent wound contact layer. Then place a single layer of moistened wound filler over the prepared area, place a flat drain as close to the middle of the wound as possible. Cut to fit the wound dimensions if required. Place a single layer of moistened wound filler over the drain and seal
™ Trademark of Smith & Nephew © Smith & Nephew January 2009. 16003

6RENASYS-F/P Foam Quick reference dressing techniquesLayered technique
Debride any necrotic tissue / eschar if necessary. Cleanse the wound bed and pat dry as per protocol.
Apply SKIN-PREP™ or a thin hydrocolloid to the peri-wound skin if required. N.B. Skin sealant is not included as part of the RENASYS-F/P foam dressing kit.
Cut the foam to fit the size and shape of the wound. Do not cut the foam directly over the wound bed.
Place the foam into the wound cavity. Multiple pieces or layers of foam can be inserted into a cavity if required to ensure a perfect fit is achieved.
Cover the foam with transparent film. The film should extend 5cm beyond the wound margin to facilitate an adequate seal.
Ensure the film is securely anchored to the peri-wound area to maintain a good seal. Ensure the film is not stretched or applied under tension, or pressure applied to the foam as this may cause blistering when the NPWT is applied
Cut a small circular hole in the centre of the film over the foam. The hole needs to be roughly 0.6cm in size. Remove any excess trimmed film.
Remove the backing from the Port dressing. Align the opening of the Port over the hole in the film. Use gentle pressure to anchor the Port to the film.
Smooth the dressing down whilst removing the frame. Connect the Port tubing to the canister tubing. Ensure the tubing clamps are open.
Switch on the device, set desired therapy setting and start therapy
The finished dressing should collapse, be firm to the touch and have a wrinkled appearance.
RENASYS–F/P Quick Reference Dressing Guide
™Trademark of Smith & Nephew © Smith & Nephew March 2010 SN8126
1 2 3
4 6 5
7 8 9
11 12 10
Healthcare DivisonSmith & Nephew Pty Ltd315 Ferntree Gully RoadPO Box 242Mount Waverley 3149Victoria Australia
T 61 3 8540 6777F 61 3 9544 5086www.smith-nephew.com.au/healthcareNPWT Customer ServiceT 1800 068 840F 1800 671 000
13
6RENASYS-F/P Foam Quick reference dressing techniquesLayered technique

6
Debride any necrotic tissue / eschar if necessary. Cleanse the wound bed and pat dry as per protocol.
Apply SKIN-PREP™ or a thin hydrocolloid to the peri-wound skin if required. N.B. SKIN-PREP wipe is not included within the dressing kit.
Cut a strip of foam from around the edge of the foam block. Do not cut the foam directly over the wound bed.
The foam strip will be used to create the foam bridge
between the two wound sites. Cut the foam to fit the size and shape of the respective wounds. Do not cut the foam directly over the wound bed.
Place the pieces of foam into the respective wound cavities. Multiple pieces or layers of foam can be inserted into a cavity, if required, to ensure a perfect fit is achieved.
Cut a piece of transparent adhesive film to size that is large enough to protect the intact skin between the wounds. Remove the backing film and apply the film to the skin between the wounds
Place the cut strip of foam between the two wounds to create the foam bridge.
Seal in all pieces of foam with transparent adhesive film.
Cut a small circular hole in the centre of the film, over the foam bridge. Ensure any loose film dressing is removed. The opening of the Port will be aligned over the hole to deliver Negative Pressure.
Remove the backing from the Port dressing. Align the opening of the Port over the hole in the film. Use gentle pressure to anchor the Port to the film.
Smooth down the dressing whilst removing the frame.
Connect the Port tubing to the canister tubing. Ensure the tubing clamps are open.
Switch on the device, set desired pressure setting and start therapy. The finished dressing should collapse, be firm to the touch and have a wrinkled appearance.
24-hour NPWT Customer Line
T: 1800 068 840
™Trademark of Smith & Nephew © Smith & Nephew February 2010 SN8125A
RENASYS–F/P Foam Specialist Dressing Technique
1 2 3 1 2 3
4 5 6
7 8 9
10 11 12
13 14
RENASYS-F/P Foam specialist dressing technique
6
RENASYS-F/P Foam specialist dressing techniqueBridging two Wounds

66
Debride any necrotic tissue / eschar if necessary. Cleanse the wound bed and pat dry as per protocol.
Apply SKIN-PREP™ or a thin hydrocolloid to the peri-wound skin if required. N.B. SKIN-PREP wipe is not included within the dressing kit.
Cut a strip of foam from around the edge of the foam block. Do not cut the foam directly over the wound bed.
The foam strip will be used to create the bridge from the wound to the non-weightbearing area.
Cut the foam to fit the size and shape of the wound. Do not cut the foam directly over the wound bed.
Place the foam into the wound. Multiple pieces or layers of foam can be inserted into a cavity, if required, to ensure a perfect fit is achieved. Secure in place with a strip of film.
Measure a piece of film that is long enough and wide enough to run in a continuous piece from the wound to the non-weightbearing area. This will be used to create the bridge and protect the intact skin. Remove the backing paper from the film and apply it to the skin.
Measure a piece of foam that is long enough to run in a continuous piece from the wound to the non- weightbearing area. N.B. the piece of foam must be narrower than the piece of film that you have applied. This will be used to create the bridge for the Port application.
Seal in all pieces of foam with transparent adhesive film.
Cut a small circular hole in the centre of the film, at the non-weightbearing end of the foam bridge. Ensure any loose film dressing is removed. The opening of the Port will be aligned over the hole to deliver Negative Pressure.
Remove the backing from the Port dressing. Align the opening of the Port over the hole in the film. Use gentle pressure to anchor the Port to the film.
Smooth down the dressing whilst removing the frame.
Connect the Port tubing to the canister tubing. Ensure the tubing clamps are open.
Switch on the device, set desired pressure setting and start therapy. The finished dressing should collapse, be firm to the touch and have a wrinkled appearance.
24-hour NPWT Customer Line
T: 1800 068 840
RENASYS–F/P Foam Specialist Dressing Techniques: Bridging to a Non-Weightbearing Area
™Trademark of Smith & Nephew © Smith & Nephew February 2010 SN8125B
1 2 3
4 5 6
7 8 9
10 11 12
13 14
RENASYS-F/P Foam specialist dressing techniqueBridging to a non-weight bearing area
RENASYS-F/P Foam specialist dressing techniqueBridging to a non-weight bearing area

6RENASYS-G using Port ConnectorQuick reference dressing guideRENASYS-G using Port ConnectorQuick reference dressing guide
™Trademark of Smith & Nephew ©Smith & Nephew 2010 SN8307 (07/10)
1 2 3
4 5 6
7 8 9
10 11 12
Debride any necrotic tissue/ eschar if necessary. Cleanse the wound bed and pat dry as per protocol.
Apply SKIN-PREP™ or a thin hydrocolloid to the peri-wound skin, if required. Cut the wound contact layer to the shape of the wound and apply.
Moisten gauze with saline
Fill the wound bed with moistened gauze to skin level.
Cover the gauze with transparent film. The film should extend 5cm beyond margin to facilitate an adequate seal. Ensure the film is not stretched or applied under tension or pressure to prevent blistering when NPWT is applied.
Cut a small circular hole in the centre of the film over the gauze. The hole needs to be roughly 1cm in size. Remove any excess trimmed film.
Remove the backing from the Port connector.
Align the opening of the Port over the hole in the film. Use gentle pressure to anchor the Port to the film.
Smooth the Port dressing down whilst removing the frame.
Connect the Port tubing to the canister tubing. Ensure the tubing clamps are open.
Switch on the device, set desired therapy setting and start therapy.
The finished dressing should collapse, be firm to the touch and have a wrinkled appearance.
Moisten gauze with saline and squeeze out excess

6RENASYS-F/ABQuick reference dressing guide
RENASYS-F/AB Abdominal Dressing Kit is intended for use with the RENASYS EZ/ RENASYS EZ PluS device as a complete Negative Pressure Wound Therapy system for managing open abdominal wounds.
the rEnasys-f/aB dressing kit is made up of the following components:
Organ Protection layer (OPl) x 1 Perforated Foam x 2 Transparent adhesive film x 6 Port dressing x 1
open abdominal Wound PreparationWarning: Review all RENASYS NPWT system safety information before beginning wound preparation. Ensure adequate hemostasis has been achieved prior to dressing placement.
1. Sharp edges or bone fragments must be eliminated from wound area or covered2. Ensure any areas of necrosis are appropriately debrided3. Irrigate abdominal wound as needed4. Clean and dry the peri-wound area
organ Protection Layer (oPL) applicationWarning: Protect vital structures such as bowel and abdominal organs with the OPl at all times during therapy. Never place exposed foam material directly in contact with exposed bowels, organs, blood vessels or nerves. The OPl is designed to allow application directly over exposed internal organs and can be cut or folded as desired. Either side of the OPl may be placed against the viscera.
Remove contents from pouch and prepare the OPl on a sterile field. If cutting the OPl to a different size, ensure that each piece removed has been properly disposed of, away from the open wound.
Ensure gloves are wet before applying the OPl. Gently position the OPl evenly into the abdominal cavity, distributing the sides into both of the lateral paracolic gutters. Any excess material on the sides of the OPl may be folded back onto itself.
Ensure complete coverage of all viscera in the abdominal compartment with the OPl, prior to filling the wound defect with foam.
Perforated foam application
Size the foam to the desired proportions by tearing along the pre-scored perforations. The foam should fit directly over the OPl whilst still being in contact with all the wound edges.
Foam may be cut if required. Do not cutthe foam directly over the wound bed. Always rub the edges of any cut foam to remove loose fragments.
Do not allow foam to contact intact skin without use of an appropriate barrier such as transparent film or a hydrocolloid. It may be necessary to stack multiple pieces of foam depending on the wound profile. If multiple pieces of foam are required, count and record how many pieces are used.
Gently place the perforated foam into the wound cavity over the OPl. Ensure the foam is sized to fit loosely in the wound defect and does not go below the level of the abdominal wall.

6RENASYS-F/ABQuick reference dressing guide
transparent film application
Holding the transparent film, expose one side of the adhesive backing by removing a single panel apply it to the foam.
Apply film to the foam removing adhesive panels as well as the carrier film to seal.
Cover the foam with transparent film. The film should extend at least 5cm beyond the wound margin to facilitate a good seal.
N.B. When using multiple pieces of film ensure the edges overlap by a minimum of 7.5cm. Avoid stretching or pulling the film to minimise tension or trauma to the peri-wound skin.
Port application
Cut a small hole (no less than 0.6cm) in the centre of the film. Remove any excess trimmed film and dispose of away from the wound.
Remove the backing liner from the Port dressing and align the centre opening over the hole to deliver negative pressure. use gentle pressure to anchor the Port dressing to the transparent film.
Smooth the dressing down while removing the frame from the Port dressing.
initiation of therapy
Ensure the canister is installed correctly. Connect the Port tubing to the canister tubing by pushing the quick-click connectors together. Ensure the Port dressing clamp is open and there are no kinks in the tubing.
Activate the RENASYS EZ or RENASYS EZ PluS device on continuous mode, beginning with -80mmHg and check the dressing has a good seal.
The finished dressing should collapse and be firm to the touch. If required, adjust the pressure setting to desired level.
N.B. The recommended pressure range is -80 to -120mmHg.

7 Case studies / Clinical papers

8RENASYS™ Wound vacuum systems
Ordering information
Product code type Description
66800697 Purchase RENASYS EZ PluS Wound Vacuum System
66800164 Purchase RENASYS GO Wound Vacuum System
GO / EZ PluS
RENT-S Standard Daily Rental Includes canister holder and power cord
RENT-C Consignment Rental Includes canister holder and power cord
RENT-l long Term lease Includes canister holder and power cord
RENT-lB Rent to buy Includes canister holder and power cord
*Purchased devices receive a carry case free of charge.

8RENASYS™ Canisters
Product code type Description
66800423 800mlRENASYS EZ large Sealed Canister Kit
66800058 250mlRENASYS EZ Small Sealed Canister Kit
66800165 300mlRENASYS GO Small Canister
66800695 750mlRENASYS GO large Canister

8
RENASYS™-G Gauze Wound Sealing Kits (Quick Click Connection)
Product code Description size Qty
66800491-5 RENASYS-G Gauze Wound Dressing Kit (Round Drain) Small 5
66800491 RENASYS-G Gauze Wound Dressing Kit (Round Drain) Small 15
66800493-5 RENASYS-G Gauze Wound Dressing Kit (Channel Drain) Medium 5
66800493 RENASYS-G Gauze Wound Dressing Kit (Channel Drain) Medium 15
66800494-5 RENASYS-G Gauze Wound Dressing Kit (Flat Drain) Medium 5
66800494 RENASYS-G Gauze Wound Dressing Kit (Flat Drain) Medium 15
66800497-5 RENASYS-G Gauze Wound Dressing Kit (Round Drain) X-large 5
66800497 RENASYS-G Gauze Wound Dressing Kit (Round Drain) X-large 15
RENASYS™-F/P Foam Port Wound Dressing Kits
Product code Description size Qty
66800639 RENASYS-F/P Foam Port Dressing Kit (Drape 20cm x 30xcm) Small 5
66800640 RENASYS-F/P Foam Port Dressing Kit (Drape 20cm x 30xcm) Medium 5
66800641 RENASYS-F/P Foam Port Dressing Kit (Drape 20cm x 30xcm) large 5
66800713 RENASYS-F/AB Foam Abdominal Wound Dressing Kit N/A 5
RENASYS™-G/P Gauze with Port Wound Dressing Kits
Product code Description size Qty
66800882 RENASYS-G/P Gauze Port Dressing Kit Small 15
66800882-5 RENASYS-G/P Gauze Port Dressing Kit Small 5
66800883 RENASYS-G/P Gauze Port Dressing Kit Medium 15
66800883-5 RENASYS-G/P Gauze Port Dressing Kit Medium 5
66800884 RENASYS-G/P Gauze Port Dressing Kit large 15
66800884-5 RENASYS-G/P Gauze Port Dressing Kit large 5

8
RENASYS™ Accessories / Spare Parts
Product code Description Qty
66800060 RENASYS EZ Canister Holder - one size 1
66800694 RENASYS Port (Ctn/10) 10
66800161 RENASYS GO Power Supply 1
66800162 RENASYS GO Carry Bag 1
66800163 RENASYS GO Carry Strap 1
66800192 RENASYS EZ Carry Bag 1
RENASYS™ Dressing kit components and consumables
Product code Description Qty
66800391 NPWT Antimicrobial gauze rolls 5
66800394 NPWT large transparent dressing (20cm x 30cm) 10
66800504 Y-Connector (Quick Click) 1

9 latest information / Product updates