Informatica Cloud Customer 360 - Winter 2017 Version 6.41 - … Documentation... · 2016-11-30 ·...
39
Informatica ® Cloud Customer 360 (Version Winter 2017 Version 6.41) User Guide
Transcript of Informatica Cloud Customer 360 - Winter 2017 Version 6.41 - … Documentation... · 2016-11-30 ·...
Informatica® Cloud Customer 360(Version Winter 2017 Version 6.41)
User Guide
Informatica Cloud Customer 360 User Guide
Version Winter 2017 Version 6.41November 2016
© Copyright Informatica LLC 2015, 2016
This software and documentation are provided only under a separate license agreement containing restrictions on use and disclosure. No part of this document may be reproduced or transmitted in any form, by any means (electronic, photocopying, recording or otherwise) without prior consent of Informatica LLC.
Informatica, the Informatica logo, AddressDoctor, and Informatica Cloud are trademarks or registered trademarks of Informatica LLC in the United States and many jurisdictions throughout the world. A current list of Informatica trademarks is available on the web at https://www.informatica.com/trademarks.html. Other company and product names may be trade names or trademarks of their respective owners.
This product includes software developed by the Apache Software Foundation (http://www.apache.org/), and/or other software which is licensed under various versions of the Apache License (the "License"). You may obtain a copy of these Licenses at http://www.apache.org/licenses/. Unless required by applicable law or agreed to in writing, software distributed under these Licenses is distributed on an "AS IS" BASIS, WITHOUT WARRANTIES OR CONDITIONS OF ANY KIND, either express or implied. See the Licenses for the specific language governing permissions and limitations under the Licenses.
This product includes software which was developed by Mozilla (http://www.mozilla.org/), software copyright The JBoss Group, LLC, all rights reserved; software copyright © 1999-2006 by Bruno Lowagie and Paulo Soares and other software which is licensed under various versions of the GNU Lesser General Public License Agreement, which may be found at http:// www.gnu.org/licenses/lgpl.html. The materials are provided free of charge by Informatica, "as-is", without warranty of any kind, either express or implied, including but not limited to the implied warranties of merchantability and fitness for a particular purpose.
The product includes ACE(TM) and TAO(TM) software copyrighted by Douglas C. Schmidt and his research group at Washington University, University of California, Irvine, and Vanderbilt University, Copyright (©) 1993-2006, all rights reserved.
This product includes software developed by the OpenSSL Project for use in the OpenSSL Toolkit (copyright The OpenSSL Project. All Rights Reserved) and redistribution of this software is subject to terms available at http://www.openssl.org and http://www.openssl.org/source/license.html.
This product includes Curl software which is Copyright 1996-2013, Daniel Stenberg, <[email protected]>. All Rights Reserved. Permissions and limitations regarding this software are subject to terms available at http://curl.haxx.se/docs/copyright.html. Permission to use, copy, modify, and distribute this software for any purpose with or without fee is hereby granted, provided that the above copyright notice and this permission notice appear in all copies.
The product includes software copyright 2001-2005 (©) MetaStuff, Ltd. All Rights Reserved. Permissions and limitations regarding this software are subject to terms available at http://www.dom4j.org/ license.html.
The product includes software copyright © 2004-2007, The Dojo Foundation. All Rights Reserved. Permissions and limitations regarding this software are subject to terms available at http://dojotoolkit.org/license.
This product includes ICU software which is copyright International Business Machines Corporation and others. All rights reserved. Permissions and limitations regarding this software are subject to terms available at http://source.icu-project.org/repos/icu/icu/trunk/license.html.
This product includes software copyright © 1996-2006 Per Bothner. All rights reserved. Your right to use such materials is set forth in the license which may be found at http:// www.gnu.org/software/ kawa/Software-License.html.
This product includes OSSP UUID software which is Copyright © 2002 Ralf S. Engelschall, Copyright © 2002 The OSSP Project Copyright © 2002 Cable & Wireless Deutschland. Permissions and limitations regarding this software are subject to terms available at http://www.opensource.org/licenses/mit-license.php.
This product includes software developed by Boost (http://www.boost.org/) or under the Boost software license. Permissions and limitations regarding this software are subject to terms available at http:/ /www.boost.org/LICENSE_1_0.txt.
This product includes software copyright © 1997-2007 University of Cambridge. Permissions and limitations regarding this software are subject to terms available at http:// www.pcre.org/license.txt.
This product includes software copyright © 2007 The Eclipse Foundation. All Rights Reserved. Permissions and limitations regarding this software are subject to terms available at http:// www.eclipse.org/org/documents/epl-v10.php and at http://www.eclipse.org/org/documents/edl-v10.php.
This product includes software licensed under the terms at http://www.tcl.tk/software/tcltk/license.html, http://www.bosrup.com/web/overlib/?License, http://www.stlport.org/doc/ license.html, http://asm.ow2.org/license.html, http://www.cryptix.org/LICENSE.TXT, http://hsqldb.org/web/hsqlLicense.html, http://httpunit.sourceforge.net/doc/ license.html, http://jung.sourceforge.net/license.txt , http://www.gzip.org/zlib/zlib_license.html, http://www.openldap.org/software/release/license.html, http://www.libssh2.org, http://slf4j.org/license.html, http://www.sente.ch/software/OpenSourceLicense.html, http://fusesource.com/downloads/license-agreements/fuse-message-broker-v-5-3- license-agreement; http://antlr.org/license.html; http://aopalliance.sourceforge.net/; http://www.bouncycastle.org/licence.html; http://www.jgraph.com/jgraphdownload.html; http://www.jcraft.com/jsch/LICENSE.txt; http://jotm.objectweb.org/bsd_license.html; . http://www.w3.org/Consortium/Legal/2002/copyright-software-20021231; http://www.slf4j.org/license.html; http://nanoxml.sourceforge.net/orig/copyright.html; http://www.json.org/license.html; http://forge.ow2.org/projects/javaservice/, http://www.postgresql.org/about/licence.html, http://www.sqlite.org/copyright.html, http://www.tcl.tk/software/tcltk/license.html, http://www.jaxen.org/faq.html, http://www.jdom.org/docs/faq.html, http://www.slf4j.org/license.html; http://www.iodbc.org/dataspace/iodbc/wiki/iODBC/License; http://www.keplerproject.org/md5/license.html; http://www.toedter.com/en/jcalendar/license.html; http://www.edankert.com/bounce/index.html; http://www.net-snmp.org/about/license.html; http://www.openmdx.org/#FAQ; http://www.php.net/license/3_01.txt; http://srp.stanford.edu/license.txt; http://www.schneier.com/blowfish.html; http://www.jmock.org/license.html; http://xsom.java.net; http://benalman.com/about/license/; https://github.com/CreateJS/EaselJS/blob/master/src/easeljs/display/Bitmap.js; http://www.h2database.com/html/license.html#summary; http://jsoncpp.sourceforge.net/LICENSE; http://jdbc.postgresql.org/license.html; http://protobuf.googlecode.com/svn/trunk/src/google/protobuf/descriptor.proto; https://github.com/rantav/hector/blob/master/LICENSE; http://web.mit.edu/Kerberos/krb5-current/doc/mitK5license.html; http://jibx.sourceforge.net/jibx-license.html; https://github.com/lyokato/libgeohash/blob/master/LICENSE; https://github.com/hjiang/jsonxx/blob/master/LICENSE; https://code.google.com/p/lz4/; https://github.com/jedisct1/libsodium/blob/master/LICENSE; http://one-jar.sourceforge.net/index.php?page=documents&file=license; https://github.com/EsotericSoftware/kryo/blob/master/license.txt; http://www.scala-lang.org/license.html; https://github.com/tinkerpop/blueprints/blob/master/LICENSE.txt; http://gee.cs.oswego.edu/dl/classes/EDU/oswego/cs/dl/util/concurrent/intro.html; https://aws.amazon.com/asl/; https://github.com/twbs/bootstrap/blob/master/LICENSE; https://sourceforge.net/p/xmlunit/code/HEAD/tree/trunk/LICENSE.txt; https://github.com/documentcloud/underscore-contrib/blob/master/LICENSE, and https://github.com/apache/hbase/blob/master/LICENSE.txt.
This product includes software licensed under the Academic Free License (http://www.opensource.org/licenses/afl-3.0.php), the Common Development and Distribution License (http://www.opensource.org/licenses/cddl1.php) the Common Public License (http://www.opensource.org/licenses/cpl1.0.php), the Sun Binary Code License Agreement Supplemental License Terms, the BSD License (http:// www.opensource.org/licenses/bsd-license.php), the new BSD License (http://opensource.org/licenses/BSD-3-Clause), the MIT License (http://www.opensource.org/licenses/mit-license.php), the Artistic License (http://www.opensource.org/licenses/artistic-license-1.0) and the Initial Developer’s Public License Version 1.0 (http://www.firebirdsql.org/en/initial-developer-s-public-license-version-1-0/).
This product includes software copyright © 2003-2006 Joe WaInes, 2006-2007 XStream Committers. All rights reserved. Permissions and limitations regarding this software are subject to terms available at http://xstream.codehaus.org/license.html. This product includes software developed by the Indiana University Extreme! Lab. For further information please visit http://www.extreme.indiana.edu/.
This product includes software Copyright (c) 2013 Frank Balluffi and Markus Moeller. All rights reserved. Permissions and limitations regarding this software are subject to terms of the MIT license.
See patents at https://www.informatica.com/legal/patents.html.
DISCLAIMER: Informatica LLC provides this documentation "as is" without warranty of any kind, either express or implied, including, but not limited to, the implied warranties of noninfringement, merchantability, or use for a particular purpose. Informatica LLC does not warrant that this software or documentation is error free. The information provided in this software or documentation may include technical inaccuracies or typographical errors. The information in this software and documentation is subject to change at any time without notice.
NOTICES
This Informatica product (the "Software") includes certain drivers (the "DataDirect Drivers") from DataDirect Technologies, an operating company of Progress Software Corporation ("DataDirect") which are subject to the following terms and conditions:
1.THE DATADIRECT DRIVERS ARE PROVIDED "AS IS" WITHOUT WARRANTY OF ANY KIND, EITHER EXPRESSED OR IMPLIED, INCLUDING BUT NOT LIMITED TO, THE IMPLIED WARRANTIES OF MERCHANTABILITY, FITNESS FOR A PARTICULAR PURPOSE AND NON-INFRINGEMENT.
2. IN NO EVENT WILL DATADIRECT OR ITS THIRD PARTY SUPPLIERS BE LIABLE TO THE END-USER CUSTOMER FOR ANY DIRECT, INDIRECT, INCIDENTAL, SPECIAL, CONSEQUENTIAL OR OTHER DAMAGES ARISING OUT OF THE USE OF THE ODBC DRIVERS, WHETHER OR NOT INFORMED OF THE POSSIBILITIES OF DAMAGES IN ADVANCE. THESE LIMITATIONS APPLY TO ALL CAUSES OF ACTION, INCLUDING, WITHOUT LIMITATION, BREACH OF CONTRACT, BREACH OF WARRANTY, NEGLIGENCE, STRICT LIABILITY, MISREPRESENTATION AND OTHER TORTS.
The information in this documentation is subject to change without notice. If you find any problems in this documentation, please report them to us in writing at Informatica LLC 2100 Seaport Blvd. Redwood City, CA 94063.
INFORMATICA LLC PROVIDES THE INFORMATION IN THIS DOCUMENT "AS IS" WITHOUT WARRANTY OF ANY KIND, EXPRESS OR IMPLIED, INCLUDING WITHOUT ANY WARRANTIES OF MERCHANTABILITY, FITNESS FOR A PARTICULAR PURPOSE AND ANY WARRANTY OR CONDITION OF NON-INFRINGEMENT.
Publication Date: 2016-11-30
Table of Contents
Preface . . . . . . . . . . . . . . . . . . . . . . . . . . . . . . . . . . . . . . . . . . . . . . . . . . . . . . . . . . . . . . . . . . . . . . . 6Informatica Resources. . . . . . . . . . . . . . . . . . . . . . . . . . . . . . . . . . . . . . . . . . . . . . . . . . . 6
Informatica Network. . . . . . . . . . . . . . . . . . . . . . . . . . . . . . . . . . . . . . . . . . . . . . . . . . 6
Informatica Knowledge Base. . . . . . . . . . . . . . . . . . . . . . . . . . . . . . . . . . . . . . . . . . . . 6
Informatica Documentation. . . . . . . . . . . . . . . . . . . . . . . . . . . . . . . . . . . . . . . . . . . . . 7
Informatica Product Availability Matrixes. . . . . . . . . . . . . . . . . . . . . . . . . . . . . . . . . . . . . 7
Informatica Velocity. . . . . . . . . . . . . . . . . . . . . . . . . . . . . . . . . . . . . . . . . . . . . . . . . . 7
Informatica Marketplace. . . . . . . . . . . . . . . . . . . . . . . . . . . . . . . . . . . . . . . . . . . . . . . 7
Informatica Global Customer Support. . . . . . . . . . . . . . . . . . . . . . . . . . . . . . . . . . . . . . 7
Chapter 1: Introduction to Informatica Cloud Customer 360. . . . . . . . . . . . . . . . . . . . . 8Informatica Cloud Customer 360 Overview. . . . . . . . . . . . . . . . . . . . . . . . . . . . . . . . . . . . . . 8
Beans, Master Beans, and External Beans. . . . . . . . . . . . . . . . . . . . . . . . . . . . . . . . . . . . . . 8
Beans. . . . . . . . . . . . . . . . . . . . . . . . . . . . . . . . . . . . . . . . . . . . . . . . . . . . . . . . . . . 9
Master Beans. . . . . . . . . . . . . . . . . . . . . . . . . . . . . . . . . . . . . . . . . . . . . . . . . . . . . . 9
External Beans. . . . . . . . . . . . . . . . . . . . . . . . . . . . . . . . . . . . . . . . . . . . . . . . . . . . . 9
Cloud Customer 360 Tasks. . . . . . . . . . . . . . . . . . . . . . . . . . . . . . . . . . . . . . . . . . . . . . . . 9
Cloud Customer 360 User Interface. . . . . . . . . . . . . . . . . . . . . . . . . . . . . . . . . . . . . . . . . . 10
Chapter 2: Creating or Searching Records for Salesforce Objects. . . . . . . . . . . . . . 12Creating or Searching Records for Salesforce Objects Overview. . . . . . . . . . . . . . . . . . . . . . . 12
Addresses, Email Addresses, and Phone Numbers Verification. . . . . . . . . . . . . . . . . . . . . . . . 13
Address Verification. . . . . . . . . . . . . . . . . . . . . . . . . . . . . . . . . . . . . . . . . . . . . . . . . 13
Email Verification. . . . . . . . . . . . . . . . . . . . . . . . . . . . . . . . . . . . . . . . . . . . . . . . . . . 14
Phone Number Verification. . . . . . . . . . . . . . . . . . . . . . . . . . . . . . . . . . . . . . . . . . . . 15
Creating or Searching Records in Salesforce Classic Experience. . . . . . . . . . . . . . . . . . . . . . . 15
Step 1. Open the Account, Contact, and Lead Scout Pages. . . . . . . . . . . . . . . . . . . . . . . 16
Step 2. Create a Record or Search for Records in the Account, Contact, or Lead Scout Page. . 16
Creating a Record in Lightning Experience. . . . . . . . . . . . . . . . . . . . . . . . . . . . . . . . . . . . . 17
Searching Records in Lightning Experience. . . . . . . . . . . . . . . . . . . . . . . . . . . . . . . . . . . . . 18
Chapter 3: Managing Duplicate Records. . . . . . . . . . . . . . . . . . . . . . . . . . . . . . . . . . . . . . 20Manage Duplicate Records Overview. . . . . . . . . . . . . . . . . . . . . . . . . . . . . . . . . . . . . . . . . 20
Identify Duplicate Records . . . . . . . . . . . . . . . . . . . . . . . . . . . . . . . . . . . . . . . . . . . . . . . 20
Considerations before Manually Merging Duplicate Records . . . . . . . . . . . . . . . . . . . . . . . . . . 21
Merging the Duplicate Records. . . . . . . . . . . . . . . . . . . . . . . . . . . . . . . . . . . . . . . . . . . . . 21
Flagging Duplicate Pairs as Unique. . . . . . . . . . . . . . . . . . . . . . . . . . . . . . . . . . . . . . . . . . 21
Chapter 4: Consolidating Records. . . . . . . . . . . . . . . . . . . . . . . . . . . . . . . . . . . . . . . . . . . . 22Consolidate Records Overview. . . . . . . . . . . . . . . . . . . . . . . . . . . . . . . . . . . . . . . . . . . . . 22
4 Table of Contents
Consolidating a Record in Salesforce Classic. . . . . . . . . . . . . . . . . . . . . . . . . . . . . . . . . . . 22
Consolidating a Record in Lightning Experience. . . . . . . . . . . . . . . . . . . . . . . . . . . . . . . . . . 23
Chapter 5: Converting Leads. . . . . . . . . . . . . . . . . . . . . . . . . . . . . . . . . . . . . . . . . . . . . . . . . 24Lead Conversion Overview. . . . . . . . . . . . . . . . . . . . . . . . . . . . . . . . . . . . . . . . . . . . . . . 24
Converting a Lead. . . . . . . . . . . . . . . . . . . . . . . . . . . . . . . . . . . . . . . . . . . . . . . . . . . . . 24
Chapter 6: Hierarchies. . . . . . . . . . . . . . . . . . . . . . . . . . . . . . . . . . . . . . . . . . . . . . . . . . . . . . . 26Hierarchies Overview. . . . . . . . . . . . . . . . . . . . . . . . . . . . . . . . . . . . . . . . . . . . . . . . . . . 26
Hierarchy Types. . . . . . . . . . . . . . . . . . . . . . . . . . . . . . . . . . . . . . . . . . . . . . . . . . . . . . 27
Hierarchy Status. . . . . . . . . . . . . . . . . . . . . . . . . . . . . . . . . . . . . . . . . . . . . . . . . . . . . . 27
Multidimensional Hierarchies. . . . . . . . . . . . . . . . . . . . . . . . . . . . . . . . . . . . . . . . . . . . . . 29
Alternate Hierarchies. . . . . . . . . . . . . . . . . . . . . . . . . . . . . . . . . . . . . . . . . . . . . . . . . . . 30
Managing Hierarchies. . . . . . . . . . . . . . . . . . . . . . . . . . . . . . . . . . . . . . . . . . . . . . . . . . . 31
Viewing Hierarchies. . . . . . . . . . . . . . . . . . . . . . . . . . . . . . . . . . . . . . . . . . . . . . . . . 31
Searching a Hierarchy . . . . . . . . . . . . . . . . . . . . . . . . . . . . . . . . . . . . . . . . . . . . . . . 31
Reorganizing Hierarchies. . . . . . . . . . . . . . . . . . . . . . . . . . . . . . . . . . . . . . . . . . . . . 32
Unlocking a Hierarchy. . . . . . . . . . . . . . . . . . . . . . . . . . . . . . . . . . . . . . . . . . . . . . . . 33
Creating a Multidimensional Hierarchy. . . . . . . . . . . . . . . . . . . . . . . . . . . . . . . . . . . . . 33
Customer 360 View. . . . . . . . . . . . . . . . . . . . . . . . . . . . . . . . . . . . . . . . . . . . . . . . . . . . 34
Viewing the Customer 360. . . . . . . . . . . . . . . . . . . . . . . . . . . . . . . . . . . . . . . . . . . . . 36
Appendix A: Glossary. . . . . . . . . . . . . . . . . . . . . . . . . . . . . . . . . . . . . . . . . . . . . . . . . . . . . . . . 37Lightning Experience. . . . . . . . . . . . . . . . . . . . . . . . . . . . . . . . . . . . . . . . . . . . . . . . . . 0
MDM Multidomain Edition. . . . . . . . . . . . . . . . . . . . . . . . . . . . . . . . . . . . . . . . . . . . . . . 0
Index. . . . . . . . . . . . . . . . . . . . . . . . . . . . . . . . . . . . . . . . . . . . . . . . . . . . . . . . . . . . 39
Table of Contents 5
PrefaceThe Informatica Cloud Customer 360 User Guide contains information about how you can add and maintain accurate verified contact data, eliminate duplicate data, consolidate data, and maintain hierarchies. This guide is written for business users who create and manage accounts, leads, and contacts as part of customer relationship management (CRM) activities.
This guide assumes that you have access to Informatica Cloud Customer 360 functionality and are familiar with the Salesforce environment.
Informatica Resources
Informatica NetworkInformatica Network hosts Informatica Global Customer Support, the Informatica Knowledge Base, and other product resources. To access Informatica Network, visit https://network.informatica.com.
As a member, you can:
• Access all of your Informatica resources in one place.
• Search the Knowledge Base for product resources, including documentation, FAQs, and best practices.
• View product availability information.
• Review your support cases.
• Find your local Informatica User Group Network and collaborate with your peers.
As a member, you can:
• Access all of your Informatica resources in one place.
• Search the Knowledge Base for product resources, including documentation, FAQs, and best practices.
• View product availability information.
• Find your local Informatica User Group Network and collaborate with your peers.
Informatica Knowledge BaseUse the Informatica Knowledge Base to search Informatica Network for product resources such as documentation, how-to articles, best practices, and PAMs.
To access the Knowledge Base, visit https://kb.informatica.com. If you have questions, comments, or ideas about the Knowledge Base, contact the Informatica Knowledge Base team at [email protected].
6
Informatica DocumentationTo get the latest documentation for your product, browse the Informatica Knowledge Base at https://kb.informatica.com/_layouts/ProductDocumentation/Page/ProductDocumentSearch.aspx.
If you have questions, comments, or ideas about this documentation, contact the Informatica Documentation team through email at [email protected].
Informatica Product Availability MatrixesProduct Availability Matrixes (PAMs) indicate the versions of operating systems, databases, and other types of data sources and targets that a product release supports. If you are an Informatica Network member, you can access PAMs at https://network.informatica.com/community/informatica-network/product-availability-matrices.
Informatica VelocityInformatica Velocity is a collection of tips and best practices developed by Informatica Professional Services. Developed from the real-world experience of hundreds of data management projects, Informatica Velocity represents the collective knowledge of our consultants who have worked with organizations from around the world to plan, develop, deploy, and maintain successful data management solutions.
If you are an Informatica Network member, you can access Informatica Velocity resources at http://velocity.informatica.com.
If you have questions, comments, or ideas about Informatica Velocity, contact Informatica Professional Services at [email protected].
Informatica MarketplaceThe Informatica Marketplace is a forum where you can find solutions that augment, extend, or enhance your Informatica implementations. By leveraging any of the hundreds of solutions from Informatica developers and partners, you can improve your productivity and speed up time to implementation on your projects. You can access Informatica Marketplace at https://marketplace.informatica.com.
Informatica Global Customer SupportYou can contact a Global Support Center by telephone or through Online Support on Informatica Network.
To find your local Informatica Global Customer Support telephone number, visit the Informatica website at the following link: http://www.informatica.com/us/services-and-training/support-services/global-support-centers.
If you are an Informatica Network member, you can use Online Support at http://network.informatica.com.
Preface 7
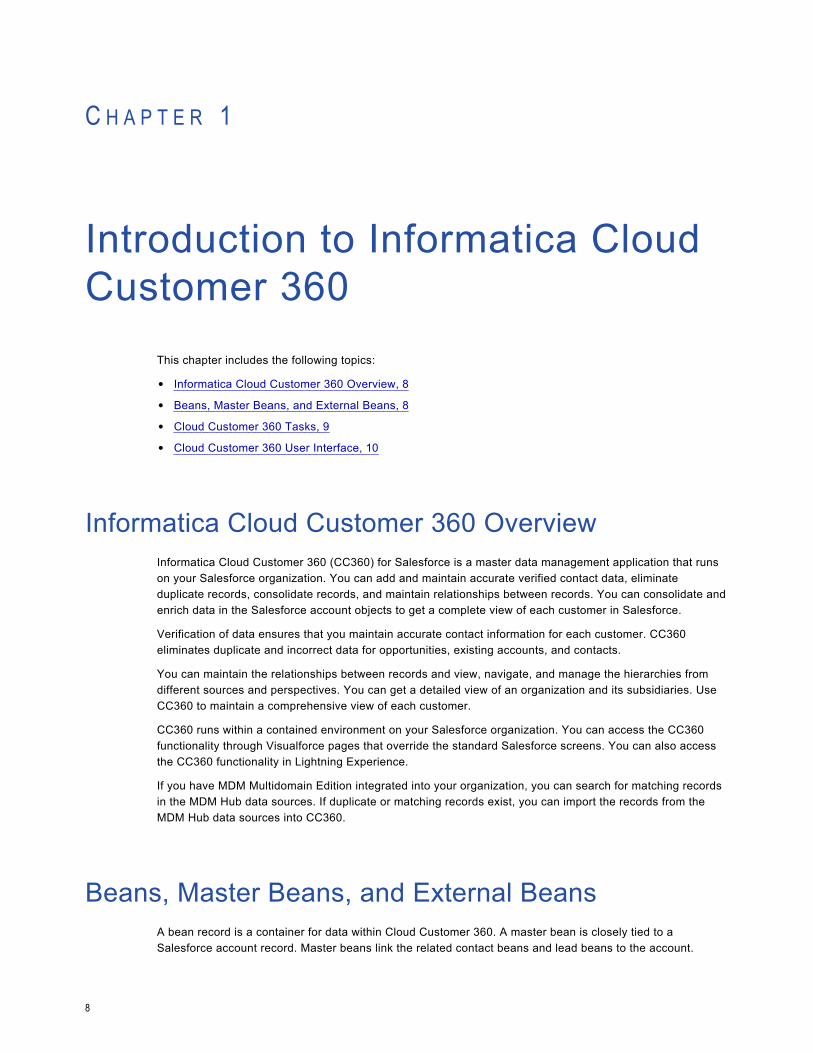
C H A P T E R 1
Introduction to Informatica Cloud Customer 360
This chapter includes the following topics:
• Informatica Cloud Customer 360 Overview, 8
• Beans, Master Beans, and External Beans, 8
• Cloud Customer 360 Tasks, 9
• Cloud Customer 360 User Interface, 10
Informatica Cloud Customer 360 OverviewInformatica Cloud Customer 360 (CC360) for Salesforce is a master data management application that runs on your Salesforce organization. You can add and maintain accurate verified contact data, eliminate duplicate records, consolidate records, and maintain relationships between records. You can consolidate and enrich data in the Salesforce account objects to get a complete view of each customer in Salesforce.
Verification of data ensures that you maintain accurate contact information for each customer. CC360 eliminates duplicate and incorrect data for opportunities, existing accounts, and contacts.
You can maintain the relationships between records and view, navigate, and manage the hierarchies from different sources and perspectives. You can get a detailed view of an organization and its subsidiaries. Use CC360 to maintain a comprehensive view of each customer.
CC360 runs within a contained environment on your Salesforce organization. You can access the CC360 functionality through Visualforce pages that override the standard Salesforce screens. You can also access the CC360 functionality in Lightning Experience.
If you have MDM Multidomain Edition integrated into your organization, you can search for matching records in the MDM Hub data sources. If duplicate or matching records exist, you can import the records from the MDM Hub data sources into CC360.
Beans, Master Beans, and External BeansA bean record is a container for data within Cloud Customer 360. A master bean is closely tied to a Salesforce account record. Master beans link the related contact beans and lead beans to the account.
8

Master beans maintain the best version of the truth. Data from external data sources are stored in external beans.
The best version of the truth is a record that has been consolidated with the best cells of data from the source records.
BeansA bean record is a container for data within Cloud Customer 360 (CC360).
CC360 associates a bean with the following objects:
• A standard Salesforce record, such as an account, contact, or lead.
• Records from sources outside Salesforce, such as Dun and Bradstreet and SAP.
• Custom objects, such as a project or an investment record.
Master BeansMaster beans link together all the beans that relate to an account and maintain the best version of the truth. Master beans link the related contact beans and lead beans to the account.
CC360 creates a master bean when you create an account. Master beans maintain consolidated data from multiple data sources and provide enriched data to the Salesforce accounts.
External BeansExternal beans store data from external data sources.
CC360 creates external beans when you import data from external data sources.
Cloud Customer 360 TasksCloud Customer 360 (CC360) runs within a contained environment on your Salesforce organization. Use CC360 to add and maintain accurate verified contact data, eliminate duplicate records, consolidate records, and maintain relationships between records.
Use CC360 to perform the following tasks:Create records for standard and custom objects.
Create records for standard and custom objects.
If you have MDM Multidomain Edition integrated with your organization, you can import data from MDM Hub data sources into CC360.
Verify record details at the point of entry.
Verify record details such as addresses, email addresses, and phone numbers at their entry into the organization.
Consolidate records and enrich Salesforce records.
Consolidate data from multiple data sources into the master bean and get the best version of the truth. Enrich Salesforce records with data from the consolidated master bean records.
Cloud Customer 360 Tasks 9
Convert leads.
When you start doing business with leads, convert the leads to contacts and accounts. Associate the lead with an account and create a contact for the lead.
Manage hierarchies.
Manage relationships between the records and view, navigate, and manage the different hierarchy types in Salesforce.
Cloud Customer 360 User InterfaceCloud Customer 360 (CC360) runs within a contained environment on your Salesforce org. You can access the CC360 functionality in your Salesforce environment through Visualforce pages that override the standard Salesforce screens. You can also access CC360 in Lightning Experience. Log in to Salesforce by using your Salesforce credentials.
In Salesforce Classic, you can see the following user interface elements when CC360 is deployed in your Salesforce environment:Standard Salesforce tabs
Standard Salesforce objects such as Accounts, Contacts, and Leads, and other features, such as Chatter have tabs. Use the tabs to view the objects and to go to the pages to perform tasks, such as create, edit, and delete. Access the CC360 functionality, such as address verification, email address verification, and phone numbers verification through Visualforce pages that override the standard Salesforce screens.
Custom objects tabs
Custom objects, such as projects, are created to meet the business needs of your organization. Custom objects have tabs. Use the tabs to view the objects and to go to the pages to perform tasks, such as create, edit, and delete.
Salesforce reports and dashboards
Use the Reports and Dashboards tabs to view and analyze your data from multiple perspectives.
CC360 buttons
Use the Consolidated View button on the Account details page to get a consolidated view from multiple beans linked to the master bean of the account.
Use the Consolidate button on the Consolidated View page to consolidate data from multiple beans linked to the master bean of the account.
Use the Convert button on the Lead details page to convert the lead.
Beans
View all the beans or a filtered list of beans. Beans are containers for data within CC360.
Master Beans
View all the master beans or a filtered list of master beans. Master beans link together all the beans that relate to an account.
In Lightning Experience, you can see the Cloud Customer 360 application when CC360 is deployed in your Salesforce environment.
You can view the following user interface elements in the Cloud Customer 360 application:
10 Chapter 1: Introduction to Informatica Cloud Customer 360
Account Scout page
Use the Account Scout page to create account records.
Record creation page
Create records for standard and custom Salesforce objects in the record creation page.
Duplicate Accounts and Other Duplicates pages
View duplicate accounts in the Duplicate Accounts page, and view duplicate contacts and leads in the Other Duplicates page.
Beans
View all the beans or a filtered list of beans. Beans are containers for data within CC360.
Master Beans
View all the master beans or a filtered list of master beans. Master beans link together all the beans that relate to an account.
Salesforce reports and dashboards
Use the Reports and Dashboards tabs to view and analyze your data from multiple perspectives.
Standard Salesforce pages
Access the standard Salesforce objects such as accounts, contacts, and leads from the standard pages.
Note: The Lightning components might not display properly in some browsers as the external Javascript and CSS libraries might take a long time to load.
Cloud Customer 360 User Interface 11
C H A P T E R 2
Creating or Searching Records for Salesforce Objects
This chapter includes the following topics:
• Creating or Searching Records for Salesforce Objects Overview, 12
• Addresses, Email Addresses, and Phone Numbers Verification, 13
• Creating or Searching Records in Salesforce Classic Experience, 15
• Creating a Record in Lightning Experience, 17
• Searching Records in Lightning Experience, 18
Creating or Searching Records for Salesforce Objects Overview
In Salesforce Classic, use the Account, Contact, and Lead Scout pages to create standard objects. In Lightning Experience, use the Create Records page to create standard and custom objects. When you create a record, if duplicate records exist, the Scout pages display the duplicate records.
You can also specify search criteria in the Scout pages and search for records.
If you have Informatica Data as a Service (DaaS) enabled in your organization, you can also verify addresses, email addresses, and phone numbers. You can also search for matching records in the record creation and Scout pages.
If you have MDM Multidomain Edition integrated in your organization, you can search for matching records in the MDM Hub data sources from the record creation page. If duplicate or matching records exist, you can import the records from the MDM Hub data sources into CC360. CC360 creates a master bean, a bean, and an external bean for that record. You can also populate the values from the matching records in the fields of the record creation page.
12
Addresses, Email Addresses, and Phone Numbers Verification
Verification of addresses, email addresses, and phone numbers improves the ability to contact your customers. Use the integration of Cloud Customer 360 (CC360) with DaaS for data verification and correction. You can verify customer contact information at the entry into the organization. You can apply corrections or adjustments and store accurate data in the organization.
Verify that your accounts, contacts, leads, and custom objects have accurately formatted global addresses. You can analyze, verify, correct, and format addresses according to the local postal standards. Ensure that the email addresses are valid and formatted correctly. Find email domains involved with spam networks, traps, and other malicious threats and verify that the email address is valid, not valid, or malicious. Verify the phone numbers of your accounts, leads, contacts, and custom objects and ensure your ability to connect.
CC360 uses the Address Verification service to verify postal addresses, the StrikeIron email verification service to verify email addresses, and the StrikeIron phone validation service to verify phone numbers.
In Salesforce Classic and Lightning Experience, you can verify addresses, email addresses, and phone numbers in the record creation pages and in the account, contact, lead, and custom object details pages.
Note: In Lightning Experience, in the record details page, when you edit the Address Information section to verify the address information, you cannot reset the changes.
Address VerificationYou can improve the quality of your address data. You can correct, standardize, and verify international postal addresses in the address fields of your accounts, contacts, leads, and custom objects. You can format the postal address according to the requirements of the local postal authorities.
Verify the postal addresses in real time when you create accounts, leads, contacts, and custom objects. Cloud Customer 360 (CC360) verifies existing addresses and any changes you make to the address data.
You can standardize and verify the following postal addresses:
• Billing address and shipping address for accounts.
• Address for leads.
• Mailing address and other address for contacts.
• Person mailing address and person other address for person accounts.
You can standardize and verify addresses of your accounts, contacts, and leads at the point of entry based on the address verification settings configured by your CC360 administrator. Receive suggestions to complete an address and generate the most likely address based on the data you enter. You can verify an address when you click the verification icon or when you save the record.
Status CodesCloud Customer 360 (CC360) verifies an address and returns a status code that indicates the result of the verification process. The status code indicates whether the address is deliverable, not deliverable, or whether the data is corrected.
CC360 classifies the status codes into the following categories:
• Green. All postally relevant elements of the address are verified or checked.
• Yellow. Delivery status of the address is unclear.
• Red. Data could not be corrected and the address might not be deliverable.
Addresses, Email Addresses, and Phone Numbers Verification 13
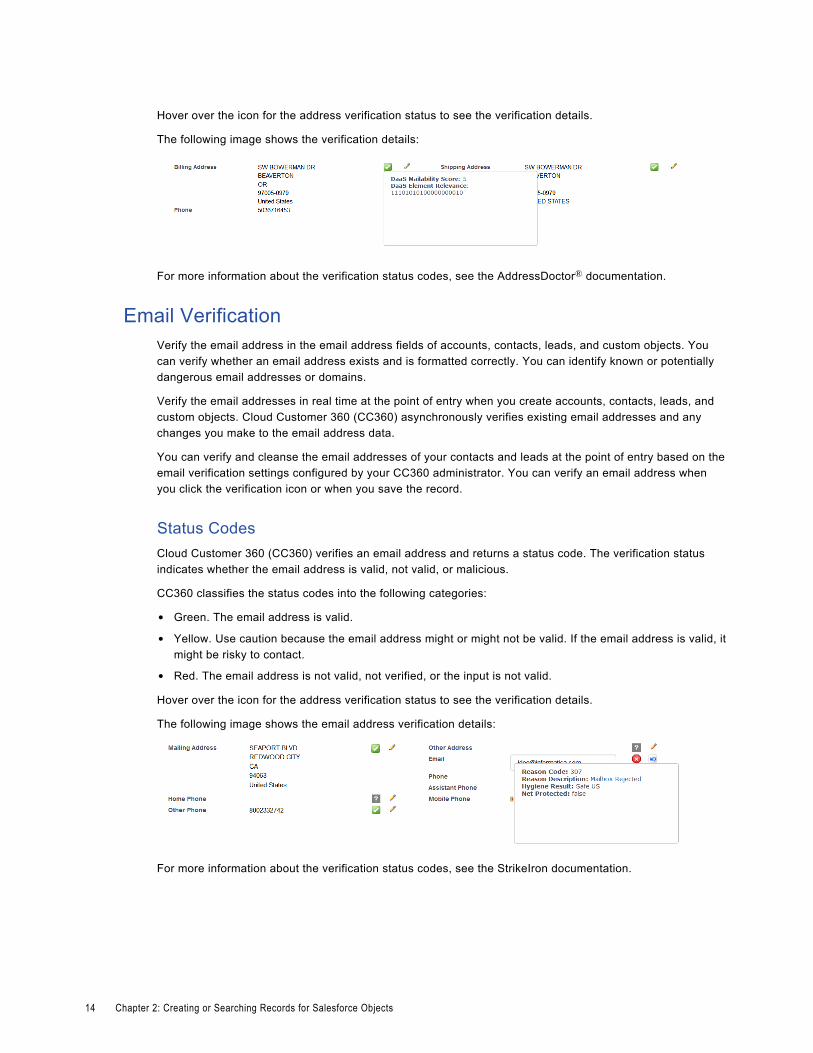
Hover over the icon for the address verification status to see the verification details.
The following image shows the verification details:
For more information about the verification status codes, see the AddressDoctor® documentation.
Email VerificationVerify the email address in the email address fields of accounts, contacts, leads, and custom objects. You can verify whether an email address exists and is formatted correctly. You can identify known or potentially dangerous email addresses or domains.
Verify the email addresses in real time at the point of entry when you create accounts, contacts, leads, and custom objects. Cloud Customer 360 (CC360) asynchronously verifies existing email addresses and any changes you make to the email address data.
You can verify and cleanse the email addresses of your contacts and leads at the point of entry based on the email verification settings configured by your CC360 administrator. You can verify an email address when you click the verification icon or when you save the record.
Status CodesCloud Customer 360 (CC360) verifies an email address and returns a status code. The verification status indicates whether the email address is valid, not valid, or malicious.
CC360 classifies the status codes into the following categories:
• Green. The email address is valid.
• Yellow. Use caution because the email address might or might not be valid. If the email address is valid, it might be risky to contact.
• Red. The email address is not valid, not verified, or the input is not valid.
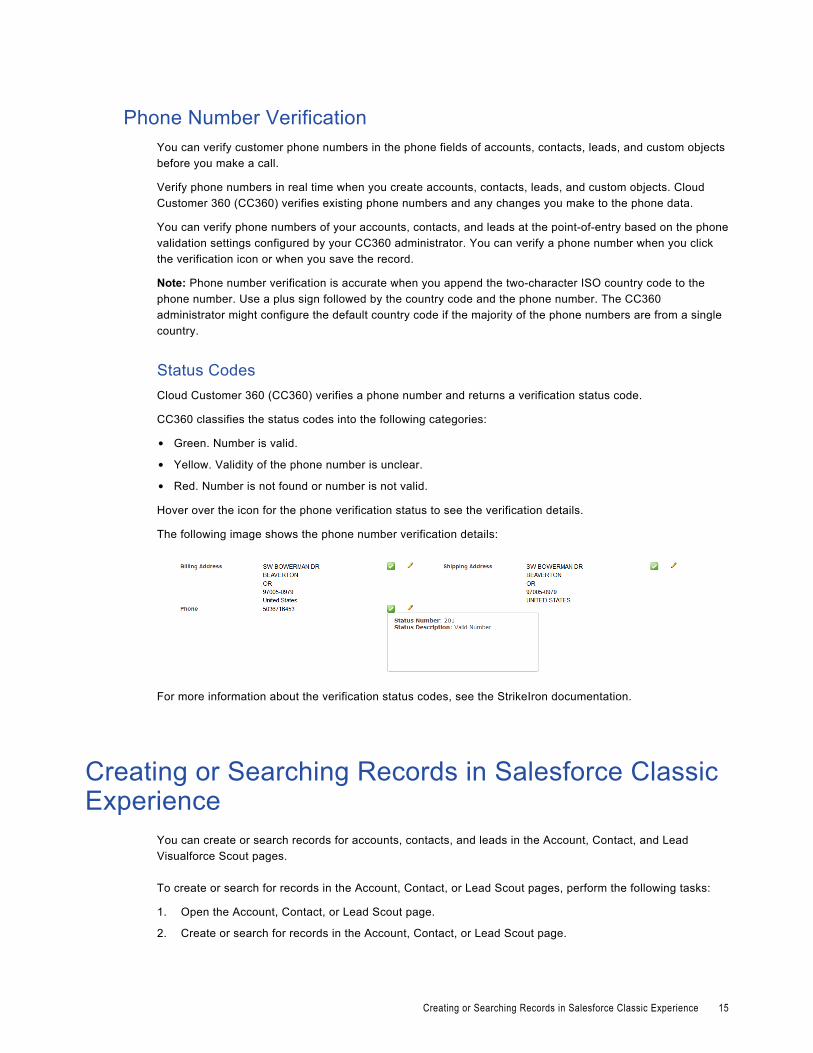
Hover over the icon for the address verification status to see the verification details.
The following image shows the email address verification details:
For more information about the verification status codes, see the StrikeIron documentation.
14 Chapter 2: Creating or Searching Records for Salesforce Objects
Phone Number VerificationYou can verify customer phone numbers in the phone fields of accounts, contacts, leads, and custom objects before you make a call.
Verify phone numbers in real time when you create accounts, contacts, leads, and custom objects. Cloud Customer 360 (CC360) verifies existing phone numbers and any changes you make to the phone data.
You can verify phone numbers of your accounts, contacts, and leads at the point-of-entry based on the phone validation settings configured by your CC360 administrator. You can verify a phone number when you click the verification icon or when you save the record.
Note: Phone number verification is accurate when you append the two-character ISO country code to the phone number. Use a plus sign followed by the country code and the phone number. The CC360 administrator might configure the default country code if the majority of the phone numbers are from a single country.
Status CodesCloud Customer 360 (CC360) verifies a phone number and returns a verification status code.
CC360 classifies the status codes into the following categories:
• Green. Number is valid.
• Yellow. Validity of the phone number is unclear.
• Red. Number is not found or number is not valid.
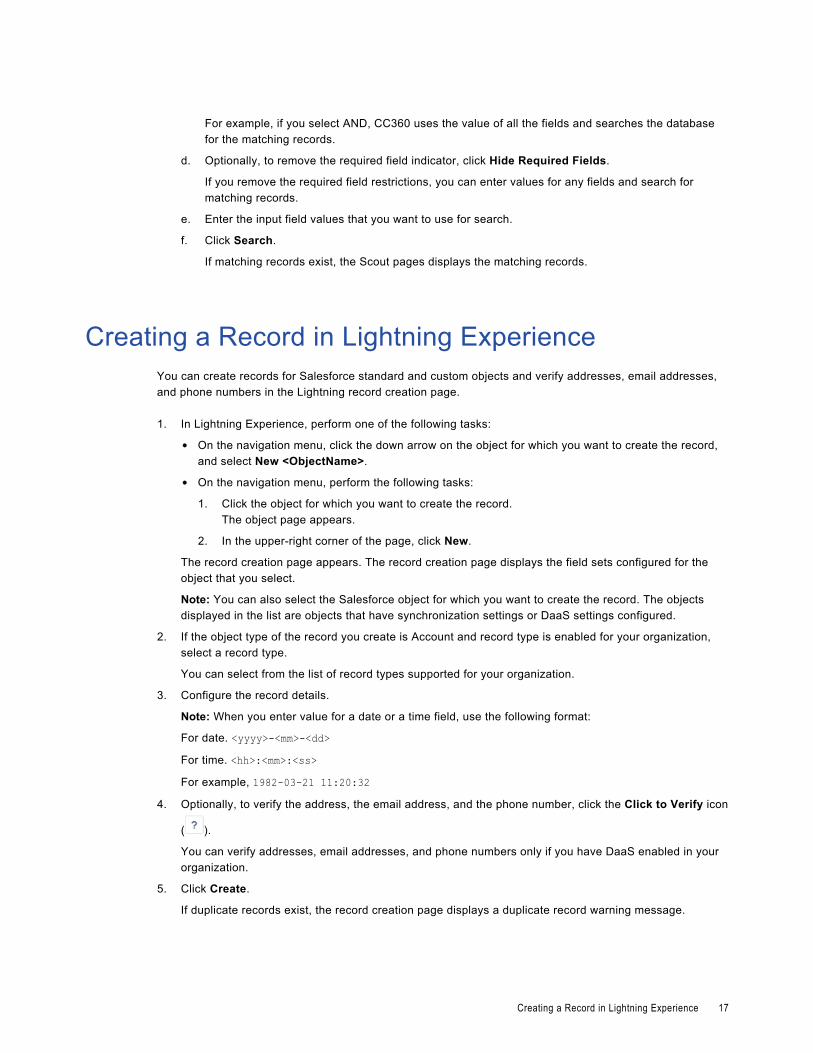
Hover over the icon for the phone verification status to see the verification details.
The following image shows the phone number verification details:
For more information about the verification status codes, see the StrikeIron documentation.
Creating or Searching Records in Salesforce Classic Experience
You can create or search records for accounts, contacts, and leads in the Account, Contact, and Lead Visualforce Scout pages.
To create or search for records in the Account, Contact, or Lead Scout pages, perform the following tasks:
1. Open the Account, Contact, or Lead Scout page.
2. Create or search for records in the Account, Contact, or Lead Scout page.
Creating or Searching Records in Salesforce Classic Experience 15

Step 1. Open the Account, Contact, and Lead Scout PagesYou can open the Account, Contact, and Lead Scout pages from the Salesforce Classic.
Perform one of the following tasks based on the Scout page that you want to open:
• To open the Account Scout page, perform the following tasks:
1. On the Accounts tab, in the Recent Accounts section, click New.
2. If record type is enabled for your organization, select a record type for the new record.You can select from the list of supported record types of your organization.
3. Click Continue.The Account Scout page appears.
• To open the Contact Scout page, on the Contacts tab, in the Recent Contacts section, click New.The Contact Scout page appears.
• To open the Lead Scout page, on the Leads tab, in the Recent Leads section, click New.The Lead Scout page appears.
Step 2. Create a Record or Search for Records in the Account, Contact, or Lead Scout Page
You can create records, search for matching records, and verify address, email addresses, and phone numbers in the Scout pages.
1. To create records, perform the following tasks:
a. In the Scout page, configure the record details.
b. Optionally, to verify the address, the email address, and the phone number, click the Click to Verify
icon ( ).
You can verify addresses, email addresses, and phone numbers only if you have DaaS enabled in your organization.
c. Based on the type of record that you create, click Create Account, Create Lead, or Create Contact.
If duplicate records exist, the record creation page displays a duplicate record warning message.
d. If you want to ignore duplicate records and create the record, click Ignore and Create New.
The Ignore and Create New button appears only if your user profile has the permission to create duplicate records.
2. To search for matching records, perform the following tasks:
a. Click Search Options to configure the search settings.
b. Select the data sources to search for potential duplicate records.
c. Select the search mode based on which you want to search for the matching records.
You can use the following search modes:
• AND. Returns records that match all the input field values.
• CONTAINS. Returns records that contain a part of the input field values.
• FUZZY. Returns all the relevant records that match the input field values and the match settings.
• OR. Returns records that contain at least one of the input field values.
Default is FUZZY.
16 Chapter 2: Creating or Searching Records for Salesforce Objects
For example, if you select AND, CC360 uses the value of all the fields and searches the database for the matching records.
d. Optionally, to remove the required field indicator, click Hide Required Fields.
If you remove the required field restrictions, you can enter values for any fields and search for matching records.
e. Enter the input field values that you want to use for search.
f. Click Search.
If matching records exist, the Scout pages displays the matching records.
Creating a Record in Lightning ExperienceYou can create records for Salesforce standard and custom objects and verify addresses, email addresses, and phone numbers in the Lightning record creation page.
1. In Lightning Experience, perform one of the following tasks:
• On the navigation menu, click the down arrow on the object for which you want to create the record, and select New <ObjectName>.
• On the navigation menu, perform the following tasks:
1. Click the object for which you want to create the record.The object page appears.
2. In the upper-right corner of the page, click New.
The record creation page appears. The record creation page displays the field sets configured for the object that you select.
Note: You can also select the Salesforce object for which you want to create the record. The objects displayed in the list are objects that have synchronization settings or DaaS settings configured.
2. If the object type of the record you create is Account and record type is enabled for your organization, select a record type.
You can select from the list of record types supported for your organization.
3. Configure the record details.
Note: When you enter value for a date or a time field, use the following format:
For date. <yyyy>-<mm>-<dd>For time. <hh>:<mm>:<ss>For example, 1982-03-21 11:20:32
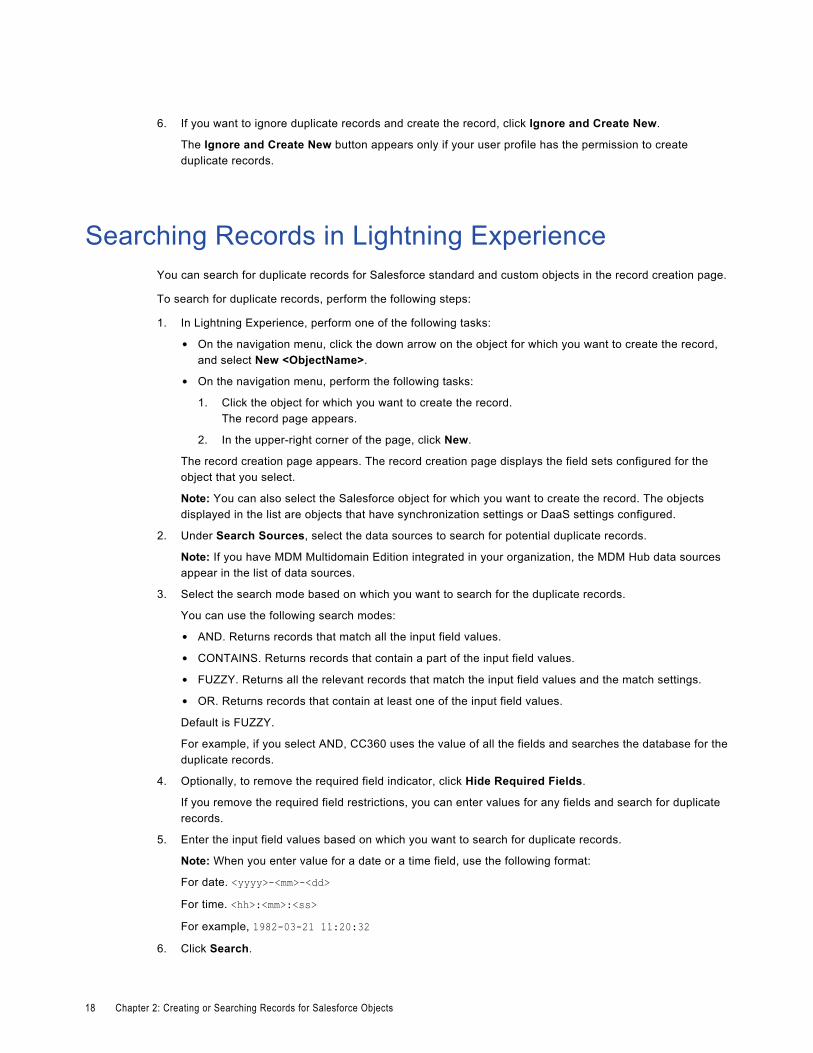
4. Optionally, to verify the address, the email address, and the phone number, click the Click to Verify icon
( ).
You can verify addresses, email addresses, and phone numbers only if you have DaaS enabled in your organization.
5. Click Create.
If duplicate records exist, the record creation page displays a duplicate record warning message.
Creating a Record in Lightning Experience 17
6. If you want to ignore duplicate records and create the record, click Ignore and Create New.
The Ignore and Create New button appears only if your user profile has the permission to create duplicate records.
Searching Records in Lightning ExperienceYou can search for duplicate records for Salesforce standard and custom objects in the record creation page.
To search for duplicate records, perform the following steps:
1. In Lightning Experience, perform one of the following tasks:
• On the navigation menu, click the down arrow on the object for which you want to create the record, and select New <ObjectName>.
• On the navigation menu, perform the following tasks:
1. Click the object for which you want to create the record.The record page appears.
2. In the upper-right corner of the page, click New.
The record creation page appears. The record creation page displays the field sets configured for the object that you select.
Note: You can also select the Salesforce object for which you want to create the record. The objects displayed in the list are objects that have synchronization settings or DaaS settings configured.
2. Under Search Sources, select the data sources to search for potential duplicate records.
Note: If you have MDM Multidomain Edition integrated in your organization, the MDM Hub data sources appear in the list of data sources.
3. Select the search mode based on which you want to search for the duplicate records.
You can use the following search modes:
• AND. Returns records that match all the input field values.
• CONTAINS. Returns records that contain a part of the input field values.
• FUZZY. Returns all the relevant records that match the input field values and the match settings.
• OR. Returns records that contain at least one of the input field values.
Default is FUZZY.
For example, if you select AND, CC360 uses the value of all the fields and searches the database for the duplicate records.
4. Optionally, to remove the required field indicator, click Hide Required Fields.
If you remove the required field restrictions, you can enter values for any fields and search for duplicate records.
5. Enter the input field values based on which you want to search for duplicate records.
Note: When you enter value for a date or a time field, use the following format:
For date. <yyyy>-<mm>-<dd>For time. <hh>:<mm>:<ss>For example, 1982-03-21 11:20:32
6. Click Search.
18 Chapter 2: Creating or Searching Records for Salesforce Objects
If duplicate records exist, the record creation page displays the duplicate records based on the source.
7. If duplicate records exist in the MDM Hub data sources, perform one of the following tasks:
• To import the duplicate record from MDM Hub into CC360, click Import.
Note: If you want to import a contact record, you must enter an account ID to associate the contact record with an account.
• To populate the values from a duplicate record in the fields of the record creation page, perform the following tasks:
1. Click Autofill.
2. In the Select Fields to be Automatically Filled dialog box, select the fields that you want to use in CC360.
Note: The Select Fields to be Automatically Filled dialog box displays the record fields that are mapped to the bean fields.
3. Click Accept.The fields are populated with the values from the duplicate record.
4. Click Create.
The record is created and the record details page appears.
Searching Records in Lightning Experience 19
C H A P T E R 3
Managing Duplicate RecordsThis chapter includes the following topics:
• Manage Duplicate Records Overview, 20
• Identify Duplicate Records , 20
• Considerations before Manually Merging Duplicate Records , 21
• Merging the Duplicate Records, 21
• Flagging Duplicate Pairs as Unique, 21
Manage Duplicate Records OverviewDuplicate leads and accounts might result in account ownership conflicts, incorrect opportunities, and inaccurate forecasts. Duplicate record management is available for accounts, leads, and contacts to maintain clean and accurate data. Cloud Customer 360 (CC360) prevents the creation of duplicate records when you enter the account, lead, or contact details.
When you attempt to save a new record, CC360 searches for potential duplicate records. CC360 displays a warning if it finds a duplicate record. You can choose to override the warning and create the record.
You can also view duplicate records in the record details page. You can merge the duplicate record pairs into one record or flag both records as unique.
Identify Duplicate RecordsCloud Customer 360 (CC360) identifies duplicate data and compiles a list of duplicate pairs of accounts, contacts, leads, and custom objects. Each duplicate pair consists of a master record and a duplicate record. You can view the duplicate information in the details section of a record.
CC360 considers records as duplicates if the records have a match score that meets or exceeds the duplicate threshold. If the match threshold is closer to the configured duplicate threshold, review the records to manually merge the records or flag the duplicate pair as unique records.
20
Considerations before Manually Merging Duplicate Records
You can merge duplicate pairs to eliminate the duplicate records and retain the master records. Analyze the duplicate pairs to ensure that the records are duplicate. You cannot undo a merge operation.
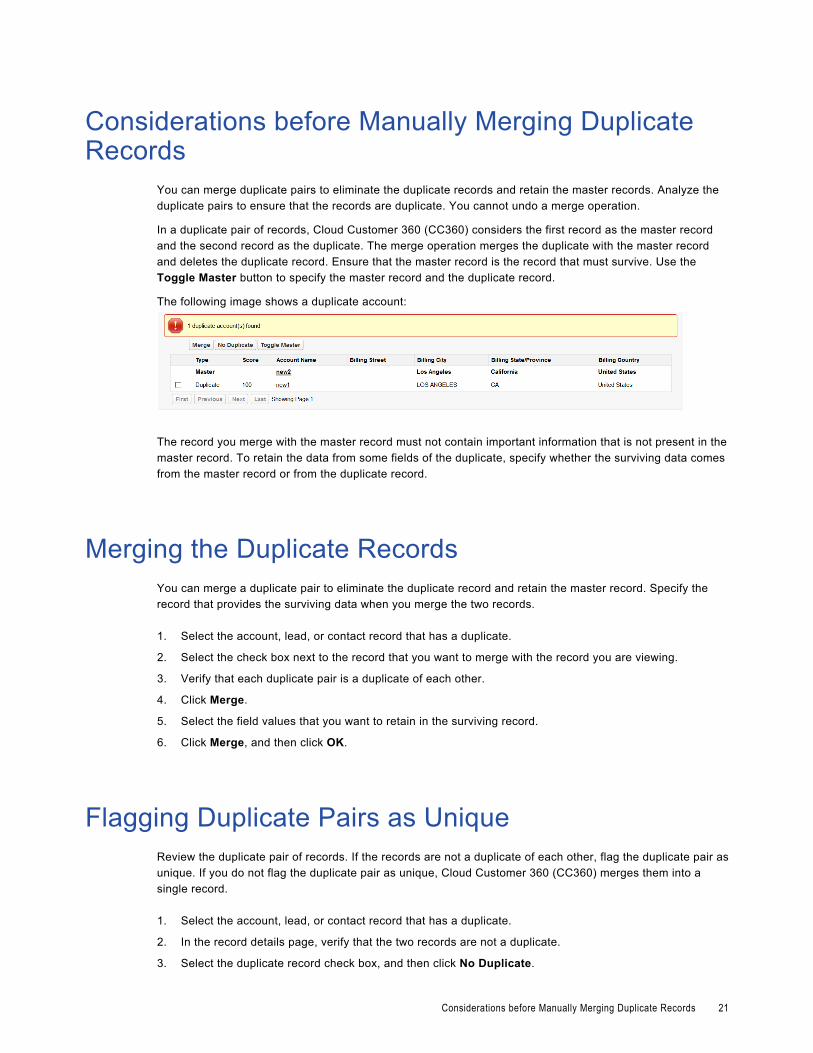
In a duplicate pair of records, Cloud Customer 360 (CC360) considers the first record as the master record and the second record as the duplicate. The merge operation merges the duplicate with the master record and deletes the duplicate record. Ensure that the master record is the record that must survive. Use the Toggle Master button to specify the master record and the duplicate record.
The following image shows a duplicate account:
The record you merge with the master record must not contain important information that is not present in the master record. To retain the data from some fields of the duplicate, specify whether the surviving data comes from the master record or from the duplicate record.
Merging the Duplicate RecordsYou can merge a duplicate pair to eliminate the duplicate record and retain the master record. Specify the record that provides the surviving data when you merge the two records.
1. Select the account, lead, or contact record that has a duplicate.
2. Select the check box next to the record that you want to merge with the record you are viewing.
3. Verify that each duplicate pair is a duplicate of each other.
4. Click Merge.
5. Select the field values that you want to retain in the surviving record.
6. Click Merge, and then click OK.
Flagging Duplicate Pairs as UniqueReview the duplicate pair of records. If the records are not a duplicate of each other, flag the duplicate pair as unique. If you do not flag the duplicate pair as unique, Cloud Customer 360 (CC360) merges them into a single record.
1. Select the account, lead, or contact record that has a duplicate.
2. In the record details page, verify that the two records are not a duplicate.
3. Select the duplicate record check box, and then click No Duplicate.
Considerations before Manually Merging Duplicate Records 21
C H A P T E R 4
Consolidating RecordsThis chapter includes the following topics:
• Consolidate Records Overview, 22
• Consolidating a Record in Salesforce Classic, 22
• Consolidating a Record in Lightning Experience, 23
Consolidate Records OverviewConsolidate data from multiple data sources to get a single complete trusted view of the customer. You can enrich Salesforce records with data from consolidated master bean records. You can consolidate records in Salesforce Classic or Lightning Experience.
Consolidation is the process of merging data from multiple beans linked to a master bean to create a golden record with the best version of the truth. The best version of the truth is a record that has been consolidated with the best cells of data from the source records. Data can come from Salesforce objects or external sources such as SAP, ERP, or Oracle. Cloud Customer 360 (CC360) checks a bean record from an external source to find the matching master bean record. The bean records from external sources might contain fields with information that is not present in the master bean. You can get a single trusted view of the customer after you consolidate the data from all beans that belong to a master bean. You can retain required information from the Salesforce record and load relevant information from the external systems into the master bean. CC360 consolidates data based on the priority of the fields and the sources.
Enrichment is the process of enriching Salesforce records with the data from the master beans after you consolidate records. You can overwrite the Salesforce records with the values from the master beans and supplement the Salesforce records with information from the external data sources.
Consolidating a Record in Salesforce ClassicThe View Consolidated Information page displays the account information, the master record information, and the data sources. You can consolidate the record. After consolidation, the master record information is updated with the consolidated data.
1. On the Accounts tab, select the account whose details you want to view.
The account details page appears.
2. Click Consolidated View.
22
The View Consolidated Information page appears.
Note: The Data Sources section displays the fields of the records from all sources. The records fields with the highest priority in the data source setting are highlighted.
3. Click Consolidate.
The Consolidated Information section displays the consolidated record details.
Consolidating a Record in Lightning ExperienceThe Consolidated View displays the account information, the master record information, and the data sources. You can consolidate the record. After consolidation, the master record information is updated with the consolidated data.
1. In Lightning Experience, on the navigation menu, click Accounts.
2. Select the account whose details you want to view.
The account details page appears.
3. In the upper-right corner of the page, click the down arrow, and select Consolidated View.
The Consolidated View page appears.
Note: The Data Sources section displays the fields of the records from all sources. The records fields with the highest priority in the data source setting are highlighted.
4. Click Consolidate.
The Consolidated View section displays the consolidated record details.
Consolidating a Record in Lightning Experience 23
C H A P T E R 5
Converting LeadsThis chapter includes the following topics:
• Lead Conversion Overview, 24
• Converting a Lead, 24
Lead Conversion OverviewLeads are potential opportunities. Leads are potential customers with whom you are yet to do business. When you start doing business with a lead, convert the lead to a contact. You cannot reverse the conversion of a lead.
When you convert a lead, attach the lead to an existing account or create an account and attach the lead to it. Convert the lead to a contact.
Use the list of suggested accounts for the lead. If an account is associated with the lead bean, Cloud Customer 360 (CC360) attaches the lead to the account. If the lead bean is not associated with an account, CC360 searches for the best matching account for the lead. You can choose to ignore the suggestions, create an account, and attach the lead with it. CC360 checks for duplicates before creating the account.
Use the list of suggested contacts into which you can convert the lead. If you attach the lead to an existing account, you can use the contacts that belong to the account. You can choose to ignore the suggestions and convert the lead to a new contact. If you create an account for the lead, CC360 creates a contact with the lead details.
Converting a LeadWhen you start doing business with a lead, convert the lead. Attach the lead with an account and create a contact for the lead.
1. On the Leads tab, select the lead that you want to convert, and then click Convert.
The status of the lead changes to qualified.
2. Select the check box if you do not want to create a new opportunity when you convert the lead.
3. If you want to attach the lead to an existing account, perform the following tasks:
a. In the Account Information section, select the Attach to Existing option.
24
b. In the Related Contacts section, select the option Attach to Existing to convert the lead to an existing contact.
c. Optionally, select the option Create New Contact to convert the lead to a new contact.
4. If you want to attach the lead to new account, perform the following task:
a. In the Account Information section, select the Create New Account option.
Cloud Customer 360 (CC360) then creates a contact with the lead details.
5. In the Task Information section, specify the task details such as status, priority, and subject.
6. Click Convert.
Converting a Lead 25
C H A P T E R 6
HierarchiesThis chapter includes the following topics:
• Hierarchies Overview, 26
• Hierarchy Types, 27
• Hierarchy Status, 27
• Multidimensional Hierarchies, 29
• Alternate Hierarchies, 30
• Managing Hierarchies, 31
• Customer 360 View, 34
Hierarchies OverviewA hierarchy represents the relationship between the various accounts. When you view hierarchies, you get a global view of an organization and its subsidiaries. You can view and manage multiple types of hierarchies. You can also view the contacts, leads, and opportunities associated with the records in the hierarchy.
Records exist as nodes in the hierarchy. Use Cloud Customer 360 (CC360) to view, navigate, and manage the different hierarchy types directly in Salesforce. Add nodes to a hierarchy, remove nodes from a hierarchy, or drag-and-drop nodes to reorganize a hierarchy. You can move a node from one hierarchy to another, even when the hierarchies are of different hierarchy types.
Multidimensional hierarchies contain records that are present in more than one hierarchy. Alternate hierarchies contain beans from the same external data source and link to the same master bean as that of the account.
Use the Customer 360 view to get a detailed view of an organization and its subsidiaries. You can view the account hierarchy and the details of records that belong to the account. You can filter the records and alphabetically sort the records. You can search for accounts within a hierarchy. If the master bean of the account is linked to beans from external data sources, you can view the alternate hierarchies.
26
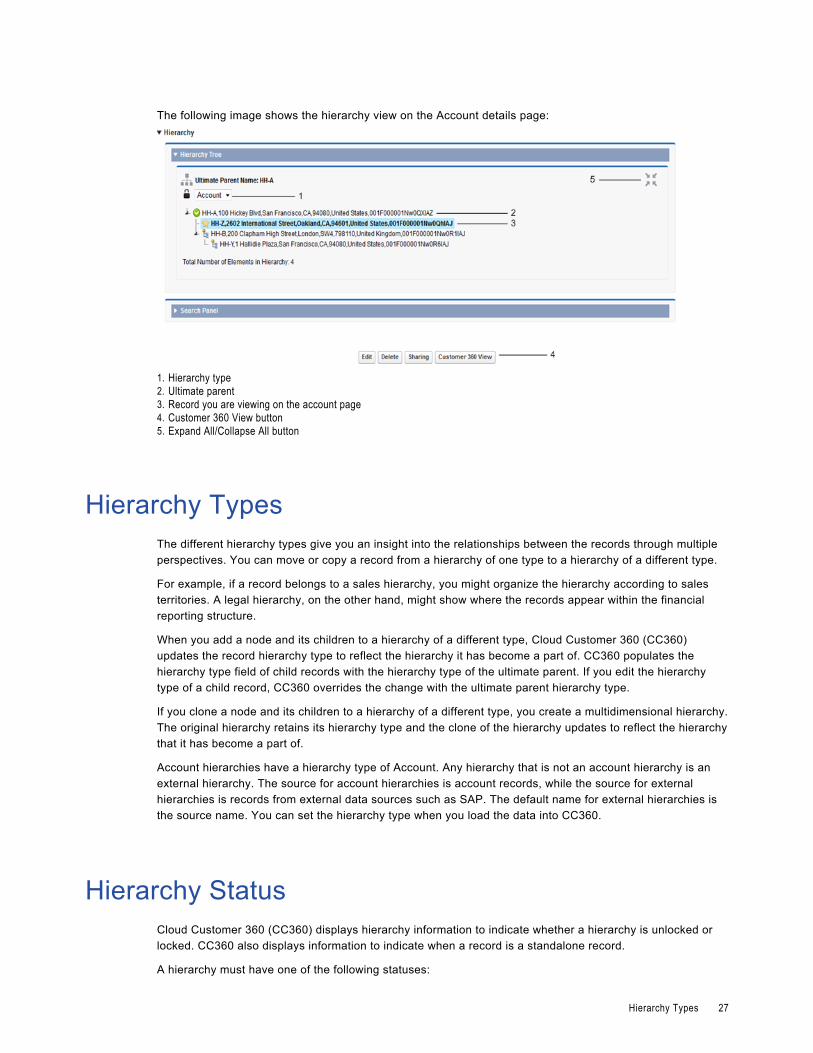
The following image shows the hierarchy view on the Account details page:
1. Hierarchy type2. Ultimate parent3. Record you are viewing on the account page4. Customer 360 View button5. Expand All/Collapse All button
Hierarchy TypesThe different hierarchy types give you an insight into the relationships between the records through multiple perspectives. You can move or copy a record from a hierarchy of one type to a hierarchy of a different type.
For example, if a record belongs to a sales hierarchy, you might organize the hierarchy according to sales territories. A legal hierarchy, on the other hand, might show where the records appear within the financial reporting structure.
When you add a node and its children to a hierarchy of a different type, Cloud Customer 360 (CC360) updates the record hierarchy type to reflect the hierarchy it has become a part of. CC360 populates the hierarchy type field of child records with the hierarchy type of the ultimate parent. If you edit the hierarchy type of a child record, CC360 overrides the change with the ultimate parent hierarchy type.
If you clone a node and its children to a hierarchy of a different type, you create a multidimensional hierarchy. The original hierarchy retains its hierarchy type and the clone of the hierarchy updates to reflect the hierarchy that it has become a part of.
Account hierarchies have a hierarchy type of Account. Any hierarchy that is not an account hierarchy is an external hierarchy. The source for account hierarchies is account records, while the source for external hierarchies is records from external data sources such as SAP. The default name for external hierarchies is the source name. You can set the hierarchy type when you load the data into CC360.
Hierarchy StatusCloud Customer 360 (CC360) displays hierarchy information to indicate whether a hierarchy is unlocked or locked. CC360 also displays information to indicate when a record is a standalone record.
A hierarchy must have one of the following statuses:
Hierarchy Types 27
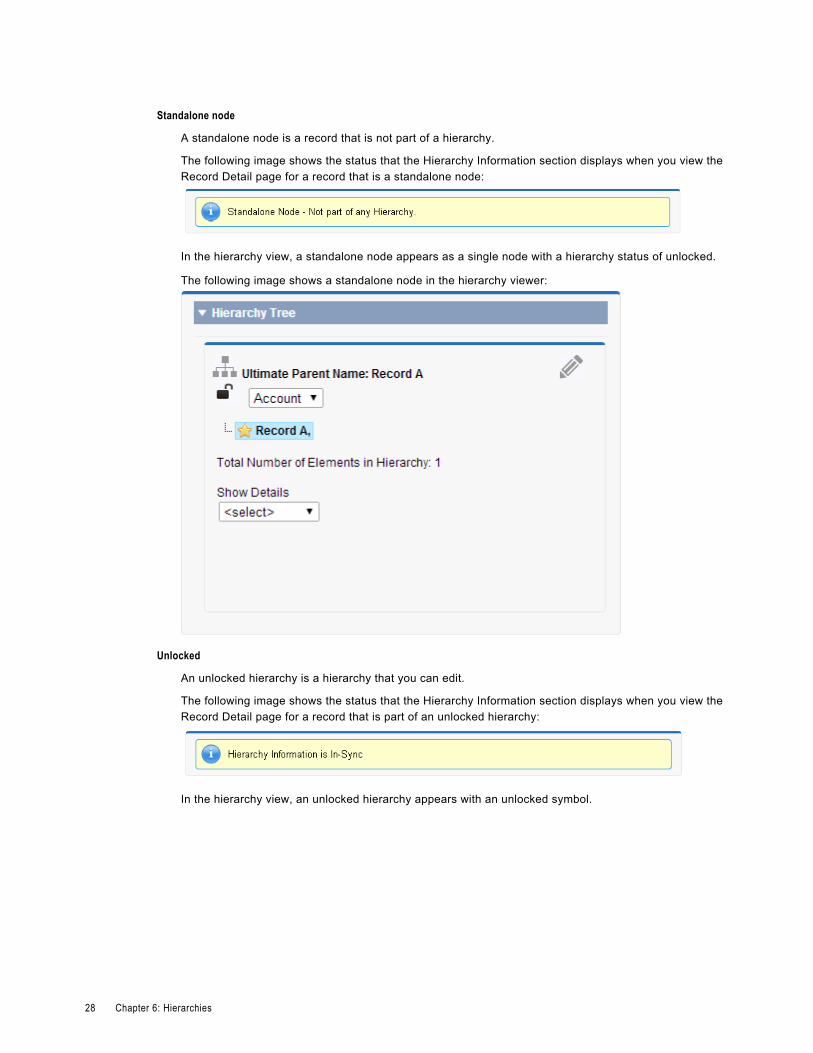
Standalone node
A standalone node is a record that is not part of a hierarchy.
The following image shows the status that the Hierarchy Information section displays when you view the Record Detail page for a record that is a standalone node:
In the hierarchy view, a standalone node appears as a single node with a hierarchy status of unlocked.
The following image shows a standalone node in the hierarchy viewer:
Unlocked
An unlocked hierarchy is a hierarchy that you can edit.
The following image shows the status that the Hierarchy Information section displays when you view the Record Detail page for a record that is part of an unlocked hierarchy:
In the hierarchy view, an unlocked hierarchy appears with an unlocked symbol.
28 Chapter 6: Hierarchies
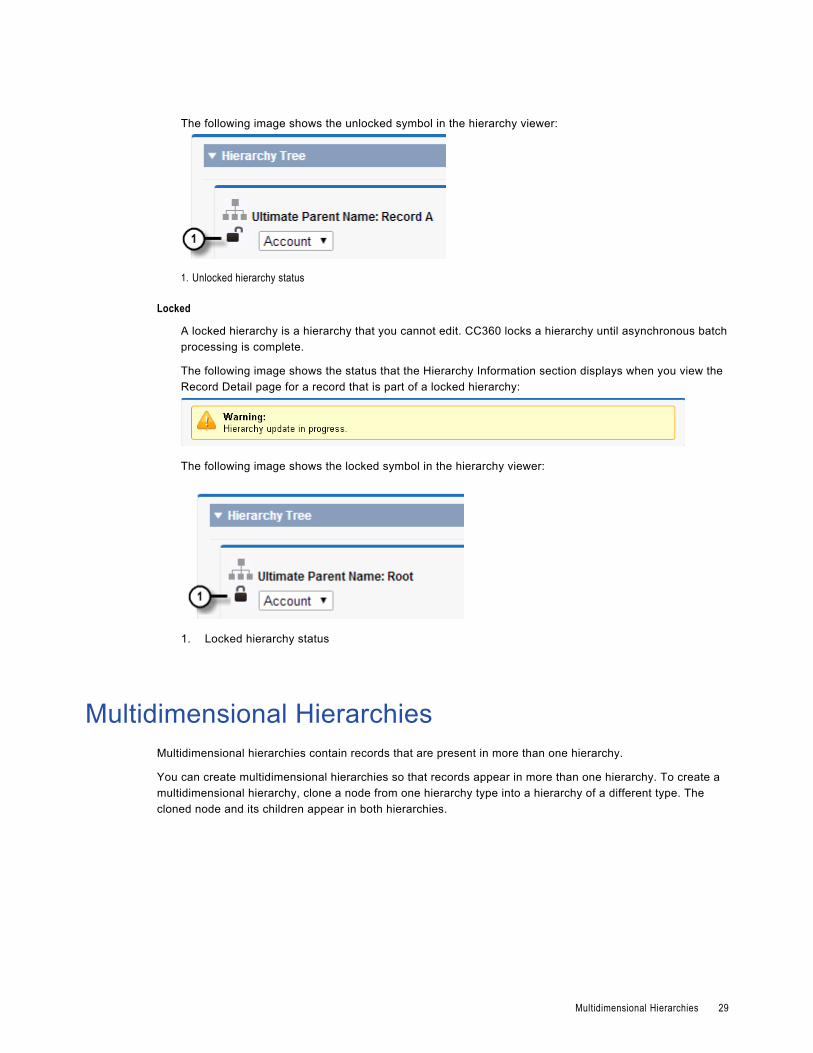
The following image shows the unlocked symbol in the hierarchy viewer:
1. Unlocked hierarchy status
Locked
A locked hierarchy is a hierarchy that you cannot edit. CC360 locks a hierarchy until asynchronous batch processing is complete.
The following image shows the status that the Hierarchy Information section displays when you view the Record Detail page for a record that is part of a locked hierarchy:
The following image shows the locked symbol in the hierarchy viewer:
1. Locked hierarchy status
Multidimensional HierarchiesMultidimensional hierarchies contain records that are present in more than one hierarchy.
You can create multidimensional hierarchies so that records appear in more than one hierarchy. To create a multidimensional hierarchy, clone a node from one hierarchy type into a hierarchy of a different type. The cloned node and its children appear in both hierarchies.
Multidimensional Hierarchies 29
Alternate HierarchiesYou can view an alternate hierarchy in the Hierarchy section of an account page. The Cloud Customer 360 (CC360) administrator must enable alternate hierarchy so that you can view alternate hierarchies in the Account Hierarchy Visualforce page.
An alternate hierarchy contains a list of nodes. The nodes indicate the beans that match the following conditions:
• Must link to the same master bean.
• Must have the same data source.
• Must belong to the same hierarchy type.
If the master bean has only one bean linked to it for a specific hierarchy type, the Hierarchy section displays the complete hierarchy of the bean. You can also select other hierarchy types and view a list of nodes that match the preceding conditions.
Note: If a master bean is linked to the beans that have different data sources but belong to the same hierarchy type, some beans might not show up in the Hierarchy section.
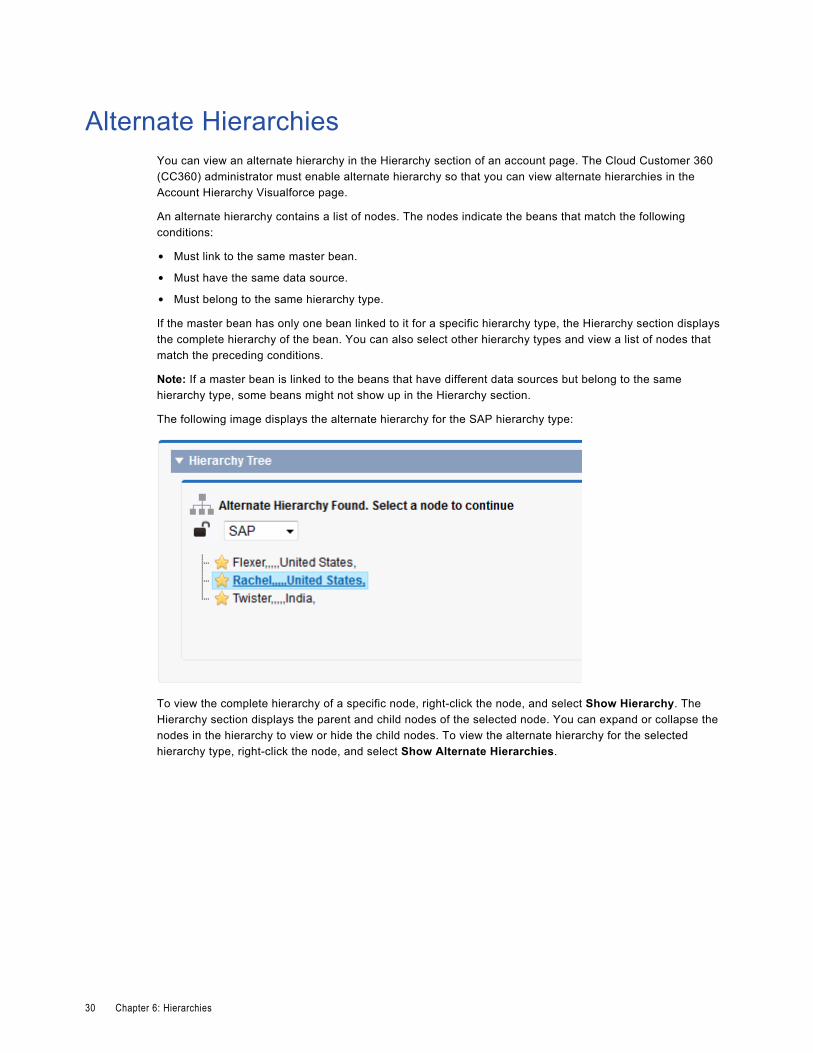
The following image displays the alternate hierarchy for the SAP hierarchy type:
To view the complete hierarchy of a specific node, right-click the node, and select Show Hierarchy. The Hierarchy section displays the parent and child nodes of the selected node. You can expand or collapse the nodes in the hierarchy to view or hide the child nodes. To view the alternate hierarchy for the selected hierarchy type, right-click the node, and select Show Alternate Hierarchies.
30 Chapter 6: Hierarchies
Managing HierarchiesYou can create hierarchies and link accounts to get a global view of a company. View, search, and reorganize the hierarchies to manage the relationships between accounts.
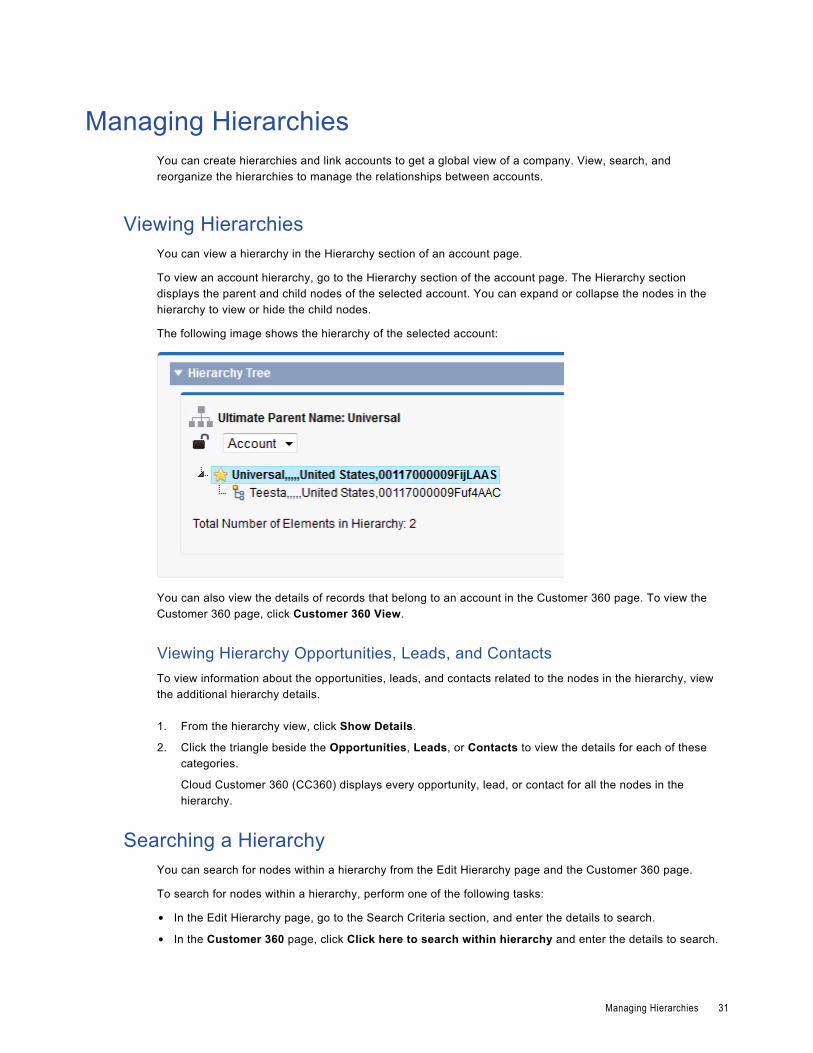
Viewing HierarchiesYou can view a hierarchy in the Hierarchy section of an account page.
To view an account hierarchy, go to the Hierarchy section of the account page. The Hierarchy section displays the parent and child nodes of the selected account. You can expand or collapse the nodes in the hierarchy to view or hide the child nodes.
The following image shows the hierarchy of the selected account:
You can also view the details of records that belong to an account in the Customer 360 page. To view the Customer 360 page, click Customer 360 View.
Viewing Hierarchy Opportunities, Leads, and ContactsTo view information about the opportunities, leads, and contacts related to the nodes in the hierarchy, view the additional hierarchy details.
1. From the hierarchy view, click Show Details.
2. Click the triangle beside the Opportunities, Leads, or Contacts to view the details for each of these categories.
Cloud Customer 360 (CC360) displays every opportunity, lead, or contact for all the nodes in the hierarchy.
Searching a HierarchyYou can search for nodes within a hierarchy from the Edit Hierarchy page and the Customer 360 page.
To search for nodes within a hierarchy, perform one of the following tasks:
• In the Edit Hierarchy page, go to the Search Criteria section, and enter the details to search.
• In the Customer 360 page, click Click here to search within hierarchy and enter the details to search.
Managing Hierarchies 31

The following image shows the search criteria for nodes within a hierarchy:
For example, if you select AND or OR and enter Info in the Account Name field, Cloud Customer 360 (CC360) searches for account names that start with Info. If you select CONTAINS and enter Info in the Account Name field, CC360 searches for account names that contain Info in the account name.
Reorganizing HierarchiesTo reorganize hierarchies, drag a node to a new location in the hierarchy. You cannot change the position of the ultimate parent record in the hierarchy.
1. From the hierarchy view, click the Edit Hierarchy button.
2. Select the node that you want to move, and then drag the node to the new location in the hierarchy.
The node and all child nodes move to the new location in the hierarchy. This is applicable for hierarchies for which the node count is less than or equal to the maximum trigger hierarchy limit.
3. The hierarchies for which the node count is greater than the maximum trigger hierarchy limit, right-click on the node to move, and select Select Node to Move. Then, right-click on the target node, and select Move Node Here.
4. Click Save.
Adding or Moving Records to a HierarchyTo add or move a record to a hierarchy, edit the hierarchy and perform a search to find the record you want to add as a node. If the record exists as a node in a different hierarchy, the node and all its children move to the hierarchy.
1. Select the account to view the account details.
2. View the hierarchy of the account in the Hierarchy Tree section.
3. Click Edit Hierarchy.
4. Select the parent node under which you want to add the record.
5. Click Search.
6. Specify the search criteria to find the record you want to add as a node and click Search.
7. From the search result, select the record that you want to add or move to the hierarchy.
8. Click Add.
32 Chapter 6: Hierarchies
Cloud Customer 360 (CC360) adds the record to the hierarchy. If the record exists as a node in a different hierarchy when you click Add, the node and all the children of the node move to the hierarchy.
9. Click Save.
Removing a Node from a HierarchyTo remove a node from a hierarchy, edit the hierarchy and then remove the node from the hierarchy.
1. From the hierarchy view, click Edit Hierarchy.
2. In the hierarchy, right-click the node to remove and select Remove.
Cloud Customer 360 (CC360) removes the node and its child nodes from the hierarchy. The node and its child nodes exist as a separate hierarchy.
3. Click Save.
Unlocking a HierarchyTo unlock a hierarchy with a hierarchy status of Locked after a hierarchy batch process fails, enable Check Hierarchy for the ultimate parent bean.
1. From the hierarchy view, right-click the ultimate parent of the locked hierarchy and select Go to Account Page.
2. From the Account Detail page, scroll down to the Beans section.
3. From the bean edit page, enable Check Hierarchy. Click Save.
Creating a Multidimensional HierarchyTo create a multidimensional hierarchy, clone the node of a hierarchy of one type to a hierarchy of another type.
1. Edit the target hierarchy that you want to add a hierarchy clone to.
2. In the target hierarchy, select the parent node for the clone hierarchy.
3. In the Search Criteria of the Edit Hierarchy page, search for the topmost node of the hierarchy that you want to clone.
4. Select the topmost node of the hierarchy to clone in the list of search results, and then click Clone. Click Save.
Managing Hierarchies 33
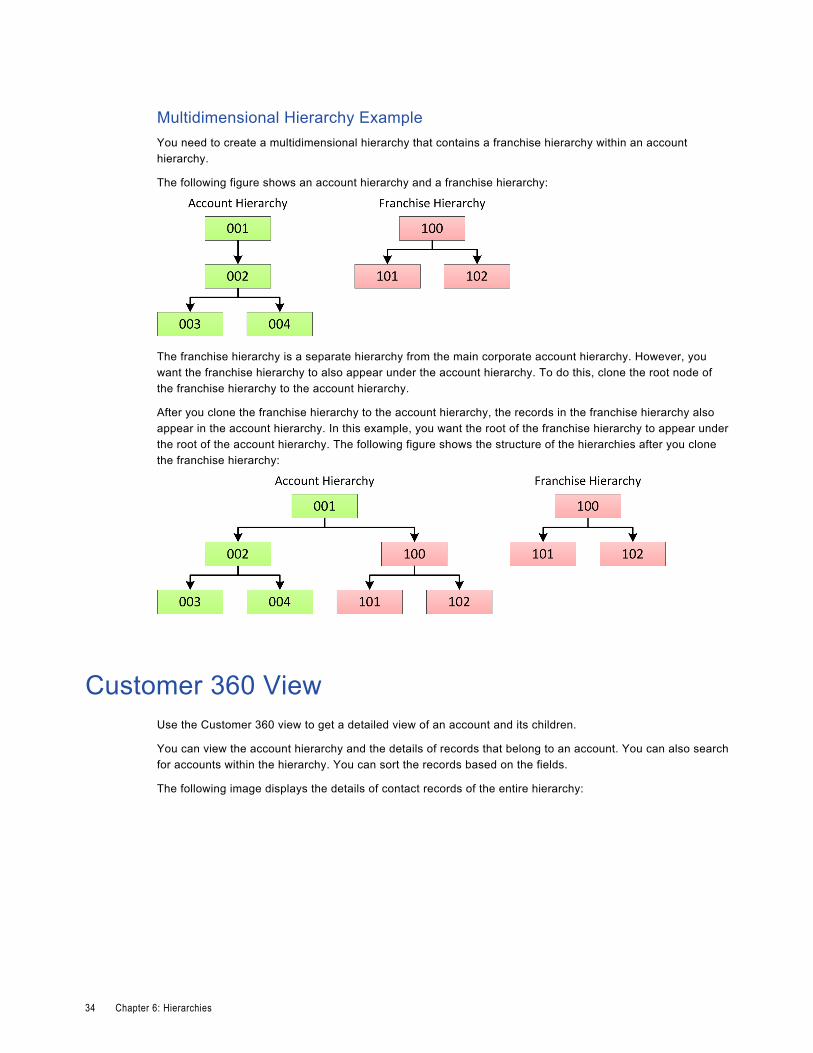
Multidimensional Hierarchy ExampleYou need to create a multidimensional hierarchy that contains a franchise hierarchy within an account hierarchy.
The following figure shows an account hierarchy and a franchise hierarchy:
The franchise hierarchy is a separate hierarchy from the main corporate account hierarchy. However, you want the franchise hierarchy to also appear under the account hierarchy. To do this, clone the root node of the franchise hierarchy to the account hierarchy.
After you clone the franchise hierarchy to the account hierarchy, the records in the franchise hierarchy also appear in the account hierarchy. In this example, you want the root of the franchise hierarchy to appear under the root of the account hierarchy. The following figure shows the structure of the hierarchies after you clone the franchise hierarchy:
Customer 360 ViewUse the Customer 360 view to get a detailed view of an account and its children.
You can view the account hierarchy and the details of records that belong to an account. You can also search for accounts within the hierarchy. You can sort the records based on the fields.
The following image displays the details of contact records of the entire hierarchy:
34 Chapter 6: Hierarchies
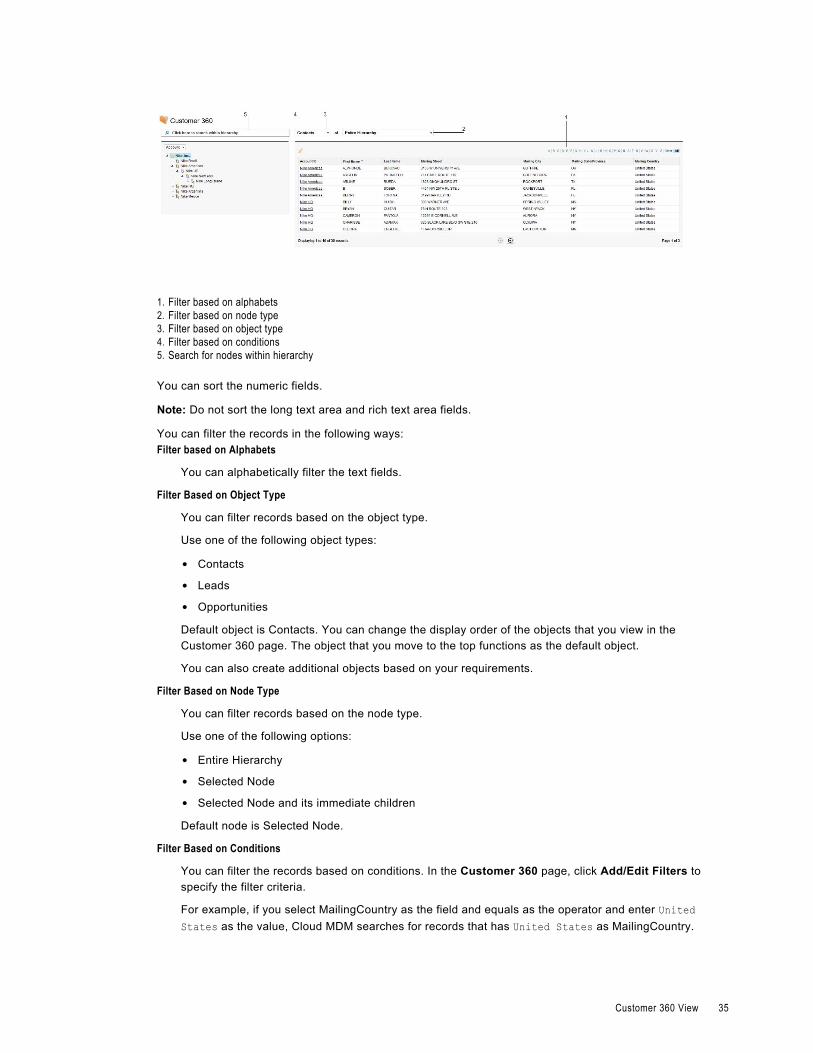
1. Filter based on alphabets2. Filter based on node type3. Filter based on object type4. Filter based on conditions5. Search for nodes within hierarchy
You can sort the numeric fields.
Note: Do not sort the long text area and rich text area fields.
You can filter the records in the following ways:Filter based on Alphabets
You can alphabetically filter the text fields.
Filter Based on Object Type
You can filter records based on the object type.
Use one of the following object types:
• Contacts
• Leads
• Opportunities
Default object is Contacts. You can change the display order of the objects that you view in the Customer 360 page. The object that you move to the top functions as the default object.
You can also create additional objects based on your requirements.
Filter Based on Node Type
You can filter records based on the node type.
Use one of the following options:
• Entire Hierarchy
• Selected Node
• Selected Node and its immediate children
Default node is Selected Node.
Filter Based on Conditions
You can filter the records based on conditions. In the Customer 360 page, click Add/Edit Filters to specify the filter criteria.
For example, if you select MailingCountry as the field and equals as the operator and enter United States as the value, Cloud MDM searches for records that has United States as MailingCountry.
Customer 360 View 35
Viewing the Customer 360You can open the Customer 360 page from Salesforce Classic or Lightning Experience.
Viewing the Customer 360 in Salesforce ClassicThe Customer 360 page displays the account hierarchy and the details of the records for an account.
1. On the Accounts tab, select the account whose details you want to view.
The account details page appears.
2. In the account details page, click Customer 360 View.
The Customer 360 page appears.
Viewing the Customer 360 in Lightning ExperienceThe Customer 360 page displays the account hierarchy and the details of the records for an account.
1. In Lightning Experience, on the navigation menu, click Accounts.
2. Select the account whose details you want to view.
The account details page appears.
3. In the upper-right corner of the page, click the down arrow, and select Customer 360 View.
The Customer 360 page appears.
36 Chapter 6: Hierarchies
A P P E N D I X A
Glossaryalternate hierarchyAlternate hierarchy contains a list of nodes. These nodes link to the same master bean, nodes that have the same data source, and nodes that belong to the same hierarchy type.
automergeProcess that merges data.
beanAn object that holds data. CC360 creates a bean for every source record.
best version of the truthThe record maintained by the master bean that consists of the best data from the source records.
consolidationThe process of consolidating data from multiple source systems.
DaaSData as a Service (DaaS) contains address verification, phone number verification, and email address verification services. DaaS can be integrated with Cloud Customer 360 to verify addresses, email addresses, and phone numbers.
data conversionThe process of converting beans from external data sources to Salesforce records.
de-duplicationProcess of removing duplicate records.
duplicate checkA job that identifies duplicate records.
enrichmentThe process of enhancing Salesforce records with consolidated data from the master beans after you run the consolidation batch job.
master beanMaster beans link the related contact beans and lead beans to the account and also maintain the best version of the truth. CC360 creates a master bean for every account bean.
multidimensional hierarchiesContains records that are present in more than one hierarchy.
Multi-OrgMulti-Org capability automates the cleansing, standardization, de-duplication, and master data management of data from multiple Orgs in a distributed Salesforce environment.
objectA table similar to a database table that stores information.
organizationA deployment of Salesforce with a defined set of licensed users that is similar to the operational reference store of the MDM Multidomain Edition. An organization is the virtual space salesforce.com provides to an individual customer. Your organization includes all of your data and applications.
profileContains a set of permissions to perform tasks in the Informatica Cloud Customer 360 environment.
standardizationStandardizes data that is used inconsistently, such as country names.
synchronizationThe process of migrating Salesforce data into Cloud Customer 360.
ultimate parentThe root node of the hierarchy. The ultimate parent is the topmost node in the hierarchy.
38 Glossary
Index
Bbeans
about 9description 9
CCC360
user interface 10Cloud Customer 360
overview 8tasks 9
consolidate records overview 22process 22
Customer 360 view filter criteria 34
DDaaS
address verification 13email address verification 14phone number verification 15
data quality about 13
duplicate pairs flagging as unique 21
duplicate records considerations 21identify 20manage 20merging 21overview 20
Hhierarchies
about 26adding a node 32moving a node 32
hierarchies (continued)multidimensional 29overview 26removing a node from hierarchy 33reorganizing 31, 32searching 31unlocking 33viewing 30, 31viewing opportunities, leads, and contacts 31
hierarchy search about 31
hierarchy status about 27
Llead conversion
overview 24leads
conversion 24Lightning Experience
consolidate records 22Customer 360 view 36record creation 10, 17searching records 18
Mmaster beans
about 9description 9
SSalesforce objects
creating records 15searching records 15
status codes address verification 13email verification 14phone validation 15
39