Indoor Bike Trainer
12
http://www.instructables.com/id/Indoor-Bike-Trainer/ Home Sign Up! Browse Community Submit All Art Craft Food Games Green Home Kids Life Music Offbeat Outdoors Pets Photo Ride Science Tech Indoor Bike Trainer by timnterra on February 28, 2011 Table of Contents Indoor Bike Trainer . . . . . . . . . . . . . . . . . . . . . . . . . . . . . . . . . . . . . . . . . . . . . . . . . . . . . . . . . . . . . . . . . . . . . . . . . . . . . . . . . . . . . . . . . . . . . . . . . . . . . . . . . . . . 1 Intro: Indoor Bike Trainer . . . . . . . . . . . . . . . . . . . . . . . . . . . . . . . . . . . . . . . . . . . . . . . . . . . . . . . . . . . . . . . . . . . . . . . . . . . . . . . . . . . . . . . . . . . . . . . . . . . . . 2 Step 1: Tools and Materials . . . . . . . . . . . . . . . . . . . . . . . . . . . . . . . . . . . . . . . . . . . . . . . . . . . . . . . . . . . . . . . . . . . . . . . . . . . . . . . . . . . . . . . . . . . . . . . . . . . 3 Step 2: Constructing the base . . . . . . . . . . . . . . . . . . . . . . . . . . . . . . . . . . . . . . . . . . . . . . . . . . . . . . . . . . . . . . . . . . . . . . . . . . . . . . . . . . . . . . . . . . . . . . . . . 4 Step 3: The Bearing Supports & Axle Shafts . . . . . . . . . . . . . . . . . . . . . . . . . . . . . . . . . . . . . . . . . . . . . . . . . . . . . . . . . . . . . . . . . . . . . . . . . . . . . . . . . . . . . . 5 Step 4: Fan Shroud and Assembly . . . . . . . . . . . . . . . . . . . . . . . . . . . . . . . . . . . . . . . . . . . . . . . . . . . . . . . . . . . . . . . . . . . . . . . . . . . . . . . . . . . . . . . . . . . . . . 6 Step 5: Upright Supports . . . . . . . . . . . . . . . . . . . . . . . . . . . . . . . . . . . . . . . . . . . . . . . . . . . . . . . . . . . . . . . . . . . . . . . . . . . . . . . . . . . . . . . . . . . . . . . . . . . . . 7 Step 6: Wrapping the fan in Aluminum . . . . . . . . . . . . . . . . . . . . . . . . . . . . . . . . . . . . . . . . . . . . . . . . . . . . . . . . . . . . . . . . . . . . . . . . . . . . . . . . . . . . . . . . . . . 8 Step 7: Making Sapcers and Mounting the Bike . . . . . . . . . . . . . . . . . . . . . . . . . . . . . . . . . . . . . . . . . . . . . . . . . . . . . . . . . . . . . . . . . . . . . . . . . . . . . . . . . . . . 9 Step 8: Go for a Spin . . . . . . . . . . . . . . . . . . . . . . . . . . . . . . . . . . . . . . . . . . . . . . . . . . . . . . . . . . . . . . . . . . . . . . . . . . . . . . . . . . . . . . . . . . . . . . . . . . . . . . . . 11 Related Instructables . . . . . . . . . . . . . . . . . . . . . . . . . . . . . . . . . . . . . . . . . . . . . . . . . . . . . . . . . . . . . . . . . . . . . . . . . . . . . . . . . . . . . . . . . . . . . . . . . . . . . . . . 11 Comments . . . . . . . . . . . . . . . . . . . . . . . . . . . . . . . . . . . . . . . . . . . . . . . . . . . . . . . . . . . . . . . . . . . . . . . . . . . . . . . . . . . . . . . . . . . . . . . . . . . . . . . . . . . . . . . . 11
-
Upload
paulo-ricardo-varella -
Category
Documents
-
view
18 -
download
0
Transcript of Indoor Bike Trainer

http://www.instructables.com/id/Indoor-Bike-Trainer/
Home Sign Up! Browse Community Submit
All Art Craft Food Games Green Home Kids Life Music Offbeat Outdoors Pets Photo Ride Science Tech
Indoor Bike Trainerby timnterra on February 28, 2011
Table of Contents
Indoor Bike Trainer . . . . . . . . . . . . . . . . . . . . . . . . . . . . . . . . . . . . . . . . . . . . . . . . . . . . . . . . . . . . . . . . . . . . . . . . . . . . . . . . . . . . . . . . . . . . . . . . . . . . . . . . . . . . 1
Intro: Indoor Bike Trainer . . . . . . . . . . . . . . . . . . . . . . . . . . . . . . . . . . . . . . . . . . . . . . . . . . . . . . . . . . . . . . . . . . . . . . . . . . . . . . . . . . . . . . . . . . . . . . . . . . . . . 2
Step 1: Tools and Materials . . . . . . . . . . . . . . . . . . . . . . . . . . . . . . . . . . . . . . . . . . . . . . . . . . . . . . . . . . . . . . . . . . . . . . . . . . . . . . . . . . . . . . . . . . . . . . . . . . . 3
Step 2: Constructing the base . . . . . . . . . . . . . . . . . . . . . . . . . . . . . . . . . . . . . . . . . . . . . . . . . . . . . . . . . . . . . . . . . . . . . . . . . . . . . . . . . . . . . . . . . . . . . . . . . 4
Step 3: The Bearing Supports & Axle Shafts . . . . . . . . . . . . . . . . . . . . . . . . . . . . . . . . . . . . . . . . . . . . . . . . . . . . . . . . . . . . . . . . . . . . . . . . . . . . . . . . . . . . . . 5
Step 4: Fan Shroud and Assembly . . . . . . . . . . . . . . . . . . . . . . . . . . . . . . . . . . . . . . . . . . . . . . . . . . . . . . . . . . . . . . . . . . . . . . . . . . . . . . . . . . . . . . . . . . . . . . 6
Step 5: Upright Supports . . . . . . . . . . . . . . . . . . . . . . . . . . . . . . . . . . . . . . . . . . . . . . . . . . . . . . . . . . . . . . . . . . . . . . . . . . . . . . . . . . . . . . . . . . . . . . . . . . . . . 7
Step 6: Wrapping the fan in Aluminum . . . . . . . . . . . . . . . . . . . . . . . . . . . . . . . . . . . . . . . . . . . . . . . . . . . . . . . . . . . . . . . . . . . . . . . . . . . . . . . . . . . . . . . . . . . 8
Step 7: Making Sapcers and Mounting the Bike . . . . . . . . . . . . . . . . . . . . . . . . . . . . . . . . . . . . . . . . . . . . . . . . . . . . . . . . . . . . . . . . . . . . . . . . . . . . . . . . . . . . 9
Step 8: Go for a Spin . . . . . . . . . . . . . . . . . . . . . . . . . . . . . . . . . . . . . . . . . . . . . . . . . . . . . . . . . . . . . . . . . . . . . . . . . . . . . . . . . . . . . . . . . . . . . . . . . . . . . . . . 11
Related Instructables . . . . . . . . . . . . . . . . . . . . . . . . . . . . . . . . . . . . . . . . . . . . . . . . . . . . . . . . . . . . . . . . . . . . . . . . . . . . . . . . . . . . . . . . . . . . . . . . . . . . . . . . 11
Comments . . . . . . . . . . . . . . . . . . . . . . . . . . . . . . . . . . . . . . . . . . . . . . . . . . . . . . . . . . . . . . . . . . . . . . . . . . . . . . . . . . . . . . . . . . . . . . . . . . . . . . . . . . . . . . . . 11

http://www.instructables.com/id/Indoor-Bike-Trainer/
Intro: Indoor Bike TrainerAfter moving from west Texas, with mild winters and roads with wide shoulders, to rural Southern Kentucky, with long winters and roads with steep ditches instead ofshoulders, it was time to start riding inside. My search for bike trainers left me feeling poor as it was hard to find one for under $100. With more time and tools thanmoney I decided to build my own trainer.
The total cost of this project was about $30 because I used scrap wood and found a free fan in a friend’s junk pile. If you go out and buy all the parts new you might aswell buy the trainer it will save you time and headache. But if you are low on cash, have spare time and don't mind "recycling" old stuff this Instructables is for you. This project could also be used to make a Bike Powered Generator. Simply substitute the fan for a pulley and v-belt connected to an electric motor or a car alternator.

http://www.instructables.com/id/Indoor-Bike-Trainer/
Step 1: Tools and MaterialsThis is pretty simple and only requires basic tools1. Power drill1/4" drill bit, square drive bit, Phillips bit, bit to match the OD of your bearings2. Circular saw and straight edge3. Grinder or file4. Square5. 2 clamps 6" or larger6. Jig saw or coping saw7. Kreg pocket hole jig- Note- if you do any woodwork you NEED a Kreg jig it will drastically speed up assembly and simplify your projects. They can be had for $40 at Lowe's and it is the best$40 you will ever spend on a tool.8. Pencil9. Hammer10. Tin Snips11. Half round file12. Wood Chisel
MaterialsI built this out of scrap 3/4" oak ply wood1. Squirrel cage fan from a junk car or a window air conditioner2. 4- Sealed ball bearings I used 5/8" inside diameter, looking back I would have used bigger bearings 3/4" maybe larger3. 2- Lengths of axle the same diameter as the inside of your bearings (the bigger the better)- the length of the axle is determined by the width of the rear hub assembly on the bike. One length of axle will need to be about 2.5" longer than the other to fit into thefan4. 1 - Box of 1 1/4" course thread Kreg screws5. 1 - Box of 1 1/4" brad nails6. 10 - 1/2" ring nails7. About 1 sq. ft. of aluminum flashing 8" x 15" should be enough8.1' threaded rod that will fit through your bike's rear hub I used 12x24 all thread9. 2- Wing nuts to match the threaded rod10. 2 flat washers
Cut List (all scrap I had lying around)1. The bottom I used a 3/4" piece of "Advantech" flooring 24"x24"2. The base is a 24"x24" 3/4" oak plywood3. Spacers between the base and bottom 4 - 3"x24"x3/4" oak ply4. Bearing supports 2- 4"x 24" x 3/4"oak ply5. Axle keepers 1 -4"x24"x 3/4" oak ply 1- 7"x24"x3/4" oak ply (height determined by size of the fan)6. Upright supports 2 - 6"x18"x3/4" oak ply (the size is determined by your bike wheel size)7. Inner upright support 2 - 6"x 14"x3/4" oak ply (same as other upright minus the width of the bearing supports)8. Fan shroud 8"x8"x3/4" (determined by the size of the fan you find)

http://www.instructables.com/id/Indoor-Bike-Trainer/
9. Fan shroud front and back 2- 3"x6"x 3/4" oak ply
Step 2: Constructing the baseThe base is made up of three layers1.The top of the base is a 24"x24" piece of 3/4" oak ply (it is stable and not bad looking; it will be seen)
2. The second layer is 4 strips of 3/4" material 3" wide and 24" long to separate the base from the bottom- the strips run parallel with the direction of the bike- two strips run under the edges the others run under the two bearing supports3. Cut a small piece of scrap 3/4" wide to go between two of the strips perpendicularly under where the fan sits (this is to create a passage way for the air that is movedby the fan
4.The bottom layer is a flat piece of 3/4" material it can be whatever you have I used particle board because it will not be seen. 24"x24" is stable enough to support youand your bike- the fan i found was about 8" diameter so I had to cut a trough in the bottom piece to accommodate it.
To build the base start with the top1. Locate the center line of the top this is where you want your tire to run.
2. Now measure the width of you bicycle through the spokes of the rear wheel measure the widest point outside the derailleur making sure there will be room for the biketo shift. Add 1" to this measurement for good measure. Divide this measure in half (call this # x ) Now measure x from the center line in both directions and draw twoparallel lines across the whole top. Now measure 1.5" out from each of these lines and draw two more parallel lines. At this point you should have 4 lines all parallel toeach other two sets of parallel lines spaced 1.5" each (in between these two narrow 1.5" lines is where your bearing supports sit)
3. Next measure your fan hopefully you found a smaller auto fan and are not forced to use a large 8" window AC fan. Mine was about 8" diameter and 5" tall. You willhave to cut a hole in the top board for the fan to spin inside of. (Do not cut the hole the full size of the fan just big enough for the fan to spin freely without rubbinganywhere) If you fan is as tall as mine you will have to shift your center line over to allow for added strength on the outside edge as you can see i did in pic #1
4. To locate the hole in the top first mark a center line perpendicular to your four parallel lines. Measure 4" from this line in both directions and draw lines perpendicular tothe four main lines. These will be the center lines for the two axles (it may help to label your lines axle or bearing to keep things strait)
5. With the axles located mark the fan diameter and height centered on the rear axle and outside the 1.5" bearing lines. (Do not cut this out yet) it will be smaller this isjust to locate it

http://www.instructables.com/id/Indoor-Bike-Trainer/
Step 3: The Bearing Supports & Axle ShaftsThe bearing supports will hold the sealed bearings that the bike runs on
I found the bearings I used at an Electric Motor supply store for $7 each, a little steep, but I discovered later that a farm implement store has larger bearings for betterprices so try the farm machinery store first.
Looking back I would have looked for larger bearings and larger diameter axles. The reason is that when the bike is setting on the axles small diameter axles burry deepinto the bikes tires making it VERY difficult to pedal. This is why I added the rubber hose on the axles, but in the test run my street bike tires ate the rubber hose almostcompletely off the axle. I will try better hose (radiator or fuel line). If that does not help I may be reduced to welding pipe around my axles to enlarge them.
Making the bearing supports:1. The bearing supports run the full length of the base and house the bearings. (On my test run I realized I needed to trim the ends of the bearing supports to avoid hittingthe bikes pedals but that will come later) These are made from 4"x24"x 3/4" oak ply wood2. Cut the strips and lay them on your base line them up so that you can transfer you axle lines form the base to the bearing supports. Use your square to continue theselines up the width of the boards.3. Measure down 1.5" from the top of the bearing supports and mark the bearing center locations on the axle lines you transferred from the base4. Drill holes for the bearings (it is Very Important that the holes fit the bearings tightly!) I used a Forstner bit slightly smaller than the bearings' outside diameter and a halfround file to make the bearings fit nice and snug. You can also use a spade bit or a hole saw, but make sure you do not go too big otherwise you might have to epoxyyour bearings into their supports.It is also important to make sure your holes are parallel from one support to the other so that you do not have binding on the axles5. Hammer the bearings into their holes in the supports and set them up next each other and do a dry fit with the axles to make sure they will spin smoothly and not bind6. Next cut one more support but do not mark or drill it this will attach to the outside of the support to contain the bearings and axles.
The Axle Shafts:1. The axles I used were just 5/8" cold rolled steel from Lowe’s about $5 for 2' which will be plenty (like I said earlier had I known I would have sought out thicker axles Ibelieve 11/2" black iron pipe would have been good but it would be harder to find the bearings)2. Cut the axles to length: The length for the front shaft should be the distance between the two sets of parallel lines plus 1.5" or the width of you bikes rear wheel andderailleur plus 2.5" (measure twice cut once and err on the long side you can always cut again but it is expensive to cut things too short3. The rear axle shaft needs to be longer because it must attach to the fan. Measure how deep your axle can go into the fan and add that plus 1" to the length of the frontaxle to get the back axle's length. For example my front axle was 7.5" and my fan had a 1" deep D shaped slot for a shaft so my total second shaft was 9.5"4. You may have to change the diameter of your shaft to fit the fan. I used the bench grinder to slowly bring the axle from 5/8" to 1/2" and then used the grinder to put aflat side on the axle so it would fit into the fan's D-shaped slot.
Test1. Once your fan is attached to your axle put the axles through the bearings and give it a spin to see if the fan is balanced or bent mine took some adjusting (to do thisyou will have to hang your fan off the edge of a workbench or the trainer's base so that the bearing supports can sit flat and the fan can spin). Use this opportunity to tracethe outside edge of your fan onto the edge of the base (this will give you the dimensions for the hole you will cut in the top part of the base.
2. Measure the furthest distance between the two marks and add 1/2" transfer this to the top of the base in place of your marks for the diameter of the fan you can thenuse a drill and jig saw to cut out the hole3. With the hole cut you may finish assembling your base (do a dry fit first before any nails or screws stack the base and set the bearing supports axles and fan in place ifthe fan spins freely without hitting the bottom you are good to go if the fan rests on the bottom you will need to remove some material until it moves4. To cut the trough for the fan in the bottom use a pencil and mark around the inside of the hole you cut in the top transferring the hole to the bottom. Now set yourcircular saw to allow the blade to just come out below the foot of the saw this way you will not cut all the way through the bottom just deep enough to allow the fan to spin.Make repetitive cuts close together and use a chisel to remove the waste.5. Do another dry fit and if it fits nail the base together if it still hits repeat step 4 a little deeper until the fan spins freely.

http://www.instructables.com/id/Indoor-Bike-Trainer/
Step 4: Fan Shroud and AssemblyYou may have noticed that the bearing support on the fan side has a hump to match the fan this is important the flashing will wrap over this to create the passage for theair to be moved by the fan thus providing the resistance.
1. Cut a piece 24" long and tall enough to accommodate the diameter of your fan plus about 1/2" for air space. Line it up with your bearing support and mark the axle lineand bearing center where the fan will go. Drill a hole big enough for the axle to go through.2. Place the axle with fan attached into the hole and trace the outer edge then using a compass make the diameter 1/2" larger all the way.3. Set the piece up next to the bearing and mark the 4" height all along the board except where the fan is to be4. Use you jig saw to cut the top edge leaving the hump for the back of the fan shroud
Now cut the fan end coverThe fan draws in air from the center and pushes it out the sides so you will need to leave the center open making a ring or more like an arch.1. This piece should have the same height and arch as the rear fan shroud but with sides that go straight down. This can be easily made by cutting a square piece of 3/4"plywood and placing it next to your rear fan shroud then trace around the arch and use a square to finish the lines strait down.2. After tracing use a compass to draw a circle in the center of the arch with a 1.5" to 2" shorter radius than the arch. Cut out the piece with the jig saw or coping sawmaking sure to leave the bottom edge square3. Now cut two rectangles one for the front fan cover and one for the back. Make them both 4"tall to line up with the bearing supports and long enough to reach from theoutside edge of the inner fan shroud to the outside edge of the outer fan cover adding 1/2" for air space between the fan and the two covers.
Assembly of the base, bearing supports, fan and axles1. Before you attach anything to the base you will need to put the rubber hose over your axles. The front axle is simple but you must have the inner fan shroud and thebearing support on the fan axle before you can put on the hose pic 52. With the hoses on you may begin assembling the base with bearing supports. I used the Kreg pocket hole jig and attached the bearing supports first to the base thenattached then attached the other pieces to the bearing supports.3. The outer fan cover is nailed with some small brad nails to the two rectangular front and back pieces that are screwed to the inner shroud.
At this point the trainer should look like pictures 2 and 3 now you can move on to the upright supports.
http://www.instructables.com/id/Indoor-Bike-Trainer/
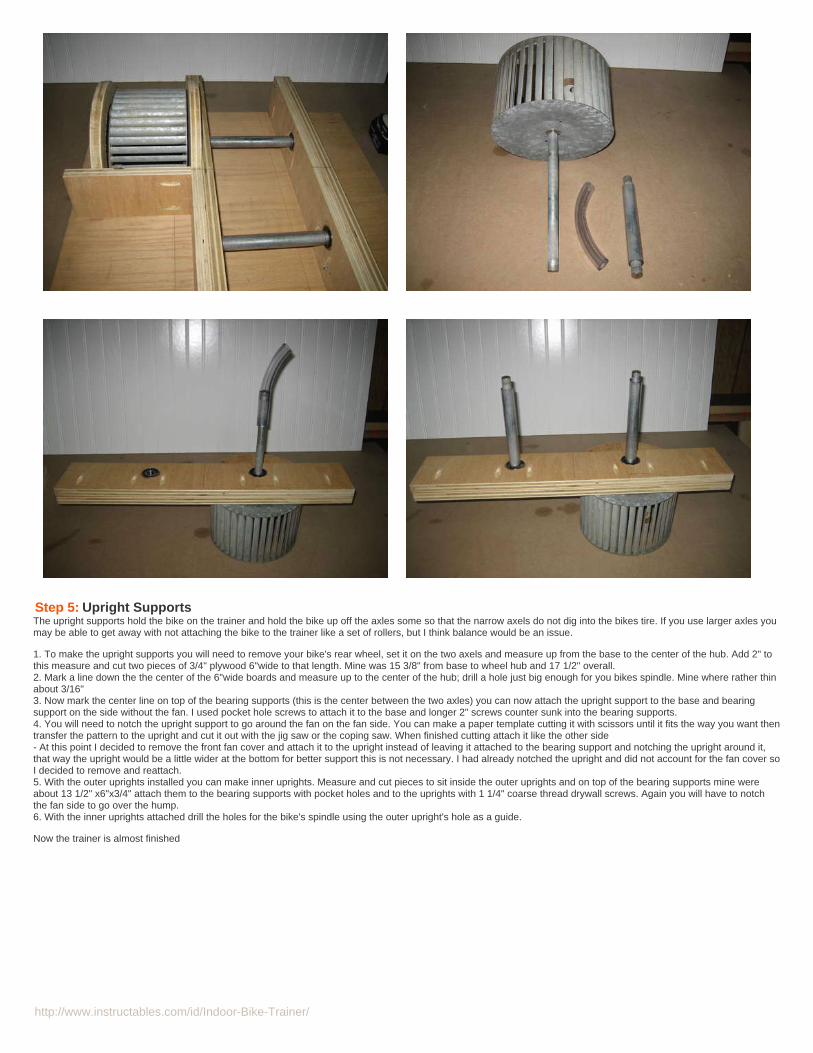
Step 5: Upright SupportsThe upright supports hold the bike on the trainer and hold the bike up off the axles some so that the narrow axels do not dig into the bikes tire. If you use larger axles youmay be able to get away with not attaching the bike to the trainer like a set of rollers, but I think balance would be an issue.
1. To make the upright supports you will need to remove your bike's rear wheel, set it on the two axels and measure up from the base to the center of the hub. Add 2" tothis measure and cut two pieces of 3/4" plywood 6"wide to that length. Mine was 15 3/8" from base to wheel hub and 17 1/2" overall.2. Mark a line down the the center of the 6"wide boards and measure up to the center of the hub; drill a hole just big enough for you bikes spindle. Mine where rather thinabout 3/16"3. Now mark the center line on top of the bearing supports (this is the center between the two axles) you can now attach the upright support to the base and bearingsupport on the side without the fan. I used pocket hole screws to attach it to the base and longer 2" screws counter sunk into the bearing supports.4. You will need to notch the upright support to go around the fan on the fan side. You can make a paper template cutting it with scissors until it fits the way you want thentransfer the pattern to the upright and cut it out with the jig saw or the coping saw. When finished cutting attach it like the other side- At this point I decided to remove the front fan cover and attach it to the upright instead of leaving it attached to the bearing support and notching the upright around it,that way the upright would be a little wider at the bottom for better support this is not necessary. I had already notched the upright and did not account for the fan cover soI decided to remove and reattach.5. With the outer uprights installed you can make inner uprights. Measure and cut pieces to sit inside the outer uprights and on top of the bearing supports mine wereabout 13 1/2" x6"x3/4" attach them to the bearing supports with pocket holes and to the uprights with 1 1/4" coarse thread drywall screws. Again you will have to notchthe fan side to go over the hump.6. With the inner uprights attached drill the holes for the bike's spindle using the outer upright's hole as a guide.
Now the trainer is almost finished

http://www.instructables.com/id/Indoor-Bike-Trainer/
Step 6: Wrapping the fan in AluminumThe fan provides resistance for your pedaling by moving air the faster it spins the more air it moves and the more resistance is created. The fan is designed to becompletely enclosed except for the side where it draws air in. So far the fan is about half enclosed and we need to make a cover for the top of the fan. This isaccomplished with some left over aluminum flashing.
1. Cut a piece of flashing to a rough size larger than you need my fan required a piece 7" wide by 15" long2. You will need to bend the edges at both ends to a 90 degree angle bending sheet metal is easy as long as you support the edge you want to bend with a metal brakeor two pieces of wood and a couple of clamps. Just line up the strips of wood with the mark where you want to make the bend and clamp the wood like a sandwicharound the metal. You can use your hands to bend soft or thin metal like aluminum.3. Start with one end and work your way to the other. Ben one end and hold or clamp it in place while bending the metal around to the other mark it a little over length andcut it off. Then bend it over again and mark your second 90 degree bend at the other end. Using the wood blocks make the bend.4. Line the aluminum up and mark the cutout to go around the upright support. Cut this out and make sure it fits snug. Once satisfied with the fit nail the flashing downwith some short ring nails beginning with one end and moving to the other. Finally go around the edges with a hammer to flatten the edges over making it safe to handlewithout cutting yourself.
With the flashing in place the fan will now intake air from the side and expel the air at the front under the top of the base.

http://www.instructables.com/id/Indoor-Bike-Trainer/
Step 7: Making Sapcers and Mounting the BikeNow that the trainer is pretty much finished it is time to prepare to mount the bike. If you left enough room for the derailleur to function you will have to fill that space withsomething. I used plywood circles cut with a circle cutter.This was very easy I just chucked the hole saw into the drill and started drilling holes in some scrap 3/4" plywood.1. Select the size hole cutter that will leave a circle of wood just big enough to fit into the recess where your quick release spindle lock fits.2. Cut as many spacers as you need to fill the space from the bike to the upright on each side. I tried to center the bike between the two uprights using more spaces onthe left than the right side.
With spacers cut your ready to mount the bike.1. Cut a piece of threaded rod the same diameter as your spindle and long enough to go through both uprights with about 1 1/2" sticking out either side.2. Remove the spindle from the rear wheel and set the bike in the trainer.3. Begin stacking spacers between the bike and the inside of the uprights until you have a tight fit. (You may have to split a spacer to make it thinner. You can use a knifeor chisel for this luckily the plywood is made in easily separated layers so you can get just the right thickness.4. Once you have established the number of spacers start the threaded rod in through one upright and add spacers till you get to the wheel hub pass the rod through thehub and add spacers to the other side till you reach the other upright5. Add a flat washer and a wing nut to each end of the threaded rod and tighten things down.

http://www.instructables.com/id/Indoor-Bike-Trainer/
Now the bike is mounted and if your pedals spin without contacting the bearing supports you're done.My pedals hit the bearing supports so I had to trim them off at an angle no big deal I used the jig saw and made the two cuts in less than a minute as you can see in thefinal pic.
http://www.instructables.com/id/Indoor-Bike-Trainer/
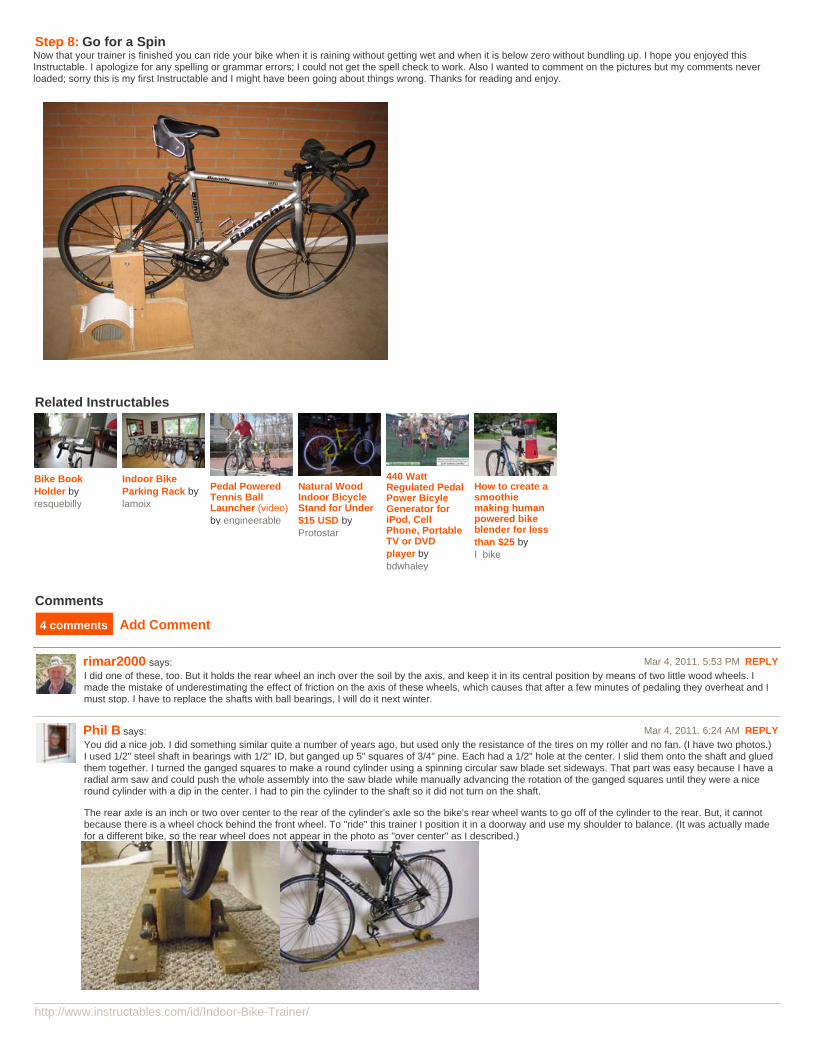
Step 8: Go for a SpinNow that your trainer is finished you can ride your bike when it is raining without getting wet and when it is below zero without bundling up. I hope you enjoyed thisInstructable. I apologize for any spelling or grammar errors; I could not get the spell check to work. Also I wanted to comment on the pictures but my comments neverloaded; sorry this is my first Instructable and I might have been going about things wrong. Thanks for reading and enjoy.
Related Instructables
Bike BookHolder byresquebilly
Indoor BikeParking Rack bylamoix
Pedal PoweredTennis BallLauncher (video)by engineerable
Natural WoodIndoor BicycleStand for Under$15 USD byProtostar
440 WattRegulated PedalPower BicyleGenerator foriPod, CellPhone, PortableTV or DVDplayer bybdwhaley
How to create asmoothiemaking humanpowered bikeblender for lessthan $25 byI_bike
Comments
4 comments Add Comment
rimar2000 says: Mar 4, 2011. 5:53 PM REPLYI did one of these, too. But it holds the rear wheel an inch over the soil by the axis, and keep it in its central position by means of two little wood wheels. Imade the mistake of underestimating the effect of friction on the axis of these wheels, which causes that after a few minutes of pedaling they overheat and Imust stop. I have to replace the shafts with ball bearings, I will do it next winter.
Phil B says: Mar 4, 2011. 6:24 AM REPLYYou did a nice job. I did something similar quite a number of years ago, but used only the resistance of the tires on my roller and no fan. (I have two photos.)I used 1/2" steel shaft in bearings with 1/2" ID, but ganged up 5" squares of 3/4" pine. Each had a 1/2" hole at the center. I slid them onto the shaft and gluedthem together. I turned the ganged squares to make a round cylinder using a spinning circular saw blade set sideways. That part was easy because I have aradial arm saw and could push the whole assembly into the saw blade while manually advancing the rotation of the ganged squares until they were a niceround cylinder with a dip in the center. I had to pin the cylinder to the shaft so it did not turn on the shaft.
The rear axle is an inch or two over center to the rear of the cylinder's axle so the bike's rear wheel wants to go off of the cylinder to the rear. But, it cannotbecause there is a wheel chock behind the front wheel. To "ride" this trainer I position it in a doorway and use my shoulder to balance. (It was actually madefor a different bike, so the rear wheel does not appear in the photo as "over center" as I described.)

http://www.instructables.com/id/Indoor-Bike-Trainer/
timnterra says: Mar 4, 2011. 8:08 AM REPLYNice, I bet yours is a lot quieter than mine. When that fan gets to spinning it really humms.
Phil B says: Mar 4, 2011. 10:07 AM REPLYMine is rather noisy. The pieces of wood I sandwiched together creak on the shaft somehow. I have not used this roller support for a bike in recentyears. All of the parts were free. Some renter left a home quickly and I drove by when the owners were setting out all sorts of stuff on the curb for thenext garbage day.