Incident Response Platform - IBM
54
Incident Response Platform PLAYBOOK DESIGNER GUIDE v30
Transcript of Incident Response Platform - IBM

Incident Response Platform
PLAYBOOK DESIGNER GUIDE v30
Resilient Incident Response Platform Playbook Designer Guide
Page 2
Licensed Materials – Property of IBM
© Copyright IBM Corp. 2010, 2018. All Rights Reserved.
US Government Users Restricted Rights: Use, duplication or disclosure restricted by GSA ADP Schedule Contract with IBM Corp.
Resilient Incident Response Platform Playbook Designer Guide
Platform Version
Publication Notes
30.0 April 2018 Initial publication.

Resilient Incident Response Platform Playbook Designer Guide
Page 3
Table of Contents
1. Introduction ......................................................................................................................................... 5
1.1. Dynamic Playbook ....................................................................................................................... 5
1.2. Incidents and Objects .................................................................................................................. 6
1.3. Integration .................................................................................................................................... 6
1.4. Logging In .................................................................................................................................... 7
2. Planning Overview .............................................................................................................................. 8
3. Playbook Toolkit .................................................................................................................................. 9
3.1. Incident Types.............................................................................................................................. 9
3.2. Phases ......................................................................................................................................... 9
3.3. Tasks and Instructions ................................................................................................................. 9
3.4. Fields and Data Tables ...............................................................................................................10
3.5. Scripts .........................................................................................................................................10
3.6. Functions and Process Scripts....................................................................................................10
3.7. Workflows ...................................................................................................................................11
3.8. Rules ...........................................................................................................................................11
3.9. Layout .........................................................................................................................................12
3.10. Simulations .................................................................................................................................12
3.11. Workspaces ................................................................................................................................12
4. Configure Incident Layouts ...............................................................................................................13
4.1. New Incident Wizard ...................................................................................................................13
4.2. Incident Tabs ..............................................................................................................................14
4.3. Close Incident .............................................................................................................................16
4.4. Fields ..........................................................................................................................................17
4.5. Views ..........................................................................................................................................17
4.6. Data Tables.................................................................................................................................18
4.7. Blocks .........................................................................................................................................19
5. Configure Rules ..................................................................................................................................20
5.1. Conditions ...................................................................................................................................21
5.2. Ordered Activities ........................................................................................................................22
5.3. Workflow Activities ......................................................................................................................23
5.4. Destinations ................................................................................................................................24
5.5. Rule Evaluations .........................................................................................................................24
5.6. Considerations for Creating a Rule .............................................................................................25
6. Configure Scripts ...............................................................................................................................26
6.1. Scope ..........................................................................................................................................26
6.2. Writing Scripts .............................................................................................................................27
6.3. Testing Scripts ............................................................................................................................30
7. Configure Workflows .........................................................................................................................31

Resilient Incident Response Platform Playbook Designer Guide
Page 4
7.1. Workflow Palette and Tools ........................................................................................................31
7.2. Designing a Workflow .................................................................................................................33
7.3. Creating a Workflow ....................................................................................................................36
7.4. Using Timer Events .....................................................................................................................37
7.5. Using Functions and Associated Scripts .....................................................................................38
Input .......................................................................................................................................38
Pre-Process Script .................................................................................................................39
Output ....................................................................................................................................39
Post-Process Script ................................................................................................................39
Add a Function to the Workflow .............................................................................................40
7.6. Using Conditions and Scripts ......................................................................................................42
7.7. Deleting a Workflow ....................................................................................................................44
8. Configure Functions ..........................................................................................................................45
8.1. Function Properties .....................................................................................................................45
8.2. Choosing Inputs ..........................................................................................................................46
8.3. Creating Input Fields ...................................................................................................................47
9. Configure Message Destinations ......................................................................................................48
10. Configure Phases & Tasks ................................................................................................................49
10.1. Phases ........................................................................................................................................49
10.2. Tasks ..........................................................................................................................................49
11. Configure Incident Types ..................................................................................................................51
12. Configure Breach Settings ................................................................................................................52
13. Configure Artifact Types ....................................................................................................................53
13.1. Create and Manage Artifact Types .............................................................................................53
13.2. Show Incident Relationships .......................................................................................................53
13.3. Test Custom Artifacts ..................................................................................................................54

Resilient Incident Response Platform Playbook Designer Guide
Page 5
1. Introduction Based on a knowledgebase of incident response best practices, industry standard frameworks, and regulatory requirements, the Resilient Incident Response Platform helps make incident response efficient and compliant.
The Resilient Incident Response Platform is, essentially, a central hub for incident responses. It is customizable so that it can be tailored to meet the needs of your company or organization. Therefore, how you interact with the Resilient platform depends on these customizations.
This guide focuses on the dynamic playbook aspect of the Resilient platform. The following sections provide the information for you to configure the Resilient Incident Response Platform so that it provides tailored responses for various incidents that threaten your environment.
For information about managing the Resilient platform, see the Resilient Incident Response Platform System Administrator Guide.
For information about managing and responding to incidents, see the Resilient Incident Response Platform User Guide.
1.1. Dynamic Playbook
A dynamic playbook, hereafter referred to as playbook, is the set of rules, conditions, business logic, workflows and tasks used to respond to an incident. The Resilient platform updates the response automatically as the incident progresses and is modified. Essentially, the playbook is the Resilient platform’s implementation of your incident response plan.
Although the term “playbook” is not shown in the user interface, you create playbooks by configuring rules, conditions and activities, phases and tasks, scripts, workflows, and more. Depending on your configuration of the Resilient platform, you can interact with other security programs in your environment using message destinations, functions, and remote action processing programs (also called action processors), all of which allow you to configure the Resilient platform as the single hub for incident response.
The primary focal point for dynamic playbooks is the Rules tab under Customization Settings. From the Rules tab, you define the conditions that trigger the rule and the activities that are executed when the conditions are met. Activities include setting incident field values, inserting tasks into the task list, launching workflows, running internal scripts to implement business logic and placing items on message destinations to be acted upon by remote action processors.
The coordinated application of all of these features make dynamic playbooks a powerful tool for accelerating the execution of methodical incident response processes and, ultimately, remediation of incidents.

Resilient Incident Response Platform Playbook Designer Guide
Page 6
1.2. Incidents and Objects
An incident is an event in which data or a system may possibly be compromised. The Resilient platform allows these incidents to be entered by Resilient users or systems integrated with the Resilient platform. You can then monitor the status from the start to the resolution of the incident.
An incident within the Resilient platform can contain the following objects:
Task. A unit of work to be accomplished by a user, device or process. The Resilient platform handles some tasks automatically. Other tasks can be assigned to users, which they accomplish manually and mark them as complete when done. Incident owners can track the progress of the various tasks.
Note. Text added to an incident or task for clarification or additional information.
Attachment. A file uploaded and attached to an incident or task.
Artifact. Data that supports or relates to the incident. The Resilient platform organizes artifacts by type, such as file name, MAC address, suspicious URL, MD5 and SHA1 file hashes, and more. An artifact can also have an attachment, such as an email, log file, or malware sample.
Milestone. A date for an important event within the incident timeline.
Data Table. Field values organized in a tabular format.
An incident is also considered an object, where the previously listed objects are considered child objects. A child object can also have a child object; for example, a task can have notes, and an artifact can have attachments. The parent-child relationship is important when creating rules, workflows and scripts.
1.3. Integration
You can integrate security systems with the Resilient platform. There are four basic use cases:
Escalation. Includes configuring email interfaces and specially constructed URLs that allow users to remotely create incidents in the Resilient platform.
Identification and enrichment. Includes custom threat services that allow you to provide artifact scanning from your own threat sources, or provide additional scanning beyond what the Resilient platform provides.
The Resilient platform also includes “built-in” threat services that you can enable or disable from the Threat Sources tab, as described in the Resilient Incident Response Platform System Administrator Guide.
Containment, Response and Recovery. Includes right-click integration, automatically initiating programmed actions based on events, and external scripts that utilize the Resilient API and your system’s RESTful API to take data from your system and initiate incidents within the Resilient platform.
Communication and Coordination. Includes use of custom actions, functions and the REST API to integrate bidirectionally with your system. This level of integration is the most advanced, customizable, and sophisticated option available.
The scripts, functions, and message destinations features are used in the more complex integration use cases. These features are enabled only when your Resilient platform is packaged with the Resilient Action Module.
For additional information about integrations, see the Resilient Developer web site or the Resilient Incident Response Platform Integration Developer’s Guide.

Resilient Incident Response Platform Playbook Designer Guide
Page 7
1.4. Logging In
You access the Resilient platform from a web browser. Your administrator provides you with the URL and login information.
Before you log in, make sure that you are using a supported web browser, which is the current release or one release back of each of the following browsers: Chrome, Firefox, Safari and Internet Explorer.
Once you log in, you see the Activity Dashboard page, which is the home page. You also see your username and Resilient organization name in the header at the right side. The following screenshot has username, Bob G, and organization, TestOrg. Click the down arrow next to these items to see the system menu. Click Customization Settings to access the playbook features.
The Customization Settings page includes several tabs that allow you to customize various aspects of your dynamic playbook, such as adding your own rules and fields, customizing the incident phases, and modifying the layout and content of the various incident pages.
At any time, you can access the documentation and Support information by selecting Help/Contact in the system menu. There is also a link to the documentation and Support on the Activity Dashboard page.

Resilient Incident Response Platform Playbook Designer Guide
Page 8
2. Planning Overview Before creating a playbook, you need to understand your organization’s policies for responding to events. You then translate those responses into a dynamic playbook.
Simply, a dynamic playbook uses rules to decide which tasks need to be done, where tasks are the actual items to be accomplished. Conceptually, rules perform the following:
Rules ask the questions and gather the answers. Based on those answers, specific tasks are brought into the playbook.
Rules use conditions to answer the questions.
Rules use Ordered Activities to identify the tasks to be done, when the tasks are fairly straightforward.
When additional information is needed to determine which tasks to perform, rules use workflows and scripts.
When the answers require additional questions, more rules can be invoked based on the result of a rule.
Creating a dynamic playbook involves a set of incident types, phases, tasks, fields, workflows, scripts and rules to respond to an incident through intelligence, automation, and orchestration. IBM Resilient recommends the following object creation approach when designing a dynamic playbook.
Before starting, familiarize yourself with the various tools and capabilities of the Resilient platform as described in Playbook Features. Afterwards, use the configuration procedures in this guide to create your playbook.

Resilient Incident Response Platform Playbook Designer Guide
Page 9
3. Playbook Toolkit Before creating a dynamic playbook, you should be familiar with the various tools that you can use. The following sections describe each major tool.
3.1. Incident Types
The incident type feature allows you to classify the various types of incidents your team will address. These incident types are used to drive the playbook. There are many methods for classifying incidents. The one you use will be dependent on:
The current threats your organization faces
What is required by policy
What is relative in the current threat landscape
The incident types that you define should be relevant and meaningful to the full lifecycle of the incident handling and response actions, specifically, pre, intra and post incident.
Organizations typically follow pre-defined methods and standards when dealing with incidents, whether it be an emphasis on tools and automation, reporting and metrics, or information sharing. The following set of industry standards can help define your incident program:
NIST Special Publication 800-61R2 (August 2012): Computer Security Incident Handling Guide
Verizon’s VERIS Framework: Vocabulary for Event Recording and Incident Sharing
Department of Defense CJCSM 6510.01B (18DEC14): Cyber Incident Handling Program
3.2. Phases
Phases logically and visually organize tasks within a dynamic playbook. Like incident types, the phases you need for your environment are largely dependent on your organization’s response approach and tracking methods.
Phases are used for two primary purposes:
Capture the general intent of the response action, gathering supporting information during assessment.
For leadership and management to be able to identify the current work state of the incident.
3.3. Tasks and Instructions
Tasks and their accompanying instructions are used as doctrine, policy, and/or as an advisory response procedure for an analyst. These tasks should be specific and repeatable to the incident or situation at hand.
Tasks also play a vital role as a system of record and as a method of training. Analysts new to your organization can quickly learn specific processes by following the dynamic playbooks presented within the Resilient platform.
You create and manage the pool of tasks in the Phases & Tasks tab under Customization Settings, where you also assign the task to a phase.
You can dynamically add these tasks to a specific incident through workflows and the configurations of rules, their conditions and activities. The conditions for adding tasks can be based on the field values of the following objects: incident, tasks, notes, milestones, artifacts, attachments and data tables.

Resilient Incident Response Platform Playbook Designer Guide
Page 10
3.4. Fields and Data Tables
You can use fields as data capture points for analysis review and to produce metrics. They specifically support incident response actions, reports, list incident views, and analytics dashboards. Fields should be distinct, specific, and purposeful.
You create and manage fields and data tables from the Layouts tab under Customization Settings where you can add them to the various incident tabs. You can also create them when creating or editing tasks.
Custom fields are available throughout the Resilient platform for assignment and for reporting purposes.
With data tables, you can capture and organize field values in a spreadsheet table format, using rows and columns each defined for their own respective field type. Note that data table values are not reflected in the List Incident views and analytics dashboards.
Data tables can also be used in integrations, where the information is escalated from another security program. In some integrations, users can access limited capabilities of that security program from the data table.
3.5. Scripts
You can use the Resilient scripts feature to implement business logic. They allow for additional functionality and flexibility outside of rules and are intended to handle complex conditions otherwise unsuitable or too intricate for simple rule conditions and activities.
You can write scripts to create and modify incident object types such as tasks, notes, milestones, and artifacts. Scripts inherit the attributes of the parent object.
You can provide scripts as follows:
Scripts tab contains scripts that can be used in rules.
Workflows allow scripts to be used with functions, as described in Functions and Process Scripts.
Workflows also allow simpler scripts to be used as conditions for inclusive and exclusive gateways.
To use this feature, you must be familiar with writing scripts using Python 2.7.
3.6. Functions and Process Scripts
A function is a workflow component that calls remote code, which is also considered part of the function. Functions simplify development of integrations by wrapping each activity into an individual workflow component. The Resilient platform sends data to the remote component that performs the activity then returns the results to the workflow. The results can be acted upon by scripts, rules, and workflow decision points to dynamically orchestrate the security incident response activities.
A function has one or more inputs and provides a result in JSON. In its simplest form, you add a function to a workflow and then manually enter the values for each of its input fields. When triggered by the workflow, the function sends the input values to the remote code via a post to a message destination and waits for a result. You use the result as a decision point in the workflow.
The function’s input can be manually provided by the workflow designer (constant values) or provided by a pre-process script (dynamic values).

Resilient Incident Response Platform Playbook Designer Guide
Page 11
A pre-process script is a read-only script that is used to dynamically set the value of one or more of the function’s input fields. You can use the script to retrieve the current value of a property then provide that value to the function. A pre-process script cannot perform such activities as changing incident values or adding artifacts.
You can use the function’s result in a post-process script, which is a script that performs an activity in response to the result provided by the function. The script can change incident values, add artifacts, add data table rows, and more.
You can also save the function’s result for use by functions later in the workflow path.
You can create and manage functions in the Functions tab. Integration developers can also create more complex functions remotely and upload them to the Functions tab.
3.7. Workflows
A workflow is a graphically designed set of activities that allows you to create a complex set of instructions. You can use workflows to implement sophisticated business processes that can be invoked by rules.
When designing rules and workflows, you should generally use workflows to define any conditional logic, sequencing and orchestration of human tasks and automated activities related to a dynamic playbook. Use rules for invoking workflows when appropriate and for implementing general business logic that cut across workflows, such as “whenever there is a data breach include the privacy team on the incident.”
Workflows can include the following items:
Gateways, which are used to make logical decisions
Other workflows
Scripts
Timers
User tasks
Functions
Message destinations
3.8. Rules
Rules define a set of activities that are triggered when conditions are met. An activity is an operation that the rule executes when the appropriate conditions are satisfied. Each condition is statement that includes a field, an equation and a value. The condition is met when the statement evaluates to true. Conditions can be combined using boolean “AND/OR” logic.
There are two types of rules:
Automatic. An automatic rule executes without user involvement when its conditions are satisfied.
Menu Item. A menu item rule displays in the Resilient platform as an action in the designated object’s Actions drop-down list and executes only when a user invokes it.
There are three types of activities:
Ordered. Ordered activities include setting incident field values, adding tasks into the task list, running internal scripts to implement business logic, and placing items on message destinations to be acted upon by integrations.
Workflow. Workflow activities launch business process workflows, graphically designed, that you can use to implement more sophisticated playbooks.
Message Destination. Message destinations allow you to post transaction data for use by external scripts and programs.

Resilient Incident Response Platform Playbook Designer Guide
Page 12
You can add conditions, order those conditions, add activities, provide the rule’s results to an external program, and more.
3.9. Layout
With the ability to add fields to tasks, users can spend more time performing actions and capturing information directly in the tasks and less time switching between the incident tabs. The values of a specific field is viewable anywhere within the Resilient platform that the field is placed. IBM Resilient recommends that, when possible, you should add relevant fields to each task for easier data capture AND the incident tab(s) layout to allow and ease of review and reporting.
3.10. Simulations
Simulations are hypothetical circumstances that can help your team to understand the impact of data loss situations and rehearse the response process. You can also use them to test your playbook to make sure it performs as expected.
The Simulations menu item is available directly from the menu bar. Click Simulations in the menu to view the two types of activities:
Scenarios: Full functionality incident creation, marked in the tool as a simulated situation rather than an actual occurrence.
Risk Assessments: Unrecorded, unlogged assessments based on limited situation parameters for data breaches involving PII.
To run a simulated scenario, click Start New Scenario and complete the incident entry wizard. To close an active simulated incident, click the Close Incident button within the appropriate incident. Simulated scenarios are distinguished within the system by a sim icon. The process of working with simulated items is identical to working with real incidents.
You can perform the same actions on simulations as you can on incidents, as described in the Resilient Incident Response Platform User Guide.
Simulated risk assessments allow you to test the implications of a data breach situation without keeping it in your organization’s record. The wizard collects basic information about a hypothetical data breach event, and ends with an assessment that includes a summary of the recommended steps to be taken as well as the estimated fine liability.
3.11. Workspaces
As described in the Resilient Incident Response Platform System Administrator Guide, workspaces are contained areas that can be used to group different incidents for ease of management. Users can be assigned to one or more workspaces.
If your organization is using workspaces, you should consider which workspace is appropriate for incidents when adding conditions to rules or layouts. For example, you can send incidents to specific workspaces or identify which workspace contains a specific incident.

Resilient Incident Response Platform Playbook Designer Guide
Page 13
4. Configure Incident Layouts The Layouts tab allows you to determine the type of information shown for each incident. Specifically, you can control the information and layout, hide tabs on the incident page, make tabs visible only when the incident meets one or more conditions, and create your own custom tabs. You can also customize the summary information shown in the left navigation pane of the incident page.
In addition, you can determine the type of information prompted by the new incident wizard, and the content of the dialog box that displays to the user when closing an incident.
4.1. New Incident Wizard
The New Incident Wizard is the set of steps that prompts a user for information when creating a new incident. You can rearrange and modify the steps, add custom fields, and create steps.
The New Incident Wizard page shows each step as a block and in order. In the example below, steps 1, 2, and 3 are Describe the Incident, Implications, and PII.
Use the up and down arrows in each step to reorder the steps.
Use the wrench icon to name the step and to set conditions. When you set a condition, the wizard displays that step only when the incident meets the condition. Using this feature, you can configure the wizard to show only some steps when certain conditions occur, such as particular field values being selected in previous steps. The wizard always displays the first step regardless of any conditions.

Resilient Incident Response Platform Playbook Designer Guide
Page 14
You can add fields, views, and blocks to each step in the wizard, as described later in this section.
Use the Add Step button to create a new step then drag the appropriate fields, views, and blocks from the right-hand column into the step. Afterwards, click the Wrench icon to name the step and set any conditions. When done, move the step to its correct position using the down arrow.
If you are using workspaces in your configuration, you might want to add the Workspace field to the new incident wizard so that the user can determine where to assign the incident.
When done, click Save to implement your changes.
4.2. Incident Tabs
Each incident page has a number of tabs. You can modify the standard tabs, add your own custom tabs, and hide default tabs. You can also set conditions that determine when to display a tab.
In addition, each incident page has a navigation pane on the left side of the page that provides additional information, which you can customize.
To view the list of tabs available for each incident page, click Incident Tabs then Manage Tabs. For example:

Resilient Incident Response Platform Playbook Designer Guide
Page 15
The following describes each component listed under Incident Tabs:
Manage Tabs
This area allows you to determine which tabs are available to users when viewing incidents. You can add tabs as well as reorder, rename, make conditional, and hide tabs.
The icon in each tab represents its visibility. In the following example, all tabs are visible except Stats, which is conditional, and News, which is hidden, and Affect, which is a user-created tab and is conditional.
To set a condition on a tab, click the tab and select the Conditional button then select Add Condition. You can then select a field and determine the condition that allows the tab to be shown. You can have multiple conditions, where all conditions must be satisfied before the tab is shown.
To add a custom tab, click Add Tab in the navigation pane on the left or the plus icon at the right then enter a name and select its visibility. You can then add fields, views, data tables, and/or blocks to the incident. These items are described later in this section.
To delete a custom tab, click the delete icon, which is next to the visibility icon. In the previous example, Affect is a custom tab. You can delete custom tabs only. You can rename or hide the default tabs, but not delete them.
To reorder the tabs, click and drag the tab or use the left and right arrows at the top of each tab.
NOTE: Data in tabs that are configured as not visible are not included in reports; however, data in tabs that may be hidden by a condition are always included in reports.
TIP: You can create a tab to gather data for reports but never have it visible to users. Create a condition that can never occur then make the tab visible only when that condition is true.

Resilient Incident Response Platform Playbook Designer Guide
Page 16
Summary Section
Each incident page has a summary section on the left side that contains useful information. This section displays on the incident page regardless of the tab selected.
You can customize the summary section by dragging the components from the column on the right into the areas on the left. To display groups of fields only under certain conditions, add a Section (under Blocks) to the layout and then drag the corresponding fields into the section. You can then configure the conditions necessary for that section to be displayed by clicking the Wrench icon in the top right corner of the section.
When adding multiple conditions, the section displays only when all of the individual conditions are met (conditions are AND’ed together). Within a single condition involving a multi-select field, the condition is met if any of the values selected in the condition are also selected in a specific incident (values are OR’ed).
To modify the order in which fields appear, drag and drop the various components to the desired order. You can modify or remove certain fields by using the “pencil” icon or the small “x” found near the field name. When finished, click Save.
You can add new fields, views, data tables, and blocks to the incident. These items are described later in this section.
To remove customization and return to the default view, click Restore Defaults at the bottom of the page.
Various tabs
Click a tab name in the left navigation pane to display its content and format.
You can customize the tab by dragging the components from the column on the right into the areas on the left. To display groups of fields only under certain conditions, add a Section (under Blocks) to the layout and then drag the corresponding fields into the section. You can then configure the conditions necessary for that section to display by clicking the wrench in the top right corner of the section.
When adding multiple conditions, the section displays only when all of the individual conditions are met (conditions are AND’ed together). Within a single condition involving a multi-select field, the condition is met if any of the values selected in the condition are also selected in a specific incident (values are OR’ed).
To modify the order in which fields appear, drag and drop the various components to the desired order. You can modify or remove certain fields by using the “pencil” icon or the small “x” found near the field name. When finished, click Save.
You can add new fields, views, data tables, and blocks to the incident. These items are described later in this section.
To remove customization and return to the default view, click Restore Defaults at the bottom of the page.
4.3. Close Incident
The Close Incident view determines if a dialog should be presented to the user when they close an incident.
This section allows you to control the layout and to prompt the users for additional fields, which are not strictly required on close. You configure this section in the same fashion as the other incident tabs.
Regardless of the Close Incident view, a dialog always displays when a user closes an incident when the incident has required fields that have not been filled.

Resilient Incident Response Platform Playbook Designer Guide
Page 17
4.4. Fields
The Fields section lists all the possible fields available for the wizard or incidents. Most fields are self-explanatory, but here is a description of a few fields:
Source of Data: You can specify a custom source of data loss, such as a specific name of a database or business application. This information becomes useful when analyzing trends.
Exposure Source/Vendor: You can specify a custom name for a vendor or other third party to your organization that may be involved in a data exposure.
Department: You can specify a custom internal department name within your organization that may be involved in a data exposure.
You can edit each field to customize it to your own needs. To use a field in your incident, drag it to the desired location in the Incident column.
In addition, you can create new data fields for tracking, reporting, and documentation purposes.
To create a custom field, click Add Field and enter the desired parameters.
When adding a field, you can determine if it is required as follows:
If not required, mark it as Optional.
Use Always to make it a required field when opening an incident. When a user creates a new incident, fields marked as Always show up with an asterisk in the user interface indicating it is required.
Use On Close to make it required when closing an incident. When a user closes an incident, the system prompts the user with a dialog displaying any fields that are marked On Close but have not yet been set.
When creating a field of the type Select, you can set a default value. When creating a field of the type Multiselect, you can set a default value; however, that is relevant only for the new incident wizard. When the field is used in other places, the default value is not shown.
4.5. Views
Views are pre-built modules that combine multiple fields and provide additional logic. Views are not editable. To use a view in your incident, drag the view to the desired location.

Resilient Incident Response Platform Playbook Designer Guide
Page 18
4.6. Data Tables
You can organize information in a tabular format, using rows and columns. Incident response users can then add information to this table.
To create a data table, click Add Table in the Data Tables section. When you choose to add a table, a wizard walks you through the following process:
Table Definition. You add a label, which is a descriptive name for the table. The API Access Name is, by default, the same as the label with underscores instead of spaces.
Layout Table. Determine the number of columns you need and enter a title for each column. If you add a column but do not enter a title, the column is not created. You can reorder the columns by dragging them as needed.
Configuring Column (N of X). There is a page for each column. Choosing Always as a Requirement requires the user to fill in this column whenever the user adds a row.
Preview & Confirm. Review the table. Optionally, you can resize the columns. The Reset Column Widths button resizes the columns so that they are approximately equal width. Use the Back button to make any changes or Save to save the table.
As an example, you can create a data table to list all users impacted by the incident. In this example, all the columns are of type text except for the column titled ‘Fixed’, which is of type boolean. The following screenshot is an example of a previewed table with sample data.

Resilient Incident Response Platform Playbook Designer Guide
Page 19
The following is an example of a table where a user edited an incident and added a row.
If your Resilient organization is integrated with a security package, the platform may allow the integration to create data tables and populate them with data from the program. You can determine where to place these data tables in your layout.
4.7. Blocks
Blocks are special components that you can use to further design your incident. To use these blocks, drag the block to the desired location column then edit it. There are three types:
HTML. Allows you to add custom HTML code.
Header. Allows you to add header text in the incident.
Section. Allows you to organize fields. Drag it to the Incident column and then drag the desired fields into the section. Optionally, you can edit the section to make it visible only upon a specific condition.

Resilient Incident Response Platform Playbook Designer Guide
Page 20
5. Configure Rules A rule is a set of conditional statements that, when satisfied, run pre-defined activities. An activity is the operation that the rule executes when the appropriate conditions are satisfied. A condition is a statement that includes a field, an equation and a value. The condition is met when the statement evaluates to true.
There are two types of rules, Automatic and Menu Item. An automatic rule executes without user involvement when its conditions are satisfied. A menu item rule displays as an action in the designated object’s Actions drop-down menu and executes only when a user invokes it.
There are three types of activities, ordered, workflow and message destination. Use ordered activities to set incident field values and add tasks into the task list. If your organization has the Action Module, you can run internal scripts as an ordered activity.
Workflow activities allows you to call predefined workflows. A workflow is a graphically designed set of activities that allows you to create a more complex set of instructions than ordered activities.
You can have a rule or workflow send information in a message to a message destination, which is the location where the message is stored and made accessible to external scripts and programs. You only specify a destination to provide information to such a script or program.
When a rule is invoked, it executes the ordered activities first, and in the order listed in the rule. Afterwards, it executes the workflows. Workflows are not order dependent and may take different lengths of time to complete depending on their complexity. Finally, it posts to any message destination specified.
The Rules tab allows you to view, edit, and create rules. The tab provides the following information:
Order. Automatic rules have numbers, which denotes the order in which the rules run when a condition invokes multiple rules. The ordering can be important especially when different rules affect the same fields, or changes made by one rule impact another rule. You can change the order by dragging the rules. Menu Item rules do not have numbers since they run only when a user invokes them.
Name. Click the name of a rule to view its details or edit the rule. When editing or creating a rule, you should enter a name that is descriptive of the rule’s purpose.
Process Type. The type of rule, Automatic or Menu Item.
Object Type. You assign a rule to one type of object, such as incident, note, milestone, task, attachment, artifact or data table.
Conditions. A condition is a statement that checks a field for a value using an operator, such as equal to. Conditions are used to determine when to invoke the rule. The Rules tab lists the conditions, if any, attached to the rule.
NOTE: A condition in red indicates an invalid condition. The reason could be that a selected object or field is disabled or hidden.
Resilient Incident Response Platform Playbook Designer Guide
Page 21
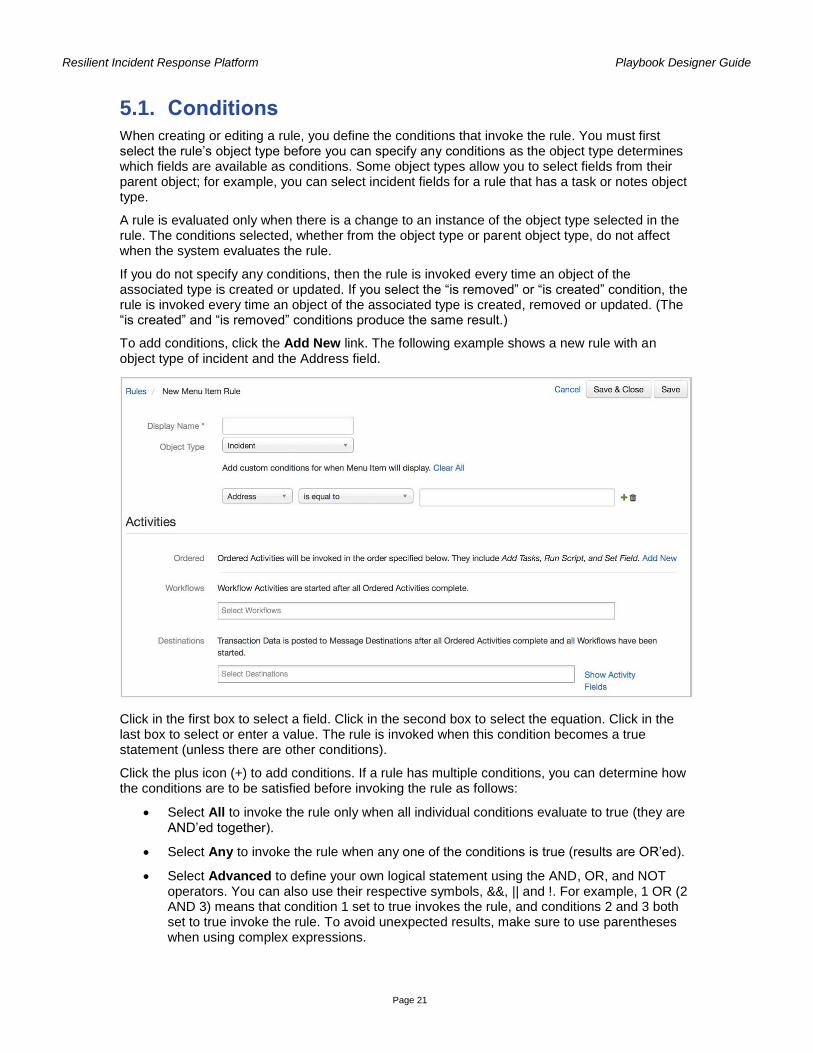
5.1. Conditions
When creating or editing a rule, you define the conditions that invoke the rule. You must first select the rule’s object type before you can specify any conditions as the object type determines which fields are available as conditions. Some object types allow you to select fields from their parent object; for example, you can select incident fields for a rule that has a task or notes object type.
A rule is evaluated only when there is a change to an instance of the object type selected in the rule. The conditions selected, whether from the object type or parent object type, do not affect when the system evaluates the rule.
If you do not specify any conditions, then the rule is invoked every time an object of the associated type is created or updated. If you select the “is removed” or “is created” condition, the rule is invoked every time an object of the associated type is created, removed or updated. (The “is created” and “is removed” conditions produce the same result.)
To add conditions, click the Add New link. The following example shows a new rule with an object type of incident and the Address field.
Click in the first box to select a field. Click in the second box to select the equation. Click in the last box to select or enter a value. The rule is invoked when this condition becomes a true statement (unless there are other conditions).
Click the plus icon (+) to add conditions. If a rule has multiple conditions, you can determine how the conditions are to be satisfied before invoking the rule as follows:
Select All to invoke the rule only when all individual conditions evaluate to true (they are AND’ed together).
Select Any to invoke the rule when any one of the conditions is true (results are OR’ed).
Select Advanced to define your own logical statement using the AND, OR, and NOT operators. You can also use their respective symbols, &&, || and !. For example, 1 OR (2 AND 3) means that condition 1 set to true invokes the rule, and conditions 2 and 3 both set to true invoke the rule. To avoid unexpected results, make sure to use parentheses when using complex expressions.

Resilient Incident Response Platform Playbook Designer Guide
Page 22
5.2. Ordered Activities
An ordered activity is invoked when the rule conditions are satisfied. You can view a rule’s ordered activities by editing the rule.
When creating a rule, click the Add New link under the Ordered Activities heading. This brings up a default Set Field activity. You can change the activity type by clicking the Set Field button and choosing the activity type from the drop-down menu. For example:
You can add an activity by clicking the plus (+) icon. You delete an activity by clicking the Delete icon.
There are three types of ordered activities:
Add Tasks. Select the tasks you wish to have the rule invoke. Select Add Tasks then click in the field to list the tasks, which are listed by incident phase and in order of priority. You can choose one or more tasks. Optionally, you can create a new task. See the procedure in Phases & Tasks for details.
NOTE: If editing a rule, any task shown in red denotes that the task has been deleted.
Run Script (requires the Action Module). Executes a script. Select Run Script then click in the field to list the scripts.
Set Field. You can select one of the object’s fields and set a value. Some object types allow you to specify fields from their parent object; for example, task rules can set incident fields. You can clear a field by setting it to no value.
When a rule has multiple activities, the rule executes each activity serially. You can determine the order.

Resilient Incident Response Platform Playbook Designer Guide
Page 23
5.3. Workflow Activities
A workflow included in a rule’s workflow activities is invoked when the rule conditions are satisfied and after running any and all ordered activities. You can view a rule’s workflow activities by editing the rule.
Workflows are not order dependent and, depending on their complexity, may not complete within the transaction that initiated it.
When you create or edit a rule, click in the Workflows field under the Activities heading. This brings up a list of available workflows. Select a workflow to add it to the rule. For example:
You can add more workflows by clicking in the field again. You delete a workflow by clicking the X icon.

Resilient Incident Response Platform Playbook Designer Guide
Page 24
5.4. Destinations
As described in Message Destinations, a rule can send information in a message to a message destination, which is the location where the message is stored and made accessible to external scripts and programs. You only specify a destination to provide information to such a script or program. You can select one or more message destinations.
For menu item rules only, you can also configure activity fields, which allow you to create a dialog box to collect information from the user, where this information is also sent to the message destination. The user sees the dialog box after selecting the action from the Actions menu. For example, you can require the user to select a ticket queue and specify a priority when generating an IT ticket from a task note.
To create a dialog box, click the Show Activity Fields link when creating or editing a menu item rule. You can drag and drop fields as well as insert headers and html markup on the layout panel to organize the dialog box. In addition, you can create new fields by clicking Add Field then configuring the following values:
Type of Field. Select the type of the field that best matches its purpose.
When creating a field of the type Select, you can set a default value. When creating a field of the type Multiselect, you can set a default value; however, that is relevant only for the new incident wizard. When the field is used in other places, the default value is not shown.
Label for the Field. Enter the display name for the field.
API Access Name. The platform automatically generates the API access name, based on the display name. NOTE: Integration developers use this name to interact with this field from the API.
Placeholder. If you enter a placeholder, this value is automatically displayed in the field to provide a hint to the user.
Requirement. Enter Always to make it a required field, where the user cannot execute the rule (as an action) without specifying a value for the field. Select On Close to make it required when closing an incident. Select Optional if the user is not required to enter or select a value.
Tooltip. Optionally enter descriptive text or a helpful hint. This displays an information icon next to the field. Your text displays when a user hovers over the icon.
5.5. Rule Evaluations
A rule is evaluated when there is a change to an instance of an object, which is of the type specified in the rule’s object type. When a rule is evaluated, its conditions are checked, and if satisfied, the rule is invoked.
Rules are re-evaluated and can be invoked again when a rule creates a new object or changes the state of an object. To guard against infinite loops, the Resilient platform limits the rule creation of new objects to 500 while processing rules.
TIP: If you see a message stating that the number of rule evaluations in a single session has been exceeded, make sure that the rule has not inadvertently created an infinite loop.
When an automatic rule creates a task, that task is an "auto-activated" task. This means that if the rule is re-evaluated and the rule condition is false, then its tasks are deactivated and hidden. This behavior is useful in many situations. For example, an automatic rule creates tasks in response to a malware event, which is later determined to not be malware; those tasks are subsequently deactivated.

Resilient Incident Response Platform Playbook Designer Guide
Page 25
This behavior can be confusing to a user when the conditions reference a state, such as ‘the incident is created.’ For example, an incident creation event invokes an automatic rule that creates one or more tasks. Should a user modify the incident, the rule is re-evaluated and as the incident has already been created, the rule evaluates to false. Therefore, any tasks created by the rule are deactivated.
5.6. Considerations for Creating a Rule
Consider the following before writing a rule:
Determine the object type and the purpose of the rule. The object type determines the context of the data that is provided to the rule.
Determine the ordered activities. If there are multiple activities, determine the order of those activities.
Consider designing workflows especially if you have repeatable processes that can be used in various situations. For example, you want to schedule a task (A) to be created after the completion of a specific task (B) and depending on the outcome yet another task (C).
Determine if the rule is to be invoked automatically or by a user from a menu item.
Determine the conditions, if any, which must be satisfied before invoking the rule. If there are multiple conditions, determine whether any one or all conditions must be satisfied.
Determine the order of the automatic rules. When invoking multiple rules, they are invoked in the assigned order.
If you wish to communicate information to other processes, make sure to choose one or more destinations. This feature requires the Action Module.
If you wish to run a script, make sure to choose the appropriate script. You create and manage scripts in the Scripts tab.
IMPORTANT: When developing and testing your rules, IBM Resilient recommends that you include a condition that prevents the activities from inadvertently being invoked against production incidents until you are sure they are ready. One simple way to do so would be to include an additional clause in the rule conditions such as "Simulation Equals True" or the equivalent. In this way, the rule would only invoke activities against simulations and not open incidents.

Resilient Incident Response Platform Playbook Designer Guide
Page 26
6. Configure Scripts You can write and edit scripts that allow you to customize incidents and retrieve information on incidents and other object types. You can then invoke a script from a rule.
You must be familiar with writing scripts using Python 2.7.
The Scripts tab allows you to view, edit, and create scripts. The tab provides the following information:
Name. Click on the name of a script to view its details or edit the script. When editing or creating a script, you should enter a name that is descriptive of the script’s purpose.
Description. Enter text to describe the script.
Object Type. You assign a script to one type of object, such as incident, note, milestone, task, attachment, artifact or data table. The object type determines the context of the data that is provided to the script.
Rules. A list of rules that call the script.
Trash can icon. Click to delete the script. If a script is referenced in a rule, you must remove it from the rule before you can delete it.
6.1. Scope
The scripts in the Scripts tab are not the same as action processors. Scripts can modify incident data, and add tasks, notes, milestones, artifacts, etc. Action processors can implement custom business logic and interact with external systems, as described in the Resilient Integration Developer’s Guide.
The scripting feature supports Python 2.7 only, and has the following language feature and security limitations in place to prevent unwanted actions:
You can import only the java.util.Date Java language class. You cannot import python libraries, including os, subprocess, sys, and threading.
Network access is not allowed in order to prevent unwanted or unauthorized access to the network.
Access to the underlying filesystem is not allowed to prevent unwanted or unauthorized access to the filesystem.

Resilient Incident Response Platform Playbook Designer Guide
Page 27
6.2. Writing Scripts
You can access the following Resilient objects when writing a script. These objects reflect the action object data and some contain helper methods. In the script context, all SELECT/MULTISELECT field values are referred to by names. TEXTAREA fields are referred to by the objects handle format.
To write a script, go to the Scripts tab and perform the following:
1. Click the New Script button.
2. Enter a descriptive name for the script.
3. Provide a description of the script’s purpose.
4. Select one of the following object types.
Incident
Task
Note
Milestone
Artifact
Attachment
Data Table, then select the specific table
5. Write the script utilizing the object type context provided to the script. The following table describes the object type contexts and the operations that can be utilized when those contexts are selected.
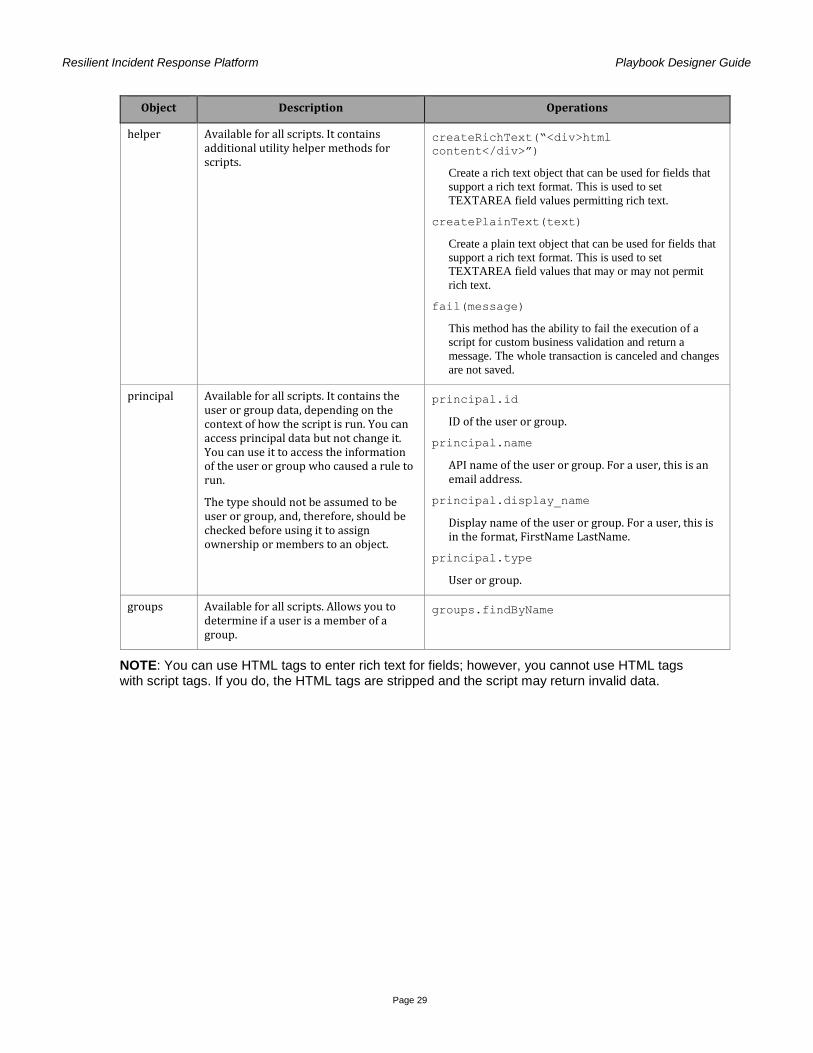
NOTE: Regardless of object type, you can access user and group information using principal and groups, as described in the table.
Object Description Operations
incident Available in every script. It contains the incident data and additional helper methods. The incident data contains only incident field data; it does not contain its notes, task, milestones, artifacts, or attachments.
addTask(name, phase_id, instr_text)
Add an adhoc task to the incident with the given name, phase, and instructions. Returns a Task script object for further customization.
addMilestone(title, description, date)
Add a milestone to the incident with the given title, description, and instructions. Returns a Milestone script object for further customization.
addArtifact(type, value, description)
Add an artifact to the incident with the given type, value, and description. Returns an Artifact script object for further customization.
addRow(name)
Add a row to the named Data Table on the incident. Returns a Row script object for further customization.
addNote(text)
Add a note to the incident with the given text. Returns a Note script object for further customization.

Resilient Incident Response Platform Playbook Designer Guide
Page 28
Object Description Operations
task Available for Task scripts and may be present for Note/Attachment scripts if the note/attachment is a task note/attachment. It contains the task data and additional helper methods. The task data contains only task field data; it does not contain its notes or attachments.
addNote(text)
Add a note to the task with the given text. Returns a Note script object for further customization.
getParentObject()
Return the Incident script object that owns this task.
note Available for Note scripts. It contains the note data and additional helper methods. The task object may be available for Note scripts that are invoked by a task note rule.
addNote(text)
Add a reply to the note with the given text. Returns a Note object for further customization.
getParentObject()
Return the Incident/Task script object that owns this
note.
milestone Available for Milestone scripts. It contains the milestone data and additional helper methods.
getParentObject()
Return the Incident script object that owns this
milestone.
artifact Available for Artifact scripts. It contains the artifact data and additional helper methods.
getParentObject()
Return the Incident script object that owns this artifact.
attachment Available for Attachment scripts. It contains the attachment data and additional helper methods. The task object may be available for Attachment scripts that are invoked by a task attachment rule. The attachment data contains only attachment fields and metadata; it does not contain the attachment content.
getParentObject()
Return the Incident/Task script object that owns this
attachment.
row Available for Data Table scripts. It contains the row data and additional helper methods.
getParentObject()
Return the Incident script object that owns this row.
log Available for all scripts. It contains the following helper methods for returning messages to display in the action status.
info(message)
Add an action status message at the INFO level.
warn(message)
Add an action status message at the WARN level.
error(message)
Add an action status message at the ERROR level.
debug(message)
Add a message at the DEBUG level. Only returned when
the script is being debugged. These messages are not
persisted as action status messages.
Resilient Incident Response Platform Playbook Designer Guide
Page 29
Object Description Operations
helper Available for all scripts. It contains additional utility helper methods for scripts.
createRichText(“<div>html
content</div>”)
Create a rich text object that can be used for fields that
support a rich text format. This is used to set
TEXTAREA field values permitting rich text.
createPlainText(text)
Create a plain text object that can be used for fields that
support a rich text format. This is used to set
TEXTAREA field values that may or may not permit
rich text.
fail(message)
This method has the ability to fail the execution of a
script for custom business validation and return a
message. The whole transaction is canceled and changes
are not saved.
principal Available for all scripts. It contains the user or group data, depending on the context of how the script is run. You can access principal data but not change it. You can use it to access the information of the user or group who caused a rule to run.
The type should not be assumed to be user or group, and, therefore, should be checked before using it to assign ownership or members to an object.
principal.id
ID of the user or group.
principal.name
API name of the user or group. For a user, this is an email address.
principal.display_name
Display name of the user or group. For a user, this is in the format, FirstName LastName.
principal.type
User or group.
groups Available for all scripts. Allows you to determine if a user is a member of a group.
groups.findByName
NOTE: You can use HTML tags to enter rich text for fields; however, you cannot use HTML tags with script tags. If you do, the HTML tags are stripped and the script may return invalid data.

Resilient Incident Response Platform Playbook Designer Guide
Page 30
6.3. Testing Scripts
Once you have written a script, you can test your script against an existing object. For example, if the script’s object type is Milestone, you run the script against a milestone within an incident.
IMPORTANT: To run a script, you must enter a valid incident ID. A script can and will cause changes to the data. When testing your script and you are not in a development environment, you should use a simulated incident ID to run your script against simulations and not open incidents.
To test your script:
1. Click the Run button.
2. Enter a valid incident ID. You can find the ID by going to the incident page and looking at the Summary section.
3. Select an object within the incident. Only those objects of the type assigned to the script are shown.
4. Click Finish.
The script runs and a console window displays with the results. It is slightly transparent so that underlying content can be visible.
If you want to view information at specific points in the script, make sure to include in the script the log info method described in the previous table. For example:
log.info("The value of x is {}”.format(x))
Log messages are the last set of information reported after each run. You can filter the log messages by changing the Log Level choice in the Console Window header area.
Because the system is designed to execute concise scripts, “stepping-through” the code is not available.
If you make changes and wish to rerun the script using the same incident and object, click Run Again. You do not need to save the script to run the script again.
NOTE: It is important to test your scripts fully to verify that the results are as expected. The Resilient platform cannot fully verify script logic.

Resilient Incident Response Platform Playbook Designer Guide
Page 31
7. Configure Workflows A workflow is a graphically designed set of activities that allows you to create a more complex set of instructions than Ordered Activities. Consider designing workflows for repeatable business processes.
The Workflow tab allows you to manage workflows, and provides the following information:
Name. Click on the name of a workflow to view its details or edit it.
Description. If provided, it is text that describes the workflow.
Object Type. Workflows can be assigned to a type of object, such as incident, note, milestone, task, attachment, artifact or data table.
. Deletes the workflow. If a workflow is referenced in a rule or another workflow, you must remove the reference before you can delete it.
7.1. Workflow Palette and Tools
You design workflows using a graphical editor. Before creating a workflow, you should be familiar with the palette and various workflow tools and features. The following table describes the workflow tools in the palette and when you click a component in the diagram.
Icon Description
Hand tool. Grabs and moves a component in the workflow.
Lasso tool. Selects multiple components, where you then use the hand tool to drag them.
Connector. Logically connects components within the workflow to each other. You can add conditions to the connector when it is the output of an exclusive or inclusive gateway.
Start Event. Denotes the start point for the workflow.
End Event. Denotes an end point. If you have multiple End Events, all active paths are traversed even when one path reaches the end point.
Timer Event. Used only for user tasks and message queues that expect an acknowledgement. If the task is not completed, or the message destination does not receive an acknowledgement in a specified time, the workflow proceeds to the designated step. A timer event can be interrupting or non-interrupting. You can repeat the occurrence of a non-interrupting timer event.
See Using Timer Events for more information.
Exclusive Gateway. Like an OR operator, only one path that results in a true condition is executed. You assign conditions to the output paths. Optionally, you can designate one output path as a Default Flow, which is used when none of the conditional paths are true. See Using Conditions and Scripts for more information about conditions for workflows.
Parallel Gateway. Like an AND operator, all paths are executed in parallel.
Inclusive Gateway. All true paths are executed. You assign conditions to the output paths. Optionally, you can designate one output path as a Default Flow, which is used when all the conditional paths are false. See Using Conditions and Scripts for more information about conditions for workflows.

Resilient Incident Response Platform Playbook Designer Guide
Page 32
Icon Description
User Task. Allows you to select an existing task to be inserted in the corresponding incident’s task list. This is comparable to adding a task from a rule. The workflow does not progress beyond this component until the task is completed, unless you use a Timer Event.
Child Workflow. Allows you to place an existing workflow within a workflow. This allows you to create smaller workflows that perform a repeatable business process that can be used within more complex workflows. A child workflow can have children workflows. When selecting a child workflow, only those compatible workflows are shown. For example, you cannot embed the same workflow in the workflow, and the object types of both workflows must be the same or compatible.
Script. Allows you to select an existing script to invoke. The workflow object type affects which scripts are available to the workflow.
Message Destination. Allows you to select an existing message destination to which a message will be posted to be consumed and processed by an action processor. This is comparable to posting to a message destination from a rule.
Function. Allows you to select an existing function. It also allows you to create pre-process and post-process scripts for that function. See Adding Functions and Associated Scripts for more information.
Text Annotation. Available when you click a component in the diagram, it allows you to annotate components with a name or description for clarification.
Change. Available when you click a component in the diagram, it allows you to select a different task or message destination.
Remove. Available when you click a component in the diagram, it deletes the component.
Change Type. Available when you click a component in the diagram, it changes the component type. If you click on a gateway, use Change Type to select a different gateway type. If a connector, you can change it to a Default Flow or Sequence Flow.
Change conditions. Available when you click a component in the diagram, it allows you to add or select a different condition for the flow. You can also access the conditions by double clicking the yellow dot on the connector.
Default Flow. Available when you click a component in the diagram, this single slanted line indicates that the connector is designated as the Default Flow. A Default Flow connector cannot have a condition. Connectors that are not designated as Default Flow are considered Sequence Flow.

Resilient Incident Response Platform Playbook Designer Guide
Page 33
7.2. Designing a Workflow
A workflow can represent a repeatable business process. You need to define the process, the tasks and message destinations involved, the relationship between them, and the conditions that are required to execute each task. Once you have designed the process, define it in terms of the workflow tools, namely the gateways, specific conditions, default flows, tasks and message destinations as described in Workflow Palette and Tools.
Before starting, review the following recommendations and considerations for building workflows:
When using a gateway, you should generally conclude the operation by pulling the paths together with the same gateway, as shown in the examples. This also allows the different paths between the gateways to complete before continuing the workflow.
Limit workflows to approximately 15 components. Incidents can change dynamically and a large or complicated workflow might take too long and miss the changes.
Create small workflows for simple, repeatable processes and then use these workflows as child workflows to simplify more complex workflows. This helps to limit the relative size of the workflow; however, you might want to limit the depth of nested workflows to prevent possible memory or performance issues.
When feasible, limit the use of Message Destinations that are configured to wait for an acknowledgement. The workflow stops when it reaches the message destination and waits until the message destination receives its acknowledgement before continuing. Optionally, you can add a Timer Event to proceed to a different part of the workflow if the acknowledgement is not received in a specific length of time.
The workflow also stops when it reaches a manual task and waits until a user marks the task as complete before continuing. Again, you can add a Timer Event to proceed to a different part of the workflow, such as an alternate task, if the manual task is not completed in a specific length of time.
Review your timers, especially when using repeating non-interrupting timers, to avoid having many workflow instances blocked on the closing of a task. For example, you may not want a timer to repeat every 15 minutes for a long period of time if a task is never closed; instead, set the repeating timer to a limited number of occurrences.
Use functions in workflows to perform data-gathering activities remotely and send the result back to the workflow.
Be sure to annotate your components and connections so that the workflow is self-documenting.

Resilient Incident Response Platform Playbook Designer Guide
Page 34
Here are a few simple examples of workflows.
The following example has two paths that execute together. There are 4 tasks (A, B, C, and D) and two parallel gateways. When a rule invokes this workflow, task A is added to the corresponding incident. Afterwards, both the B and C tasks are added to the incident. The second parallel gateway is used to complete the circuit, which is a recommended practice. Once both of the B and C tasks are completed, task D is added to the incident.
The following is an “exclusive gateway” example, where you can take one path only. There are a total of 5 tasks (A-E) and two exclusive gateways. When a rule invokes this workflow, task A is added to the corresponding incident. In this example, it determines the city where the incident occurred. Depending on the output of Task A, Task B, C, or D is added to the incident. Note that the gateway has a Default Flow connector to Task D so that if the city is not Boston or Cambridge, the workflow defaults to Task D.
The second exclusive gateway is used to complete the circuit, which is a recommended practice. Once B, C or D is completed, task E is added to the incident.

Resilient Incident Response Platform Playbook Designer Guide
Page 35
This is an “inclusive gateway” example, where you can take many paths, but only the ones that are true. After Task A is completed and the state is equal to Vermont (which is in the New England region) then both B and D are added to the incident. Once both tasks are completed, Task E is added. Note that the Region is New England connector is the default flow in case the location from Task A is not New Hampshire or Vermont.
Each of the examples with an inclusive or exclusive gateway designate a Default Flow path, which is a path that is valid when none of the conditions assigned to the gateway’s outputs are met (that is, none of the statements are true). A Default Flow path cannot have a condition.

Resilient Incident Response Platform Playbook Designer Guide
Page 36
7.3. Creating a Workflow
The following procedure describes the mechanics of creating a workflow. You should be familiar with the workflow palette and tools before starting.
IMPORTANT: A workflow can and will cause changes to incidents. You should thoroughly test your workflows in a development environment before using them on open incidents.
1. In the Workflows tab, click the New Workflow button.
2. Enter a name for the workflow. This name should be unique and indicative of its purpose. The API Name is generated automatically. It is used by programmers to integrate with the Resilient platform and, therefore, you should use the default name unless directed otherwise.
3. Optionally, enter a description of the workflow. This is useful in helping other administrators to understand the purpose of the workflow.
4. Assign the workflow to one type of object, such as incident, note, milestone, task, attachment, artifact, or data table. Not all workflow types are available for all object types.
5. Click in the diagram and use the Start Event already present or click the Start Event icon.
TIP: Use the expand icon ( ) to use the whole page for ease-of use in creating your workflow. Click the icon again to restore the Resilient workflow page when you are done.
If you do not see the tools in the diagram, use your mouse wheel to zoom in on the diagram.
6. Use the palette or icons in the diagram to add the components you need.
For information about adding functions to the workflow, see the Adding Functions section.
7. Use the connector tool to connect the components as appropriate. Connectors are directional so you must click on the output of one item first then connect it to the input of the next component.
8. If you have inclusive or exclusive gateways, be sure to set the conditions of the output paths as described in Using Conditions and Scripts.
9. Conclude the workflow by adding the End Event component.
10. Optionally but recommended, double click the yellow dot on each connector to open the text box and provide a short description of what is expected when this path is used. You can click on the text box afterwards and drag it to another position.
11. Click Save. The platform checks your workflow for any configuration errors.
If you see an invalid workflow message, review your diagram for problems.

Resilient Incident Response Platform Playbook Designer Guide
Page 37
7.4. Using Timer Events
Timer events are used only for user tasks, functions and message destinations that expect an acknowledgement. If the task is not completed, or the message destination does not receive an acknowledgement in a specified time, the workflow proceeds to the designated step. One example of using a timer is to perform a different task when the initial user task is not performed within 24 hours.
There are two types of timer events, interrupting and non-interrupting.
An interrupting timer event invalidates all outgoing paths from the user task or message destination when the timer fires. For example, use an interrupting timer event to escalate the incident to another team when a task is not completed in a specified time, and then perform a different set of steps.
A non-interrupting timer event does not invalidate the outgoing paths. For example, use a non-interrupting timer event to send an email when a task is not completed in a specified time, but you do want the workflow to continue to the next step when the task is completed.
Optionally, you can repeat the occurrence of a non-interrupting timer. For example, you could configure a non-interrupting timer to send an email once an hour for eight occurrences, which would be an eight hour period or until the task is marked complete. You can also set it to repeat forever or until the task is completed.
Here are a few considerations that you should know when using timer events:
Using too many timers in a given time frame, such as 120 timers per minute, can impact performance.
Having timers access too many tasks, such as 1,000 tasks, can also impact performance.
If the Resilient platform goes offline, a non-interrupting timer that repeats may skip some of the occurrences. For example, a timer set to repeat once every 15 minutes for four occurrences (for a total of 1 hour) may only execute once if the platform goes offline then comes back within 45 minutes.
Due to the nature or workflows, repeating timers may not execute exactly on the minute that the timer is set to repeat. For example, a timer set to repeat every hour may actually execute after 61 minutes one time or 63 minutes the next time.
NOTE: Refer to the Resilient Incident Response Platform Sizing Guidelines for best performance practices.
Perform the following to use a timer event in your workflow.
1. Drag the Timer Event icon and attach it to the desired User Task or Message Destination icon.
All timer events are non-interrupting by default when you drag them into the workflow.
2. If you wish the timer event to be an interrupting timer, click the timer event then click its wrench icon and select the Timer (interrupting) pop-up.
NOTE: You can switch it back to non-interrupting by clicking the timer event’s wrench icon again.
3. Click the timer event again and click its pencil icon to edit it.
4. Enter the name of the time event and the elapsed time, which is the time you wish to wait before it executes.

Resilient Incident Response Platform Playbook Designer Guide
Page 38
5. If this is a non-interrupting timer, you can also set the number of occurrences that you wish to have the timer repeat.
6. Click Save when done.
7.5. Using Functions and Associated Scripts
As described in Functions and Process Scripts, is a workflow component that calls remote code through the use of message destinations. The purpose of a function is to invoke remote code, which performs an activity then returns the results to the function.
Optionally, you can use a pre-process script to dynamically set the input values, and a post-process script to perform an activity based on the function’s result.
If a function encounters an error and cannot complete, it terminates the workflow.
Input
Each function can have one or more input parameters. Depending on the type of parameter, you can enter or select a value. However, any value you select or enter becomes a constant value, which means that this value remains the same every time this function is called by any instance of this workflow. If you wish the values to be dynamic, leave the input fields blank and have the pre-process script provide the values.
If the function has multiple inputs, you can have a mix of constant and dynamic values.
The types of input are described in Configure Functions.

Resilient Incident Response Platform Playbook Designer Guide
Page 39
Pre-Process Script
A pre-process script can only read incident values. It cannot perform activities such as changing incident values and adding artifacts. You use a pre-process script to dynamically retrieve a value then set a function’s input to that value.
Use standard Python language to retrieve values. The scope and restrictions that apply to the Resilient scripting feature, as described in Configure Scripts, applies here too.
To provide a value to the function, use the inputs.<field_name> keyword, where field_name is the function field’s API name. If you do not know the field name, type the inputs. keyword and the type-ahead displays the field names.
The pre-process scripts ignores any attempt to set the value of anything other than input fields, and it does not issue an error message. It also ignores any attempt to create objects; for example, incident.createTask().
The following simple example of a pre-process script retrieves the ID of the incident and places it into a function field called incidentID.
incident.id
inputs.incidentID = incident.id
Output
You can save the output of a function for use in the pre- or post-process scripts for functions further in the workflow. You do not need to save the output to use the result in the post-process script in the same function.
The output from a function can only be used in its workflow; it cannot be used in the workflow’s child or parent workflow.
You should not save the output if you do not intend to use it at all, which allows the platform to conserve storage space in the workflow.
Post-Process Script
The post-process script can change incident values, add artifacts, add data table rows, and perform the activities that a script in the Scripts tab can perform, with the exception of logs. In addition, the post-process script has the following unique keywords:
results: Obtains the results from its function.
workflow.properties.<output_name>: Obtains the results from a different function that was invoked previously in the workflow. The output_name is the name of the saved output.
The script ignores any attempt to set the value of anything other than object fields, such as incident, task, etc. For example, the script ignores inputs.field = 'x'. Like the pre-process script, the script does not issue an error message when it ignores a line.
TIP: If there is an existing script or code that you would like to use in a pre- or post-process script, you can copy and paste from any script editor including the scripts in the Scripts tab.

Resilient Incident Response Platform Playbook Designer Guide
Page 40
Add a Function to the Workflow
To add a function, perform the following:
1. Drag the function component to the desired place in your workflow. When you release the mouse, a list of functions appear.
2. Select the desired function. The Functions screen appears with the Input tab selected.
3. If you are not using a pre-process script to provide values, select the values for each field in the function.
How you enter the values depends on the type of field. You may have to enter text, date, or number, or select a value from the drop-down.
One type of field allows you to select text by clicking the … button, where each selection represents a large amount of text, or you can enter your own text. The following is an example of such a field:

Resilient Incident Response Platform Playbook Designer Guide
Page 41
4. If you wish to use a pre-process script, click the Pre-Process Script tab and write a script that provides the values for one or more of the input fields. For example:
5. If you wish to save the output of the function for use by pre- or post-process scripts in functions further in the same workflow, click the Output tab and give the output a name.
NOTE: You can access the function’s output only in this workflow. You cannot access the output in any child or parent workflow.
6. If you wish to use a post-process script, click the Post-Process Script tab and write a script that performs an operation based on the results of the function. For example:
7. Click the x in the right corner when done.
8. Connect the function to the other workflow components as appropriate.

Resilient Incident Response Platform Playbook Designer Guide
Page 42
7.6. Using Conditions and Scripts
When using exclusive and inclusive gateways, you define the conditions for the output paths. An output path is valid only when its condition is True. As with rules, a condition is a statement that checks a field for a value using an operator, such as equal to.
Alternatively, you can designate an output path as the default flow, which means this path is used when none of the other output path conditions are True. When a gateway has multiple output paths, you should designate one path; otherwise, it is possible to start a workflow but never conclude it if the conditions are never satisfied. This, in turn, can cause errors in the workflow and inconclusive results in the incident.
Defining a condition for an output path is the same as defining conditions for rules. You select a field, an operator then a value.
The workflow condition builder has an additional selection, not available for rules, called Script Conditions. This includes two components:
Expression. A single expression that must evaluate to True or False. The expression can use a property value from the incident, task or workflow.
Advanced Scripting Option. Allows you to enter a script that computes a value which is then consumed by the expression. This script is similar to the script feature in that it can read and set values. This component is optional.
The following example shows a condition that requires the use of the advanced scripting field.
Expression field:
res or incident.country == "Russia"
Advanced Scripting field:
from java.util import Date
now = Date()
if (incident.created_date < (now.time - (3*60*60*24*1000))) or
incident.confirmed :
res = False
elif incident.owner_id == 7 :
res = True
else :
res = False
To avoid performance issues, you should keep your script as short as possible.
If you choose to have multiple conditions for your output path, determine how the conditions are to be satisfied as follows:
Select All to make the path True only when all individual conditions evaluate to true (they are AND’ed together).
Select Any to make the path True when any one of the conditions is true (results are OR’ed).
Select Advanced to define your own logical statement using the AND, OR, and NOT operators. You can also use their respective symbols, &&, || and !. For example, 1 OR (2 AND 3) means that condition 1 set to true makes the path True, and conditions 2 and 3 both set to true makes the path True. To avoid unexpected results, make sure to use parentheses when using complex expressions.

Resilient Incident Response Platform Playbook Designer Guide
Page 43
To add a condition:
1. Click the output connector of an inclusive or exclusive gateway as shown below.
2. Click the pencil icon to open the Condition Builder dialog box; for example:
3. In the Condition Builder, enter a name for your condition. The name should be descriptive of the result that makes this path True.
4. Click Add new to enter one or more conditions.
5. Enter the conditions as described previously then click Save when done.

Resilient Incident Response Platform Playbook Designer Guide
Page 44
6. If adding a default flow, click the output connector of an inclusive or exclusive gateway then click the wrench icon.
7. Click Default Flow to designate the connector as the default flow.
8. Click Save or Save & Close when done with the workflow.
7.7. Deleting a Workflow
Use the delete icon ( ) to delete the workflow. If a workflow is referenced in a rule or another workflow, you must remove the reference before you can delete it.
Deleting a reference to a workflow in a parent workflow does not remove that reference in any running instances of the parent workflow. In this case, you can wait until those instances complete before you delete the workflow or you must terminate those running instances.

Resilient Incident Response Platform Playbook Designer Guide
Page 45
8. Configure Functions The purpose of a function is to invoke remote code, which performs an activity and then returns the results to the function.
The Functions tab lists the functions available for use with workflows. Developers who integrate the Resilient platform with other security programs can create functions remotely and deploy them to the platform, which makes them available in this tab. You can edit and delete functions as necessary, as well as create functions.
To view or edit a function, click on the function name. To delete a function, click the delete icon in the same row as the function name. To add a new function, click the New Function button.
8.1. Function Properties
Each function has the following properties:
Name: Name of the function. When adding or editing, use a unique name that describes the purpose of the function.
API Name: Generated by the system and based on the Name field. Integration developers use this name when creating external scripts that call this function. As the function is implemented by external scripts, it is recommended that you make the API name unique.
Message destination: Used to transport the function call. The message destination is required and must be configured to be type queue and expect an acknowledgement. If a function does not receive an acknowledgement, it continues to wait and can prevent the workflow from completing.
Description: Text that describes the function.
Inputs: One or more fields whose values are inputs for the function. The values can be statically given by the workflow designer or dynamically specified in a pre-process script.
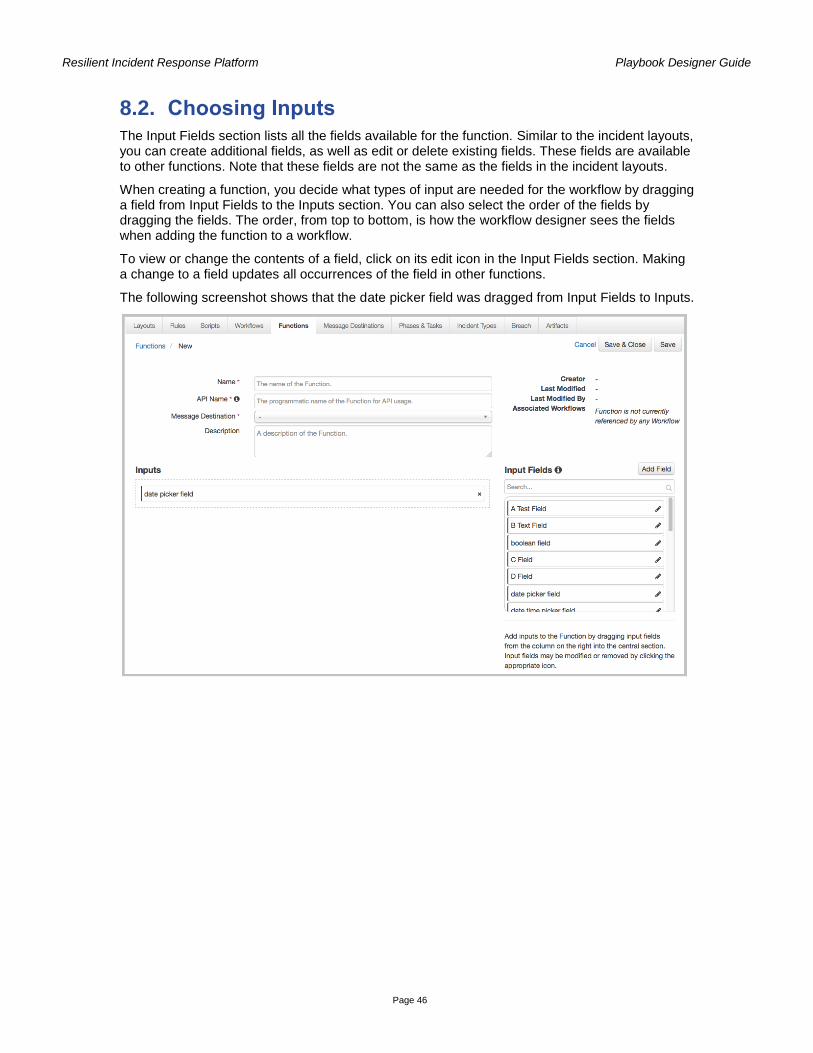
Resilient Incident Response Platform Playbook Designer Guide
Page 46
8.2. Choosing Inputs
The Input Fields section lists all the fields available for the function. Similar to the incident layouts, you can create additional fields, as well as edit or delete existing fields. These fields are available to other functions. Note that these fields are not the same as the fields in the incident layouts.
When creating a function, you decide what types of input are needed for the workflow by dragging a field from Input Fields to the Inputs section. You can also select the order of the fields by dragging the fields. The order, from top to bottom, is how the workflow designer sees the fields when adding the function to a workflow.
To view or change the contents of a field, click on its edit icon in the Input Fields section. Making a change to a field updates all occurrences of the field in other functions.
The following screenshot shows that the date picker field was dragged from Input Fields to Inputs.

Resilient Incident Response Platform Playbook Designer Guide
Page 47
8.3. Creating Input Fields
If none of the existing fields meets your requirements, click Add Field to create a new field. Enter the parameters as follows:
Type of field. Determines what type of values a workflow designer or pre-process script can provide to this field.
o Date Picker. Value must be a date.
o Date Time Picker. Value must be date and time.
o Text. Value must be text.
o Number. Value must be a number.
o Text with value string. Value must be text which a workflow designer or pre-process script can enter or select.
In the Templates section of the Create Input Field dialog box, you can predefine lengthy text and provide a label for it for ease of use. For example, you can enter Policy 1 in the Display Value column to represent a lengthy paragraph describing the policy which you enter in the Data Value column. When a workflow designer or pre-process script selects this field and chooses Policy 1, the policy text populates the input field.
To enter a text value with string, click Add Row, enter a label in the Display Value column then enter the full text in the Data Value column. You can add rows for more text options. Click the green checkmark when done.
TIP: You can use this field to have a text string represent commonly used settings, such as an LDAP account settings or an SQL query.
o Select. You provide a list of values, where the workflow designer or pre-process script selects one value. Click Add/Edit Values to enter the values then click the green checkmark when done. In Blank Option, determine whether users can choose to not have a value (leave it blank).
o Boolean. Values can only be Yes, No, or Unknown, which the workflow designer or pre-process script selects.
o Multiselect. You provide a list of values, where the workflow designer or pre-process script selects one or more values. Click Add/Edit Values to enter the values then click the green checkmark when done.
API Access Name. Enter a name for the field so that integration developers can access this this field from the API. Use underscores instead of spaces.
Tooltip. Optionally enter descriptive text or a helpful hint. This displays an information icon next to the field. Your text displays when a user hovers over the icon.
Requirement. Enter Always to make it a required field, where the workflow designer cannot execute the function without specifying a value for the field or having the pre-process script provide the value. Select Optional if the workflow designer is not required to enter or select a value.
Placeholder. If you enter a placeholder, this value is automatically displayed in the field to provide a hint to the workflow designer.

Resilient Incident Response Platform Playbook Designer Guide
Page 48
9. Configure Message Destinations The Message Destinations tab allows you to view, edit, add and delete message destinations. To add a new destination, click the Add Message Destination button. To view, edit or delete a destination, click on the destination name in the table.
Each destination has the following properties:
Type: The type determines what happens when a rule sends a message to the destination. You can choose the type only when creating a message destination. You cannot change the type for an existing destination.
o Queue: One subscriber receives this message. If there are multiple subscribers to the queue, only the first subscriber to request it receives the message. When there is no subscriber, the message stays on the message destination. An advantage of the Queue type is it ensures that messages are not dropped because services are down
o Topic: All active subscribers receive this message. If there are multiple subscribers, all of the subscribers retrieve a copy of the message. When there is no subscriber, the message is discarded.
Name: Name of the destination. When adding or editing, use a name that describes the purpose of the message destination.
Programmatic Name: Generated by the system and based on the Name field. Integration developers use this programmatic name when creating external scripts that connect to the destination. It is displayed for informational purposes.
Expect Acknowledgement: When set to Yes, the destination expects the script to return an acknowledgement when it has completed processing the message. Set the field to No if you do not require an acknowledgement or you expect the scripts to silently process messages without returning any indication of progress or status.
If expecting an acknowledgement, the Action Status for the action is listed as Pending until the acknowledgement is received. If an acknowledgement is not received within a day, the status for the action changes to Timed Out.
Users: External scripts that connect to a message destination must authenticate using a Resilient account. Specify one or more accounts authorized to connect to this message destination. You should create specific Resilient accounts for this purpose.

Resilient Incident Response Platform Playbook Designer Guide
Page 49
10. Configure Phases & Tasks The Resilient platform defines distinct stages, called phases, for all incidents, which is useful for tracking progress. Each phase contains a number of tasks to perform before going to the next phase. The Phases & Tasks tab allows you to define and order the phases, as well as the tasks in each phase.
10.1. Phases
The phases are listed in the order of execution. The tasks within a phase are also listed in the order of execution. You can manage phases in the Phases & Tasks tab as follows:
To create a new phase, click the Create Phase button, specify a name, and save your changes.
You can edit the name of the phase by clicking the “pencil” icon next to the phase.
To delete phase, first remove its tasks then click the “x” icon.
NOTE: If you create a phase with the same name as a deleted phase, the deleted phase is reinstated.
You can reorder phases by clicking and dragging the icon next to the phase. You cannot move the first phase.
You can also reorder tasks within a phase by dragging them. You cannot drag a task from one phase to another.
Use the filters, such as Rules, Phase, and Name, at the top of the list of phases to show different views. Use the More button to select additional filters. You can deactivate a filter by clicking the x icon. Hint: To better visualize your playbook, select a rule in the Rules filter to show the tasks that are associated with the rule.
To save your changes to the reordered tasks or phases, click the Save Order button.
10.2. Tasks
Check the following when creating or editing a task:
Tasks are ordered when assigned to a phase. When you assign a task to a phase, make sure that the tasks are in the order that you require.
Make sure that the task is enabled.
If there is a SLA (Service Level Agreement) associated to that specific task, you can set the due date from the time the task is created on the incident.
You can provide instructions to users from within a task. Be as detailed as possible, using rich text, references to internal and external resources, hyperlinks and embedded images when applicable.
You have the option of creating custom fields and data tables within the task creation. You can place these fields and data tables onto a task for ease of entry and information reference.
You can reference tasks when creating workflows, which cause the tasks to be added to the associated incident’s task list when that workflow is executed on the incident.
You can add a task to one or more rules, which will cause the tasks to be added to the associated incident’s task list when that rule is executed. You can also add and create new tasks when creating or editing a rule.

Resilient Incident Response Platform Playbook Designer Guide
Page 50
You can click the pencil icon in a task row to edit a task or click Create Task to create a new task. In either case, you can manage the following properties:
Task Name. Any text you choose. It should be descriptive of the task’s purpose.
Phase. Select the phase where the task is to appear.
Rules Using this Task. Lists the rules that invoke this task. It is the same set of rules that appears for the task in the Associated Rules column of the Phases & Tasks tab. If you wish to add the task to additional rules, click in the field to list the available rules and then select the desired rules. This action is the equivalent of using the Add Tasks activity field when creating or editing a rule. To remove the task from a rule, click the x icon by the rule name.
Required. Select Mandatory if the task must be performed before the incident can enter the next phase; otherwise, select Optional.
Enabled. If Disabled, the task does not appear in all future incidents.
Due Date. To impose a deadline, select Yes then enter the time as a number of days, hours or minutes that the user has to perform the task.
Instructions. Provide instructions to help users perform the task. You can insert links and images. The instructions appear when a user hovers over the task name in the Tasks tab of an incident.
Incident Fields. You can add fields and data tables for users to enter information. Drag the fields and data tables to the layout section. This function is the same as described in Fields and Data Tables.
To delete a task, click the pencil icon in a task row then click Delete.
When you edit a task, the changes apply only to future instances of the task; it does not apply to existing incidents.
Resilient Incident Response Platform Playbook Designer Guide
Page 51
11. Configure Incident Types The Resilient platform organizes incidents by types. Rules are assigned to incident types so only those rules applicable to the incident are available.
Click Add Type to create custom incident types. You can also customize the details of an existing incident type. When creating/editing incident types, you can create incident type hierarchies.
For example, your organization executes general activities for any lost laptop. If the laptop belongs to Sales, your organization executes additional activities. If the laptop belongs to HR, it executes additional but different activities due to the nature of the data that is on the device.
To provide this distinction, click Add Type and assign a name such as “Lost HR Laptop”, and select “Lost Laptop/PC” as the parent. These incident types can be used to control the inclusion of rules in playbooks. By building up hierarchies of incident types and associating them with rules, you can create very precise playbooks to meet your specific needs.
If you choose to make the incident type hidden, it is not available for selection when entering a new incident. Only the more detailed option appears in the drop-down menu. This prevents users from choosing the broader category and forces them to choose the more detailed option.

Resilient Incident Response Platform Playbook Designer Guide
Page 52
12. Configure Breach Settings The Breach tab contains the privacy breach-related configuration settings and customizable features for your organization. It is essential that the configuration settings be completed so that the Resilient platform is an effective tool to help your organization respond properly to a data breach.
NOTE: If your organization subscribes only to the Security Module, you can still configure breach settings but breach-related tasks are not generated within a playbook.
The tab organizes the privacy breach-related configuration settings into the following three categories.
Regulators: Specify which regulators govern your organization. By selecting the appropriate regulators, the system can generate the appropriate regulatory required tasks in the case of a data breach. In addition, this is where you select the best practices to be applied when generating playbooks.
Click the Edit button to enable changes, and then select one or more industries that apply to your organization. Depending on the industry selected, the system highlights regulators that are typically involved in regulating your industry, in addition to potentially influencing liability estimates and recommended tasks. Check off the regulators you wish to enable; you are not required to adhere to highlighted options. Once you have made your selections from each list, click Save.
Regarding EMEA, AsiaPac, and Latin America: Only those countries in which the corporate establishment or data processing is material to a particular incident should be selected. This may also be done at the time the incident is being created. Refer to each country’s tool tip for additional detail.
Incident owners have the option to adjust which regulators apply to a particular incident during incident creation. Doing so does not change the default regulators selected here.
You can also select Data Breach Best Practices on the Regulators page if desired. These are suggested non-regulatory activities for responding to breaches of PII.
If your organization is an Experian customer, click the Experian checkbox under Resilient Partners to generate Experian-related tasks in appropriate playbooks.
Data Types: Choose the data types that the company generally captures and/or stores. All fields are available during the recording of an incident but the fields selected here are highlighted. Click the Edit button to enable changes and then click Save when you have made the desired selections.
Jurisdictions: Select all jurisdictions for which your organization has records. For example, you should select California even if your organization does not have an office in California, but stores information related to residents of that state. The selected states appear in a list for each incident, and the user selects the states for which information was lost during the specific incident. Click the Edit button to enable changes and then click Save when you have made the desired selections. Jurisdictions not indicated here can be added during incident creation if necessary.

Resilient Incident Response Platform Playbook Designer Guide
Page 53
13. Configure Artifact Types An artifact is data that supports or relates to an incident. The Resilient platform organizes artifacts by type, such as file name, MAC address, suspicious URL, MD5 and SHA1 file hashes, and more. An artifact can also have an attachment, such as an email, log file, and malware sample.
The Artifacts tab lists the type of artifacts available in the Resilient platform. There are a number of artifact types provided by the system. In addition, you can create your own custom artifact types to better organize artifacts for your environment.
The following sections describe how to create and edit artifact types, determine whether the Resilient platform shows a relationship between incidents when they contain the same artifact, and test your custom artifacts.
13.1. Create and Manage Artifact Types
To create an artifact type, click the Create Artifact Type button in the Artifacts tab. To edit, click the artifact type name. You can enter the following properties:
Name. Brief but descriptive and unique name for the artifact type.
API Name. Auto-generated based on the Name. It is used by integration developers to programmatically access the artifact type. Do not change it unless directed to do so by your organization as changing the name will require changing any software programs accessing the artifact type.
Relate Incidents. Determine whether the Resilient platform shows a relationship between incidents when they contain the same artifact. See Show Incident Relationships for details.
Allow File Attachments. Determine whether users can attach a file to this artifact. This option is disabled if you are allowing multiple values.
Allow Multiple Values. If Yes, a user can enter multiple values for one artifact; for example, multiple email addresses. Multiple values can be separated by a comma, space or new line. This option is disabled if you are allowing file attachments.
Description. Text that describes the purpose of the artifact type and any other useful information.
You can delete any artifact type by clicking the delete icon; however, you cannot delete an artifact type if it is referenced by a condition in a rule. Once deleted, users can no longer select that artifact type, but any artifacts of that type attached to an incident are still available.
13.2. Show Incident Relationships
Incidents are related when they share the same artifact. Users can see this relationship in the individual incident Artifacts tab and summary section.
Some artifact types may be included in a large number of incidents, but showing those relationships does not provide useful information to users. For example, you may not want artifacts of type "Email Subject" to relate incidents together because it is irrelevant to your process and not useful in resolving the incident.
The Artifacts tab allows you to reduce this type of non-useful information. Click No for those artifact types that can appear in multiple incidents but the relationship information is not useful.

Resilient Incident Response Platform Playbook Designer Guide
Page 54
The Artifacts tab sets the default behavior. There may be exceptions where a user needs to see which incidents contain a specific artifact type. There also may be exceptions where the user wants to see fewer relationships to reduce “clutter.” Therefore, an incident owner can change the setting for an artifact type at the incident level.
13.3. Test Custom Artifacts
You can validate the values of custom artifact types when they are created. The following example shows how to do this with Rules and Scripts. For this example, the Object Type is Artifact, the custom artifact type is Corporate User, and the script name is Corporate User ID.
1. Create a script that validates the value of an artifact value.
2. Create a rule that executes when the custom artifact type is created.
3. As a user, create an instance of a custom artifact type that does not meet this rule and verify that you see the message configured in the script.