iNaturalist - Home | BC Parks Foundation
24
iNaturalist Photo Guide Tips, tricks, and guides to help get your sightings identified A collaboration between the BC Parks iNaturalist Project, BC Conservation Data Centre, Royal BC Museum, Scott Gilmore, and Andrew Simon
Transcript of iNaturalist - Home | BC Parks Foundation

iNaturalist Photo Guide
Tips, tricks, and guides to help get your sightings identified
A collaboration between the BC Parks iNaturalist Project, BC Conservation Data Centre, Royal BC
Museum, Scott Gilmore, and Andrew Simon

Ta
ble
of
Co
nte
nts
Table of Contents
Basic Techniques.........................................
Cropping............................................................
Multiple Views....................................................
Focus.................................................................
Create Your Own Macro Lens...........................
Arthropods.......................................................
Beetles, Bugs, and Crabs..................................
Bumblebees, Flies, and Leafhoppers................
Butterflies and Moths.........................................
Dragonflies........................................................
Spiders..............................................................
Chordates.........................................................
Amphibians and Reptiles....................................
Birds and Mammals...........................................
Cnidarians & Molluscs...............................
Anemones.........................................................
Limpets..............................................................
Nudibranchs.......................................................
Bivalves..............................................................
Snails.................................................................
Plants & Fungi................................................ Mosses, Liverworts, and Hornworts...................
Vascular Plants...................................................
Fungi and Lichens...............................................
Acknowledgements & Resources....................... back
3
3
3
4
5
6
6
7
9
9
11
19
19
20
23
2
15
15
15
16
16
17
13
13
13

Basic
Te
chniq
ues
Basic Techniques__
Cropping
Always crop your photos so the focus is on the species
you are observing. This gives computer vision software
the best chance of suggesting the correct species and
makes it easier for others to confirm your species
identification.
Multiple Views
Take photos of different features
at different angles and combine
your multiple views into a single
observation. A photo showing
the habitat or what the species
is growing on can also be useful
for species identification.
Insects can
be tricky…
take multiple
shots as you
approach and
see how close
you can get!
Try to take macro (close-up)
photos of these features.
The more detail, the better
the chance of identification.
3

Basic
Te
chniq
ues
The photo on the right has flowers, stems, leaves, and rocks in focus – all in one shot.
Focus
Depth of field is the amount of space that is in focus in a
single photo. For 3D subjects like tall plants or insects
with long legs and antennae, it can be hard to get the
entire subject in focus. Use the largest possible depth of
field by setting your camera to a larger aperture number
or “f-stop” (e.g., f11 instead of f2.8).
Be aware that using a higher f-stop in low light may
mean movement from the camera or the subject will
result in a blurry photo. When it is dark or windy, use a
flash or a headlamp. If needed, take multiple photos.
4

Basic
Te
chniq
ues
Create Your Own Macro Lens
Did you know a basic jewelers loupe hand lens acts like
a macro lens for your smartphone camera? Just hold it
up to the lens and get close for a much more detailed
photograph.
If you have access to a microscope, you can use
a similar technique to photograph tiny things.
5

Art
hro
pods
For tiger beetles, the mandibles and labrum (in addition
to the view from above) are important for identification.
Arthropods________
Beetles, Bugs, and Crabs
(Flat species from the top)
The most important photo is from above. This allows the
shape of key features to be seen. Additional photos of
the side, front, and underside can also be extremely
useful.
6

Face
Top-down
Side Abdomen
Arth
rop
ods
Bumblebees, Flies, and Leafhoppers (Flat species from the side)
Take a photo from the side so that the head and
abdomen are visible. Additional photos of the abdomen
from above, the wing venation, and the face head-on
can increase the likelihood that your sighting will be
identified.
7

Art
hro
pods
How They Got The Shot
8
Brian Starzomski (https://inaturalist.ca/people/bstarzomski)
“I always take multiple shots
of insects. They move so
fast that it is difficult to get
that "perfect" shot.
Fortunately, you can
combine multiple photos in
one iNaturalist observation,
so I do my best to get as
many different angles as
possible. Side shots are
essential, especially of
things like dragonflies
and butterflies where both the top and bottom of the
wings are important for IDs. Top shots are important for
beetles. So, when I'm approaching an insect, I take
lots of photos and choose
the best ones later to
combine into one
observation. I'm shameless
about including as many as
20 different photos into
one observation, to ensure
as many ID characteristics
as possible are present. I’ll
do this with a macro lens
on my DSLR or a hand lens
over my cell phone lens: whatever works!”
Golden Northern Bumble
Bee (Bombus fervidus) https://inaturalist.ca/observations/51238166

Arth
rop
ods
Butterflies and Moths
For many butterflies, the underside of the wing is more
important for identification than the top side. For many
moths, the top side provides more information about the
species than the underside. When possible, it is
beneficial to photograph both perspectives.
Dragonflies
Photos should be taken from the side, showing the
thorax and if possible, the terminal appendages. If there
is a distinct wing pattern, a photo taken from above will
work.
9
Terminal appendages

Art
hro
pods
How They Got The Shot
10
Kate McKeown (https://inaturalist.ca/people/katemckeown)
“When
photographing
butterflies and
moths, I take
several photos as
I approach. You
usually cannot
get too close
before they fly
away. When
photographing
moths at night,
I use a flashlight or headlamp to illuminate the
subject so my
camera can
focus. I make
sure to use a
good flash
so I can see all
of the details of
the moth’s back.
When possible,
I also photograph the moth’s side as the underwing
can provide useful information about the species.”
Southwestern Eyed Sphinx
(Smerinthus ophthalmica) https://inaturalist.ca/observations/54866955

Arth
rop
ods
Spiders
Photograph the shape of the spider’s web and take note
of its habitat.
Next, use your macro lens to obtain close-ups of the top
side and underside of the spider, as well as a shot of the
face head-on to see the position of the eyes.
Photographing the eye arrangement and dorsal pattern
can help you identify the spider to family or genus.
11

Art
hro
pods
Art
hro
pods
How They Got The Shot
Thomas Barbin (https://inaturalist.ca/people/thomasbarbin)
“I like to encourage
active spiders
(especially jumping
spiders) onto a
stick, leaf or rock to
make photographing
them easier. I hold
the object with the
spider in my left hand
while resting the end
of my lens on the
palm/wrist area of my
left hand. This allows everything to move as one, making it
easier to focus on the spider. As I track and photograph
the spider, I move the object with my fingers to get all the
key angles for ID. Once I have what I need for an ID, I like
to get creative with different angles. By facing different
directions, I can choose what I want the background to be
(blue sky, green leaves, dark background, etc.).
Jumping spiders can be
especially tricky and like
to jump. When they jump,
they leave a dragline
attached to the object
they jumped from and
repel down. Try to grab
their dragline before they
hit the ground and lift them back up to your
stick/leaf/rock!”
12
Johnson's Jumping Spider
(Phidippus johnsoni) https://inaturalist.ca/observations/59997087
Chord
ate
s
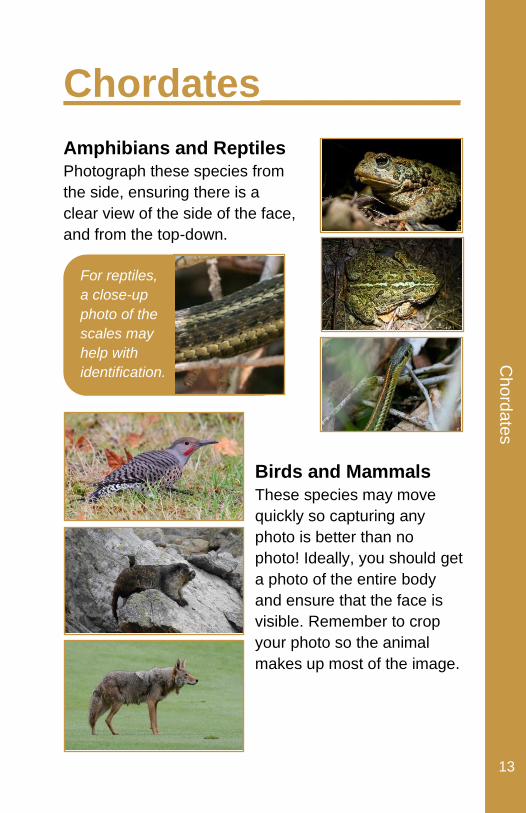
For reptiles,
a close-up
photo of the
scales may
help with
identification.
Chordates_________
Amphibians and Reptiles
Photograph these species from
the side, ensuring there is a
clear view of the side of the face,
and from the top-down.
Birds and Mammals
These species may move
quickly so capturing any
photo is better than no
photo! Ideally, you should get
a photo of the entire body
and ensure that the face is
visible. Remember to crop
your photo so the animal
makes up most of the image.
13
12

Chord
ate
s
How They Got The Shot
14
John Reynolds (https://inaturalist.ca/people/johndreynolds)
“Flight shots of
birds are tricky;
for every one
that works, I
usually get 10
that don't.
Having a good
zoom lens and
a camera that
takes multiple
frames per
second certainly helps. Fast shutter speeds are
essential. Set your
camera's focus to track
moving objects if
possible, then focus on
the bird as soon as you
can and keep firing as it
flies by.
Delete delete delete...
success!”
Bufflehead (Bucephala albeola) https://inaturalist.ca/observations/63359802

Cn
ida
rian
s &
Mo
lluscs
Cnidarians & Molluscs_
Anemones
Photos of the column and the oral face are most
important for identification.
Limpets
Take photos of the top,
the side, and the inside
of the shell. Photos of
the inside of the shell
show the dark blotch
in the middle, which can
be useful for identification.
15

Cn
ida
ria
ns &
Mollu
scs
Nudibranchs
In addition to a photo of the whole body, try to obtain
close-ups of the rhinophores, gills, and cerata (as
applicable).
Bivalves
If they are alive, take photos of the side and the hinge.
If they are dead, photos of the top, inside of the shell
and the hinge can provide key identification features.
16
Cn
ida
rian
s &
Mo
lluscs
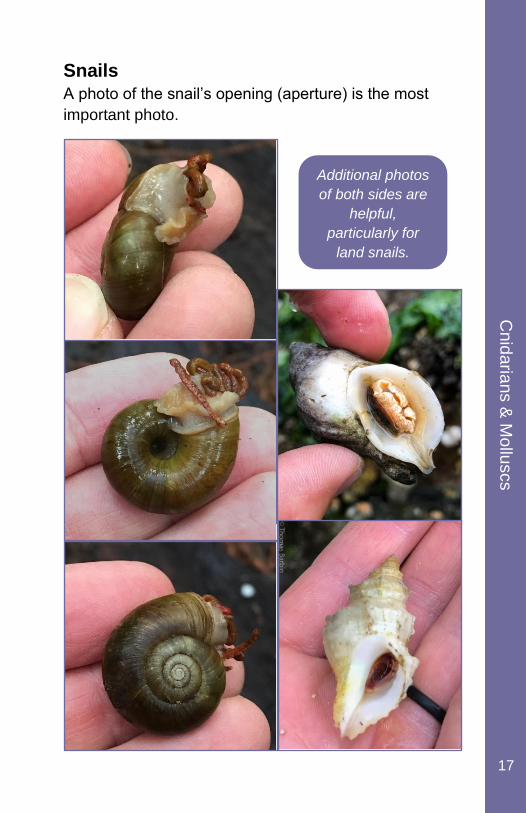
Snails
A photo of the snail’s opening (aperture) is the most
important photo.
17
Additional photos
of both sides are
helpful,
particularly for
land snails.

Cn
ida
ria
ns &
Mo
lluscs
How They Got The Shot
18
Lena Dietz Chiasson (https://inaturalist.ca/people/ldietzchiasson)
“Walks on the
beach are
especially
exciting to me
because there’s
an endless
variety of critters
to find and
observe. Some
of them like to
hide in the sand
or under rocks
and are a bit tricky to find, while others will be
scurrying in
front of your
feet. I like to
carry a
waterproof
camera or my
waterproofed
phone and
hand lens
when exploring intertidal areas.”
Purple Dwarf Olive Snail
(Olivella biplicata) https://inaturalist.ca/observations/55674317

Pla
nts
& F
un
gi
Mosses
Liverworts
Plants & Fungi_____
Mosses, Liverworts, and Hornworts For these taxa, photograph the overall shape of the
species and what it is growing on (e.g. wood, rock, soil,
etc.). Use your macro lens to obtain close-ups showing
how the leaves attach to the stem, if and where there are
teeth on the leaf margins, and (for mosses) the shape,
number of teeth, and colour of the capsule.
19
Moss on rock Moss on forest floor
Leaves
(with teeth)
Capsule
Gemmae
cups

Pla
nts
& F
un
gi
Close-ups showing texture of these features (e.g.
hairiness of involucral bracts, leaves, stems) may offer
more information about the species.
Flowering Plants
Ferns
Vascular Plants
Take photos of the species’ habitat and its overall
appearance (showing scale if possible), then
photograph the different features of the plant. Common
features include the capitulum (head of the flower),
involucral bracts (modified leaves at the base of the
head of the flower), and basal and cauline leaves
(leaves at the base and leaves further up the stem,
respectively).
Also photograph sori, fruit, and cones as applicable.
20
Involucral bracts
Sori
Basal leaves
Capitulum
Basal leaves

Pla
nts
& F
un
gi
Sedge stems are triangular and solid while grass stems
are round and hollow. When photographing a sedge,
take close-ups of the basal leaf sheath (for colour), both
sides of the cauline leaf sheath (for venation, shape,
and texture), and the spike. When photographing grass,
take photos of the seed head, collar (ligule and sheath)
and leaves (leaf tips and blades). Don’t forget to
photograph the overall appearance and habitat, too.
20
Grasses
Sedges
Spikes
Leaf sheath
Habitat
Spike
Sheath
Overall appearance
Stem
Sheath
Ligule
Leaf blade
Collar
Seed head
Overall
appearance
21

Pla
nts
& F
un
gi
How They Got The Shot
22
Jason Headley (https://inaturalist.ca/people/jasonheadley)
“Macro helps a ton with
identifications, whether it’s
showing fine hairs on leaf
margins or you just want
to show off the spots on
Corallorhiza maculata.
Most macro setups can be
expensive and
cumbersome in the field;
however, holding a hand
lens/jewelers loupe up to
your phone camera can
be an inexpensive solution
with surprising results.
I often use a 10x21mm loupe
that rarely leaves my side,
you never know when
you’ll run into the next insect
or beautiful spring wildflower.
Spotted Coralroot
(Corallorhiza maculata) https://inaturalist.ca/observation
s/27367682
Pop the hand lens over the
phone camera and voila!, a
DIY close-up shot that gets
all the key ID features for
this beautiful plant.”

Fungi
Lichens
Fungi on wood Overall shape Underside
Top view of lichen (on wood) Underside
Pla
nts
& F
un
gi
Fungi and Lichens
The habitat where a fungus or lichen is growing is
crucial for its identification. Take photos of what the
organism is growing on (e.g. wood, rock, etc.), its overall
shape, and the different sides of the organism (e.g. the
underside of a mushroom cap and both sides of the
lichen). Use your macro lens to obtain close-ups of the
different features and textures of the organism.
Many fungi and lichens must be viewed under a
microscope and often fungi have a spore print taken to
identify them to species.
23
Acknowledgements
Thank you to Scott Gilmore, Kate McKeown, John
Reynolds, Brian Starzomski, Andrew Simon, Jason
Headley, Lena Dietz Chiasson, Thomas Barbin, Jason
Straka, Heidi Gartner, Bridget Spencer, Celeste Kieran,
Maleen Mund, Ellyne Geurts, Erica Wheeler, and Lea
Gelling for your contributions to this photo guide.
iNaturalist Resources BC Parks Foundation Guide to Becoming a Citizen Scientist https://bcparksfoundation.ca/site/assets/files/1697/bcparksinaturalist_howtoguide.pdf
iNaturalist.ca – Getting Started https://inaturalist.ca/pages/getting+started
iNaturalist Tips & Tricks by Cassi Saari http://www.cassisaari.com/inaturalist-tips-tricks/
How to photograph plants (and more) by Lena Struwe &
Peter Nitzsche https://botanydepot.com/2020/07/27/presentation-how-to-photograph-plants-and-more/
Check out the BC Parks iNaturalist Project at
https://inaturalist.ca/projects/bc-parks