In-App Purchase Guide - Samsung Developers To offer in-app items, you register, get distribution...
27
In-App Purchase Guide
Transcript of In-App Purchase Guide - Samsung Developers To offer in-app items, you register, get distribution...

In-App Purchase Guide

2
Index
1. Samsung In-App Purchase ......................................................................................................................................... 3
2. Managing In-App Items ............................................................................................................................................... 6
1) Registering an Individual In-App Item ............................................................................................................. 9
2) Registering In-App Items in Bulk ................................................................................................................... 17
3) Updating an In-App Item .................................................................................................................................. 19
4) Deleting an In-App Item .................................................................................................................................... 24
3. Getting Help from Seller Office ............................................................................................................................... 26
3
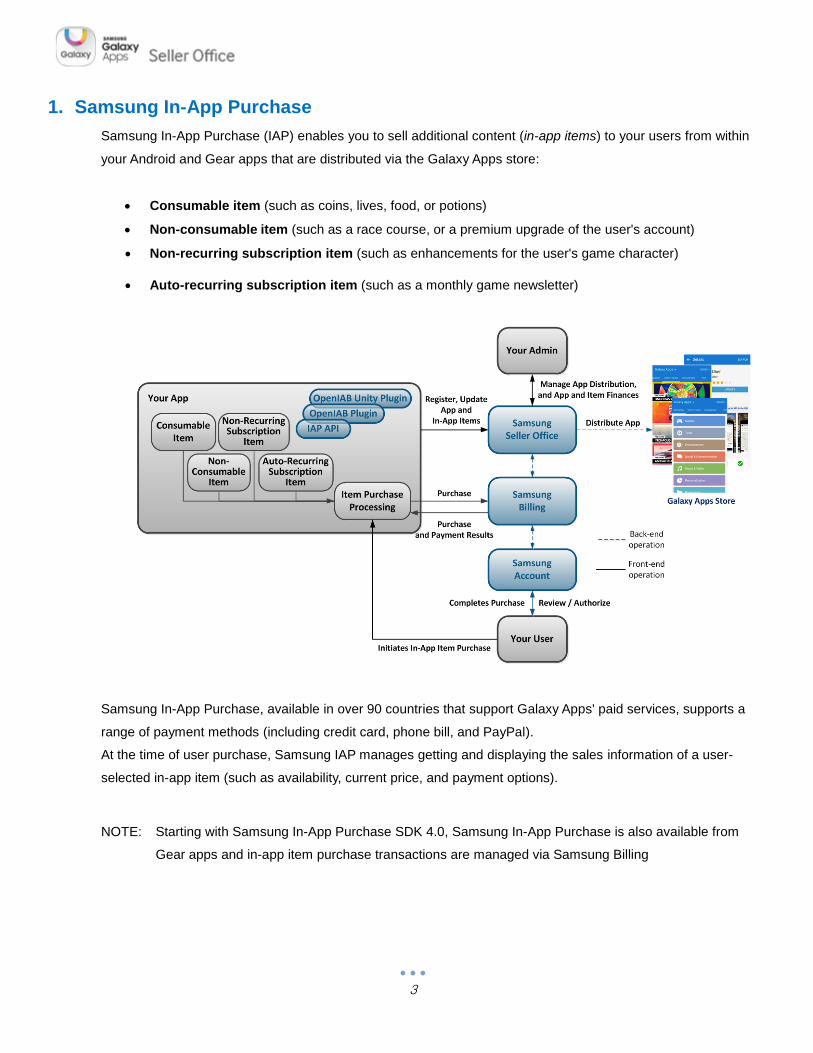
1. Samsung In-App Purchase
Samsung In-App Purchase (IAP) enables you to sell additional content (in-app items) to your users from within
your Android and Gear apps that are distributed via the Galaxy Apps store:
Consumable item (such as coins, lives, food, or potions)
Non-consumable item (such as a race course, or a premium upgrade of the user's account)
Non-recurring subscription item (such as enhancements for the user's game character)
Auto-recurring subscription item (such as a monthly game newsletter)
Samsung In-App Purchase, available in over 90 countries that support Galaxy Apps' paid services, supports a
range of payment methods (including credit card, phone bill, and PayPal).
At the time of user purchase, Samsung IAP manages getting and displaying the sales information of a user-
selected in-app item (such as availability, current price, and payment options).
NOTE: Starting with Samsung In-App Purchase SDK 4.0, Samsung In-App Purchase is also available from
Gear apps and in-app item purchase transactions are managed via Samsung Billing

4
To offer in-app items, you register, get distribution approval, and manage your app and in-app items via Galaxy
Apps Seller Office. This document explains how to register and manage your commercial in-app items offered by
your IAP-integrated Android apps that are distributed (freely or commercially) via the Galaxy Apps store.
You have several options regarding registering, submitting them for certification and distribution approval, and
managing your IAP-integrated app and its in-app items after they are certified (both before and after they are
actively distributed via the Galaxy Apps store).
NOTE: Your IAP-integrated app and all in-app items must pass certification in order to be distributed via the
Samsung Galaxy Apps store. After your IAP-integrated app and items have passed, new in-app items
must be submitted for and pass certification.
Before registering in-app items to your app:
① You must be registered as a Samsung Seller Office Commercial Seller.
For details, see the Certification Guide.
② All of your app's binary files must:
A. Meet Samsung Galaxy App store certification guidelines.
For details, see the Certification Guide and the Age Rating Guide.
B. Integrate IAP API method calls and functionality.
For details, see the Programming Guide from Samsung Developers (developer.samsung.com).
③ Your app and its binary files must be registered in the Galaxy Apps Seller Office.
For details, see the Application Registration Guide.
NOTE: If these conditions are not met, the In-App Purchase tab will not be active in the Seller Office Add New
Application menu.
For details about Samsung terms and condition and the Samsung privacy policy, which can affect in-app item
registration and pricing, in the Samsung Seller Office website, click the Samsung Terms & Condition and Privacy
Policy links at the bottom of the web page.
After you register an IAP-integrated binary file to your app, Seller Office assigns a unique ID and a changeable
title to the group of in-app items to be registered to your app. The item group ID and title are displayed in the
Seller Office In App Purchase list of in-app items registered to your app, which is displayed in the Add New
Application by clicking the In-App Purchase menu item.

5
All binary files with the same package name will be associated with the same in-app item group ID and title.
You cannot change the assigned item group ID. However, you can change the item group title by clicking Modify
and entering and saving a new title.
NOTE: A binary file cannot be registered if it has the same package name of a binary file that was registered by
any OTHER Seller Office Commercial Seller, even after the file was deleted.
If you encounter this:
1) In the Seller Office UI, click Support > 1:1 ENQUIRY
2) In the Samsung For Developers Content & Services Customer Support website, click Contact us
3) In the Contact us form, please fill out the form with the details and click Submit
6
2. Managing In-App Items
You can register new in-app items for your IAP-integrated apps, either: one at a time, or many at a time via an
Excel spreadsheet file. You can update an in-app item that you have already registered (for example, to change
item pricing).
NOTE: In-app items registered to your IAP-integrated app will be available to users who download any of your
app's binary files. All your app's binary files must have the same package name.
Before you submit your app for certification or after your app has passed certification, you can delete registered
in-app items, which makes them permanently unavailable. However, while your app is undergoing certification,
in-app items cannot be deleted.
In-App Item Pricing and Payment Options
This section presents a summary of how you and other factors determine the price that users pay for your in-app
items, and how you can control payment methods.
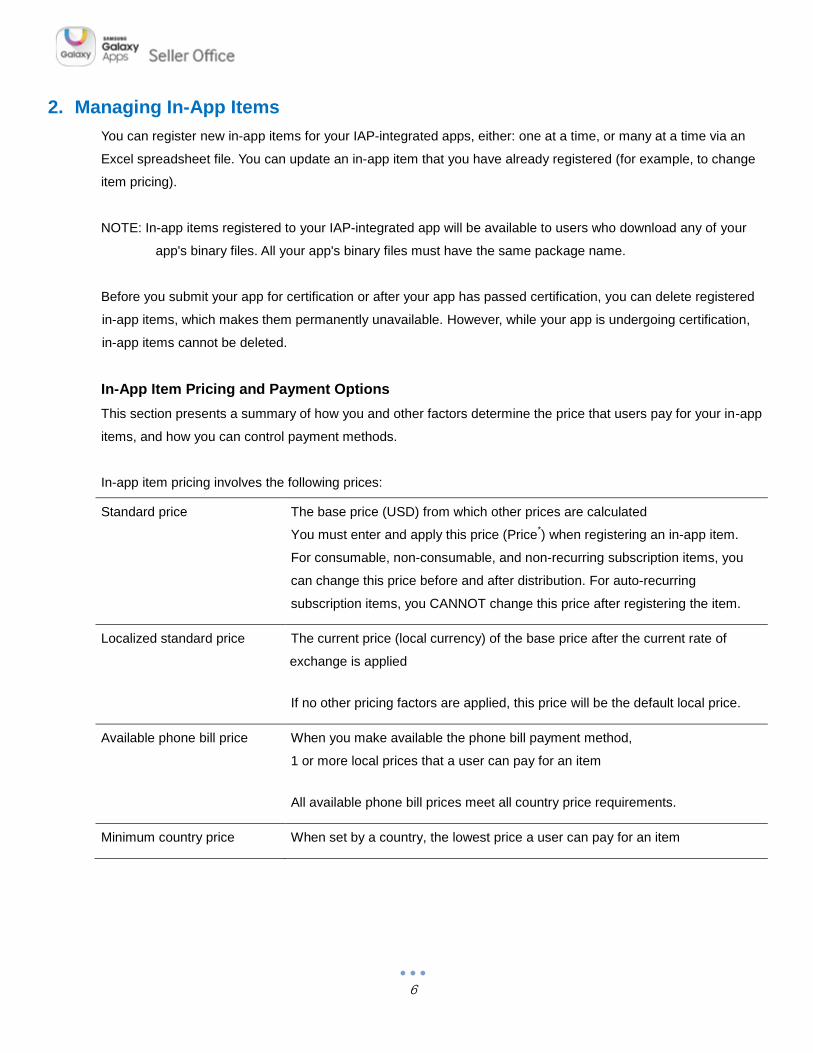
In-app item pricing involves the following prices:
Standard price The base price (USD) from which other prices are calculated
You must enter and apply this price (Price*) when registering an in-app item.
For consumable, non-consumable, and non-recurring subscription items, you
can change this price before and after distribution. For auto-recurring
subscription items, you CANNOT change this price after registering the item.
Localized standard price The current price (local currency) of the base price after the current rate of
exchange is applied
If no other pricing factors are applied, this price will be the default local price.
Available phone bill price When you make available the phone bill payment method,
1 or more local prices that a user can pay for an item
All available phone bill prices meet all country price requirements.
Minimum country price When set by a country, the lowest price a user can pay for an item

7
Local price The price (local currency) your user must pay for an in-app item during the
purchase transaction, not including any additional local taxes or fees
This price must meet all country pricing requirements. When you make
available phone bill payment, this price will be an available phone bill price.
The following pricing principles apply:
You can accept the default local price or enter a new local price.
o The default local price is automatically set by Seller Office by applying all applicable pricing
factors to the standard price: the current exchange rate, country price requirements, and country-
specific available phone bill prices (when phone bill payment is available).
o When you set a local price:
Seller Office ensures your local price meets all country price requirements and is a
supported phone bill price when applicable (see below for details).
Your valid local price setting is in effect when your app and the in-app item are currently
certified for distribution.
CAUTION: After you input a local price, Seller Office may adjust the local price to comply with
requirements. Ensure all local prices are suitable to you. Samsung Galaxy Apps is not
responsible for any loss incurred due to user negligence in checking prices.
o For default settings and for your settings of the local price:
If a proposed local price is below the minimum country price, the local price is automatically
adjusted to the minimum.
When phone bill payment is made available, if a proposed local price is not an available
phone bill price, the local price is automatically adjusted (up or down) to the nearest
available phone bill price.
For auto-recurring subscription in-app items:
o You cannot enter a zero (0) value for the standard price or a local price.
o After the item is registered, you cannot update the standard price or set any local price.
When the Samsung Galaxy Apps service initially becomes available in a distribution country and you
agreed to 'When Samsung Galaxy Apps becomes available in more countries or with more payment
options, your applications will automatically be sold in those countries':
o All default local prices for all in-app items will be initially based on the exchange rate in effect at
the time the service becomes available.

8
If you agreed to 'When Samsung Galaxy Apps becomes available in more countries or with more
payment options’ in the [Country & Price] tab, your applications will automatically be sold in those
countries, then the item price in each new country will be based on the standard price at the time when
the service opened in that country, and determined by the appropriate exchange rate.
Calculating, setting, and changing local prices
Exchange rates are updated every 4 hours. When a local price is calculated or recalculated, the
current exchange rate is used.
For each distribution country, the local price is calculated or recalculated and applied ONLY when:
o You set a new standard price AND:
You accepted the default local price without checking Apply Phone Bill.
You checked Apply Phone Bill and accepted the default local price.
You checked Apply Phone Bill and selected a phone bill price.
o Samsung Galaxy becomes available in a new country and you selected 'When Samsung
Galaxy Apps becomes available in more countries or with more payment options’ in the
[Country & Price] tab.
Local prices are NOT changed when:
You enter and save a value for a local price and you do not check Apply Phone Bill.
Exchange rates are updated.
Phone Bill Payment Method
You can make available in-app item purchase payment via your user's phone bill in countries that permit this
payment method (as indicated in the Seller Office UI).
When you make phone bill payment available:
Your in-app items can only be sold for 1 of the available phone bill prices that is set for each distribution
country.
When an item's localized standard price is not one of the available phone bill prices, the default local
price is set to the nearest (above or below) available phone bill price.
You can accept the default local price or any other available phone bill prices.
CAUTION: After making phone bill payment available, each country's local price may change. Check all local
prices and ensure they are suitable to you. Samsung Galaxy Apps is not responsible for any loss
incurred due to user negligence in checking prices.
9
1) Registering an Individual In-App Item
Before or after getting distribution approval for your Android IAP-integrated app and its in-app items, you can
register new in-app items one at a time.
NOTE: You cannot register new in-app items while your app is undergoing certification.
To individually register an in-app item for an IAP-integrated app:
Ensure that an IAP-integrated Android binary file has been registered to your app. After some actions, a
notice popup window is displayed that requires clicking a button (such as OK).
Notice popup steps are NOT indicated in this procedure.
To see help text, hover the mouse over a field's Comments icon ,
click Show Tip: On (info tips for all fields), or toggle-click an individual field's Info Tip icon
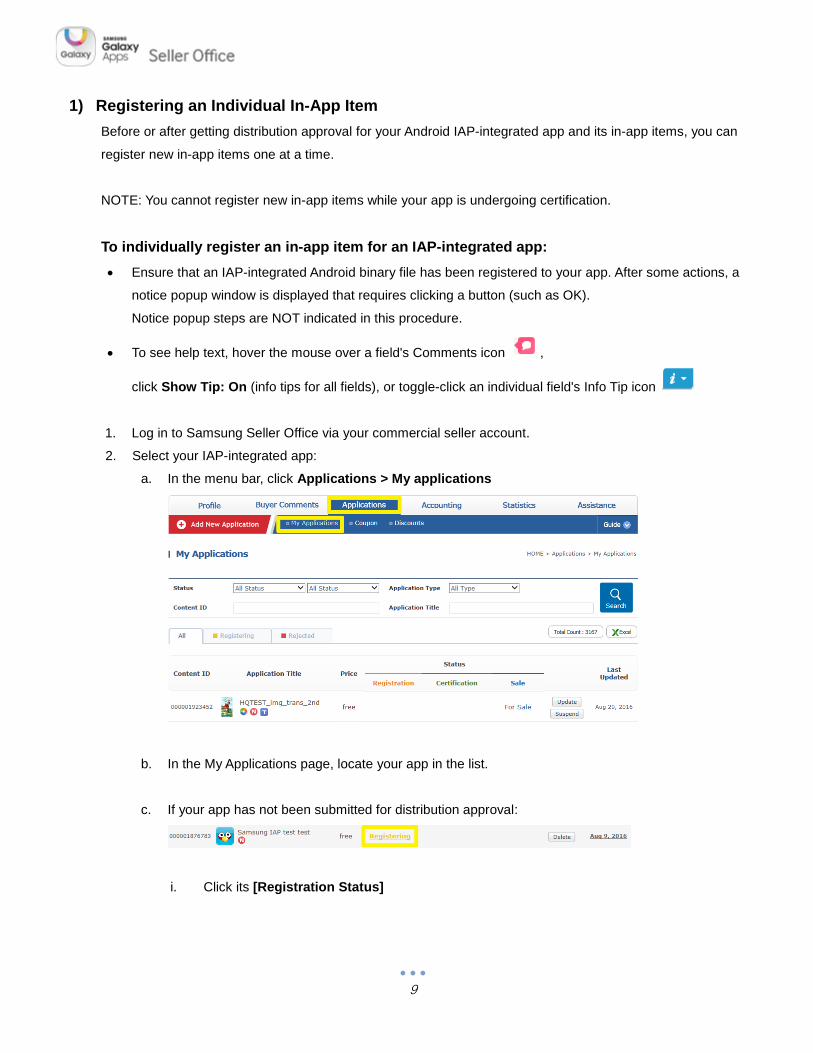
1. Log in to Samsung Seller Office via your commercial seller account.
2. Select your IAP-integrated app:
a. In the menu bar, click Applications > My applications
b. In the My Applications page, locate your app in the list.
c. If your app has not been submitted for distribution approval:
i. Click its [Registration Status]
10
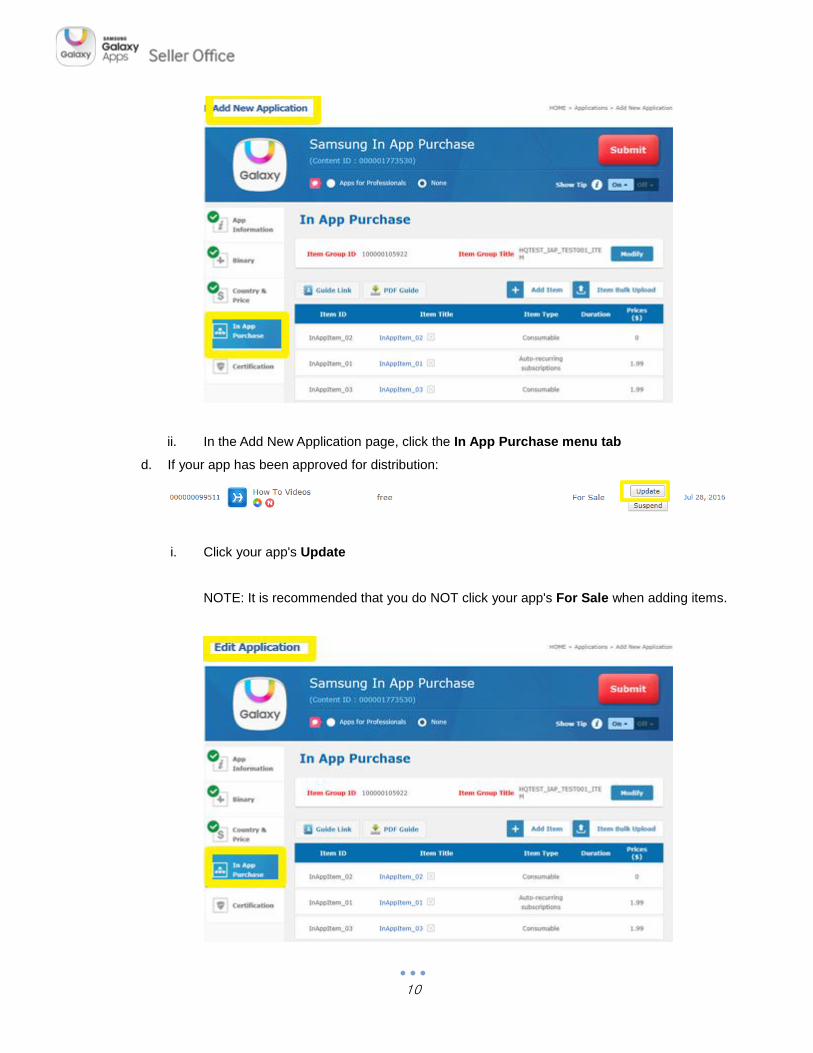
ii. In the Add New Application page, click the In App Purchase menu tab
d. If your app has been approved for distribution:
i. Click your app's Update
NOTE: It is recommended that you do NOT click your app's For Sale when adding items.

11
ii. In its Edit Application page, click the In App Purchase menu tab
3. Register an in-app item:
NOTE: Your in-app item must meet Samsung certification guidelines.
a. In the In App Purchase panel, click Add Item
b. Enter or update the in-app item information:
i. Enter the following required field entries:
NOTE: All information should be entered in English.

12
Item ID Identifier of the in-app item (English letters, numbers, and certain special
characters (period, dash, and underscore)) that is unique among all item IDs
in the item group
After entering a proposed ID, click Check
If a notice is displayed, click OK and enter and check a different ID.
CAUTION: After item registration, item ID cannot be changed.
Item Title Name of the in-app item (English letters, Korean letters, numbers, spaces, and
certain special characters (period, dash, and underscore), fewer than 100
bytes) unique among all item names in the item group
Users will be able to see the item name in the Samsung Unified Payment
window when they purchase in-app items.

13
Item Type Kind of in-app item:
CAUTION: After item registration, item type cannot be changed.
Consumable
Item can be purchased 1 or more times, remains
effective / available in the app until it is used, after
which it becomes ineffective / unavailable (such as in-
game coins, food, potions)
Non-consumable
Supported by IAP
v2.0 and above
Item needs to be purchased only once to remain
effective / available in the app at all times, even after
deletion and re-installation of the app (such as a more
difficult race course, or a premium upgrade of the
user's account).
Non-recurring
Subscriptions
Supported by IAP
v2.0 and above
Item can be purchased 1 or more times, and remains
effective / available in the app during the subscription
period (Duration) after each purchase (such as
enhancements for the user's game character, images
for each day of 1 month).
Auto-recurring
Subscriptions
After initial purchase/free trial, its auto recurring
purchase is automatically applied to the users.
Samsung IAP provides monthly subscription (such as
monthly magazine).
Duration For non-recurring subscription items ONLY, the length of time (1, 3, 6, or 12
months) from the purchase date that the item is effective / available to the
user
CAUTION: After item registration, duration cannot be changed.
Payment
Cycle
For auto-recurring subscription items ONLY, the length of time (1 month only)
from the purchase date that the item is effective / available to the user for
each subscription period
1 month is the interval the user is billed to automatically re-subscribe.

14
Free Trial
Period
For auto-recurring subscription items ONLY, the length of time (30, 60, or 90
days) from the purchase date that the item is effective / available to the user
without charge
At the end of this period, the user is billed for their subscription.
Description Brief explanation of the item
Price The standard price (USD 0 to USD 400) of the in-app item
NOTE: For an auto-recurring subscription item: a value of 0 (zero) cannot be
entered, and its standard price cannot be changed after the item is
registered.
After entering a value, set the value by clicking Apply
For details about in-app item pricing, see the In-App Item Pricing and
Payment Options section.
c. For each country, manage your in-app item's local price, and either enable or do not enable user
payment via their phone bill.
CAUTION: Ensure each country has a suitable local price. Each local price will ONLY be in effect
after your app AND the in-app item are certified for distribution.
NOTE: For each country, you may have the following options:
Do not enable phone bill payment and either:
o Accept the default local price (which is based on the standard price and the
exchange rate or a price set by country price requirements).
o Enter your own local price (subject to country price requirements).
Enable phone bill payment (when available) and either:
o Accept the default local price (which is the phone bill nearest to the default local
price).
o Select another available phone bill price as the local price.

15
NOTE: For details about the payment method applied to each country,
see the Seller Office Terms and Conditions.
i. In the Add Item popup window, click Advanced Mode
ii. When NOT enabling phone bill payment for a country:
1. Review the default local price for the country.
2. If the default local price is NOT suitable, enter a suitable price.
NOTE: If your new price is below the country minimum, the price will be changed to the
minimum. If a notice is displayed that your entry does not meet country price
requirements, either accept the automatically entered price or enter another price.
3. Go to step 3.d. Complete the registration of the in-app item.
iii. To enable phone bill payment:
1. Checkmark Payment Method: Phone Bill (Premium SMS/Carrier Billing)
2. For each country in which to make phone bill payment available:
A. Checkmark Apply Phone Bill

16
B. Review the new default local price, which is the phone bill price nearest to the original
default local price.
C. Review the equivalent USD price.
D. If either the new default local price or the USD price is NOT suitable, select a suitable
phone bill price.
d. Complete the registration of the in-app item:
i. Ensure that the Item ID and Item Type entries are correct.
CAUTION: These entries CANNOT be changed after saving the in-app item.
ii. Click Save
4. To register additional in-app items, go to step 3. above.
5. Make the in-app item(s) available to your users:
a. If your app has not been certified for distribution:
i. Complete the registration of your app.
NOTE: After making entries for all required app fields, the Submit button turns red.
ii. Submit your app and all of its in-app items to be certified for distribution.
For details, see the Application Registration Guide.
b. If your app has already been certified for distribution, submit all of the new in-app items to be certified
for distribution by clicking Submit
The items will undergo certification for distribution by Samsung.

17
2) Registering In-App Items in Bulk
At one time, you can register, but not update, 1 or more consumable, non-consumable, and non-recurring
subscription in-app items to your IAP-integrated app via a provided Excel spreadsheet.
You can register in-app items in bulk before your IAP-integrated app has been submitted for certification or after
it has passed or failed certification. You cannot specify local prices or purchase options for different countries via
the spreadsheet; however, you can do this via the Seller Office UI after individual in-app items have been
registered in bulk.
To register many in-app items in bulk:
1. Log in to your Samsung Seller Office commercial seller account.
For details, see step 1. of To individually register or update an in-app item for an IAP-integrated app:
2. Select your IAP-integrated app and navigate to its In App Purchase page.
For details, see step 2. of To individually register or update an in-app item for an IAP-integrated app:
3. Download the bulk in-app item registration Excel spreadsheet:
a. In the In App Purchase page, click Item Bulk Upload
b. Click Download Excel Form
c. Locally save the form.
4. Fill out and upload the spreadsheet:
a. Fill in the spreadsheet with the required field information for each new in-app item:
With the indicated information for each new in-app item on 1 row.
18
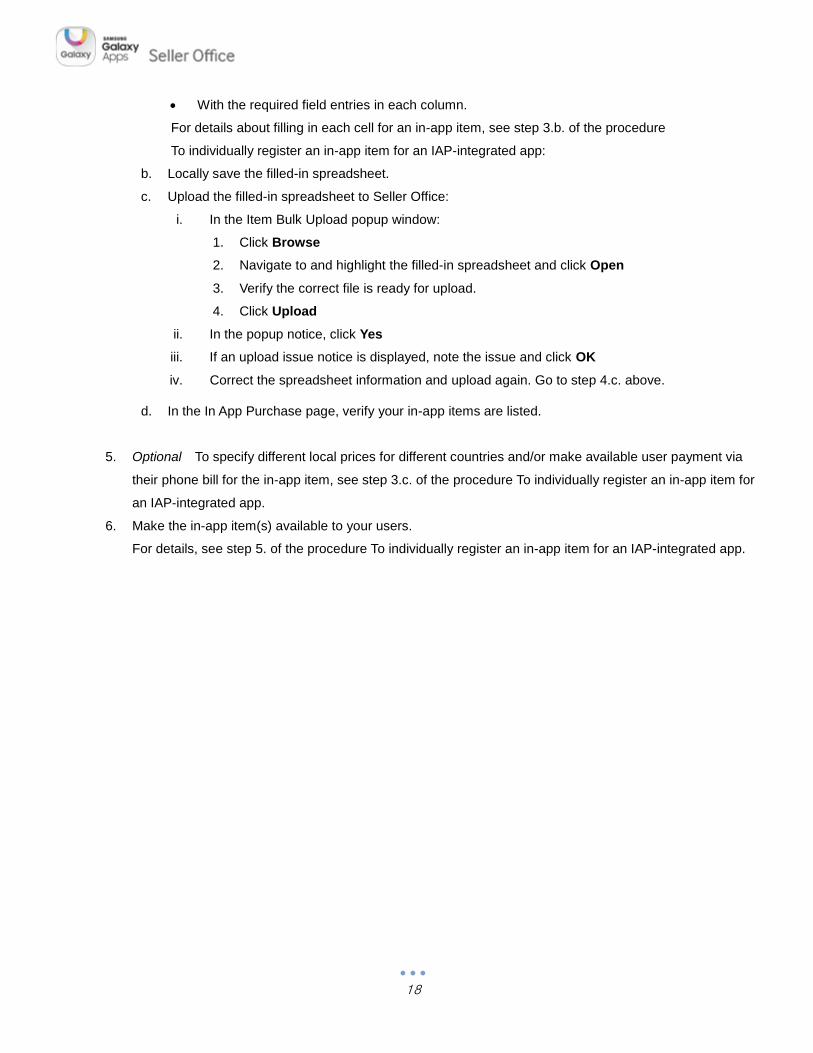
With the required field entries in each column.
For details about filling in each cell for an in-app item, see step 3.b. of the procedure
To individually register an in-app item for an IAP-integrated app:
b. Locally save the filled-in spreadsheet.
c. Upload the filled-in spreadsheet to Seller Office:
i. In the Item Bulk Upload popup window:
1. Click Browse
2. Navigate to and highlight the filled-in spreadsheet and click Open
3. Verify the correct file is ready for upload.
4. Click Upload
ii. In the popup notice, click Yes
iii. If an upload issue notice is displayed, note the issue and click OK
iv. Correct the spreadsheet information and upload again. Go to step 4.c. above.
d. In the In App Purchase page, verify your in-app items are listed.
5. Optional To specify different local prices for different countries and/or make available user payment via
their phone bill for the in-app item, see step 3.c. of the procedure To individually register an in-app item for
an IAP-integrated app.
6. Make the in-app item(s) available to your users.
For details, see step 5. of the procedure To individually register an in-app item for an IAP-integrated app.
19
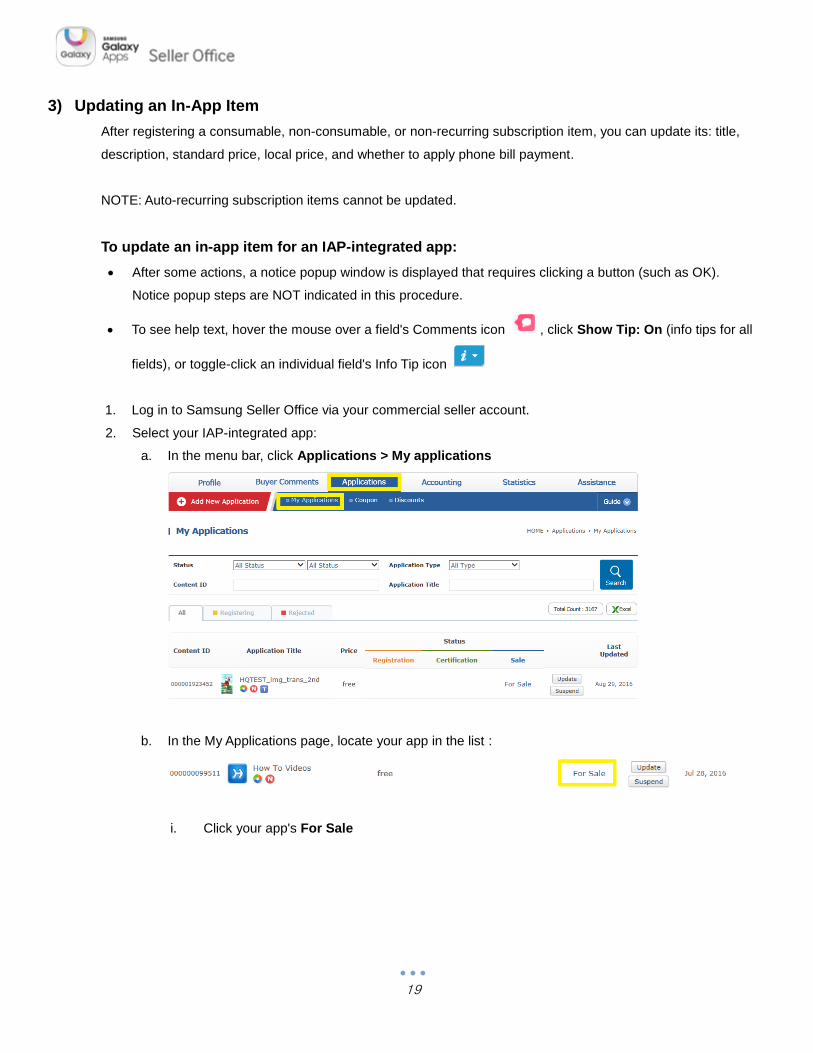
3) Updating an In-App Item
After registering a consumable, non-consumable, or non-recurring subscription item, you can update its: title,
description, standard price, local price, and whether to apply phone bill payment.
NOTE: Auto-recurring subscription items cannot be updated.
To update an in-app item for an IAP-integrated app:
After some actions, a notice popup window is displayed that requires clicking a button (such as OK).
Notice popup steps are NOT indicated in this procedure.
To see help text, hover the mouse over a field's Comments icon , click Show Tip: On (info tips for all
fields), or toggle-click an individual field's Info Tip icon
1. Log in to Samsung Seller Office via your commercial seller account.
2. Select your IAP-integrated app:
a. In the menu bar, click Applications > My applications
b. In the My Applications page, locate your app in the list :
i. Click your app's For Sale

20
ii. In its Application Details page, click the In App Purchase menu tab
3. Update an in-app item information:
a. In the list of in-app items, locate the item to be updated and click [its Item Title]
b. Update the in-app item information:
i. Update the following required field entries:
NOTE: All information should be entered in English.
Item ID and Item Type cannot be updated.

21
Item Title Name of the in-app item (English letters, Korean letters, numbers, spaces, and
certain special characters (period, dash, and underscore), fewer than 100
bytes) unique among all item names in the item group
Users will be able to see the item name in the Samsung Unified Payment
window when they purchase in-app items.
Description Brief explanation of the item
Price The standard price (USD 0 to USD 400) of the in-app item
After entering a value, set the value by clicking Apply
For details about in-app item pricing, see the In-App Item Pricing and
Payment Options section.
c. For each country, manage your in-app item's local price, and enable or do not enable user payment
via their phone bill.
CAUTION: Ensure each country has a suitable local price and the changed price will be
applied as soon as you click Save.
NOTE: You have the following options:
Do not make phone bill payment available and either:
o Accept the default local price (which is based on the standard price and the
exchange rate or a price set by country price requirements).
o Enter your own local price (subject to country price requirements).
Enable phone bill payment (when available) and either:
o Accept the default local price (which is the phone bill nearest to the default local
price).
o Select another available phone bill price as the local price.
NOTE: When you make phone bill payment available:
In Brazil and Turkey, in-app item purchases are applied to the users'
premium SMS bill.
In all other countries, they are applied to the users' carrier bill.
i. In the Add Item / Update Item popup window, click Advanced Mode

22
ii. When NOT enabling phone bill payment for a country:
1. Review the default local price for the country.
2. If the default local price is NOT suitable, enter a suitable price.
NOTE: If your new price is below the country minimum, the price will be changed to the
minimum, and a notice will be displayed. Either accept the automatically entered
price or enter another price.
3. Go to step 3.d. Complete the registration of the in-app item.
iii. To enable phone bill payment:
1. Checkmark Payment Method: Phone Bill (Premium SMS/Carrier Billing)
2. For each country in which to make phone bill payment available:
A. Checkmark Apply Phone Bill
B. Review the new default local price, which is the phone bill price nearest to the original
default local price.
C. Review the new default local price.

23
D. If either the new default local price or the USD price is NOT suitable, select a suitable
phone bill price.
d. Complete the updating of the in-app item by clicking Save
NOTE: The changes will be applied without you having to take further action.
No submission for certification is needed.

24
4) Deleting an In-App Item
Before your IAP-integrated app and its in-app item have been submitted for certification or after they have
passed or failed certification, you can delete registered in-app items. Deletion permanently removes the in-app
item from Seller Office, and makes the item unpurchaseable by ALL of your app users. Previous item
purchases are not affected.
NOTE: You cannot delete new in-app items while your app is undergoing certification.
CAUTION: You cannot undo deleting an in-app item.
To delete an in-app item from an IAP-integrated app:
1. Log in to your Samsung Seller Office commercial seller account.
For details, see step 1. of To individually register or update an in-app item for an IAP-integrated app:
2. Select your IAP-integrated app and navigate to its In App Purchase page.
For details, see step 2. of To individually register or update an in-app item for an IAP-integrated app:
3. Delete an in-app item:
a. In your app's In App Purchase page:
i. Navigate to the in-app item, and click its Delete Checkbox
ii. In the delete popup notice:

25
CAUTION: Clicking the Yes UI button permanently removes the in-app item from Seller Office.
You cannot undo this action.
1. To delete the in-app item, click Yes

26
3. Getting Help from Seller Office
If you have questions while registering or updating in-app items, you can get help from Galaxy Apps Seller Office.
① To download SDKs and development resources to implement Samsung In-App Purchase that are available
on the Samsung's Developer website, click Guide Link
[Samsung Developers(developer.samsung.com)]
② To download the latest Samsung Galaxy Apps In App Purchase Guide (this document),
click PDF Guide
27
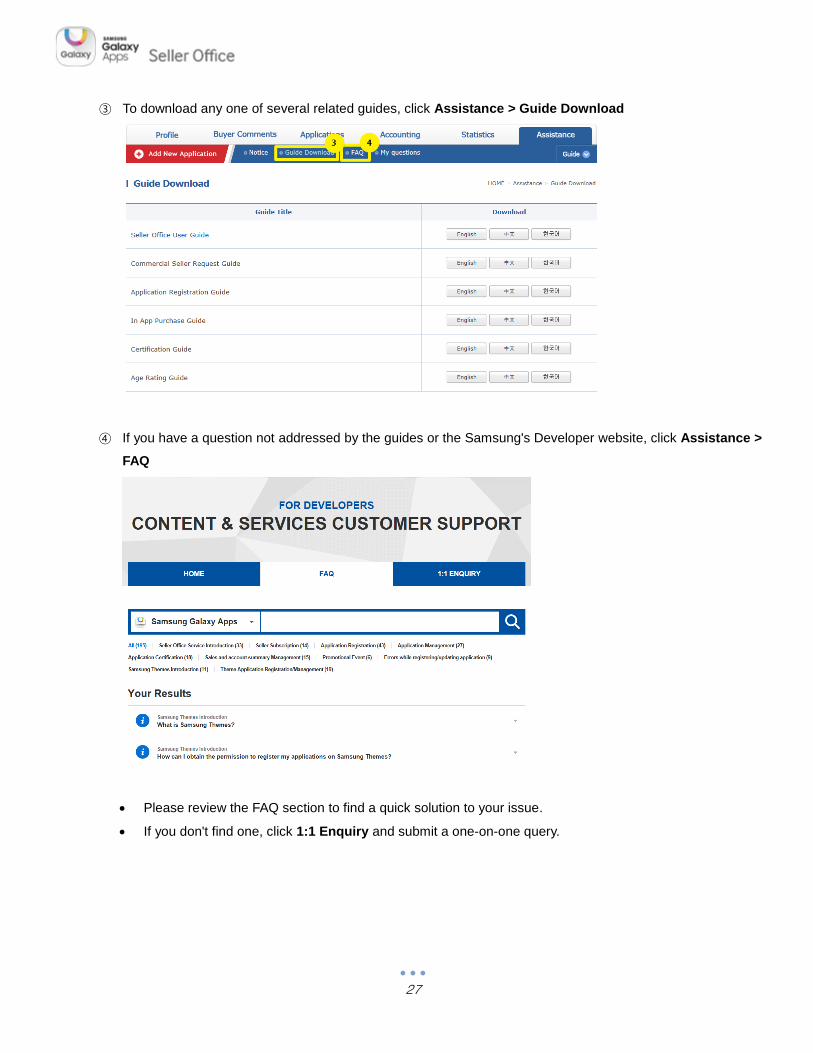
③ To download any one of several related guides, click Assistance > Guide Download
④ If you have a question not addressed by the guides or the Samsung's Developer website, click Assistance >
FAQ
Please review the FAQ section to find a quick solution to your issue.
If you don't find one, click 1:1 Enquiry and submit a one-on-one query.