IMPORTANT SAFETY INSTRUCTIONS -...
32
2 E
Transcript of IMPORTANT SAFETY INSTRUCTIONS -...

2E
ii
IMPORTANT SAFETY INSTRUCTIONS
• Read these instructions.• Keep these instructions.• Heed all warnings.• Follow all instructions.• Do not use this apparatus near water.• Mains powered apparatus shall not be exposed to dripping or
splashing and that no objects filled with liquids, such as vases, shall be placed on the apparatus.
• Clean only with dry cloth.• Do not block any ventilation openings, install in accordance with
the manufacturer’s instructions.• Do not install near any heat sources such as radiators, heat
registers, stoves, or other apparatus (including amplifiers) that produce heat.
• Do not defeat the safety purpose of the polarized or grounding-type plug. A polarized plug has two blades with one wider than the other. A grounding type plug has two blades and a third grounding prong. The wide blade or the third prong are provided for your safety. If the provided plug does not fit into your outlet, consult an electrician for replacement of the obsolete outlet. (for U.S.A. and Canada)
• Protect the power cord from being walked on or pinched particularly at plugs, convenience receptacles, and the point where they exit from the apparatus.
• Only use attachments/accessories specified by the manufacturer.
• Unplug this apparatus during lightning storms or when unused for long periods of time.
• Refer all servicing to qualified service personnel. Servicing is required when the apparatus has been damaged in any way, such as power-supply cord or plug is damaged, liquid has been spilled or objects have fallen into the apparatus, the apparatus has been exposed to rain or moisture, does not operate normally, or has been dropped.
• Do not install this equipment on the far position from wall outlet and/or convenience receptacle.
• Do not install this equipment in a confined space such as a box for the conveyance or similar unit.
• Use only with the cart, stand, tripod, bracket, or table specified by the manufacturer, or sold with the apparatus. When a cart is used, use caution when moving the cart/apparatus combination to avoid injury from tip-over.
The lightning flash with arrowhead symbol within an equilateral triangle, is intended to alert the user to the presence of uninsulated “dangerous voltage” within the product’s enclosure that may be of sufficient magnitude to constitute a risk of electric shock to persons.
The exclamation point within an equilateral triangle is intended to alert the user to the presence of important operating and maintenance (servicing) instructions in the literature accompanying the product.
CAUTION
Danger of explosion if battery is incorrectly replaced.Replace only with the same or equivalent type.
THE FCC REGULATION WARNING (for U.S.A.)
This equipment has been tested and found to comply with the limits for a Class B digital device, pursuant to Part 15 of the FCC Rules. These limits are designed to provide reasonable protection against harmful interference in a residential installation. This equipment generates, uses, and can radiate radio frequency energy and, if not installed and used in accordance with the instructions, may cause harmful interference to radio communications. However, there is no guarantee that interference will not occur in a particular installation. If this equipment does cause harmful interference to radio or television reception, which can be determined by turning the equipment off and on, the user is encouraged to try to correct the interference by one or more of the following measures:• Reorient or relocate the receiving antenna.• Increase the separation between the equipment and receiver.• Connect the equipment into an outlet on a circuit different
from that to which the receiver is connected.• Consult the dealer or an experienced radio/TV technician for
help.Unauthorized changes or modification to this system can void the user’s authority to operate this equipment.
CE mark for European Harmonized Standards
CE mark which is attached to our company’s products of AC mains operated apparatus until December 31, 1996 means it conforms to EMC Directive (89/336/EEC) and CE mark Directive (93/68/EEC).And, CE mark which is attached after January 1, 1997 means it conforms to EMC Directive (89/336/EEC), CE mark Directive (93/68/EEC) and Low Voltage Directive (73/23/EEC).Also, CE mark which is attached to our company’s products of Battery operated apparatus means it conforms to EMC Directive (89/336/EEC) and CE mark Directive (93/68/EEC).
Incorrect operation or malfunction may cause the con-tents of memory to be lost, so we recommend that you save important data on media. Please be aware that Korg will accept no responsibility for any damages which may result from loss of data.
Also, when digitally recording copyrighted audio mate-rial from a DAT or CD etc., you must obtain permission for use. Please be aware that Korg will accept no respon-sibility for any copyright violations which may occur through your use of this product.
This professional device is intended only for use with works for which you yourself own the copyright, for which you have received permission from the copyright holder to publicly perform, record, broadcast, sell, and duplicate, or in connection with activities which consti-tute “fair use” under copyright law. If you are not the copyright holder, have not received permission from the copyright holder, or have not engaged in fair use of the works, you may be violating copyright law, and may be liable for damages and penalties. If you are unsure about your rights to a work, please consult a copyright attor-ney. KORG TAKES NO RESPONSIBILITY FOR ANY INFRINGEMENT COMMITTED THROUGH USE OF KORG PRODUCTS.
* Company names, product names, and names of formats etc. are the trademarks or registered trademarks of their respective owners.
Data handling
COPYRIGHT WARNING
iii

iv
Table of Contents
Setup ..................................................... 1
Listening to the demo songs .................... 2
Loading the demo song data .............................. 2Selecting and playing a demo song ................... 2
Selecting and playing a program or combination ........................................... 4
Selecting a program.............................................. 4Using controllers to modify the sound.............. 4Using the arpeggiator .......................................... 5Selecting a combination....................................... 5
Simple program editing .......................... 6
Performance Editor .............................................. 6Realtime Controls ................................................. 6Saving the data you edit ...................................... 7
Simple combination editing ..................... 8
Changing the program assigned to a timbre.... 8Adjusting the pan of each timbre....................... 9Adjusting the volume of each timbre ................ 9Creating a split combination............................... 9Saving your edited data ...................................... 9
Simple arpeggiator editing.................... 10
Changing a program’s arpeggiator Pattern.... 10Adjusting the arpeggiator speed...................... 10Changing the way that the arpeggio is
played ............................................................... 11Saving your edited data .................................... 11Specifying the arpeggio patterns used in a
Combination .................................................... 12Making arpeggiator assignments..................... 12Selecting an arpeggio pattern and specifying
how it will play................................................ 12Saving your edited data .................................... 12The arpeggiators in Sequencer mode and
Song Play mode............................................... 12Creating a user arpeggio pattern ..................... 12Arpeggiator assignments in a combination.... 13
Editing effects and Valve Force.............. 14
Working with the effect settings in a program......................................................... 14
Working with the effect settings in a combination .................................................. 15
Valve Force settings ........................................... 16
Sampling (recording a sample) ............. 18
Sampling a vocal from a mic, and playing it as a “one-shot” sample ............................... 18
Applying an insert effect to the audio input and sampling the result ................................. 21
Applying the Valve Force effect to the audio input and sampling the result....................... 21
Saving your multisamples and samples to media ................................................................ 21
Resampling an arpeggiated phrase in Program mode................................................. 22
Producing a song ................................. 24
Loading a template song, and copying preset patterns (drum phrases) ................................ 24
Repeatedly playing specific measures of a track (Track Play Loop)............................... 25
Realtime recording............................................. 26Realtime-recording an arpeggio pattern......... 26Step recording..................................................... 27Using controllers to record tonal changes ...... 28Recording the sound of a combination or
program “as is” ............................................... 28Saving a song ...................................................... 28
The names of the manuals are abbreviated as follows.
QS:
Quick Start
OG:
Operation Guide
PG:
Parameter Guide
VNL:
Voice Name List
Setup
Setup
Demo
song
sCo
mbina
tion/
Progr
amPr
ogra
m ed
iting
Comb
inatio
n edit
ingAr
pegg
iator
editin
gEff
ects
and V
alve F
orce
Sapli
ngPr
oduc
ing a
song
This Quick Start manual will guide you through the basics of learning how to use the TRITON Extreme. Before we begin, let’s get the TRITON Extreme set up, connected, and ready to play.
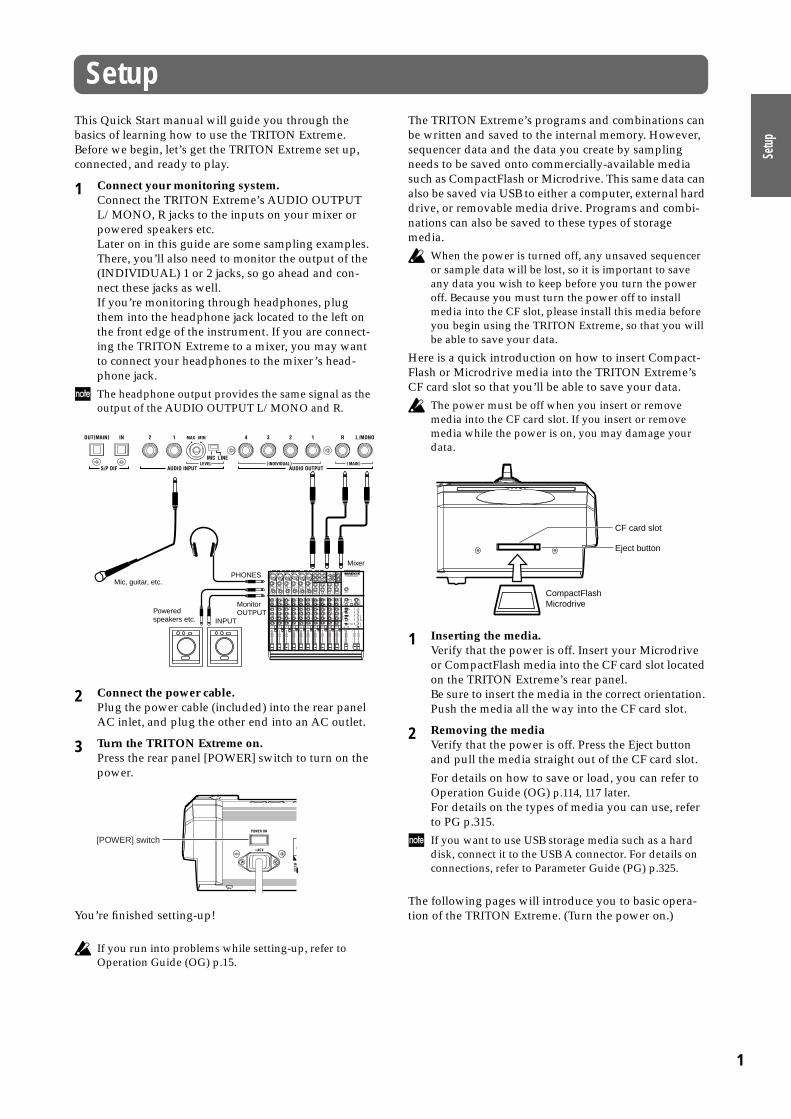
1 Connect your monitoring system.Connect the TRITON Extreme’s AUDIO OUTPUT L/MONO, R jacks to the inputs on your mixer or powered speakers etc. Later on in this guide are some sampling examples. There, you’ll also need to monitor the output of the (INDIVIDUAL) 1 or 2 jacks, so go ahead and con-nect these jacks as well.If you’re monitoring through headphones, plug them into the headphone jack located to the left on the front edge of the instrument. If you are connect-ing the TRITON Extreme to a mixer, you may want to connect your headphones to the mixer’s head-phone jack.
The headphone output provides the same signal as the output of the AUDIO OUTPUT L/MONO and R.
2 Connect the power cable.Plug the power cable (included) into the rear panel AC inlet, and plug the other end into an AC outlet.
3 Turn the TRITON Extreme on.Press the rear panel [POWER] switch to turn on the power.
You’re finished setting-up!
If you run into problems while setting-up, refer to Operation Guide (OG) p.15.
The TRITON Extreme’s programs and combinations can be written and saved to the internal memory. However, sequencer data and the data you create by sampling needs to be saved onto commercially-available media such as CompactFlash or Microdrive. This same data can also be saved via USB to either a computer, external hard drive, or removable media drive. Programs and combi-nations can also be saved to these types of storage media.
When the power is turned off, any unsaved sequencer or sample data will be lost, so it is important to save any data you wish to keep before you turn the power off. Because you must turn the power off to install media into the CF slot, please install this media before you begin using the TRITON Extreme, so that you will be able to save your data.
Here is a quick introduction on how to insert Compact-Flash or Microdrive media into the TRITON Extreme’s CF card slot so that you’ll be able to save your data.
The power must be off when you insert or remove media into the CF card slot. If you insert or remove media while the power is on, you may damage your data.
1 Inserting the media.Verify that the power is off. Insert your Microdrive or CompactFlash media into the CF card slot located on the TRITON Extreme’s rear panel. Be sure to insert the media in the correct orientation. Push the media all the way into the CF card slot.
2 Removing the mediaVerify that the power is off. Press the Eject button and pull the media straight out of the CF card slot.
For details on how to save or load, you can refer to Operation Guide (OG) p.114, 117 later.For details on the types of media you can use, refer to PG p.315.
If you want to use USB storage media such as a hard disk, connect it to the USB A connector. For details on connections, refer to Parameter Guide (PG) p.325.
The following pages will introduce you to basic opera-tion of the TRITON Extreme. (Turn the power on.)
Mic, guitar, etc.PHONES
MIC1
BALOR
UNBAL
LINE IN 1LOW CUT
75Hz18dB/OCT
TRIM+10dB -40dB
10 60
U
-10dBV
MIC GAIN
LINE IN 7-8
L
R
BALOR
UNBAL
MONO
+4-10
LEVEL
LINE IN 9-10
L
R
BALOR
UNBAL
MONO
+4-10
LEVEL
LINE IN 11-12
L
R
BALOR
UNBAL
MONO
+4-10
LEVEL
LINE IN 13-14
L
R
BALOR
UNBAL
MONO
+4-10
LEVEL
STEREO AUX RETURNS1
2
1
2
AUX SEND
LEFT(1/MONO) RIGHT ALL BAL/UNBAL
L
R
TAPE
INPUT
TAPE
OUTPUT
MAIN OUTSL
R
BAL/UNBAL
PHONES
MICRO SERIES 1402-VLZ14-CHANNEL MIC/LINE MIXER
MIC2
BALOR
UNBAL
LINE IN 2LOW CUT
75Hz18dB/OCT
TRIM+10dB -40dB
10 60
U
-10dBV
MIC GAIN
MIC3
BALOR
UNBAL
LINE IN 3LOW CUT
75Hz18dB/OCT
TRIM+10dB -40dB
10 60
U
-10dBV
MIC GAIN
MIC4
BALOR
UNBAL
LINE IN 4LOW CUT
75Hz18dB/OCT
TRIM+10dB -40dB
10 60
U
-10dBV
MIC GAIN
MIC5
BALOR
UNBAL
LINE IN 5LOW CUT
75Hz18dB/OCT
TRIM+10dB -40dB
10 60
U
-10dBV
MIC GAIN
MIC6
BALOR
UNBAL
LINE IN 6LOW CUT
75Hz18dB/OCT
TRIM+10dB -40dB
10 60
U
-10dBV
MIC GAIN
60
U
+15
U
+15
AUX1
MON/EFX
2EFX
U
+15
U
+12
-15
-12
U
+15-15
PAN
SOLO
1MUTEA LT 3 – 4
EQHI
12kHz
MID2.5kHz
LOW80Hz
L R
dB10
5
U
5
10
20
30
4050
60
U
+15
U
+15
AUX1
MON/EFX
2EFX
U
+15
U
+12
-15
-12
U
+15-15
PAN
SOLO
2MUTEA LT 3 – 4
EQHI
12kHz
MID2.5kHz
LOW80Hz
L R
dB10
5
U
5
10
20
30
4050
60
U
+15
U
+15
AUX1
MON/EFX
2EFX
U
+15
U
+12
-15
-12
U
+15-15
PAN
SOLO
3MUTEA LT 3 – 4
EQHI
12kHz
MID2.5kHz
LOW80Hz
L R
dB10
5
U
5
10
20
30
4050
60
U
+15
U
+15
AUX1
MON/EFX
2EFX
U
+15
U
+12
-15
-12
U
+15-15
PAN
SOLO
4MUTEA LT 3 – 4
EQHI
12kHz
MID2.5kHz
LOW80Hz
L R
dB10
5
U
5
10
20
30
4050
60
U
+15
U
+15
AUX1
MON/EFX
2EFX
U
+15
U
+12
-15
-12
U
+15-15
PAN
SOLO
5MUTEA LT 3 – 4
EQHI
12kHz
MID2.5kHz
LOW80Hz
L R
dB10
5
U
5
10
20
30
4050
60
U
+15
U
+15
AUX1
MON/EFX
2EFX
U
+15
U
+12
-15
-12
U
+15-15
PAN
SOLO
6MUTEA LT 3 – 4
EQHI
12kHz
MID2.5kHz
LOW80Hz
L R
dB10
5
U
5
10
20
30
4050
60
U
+15
U
+15
AUX1
MON/EFX
2EFX
U
+15
U
+12
-15
-12
U
+15-15
PAN
SOLO
7–8MUTEA LT 3 – 4
EQHI
12kHz
MID2.5kHz
LOW80Hz
L R
dB10
5
U
5
10
20
30
4050
60
U
+15
U
+15
AUX1
MON/EFX
2EFX
U
+15
U
+12
-15
-12
U
+15-15
PAN
SOLO
9–10MUTEA LT 3 – 4
EQHI
12kHz
MID2.5kHz
LOW80Hz
L R
dB10
5
U
5
10
20
30
4050
60
U
+15
U
+15
AUX1
MON/EFX
2EFX
U
+15
U
+12
-15
-12
U
+15-15
PAN
SOLO
11–12MUTEA LT 3 – 4
EQHI
12kHz
MID2.5kHz
LOW80Hz
L R
dB10
5
U
5
10
20
30
4050
60
U
+15
U
+15
AUX1
MON/EFX
2EFX
U
+15
U
+12
-15
-12
U
+15-15
PAN
SOLO
13–14MUTEA LT 3 – 4
EQHI
12kHz
MID2.5kHz
LOW80Hz
L R
dB10
5
U
5
10
20
30
4050
60
dB10
5
U
5
10
20
30
4050
60
dB10
5
U
5
10
20
30
4050
U
+10
U
+20
U
+20
1
2AUX 1 MASTER
PREPOST
NORMALLED
AUX 1SELECT
EFX TOMONITOR
AUX RETURNS
SOURCE
MAINMIX
LEFT RIGHT
CLIP+28
+10
+7
+4
+2
0
-2
-4
-7
-10
-20
-30
0dB=0dBu
RUDE SOLO LIGHT
ALT3-4
TAPE
ASSIGNTO MAIN MIX
NORMAL(AFL)LEVEL SET(PFL)
SOLOMODE
PHANTOM POWER
CONTROLROOM / PHONES MAIN MIX
Mixer
Powered speakers etc. INPUT
MonitorOUTPUT
[POWER] switch
CompactFlashMicrodrive
CF card slot
Eject button
1

2
Listening to the demo songs
VALVE FORCE
VOLUME VALUEPROGCOMBI
SAMPLINGSEQ
GLOBALS.PLAY
COMPAREMEDIA
A
B
INPUT TRIM
ASSIGNABLE 1
LPF CUTOFF
ULTRA BOOST
ASSIGNABLE 2
RESONANCE/HPF
TUBE GAIN
ASSIGNABLE 3
EG-INTENSITY
OUTPUT LEVEL
ASSIGNABLE 4
EG-RELEASE
ON/OFFREALTIME CONTROLS
212
11 76
Basic Tab
Loading the demo song dataLet’s start by listening to the TRITON Extreme’s demo songs.
1 Press the [GLOBAL] key (it will light).You’re in Global mode. Make sure that the Global P0: Basic Setup page is displayed.
If this page is not displayed, press the [EXIT] key and then the Basic tab.
2 Press the page menu button in the upper right hand corner of the display.
3 Press “Load Preload/Demo Data.”
4 In the “Kind” field, choose “All (Preload PCG and Demo Songs).”When you execute loading, the preloaded data and the demo song data will be loaded.
5 Press the OK button.A dialog box will ask you for confirmation.Press the OK button once again to load the data.
Never turn off the power while data is being loaded.
If the Memory Protected dialog appears, press the Sys-tem Pref. tab and clear the check mark from the mem-ory protect setting. Then load the data again.
Selecting and playing a demo song
6 Press the [SEQ] key (it will light).You’re in Sequencer mode. Make sure that the Sequencer P0: Play/REC, Program T01–08 page is selected. In this mode you can record songs and play them back.
If this page is not displayed, press the [EXIT] key and then the Prog.1–8 tab.
7 Select the demo song that you want to play.Press “Song Select” to highlight it, and use the [ ][ ] keys to select a song. Alternatively, you can press the “Song Select” popup button and choose a song from the popup menu.
8 Press the SEQUENCER [START/STOP] key.The key will blink, and playback will begin.To stop playback, press the [START/STOP] key once again.
The demo song will not be retained when the power is turned off, but you can load it again at any time.
3
4
5
7Song Select
Prog. 1-8 Tab
Popup menu
MENUEXIT ENTER0 /10's HOLD
21 3
REC/WRITELOCATE START/STOP
REW
SEQUENCER ARPEGGIATOR
PROG BANK
A B C D E F G
H I J K L M N
SMPL MOSS GMCOMBI BANK
PROG/COMBI BANK
PAUSE FF TEMPO120
40 240
REC START/STOPSAMPLING
ON/OFF
VELOCITYGATE
54 6
87 9
8
[MENU] key
[EXIT] key
Ten key[0]–[9]
Setup
Demo
song
sCo
mbina
tion/
Progr
amPr
ogra
m ed
iting
Comb
inatio
n edit
ingAr
pegg
iator
editin
gEff
ects
and V
alve F
orce
Sapli
ngPr
oduc
ing a
song
* The numbers shown in the illustration correspond to the step numbers in the text. (Not every step is represented by an illustration.)
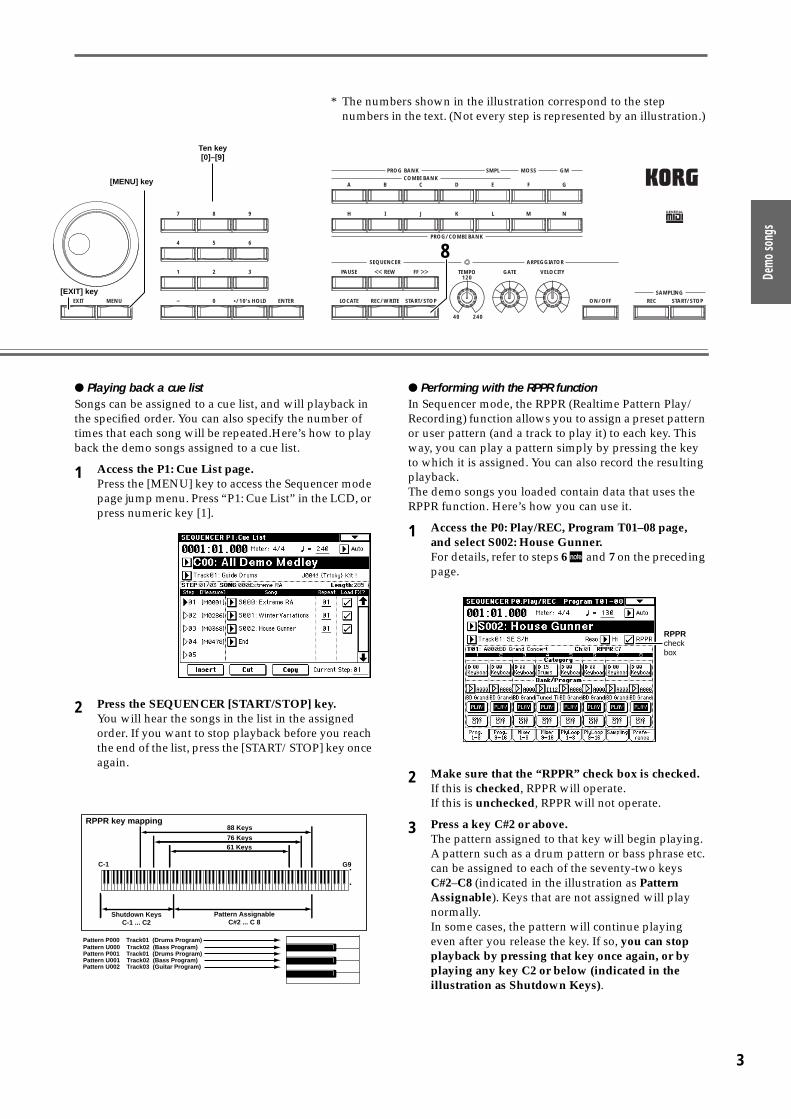
● Playing back a cue listSongs can be assigned to a cue list, and will playback in the specified order. You can also specify the number of times that each song will be repeated.Here’s how to play back the demo songs assigned to a cue list.
1 Access the P1: Cue List page.Press the [MENU] key to access the Sequencer mode page jump menu. Press “P1: Cue List” in the LCD, or press numeric key [1].
2 Press the SEQUENCER [START/STOP] key.You will hear the songs in the list in the assigned order. If you want to stop playback before you reach the end of the list, press the [START/STOP] key once again.
● Performing with the RPPR functionIn Sequencer mode, the RPPR (Realtime Pattern Play/Recording) function allows you to assign a preset pattern or user pattern (and a track to play it) to each key. This way, you can play a pattern simply by pressing the key to which it is assigned. You can also record the resulting playback.The demo songs you loaded contain data that uses the RPPR function. Here’s how you can use it.
1 Access the P0: Play/REC, Program T01–08 page, and select S002: House Gunner.For details, refer to steps 6 and 7 on the preceding page.
2 Make sure that the “RPPR” check box is checked.If this is checked, RPPR will operate.If this is unchecked, RPPR will not operate.
3 Press a key C#2 or above.The pattern assigned to that key will begin playing. A pattern such as a drum pattern or bass phrase etc. can be assigned to each of the seventy-two keys C#2–C8 (indicated in the illustration as Pattern Assignable). Keys that are not assigned will play normally.In some cases, the pattern will continue playing even after you release the key. If so, you can stop playback by pressing that key once again, or by playing any key C2 or below (indicated in the illustration as Shutdown Keys).
88 Keys
76 Keys61 Keys
Shutdown KeysC-1 ... C2
RPPR key mapping
Pattern AssignableC#2 ... C 8
C-1 G9
Pattern P000 Track01 (Drums Program)Pattern U000 Track02 (Bass Program)Pattern P001 Track01 (Drums Program)Pattern U001 Track02 (Bass Program)Pattern U002 Track03 (Guitar Program)
RPPRcheck box
3
4
Selecting and playing a program or combination
VALVE FORCE
VOLUME VALUEPROGCOMBI
SAMPLINGSEQ
GLOBALS.PLAY
COMPAREMEDIA
A
B
INPUT TRIM
ASSIGNABLE 1
LPF CUTOFF
ULTRA BOOST
ASSIGNABLE 2
RESONANCE/HPF
TUBE GAIN
ASSIGNABLE 3
EG-INTENSITY
OUTPUT LEVEL
ASSIGNABLE 4
EG-RELEASE
ON/OFFREALTIME CONTROLS
2 3412
119151
52
53 31
Category popup button(Category/Program Select)Program Select
Perf. EditTab
Selecting a program
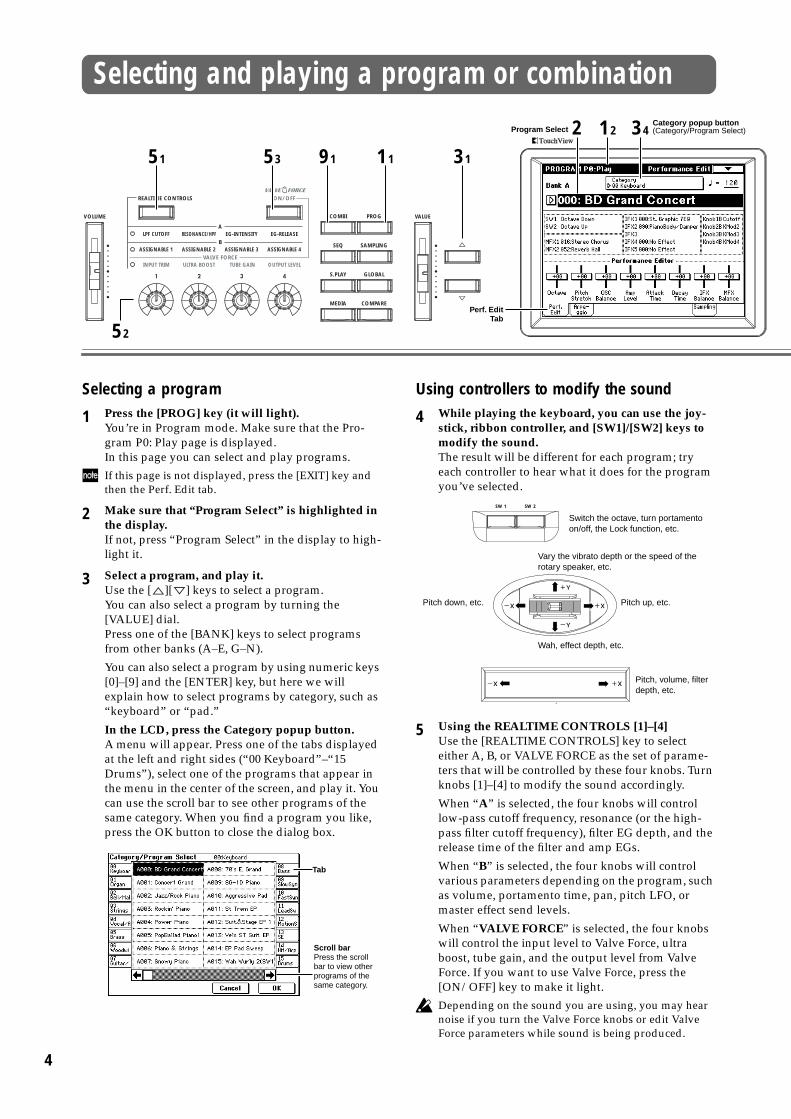
1 Press the [PROG] key (it will light).You’re in Program mode. Make sure that the Pro-gram P0: Play page is displayed.In this page you can select and play programs.
If this page is not displayed, press the [EXIT] key and then the Perf. Edit tab.
2 Make sure that “Program Select” is highlighted in the display.If not, press “Program Select” in the display to high-light it.
3 Select a program, and play it.Use the [ ][ ] keys to select a program.You can also select a program by turning the [VALUE] dial.Press one of the [BANK] keys to select programs from other banks (A–E, G–N).
You can also select a program by using numeric keys [0]–[9] and the [ENTER] key, but here we will explain how to select programs by category, such as “keyboard” or “pad.”
In the LCD, press the Category popup button.A menu will appear. Press one of the tabs displayed at the left and right sides (“00 Keyboard”–“15 Drums”), select one of the programs that appear in the menu in the center of the screen, and play it. You can use the scroll bar to see other programs of the same category. When you find a program you like, press the OK button to close the dialog box.
Using controllers to modify the sound
4 While playing the keyboard, you can use the joy-stick, ribbon controller, and [SW1]/[SW2] keys to modify the sound.The result will be different for each program; try each controller to hear what it does for the program you’ve selected.
5 Using the REALTIME CONTROLS [1]–[4] Use the [REALTIME CONTROLS] key to select either A, B, or VALVE FORCE as the set of parame-ters that will be controlled by these four knobs. Turn knobs [1]–[4] to modify the sound accordingly.
When “A” is selected, the four knobs will control low-pass cutoff frequency, resonance (or the high-pass filter cutoff frequency), filter EG depth, and the release time of the filter and amp EGs.
When “B” is selected, the four knobs will control various parameters depending on the program, such as volume, portamento time, pan, pitch LFO, or master effect send levels.
When “VALVE FORCE” is selected, the four knobs will control the input level to Valve Force, ultra boost, tube gain, and the output level from Valve Force. If you want to use Valve Force, press the [ON/OFF] key to make it light.
Depending on the sound you are using, you may hear noise if you turn the Valve Force knobs or edit Valve Force parameters while sound is being produced.
Tab
Scroll barPress the scroll bar to view other programs of the same category.
SW 1 SW 2
Pitch down, etc. Pitch up, etc.
Pitch, volume, filter depth, etc.
Vary the vibrato depth or the speed of the rotary speaker, etc.
Switch the octave, turn portamento on/off, the Lock function, etc.
Wah, effect depth, etc.
MENUEXIT ENTER0 /10's HOLD
21 3
REC/WRITELOCATE START/STOP
REW
SEQUENCER ARPEGGIATOR
PROG BANK
A B C D E F G
H I J K L M N
SMPL MOSS GMCOMBI BANK
PROG/COMBI BANK
PAUSE FF TEMPO120
40 240
REC START/STOPSAMPLING
ON/OFF
VELOCITYGATE
54 6
87 9
33
682 781
[EXIT] key
[BANK] key
32 [VALUE] dial
Setup
Demo
song
sPro
gram
/Com
binati
onPr
ogra
m ed
iting
Comb
inatio
n edit
ingAr
pegg
iator
editin
gEff
ects
and V
alve F
orce
Sapli
ngPr
oduc
ing a
song
Using the arpeggiator
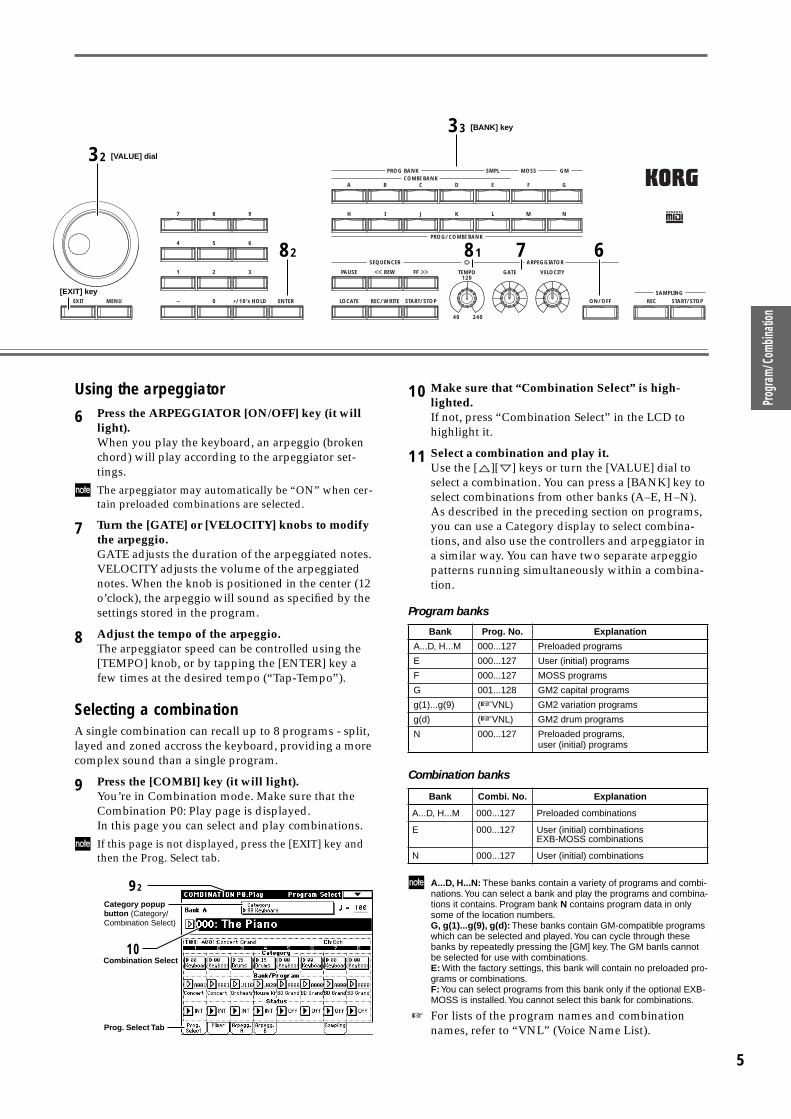
6 Press the ARPEGGIATOR [ON/OFF] key (it will light).When you play the keyboard, an arpeggio (broken chord) will play according to the arpeggiator set-tings.
The arpeggiator may automatically be “ON” when cer-tain preloaded combinations are selected.
7 Turn the [GATE] or [VELOCITY] knobs to modify the arpeggio.GATE adjusts the duration of the arpeggiated notes. VELOCITY adjusts the volume of the arpeggiated notes. When the knob is positioned in the center (12 o’clock), the arpeggio will sound as specified by the settings stored in the program.
8 Adjust the tempo of the arpeggio.The arpeggiator speed can be controlled using the [TEMPO] knob, or by tapping the [ENTER] key a few times at the desired tempo (“Tap-Tempo”).
Selecting a combinationA single combination can recall up to 8 programs - split, layed and zoned accross the keyboard, providing a more complex sound than a single program.
9 Press the [COMBI] key (it will light).You’re in Combination mode. Make sure that the Combination P0: Play page is displayed.In this page you can select and play combinations.
If this page is not displayed, press the [EXIT] key and then the Prog. Select tab.
10 Make sure that “Combination Select” is high-lighted.If not, press “Combination Select” in the LCD to highlight it.
11 Select a combination and play it.Use the [ ][ ] keys or turn the [VALUE] dial to select a combination. You can press a [BANK] key to select combinations from other banks (A–E, H–N).As described in the preceding section on programs, you can use a Category display to select combina-tions, and also use the controllers and arpeggiator in a similar way. You can have two separate arpeggio patterns running simultaneously within a combina-tion.
Program banks
Combination banks
A...D, H...N: These banks contain a variety of programs and combi-nations. You can select a bank and play the programs and combina-tions it contains. Program bank N contains program data in only some of the location numbers.G, g(1)...g(9), g(d): These banks contain GM-compatible programs which can be selected and played. You can cycle through these banks by repeatedly pressing the [GM] key. The GM banls cannot be selected for use with combinations.E: With the factory settings, this bank will contain no preloaded pro-grams or combinations.F: You can select programs from this bank only if the optional EXB-MOSS is installed. You cannot select this bank for combinations.
☞ For lists of the program names and combination names, refer to “VNL” (Voice Name List).
Combination Select
92
10
Prog. Select Tab
Category popup button (Category/ Combination Select)
Bank Prog. No. Explanation
A...D, H...M 000...127 Preloaded programs
E 000...127 User (initial) programs
F 000...127 MOSS programs
G 001...128 GM2 capital programs
g(1)...g(9) (☞VNL) GM2 variation programs
g(d) (☞VNL) GM2 drum programs
N 000...127 Preloaded programs, user (initial) programs
Bank Combi. No. Explanation
A...D, H...M 000...127 Preloaded combinations
E 000...127 User (initial) combinationsEXB-MOSS combinations
N 000...127 User (initial) combinations
5

6
Simple program editing
7
You can adjust the sound of the preloaded programs to your taste by modifying the pitch, tone, or volume, and by editing the controller and effect settings. You can also create sounds “from scratch.” Such operations are referred to as “editing.”
In this section, we’ll guide you through some simple editing examples using the Performance Editor and the Realtime Controls.
Performance EditorYou can use the eight Performance Editor sliders to mod-ify the sound. Adjusting these sliders will affect multiple parameters of the program.
1 Press the [PROG] key (it will light).You’re in Program mode. Make sure that the Pro-gram Play P0: Play, Performance Edit page is dis-played.
If this is not displayed, press the [EXIT] key and then the Perf. Edit tab.
2 Choose the program whose sound you want to modify. (☞p.4)
3 Select the Performance Editor, and use the [ ][ ] keys or [VALUE] sliders to adjust the values.Octave: Indicates the octave setting.Pitch Stretch: Simultaneously adjusts the transpose and tune settings of the oscillator. This allows you to produce a variety of tonal changes without losing the character of the original sound.This is particularly effective for acoustic-type pro-grams such as guitar, bass, or piano. Select various programs and try this out.OSC Balance: Adjusts the level balance between oscillators 1 and 2.Amp Level: Indicates the amp level. This will adjust the volume of the entire program.Attack Time: Indicates the attack time of the filter EG and amp EG. This will adjust the speed of the attack from note-on.In order to maximize the effect of the Attack Time adjustment, the amp EG Start Level, Attack Level, Start Level Modulation, and Attack Time Modula-tion parameters are also adjusted.
Decay Time: This indicates and adjusts the decay time and slope time of the filter EG and amp EG.IFX Balance: This simultaneously adjusts the “Wet/Dry” balance of all insert effects.MFX Balance: This simultaneously adjusts the Return 1 and 2 parameters of the master effects.
Pitch Stretch cannot be used on programs in bank F.
OSC Balance: For programs whose “Oscillator Mode” (Program P1: Edit-Basic, Program Basic page) setting is Single, oscillator 2 will not sound. Only the level of oscillator 1 will change. For a Drums program, this per-formance editor will have no effect.
Depending on the settings of the program parameters, the result may not be noticeable.
To reset the selected Performance Editor to the value saved with the current program, press numeric key [0] and then press the [ENTER] key.
Realtime Controls
4 Press the [REALTIME CONTROLS] key to select the desired set of realtime control functions. For this example, make the “A” LED light.Each press of the button will cycle through A mode, B mode, and VALVE FORCE.
5 Use REALTIME CONTROLS [1]–[4] to adjust the sound.Turn the knobs to control the tone or other aspects of the sound.
A-mode controlsSetting the knobs to the center (12 o’clock) position will produce the parameter values stored with the program.
Knob [1]: LPF CUTOFFAdjusts the cutoff frequency of the low pass filter.When you adjust the cutoff frequency of the filter, the brightness of the sound will change. The effect will depend on the settings of the program parame-ters, but normally, rotating the knob toward the left will darken the sound, and rotating it toward the right will brighten it.
Knob [2]: RESONANCE/HPFAdjust the resonance level of a low pass filter or the cutoff frequency of a high pass filter.
VALVE FORCE
VOLUME VALUEPROGCOMBI
SAMPLINGSEQ
GLOBALS.PLAY
COMPAREMEDIA
A
B
INPUT TRIM
ASSIGNABLE 1
LPF CUTOFF
ULTRA BOOST
ASSIGNABLE 2
RESONANCE/HPF
TUBE GAIN
ASSIGNABLE 3
EG-INTENSITY
OUTPUT LEVEL
ASSIGNABLE 4
EG-RELEASE
ON/OFFREALTIME CONTROLS
21
31
12
114, 6, 9 8 22, 3232
Program Select
5, 7, 10
Perf. Edit Tab

Setup
Demo
song
sCo
mbina
tion/
Progr
amPr
ogra
m ed
iting
Comb
inatio
n edit
ingAr
pegg
iator
editin
gEff
ects
and V
alve F
orce
Sapli
ngPr
oduc
ing a
song
The content that is controlled will depend on the fil-ter type specified by the program.By adjusting the filter resonance level, you can increase or decrease the resonance level to add a unique character to the sound.Adjusting the cutoff frequency of the high-pass filter will modify the fullness of the sound from which the low frequency range has been filtered out.
Knob [3]: EG-INTENSITYAdjusts the filter EG intensity (the depth at which the filter EG is applied).Rotating the knob will affect the depth of the filter EG. Normally, rotating the knob toward the left will apply the filter EG less deeply, and rotating it
toward the right will apply the filter EG more deeply. Since the filter EG will operate based on the cutoff frequency of the filter, knobs [1] and [3] will work together to control the tonal changes produced by the filter.
Knob [4]: EG-RELEASEAdjusts the release times of the filter EG and the amp EG. This will determine the amount of time from note-off until the sound disappears.When you adjust the knob, the release times of the filter EG and the amp EG will change. Normally, rotating the knob toward the left will shorten the release time, and rotating it toward the right will lengthen the release time.
B-mode controls
6 Press the [REALTIME CONTROLS] key to make the “B” LED light.
7 Use the REALTIME CONTROLS [1]–[4] knobs to adjust the sound.The LCD shows the functions assigned to the knobs in B-mode. Using these knobs, you can control parameters such as volume, portamento time, pan, filter and amp EG, pitch LFO, and master effect send levels etc.In each of the preloaded programs and combina-tions, functions have been assigned to the B-mode knobs. The B-mode functions can be set for each individual program, combination, or song.In Sampling mode and Song Play mode, the B-mode functions are set for the entire mode (☞OG p.129).
Controlling the Valve Force circuit
8 Press the VALVE FORCE [ON/OFF] key (it will light).
9 Press the [REALTIME CONTROLS] key to make the VALVE FORCE LED light.
10 Use the REALTIME CONTROLS [1]–[4] knobs to adjust the sound.
Knob [1]: INPUT TRIMAdjusts the level of the signal being sent to the Valve Force input. This setting will change the way in which “Ultra Boost” affects the low range, and will also affect the effect of the vacuum tube. You can adjust this if raising the “Ultra Boost” setting pro-duces an unwanted type of distortion.
Knob [2]: ULTRA BOOSTAdjusts the mix level being sent to the ultra boost (ultra low frequency boost) circuit located in the ini-tial stage of Valve Force. If you turn this knob all the way toward the left, the ultra boost circuit will be bypassed. Turning the knob toward the right will boost the low range, and simultaneously emphasize the edge. This is especially effective with kick and bass drum.
Knob [3]: TUBE GAINAdjusts the level of the signal being sent to the vac-uum tube. Rotating this knob to the right will increase the amount of the warm tonal character and distortion that is typical of a vacuum tube.
Knob [4]: OUTPUT LEVELAdjusts the Valve Force output level. This lets you adjust the signal level while maintaining the tonal characteristics of the Valve Force circuit. If an unwanted type of distortion occurs in the output, or if “ADC OVERLOAD !!” appears in the display, use this knob to lower the level until this indication does not appear.
Saving the data you editAny edits you have made will disappear when you select a different program or turn off the power. If you’ve come up with a sound you want to keep, you’ll need to Write or Save it. For details on writing and sav-ing, refer to OG p.114 and p.117.If you’ve selected REALTIME CONTROLS A-mode, or if you’ve selected B-mode with CC#70–79 assigned to the knobs, you can write the sounds you’ve edited using knobs [1]–[4].
FrequencyHighLow Cutoff
frequency
Level
Cutoff frequency
LPF
FrequencyHighLow
Level
LPF
Level
LPF HPF
Level
Time
Attack TimeDecay Time Slope Time Release Time
Attack Level
Start Level
Sustain Level
Break Levelnote-on note-off
ReleaseLevel
Level
Time
note-on note-off
A-mode[1] LPF CUTOFF [2] RESONANCE
[2] HPF
[3] EG-INTENSITY [4] EG-RELEASE
7

8
Simple combination editing
enuYou can start with one of the preloaded combinations and modify it to your own liking, or create a combina-tion “from scratch.”Up to eight Timbres can be assigned to a combination to create a complex sound. A timbre consists of a program together with various parameters to control that pro-gram.You can create keyboard splits or layers in which differ-ent programs will sound when you play different areas of the keyboard or vary your playing strength.
Here’s how to change the programs that are assigned to a preloaded combination, and how to adjust the pan and volume settings.
Changing the program assigned to a timbreIn this example we’ll select the combination K032: Shiny DigiPiano and do some simple editing.
1 Press the [COMBI] key (it will light).You’re in Combination mode. Make sure that the Combination P0: Play, Program Select page is dis-played.
If a different page is displayed, press the [EXIT] key and then the Prog. Select tab.
2 Select K032: Shiny DigiPiano.This combination layers (simultaneously sounds) the programs of timbre 1 and timbre 2. A typical electric piano M017: Pro-Stage EP is assigned to Timbre 1, and a digital-type electric piano M049: Classic Tines is assigned to Timbre 2. These two programs are layered to create a frequently-heard type of electric piano sound.
3 Specify the “Status.”When a timbre’s “Status” is turned Off, the pro-gram assigned to that timbre will not sound. If the “Status” is set to INT, the program will sound. Try setting timbres 1 and 2 alternately to INT and Off, and listen to the result.
After you have listened to the sound, set the “Sta-tus” for timbres 1 and 2 to INT.
As an alternative to changing the “Status” setting, you can select the page menu command “Solo Selected Timbre” to hear the sound of an individual timbre.
4 Press the Timbre 2 category popup button, and select a program from the menu.In this combination, both timbre 1 and timbre 2 use programs from the “Keyboard” category. In the menu that appears, try choosing different programs for timbre 2 and listening to the results.
As an alternative way to select a program, you can press “Bank/Program (Program Select)” to highlight it, and use the [ ][ ] keys, the [VALUE] slider, or numeric keys [0]–[9]. Use the BANK [A]–[N] keys to switch banks. You can also press the popup buttons located beside the program numbers and choose from the bank select menu.
VALVE FORCE
VOLUME VALUEPROGCOMBI
SAMPLINGSEQ
GLOBALS.PLAY
COMPAREMEDIA
A
B
INPUT TRIM
ASSIGNABLE 1
LPF CUTOFF
ULTRA BOOST
ASSIGNABLE 2
RESONANCE/HPF
TUBE GAIN
ASSIGNABLE 3
EG-INTENSITY
OUTPUT LEVEL
ASSIGNABLE 4
EG-RELEASE
ON/OFFREALTIME CONTROLS
21 12
11 22, 82
3
Combination Select Page m
4
Prog. Select Tab
Bank/Program
Timbre 2Timbre 1
Program B
Program A
Layer: Two or more programs sound simultaneously.
Only timbre 1 will sound
Only timbre 2 will sound
Setup
Demo
song
sCo
mbina
tion/
Progr
amPr
ogra
m ed
iting
Comb
inatio
n edit
ingAr
pegg
iator
editin
gEff
ects
and V
alve F
orce
Sapli
ngPr
oduc
ing a
song
Selecting another program from the same category
Selecting a program from a different categoryPress one of the tabs located at left or right to select a different category, and then choose a program from that category.
In this example, press the 04 Vocal/Airy tab to select the 04: Vocal/Airy category, and choose L027: Dream Voices. This will produce a layered combina-tion with electric piano and voice.
5 If you’re satisfied with the program you selected, press the OK button.If you press the Cancel button, the combination will revert to its original settings.
Adjusting the pan of each timbre
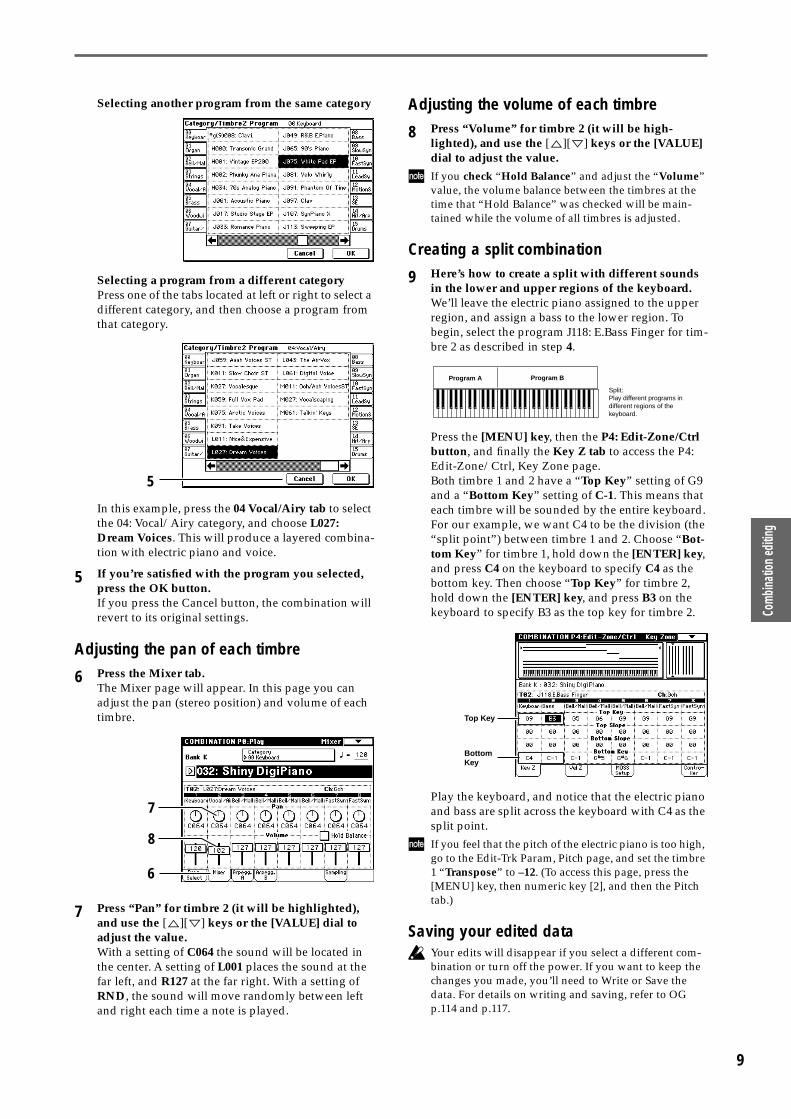
6 Press the Mixer tab.The Mixer page will appear. In this page you can adjust the pan (stereo position) and volume of each timbre.
7 Press “Pan” for timbre 2 (it will be highlighted), and use the [ ][ ] keys or the [VALUE] dial to adjust the value.With a setting of C064 the sound will be located in the center. A setting of L001 places the sound at the far left, and R127 at the far right. With a setting of RND, the sound will move randomly between left and right each time a note is played.
Adjusting the volume of each timbre
8 Press “Volume” for timbre 2 (it will be high-lighted), and use the [ ][ ] keys or the [VALUE] dial to adjust the value.
If you check “Hold Balance” and adjust the “Volume” value, the volume balance between the timbres at the time that “Hold Balance” was checked will be main-tained while the volume of all timbres is adjusted.
Creating a split combination
9 Here’s how to create a split with different sounds in the lower and upper regions of the keyboard. We’ll leave the electric piano assigned to the upper region, and assign a bass to the lower region. To begin, select the program J118: E.Bass Finger for tim-bre 2 as described in step 4.
Press the [MENU] key, then the P4: Edit-Zone/Ctrl button, and finally the Key Z tab to access the P4: Edit-Zone/Ctrl, Key Zone page.Both timbre 1 and 2 have a “Top Key” setting of G9 and a “Bottom Key” setting of C-1. This means that each timbre will be sounded by the entire keyboard.For our example, we want C4 to be the division (the “split point”) between timbre 1 and 2. Choose “Bot-tom Key” for timbre 1, hold down the [ENTER] key, and press C4 on the keyboard to specify C4 as the bottom key. Then choose “Top Key” for timbre 2, hold down the [ENTER] key, and press B3 on the keyboard to specify B3 as the top key for timbre 2.
Play the keyboard, and notice that the electric piano and bass are split across the keyboard with C4 as the split point.
If you feel that the pitch of the electric piano is too high, go to the Edit-Trk Param, Pitch page, and set the timbre 1 “Transpose” to –12. (To access this page, press the [MENU] key, then numeric key [2], and then the Pitch tab.)
Saving your edited dataYour edits will disappear if you select a different com-bination or turn off the power. If you want to keep the changes you made, you’ll need to Write or Save the data. For details on writing and saving, refer to OG p.114 and p.117.
5
7
6
8
Program BProgram A
Split:Play different programs in different regions of the keyboard.
Top Key
Bottom Key
9

10
Simple arpeggiator editing
VALVE FORCE
VOLUME VALUEPROGCOMBI
SAMPLINGSEQ
GLOBALS.PLAY
COMPAREMEDIA
A
B
INPUT TRIM
ASSIGNABLE 1
LPF CUTOFF
ULTRA BOOST
ASSIGNABLE 2
RESONANCE/HPF
TUBE GAIN
ASSIGNABLE 3
EG-INTENSITY
OUTPUT LEVEL
ASSIGNABLE 4
EG-RELEASE
ON/OFFREALTIME CONTROLS
21 63
5
4
12
11 22, 64
Program Select
8292
711...14
10
Arpeggio Tab
The arpeggiator is a function that automatically gener-ates arpeggios (broken chords). Most arpeggiators pro-duce an arpeggio when you play a chord on the keyboard.
In addition to this, the TRITON Extreme’s arpeggiator is a polyphonic arpeggiator that is able to produce a vari-ety of chordal transformations or phrases based on the pitch or timing of the notes you play on the keyboard. These functions let you use the arpeggiator to play a wide range of patterns including drum or bass phrases, and guitar or keyboard backing riffs. It is also effective to use the arpeggiator as part of the sound-creating process when creating subtly-moving pads, synth-sounds, or sound effects.The TRITON Extreme provides five preset arpeggio pat-terns (the standard UP, DOWN, ALT1, ALT2, and RAN-DOM), and lets you create, program and store 507 user arpeggio patterns; and 367 of these user arpeggiator locations contain preloaded patterns. (☞OG p.98)
Changing a program’s arpeggiator Pattern
1 Press the [PROG] key.You’re in the Program mode. Make sure that the dis-play shows Program P0: Play.
If a different screen is shown, press the [EXIT] key.
2 Select a program.
3 Press the ARPEGGIATOR [ON/OFF] key (it will light).When you play the keyboard, the arpeggiator will produce an arpeggio pattern such as an arpeggio (broken chord) or backing riff.
Normally, when you select a new program, the arpeg-giator will use the arpeggiator pattern saved with that program. If you want to keep the current arpeggio pat-tern running while you switch programs, you can change this setting in “Auto Arpeggiator” (Global P0: Basic Setup, Basic page). (☞OG p.90)
4 Press the Arpeggio tab.
5 In “Pat (Pattern Select),” press the popup button and select an arpeggio pattern from the menu.
You can press the Pin icon to keep the menu open while you are selecting a pattern.
You can choose from preset arpeggio patterns P000–P004 and user arpeggio patterns U000 (A/B)–U506 (User). With the factory settings, these contain a wide range of arpeggio patterns. (☞VNL)The arpeggio pattern names are organized by type according to the first characters of the name.Gt: guitar backing, Key: keyboard backing, Str: strings, Bs: bass phrases, Ds: drum phrases, etc.
Adjusting the arpeggiator speed
6 Turn the ARPEGGIATOR [TEMPO] knob to adjust the tempo.The “� =” value in the upper right of the LCD will change.You can adjust the tempo from 40–240 BPM (Beats Per Minute).Alternatively, you can specify the tempo by tapping the [ENTER] key a few times at the desired tempo (“Tap-Tempo”). The LED will blink at the specified tempo.
“Pat” UP, “Sort” checkThe chord you played on the keyboard is sounded as an arpeggio (broken chord)
5
Pin

11
MENUEXIT ENTER0 /10's HOLD
21 3
REC/WRITELOCATE START/STOP
REW
SEQUENCER ARPEGGIATOR
PROG BANK
A B C D E F G
H I J K L M N
SMPL MOSS GMCOMBI BANK
PROG/COMBI BANK
PAUSE FF TEMPO120
40 240
REC START/STOPSAMPLING
ON/OFF
VELOCITYGATE
54 6
87 9
62
23
361 81 91
Setup
Demo
song
sCo
mbina
tion/
Progr
amPr
ogra
m ed
iting
Comb
inatio
n edit
ingAr
pegg
iator
editin
gEff
ects
and V
alve F
orce
Sapli
ngPr
oduc
ing a
song
Another way to set the tempo is by selecting “� =” and using the [ ][ ] keys or the [VALUE] slider.You can also synchronize the tempo to an external MIDI device. In this case you won’t be able to control the tempo from the TRITON Extreme.The apparent tempo is also affected by the “Resolu-tion” setting in the P7: Edit-Arpeggiator, Arpeg. Setup page.
If the display indicates “� =” EXT, the TRITON Extreme is operating according to an external MIDI clock signal; i.e., “MIDI Clock” (Global P1: MIDI) is set to External MIDI or External USB.
7 Set “Reso (Resolution)” to specify the spacing of the arpeggiated notes over a range of �� – � .
Changing the way that the arpeggio is played
8 Turn the ARPEGGIATOR [GATE] knob to adjust the duration of the arpeggiated notes.Turning the knob toward the left will shorten the notes, and turning it toward the right will lengthen them. When the knob is at the center (12 o’clock) position, the notes will be played as specified by the program parameter “Gate”. (☞Program P7: Edit-Arpeggiator, Arpeg. Setup page)
This function can work more effectively in conjunction with the REALTIME CONTROLS A-mode knob [4] (EG RELEASE).
9 Rotate the ARPEGGIATOR [VELOCITY] knob to adjust the strength (loudness) of the arpeggio notes.Rotating the knob toward the left will make the notes softer, and rotating the knob toward the right will make the notes stronger. At the center position (12 o’clock), the velocity will be played as specified by the program parameter “Velocity” (☞Program P7: Edit-Arpeggiator, Arpeg. Setup page).
This function can work more effectively in conjunction with the REALTIME CONTROLS A-mode knobs [1] (LPF CUTOFF), [2] (RESONANCE/HPF), and [3] (EG- INTENSITY).
10 Select 1, 2, 3, or 4 next to “Octave” to specify the range of octaves over which the arpeggiated pat-tern will be played.
11 Use “Sort” to specify whether the notes you play will be sounded in the order of their pitch.Checked: the arpeggio will sound each note in the order of its pitch, regardless of the order in which you actually played the notes.Unchecked: the arpeggio will sound each note in the order in which you actually played the notes.
12 Use “Latch” to specify whether the arpeggio will continue even after you take your hand off the keyboard.Checked: The arpeggio will continue playing even after you remove your hand from the keyboard.Unchecked: The arpeggio will stop playing when you remove your hand from the keyboard.
13 Use “Key Sync.” to specify whether the arpeggio pattern will start when you play the keyboard, or will always follow the tempo in synchronization with the MIDI Clock.Checked: When you take your hand completely off of the keyboard and then play the first note-on, the arpeggio pattern will start from the beginning. This setting is suitable when you want the arpeggio to start from the beginning of the measure as you are playing in realtime.Unchecked: The arpeggio will always be synchro-nized to the sequncer or external MIDI clock tempo. This is useful when playing arpeggios in sync with recorded tracks or other instruments.
14 Use “Keyboard” to specify whether the notes you play on the keyboard will be heard in addition to the arpeggiated notes.Checked: The notes you play on the keyboard and the notes played by the arpeggiator will both sound.Unchecked: Only the arpeggiated notes will sound.
Saving your edited dataYour edits will disappear if you select a different pro-gram or turn off the power. If you want to keep the changes you made, you’ll need to Write or Save the data. For details on writing and saving, refer to OG p.114 and p.117.
12
8
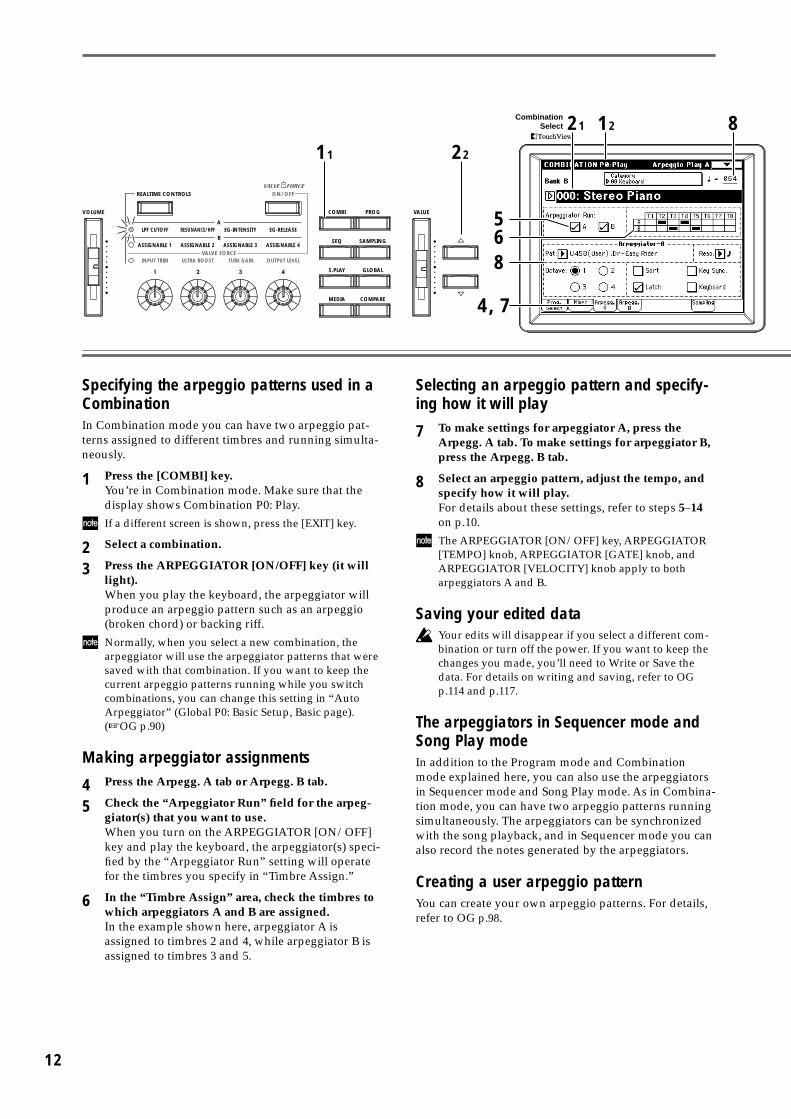
Specifying the arpeggio patterns used in a CombinationIn Combination mode you can have two arpeggio pat-terns assigned to different timbres and running simulta-neously.
1 Press the [COMBI] key.You’re in Combination mode. Make sure that the display shows Combination P0: Play.
If a different screen is shown, press the [EXIT] key.
2 Select a combination.
3 Press the ARPEGGIATOR [ON/OFF] key (it will light).When you play the keyboard, the arpeggiator will produce an arpeggio pattern such as an arpeggio (broken chord) or backing riff.
Normally, when you select a new combination, the arpeggiator will use the arpeggiator patterns that were saved with that combination. If you want to keep the current arpeggio patterns running while you switch combinations, you can change this setting in “Auto Arpeggiator” (Global P0: Basic Setup, Basic page). (☞OG p.90)
Making arpeggiator assignments
4 Press the Arpegg. A tab or Arpegg. B tab.
5 Check the “Arpeggiator Run” field for the arpeg-giator(s) that you want to use.When you turn on the ARPEGGIATOR [ON/OFF] key and play the keyboard, the arpeggiator(s) speci-fied by the “Arpeggiator Run” setting will operate for the timbres you specify in “Timbre Assign.”
6 In the “Timbre Assign” area, check the timbres to which arpeggiators A and B are assigned.In the example shown here, arpeggiator A is assigned to timbres 2 and 4, while arpeggiator B is assigned to timbres 3 and 5.
Selecting an arpeggio pattern and specify-ing how it will play
7 To make settings for arpeggiator A, press the Arpegg. A tab. To make settings for arpeggiator B, press the Arpegg. B tab.
8 Select an arpeggio pattern, adjust the tempo, and specify how it will play.For details about these settings, refer to steps 5–14 on p.10.
The ARPEGGIATOR [ON/OFF] key, ARPEGGIATOR [TEMPO] knob, ARPEGGIATOR [GATE] knob, and ARPEGGIATOR [VELOCITY] knob apply to both arpeggiators A and B.
Saving your edited dataYour edits will disappear if you select a different com-bination or turn off the power. If you want to keep the changes you made, you’ll need to Write or Save the data. For details on writing and saving, refer to OG p.114 and p.117.
The arpeggiators in Sequencer mode and Song Play modeIn addition to the Program mode and Combination mode explained here, you can also use the arpeggiators in Sequencer mode and Song Play mode. As in Combina-tion mode, you can have two arpeggio patterns running simultaneously. The arpeggiators can be synchronized with the song playback, and in Sequencer mode you can also record the notes generated by the arpeggiators.
Creating a user arpeggio patternYou can create your own arpeggio patterns. For details, refer to OG p.98.
VALVE FORCE
VOLUME VALUEPROGCOMBI
SAMPLINGSEQ
GLOBALS.PLAY
COMPAREMEDIA
A
B
INPUT TRIM
ASSIGNABLE 1
LPF CUTOFF
ULTRA BOOST
ASSIGNABLE 2
RESONANCE/HPF
TUBE GAIN
ASSIGNABLE 3
EG-INTENSITY
OUTPUT LEVEL
ASSIGNABLE 4
EG-RELEASE
ON/OFFREALTIME CONTROLS
11 22
21
8
4, 7
12Combination
Select
56
[E
Setup
Demo
song
sCo
mbina
tion/
Progr
amPr
ogra
m ed
iting
Comb
inatio
n edit
ingAr
pegg
iator
editin
gEff
ects
and V
alve F
orce
Sapli
ngPr
oduc
ing a
song
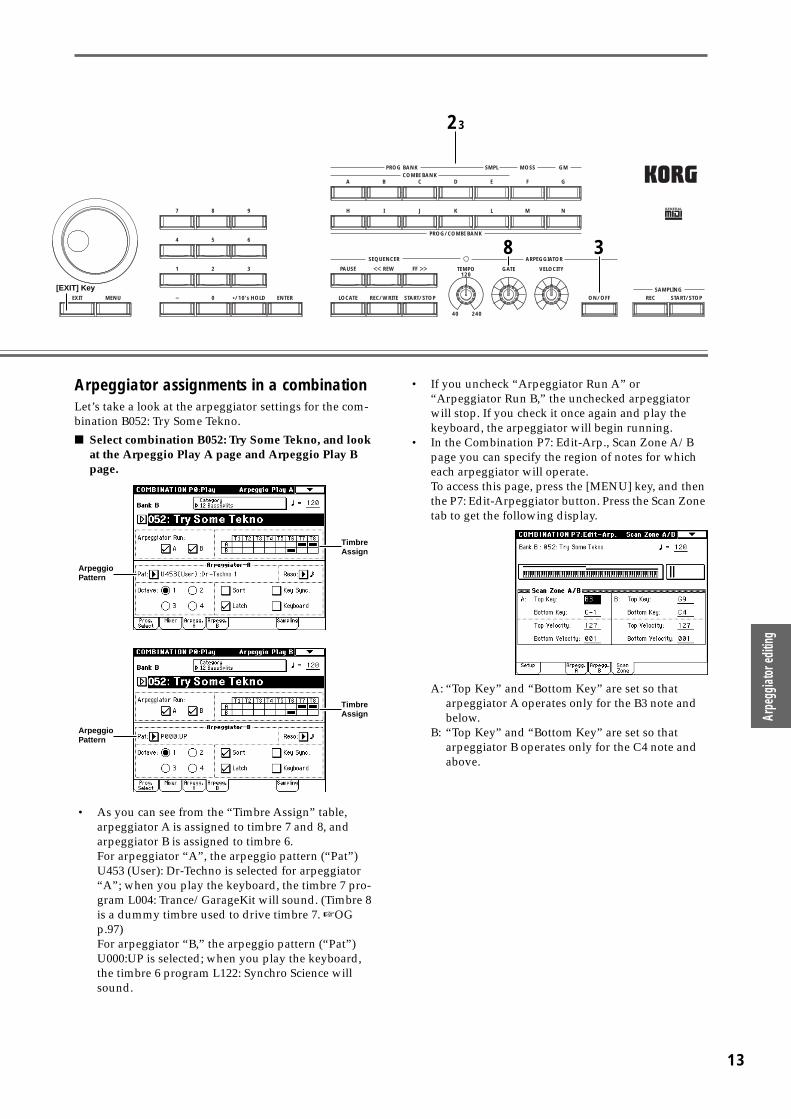
Arpeggiator assignments in a combinationLet’s take a look at the arpeggiator settings for the com-bination B052: Try Some Tekno.
■ Select combination B052: Try Some Tekno, and look at the Arpeggio Play A page and Arpeggio Play B page.
• As you can see from the “Timbre Assign” table, arpeggiator A is assigned to timbre 7 and 8, and arpeggiator B is assigned to timbre 6.For arpeggiator “A”, the arpeggio pattern (“Pat”) U453 (User): Dr-Techno is selected for arpeggiator “A”; when you play the keyboard, the timbre 7 pro-gram L004: Trance/GarageKit will sound. (Timbre 8 is a dummy timbre used to drive timbre 7. ☞OG p.97)For arpeggiator “B,” the arpeggio pattern (“Pat”) U000:UP is selected; when you play the keyboard, the timbre 6 program L122: Synchro Science will sound.
• If you uncheck “Arpeggiator Run A” or “Arpeggiator Run B,” the unchecked arpeggiator will stop. If you check it once again and play the keyboard, the arpeggiator will begin running.
• In the Combination P7: Edit-Arp., Scan Zone A/B page you can specify the region of notes for which each arpeggiator will operate.To access this page, press the [MENU] key, and then the P7: Edit-Arpeggiator button. Press the Scan Zone tab to get the following display.
A: “Top Key” and “Bottom Key” are set so that arpeggiator A operates only for the B3 note and below.
B: “Top Key” and “Bottom Key” are set so that arpeggiator B operates only for the C4 note and above.
MENUEXIT ENTER0 /10's HOLD
21 3
REC/WRITELOCATE START/STOP
REW
SEQUENCER ARPEGGIATOR
PROG BANK
A B C D E F G
H I J K L M N
SMPL MOSS GMCOMBI BANK
PROG/COMBI BANK
PAUSE FF TEMPO120
40 240
REC START/STOPSAMPLING
ON/OFF
VELOCITYGATE
54 6
87 9
23
38
XIT] Key
Arpeggio Pattern
Timbre Assign
Arpeggio Pattern
Timbre Assign
13

14
Editing effects and Valve Force
0
2
5
8
The TRITON Extreme provides five insert effects, two master effects, and a three-band master EQ. For each insert effect, you can choose from 102 types of effect including filter, dynamics, pitch, modulation, delay, and reverb. For each master effect you can choose from 89 types of effect.
By sending the signal through Valve Force (analog vac-uum tube circuit) you can produce the rich overtones and smooth distortion that are typical of vacuum tubes.
Working with the effect settings in a program
1 Select a program.Press the [PROG] key to enter Program mode, and select the bank J program 017: Studio Stage EP. (☞p.4)
2 Access the P8: Edit-Insert Effect, Routing page.Press the [MENU] key to access the page jump menu, and then press the P8: Edit-Insert Effect but-ton. Then press the Routing tab.
“BUS Select (IFX/Indiv. Out Assign)” specifies the destination to which the output of the oscillator will be sent. IFX1 is selected for this program, meaning that the output of the oscillator will be sent to insert effect 1. The output is shown as an arrow in the LCD screen, indicating that the signal is being sent to IFX1. This page also shows the type of effects used by IFX1–IFX3. Notice that the arrow extending from IFX1 points into IFX2, and that the arrow extending from IFX2 points into IFX3. This shows that the oscillator output is connected in series to these three effects.
3 Access the P8: Edit-Insert Effect, Insert FX page.Press the Insert FX tab. In this page you can select an effect and specify how it is connected.Let’s change the effect assigned to insert effect 1. Press the popup button to choose an effect type by category. For this example, select 002: Stereo Com-pressor.
Now let’s add an additional effect. Check the “Chain” check box located at the left of IFX3. This connects IFX4 to our chain of effects. Press the IFX4 OFF button to turn it ON. Then select an effect. How about 034: Stereo Auto Pan? Try selecting vari-ous effects to find the best one for your purpose.
To adjust the effect depth and other effect settings, use the IFX1–IFX5 tabs to select the appropriate page, and adjust the various parameters. For details on each effect, refer to PG p.217.With the settings you’ve made here, the post-IFX4 “Pan (CC#8)” will adjust the panning to Output L/R, and “Send1” and “Send2” will adjust the amount of the oscillator output signal that is sent to master effect 1 and 2.
VALUEPROGCOMBI
SAMPLINGSEQ
GLOBALS.PLAY
COMPAREMEDIA MENUEXIT
1
4
7
13
21
12
11 14
22
31
32
33
34
35
Setup
Demo
song
sCo
mbina
tion/
Progr
amPr
ogra
m ed
iting
Comb
inatio
n edit
ingAr
pegg
iator
editin
gEff
ects
and V
alve F
orce
Sapli
ngPr
oduc
ing a
song
0
2
5
8
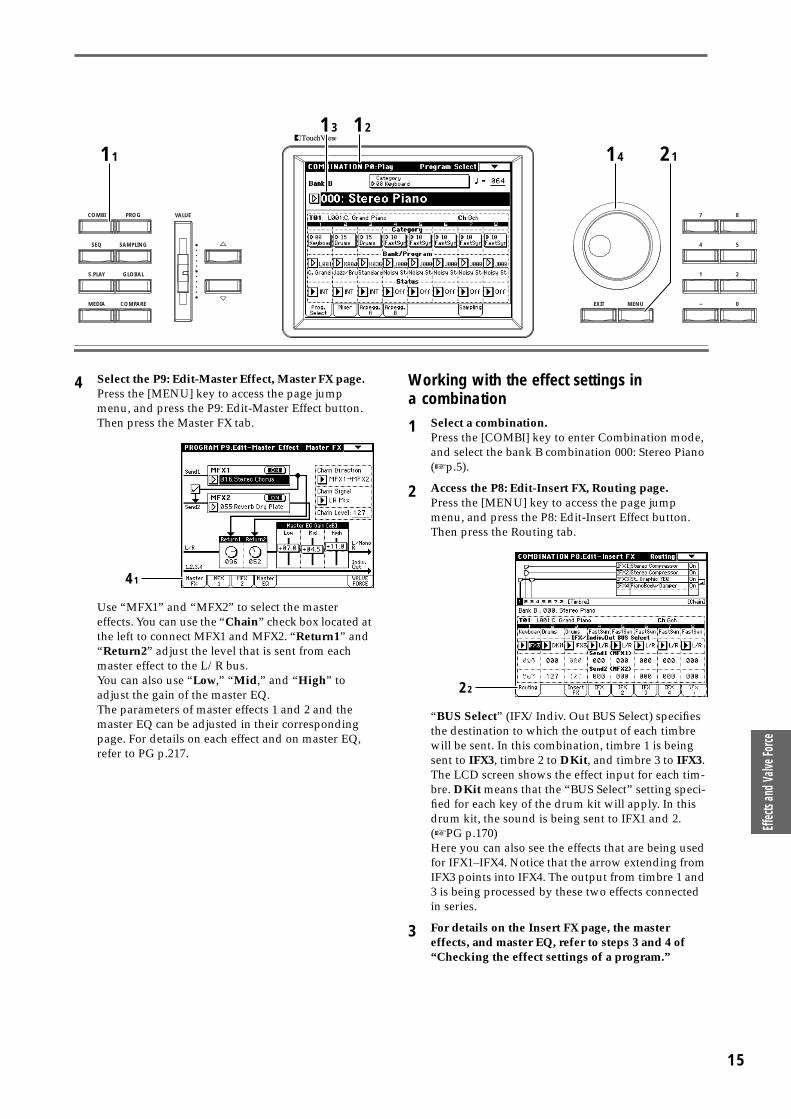
4 Select the P9: Edit-Master Effect, Master FX page.Press the [MENU] key to access the page jump menu, and press the P9: Edit-Master Effect button. Then press the Master FX tab.
Use “MFX1” and “MFX2” to select the master effects. You can use the “Chain” check box located at the left to connect MFX1 and MFX2. “Return1” and “Return2” adjust the level that is sent from each master effect to the L/R bus.You can also use “Low,” “Mid,” and “High” to adjust the gain of the master EQ.The parameters of master effects 1 and 2 and the master EQ can be adjusted in their corresponding page. For details on each effect and on master EQ, refer to PG p.217.
Working with the effect settings in a combination
1 Select a combination.Press the [COMBI] key to enter Combination mode, and select the bank B combination 000: Stereo Piano (☞p.5).
2 Access the P8: Edit-Insert FX, Routing page.Press the [MENU] key to access the page jump menu, and press the P8: Edit-Insert Effect button. Then press the Routing tab.
“BUS Select” (IFX/Indiv. Out BUS Select) specifies the destination to which the output of each timbre will be sent. In this combination, timbre 1 is being sent to IFX3, timbre 2 to DKit, and timbre 3 to IFX3. The LCD screen shows the effect input for each tim-bre. DKit means that the “BUS Select” setting speci-fied for each key of the drum kit will apply. In this drum kit, the sound is being sent to IFX1 and 2. (☞PG p.170)Here you can also see the effects that are being used for IFX1–IFX4. Notice that the arrow extending from IFX3 points into IFX4. The output from timbre 1 and 3 is being processed by these two effects connected in series.
3 For details on the Insert FX page, the master effects, and master EQ, refer to steps 3 and 4 of “Checking the effect settings of a program.”
VALUEPROGCOMBI
SAMPLINGSEQ
GLOBALS.PLAY
COMPAREMEDIA MENUEXIT
1
4
7
13
21
12
11 14
41
22
15
16
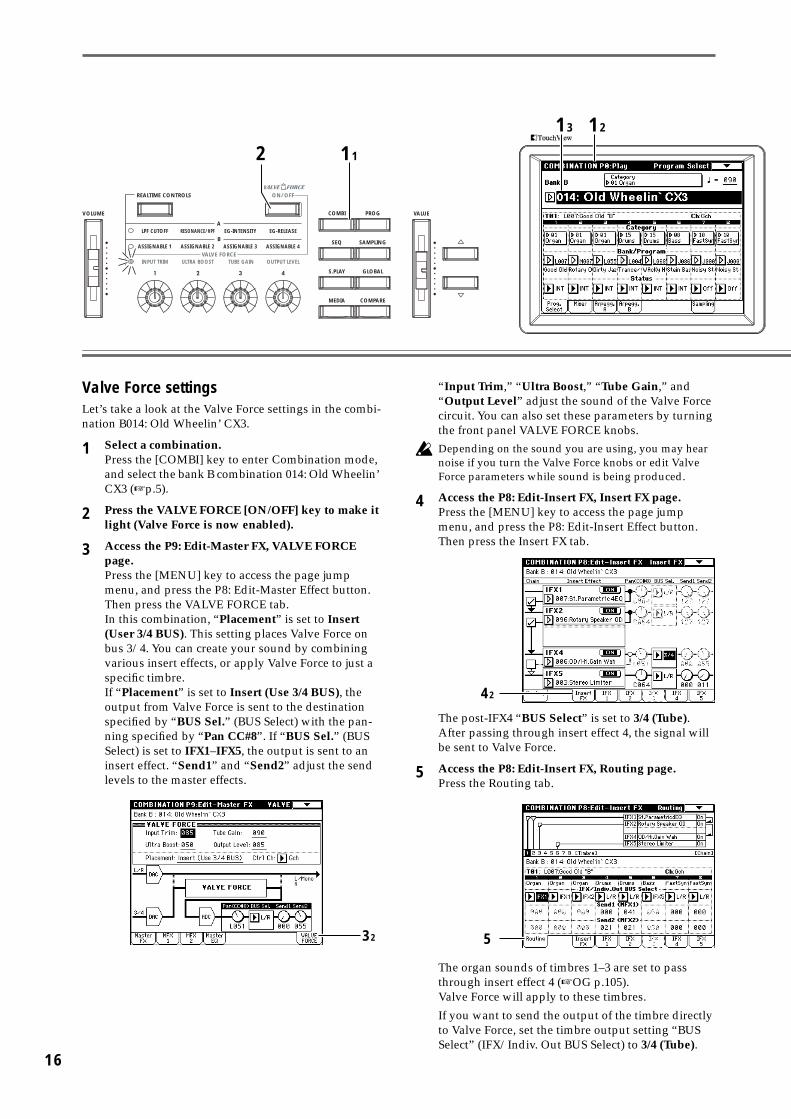
Valve Force settingsLet’s take a look at the Valve Force settings in the combi-nation B014: Old Wheelin’ CX3.
1 Select a combination.Press the [COMBI] key to enter Combination mode, and select the bank B combination 014: Old Wheelin’ CX3 (☞p.5).
2 Press the VALVE FORCE [ON/OFF] key to make it light (Valve Force is now enabled).
3 Access the P9: Edit-Master FX, VALVE FORCE page.Press the [MENU] key to access the page jump menu, and press the P8: Edit-Master Effect button. Then press the VALVE FORCE tab.In this combination, “Placement” is set to Insert (User 3/4 BUS). This setting places Valve Force on bus 3/4. You can create your sound by combining various insert effects, or apply Valve Force to just a specific timbre.If “Placement” is set to Insert (Use 3/4 BUS), the output from Valve Force is sent to the destination specified by “BUS Sel.” (BUS Select) with the pan-ning specified by “Pan CC#8”. If “BUS Sel.” (BUS Select) is set to IFX1–IFX5, the output is sent to an insert effect. “Send1” and “Send2” adjust the send levels to the master effects.
“Input Trim,” “Ultra Boost,” “Tube Gain,” and “Output Level” adjust the sound of the Valve Force circuit. You can also set these parameters by turning the front panel VALVE FORCE knobs.
Depending on the sound you are using, you may hear noise if you turn the Valve Force knobs or edit Valve Force parameters while sound is being produced.
4 Access the P8: Edit-Insert FX, Insert FX page.Press the [MENU] key to access the page jump menu, and press the P8: Edit-Insert Effect button. Then press the Insert FX tab.
The post-IFX4 “BUS Select” is set to 3/4 (Tube). After passing through insert effect 4, the signal will be sent to Valve Force.
5 Access the P8: Edit-Insert FX, Routing page.Press the Routing tab.
The organ sounds of timbres 1–3 are set to pass through insert effect 4 (☞OG p.105).Valve Force will apply to these timbres.
If you want to send the output of the timbre directly to Valve Force, set the timbre output setting “BUS Select” (IFX/Indiv. Out BUS Select) to 3/4 (Tube).
VALVE FORCE
VOLUME VALUEPROGCOMBI
SAMPLINGSEQ
GLOBALS.PLAY
COMPAREMEDIA
A
B
INPUT TRIM
ASSIGNABLE 1
LPF CUTOFF
ULTRA BOOST
ASSIGNABLE 2
RESONANCE/HPF
TUBE GAIN
ASSIGNABLE 3
EG-INTENSITY
OUTPUT LEVEL
ASSIGNABLE 4
EG-RELEASE
ON/OFFREALTIME CONTROLS
13 12
112
32
42
5

E
Setup
Demo
song
sCo
mbina
tion/
Progr
amPr
ogra
m ed
iting
Comb
inatio
n edit
ingAr
pegg
iator
editin
gEff
ects
and V
alve F
orce
Sapli
ngPr
oduc
ing a
song
6 Access the P9: Edit-Master FX, VALVE FORCE page.Earlier in step 3, we explained how Valve Force works whenplaced on bus 3/4. You can place the TRITON Extreme’s Valve Force circuit at the final stage of the L/R bus, so that the signal will enter Valve Force after the master EQ is applied. This means that the output of all timbres will pass through Valve Force. If you want to use Valve Force in this way, set “Placement” to Final. In this case, the “Pan CC#8”–“Send2” settings will be ignored.In this combination if you (for example) set the post-IFX4 “BUS Select” to L/R (step 4) and set “Place-ment” to Final, the Valve Force effect will apply to the drum program as well (if the arpeggiator ON).
MENUXIT ENTER0 /10's HOLD
21 3
REC/WRITELOCATE START/STOP
REW
SEQUENCER ARPEGGIATOR
PROG BANK
A B C D E F G
H I J K L M N
SMPL MOSS GMCOMBI BANK
PROG/COMBI BANK
PAUSE FF TEMPO120
40 240
REC START/STOPSAMPLING
ON/OFF
VELOCITYGATE
54 6
87 9
3114
17
18
Sampling (recording a sample)
VALVE FORCE
VOLUME VALUEPROGCOMBI
SAMPLINGSEQ
GLOBALS.PLAY
COMPAREMEDIA
A
B
INPUT TRIM
ASSIGNABLE 1
LPF CUTOFF
ULTRA BOOST
ASSIGNABLE 2
RESONANCE/HPF
TUBE GAIN
ASSIGNABLE 3
EG-INTENSITY
OUTPUT LEVEL
ASSIGNABLE 4
EG-RELEASE
ON/OFFREALTIME CONTROLS
3122
21
24
94
Input Setup Tab
The TRITON Extreme can record mono or stereo, 48 kHz 16-bit samples. The Open Sampling System allows sam-pling to be performed in Sampling, Program, Combina-tion, and Sequencer modes. (Open Sampling System)The various functions of each mode can be used while sampling.
Here are some examples.• Sample a vocal from a mic, and play it back using
“one-shot” playback.• Send the input audio through an insert effect or
Valve Force and sample it• In Program mode, resample a phrase played by the
arpeggiator.
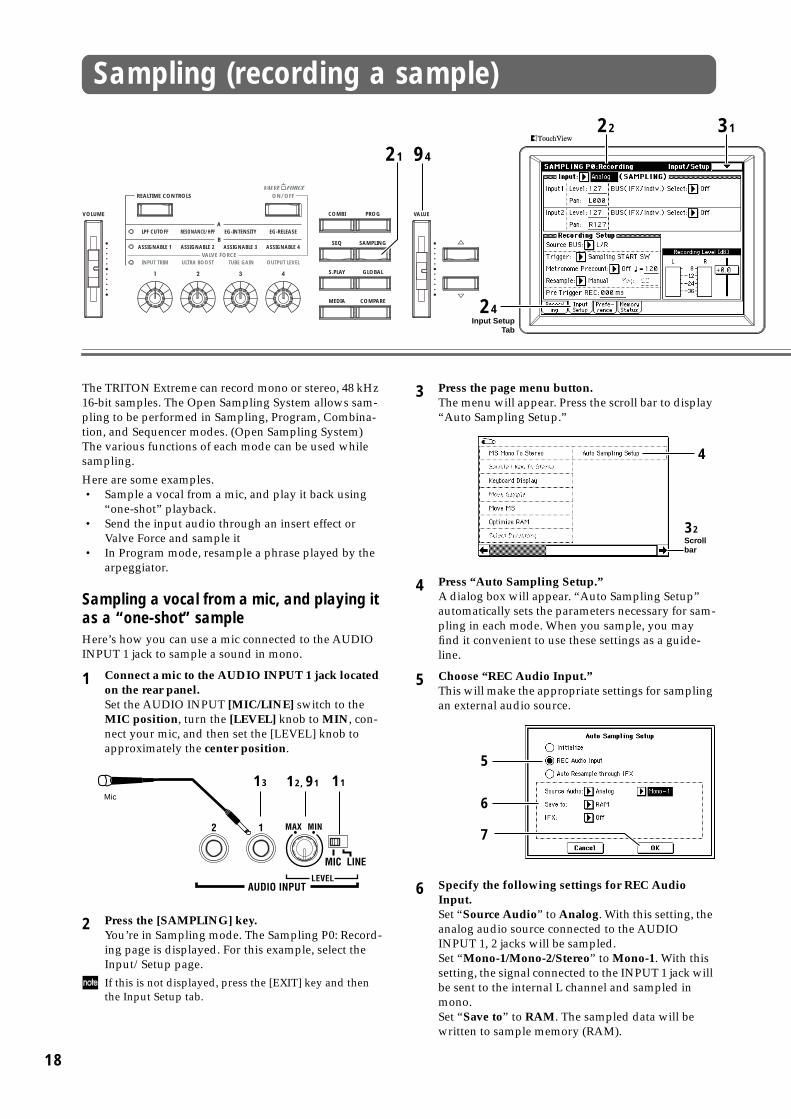
Sampling a vocal from a mic, and playing it as a “one-shot” sampleHere’s how you can use a mic connected to the AUDIO INPUT 1 jack to sample a sound in mono.
1 Connect a mic to the AUDIO INPUT 1 jack located on the rear panel.Set the AUDIO INPUT [MIC/LINE] switch to the MIC position, turn the [LEVEL] knob to MIN, con-nect your mic, and then set the [LEVEL] knob to approximately the center position.
2 Press the [SAMPLING] key.You’re in Sampling mode. The Sampling P0: Record-ing page is displayed. For this example, select the Input/Setup page.
If this is not displayed, press the [EXIT] key and then the Input Setup tab.
3 Press the page menu button.The menu will appear. Press the scroll bar to display “Auto Sampling Setup.”
4 Press “Auto Sampling Setup.”A dialog box will appear. “Auto Sampling Setup” automatically sets the parameters necessary for sam-pling in each mode. When you sample, you may find it convenient to use these settings as a guide-line.
5 Choose “REC Audio Input.”This will make the appropriate settings for sampling an external audio source.
6 Specify the following settings for REC Audio Input.Set “Source Audio” to Analog. With this setting, the analog audio source connected to the AUDIO INPUT 1, 2 jacks will be sampled.Set “Mono-1/Mono-2/Stereo” to Mono-1. With this setting, the signal connected to the INPUT 1 jack will be sent to the internal L channel and sampled in mono.Set “Save to” to RAM. The sampled data will be written to sample memory (RAM).
Mic
13 1112, 91
4
32Scrollbar
5
6
7

MENUEXIT ENTER0 /10's HOLD
21 3
REC/WRITELOCATE START/STOP
REW
SEQUENCER ARPEGGIATOR
PROG BANK
A B C D E F G
H I J K L M N
SMPL MOSS GMCOMBI BANK
PROG/COMBI BANK
PAUSE FF TEMPO120
40 240
REC START/STOPSAMPLING
ON/OFF
VELOCITYGATE
54 6
87 9 92, 95, 101, 151
23
102, 12, 152, 153
Setup
Demo
song
sCo
mbina
tion/
Progr
amPr
ogra
m ed
iting
Comb
inatio
n edit
ingAr
pegg
iator
editin
gEff
ects
and V
alve F
orce
Sapli
ngPr
oduc
ing a
song
Turn “IFX” Off. No insert effect will be applied while sampling.
7 Press the OK button.The TRITON Extreme will automatically set up the following sampling parameters.
Take a minute to check that these are the settings that have been made.
Input 1 “Level”: 127, “Pan”: L000“BUS (IFX/Indiv.) Select”: L/R
These parameters specify the input level and pan from the INPUT 1, and select the L/R bus as the des-tination.
“Source BUS”: L/RThe sound sent to the L/R bus will be sampled.
“Trigger”: Sampling START SWSampling will start when you press the SAMPLING [START/STOP] key.
“Recording Level”: +0.0This is the default setting for external input record-ing.
“Save to”: RAMThe sound will be sampled to sample memory (RAM).
“Mode”: Mono-1The sound of the internal L channel will be sampled in mono.
The only thing we’re going to change here is the “Trigger” setting that specifies how sampling will begin. For this example, let’s set this so sampling will begin when the input audio exceeds a specific level.
8 Set “Trigger” to Threshold, and set “Level” to –30.With this setting, recording will begin automatically when the audio input reaches –30 dB or higher in record-ready mode.
Set “Pre Trigger” to 005 ms.With this setting, sample recording will begin 5 ms earlier than (i.e., immediately before) sampling is actually triggered, so that the very beginning of the sound is not lost.
9 Adjust the recording level.Use the rear panel [LEVEL] knob to adjust the level appropriately.Speak into your mic at the level you intend to record, and adjust the level as high as possible with-out allowing the “ADC OVERLOAD !!” (AD con-verter input overload) warning to appear.
Press the SAMPLING [REC] key, and adjust the “Recording Level” slider.When you press the SAMPLING [REC] key, a level meter will indicate the input level. Adjust the level as high as possible without allowing the “CLIP!!” warning to appear. Use the [VALUE] slider etc. to adjust the “Recording Level” slider.
8
93
19
20
10 With the SAMPLING [REC] key still lit (on), press the SAMPLING [START/STOP] key to enter record-ready mode.
11 Speak into your mic, saying the word or phrase you want to sample.(E.g., “It’s”)Recording will start when the input exceeds the “Level” –30 dB level.
12 When you finish speaking, press the SAMPLING [START/STOP] key to stop sampling.A sample has now been created. The sample you recorded is automatically assigned to “Sample (Sample Select).” Press the note on the keyboard designated as the “OrigKey” note (C2 in this case), and you will hear the sound that was sampled. (Recording page)
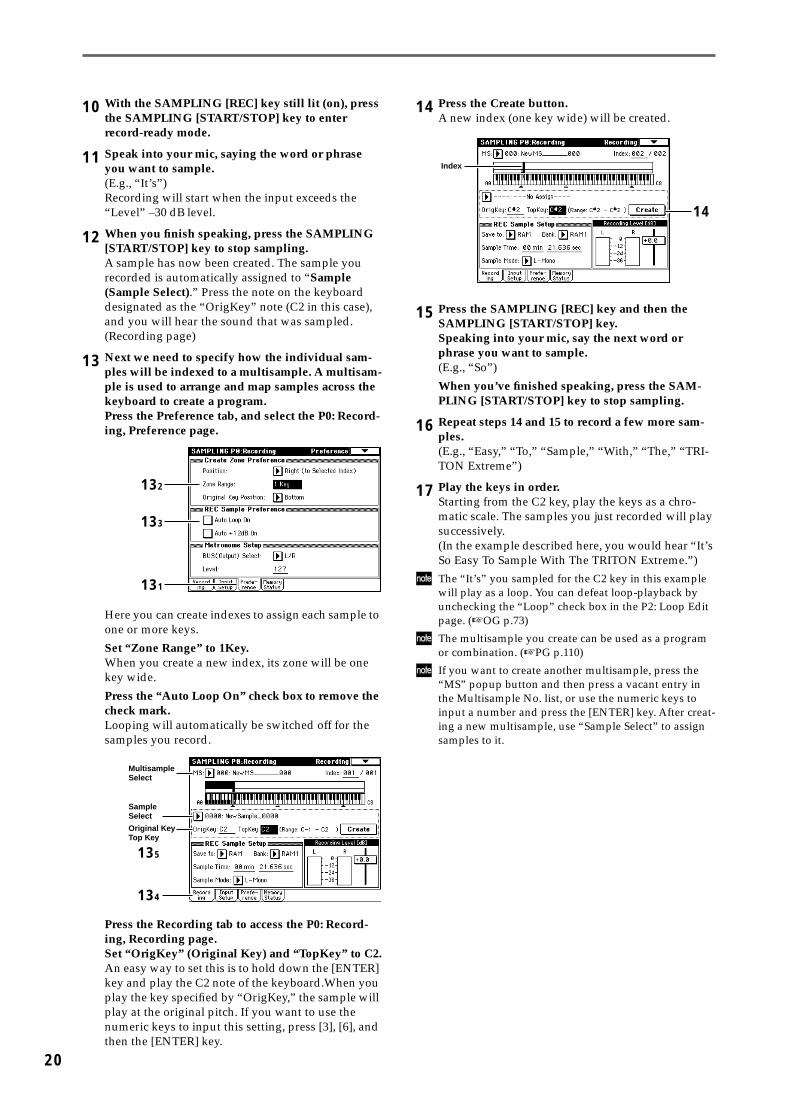
13 Next we need to specify how the individual sam-ples will be indexed to a multisample. A multisam-ple is used to arrange and map samples across the keyboard to create a program.Press the Preference tab, and select the P0: Record-ing, Preference page.
Here you can create indexes to assign each sample to one or more keys.
Set “Zone Range” to 1Key.When you create a new index, its zone will be one key wide.
Press the “Auto Loop On” check box to remove the check mark.Looping will automatically be switched off for the samples you record.
Press the Recording tab to access the P0: Record-ing, Recording page.Set “OrigKey” (Original Key) and “TopKey” to C2.An easy way to set this is to hold down the [ENTER] key and play the C2 note of the keyboard.When you play the key specified by “OrigKey,” the sample will play at the original pitch. If you want to use the numeric keys to input this setting, press [3], [6], and then the [ENTER] key.
14 Press the Create button.A new index (one key wide) will be created.
15 Press the SAMPLING [REC] key and then the SAMPLING [START/STOP] key.Speaking into your mic, say the next word or phrase you want to sample.(E.g., “So”)
When you’ve finished speaking, press the SAM-PLING [START/STOP] key to stop sampling.
16 Repeat steps 14 and 15 to record a few more sam-ples.(E.g., “Easy,” “To,” “Sample,” “With,” “The,” “TRI-TON Extreme”)
17 Play the keys in order.Starting from the C2 key, play the keys as a chro-matic scale. The samples you just recorded will play successively.(In the example described here, you would hear “It’s So Easy To Sample With The TRITON Extreme.”)
The “It’s” you sampled for the C2 key in this example will play as a loop. You can defeat loop-playback by unchecking the “Loop” check box in the P2: Loop Edit page. (☞OG p.73)
The multisample you create can be used as a program or combination. (☞PG p.110)
If you want to create another multisample, press the “MS” popup button and then press a vacant entry in the Multisample No. list, or use the numeric keys to input a number and press the [ENTER] key. After creat-ing a new multisample, use “Sample Select” to assign samples to it.
131
132
133
Original KeyTop Key
SampleSelect
MultisampleSelect
134
135
Index
14

Setup
Demo
song
sCo
mbina
tion/
Progr
amPr
ogra
m ed
iting
Comb
inatio
n edit
ingAr
pegg
iator
editin
gEff
ects
and V
alve F
orce
Sapli
ngPr
oduc
ing a
song
Applying an insert effect to the audio input and sampling the result
1 Press the Input Setup tab to access the P0: Record-ing, Input/Setup page.Set the Input1 “Pan” to C064, and “BUS” to IFX1.
2 Press the [MENU] key to access the page jump page, and press P8: Insert Effect.The P8: Insert Effect page will appear.Press the Insert FX tab to access the Insert FX page.
3 Select “IFX1,” use the numeric keys to enter [5], [2], and press the [ENTER] key to confirm 052: Reverb Hall. Press “IFX1 On/Off” to turn it ON.
4 Speak into the mic, and verify that reverb is applied to the sound.You can adjust the effect settings in the IFX1 page (IFX1 tab).
5 After pressing the [EXIT] key, press the Recording tab to access the P0: Recording, Recording page.
6 Set “Sample Mode” to Stereo.Now the sound of the internal LR channels can be sampled in stereo.
7 Press the Create button to create a new index.
8 Sample the sound.Press the SAMPLING [REC] key, and then the SAM-PLING [START/STOP] key to enter record-ready mode.Speak the word that you want to sample.
Recording will start when the input exceeds the “Level” –30 dB level.Press the SAMPLING [START/STOP] key to stop.
9 Play the keyboard.When you play the “OrigKey” note, you will hear the sound that was sampled.
Applying the Valve Force effect to the audio input and sampling the result
1 Press the VALVE FORCE [ON/OFF] key to make it light. Valve Force is enabled.
2 Press the [MENU] key to access the page jump menu, and display P9: VALVE FORCE.The P9: VALVE FORCE page will appear.
Set “Placement” to Insert (User Indiv. 3/4 BUS).
3 Press the [EXIT] key, and then press the Input Setup tab to select the P0: Recording, Input/Setup page.Set the Input1 “Pan” to C064, and “BUS” to 3 (Tube).If “Placement” is set to Insert (Use Indiv. 3/4 BUS), selecting 3 (Tube), 4 (Tube), or 3/4 (Tube) will send the sound through Valve Force.
4 Sample as described in steps 5–9 of “Applying an insert effect to the sound while you sample.”
You can also combine an insert effect with Valve Force while you sample. Refer to PG p.142.
Saving your multisamples and samples to mediaIf you are satisfied with the multisamples and samples you created and would like to keep them, you must save them to media (sold separately).
The multisamples and samples you create will disap-pear when you turn off the power. For the Save proce-dure, refer to OG p.117. For details on the types of media you can use, refer to OG p.137.
7
5
21

22
2
Resampling an arpeggiated phrase in Pro-gram modeWhile performing in program or combination mode, and using the arpeggiator if desired, you can resample your performance as audio data (sound).As an example, this section explains how to sample an arpeggiated phrase in Program mode. Sampling can be performed in the same way in Combination or Sequencer modes as well.
1 Select the program that you want to resample.Press the [PROG] key to enter Program mode.Select program J028: Rezbo.
2 Turn the arpeggiator on (ARPEGGIATOR [ON/OFF] key LED is lit), and play the keyboard to ver-ify that a phrase is produced.
Make sure that the arpeggio tempo “�” is set to 120.
3 Press the Sampling tab to access the P0: Play, Sam-pling page.
4 Press the menu button, and select “Auto Sampling Setup.”The dialog box will appear.
5 Choose “Resample Program Play.”This will make the appropriate settings for resam-pling your performance on a program.
6 Make the following settings for Resample Pro-gram Play.Set “Save to” to RAM. The resampled data will be written to sample memory (RAM).Check “Convert to Program.” After resampling, the data will automatically be converted a program with the number you specify in “Program.”Use “Program” to specify the save-destination of the sample created by resampling. You’ll probably want to use bank E.
7 Press the OK button to execute the command.Settings for resampling are now completed.
Take a minute to verify that these are the settings that have been made.
Input 1 “BUS (IFX/Indiv.) Select”: OffInput 2 “BUS (IFX/Indiv.) Select”: OffThe sound from the INPUT 1, 2 jacks will not be input.
“Source BUS”: L/RThe sound sent to the L/R bus will be sampled.
VALVE FORCE
VOLUME VALUEPROGCOMBI
SAMPLINGSEQ
GLOBALS.PLAY
COMPAREMEDIA
A
B
INPUT TRIM
ASSIGNABLE 1
LPF CUTOFF
ULTRA BOOST
ASSIGNABLE 2
RESONANCE/HPF
TUBE GAIN
ASSIGNABLE 3
EG-INTENSITY
OUTPUT LEVEL
ASSIGNABLE 4
EG-RELEASE
ON/OFFREALTIME CONTROLS
12 211
3
83
Sampling Tab
4
5
6
7
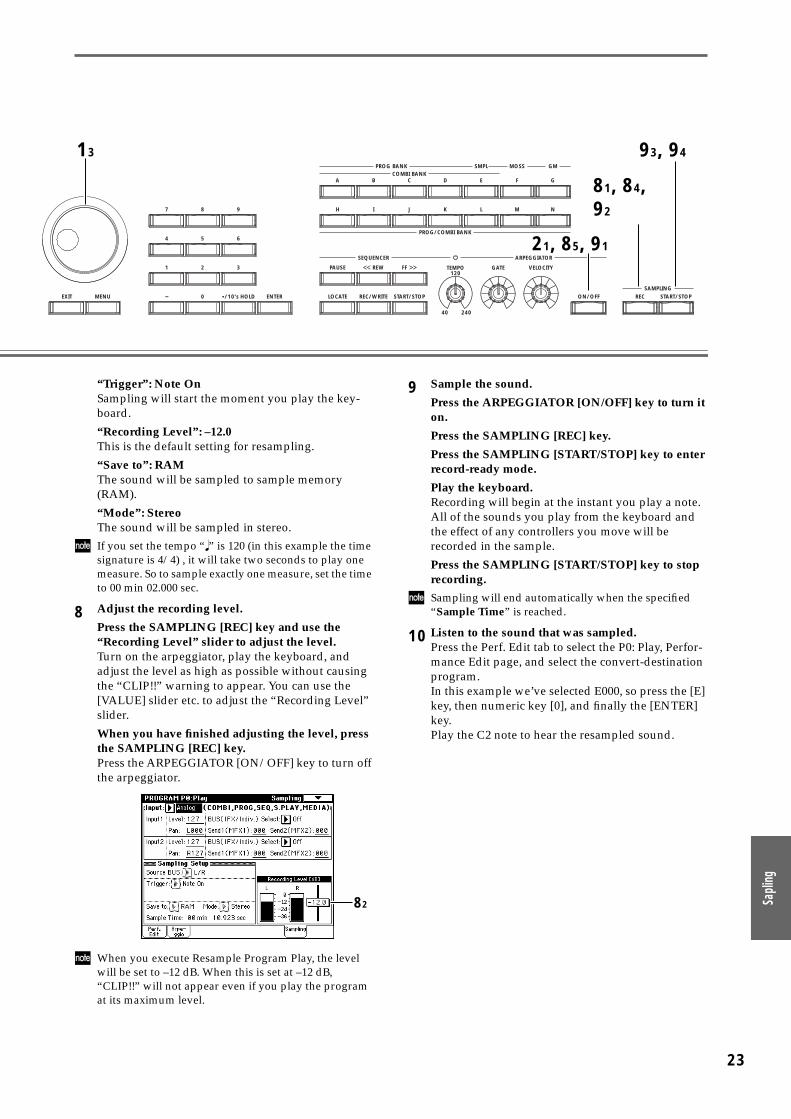
E
Setup
Demo
song
sCo
mbina
tion/
Progr
amPr
ogra
m ed
iting
Comb
inatio
n edit
ingAr
pegg
iator
editin
gEff
ects
and V
alve F
orce
Sapli
ngPr
oduc
ing a
song
“Trigger”: Note OnSampling will start the moment you play the key-board.
“Recording Level”: –12.0This is the default setting for resampling.
“Save to”: RAMThe sound will be sampled to sample memory (RAM).
“Mode”: StereoThe sound will be sampled in stereo.
If you set the tempo “�” is 120 (in this example the time signature is 4/4) , it will take two seconds to play one measure. So to sample exactly one measure, set the time to 00 min 02.000 sec.
8 Adjust the recording level.
Press the SAMPLING [REC] key and use the “Recording Level” slider to adjust the level.Turn on the arpeggiator, play the keyboard, and adjust the level as high as possible without causing the “CLIP!!” warning to appear. You can use the [VALUE] slider etc. to adjust the “Recording Level” slider.
When you have finished adjusting the level, press the SAMPLING [REC] key.Press the ARPEGGIATOR [ON/OFF] key to turn off the arpeggiator.
When you execute Resample Program Play, the level will be set to –12 dB. When this is set at –12 dB, “CLIP!!” will not appear even if you play the program at its maximum level.
9 Sample the sound.
Press the ARPEGGIATOR [ON/OFF] key to turn it on.
Press the SAMPLING [REC] key.
Press the SAMPLING [START/STOP] key to enter record-ready mode.
Play the keyboard.Recording will begin at the instant you play a note.All of the sounds you play from the keyboard and the effect of any controllers you move will be recorded in the sample.
Press the SAMPLING [START/STOP] key to stop recording.
Sampling will end automatically when the specified “Sample Time” is reached.
10 Listen to the sound that was sampled.Press the Perf. Edit tab to select the P0: Play, Perfor-mance Edit page, and select the convert-destination program.In this example we’ve selected E000, so press the [E] key, then numeric key [0], and finally the [ENTER] key.Play the C2 note to hear the resampled sound.
MENUXIT ENTER0 /10's HOLD
21 3
REC/WRITELOCATE START/STOP
REW
SEQUENCER ARPEGGIATOR
PROG BANK
A B C D E F G
H I J K L M N
SMPL MOSS GMCOMBI BANK
PROG/COMBI BANK
PAUSE FF TEMPO120
40 240
REC START/STOPSAMPLING
ON/OFF
VELOCITYGATE
54 6
87 9
21, 85, 91
13 93, 94
81, 84, 92
82
23

24
Producing a song
VALVE FORCE
VOLUME VALUEPROGCOMBI
SAMPLINGSEQ
GLOBALS.PLAY
COMPAREMEDIA
A
B
INPUT TRIM
ASSIGNABLE 1
LPF CUTOFF
ULTRA BOOST
ASSIGNABLE 2
RESONANCE/HPF
TUBE GAIN
ASSIGNABLE 3
EG-INTENSITY
OUTPUT LEVEL
ASSIGNABLE 4
EG-RELEASE
ON/OFFREALTIME CONTROLS
21 3,
4,11Track Select
This section explains how to use the TRITON Extreme’s internal sequencer. The example described here will cover realtime recording and step recording, as well as various convenient functions provided by the internal sequencer, such as template songs, preset patterns, and the arpeggiator.There are also other recording methods such as RPPR and In-Track Sampling (☞OG p.56, 82).
This explanation assumes that you are starting from the default state immediately after turning the power on.
Loading a template song, and copying preset patterns (drum phrases)The TRITON Extreme provides 16 preset template songs (plus room for another 16 of your own), each containing program, pan, volume, and effect settings suitable for various styles of music. By loading a template into a song, you can begin recording immediately without hav-ing to make the same frequently-used settings each time.
1 Press the [SEQ] key to enter Sequencer mode.
2 Load a template song.Press the page menu button to access the page menu, and press “Load Template Song.”A dialog box will appear.
Press the popup button located at the right of “From,” and select P13: Acid Jazz from the menu.Check the “Copy Pattern to Track too?” check box.If this is checked, a drum pattern will be copied to the song after the template song is loaded.
Press the OK button to load the template song.A dialog box will appear.
If you want to specify the program and volume settings yourself from scratch, refer to “Preparations for record-ing” (☞OG p.41).
Use “Pattern” to select the pattern that you want to copy.Make sure that Preset, P109: AcidJazz 1/Std2 is selected. If not, use the popup button and VALUE controller to select it. You can press the SEQUENCER [START/STOP] key to hear the selected pattern. To stop, press the [START/STOP] key once again.
Press the OK button to copy the pattern.The “Measure” value will change from 001 to 009. This indicates that the pattern has been copied from measure 1 to measure 8, and that the next time you press the OK button, the pattern will be copied from measure 9.
Press the Exit button.In the Sequencer P0: Play/REC, Program T01–08 page, the “Song Select” field will indicate S000: Acid Jazz.
Track Select

25
MENUEXIT ENTER0 /10's HOLD
21 3
REC/WRITELOCATE START/STOP
REW
SEQUENCER ARPEGGIATOR
PROG BANK
A B C D E F G
H I J K L M N
SMPL MOSS GMCOMBI BANK
PROG/COMBI BANK
PAUSE FF TEMPO120
40 240
REC START/STOPSAMPLING
ON/OFF
VELOCITYGATE
54 6
87 9
LOCATE key 6, 9, 108
Setup
Demo
song
sCo
mbina
tion/
Progr
amPr
ogra
m ed
iting
Comb
inatio
n edit
ingAr
pegg
iator
editin
gEff
ects
and V
alve F
orce
Sapli
ngPr
oduc
ing a
song
3 When you play the keyboard, you will hear the drum program for track 1 of the template song.
Press the popup button located at the left of “Track Select,” and select Track 02: Bass. When you play the keyboard, you will hear a bass sound.The track you select here can be played from the keyboard; when you record, your performance on this track will be recorded (except for Multi REC or Master Track).Next select T03–T08 in order, and play them from the keyboard. (The TRITON Extreme has sixteen sequence tracks, but this template song specifies only tracks 1–8.)
Use “Track Select” to select T03: Elec.Piano.
Press the SEQUENCER [START/STOP] key to play back the preset pattern that you copied.Play the keyboard while you listen to the drum pat-tern.
Press the SEQUENCER [START/STOP] key to stop, and press the [LOCATE] key to return to the beginning of the song.The location indicator will show 001:01.000.
Repeatedly playing specific measures of a track (Track Play Loop)Here’s how to use Track Play Loop to repeatedly play back a drum phrase.
4 Press the PlyLoop 1–8 tab to access the P0: Play/REC, PlayLoop T01–08 page.
5 Check track 1 “Track Play Loop,” leave “Loop Start Measure” as it is, and set “Loop End Measure” to 008.
6 When you press the SEQUENCER [START/STOP] key, the drum phrase will be played back repeat-edly.When the playback has repeated for the number of measures in the song as specified by “Length” (the power-on default is 64 measures), it will stop auto-matically.
By using “Play Intro” you can begin the loop after add-ing an introduction (☞PG p.62).
Track Play Loop will continue repeating for the number of measures specified by “Length.” If you want to limit the number of repetitions or place other performance data (e.g., a drum fill-in) in that track, you will need to expand the pattern into actual performance data. Use the page menu command “Repeat Measure” P5: Edit, Track Edit page to specify the number of playback repe-titions and expand the pattern as playback data. In the sample illustration below, performance data will be cre-ated to play measures 1–8 of track 1 for four times (i.e., 32 measures). This is the same result as if you had pressed OK a total of four times in Step 2b “Copy Pat-tern to Track” (☞PG p.82)
5
4

26
Realtime recordingRealtime recording is a method of recording in which your performance on the keyboard and controllers (joy-stick etc.) is recorded “as is.” In this example, let’s use realtime recording to record the keyboard part.
7 Use “Track Select” to select the track that you want to record. In this example, select Track02: Bass.
Press the SEQUENCER [START/STOP] key to play back, so you can rehearse the phrase you want to record. When you are finished rehearsing, press the SEQUENCER [START/STOP] key to stop playback.Press the [LOCATE] key.
When recording rapid or difficult phrases, you can slow down the tempo and record at a more comfortable tempo. Simply adjust the “� (Tempo).” After recording, restore the original tempo.
You can use the Quantize and Resolution functions to correct the timing of your performance as it is recorded.For example during realtime recording, suppose that you input eighth notes at slightly inaccurate timing, as shown in line 1 of the diagram below. If you set “Reso” (Resolution) to � and performed realtime recording, the timing would automatically be corrected as shown in line 2. With a setting of Hi, the performance will be recorded with the exact timing at which it was played.
Independent of this function, there is also a page menu command “Quantize” (P5: Track Edit, Track Edit page) that can be used to correct the timing of performance data that has already been recorded. If data (recorded without using Realtime Quantize) falls at the timings shown in the above figure 1, then when played back, it will be corrected to the timings shown in figure 2 if you set “Quantize” to a “Reso-lution” of � and press the OK button.You can use “Quantize” to add a sense of “swing.” (☞PG p.84)
8 Press the SEQUENCER [REC/WRITE] key.You will hear the metronome. The TRITON Extreme will be in record-ready mode.
9 Press the SEQUENCER [START/STOP] key.After a two-measure count, recording will begin.Play the keyboard for about 16 measures, and record your performance.If you make a mistake or decide to re-record, press the [START/STOP] key to stop recording, and press the [COMPARE] key.When you press the [COMPARE] key to execute the Compare function, you will return to the state prior to recording.
10 When you are satisfied with your performance, press the SEQUENCER [START/STOP] key to stop recording.
For example if your performance in measures 5–8 was the best take, you can use the Track Play Loop function to repeatedly play back just this portion.In the P0: Play/REC, PlayLoop T01–08 page, check “Track Play Loop” for track 2, set “Loop Start Measure” to 005, and set “Loop End Measure” to 008.When you press the SEQUENCER [START/STOP] key, repeated playback will begin.
After you press the SEQUENCER [START/STOP] key to stop playback. You will automatically return to the measure at which recording began. We recommend that you press the [LOCATE] key to return to the beginning of the song.
11 In the same way, use “Track Select” to choose Track 03: Elec.Piano, and record about 16 measures.
Realtime-recording an arpeggio patternThe performance of an arpeggio pattern can be recorded into a song. With the settings of this template song, the arpeggiator will function on track 4.
1 In “Track Select,” choose Track04: Guitar.
2 Press the ARPEGGIATOR [ON/OFF] key.
3 Press the SEQUENCER [START/STOP] key and play single notes or chords.Verify that arpeggios are sounded in synchroniza-tion with the tempo of the drum and bass perfor-mance, and rehearse your performance.
4 Press the SEQUENCER [START/STOP] key to stop playback.
Then press the [LOCATE] key to return to the beginning of the song.
5 Start recording.Press the SEQUENCER [REC/WRITE] key, and then press the SEQUENCER [START/STOP] key.If you play notes on the keyboard during the count-in, the arpeggio will wait and begin at the same time that recording begins.
�� � � � � � � �
� � � � � � �

Setup
Demo
song
sCo
mbina
tion/
Progr
amPr
ogra
m ed
iting
Comb
inatio
n edit
ingAr
pegg
iator
editin
gEff
ects
and V
alve F
orce
Sapli
ngPr
oduc
ing a
song
Play the keyboard for about 16 measures and record your performance.
Press the SEQUENCER [START/STOP] key to stop recording.If you made a mistake or would like to re-record, you can use the Compare function (press the [COM-PARE] key) to re-record as many times as you wish.
The note data that was generated by the arpeggio pat-tern will be recorded. If you change the ARPEGGIA-TOR [GATE] or [VELOCITY] knob settings while recording an arpeggio pattern, this data will also be recorded, but it will not be possible to add changes by overdubbing [GATE] or [VELOCITY] data afterward for those notes.
Step recordingStep recording is a method of recording in which you specify the timing, duration, and velocity etc. of each note in the LCD screen, and use the keyboard to input the pitches. Only note-on/off data can be recorded in this way.Step recording is useful when you want to create mechanically precise beats, or when you need to record a phrase that would be difficult to play by hand “in real-time,” or when you find it difficult to play extremely complicated or rapid passages.
Rapid phrases can also be recorded in realtime by tem-porarily slowing down the sequencer tempo.
Here’s the procedure for step recording.
1 Press the [MENU] key to access the Jump menu, and press P5: Track Edit.The P5: Track Edit, Track Edit page will appear.
2 Set “Track Select” to Track 08: Lead Synth.For this example we will input a lead performance using an analog synthesizer sound.
3 Set “From Measure” to 001.With this setting, step recording will begin from measure 1.
4 Press the page menu button to access the page menu, and press “Step Recording.”A dialog box will appear.
5 Set “Step Time” to specify the basic timing value at which you will input notes and rests.In the popup menu at left, you can specify a value in the range of � (whole note)–� (32nd note). For this example, select � (16th note).If you want to input triplets or dotted notes, use the popup menu at the right to select “3” for triplets, or “.” for dotted notes. Select “–” if you want to use the unmodified length of the note that is selected at the left.“Note Duration” indicates the length that the note itself will sound. Smaller values will produce a stac-cato note, and larger values will produce a legato note. For this example, leave this setting unchanged.“Note Velocity” is the velocity (playing strength), and larger values will produce a louder volume. Set this to about 090.If you select Key for this parameter, the velocity with which you actually play the keyboard will be input.
6 On the keyboard, press and then release the first note that you want to input.The data you input will appear in the LCD screen as numerical values. In the upper right, M001:01.000 will change to M001:01.048. The next note you input will be placed at this location.Continue pressing notes to input a melody.You can also delete notes or rests, or input rests or ties.
• To delete a note or rest that you input, press the Step Back button. The previously-input note will be deleted.
• To input a rest, press the Rest button. This will input a rest of the “Step Time” value.
• To modify the length of a note, you can modify the “Step time” value before you input the note. However if you want to extend the length (tie) of the note, press the Tie button. At this time, the previously-input note will be extended by the “Step time” length.
If you want to verify the pitch of the note that you will input next, press the [PAUSE] key. In this state, playing a key will produce a sound, but will not input a note. Press the [PAUSE] key once again to cancel the record-pause state, and resume inputting notes.
2
3
4
Track Select
27

28
2004
2E
KORG INC.
To input a chord, simultaneously press the notes of the desired chord. Even if you do not press them simulta-neously, notes that are pressed before you fully remove your hand from all keys on the keyboard will be input at the same location.However in the above example, the program of track 8 will not sound chords. This is because the program is set to mono mode, and the song follows the setting of the program.In other words since this track is set to “Force OSC Mode” PRG, the “Voice Assign Mode” Mono setting of program J124: Espress Lead is used.
7 When you are finished inputting, press the Done button.
8 Press the SEQUENCER [START/STOP] key to play back.
When you begin step recording, all data in the track that follows the measure where you began recording will be erased.You need to be aware of this if you begin step recording from a measure mid-way through the song.If you want to re-input data into a measure that already contains data, perform step recording in another un-recorded track, and execute “Move Measure” or “Copy Measure” (☞PG p.82).If you want to edit or add to the recorded data, you can use the “Event Edit” function (☞PG p.79).
Using controllers to record tonal changesYou can add realtime controller or joystick movements to a performance you recorded. As an example, here’s how to add such effects to the track you recorded in “Step recording” (☞p.27).
1 Press the [EXIT] key, and then press the Preference button to move to the P0: Play/REC, Preference page.
2 Set the “Recording Mode” to Over Dub.Over Dub allows you to add to a previously-recorded track.
3 For “Track Select,” make sure that Track08: Lead Synth is selected.Press the SEQUENCER [START/STOP] key to start playback, and operate the realtime controllers and joystick to rehearse. When you are finished rehears-ing, press the SEQUENCER [START/STOP] key to stop. Press the [LOCATE] key.
4 Start recording.
Press the SEQUENCER [REC/WRITE] key, and then press the SEQUENCER [START/STOP] key.After a two-measure count-in, recording will begin.Operate the LPF CUTOFF or RESONANCE/HPF realtime controllers or the joystick (±Y axis) to record their movements.
When you are finished performing, press the SEQUENCER [START/STOP] key.If you make a mistake or want to re-record, press the [COMPARE] key to execute the Compare function, and then re-record.
Recording the sound of a combination or program “as is”Ideas for a song may occur to you while you’re playing in Combination mode or Program mode. The Auto Song Setup function is particularly convenient in such cases. This function uses the settings of the combination or pro-gram to automatically create settings for a song in Sequencer mode. For details, refer to OG p.58.
Saving a songIf you’re satisfied with the song you’ve created and want to keep the data, you must save to media (sold sepa-rately).
The data you create will disappear when you turn off the power. For details on Saving, refer to OG p.117. For details on the types of media to which you can save data, refer to OG p.137.
This ends the Quick Start manual.
The functions we’ve introduced here are only a small portion of what the TRITON Extreme has to offer.We strongly recommend that you next read the separate “Operation Guide.” Then when you’d like to obtain a more detailed understanding of the TRITON Extreme, refer to the “Parameter Guide.”
15 - 12, Shimotakaido 1 - chome, Suginami-ku, Tokyo, Japan.
KORG INC. 1602 GTH Printed in Japan