Important revision links - Meden School revision links ... ICT/Miss Proctor/June13 paper/exam files)...
42
Important revision links http://www.igcseict.info/theory/ http://www.ictlounge.com/html/overview.htm
-
Upload
truongdien -
Category
Documents
-
view
216 -
download
2
Transcript of Important revision links - Meden School revision links ... ICT/Miss Proctor/June13 paper/exam files)...

Important revision links
http://www.igcseict.info/theory/
http://www.ictlounge.com/html/overview.htm

Exam Help Sheet
Formatting
1. Setting the page to A4: See below
To landscape

Setting margins
Click on Margins, Custom Margins
2. Save the document in a folder that you have made for this exam
paper in your own area
3. Header: Left and right aligned

8. Adding a title
Offshore Wind Energy
10. Adding a subtitle
Report by: Miss Proctor
12. Subtitle must be right aligned / size 18, italic, bold
Report by: Miss Proctor

13. Format the body text into three equal columns with 1.5 spacing
between the columns.
Highlight the text, click on page layout columns, more columns
Click on three because it asks you for three columns and then change the
spacing to 1.5 spacing

14. You should all be able to change the body text (the main text) to the
size, font it asks for;
Fully Justify
Single Line spacing
Highlight the text, right click, paragraph the set your line spacing to
single

Exam Help Sheet
How to Create and Manage Contact Groups in Outlook 2010
Today we take a look at creating Contact Groups to make the process a lot
easier.
Create Contact Groups
Open Outlook and click on New Items \ More Items \ Contact Group.
This opens the Contract Group window. Give your group a name, click on Add Members, and select the people you want to add from your Outlook Contacts,
Address Book, or Create new ones.

If you select from your address book you can scroll through and add the
contacts you want. If you have a large amount of contacts you might want to
search for them or use Advanced Find.
If you want to add a new email contact to your group, you’ll just need to enter in
their display name and email address then click OK. If you want the new member
added to your Contacts list then make sure Add to Contacts is checked.
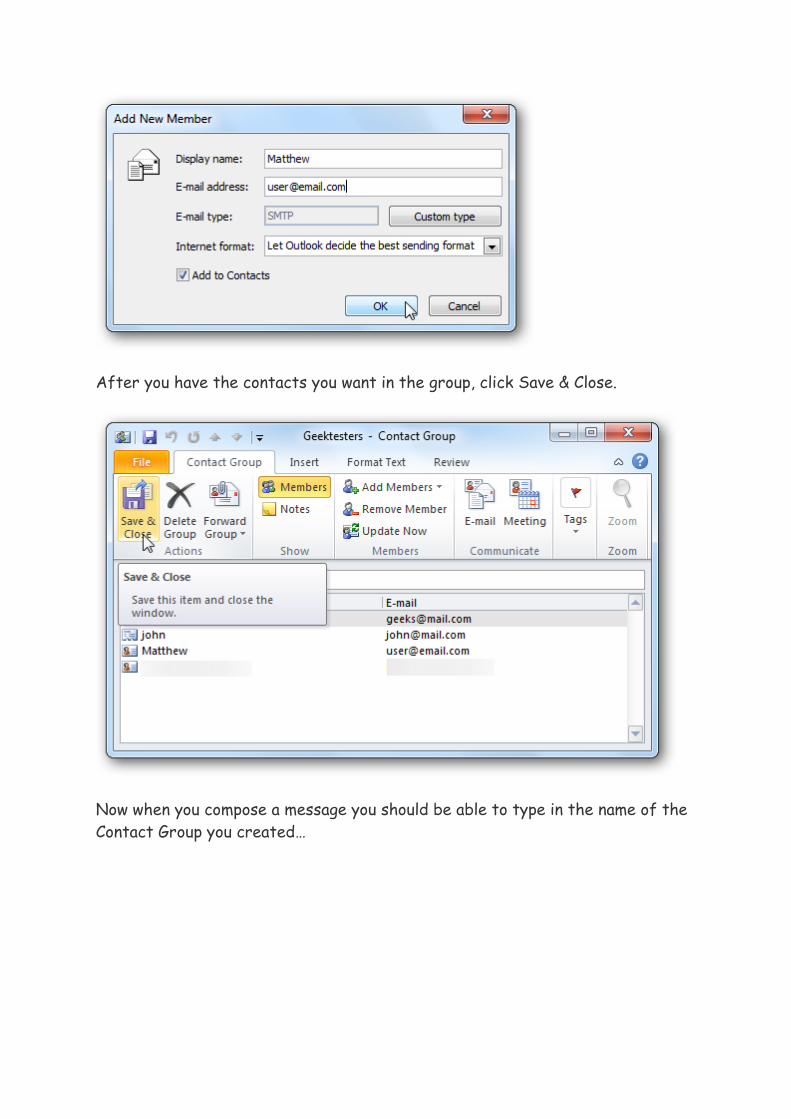
After you have the contacts you want in the group, click Save & Close.
Now when you compose a message you should be able to type in the name of the
Contact Group you created…

If you want to make sure you have everyone included in the group, click on the
plus icon to expand the contacts. You will get a dialog box telling you the
members of the group will be shown and you cannot collapse it again. Check the
box not to see the message again then click OK.
Then the members of the group will appear in the To field. Of course you can
enter a Contact Group into the CC or Bcc fields as well.
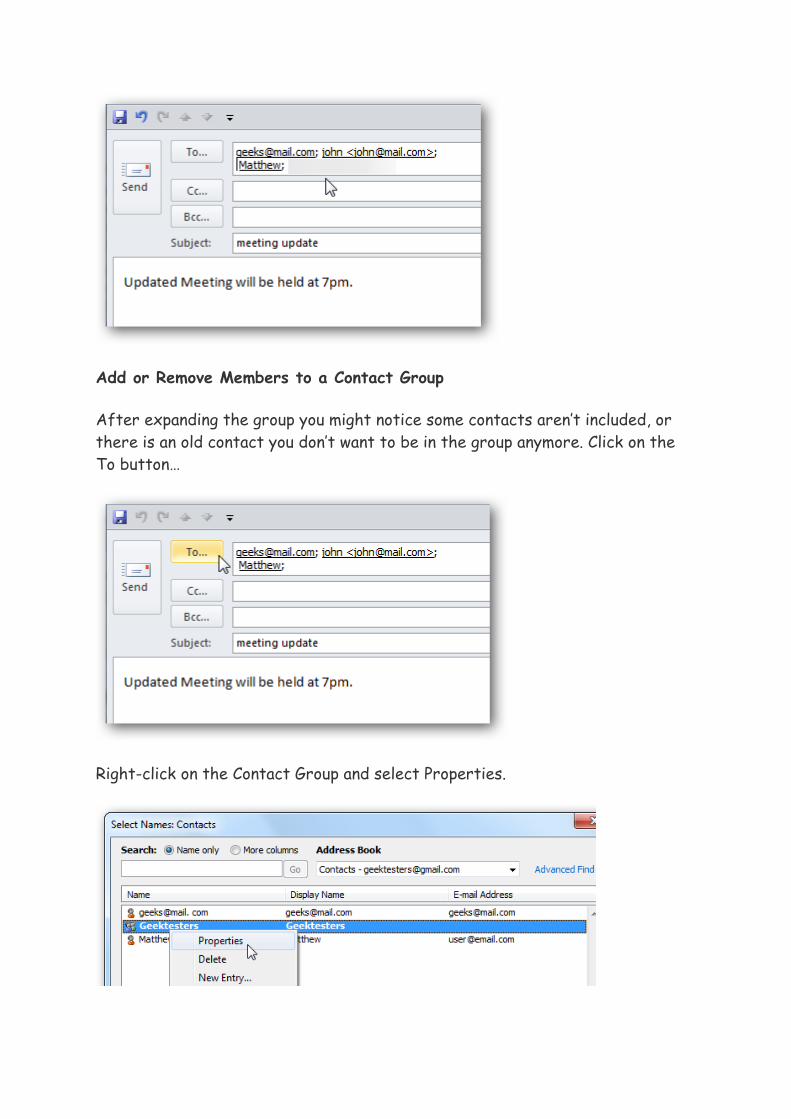
Add or Remove Members to a Contact Group
After expanding the group you might notice some contacts aren’t included, or
there is an old contact you don’t want to be in the group anymore. Click on the
To button…
Right-click on the Contact Group and select Properties.

Now you can go ahead and Add Members…
Or highlight a member and remove them…when finished click Save & Close.
If you need to send emails to several of the same people, creating Contact
Groups is a great way to save time by not entering them individually. If you work
in for a large company, creating Contact Groups by department is a must!

Exam Help Sheet
DATABASES
Importing
1) Complete each instruction. Tick each box when you have done it
Q27:
Create a new folder and call it Databases.
Open up a database
Create a new file called offshore
Click on external data
Click on text file

Click on browse
Click on the offshore file
(SharedDrive: ICT/Miss Proctor/June13 paper/exam files)
Click on delimited!
Click next
Click - “first Row Contains Names”

Click on Advanced
This is important!
Click on the arrows to change each data type
Click finish
zz
zz
v

Finish!!!
Open the offshore table that you have just imported
Click on Home, view, design view.
Check that all data types are correct. They MUST be the same as what it
states on the exam paper

Change the decimal places etc IF it asks you to!
Inserting a record

Add each of the records shown in the exam paper
Adding Fields and Completing Calculations
Q32.
Add a new field in design view and make it calculated
You have to do a calculation for question 32
1) When you click on Calculated it should look like this
Click on Capacity at the bottom
Put the Forward slash for divide
Click on Number
Click on Ok
Make sure it says ONE decimal place in Design view

Save database at this point
File, save database as
How to do a search
Open up your exam database “offshore”. If you don’t have this you need to
import this into Access. You need to look at help sheets if you cannot remember
how to do this.

Create – Query Wizard
Select all fields. These should
transfer from the left box to the
right box using the arrows
Put a title – this is what you will
be searching for
Task Three
Click on Finish – Have you got this?
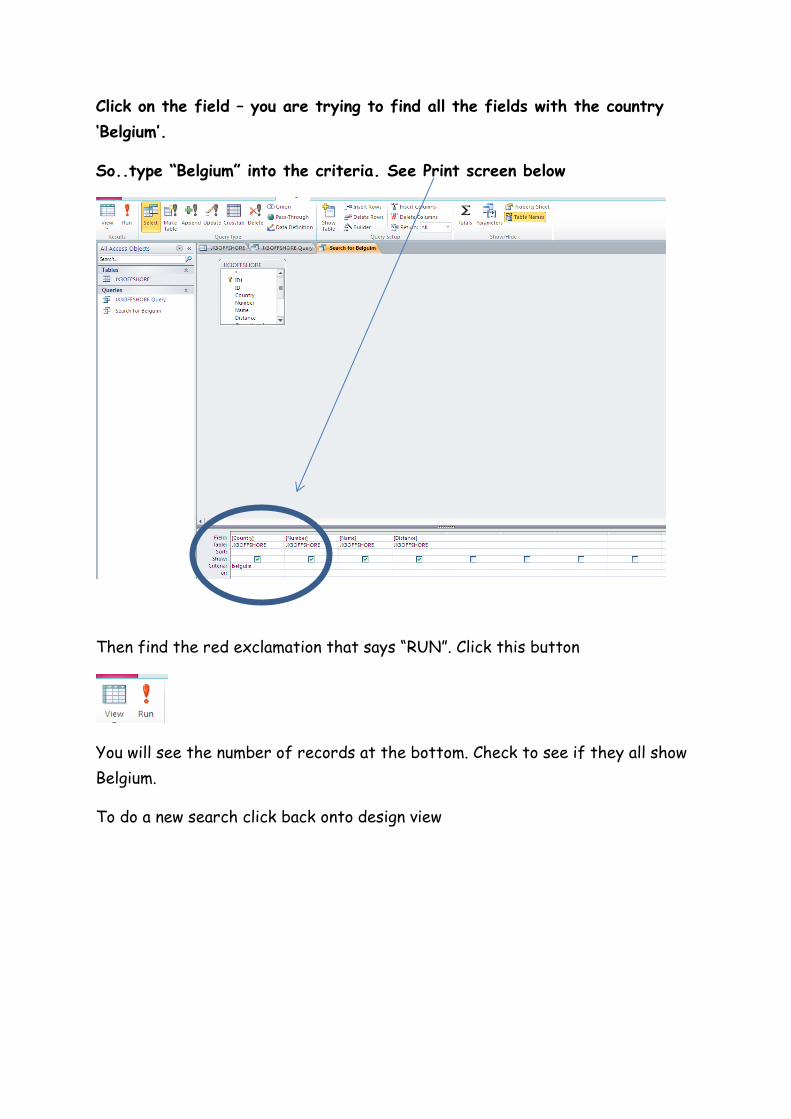
Click on the field – you are trying to find all the fields with the country
‘Belgium’.
So..type “Belgium” into the criteria. See Print screen below
Then find the red exclamation that says “RUN”. Click this button
You will see the number of records at the bottom. Check to see if they all show
Belgium.
To do a new search click back onto design view

How to create a Report
Show all
Click on . . . . Report wizard
Task Show only fields Country, ID, Name, Number, Distance, Operational,
Capacity,
Height, Sea and Turbine_Capacity in this order
Click again
Task Sort the data into ascending order of Country and then ascending order of
Name

Task fits on a single page wide and has a page orientation of landscape
Click on Modify Design
Task-includes the headings Power from North and Irish Seas at the top of the
page
Task add your name, Centre number and candidate number on the right in the
footer
Click on the top of report footer and drag it 5mm so we have more room
Click on Label and drag it out
See the last task to complete
Highlight (click) on the box and right align the text

Displaying the Data correctly – switch between design view and see what you can
do!
How to Extract Data
Do the query using Query Wizard. Remember to save it as extractor
Make sure you have 5 records as below
Show
the
fields Name, Sea and Capacity – do this by Design View and untick those you do
not want
Sort Capacity into descending order is Design View - click on Sort and do your
business
You should have this
Click on Views to see the Report view and switch between
design view

Saving the Data in the correct format
1) Acess - Right click on the Navigation Bar and copy your query.
2) Open your JX3Wind – yep that’s making a comeback . .
3) Move your cursor to after Offshore Wind farms in the UK producing
90MW or more of power are
4) Paste the document in
5) Delete the Extraction 1 - right click – delete row
Exam Help Sheet
SPREADSHEETS

A row contains numbers (across the page)
A column contains letters (down the page)
How to insert a new row
How to merge cells
Put your mouse over the number
one so an arrow appears
Right click, then press insert
Click and drag to select the cells you
want

How to format cells to change or add colour
Right click, format cells
Click on alignment. Then click merge
cells. Ok
Click and drag to select the cells you
want
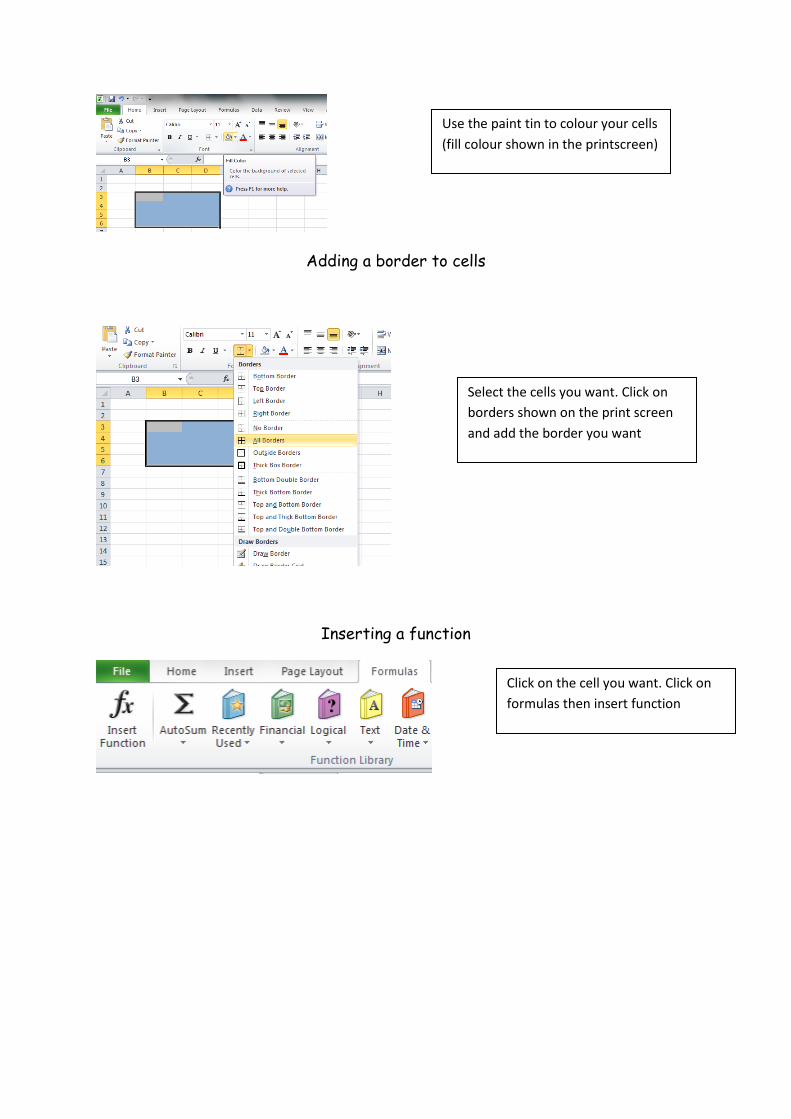
Adding a border to cells
Inserting a function
Use the paint tin to colour your cells
(fill colour shown in the printscreen)
Select the cells you want. Click on
borders shown on the print screen
and add the border you want
Click on the cell you want. Click on
formulas then insert function

How to calculate the profit
Click on the function you want. EG if
you are calculating by adding you
would be using SUM because you
are doing a sum.
In the top box where it says Number 1 is where you tell the computer what you want to add up. Don’t
put numbers put the CELL REFERENCES. So…. I want to add up B4, C2 and D4 which I have put in
yellow. Instead of writing these all out I can click on the cell B4 and drag it across to D4.
This shows up as B4:D4 which means from B4 to D4
Then click ok
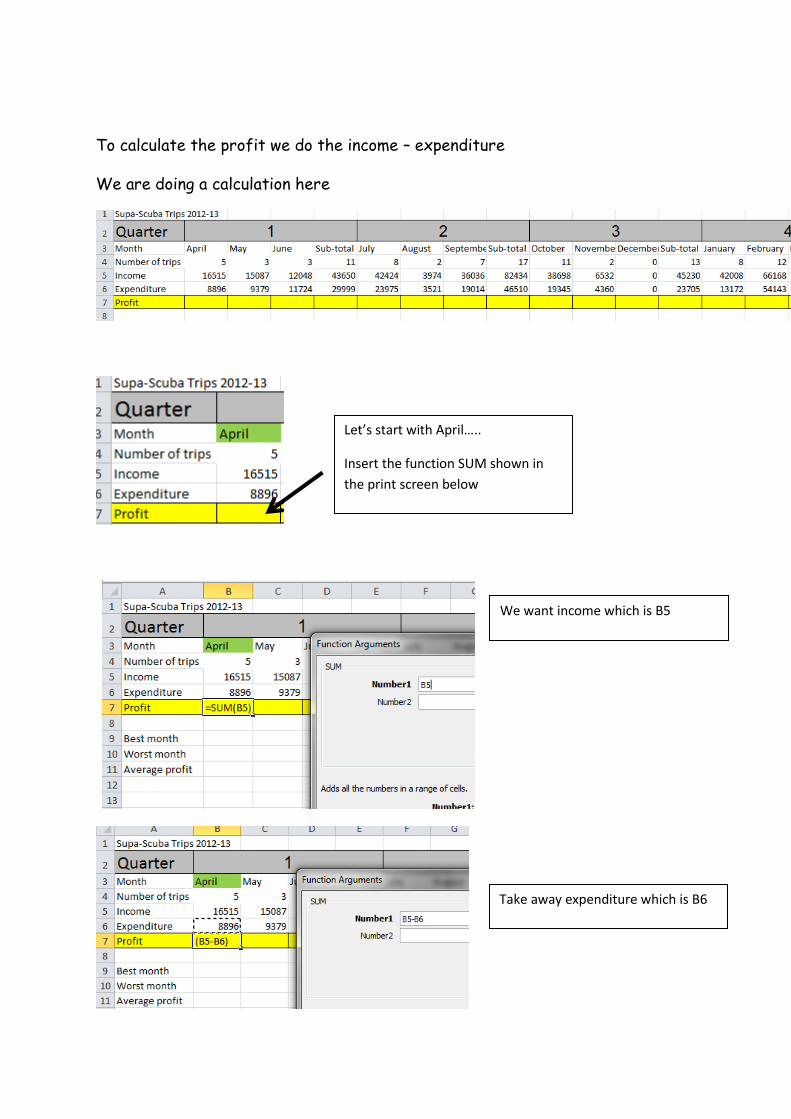
To calculate the profit we do the income – expenditure
We are doing a calculation here
Let’s start with April…..
Insert the function SUM shown in
the print screen below
We want income which is B5
Take away expenditure which is B6

Inserting a Header or Footer
Function to display the greatest monthly profit
This is a little bit different from
Word. Click on insert then header
and footer.
Then when you have clicked this,
you will see a separate header and
footer button on the right at the
top.You click on you header of
footer to add these to the page.
Click on “NONE”
When you have finished your
header or footer, click on view then
click on normal.

Function to display them lowest monthly profit
Repeat the above using the Min function
Function to display the average monthly profit
You then want to find the MAX
function to complete your
calculation
Click on function. Click on the
category all
Then select your each months profit
to find the greatest

Repeat the above using the Average function
Apply appropriate formatting to all cells
Format cells showing currency
(Read carefully, the exam tells you to format in dollars!)
You could also format the spreadsheet appropriately so that any labels
(headings) are clear and all information is presented clearly. This could mean
using boarders, shading, align, bold etc also
Right click or highlight the cell you
want to format then select “format
cells”
Then click currency and change the
currency to Dollar

Edit the formula to round the value to the nearest whole dollar
Display the contents of this cell so that it shows only integer values
Your Average formula should look
like this
Now after the = sign add the word
ROUND telling the computer to
round up and then an open bracket.
At the end of the formula add a
comma and then a 0. The 0 tells the
computer that your want the
number to be rounded to 0 decimal
places eg a whole number.
Right click, format cells

Print the spreadsheet showing formulae.
Row and column headings are displayed
Contents of all cells are fully visible
Make sure that all text is visible and not cut off
Print the spreadsheet showing the values
Change the decimal place to 0 to
make it an integer (whole number)
Click on Formulas then show
formulas.
Click on Page layout then make sure that
under heading, print is ticked

Unclick show formulas and print again as a normal spreadsheet view
Printout fits on a single page
Produce a vertical bar chart to compare the monthly income for each of the
twelve months.
The dotted line shows the
end of the page. Make sure
that your spreadsheet cells
are changed so that it fit on
the page (to the left of the
line)

Fully label your chart but do not display a legend.
Exam Help Sheet
WEB AUTHORING

Webpage help sheet
Opening a Stylesheet
Attaching a style sheet in Dreamweaver
Go to Window option and make sure that CSS Styles is clicked.
Click on the “attach style sheet”
Browse for the style sheet then click okay
Right click, open with, dreamweaver

Changing text in the style sheet code
You can change the text either in the code on the left or you can change the
text on the webpage on the right
Setting the table border
Click on the border, then put in the boarder width here

Setting the table to fill the width of the window.
Again, click on the boarder then change the width by putting in the size
To show your webpage in full view click on design
Inserting an image
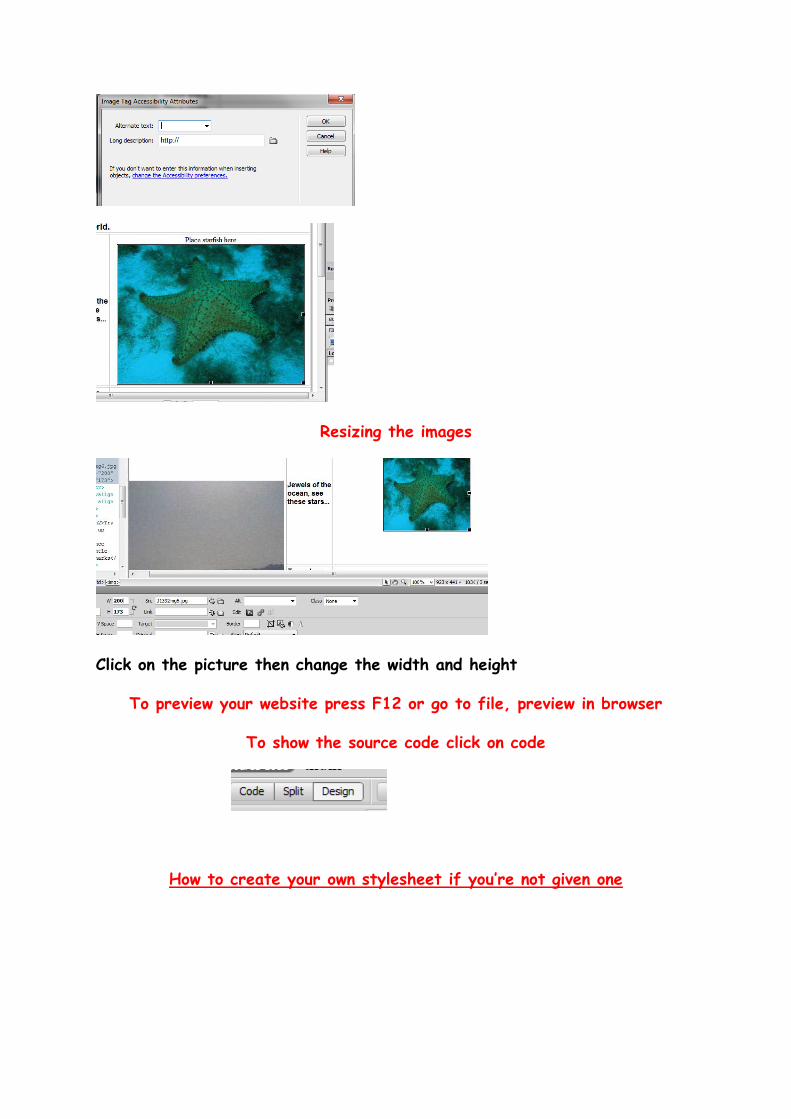
Resizing the images
Click on the picture then change the width and height
To preview your website press F12 or go to file, preview in browser
To show the source code click on code
How to create your own stylesheet if you’re not given one

Then save
Inserting tables into webpage