Implant-Retained Prosthetics Restoring the orally … Dental Technology November/December 2010,...
4
Inside Dental Technology November/December 2010, Volume 1, Issue 2 Published by AEGIS Communications MasterClass Implant-Retained Prosthetics Restoring the orally-handicapped with the All-on-4™ technique. by Irfan Atcha, DDS; and Luke Kahng, CDT People are living longer and demanding more functional solutions for missing dentition. Because many patients do not want to deal with the inconvenience of a conventional denture prosthetic, the demand for dental implant-retained prosthetics has increased. Any dental team that incorporates a less expensive, immediate-load product option can offer patients a great service. However, complete rehabilitation of the upper and lower jaw can be costly and time-consuming. The All-on-4 concept (Nobel Biocare, www.nobelbiocare.com) is an optimal alternative for many patients because it utilizes only four implants per arch for an immediate complete full fixed-detachable, screwretained prosthesis. The benefits are numerous and exciting for patients who have suffered with ill-fitting dentures. Dentulous patients in need of extractions with terminal dentition can take advantage of this concept, which increases stability, even with low bone volume. They can choose from several prosthetic options, such as a fixed, titanium implant bridge with acrylic veneering or individual crowns cemented to the bridgework. The treatment procedure uses tilting posterior implants to facilitate optimal support for an acrylic or composite bridge that can be fabricated and functioning just a few hours after surgery. Based on documented measurements, tilted implants have shown good clinical results. The system can be used in the maxilla, allowing the dentist to avoid sinus grafting, or in the mandible, to avoid having to place implants posterior to the symphysis.1 It also has higher patient acceptance rates because of its lower cost and shorter treatment time. Case Studies The case study review photos included involve numerous patients who had similar complaints, many of whom were completely edentulous and tired of wearing dentures that never fit properly. Poorly fitting prosthetics limited the patients' menu choices at restaurants and made social gatherings painful because eating or smiling in public often meant dealing with a loose prosthetic. In the authors' experience, patients who are desperate for a change will eagerly embrace an implant-retained option in order to avoid the embarrassment endured with removable prosthetics. Our patient presented with a fully edentulous maxilla and mandible. The dental team decided on a treatment plan using the Nobel Biocare All-on-4 implant system. The clinician placed eight implants—four in the maxilla and four in the mandible (Figure 1 and Figure 2). An open-tray impression was taken and impression copings were placed. The dentist confirmed proper seating (Figure 3). After taking the impression, the clinician sent this case to the laboratory where the analogs were placed and the soft tissue cast was created (Figure 4 and Figure 5). The lab received the midline, vertical dimension, high lip line, and lip support from the clinician in order to set the patient's tooth position and facial features (Figure 6). Along with creating the bite blocks, the laboratory also fashioned a verification jig to make sure the master cast model and the patient's mouth were mirror images. Before creating the verification index, the temporary abutments were screwed into the model and a bar was lasered to create index stability (Figure 7). The light-cured wax verification index was then formed (Figure 8 and Figure 9). The next step was the patient try-in at the doctor's office. The clinician was asked to verify fit with the same verification index that was created by the technician (Figure 10 and Figure 11) by screwing in each temporary abutment, one at a time. If any problems were to arise at this try-in checkpoint, the doctor could cut and reconnect the jig into the proper position. He could then verify the seating of the implants with an X-ray and send the case back to the lab. Necessary lab adjustments could be made at this time. After the lab received the bite block back from the clinician (Figure 12), a tooth wax try-in was fabricated according to the doctor's bite block markings. The case was then sent back to the doctor to confirm occlusion and esthetics and verify the phonetic position of the teeth prior to bar fabrication. Once the doctor verified the tooth setup in his office, he then sent the case back to the laboratory, where a putty matrix was created as a record of the teeth positioning (Figure 13 and Figure 14). Using the putty matrix record, a wax-up of the titanium bar for this case was formed with the Metacon light-cured wax system (Primotec, www.primogroup.net) for consistent quality (Figure 15).
Transcript of Implant-Retained Prosthetics Restoring the orally … Dental Technology November/December 2010,...

Inside Dental Technology
November/December 2010, Volume 1, Issue 2
Published by AEGIS Communications
MasterClass
Implant-Retained Prosthetics Restoring the orally-handicapped with the All-on-4™
technique.
by Irfan Atcha, DDS; and Luke Kahng, CDT
People are living longer and demanding more functional solutions for missing dentition. Because many
patients do not want to deal with the inconvenience of a conventional denture prosthetic, the demand for
dental implant-retained prosthetics has increased. Any dental team that incorporates a less expensive,
immediate-load product option can offer patients a great service. However, complete rehabilitation of the
upper and lower jaw can be costly and time-consuming. The All-on-4 concept (Nobel Biocare,
www.nobelbiocare.com) is an optimal alternative for many patients because it utilizes only four implants
per arch for an immediate complete full fixed-detachable, screwretained prosthesis.
The benefits are numerous and exciting for patients who have suffered with ill-fitting dentures. Dentulous
patients in need of extractions with terminal dentition can take advantage of this concept, which increases
stability, even with low bone volume. They can choose from several prosthetic options, such as a fixed,
titanium implant bridge with acrylic veneering or individual crowns cemented to the bridgework.
The treatment procedure uses tilting posterior implants to facilitate optimal support for an acrylic or
composite bridge that can be fabricated and functioning just a few hours after surgery. Based on
documented measurements, tilted implants have shown good clinical results. The system can be used in
the maxilla, allowing the dentist to avoid sinus grafting, or in the mandible, to avoid having to place
implants posterior to the symphysis.1 It also has higher patient acceptance rates because of its lower cost
and shorter treatment time.
Case Studies
The case study review photos included involve numerous patients who had similar complaints, many of
whom were completely edentulous and tired of wearing dentures that never fit properly. Poorly fitting
prosthetics limited the patients' menu choices at restaurants and made social gatherings painful because
eating or smiling in public often meant dealing with a loose prosthetic. In the authors' experience,
patients who are desperate for a change will eagerly embrace an implant-retained option in order to avoid
the embarrassment endured with removable prosthetics.
Our patient presented with a fully edentulous maxilla and mandible. The dental team decided on a
treatment plan using the Nobel Biocare All-on-4 implant system. The clinician placed eight implants—four
in the maxilla and four in the mandible (Figure 1 and Figure 2). An open-tray impression was taken and
impression copings were placed. The dentist confirmed proper seating (Figure 3). After taking the
impression, the clinician sent this case to the laboratory where the analogs were placed and the soft
tissue cast was created (Figure 4 and Figure 5). The lab received the midline, vertical dimension, high lip
line, and lip support from the clinician in order to set the patient's tooth position and facial features
(Figure 6).
Along with creating the bite blocks, the laboratory also fashioned a verification jig to make sure the
master cast model and the patient's mouth were mirror images. Before creating the verification index, the
temporary abutments were screwed into the model and a bar was lasered to create index stability (Figure
7). The light-cured wax verification index was then formed (Figure 8 and Figure 9).
The next step was the patient try-in at the doctor's office. The clinician was asked to verify fit with the
same verification index that was created by the technician (Figure 10 and Figure 11) by screwing in each
temporary abutment, one at a time. If any problems were to arise at this try-in checkpoint, the doctor
could cut and reconnect the jig into the proper position. He could then verify the seating of the implants
with an X-ray and send the case back to the lab. Necessary lab adjustments could be made at this time.
After the lab received the bite block back from the clinician (Figure 12), a tooth wax try-in was fabricated
according to the doctor's bite block markings. The case was then sent back to the doctor to confirm
occlusion and esthetics and verify the phonetic position of the teeth prior to bar fabrication.
Once the doctor verified the tooth setup in his office, he then sent the case back to the laboratory, where
a putty matrix was created as a record of the teeth positioning (Figure 13 and Figure 14). Using the putty
matrix record, a wax-up of the titanium bar for this case was formed with the Metacon light-cured wax
system (Primotec, www.primogroup.net) for consistent quality (Figure 15).

Using the NobelProcera™ CAD/ CAM scanner (Nobel Biocare), the wax bar fabricated from the Metacon
light-cured wax was scanned and sent for processing (Figure 16). This CAD/ CAM touch-scanning system
is very accurate for designing implant bars, and takes approximately 2 weeks to complete once ordered.
After this implant bar was milled and returned to the lab (Figure 17), the author verified the fit with the
framework on the model, comparing the metal and wax framework (Figure 18) and adjusting as needed.
Next, GC metal primer (Metal Primer II, GC America, www. gcamerica.com) was applied to the bar (Figure
19), followed by the opaquing process (Figure 20) and a pink composite application (Figure 21) before
being sent to the clinician for a patient try-in. This step was the final check for the patient and clinician to
ensure proper fit.Approval for final laboratory processing was given at this time.
After the clinician verified the bar and returned it to the laboratory, the author began creating the
composite denture teeth. The first and second steps involved the application of GC Gradia Opaque (GC
America) (Figure 22) and then opacious dentin (Figure 23). A basic A2 dentin was applied (Figure 24)
before layering pink porcelain onto the gum area (Figure 25). The incisal onethird was cut back (Figure
26), and blue stain was applied. To modify further, the author applied an orange stain (Figure 27 and
Figure 28) to reproduce mamelon effects. To then create a lifelike gradation of color, he applied the stain
to the interproximal areas (Figure 29).
The corner areas of the denture teeth were covered lightly with a white stain to create a three-
dimensional effect (Figure 30) and then layered again with a clear GC Gradia Composite (GC America)
material (Figure 31). Figure 32 shows an occlusal view of the mandibular overdenture and Figure 33
displays the right quadrant view of the occlusal contour. The mandibular left side occlusal view (Figure 34)
gives a closeup of the natural, lifelike color the author fashioned with his use of composite material. The
curve of Spee, curve of Wilson, and the height of contour were checked on the cast model (Figure 35) and
then again on a mirrored surface (Figure 36). Next, the final restoration was placed in the mouth (Figure
37).
If the bar were fitted with acrylic teeth, the procedure would be slightly different for the final try-in.
Instead of building the teeth onto the bar as demonstrated in this case, the acrylic denture would be
fabricated and temporarily placed on the bar. The patient would then approve the shape of the teeth
before they were permanently placed on the bar.
Conclusion
The more laboratory technicians know about this technique and the more they learn to perfect it, the
better they will be able to accommodate both the clinicians and their patients. The All-on-4 concept is a
perfect alternative for many patients because it utilizes only four implants per arch for an immediate
complete full fixed-detachable, screw-retained prosthesis. The authors would like to acknowledge Steve
Stevens, CDT, from Lakeside Dental in Mokena, Illinois.
Reference
Parrish K. Full-arch rehabilitation with the All-on-4™ technique. Description of lecture to be presented at:
the University of Texas Health Science Center San Antonio Dental School; February 18-19, 2011; San
Antonio, Texas. Available at: http://cde.uthscsa.edu/ coursepages/parrishfeb.php.

Fig 1. and Fig 2. Retracted view of the patient after implant placement.
Fig 3. The open-tray impression technique was
used, and impression copings were
placed after X-ray confirmation.
Fig 4. Soft tissue was added using a syringe
after the analogs were placed.
Fig 5.
Final working model was poured with
soft tissue in place.
Fig 6.
The clinician verified midline, vertical
dimension, high lip line, and lip support.
Fig 7.
The temporary abutments were screwed
into the model and a bar was lasered to
create index stability.
Fig 8.
The verification index was formed …
Fig 9.
… using Primotec's Metacon light-cured
wax.
Fig 10.
The verification index was then sent to
the clinician for him to verify fit by …
Fig 11.
… screwing in each temporary abutment
and noting any necessary adjustments.
Fig 12.
After the bite block was received back at
the laboratory, the technician fabricated a wax try-in according to the doctor's
recorded markings.
Fig 13.
The putty matrix was then used for a
positioning check and …
Fig 14.
… to help design the titanium bar.
Fig 15.
A wax-up of the titanium bar and
denture teeth was placed over the model
prior to scanning.
Fig 16.
The wax-up was scanned using the
NobelProcera Forte CAD/CAM scanner.
Fig 17. After the implant bar was milled, the fit
was compared between the wax
framework and …
Fig 18. … the metal framework.
Fig 19. GC Metal Primer II was the first
application to the implant bar and was
done prior to opaque.
Fig 20. A layer of opaque was next applied to the
implant bar.
Fig 21.
A pink composite was layered over the opaque.
Fig 22.
To begin creation of the denture teeth, GC Gradia Opaque was layered onto the
implant bar.
Fig 23.
A layer of opacious dentin was the next step.
Fig 24.
The opacious dentin application was followed by a layer of A2 dentin.
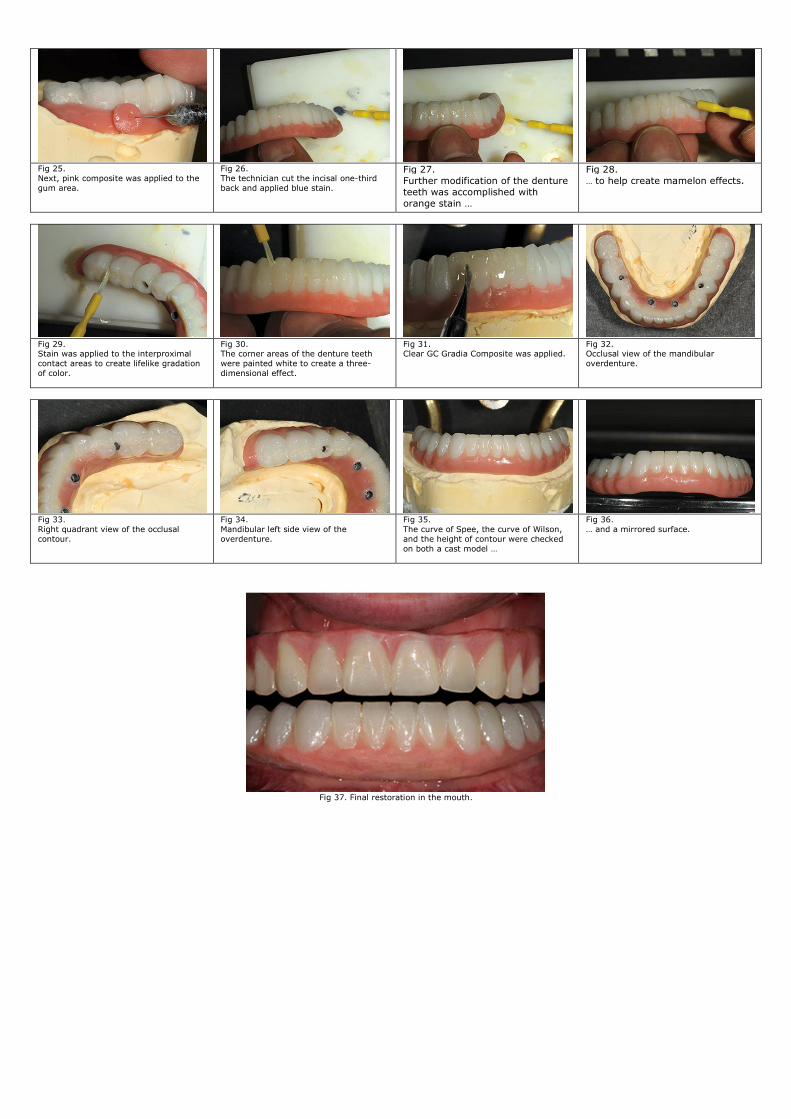
Fig 25.
Next, pink composite was applied to the
gum area.
Fig 26.
The technician cut the incisal one-third
back and applied blue stain.
Fig 27.
Further modification of the denture
teeth was accomplished with
orange stain …
Fig 28.
… to help create mamelon effects.
Fig 29. Stain was applied to the interproximal
contact areas to create lifelike gradation
of color.
Fig 30. The corner areas of the denture teeth
were painted white to create a three-
dimensional effect.
Fig 31. Clear GC Gradia Composite was applied.
Fig 32. Occlusal view of the mandibular
overdenture.
Fig 33.
Right quadrant view of the occlusal
contour.
Fig 34.
Mandibular left side view of the
overdenture.
Fig 35.
The curve of Spee, the curve of Wilson,
and the height of contour were checked
on both a cast model …
Fig 36.
… and a mirrored surface.
Fig 37. Final restoration in the mouth.