
Impact Analysis User Guide
56
Oracle Insurance Insbridge Rating and Underwriting Impact Analysis User Guide Release 4.0.1 August 2010
Transcript of Impact Analysis User Guide

Oracle Insurance
Insbridge Rating and Underwrit ing Impact Analysis User Guide Release 4.0.1
August 2010

Copyright © 2005, 2010, Oracle and/or its affiliates. All rights reserved. Oracle Insurance Insbridge Rating and Underwriting Impact Analysis User Guide Release 4.0.1 Part # E18505-01 Library # E18517-01 August 2010 Primary Authors: Mary Elizabeth Wiger This software and related documentation are provided under a license agreement containing restrictions on use and disclosure and are protected by intellectual property laws. Except as expressly permitted in your license agreement or allowed by law, you may not use, copy, reproduce, translate, broadcast, modify, license, transmit, distribute, exhibit, perform, publish, or display any part, in any form, or by any means. Reverse engineering, disassembly, or decompilation of this software, unless required by law for interoperability, is prohibited. The information contained herein is subject to change without notice and is not warranted to be error-free. If you find any errors, please report them to us in writing. If this software or related documentation is delivered to the U.S. Government or anyone licensing it on behalf of the U.S. Government, the following notice is applicable: U.S. GOVERNMENT RIGHTS Programs, software, databases, and related documentation and technical data delivered to U.S. Government customers are “commercial computer software” or “commercial technical data” pursuant to the applicable Federal Acquisition Regulation and agency-specific supplemental regulations. As such, the use, duplication, disclosure, modification, and adaptation shall be subject to the restrictions and license terms set forth in the applicable Government contract, and, to the extent applicable by the terms of the Government contract, the additional rights set forth in FAR 52.227-19, Commercial Computer Software License (December 2007). Oracle USA, Inc., 500 Oracle Parkway, Redwood City, CA 94065. This software is developed for general use in a variety of information management applications. It is not developed or intended for use in any inherently dangerous applications, including applications which may create a risk of personal injury. If you use this software in dangerous applications, then you shall be responsible to take all appropriate fail-safe, backup, redundancy, and other measures to ensure the safe use of this software. Oracle Corporation and its affiliates disclaim any liability for any damages caused by use of this software in dangerous applications. Oracle is a registered trademark of Oracle Corporation and/or its affiliates. Other names may be trademarks of their respective owners. This software and documentation may provide access to or information on content, products, and services from third parties. Oracle Corporation and its affiliates are not responsible for and expressly disclaim all warranties of any kind with respect to third-party content, products, and services. Oracle Corporation and its affiliates will not be responsible for any loss, costs, or damages incurred due to your access to or use of third-party content, products, or services. Where an Oracle offering includes third party content or software, we may be required to include related notices. For information on third party notices and the software and related documentation in connection with which they need to be included, please contact the attorney from the Development and Strategic Initiatives Legal Group that supports the development team for the Oracle offering. Contact information can be found on the Attorney Contact Chart. The information contained in this document is for informational sharing purposes only and should be considered in your capacity as a customer advisory board member or pursuant to your beta trial agreement only. It is not a commitment to deliver any material, code, or functionality, and should not be relied upon in making purchasing decisions. The development, release, and timing of any features or functionality described in this document remains at the sole discretion of Oracle. This document in any form, software or printed matter, contains proprietary information that is the exclusive property of Oracle. Your access to and use of this confidential material is subject to the terms and conditions of your Oracle Software License and Service Agreement, which has been executed and with which you agree to comply. This document and information contained herein may not be disclosed, copied, reproduced, or distributed to anyone outside Oracle without prior written consent of Oracle. This document is not part of your license agreement nor can it be incorporated into any contractual agreement with Oracle or its subsidiaries or affiliates.

CONTENTS
PREFACE .............................................................................................................. V Audience ................................................................................................................ v Related Documents ............................................................................................... v Conventions .......................................................................................................... vi System Requirements ........................................................................................... vi Manual History ...................................................................................................... vi
CHAPTER 1 INTRODUCTION TO IMPACT ANALYSIS ............................................................ 7 Preparation ............................................................................................................. 8 Preparing a Batch Input File .................................................................................. 8
CHAPTER 2 BATCH FILES ...................................................................................................... 12 Functionality ......................................................................................................... 13 Fields .................................................................................................................... 14 Rating an Insbridge XML Batch File .................................................................... 16 Rating a Custom XML Batch File ......................................................................... 17 Deleting a Batch File ............................................................................................ 19
CHAPTER 3 REPORTING ........................................................................................................ 21 Functionality ......................................................................................................... 21 Fields .................................................................................................................... 22 NEW SCENARIO ................................................................................................. 23 Step 1 – Select Results ........................................................................................ 24 Functionality ......................................................................................................... 24 Fields .................................................................................................................... 25 Step 2 – Define Report ........................................................................................ 27 Functionality ......................................................................................................... 27 Fields .................................................................................................................... 28 Report Flags ......................................................................................................... 29 Report Filters ........................................................................................................ 31 Creating a New Scenario Report ......................................................................... 34 Editing a Scenario Report .................................................................................... 36 Deleting a Scenario .............................................................................................. 36
ii

Contents
iii
CHAPTER 4 REPORTS ............................................................................................................ 37 Viewing a View XML Report ................................................................................ 37 Viewing a View Output Report ............................................................................. 38 Viewing Baseline and Comparison Files ............................................................. 39 Viewing a Scenario Report .................................................................................. 41
SUPPORT CONTACTING SUPPORT ................................................................................... 45 TTY Access to Oracle Support Services ............................................................. 45
GLOSSARY GLOSSARY TERMS ............................................................................................ 46
INDEX INDEX .................................................................................................................. 51
LIST OF FIGURES FIGURE 1 IMPACT ANALYSIS TAB ............................................................................................................ 7 FIGURE 2 EXAMPLE OF A BATCH XML FILE ............................................................................................ 9 FIGURE 3 IMPACT ANALYSIS BATCH FILE ............................................................................................ 11 FIGURE 4 BATCH FILES SUB-TAB ........................................................................................................... 12 FIGURE 5 RIGHT CLICK MENU FOR THE XML INPUT FILE LISTING ................................................... 15 FIGURE 6 RIGHT CLICK MENU FOR RESULT FILE LISTING ................................................................ 15 FIGURE 7 ENTERING A BATCH FILE NAME ........................................................................................... 16 FIGURE 8 CONFIRMATION MESSAGE FOR BATCH RATE REQUEST ................................................. 17 FIGURE 9 NEW RATE CUSTOM BATCH FILE DIALOGUE BOX ............................................................. 18 FIGURE 10 EXAMPLE CUSTOM BATCH FILE ......................................................................................... 19 FIGURE 11 CONFIRMATION MESSAGE FOR BATCH RATE REQUEST ............................................... 19 FIGURE 12 DELETE INPUT FILE MESSAGE ........................................................................................... 20 FIGURE 13 ERROR MESSAGE FOR BATCH RATE ................................................................................ 20 FIGURE 14 REPORTING SUB-TAB .......................................................................................................... 21 FIGURE 15 CREATING A NEW SCENARIO ............................................................................................. 23 FIGURE 16 STEP 1 – SELECT RESULTS ................................................................................................ 24 FIGURE 17 FILE NAME EXAMPLE ........................................................................................................... 26 FIGURE 18 STEP 2 – DEFINE REPORT ................................................................................................... 27 FIGURE 19 RIGHT CLICK MENU FOR STEP 2 – DEFINE REPORT....................................................... 29 FIGURE 20 FLAGGING OR UN-FLAGGING A RESULT ........................................................................... 30 FIGURE 21 POLICY FILTER OPTIONS ..................................................................................................... 31 FIGURE 22 FILTER OPTIONS SELECTING AN OPERATOR .................................................................. 32 FIGURE 23 ENTERING A CONSTANT VALUE ......................................................................................... 33 FIGURE 24 STEP 2 – DEFINE REPORT WITH FLAGS AND FILTERS ................................................... 34 FIGURE 25 CONFIRMATION MESSAGE FOR RUNNING AN IMPACT ANALYSIS SCENARIO ............ 35 FIGURE 26 ERROR MESSAGE FOR BATCH RATE ................................................................................ 35 FIGURE 27 DELETE REPORT MESSAGE ................................................................................................ 36 FIGURE 28 VIEW XML REPORT ............................................................................................................... 37 FIGURE 29 VIEW OUTPUT REPORT ....................................................................................................... 38 FIGURE 30 VIEWING BASELINE OR COMPARISON FILES ................................................................... 40 FIGURE 31 IMPACT ANALYSIS SCENARIO REPORT ............................................................................ 42
iv

Preface
PREFACE Welcome to the Oracle Insurance Insbridge Rating and Underwriting Impact Analysis User Guide. This guide describes the features and functionality of Oracle Insurance Insbridge Rating and Underwriting Impact Analysis (Impact Analysis). Impact Analysis is a new feature for Release 4.0 that combines two features from previous releases, BatchManager Rating and Pricing Manager. Impact Analysis is a module in Oracle Insurance Insbridge Rating and Underwriting RateManager (RateManager) that serves as a data analysis tool and allows you to rate a group of policies in a batch rather than individually. With Impact Analysis, you can compare the effects of a program change against existing rates. You can compare two complete sets of data, such as a data set containing current rates and another data set containing a proposed rate change. Impact Analysis is available from the Module Menu.
RateManager 3.13 and earlier RateManager Release 4.0.1
BatchManager (Batch Rating) has been combined with PricingManager and is now called Impact Analysis. Impact Analysis is an option on the Modules menu.
NOTE: BatchManager Packaging is located in Modules Releases Packaging.
AUDIENCE This guide is intended for RateManager users and system administrators who are tasked with comparison rating and batching. A fundamental knowledge of RateManager is required.
RELATED DOCUMENTS For more information, refer to the following Oracle resources:
● The Oracle Insurance Insbridge Rating and Underwriting RateManager User Guide.
● The Oracle Insurance Insbridge Rating and Underwriting Framework Administrator User Guide. ● You can view these guides on-line at this address:
v

Preface
vi
http://www.oracle.com/technology/documentation/insurance.html
CONVENTIONS The following text conventions are used in this document:
Convention Description
bold Boldface type indicates graphical user interface elements associated with an action.
italic Italic type indicates book titles, emphasis, or placeholder variables for which you supply particular values.
monospace Monospace type indicates commands within a paragraph, URLs, code in examples, text that appears on the screen, or text that you enter.
SYSTEM REQUIREMENTS For minimum operating system and hardware requirements, please see the Hardware Software requirements guide.
Manual History New editions incorporate any updates issued since the previous edition.
Edition Publication Number
Product Version Publication Date Comment
1st Edition P01-730-15 R 4.0 April 2010 2nd Edition P01-730-16 R 4.0.1 August 2010

Chapter 1
INTRODUCTION TO IMPACT ANALYSIS Impact Analysis is a data analysis tool that allows you to compare the effects of a program change against existing rates. You may run a book of business through the rating system and then compare two rate changes or two programs to analyze the true impact of a change. Impact Analysis contains two sub-tabs:
● Batch Files – This sub-tab can rate multiple XML files at one time either as a combined single file or as a group of XML files bundled together under one folder. The result files can then be used in the Reporting sub-tab.
● Reporting – This sub-tab is where you can compare two complete sets of data, such as a data
set containing current rates and another containing a proposed rate change.
Figure 1 Impact Analysis Tab The Selected Menu Item will display the sub-tab you are currently using.
7

Chapter 1 – Introduction to Impact Analysis
PREPARATION Batch files are required when working with Impact Analysis. Before running a Scenario report, you must first identify the two programs or program versions to be compared. Programs must be packaged and should be in the same line of business. It is recommended that you keep lines of business together to allow for a more accurate and relative comparison. Batch Packaging Location If you have a large number of programs to package, the Releases Module contains the batch packaging option. Modules Releases Packaging
NOTE: If you do not have Releases as a menu option, please contact your system administrator to
request Release rights. For more information on working with batch packaging, please see Releases in the RateManager User Guide.
Preparing a Batch Input File Batch Files can rate multiple XML files at one time either as a combined single file or as a group of XML files bundled together under one folder. The result files can then be used on the Reporting sub-tab. The first step is to create a batch input file or folder. NOTE: Only files located on a network share can be batch rated, i.e. the file path must be of the form
"\\server\folder\file.xml". Files located on your local machine or on a mapped network drive are not available.
The network share must be accessible to both the Impact Analysis user and the user account
used to run Insbridge, i.e. the account specified for the IBRU installation. If this account is a local account on the Insbridge server, then a network share must be established on a local drive on the Insbridge server itself.
8

Chapter 1 – Introduction to Impact Analysis
Batch Input Files There are two types of batch input files:
● Individual File – An individual batch input file consists of multiple XML input files surrounded by a batch header. Since the batch file consists of many input files, it is recommended that an additional element (PolicyNumber) is added to the rate node for each file. Although not required, this element lets you distinguish between the files when viewing an Impact Analysis result report. Files will retain their original name.
● Group Folder – A group of batch input files under one folder. Each input file will have the same
header information and all the files will be contained within one folder. Groups folder are designated with a *.xml extension. The file name will not remain the same as the folder. If you want to use a group folder result, make sure you save the confirmation email from any group folder batch. The result file name will be listed on the email.
Individual File Batch files can be created in an XML editor. An individual batch input file consists of multiple XML input files surrounded by a batch header. You can create this file by assembling multiple input files and appending them together in one large batch XML file. An XML wrapper must be added to both the beginning and end of the document in order for the file to be valid XML. An example single batch XML input file is shown in Figure 2, (<ibdoc> is used as the XML wrapper):
Figure 2 Example of a Batch XML File Since the batch file consists of many input files, an additional element (PolicyNumber) is added to the rate node for each file. Although not required, this element lets you distinguish between the files when viewing an Impact Analysis result report.
9

Chapter 1 – Introduction to Impact Analysis
Group Folders Use a group folder when you want to group together multiple rate files. For example, you may have 500 auto policies that you want to rate. Rather then merge all of these files into one large batch XML file, you can place them all in a folder and rate the folder. To create a group folder, place your Insbridge XML inputs into a folder. Folder names should not contain spaces or special characters. Groups folder are designated with a *.xml extension. Your file name will be similar to: \\(yourserver)\BatchFiles\Group1\*.XML. Do not place any other file type in the folder. This will cause an error and the folder will not batch. It is possible to batch a group custom folder. When using custom files, each input file must have the same XSLT information to get Insbridge XML. If you want to use a group folder result, make sure you save the confirmation email from any group folder batch. The result file name will be listed on the email. When you enter an Impact Analysis report, the baseline and comparison files names will be the result file name on the email and not necessarily the folder name. NOTE: In IE 8, you can no longer edit the directory path to use an asterisk if you want to rate a group of
files in directory. An option has been added to the Open Batch File Dialog window to "Rate all files in this directory". Browse to the directory where you have the multiple files you want to rate. Select one file and then select the "Rate all files in this directory" option. The file path will be modified, replacing the file name with an asterisk.
Result Mapping in Batch Files When creating an Impact Analysis report, you will have the option to choose multiple items to show in the report. In order for these items to be available for an Impact Analysis report, they must first be added to the result mapping for both programs. The result IDs between these programs should also be identical. For more information, see Introduction to Result Mapping in the RateManager User Guide. NOTE: When using custom XML in Impact Analysis and Releases Packaging, you must map the
System Category – rate and category input pricing_manager_policy_id. This input requires a unique policy identifier and is used in the batch and rating process. Please see the Oracle Insurance Insbridge Rating and Underwriting RateManager User Guide, Input and Output Mapping for more information.
NOTE: Once you have finished modifying the programs, a RateManager (local) package should be
created for both programs before batch rating. Batch Results with New Line In Batch Files, the results are set to form one continuous string. If you want to add a break between results, you must go to RateManager. To set Batch Results with a New Line enter RateManager and go to Tools. On the Preferences page (Tools Preferences) will be the option to set Batch Results with a New Line. If the "Batch Results with a New Line" setting is set to true, batch results will go to a new line instead of forming one continuous
10

Chapter 1 – Introduction to Impact Analysis
string. A True setting places a carriage return between result files. A False setting will result in one continuous string without a break. Please see the RateManager User Guide for more information. To Navigate to Impact Analysis
1. Select Modules Impact Analysis.
2. This will open the Impact Analysis Batch Files sub-tab. To go the Reporting, click the Reporting sub-tab.
Figure 3 Impact Analysis Batch File
11

Chapter 2
BATCH FILES The first sub-tab is Batch Files. Batch Files is where you will perform batch rating. Batch rating is used to rate multiple XML files at one time. Rates are returned in a result report. Result reports can be displayed in XML format or report format and can contain debug information if needed.
● The upper portion of the sub-tab is the XML Input Files Listing. This area will be populated with the XML files that you have created and brought into Batch Files.
● The lower portion of the sub-tab is the Result File Listing. This area will be populated with the
result files that are generated when you run the batch XML input files.
Figure 4 Batch Files Sub-Tab
12

Chapter 2 – Batch Files
FUNCTIONALITY The Menu Bar is located at the top of the tab. The menu bar contains the functions you can perform on this sub-tab as well as the definition options you can add. Functions:
Run Batch File: Rates an existing/displayed input file. To use, place a check in the box next to the File Name and select this option.
NOTE: You can also rate an existing/displayed input file by double clicking it.
Open Batch File: Opens a browser window where you can select an input file to rate. There are two options:
● Insbridge XML – Opens a browser window where you can select a file that is in Insbridge.XML format.
● Custom XML – Opens a browser window where you can select a custom input file to rate. A separate screen will be displayed that allows you to define the file parameters and specify the mapping to use that will transform the input file into an Insbridge.XML format.
Delete: Removes the selected file(s). NOTE: For input files, this does not delete the actual XML file.
Refresh: Refreshes the listing of input and result files. Definition Options: Definition options allow you to further define the batch rating. Send Confirmation is the only required option.
Send Confirmation to: Provides a place where you can enter an email address that will receive notification when the rating is complete. This is a required field.
Version Override: If you want to override the version of the program that would normally be rated, enter the version number in this box. If you want to use the version specified in the input file (or determined by automatic version selection), clear this box.
Include Debug Report: Checking this option sends the batch rate through debug. You must check this prior to rating a batch file. Debug files are local to the Batch Rating sub-tab. If you want to use a batch file on the Reporting sub-tab, do not select to debug the file.
13

Chapter 2 – Batch Files
NOTE: Batch files that are run with the debug option will not be available for use by the Reporting sub-tab.
SoftRater Environment Override: Choose this option if you want to override the rating environment.
● None – no override will be in place. You also can use this option when you want to use the defined environment in your ratings.
● Default – selects the default environment. ● Another Environment – if other environments
have been entered, you may select one of those.
NOTE: If you select Default or another environment, any defined environments in your ratings will be ignored.
FIELDS The fields on the tab are divided over two areas:
● The upper portion of the tab is the XML Input File Listing. This area lists the input files that are being batch rated.
● The lower portion of the tab in the Result File Listing. This area lists the result files that are
being returned. XML Input File Listing Shows a listing of input files, sorted newest to oldest by the last date used time stamp.
Check Box: Used to select multiple files to delete or a single file to rate. File Name: Displays the pathway of the input file. Date Modified: Time stamp of when the input file was last used.
Result File Listing Shows a listing of result files, sorted newest to oldest by the last rate date time stamp. To open a result file in report format, double-click it.
Check Box: Used to select multiple files to delete. Debug: A checkmark indicates the result file is a full debug report. This report will not be listed on the Reporting sub-tab. File Name: The name of the result file.
14

Chapter 2 – Batch Files
Run By: The user that rated the file. Date Run: Time stamp of when the result file was produced. Policies: The total number of policies the result file is for. Size: The size of the result file.
Right Click Options Every File Name line will have right click menu options. To view the right click menu options, select the line you want and right click.
Figure 5 Right Click Menu for the XML Input File Listing The XML Input File Listing will have three choices:
● Delete: Removes the selected file.
● Run Batch File: Rates the selected file.
● View XML: Allows you to view the selected XML file.
Figure 6 Right Click Menu for Result File Listing The Result File Listing will have three choices:
● View Output: Allows you to view the output in report format.
● View XML: Allows you to view the selected XML file.
● Delete: Removes the selected file.
15

Chapter 2 – Batch Files
Rating an Insbridge XML Batch File
1. Enter an email address into the Send Confirmation to text box. When the batch file is finished rating, an email will be sent to this address. A batch file cannot be rated without an email address.
2. To override the version of the program that would normally be rated, enter the version number in
the Version Override box. To use the version specified in the input file (or determined by automatic version selection), clear this box.
3. If you want to debug this batch, check the Debug Rate box.
4. If you want to override the SoftRater rating environment, choose the environment you want from
the listing. 5. If the file to be rated is already listed in the input file listing, it can be rated by selecting it and
clicking RUN BATCH FILE or by double-clicking the file.
6. If the file to be rated in not listed, click OPEN BATCH FILE and select INSBRIDGE XML. A browse box will open for you to select the file to rate.
Figure 7 Entering a Batch File Name
NOTE: In IE 8, you can no longer edit the directory path to use an asterisk if you want to rate a group of
files in directory. An option has been added to the Open Batch File Dialog window to "Rate all files in this directory". Browse to the directory where you have the multiple files you want to rate. Select one file to rate and then select the "Rate all files in this directory" option. The file path will be modified, replacing the file name with an asterisk.
7. If you know the path to the input file, you can type it in; otherwise, click Browse… to find a file to
rate. When you are finished, click RUN.
8. A popup message will notify you that your request has been submitted for processing. If a different message is received.
16

Chapter 2 – Batch Files
Figure 8 Confirmation Message for Batch Rate Request
8. You will receive an email when the file is finished rating. The result file can now be used in an
Impact Analysis scenario or the result XML can be viewed by double-clicking the result file.
Rating a Custom XML Batch File Input files that are custom XML can be rated using Impact Analysis. You will need to have some file information ready: Line number, Program number, Version number and Root name.
1. Enter an email address into the Send Confirmation to text box. When the batch file is finished rating, an email will be sent to this address. A batch file cannot be rated without an email address.
2. Leave the Version Override box blank. You will select the version to use in the batch file details.
3. If you want to debug this batch, check the Debug Rate box.
4. Leave the SoftRater Environment Override to NONE. 5. If the file to be rated is already listed in the input file listing, it can be rated by selecting it and
clicking RUN BATCH FILE or by double-clicking the file.
6. If the file to be rated in not listed, click OPEN BATCH FILE and select CUSTOM XML. A browse box will open for you to select the file to rate.
17

Chapter 2 – Batch Files
Figure 9 New Rate Custom Batch File Dialogue Box
7. If you know the path to the file you want to rate, type it in the box, otherwise, click Browse… to
find a file to rate.
NOTE: If a file is moved to a different location, you will have to browse to find the file again before rating. If a change is made to an existing file, but the file is not moved, there is no need to browse to find the file. Just double-click the file to re-rate.
8. Enter in the Line, Program and Version numbers. The Subscriber number will default to your current number.
9. Enter in the Root Name. This is the element name that delineates each quote. Do not include the
element brackets. If no entry is made, no files will be returned. In Figure 10, Quote is the element that marks the beginning and end of each quote.
18

Chapter 2 – Batch Files
Figure 10 Example Custom Batch File
10. Select the input mapping Type. There are three options; Global, Local and Custom. Global uses XSLT created for the line (all inputs for the line), local uses XSLT created for a specific version (only inputs used by a specific version) and custom uses a custom XSLT created outside of the RateManager mapping tool.
11. Any mapping needed to transform the input file into Insbridge.XML format will be in the Identifier
field. Select the Identifier to be used for this rating. The options will be filled in after you select the File Name at the top of the popup. You also can use Search to find the file you need.
12. When you are finished, click RUN. Your file will be rated and the result file will show in the result
file listing.
13. A popup message will notify you that your request has been submitted for processing. If a different message is received, see Batch Error Messages.
Figure 11 Confirmation Message for Batch Rate Request
14. You will receive an email when the file is finished rating. The result file can now be used in an Impact Analysis scenario or the result XML can be viewed by double-clicking the result file.
Deleting a Batch File If an input file or result file is no longer needed, it can be deleted.
19

Chapter 2 – Batch Files
To Delete an Input File
1. Navigate to the Batch Files sub-tab.
2. Select the input file or result file you wish to delete and click DELETE.
3. You will be asked to confirm deletion.
Figure 12 Delete Input File Message
4. Click OK to delete the file. Click Cancel to return to the Batch Files sub-tab without deleting the
input file. Batch Error Messages
If you rate a batch file and receive the following message, it means that an administrator needs to start the Insbridge Message Service in Insbridge Framework Administrator (IBFA). Once the service is started, the request will be submitted and processed.
Figure 13 Error Message for Batch Rate
If there was a problem when rating your batch file, the email you receive will list the problem. For example, the file could not be found or some element was missing. If you do not receive an email regarding your batch file, there may be a problem with Insbridge Framework Administrator (IBFA) relaying messages. Please contact your system administrator to verify that emails are being relayed.
20

Chapter 3
REPORTING The second sub-tab is Reporting. Reporting is a data analysis tool that allows you to compare the effects of a program change against existing rates. You may run a book of business through the rating system and then compare two rate changes or two programs to analyze the true impact of a change.
● Reports will be listed in the Scenario Listing area after they have been created.
● Reports will be listed in the Scenario Reports Listing after they have been run.
Figure 14 Reporting Sub-Tab
FUNCTIONALITY The Menu Bar is located at the top of the tab. The menu bar contains the functions you can perform on this sub-tab as well as the definition options you can add.
21

Chapter 3 – Reporting
Functions:
New Scenario: Begins the process of creating a new scenario.
Delete: Removes the selected scenario or the selected report(s).
Run Scenario: Submits the selected scenario for processing.
Refresh: Refreshes the listing of scenarios and reports. Definition Options: The only definition option is the Send Report Response to field. This is a required option.
Send Report Response to: Enter in an email address for the person to be notified when the report is ready for viewing.
This is a required field.
FIELDS The fields on the tab are divided over areas:
● The upper portion of the tab is the Scenario Listing. This area lists the scenarios that have been created.
● The lower portion of the tab is the Scenario Reports Listing. This area lists the reports that have
been generated.
Scenario Listing
Description: Shows a listing of scenarios that have been created. Double-click a scenario to edit it. To run a scenario, select it and click RUN SCENARIO. Last Date Modified: Displays the date of the last modification.
Scenario Reports Listing Shows a listing of reports generated, sorted newest to oldest. Double-click a report to open it.
Check Box: Used to select multiple reports to delete.
Scenario Reports: Name of the report.
Scenario Administrator: Email address of the user that ran the report.
22
Chapter 3 – Reporting
Creation Date: Time stamp of when the report was generated. Report Size: Size of the report.
Right Click Options There are no right click menu options for Reporting.
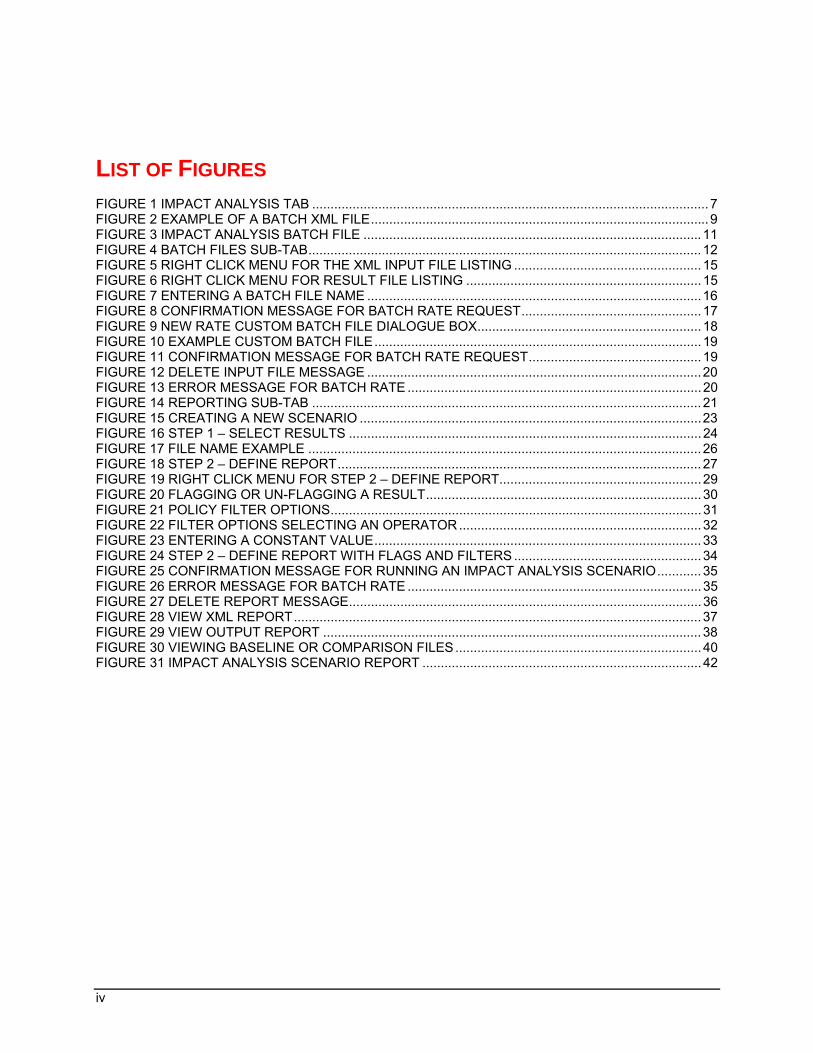
NEW SCENARIO The New Scenario tab can be accessed only from the Reporting sub-tab. On the Reporting sub-tab, click NEW SCENARIO. This will open a New Scenario tab.
Figure 15 Creating a New Scenario The New Scenario tab also has two sub-tabs:
● Step 1 – Select Results: This tab is where you select the result files to be compared.
● Step 2 – Define Reports: This tab is where you enter any filters and flags on the report.
23
Chapter 3 – Reporting
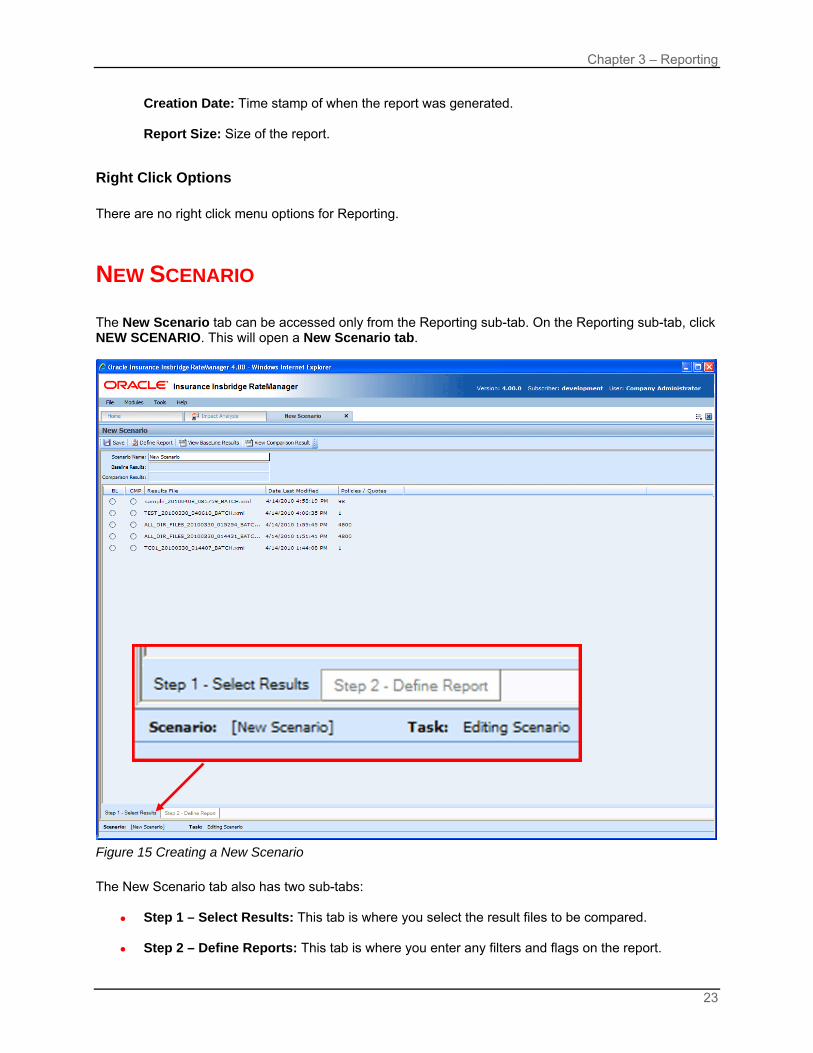
STEP 1 – SELECT RESULTS The first step in creating a new scenario is to name the scenario and select the result files to be compared. This is done on Step 1– Select Results.
Figure 16 Step 1 – Select Results
FUNCTIONALITY The Menu Bar is located at the top of the tab. The menu bar contains the functions you can perform on this sub-tab as well as the definition options you can add.
24
Chapter 3 – Reporting
Functions:
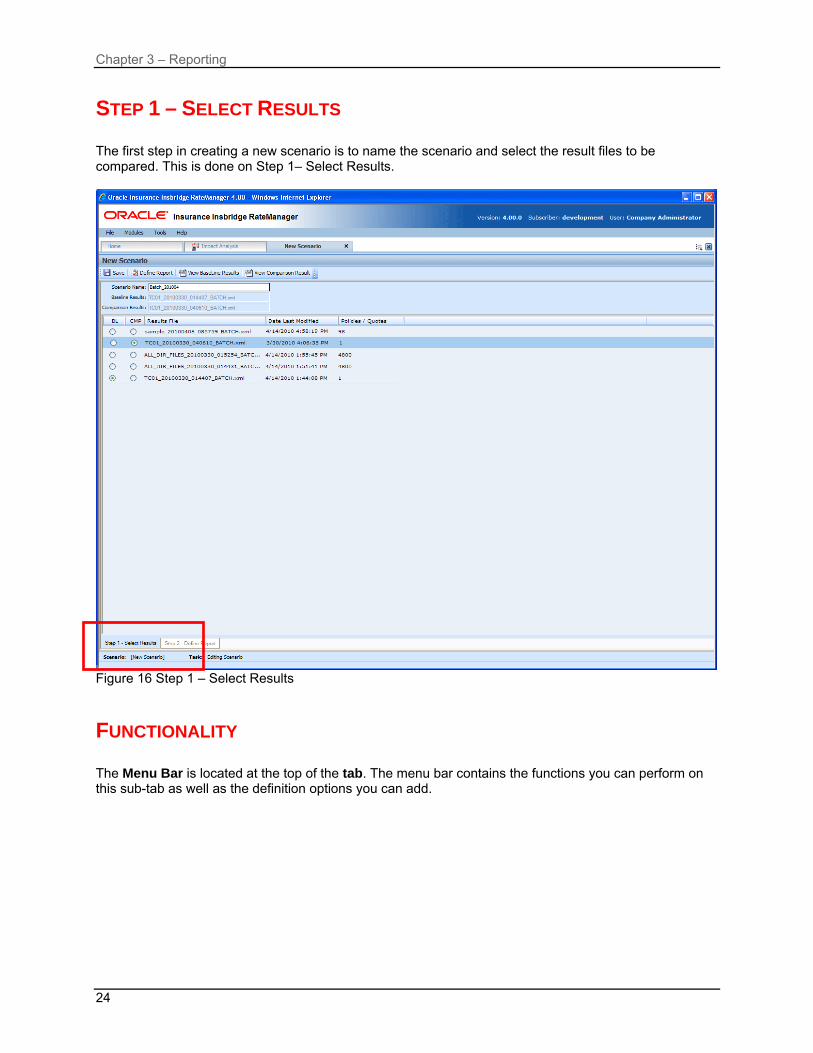
Save: Saves changes to the current scenario. If you choose a different baseline or comparison file, the scenario should be saved before defining the report.
Define Report: Opens Step 2 – Define Reports, where you can choose results to filter on and which results to display. If you choose a different baseline or comparison file, the scenario should be saved before defining the report.
View Baseline Results: Allows you to view the Batch Rating Summary report of the selected baseline file. The report shows information about the result file and the elements (results, variables and inputs) that were selected for output enabling you to verify that you have selected the right file. For more information, see Viewing Baseline and Comparison Files.
View Comparison Results: Allows you to view the Batch Rating Summary report of the selected comparison file. The report shows information about the result file and the elements (results, variables and inputs) that were selected for output enabling you to verify that you have selected the right file. For more information, see Viewing Baseline and Comparison Files.
Definition Options: The only definition option is the Send Report Response to field. This is a required option.
Scenario Name: Enter a name for the scenario.
This is a required field.
Baseline Results: The result file that contains the original results. This field is not directly editable. It will be updated when a new baseline file is chosen from the results file listing. Comparison Results: The result file that will be compared to the baseline file. This field is not directly editable. It will be updated when a new comparison file is chosen from the results file listing.
FIELDS Results File Listing The Result File Listing has all the result files from Impact Analysis Batch Files that are not in Debug. If the file you need is not listed, please return to Impact Analysis Batch File tab and verify the file is listed. If the file has Debug checked it will not be listed.
25

Chapter 3 – Reporting
BL (BaseLine): This column allows the user to choose the baseline file. Select the file you want to be the baseline file. Only one baseline file can be chosen. CMP (Comparison): This column allows you to choose the comparison file. Select the file you want to be the comparison file. Only one comparison file can be chosen. Results File: Name of the results file. Last Date Modified: Time stamp of when the results file was created. Policies/Quotes: The total number of policies the results file is for.
Right Click Options There are no right click menu options for Step 1 – Select Results. File Names When you are selecting baseline and comparison files, please take note of the file names. Individual files will retain their file names. Group files will return with an ALL_DIR_FILES batch file name. This may make locating a group file confusing because the folder name will not be listed. To locate the exact group file you need, please refer back to the batch process email you received. This will have the name of the batch file return result.
Figure 17 File Name Example
Example of an Individual file name.
Example of a group file name.
26

Chapter 3 – Reporting
STEP 2 – DEFINE REPORT The second step in creating a new scenario is choosing the results to filter on and the results to show on the report. This is done via step 2 – Define Report. Step 2 is where you can choose which results to filter on and which results to display. If you choose a different baseline or comparison file, the scenario should be saved before defining the report.
Figure 18 Step 2 – Define Report
FUNCTIONALITY The Menu Bar is located at the top of the tab. The menu bar contains the functions you can perform on this tab as well as the definition options you can add.
27

Chapter 3 – Reporting
Functions:
Save: Saves changes to the current scenario. If you choose a different baseline or comparison file, the scenario should be saved before defining the report.
+/- Report Flag: Adds or removes the report flag from the selected result. A report flag also can be added or removed by double-clicking a result. For more information, see Report Flags.
Edit Filter: Opens the edit filter popup that allows you to specify how the result is filtered. For more information, see Report Filters.
Remove Filter: Removes all filters from the selected result. Definition Options: The only definition option is the Send Report Response to field. This is a required option.
Scenario Name: Enter a name for the scenario.
This is a required field.
Baseline Results: The result file that contains the original results. This field is not directly editable. It will be updated when a new baseline file is chosen from the results file listing. Comparison Results: The result file that will be compared to the baseline file. This field is not directly editable. It will be updated when a new comparison file is chosen from the results file listing.
FIELDS Program information will be at the top of the report. This is basic program identification information. Results are listed next. If Stop, start and run time information may be listed. This is an option that is set by the system administrator in Insbridge Framework Administrator (IBFA) or Insbridge SoftRater Server (IBSS). If you would like run time information, please contact your system administrator to set this option to ON. Program Information
Program Name: Shows the name of the program for the baseline file.
Line of Bus: Line of business the programs are for.
28

Chapter 3 – Reporting
Program ID: Shows the program ID of the program for the baseline file. Parent ID: Parent ID (i.e. Subscriber) of the programs.
Results
● Shows a listing of the results the baseline and comparison files have in common, arranged by category. A indicates that the report flag has been set, and the result will be shown in the report. A indicates that a filter has been set for the result.
● Start and stop times can be listed at the top of the result if needed. Start and stop times are set in
the Insbridge SoftRater Server (IBSS) on the Edit Options page. Allowing for start and stop times to be displayed will return start and stop times on all XML documents that IBSS processes. An administrator may have to make the changes.
Right Click Options: Every result line will have right click menu options. To view the right click menu options, select the line you want and right click.
Figure 19 Right Click menu for Step 2 – Define Report Step 2 – Define Report will have three choices:
● Add/Remove Report Flag: Adds or removes the report flag from the selected result. A report flag also can be added or removed by double-clicking a result.
● Edit Filter: Opens the edit filter popup that allows you to specify how the result is filtered.
● Remove Filter: Removes all filters from the selected result.
Report Flags In order for a result to show on an Impact Analysis report, it must be flagged. If a result appears multiple times for the same policy, all instances of the result will be shown in the Filtered Policy Details section. NOTE: There is no limit to the number of results that can be flagged, however, the more results that are
flagged, the larger the report will be.
29

Chapter 3 – Reporting
For example, in the example below, a report flag has been added to the Policy result TOTAL_POLICY_SDIP. For each vehicle on the policy, a TOTAL_POLICY_SDIP will be shown. For more information on how results are displayed, see Viewing a Scenario Report . Flags can be set only on the Step 2 – Define Report sub-tab. Flags can be added or removed at any time. If you add or remove a flag to a scenario that has already been run, you will need to run the scenario again. To Flag or Un-flag a Result
1. Navigate to Step 2 - Define Report on the report where you want to add or remove a flag.
Figure 20 Flagging or Un-Flagging a Result
2. Select the result you wish to flag or un-flag and then click +/- REPORT FLAG. A flag also can be added or removed by double-clicking the result or by right clicking it and selecting Add/Remove Report Flag from the menu.
3. If you added a flag, a check icon ( ) will show next to the result. If you removed a flag, the check
icon will be removed.
30
Chapter 3 – Reporting
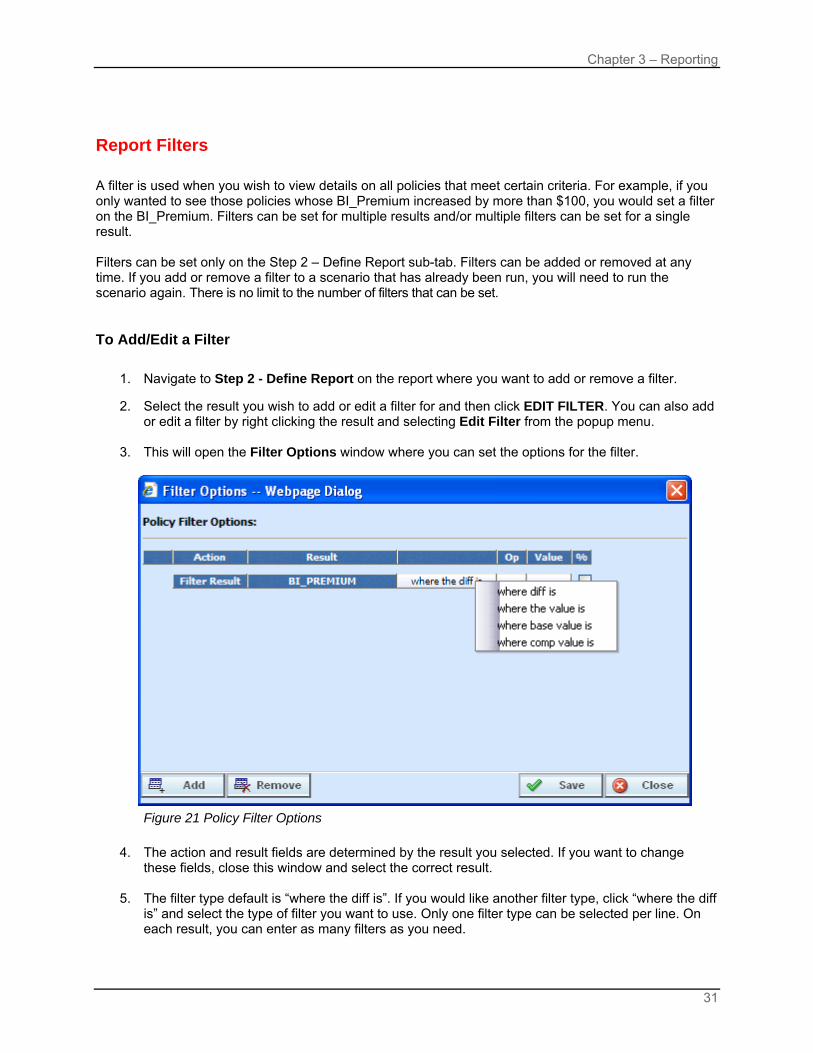
Report Filters A filter is used when you wish to view details on all policies that meet certain criteria. For example, if you only wanted to see those policies whose BI_Premium increased by more than $100, you would set a filter on the BI_Premium. Filters can be set for multiple results and/or multiple filters can be set for a single result. Filters can be set only on the Step 2 – Define Report sub-tab. Filters can be added or removed at any time. If you add or remove a filter to a scenario that has already been run, you will need to run the scenario again. There is no limit to the number of filters that can be set. To Add/Edit a Filter
1. Navigate to Step 2 - Define Report on the report where you want to add or remove a filter.
2. Select the result you wish to add or edit a filter for and then click EDIT FILTER. You can also add or edit a filter by right clicking the result and selecting Edit Filter from the popup menu.
3. This will open the Filter Options window where you can set the options for the filter.
Figure 21 Policy Filter Options
4. The action and result fields are determined by the result you selected. If you want to change
these fields, close this window and select the correct result. 5. The filter type default is “where the diff is”. If you would like another filter type, click “where the diff
is” and select the type of filter you want to use. Only one filter type can be selected per line. On each result, you can enter as many filters as you need.
31
Chapter 3 – Reporting
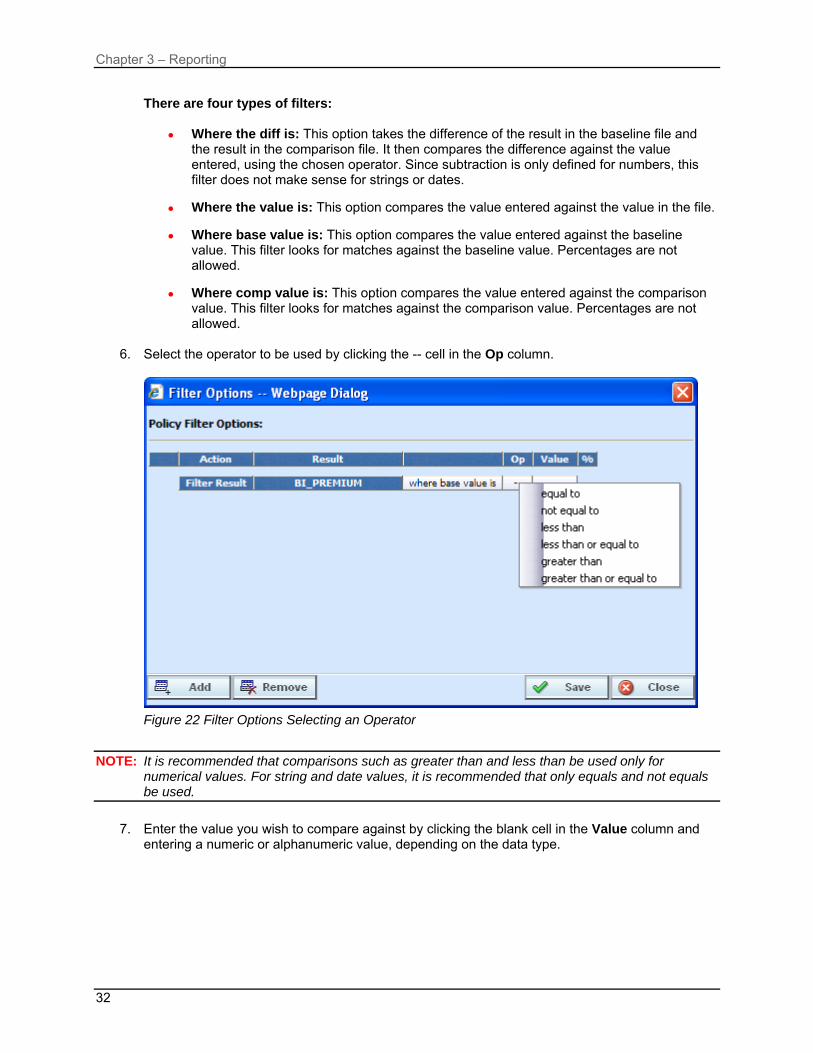
There are four types of filters:
● Where the diff is: This option takes the difference of the result in the baseline file and the result in the comparison file. It then compares the difference against the value entered, using the chosen operator. Since subtraction is only defined for numbers, this filter does not make sense for strings or dates.
● Where the value is: This option compares the value entered against the value in the file. ● Where base value is: This option compares the value entered against the baseline
value. This filter looks for matches against the baseline value. Percentages are not allowed.
● Where comp value is: This option compares the value entered against the comparison
value. This filter looks for matches against the comparison value. Percentages are not allowed.
6. Select the operator to be used by clicking the -- cell in the Op column.
Figure 22 Filter Options Selecting an Operator
NOTE: It is recommended that comparisons such as greater than and less than be used only for
numerical values. For string and date values, it is recommended that only equals and not equals be used.
7. Enter the value you wish to compare against by clicking the blank cell in the Value column and
entering a numeric or alphanumeric value, depending on the data type.
32

Chapter 3 – Reporting
Figure 23 Entering a Constant Value
8. If you are using the where the diff is filter option, you can select the checkbox in the % column to
filter based on the percent difference instead of the dollar difference. Make sure the value you enter into the Value column is the actual percentage difference you wish to compare against, i.e. for 8%, you would enter 8.
9. If you wish to add additional filters for the current result, click Add and repeat steps 4 through 8.
NOTE: Multiple filters may be created for an Impact Analysis report. As new filters are added, each filter
must be met in order for a policy to show in the Filtered Policy Details section.
10. To remove one of the filters, check the line of the filter you want to delete and click REMOVE FILTER.
The first filter listed cannot be removed from this window. To remove the entire filter, exit the Filter Options popup. Select the result where you want to remove the filter and click REMOVE FIILTER from the toolbar. This will remove the filter from the result.
11. When you are finished making changes, click SAVE to close the Filter Options window and
refresh the Step 2 – Define Report tab. A funnel icon ( ) will be next to the result where you added a filter.
33

Chapter 3 – Reporting
Figure 24 Step 2 – Define Report with Flags and Filters
CREATING A NEW SCENARIO REPORT Once you have finished creating your scenario, you can run it to produce an Impact Analysis report. The report will show data based upon the report flags and filters you defined. Before creating a new scenario, batch result files should be available. If batch result files are not listed, you must create them. For more information, see Preparing a Batch Input File.
1. The NEW SCENARIO tab can be accessed only from the Reporting sub-tab. On the Reporting sub-tab, click NEW SCENARIO. This will open a New Scenario tab.
2. On the Step 1 – Select Results sub-tab, enter a Scenario Name and select the Baseline and
Comparison files you want.
3. If needed, you can further define the report. Enter the Step 2 – Define Report sub-tab. Set any filters or flags.
4. Save your report.
34
Chapter 3 – Reporting
5. Return to the Reporting sub-tab on the Impact Analysis tab. Your report will be listed in the Scenario Listing area at the top. Select your report.
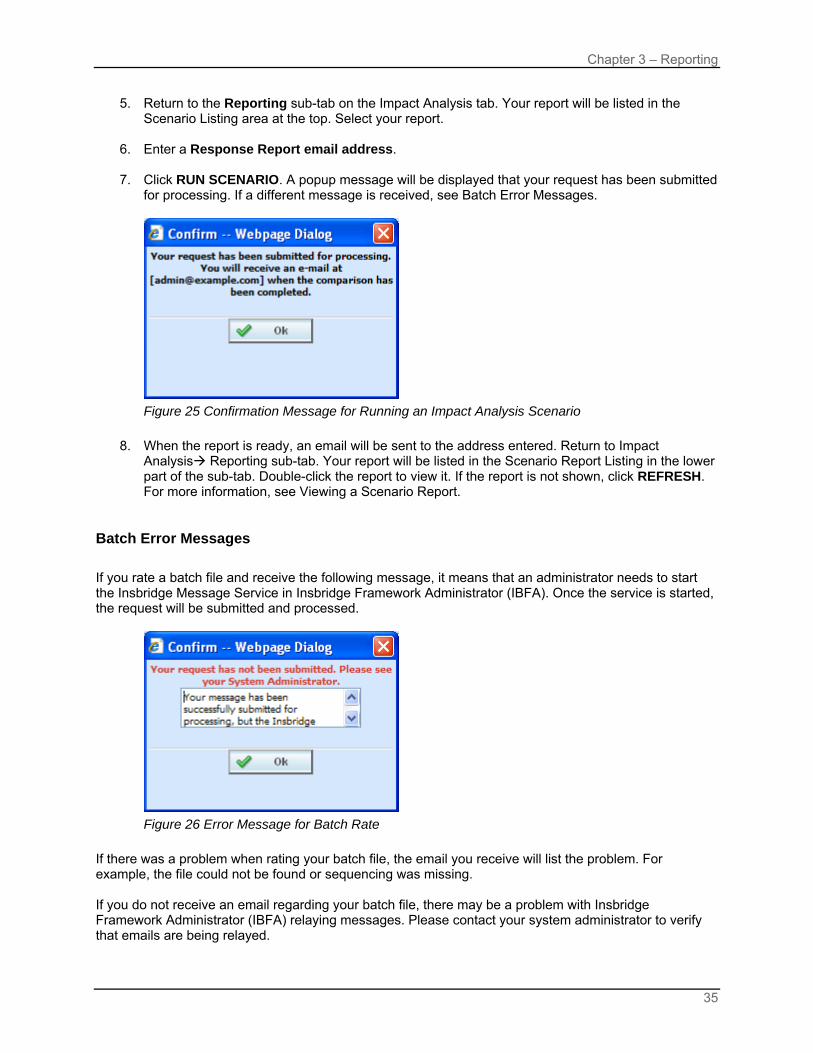
6. Enter a Response Report email address.
7. Click RUN SCENARIO. A popup message will be displayed that your request has been submitted
for processing. If a different message is received, see Batch Error Messages.
Figure 25 Confirmation Message for Running an Impact Analysis Scenario
8. When the report is ready, an email will be sent to the address entered. Return to Impact
Analysis Reporting sub-tab. Your report will be listed in the Scenario Report Listing in the lower part of the sub-tab. Double-click the report to view it. If the report is not shown, click REFRESH. For more information, see Viewing a Scenario Report.
Batch Error Messages
If you rate a batch file and receive the following message, it means that an administrator needs to start the Insbridge Message Service in Insbridge Framework Administrator (IBFA). Once the service is started, the request will be submitted and processed.
Figure 26 Error Message for Batch Rate
If there was a problem when rating your batch file, the email you receive will list the problem. For example, the file could not be found or sequencing was missing. If you do not receive an email regarding your batch file, there may be a problem with Insbridge Framework Administrator (IBFA) relaying messages. Please contact your system administrator to verify that emails are being relayed.
35

Chapter 3 – Reporting
EDITING A SCENARIO REPORT You can edit a scenario if changes need to be made to an existing scenario or a new scenario needs to be set up. To Edit a Scenario
1. The EDIT SCENARIO tab can be accessed only from the Reporting sub-tab. On the Reporting sub-tab, in the Scenario Listing area, double click the report you want to edit. This will open an Edit Scenario tab.
2. Make any change on the Step 1 – Select Results sub-tab. You can edit the Scenario Name
and change the Baseline and Comparison files you want to use.
3. If needed, you can edit and flags or filters. Enter the Step 2 – Define Report sub-tab. Edit any filters or flags.
4. Save your report.
5. Return to the Reporting sub-tab on the Impact Analysis tab. Your report will be listed in the
Scenario Listing area at the top. Your report is ready to be run again.
DELETING A SCENARIO If a scenario report is no longer needed, it can be deleted. To Delete a Scenario Report
1. Navigate to the Reporting sub-tab. Select the scenario report you wish to delete and click DELETE.
2. For reports in the scenario listing at the top of the tab, you will NOT receive a warning message. Your report will be removed immediately. For scenario reports in the scenario reports listing in the lower part of the tab, you will be asked to confirm deletion.
Figure 27 Delete Report Message
3. Click OK to delete the scenario report file. Click Cancel to return to the Reporting sub-tab without
deleting the report.
36
Chapter 4
REPORTS Impact Analysis has a variety of reports:
● View XML Report: Located on the right click menu in the XML Input File Listing of Batch Files sub-tab. Also found on the right click menu of the Result XML File Listing. This report allows you to review the input XML being used and make sure this is the file you want to utilize. The selected XML file is displayed in a separate window.
● View Output Report: Located on the right click menu in the XML Result File Listing of Batch
Files sub-tab. This report allows you to review the result file content to verify that this is the file you want to utilize. The selected XML file is displayed in report format in a separate tab.
● View BaseLine Results: This report can be viewed on the Step 1 – Select Results sub-tab. View
BaseLine Results allows you to view the Batch Rating Summary report of the selected baseline file. The report shows information about the result file and the elements (results, variables and inputs) that were selected for output enabling you to verify that you have selected the right file. The information is displayed in a separate window.
● View Comparison Results: This report can be viewed on the Step 1 – Select Results sub-tab.
View Comparison Results allows you to view the Batch Rating Summary report of the selected comparison file. The report shows information about the result file and the elements (results, variables and inputs) that were selected for output enabling you to verify that you have selected the right file. The information is displayed in a separate window.
● Scenario Report: This report can be viewed on the Step 1 – Select Results sub-tab. This report
will show the differences between two selected result files, allowing you to compare the effects of a program change against existing rates. The report is displayed in a separate window.
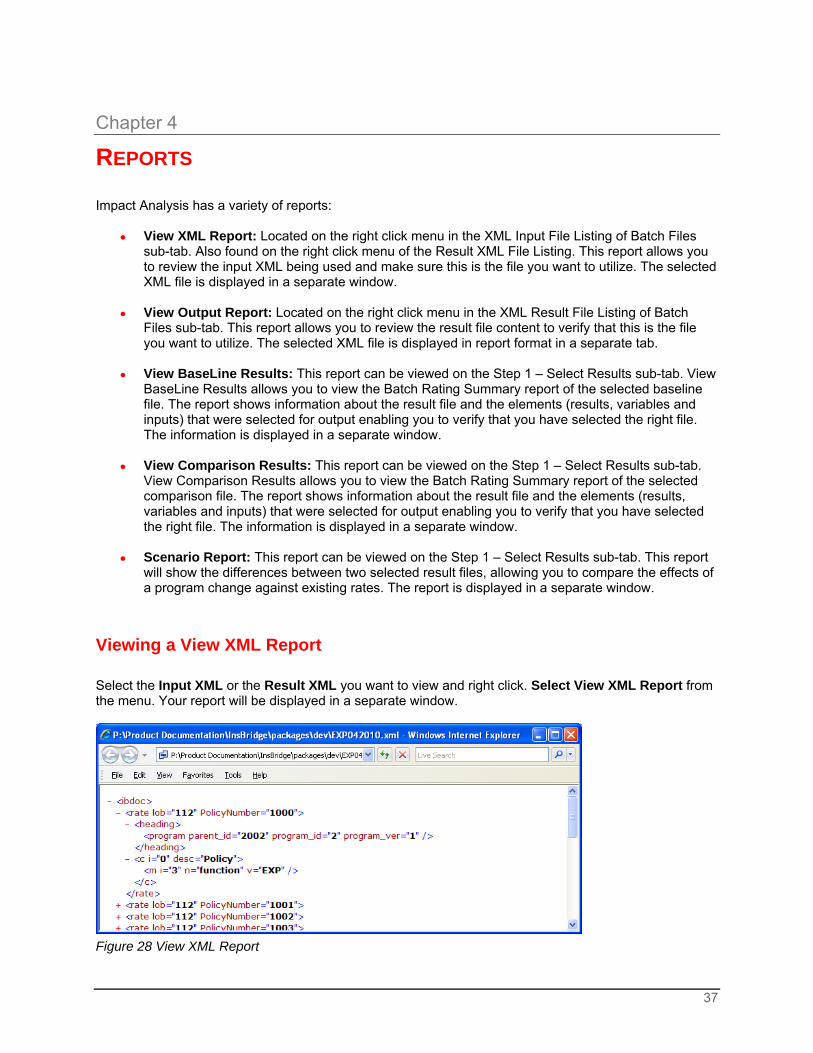
Viewing a View XML Report Select the Input XML or the Result XML you want to view and right click. Select View XML Report from the menu. Your report will be displayed in a separate window.
Figure 28 View XML Report
37

Chapter 4 – Reports
Viewing a View Output Report Select the Result XML you want to view and right click. Select View XML Report from the menu. Your report will be displayed in a separate tab.
Figure 29 View Output Report The top bar will contain the file name and the debug option. Navigation Bar
Program Name: Displays the name of the program being rated. The drop down menu will be available when you are rating multiple programs using Program to Program. View: The report view is the default view. You may change this view to show the raw XML output. Find: Allows you to search through the report for a specific alpha/numeric character string. Next: If a search is performed, Next will navigate to the next place in the report that a match was found. Previous: If a search is performed, Find Previous will navigate to the previous place in the report that a match was found.
38

Chapter 4 – Reports
Advanced Options Advanced Algorithm Looping will be displayed only if you have selected Debug. In the gray information bar you will see the [Advanced Option] indicator. The maximum number of loops and the number of loops performed will be displayed. The Loop Instance will show the number of the last loop run. Details will not be available in Impact Analysis. To see details, please go to Modules Testing. If you did not select Debug, Advanced Options will not be displayed.
VIEWING BASELINE AND COMPARISON FILES When Impact Analysis compares the baseline file to the comparison file, it does so by taking the value in the comparison file and subtracting the value in the baseline file. For example, for Policy 1 the baseline file has a value of 1000 for the Total Policy Premium, while the result file has a value of 1250. Then, when Impact Analysis compares the two values, it will take the value in the comparison file (1250) and subtract the value in the baseline file (1000) and come up with a result of 250. If the filter, where the diff is > 200, is set up on the Total Policy Premium, Policy 1 would show in the Filtered Policy Details section. However, if the situation were reversed, and the baseline file had a value of 1250 and the comparison file had a value of 1000, Policy 1 would not meet the filter because the difference would be -250 and Policy 1 would not be shown in the Filtered Policy Details section. To cover both positive and negative differences, you would need to set up two filters; one for when “where the diff is > 200” and one for when “where the diff is < -200.” This would allow both situations to be shown in the Filtered Policy Details. The BaseLine and Comparison results can be viewed on the Step 1 – Select Results sub-tab.
View BaseLine Results: Allows you to view the Batch Rating Summary report of the selected baseline file. The report shows information about the result file and the elements (results, variables and inputs) that were selected for output enabling you to verify that you have selected the right file.
View Comparison Results: Allows you to view the Batch Rating Summary report of the selected comparison file. The report shows information about the result file and the elements (results, variables and inputs) that were selected for output enabling you to verify that you have selected the right file.
To View a BaseLine or a Comparison File
1. On Impact Analysis Reporting sub-tab, select the scenario report where you want to view the BaseLine or Comparison files. This will open Step 1 – Select Results. You also can view these files when you are creating a New Scenario.
2. If you are creating a new scenario, select the file you need. Otherwise, click VIEW BASELINE
RESULTS or VIEW COMPARISON RESULTS to view the appropriate file. A separate screen will be displayed.
39
Chapter 4 – Reports
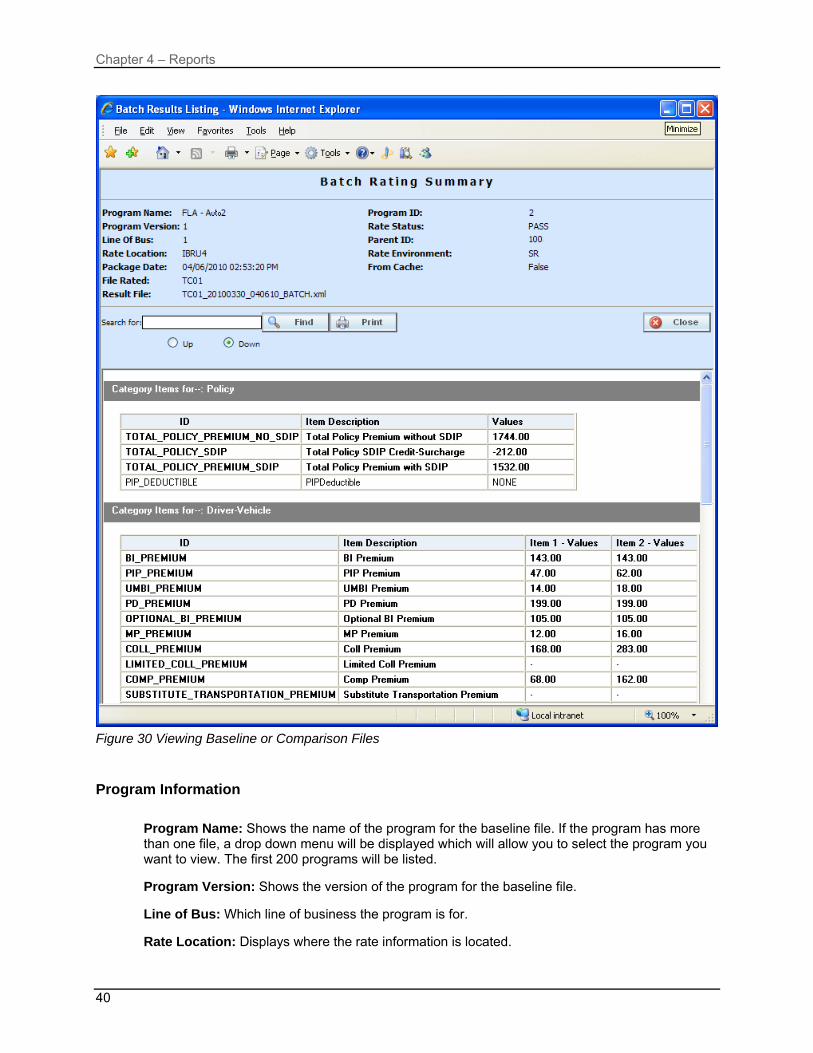
Figure 30 Viewing Baseline or Comparison Files Program Information
Program Name: Shows the name of the program for the baseline file. If the program has more than one file, a drop down menu will be displayed which will allow you to select the program you want to view. The first 200 programs will be listed. Program Version: Shows the version of the program for the baseline file. Line of Bus: Which line of business the program is for. Rate Location: Displays where the rate information is located.
40
Chapter 4 – Reports
Package Date: The last date and time the package was created. File Rated: Name of the file rated. Result File: The XML file name. Use this to verify that you have selected the right file. Program ID: Shows the program ID of the program for the baseline file. Rate Status: The results of the rating request. Parent ID: Parent ID (i.e. Subscriber) of the programs. Rate Environment: The name of the environment the rated package is loaded to. From Cache: A True or False result. True indicates that the file was rated from cache. False, the file was not rated from cache.
Search
Allows you to search for a particular word or phrase. Enter or paste the phrase you are looking for and then press Enter or click FIND. By default, the search will start at the current location and proceed down (forward). To proceed up (backward), select the radio button next to Up. To find the next instance of the word or phrase, press Enter or click FIND again.
Opens a printer-friendly version of the Rating Summary report. Close Window
Closes the current Rating Summary report. Results
Shows the selected results, sorted by category, in an easy to read table format.
● ID: The Result ID entered on the Edit Group Tab in Result Mapping.
● Item Description: The name of the element (result, variable or input).
● Values: The value for the element. If multiple instances of the category exist, then there will be a Value column for each instance.
VIEWING A SCENARIO REPORT Depending on the complexity of your scenario and the number of policies, when your report is ready, you will receive an email that it is available for viewing. You can then return to Impact Analysis, or refresh the screen if it is already open, to view your report.
41

Chapter 4 – Reports
To View a Impact Analysis Report
1. Navigate to Impact Analysis Reporting sub-tab. Scenario Reports will be listed in the lower portion of the tab. If you do not see your report, click REFRESH to refresh the tab.
2. Locate the report you wish to view in the listing and double-click it. The report will open in a
separate window.
Figure 31 Impact Analysis Scenario Report Scenario Summary
Number of Results Processed: The total number of policies. Number of Results Filtered: The total number of policies that met the filter. Job Duration: Total time taken for the report to be generated.
Statistics on Selected Result Elements This area displays all results that have been flagged, as well as statistical information about the result.
42

Chapter 4 – Reports
Result Name: The name of the result the information is for. Filtered Values
- Baseline: The total, for the specified result, of all policies that met the filter(s), based on
the value in the baseline file. - Comparison: The total, for the specified result, of all policies that met the filter(s), based
on the value in the comparison file. - Amt Diff: The dollar difference between the value listed in the Comparison column and
the value listed in the Baseline column, i.e. Comparison minus Baseline. - Perc Diff: The percent difference between the value listed in the Comparison column
and the value listed in the Baseline column, i.e. Amt Diff divided by Baseline.
All Policy Values
- Baseline: The total, for the specified result, of all policies, based on the value in the baseline file.
- Comparison: The total, for the specified result, of all policies, based on the value in the comparison file.
- Amt Diff: The dollar difference between the value listed in the Comparison column and the value listed in the Baseline column, i.e. Comparison minus Baseline.
- Perc Diff: The percent difference between the value listed in the Comparison column and the value listed in the Baseline column, i.e. Amt Diff divided by Baseline.
Filter Definitions A listing of all filters used for the current report. Filtered Policy Details Provides a place for you to select and view details about all policies that met the filter. Only the first 150 policies that met the filter will be shown.
Policy List: Shows a list of all policies that met the filter. Choose a policy in the list to view detailed information about each result flagged for that policy. Baseline
- Policy Number: Shows the policy number the results are for. Click the policy number to
open the baseline result XML for that policy. - Result Name: The name of the result the information is for. The number in parenthesis
denotes the instance number of the result. For example, a [4] next to BI Premium indicates the result is for the fourth vehicle on the policy.
- Result Value: The value in the baseline file for the result.
Comparison
- Policy Number: Shows the policy number the results are for. Click the policy number to open the comparison result XML for that policy.
- Result Name: The name of the result the information is for. The number in parenthesis denotes the instance number of the result. For example, a [4] next to BI Premium indicates the result is for the fourth vehicle on the policy.
- Result Value: The value in the comparison file for the result.
43

Chapter 4 – Reports
44
Difference
- Amount: The dollar difference for the result between the value in the comparison file and the value in the baseline file, i.e. Comparison Result Value minus Baseline Result Value.
- Perc: The percent difference, for the specified result, between the value in the comparison file and the value in the baseline file, i.e. Amount Difference divided by Baseline Result Value.

Support
CONTACTING SUPPORT If you need assistance with an Oracle Insurance Insbridge Rating and Underwriting System product, please log a Service Request using My Oracle Support at https://support.oracle.com/. Address any additional inquiries to: Oracle Corporation World Headquarters 500 Oracle Parkway Redwood Shores, CA 94065 U.S.A. Worldwide Inquiries: Phone: +1.650.506.7000 Fax: +1.650.506.7200 oracle.com
TTY ACCESS TO ORACLE SUPPORT SERVICES Oracle provides dedicated Text Telephone (TTY) access to Oracle Support Services within the United States of America 24 hours a day, seven days a week. For TTY support, call 800.446.2398.
45

Glossary
GLOSSARY TERMS
A Administrator: The person designated by your company who has the authority to
create and change groups, usernames, passwords and restrictions. Algorithm: A sequence of steps used to perform a calculation. Assigned Driver: A driver who has been assigned to a vehicle. Assigned Vehicle: A vehicle that has been assigned a driver. Authoring Environment
The physical machine where RateManager is installed.
C Calculated Variable: Calculated Variables are used when a result cannot best be derived
from simple data mapping in a table. For example, if age is not passed as an input, but is a criteria needed in determining other factors, you would use a Calculated Variable to calculate driver age from the inputs of effective date and driver date of birth. Calculated Variables look at every node (driver, vehicle, location, etc.) independently and create a result for each. Once a calculated variable is created, the result can be used in any other variable.
Callouts A set of a single or multiple programs and/or SoftLibraries that allows users to call needed operations at a specific time from either inside the system or outside the system.
Category: A user defined group of information that defines inputs, variables, algorithms and the overall structure of the program.
Criteria: An input or variable used in a mapped variable to determine which value to return. Any input or variable can be used as a criteria.
D Data Type: The type of data associated with a parameter. RateManager supports
three (decimal, integer and string) data types for variables and inputs and a fourth (date) for inputs and result variables only.
Date: A data type supported for inputs and result variables only. For more information, see Dates in the Contents section.
Decimal: A data type supported for all types of variables and inputs. Examples of decimal values are 3.1415, 18 and 0.995.
Default Value: Used by a mapped variable if no match is found based on the criteria. Dependency: When copying a variable, algorithm or driver assignment, any element
that requires another element to be present or defined will be listed. All dependencies must be resolved.
Driver Assignment: Driver assignment is an auto insurance specific method of assigning a particular driver to a particular vehicle on a policy, based on certain criteria. Criteria often differ on a carrier basis, and sometimes even on a program level.
Driver Assignment A driver assignment scenario is a list of instructions that define the
46

Glossary
Scenario: main sequence of operations to properly define the driver assignment logic for a carrier. A scenario is based upon the same algorithm principle used throughout the RateManager software.
E Export: Exports allow users to export all elements of a program from one
database to another database or within the same database. Or to export data in tab-delimited form, from a RateManager table to an outside location.
F Flag: A variable that holds a 1 for true and a 0 for false. Flag Driver Algorithm: An algorithm used by a Flag Driver Function to flag drivers based on
certain criteria. Flag Driver Function: A built-in function used in the main driver assignment that defines the
scope of the flagging operation. Most require an association with a predefined Flag Driver Algorithm.
Flag Vehicle Algorithm:
An algorithm used by a Flag Vehicle Function to flag vehicles based on certain criteria.
Flag Vehicle Function: A built-in function used in the main driver assignment that defines the scope of the flagging operation. Most require an association with a predefined Flag Vehicle Algorithm.
G Global: An input or variable that is available to all programs under a specific
subline. Global Input: A value that is passed into the rating system. Global Result: A value that is passed out of the system after rating. Group: A set of users that have the same access rights.
I IBFA Insbridge Framework Administrator. IBFA is an administrative tool
used to configure Insbridge applications and setup RateManager database connections. IBFA will be located on a Windows Server machine. IBFA/SR-WIN is an Insbridge Framework Administrator/SoftRater for Windows.
IBSS Insbridge SoftRater Server. IBSS is the administrative tool for the SoftRater engine. The SoftRater engine is a multi-platform component within IBRU that executes the rules, rating and underwriting instructions as defined by the user in RateManager. IBSS is usually located on a Java machine. IBSS/SR-JAVA is an Insbridge SoftRater Server/SoftRater for Java.
IBRU Insbridge Rating and Underwriting System. This is the entire system. If: A step type available for use in calculated variables and algorithms.
For more information, see If in the contents section. Import: Import allows users to bring in programs from an outside location into
RateManager. Or to import data in tab-delimited form, into a RateManager table.
Input: A value that is passed into the rating system. Integer: A data type supported for all types of variables and inputs. Examples
of integer values are 3, 1859865 and -47.
47

Glossary
Interpolation: An estimated value derived from two known values.
L Library: The Library is where templates are stored and managed. Linked Variables: Two or more mapped variables that have been associated with one
another because they use the same criteria. Lock: A lock will close all associated Variables, Algorithms, Driver
Assignments, Sequencing and Result Mappings in a program version from deletions and edits.
Logical Environment An environment created for a subscriber in IBFA. It defines package location, engine location and database location in addition to several other supporting data items. This environment is used for rating and/or SRP management. Each database connection will have a logical environment.
M Mapped Variable: A variable that uses other variables and inputs as criteria in
determining the appropriate value. See Mapped Variables in the Contents section for more information.
Mask: A feature that allows the customer to determine how data should be interpreted. See Masking in the Contents section for more information.
N Normal Rating Algorithm:
The most common type of algorithm. Examples of what it can be used for are: ● Determine premiums ● Calculate differences in limits being passed into the system vs.
limits being rated by the system ● Assign tiers
O Operator: A built-in mathematical function used in calculations and comparisons.
P Package: A small file that holds all the RateManager logic for a specific program
and version. Package Location A pointer to a location where SoftRater Packages (SRP's) are stored. Physical Environment A physical environment is generally referred to as a physical machine. Program: A planned group of procedures executed in a specific order to return a
rating. Programs in RateManager typically correspond to rate manuals. Programs can be either created by the users or imported.
Program Date Mask: Specifies how SoftRater interprets dates being passed into an input file.
Program Folders: A RateManager file management system that functions in much the same way as Microsoft Windows Explorer. This multi level setup allows for an unlimited number of program folders and subfolders to be placed underneath a subline.
R Rank Driver Algorithm:
An algorithm used by a Rank Driver Function to rate drivers based on certain criteria.
48

Glossary
Rank Driver Function: A built-in function used in the main driver assignment that defines the scope and sorting order of the ranking operation. Most require an association with a predefined Rank Driver Algorithm.
Rank Vehicle Algorithm:
An algorithm used by a Rank Vehicle Function to rate vehicles based on certain criteria.
Rank Vehicle Function:
A built-in function used in the main driver assignment that defines the scope and sorting order of the ranking operation. Most require an association with a predefined Rate Vehicle Algorithm.
Rating Environment The physical machine(s) where SoftRater is installed. This is typically the same as a SoftRater node.
Reconcile A comparison feature that compares one program version against another version in the same program and generate a report of the differences.
Restrictions: Limitations on viewing and editing pages and fields in the system. Restrictions are assigned and changed by the Administrator.
Result Mapping: A defined set of results, inputs and variables displayed in the output file.
Revision: A variable specific type of versioning. See Versioning in the Contents section for more information.
RM RateManager. RateManager is a component within IBRU that enables users to manage the product definition and modification process, including rating and underwriting logic.
S Sequence: The order in which algorithms run. See Sequencing in the Contents
section for more information. SoftLibrary: A SoftLibrary is a specially developed program that performs a specific
task. SoftLibraries may run their own code or call upon other systems to obtain information outside of RateManager, for example, obtaining a credit score
SoftRater Node A SoftRater node is either an IBFA (without RateManager) or IBSS instance on a physical environment.
Source: The source is the creator of a template and will also be the name of the new subline.
SR SoftRater. The engine that executes the rating, rules and underwriting instructions defined within RateManager. The rating environment for runtime execution and processing of business content. SoftRater can be further defined by the operating system where it has been loaded.
SRP SoftRater Packages. A package that holds all the RateManager logic for a specific program and version.
SR-JAVA SoftRater for Java. This is also another name for IBSS. SR-WIN – SoftRater for Windows. This is also another name for IBFA. String: A data type supported for all types of variables and inputs. Examples
of string values are "2.718", "The quick brown fox jumps over the lazy dog." and "001".
Subline: Sublines are classifications that fall in between lines of business and program folders. Sublines allow for the separation of programs by source.
49

Glossary
50
T Tab-delimited: A type of text file in which columns are separated by tabs. This is the
required format for importing tables into RateManager. Template: Templates are exact copies of existing programs within a line of
business that can be from within your own user group, any other user group within the company or even from an outside company.
U Unassigned Driver: A driver who has not been assigned to a vehicle. Unassigned Vehicle: A vehicle that has not been assigned a driver. Underwriting Algorithm:
A type of algorithm used to determine if a policy meets the requirements of the company.
Universal: A collection of programs from all lines of business combined with result group mappings and assigned to execute in sequence that returns a single or multiple results.
V Variable: A name used to represent a value that can change. See Variables in
the Contents section for more information. Version: One of a sequence of copies of a program, each incorporating new
modifications. See Versioning in the Contents section for more information.
VFS Virtual File Servers. Virtual file server management allows you to set up servers that are in different locations where packages can be downloaded.
W Wildcard: An option available for mapped variables that tells RateManager that
one or more rows ignore the value passed in for the criteria. See Variables in the Contents section for more information.
Workflow: A workflow is a type of program that allows you to call multiple programs from different lines of business together under one universal program.
Working Category: A classification used to define how elements should run. See Categories in the Contents section for more information.
X XML ID: A number automatically assigned by RateManager to identify inputs
and categories.

Index
Index
INDEX
+ +/- Report Flag
Editing a Scenario, 28
A Add/Remove Report Flag
Using, 30 Adding
Filter, 31 All Policy Values
Amt Diff, 43 Baseline, 43 Comparison, 43 Impact Analysis Scenario Report, 43 Perc Diff, 43
Amount Filtered Policy Details, 44
Amt Diff All Policy Values, 43 Filtered Values, 43
Authoring Environment Definition, 46
B Baseline
All Policy Values, 43 Filtered Policy Details, 43 Filtered Values, 43
Baseline File Compared to Comparison File, 32, 39 Overview, 39 Result, 32 Results File Listing, 26
Baseline Results Editing a Scenario, 25, 28
Baseline to Comparison File Example, 39
Batch Custom XML Files, 17 Delete, 13 Identifier, 19 Input File Listing, 14 Menu Bar, 13, 21, 24, 27 Open Custom XML File, 13 Open Insbridge XML File, 13 Options, 13, 22, 25, 28 Rate Batch File, 13 Rate New Custom Files, 17 Refresh, 13 Result File Listing, 14 Result Files, Impact Analysis, 34 Root Name, 18
View XML, 15 Batch File
Deleting, 19, 36 Network Share, 8
Batch File Naming Structure, 26 Batch Header
Input Files, 9 Batch Input File
Creating, 8 Batch Rating
Overview, 12 Batch Rating Summary Report
Close Window, 41 Print, 41 Results, 41 Results, ID, 41 Results, Item Description, 41 Results, Values, 41 Search, 41
BatchReuslts New Line, 10
BL Editing a Scenario, 26
C Check Box
Batch, 14 Impact Analysis, 22 Result File Listing, 14
Choosing Results, 27
Close Window Batch Rating Summary Report, 41
CMP Editing a Scenario, 26
Comparison All Policy Values, 43 Filtered Policy Details, 43 Filtered Values, 43
Comparison File Compared Against Baseline File, 32, 39 Overview, 39 Result, 32 Results File Listing, 26
Comparison Results Editing a Scenario, 25, 28
Creating Batch Input File, 9 New Scenario, 34
Creation Date Impact Analysis, 23
Custom XML Files Batch, 17
51

Index
D Data Analysis Tool
Impact Analysis, 7 PricingManager, 21
Debug Result File, Batch, 14
Debug Test Case Editor Find Next, Navigation Bar, 38 Find Previous, Navigation Bar, 38 Find, Navigation Bar, 38 Navigation Bar, 38 View, Navigation Bar, 38
Define Reports, 27
Definition Impact Analysis, v Delete
Batch, 13 Batch File, 19, 36 Impact Analysis, 22
Difference Filtered Policy Details, 44
E Edit Filter, 31
Editing a Scenario, 28 Edit Scenario Tab, 23, 34, 36 Editing
Filter, 31 Scenario, 36 Scenario, Step 2, 27
Editing a Scenario +/- Report Flag, 28 Baseline Results, 25, 28 BL, 26 Choosing Baseline File, 26 Choosing Comparison File, 26 CMP, 26 Comparison Results, 25, 28 Edit Filter, 28 Last Date Modified, 26 Line of Bus, 28 Parent ID, 29 Policeis/Quotes, 26 Program ID, 29 Program Information, 28 Program Name, 28 Remove Filter, 28 Results, 29 Results File, 26 Results File Listing, 25 Scenario Name, 25, 28 Time Stamp, 26
Edition Notice, 2 Errors
Message for Batch, 17, 20, 35 Example
Baseline to Comparison File, 39 Report Filter, 31 Report Flag, 30 XML Input File, 9
F File
Baseline to Comparison, 32, 39 File Rated
Viewing, 41 Files
Listed Results for Impact Analysis, 29 Re-locating for a Batch, 18 Selecting Result Impact Analysis, 23, 24
Files Names Impact Analysis, 26
Filter Adding, 31 Editing, 31 Set, 29 Using Multiple, 33
Filter Definitions Impact Analysis Scenario Report, 43
Filter Options, 31 Filter Policy Details
Impact Analysis Scenario Report, 43 Filtered Policy Details, 29, 39
Amount, 44 Baseline, 43 Comparison, 43 Difference, 44 Perc, 44 Policy List, 43 Policy Number, 43 Result Name, 43 Result Value, 43
Filtered Values Amt Diff, 43 Baseline, 43 Comparison, 43 Impact Analysis Scenario Report, 43 Perc Diff, 43
Filters Numeric Operators, 32 Values, 32 Where base value is, 32 Where comp value is, 32 Where the diff is, 32 Where the value is, 32
Find Batch Rating Summary Report, 41 Navigation Bar Debug Test Case Editor, 38
Find Next Navigation Bar Debug Test Case Editor, 38
Find Previous Navigation Bar Debug Test Case Editor, 38
Flagged Results Statistics on Selected Results, 42
From Cache Viewing, 41
G Group Batch Input File
Used in Impact Analysis, 9
52

Index
I IBFA Definition, 47 IBRU Definition, 47 IBSS Definition, 47 ID
Batch Rating Summary Report Results, 41 Identifier
Batch, 19 Impact Analysis
All Policy Values, Scenario Report, 43 Check Box, 22 Creating New Scenario, 34 Creation Date, 23 Delete, 22 Editing New Scenario, 36 Filter Definitions, Scenario Report, 43 Filter Policy Details, Scenario Report, 43 Filtered Values, Scenario Report, 43 Flagging Result, 30 Navigating, 11 New Scenario, 22 Overview, 7 Refresh, 22 Report Filter, 31 Report Flag, 29 Report Size, 23 Result Name, Scenario Report, 43 Run Scenario, 22 Scenario Administrator, 22 Scenario Listing, 22 Scenario Reports, 22 Scenario Reports Listing, 22 Step 1 – Select Results, 24 Step 2 – Define Report, 27 Viewing a Report, 41
Impact Analysis Definition, v Impact Analysis Input Files, 7 Impact Analysis Report
Result Mapping, 10 Include Debug Report
Batch, 13 Individual Batch Input File
Used in Impact Analysis, 9 Input File
Batch Header, 9 Deleting Batch, 13
Input File Listing Batch, 14 Check Box, 14 Last Date Used, 14 XML Input File, 14
Input Files From Impact Analysis, 7 Preparing, 8
Item Description Batch Rating Summary Report Results, 41
J Job Duration
Scenario Summary, 42
L Last Date Modified
Editing a Scenario, 26 Last Date Used
Batch, 14 Last Rate Date
Batch, 15 Line of Bus
Editing a Scenario, 28 Viewing, 40
Listing Results for Impact Analysis, 29
Logical Environment Definition, 48
M Menu Bar
Batch, 13, 21, 24, 27
N Naming
Scenario for Impact Analysis, 24 Navigating
Impact Analysis, 11 Navigation Bar
Debug Test Case Editor, 38 Network Share
Batch Files, 8 New Scenario
Impact Analysis, 22 Number of Results Filtered
Scenario Summary, 42 Number of Results Processed
Scenario Summary, 42
O Op Column, 32 Open Batch File
Custom XML, 13 Insbridge XML, 13
Opening Step 2 of Editing a Scenario, 25
Operators, 32 Options
Batch, 13, 22, 25, 28 Include Debug Report, 13 Send Confirmation to, 13 SoftRater Environment Override, 14 Version Override, 13
Original Results Editing a Scenario, 25, 28
Overview Baseline to Comparison File, 39 Batch Rating, 12 Impact Analysis, 7 Standard Rating Summary Report, 25, 37, 39
53

Index
P Package Date
Viewing, 41 Package Location Definition, 48 Parent ID
Editing a Scenario, 29 Viewing, 41
Perc Filtered Policy Details, 44
Perc Diff All Policy Values, 43 Filtered Values, 43
Physical Environment Definition, 48 Policies/Quotes
Batch, 15 Editing a Scenario, 26
Policy List Filtered Policy Details, 43
Policy Number Filtered Policy Details, 43
Preparing Input Files, 8 Print
Batch Rating Summary Report, 41 Program
Version for Impact Analysis Reports, 8 Program ID
Editing a Scenario, 29 Viewing a Scenario, 41
Program Information Editing a Scenario, 28 Viewing, 40
Program Name Editing a Scenario, 28 Viewing, 40
Program Version Viewing, 40
R Rate Administrator
Batch, 15 Rate Batch File
Batch, 13 Rate Environment
Viewing, 41 Rate Location
Viewing, 40 Rate New Custom Files
Batch, 17 Rate Status
Viewing, 41 Rating
Multiple XML Files, 8, 12 Rating Environment Definition, 49 Refresh
Batch, 13 Impact Analysis, 22
Remove Filter Editing a Scenario, 28
Report All Policy Values, Impact Analysis, 43
Filter Definitions, Impact Analysis, 43 Filter Policy Details, Impact Analysis, 43 Filtered Values, Impact Analysis, 43 Result Name, Impact Analysis, 43 Viewing Impact Analysis, 41
Report Filter, 31 Example, 31
Report Flag, 29 Example, 30
Report Size Impact Analysis, 23
Reports Define, 27 Filters in Impact Analysis, 31 Impact Analysis Preerquisites, 8 Impact Analysis Report Rules, 8 Impact Analysis, Start and Stop Times, 29 Prerequisites, Impact Analysis, 8 Scenario Listing Impact Analysis, 22 Scenario Listing Time Stamp, 23 Scenario Summary, 42
Result Baseline to Comparison File, 32 Flagging, 30 Report Flag, 29 Un-Flagging, 30
Result File Viewing, 41
Result File Listing Batch, 14 Check Box, 14 Debug, 14 Last Rate Date, 15 Policies/Quotes, 15 Rate Administrator, 15 Scenario Name, 14 Size, 15
Result Files Batch, Impact Analysis, 34 New Line Breaks, 10 Selecting for Impact Analysis, 23, 24
Result Mapping Requirements for Impact Analysis Reports, 10
Result Name Filter Policy Details, 43 Impact Analysis Scenario Report, 43
Result Value Filtered Policy Details, 43
Results Batch Rating Summary Report, 41 Choosing, 27 Editing a Scenario, 29 On Impact Analysis Report, 27
Results File Editing a Scenario, 26
Results File Listing Editing a Scenario, 25
RM Definition, 49 Root Name
Batch, 18 Run Scenario
Impact Analysis, 22
54

Index
55
S Scenario
Creating New, 34 Editing, 36 Editing, Step 2, 27 Naming for Impact Analysis, 24
Scenario Administrator Impact Analysis, 22
Scenario Listing Impact Analysis, 22
Scenario Name Batch, 14 Editing a Scenario, 25, 28
Scenario Reports Impact Analysis, 22
Scenario Reports Listing Impact Analysis, 22
Scenario Summary Impact Analysis, 42 Job Duration, 42 Number of Results Filtered, 42 Number of Results Processed, 42
Search Batch Rating Summary Report, 41
Send Batch Responses to, 16, 17 Send Confirmation to
Batch, 13 Set
Filter, 29 Report Flag, 29
Size Result File, Batch, 15
SoftRater Environment Override Batch, 14
SoftRater Node Definition, 49 SoftRater Packages
Environments, 48 SR Definition, 49 SR-JAVA Definition, 49 SRP Definition, 49 SR-WIN Definition, 49 Standard Rating Summary Report, 25, 37, 39 Statistics on Selected Result Elements, 42 Step 1 – Select Results
Impact Analysis, 24 Step 2 – Define Report
Impact Analysis, 27 Stop and Start Times
Impact Analysis Reports, 29
T Time Stamp
Editing a Scenario, 26 Scenario Reports Listing, 23
U Using
Add/Remove Report Flag, 30
V Values
Batch Rating Summary Report Results, 41 Filter in Impact Analysis, 32 Filters, 32
Version For Programs, Impact Analysis Reports, 8
Version Override Batch, 13, 16, 17
VFS Definition, 50 View
Navigation Bar Debug Test Case Editor, 38 View XML
Batch, 15 Viewing
File Rated, 41 From Cache, 41 Line of Bus, 40 Package Date, 41 Parent ID, 41 Program ID, 41 Program Information, 40 Program Name, 40 Program Version, 40 Rate Environment, 41 Rate Location, 40 Rate Status, 41 Report Impact Analysis, 41 Result File, 41
Virtual File Server Definition, 50
W Where base value is
Filters, 32 Where comp value is
Filters, 32 Where the diff is
Filters, 32 Where the value is
Filters, 32
X XML Files
Creating Batch, 9 Deleting from Batch, 13, 22, 25, 28, 39 Rating Multiple, 8, 12
XML Input File Batch, 14 Example, 9
XML Wrapper Added to Batch, 9


