BlackBerry Z10 Smartphone User Guide 1357927074626 10.0.0 En
Upload
saintclockCategory
view
591download
0
ImCoSys Smartphone
I-SM1
USER MANUAL
V1.0
1
Declaration
Read this manual carefully before using your smartphone. ImCoSys AG will not undertake any responsibility or liability for any direct or indirect damage caused by users who failed to comply with this operational manual.
For the update of the software and hardware or the difference of the mobile networks, the information and pictures in this manual may be different from the actual condition of the smartphone, so ImCoSys tries its best, but will not guarantee to eliminate this difference completely. At the same time, ImCoSys reserves the rights to revise or modify the manual without prior notification or replacement with updated version. The smartphones, accessories, and manual may vary depending on the release areas and time.
The copyright of this manual is reserved by ImCoSys. Without prior written permission of ImCoSys, all or part of the content of this manual must not be reproduced, propagated or distributed in any manner.
Copyright © 2007 ImCoSys. All rights reserved. Reproduction will be prosecuted.
ImCoSys is the registered trademark of ImCoSys.
Java is the registered trademark of Sun Microsystems.
2
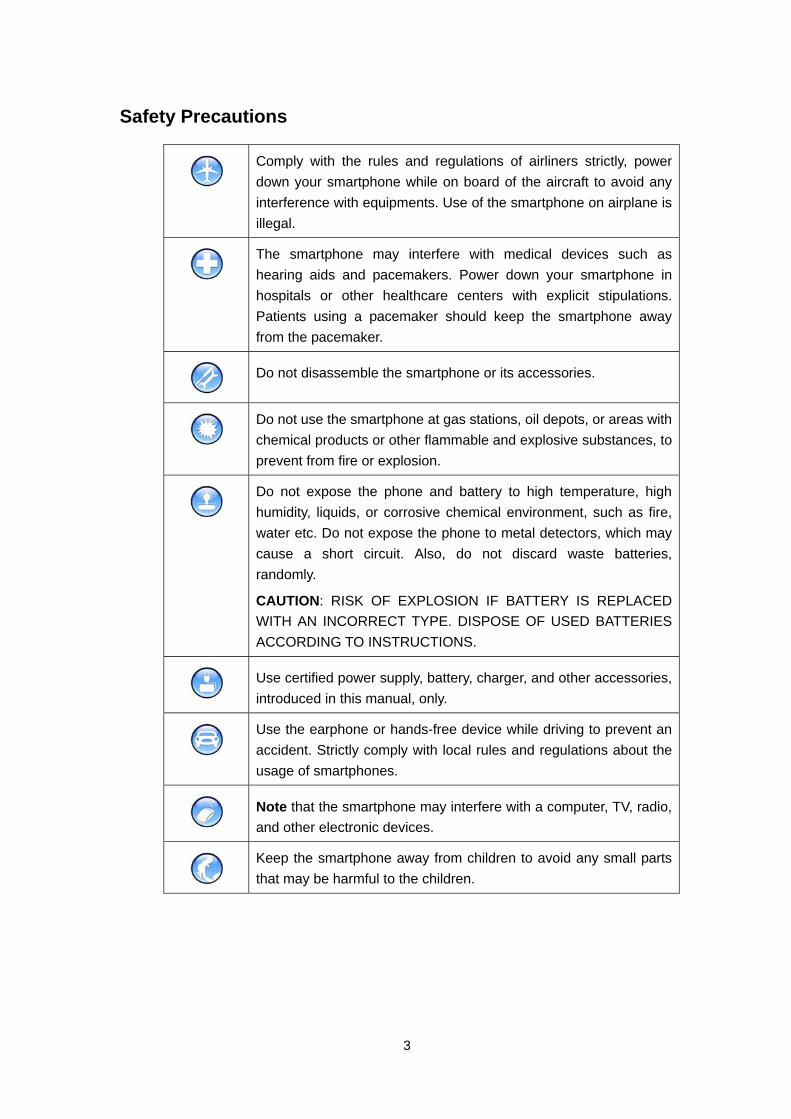
Safety Precautions
Comply with the rules and regulations of airliners strictly, power down your smartphone while on board of the aircraft to avoid any interference with equipments. Use of the smartphone on airplane is illegal.
The smartphone may interfere with medical devices such as hearing aids and pacemakers. Power down your smartphone in hospitals or other healthcare centers with explicit stipulations. Patients using a pacemaker should keep the smartphone away from the pacemaker.
Do not disassemble the smartphone or its accessories.
Do not use the smartphone at gas stations, oil depots, or areas with chemical products or other flammable and explosive substances, to prevent from fire or explosion.
Do not expose the phone and battery to high temperature, high humidity, liquids, or corrosive chemical environment, such as fire, water etc. Do not expose the phone to metal detectors, which may cause a short circuit. Also, do not discard waste batteries, randomly.
CAUTION: RISK OF EXPLOSION IF BATTERY IS REPLACED WITH AN INCORRECT TYPE. DISPOSE OF USED BATTERIES ACCORDING TO INSTRUCTIONS.
Use certified power supply, battery, charger, and other accessories, introduced in this manual, only.
Use the earphone or hands-free device while driving to prevent an accident. Strictly comply with local rules and regulations about the usage of smartphones.
Note that the smartphone may interfere with a computer, TV, radio, and other electronic devices.
Keep the smartphone away from children to avoid any small parts that may be harmful to the children.
3
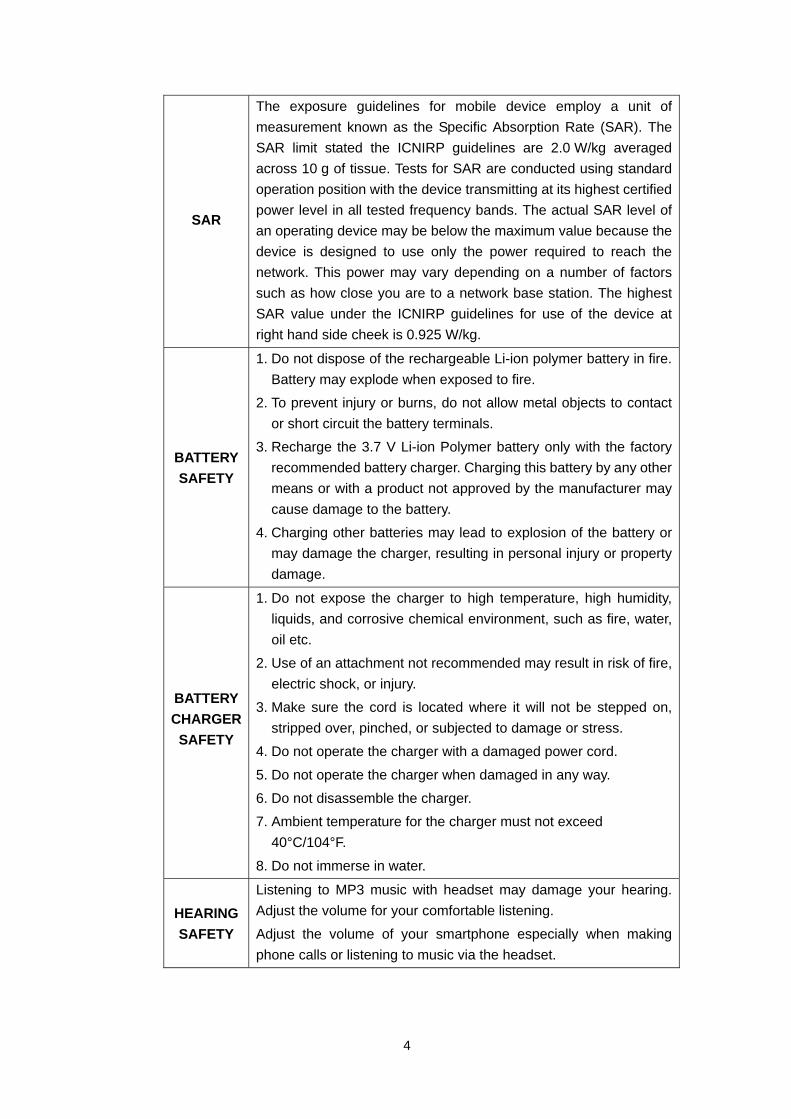
SAR
The exposure guidelines for mobile device employ a unit of measurement known as the Specific Absorption Rate (SAR). The SAR limit stated the ICNIRP guidelines are 2.0 W/kg averaged across 10 g of tissue. Tests for SAR are conducted using standard operation position with the device transmitting at its highest certified power level in all tested frequency bands. The actual SAR level of an operating device may be below the maximum value because the device is designed to use only the power required to reach the network. This power may vary depending on a number of factors such as how close you are to a network base station. The highest SAR value under the ICNIRP guidelines for use of the device at right hand side cheek is 0.925 W/kg.
BATTERY SAFETY
1. Do not dispose of the rechargeable Li-ion polymer battery in fire. Battery may explode when exposed to fire.
2. To prevent injury or burns, do not allow metal objects to contact or short circuit the battery terminals.
3. Recharge the 3.7 V Li-ion Polymer battery only with the factory recommended battery charger. Charging this battery by any other means or with a product not approved by the manufacturer may cause damage to the battery.
4. Charging other batteries may lead to explosion of the battery or may damage the charger, resulting in personal injury or property damage.
BATTERY CHARGER SAFETY
1. Do not expose the charger to high temperature, high humidity, liquids, and corrosive chemical environment, such as fire, water, oil etc.
2. Use of an attachment not recommended may result in risk of fire, electric shock, or injury.
3. Make sure the cord is located where it will not be stepped on, stripped over, pinched, or subjected to damage or stress.
4. Do not operate the charger with a damaged power cord.
5. Do not operate the charger when damaged in any way.
6. Do not disassemble the charger.
7. Ambient temperature for the charger must not exceed 40°C/104°F.
8. Do not immerse in water.
HEARING SAFETY
Listening to MP3 music with headset may damage your hearing. Adjust the volume for your comfortable listening.
Adjust the volume of your smartphone especially when making phone calls or listening to music via the headset.
4
Note
I-SM1 has been tested and found to comply with the limits for a Class B digital device, pursuant to part 15 of the FCC Rules. These limits are designed to provide reasonable protection against harmful interference in a residential installation. I-SM1 generates, uses, and may radiate radio frequency energy and, if not installed and used in accordance with the instructions, may cause harmful interference to radio communications. However, there is no guarantee that interference will not occur in a particular installation. If I-SM1 does cause harmful interference to radio or television reception, which may be determined by turning the equipment off and on, the user is encouraged to try to correct the interference by one or more of the following measures:
Increase the separation between the equipment and receiver Consult the dealer or an experienced radio/TV technician for help
I-SM1 is a radio transmitter and receiver. It was designed and manufactured to comply with the radio frequency exposure thresholds recommended by the FCC (Part 15/22/24 of the FCC rules), and by the Council of the European Union (Recommendation 73/23/EEC, 89/336/EEC and 99/5/EC). The Conformity Declaration is available from ImCoSys AG, Bundesstrasse 5, CH-6300 Zug, Switzerland. Java and all Java-based marks are trademarks or registered trademarks of Sun Microsystems, Inc. in the United States and other countries.
Esmertec, Jbed, and u@ are trademarks or registered trademarks of Esmertec AG in Switzerland and other countries. All rights reserved.
is the registered trademark of Opera Software ASA.
5
TABLE OF CONTENTS
1 Quick Reference .......................................................................................9
1.1 Smartphone Outline........................................................................................ 9 1.2 SIM Card Installation .................................................................................... 10 1.3 Battery Installation ........................................................................................ 11 1.4 Installation of Extended Memory................................................................... 12 1.5 Charger......................................................................................................... 13 1.6 Idle Screen ................................................................................................... 14 1.7 Keypad Usage .............................................................................................. 16 1.8 Specification ................................................................................................. 17
2 Telephone................................................................................................20
2.1 Telephone Functions .................................................................................... 20 2.1.1 Dialing ..................................................................................................... 20 2.1.2 Photo Dial................................................................................................ 23 2.1.3 Quick Dial Numbers in SIM Card............................................................ 24 2.1.4 Answer Call ............................................................................................. 24
2.2 Contacts ....................................................................................................... 25 2.2.1 New Contact............................................................................................ 26 2.2.2 View Contact ........................................................................................... 27 2.2.3 Search Contact ....................................................................................... 29 2.2.4 Delete Contact ........................................................................................ 29 2.2.5 Groups and Categories........................................................................... 29 2.2.6 Manage Categories................................................................................. 30 2.2.7 Manage Groups ...................................................................................... 31
2.3 Call Log ........................................................................................................ 32
3 Message ..................................................................................................34
3.1 Inbox............................................................................................................. 34 3.2 Read Message.............................................................................................. 36 3.3 Send Message.............................................................................................. 36 3.4 Delete Message............................................................................................ 38
4 Calendar ..................................................................................................39
4.1 View Calendar .............................................................................................. 39 4.2 New Event .................................................................................................... 40
5 Application..............................................................................................42
5.1 File Manager................................................................................................. 42 5.2 E-mail ........................................................................................................... 43
5.2.1 Setup E-mail Category............................................................................ 43 5.2.2 Setup E-mail Account ............................................................................. 44 5.2.3 Mailbox Folder......................................................................................... 45 5.2.4 Read E-mail ............................................................................................ 45
6
5.2.5 Send E-mail............................................................................................. 46 5.2.6 Delete E-mail........................................................................................... 46
5.3 Memo............................................................................................................ 47 5.4 World Clock .................................................................................................. 48 5.5 Alarm Clock .................................................................................................. 48 5.6 Calculator ..................................................................................................... 49 5.7 Java .............................................................................................................. 50 5.8 SyncML......................................................................................................... 51 5.9 GPS.............................................................................................................. 52 5.10 Doc Viewer ................................................................................................... 52 5.11 Push E-mail .................................................................................................. 54
6 Sight & Sound.........................................................................................55
6.1 MP3 player ................................................................................................... 55 6.1.1 Play Music............................................................................................... 56 6.1.2 Play List................................................................................................... 57
6.2 Gallery .......................................................................................................... 58
7 Internet ....................................................................................................60
7.1 Browser ........................................................................................................ 61 7.2 STK Service.................................................................................................. 62
8 Tools & Setup..........................................................................................63
8.1 Memory Usage ............................................................................................. 63 8.2 Connect PC .................................................................................................. 64 8.3 Bluetooth ...................................................................................................... 64 8.4 Modem.......................................................................................................... 65 8.5 Alerts ............................................................................................................ 66 8.6 Device........................................................................................................... 67
8.6.1 Date and Time......................................................................................... 67 8.6.2 Theme and Sounds................................................................................. 67 8.6.3 Auto Power On/Off .................................................................................. 68 8.6.4 Security ................................................................................................... 68 8.6.5 Calibrate Screen ..................................................................................... 69 8.6.6 Power Save Mode................................................................................... 69 8.6.7 Screen Brightness................................................................................... 69 8.6.8 Auto Lock ................................................................................................ 69 8.6.9 Language ................................................................................................ 70 8.6.10 Reset Factory Settings............................................................................ 70 8.6.11 User Information...................................................................................... 70
8.7 WiFi Setup .................................................................................................... 70 8.7.1 WiFi Settings ........................................................................................... 70 8.7.2 WiFi Connect Status ............................................................................... 71
8.8 Calls.............................................................................................................. 71 8.8.1 Network ................................................................................................... 71
7
8.8.2 Incoming Calls......................................................................................... 71 8.8.3 Outgoing Calls......................................................................................... 72
8.9 Message ....................................................................................................... 72 8.9.1 SMS ........................................................................................................ 72 8.9.2 MMS........................................................................................................ 73 8.9.3 Cell Broadcast......................................................................................... 73 8.9.4 Quick Message ....................................................................................... 73 8.9.5 Signature................................................................................................. 73
8.10 Internet ......................................................................................................... 73 8.11 SOS.............................................................................................................. 74 8.12 User Defined Key.......................................................................................... 74
9 Input Operation.......................................................................................75
10 FAQ…. .....................................................................................................78
10.1 How to power on/off...................................................................................... 78 10.2 How to adjust volume while talking............................................................... 78 10.3 How to set the Bluetooth password .............................................................. 78 10.4 How to dial .................................................................................................... 78 10.5 How to set time and date .............................................................................. 78 10.6 How to set alarm........................................................................................... 79 10.7 How to switch to flight mode ......................................................................... 79 10.8 How to change the wallpaper ....................................................................... 79 10.9 How to send a MMS ..................................................................................... 79 10.10 How to access the Internet.............................................................................. 79 10.11 How to download and play MP3...................................................................... 80 10.12 How to change the ring tones ......................................................................... 80 10.13 How to use ImCoSys PC Client ...................................................................... 80 10.14 How to find [WiFi setup] .................................................................................. 80 10.15 How to enable WiFi network ........................................................................... 80 10.16 How do I know I already connected to a WiFi network.................................... 81 10.17 Why no access to WAP browser even though WiFi settings are correct......... 81 10.18 How to download pictures ............................................................................... 81 10.19 How to use the hands free function................................................................. 81 10.20 How to use IP call ........................................................................................... 82 10.21 How to use the RS232-USB cable .................................................................. 82
11 Troubleshooting .....................................................................................83
12 Index… ....................................................................................................88
8
1 Quick Reference
1.1 Smartphone Outline
The 4-way navigation key shortcuts also allow you to access certain functions directly in idle screen:
(8) Up Contacts
(9) Left Message
(11) Right Call Log
(12) Down Application
Note
The color of the pictures in this manual may differ from the color of the your smartphone.
When first in use, the display needs to be calibrated (please refer to chapter 8.6.5).
9
1.2 SIM Card Installation
Caution
1. I-SM1 supports the latest 3V SIM card. Apply for a new card from the mobile operator if still using an old 5V SIM card. Most of the mobile operators will replace it with a new one without changing the phone number.
2. Do not bend or scratch on the SIM card or expose it to electrostatic discharge, dust, or water.
① ②
Insert the SIM card
Switch off the smartphone before removing the battery. Insert the SIM card,observing the correct orientation as shown in picture 2.
① ②
Switch off the smartphone before removing the battery.
Take out the SIM card
10
1.3 Battery Installation
Warning
1. DO NOT remove the battery when the smartphone is switched on or in charging mode, to prevent the smartphone from getting damaged or from loosing any data.
2. DO NOT expose the battery contacts to external conducting matter, to prevent damage by a short circuit.
3. DO NOT use a battery, which is not from the original manufacturers or is not a specified model.
4. DO NOT use sharp metal objects to remove the battery, to prevent an accidental short circuit of the battery.
①
②
11
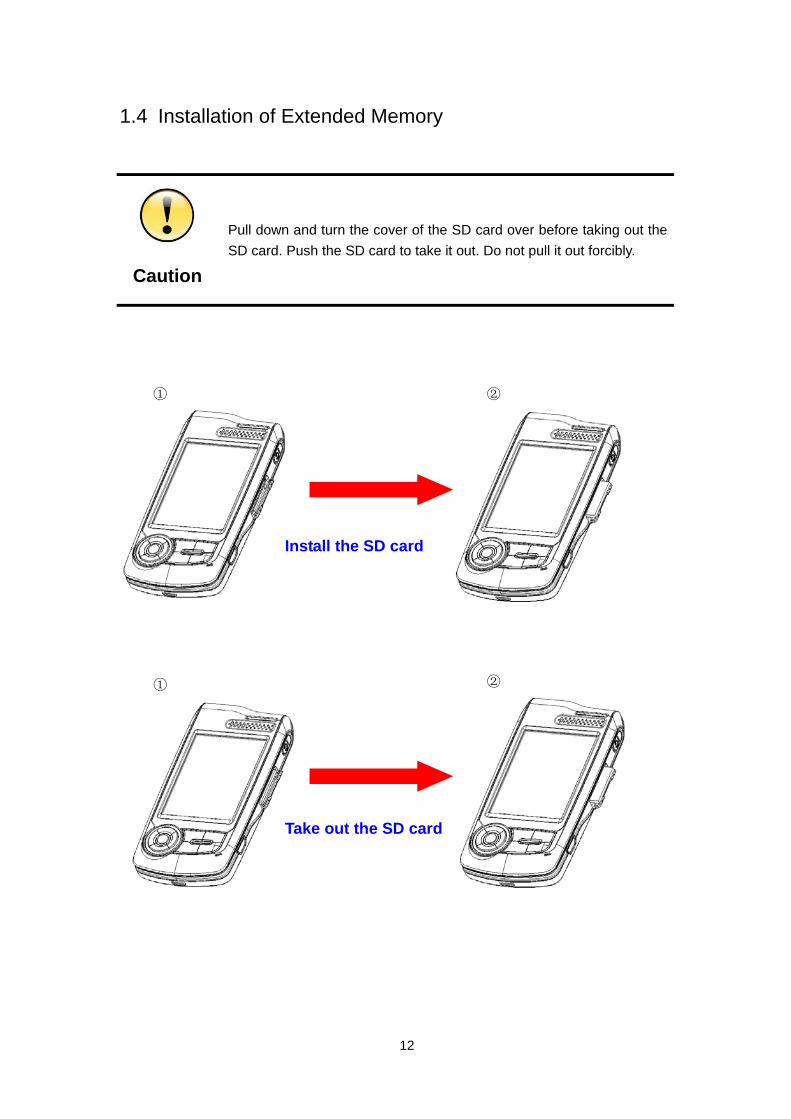
1.4 Installation of Extended Memory
Caution
Pull down and turn the cover of the SD card over before taking out the SD card. Push the SD card to take it out. Do not pull it out forcibly.
① ②
Install the SD card
② ①
Take out the SD card
12
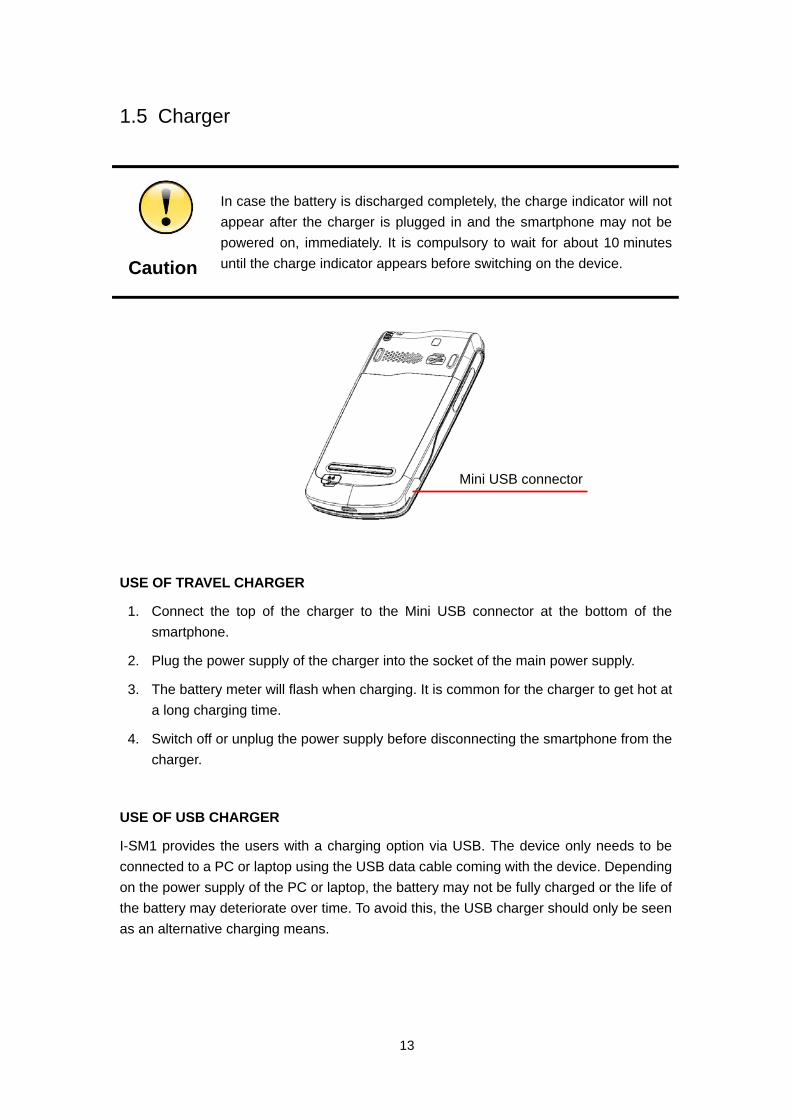
1.5 Charger
Caution
In case the battery is discharged completely, the charge indicator will not appear after the charger is plugged in and the smartphone may not be powered on, immediately. It is compulsory to wait for about 10 minutes until the charge indicator appears before switching on the device.
Mini USB connector
USE OF TRAVEL CHARGER
1. Connect the top of the charger to the Mini USB connector at the bottom of the smartphone.
2. Plug the power supply of the charger into the socket of the main power supply.
3. The battery meter will flash when charging. It is common for the charger to get hot at a long charging time.
4. Switch off or unplug the power supply before disconnecting the smartphone from the charger.
USE OF USB CHARGER
I-SM1 provides the users with a charging option via USB. The device only needs to be connected to a PC or laptop using the USB data cable coming with the device. Depending on the power supply of the PC or laptop, the battery may not be fully charged or the life of the battery may deteriorate over time. To avoid this, the USB charger should only be seen as an alternative charging means.
13
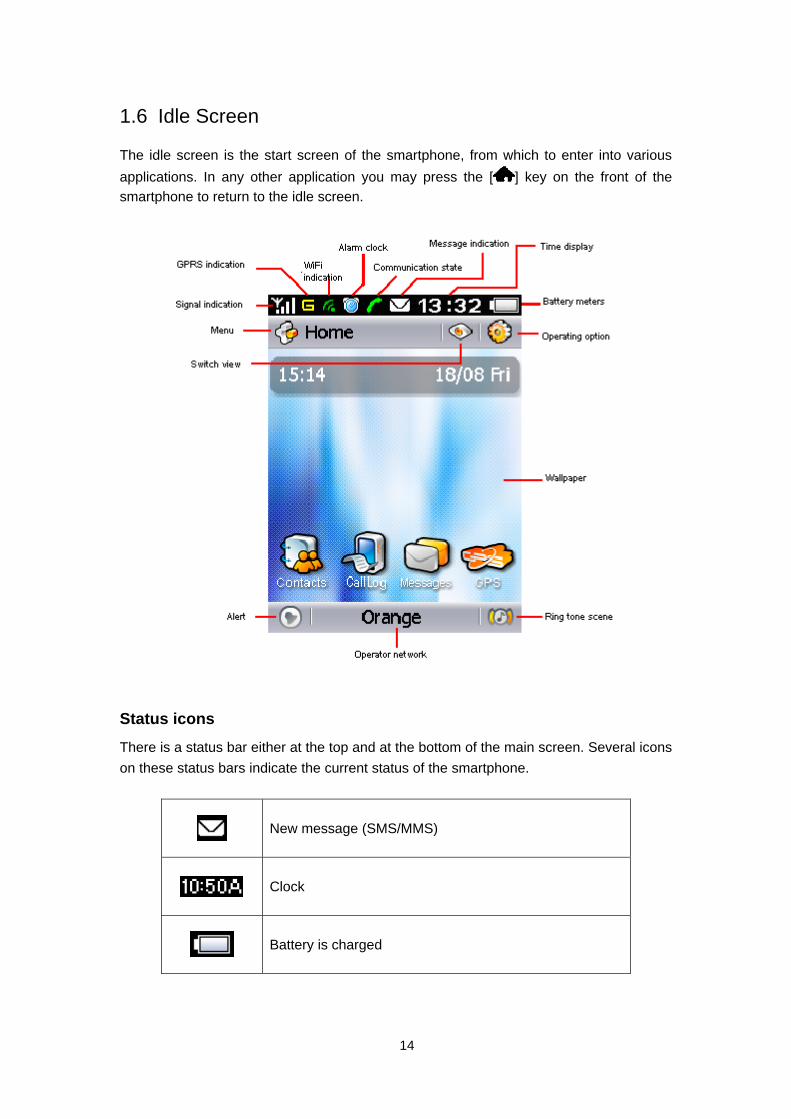
1.6 Idle Screen
The idle screen is the start screen of the smartphone, from which to enter into various applications. In any other application you may press the [ ] key on the front of the smartphone to return to the idle screen.
Status icons
There is a status bar either at the top and at the bottom of the main screen. Several icons on these status bars indicate the current status of the smartphone.
New message (SMS/MMS)
Clock
Battery is charged
14
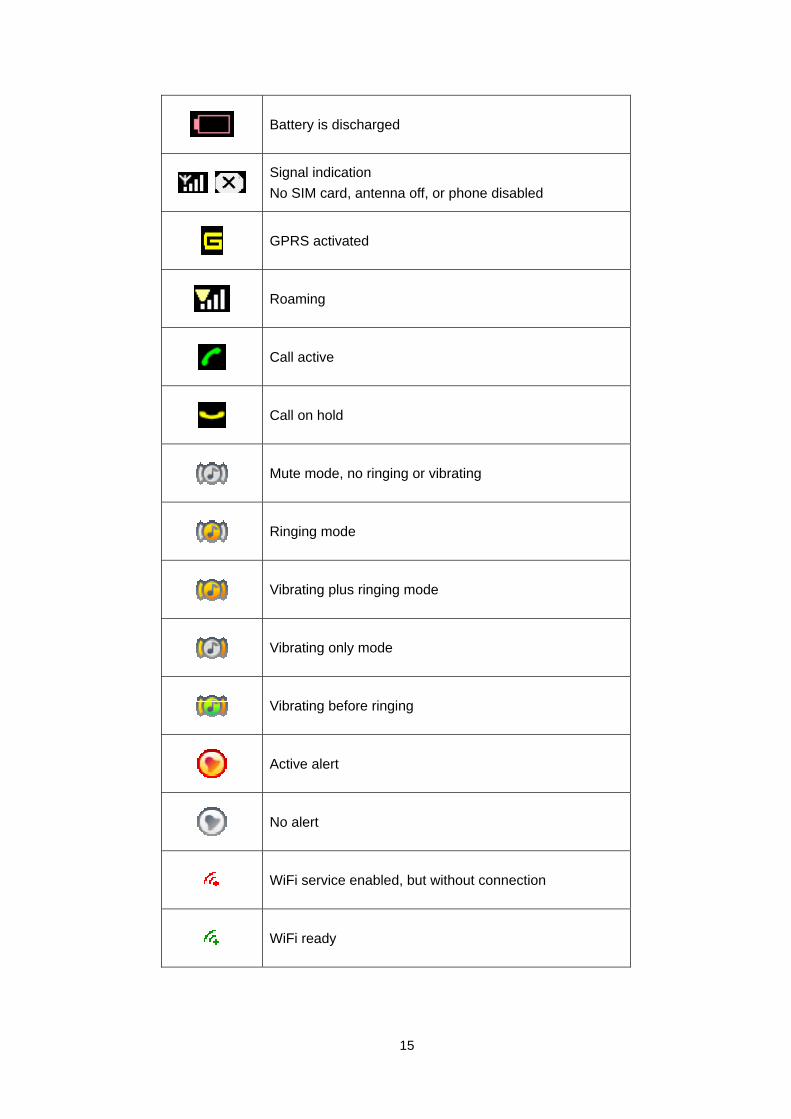
Battery is discharged
Signal indication No SIM card, antenna off, or phone disabled
GPRS activated
Roaming
Call active
Call on hold
Mute mode, no ringing or vibrating
Ringing mode
Vibrating plus ringing mode
Vibrating only mode
Vibrating before ringing
Active alert
No alert
WiFi service enabled, but without connection
WiFi ready
15
The idle screen of I-SM1 provides several application views such as calendar, clock,
shortcut, and background only. Press to select the view mode, and press to configure the display content of current view.
1.7 Keypad Usage
You may discard operations and return to idle screen by pressing [Home] key in most cases except for some critical operations such as making a phone call.
When on the idle screen, you may directly access certain applications by the 4-way navigation key shortcuts
1. Directly access pull-down menu by pressing [Ok] key 2. Directly access contacts by pressing [Up] key 3. Directly access application by pressing [Down] key 4. Directly access message by pressing [Left] key 5. Directly access call log by pressing [Right] key
Operating on pull-down menu, you may 1. Move up in menu item by pressing [Up] key 2. Move down in menu item by pressing [Down] key 3. Access options/submenus by pressing [Ok] key 4. Return from any point to the idle screen by pressing the [HOME] key
Use of screen lock/unlock key
To prevent from pressing the keyboard or tapping the screen unintentionally, press the [Screen Lock] key to lock keypad and touch-screen. Press the [Screen Lock] key again to unlock. You may not operate the smartphone while the screen is locked. Please press [Screen lock] key to unlock smartphone before further operations. All application except MP3 player will quit to idle screen if the screen is locked. You need to unlock smartphone before you may long press [Screen lock] key to power down the smartphone. (Other special functions will be described in the following sections)
16
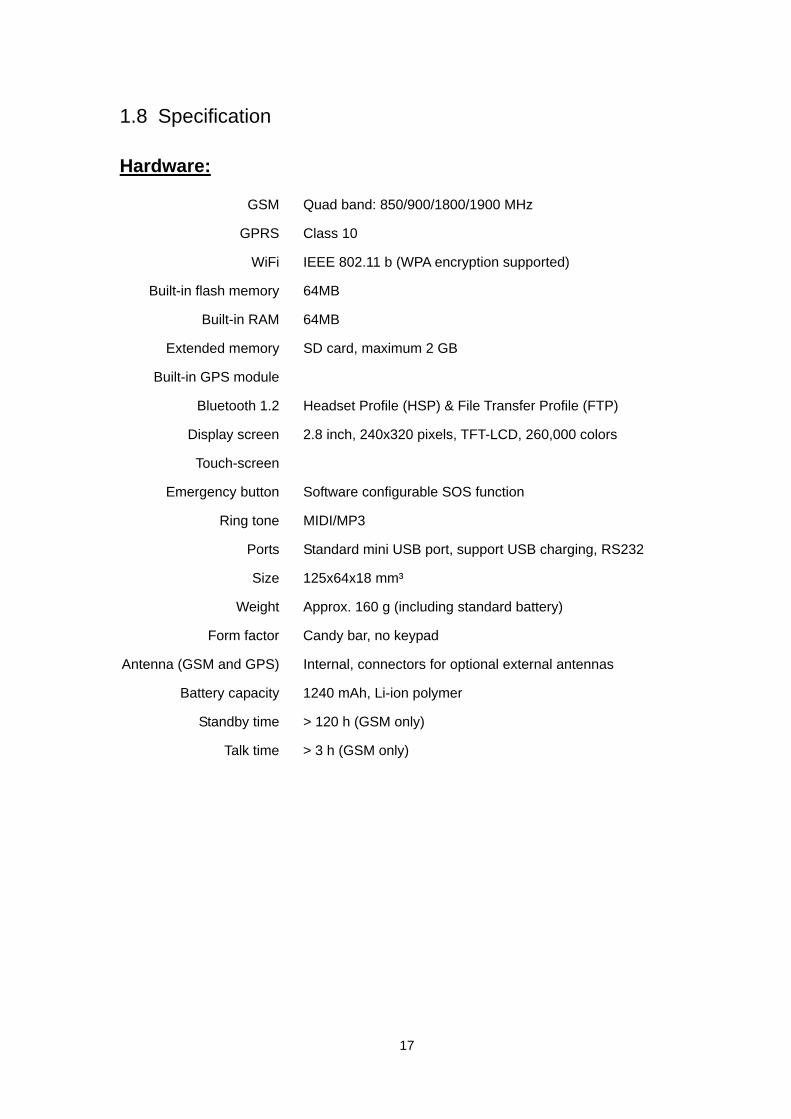
1.8 Specification
Hardware:
GSM Quad band: 850/900/1800/1900 MHz
GPRS Class 10
WiFi IEEE 802.11 b (WPA encryption supported)
Built-in flash memory 64MB
Built-in RAM 64MB
Extended memory SD card, maximum 2 GB
Built-in GPS module
Bluetooth 1.2 Headset Profile (HSP) & File Transfer Profile (FTP)
Display screen 2.8 inch, 240x320 pixels, TFT-LCD, 260,000 colors
Touch-screen
Emergency button Software configurable SOS function
Ring tone MIDI/MP3
Ports Standard mini USB port, support USB charging, RS232
Size 125x64x18 mm³
Weight Approx. 160 g (including standard battery)
Form factor Candy bar, no keypad
Antenna (GSM and GPS) Internal, connectors for optional external antennas
Battery capacity 1240 mAh, Li-ion polymer
Standby time > 120 h (GSM only)
Talk time > 3 h (GSM only)
17
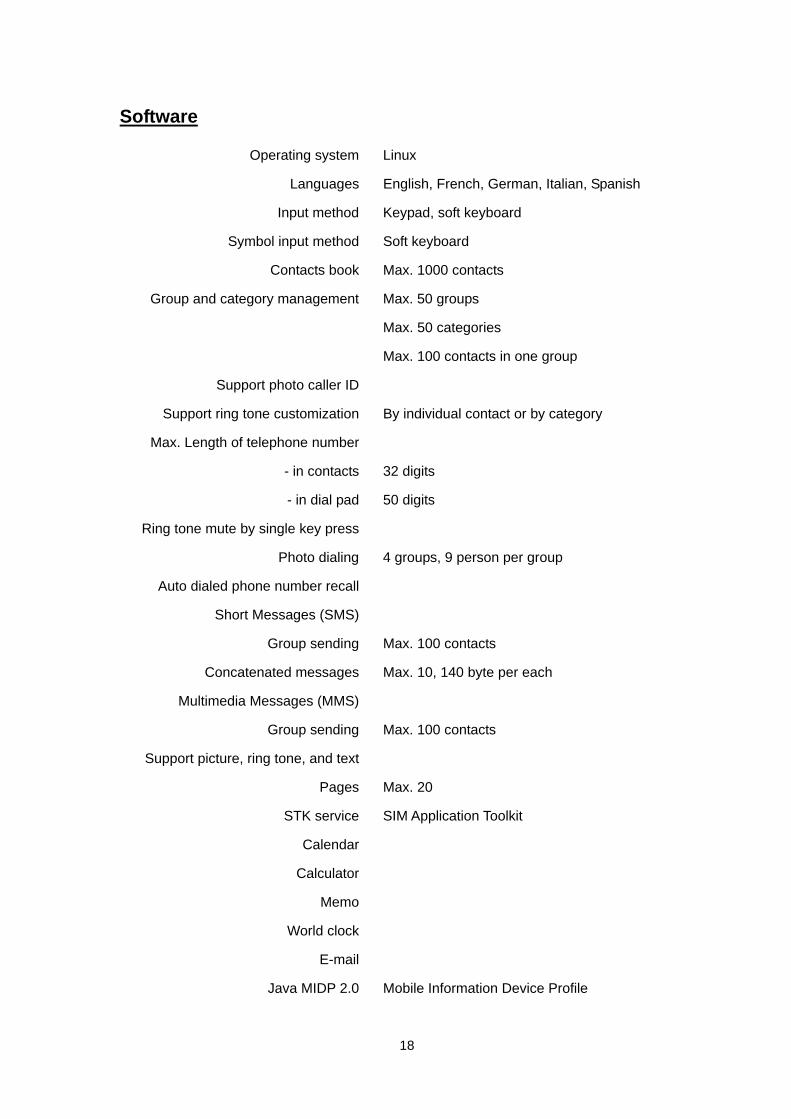
Software
Operating system Linux
Languages English, French, German, Italian, Spanish
Input method Keypad, soft keyboard
Symbol input method Soft keyboard
Contacts book Max. 1000 contacts
Group and category management Max. 50 groups
Max. 50 categories
Max. 100 contacts in one group
Support photo caller ID
Support ring tone customization By individual contact or by category
Max. Length of telephone number
- in contacts 32 digits
- in dial pad 50 digits
Ring tone mute by single key press
Photo dialing 4 groups, 9 person per group
Auto dialed phone number recall
Short Messages (SMS)
Group sending Max. 100 contacts
Concatenated messages Max. 10, 140 byte per each
Multimedia Messages (MMS)
Group sending Max. 100 contacts
Support picture, ring tone, and text
Pages Max. 20
STK service SIM Application Toolkit
Calendar
Calculator
Memo
World clock
Java MIDP 2.0 Mobile Information Device Profile
18
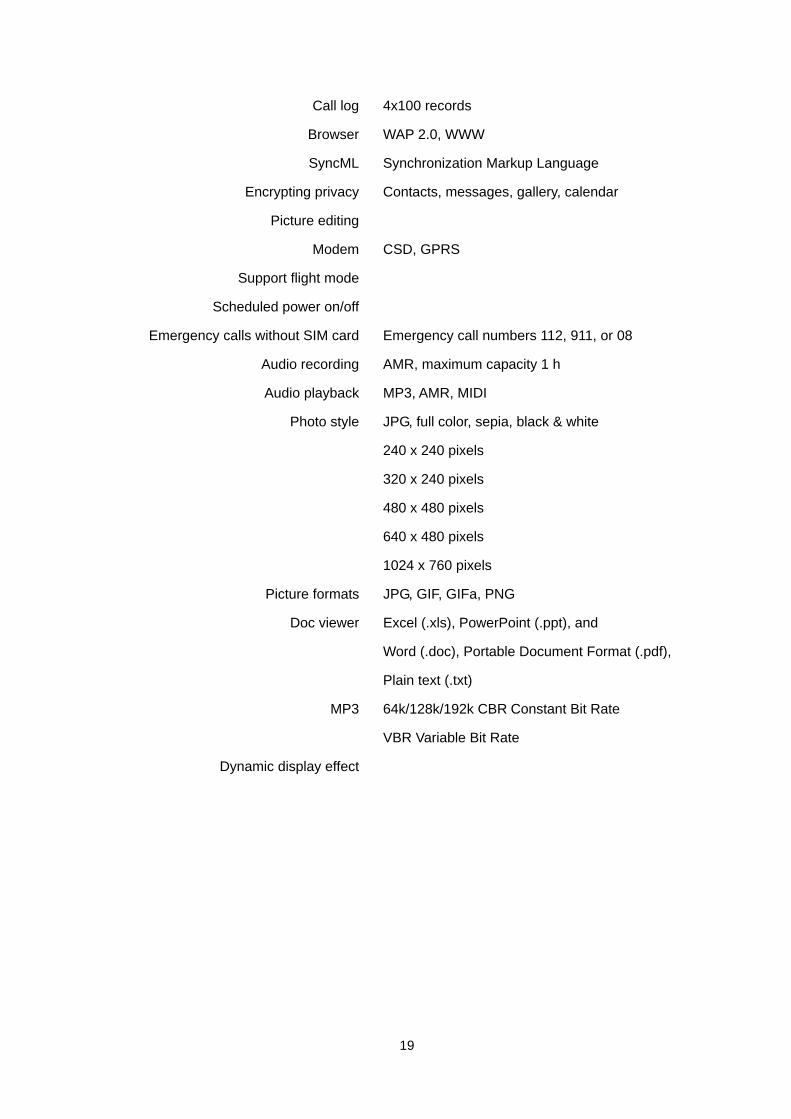
Call log 4x100 records
Browser WAP 2.0, WWW
SyncML Synchronization Markup Language
Encrypting privacy Contacts, messages, gallery, calendar
Picture editing
Modem CSD, GPRS
Support flight mode
Scheduled power on/off
Emergency calls without SIM card Emergency call numbers 112, 911, or 08
Audio recording AMR, maximum capacity 1 h
Audio playback MP3, AMR, MIDI
Photo style JPG, full color, sepia, black & white
240 x 240 pixels
320 x 240 pixels
480 x 480 pixels
640 x 480 pixels
1024 x 760 pixels
Picture formats JPG, GIF, GIFa, PNG
Doc viewer Excel (.xls), PowerPoint (.ppt), and
Word (.doc), Portable Document Format (.pdf),
Plain text (.txt)
MP3 64k/128k/192k CBR Constant Bit Rate
VBR Variable Bit Rate
Dynamic display effect
19
2 Telephone I-SM1 provides a lot of ways to deal with the telephone, which makes it at your greatest convenience to dial or answer a phone call, do call diverting or call waiting.
I-SM1 provides 400 records of call logs including 100 records of missed calls, 100 records of answered calls, 100 records of outgoing calls and records of rejected calls.
It is most worthy to mention about the high capacity of the contact book of I-SM1. It may store 1000 items of contacts; each contact may present information such as smartphone number, home phone number, business phone number and so on. Furthermore, a photograph and the ring tone may be set individually for each contact. For easy management, the contacts may be sorted by group or by category.
Note
Above capacity is the recommended upper limit. The large capacity will affect the user performance to some extent.
2.1 Telephone Functions
Caution
Without SIM card inserted, you may only dial the emergency numbers 112, 911, or 08.
2.1.1 Dialing
I-SM1 provides multiple options for dialing. You may dial directly by clicking the dial pad on touch-screen, by inputting the phone number by keypad, by dialing out from the contacts book, by photo dial, or by call log.
Tips
Press key to return to idle screen.
20
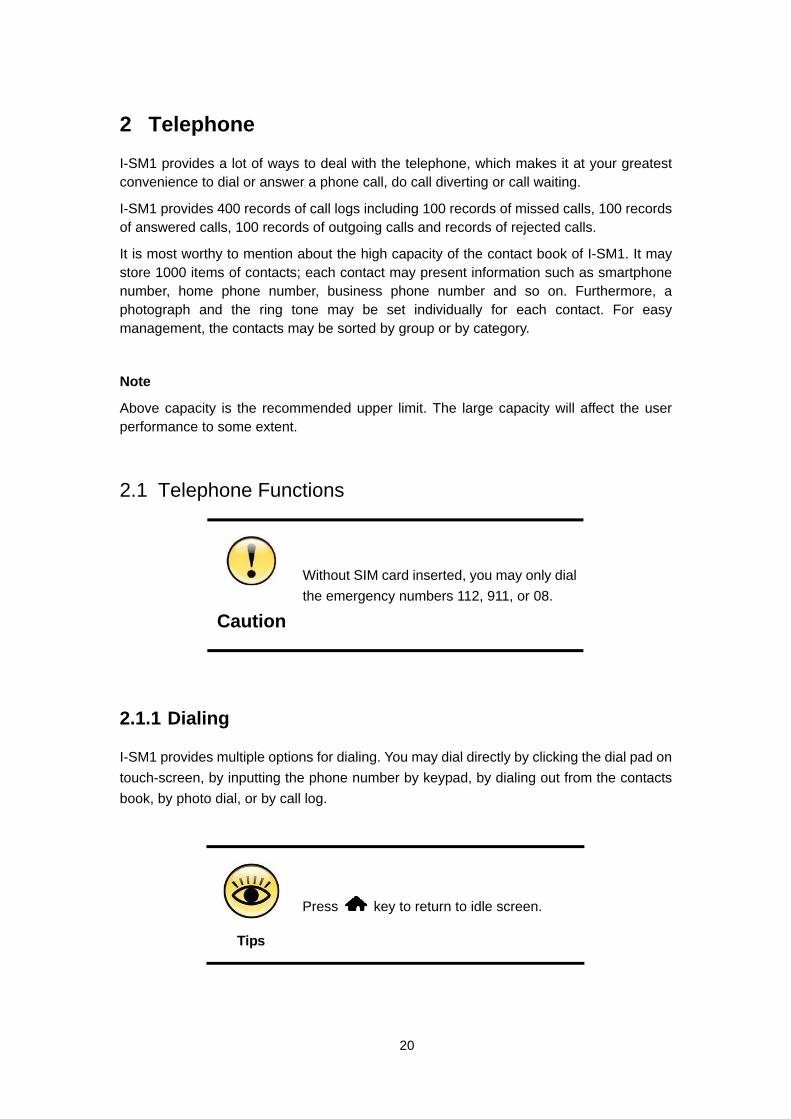
1. Press the desktop wallpaper area on idle screen to switch to the dial pad.
Photo Dial
Call log Contacts
Long click this key to insert
“p” to be followed by the
extension number
(1)
Tips
When dialer pad appears
Clicking [Left] key directly jumps to Missed Calls
Clicking [Right] key directly jumps to Answered Calls
Clicking [Down] key directly jumps to Contacts
Clicking [Up] key directly jumps to Photo Dial
21
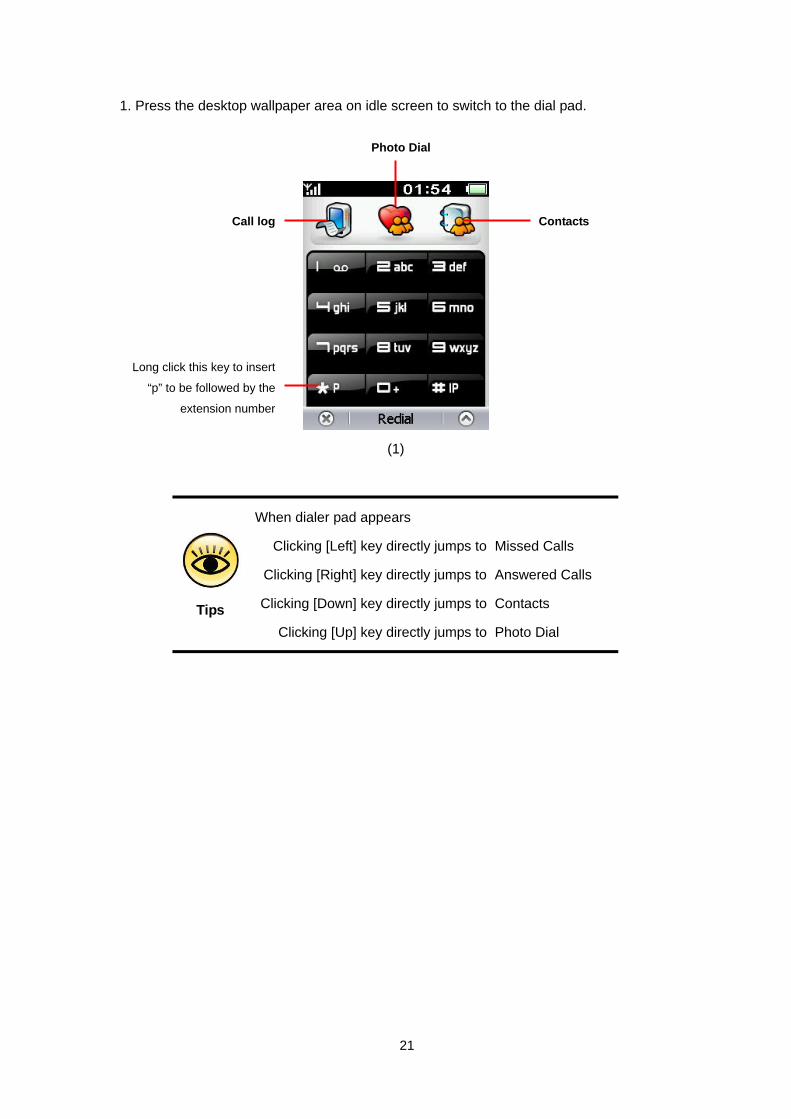
2. Press number key to input the phone number to appear in the number box.
Press to delete the digit left to the cursor.
(2)
Tips
I-SM1 provides unique intelligent auto-fill function to help call the dialed number quickly. When the first several digits are matched with that dialed, the smartphone will complete the rest of the digits, automatically. If the filled result is not what you want, you may just continue to input the remaining digits and to overwrite the auto-filled digits.
22
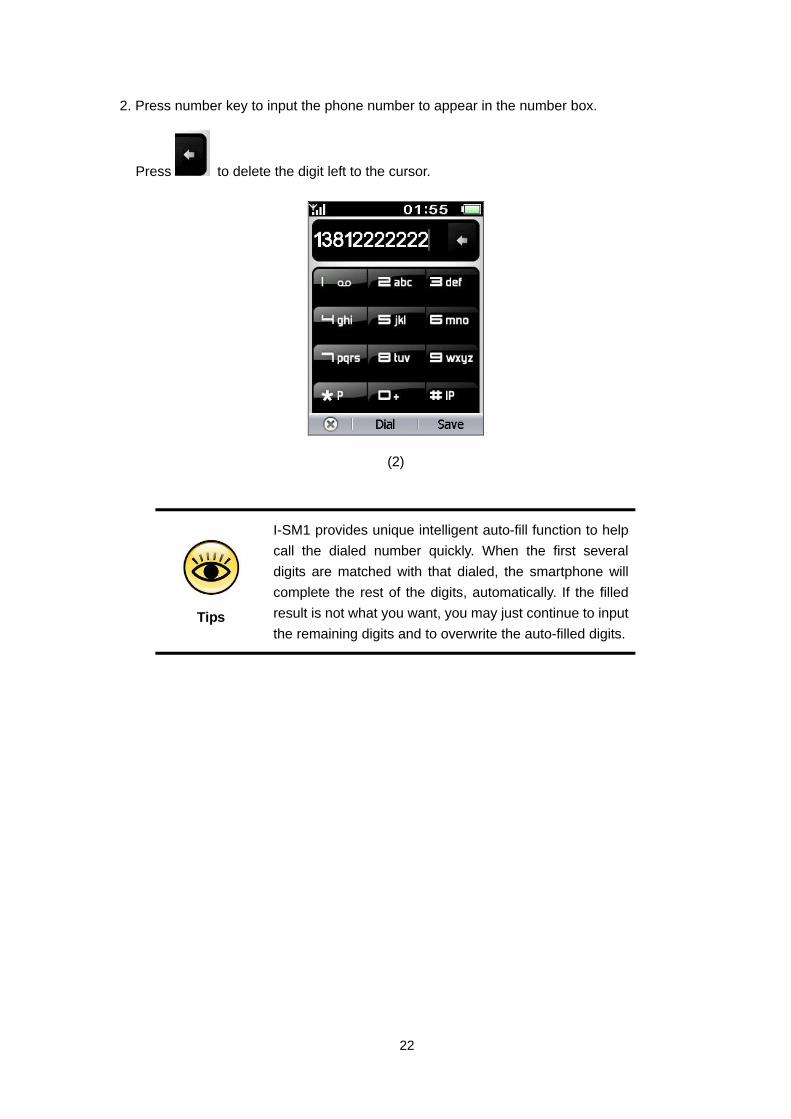
3. Click the [Dial] button to dial the phone number shown in phone number box. If the number matches with that in the contact book, the corresponding name and photo will be displayed. Otherwise, the phone number with default picture will be displayed.
(3)
Press to dial extension or input digits (for example, input you account or password).
Press to mute the device.
Press to hold current call (operator service required).
Press to do a third party call or a conference call (operator service required).
Press [End] on screen or press [End] key to end the call.
2.1.2 Photo Dial
Photo dial makes the phone dialing easier and more directly. You may simply press the photo of the contact to dial the corresponding phone.
In order to facilitate the contact searching, there are four groups of photo dial contacts, which is different in background color. Each group contains 9 photo dial contacts.
23
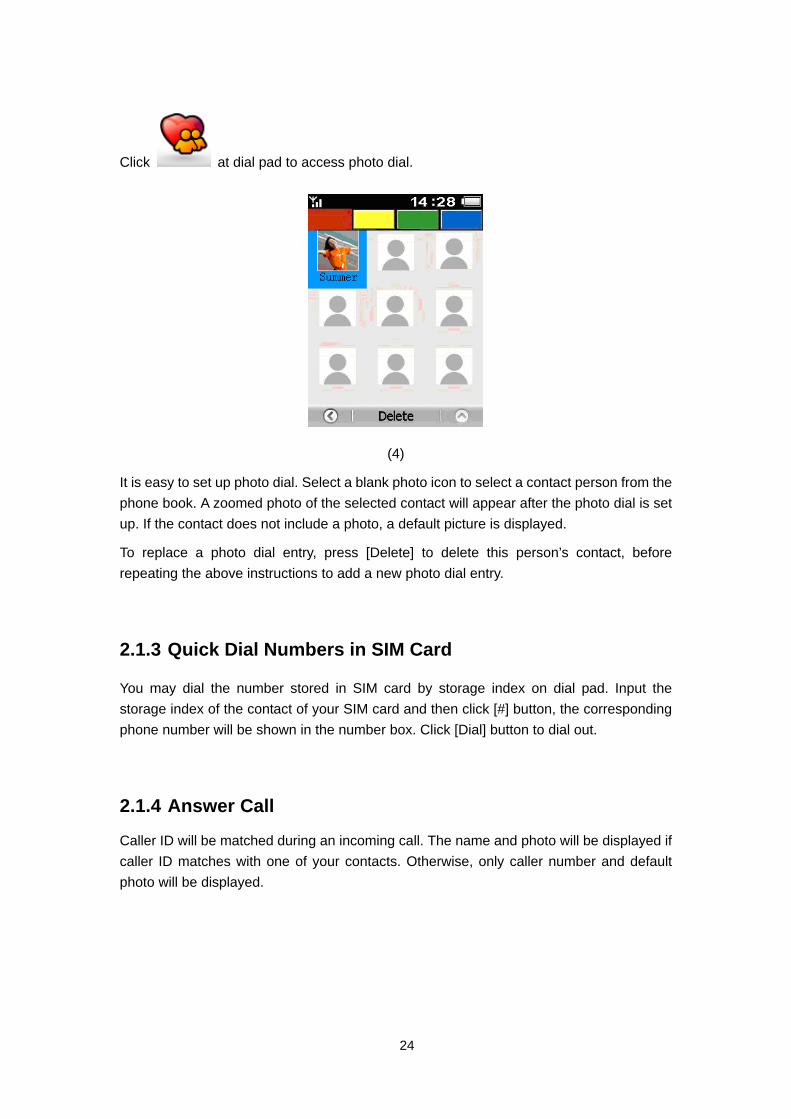
Click at dial pad to access photo dial.
(4)
It is easy to set up photo dial. Select a blank photo icon to select a contact person from the phone book. A zoomed photo of the selected contact will appear after the photo dial is set up. If the contact does not include a photo, a default picture is displayed.
To replace a photo dial entry, press [Delete] to delete this person’s contact, before repeating the above instructions to add a new photo dial entry.
2.1.3 Quick Dial Numbers in SIM Card
You may dial the number stored in SIM card by storage index on dial pad. Input the storage index of the contact of your SIM card and then click [#] button, the corresponding phone number will be shown in the number box. Click [Dial] button to dial out.
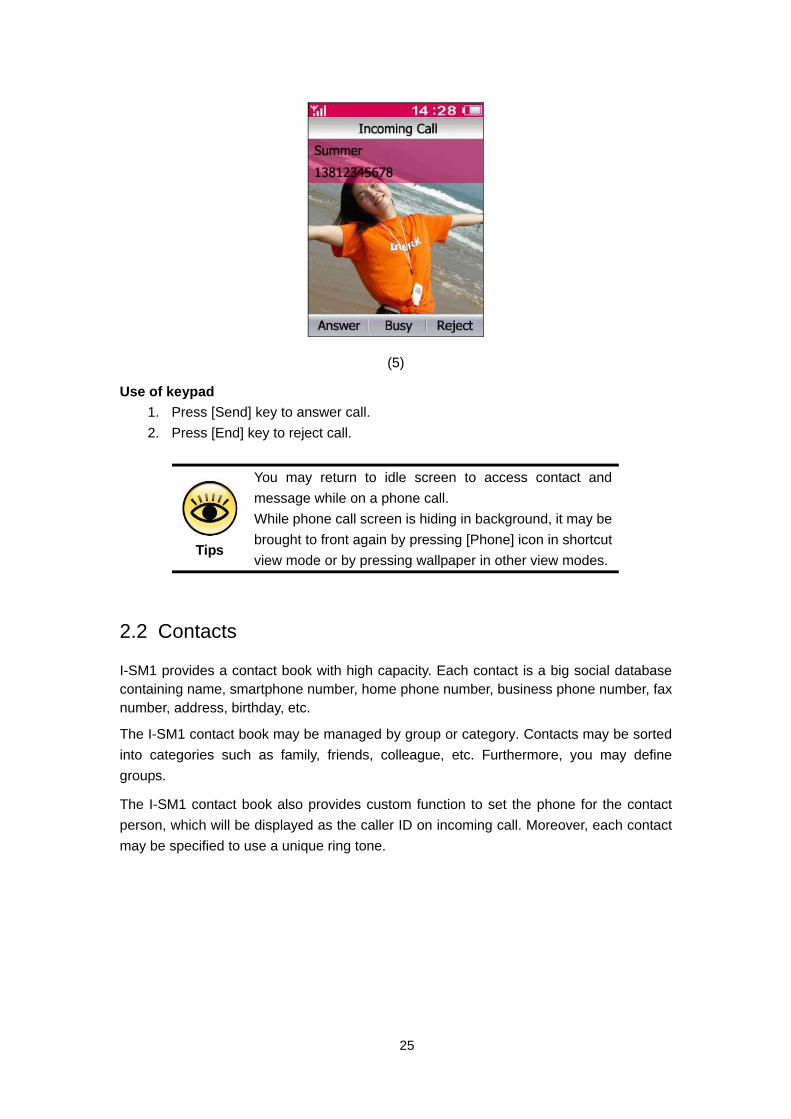
2.1.4 Answer Call
Caller ID will be matched during an incoming call. The name and photo will be displayed if caller ID matches with one of your contacts. Otherwise, only caller number and default photo will be displayed.
24
(5)
Use of keypad 1. Press [Send] key to answer call. 2. Press [End] key to reject call.
Tips
You may return to idle screen to access contact and message while on a phone call. While phone call screen is hiding in background, it may be brought to front again by pressing [Phone] icon in shortcut view mode or by pressing wallpaper in other view modes.
2.2 Contacts
I-SM1 provides a contact book with high capacity. Each contact is a big social database containing name, smartphone number, home phone number, business phone number, fax number, address, birthday, etc.
The I-SM1 contact book may be managed by group or category. Contacts may be sorted into categories such as family, friends, colleague, etc. Furthermore, you may define groups.
The I-SM1 contact book also provides custom function to set the phone for the contact person, which will be displayed as the caller ID on incoming call. Moreover, each contact may be specified to use a unique ring tone.
25
[Menu] → [Contacts]
Select
Viewing mode View List/View Thumb and
Sorting method View by Last Name/View by First Name
Search the contact Type of contact Number of contacts
(6)
Contacts
Family name index
Go back to
previous screen Menu
Delete Contact
Manage Categories
Manage Groups
Copy from SIM card
Copy to SIM card
Backup to SD card
Restore from SD card
2.2.1 New Contact
Press [New Contact] on the contact list screen (6) to add a new contact.
Each contact contains name, mobile number, business phone number, home phone number, fax number, and multimedia data such as photo and ring tone.
26
(7)
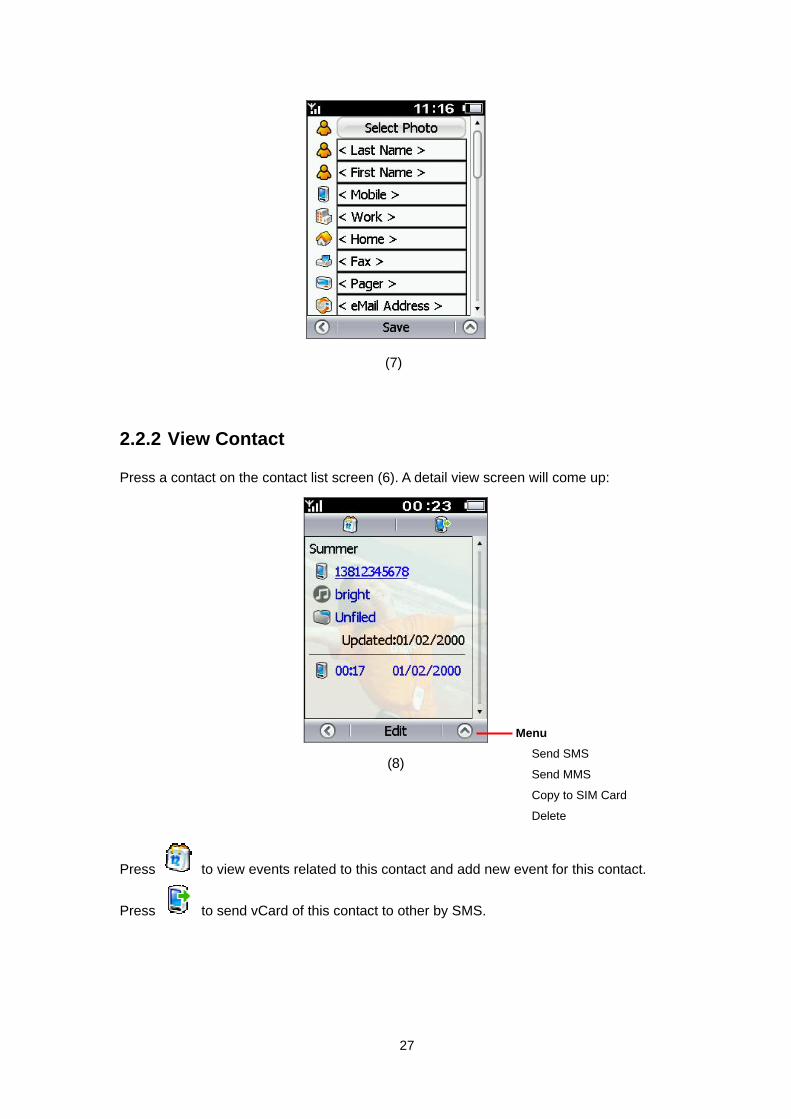
2.2.2 View Contact
Press a contact on the contact list screen (6). A detail view screen will come up:
Menu Send SMS
(8) Send MMS
Copy to SIM Card
Delete
Press to view events related to this contact and add new event for this contact.
Press to send vCard of this contact to other by SMS.
27
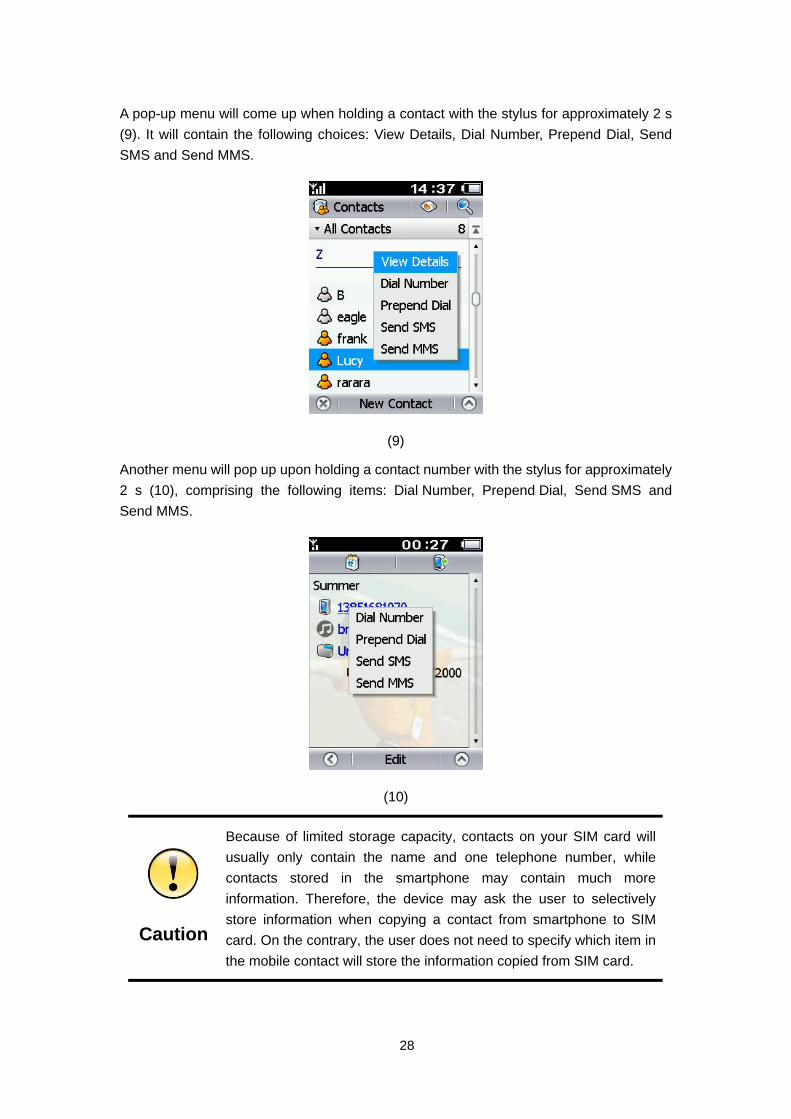
A pop-up menu will come up when holding a contact with the stylus for approximately 2 s (9). It will contain the following choices: View Details, Dial Number, Prepend Dial, Send SMS and Send MMS.
(9)
Another menu will pop up upon holding a contact number with the stylus for approximately 2 s (10), comprising the following items: Dial Number, Prepend Dial, Send SMS and Send MMS.
(10)
Caution
Because of limited storage capacity, contacts on your SIM card will usually only contain the name and one telephone number, while contacts stored in the smartphone may contain much more information. Therefore, the device may ask the user to selectively store information when copying a contact from smartphone to SIM card. On the contrary, the user does not need to specify which item in the mobile contact will store the information copied from SIM card.
28
2.2.3 Search Contact
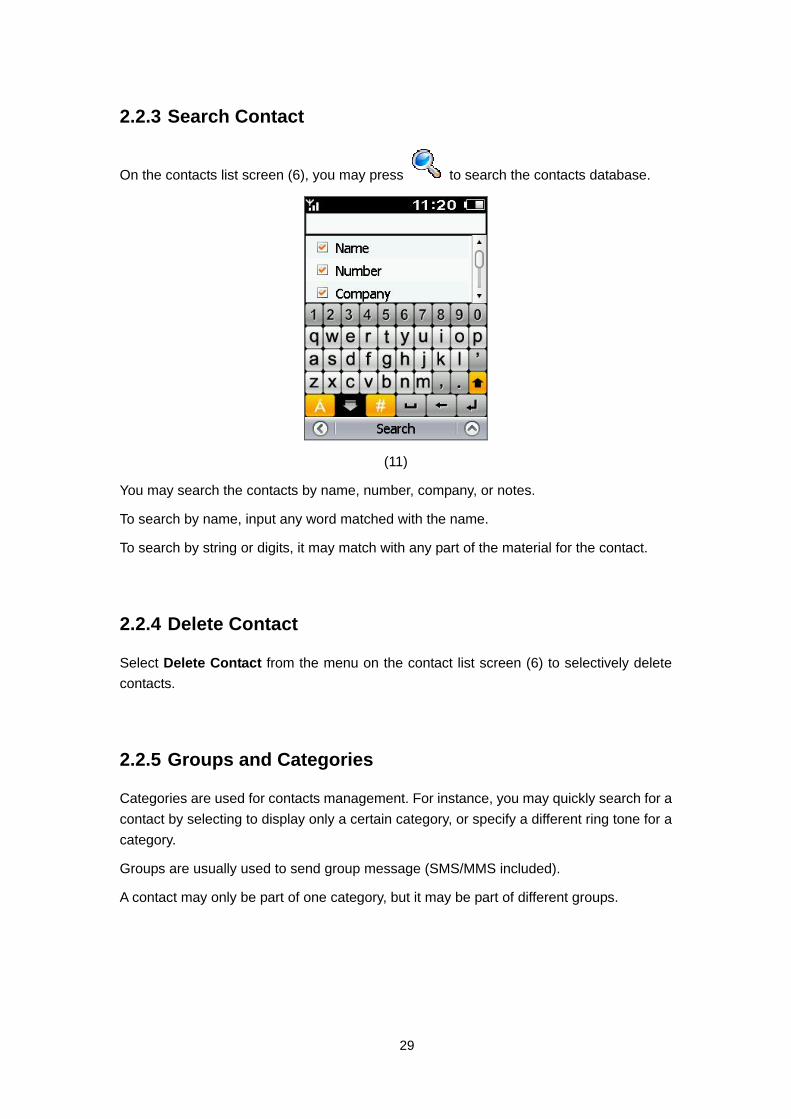
On the contacts list screen (6), you may press to search the contacts database.
(11)
You may search the contacts by name, number, company, or notes.
To search by name, input any word matched with the name.
To search by string or digits, it may match with any part of the material for the contact.
2.2.4 Delete Contact
Select Delete Contact from the menu on the contact list screen (6) to selectively delete contacts.
2.2.5 Groups and Categories
Categories are used for contacts management. For instance, you may quickly search for a contact by selecting to display only a certain category, or specify a different ring tone for a category.
Groups are usually used to send group message (SMS/MMS included).
A contact may only be part of one category, but it may be part of different groups.
29
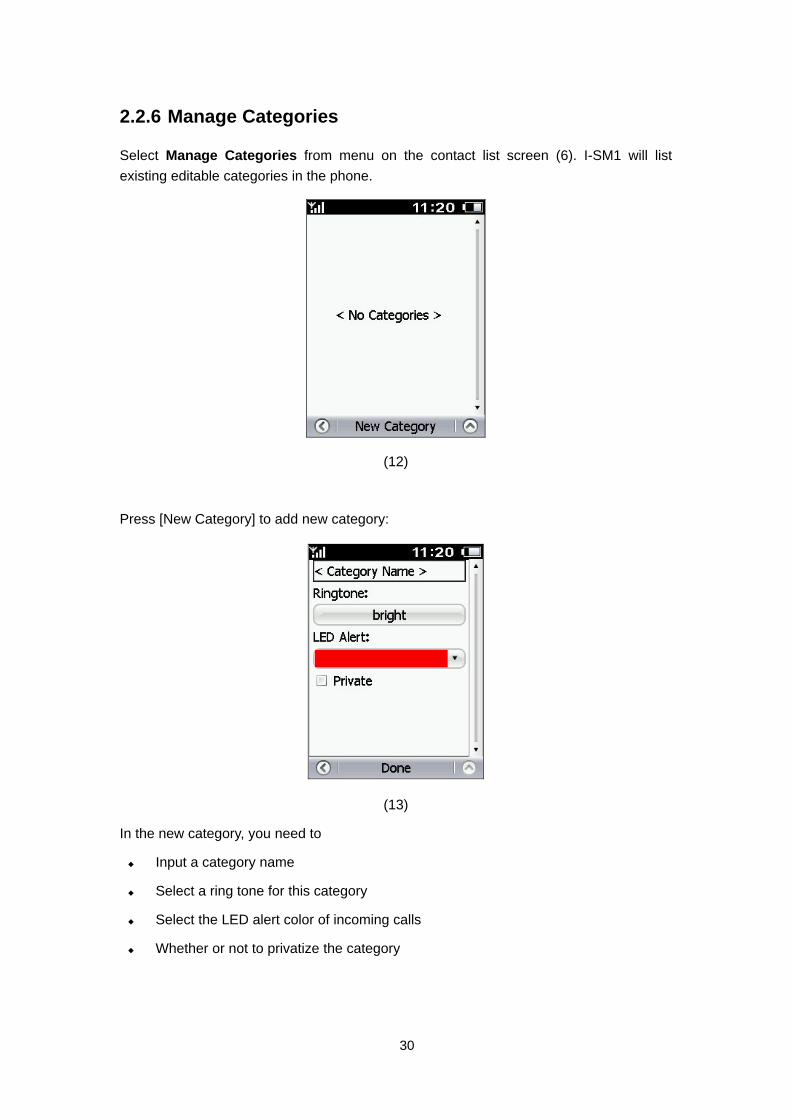
2.2.6 Manage Categories
Select Manage Categories from menu on the contact list screen (6). I-SM1 will list existing editable categories in the phone.
(12)
Press [New Category] to add new category:
(13)
In the new category, you need to
Input a category name
Select a ring tone for this category
Select the LED alert color of incoming calls
Whether or not to privatize the category
30
2.2.7 Manage Groups
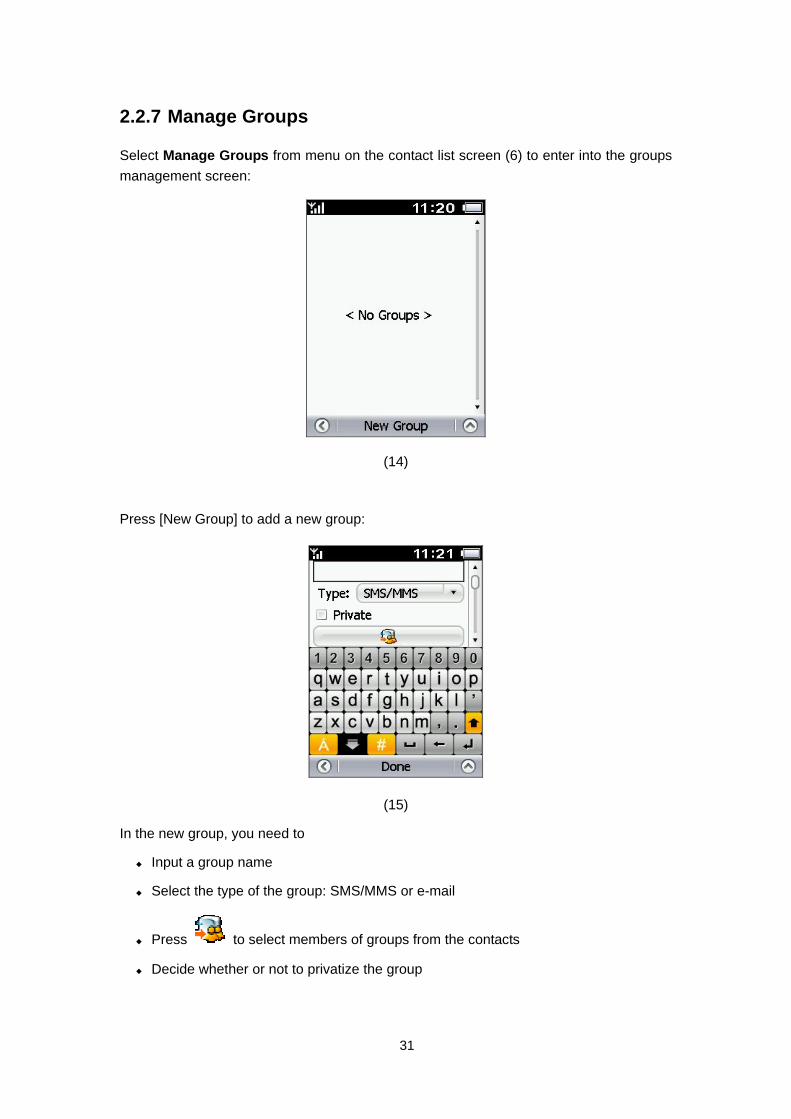
Select Manage Groups from menu on the contact list screen (6) to enter into the groups management screen:
(14)
Press [New Group] to add a new group:
(15)
In the new group, you need to
Input a group name
Select the type of the group: SMS/MMS or e-mail
Press to select members of groups from the contacts
Decide whether or not to privatize the group
31
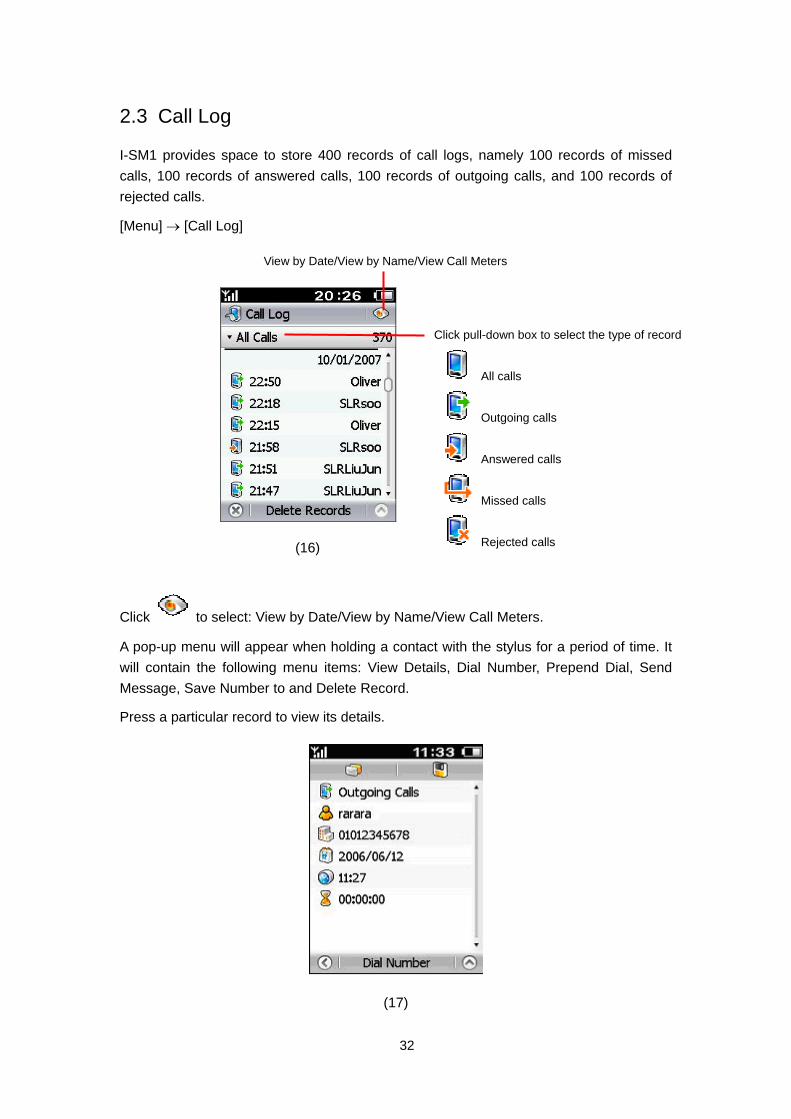
2.3 Call Log
I-SM1 provides space to store 400 records of call logs, namely 100 records of missed calls, 100 records of answered calls, 100 records of outgoing calls, and 100 records of rejected calls.
[Menu] → [Call Log]
View by Date/View by Name/View Call Meters
Click pull-down box to select the type of record
All calls
Outgoing calls
Answered calls
Missed calls
Rejected calls (16)
Click to select: View by Date/View by Name/View Call Meters.
A pop-up menu will appear when holding a contact with the stylus for a period of time. It will contain the following menu items: View Details, Dial Number, Prepend Dial, Send Message, Save Number to and Delete Record.
Press a particular record to view its details.
(17)
32
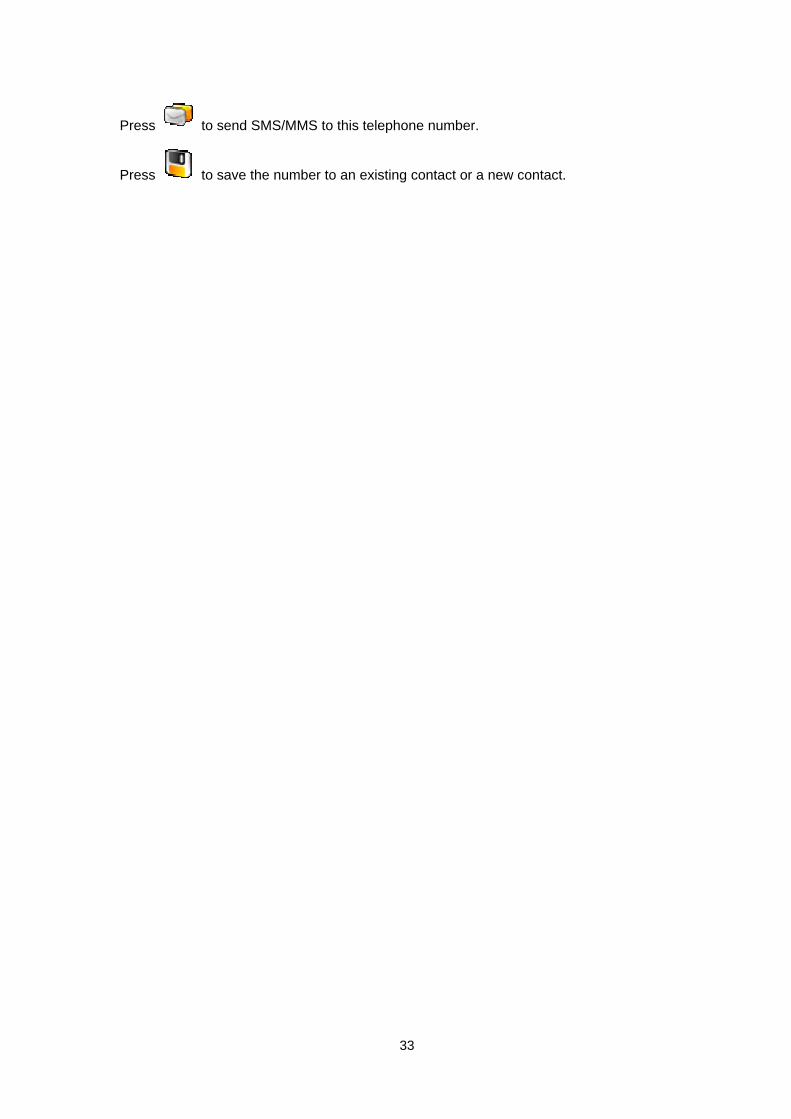
Press to send SMS/MMS to this telephone number.
Press to save the number to an existing contact or a new contact.
33
3 Message I-SM1 supports both common Short Message Service (SMS) and Multimedia Messaging Service (MMS). You may send photos or music to your friends. With the big size multicolor touch-screen and the writing recognition function, it is easy to manage your information.
[Menu] → [Message]
Related knowledge
SMS AND MMS
SMS (Short Message Service) Common Short Message Service is a basic simple text message service of GSM network, and is sent directly from one side to the other by point-to-point mode.
MMS (Multimedia Messaging Service) An enhancement of the existing SMS that may be used to edit and real-time send pictures, audio and text information, to implement the information transmission among smartphones and from the smartphone to the network easily, bringing you into a vivid and dramatic mobile multimedia world.
Both types are supported by the I-SM1.
3.1 Inbox
Information such as SMS, MMS and cell broadcasting messages may easily be managed in the I-SM1 inbox.
[Menu] → [Message]
34
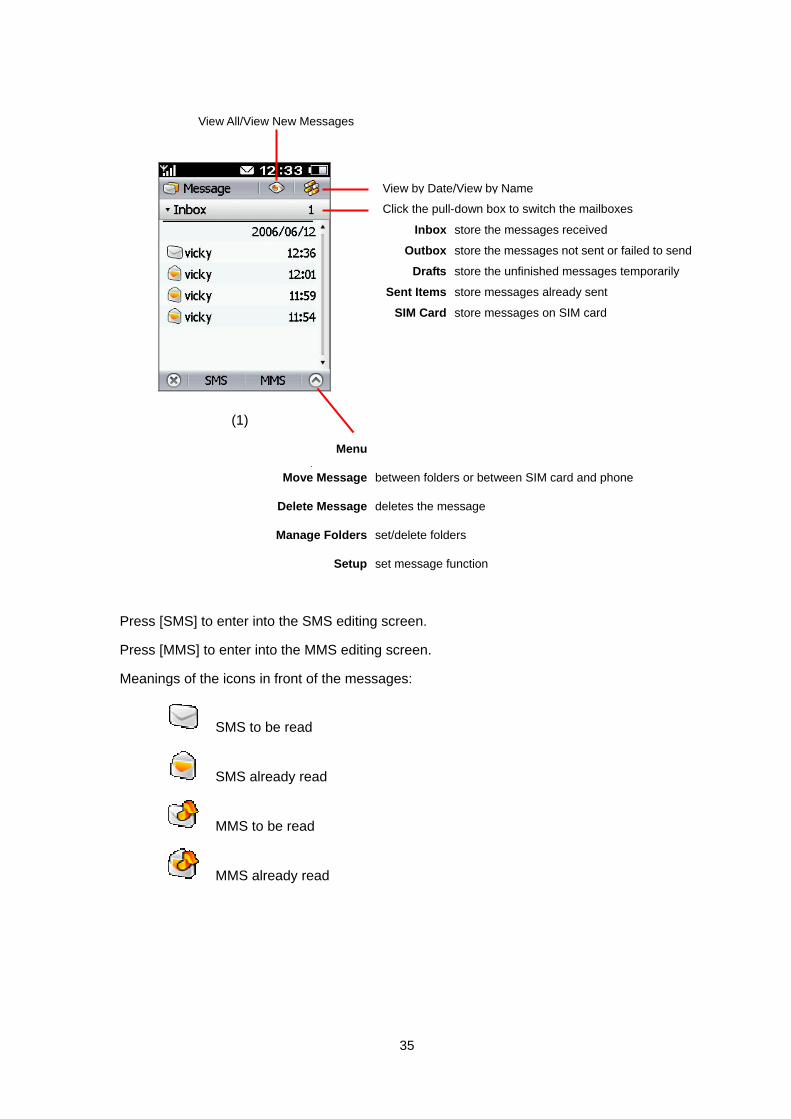
(1)
View by Date/View by Name Click the pull-down box to switch the mailboxes
Inbox store the messages received
Outbox store the messages not sent or failed to send
Drafts store the unfinished messages temporarily
Sent Items store messages already sent
SIM Card store messages on SIM card
View All/View New Messages
Menu
Move Message between folders or between SIM card and phone
Delete Message deletes the message
Manage Folders set/delete folders
Setup set message function
Press [SMS] to enter into the SMS editing screen.
Press [MMS] to enter into the MMS editing screen.
Meanings of the icons in front of the messages:
SMS to be read
SMS already read
MMS to be read
MMS already read
35
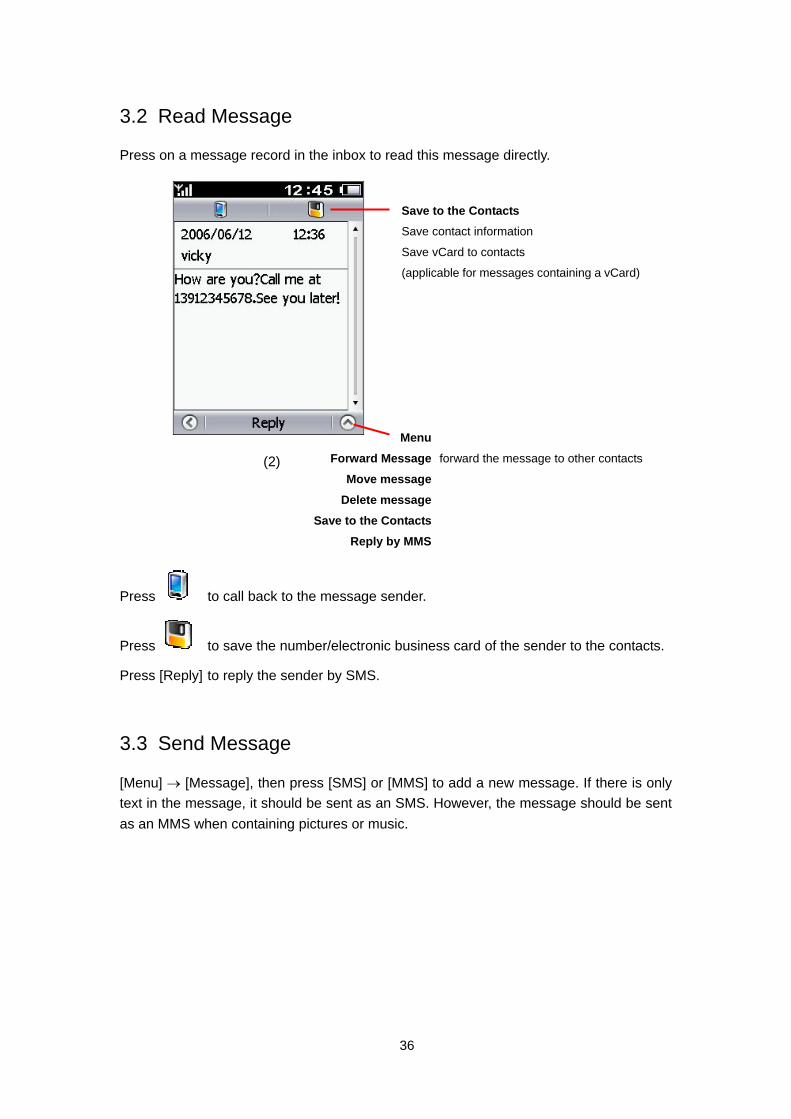
3.2 Read Message
Press on a message record in the inbox to read this message directly.
(2)
Menu
Forward Message forward the message to other contacts
Move message
Delete message
Save to the Contacts
Reply by MMS
Save to the Contacts Save contact information
Save vCard to contacts
(applicable for messages containing a vCard)
Press to call back to the message sender.
Press to save the number/electronic business card of the sender to the contacts.
Press [Reply] to reply the sender by SMS.
3.3 Send Message
[Menu] → [Message], then press [SMS] or [MMS] to add a new message. If there is only text in the message, it should be sent as an SMS. However, the message should be sent as an MMS when containing pictures or music.
36
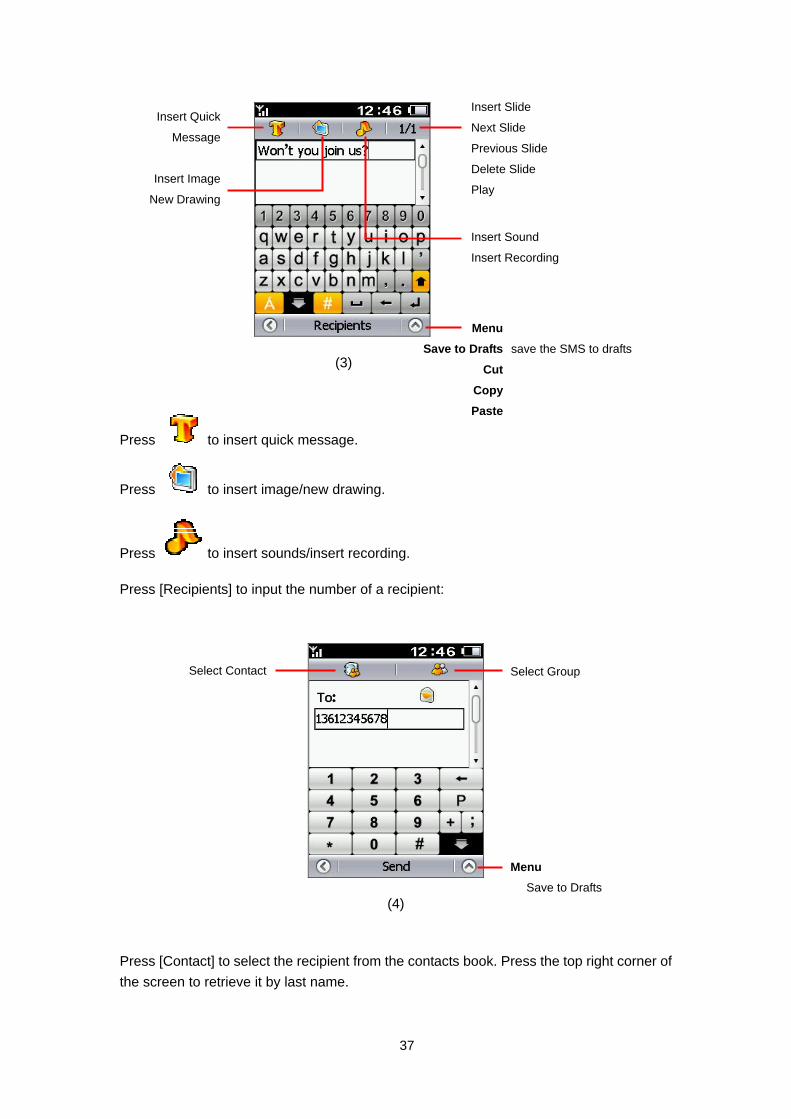
Insert Slide
Next Slide
Menu Save to Drafts save the SMS to drafts
Insert Quick
MessagePrevious Slide
Delete Slide
Play Insert Image
New Drawing
Insert Sound
Insert Recording
Cut
Copy Paste
(3)
Press to insert quick message.
Press to insert image/new drawing.
Press to insert sounds/insert recording.
Press [Recipients] to input the number of a recipient:
Select Contact Select Group
Menu Save to Drafts
(4)
Press [Contact] to select the recipient from the contacts book. Press the top right corner of the screen to retrieve it by last name.
37
3.4 Delete Message
Select Delete Message from the menu of screen (1) to selectively delete messages.
38

4 Calendar In the calendar view, you may arrange your daily schedule.
[Menu] → [Calendar]
Menu
Delete Month’s Events
(1) Delete All Events Setup week begins on/day begins at/retention period
4.1 View Calendar
(2)
Press to select: View Month/View Week.
39
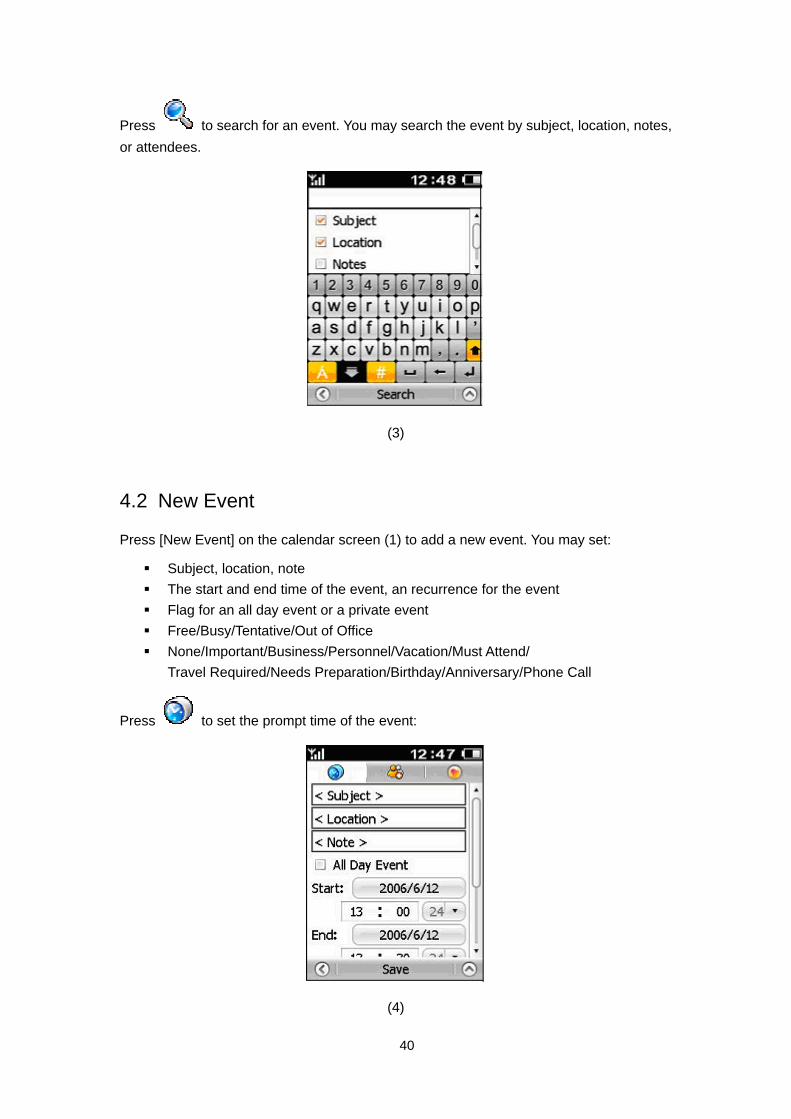
Press to search for an event. You may search the event by subject, location, notes, or attendees.
(3)
4.2 New Event
Press [New Event] on the calendar screen (1) to add a new event. You may set:
Subject, location, note The start and end time of the event, an recurrence for the event Flag for an all day event or a private event Free/Busy/Tentative/Out of Office None/Important/Business/Personnel/Vacation/Must Attend/
Travel Required/Needs Preparation/Birthday/Anniversary/Phone Call
Press to set the prompt time of the event:
(4)
40

Press to add the attendees of the event:
(5)
Press to set the reminder mode of the event:
(6)
41
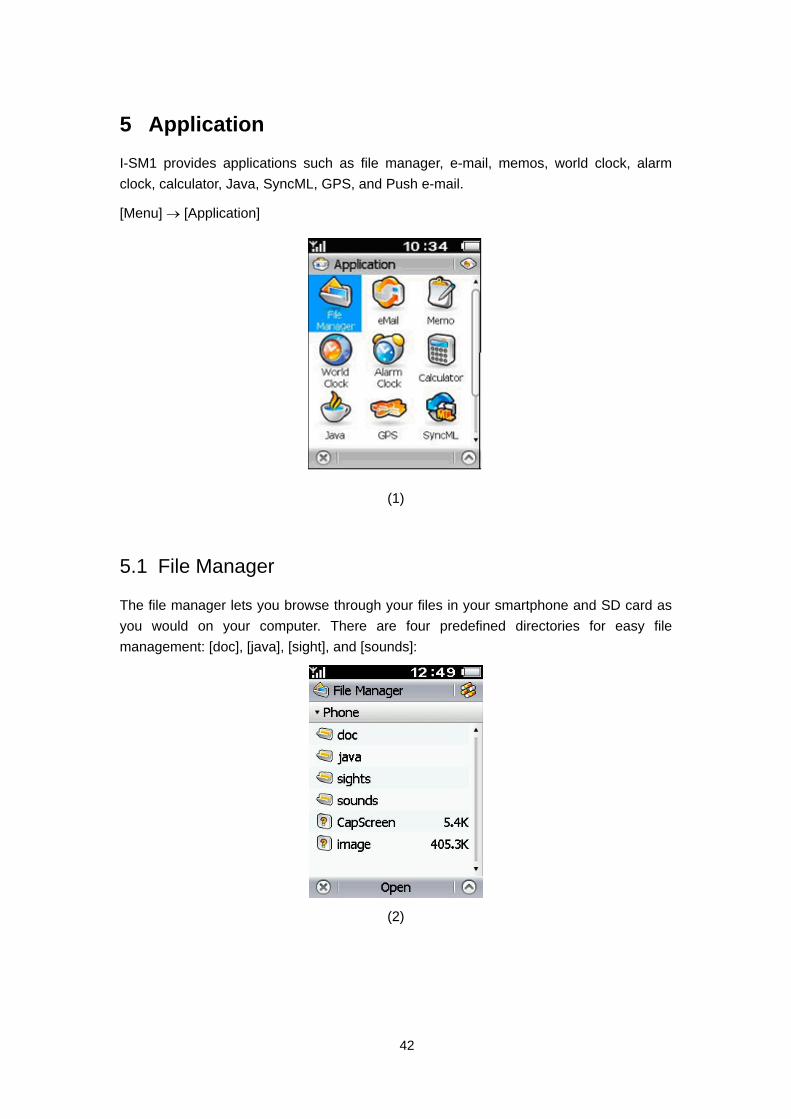
5 Application I-SM1 provides applications such as file manager, e-mail, memos, world clock, alarm clock, calculator, Java, SyncML, GPS, and Push e-mail.
[Menu] → [Application]
(1)
5.1 File Manager
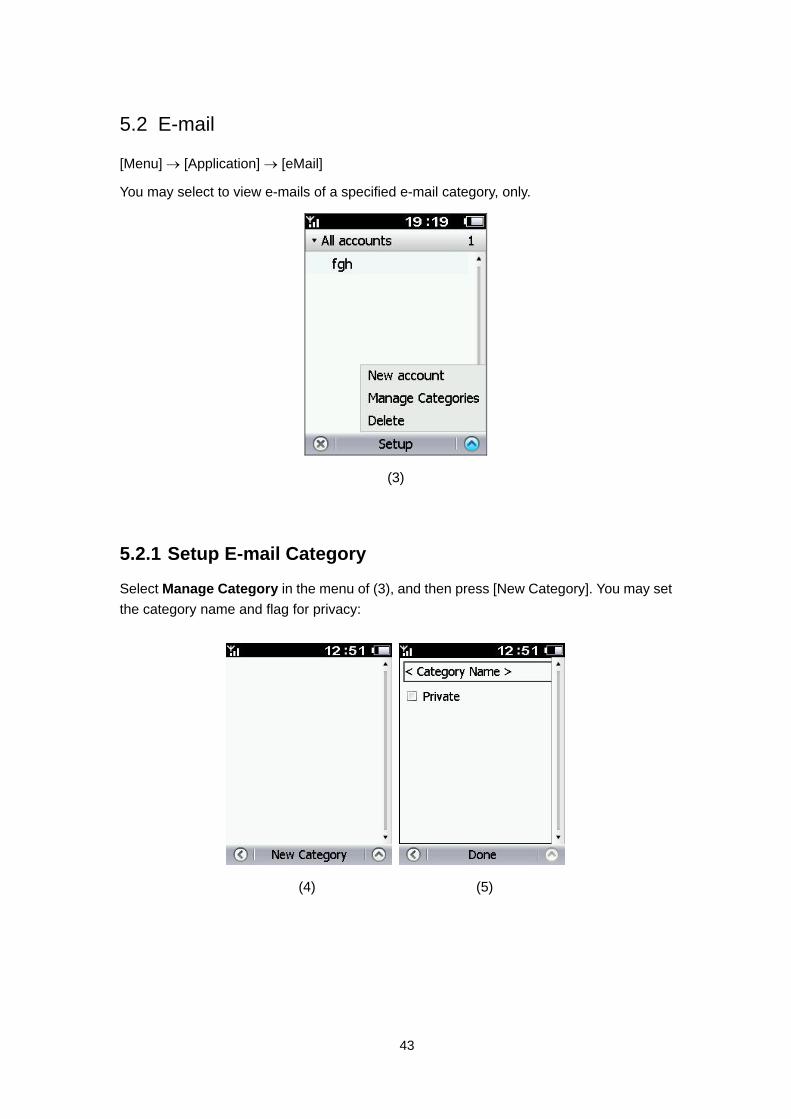
The file manager lets you browse through your files in your smartphone and SD card as you would on your computer. There are four predefined directories for easy file management: [doc], [java], [sight], and [sounds]:
(2)
42
5.2 E-mail
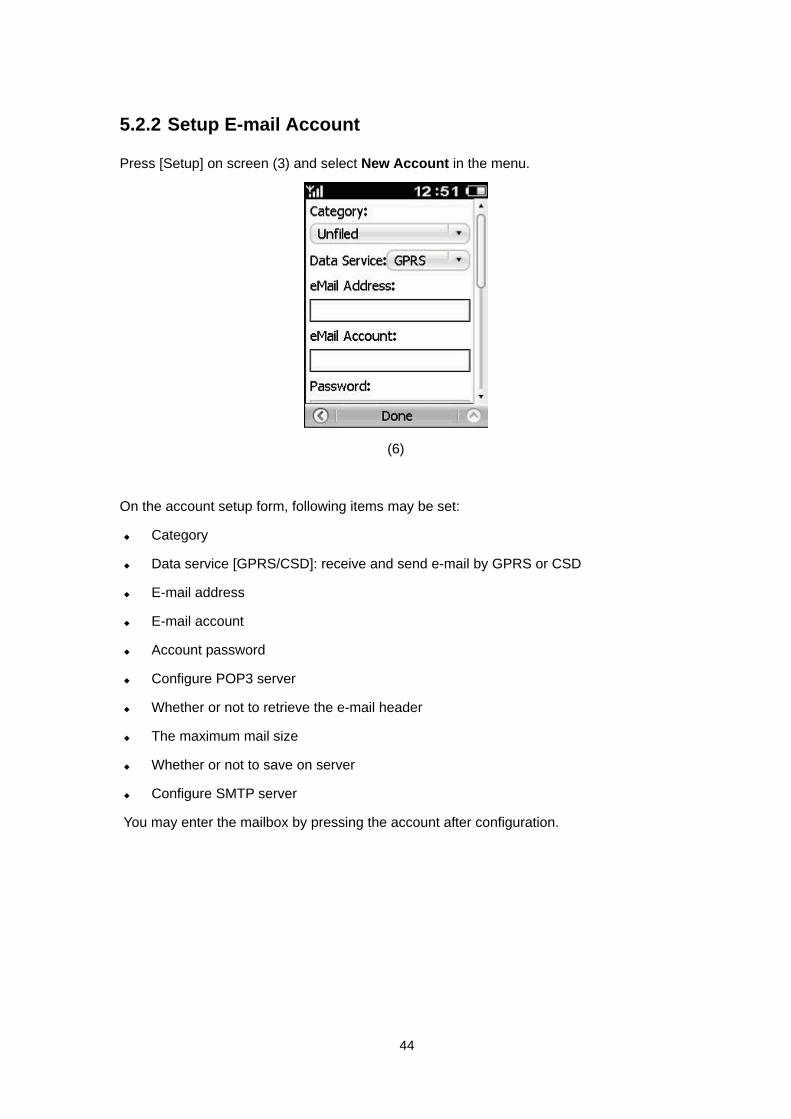
[Menu] → [Application] → [eMail]
You may select to view e-mails of a specified e-mail category, only.
(3)
5.2.1 Setup E-mail Category
Select Manage Category in the menu of (3), and then press [New Category]. You may set the category name and flag for privacy:
(4) (5)
43
5.2.2 Setup E-mail Account
Press [Setup] on screen (3) and select New Account in the menu.
(6)
On the account setup form, following items may be set:
Category
Data service [GPRS/CSD]: receive and send e-mail by GPRS or CSD
E-mail address
E-mail account
Account password
Configure POP3 server
Whether or not to retrieve the e-mail header
The maximum mail size
Whether or not to save on server
Configure SMTP server
You may enter the mailbox by pressing the account after configuration.
44
5.2.3 Mailbox Folder
(7)
E-mails to be read
E-mails already read
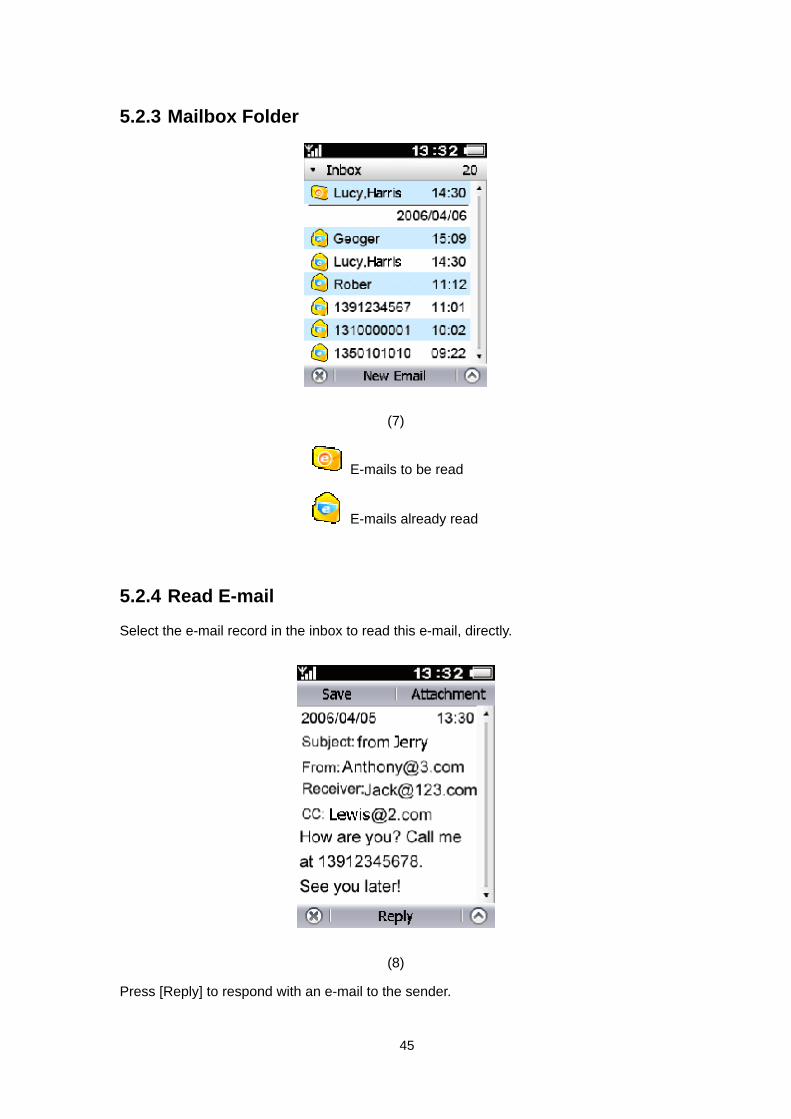
5.2.4 Read E-mail
Select the e-mail record in the inbox to read this e-mail, directly.
(8)
Press [Reply] to respond with an e-mail to the sender.
45

5.2.5 Send E-mail
Press [New Email] to enter the e-mail edit screen (9). You may input subject and message. Press [Recipient] to input the recipient’s address. Press [Contacts] to select e-mail address of contact to [Recipient] edit box, or click [To/CC/BCC] edit box to input the e-mail address:
(9)
5.2.6 Delete E-mail
Select Delete e-mails from the menu of inbox screen (7) to selectively delete e-mails:
(10)
46
5.3 Memo
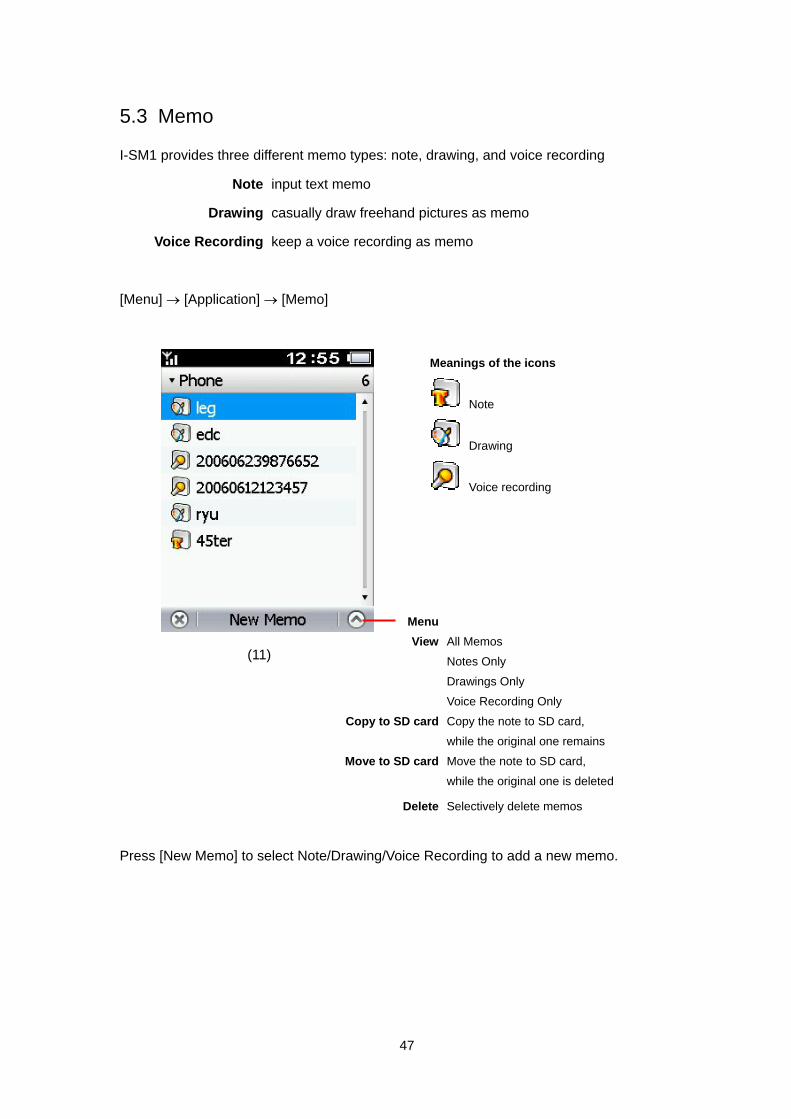
I-SM1 provides three different memo types: note, drawing, and voice recording
Note input text memo
Drawing casually draw freehand pictures as memo
Voice Recording keep a voice recording as memo
[Menu] → [Application] → [Memo]
Meanings of the icons
Note
Drawing
Voice recording
Menu
(11) View All Memos
Notes Only
Drawings Only
Voice Recording Only
Copy to SD card Copy the note to SD card,
while the original one remains
Move to SD card Move the note to SD card,
while the original one is deleted
Delete Selectively delete memos
Press [New Memo] to select Note/Drawing/Voice Recording to add a new memo.
47

5.4 World Clock
I-SM1’s built-in world clock facilitates contacting remote friends and business partners.
[Menu] → [Application] → [World Clock]
Press pull-down list to select world cities
(12)
Both the time for the local city and that for the world city will be displayed at the same time.
5.5 Alarm Clock
Three sets of alarm clock may be set, each of which may present its own repetition cycle.
[Menu] → [Application] → [Alarm Clock] → [Save]
Press the clock icon to turn on/off alarm module.
Press the alarm information to enter alarm clock setup screen (14).
(13)
48

Alarm time
Repeat cycle
Ring tone
Vibration mode
Snooze time
Settings: Enable/disable alarm clock
(14)
5.6 Calculator
[Menu] → [Application] → [Calculator]
(15)
49
5.7 Java
[Menu] → [Application] → [Java]
I-SM1 may run a Java program.
1. Installing Java The user may download Java files to the smartphone by going online or through other means. Access the Java interface through [Menu] → [Application] → [Java], open the browser from the menu options in the lower-right corner of the screen. Click on the desired file to install.
2. Executing Java
Access the Java interface through [Menu] → [Application] → [Java]. Click any Java program at the main screen to launch the program.
3. Deleting Java
Access the Java interface through [Menu] → [Application] → [Java]. Open the menu in the lower right corner of the screen, and then select Remove or Remove All to remove one or all installed Java programs.
4. Upgrading Java
Access the Java interface through [Menu] → [Application] → [Java]. Open the menu in the lower right corner of the screen, then select Update to upgrade previously installed programs.
5. Java Options
Access the Java interface through [Menu] → [Application] → [Java]. Open the menu in the lower right corner of the screen, then select Options to configure items such as local connection, internet connection and autorun.
6. Exit Java
Access the Java interface through [Menu] → [Application] → [Java]. Open the menu in the lower right corner of the screen, then select Exit to close the Java program.
Related knowledge
Java is a high-level, object-oriented programming language, providing an open and safe environment for use on the World Wide Web. Java games and applications may be downloaded from the internet or ISPs to make your smartphone a multi-purpose device.
50
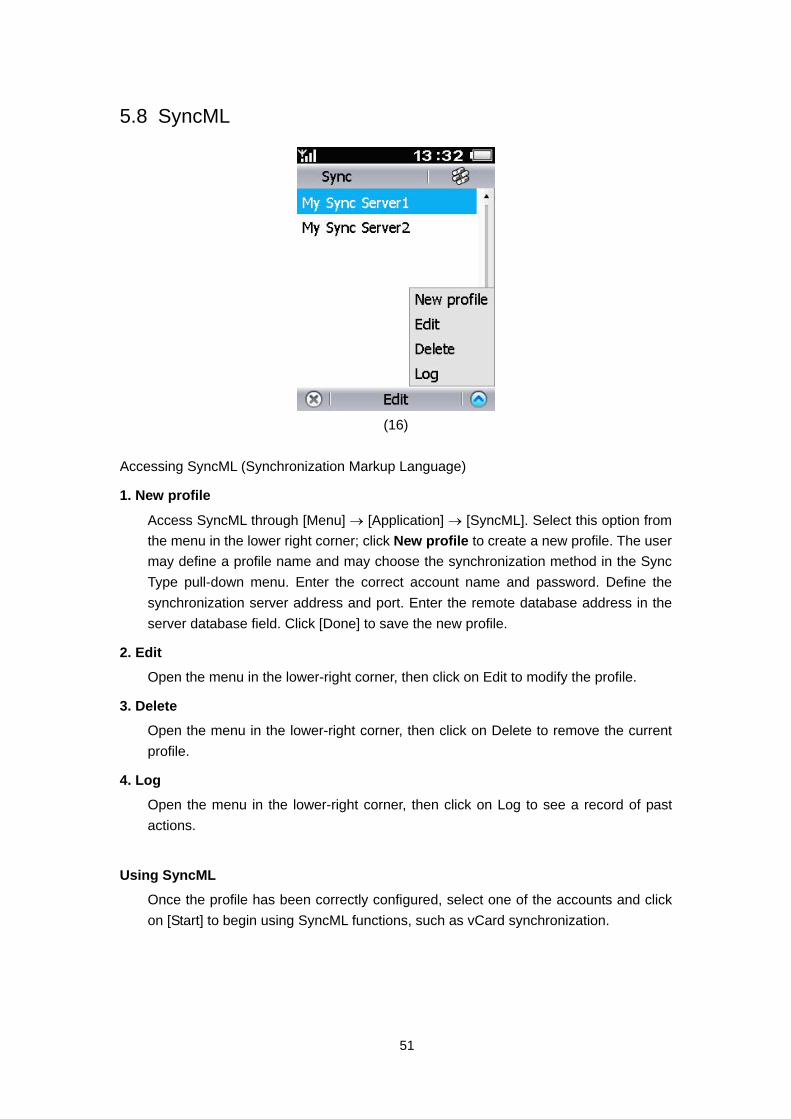
5.8 SyncML
(16)
Accessing SyncML (Synchronization Markup Language)
1. New profile
Access SyncML through [Menu] → [Application] → [SyncML]. Select this option from the menu in the lower right corner; click New profile to create a new profile. The user may define a profile name and may choose the synchronization method in the Sync Type pull-down menu. Enter the correct account name and password. Define the synchronization server address and port. Enter the remote database address in the server database field. Click [Done] to save the new profile.
2. Edit
Open the menu in the lower-right corner, then click on Edit to modify the profile.
3. Delete
Open the menu in the lower-right corner, then click on Delete to remove the current profile.
4. Log
Open the menu in the lower-right corner, then click on Log to see a record of past actions.
Using SyncML
Once the profile has been correctly configured, select one of the accounts and click on [Start] to begin using SyncML functions, such as vCard synchronization.
51
5.9 GPS
The user may access the GPS function through [Menu] → [Application] → [GPS]. (Please see the GPS User Manual for detailed instructions) Note
It is imperative to insert an SD card with map data in order to use the GPS function.
Related
knowledge
GPS GPS is the abbreviation of Global Positioning System.
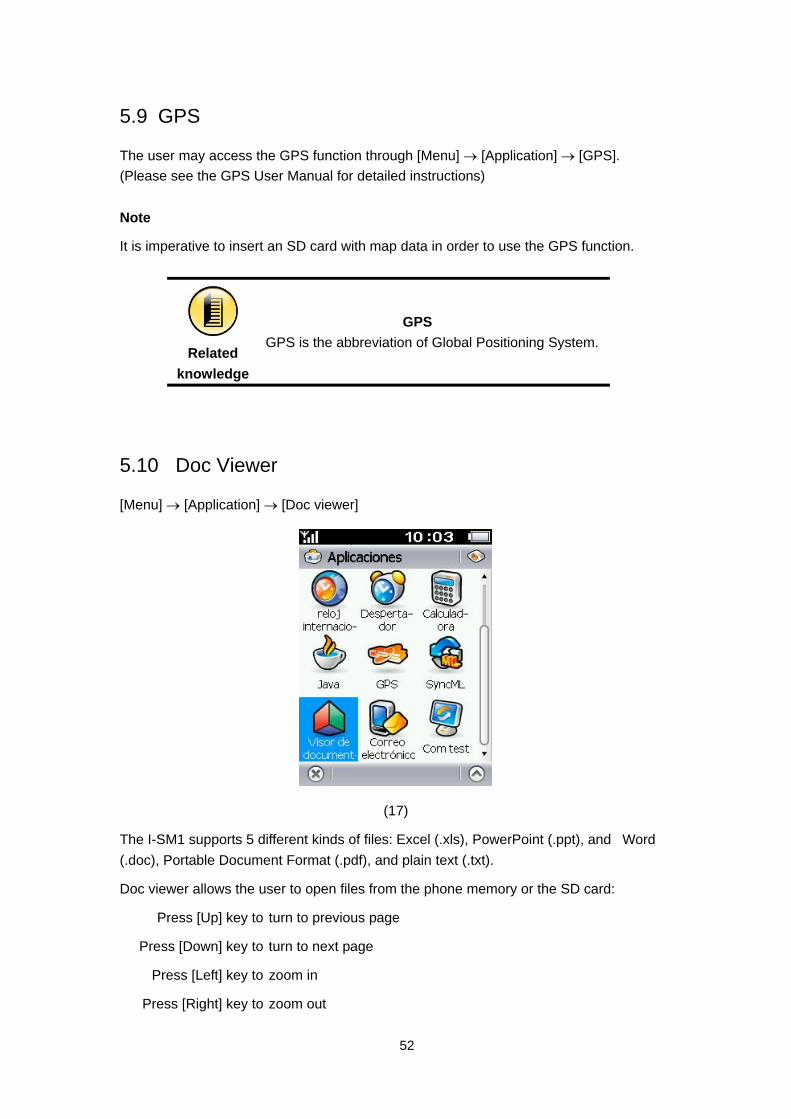
5.10 Doc Viewer
[Menu] → [Application] → [Doc viewer]
(17)
The I-SM1 supports 5 different kinds of files: Excel (.xls), PowerPoint (.ppt), and Word (.doc), Portable Document Format (.pdf), and plain text (.txt).
Doc viewer allows the user to open files from the phone memory or the SD card:
Press [Up] key to turn to previous page
Press [Down] key to turn to next page
Press [Left] key to zoom in
Press [Right] key to zoom out
52
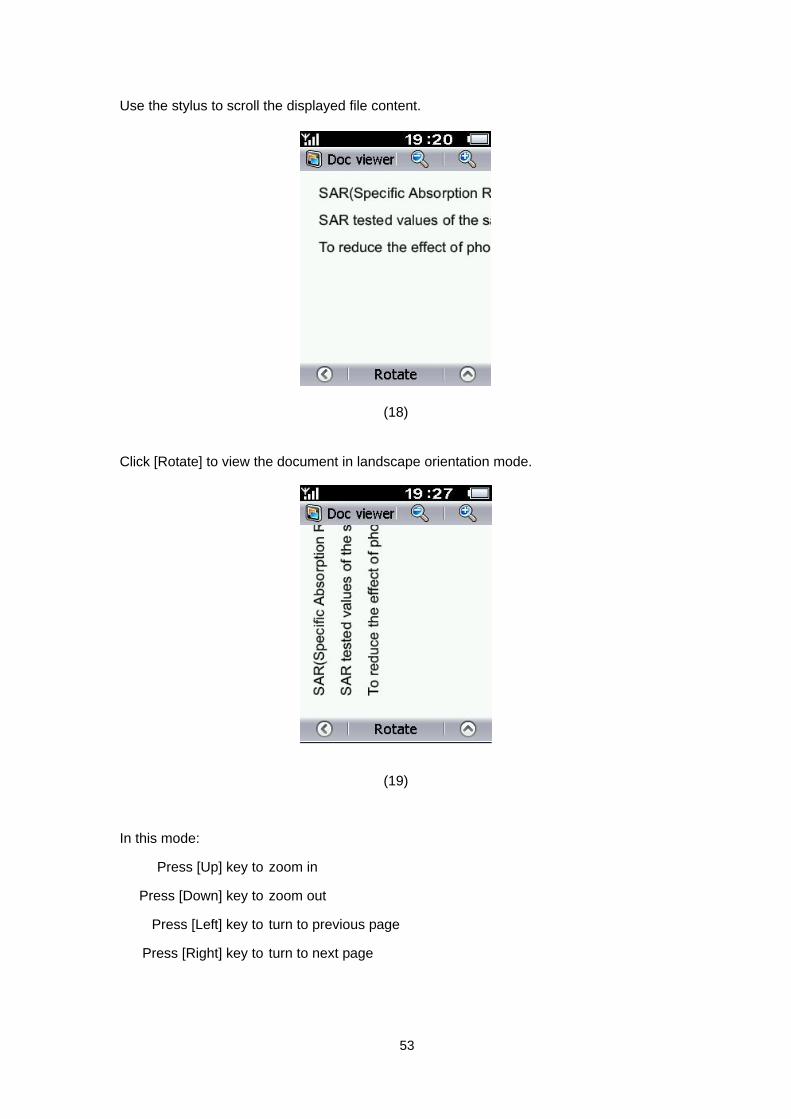
Use the stylus to scroll the displayed file content.
(18)
Click [Rotate] to view the document in landscape orientation mode.
(19)
In this mode:
Press [Up] key to zoom in
Press [Down] key to zoom out
Press [Left] key to turn to previous page
Press [Right] key to turn to next page
53
5.11 Push E-mail
[Menu] → [Application] → [Push email]
(Please see the separate leaflet for detailed instructions)
54
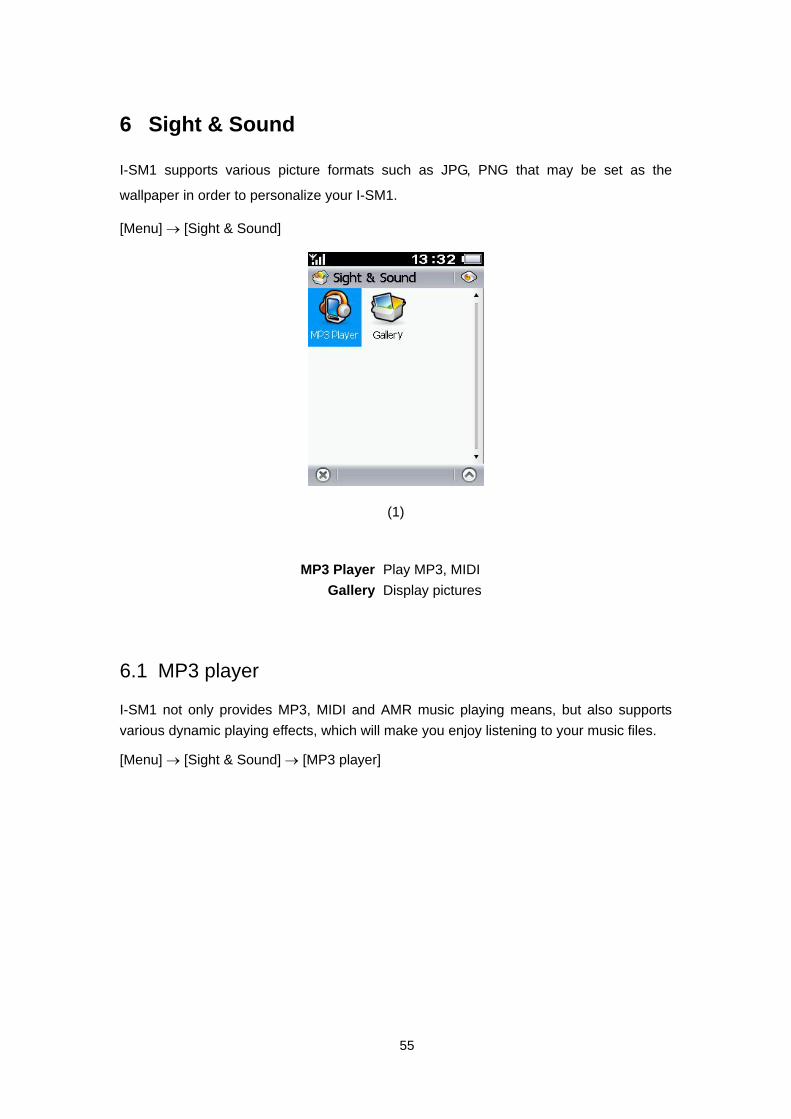
6 Sight & Sound
I-SM1 supports various picture formats such as JPG, PNG that may be set as the
wallpaper in order to personalize your I-SM1.
[Menu] → [Sight & Sound]
(1)
MP3 Player Play MP3, MIDI Gallery Display pictures
6.1 MP3 player
I-SM1 not only provides MP3, MIDI and AMR music playing means, but also supports various dynamic playing effects, which will make you enjoy listening to your music files.
[Menu] → [Sight & Sound] → [MP3 player]
55
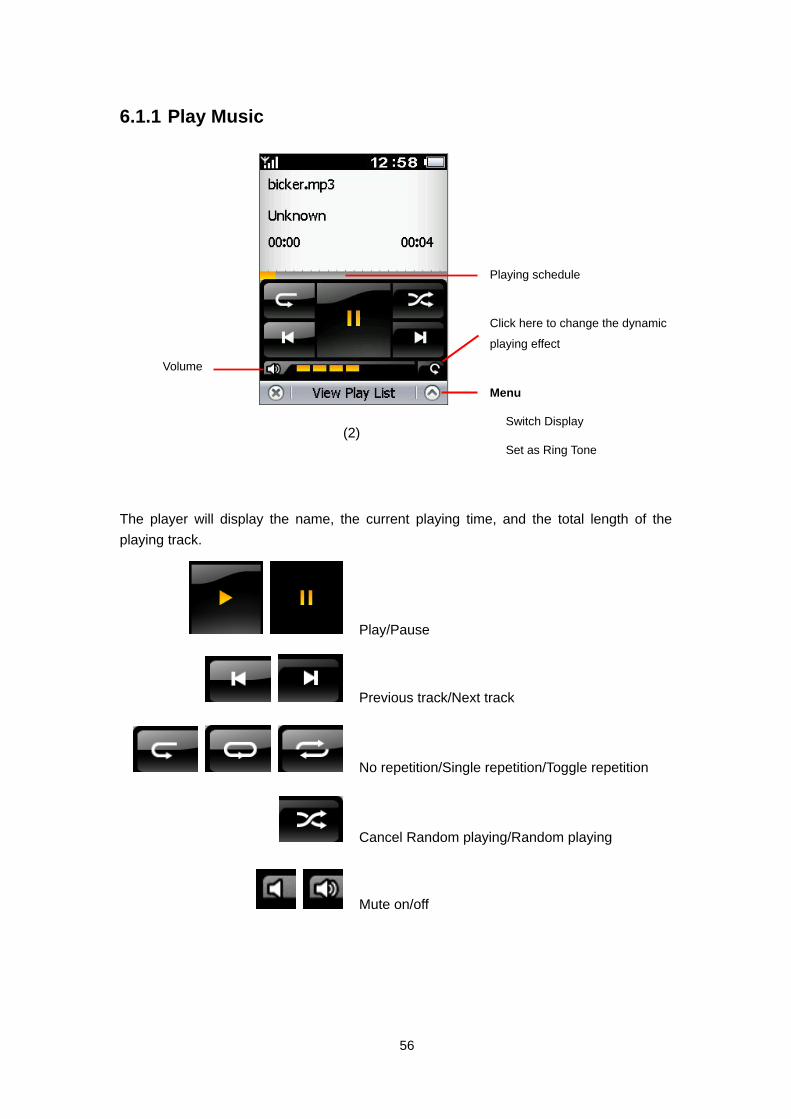
6.1.1 Play Music
Playing schedule
Click here to change the dynamic
playing effect Volume
Menu
Switch Display (2)
Set as Ring Tone
The player will display the name, the current playing time, and the total length of the playing track.
Play/Pause
Previous track/Next track
No repetition/Single repetition/Toggle repetition
Cancel Random playing/Random playing
Mute on/off
56
Use of keypad Press [Up] key to turn up the volume Press [Down] key to turn down the volume Press [Left] key to jump to the previous track Press [Right] key to jump to the next track Press [Ok] key to switch [Play] and [Pause] function
6.1.2 Play List
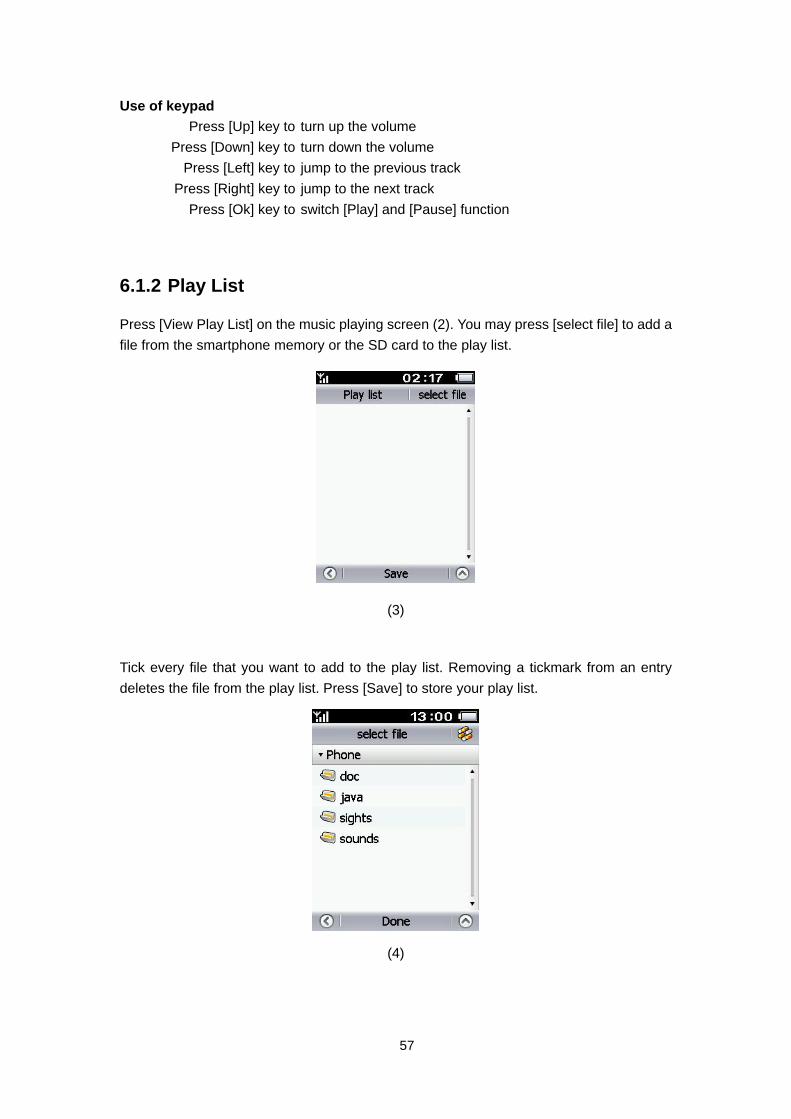
Press [View Play List] on the music playing screen (2). You may press [select file] to add a file from the smartphone memory or the SD card to the play list.
(3)
Tick every file that you want to add to the play list. Removing a tickmark from an entry deletes the file from the play list. Press [Save] to store your play list.
(4)
57
Click the pull-down box to select
the music location: Phone/SD card
Menu
Select All (5)
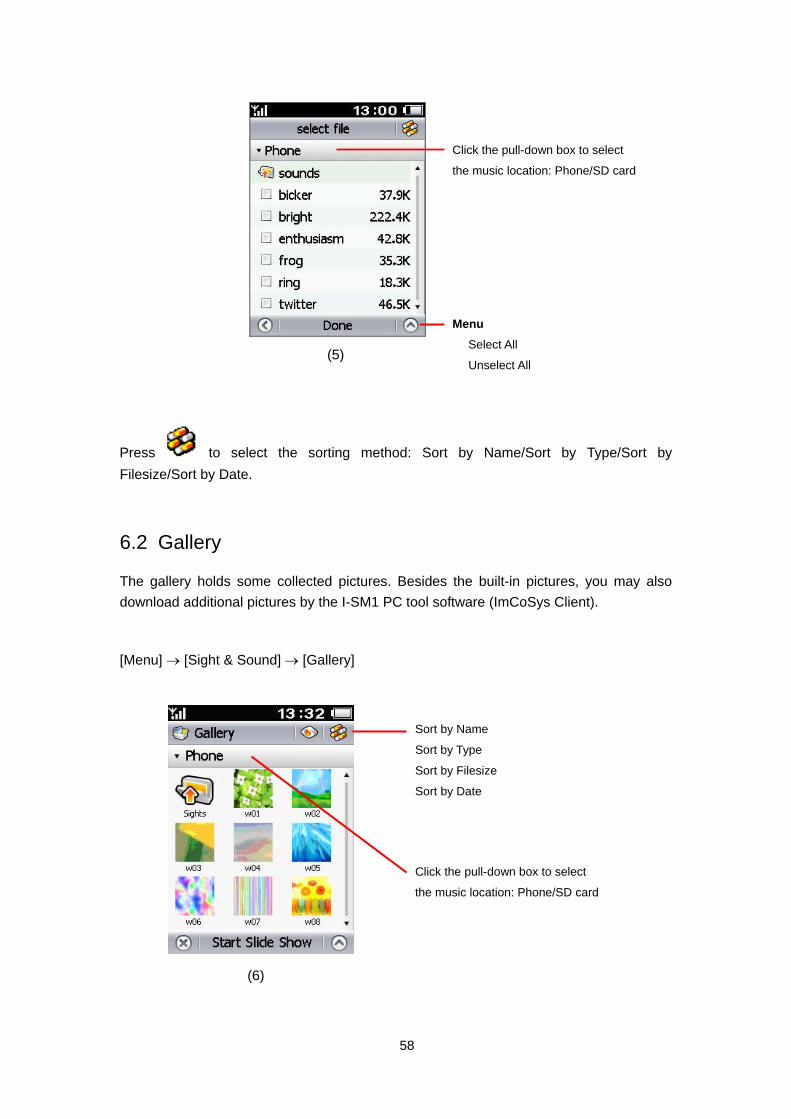
Press to select the sorting method: Sort by Name/Sort by Type/Sort by Filesize/Sort by Date.
6.2 Gallery
The gallery holds some collected pictures. Besides the built-in pictures, you may also download additional pictures by the I-SM1 PC tool software (ImCoSys Client).
Sort by Name
Sort by Type
Sort by Filesize
Sort by Date
Unselect All
Click the pull-down box to select
the music location: Phone/SD card
[Menu] → [Sight & Sound] → [Gallery]
(6)
58
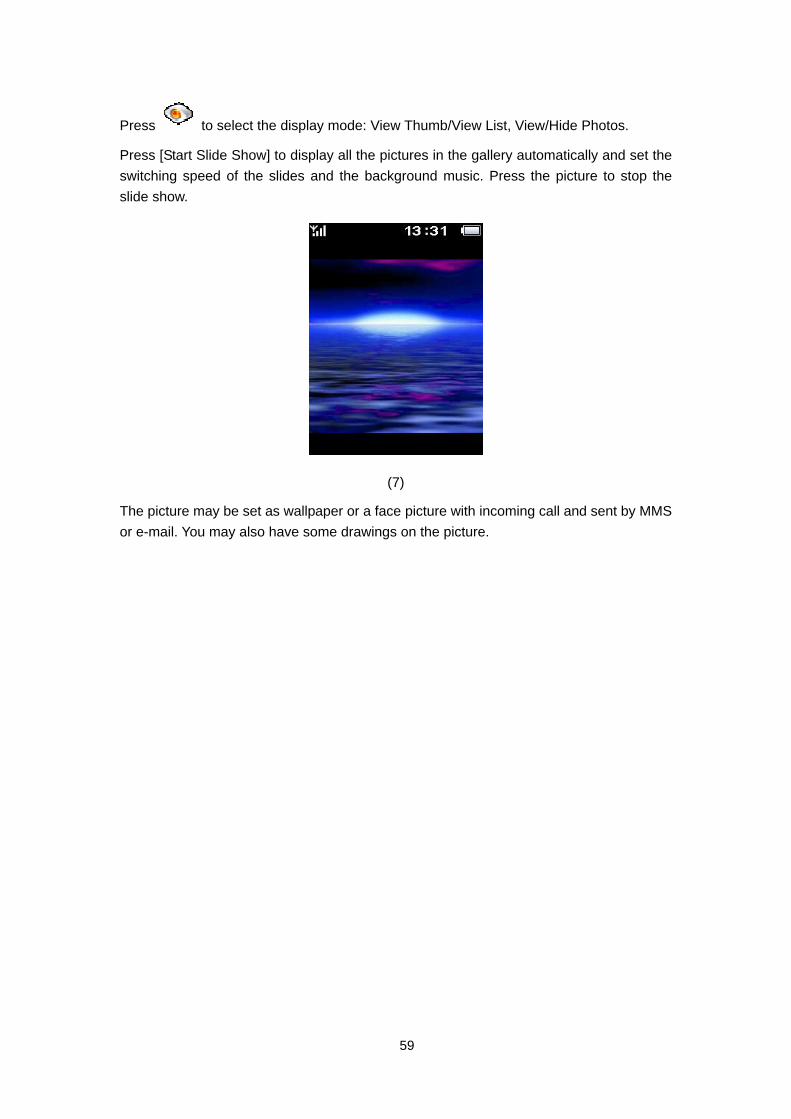
Press to select the display mode: View Thumb/View List, View/Hide Photos.
Press [Start Slide Show] to display all the pictures in the gallery automatically and set the switching speed of the slides and the background music. Press the picture to stop the slide show.
(7)
The picture may be set as wallpaper or a face picture with incoming call and sent by MMS or e-mail. You may also have some drawings on the picture.
59
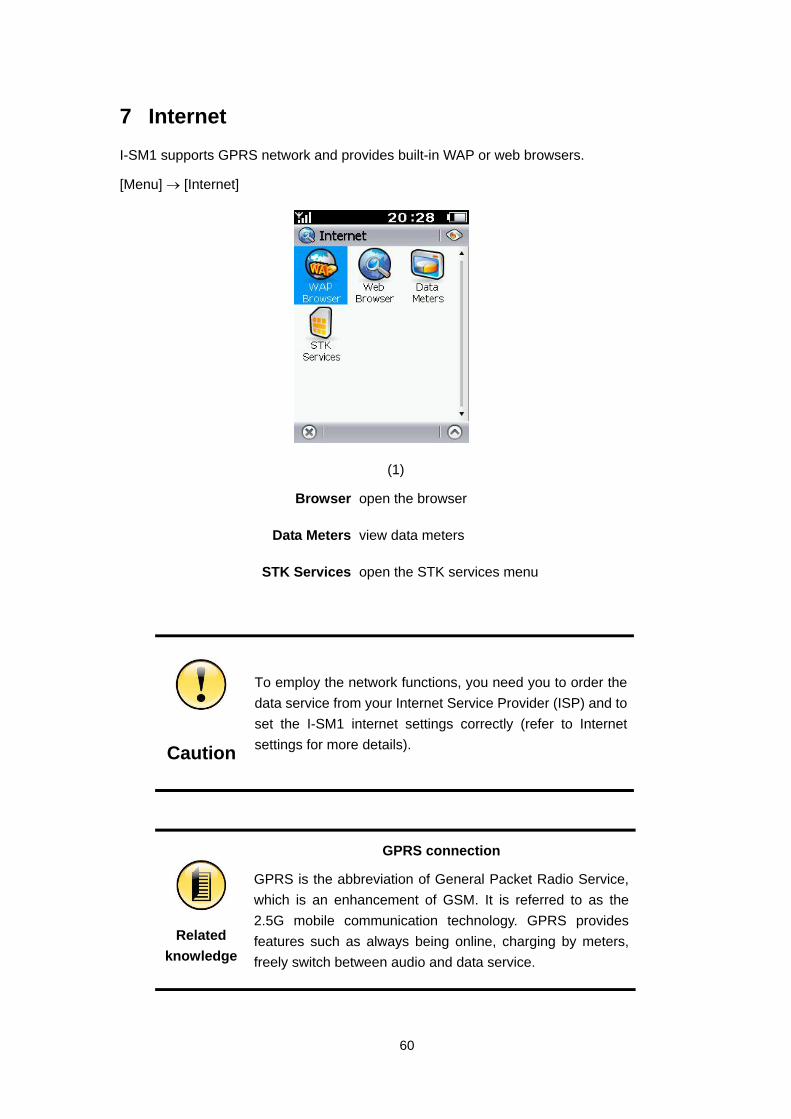
7 Internet I-SM1 supports GPRS network and provides built-in WAP or web browsers.
[Menu] → [Internet]
(1)
Browser open the browser
Data Meters view data meters
STK Services open the STK services menu
Caution
To employ the network functions, you need you to order the data service from your Internet Service Provider (ISP) and to set the I-SM1 internet settings correctly (refer to Internet settings for more details).
Related knowledge
GPRS connection
GPRS is the abbreviation of General Packet Radio Service, which is an enhancement of GSM. It is referred to as the 2.5G mobile communication technology. GPRS provides features such as always being online, charging by meters, freely switch between audio and data service.
60
7.1 Browser
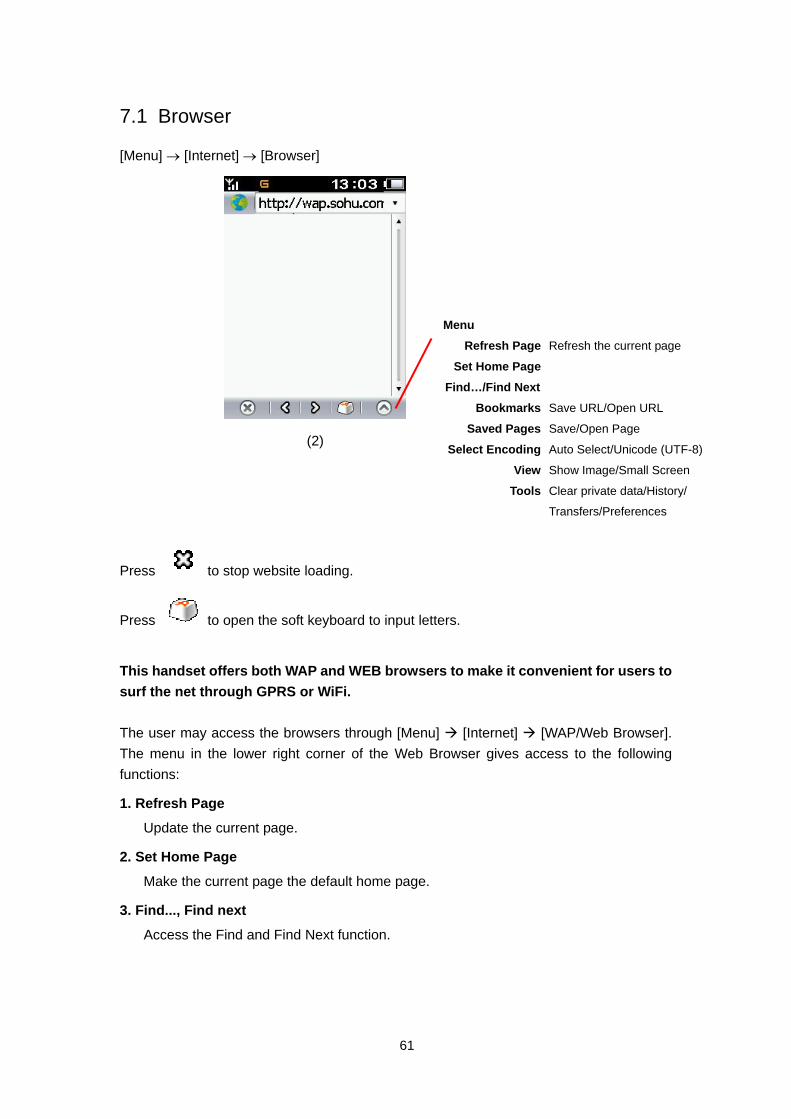
[Menu] → [Internet] → [Browser]
Menu
Refresh Page Refresh the current page
(2)
Set Home Page
Find…/Find Next
Bookmarks Save URL/Open URL
Saved Pages Save/Open Page
Select Encoding Auto Select/Unicode (UTF-8)
View Show Image/Small Screen
Tools Clear private data/History/
Transfers/Preferences
Press to stop website loading.
Press to open the soft keyboard to input letters.
This handset offers both WAP and WEB browsers to make it convenient for users to surf the net through GPRS or WiFi. The user may access the browsers through [Menu] [Internet] [WAP/Web Browser]. The menu in the lower right corner of the Web Browser gives access to the following functions:
1. Refresh Page
Update the current page.
2. Set Home Page
Make the current page the default home page.
3. Find..., Find next
Access the Find and Find Next function.
61
4. Bookmarks
Bookmark the current page or open previously saved bookmarks.
5. Saved Pages
Save a copy of the current page or open previously saved pages.
6. Select Encoding
Cycle between the encoding used for the page.
7. View (Show Image & Small screen)
At the View menu, the user may use the Show Image option to have all the graphics in the current page displayed normally. If Small Screen is used, the page being currently browsed will be resized to fit completely within the left and right side of the screen.
8. Tools
Select Tools to clear the cache, check browsing history, check file transfers and configure parameters.
Tips
Once the browser is opened, I-SM1 will start with the corresponding website, provided the homepage has been set. Enter a web site address, if no default homepage has been set.
7.2 STK Service
[Menu] → [Internet] → [STK Services]
Caution
VAS (Value Added Service) requires a SIM card with STK (SIM Application Toolkit) function. Only after inserting a SIM card with STK function, this function will be presented on the I-SM1. The actual level of VAS applications varies depending on the service operator.
62
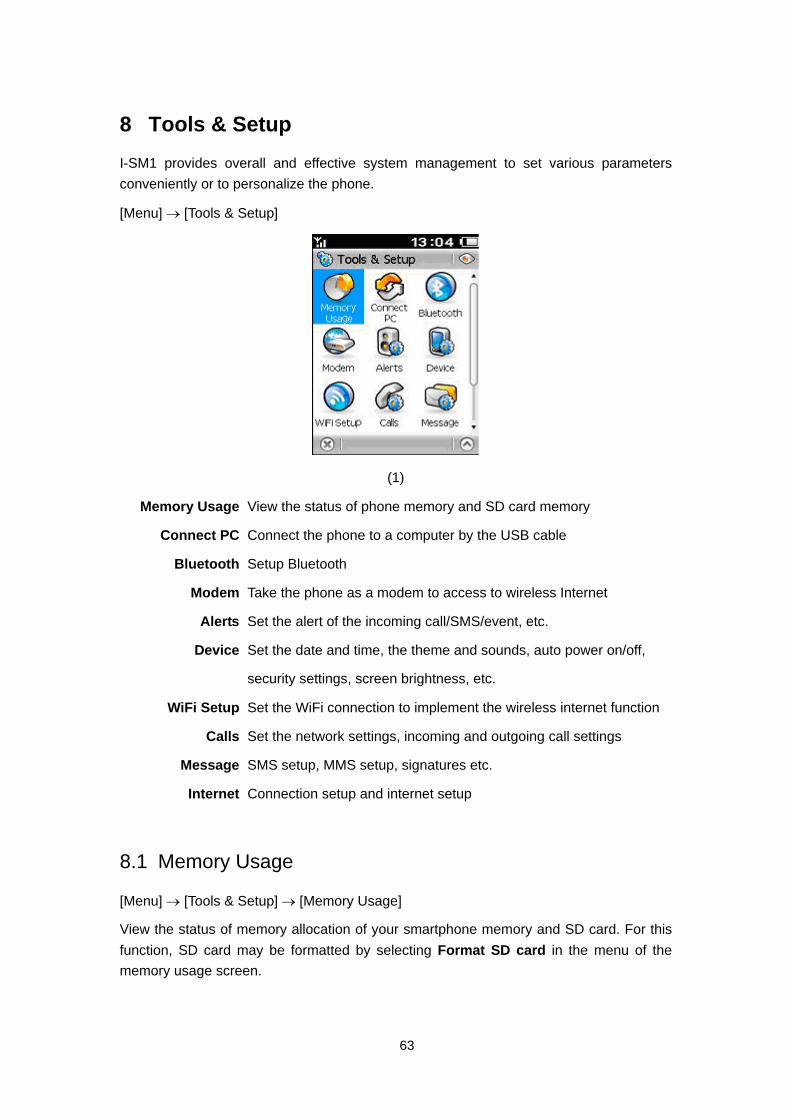
8 Tools & Setup I-SM1 provides overall and effective system management to set various parameters conveniently or to personalize the phone.
[Menu] → [Tools & Setup]
(1)
Memory Usage View the status of phone memory and SD card memory
Connect PC Connect the phone to a computer by the USB cable
Bluetooth Setup Bluetooth
Modem Take the phone as a modem to access to wireless Internet
Alerts Set the alert of the incoming call/SMS/event, etc.
Device Set the date and time, the theme and sounds, auto power on/off,
security settings, screen brightness, etc.
WiFi Setup Set the WiFi connection to implement the wireless internet function
Calls Set the network settings, incoming and outgoing call settings
Message SMS setup, MMS setup, signatures etc.
Internet Connection setup and internet setup
8.1 Memory Usage
[Menu] → [Tools & Setup] → [Memory Usage]
View the status of memory allocation of your smartphone memory and SD card. For this function, SD card may be formatted by selecting Format SD card in the menu of the memory usage screen.
63
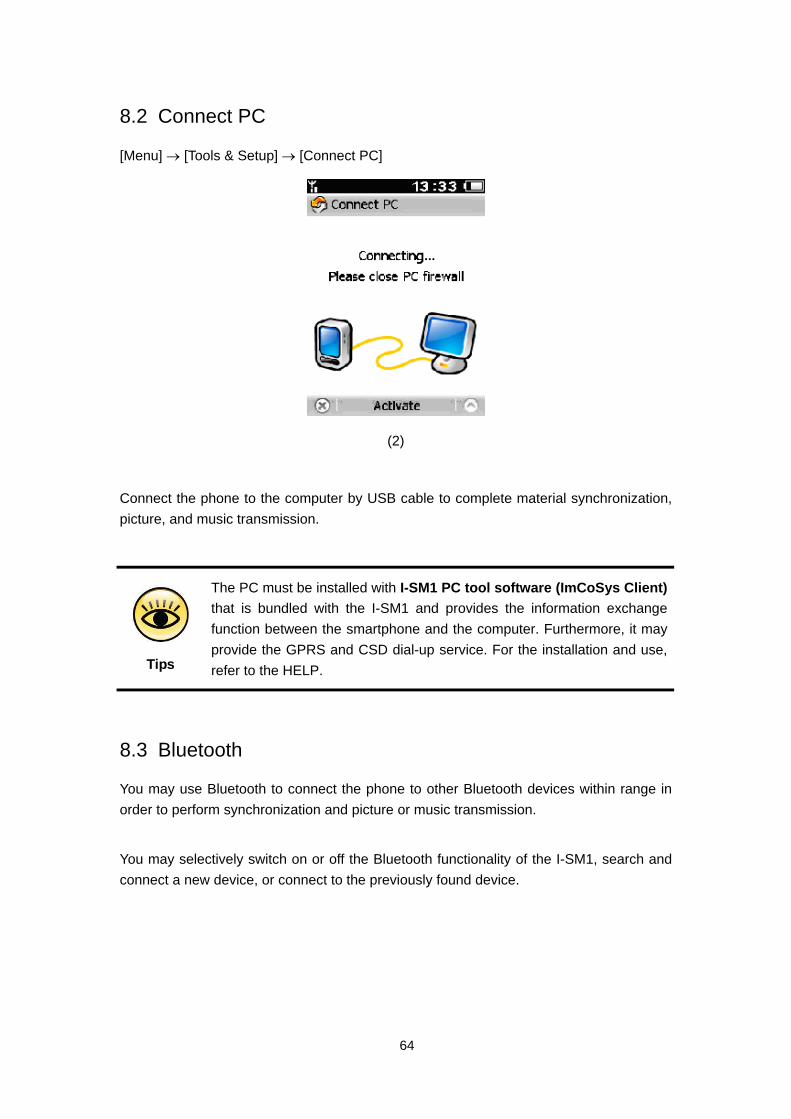
8.2 Connect PC
[Menu] → [Tools & Setup] → [Connect PC]
(2)
Connect the phone to the computer by USB cable to complete material synchronization, picture, and music transmission.
Tips
The PC must be installed with I-SM1 PC tool software (ImCoSys Client) that is bundled with the I-SM1 and provides the information exchange function between the smartphone and the computer. Furthermore, it may provide the GPRS and CSD dial-up service. For the installation and use, refer to the HELP.
8.3 Bluetooth
You may use Bluetooth to connect the phone to other Bluetooth devices within range in order to perform synchronization and picture or music transmission.
You may selectively switch on or off the Bluetooth functionality of the I-SM1, search and connect a new device, or connect to the previously found device.
64
(3)
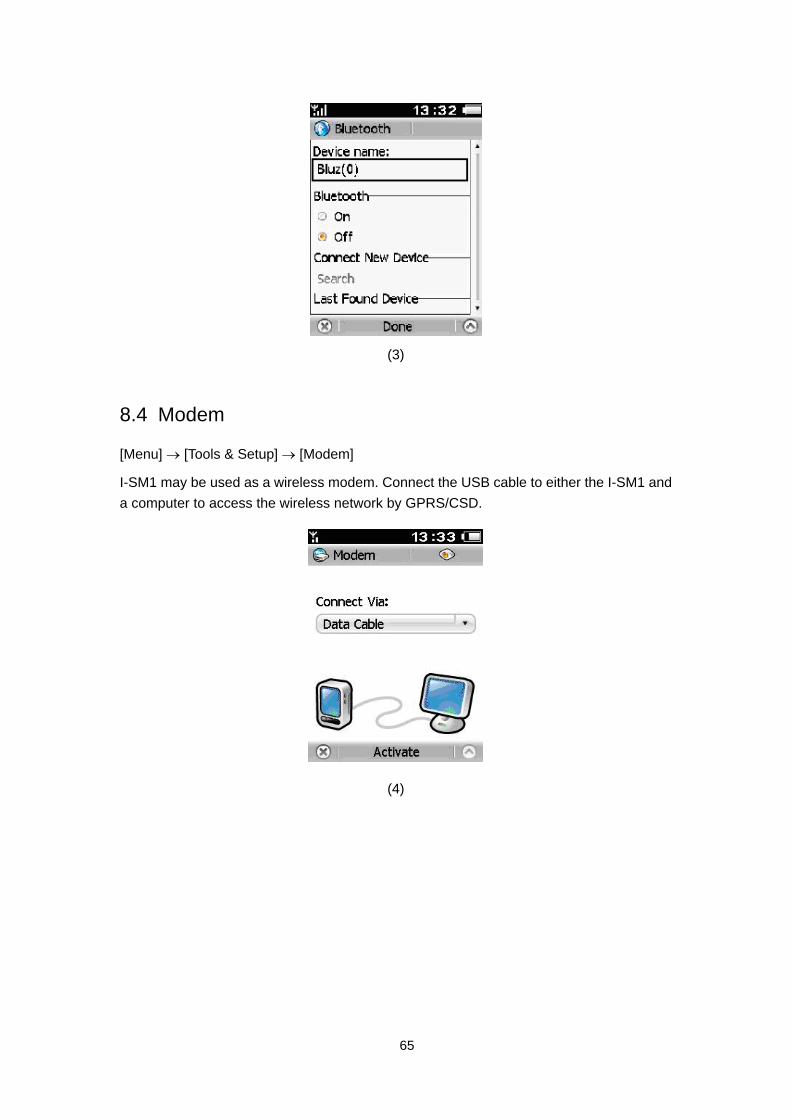
8.4 Modem
[Menu] → [Tools & Setup] → [Modem]
I-SM1 may be used as a wireless modem. Connect the USB cable to either the I-SM1 and a computer to access the wireless network by GPRS/CSD.
(4)
65

(5)
Tips
The PC must be installed with I-SM1 PC tool software (ImCoSys client) and the modem driver.
8.5 Alerts
[Menu] → [Tools & Setup] → [Alerts]
Power on/off sound Set the alert type (Ring Only/Vibrate Only/Vibrate then Ring/Vibrate and
Ring/Mute) and volume Set the ring tone and LED color of call alert, message alert and calendar alert
(6)
66
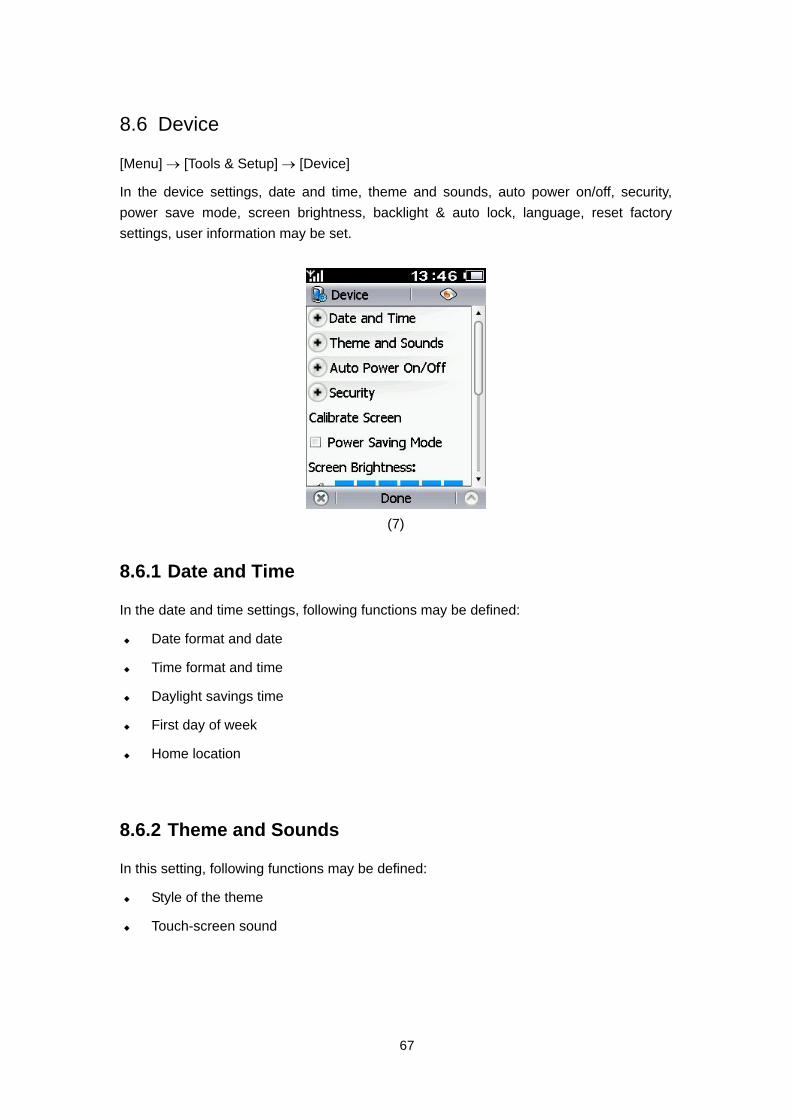
8.6 Device
[Menu] → [Tools & Setup] → [Device]
In the device settings, date and time, theme and sounds, auto power on/off, security, power save mode, screen brightness, backlight & auto lock, language, reset factory settings, user information may be set.
(7)
8.6.1 Date and Time
In the date and time settings, following functions may be defined:
Date format and date
Time format and time
Daylight savings time
First day of week
Home location
8.6.2 Theme and Sounds
In this setting, following functions may be defined:
Style of the theme
Touch-screen sound
67
8.6.3 Auto Power On/Off
In the Auto Power On/Off settings, you may set:
Power on: every day/weekday only/weekends only/once only
Specific time format and time
Flag for mute sound
Whether to prompt for an antenna
Power down: every day/weekday only/weekends only/once only
Specific time format and time
Flag for mute sound
8.6.4 Security
In the security settings section, you may do the following:
Activate privacy
Select your power-on features
Request the SIM PIN
Request the lock code
Change password (SIM PIN, SIM PIN2, Lock Code, Privacy Code). The default code for both locking/unlocking the phone and for privacy activation/deactivation is 000000)
Caution
SIM PIN code may protect your SIM card from being stolen. When the PIN code protection is activated, you will be asked to enter PIN code every time the smartphone is power on. SIM PIN2 code may protect some important settings from changing arbitrarily. If the PIN is entered incorrectly for three times successively, the SIM card will be locked and may only be unlocked by the mobile operator.
The PIN code may only be changed when having PIN protection activated. For a reasonable security level, the PIN code should at least consist of 4 digits.
68
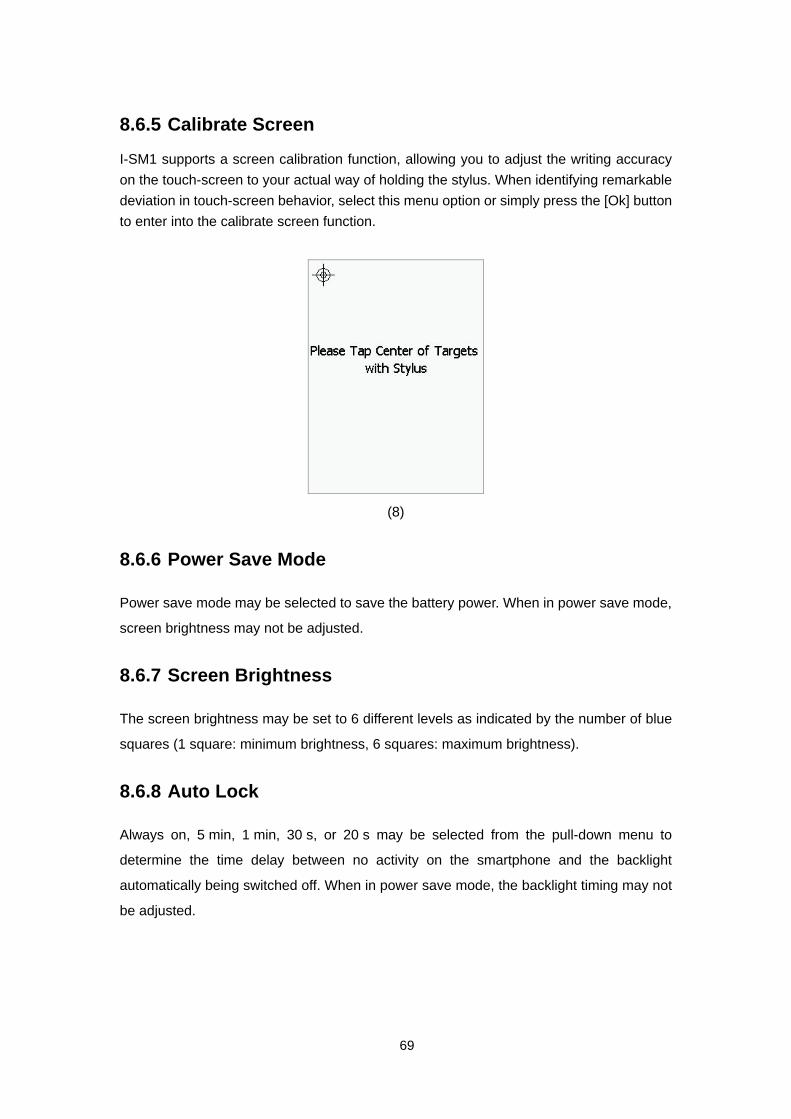
8.6.5 Calibrate Screen
I-SM1 supports a screen calibration function, allowing you to adjust the writing accuracy on the touch-screen to your actual way of holding the stylus. When identifying remarkable deviation in touch-screen behavior, select this menu option or simply press the [Ok] button to enter into the calibrate screen function.
(8)
8.6.6 Power Save Mode
Power save mode may be selected to save the battery power. When in power save mode,
screen brightness may not be adjusted.
8.6.7 Screen Brightness
The screen brightness may be set to 6 different levels as indicated by the number of blue
squares (1 square: minimum brightness, 6 squares: maximum brightness).
8.6.8 Auto Lock
Always on, 5 min, 1 min, 30 s, or 20 s may be selected from the pull-down menu to
determine the time delay between no activity on the smartphone and the backlight
automatically being switched off. When in power save mode, the backlight timing may not
be adjusted.
69
8.6.9 Language
English, Deutsch, Français, Italiano or Español may be selected from the pull-down menu
to set the type of language the smartphone displays.
8.6.10 Reset Factory Settings
Upon selecting this item, all options will be reset to original factory settings. After the
factory settings are restored, the smartphone will be powered down automatically and all
information stored on the smartphone will be cleared.
8.6.11 User Information
Your name and contact information may be stored to your smartphone or SIM card.
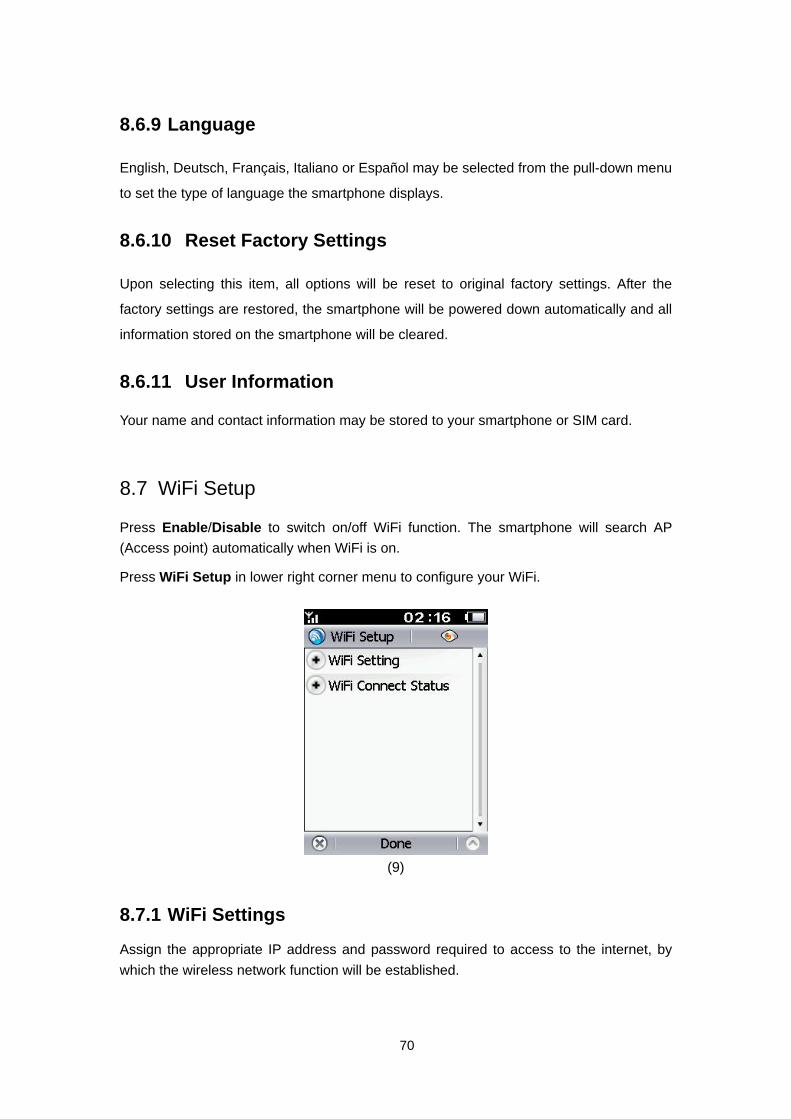
8.7 WiFi Setup
Press Enable/Disable to switch on/off WiFi function. The smartphone will search AP (Access point) automatically when WiFi is on.
Press WiFi Setup in lower right corner menu to configure your WiFi.
(9)
8.7.1 WiFi Settings
Assign the appropriate IP address and password required to access to the internet, by which the wireless network function will be established.
70
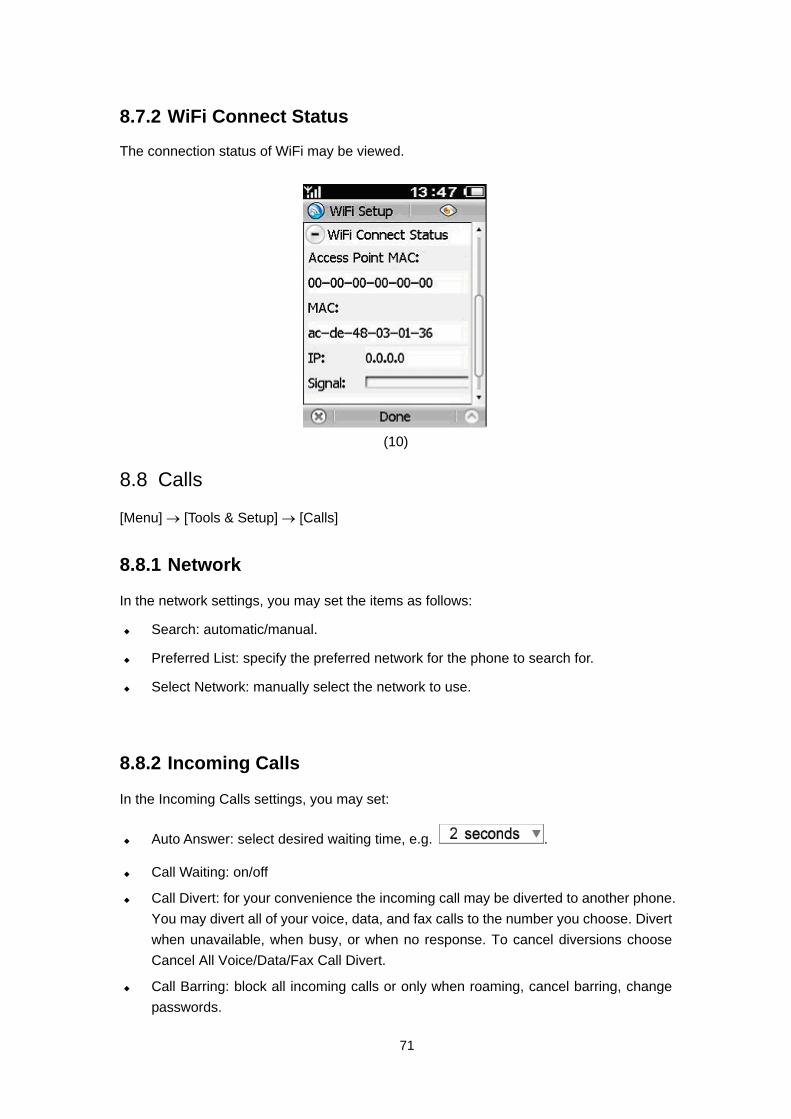
8.7.2 WiFi Connect Status
The connection status of WiFi may be viewed.
(10)
8.8 Calls
[Menu] → [Tools & Setup] → [Calls]
8.8.1 Network
In the network settings, you may set the items as follows:
Search: automatic/manual.
Preferred List: specify the preferred network for the phone to search for.
Select Network: manually select the network to use.
8.8.2 Incoming Calls
In the Incoming Calls settings, you may set:
Auto Answer: select desired waiting time, e.g. .
Call Waiting: on/off
Call Divert: for your convenience the incoming call may be diverted to another phone. You may divert all of your voice, data, and fax calls to the number you choose. Divert when unavailable, when busy, or when no response. To cancel diversions choose Cancel All Voice/Data/Fax Call Divert.
Call Barring: block all incoming calls or only when roaming, cancel barring, change passwords.
71
Caution
Auto answer settings will take effect only when the earphone is inserted.
8.8.3 Outgoing Calls
In the outgoing calls settings, you may set:
Auto Redial: switch on to auto redial after the number you dialed was busy.
Show My Number: note that some mobile operators exclude this function. So the phone may not be dialed if the user chose not to display his number.
Prepend: this is often needed to add the area code, national code, or IP Tel ahead of the number before you dial the number in the contacts book or call log. Switching on this option will give you the chance to enter the area code or national code before dialing. You will dial the number directly if you turn off the prepend option.
Voice Mail Center Nbr: enter the voice mail center number and then press [Done] to store the number.
Call Barring: block all outgoing calls, international calls, international calls except to home, cancel all barring, or change passwords.
8.9 Message
[Menu] → [Tools & Setup] → [Message]
8.9.1 SMS
In the SMS settings, you may set the items as follows:
Service Center Number (query from the mobile SP)
Save incoming message/outgoing message to: SIM card memory/phone memory
Validity Period: the validity period of the outgoing messages saved in the SMS center
Type: Text/Fax/eMail/Pager/X400
72
8.9.2 MMS
In the MMS settings, the following items may be set:
Data Service: GPRS/CSD
Incoming Messages: Retrieve At Once/Retrieve Later/Do Not Retrieve
Accept Anonymous
Accept Adverts
Outgoing messages: Validity Period: the validity period of the outgoing message saved in the MMS center
8.9.3 Cell Broadcast
Cell broadcast is a kind of broadcasting short message service. You may automatically receive the broadcasting short message when in a network with broadcasting service, if you turn it on and set a correct receiving channel.
8.9.4 Quick Message
You may edit some common phrase (text module) for your convenience of input. Choose [Quick Message] on the [Message] screen, then press [New Message] to enter the edit screen.
8.9.5 Signature
Your own signature may be stored and appended to the outgoing message. Choose [Signature] on the [Message] screen, and then press the signature box to input the signature.
8.10 Internet
[Menu] → [Tools & Setup] → [Internet]
In the Internet settings, you may do the following:
Connection setup – connection setup is the base of all the network service, including WAP network access, MMS and associated functions, which all depend on the correct connection setup. I-SM1 may provide the automatic configuration function and select the appropriate configuration from the configuration file belonging to the SIM card. Please contact your operator for the detailed profile and settings. I-SM1 may provide the automatic configuration function and select the appropriate configuration from this list.
73
WAP browser setup
Data service: GPRS/CSD
Auto Offline and time to auto offline
Display Images
Connection Type: continuous or on demand
Home Page: enter the URL of your preferred default web page
8.11 SOS
This device provides an SOS function for use in case of an emergency.
SOS Configuration
The user may access the SOS number configuration interface through [Menu] [Tools & Setup] [SOS]. The user may define up to 5 preset numbers, and has the possibility to insert a certain sound or an individual text into the SOS message. Click [Done] when finished with the configuration process.
SOS Usage
If the user holds down the SOS key on the right side of the handset for 5 seconds, the SOS function will send the GPS coordinates of its current location as an SMS to the pre-defined numbers.
Note
The actual GPS position may only be transmitted if there is a valid GPS signal.
8.12 User Defined Key
[Menu] → [Tools & Setup] → [Key definition]
Select any of the applications listed within the pull-down menu. Click [Done] when finished.
Using the user defined key: On the idle screen press the [User defined] key to directly access the application defined by the user.
74
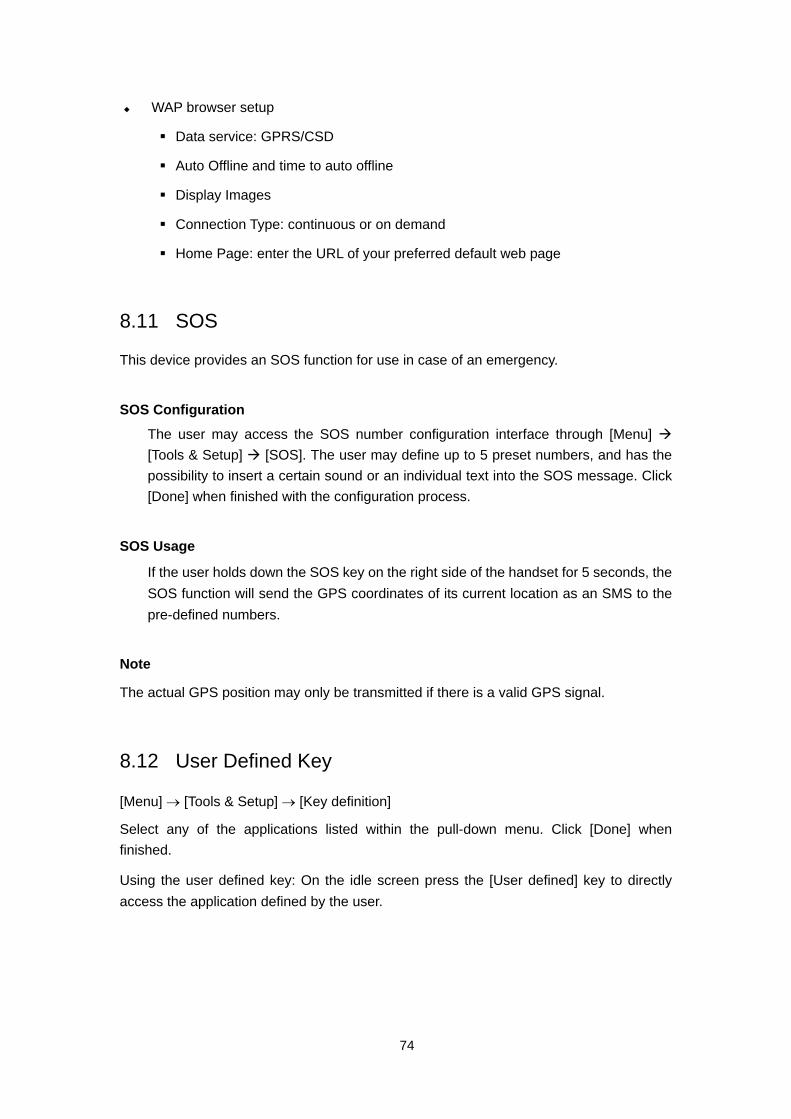
9 Input Operation I-SM1 is equipped with a large-size touch-screen and intelligent handwriting recognition. You may use the stimulant soft keyboard on the screen to input letters, special characters, symbols, or numbers. The input area will automatically pop up whenever required.
Spelling input mode
Letter input mode
Symbol input mode
Hide the keyboard
Space bar
Backspace
Enter
75
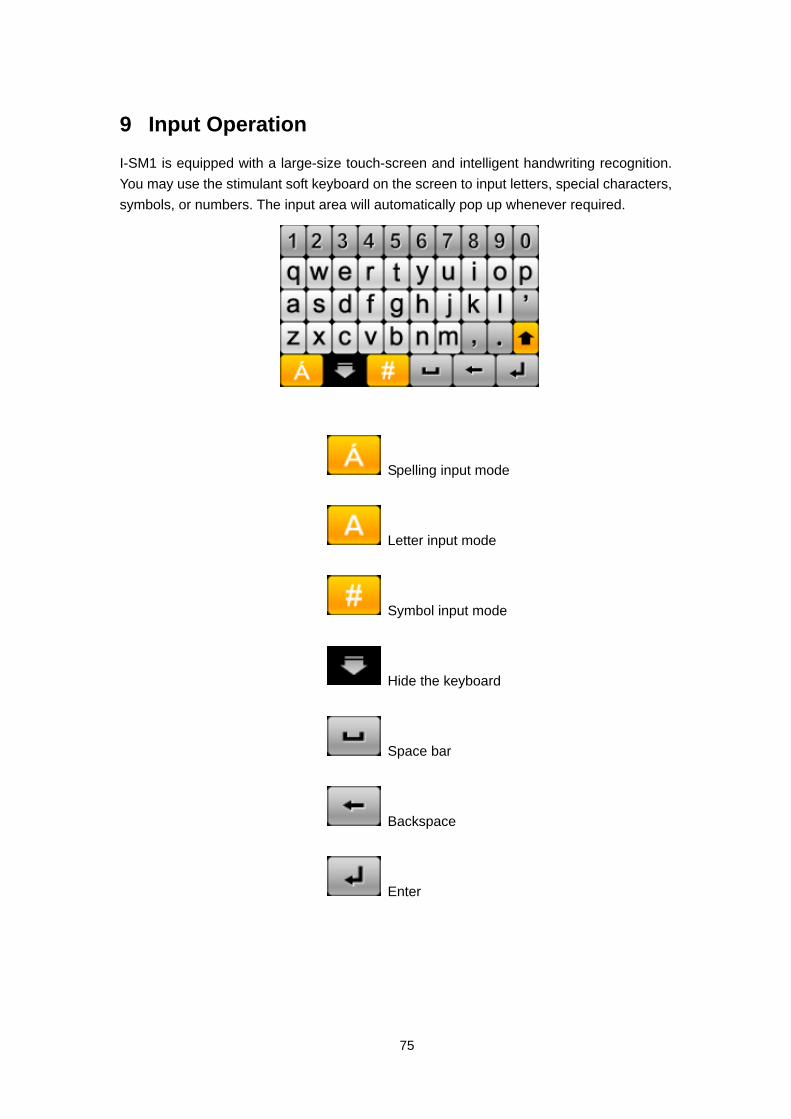
Letter Input Mode
The symbol highlighted by the red circle denotes the status of switching between UPPERCASE and lowercase.
Lowercase
UPPERCASE lock will only be effective to the next input letter
UPPERCASE lock, i.e. all following letters will be UPPERCASE
Spelling Input Mode
76
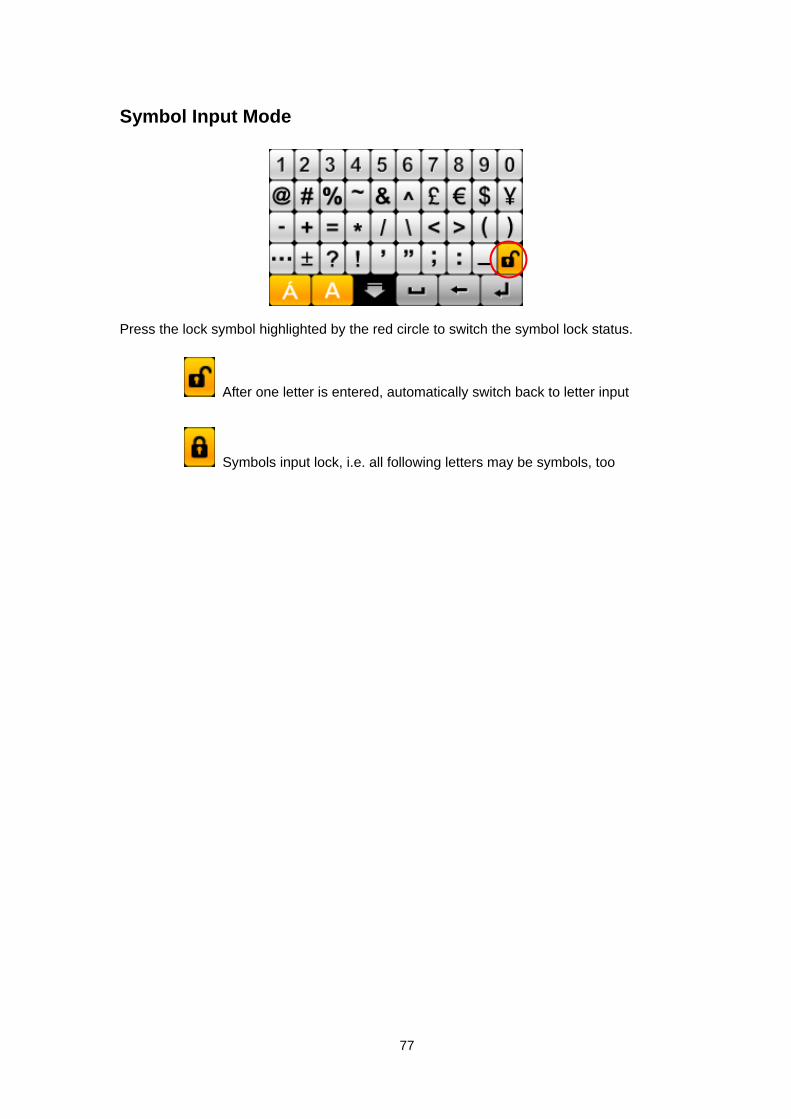
Symbol Input Mode
Press the lock symbol highlighted by the red circle to switch the symbol lock status.
After one letter is entered, automatically switch back to letter input
Symbols input lock, i.e. all following letters may be symbols, too
77
10 FAQ
10.1 How to power on/off
Press the screen lock key to power on the phone. If the phone is locked, you need to press the screen lock key to unlock, first. Then long press the screen lock key to power down the smartphone.
10.2 How to adjust volume while talking
You may press side up/down key to increase or decrease the volume when talking.
10.3 How to set the Bluetooth password
When you use I-SM1 to connect with other Bluetooth device, you should input the same password as the other device.
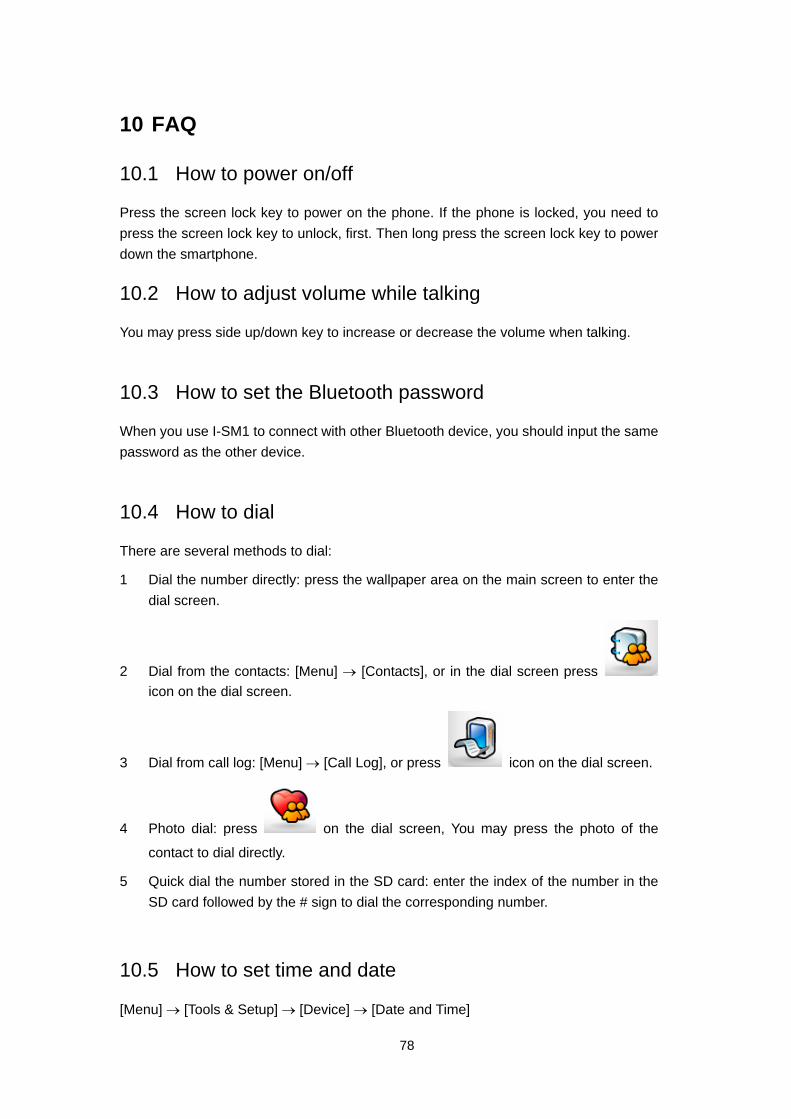
10.4 How to dial
There are several methods to dial:
1 Dial the number directly: press the wallpaper area on the main screen to enter the dial screen.
2 Dial from the contacts: [Menu] → [Contacts], or in the dial screen press icon on the dial screen.
3 Dial from call log: [Menu] → [Call Log], or press icon on the dial screen.
4 Photo dial: press on the dial screen, You may press the photo of the
contact to dial directly.
5 Quick dial the number stored in the SD card: enter the index of the number in the SD card followed by the # sign to dial the corresponding number.
10.5 How to set time and date
[Menu] → [Tools & Setup] → [Device] → [Date and Time]
78
10.6 How to set alarm
[Menu] → [Application] → [Alarm Clock] → [Save]
10.7 How to switch to flight mode
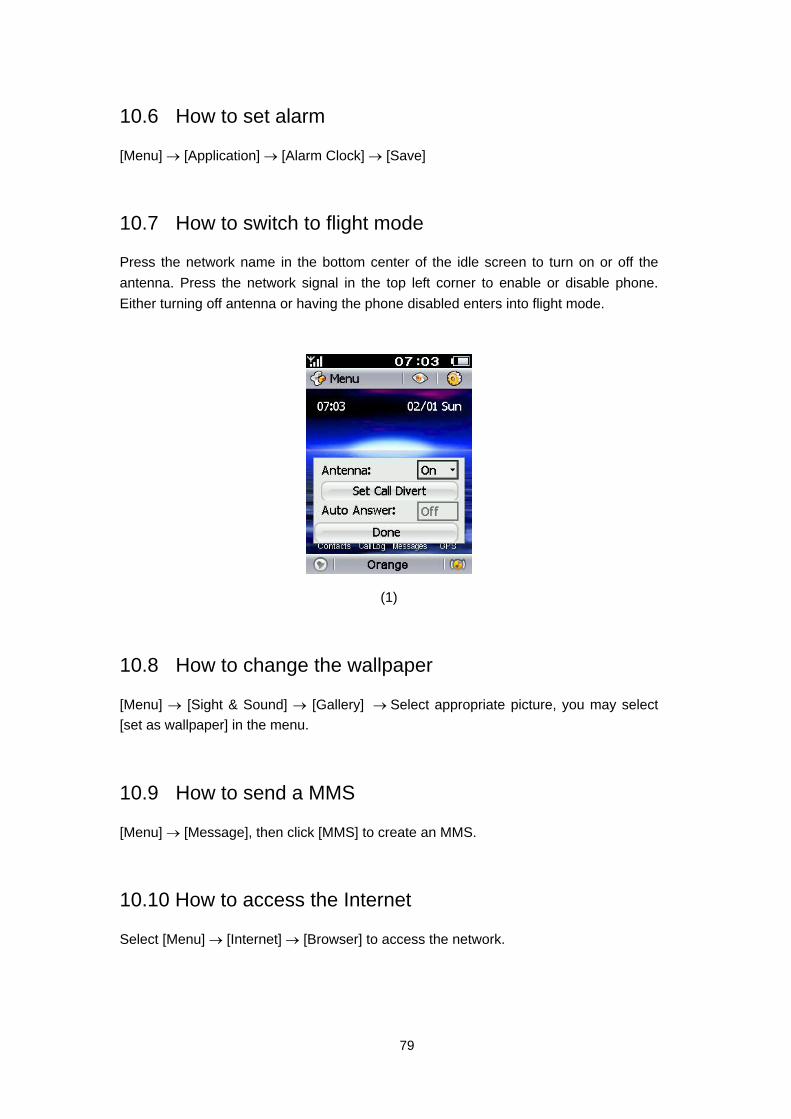
Press the network name in the bottom center of the idle screen to turn on or off the antenna. Press the network signal in the top left corner to enable or disable phone. Either turning off antenna or having the phone disabled enters into flight mode.
(1)
10.8 How to change the wallpaper
[Menu] → [Sight & Sound] → [Gallery] → Select appropriate picture, you may select [set as wallpaper] in the menu.
10.9 How to send a MMS
[Menu] → [Message], then click [MMS] to create an MMS.
10.10 How to access the Internet
Select [Menu] → [Internet] → [Browser] to access the network.
79
10.11 How to download and play MP3
I-SM1 supports music files in MP3, MIDI and AMR format, which may be stored in the phone or SD card. Following measures may be taken to download the music file to the smartphone.
I-SM1 PC tool software (ImCoSys Client) is used to download from PC.
1. Connect I-SM1 with PC via USB data cable.
2. Select [Menu] → [Tools & Setup] → [Connect PC] to wait I-SM1 PC to set up the connection.
3. Activate the I-SM1 PC tool software (ImCoSys Client) from the PC and connect it with I-SM1. Press [Music] button to copy the music files to phone or SD card.
Card writer is used to write the file to SD card directly.
In case you have an SD card writer, there is no need to install further software. The card writer may be used to copy the music files into the [sounds] directory of the SD card from PC directly.
10.12 How to change the ring tones
[Menu] → [Tools & Setup] → [Alerts], press the scene mode in use to switch off or change the ring tone.
10.13 How to use ImCoSys PC Client I-SM1 provides a PC tool, supporting ring tone upload/download, picture upload/download, Java installation, data backup/restore function, contacts/calendar synchronization function and so on. For detailed introduction and help, please refer to the enclosed CD.
10.14 How to find [WiFi setup]
[Menu] → [Tools & Setup] → [WiFi setup]
10.15 How to enable WiFi network Click the [Enable] soft button to enable WiFi in the upper-right corner in the WiFi setup screen. The smartphone will then search the access point automatically.
Note
The WiFi connection may fail due to weak WiFi signal strength.
80
10.16 How do I know I already connected to a WiFi network
Please check the icon on idle screen. If changing to , you are already
connected to a WiFi network.
10.17 Why no access to WAP browser even though WiFi
settings are correct The phone supports 2 different kinds of browsers: WAP & Web. The end user may access the WAP browser only by GPRS & CSD. The Web browser requires WiFi.
10.18 How to download pictures
The I-SM1 PC tool software (ImCoSys Client) may be used to download the supported files and pictures to the phone.
1. Connect the I-SM1 with the computer via USB data cable.
Select [Menu] → [Tools & Setup] → [Connect PC] from I-SM1 to wait for I-SM1 to set up connection with PC.
2. Activate the I-SM1 PC tool software (ImCoSys Client) from PC to connect with the I-SM1. Press [Gallery] to copy the pictures to the phone or SD card.
Card writer is used to write the file to SD directly.
In case you have an SD card writer, there is no need to install further software. The card writer may be used to copy the music files into the [sights] directory of the SD card from PC directly.
Note Copying not supported or corrupted files to the [sights] directory will cause the gallery software not being available.
10.19 How to use the hands free function
Click the right-down menu during a call, and select [Enable handfree] to enable speakerphone function. Click the menu item [Disable handfree] again to return to normal calling.
81
10.20 How to use IP call
On dialer pad, long press on key [IP] for 3 s, Input the IP prefix number for IP Call. (For the actual prefix number please consult your local operator). After finish the setting, before you make a phone call, long press [IP], the prefix number will appear on your dialer pad automatically, then append the phone number.
10.21 How to use the RS232-USB cable
Please see the separate leaflet.
82
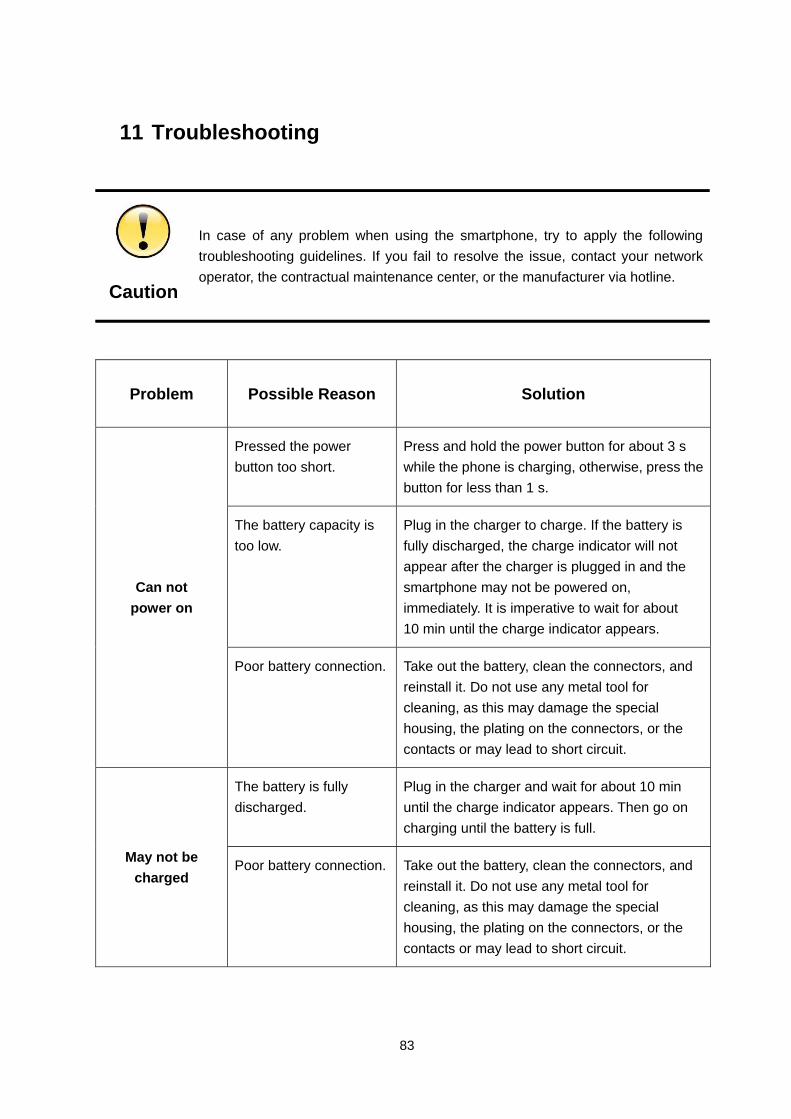
11 Troubleshooting
Caution
In case of any problem when using the smartphone, try to apply the following troubleshooting guidelines. If you fail to resolve the issue, contact your network operator, the contractual maintenance center, or the manufacturer via hotline.
Problem Possible Reason Solution
Pressed the power button too short.
Press and hold the power button for about 3 s while the phone is charging, otherwise, press the button for less than 1 s.
The battery capacity is too low.
Plug in the charger to charge. If the battery is fully discharged, the charge indicator will not appear after the charger is plugged in and the smartphone may not be powered on, immediately. It is imperative to wait for about 10 min until the charge indicator appears.
Can not power on
Poor battery connection. Take out the battery, clean the connectors, and reinstall it. Do not use any metal tool for cleaning, as this may damage the special housing, the plating on the connectors, or the contacts or may lead to short circuit.
The battery is fully discharged.
Plug in the charger and wait for about 10 min until the charge indicator appears. Then go on charging until the battery is full.
May not be charged
Poor battery connection. Take out the battery, clean the connectors, and reinstall it. Do not use any metal tool for cleaning, as this may damage the special housing, the plating on the connectors, or the contacts or may lead to short circuit.
83
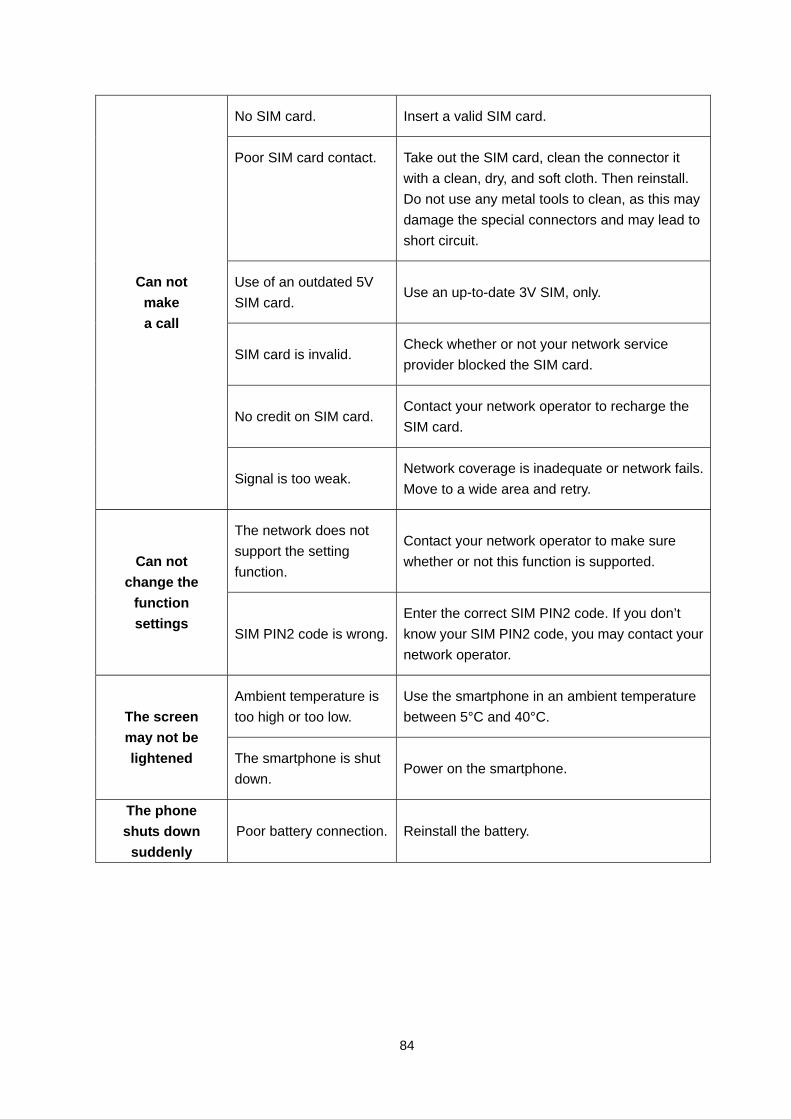
No SIM card. Insert a valid SIM card.
Poor SIM card contact. Take out the SIM card, clean the connector it with a clean, dry, and soft cloth. Then reinstall. Do not use any metal tools to clean, as this may damage the special connectors and may lead to short circuit.
Use of an outdated 5V SIM card.
Use an up-to-date 3V SIM, only.
SIM card is invalid. Check whether or not your network service provider blocked the SIM card.
No credit on SIM card. Contact your network operator to recharge the SIM card.
Can not make a call
Signal is too weak. Network coverage is inadequate or network fails. Move to a wide area and retry.
The network does not support the setting function.
Contact your network operator to make sure whether or not this function is supported. Can not
change the function settings
SIM PIN2 code is wrong. Enter the correct SIM PIN2 code. If you don’t know your SIM PIN2 code, you may contact your network operator.
Ambient temperature is too high or too low.
Use the smartphone in an ambient temperature between 5°C and 40°C. The screen
may not be lightened The smartphone is shut
down. Power on the smartphone.
The phone shuts down
suddenly Poor battery connection. Reinstall the battery.
84
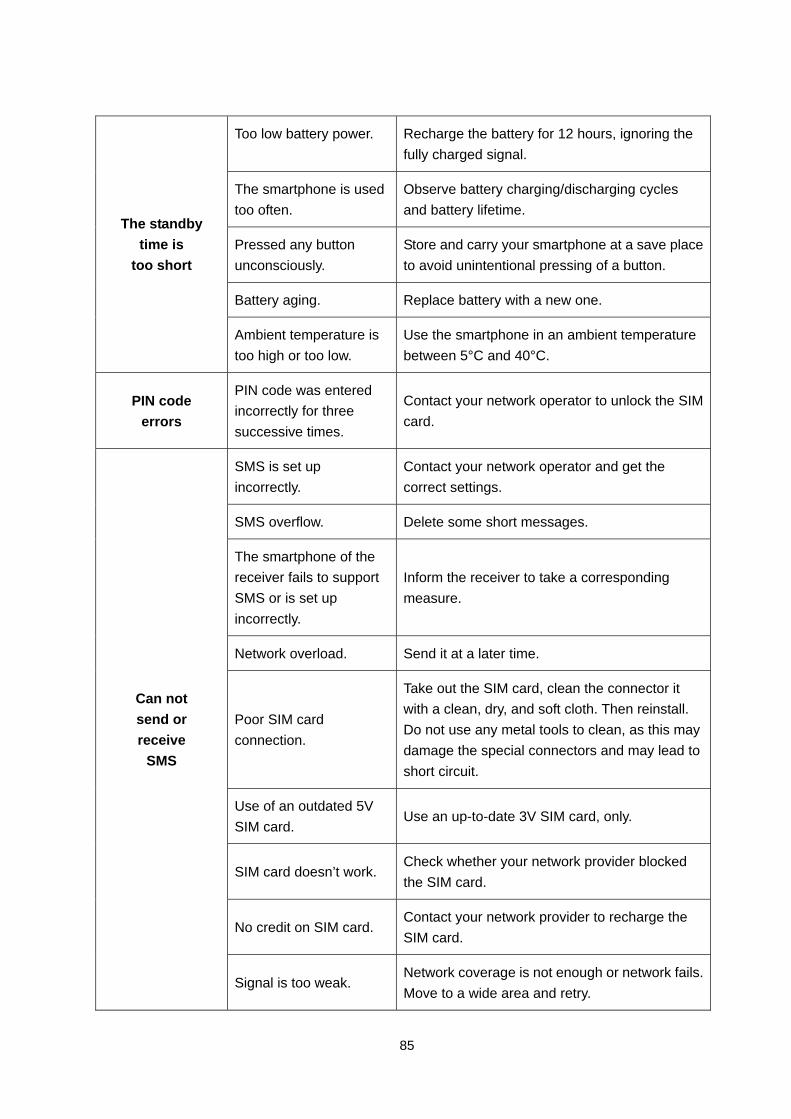
Too low battery power. Recharge the battery for 12 hours, ignoring the fully charged signal.
The smartphone is used too often.
Observe battery charging/discharging cycles and battery lifetime.
Pressed any button unconsciously.
Store and carry your smartphone at a save place to avoid unintentional pressing of a button.
Battery aging. Replace battery with a new one.
The standby time is
too short
Ambient temperature is too high or too low.
Use the smartphone in an ambient temperature between 5°C and 40°C.
PIN code errors
PIN code was entered incorrectly for three successive times.
Contact your network operator to unlock the SIM card.
SMS is set up incorrectly.
Contact your network operator and get the correct settings.
SMS overflow. Delete some short messages.
The smartphone of the receiver fails to support SMS or is set up incorrectly.
Inform the receiver to take a corresponding measure.
Network overload. Send it at a later time.
Poor SIM card connection.
Take out the SIM card, clean the connector it with a clean, dry, and soft cloth. Then reinstall. Do not use any metal tools to clean, as this may damage the special connectors and may lead to short circuit.
Use of an outdated 5V SIM card.
Use an up-to-date 3V SIM card, only.
SIM card doesn’t work. Check whether your network provider blocked the SIM card.
No credit on SIM card. Contact your network provider to recharge the SIM card.
Can not send or receive
SMS
Signal is too weak. Network coverage is not enough or network fails. Move to a wide area and retry.
85
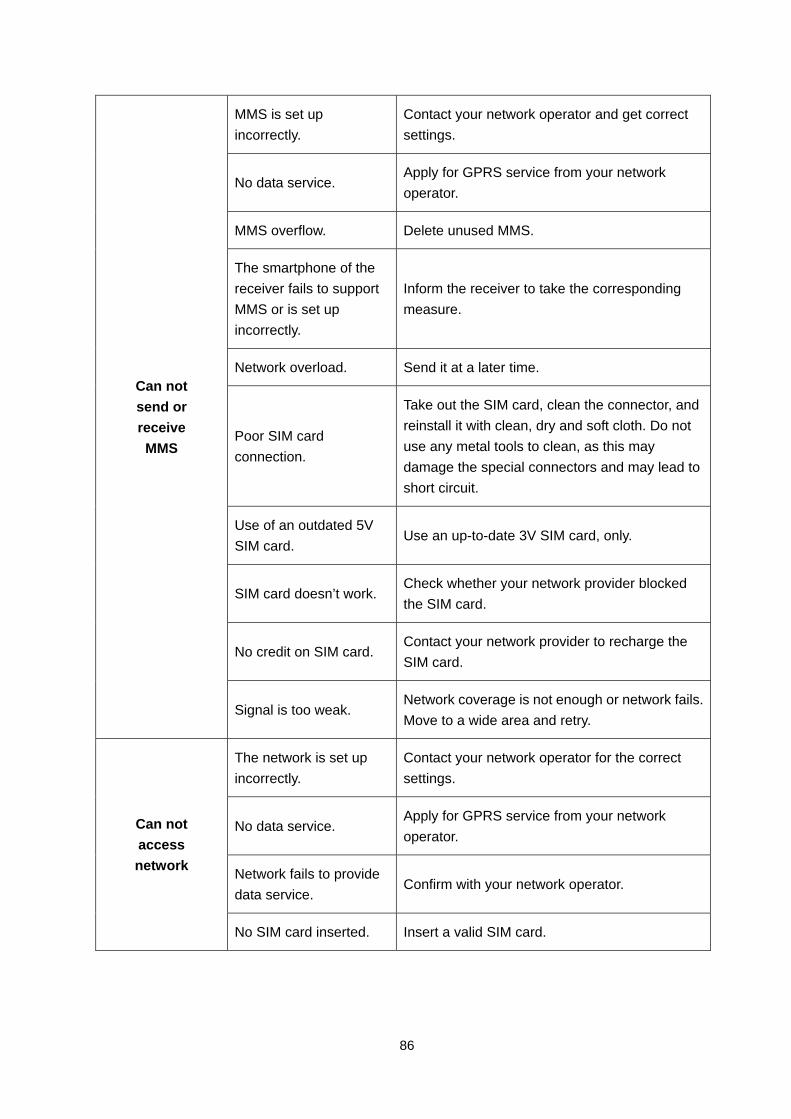
MMS is set up incorrectly.
Contact your network operator and get correct settings.
No data service. Apply for GPRS service from your network operator.
MMS overflow. Delete unused MMS.
The smartphone of the receiver fails to support MMS or is set up incorrectly.
Inform the receiver to take the corresponding measure.
Network overload. Send it at a later time.
Poor SIM card connection.
Take out the SIM card, clean the connector, and reinstall it with clean, dry and soft cloth. Do not use any metal tools to clean, as this may damage the special connectors and may lead to short circuit.
Use of an outdated 5V SIM card.
Use an up-to-date 3V SIM card, only.
SIM card doesn’t work. Check whether your network provider blocked the SIM card.
No credit on SIM card. Contact your network provider to recharge the SIM card.
Can not send or receive MMS
Signal is too weak. Network coverage is not enough or network fails. Move to a wide area and retry.
The network is set up incorrectly.
Contact your network operator for the correct settings.
No data service. Apply for GPRS service from your network operator.
Network fails to provide data service.
Confirm with your network operator.
Can not access network
No SIM card inserted. Insert a valid SIM card.
86
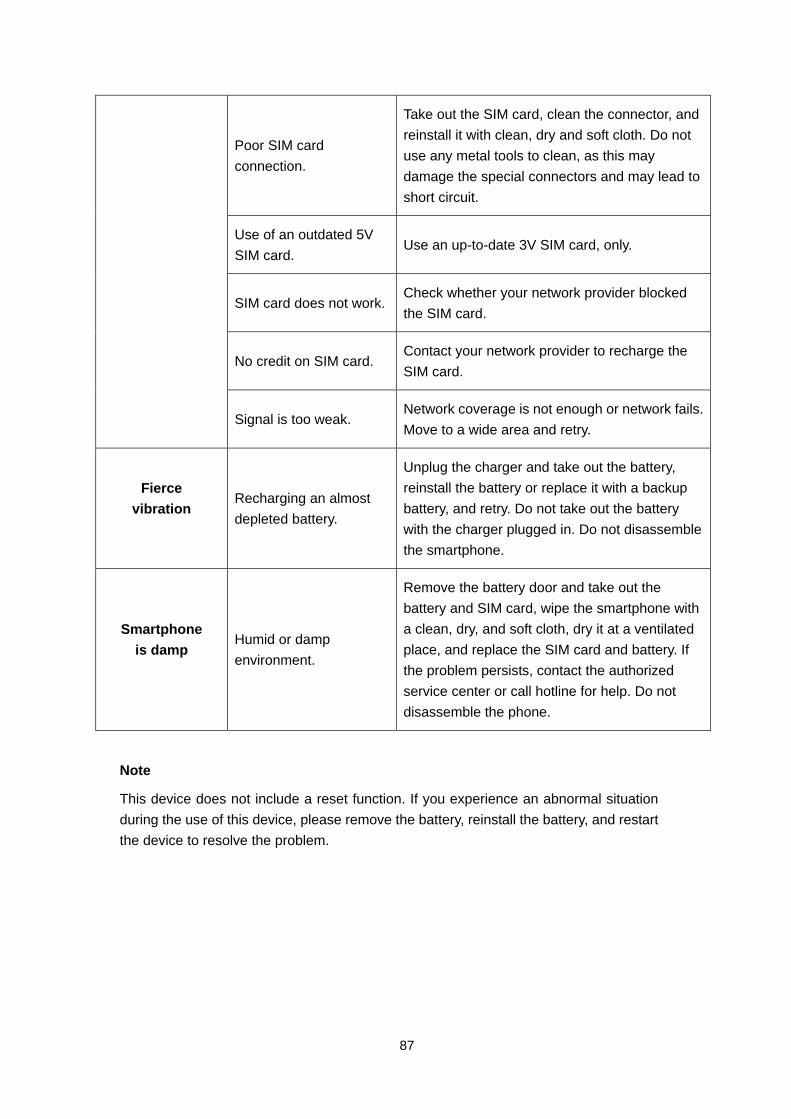
Poor SIM card connection.
Take out the SIM card, clean the connector, and reinstall it with clean, dry and soft cloth. Do not use any metal tools to clean, as this may damage the special connectors and may lead to short circuit.
Use of an outdated 5V SIM card.
Use an up-to-date 3V SIM card, only.
SIM card does not work. Check whether your network provider blocked the SIM card.
No credit on SIM card. Contact your network provider to recharge the SIM card.
Signal is too weak. Network coverage is not enough or network fails. Move to a wide area and retry.
Fierce vibration
Recharging an almost depleted battery.
Unplug the charger and take out the battery, reinstall the battery or replace it with a backup battery, and retry. Do not take out the battery with the charger plugged in. Do not disassemble the smartphone.
Smartphone is damp
Humid or damp environment.
Remove the battery door and take out the battery and SIM card, wipe the smartphone with a clean, dry, and soft cloth, dry it at a ventilated place, and replace the SIM card and battery. If the problem persists, contact the authorized service center or call hotline for help. Do not disassemble the phone.
Note
This device does not include a reset function. If you experience an abnormal situation during the use of this device, please remove the battery, reinstall the battery, and restart the device to resolve the problem.
87
12 Index
A Accounts
E-mail ............................................................................................44
Alarms
Calendar ........................................................................................39
Setting ...........................................................................................48
Alert mode
Setting ...........................................................................................66
Answer call ..........................................................................................24
Application ...........................................................................................42
Auto power on/off.................................................................................68
Automatic redial ...................................................................................72
B Backlight ..............................................................................................69
Battery
Charging ........................................................................................13
Installation .....................................................................................11
Battery meters ...............................................................................14
Bluetooth..............................................................................................64
Bookmark
Save ..............................................................................................61
Open..............................................................................................60
Brightness
Setting ...........................................................................................69
Browser................................................................................................61
C Calculator.............................................................................................49
88
Calendar
View calendar ................................................................................39
New event......................................................................................40
Call barring ..........................................................................................72
Call diverting ........................................................................................71
Call waiting ..........................................................................................71
Calls
Answering......................................................................................24
Dialing............................................................................................20
Emergency call ..............................................................................20
Conference calls............................................................................20
Redialing........................................................................................72
Call log.................................................................................................32
Charger................................................................................................13
Clock
World clock ..........................................................................................48
D Date and time ......................................................................................67
Dialing
Dialing............................................................................................20
Photo dial.......................................................................................23
Downloading
Java...............................................................................................50
Internet ..........................................................................................61
Drawing................................................................................................47
E E-mail
Setup e-mail category....................................................................43
Set e-mail account.........................................................................44
Mailbox folder ................................................................................45
Emergency call ....................................................................................20
End call ................................................................................................20
89

F File manager........................................................................................42
Flight mode ..........................................................................................79
G Gallery .................................................................................................58
GPS .....................................................................................................52
H Home key...............................................................................................9
I Idle screen ...........................................................................................14
Inbox ....................................................................................................34
Internet
Browsers........................................................................................61
Bookmarks.....................................................................................61
Web history....................................................................................61
STK services .................................................................................62
J Java .....................................................................................................50
K Key definition .........................................................................................9
L Language setting .................................................................................70
Lock
Auto lock........................................................................................69
Lock/unlock key .............................................................................16
Letter input mode.................................................................................75
90
M Memo...................................................................................................47
Memory usage .....................................................................................63
Memory card
SD card..........................................................................................12
Messages
Read messages.............................................................................36
Send messages.............................................................................36
MMS ....................................................................................................34
Modem.................................................................................................65
MP3 player
Play music .....................................................................................56
Play list ..........................................................................................57
N Network
Operator network...........................................................................14
Signal indication ............................................................................14
O Operator network .................................................................................14
P
PC tool .................................................................................................80
Pictures
Adding pictures into MMS..............................................................36
Draw a picture in memo.................................................................47
Sights folder...................................................................................42
Slideshow ......................................................................................58
Photo dial.............................................................................................23
Play
Play list ..........................................................................................57
91
Power
Auto power on/off ..........................................................................68
Power on .......................................................................................78
Power down...................................................................................78
Power save mode..........................................................................69
Push e-Mail ..........................................................................................54
R Recorder
Voice recording..............................................................................47
Ring tone setup....................................................................................66
RS232-USB cable................................................................................82
S Saving
Contact ..........................................................................................26
Message........................................................................................36
Bookmark ......................................................................................61
Screen
Brightness......................................................................................69
Calibration .....................................................................................69
Idle screen .....................................................................................14
Wallpaper ......................................................................................79
SD card................................................................................................12
Security
Pin code.........................................................................................68
Signal indication...................................................................................14
Signature
Message signature ........................................................................73
Silent mode..........................................................................................66
SIM card ..............................................................................................10
Slideshow ............................................................................................58
SOS .....................................................................................................74
Sound ..................................................................................................67
92
STK service .........................................................................................62
Symbol input mode ..............................................................................75
Synchronization
Network .........................................................................................14
PC .................................................................................................80
SyncML................................................................................................51
Screen theme ......................................................................................67
T Theme..................................................................................................67
Touch-screen calibration......................................................................69
U User defined key..................................................................................74
User information ..................................................................................70
V Vibrate mode .......................................................................................66
Voice recording....................................................................................47
Volume
Adjusting........................................................................................78
W Wallpaper.............................................................................................79
Web browser........................................................................................61
WiFi
WiFi setting....................................................................................70
WiFi connect status .......................................................................71
93