IMAGE MEMORY CARD READER DPC-R1 - FUJIFILM USA · User's Guide This manual will show you how to use...
36
User's Guide This manual will show you how to use your IMAGE MEMORY CARD READER DPC-R1 correctly. Please follow the instructions carefully. IMAGE MEMORY CARD READER DPC-R1 for Windows / Macintosh
Transcript of IMAGE MEMORY CARD READER DPC-R1 - FUJIFILM USA · User's Guide This manual will show you how to use...

User's Guide
This manual will show you how to use your IMAGE MEMORY CARD READER DPC-R1
correctly. Please follow the instructions carefully.
IMAGE MEMORY CARD READER
DPC-R1
for Windows / Macintosh
2
IMPORTANTTo customer _____ Please read the following before using your DPC-R1.
In rare cases the DPC-R1 may not be compatible, depending on the personalcomputer used.
■ To open an imageTo display an image on your personal computer, JPEG image reading softwareis required.
■ Trademark Information● Microsoft and Windows are registered trademarks of the Microsoft
Corporation of the U.S. registered in the USA and other countries.Windows is an abbreviated term referring to the Microsoft WindowsOperating System.
● IBM PC/AT is a registered trademark of International Business MachinesCorp. of the USA.
● Macintosh, iMac, iBook, PowerMacintosh, PowerBook, MacOS aretrademarks of Apple Computer, Inc.
● SmartMedia is a trademark of Toshiba Corporation.● Other company or product names are trademarks or registered trademarks of
the respective companies.
■ Notes on Electrical InterferenceUsage of the DPC-R1 in an aircraft or hospital may cause erroneous operationsof the aircraft and hospital control devices, make sure of the regulations ofhospitals or aircraft.
Software and User's Guide precautions
(1) No part of the software and owner’s manual may be reproduced withoutprior permission.
(2) The software and owner’s manual can be used with one Image MemoryCard Reader DPC-R1.
(3) Fuji Photo Film Co., Ltd. shall not be liable for any losses incurred by thecustomer or other parties by use of the DPC-R1 according to the accessorysoftware and owner’s manual.
(4) The DPC-R1 has been carefully inspected, however, if the product is foundto be defective due to faulty materials or workmanship the product will bereplaced. No other warranty is implied.
(5) The contents of the software and User's Guide are subject to changewithout prior notice.

3
NOTES ON USING YOUR DPC-R1 CORRECTLY● Do not turn off the personal computer power, while the “READY/ACCESS lamp” is on
or blink.The xD-Picture Card, SmartMedia Card and internal data will be destroyed.
● Do not drop or otherwise apply strong shock or vibration to the DPC-R1.Strong shock or vibration will damage the DPC-R1 or cause trouble.
● Do not store, or use, the DPC-R1 with heavy objects atop it.Heavy objects will damage the DPC-R1, or cause trouble.
● Do not touch the pins of the USB connector.Touching the pins may damage the DPC-R1 and the personal computer.
● When disconnecting the USB interface cable, pull out the connector while pressingthe end with your finger.Forcefully pulling out the cable itself will damage the DPC-R1 and the cable.
● Do not use cable other than the cable supplied.The use of other cable will cause erroneous operation.
● When inserting the xD-Picture Card or SmartMedia Card, pay careful attention to thedirection of the card. Inserting the xD-Picture Card or SmartMedia Card in reversemay cause trouble.
● The DPC-R1 does not support 2MB SmartMedia. Note also that when a 2MBSmartMedia and an xD-Picture Card are loaded at the same time, the xD-PictureCard cannot be accessed after the SmartMedia has been accessed. Open the coverand remove the 2MB SmartMedia.

4
IMPORTANT ................................................................2
NOTES ON USING YOUR DPC-R1 CORRECTLY...........3
BEFORE USING ...........................................................5Data storage ..................................................................................5
HANDLING...................................................................6USB cable connection ...................................................................6Inserting the xD-Picture Card or SmartMedia .............................10Removing the xD-Picture Card and SmartMedia Card ................11Disconnecting the USB cable ......................................................12
Using with Windows ....................................................14Hardware and software requirements .........................................14Setup Procedure in Windows ......................................................15Using the DPC-R1 .......................................................................18
Using with a Macintosh ...............................................19
Hardware and software requirements ....................................19Set up procedure.....................................................................20
Hardware and software requirements ....................................22Set up procedure ....................................................................22
Using the DPC-R1 .......................................................................27File Exchange (Mac OS 8.6 to 9.2 users) ....................................28
TROUBLE SHOOTING ................................................29
MAIN SPECIFICATIONS .............................................30
UNINSTALLING THE SOFTWARE ...............................31Windows ......................................................................................31Macintosh ....................................................................................35
Mac OS X
Mac OS 8.6 to 9.2
Macintosh
Windows
CONTENTS

5
Data storageThe data stored in the xD-Picture Card or SmartMedia Card may be destroyed in the
following cases. Fuji Photo Film Co., Ltd. shall not be liable for destruction of the stored
data.
1. When the customer, or other party, used the xD-Picture Card, SmartMedia Card and
DPC-R1 improperly.
2. When the USB cable or xD-Picture Card or SmartMedia Card were removed and
when the device power was turned off while the DPC-R1 was being accessed (data
communication).
We recommend that you copy your valuable data to another media (MO disk, CD-R,
hard disk, etc.).
BEFORE USING

6
HANDLING
PC
The accessory rubber feet are designed to prevent slipping. Install these feet at the four
corners of the DPC-R1, as required.
✽ Install the software before connecting the USB cable to your computer.
USB cable connectionConnect the DPC-R1 directly to the USB port on the personal computer base unit as
shown below.
• Insert the USB cable fully and firmly. Improper connection will cause the DPC-R1 tomalfunction.
• The DPC-R1 can be connected and disconnected even while the personal computerpower is on.
• When there are two or more USB connectors, the DPC-R1 can be connected to anyport.
• If connected through a USB hub, depending on the type of hub, the DPC-R1 maymalfunction. In this case, connect the DPC-R1 directly to the personal computer.
NOTE
USB cable(DPC-R1 accessory)
Personal computer
DPC-R1
xD-Picture Card SmartMedia
IBM PC/AT compatible, Macintosh

(1) When you first connect the DPC-R1 to your computer, the "FoundNew Hardware Wizard" window appears. Click the [Next] button.
(2) The search window shown below appears.
Windows XP
7

8
(3) A warning message such as the one shown below may appear. If so,click the [Continue Anyway] button.
Note that clicking the [STOP installation] button requires you to redo the installationfrom the beginning.
(4) The software installation window appears.
NOTE
Tests are being performed to ensure that there are no problemswith DPC-R1 Driver operation.

9
(5) When the "Installation completed" window appears, click the[Finish] button.

10
Inserting the xD-Picture Card or SmartMediaWhen inserting a xD-Picture Card or SmartMedia, insert them into the xD-Picture Card
slot or SmartMedia slot respectively, as indicated in the figures below.
✽ Insert the SmartMedia with the contact area (gold colored area) facing upwards.
Push the rear edge of the SmartMedia firmly with your fingertip until the SmartMedia isfully inserted. When SmartMedia is inserted correctly and the cover is closed, theREADY / ACSESS lamp will be lit. The same READY / ACSESS lamp is used for boththe xD-Picture Card slot and the SmartMedia slot.
NOTE
SmartMedia slot
Cover
READY / ACSESSlamp (green)
SmartMedia
✽ Insert the xD-Picture Card with the contact area (gold colored area) facing downwards.
Push the xD-Picture Card slowly but firmly all the way into the slot with your fingertip.When the xD-Picture Card is inserted correctly and the cover is closed, the READY /ACSESS lamp will be lit. The same READY / ACSESS lamp is used for both the xD-Picture Card slot and the SmartMedia slot.
NOTE
xD-Picture Card slot
Cover
READY / ACSESSlamp (green)
xD-Picture Card

(1) Before removing the xD-Picture Card andSmartMedia Card, open “My Computer”and right-click on the “Removable disk”icon and select the “Eject” menu. If an xD-Picture Card and SmartMedia areboth inserted, perform this procedure forboth media. Confirm that the “READY / ACSESS lamp”is off
(2) Check that the "READY/ACCESS" lamp is no longer lit. Then openthe DPC-R1 cover and slowly pull the xD-Picture Card or SmartMediaout.
11
Removing the xD-Picture Card and SmartMedia Card
Windows 98, Windows Me, Windows 2000 Professional
Do not touch the cover while the xD-Picture Card or SmartMedia is being accessed(while the READY/ACCESS lamp is lit).
NOTE
(1) To remove a xD-Picture Card or SmartMedia, drag the correspondingicon on the desktop to the Trash or select “Eject” from the “Special”menu at the top of the screen.
Macintosh
(2) Check that the "READY/ACCESS" lamp is no longer lit and thenopen the DPC-R1 cover, grasp the xD-Picture Card or SmartMediaand slowly pull it out.
Do not touch the cover while the xD-Picture Card or SmartMedia is being accessed(while the READY/ACCESS lamp is lit).
NOTE
Always remove the xD-Picture Card and SmartMedia Card as described below. If images downloaded from the DPC-R1 are still open, exit the image viewingapplication.
<Mac OS 8.6 to 9.2> <Mac OS X>

12
Disconnecting the USB cable
Check that the READY/ACCESS lamp is no longer lit and then disconnect the USB
cable.
(1) Double-click the icon (circled) displayed in the taskbar (in thebottom-right corner of the screen).
(2) When the next screen appears, check that the READY/ACCESS lampis no longer lit or flashing and then left-click "Fujifilm USBMemoryCard ReaderWriter" to select it. Then click the [Stop] button.
Windows 2000 Professional / XP
Windows 98 / 98SE / Me, Macintosh

13
(3) Select "Fujifilm USB MemoryCard ReaderWriter" and click the [OK]button.
(4) In Windows 2000, the window shown below appears. Click the [OK]button and close the "Disconnect hardware" window.
In Windows XP, close the "It is safe to disconnect the hardware"window.

Hardware and software requirementsTo run this software, you must have the hardware and software describedbelow. Check your system before you begin the installation.
Compatible PCs IBM PC/AT or compatible ✽1
Operating System Windows 98 (including the Second Edition)Windows Millennium Edition (Windows Me)Windows 2000 Professional✽2
Windows XP Home Edition✽2
Windows XP Professional✽2
CPU 200 MHz Pentium or better recommended (800 MHzPentium III or better recommended for Windows XP
RAM 64MB minimum (128 MB minimum for Windows XP)Hard disk space Amount required for installation: 140 MB minimum
Amount required for operation: 300 MB minimum✽1 Models with a USB interface as a standard feature and one of the above operating
systems preinstalled.✽2 When you install the software, log in using a system administrator account (e.g.
“Administrator”).
14
Using with Windows

15
Windows
Setup Procedure in WindowsThis section describes the setup procedure for using this product on Windows.Be sure to use this procedure for setup.
✽ The screens shown on some PCs may differ slightly from those shown here.
Do not connect the USB cable to your computer until youhave finished installing the software.
(1) Switch on your PC and start up Windows.✽ If you have already switched on your PC, restart your PC at this point.
Users of Windows 2000 or Windows XP should log in using a system administratoraccount (e.g. “Administrator”).
(2) Quit all other active applications until no applications are shown inthe taskbar.
1 Click the right mouse button on the application icon in the taskbar.2 Click “Close” in the menu that appears to quit the application.
✽ For more information, refer to the instructions provided with your PC andapplications (antivirus software, etc.).
If a “----.dll file not found.” message appears during installation, there is anotherapplication running in the background. Forcibly shut down the application. Refer toyour Windows manuals for information on how to forcibly shut down an application.
(3) Load the enclosed CD-ROM into the CD-ROM drive. The installerstarts up automatically.
NOTE
NOTE
<Taskbar>
Applications to be shut down(the icons shown vary depending on the applications that are running)

16
Windows
Launching the Installer Manually1 Double-click the “My Computer” icon.
✽ Windows XP users should click “My Computer” in the “Start” menu.
2 Right-click “DPC-R1” (CD-ROM drive) in the “My Computer” window andselect “Open”.
3 Double-click “SETUP” or “SETUP.exe” in the CD-ROM window.
✽ The way file names are displayed differs as described below depending onyour computer settings.• File extensions (3-letter suffixes indicating the file type) may be shown or hidden.
(e.g. Setup.exe or Setup)• Text may be shown normally or all in uppercase (e.g. Setup or SETUP).
If the "New Hardware Wizard" appears
The USB cable is already connected. Click the [Cancel] button and then disconnect the
USB cable.

17
Windows
(4) The Setup screen appears. Click the [Install Driver Software for DPC-R1] button.
(5) When file copying ends, the "InstallShield wizard finished" windowappears. Click [Finish].
(6) When the screen shown below appears, select "Yes, I want to restartmy computer now" and click the [Finish] button. Restart yourcomputer.
This completes driver software installation. Remove the setup diskfrom the CD-ROM drive and store it in a safe place.
(7) Connect the USB cable to your computer.

18
Windows
Using the DPC-R1⟨Reading and writing digital camera image files⟩To view an image imported onto a Windows PC, you will need an image-viewingsoftware program that supports the image format.
1 Load the xD-Picture Card or SmartMedia into the DPC-R1.
2 When you open the “My Computer” window, a “Removable disk” icon thatwas not there previously is displayed. The drive with the lower drive letter is used for xD-Picture Cards.(In the window below, the I: drive is for xD-Picture Cards.
Double-click this icon. The folders and files on the xD-Picture Card orSmartMedia appear.
● Files can be read by dragging them from the xD-Picture Card or SmartMediato your hard disk.
● Files can be written by dragging them from your hard disk to the xD-PictureCard or SmartMedia.
● Files can also be read and written by specifying the xD-Picture Card orSmartMedia as the drive name from an application program.
● Files can be copied in either direction between a xD-Picture Card and aSmartMedia.
• Never switch off your PC or touch the DPC-R1 slot cover while the READY/ACCESSlamp is lit. Either of these actions could corrupt the data on the xD-Picture Card orSmartMedia or damage the media itself.
• To use a xD-Picture Card or SmartMedia in a digital camera, you must alwaysinitialize (format) the xD-Picture Card or SmartMedia in the digital camera.
• The DPC-R1 does not support 2MB SmartMedia. Note also that when a 2MBSmartMedia and an xD-Picture Card are loaded at the same time, the xD-PictureCard cannot be accessed after the SmartMedia has been accessed. Open the coverand remove the 2MB SmartMedia.
NOTE

19
Using with a Macintosh
This section describes the setup procedure for using this product on a Macintosh. Note
that the setup procedures for Mac OS 8.6 to 9.2 and Mac OS X are different. The setup
procedure for Mac OS 8.6 to 9.2 is described below. See P.22 for the procedure for Mac
OS X.
Hardware and software requirementsTo run this software, you must have the hardware and software describedbelow. Check your system before you begin the installation.
Mac OS 8.6 to 9.2
Compatible Mac Power Macintosh G3✽1, PowerBook G3 ✽1, Power Macintosh G4, iMac, iBook, Power Macintosh G4 Cube or PowerBook G4
Operating System Mac OS 8.6 to 9.2✽2
RAM 64 MB minimum✽3
Hard disk space Amount required for installation: 40 MB minimum
✽1 Models with a USB port as a standard feature✽2 This software does not run correctly in the Mac OS X Classic environment.✽3 Turn virtual memory on if necessary.

20
Macintosh
Set up procedure
(1) Switch on your Macintosh and launch the Mac OS.
(2) Load the bundled CD-ROM (DPC-R1 setup disk) into the CD-ROMdrive.
(3) Double-click the "DPC-R1" CD-ROM icon displayed on the desktop.
(4) Double-click "Installer for Mac OS 8.6-9.x" to launch the installer.
(5) A message appears asking you to confirm that you want to continuewith the installation. Click the [OK] button.

21
Macintosh
(6) Check the installation destination and then click [Install].
(7) When installation ends, the window shown below appears. Click[Restart] and restart your Mac.
(8) After restarting, connect the DPC-R1 directly to the USB port on thepersonal computer base unit.
• Insert the USB connector fully and firmly. Improper connection will cause the DPC-R1 to malfunction.
• If connected through a USB hub, depending on the type of hub, the DPC-R1 maymalfunction. In this case, connect the DPC-R1 directly to the personal computer.
• If there are two or more USB ports, the DPC-R1 can be connected to any port.
This completes set up. Hereafter, the personal computer automatically recognizes the
DPC-R1 by connection of the USB cable.
NOTE

22
Macintosh
Hardware and software requirementsTo run this software, you must have the hardware and software describedbelow. Check your system before you begin the installation.
Compatible Mac Power Macintosh G3✽1, PowerBook G3,Power Macintosh G4, iMac, iBook, Power Macintosh G4 Cube, or PowerBook G4
Operating System Mac OS X (compatible with version 10.1.2 to 10.1.5)RAM 128 MB minimumHard disk space Amount required for installation: 40 MB minimum
✽1 Models with a USB port as a standard feature
Set up procedure
(1) Start up your Macintosh and load the enclosed CD-ROM into the CD-ROM drive.
Quit any applications that are currently running.Open the "DPC-R1" CD-ROM icon displayed on the desktop anddouble-click "Installer for MacOS X".
Mac OS X

23
Macintosh
(2) When you double-click "Installer for MacOS X", the window shownbelow appears. Click the padlock icon beside "Click the lock to makechanges".
(3) The "Authorization" window shown below appears.Enter the administrator name and password. Then click "OK".

24
Macintosh
(4) The "Introduction" window shown below appears. Click [Continue].
(5) The "Important Information" window shown below appears. Click[Continue].

25
Macintosh
(6) The "Select a Destination" window shown below appears. Select theinstallation destination disk and click [Continue].
(7) The "Easy Install" window shown below appears. Click [Install].

26
Macintosh
(8) A message then appears saying “Installing this software requiresyou to restart your computer when the installation is done. Are yousure you want to install the software now?”. Click [Continueinstallation].
(9) The installation continues and the "Install Software" window shownbelow appears. Click [Restart].
(10)After restarting, connect the DPC-R1 directly to the USB port on thepersonal computer base unit.
• Insert the USB connector fully and firmly. Improper connection will cause the DPC-R1 to malfunction.
• If connected through a USB hub, depending on the type of hub, the DPC-R1 maymalfunction. In this case, connect the DPC-R1 directly to the personal computer.
• If there are two or more USB ports, the DPC-R1 can be connected to any port.
This completes set up. Hereafter, the personal computer automatically recognizes the
DPC-R1 by connection of the USB cable.
NOTE

27
Macintosh
Using the DPC-R1⟨Reading and Writing Digital Camera Image Files⟩
(1) Load the xD-Picture Card or SmartMedia into the DPC-R1 and thecover is closed.The following icon appears:
(2) Double-click the icon displayed on the desktop. The folders and fileson the xD-Picture Card or SmartMedia appear.
● Files can be written by dragging them from your hard disk to the xD-PictureCard or SmartMedia.
● Files can be read by dragging them from the xD-Picture Card or SmartMediato your hard disk.
● Files can also be read and written by specifying the xD-Picture Card orSmartMedia as the drive name from an application program.
● Files can be copied in either direction between a xD-Picture Card and aSmartMedia.
• Never shut down your Macintosh or touch the DPC-R1 slot cover while theREADY/ACCESS lamp is lit.
• Either of these actions could corrupt the data on the xD-Picture Card or SmartMediaor damage the media itself.
• To use a xD-Picture Card or SmartMedia in a digital camera, you must alwaysinitialize (format) the xD-Picture Card or SmartMedia in the digital camera.
• The DPC-R1 does not support 2MB SmartMedia. Note also that when a 2MBSmartMedia and an xD-Picture Card are loaded at the same time, the xD-PictureCard cannot be accessed after the SmartMedia has been accessed. Open the coverand remove the 2MB SmartMedia.
NOTE
<Mac OS 8.6 to 9.2> <Mac OS X>
28
Macintosh
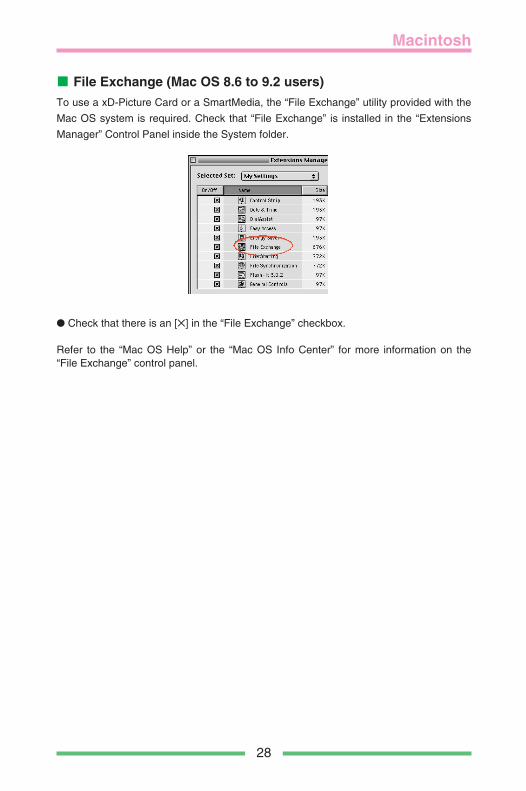
File Exchange (Mac OS 8.6 to 9.2 users)To use a xD-Picture Card or a SmartMedia, the “File Exchange” utility provided with the
Mac OS system is required. Check that “File Exchange” is installed in the “Extensions
Manager” Control Panel inside the System folder.
● Check that there is an [✕] in the “File Exchange” checkbox.
Refer to the “Mac OS Help” or the “Mac OS Info Center” for more information on the“File Exchange” control panel.

Error Possible Causes Remedies
29
TROUBLE SHOOTING
Before deciding that there is some kind of trouble, check the DPC-R1 again.
Personal computerdoes not recognizethe DPC-R1.
The PC cannot readthe xD-Picture Cardor SmartMedia (nodrive icon appears).
xD-Picture Card orSmartMedia is notwritten.
USB connector is notproperly connected to thepersonal computer.
Check if the USB connectoris connected properly.(➡ Page 6)
Device driver is not installedcorrectly.
Install the device driver correctly.(➡ Page 14-17, 19-26)
Device driver is not installedcorrectly.
Install the device driver correctly.(➡ Page 14-17, 19-26)
The xD-Picture Card orSmartMedia is inserted thewrong way round.
Insert the xD-Picture Card or SmartMedia correctly.(➡ Page 10)
There is no xD-Picture Cardor SmartMedia inserted inthe DPC-R1.
Insert the xD-Picture Card or SmartMedia into the DPC-R1. (➡ Page 10)
The write protect seal wasnot removed from theSmartMedia Card.
Remove the write protectseal.
The data being written is toolarge for the available spaceon the xD-Picture Card orSmartMedia.
Amounts of data that exceedthe available space cannotbe written. Make additionalspace available on the xD-Picture Card or SmartMedia.
Device driver is not installedcorrectly.
Install the device driver correctly.(➡ Page 14-17, 19-26)

30
Type USB Image Memory Card Reader
Applicable Computer ✽1 IBM PC/AT compatible machinesiMac DV, iMac or any Macintosh that supports the USBinterface as standard
Applicable OS ✽2 Windows 98 Second Edition, Windows 2000 ProfessionalWindows XP Professional / HomeMac OS 8.6 to 9.2, 10.1.2 to 10.1.5
Compatible media ●SmartMedia3.3 V (4, 8, 16 or 32 MB)3.3 V with ID (16, 32, 64 or 128 MB)However, 64MB media formatted on the followingFUJIFILM cameras cannot be used:FinePix 700, FinePix 500, CLIP-IT 50 or DS-250HD
●xD-Picture Card16, 32, 64 or 128MB
Host interface Universal Serial Bus (USB) Interface ver 1.1
Current drain Operating : Max. 530mA or less
Operating conditions Temperature : 0°C to +40°C (+32°F to +104°F)Humidity : 20% to 80% or less (no condensation)
Dimensions 72 ✕ 23.4 ✕ 103.7mm (2.8 ✕ 0.9 ✕ 4.1 in.) (W ✕ H ✕ D)
Mass (Weight) Approx.110g (3.9 oz.)
✽ 1 : Only models that support USB as standard.✽ 2 : Standard installation models recommended.
❋ Specifications and functions are subject to change without prior notice.Fuji Photo Film Co., Ltd. shall not be liable for any mistakes, etc. in the contents of this manual.
MAIN SPECIFICATIONS

31
UNINSTALLING THE SOFTWARE
WindowsOnly perform this operation when you no longer require the installed software.
(1) Switch on your PC.
(2) Disconnect the DPC-R1.
(3) Quit all currently running applications.
(4) Close all files.
(5) Open the “My Computer” window and double-click “Add/RemovePrograms” in the Control Panel.
(6) The “Add/Remove Programs Properties” window appears. Select thesoftware to be uninstalled (Fujifilm USB MemoryCard ReaderWriter)and then click the [Add/Remove] button.
Windows 98 / 98SE / Me

32
(7) When the confirmation message appears, click the [OK] button.Check your selection carefully since the process cannot becancelled once you click [OK].
(8) The uninstallation in progress window is displayed. Whenuninstallation ends, the maintenance completion screen shownbelow appears. Click [Finish].
(9) The restart request window shown below appears.Click [Finish] and restart your computer.
UNINSTALLING THE SOFTWARE

33
UNINSTALLING THE SOFTWARE
* The screens shown on some PCs may differ slightly from those shown here.
(1) Disconnect the DPC-R1.
(2) Quit all currently running applications.
(3) Close all files.
(4) Open the My Computer window and double-click [Add/RemovePrograms] (Windows 2000) or [Add or Remove Programs] (WindowsXP) in the Control Panel.
(5) Select the file name of the driver (Fujifilm USB MemoryCardReaderWriter) to be deleted and then click [Change/Remove].
(6) The "Confirm file removal" message shown below appears.Click [OK].
Windows 2000 / XP
34
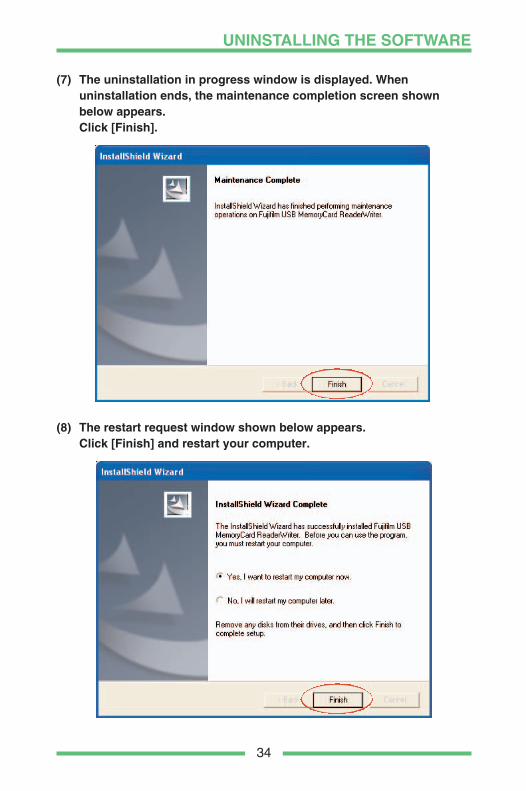
(7) The uninstallation in progress window is displayed. Whenuninstallation ends, the maintenance completion screen shownbelow appears.Click [Finish].
(8) The restart request window shown below appears.Click [Finish] and restart your computer.
UNINSTALLING THE SOFTWARE

35
MacintoshOnly perform this operation when you no longer require the installed software.
(1) Check that the DPC-R1 is not connected to your Macintosh.Open the "Extensions" folder in the Mac OS System Folder (on thestartup volume) and put the 2 files shown below in the Trash.
"Alauda StorageDriver(Y)""Alauda StorageShim(Y)"
(2) Restart your Macintosh.
The driver software for Mac OS X (versions 10.1.2 to 10.1.5)cannot be uninstalled (deleted).
Mac OS X
Mac OS 8.6 to 9.2
UNINSTALLING THE SOFTWARE

FGS-204106