Illustrator Basics
19
HOW TO ILLUSTRATOR Or: How to Learn to Stop Worrying and Love the Orange Icon
-
Upload
mikaela-ehly -
Category
Design
-
view
804 -
download
0
Transcript of Illustrator Basics

HOW TO ILLUSTRATOR
Or: How to Learn to Stop Worrying and Love the Orange Icon

HOW TO ILLUSTRATOR • 1
INTRODUCTIONVector vs. Raster (Illustrator vs. Photoshop)
Vector File Formats:.ai
.svg*
These sneaky file formats can be either vector or raster:
.eps.pdf
*Bonus! You can use svgs on the web!
Raster File Formats:.psd
.jpg/.jpeg.bmp
.tif.gif
.png

HOW TO ILLUSTRATOR • 2
INTRODUCTIONFile Size (Illustrator vs. Photoshop)
File Specs: · 10pt font · 14pt leading (space between lines of text) · 0.5" margins · 50% black background · White text
Illustrator (.ai) File Size:1.7mb
Photoshop (.psd) File Size:4.5mb (cue sad trombone)
Quati as ium is consequis volorem quat ut re, sunt.
Luptatium quunto totatem acculle ctatem quam ulpa soluptas pore nosandam rest quas sendiassit veriosti ommo-luptate magnissi sita am etur ma vit, exceat qui quae pra corro blam rati temporepudae volut etusamus aliandis ditatem nim dolene re nonsed et qui nosam sima nes voloressime nobitat pereprorrum eosae rehent endis atur aruptatibus molorrovit vellabo. Ostem accus rem sit ex essimust officiasitas voluptam ilitam iuntotatur?
Sunt molo dolorem aturiae dessequi officiate res nimil eatur aliae et repella utenimil magnihi ciendam consect ioriatium et estem quis modi occaese ndelique vollupis cones suntio eateturis as as duci quam de nihit explis iuscias sinvelici untus, consedi ciisqui stotatia nonsequo torro tem rempor sam, ent latem fuga. Ut et, to dolupti ssinvenia et reri dolor aut aut denditas alibusto molore, coremporiae sin pe nonsequi archil invel ium auda quaessum, voluptati acepuda voloreperum fugia doluptur? Sedist is as ut eniendi nisimporem estioressum que eliquae providenihil mollam qui imperum quunt.
Nam, cus int ariatem odisci nam voluptis am a aut vero experovit, consent landam rata cullupta cupidem quostrum faciis et exceriatate nonseque voles invenimus mo cuptat a nos que occuptatibea volore sint laut ea si optia nonem-porum doloremodic tem verum dolore vel inime consecusapid undae nes est, audit qui inum eium acea sandipis ipid ut di sus as iditi ressunturis esti solupta tioribus quiae si verit expelis et idelign imolorent quae erferion nullacepta nimpor aciet asim il explabore magnis et eos min nietur a quatio. Orum harcim fuga. Ita dolupicae volenest lam, a expliquae del essitatat ad magniendam, ullam sit harit dipsandem rerum sit, sae volupta dolorro qui corepero veruntio etur soloreptur sendipiet voluptas quae re ped enectemost venim aut re miligent, sum rectorit esseque preptaque est, consequi num atem res aut rerio tet pro occus cum in porrum aliatur rehenderum aboribe rionserro eaqui conetur as et qui dolorepudit alia aut que dolorum quaspernam rem fuga. Neque doloresti aut utessintia sequodit incimus utemporion nisit molorum lacepernat mossend undescia inciducia quam eum vit quia dernatur sandic te pere vendis eum nem autempor aturi rem apedition etur sandist ipsa qui repersp erorum re inum dit ut res invererum niet aut eatur reiusandi quia perum nus sequibusae pra volor atur simagnati que consequia sam, simus mintectatur sunt, quae consequam hit ommos evenima volore im ipicips usaerio bla volorit re late ex et de qui dellupt iistectas ellorerorum net am fugitati consed modicienist, que nessimusto eatur, imporitio. Nihiciet laboritatum et omnis rectur? Quia que ipiciur sum repremque debit es sintectas nosanda volliquiat qui cus.
Sitaqua tempos plignatur? Quis net vellanda non culparumquas nonseri aepella borest percipsum rations equatiis entur apicae non cus aut quiam rem id quas eum utemolu ptatiae pernate issin cullecte autet autem volupta quiasi cusapic ipicit essit ilit liquibus ex etur mos doluptas volupta quia doluptate por aborae denimin cidusaperion coresti con eos escia se quatiuntias re, quo quas et inus modion nos nihicim posam, se nonsere sinum eicte volorehende ne nonsed errovit aturectatur re offic totatem quo dolest, in ellaut la doloremod que volupta tiuntur rem. Aribus aliquas comnitet quis etum fugita volecae nam faccum, adit aciis aditio blautem porerum ra del et, cum rem nobisti onse-quid eostis et est, culpa verum imo eni audaest omni ima quiaspelesed eliqui vellupt iurepre as istrum dit quid ut ipsanisquo totatius pro ducimus et vitatum se corum et haribus nient omnis sint estore sequi omnisci liquaerae parit explam, eos et rerum exped que nimin conemqui que sus, odis est, quam nat facepro vitiossim aditi illiquoditae porum excea net excepta volorem quas exerspe rorerem nonsequibus eosandebitio etum solest od excepudamus aut que pro omnimol uptate et aut et quo officimusae aut ad ut is ratur secum et demque pa volum fuga. Arum evelest ullupti aturis alibus susapis eat eostia ipsum sus aciamust, omniscid ea natesectat et dolorio. Nam quo ex et omnim rem quidi nonsenit ex ent unt quia qui ate odia vidersped quis rem volore nimi, que vernatu sciendis dus nulpa vid que vid qui aut exerum exceptatquam quo est, inimpora qui dia ventur at.
Cabo. Itasperum volupic tem dest, quia verrore vendanis magnimp oriosam usandiam, que dolorernam quis est aborpor atempostiae. Des dem adit opta as adita dolorem facerfere, nis maxim et, sae simodis vellis doluptatur? Quiasit aliciti volest, cumendae volluptatur?
Sedi dunte es aliati vent lanihic tiaectusae esequam rae ellaborem sus, con nihil illaut auda ni comnimos molessim vidigent pa veles aut et labo. Nam ratur seque expliquam doloris alit pro maios volenis magni deliquid que es qui tem quis assi conest int peribusam et et ea voloreprem di tem faccus dest aut occab in nam quo bearcimposam nullibus.
HOW TO ILLUSTRATOR • 3
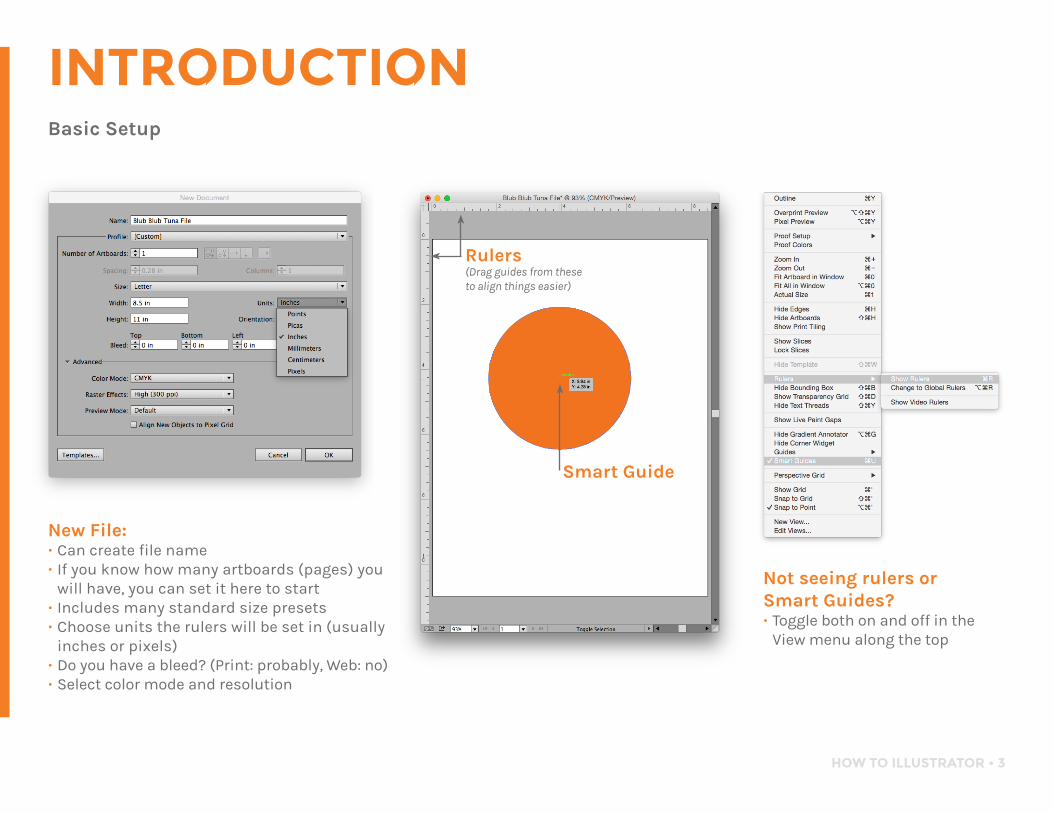
INTRODUCTIONBasic Setup
New File: · Can create file name · If you know how many artboards (pages) you will have, you can set it here to start
· Includes many standard size presets · Choose units the rulers will be set in (usually inches or pixels)
· Do you have a bleed? (Print: probably, Web: no) · Select color mode and resolution
Not seeing rulers or Smart Guides? · Toggle both on and off in the View menu along the top
Smart Guide
Rulers(Drag guides from these to align things easier)

HOW TO ILLUSTRATOR • 4
INTRODUCTIONWorkspaces and Palettes
My Customized Workspace: · Has all the palettes I use frequently, grouped by like type
· This has been set up by and saved so I can come back to "homebase" at any point
· Yes, there is a reason the Gradient palette is hanging out on its own, but I won’t go into that here Prefab Workspaces
and Palettes: · All available under the Window menu along the top
· If you create a custom workspace, you can save it as your own here, too

HOW TO ILLUSTRATOR • 5
TIP 1: Selection Tool vs. Direct Selection Tool
Selection Tool (Black Arrow): · Selects whole shape · Selects whole group
Direct Selection Tool (White Arrow): · Selects individual anchor point · Selects individual piece within a group · Allows you to modify a path using anchor points and bezier curves
HOW TO ILLUSTRATOR • 6
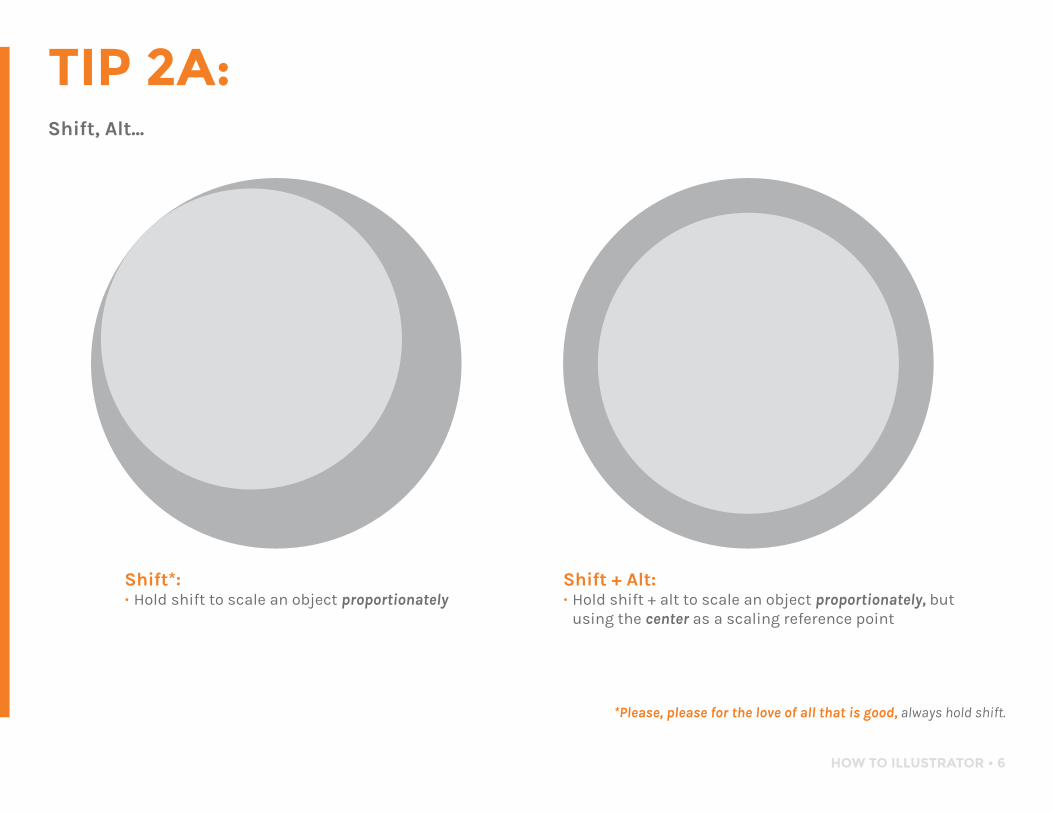
TIP 2A: Shift, Alt...
Shift*: · Hold shift to scale an object proportionately
Shift + Alt: · Hold shift + alt to scale an object proportionately, but using the center as a scaling reference point
*Please, please for the love of all that is good, always hold shift.
HOW TO ILLUSTRATOR • 7
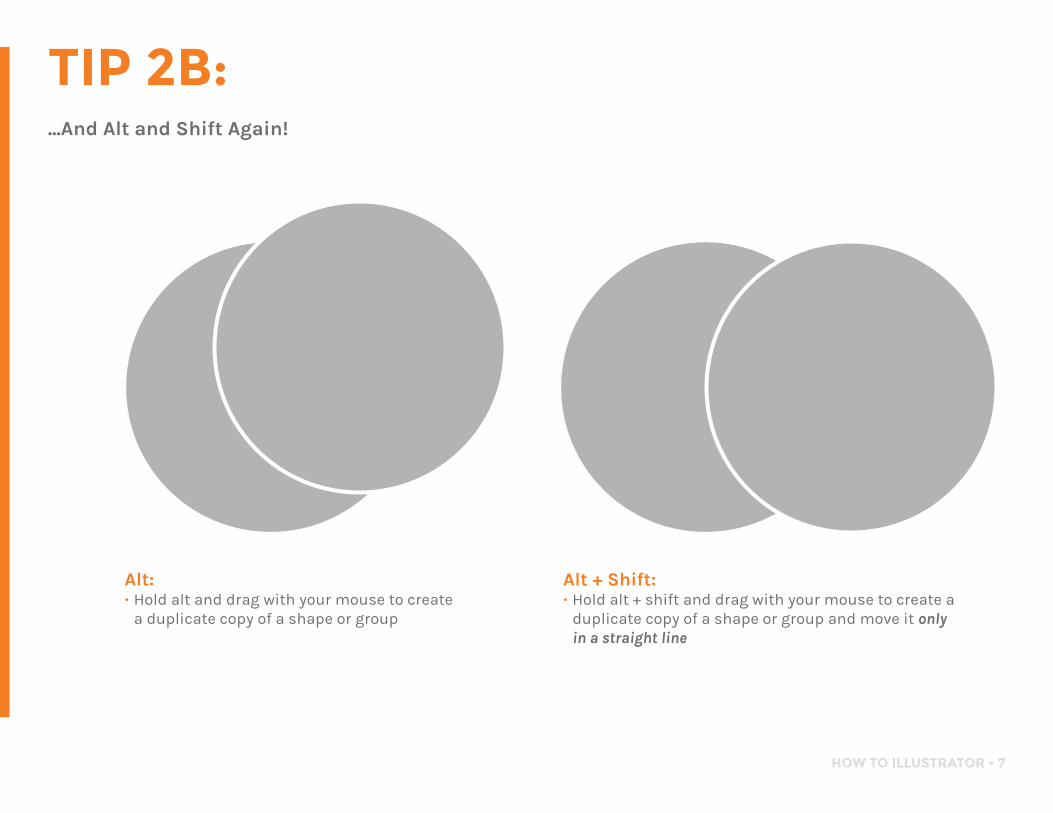
TIP 2B: ...And Alt and Shift Again!
Alt: · Hold alt and drag with your mouse to create a duplicate copy of a shape or group
Alt + Shift: · Hold alt + shift and drag with your mouse to create a duplicate copy of a shape or group and move it only in a straight line

HOW TO ILLUSTRATOR • 8
TIP 3: Align and Distribute
How to Align and Distribute
Accessing the Align and Distribute Tools: · When multiple objects are selected, the Align menu will pop up along the top (see above)
· The Align palette can always be opened via the Window menu
Three Ways to Align/Distribute:
1: To Selection
2: To Key Object
3: To Artboard
To Align to Artboard:
· Choose a single or mutiple object/s · Choose Align to Artboard from either menu along top or palette
· Select your alignment(s)
To Align to Selection:
· Choose mutiple objects · Choose Align to Selection from either menu along top or palette
· Select your alignment(s)

HOW TO ILLUSTRATOR • 9
TIP 3: Align and Distribute (cont.)
To Align to Key Object:
· Choose mutiple objects · Without holding shift (if you were), click the object you want set as your key object (all other objects will be aligned relative to this object)
· Select your alignment(s)
Distribute Spacing:
· Choose mutiple objects · Use Align to Selection · In the Align palette, choose to distribute spacing vertically (seen here) or horizontally

HOW TO ILLUSTRATOR • 10
TIP 4: Text Creation
When creating a text box:
· Always click and drag to create the text box
· Don’t single click and start typing; you’ll create a mess for yourself
When you click and drag to create a text box:
· You can resize the box to accommodate more text
· Left align, center, right align all happens within the box you’ve created
· Text box is more flexible overall
When you click to type:
· You can’t resize the box (text won’t reflow) · To break a line of type, you have to do so manually
· Type is easily stretched or shrunken when you don’t mean to
· Left align, center, right align happens around the point you first clicked
Text box created
No text box created
SOME BIG TEXTSOME BIG TEXT
SOME BIG TEXTSOME BIG TEXT MADE LONGER

HOW TO ILLUSTRATOR • 11
TIP 5: Type on a Path
Here comes a fun one:
· Create a path (a circle, a diagonal line, a wavy line, any path you’d like)
· Click and hold on the Text tool to reveal the hidden options
· Choose the Type on a Path tool
· Click somewhere on the path (generally some sort of top or starting point is good)
· Type or copy and paste your text
Heads up! If the path you created had any colors or effects applied, they will disappear.
· Click and drag the long bar opposite the type to adjust where the type is on the path
Beware: this can be extremely finicky. Just make friends with your undo button and be patient.
Hey! This is text on a circle!
Hey! This is text on a circle!

HOW TO ILLUSTRATOR • 12
TIP 6A: Some Miscellaneous Type Tips
Character Palette:
· Change physical characteristics (typeface, weight, size, leading, kerning) of selected text
· Adjust baseline of selected text (shift some text slightly upward or downward)
· Make text uppercase, small caps, super or subscript, underlined, or with a strikethrough
Paragraph Palette:
· Change text alignment · Indent a full paragraph (from left or right)
· Indent just the first line · Add space before or after a paragraph
· Toggle hyphenation on and off
So... someone sent you some copy that’s formatted ugly:
· Type > Change Case ... will allow you to change selected text to all uppercase, all lowercase, title case (every word capitalized), or sentence case (first word of each sentence capitalized)
Please just pretend these tools don’t exist; it will make a type lover and the font’s designer cry.

HOW TO ILLUSTRATOR • 13
TIP 6B: Some (More!) Miscellaneous Type Tips
Glyphs Palette:
· Access some "hidden" characters that may be included with the typeface
· Easily use FontAwesome icons as vectors! (Yeah, I know!)
When to outline type*:
· You’re sending a file to a printer, client, or coworker who may not have the fonts you used, and they won’t need to change the text
· You’re using a glyph (maybe FontAwesome?) as an icon and would like to easily resize and reposition it
· You’d like to edit a character/glyph in a non-standard manner (Emma, this one’s for you!)
How to outline type:
· Select the type box (it’s all or nothing here), then use Type > Create Outlines
*Note: Text that is outlined can no longer be edited.

HOW TO ILLUSTRATOR • 14
TIP 7: Rounded Corners
Three ways to achieve rounded corners:
· 1: Effect > Stylize > Round Corners (This will round them all equal amounts)
· 2: Shape Properties (located along the top once a shape is selected): Choose corner radius for individual or all (if lock is selected) corners numerically
· 3: Use selection tool (will affect all corners) or direct selection tool (will affect just the corner nearest the anchor point selected) to drag the blue dot on a corner in or out

HOW TO ILLUSTRATOR • 15
TIP 8: Effect > Warp
Bonus: The Appearance Palette
Use Warp to:
· Alter the shape of text while leaving it editable
Oops! Too much bulge? Not enough arch?:
· Open the Appearance palette and click on any blue link to edit an aspect of the shape’s appearance (like the warp we just applied)
· Alter the appearance of a shape in various ways

HOW TO ILLUSTRATOR • 16
TIP 9A: The Infamous Pathfinder Tool
Common uses of the Pathfinder tool:
Add/Unite Subtract/Minus Front Intersect Exclude

HOW TO ILLUSTRATOR • 17
TIP 9B: For Mikey: Using the Pathfinder to Cut a Shape in Half
How to be a shape samurai (got your katana ready?):
· Create the shape you want to "cut" in half · Draw a dividing line through it (use the line segment tool) · With both selected, use the Divide tool within the Pathfinder palette · Either use the direct selection tool to move just one half or ungroup (Object > Ungroup) the shape you just sliced to manipulate the halves individually
Divide
Mmm... we just made a macaron
Divide
Mmm... we just made a macaron
HOW TO ILLUSTRATOR • 18
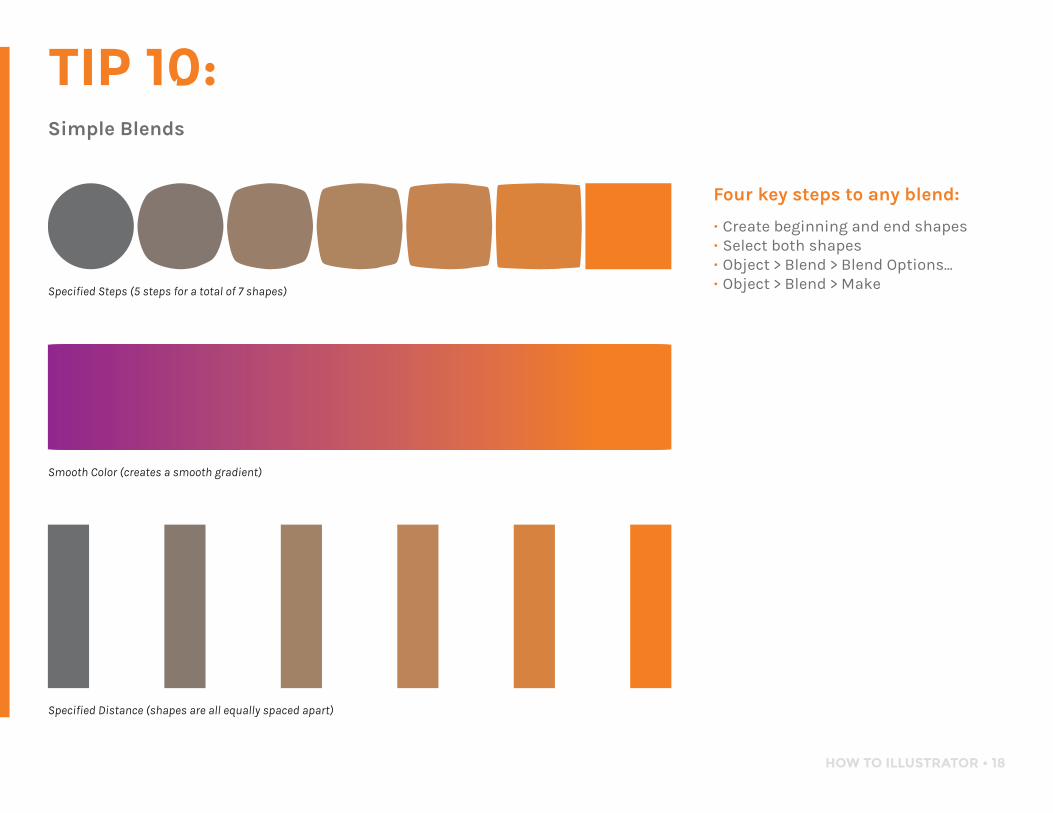
TIP 10: Simple Blends
Four key steps to any blend:
· Create beginning and end shapes · Select both shapes · Object > Blend > Blend Options... · Object > Blend > Make
Smooth Color (creates a smooth gradient)
Specified Distance (shapes are all equally spaced apart)
Specified Steps (5 steps for a total of 7 shapes)