IIS by Raghavendra
46
A PROJECT ON ³Internet Information Services´ SUBMITTED IN PARTIAL FULFILLMENT OF THE REQIREMENT FOR THE AWARD OF THE DIPLOMA OF B.Sc. INFRASTRUCTURE MANAGEMENT SYSTEM Project Guide:- Submitted by: Mr.Jayant Vaishnav Raghav endra Pratap Singh Technical Coordinat or REG.NO.-520840953 IIHT Jaipur B.Sc. IMS (6 SEM.) India Institute of Hardware & Technology, Gandhi Path Vaishali Nagar, Jaipur-302021 Rajasthan
-
Upload
raghavendra-p-singh -
Category
Documents
-
view
226 -
download
0
Transcript of IIS by Raghavendra

8/6/2019 IIS by Raghavendra
http://slidepdf.com/reader/full/iis-by-raghavendra 1/46
A
PROJECT
ON
³Internet Information Services´
SUBMITTED IN PARTIAL FULFILLMENT OF THE REQIREMENT
FOR THE AWARD OF THE DIPLOMA
OF
B.Sc. INFRASTRUCTURE MANAGEMENT SYSTEM
Project Guide:- Submitted by:
Mr.Jayant Vaishnav Raghavendra Pratap
Singh
Technical Coordinator REG.NO.-520840953
IIHT Jaipur B.Sc. IMS (6 SEM.)
India Institute of Hardware & Technology,
Gandhi Path Vaishali Nagar, Jaipur-302021
Rajasthan

8/6/2019 IIS by Raghavendra
http://slidepdf.com/reader/full/iis-by-raghavendra 2/46
CANDIDATE¶S DECLARATION
This is to certify that work, which is being presented in the Project entitled
³Internet Information Services´ submitted by undersigned student of BSCIMS in
partial fulfillment for award of Degree of post B.SC. Of IMS is a record of my
own work Carrie out by me under guidance and supervision of Mr. Jayant
Vaishnav.
This work has not submitted elsewhere for award of any other degree.
Date: - Name & Signature of Students
Place: - Jaipur Raghavendra Pratap Singh
8/6/2019 IIS by Raghavendra
http://slidepdf.com/reader/full/iis-by-raghavendra 3/46
CERTIFICATE
This is to certify that R aghavendra Pratap Singh of BScIMS 6th semester of IIHT Academy Vaishali
Nagar Jaipur, has completed his project report on the topic of ³Internet Information Services´ under
the supervision of Jayant Vaishnav (Tech Head).
To best of my knowledge the report is original and has not been copied or submitted anywhere
else. It is an independent work done by him.
Mr. Jayant Vaishnav
Technical Coordinator
IIHT Academy , Jaipur

8/6/2019 IIS by Raghavendra
http://slidepdf.com/reader/full/iis-by-raghavendra 4/46
ACKNOWLEDGMENT
It is great happiness and privilege for me to present this project report on June 24, 2010. I have completed
this project under Mr . Jayant Vaishnav, (faculty guide.) IIHT, Jaipur. This is an essential requirement to
take project as a student of BSc (IMS) three year master degree course.
We would like to express our gratitude towards all those people who have in various ways, helped in
successful completion of our project.
We express our deep sense of respect to Mr Vinod Arora Director and Mr. Jayant Vaishnav (Tech.
Coordinator, IIHT, Jaipur) Project Guide, , for extending his full support to me and for giving me a
golden opportunity to work on this project.
We are also grateful to our Director Sir, parents, Sr. teachers, for them valuable suggestions and continuous
monitoring.
Date: R aghavendra Pratap Singh
8/6/2019 IIS by Raghavendra
http://slidepdf.com/reader/full/iis-by-raghavendra 5/46
Index
1. Introduction
2. Objective
3. Prerequisites
a. Hardware
b. Software
4. Checklist
5. Installation & Implementation
a. The Pre Installation
b. The Installation
c. The Post Installation
6. Method of Access
a. Using IP
b. Using Port No.
c. Using header
7. Defining of Web-site
8. The Complete Configuration of IIS
9. Summary
8/6/2019 IIS by Raghavendra
http://slidepdf.com/reader/full/iis-by-raghavendra 6/46
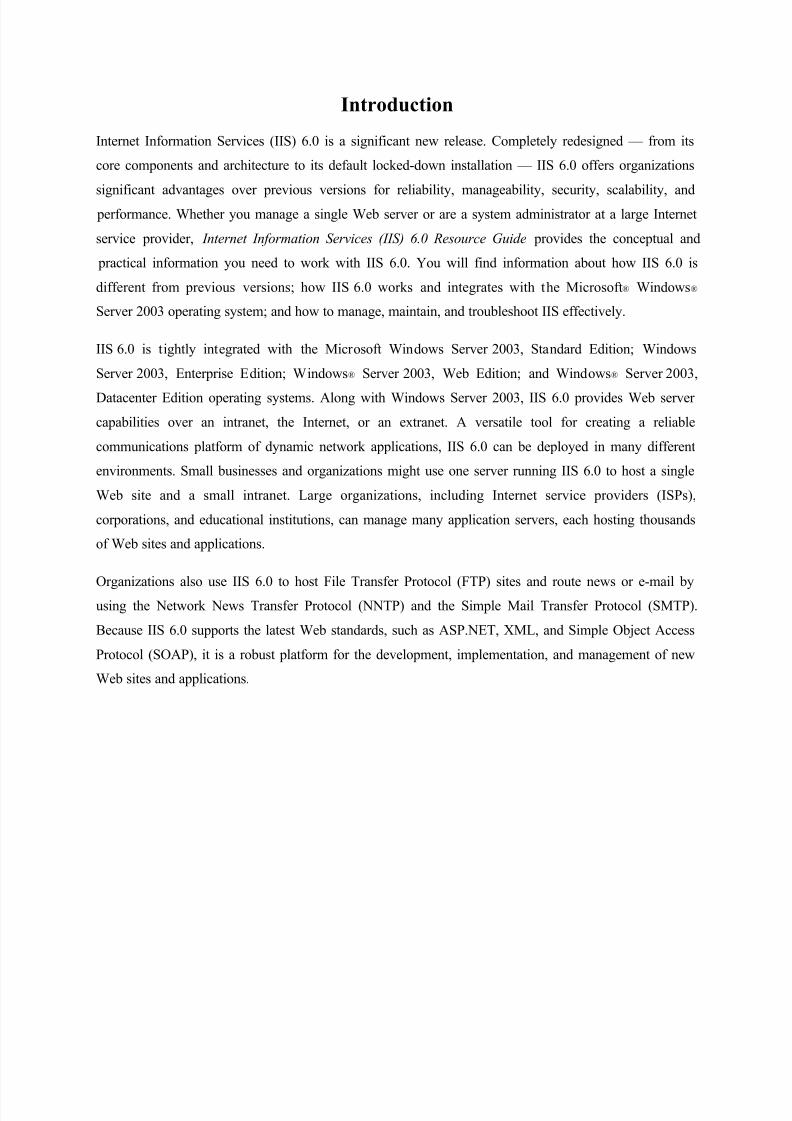
Introduction
Internet Information Services (IIS) 6.0 is a significant new release. Completely redesigned ² from its
core components and architecture to its default locked-down installation ² IIS 6.0 offers organizations
significant advantages over previous versions for reliability, manageability, security, scalability, and performance. Whether you manage a single Web server or are a system administrator at a large Internet
service provider, Internet Information Services (IIS) 6.0 Resource Guide provides the conceptual and
practical information you need to work with IIS 6.0. You will find information about how IIS 6.0 is
different from previous versions; how IIS 6.0 works and integrates with the Microsoft® Windows®
Server 2003 operating system; and how to manage, maintain, and troubleshoot IIS effectively.
IIS 6.0 is tightly integrated with the Microsoft Windows Server 2003, Standard Edition; Windows
Server 2003, Enterprise Edition; Windows® Server 2003, Web Edition; and Windows® Server 2003,
Datacenter Edition operating systems. Along with Windows Server 2003, IIS 6.0 provides Web server
capabilities over an intranet, the Internet, or an extranet. A versatile tool for creating a reliable
communications platform of dynamic network applications, IIS 6.0 can be deployed in many different
environments. Small businesses and organizations might use one server running IIS 6.0 to host a single
Web site and a small intranet. Large organizations, including Internet service providers (ISPs),
corporations, and educational institutions, can manage many application servers, each hosting thousands
of Web sites and applications.
Organizations also use IIS 6.0 to host File Transfer Protocol (FTP) sites and route news or e-mail by
using the Network News Transfer Protocol (NNTP) and the Simple Mail Transfer Protocol (SMTP).
Because IIS 6.0 supports the latest Web standards, such as ASP.NET, XML, and Simple Object Access
Protocol (SOAP), it is a robust platform for the development, implementation, and management of new
Web sites and applications.

8/6/2019 IIS by Raghavendra
http://slidepdf.com/reader/full/iis-by-raghavendra 7/46
Objective
This article will guide you through installing IIS 6.0 on Windows Server 2003, and show you
how to avoid common mistakes and explain some of the new features available in IIS 6.0. The
outcome of this article is to have a web server running IIS 6.0 that will serve ASP, ASP.NET and
static content. Although this sounds trivial (and was trivial on Windows 2000), it requires some
additional steps in IIS 6.0.
8/6/2019 IIS by Raghavendra
http://slidepdf.com/reader/full/iis-by-raghavendra 8/46
Checklist
y Enable a firewall
y Visit Windows Update
y Install and update antivirus software
y Install IIS
y Configure IIS
y Visit Windows Update
y Open port(s) in the firewall (optional)
8/6/2019 IIS by Raghavendra
http://slidepdf.com/reader/full/iis-by-raghavendra 9/46
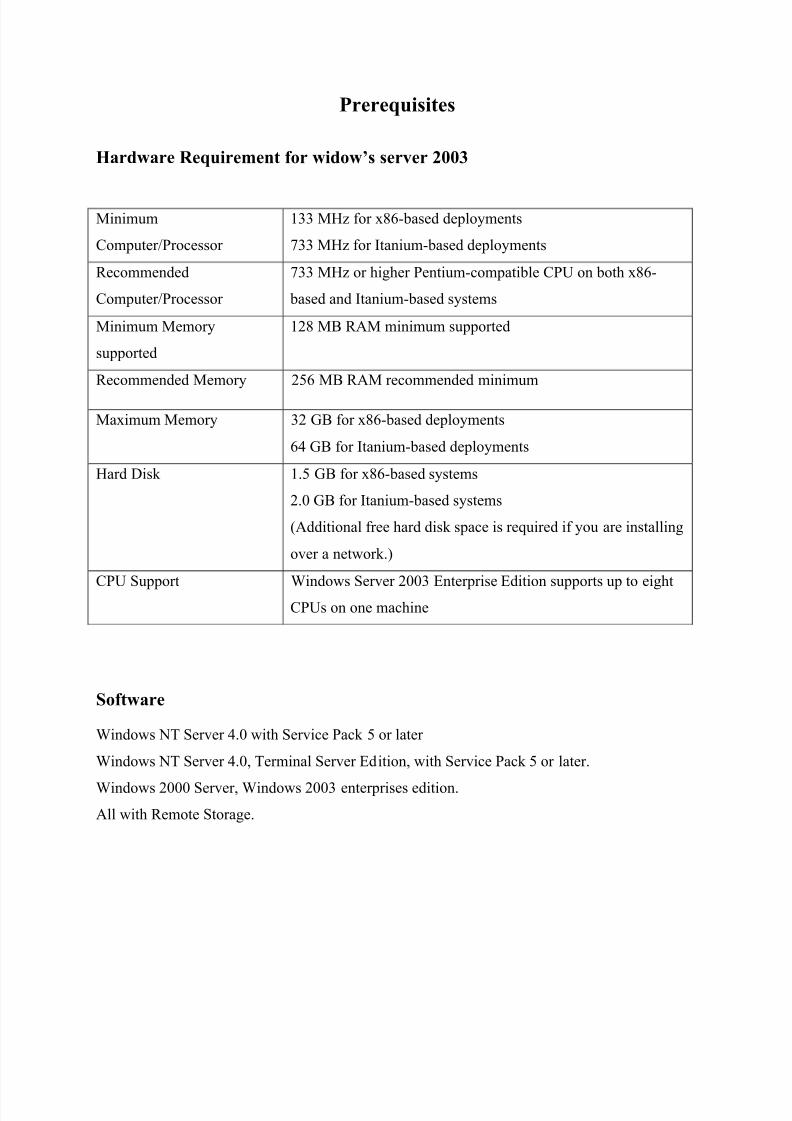
Prerequisites
Hardware R equirement for widow¶s server 2003
Minimum
Computer/Processor
133 MHz for x86-based deployments
733 MHz for Itanium-based deployments
Recommended
Computer/Processor
733 MHz or higher Pentium-compatible CPU on both x86-
based and Itanium-based systems
Minimum Memory
supported
128 MB RAM minimum supported
Recommended Memory 256 MB RAM recommended minimum
Maximum Memory 32 GB for x86-based deployments
64 GB for Itanium-based deployments
Hard Disk 1.5 GB for x86-based systems
2.0 GB for Itanium-based systems
(Additional free hard disk space is required if you are installing
over a network.)
CPU Support Windows Server 2003 Enterprise Edition supports up to eight
CPUs on one machine
Software
Windows NT Server 4.0 with Service Pack 5 or later
Windows NT Server 4.0, Terminal Server Edition, with Service Pack 5 or later.
Windows 2000 Server, Windows 2003 enterprises edition.
All with Remote Storage.
8/6/2019 IIS by Raghavendra
http://slidepdf.com/reader/full/iis-by-raghavendra 10/46
Installation & Implementation
Pre-installation
Before we start the installation of IIS there are a few things we need to do. One of them is to
secure the operating system (OS). That means we need a firewall, antivirus software and update
the OS. The system I am using when writing this article is already behind a hardware firewall,
but for additional security (and to show the reader) the built-in firewall is enabled as well. A
very important notice is that you should not open up any ports in the firewall, not even port 80,
before the installation. Although IIS 6.0 is locked down by default, and no known security issues
impacts IIS during installation (when writing this) it is wise to first properly configure IIS and
then publish it.
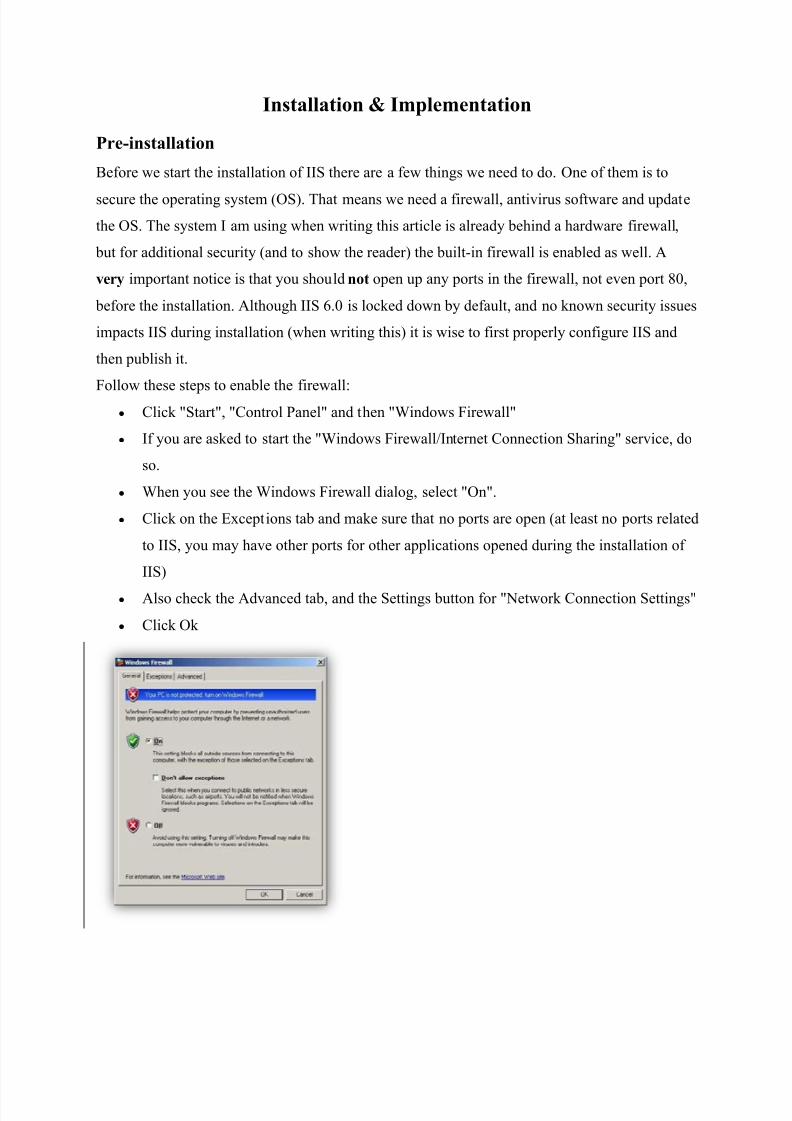
Follow these steps to enable the firewall:y Click "Start", "Control Panel" and then "Windows Firewall"
y If you are asked to start the "Windows Firewall/Internet Connection Sharing" service, do
so.
y When you see the Windows Firewall dialog, select "On".
y Click on the Exceptions tab and make sure that no ports are open (at least no ports related
to IIS, you may have other ports for other applications opened during the installation of
IIS)
y Also check the Advanced tab, and the Settings button for "Network Connection Settings"
y Click Ok
8/6/2019 IIS by Raghavendra
http://slidepdf.com/reader/full/iis-by-raghavendra 11/46
Once the firewall is enabled, it is time to visit Windows Update and get the latest updates.
y Click "Start" and then "Windows Update"
y Follow the instructions
The last step in this section is to install and/or update an antivirus program. Do note that the
antivirus software should be designed to be used on servers. Antivirus software designed for
home users will not install on a server edition of Windows, or may not work well with IIS.
The installation
IIS can be installed in two ways, either by using the "Manage Your Server" wizard, or by using
"Add/Remove Windows Components". In this article, I will show you how to use "Manage Your
Server".
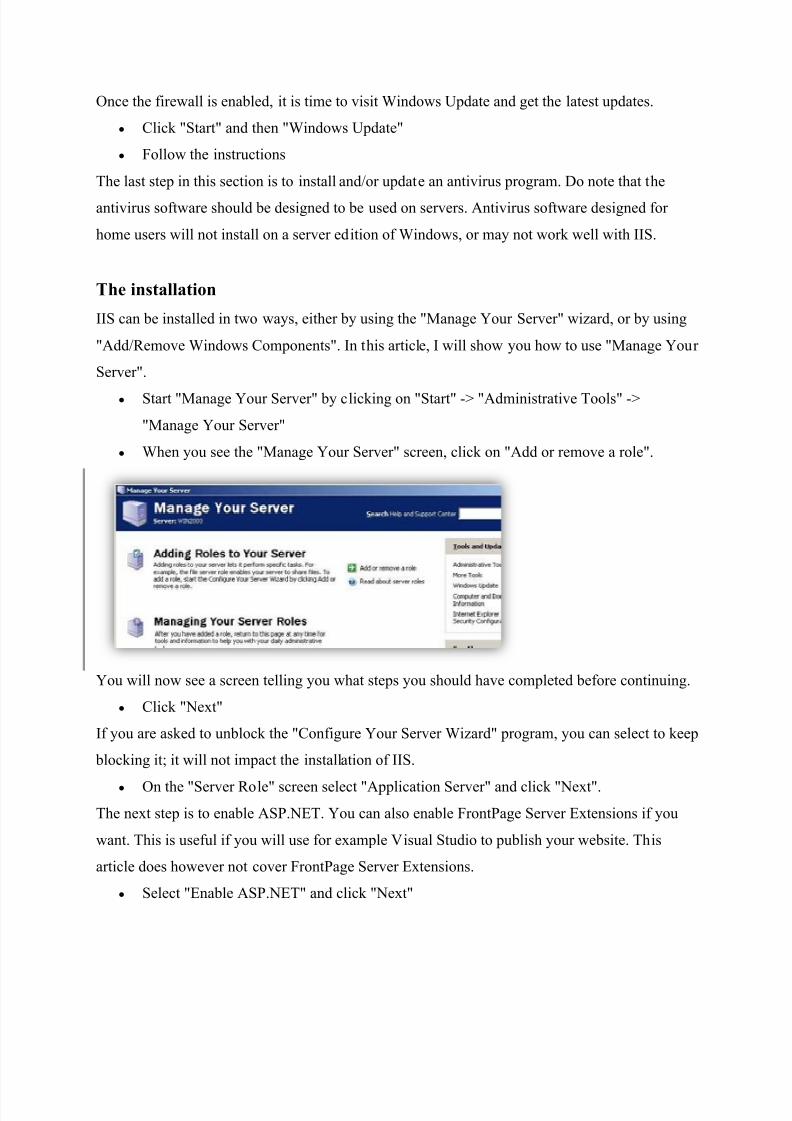
y Start "Manage Your Server" by clicking on "Start" -> "Administrative Tools" ->
"Manage Your Server"
y When you see the "Manage Your Server" screen, click on "Add or remove a role".
You will now see a screen telling you what steps you should have completed before continuing.
y Click "Next"
If you are asked to unblock the "Configure Your Server Wizard" program, you can select to keep
blocking it; it will not impact the installation of IIS.
y On the "Server Role" screen select "Application Server" and click "Next".
The next step is to enable ASP.NET. You can also enable FrontPage Server Extensions if you
want. This is useful if you will use for example Visual Studio to publish your website. This
article does however not cover FrontPage Server Extensions.
y Select "Enable ASP.NET" and click "Next"
8/6/2019 IIS by Raghavendra
http://slidepdf.com/reader/full/iis-by-raghavendra 12/46
A summary will be presented to you, and the installation will start after you click Next.
y Click "Next"
You may be asked for the Windows Server 2003 CD during the installation, so keep it nearby.
When the installation has finished, click the "Finish" button.
Post-installation
Once IIS is installed, you will probably want to check if it is running and working as expected.
To do so, we can simply browse to http://localhost/ on the machine itself. Localhost refers to the
local machine, and can only be used on the machine itself. It cannot be used to access other
machines.
If you do this using Internet Explorer you will see an "Under Construction" page. This indicates
that IIS is installed and can process requests. It also means that we have not yet created a default
page for our website.
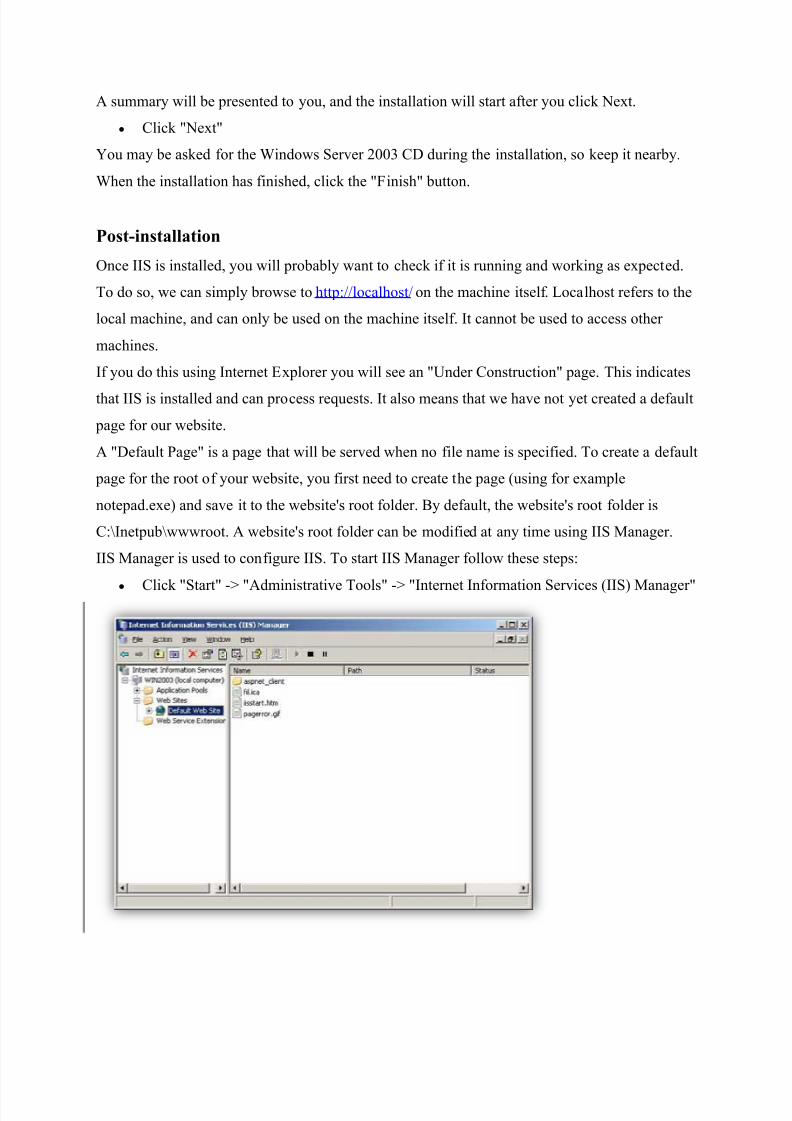
A "Default Page" is a page that will be served when no file name is specified. To create a default
page for the root of your website, you first need to create the page (using for example
notepad.exe) and save it to the website's root folder. By default, the website's root folder is
C:\Inetpub\wwwroot. A website's root folder can be modified at any time using IIS Manager.
IIS Manager is used to configure IIS. To start IIS Manager follow these steps:
y Click "Start" -> "Administrative Tools" -> "Internet Information Services (IIS) Manager"
8/6/2019 IIS by Raghavendra
http://slidepdf.com/reader/full/iis-by-raghavendra 13/46
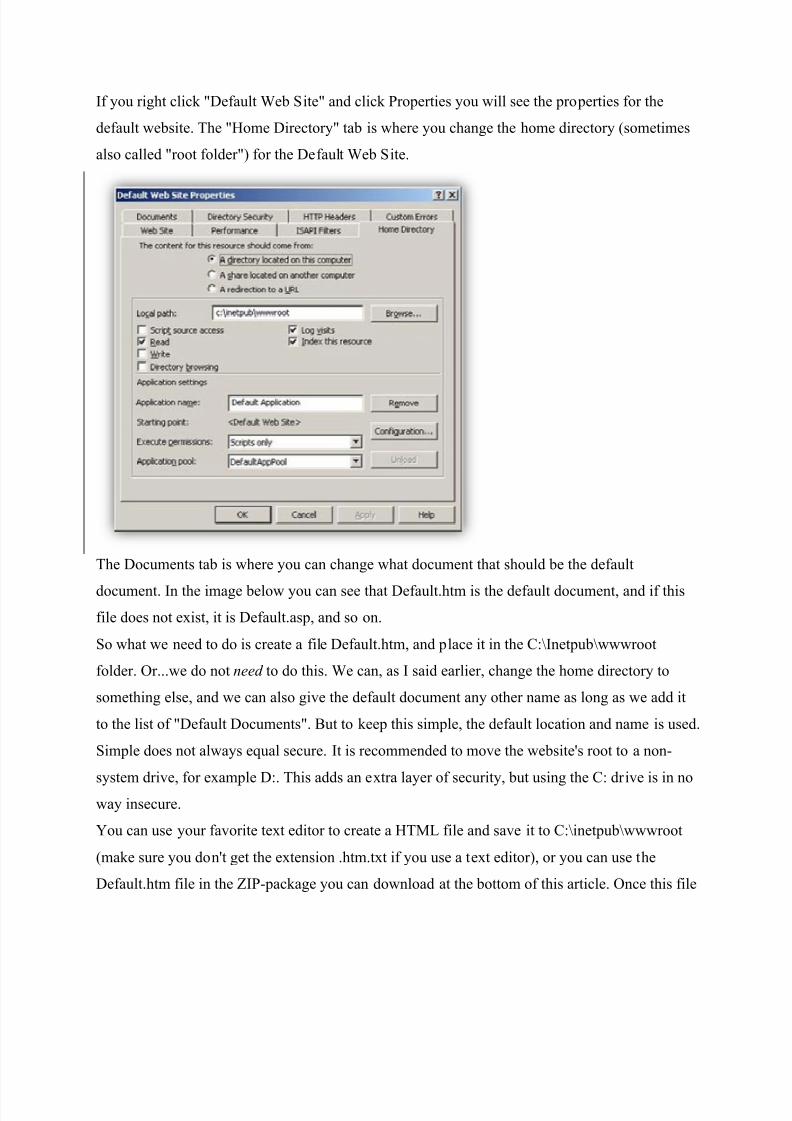
If you right click "Default Web Site" and click Properties you will see the properties for the
default website. The "Home Directory" tab is where you change the home directory (sometimes
also called "root folder") for the Default Web Site.
The Documents tab is where you can change what document that should be the default
document. In the image below you can see that Default.htm is the default document, and if this
file does not exist, it is Default.asp, and so on.
So what we need to do is create a file Default.htm, and place it in the C:\Inetpub\wwwroot
folder. Or...we do not need to do this. We can, as I said earlier, change the home directory to
something else, and we can also give the default document any other name as long as we add it
to the list of "Default Documents". But to keep this simple, the default location and name is used.
Simple does not always equal secure. It is recommended to move the website's root to a non-
system drive, for example D:. This adds an extra layer of security, but using the C: drive is in no
way insecure.
You can use your favorite text editor to create a HTML file and save it to C:\inetpub\wwwroot
(make sure you don't get the extension .htm.txt if you use a text editor), or you can use the
Default.htm file in the ZIP-package you can download at the bottom of this article. Once this file
8/6/2019 IIS by Raghavendra
http://slidepdf.com/reader/full/iis-by-raghavendra 14/46
is placed in the home directory, and you browse to http://localhost/ you will see the content of
the default document.
So now we have a default document. The goal of this article was however to get the server to
serve static pages, ASP and ASP.NET. Static pages and ASP.NET should work at this moment
(IIS serves static pages by default, and ASP.NET was enabled during the installation). But just to
make sure that it works, browse to http://localhost/default.htm.
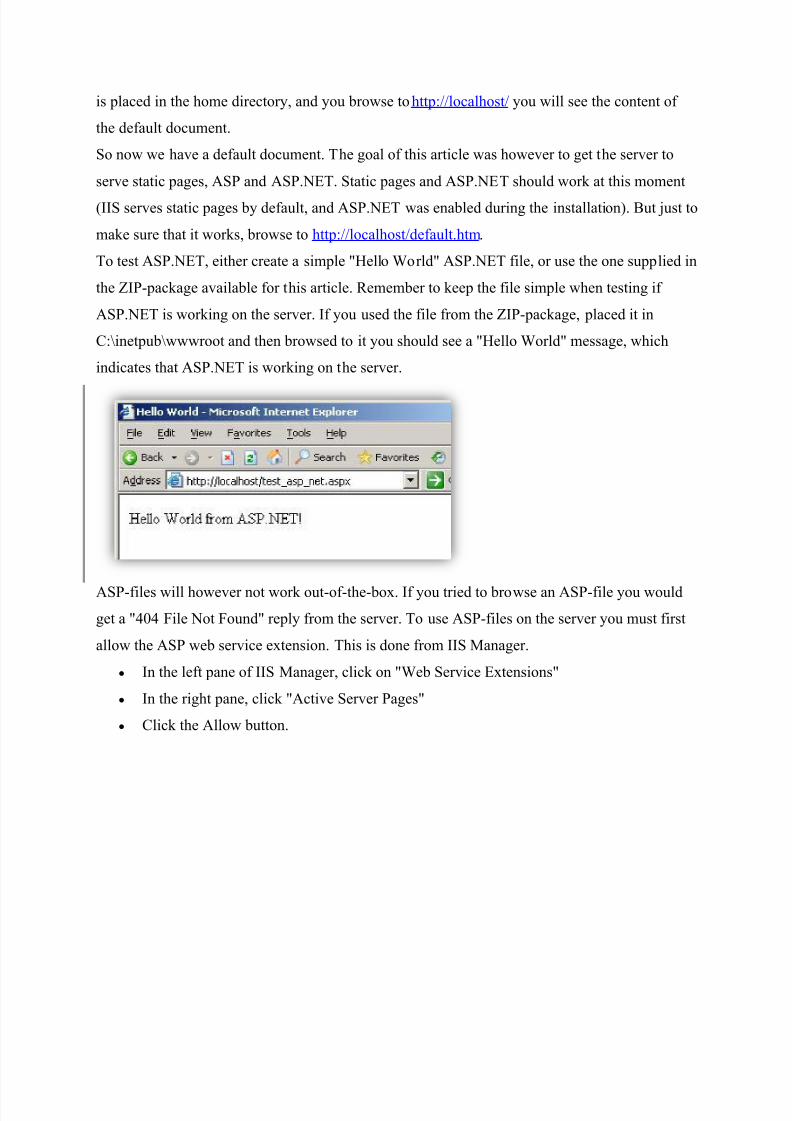
To test ASP.NET, either create a simple "Hello World" ASP.NET file, or use the one supplied in
the ZIP-package available for this article. Remember to keep the file simple when testing if
ASP.NET is working on the server. If you used the file from the ZIP-package, placed it in
C:\inetpub\wwwroot and then browsed to it you should see a "Hello World" message, which
indicates that ASP.NET is working on the server.
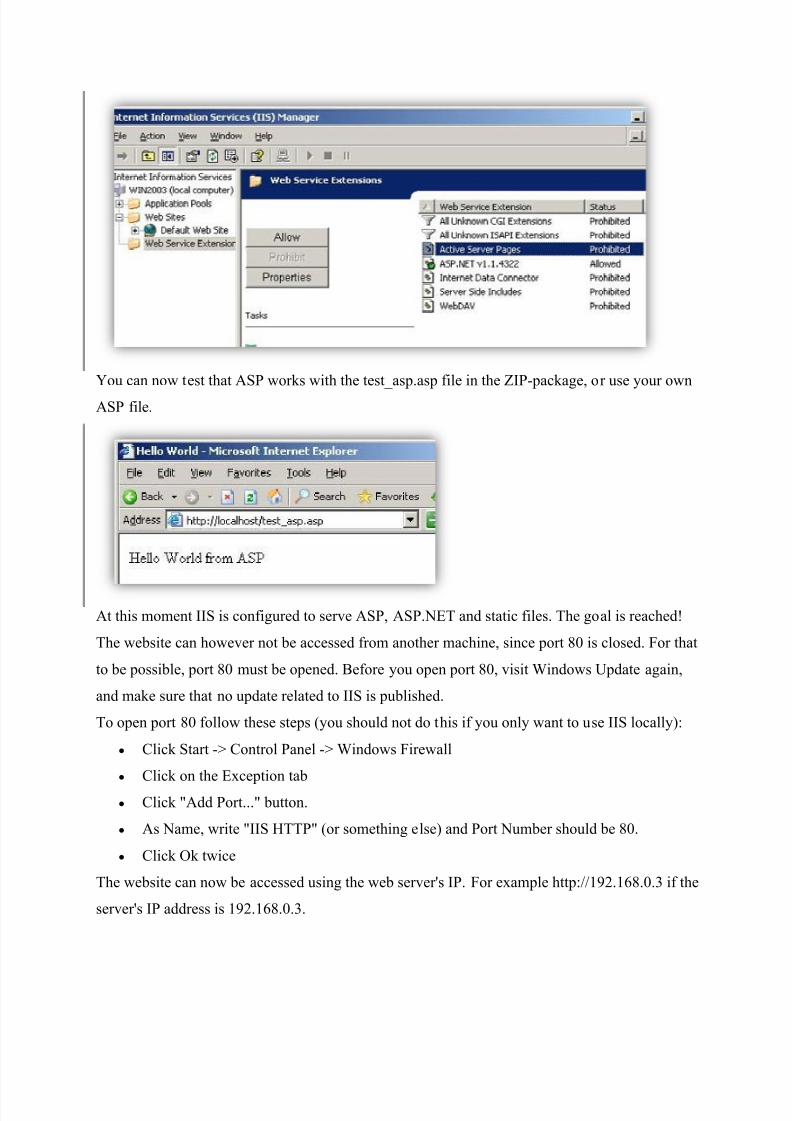
ASP-files will however not work out-of-the-box. If you tried to browse an ASP-file you would
get a "404 File Not Found" reply from the server. To use ASP-files on the server you must first
allow the ASP web service extension. This is done from IIS Manager.
y In the left pane of IIS Manager, click on "Web Service Extensions"
y In the right pane, click "Active Server Pages"
y Click the Allow button.
8/6/2019 IIS by Raghavendra
http://slidepdf.com/reader/full/iis-by-raghavendra 15/46
You can now test that ASP works with the test_asp.asp file in the ZIP-package, or use your own
ASP file.
At this moment IIS is configured to serve ASP, ASP.NET and static files. The goal is reached!
The website can however not be accessed from another machine, since port 80 is closed. For that
to be possible, port 80 must be opened. Before you open port 80, visit Windows Update again,
and make sure that no update related to IIS is published.
To open port 80 follow these steps (you should not do this if you only want to use IIS locally):
y Click Start -> Control Panel -> Windows Firewall
y Click on the Exception tab
y Click "Add Port..." button.
y As Name, write "IIS HTTP" (or something else) and Port Number should be 80.
y Click Ok twice
The website can now be accessed using the web server's IP. For example http://192.168.0.3 if the
server's IP address is 192.168.0.3.
8/6/2019 IIS by Raghavendra
http://slidepdf.com/reader/full/iis-by-raghavendra 16/46
Installing IIS6 on Windows Server 2003:
If using the new style Start menu: Click on ³Start´, ³Control Panel´, ³Add or Remove
Programs´ and select the ³Add/Remove Windows Components´ tab on the left-hand side.
If using the "Classic" style Start menu: Click on ³Start´, ³Settings´, ³Control Panel´, ³Add
or Remove Programs´ and select the ³Add/Remove Windows Components´ tab on the left-
hand side.
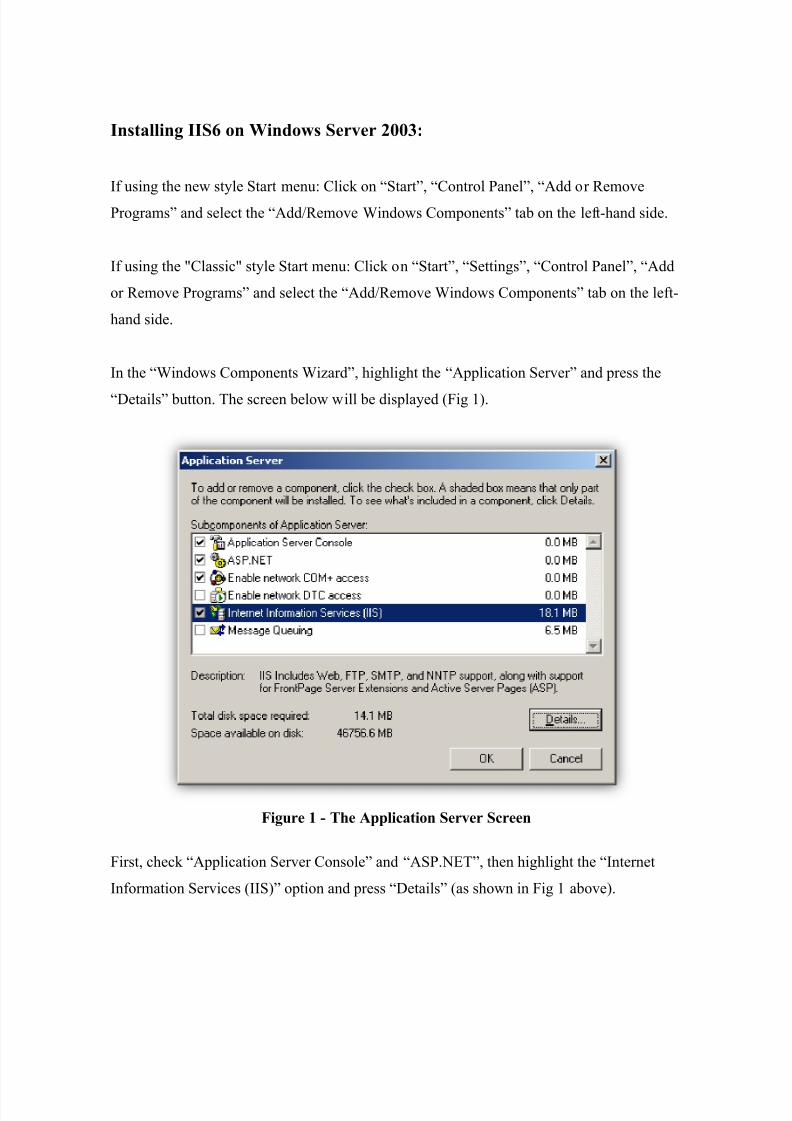
In the ³Windows Components Wizard´, highlight the ³Application Server´ and press the
³Details´ button. The screen below will be displayed (Fig 1).
Figure 1 - The Application Server Screen
First, check ³Application Server Console´ and ³ASP.NET´, then highlight the ³Internet
Information Services (IIS)´ option and press ³Details´ (as shown in Fig 1 above).
8/6/2019 IIS by Raghavendra
http://slidepdf.com/reader/full/iis-by-raghavendra 17/46
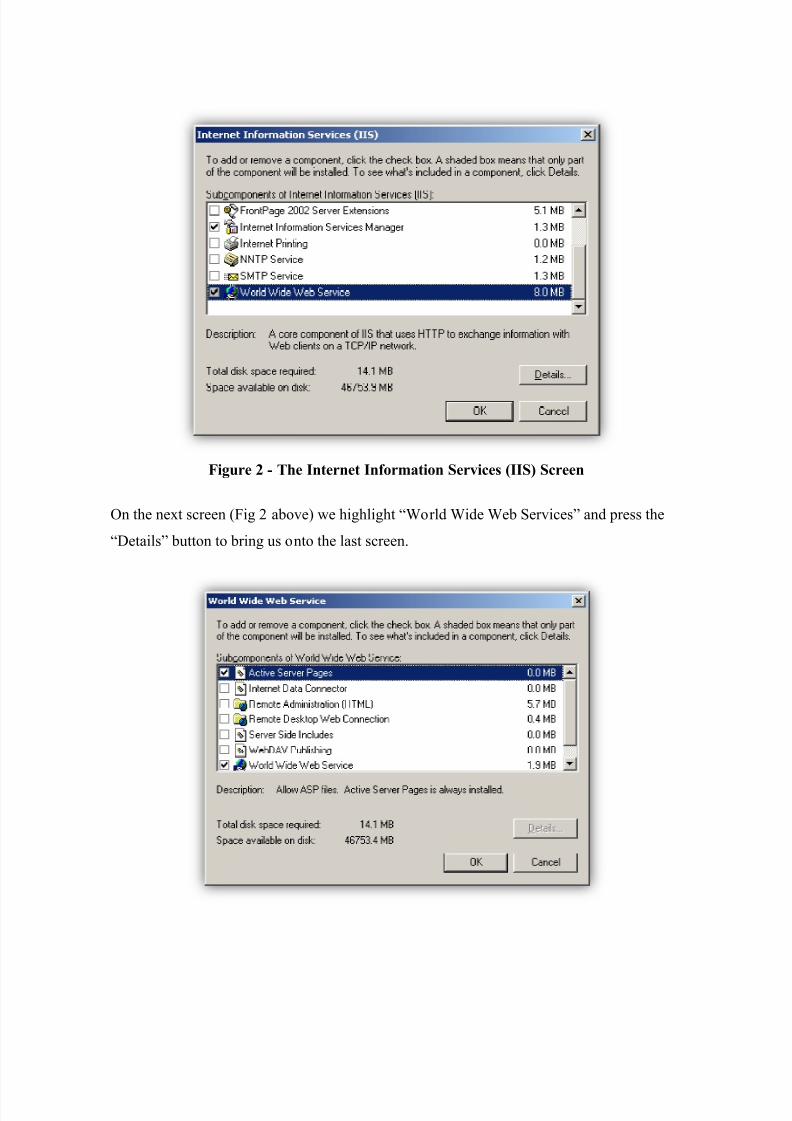
Figure 2 - The Internet Information Services (IIS) Screen
On the next screen (Fig 2 above) we highlight ³World Wide Web Services´ and press the
³Details´ button to bring us onto the last screen.
8/6/2019 IIS by Raghavendra
http://slidepdf.com/reader/full/iis-by-raghavendra 18/46
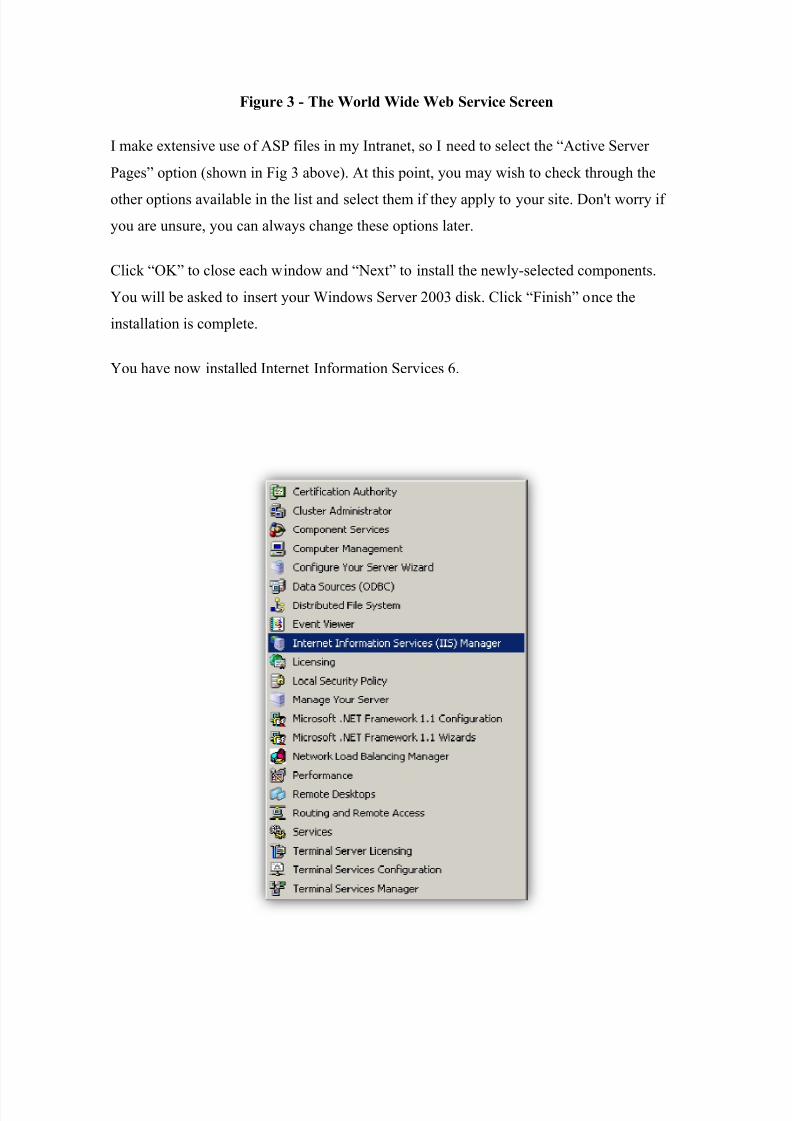
Figure 3 - The World Wide Web Service Screen
I make extensive use of ASP files in my Intranet, so I need to select the ³Active Server
Pages´ option (shown in Fig 3 above). At this point, you may wish to check through the
other options available in the list and select them if they apply to your site. Don't worry if
you are unsure, you can always change these options later.
Click ³OK´ to close each window and ³Next´ to install the newly-selected components.
You will be asked to insert your Windows Server 2003 disk. Click ³Finish´ once the
installation is complete.
You have now installed Internet Information Services 6.

8/6/2019 IIS by Raghavendra
http://slidepdf.com/reader/full/iis-by-raghavendra 19/46
Figure 4 - Where to find the IIS Manager
Where to find the IIS Manager:
If you are using the new style Start menu, you can reach the Internet Information Services
console by clicking ³Start´, ³Administrative Tools´ and selecting ³Internet Information
Services (IIS) Manager´ from the list in figure 4 above.
If you are using the ³Classic´ style Start Menu, you can reach the console by clicking ³Start´,
³Programs´, ³Administrative Tools´ and select ³Internet Information Services (IIS) Manager´
from the list in figure 4 above.
8/6/2019 IIS by Raghavendra
http://slidepdf.com/reader/full/iis-by-raghavendra 20/46
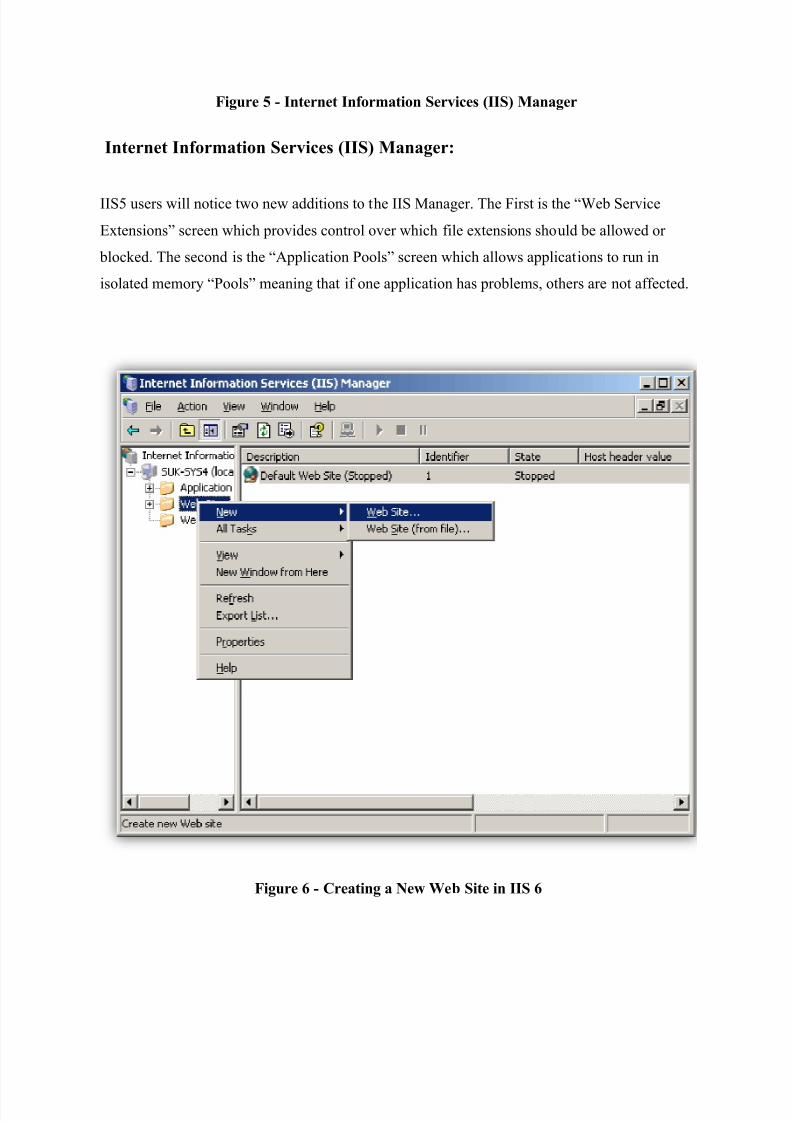
Figure 5 - Internet Information Services (IIS) Manager
Internet Information Services (IIS) Manager:
IIS5 users will notice two new additions to the IIS Manager. The First is the ³Web Service
Extensions´ screen which provides control over which file extensions should be allowed or
blocked. The second is the ³Application Pools´ screen which allows applications to run in
isolated memory ³Pools´ meaning that if one application has problems, others are not affected.
Figure 6 - Creating a New Web Site in IIS 6
8/6/2019 IIS by Raghavendra
http://slidepdf.com/reader/full/iis-by-raghavendra 21/46
Creating a New Site in IIS 6:
The first task is to disable the ³Default Web Site´. To do this, select the ³Web Sites´ item in the
left-hand pane then right-click on the ³Default Web Site´ item in the right-hand pane and select
³Stop´ from the list. The Default Web Site is now stopped.
Next, we need to create a new site to host our web content. To do this, right-click on ³Web
Sites´ in the left-hand pane and select ³New´ and ³Web Site«´ as shown above in figure 6.
When the ³Welcome to the Web Site creation Wizard´ screen appears, click next.
8/6/2019 IIS by Raghavendra
http://slidepdf.com/reader/full/iis-by-raghavendra 22/46
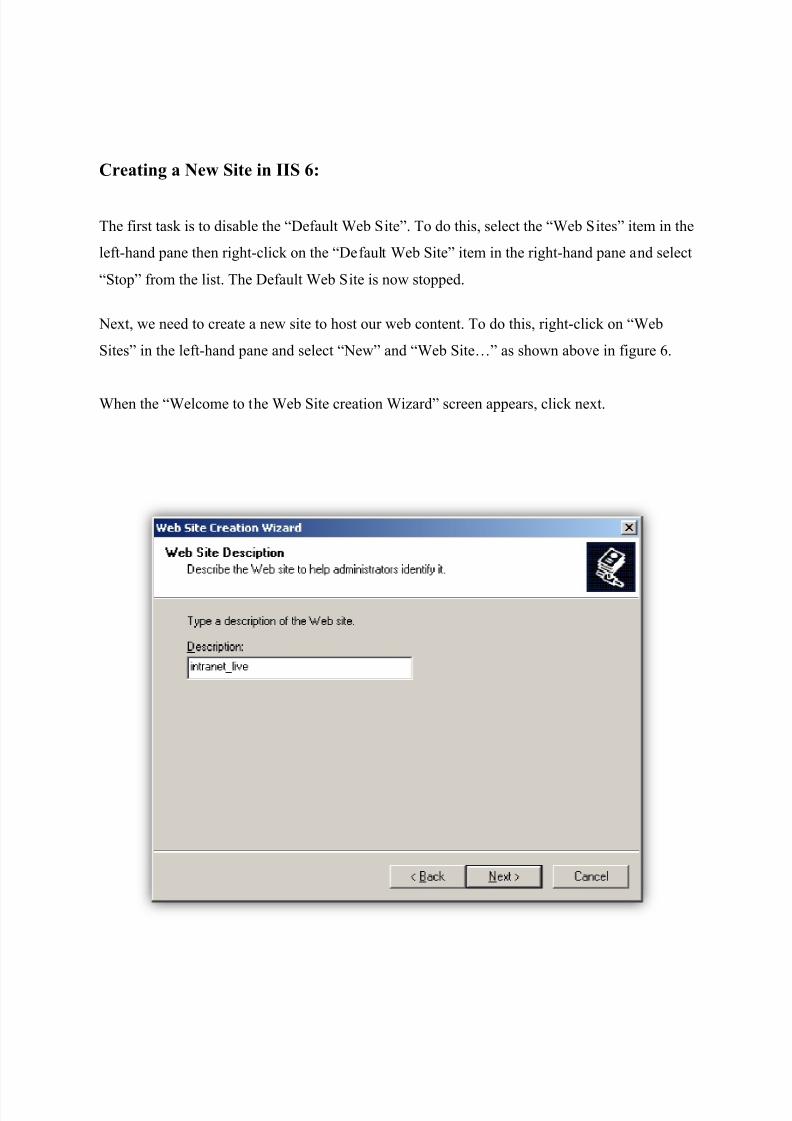
Figure 7 - Name your Site
Name your Site:
Simply enter in a name for your site in the box and press "Next" as shown in Figure 7
above. This name is for reference only and should help you locate your site in IIS Manager.
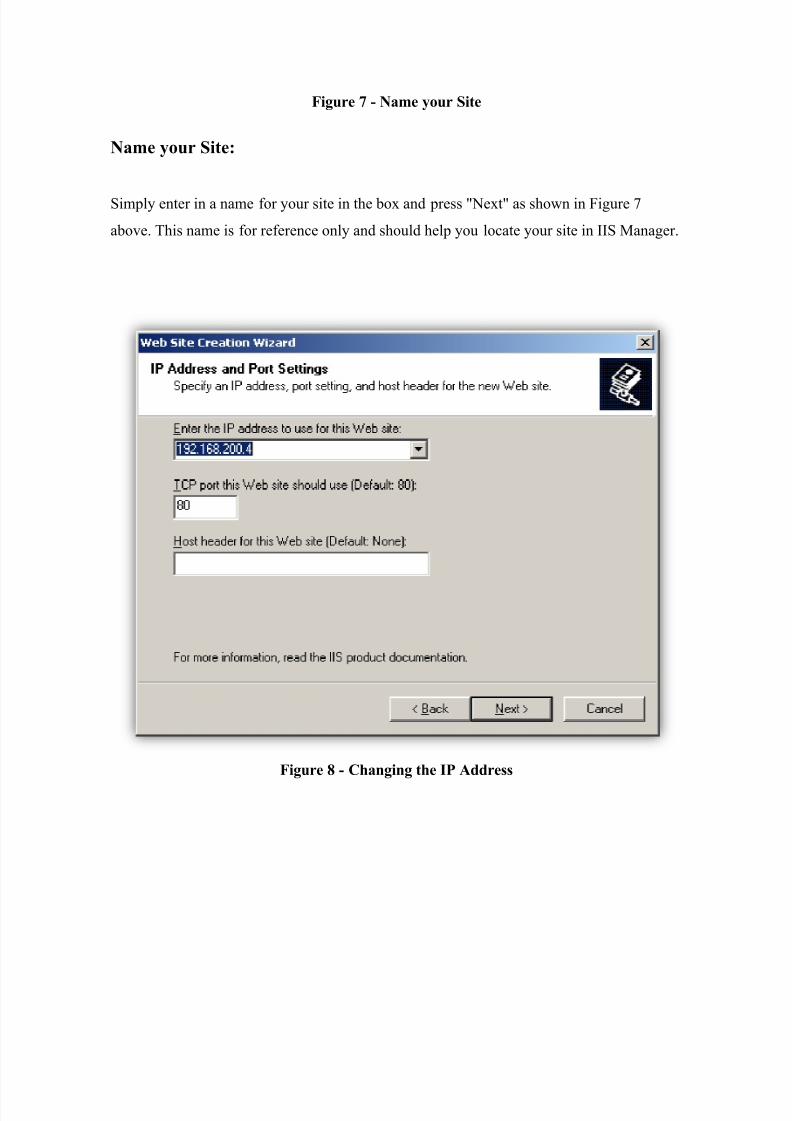
Figure 8 - Changing the IP Address

8/6/2019 IIS by Raghavendra
http://slidepdf.com/reader/full/iis-by-raghavendra 23/46
Method of Access
Method of Access (using an IP address - R ecommended):
This method simply uses the IP address (or one of the IP addresses if more than one are
configured) of the web site to allow users to reach the site.
To use this method, all you need to do is select an/the available IP number from the list and
leave the port settings on 80.
To reach the site, visitors will have to type the IP address http://192.168.200.4 into their web
browser. They can also type the machine name in eg. http://suk-sys4
8/6/2019 IIS by Raghavendra
http://slidepdf.com/reader/full/iis-by-raghavendra 24/46
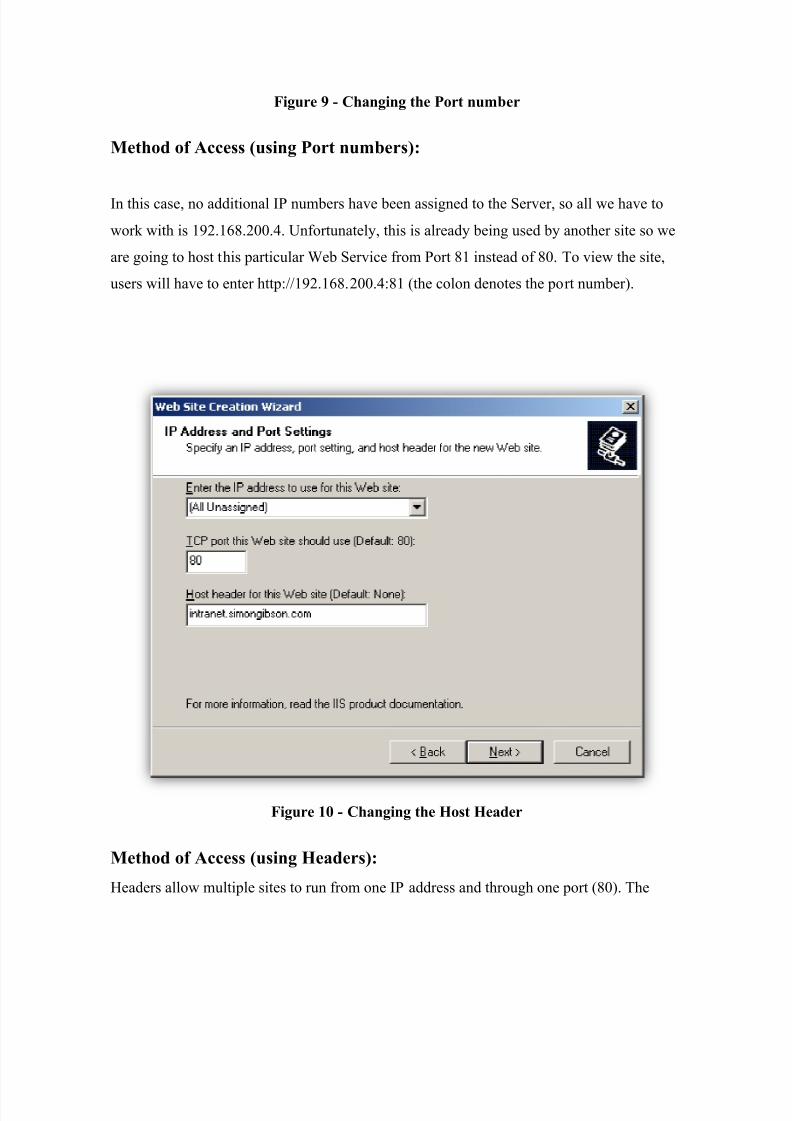
Figure 9 - Changing the Port number
Method of Access (using Port numbers):
In this case, no additional IP numbers have been assigned to the Server, so all we have to
work with is 192.168.200.4. Unfortunately, this is already being used by another site so we
are going to host this particular Web Service from Port 81 instead of 80. To view the site,
users will have to enter http://192.168.200.4:81 (the colon denotes the port number).
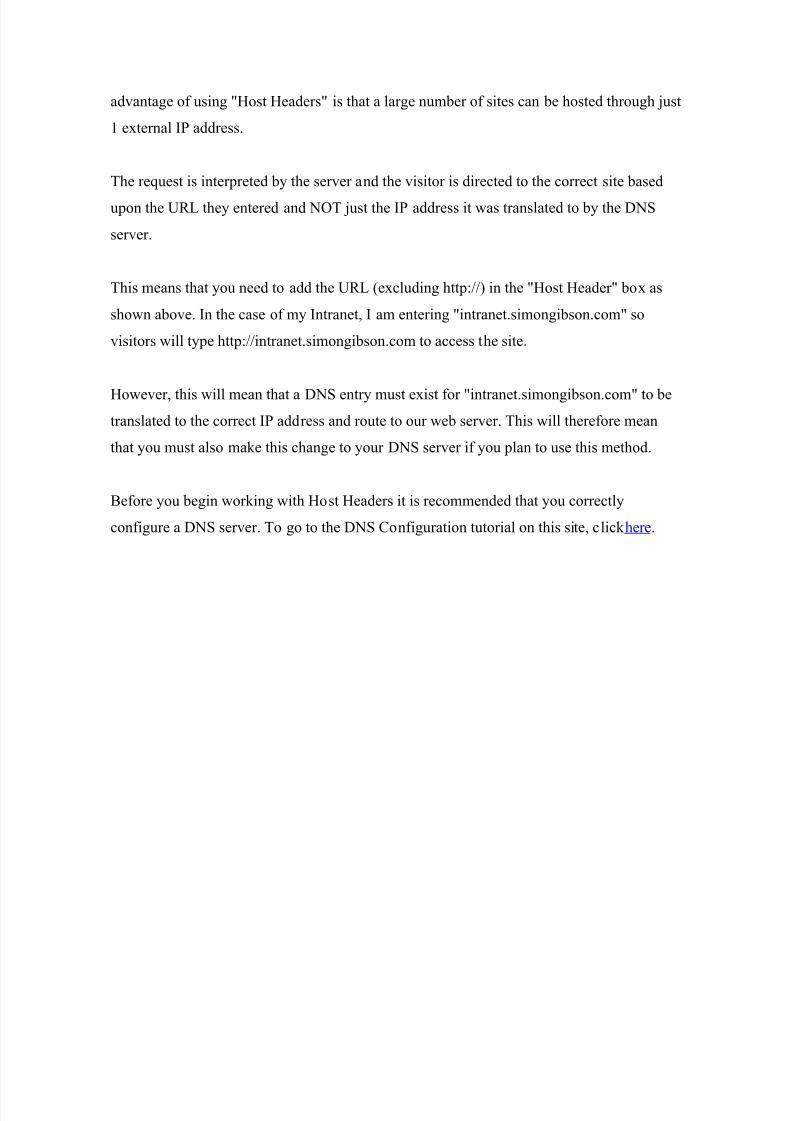
Figure 10 - Changing the Host Header
Method of Access (using Headers):
Headers allow multiple sites to run from one IP address and through one port (80). The
8/6/2019 IIS by Raghavendra
http://slidepdf.com/reader/full/iis-by-raghavendra 25/46
advantage of using "Host Headers" is that a large number of sites can be hosted through just
1 external IP address.
The request is interpreted by the server and the visitor is directed to the correct site based
upon the URL they entered and NOT just the IP address it was translated to by the DNS
server.
This means that you need to add the URL (excluding http://) in the "Host Header" box as
shown above. In the case of my Intranet, I am entering "intranet.simongibson.com" so
visitors will type http://intranet.simongibson.com to access the site.
However, this will mean that a DNS entry must exist for "intranet.simongibson.com" to be
translated to the correct IP address and route to our web server. This will therefore mean
that you must also make this change to your DNS server if you plan to use this method.
Before you begin working with Host Headers it is recommended that you correctly
configure a DNS server. To go to the DNS Configuration tutorial on this site, click here.
8/6/2019 IIS by Raghavendra
http://slidepdf.com/reader/full/iis-by-raghavendra 26/46
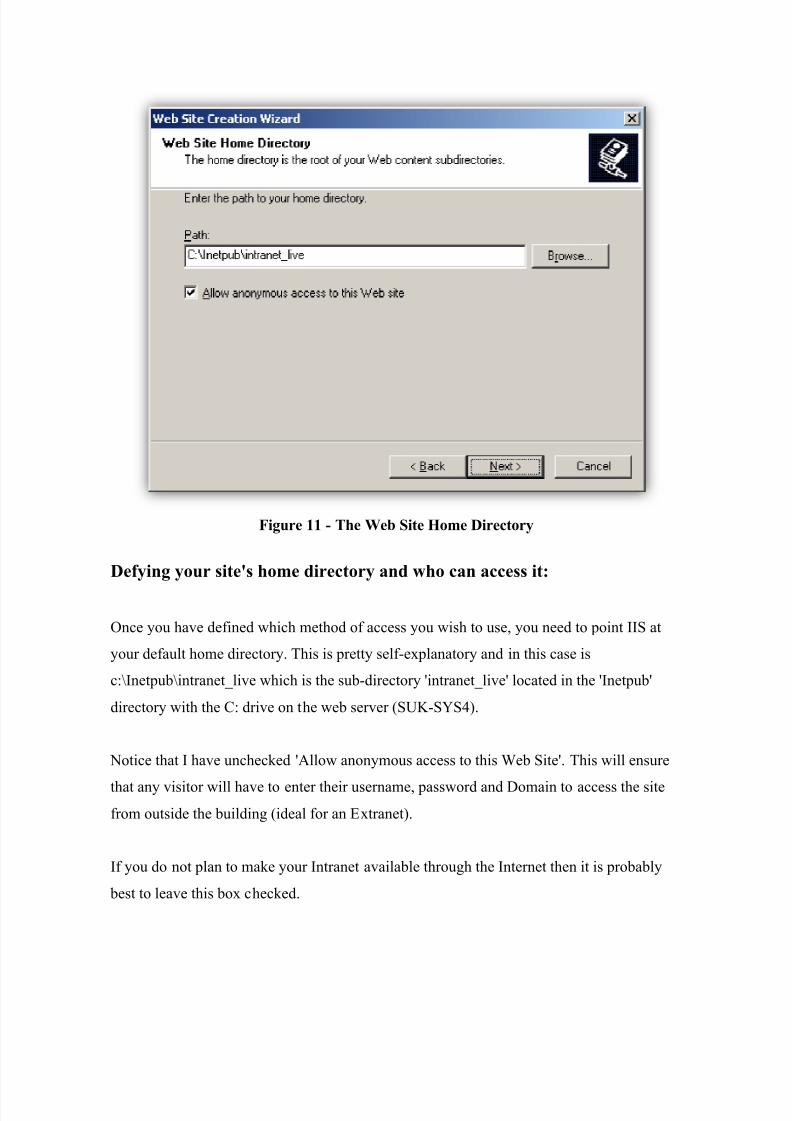
Figure 11 - The Web Site Home Directory
Defying your site's home directory and who can access it:
Once you have defined which method of access you wish to use, you need to point IIS at
your default home directory. This is pretty self-explanatory and in this case is
c:\Inetpub\intranet_live which is the sub-directory 'intranet_live' located in the 'Inetpub'
directory with the C: drive on the web server (SUK-SYS4).
Notice that I have unchecked 'Allow anonymous access to this Web Site'. This will ensure
that any visitor will have to enter their username, password and Domain to access the site
from outside the building (ideal for an Extranet).
If you do not plan to make your Intranet available through the Internet then it is probably
best to leave this box checked.
8/6/2019 IIS by Raghavendra
http://slidepdf.com/reader/full/iis-by-raghavendra 27/46
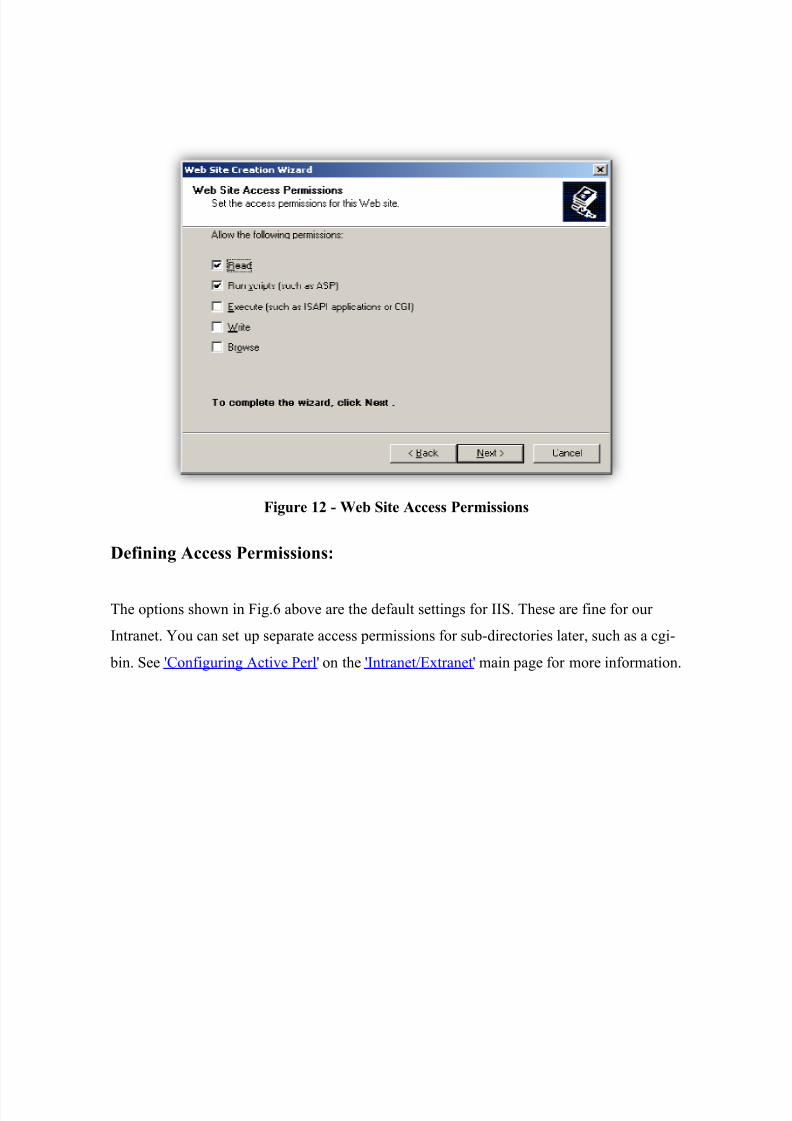
Figure 12 - Web Site Access Permissions
Defining Access Permissions:
The options shown in Fig.6 above are the default settings for IIS. These are fine for our
Intranet. You can set up separate access permissions for sub-directories later, such as a cgi-
bin. See 'Configuring Active Perl' on the 'Intranet/Extranet' main page for more information.
8/6/2019 IIS by Raghavendra
http://slidepdf.com/reader/full/iis-by-raghavendra 28/46
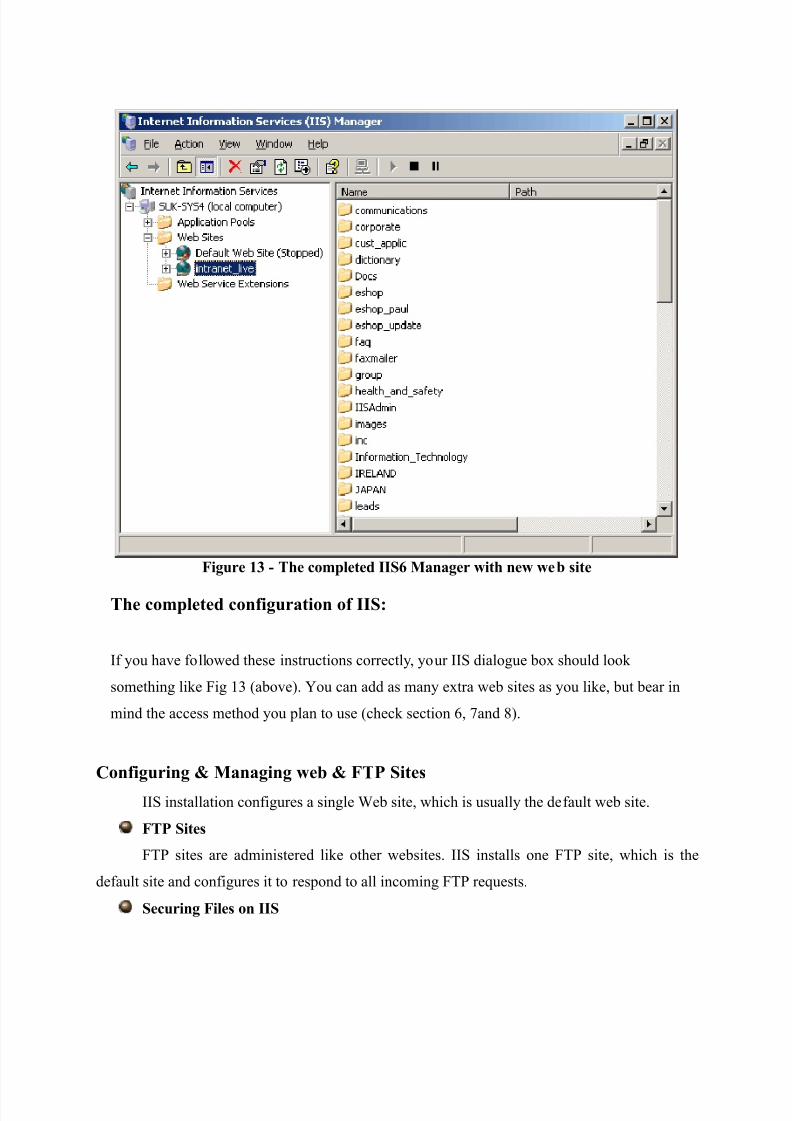
Figure 13 - The completed IIS6 Manager with new web site
The completed configuration of IIS:
If you have followed these instructions correctly, your IIS dialogue box should look
something like Fig 13 (above). You can add as many extra web sites as you like, but bear in
mind the access method you plan to use (check section 6, 7and 8).
Configuring & Managing web & FTP Sites
IIS installation configures a single Web site, which is usually the default web site.
FTP Sites
FTP sites are administered like other websites. IIS installs one FTP site, which is the
default site and configures it to respond to all incoming FTP requests.
Securing Files on IIS
8/6/2019 IIS by Raghavendra
http://slidepdf.com/reader/full/iis-by-raghavendra 29/46
Files accesses by way of IIS can be secured under authentication, authorization through
NTFS permissions and the IIS permissions categories.
Configuring Authentication Methods
You can configure the following authentication methods on the Directory Security tab of
the server, a web or FTP site, a virtual directory or a file.
Web Authentication Options
FTP Authentication Options
Defining R esource Access with Permissions
IIS defines permission on sites and virtual directories. Although NTFS
permissions define a specific level of access to existing Windows user and group
accounts.
Permissions are assigned to files and folders immediately after authentication has
been configured.
If IIS permissions and NTFS permissions are both in place, the effective
permissions will be the more restrictive of the two.
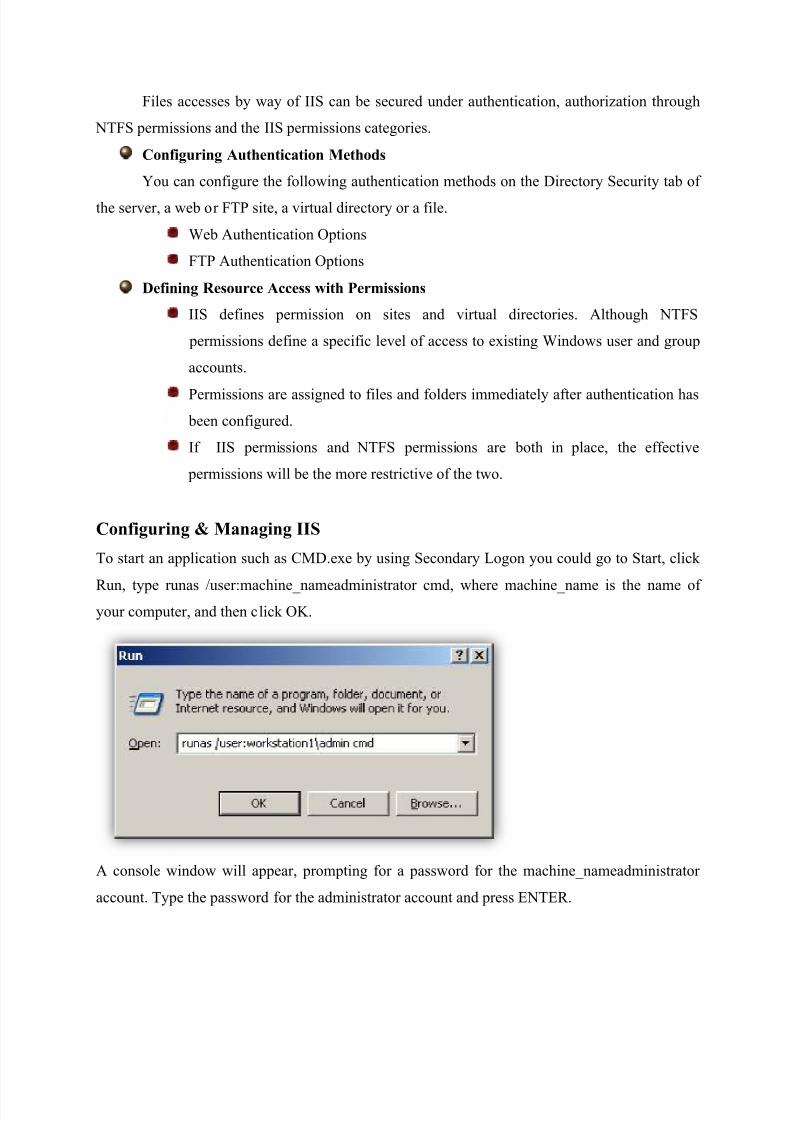
Configuring & Managing IIS
To start an application such as CMD.exe by using Secondary Logon you could go to Start, click
Run, type runas /user:machine_nameadministrator cmd, where machine_name is the name of your computer, and then click OK.
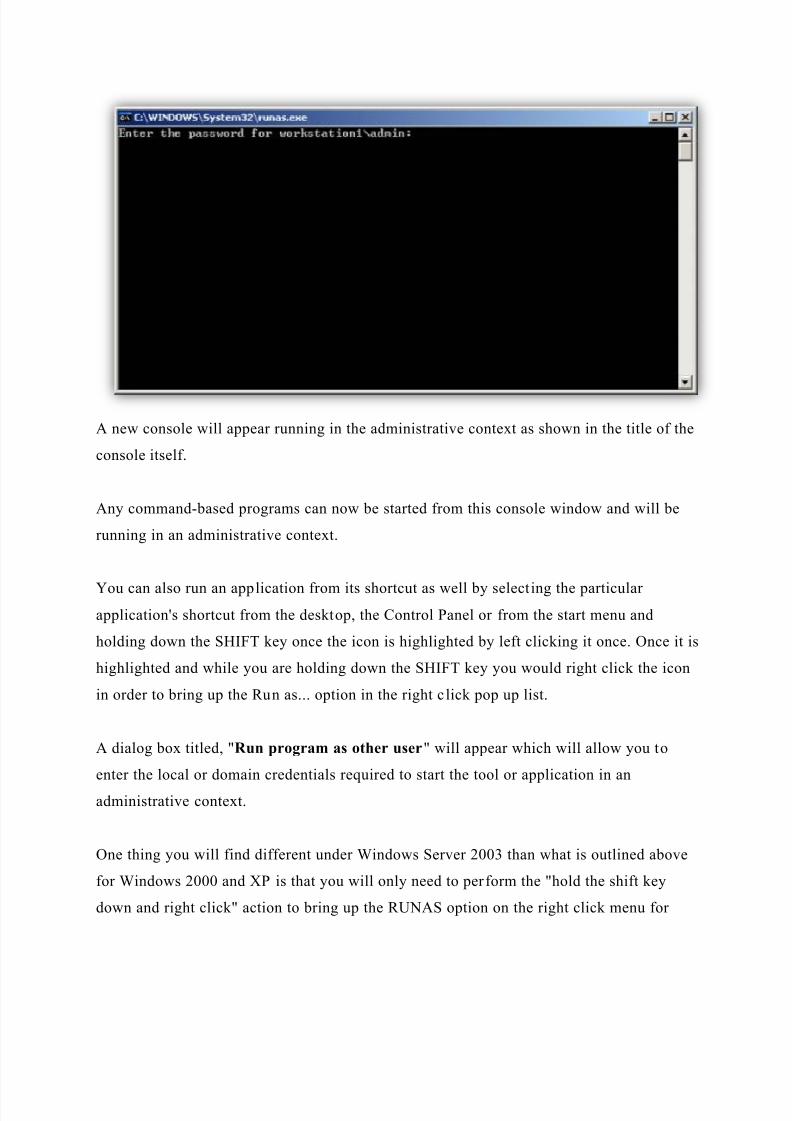
A console window will appear, prompting for a password for the machine_nameadministrator
account. Type the password for the administrator account and press ENTER.
8/6/2019 IIS by Raghavendra
http://slidepdf.com/reader/full/iis-by-raghavendra 30/46
8/6/2019 IIS by Raghavendra
http://slidepdf.com/reader/full/iis-by-raghavendra 31/46
your Control Panel tools on your Windows Server 2003 system where this needs to be done
for everything under Windows 2000 and XP. Regular EXEs at their path location, Start
Menu shortcuts and shortcuts on the desktop will automatically show RUNAS on the right
click menu WITHOUT holding down the SHIFT key on Windows Server 2003 systems.
Server Roles in Windows Server 2003 allow you as the Administrator to configure specific
roles for your system by using the Configure Your Server Wizard.
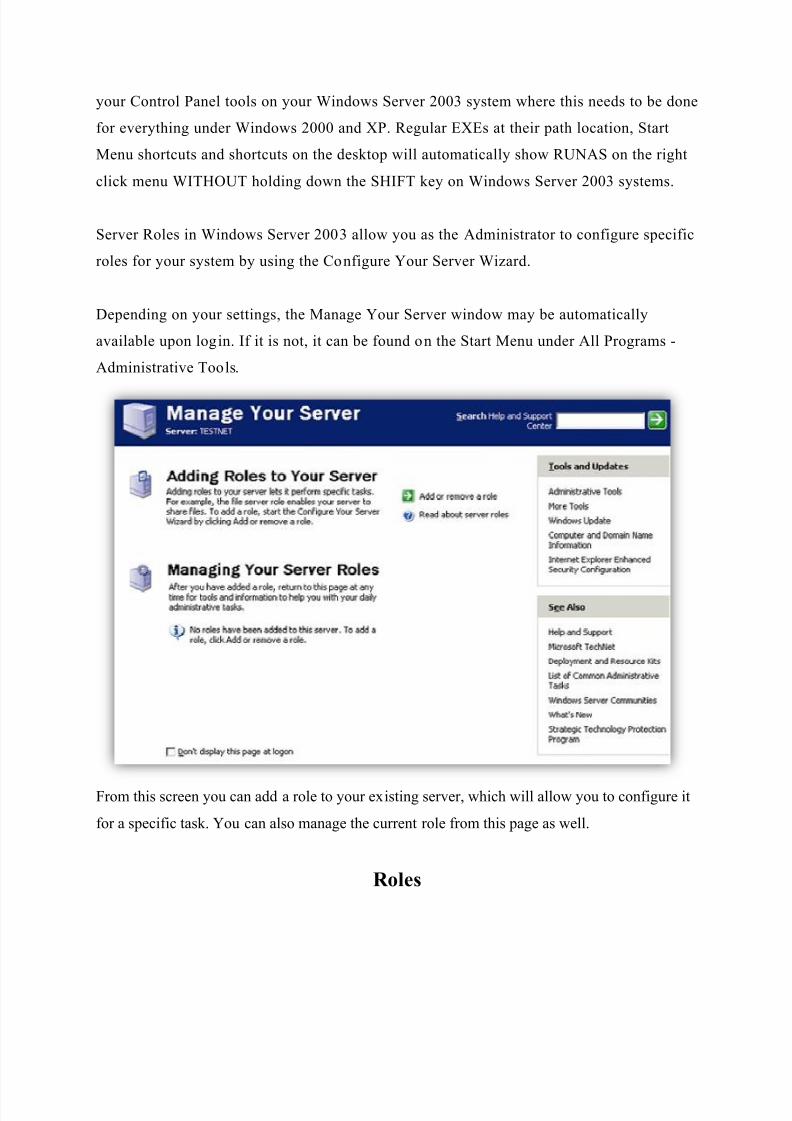
Depending on your settings, the Manage Your Server window may be automatically
available upon login. If it is not, it can be found on the Start Menu under All Programs -
Administrative Tools.
From this screen you can add a role to your existing server, which will allow you to configure it
for a specific task. You can also manage the current role from this page as well.
R oles

8/6/2019 IIS by Raghavendra
http://slidepdf.com/reader/full/iis-by-raghavendra 32/46
From this point you can pick one of the listed roles, all of which are pretty self explanatory for
the most part by their titles.
- File server
- Print server
- Application server
- Mail server
- Terminal server
- Remote access/VPN server
- Domain controller
- DNS server
- DHCP server
- Streaming media server
- WINS server
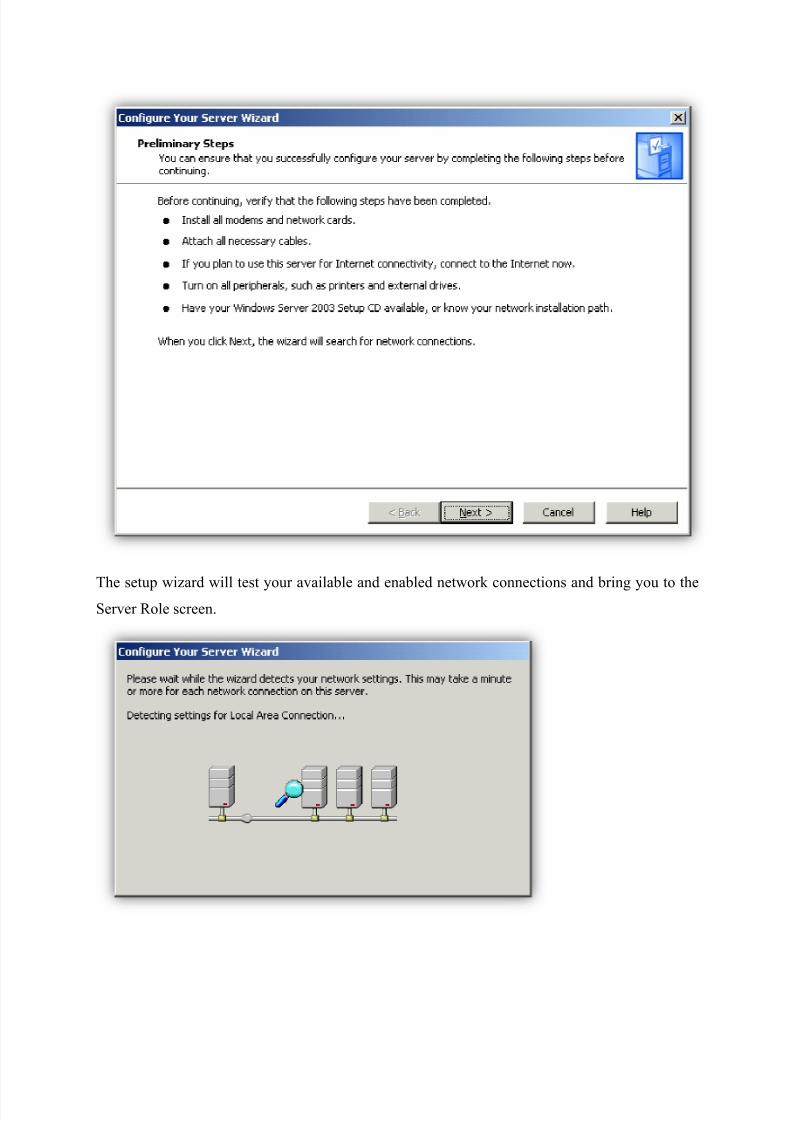
The steps for configuring the server in any role are pretty straightforward. You would select Add
or Remove a Role from the main Manage Your Server window to launch the Configure Your
Server Wizard. Once you have read the information on the screen and verified that all of the
network connections are verified and you have the needed installation path information (or the
CD) to the Windows Server 2003 setup files you can click NEXT to continue.
8/6/2019 IIS by Raghavendra
http://slidepdf.com/reader/full/iis-by-raghavendra 33/46
The setup wizard will test your available and enabled network connections and bring you to theServer Role screen.
8/6/2019 IIS by Raghavendra
http://slidepdf.com/reader/full/iis-by-raghavendra 34/46
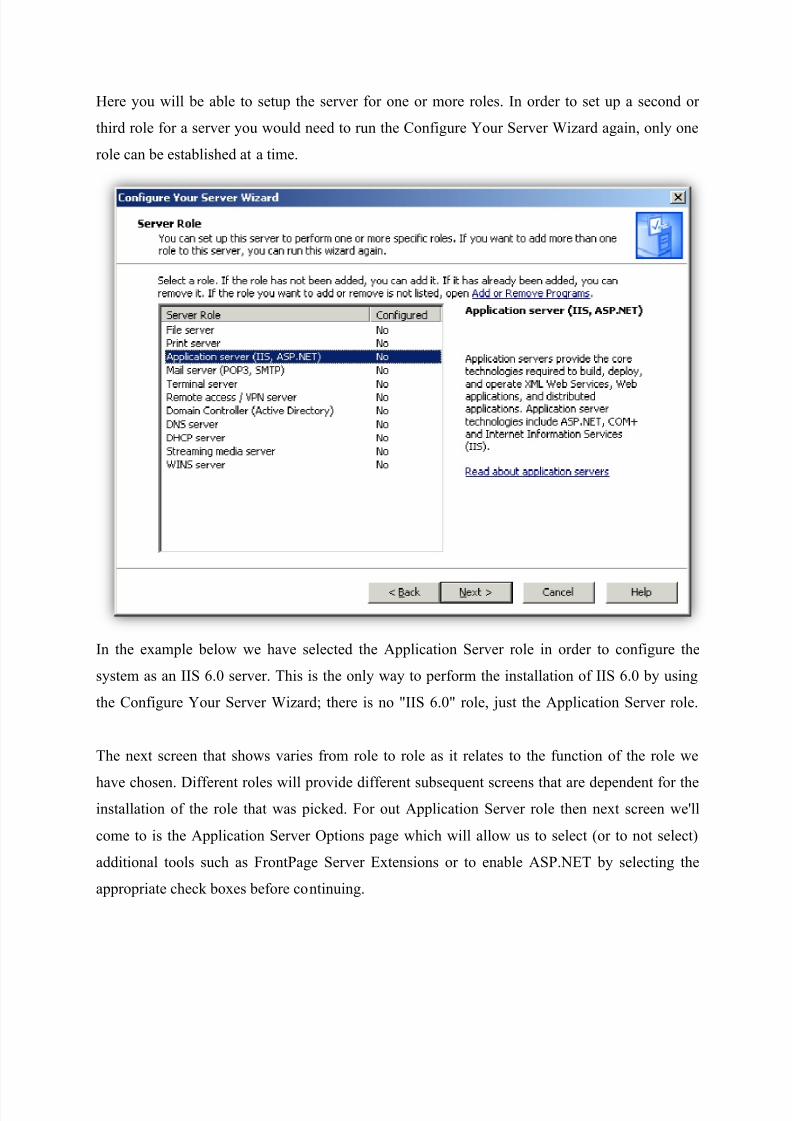
Here you will be able to setup the server for one or more roles. In order to set up a second or
third role for a server you would need to run the Configure Your Server Wizard again, only one
role can be established at a time.
In the example below we have selected the Application Server role in order to configure the
system as an IIS 6.0 server. This is the only way to perform the installation of IIS 6.0 by using
the Configure Your Server Wizard; there is no "IIS 6.0" role, just the Application Server role.
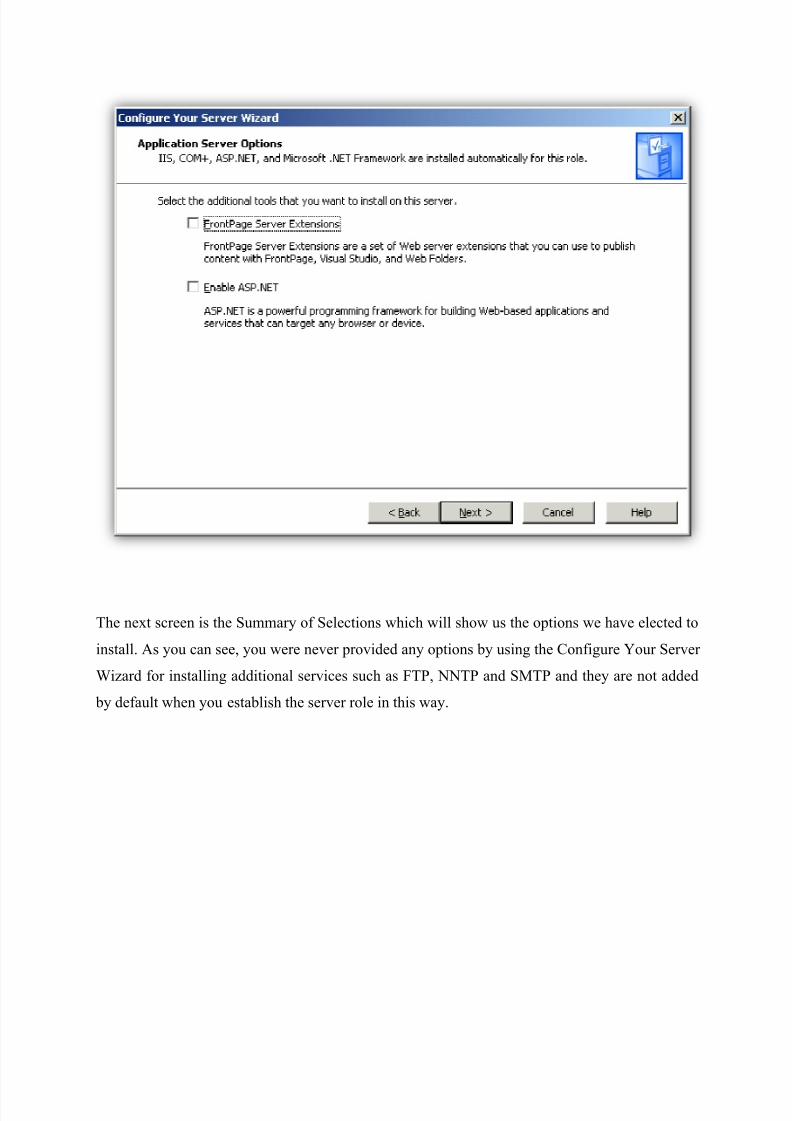
The next screen that shows varies from role to role as it relates to the function of the role we
have chosen. Different roles will provide different subsequent screens that are dependent for theinstallation of the role that was picked. For out Application Server role then next screen we'll
come to is the Application Server Options page which will allow us to select (or to not select)
additional tools such as FrontPage Server Extensions or to enable ASP.NET by selecting the
appropriate check boxes before continuing.
8/6/2019 IIS by Raghavendra
http://slidepdf.com/reader/full/iis-by-raghavendra 35/46
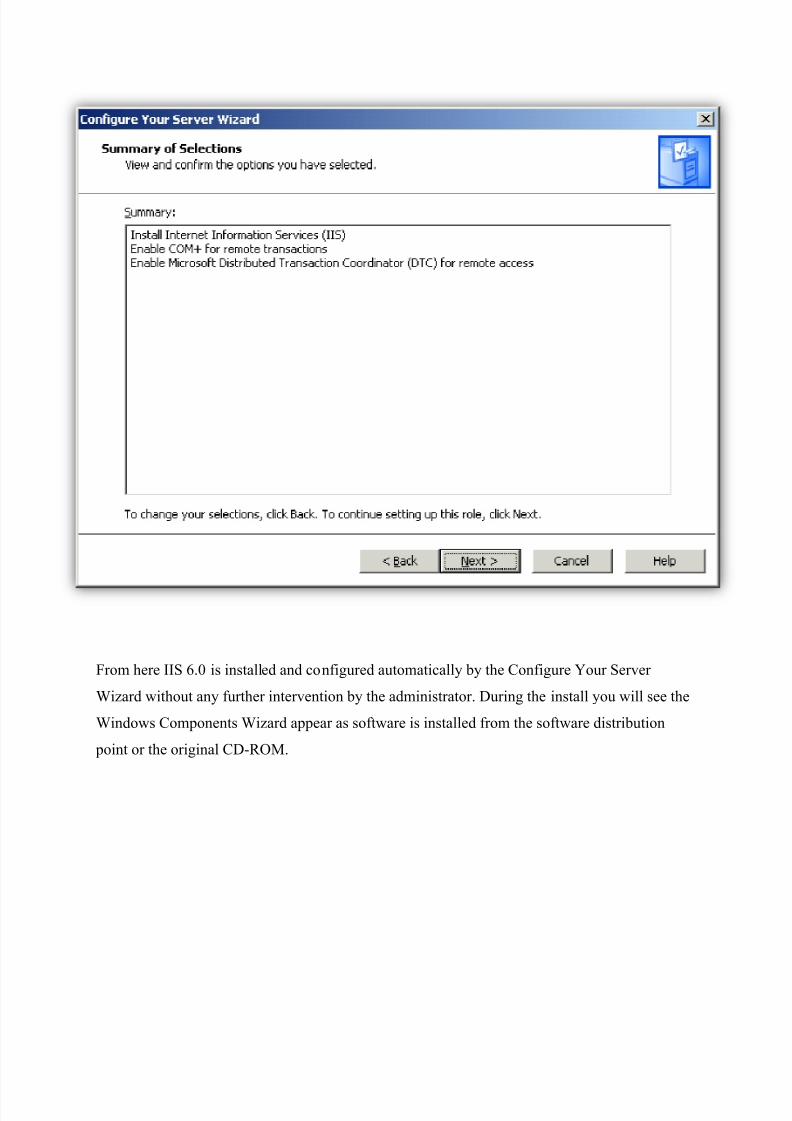
The next screen is the Summary of Selections which will show us the options we have elected to
install. As you can see, you were never provided any options by using the Configure Your Server
Wizard for installing additional services such as FTP, NNTP and SMTP and they are not added
by default when you establish the server role in this way.
8/6/2019 IIS by Raghavendra
http://slidepdf.com/reader/full/iis-by-raghavendra 36/46
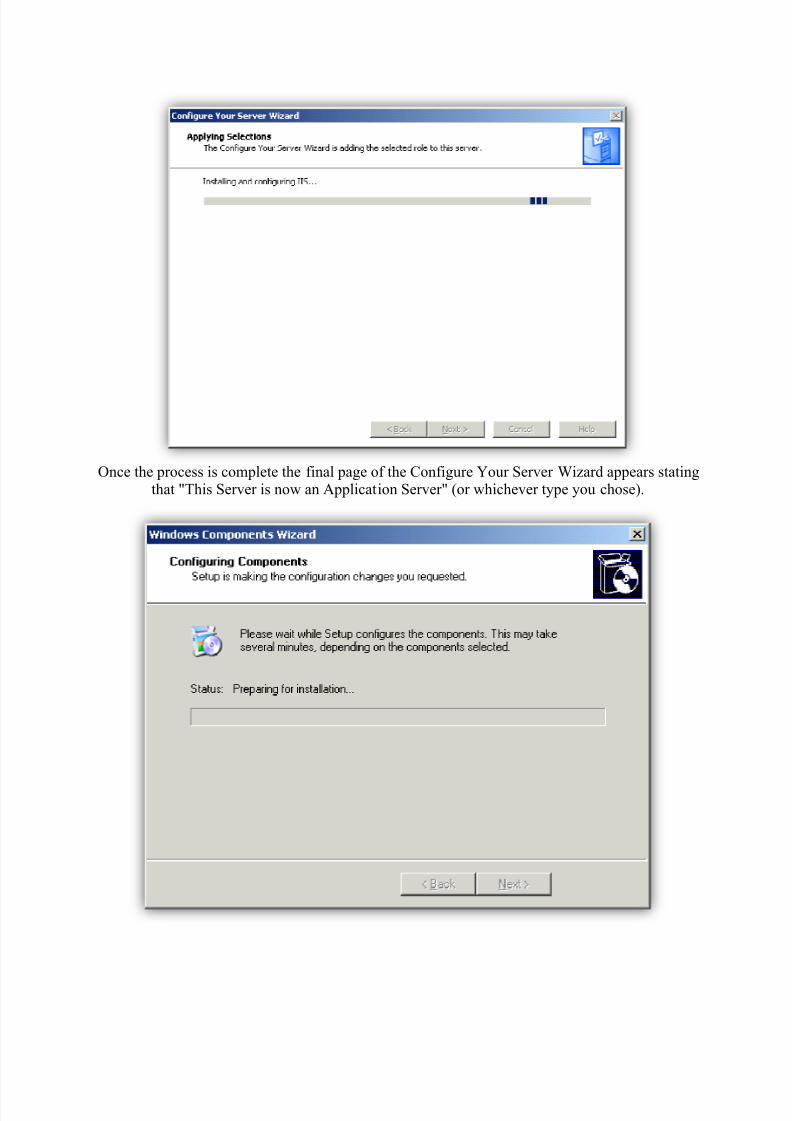
From here IIS 6.0 is installed and configured automatically by the Configure Your Server
Wizard without any further intervention by the administrator. During the install you will see the
Windows Components Wizard appear as software is installed from the software distribution
point or the original CD-ROM.
8/6/2019 IIS by Raghavendra
http://slidepdf.com/reader/full/iis-by-raghavendra 37/46
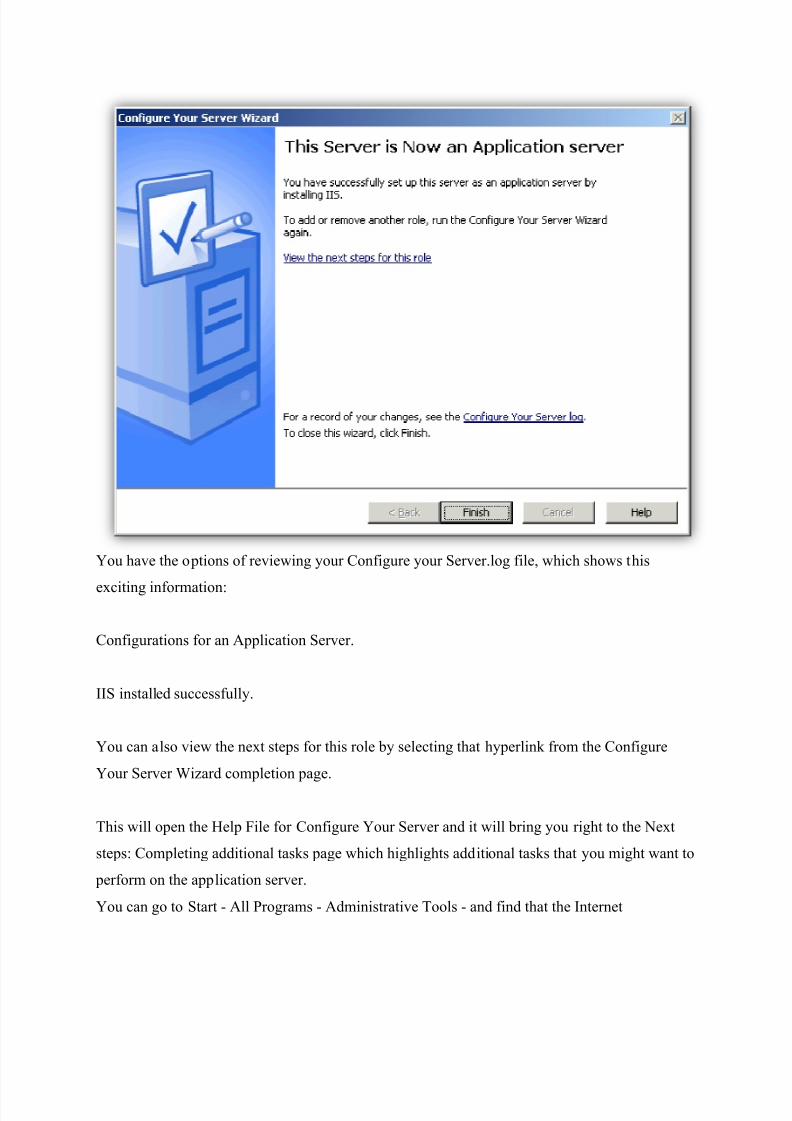
Once the process is complete the final page of the Configure Your Server Wizard appears statingthat "This Server is now an Application Server" (or whichever type you chose).
8/6/2019 IIS by Raghavendra
http://slidepdf.com/reader/full/iis-by-raghavendra 38/46
You have the options of reviewing your Configure your Server.log file, which shows this
exciting information:
Configurations for an Application Server.
IIS installed successfully.
You can also view the next steps for this role by selecting that hyperlink from the Configure
Your Server Wizard completion page.
This will open the Help File for Configure Your Server and it will bring you right to the Next
steps: Completing additional tasks page which highlights additional tasks that you might want to
perform on the application server.
You can go to Start - All Programs - Administrative Tools - and find that the Internet
8/6/2019 IIS by Raghavendra
http://slidepdf.com/reader/full/iis-by-raghavendra 39/46
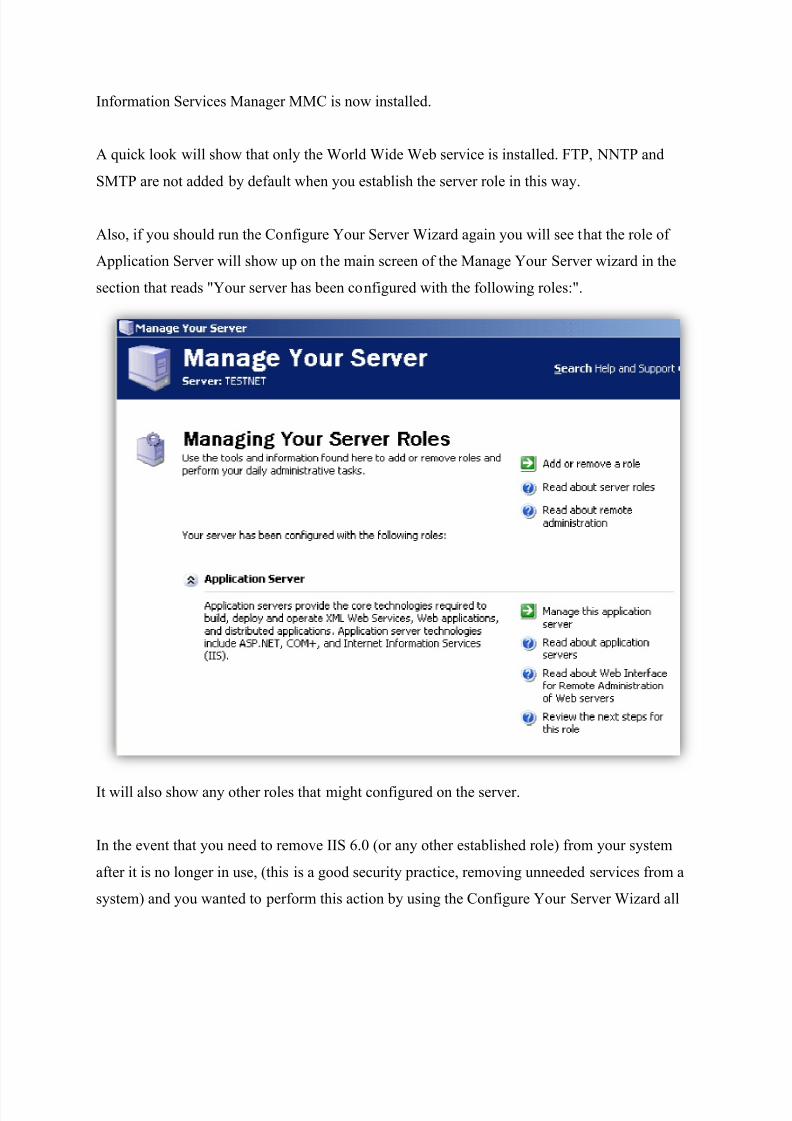
Information Services Manager MMC is now installed.
A quick look will show that only the World Wide Web service is installed. FTP, NNTP and
SMTP are not added by default when you establish the server role in this way.
Also, if you should run the Configure Your Server Wizard again you will see that the role of
Application Server will show up on the main screen of the Manage Your Server wizard in the
section that reads "Your server has been configured with the following roles:".
It will also show any other roles that might configured on the server.
In the event that you need to remove IIS 6.0 (or any other established role) from your system
after it is no longer in use, (this is a good security practice, removing unneeded services from a
system) and you wanted to perform this action by using the Configure Your Server Wizard all
8/6/2019 IIS by Raghavendra
http://slidepdf.com/reader/full/iis-by-raghavendra 40/46
you would need to do is choose the Add or Remove a Role green arrow at the upper right hand
side of the Manage Your Server intro page.
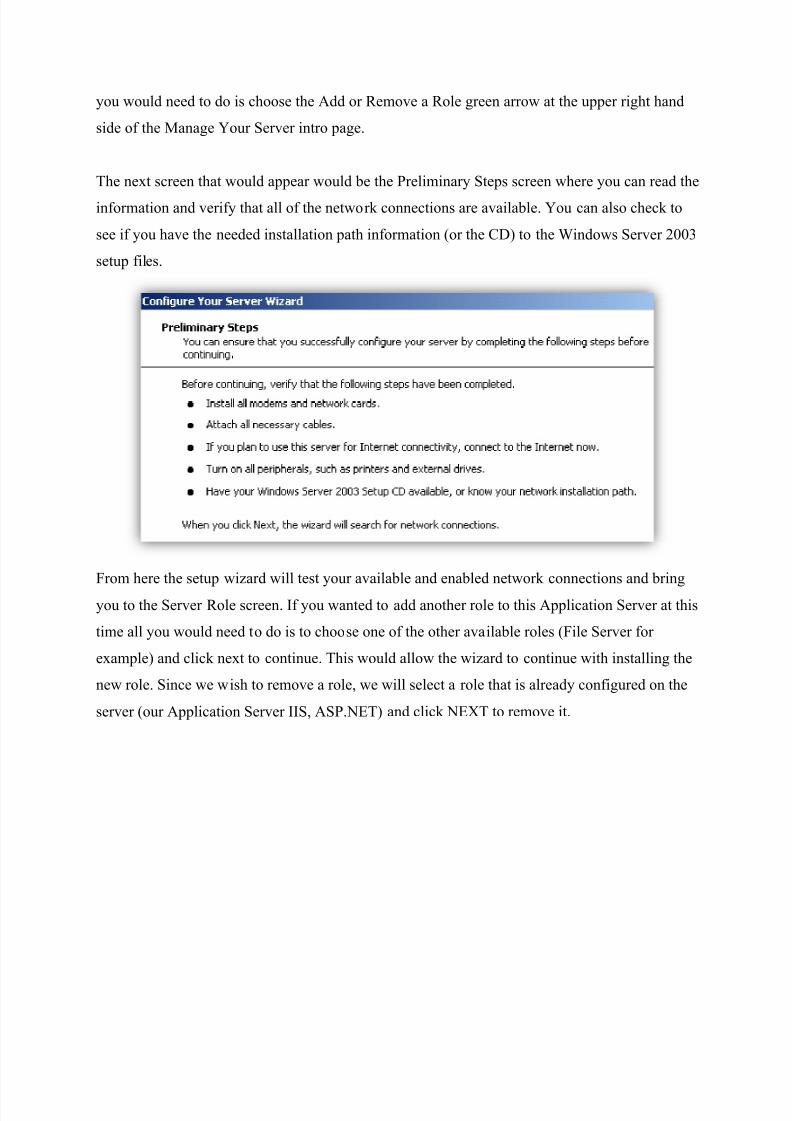
The next screen that would appear would be the Preliminary Steps screen where you can read the
information and verify that all of the network connections are available. You can also check to
see if you have the needed installation path information (or the CD) to the Windows Server 2003
setup files.
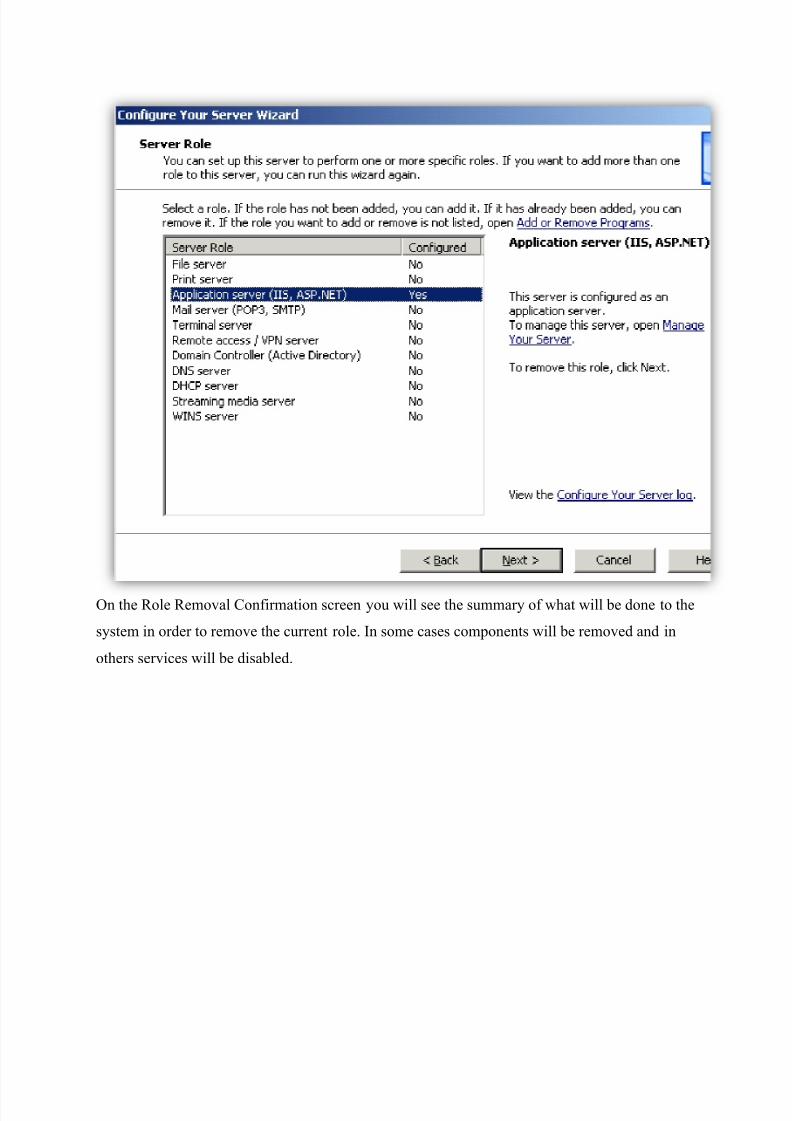
From here the setup wizard will test your available and enabled network connections and bring
you to the Server Role screen. If you wanted to add another role to this Application Server at this
time all you would need to do is to choose one of the other available roles (File Server for
example) and click next to continue. This would allow the wizard to continue with installing the
new role. Since we wish to remove a role, we will select a role that is already configured on the
server (our Application Server IIS, ASP.NET) and click NEXT to remove it.
8/6/2019 IIS by Raghavendra
http://slidepdf.com/reader/full/iis-by-raghavendra 41/46
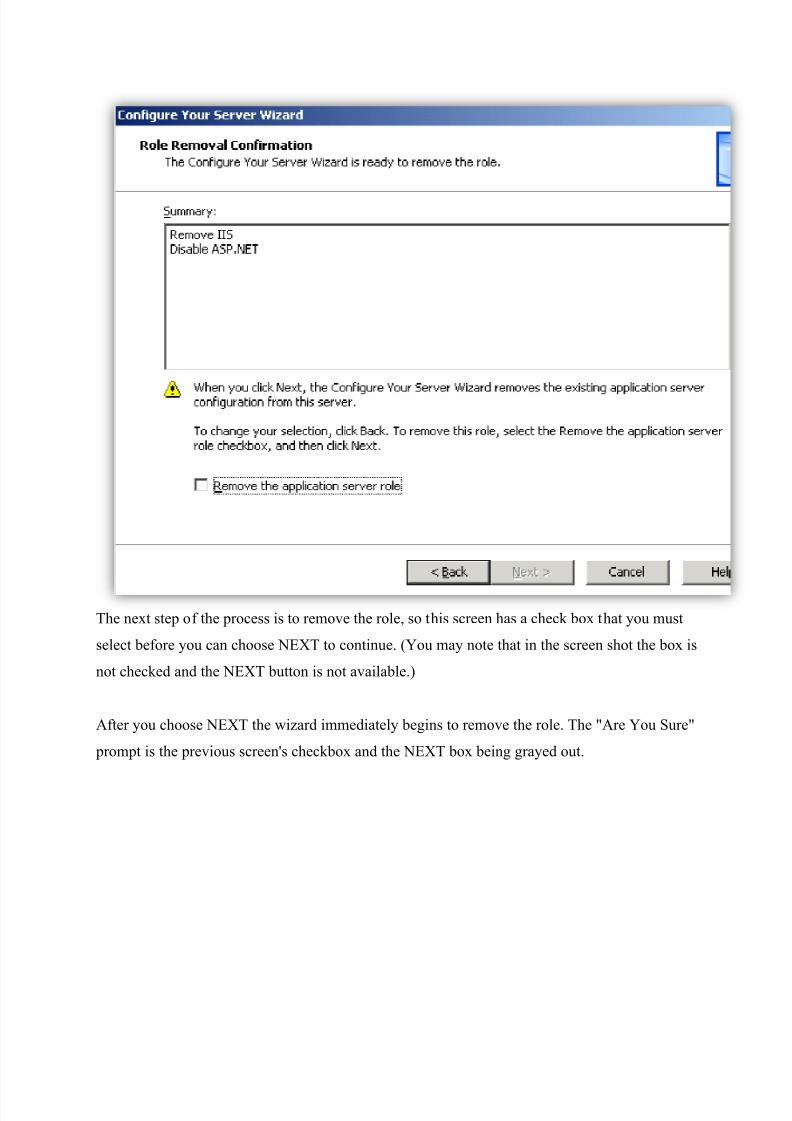
On the Role Removal Confirmation screen you will see the summary of what will be done to the
system in order to remove the current role. In some cases components will be removed and in
others services will be disabled.
8/6/2019 IIS by Raghavendra
http://slidepdf.com/reader/full/iis-by-raghavendra 42/46
The next step of the process is to remove the role, so this screen has a check box that you must
select before you can choose NEXT to continue. (You may note that in the screen shot the box is
not checked and the NEXT button is not available.)
After you choose NEXT the wizard immediately begins to remove the role. The "Are You Sure"
prompt is the previous screen's checkbox and the NEXT box being grayed out.
8/6/2019 IIS by Raghavendra
http://slidepdf.com/reader/full/iis-by-raghavendra 43/46
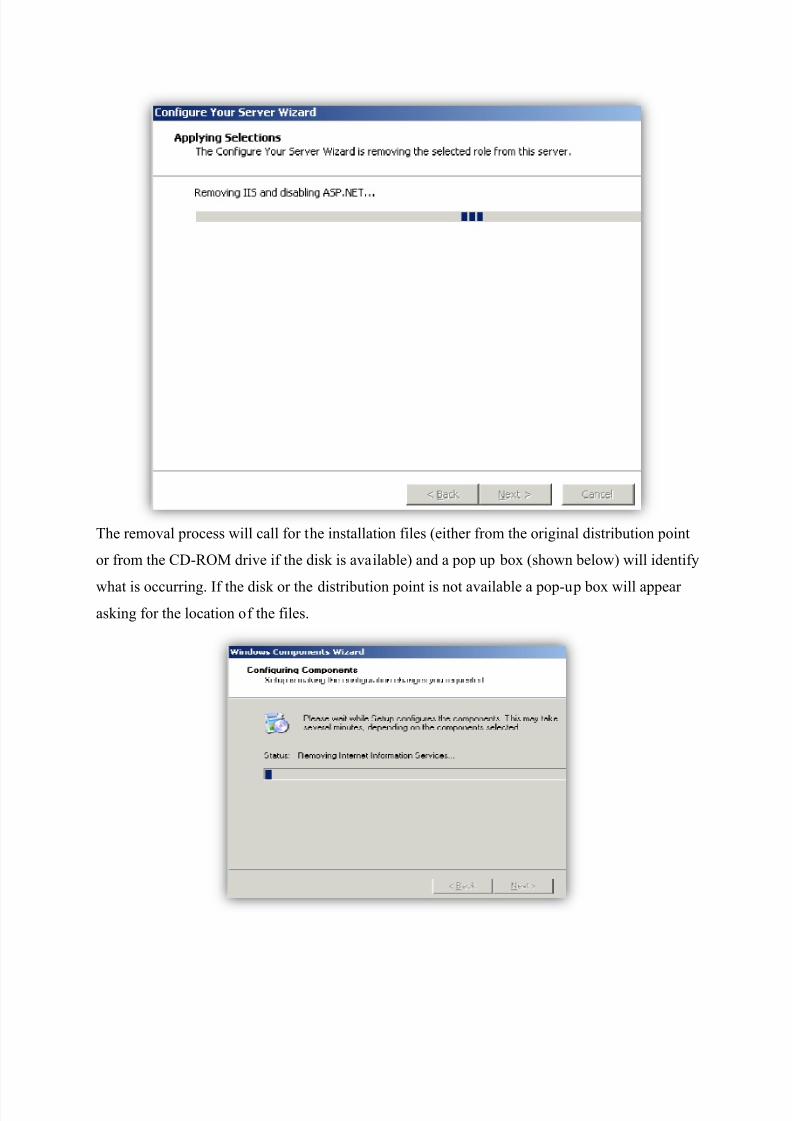
The removal process will call for the installation files (either from the original distribution point
or from the CD-ROM drive if the disk is available) and a pop up box (shown below) will identify
what is occurring. If the disk or the distribution point is not available a pop-up box will appear
asking for the location of the files.
8/6/2019 IIS by Raghavendra
http://slidepdf.com/reader/full/iis-by-raghavendra 44/46
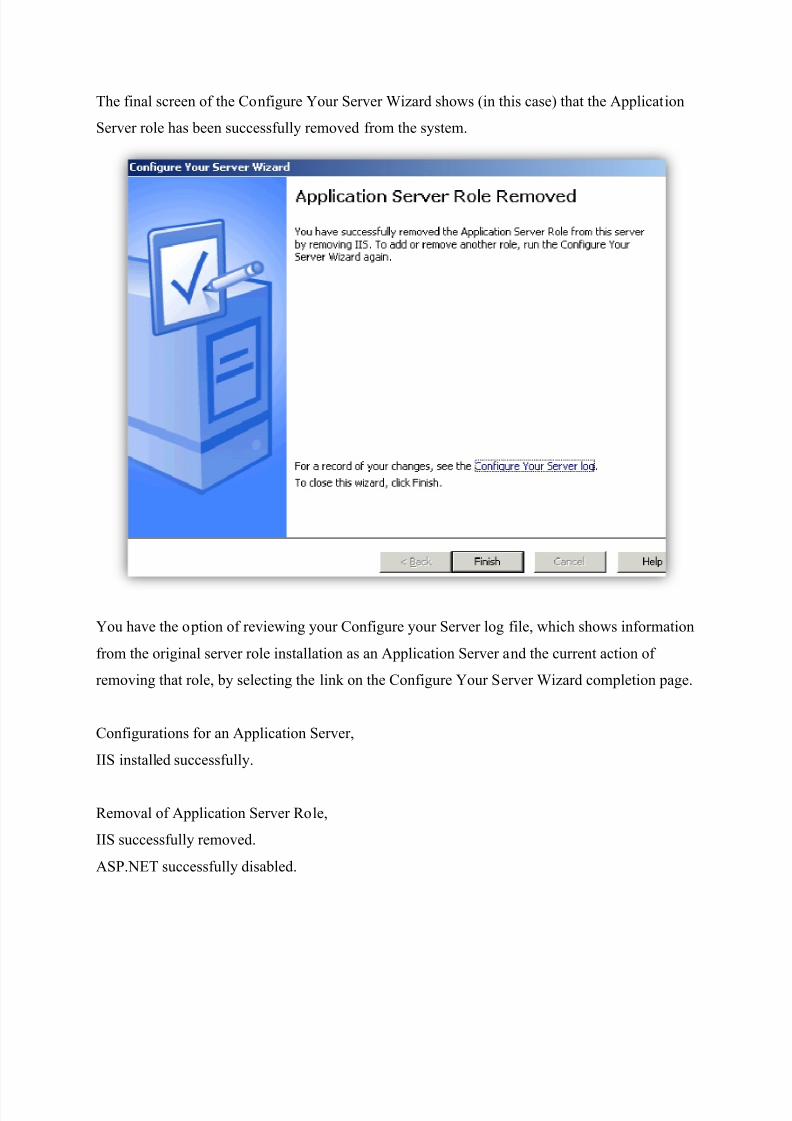
The final screen of the Configure Your Server Wizard shows (in this case) that the Application
Server role has been successfully removed from the system.
You have the option of reviewing your Configure your Server log file, which shows information
from the original server role installation as an Application Server and the current action of
removing that role, by selecting the link on the Configure Your Server Wizard completion page.
Configurations for an Application Server,
IIS installed successfully.
Removal of Application Server Role,
IIS successfully removed.
ASP.NET successfully disabled.
8/6/2019 IIS by Raghavendra
http://slidepdf.com/reader/full/iis-by-raghavendra 45/46
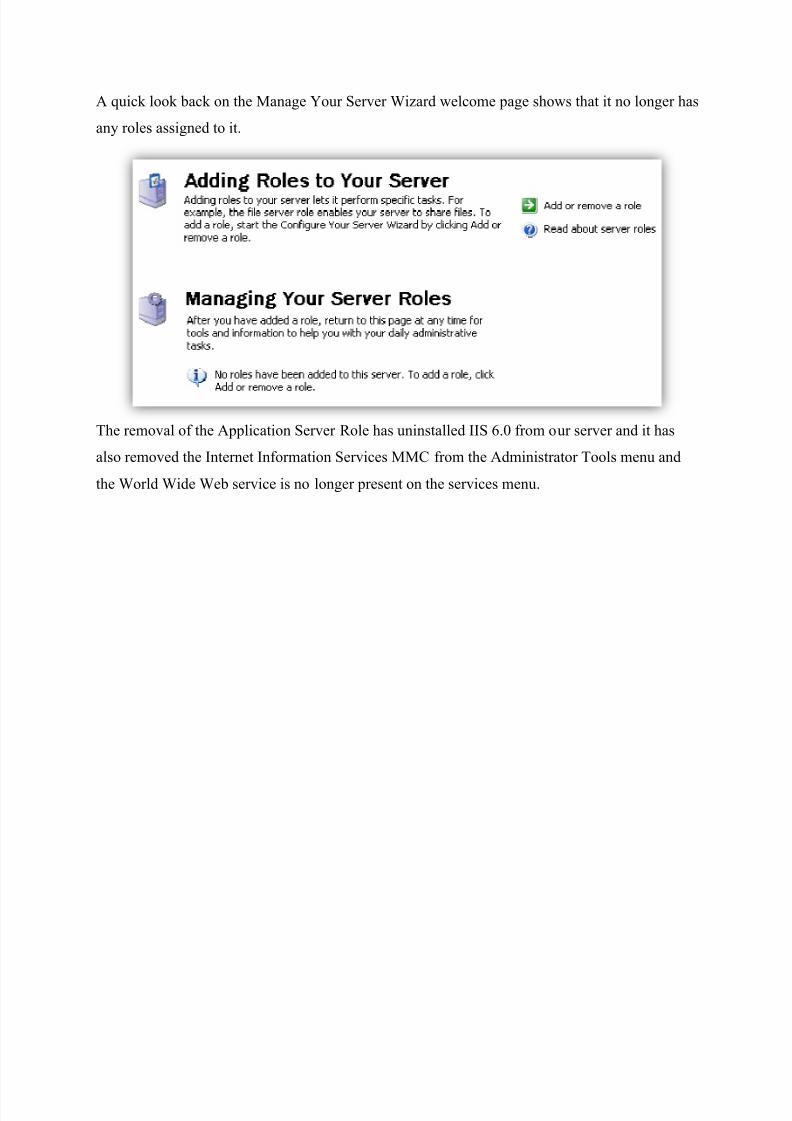
A quick look back on the Manage Your Server Wizard welcome page shows that it no longer has
any roles assigned to it.
The removal of the Application Server Role has uninstalled IIS 6.0 from our server and it has
also removed the Internet Information Services MMC from the Administrator Tools menu and
the World Wide Web service is no longer present on the services menu.
8/6/2019 IIS by Raghavendra
http://slidepdf.com/reader/full/iis-by-raghavendra 46/46
Summary
IIS can host thousands or tens of thousands of site depending on the server hardware configuration, the
default website is the apt place to explore the functionality and administration of website on the IIS.
IIS also defines permission on sites and virtual directories.
Internet Information Services (IIS) 6.0 and Windows .NET Server provide the most dependable,
productive, connected, and integrated Web server solution. IIS 6.0 offers many new features to
increase Web server reliability, manageability, security, performance and scalability