IIOP Domain BoundaryControllerv 3
42
Quick Installation Guide Quick Installation Guide IIOP Domain Boundary Controller v 3.1
Transcript of IIOP Domain BoundaryControllerv 3
Quick Installation GuideQuick Installation Guide
IIOP Domain Boundary Controller v 3.1
© 2010 PrismTech. All rights reserved. No part of this document may be reproduced or transmitted in any form for any purpose without the written permission of PrismTech.
This document and the software described herein are furnished under license and may be used and copied only in accordance with the terms of such license and with the inclusion of the above copyright notice. The information contained within this document is subject to change without notice.
PrismTech (a) makes no warranty of any kind with regard to this product, including, but not limited to, the implied warranties of merchantability and fitness for a particular purpose; and (b) and the suppliers disclaim all liability in connection with your use of the product, including liability for all direct indirect damages or loss of profit, business interruption, loss, damage or destruction of data or for special, incidental or consequential damages or for any other indirect damages such as, but not limited to exemplary or punitive damages.
This product includes software developed by Open SSL Project for use in the OpenSSL Toolkit (http://www.openssl.org/). Copy-right © by The Open SSL Project. All rights reserved. This product includes cryptographic software written by Eric Young Copy-right © by Eric Young ([email protected]). This product includes software written by Tim Hudson ([email protected]). All rights reserved.
This product includes software developed by the Apache Software Foundation (http://www.apache.org). Copyright © by The Apache Software Foundation. All rights reserved. ORB, Object Request Broker, OMG IDL and CORBA are trademarks of Object Management Group.Enterprise JavaBeans is a trademark of Sun Microsystems Inc.SecurID is a registered trademark of RSA Security Inc.All other registered and unregistered trademarks in this document are the sole property of their respective owners.XTRADYNE is a registered trademark of PrismTech..
1st EditionIssue Date: 1 April 2010Security Policy Server v. 3.1
USA Corporate HeadquartersPrismTech Corporation400 TradeCenter, Suite 5900Woburn, MA, 01801USATel: (1) 781-569-5819
European HeadquartersPrismTech Limited5th Avenue Business Park, Team ValleyGateshead, Tyne & Wear, NE11 0NGUnited KingdomTel: +44 (0) 191-4979900
For product or technical questions, please contact our Customer Response Center, Email: [email protected] For licensing an pricing questions, please email to [email protected]
Table of Contents
Contents1 Introduction .................................................................................................. 52 DBC Components and Installation ............................................................... 5
2.1 DBC Components ........................................................................... 52.2 Component Specifications .............................................................. 6
DBC Proxy ...................................................................................... 6Security Policy Server ..................................................................... 6Administration Console .................................................................. 6
2.3 DBC Deployment ............................................................................ 72.4 Prerequisites .................................................................................... 72.5 Installation ....................................................................................... 8
Linux & Solaris ............................................................................... 8Windows .......................................................................................... 8Mounting the CD ROM .................................................................. 9Installer Prerequisites ...................................................................... 9
2.6 Installation Steps ........................................................................... 10Choosing the Install Task .............................................................. 10Choose the Install Folder .............................................................. 10Choose a DBC User Name ............................................................ 11Security Policy Server Configuration ........................................... 11Choose SSL Key Pair Information ................................................ 12DBC Proxy Configuration ............................................................ 13Choose Key Archive ..................................................................... 14Choose License File ...................................................................... 14Configuration Summary ................................................................ 15
2.7 Startup, Shutdown, and Restart ..................................................... 15Security Policy Server ................................................................... 15DBC Proxy .................................................................................... 15
2.8 Installation of the Admin Console ................................................ 16Linux and Solaris .......................................................................... 16Installation Steps ........................................................................... 17Installing SSL Keys ...................................................................... 17
2.9 Summary ....................................................................................... 17
Domain Boundary Controller - Quick Installation Guide 3
Table of Contents
3 Protecting CORBA Applications – Example ............................................. 193.1 Problems and Solution .................................................................. 193.2 Getting familiar with the Frankfurter Bank application ............... 19
Prerequisites for the Frankfurter Bank Example .......................... 20Running Frankfurter Bank ............................................................ 20
3.3 Running Frankfurter Bank With the I-DBC .................................. 23Let’s Get Started! .......................................................................... 24Import the Server IOR .................................................................. 25Export the Proxified IOR to Client ............................................... 25Verify that the service runs across the DBC ................................. 26
3.4 Protecting an Application with the I-DBC .................................... 26Activate Access Control ............................................................... 27Add the Frankfurter Bank Resource to the Security Policy .......... 28
3.5 Define Security Policies for the Protected Resource .................... 31Create Users .................................................................................. 31Authentication ............................................................................... 32Required Authentication for the Protected Resource .................... 33Assign Permissions ....................................................................... 34
3.6 Define a more fine-grained policy ................................................ 363.7 Using SSL ..................................................................................... 37
Frankfurter Bank Keys and Certificates ....................................... 37Establish Mutual Trust between DBC and FB Client ................... 38Adapt the Access Control Policy .................................................. 39Start the Client with SSL .............................................................. 41
3.8 Summary ....................................................................................... 42
4 Domain Boundary Controller - Quick Installation Guide
Introduction
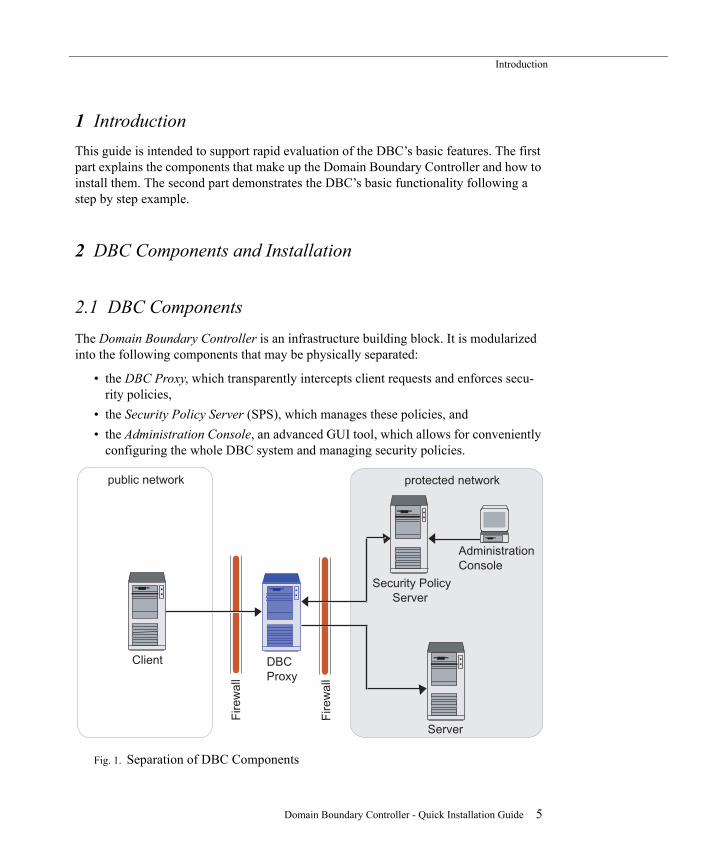
1 IntroductionThis guide is intended to support rapid evaluation of the DBC’s basic features. The first part explains the components that make up the Domain Boundary Controller and how to install them. The second part demonstrates the DBC’s basic functionality following a step by step example.
2 DBC Components and Installation
2.1 DBC ComponentsThe Domain Boundary Controller is an infrastructure building block. It is modularized into the following components that may be physically separated:
• the DBC Proxy, which transparently intercepts client requests and enforces secu-rity policies,
• the Security Policy Server (SPS), which manages these policies, and• the Administration Console, an advanced GUI tool, which allows for conveniently
configuring the whole DBC system and managing security policies.
Fig. 1. Separation of DBC Components
protected network
Client
Server
DBCProxy
Security PolicyServer
public network
AdministrationConsole
Fire
wal
l
Fire
wal
l
Domain Boundary Controller - Quick Installation Guide 5
As illustrated in figure 1 the main stronghold towards the public Internet is realized by the DBC Proxy. The Security Policy Server and the Admin Console are usually located inside the protected internal network, i.e., behind the DBC Proxy and any existing packet filters.
2.2 Component Specifications
DBC ProxyThe DBC Proxy is generally installed on a host that will become part of the firewall. All firewall machines are potential targets of attacks, so they require great care in the config-uration of their operating system and their network components. Therefore, a hardened configuration of the operating system should be set up. A hardened configuration is a minimal system configuration which possibly relies on additional tools or libraries to increase the resilience of the system against attacks (cf. Chapter 6 “Hardened System” on page 55 of the Deployment Guide).
Security Policy ServerThe Security Policy Server should be installed on a host located in a protected domain. However, for scenarios with less stringent security requirements, it can be installed on the same host as the DBC Proxy. If your security policy requires protection against attacks from the inside, you should also set up a hardened operating system configura-tion for the Security Policy Server host.
Administration ConsoleThe Xtradyne Administration Console is written in Java and thus requires a platform where the Java2 Runtime Environment (JRE) is available. The JRE is included in the installation package of the Admin Console. Installation packages are available for the Linux and Solaris platforms as specified above. On the PC x86 platform the Admin Con-sole is also supported on the following operating systems:
• Windows NT4 SP6a• Windows 2000 SP2• Windows 98 SR2• Windows XP SR1a
6 Domain Boundary Controller - Quick Installation Guide
DBC Components and Installation
To ensure acceptable performance, the host on which the Admin Console will be installed should have at least 256 MB RAM and 128 MB free disk space (recommended are 512 MB).
2.3 DBC DeploymentThe Domain Boundary Controller can be deployed in different ways according to your requirements. For a detailed discussion, please refer to the Administrator’s Guide. For evaluation purposes all DBC components can be installed on one host.
2.4 PrerequisitesTable 1 gives an overview about the hardware and operating system requirements for the DBC Proxy, the Security Policy Server, and the Admin Console.
Table 1. DBC Hardware Requirements and Supported Platforms
Note that if you want to operate the DBC Proxy and Security Policy Server co-located on a single machine, this machine should have at least 512 MB RAM.
Hardware Requirements Supported OS
PC x86 Platform
• CPU: Intel Pentium III at 600 MHz• RAM: 256 MB minimum,
512 MB recommended• Free disk space: 512 MB• 1 Network Interface Card (NIC): up to
four NICs supported on the Proxy host
• RHEL 3 and RHEL 4 WS or AS Update 4 (and higher)
• SuSE Professional & Enter-prise Linux 8.x and higher
• Novell SuSE Linux Enterprise 10.x and open SUSE 10.x
• Solaris 10 x86 (I-DBC only)
Sun sparc Platform
• CPU: 440-MHz UltraSPARC-II CPU• RAM: 256 MB minimum,
512 MB recommended• Free disk space: 512 MB• 1 Network Interface Card (NIC): up to
four NICs supported on the Proxy host
• Solaris 9 (kernel patch 112233-02)
• Solaris 8 (kernel patch 108528-06 or higher)
• Solaris 10 (kernel patch 118822-29 or higher)
Domain Boundary Controller - Quick Installation Guide 7
2.5 InstallationThe distribution (archive or CD-ROM) contains the directories linux_glibc-2.2, linux_glibc-2.3, solaris, and windows. The table below indicates which sup-ported Linux distribution use the glibc-2.2 or glibc-2.3 respectively. Please choose the installer for your distribution from the appropriate directory.
Table 2. glibc version of supported Linux Distributions
The following can be found in the respective directories:
Linux & SolarisLinux & Solaris • The installer for the I-DBC Proxy: IDBCInstall-3.1.<x>.bin
• The installer for the WS-DBC Proxy: WSDBCInstall-3.1.<x>.bin• The Admin Console installer: AdminConsoleInstall-3.1.<x>.bin • The installer for the I-DBC example application Frankfurter Bank: FrankfurterBankIIOP_Install-1.1.<x>.bin
• The installer for the WS-DBC example application Frankfurter Bank: FrankfurterBankSOAP_Install-1.1.<x>.bin
WindowsWindows • The Admin Console installer: AdminConsoleInstall-3.1.<x>.exe
• The installer for the I-DBC example application Frankfurter Bank: FrankfurterBankIIOP_Install-1.1.<x>.exe
• The installer for the WS-DBC example application Frankfurter Bank: FrankfurterBankSOAP_Install-1.1.<x>.exe
glibc Version Linux Distributionglibc-2.2 • SuSE Linux 8.x
• SuSE Linux 9.0glibc-2.3 • RedHat Enterprise Linux 3.0 (Update
4 and higher) and 4.0• SuSE Linux 9.1 and higher
8 Domain Boundary Controller - Quick Installation Guide

DBC Components and Installation
Additionally, in the top level directory, you will find the following documentation files:
• a copy of this Administrator Guide in PDF format (AdminGuide.pdf),• a Quick Installation Guide (QuickInstallation.pdf) to help with quick
evaluation of the product, • a Deployment Guide (DeploymentGuide.pdf) which explains different
deployment scenarios and specialties e.g. high availability, and • the release notes for this version.
Mounting the CD ROMThis section may be skipped if you downloaded the distribution as a tar archive.
LinuxOn Linux, a CD can usually be mounted to make it available to the system by typing:
mount /cdrom on SuSE Linux
mount /mnt/cdrom on Red Hat Linux
If this does not work, consult your operating system manuals. After mounting, the files contained on the CD will be available at the cdrom mount point.
SolarisOn Solaris, the CD is usually mounted automatically under /cdrom. If not, use the command volcheck. If the Volume Manager is not running, determine the device name of the CD drive and enter the following commands to mount the CD:
mkdir /cdrom/dbc_cd
/usr/sbin/mount -f hsfs -r /dev/dsk/cddevice /cdrom/dbc_cd
Installer Prerequisites
To run the DBC installer root privileges are required.
Apart from installing the selected DBC component the installer will also perform some basic configuration and administrative operations. This includes the creation of an administrative UNIX user account (cf. “Choose a DBC User Name” on page 11).
Before starting the installer, make sure that the DISPLAY environment variable is set correctly, otherwise the installer will fail to run. When using bash or sh as shell, type:
DISPLAY=<host>:0; export DISPLAY
If no X windowing system is available, the installer can be run in console mode (start the installer with the option -i console).
Domain Boundary Controller - Quick Installation Guide 9
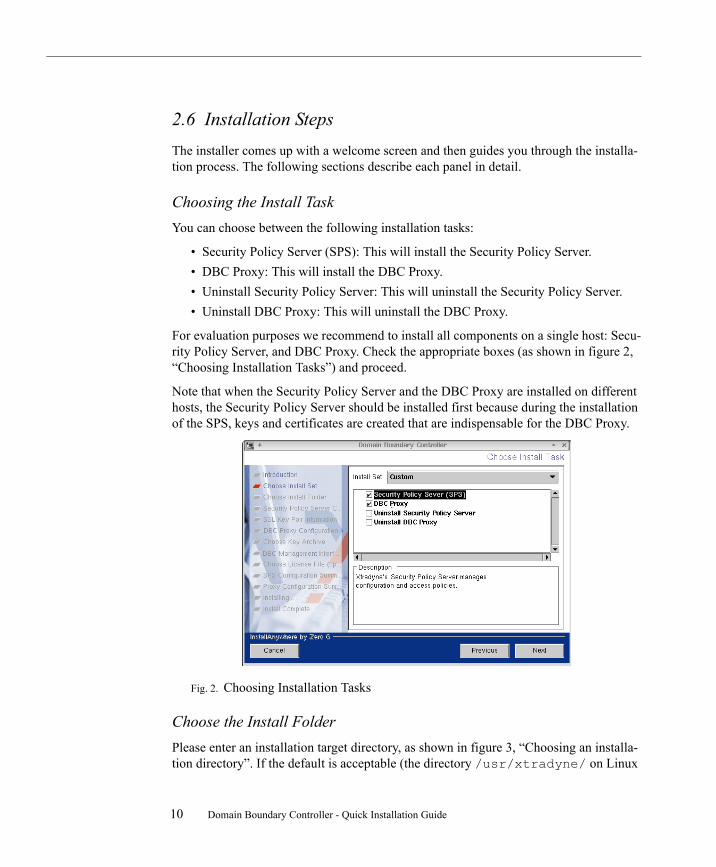
2.6 Installation StepsThe installer comes up with a welcome screen and then guides you through the installa-tion process. The following sections describe each panel in detail.
Choosing the Install TaskYou can choose between the following installation tasks:
• Security Policy Server (SPS): This will install the Security Policy Server.• DBC Proxy: This will install the DBC Proxy.• Uninstall Security Policy Server: This will uninstall the Security Policy Server.• Uninstall DBC Proxy: This will uninstall the DBC Proxy.
For evaluation purposes we recommend to install all components on a single host: Secu-rity Policy Server, and DBC Proxy. Check the appropriate boxes (as shown in figure 2, “Choosing Installation Tasks”) and proceed.
Note that when the Security Policy Server and the DBC Proxy are installed on different hosts, the Security Policy Server should be installed first because during the installation of the SPS, keys and certificates are created that are indispensable for the DBC Proxy.
Fig. 2. Choosing Installation Tasks
Choose the Install FolderPlease enter an installation target directory, as shown in figure 3, “Choosing an installa-tion directory”. If the default is acceptable (the directory /usr/xtradyne/ on Linux
10 Domain Boundary Controller - Quick Installation Guide
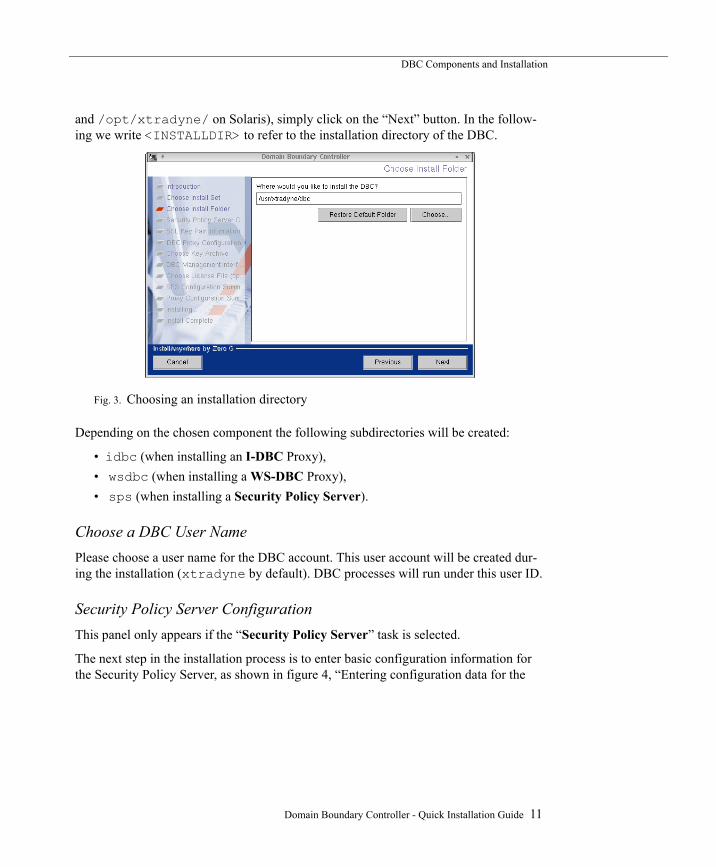
DBC Components and Installation
and /opt/xtradyne/ on Solaris), simply click on the “Next” button. In the follow-ing we write <INSTALLDIR> to refer to the installation directory of the DBC.
Fig. 3. Choosing an installation directory
Depending on the chosen component the following subdirectories will be created:
• idbc (when installing an I-DBC Proxy),• wsdbc (when installing a WS-DBC Proxy),• sps (when installing a Security Policy Server).
Choose a DBC User NamePlease choose a user name for the DBC account. This user account will be created dur-ing the installation (xtradyne by default). DBC processes will run under this user ID.
Security Policy Server ConfigurationThis panel only appears if the “Security Policy Server” task is selected.
The next step in the installation process is to enter basic configuration information for the Security Policy Server, as shown in figure 4, “Entering configuration data for the
Domain Boundary Controller - Quick Installation Guide 11
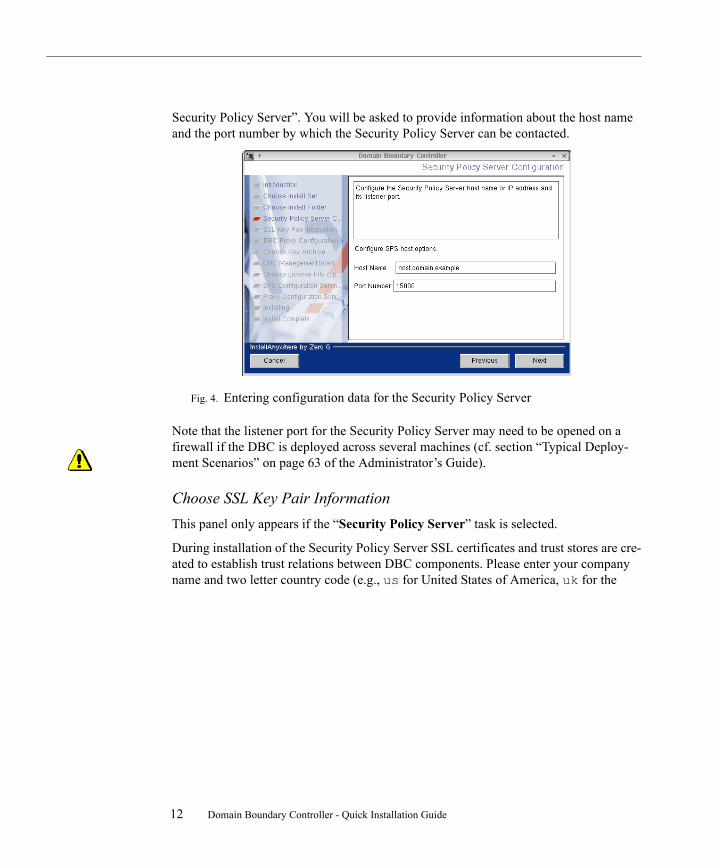
Security Policy Server”. You will be asked to provide information about the host name and the port number by which the Security Policy Server can be contacted.
Fig. 4. Entering configuration data for the Security Policy Server
Note that the listener port for the Security Policy Server may need to be opened on a firewall if the DBC is deployed across several machines (cf. section “Typical Deploy-ment Scenarios” on page 63 of the Administrator’s Guide).
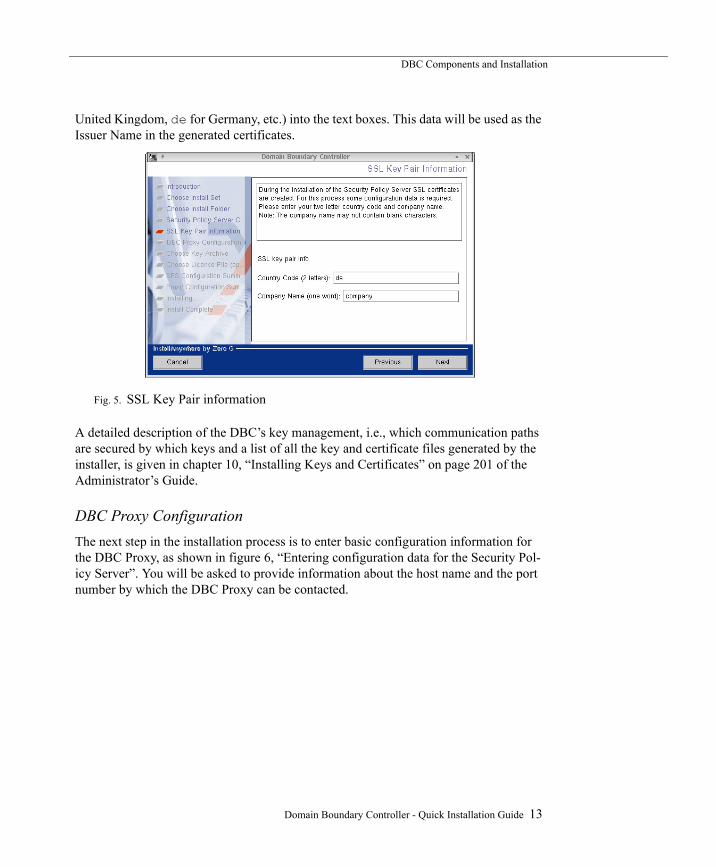
Choose SSL Key Pair InformationThis panel only appears if the “Security Policy Server” task is selected.
During installation of the Security Policy Server SSL certificates and trust stores are cre-ated to establish trust relations between DBC components. Please enter your company name and two letter country code (e.g., us for United States of America, uk for the
12 Domain Boundary Controller - Quick Installation Guide
DBC Components and Installation
United Kingdom, de for Germany, etc.) into the text boxes. This data will be used as the Issuer Name in the generated certificates.
Fig. 5. SSL Key Pair information
A detailed description of the DBC’s key management, i.e., which communication paths are secured by which keys and a list of all the key and certificate files generated by the installer, is given in chapter 10, “Installing Keys and Certificates” on page 201 of the Administrator’s Guide.
DBC Proxy ConfigurationThe next step in the installation process is to enter basic configuration information for the DBC Proxy, as shown in figure 6, “Entering configuration data for the Security Pol-icy Server”. You will be asked to provide information about the host name and the port number by which the DBC Proxy can be contacted.
Domain Boundary Controller - Quick Installation Guide 13

Note that if you install only the SPS this information is optional and can be configured later on with the Admin Console.
Fig. 6. Entering configuration data for the Security Policy Server
Note that the listener port for the DBC Proxy may need to be opened on a firewall if the DBC is deployed across several machines (cf. section “Typical Deployment Scenarios” on page 63 of the Administrator’s Guide). The default listener port for the I-DBC is 14000. The default listener port for the WS-DBC is 14001.
Choose Key ArchiveThis panel only appears if only the “DBC Proxy” task is selected.
When installing the Security Policy Server certificates and trust stores are created. The certificates needed on the DBC Proxy host can be found in the file <INSTALLDIR>/sps/adm/ProxyKeys.tar. Please provide this file name here. If this file is not available, you may skip this step and install the keys later on. Please refer to section “Generating Keys” on page 90 of the Administrator’s Guide on how to install the keys manually.
Choose License FileDepending on the selected component you can provide a license file for the SPS or the Proxy. The license is available from your reseller. If you did not obtain a license yet you may skip this step and install the license later on (cf. gray box “Installing the License”
14 Domain Boundary Controller - Quick Installation Guide
DBC Components and Installation
on page 88 of the Administrator’s Guide). Note that DBC and SPS will not start if no license file is present.
Configuration SummaryThis panel shows the configuration summary of the each selected component. Please review the data carefully before continuing.
Installing...After clicking “Next”, the installation will be carried out. This will take a few moments.
In case of any problems during the installation of the DBC Proxy, see chapter 11, “Trou-bleshooting” on page 217 of the Administrator’s Guide.
2.7 Startup, Shutdown, and Restart
Security Policy ServerThe script for starting the Security Policy Server is called xdn_sps. It is located in the directory /etc/init.d. A symbolic link (rcxdn_sps) is created in /usr/sbin/ on Solaris and /sbin on Linux. The start script is automatically executed when enter-ing into runlevel 3 or 5 and runlevel 2 on Solaris.
The script can also be run from the command line. You have to be root to run the script. The following parameters can be used:
• to start the Security Policy Server: rcxdn_sps start• to restart the Security Policy Server: rcxdn_sps restart• to stop the Security Policy Server: rcxdn_sps stop• to get status information: rcxdn_sps status
Note that you can also restart the Security Policy Server with the Admin Console. Sec-tion “When to Restart the DBC Proxy / Security Policy Server” on page 120 of the Administrator’s Guide lists which changes in the configuration require a restart of the Security Policy Server.
DBC ProxyThe script for starting the I-DBC Proxy is called xdn_idbc. The script for starting the WS-DBC is called xdn_wsdbc. They are located in the directory /etc/init.d.
Domain Boundary Controller - Quick Installation Guide 15
Symbolic links (rcxdn_idbc for the I-DBC Proxy and rcxdn_wsdbc for the WS-DBC) are created in /usr/sbin/ on Solaris and in /sbin on Linux. The start script is automatically executed when entering runlevel 3 or 5 on Linux and in runlevel 2 on Solaris.
The script can also be run from the command line. To run the script, you have to be root. The parameters start, restart, stop, and status can be used.
Note that you can also restart the DBC with the Admin Console. Section “When to Restart the DBC Proxy / Security Policy Server” on page 120 of the Administrator’s Guide lists which changes in the configuration require a restart of the DBC.
2.8 Installation of the Admin ConsoleThe Admin Console can be installed on Windows, Linux, or Solaris. In the distribution (archive or CD-ROM), you will find the directories linux_glibc2-2, linux_glibc2-3, solaris, and windows. These directories contain the executa-bles for the respective operating systems that will install the Admin Console (AdminConsole.bin for Linux and Solaris and AdminConsole.exe for Win-dows).
Note that the Admin Console is a Java application, therefore the version of the glibc (for Linux) is not relevant. If you would like to install on a Linux system, you can choose an AdminConsoleInstall-3.1.<x>.bin installer from any of the linux directo-ries.
WindowsTo start the installation execute the file AdminConsoleInstall-3.1.<x>.exe in the windows directory.
Linux and SolarisWhen installing from CD-ROM, please mount the CD-ROM as described in section “Mounting the CD ROM” on page 9. To start the installation execute the file Admin-Console.bin in the linux or solaris directory you just mounted.
16 Domain Boundary Controller - Quick Installation Guide
DBC Components and Installation
Installation Steps
The installer will lead you through the set up process.
1. Introduction2. Choose an Install Folder. The default destination is:
- on Windows: <Program Files>\xtradyne\- on Linux: /usr/xtradyne/- on Solaris: /opt/xtradyne/
3. Please choose the license.txt file. It will be installed in the directory <INSTALLDIR>/adminconsole/bin. You can skip this step and copy or update the license file later manually. But if the Admin Console is started without a valid license not all features are available.
4. Installation Summary
Installing SSL KeysWe recommend configuring the Admin Console to use SSL with client authentication to communicate securely with the Security Policy Server. However, for evaluation pur-poses keys don’t need to be installed and client authentication can be disabled (this is actually the default).
If you would like to install SSL keys for the Admin Console, please refer to section “Installing SSL Keys” on page 101 of the Administrator’s Guide.
2.9 SummaryUp to now you have successfully installed the Domain Boundary Controller. The next section shows along with an example how to use the DBC to protect a service.
Domain Boundary Controller - Quick Installation Guide 17

18 Domain Boundary Controller - Quick Installation Guide
Protecting CORBA Applications – Example
3 Protecting CORBA Applications – ExampleThis chapter presents the example CORBA application “Frankfurter Bank”. This is a simple fictitious bank application to illustrate how to run a CORBA application across the I-DBC and how to define an access control policy using the Administration Console.
3.1 Problems and SolutionThere are two essential problems when trying to use the Internet Inter-ORB Protocol (IIOP) across today’s firewalls:
• Location-transparency and the dynamic allocation of addressing resources as done by CORBA middleware make it difficult to know in advance which hosts and ports will be used for transactions. Consequently, a broad port range would have to be opened on a firewall to make the application work - an immense security risk!
• Addressing information contained in a remote request is invalidated when crossing a network address translating router. Consequently, CORBA applications just don’t work across NAT routers.
A viable solution is to use the I-DBC which is installed as part of the firewall and listens at a dedicated port. It solves the problems stated above by inspecting passing CORBA object references and proxifying them (replacing addressing information). Additionally, the I-DBC can enforce fine-grained access control to guarantee that only trusted peers can interact.
In the following sections the example CORBA application Frankfurter Bank is presented and protected by employing the I-DBC. Note that not all the features of the I-DBC and the Frankfurter Bank application are explained here, as this is beyond the scope of this Quick Installation Guide.
3.2 Getting familiar with the Frankfurter Bank applicationYou are the security administrator of a fictitious bank application “Frankfurter Bank”. The application offers some operations for account managers and also has a small data-base (cf. figure 7, “Frankfurter Bank”):
• there are two account managers: Mrs. Monica Meyer and Mr. Stefan Bauer,• they can withdraw and deposit money from/to accounts,
Domain Boundary Controller - Quick Installation Guide 19

• there are two accounts in the database: The account with the number “4711” is owned by Max Smith and initially holds 750 EUR. The account with the number “1234” is owned by Ann Carter and initially holds 333 EUR.
Fig. 7. Frankfurter Bank
Prerequisites for the Frankfurter Bank ExampleThe Frankfurter Bank example is written in Java. It is a CORBA application that is based on JacORB, an open source ORB developed at Freie Universität Berlin. The Frankfurter Bank example can be run on Linux, Solaris, or Windows.
The installer for this example is included in the DBC distribution (FrankfurterBankIIOP_Installer.bin for Linux/Solaris or for Windows FrankfurterBankIIOP_Installer.exe respectively). Running the installer will lead you through the setup of the example. By default, Frankfurter Bank is installed in <user_home>/FrankfurterBank/iiop on Linux/Solaris and in C:\Program Files\FrankfurterBank\iiop on Windows.
Running Frankfurter BankTo get a first impression of how the application works, go to the directory where the application has been installed and start the Bank Server and Bank Client:
Meyer
Bauer
AccountManagers
withdraw
deposit
getAcount
updateBalance
Bank Application
No.: 1234Name: Ann CarterAmount: EUR 333
Account 1
No.: 4711Name: Max SmithAmount: EUR 750
Account 2
20 Domain Boundary Controller - Quick Installation Guide
Protecting CORBA Applications – Example
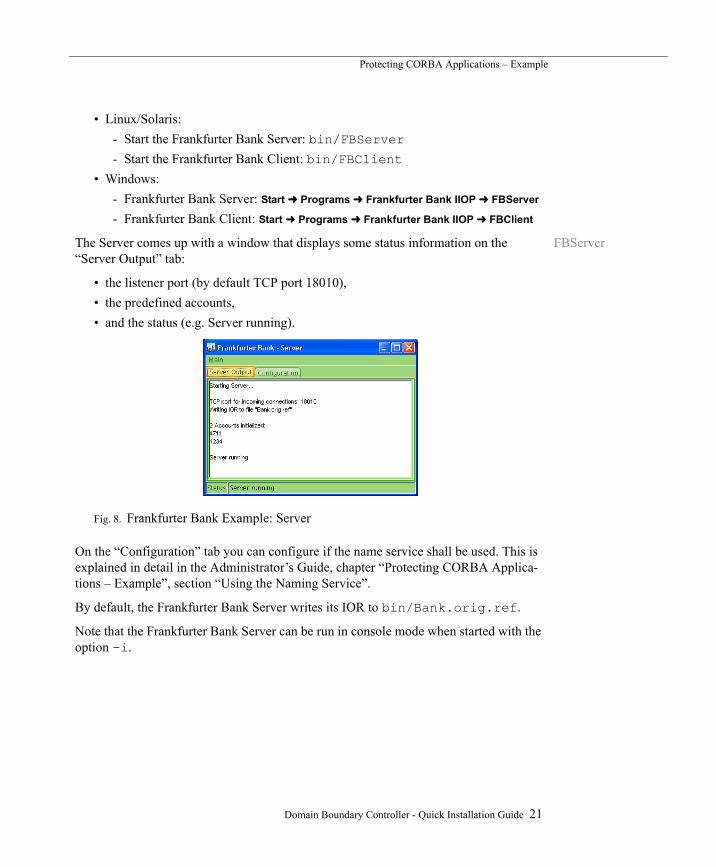
• Linux/Solaris:- Start the Frankfurter Bank Server: bin/FBServer- Start the Frankfurter Bank Client: bin/FBClient
• Windows: - Frankfurter Bank Server: Start Programs Frankfurter Bank IIOP FBServer
- Frankfurter Bank Client: Start Programs Frankfurter Bank IIOP FBClient
FBServerThe Server comes up with a window that displays some status information on the “Server Output” tab:
• the listener port (by default TCP port 18010), • the predefined accounts, • and the status (e.g. Server running).
Fig. 8. Frankfurter Bank Example: Server
On the “Configuration” tab you can configure if the name service shall be used. This is explained in detail in the Administrator’s Guide, chapter “Protecting CORBA Applica-tions – Example”, section “Using the Naming Service”.
By default, the Frankfurter Bank Server writes its IOR to bin/Bank.orig.ref.
Note that the Frankfurter Bank Server can be run in console mode when started with the option -i.
Domain Boundary Controller - Quick Installation Guide 21
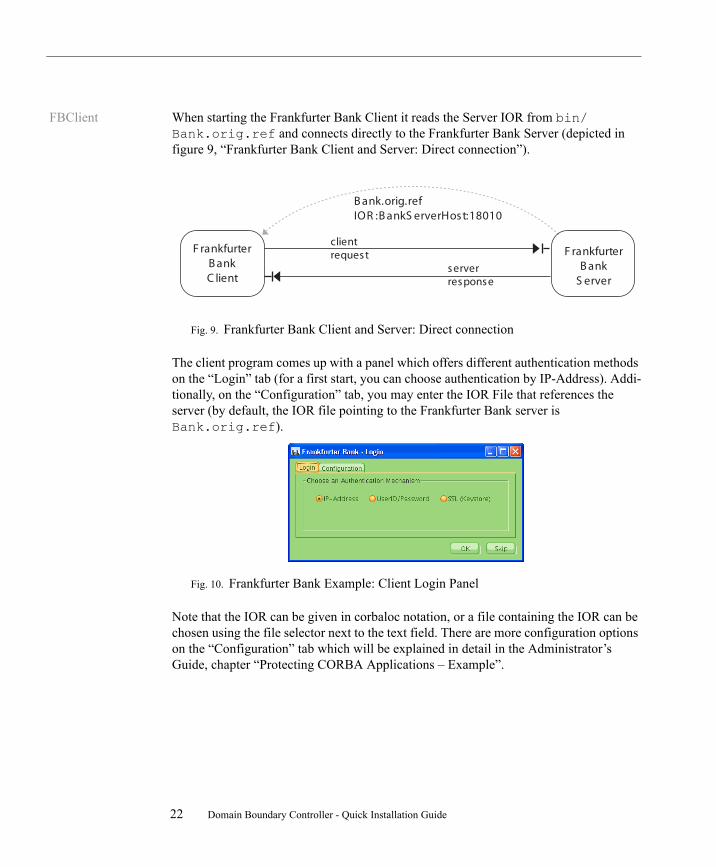
FBClient When starting the Frankfurter Bank Client it reads the Server IOR from bin/Bank.orig.ref and connects directly to the Frankfurter Bank Server (depicted in figure 9, “Frankfurter Bank Client and Server: Direct connection”).
Fig. 9. Frankfurter Bank Client and Server: Direct connection
The client program comes up with a panel which offers different authentication methods on the “Login” tab (for a first start, you can choose authentication by IP-Address). Addi-tionally, on the “Configuration” tab, you may enter the IOR File that references the server (by default, the IOR file pointing to the Frankfurter Bank server is Bank.orig.ref).
Fig. 10. Frankfurter Bank Example: Client Login Panel
Note that the IOR can be given in corbaloc notation, or a file containing the IOR can be chosen using the file selector next to the text field. There are more configuration options on the “Configuration” tab which will be explained in detail in the Administrator’s Guide, chapter “Protecting CORBA Applications – Example”.
B ank.orig.refIOR :B ankS erverHost:18010
F rankfurterB ank
S erver
clientrequest
F rankfurterB ankC lient
serverresponse
22 Domain Boundary Controller - Quick Installation Guide
Protecting CORBA Applications – Example
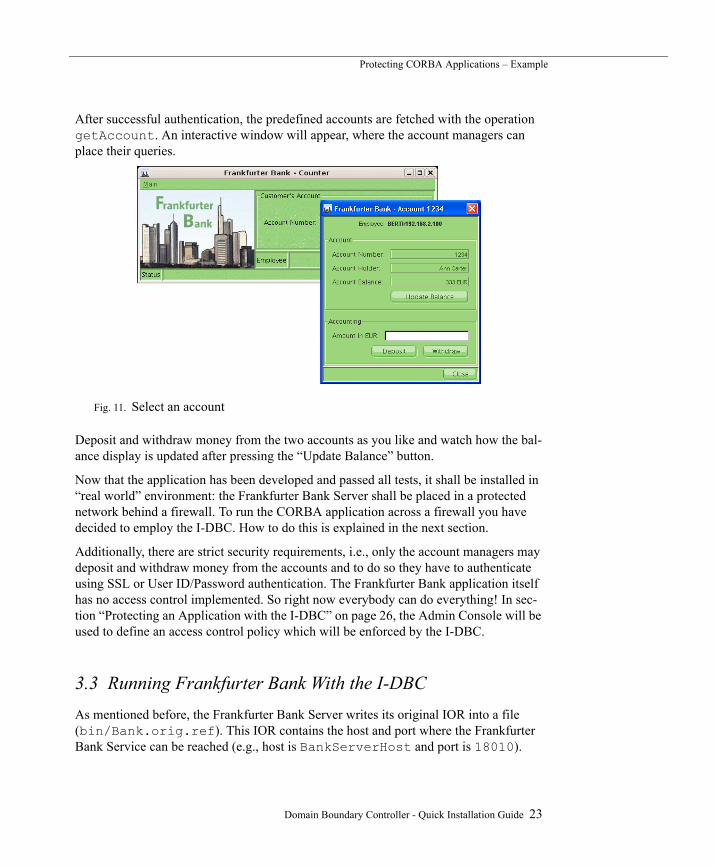
After successful authentication, the predefined accounts are fetched with the operation getAccount. An interactive window will appear, where the account managers can place their queries.
Fig. 11. Select an account
Deposit and withdraw money from the two accounts as you like and watch how the bal-ance display is updated after pressing the “Update Balance” button.
Now that the application has been developed and passed all tests, it shall be installed in “real world” environment: the Frankfurter Bank Server shall be placed in a protected network behind a firewall. To run the CORBA application across a firewall you have decided to employ the I-DBC. How to do this is explained in the next section.
Additionally, there are strict security requirements, i.e., only the account managers may deposit and withdraw money from the accounts and to do so they have to authenticate using SSL or User ID/Password authentication. The Frankfurter Bank application itself has no access control implemented. So right now everybody can do everything! In sec-tion “Protecting an Application with the I-DBC” on page 26, the Admin Console will be used to define an access control policy which will be enforced by the I-DBC.
3.3 Running Frankfurter Bank With the I-DBCAs mentioned before, the Frankfurter Bank Server writes its original IOR into a file (bin/Bank.orig.ref). This IOR contains the host and port where the Frankfurter Bank Service can be reached (e.g., host is BankServerHost and port is 18010).
Domain Boundary Controller - Quick Installation Guide 23
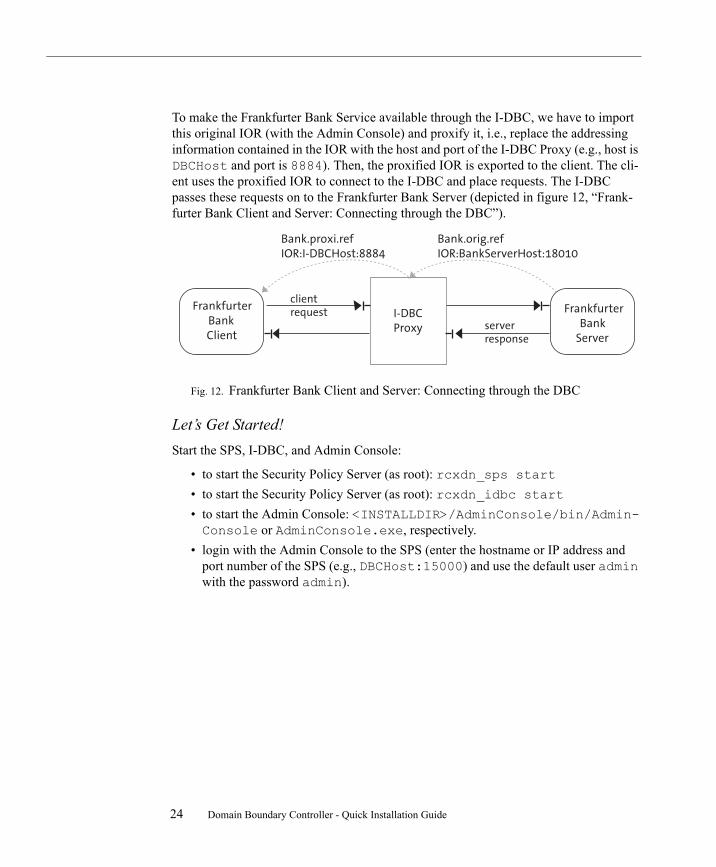
To make the Frankfurter Bank Service available through the I-DBC, we have to import this original IOR (with the Admin Console) and proxify it, i.e., replace the addressing information contained in the IOR with the host and port of the I-DBC Proxy (e.g., host is DBCHost and port is 8884). Then, the proxified IOR is exported to the client. The cli-ent uses the proxified IOR to connect to the I-DBC and place requests. The I-DBC passes these requests on to the Frankfurter Bank Server (depicted in figure 12, “Frank-furter Bank Client and Server: Connecting through the DBC”).
Fig. 12. Frankfurter Bank Client and Server: Connecting through the DBC
Let’s Get Started!Start the SPS, I-DBC, and Admin Console:
• to start the Security Policy Server (as root): rcxdn_sps start• to start the Security Policy Server (as root): rcxdn_idbc start• to start the Admin Console: <INSTALLDIR>/AdminConsole/bin/Admin-Console or AdminConsole.exe, respectively.
• login with the Admin Console to the SPS (enter the hostname or IP address and port number of the SPS (e.g., DBCHost:15000) and use the default user admin with the password admin).
I-DBCProxy
FrankfurterBankServer
Bank.orig.refIOR:BankServerHost:18010
Bank.proxi.refIOR:I-DBCHost:8884
clientrequest
FrankfurterBankClient
serverresponse
24 Domain Boundary Controller - Quick Installation Guide
Protecting CORBA Applications – Example
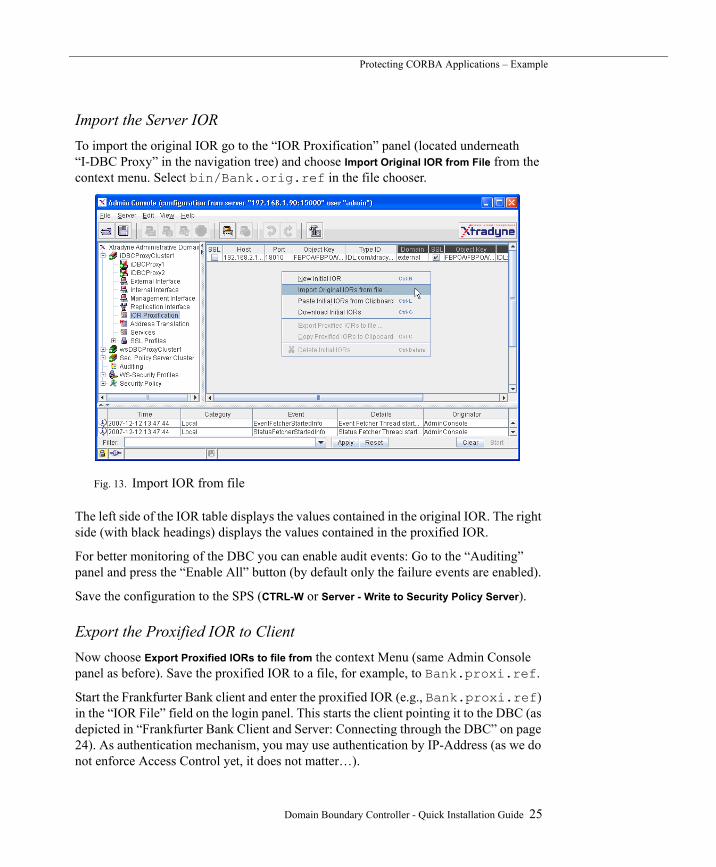
Import the Server IORTo import the original IOR go to the “IOR Proxification” panel (located underneath “I-DBC Proxy” in the navigation tree) and choose Import Original IOR from File from the context menu. Select bin/Bank.orig.ref in the file chooser.
Fig. 13. Import IOR from file
The left side of the IOR table displays the values contained in the original IOR. The right side (with black headings) displays the values contained in the proxified IOR.
For better monitoring of the DBC you can enable audit events: Go to the “Auditing” panel and press the “Enable All” button (by default only the failure events are enabled).
Save the configuration to the SPS (CTRL-W or Server - Write to Security Policy Server).
Export the Proxified IOR to ClientNow choose Export Proxified IORs to file from the context Menu (same Admin Console panel as before). Save the proxified IOR to a file, for example, to Bank.proxi.ref.
Start the Frankfurter Bank client and enter the proxified IOR (e.g., Bank.proxi.ref) in the “IOR File” field on the login panel. This starts the client pointing it to the DBC (as depicted in “Frankfurter Bank Client and Server: Connecting through the DBC” on page 24). As authentication mechanism, you may use authentication by IP-Address (as we do not enforce Access Control yet, it does not matter…).
Domain Boundary Controller - Quick Installation Guide 25
Verify that the service runs across the DBCTo verify that the application really runs across the DBC you can watch the events in the event browser at the bottom of the Admin Console (double-click on the event to bring up the details). If you enabled all events before, you should see the event ProxyEn-gine.GIOPConnectionAcceptedSuccess. It shows that an incoming GIOP connection from the Frankfurter Bank client host was accepted on port 8884 (default plain IIOP listener port).
You should also see the event ProxyEngine.GIOPConnectionEstablished-Success which shows that an outgoing connection from the DBC host to the Frank-furter Bank Server host on port 18011 has been established.
The first problem is solved now – we get across firewalls! Let’s do Access Control!
3.4 Protecting an Application with the I-DBCTo protect an application with the I-DBC you generally have to carry out the following steps:
1. Activate Access Control with the Admin Console on the “I-DBC” panel or in case of a cluster on the “I-DBC Cluster” panel.
2. Add the resource (Service) to the Security Policy:Make a new entry for the protected target service.
3. Define Security Policies for the protected resource:Define access rules and authentication requirements that CORBA clients must respect:a. Define Users, Groups, and Roles:As a prerequisite for defining access rules, you need to set up the user entities to which your policy rules refer. For ease of management, users can be grouped (e.g., teams, departments, etc.) and assigned to roles (for concepts see “Access Control” on page 215 of the Admin Guide).b. Define how the Resource shall be protected: Define the required authentication and the required protection for clients access-ing the resource.c. Define the Resource’s Accessors:Define which users, groups, or roles may access the resource or certain operations of the resource.
26 Domain Boundary Controller - Quick Installation Guide
Protecting CORBA Applications – Example
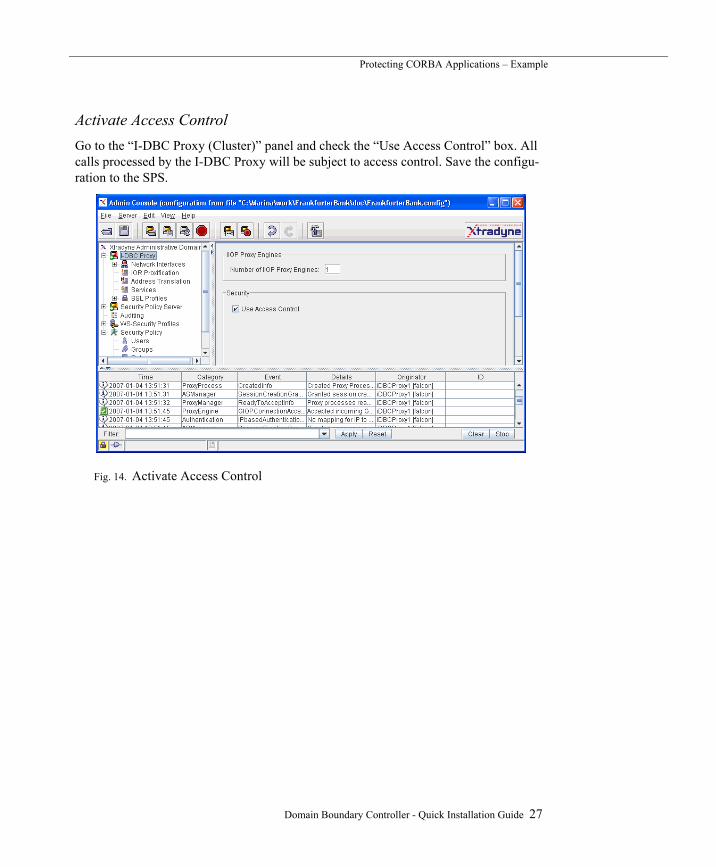
Activate Access ControlGo to the “I-DBC Proxy (Cluster)” panel and check the “Use Access Control” box. All calls processed by the I-DBC Proxy will be subject to access control. Save the configu-ration to the SPS.
Fig. 14. Activate Access Control
Domain Boundary Controller - Quick Installation Guide 27
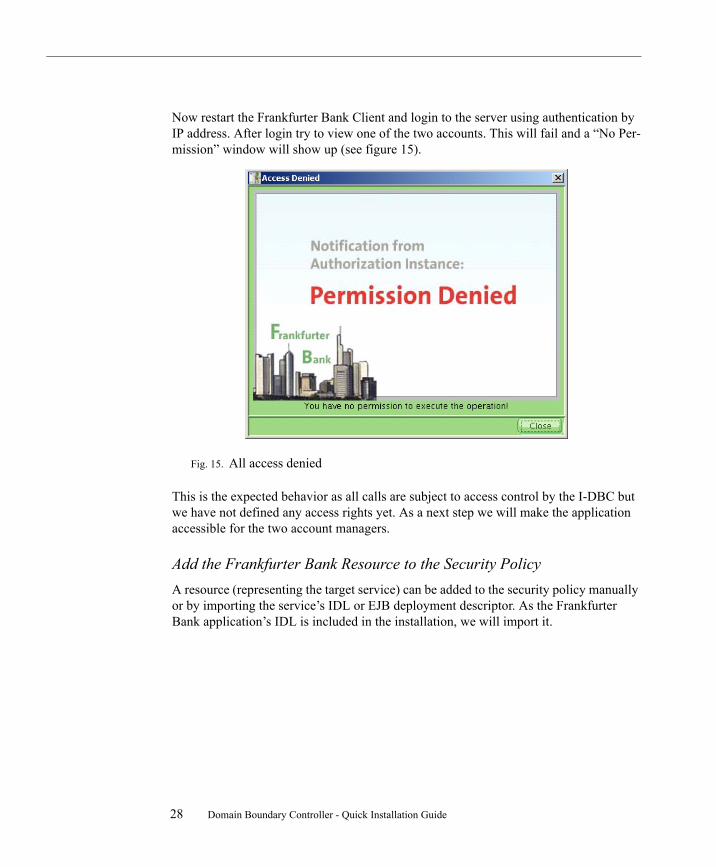
Now restart the Frankfurter Bank Client and login to the server using authentication by IP address. After login try to view one of the two accounts. This will fail and a “No Per-mission” window will show up (see figure 15).
Fig. 15. All access denied
This is the expected behavior as all calls are subject to access control by the I-DBC but we have not defined any access rights yet. As a next step we will make the application accessible for the two account managers.
Add the Frankfurter Bank Resource to the Security PolicyA resource (representing the target service) can be added to the security policy manually or by importing the service’s IDL or EJB deployment descriptor. As the Frankfurter Bank application’s IDL is included in the installation, we will import it.
28 Domain Boundary Controller - Quick Installation Guide

Protecting CORBA Applications – Example
Frankfurter Bank IDL
The IDL file can be found in idl/FrankfurterBank.idl. It comprises three types: AccountServer, Account, and BalanceChangeListener. The types and some of their key operations are depicted in figure 16.
Fig. 16. Frankfurter Bank IDL: Types and operations
As a first step we want to grant complete access to all the types with all their operations. In a second step we will define a more fine-grained access control policy (section “Define a more fine-grained policy” on page 36).
To import the application’s IDL file, bring up the Admin Console, choose File Import IDL.... and select idl/FrankfurterBank.idl in the file chooser of the first wizard panel. Press the “Next” button. As we want to grant access to all operations of the IDL
withdraw
deposit
getAcount
updateBalance
Bank Application
IDL:com/xtradyne/frankfurterbank/AccountServer:1.0
IDL:com/xtradyne/frankfurterbank/Account:1.0
IDL:com/xtradyne/frankfurterbank/BalanceChangeListener:1.0
Domain Boundary Controller - Quick Installation Guide 29
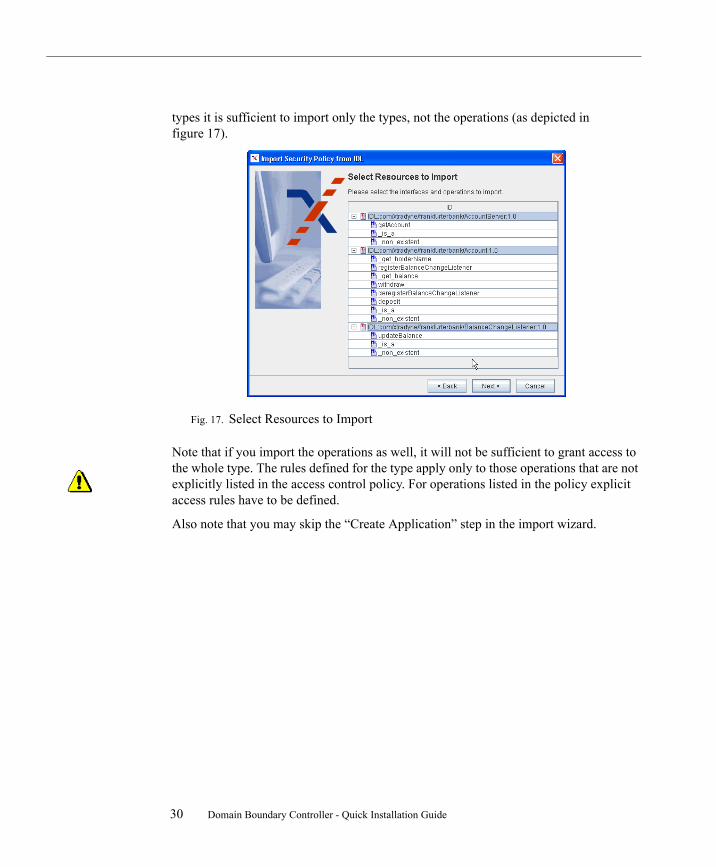
types it is sufficient to import only the types, not the operations (as depicted in figure 17).
Fig. 17. Select Resources to Import
Note that if you import the operations as well, it will not be sufficient to grant access to the whole type. The rules defined for the type apply only to those operations that are not explicitly listed in the access control policy. For operations listed in the policy explicit access rules have to be defined.
Also note that you may skip the “Create Application” step in the import wizard.
30 Domain Boundary Controller - Quick Installation Guide
Protecting CORBA Applications – Example
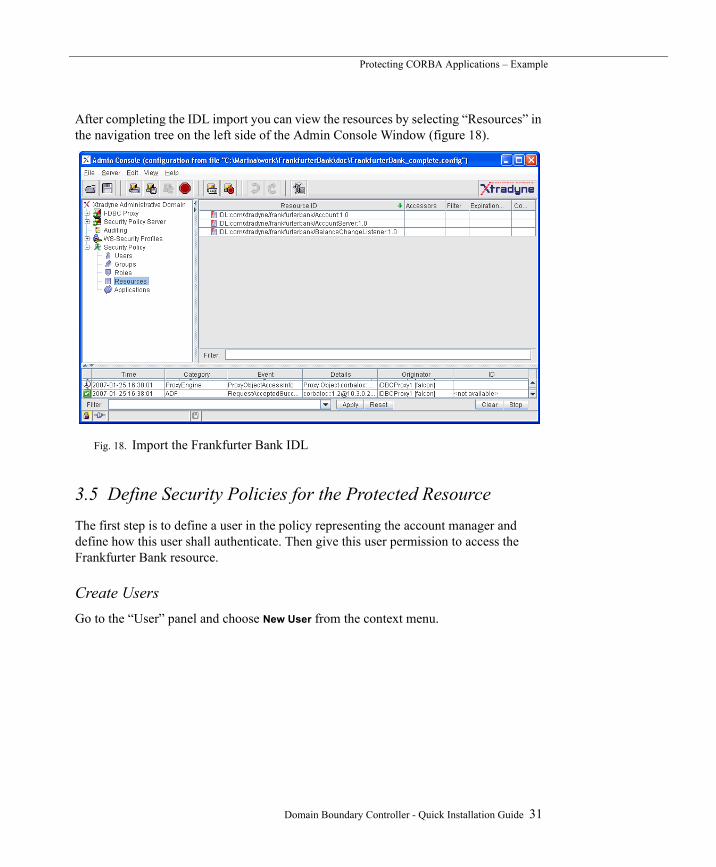
After completing the IDL import you can view the resources by selecting “Resources” in the navigation tree on the left side of the Admin Console Window (figure 18).
Fig. 18. Import the Frankfurter Bank IDL
3.5 Define Security Policies for the Protected ResourceThe first step is to define a user in the policy representing the account manager and define how this user shall authenticate. Then give this user permission to access the Frankfurter Bank resource.
Create UsersGo to the “User” panel and choose New User from the context menu.
Domain Boundary Controller - Quick Installation Guide 31
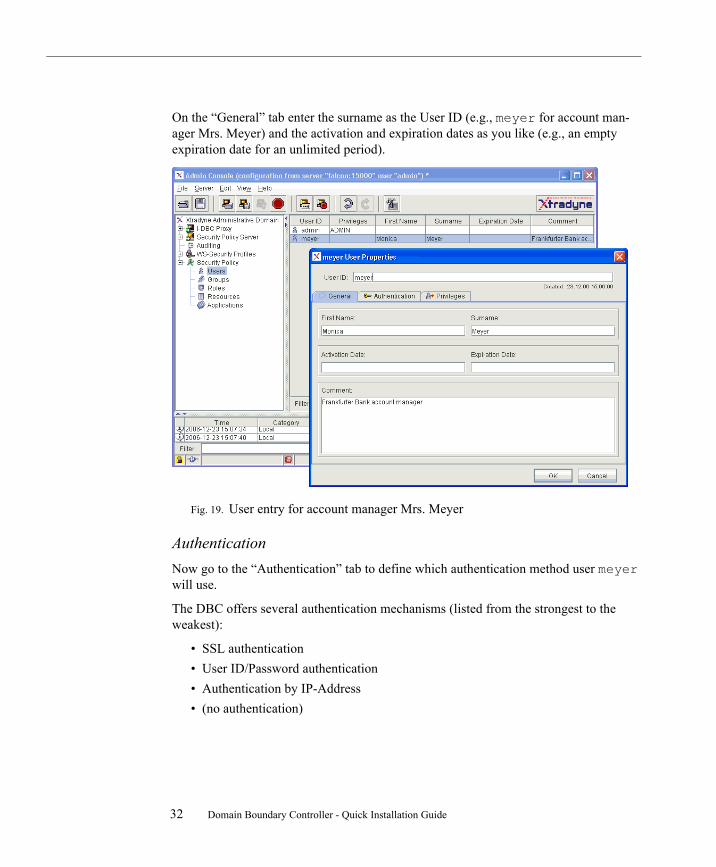
On the “General” tab enter the surname as the User ID (e.g., meyer for account man-ager Mrs. Meyer) and the activation and expiration dates as you like (e.g., an empty expiration date for an unlimited period).
Fig. 19. User entry for account manager Mrs. Meyer
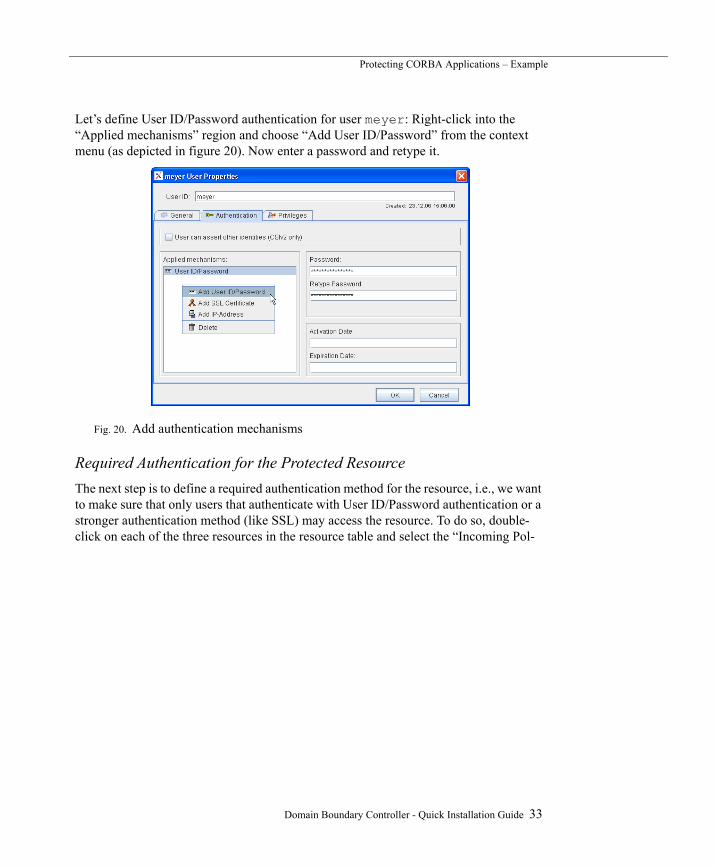
AuthenticationNow go to the “Authentication” tab to define which authentication method user meyer will use.
The DBC offers several authentication mechanisms (listed from the strongest to the weakest):
• SSL authentication• User ID/Password authentication• Authentication by IP-Address• (no authentication)
32 Domain Boundary Controller - Quick Installation Guide
Protecting CORBA Applications – Example
Let’s define User ID/Password authentication for user meyer: Right-click into the “Applied mechanisms” region and choose “Add User ID/Password” from the context menu (as depicted in figure 20). Now enter a password and retype it.
Fig. 20. Add authentication mechanisms
Required Authentication for the Protected ResourceThe next step is to define a required authentication method for the resource, i.e., we want to make sure that only users that authenticate with User ID/Password authentication or a stronger authentication method (like SSL) may access the resource. To do so, double-click on each of the three resources in the resource table and select the “Incoming Pol-
Domain Boundary Controller - Quick Installation Guide 33
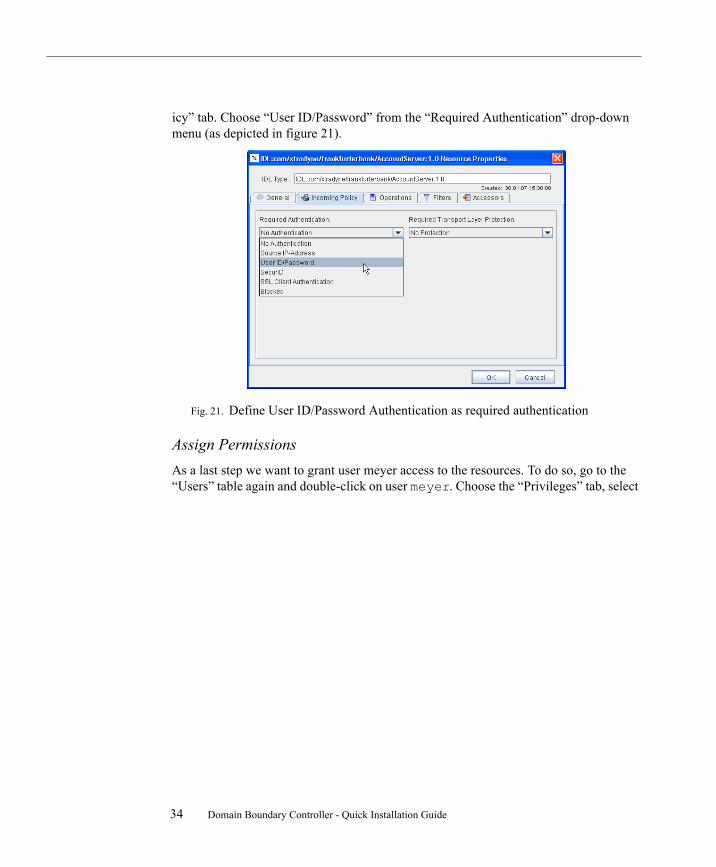
icy” tab. Choose “User ID/Password” from the “Required Authentication” drop-down menu (as depicted in figure 21).
Fig. 21. Define User ID/Password Authentication as required authentication
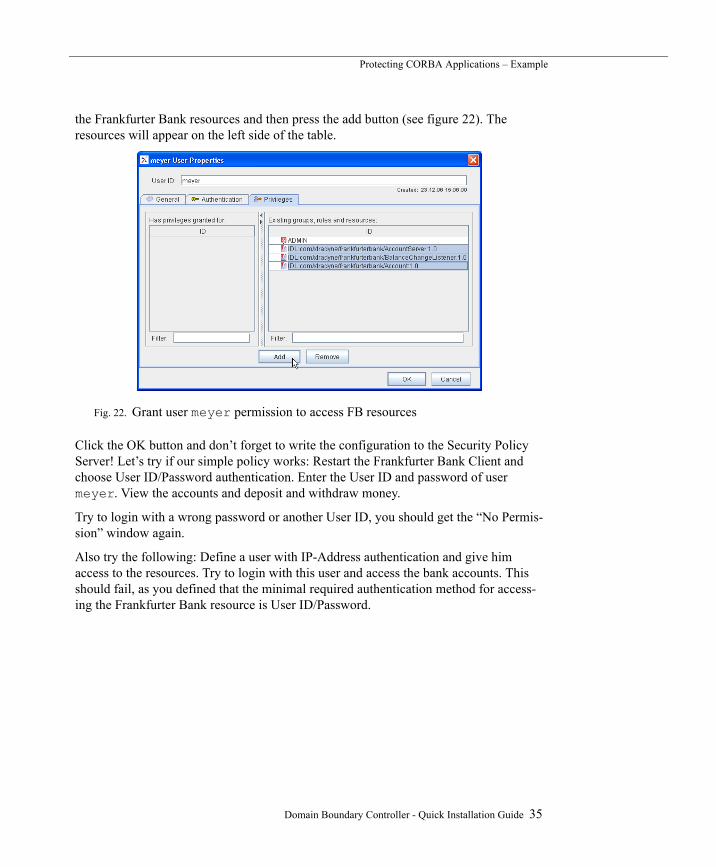
Assign PermissionsAs a last step we want to grant user meyer access to the resources. To do so, go to the “Users” table again and double-click on user meyer. Choose the “Privileges” tab, select
34 Domain Boundary Controller - Quick Installation Guide
Protecting CORBA Applications – Example
the Frankfurter Bank resources and then press the add button (see figure 22). The resources will appear on the left side of the table.
Fig. 22. Grant user meyer permission to access FB resources
Click the OK button and don’t forget to write the configuration to the Security Policy Server! Let’s try if our simple policy works: Restart the Frankfurter Bank Client and choose User ID/Password authentication. Enter the User ID and password of user meyer. View the accounts and deposit and withdraw money.
Try to login with a wrong password or another User ID, you should get the “No Permis-sion” window again.
Also try the following: Define a user with IP-Address authentication and give him access to the resources. Try to login with this user and access the bank accounts. This should fail, as you defined that the minimal required authentication method for access-ing the Frankfurter Bank resource is User ID/Password.
Domain Boundary Controller - Quick Installation Guide 35
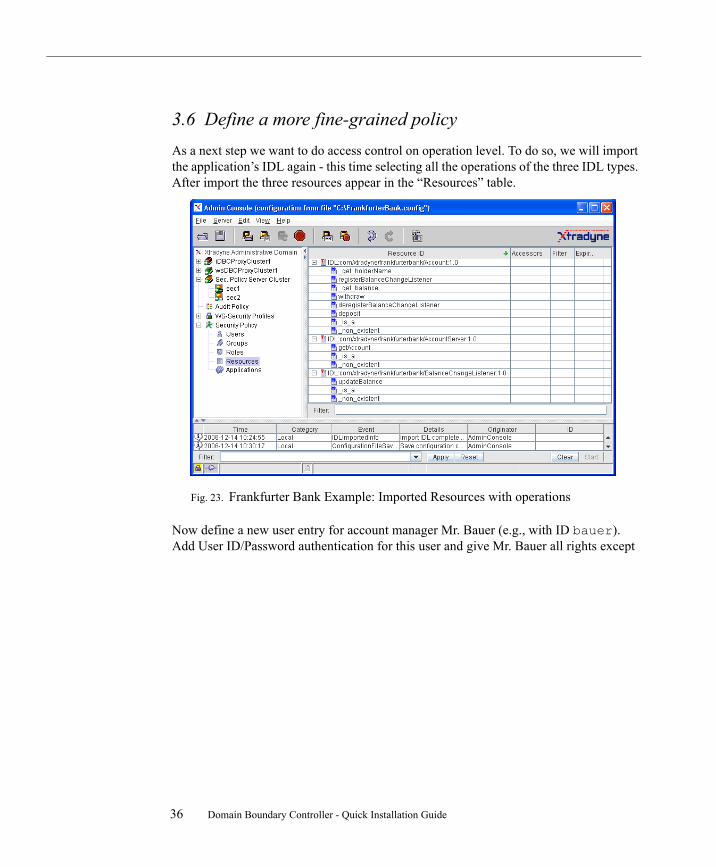
3.6 Define a more fine-grained policyAs a next step we want to do access control on operation level. To do so, we will import the application’s IDL again - this time selecting all the operations of the three IDL types. After import the three resources appear in the “Resources” table.
Fig. 23. Frankfurter Bank Example: Imported Resources with operations
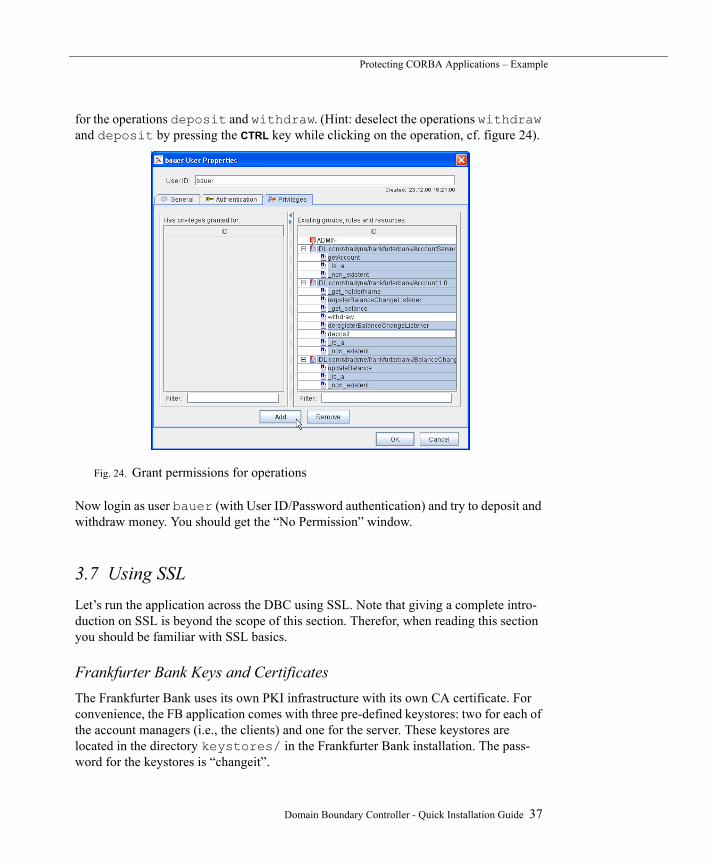
Now define a new user entry for account manager Mr. Bauer (e.g., with ID bauer). Add User ID/Password authentication for this user and give Mr. Bauer all rights except
36 Domain Boundary Controller - Quick Installation Guide
Protecting CORBA Applications – Example
for the operations deposit and withdraw. (Hint: deselect the operations withdraw and deposit by pressing the CTRL key while clicking on the operation, cf. figure 24).
Fig. 24. Grant permissions for operations
Now login as user bauer (with User ID/Password authentication) and try to deposit and withdraw money. You should get the “No Permission” window.
3.7 Using SSLLet’s run the application across the DBC using SSL. Note that giving a complete intro-duction on SSL is beyond the scope of this section. Therefor, when reading this section you should be familiar with SSL basics.
Frankfurter Bank Keys and CertificatesThe Frankfurter Bank uses its own PKI infrastructure with its own CA certificate. For convenience, the FB application comes with three pre-defined keystores: two for each of the account managers (i.e., the clients) and one for the server. These keystores are located in the directory keystores/ in the Frankfurter Bank installation. The pass-word for the keystores is “changeit”.
Domain Boundary Controller - Quick Installation Guide 37
To list the contents of the keystores you can use the Java keytool:
keytool -list -keystore Meyer.jks
Each keystore contains a key for the respective user and the CA certificate that signed the key.
Establish Mutual Trust between DBC and FB ClientUp to now the DBC doesn’t know anything about the Frankfurter Bank’s CA certificate. So when a Frankfurter Bank client connecting to the DBC with SSL presents its key, the DBC won’t trust this client as the CA certificate that issued the key is unknown to the DBC. The same applies to the other direction: the Frankfurter Bank application doesn’t know anything about the DBC CA certificate, therefor it won’t accept the DBC as com-munication partner.
To establish mutual trust between the two communication partners the Frankfurter Bank CA certificate has to be added to the list of trusted CA certificates in the DBC. And the DBC’s CA certificate has to be added to the Frankfurter Bank Client’s keystore.
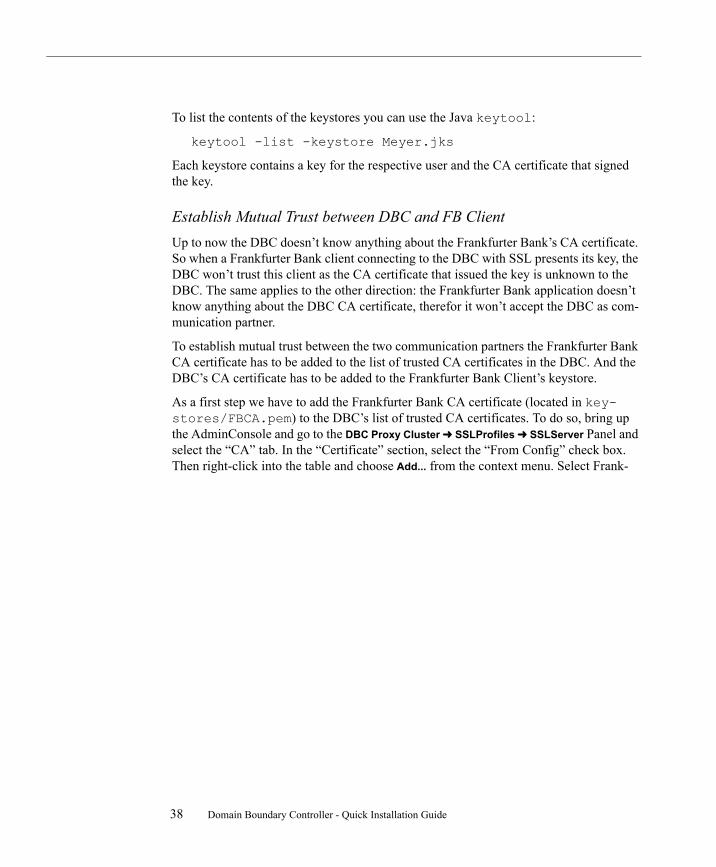
As a first step we have to add the Frankfurter Bank CA certificate (located in key-stores/FBCA.pem) to the DBC’s list of trusted CA certificates. To do so, bring up the AdminConsole and go to the DBC Proxy Cluster SSLProfiles SSLServer Panel and select the “CA” tab. In the “Certificate” section, select the “From Config” check box. Then right-click into the table and choose Add... from the context menu. Select Frank-
38 Domain Boundary Controller - Quick Installation Guide
Protecting CORBA Applications – Example
furter Bank’s CA certificate (keystores/FBCA.pem) in the file chooser. The CA certificate will appear in the table (cf. screenshot in figure 18).
Fig. 25. Import the Frankfurter Bank CA Certificate
Save the new configuration to the SPS.
As the next step add the ProxyCACert.pem (located in <INSTALLDIR>/idbc/adm/) to Meyer’s and Bauer’s keystore. You may use the script replaceDBCCert located in the Frankfurter Bank’s bin directory:
On Linux/Solaris:
replaceDBCCert.bin ProxyCACert.pem
On Windows
replaceDBCCert.bat ProxyCACert.pem
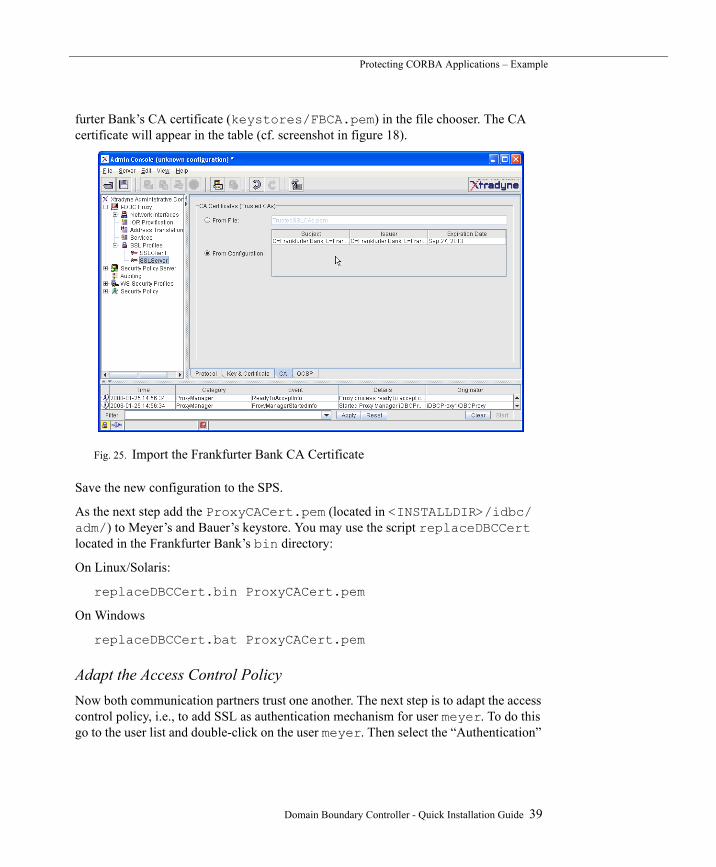
Adapt the Access Control PolicyNow both communication partners trust one another. The next step is to adapt the access control policy, i.e., to add SSL as authentication mechanism for user meyer. To do this go to the user list and double-click on the user meyer. Then select the “Authentication”
Domain Boundary Controller - Quick Installation Guide 39
tab and right-click into the “Applied mechanisms” area. Select “SSL Certificate” and then configure the Distinguished Name (as depicted in figure figure 26).
Fig. 26. Add SSL as authentication mechanism for user meyer
The Distinguished Name (DN) has to be the same as the one contained in Mrs. Meyer’s key (i.e., “CN=Monica Meyer,O=Frankfurter Bank,C=de”).
You can view the DN by running the script printcert.sh on Linux/Solaris or printcert.wsf on Windows. The script is located in the bin directory. On Win-dows, type for example:
printcert.wsf ..\keystores\Meyer.jks
Alternatively, you may use the Java keytool. First export Mrs. Meyer’s key from the keystore and then print it:
keytool –export –alias monicameyer –keystore Meyer.jks
-storepass changeit –file MeyerCert.pem
To print out the key:
keytool –printcert –file MeyerCert.pem
After entering the DN in the AdminConsole’s User Properties panel, press the OK but-ton and save the configuration to the Security Policy Server.
40 Domain Boundary Controller - Quick Installation Guide
Protecting CORBA Applications – Example
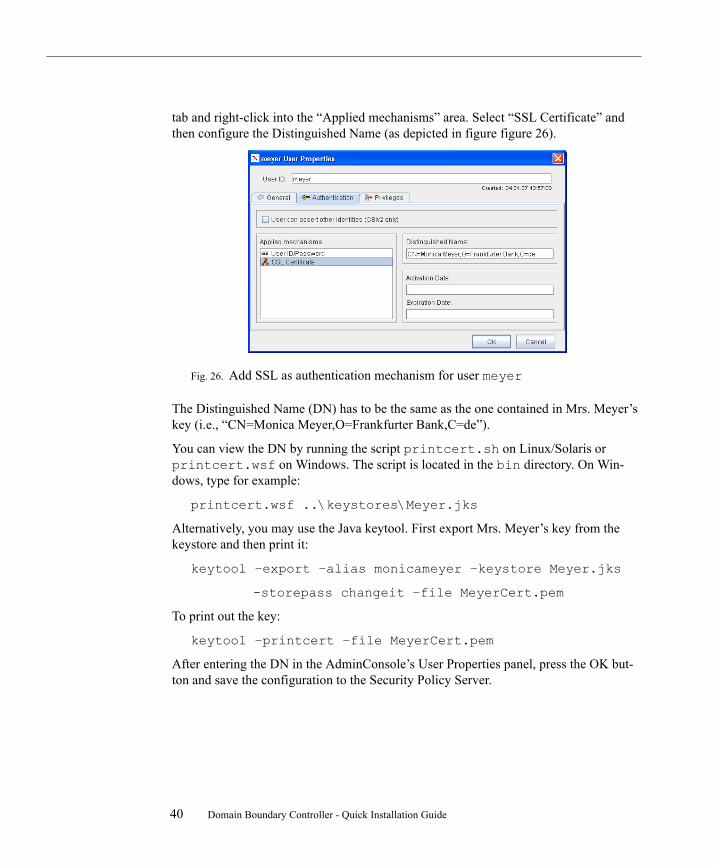
Start the Client with SSLStart the Frankfurter Bank Client and choose “SSL (keystore)” as authentication method. Then select a keystore (e.g. keystores/Meyer.jks) with the file selector and enter the keystore password (changeit).
Fig. 27. Frankfurter Bank Client: SSL Authentication
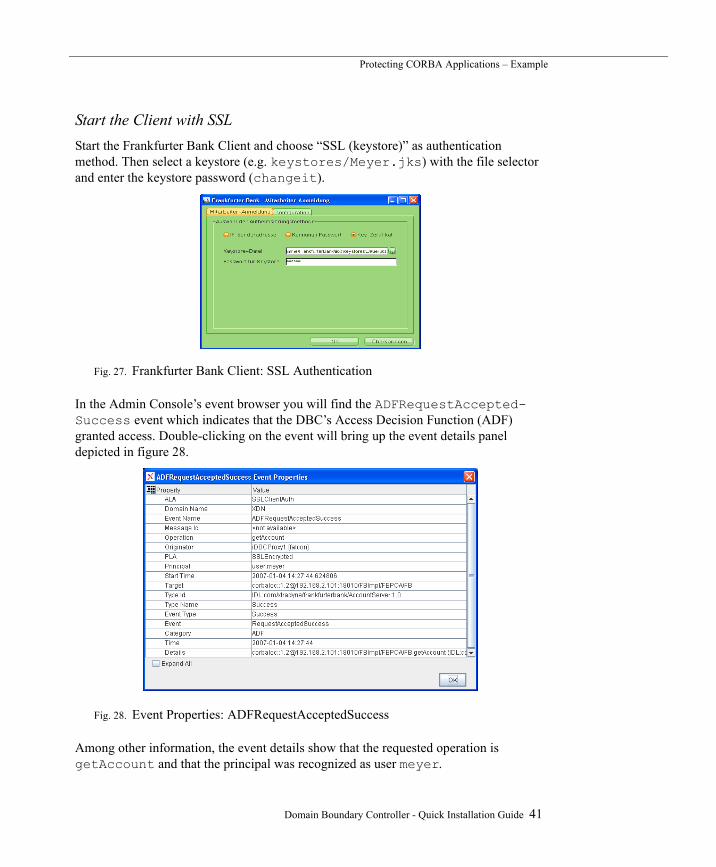
In the Admin Console’s event browser you will find the ADFRequestAccepted-Success event which indicates that the DBC’s Access Decision Function (ADF) granted access. Double-clicking on the event will bring up the event details panel depicted in figure 28.
Fig. 28. Event Properties: ADFRequestAcceptedSuccess
Among other information, the event details show that the requested operation is getAccount and that the principal was recognized as user meyer.
Domain Boundary Controller - Quick Installation Guide 41
We suggest that you play around a bit with the example. For a more detailed example on how to define access control policies, please refer to (chapter “Protecting CORBA Applications – Example” on page 305 of the Admin Guide).
3.8 SummaryWe have seen how to define a very simple security policy. The DBC offers to define far more complex security policies. For example, the I-DBC can perform content inspection by validating the parameters of incoming messages. Flexible filter rules for operation parameters can be defined with the Admin Console. Messages carrying arguments that do not conform to the filter rules will be rejected. For more details, please refer to the Administrator’s Guide.
42 Domain Boundary Controller - Quick Installation Guide