IDA-1S - Fluke Biomedical
32
FBC-0064 February 2014, Rev. 2, 10/14 © 2014 Fluke Corporation. All rights reserved. Specifications are subject to change without notice. All product names are trademarks of their respective companies. IDA-1S Infusion Device Analyzer Users Manual
Transcript of IDA-1S - Fluke Biomedical

FBC-0064 February 2014, Rev. 2, 10/14 © 2014 Fluke Corporation. All rights reserved. Specifications are subject to change without notice. All product names are trademarks of their respective companies.
IDA-1S Infusion Device Analyzer
Users Manual

Warranty and Product Support
Fluke Biomedical warrants this instrument against defects in materials and workmanship for one year from the date of original purchase OR two years if at the end of your first year you send the instrument to a Fluke Biomedical service center for calibration. You will be charged our customary fee for such calibration. During the warranty period, we will repair or at our option replace, at no charge, a product that proves to be defective, provided you return the product, shipping prepaid, to Fluke Biomedical. This warranty covers the original purchaser only and is not transferable. The warranty does not apply if the product has been damaged by accident or misuse or has been serviced or modified by anyone other than an authorized Fluke Biomedical service facility. NO OTHER WARRANTIES, SUCH AS FITNESS FOR A PARTICULAR PURPOSE, ARE EXPRESSED OR IMPLIED. FLUKE SHALL NOT BE LIABLE FOR ANY SPECIAL, INDIRECT, INCIDENTAL OR CONSEQUENTIAL DAMAGES OR LOSSES, INCLUDING LOSS OF DATA, ARISING FROM ANY CAUSE OR THEORY.
This warranty covers only serialized products and their accessory items that bear a distinct serial number tag. Recalibration of instruments is not covered under the warranty.
This warranty gives you specific legal rights and you may also have other rights that vary in different jurisdictions. Since some jurisdictions do not allow the exclusion or limitation of an implied warranty or of incidental or consequential damages, this limitation of liability may not apply to you. If any provision of this warranty is held invalid or unenforceable by a court or other decision-maker of competent jurisdiction, such holding will not affect the validity or enforceability of any other provision.
7/07

Notices
All Rights Reserved Copyright 2014, Fluke Biomedical. No part of this publication may be reproduced, transmitted, transcribed, stored in a retrieval system, or translated into any language without the written permission of Fluke Biomedical.
Copyright Release Fluke Biomedical agrees to a limited copyright release that allows you to reproduce manuals and other printed materials for use in service training programs and other technical publications. If you would like other reproductions or distributions, submit a written request to Fluke Biomedical.
Unpacking and Inspection Follow standard receiving practices upon receipt of the instrument. Check the shipping carton for damage. If damage is found, stop unpacking the instrument. Notify the carrier and ask for an agent to be present while the instrument is unpacked. There are no special unpacking instructions, but be careful not to damage the instrument when unpacking it. Inspect the instrument for physical damage such as bent or broken parts, dents, or scratches.
Technical Support For application support or answers to technical questions, either email [email protected] or call 1-800- 850-4608 or 1-440-248-9300. In Europe, email [email protected] or call +31-40-2965314.
Claims Our routine method of shipment is via common carrier, FOB origin. Upon delivery, if physical damage is found, retain all packing materials in their original condition and contact the carrier immediately to file a claim. If the instrument is delivered in good physical condition but does not operate within specifications, or if there are any other problems not caused by shipping damage, please contact Fluke Biomedical or your local sales representative.
Returns and Repairs Return Procedure
All items being returned (including all warranty-claim shipments) must be sent freight-prepaid to our factory location. When you return an instrument to Fluke Biomedical, we recommend using United Parcel Service, Federal Express, or Air Parcel Post. We also recommend that you insure your shipment for its actual replacement cost. Fluke Biomedical will not be responsible for lost shipments or instruments that are received in damaged condition due to improper packaging or handling.
Use the original carton and packaging material for shipment. If they are not available, we recommend the following guide for repackaging:
Use a double–walled carton of sufficient strength for the weight being shipped. Use heavy paper or cardboard to protect all instrument surfaces. Use nonabrasive material around all
projecting parts. Use at least four inches of tightly packed, industry-approved, shock-absorbent material around the
instrument. Returns for partial refund/credit:
Every product returned for refund/credit must be accompanied by a Return Material Authorization (RMA) number, obtained from our Order Entry Group at 1-440-498-2560.
Repair and calibration:
To find the nearest service center, go to www.flukebiomedical.com/service or
In the U.S.A.: Cleveland Calibration Lab Tel: 1-800-850-4608 x2564 Email: [email protected] Everett Calibration Lab Tel: 1-888-99 FLUKE (1-888-993-5853) Email: [email protected]
In Europe, Middle East, and Africa: Eindhoven Calibration Lab Tel: +31-40-2675300 Email: [email protected] In Asia: Everett Calibration Lab Tel: +425-446-6945 Email: [email protected]
To ensure the accuracy of the Product is maintained at a high level, Fluke Biomedical recommends the product be calibrated at least once every 12 months. Calibration must be done by qualified personnel. Contact your local Fluke Biomedical representative for calibration.

Certification This instrument was thoroughly tested and inspected. It was found to meet Fluke Biomedical’s manufacturing specifications when it was shipped from the factory. Calibration measurements are traceable to the National Institute of Standards and Technology (NIST). Devices for which there are no NIST calibration standards are measured against in-house performance standards using accepted test procedures.
WARNING Unauthorized user modifications or application beyond the published specifications may result in electrical shock hazards or improper operation. Fluke Biomedical will not be responsible for any injuries sustained due to unauthorized equipment modifications.
Restrictions and Liabilities Information in this document is subject to change and does not represent a commitment by Fluke Biomedical. Changes made to the information in this document will be incorporated in new editions of the publication. No responsibility is assumed by Fluke Biomedical for the use or reliability of software or equipment that is not supplied by Fluke Biomedical, or by its affiliated dealers.
Manufacturing Location The IDA-1S Infusion Device Analyzer is manufactured at Fluke Biomedical, 6920 Seaway Blvd., Everett, WA, U.S.A.
i
Table of Contents
Title Page
Introduction ............................................................................................ 1 Intended Use ......................................................................................... 1 Unpack the Product ............................................................................... 1 Safety Information ................................................................................. 2 Symbols ................................................................................................. 3 Instrument Familiarization ..................................................................... 4 Product Connections ............................................................................. 7
Connect Infusion Devices .................................................................. 7 Connect Drains .................................................................................. 8
Product Operation ................................................................................. 9 Preferences ....................................................................................... 9 How to Set Up for a Test ................................................................... 9 Flow Tests ......................................................................................... 11 Occlusion Tests ................................................................................. 13
Utilities ................................................................................................... 14 Recall Tests ....................................................................................... 14 User Preferences ............................................................................... 15 View Settings ..................................................................................... 16 Set Clock ........................................................................................... 16 Report Heading ................................................................................. 16 Instructions ........................................................................................ 16 Calibration History ............................................................................. 16 Touch Calibration .............................................................................. 16
Troubleshooting ..................................................................................... 17 Product Maintenance ............................................................................ 18
Clean the Product (Outside) .............................................................. 19 Clean the Product (Inside) ................................................................. 19 Replaceable Parts ............................................................................. 19 Test Fluid ........................................................................................... 20 Storage .............................................................................................. 20 Shipping ............................................................................................. 20
General Specifications .......................................................................... 21 Performance Specifications ................................................................... 21

IDA-1S Users Manual
ii

iii
List of Tables
Table Title Page
1. Symbols ..................................................................................................... 3 2. Front-Panel Controls and Indicators .......................................................... 5 3. Side-Panel Connections ............................................................................ 6 4. Information Screen .................................................................................... 10 5. Flow Measurement Screen ....................................................................... 11 6. Occlusion Measurement Screen ............................................................... 13 7. Recall Tests Screen .................................................................................. 14 8. User Preferences Screen .......................................................................... 15 9. Bubble Errors ............................................................................................ 17 10. Air Lock Errors ........................................................................................... 17 11. Replacement Parts .................................................................................... 19

IDA-1S Users Manual
iv
v
List of Figures
Figure Title Page
1. Front-Panel Controls and Indicators .......................................................... 4 2. Side-Panel Connections ............................................................................ 6 3. Infusion Device Connections to the Product ............................................. 7 4. Drain Connections to the Product ............................................................. 8

IDA-1S Users Manual
vi
1
Introduction The IDA-1S Infusion Device Analyzer (the Product) is a portable, battery-operated instrument that verifies the performance of medical infusion devices. The Product measures the flow rate and volume delivered and the pressure generated in occlusions or blockages of the fluid line.
Intended Use The Product is to be used by infusion device manufacturers, hospital biomedical engineering departments, and third-party service organizations. Use the Product to verify accurate performance of infusion devices through measurement of flow, volume, and pressure. The performance of a wide range of infusion devices can be analyzed including syringe, drop counting, peristaltic, and volumetric types. Non-steady flow rate pumps can also be analyzed. The Product uses distilled or deionized water with an optional wetting agent only.
Unpack the Product Carefully unpack all items from the box and check that these items are included:
• The Product
• Battery charger / power supply
• Accessory Set:
o plastic syringe (20 ml)
o 3-way Luer plastic stop-cock
o extension tube, short (20 cm)
o drain tube (1 m)
o Micro-90 (100 ml)
• CD (contains Users Manual and HydroGraph software)
• USB Cable

IDA-1S Users Manual
2
Safety Information A Warning identifies conditions and procedures that are dangerous to the user. A Caution identifies conditions and procedures that can cause damage to the Product or the equipment under test.
Warning To prevent possible electrical shock, fire, or personal injury:
• Read all safety information before you use the Product.
• Use the Product only as specified, or the protection supplied by the Product can be compromised.
• Remove the batteries if the Product is not used for an extended period of time, or if stored in temperatures above 50 °C. If the batteries are not removed, battery leakage can damage the Product.
• The battery door must be closed and locked before you operate the Product.
• Replace the batteries when the low battery indicator shows to prevent incorrect measurements.
• Carefully read all instructions.
• Do not touch voltages >30 V ac rms, 42 V ac peak, or 60 V dc.
• Do not use the Product around explosive gas, vapor, or in damp or wet environments.
• Examine the case before you use the Product. Look for cracks or missing plastic. Carefully look at the insulation around the terminals.
• Use this Product indoors only.
• Use only the mains power cord and connector approved for the voltage and plug configuration in your country and rated for the Product.
• Replace the mains power cord if the insulation is damaged or if the insulation shows signs of wear.
• Use only the external mains power supply included with the Product.
• Remove all probes, test leads, and accessories before the battery door is opened.
• Disable the Product if it is damaged. Remove the batteries to disable the Product.
• Do not use the Product if it is damaged.
• Do not use the Product on infusion devices that are attached to patients.

Infusion Device Analyzer Symbols
3
• Do not reuse test tubing or syringes for patient infusion.
• Avoid possible contamination of reusable components due to backflow conditions. Some older style infusion devices may have reusable components that could come in direct contact with the fluids being pumped. When testing these types of devices take care to avoid possible contamination of reusable components.
Caution
To prevent possible damage to the product or to equipment under test:
• Only use degassed de-ionized water with the Product. Wetting agent may be added.
• Remove internal water before shipping or storing. Do not use compressed air to clean out the Product.
• Do not expose the Product to temperature extremes. For proper operation, ambient temperatures should be from 15 °C to 30 °C (59 °F to 86 °F). Performance may be adversely affected if temperatures fluctuate above or below this range. For Storage Temperature limits, see the Specifications section.
• Do not use the Product in close proximity to sources of strong electromagnetic radiation (for example, unshielded intentional RF sources). These sources may interfere with proper operation.
Symbols Table 1 is a list of symbols used on the Product and in this document.
Table 1. Symbols
Symbol Description Symbol Description
Risk of Danger. Important information. See Manual.
Hazardous voltage. Risk of electric shock.
Power input USB
Recycling information Conforms to European Union directives
Conforms to relevant North American Safety Standards.
Conforms to relevant Australian EMC standards
This product complies with the WEEE Directive (2002/96/EC) marking requirements. The affixed label indicates that you must not discard this electrical/electronic product in domestic household waste. Product Category: With reference to the equipment types in the WEEE Directive Annex I, this product is classed as category 9 "Monitoring and Control Instrumentation" product. Do not dispose of this product as unsorted municipal waste. Go to Fluke’s website for recycling information.

IDA-1S Users Manual
4
Instrument Familiarization Figure 1 and Table 2 show the controls and indicators on the front panel of the Product.
1
2
3
4
5
6
hqf01.eps
Figure 1. Front-Panel Controls and Indicators

Infusion Device Analyzer Instrument Familiarization
5
Table 2. Front-Panel Controls and Indicators
Item Description
Integrated Carrying Handle
Touch Display (LCD)
Charging Indicator – Illuminates when the battery is charging
Power On Indicator:
• Green – Operating on ac power using the charger
• Orange – Operating on battery
• Red – Battery low
WAKE UP Button – Turns on the Product
Test Active Indicator – Flashes green when a test is active

IDA-1S Users Manual
6
Figure 2 and Table 3 show the connections on the side-panel of the Product.
1
2
3
4
5
hqf02.eps
Figure 2. Side-Panel Connections
Table 3. Side-Panel Connections
Item Description
Power Input for Battery Charger / Power Supply 9 V dc
USB Port – Computer connection
Fluid Outlet (drain)
Pressure Inlet – For occlusion tests
Fluid Inlet – For flow tests

Infusion Device Analyzer Product Connections
7
Product Connections Warning
To prevent possible electrical shock, fire, or personal injury:
• Only assemble and operate high-pressure systems if you know the correct safety procedures. High-pressure liquids and gases are hazardous and the energy from them can be released without warning.
• Do not put metal objects into connectors.
The Product connects to an infusion device through the inlet ports on the side panel. The side panel also has the connections for drain hoses and accessories.
Connect Infusion Devices Figure 3 shows the Product connected for a flow test with a 20 ml syringe attached to one 3-way stopcock inlet. Use a syringe to prime the line before a test. Fluke Biomedical recommends that you make all infusion device connections to the Product through 3-way stopcocks.
hqf03.eps
Figure 3. Infusion Device Connections to the Product
Follow these recommendations when you connect to the inlet tubing circuits:
• Use adequate prime volumes (for example, 10 ml) to push through any bubbles.
• Use the stopcocks at the inlet to prevent fluid backflow out of the inlet between tests.
IDA-1S Users Manual
8
• When you connect to the inlet circuits (for example, when you attach the priming syringes to the stopcocks) make sure no new bubbles are introduced.
Caution
To prevent possible damage to the product or to equipment under test, do not use delivery set or components that have been used for prior testing for patient infusion.
Note
Before you use the delivery set (the tubing, the syringe, and stopcocks), make sure it is within the specified use period of the manufacturer. Many sets are made to be used only once.
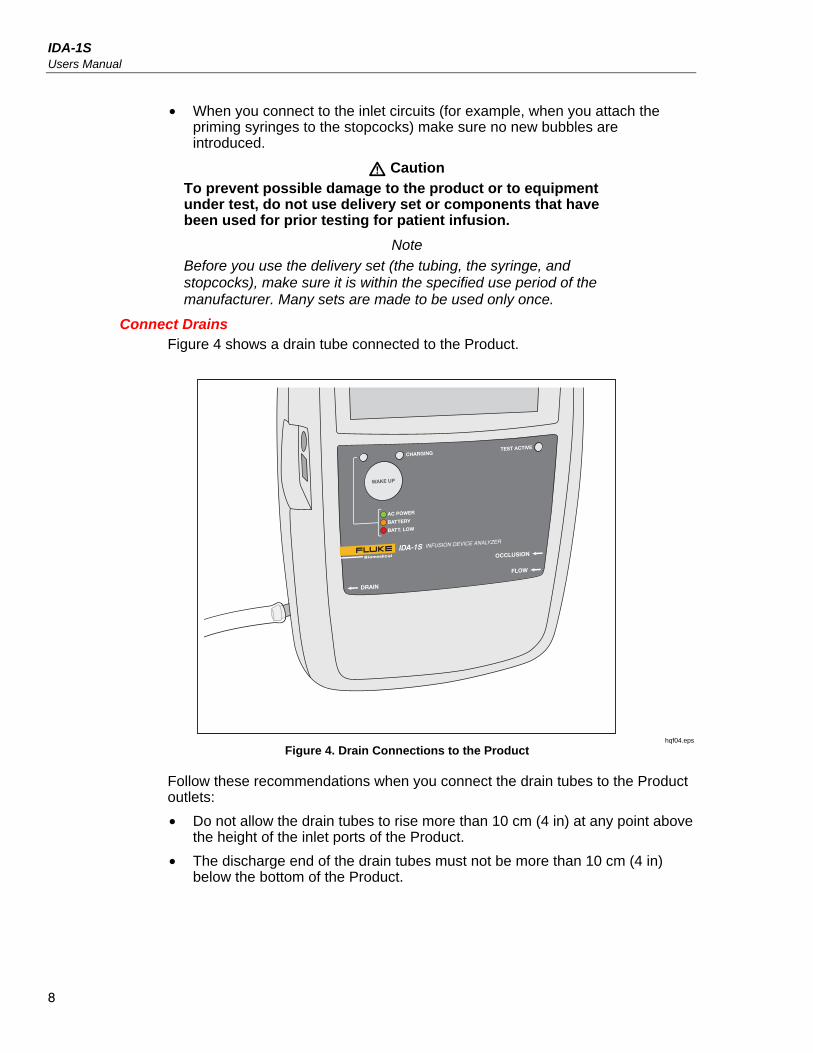
Connect Drains Figure 4 shows a drain tube connected to the Product.
hqf04.eps
Figure 4. Drain Connections to the Product
Follow these recommendations when you connect the drain tubes to the Product outlets:
• Do not allow the drain tubes to rise more than 10 cm (4 in) at any point above the height of the inlet ports of the Product.
• The discharge end of the drain tubes must not be more than 10 cm (4 in) below the bottom of the Product.

Infusion Device Analyzer Product Operation
9
Product Operation The Product has rechargeable batteries that can supply a minimum of eight hours of operation. The Product can operate while it charges. Control the Product with the LCD touch screen.
Before you turn on the Product, make sure the Product calibration is up-to-date, check for signs of wear, and ensure the battery door is closed.
To turn on the product and display the Start menu:
1. Push the WAKE UP button. If the startup screen appears without errors, the Product is ready to use.
2. Touch PRESS TO PROCEED.
The Start menu has these options:
• Flow
• Occlusion
• Utilities
• Shut Down
Preferences Before you use the Product for the first time, set your preferences for display functions, date and time, and the name of your location. The instructions for how to set preferences are in the Utilities section in this manual.
How to Set Up for a Test Each test starts with an information screen that contains data for the test. You can change the data on the information screen for each test.
To change the data on the information screen:
1. Touch a field and use the on-screen keyboard to enter the data.
2. Use the buttons on the information screen to move between screens, to save data, and delete data.
IDA-1S Users Manual
10
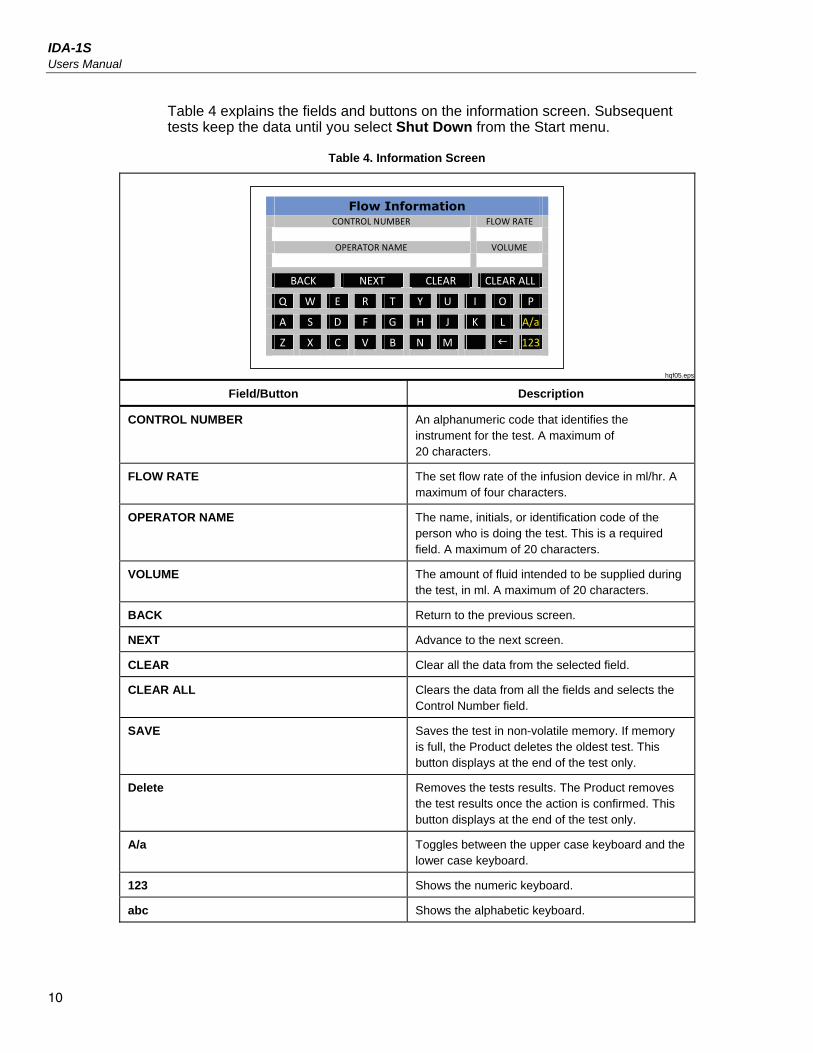
Table 4 explains the fields and buttons on the information screen. Subsequent tests keep the data until you select Shut Down from the Start menu.
Table 4. Information Screen
hqf05.eps
Field/Button Description
CONTROL NUMBER An alphanumeric code that identifies the instrument for the test. A maximum of 20 characters.
FLOW RATE The set flow rate of the infusion device in ml/hr. A maximum of four characters.
OPERATOR NAME The name, initials, or identification code of the person who is doing the test. This is a required field. A maximum of 20 characters.
VOLUME The amount of fluid intended to be supplied during the test, in ml. A maximum of 20 characters.
BACK Return to the previous screen.
NEXT Advance to the next screen.
CLEAR Clear all the data from the selected field.
CLEAR ALL Clears the data from all the fields and selects the Control Number field.
SAVE Saves the test in non-volatile memory. If memory is full, the Product deletes the oldest test. This button displays at the end of the test only.
Delete Removes the tests results. The Product removes the test results once the action is confirmed. This button displays at the end of the test only.
A/a Toggles between the upper case keyboard and the lower case keyboard.
123 Shows the numeric keyboard.
abc Shows the alphabetic keyboard.

Infusion Device Analyzer Product Operation
11
Flow Tests To do a flow test:
1. Select Flow from the Start menu.
2. Complete the fields on the Flow Information screen. See the How to Set Up for a Test section in this manual.
3. Touch Next. The Flow Measurement screen appears. See Table 5.
Table 5. Flow Measurement Screen
0.00
DEVIATION %0.00
AVE FLOW RATE (ml /hr)
0.00INST FLOW RATE (ml/hr)
FLOW
PRIME END
0.00VOLUME (ml)
ELAPSED TIME00:00:00
1
2
3
4
hqf06.eps
Item Description
The average and instantaneous (current) flow rates.
The deviation of the average flow rate from the set flow rate.
The prime indicator. When the Product senses fluid in the measuring tube, the prime indicator is blue. If the Product does not sense fluid, the prime indicator is red.
The delivered volume and the elapsed time.
4. Prime the Product by continuously pushing water into the Flow inlet until the prime indicator (the vertical bar) is all blue. Continue to push 5 ml into the Flow inlet to make sure that no bubbles follow.
Caution
To avoid inaccurate readings, always repeat a test when “Bubble” or “Air Lock” is shown on the display while a test is running. See the Troubleshooting section of this manual.

IDA-1S Users Manual
12
5. Touch Auto Start to start the measurement when the Product senses the flow. As an alternative, touch Start to start the test immediately.
0.000.00
VOLUME (ml)
DEVIATION %0.00
AVE FLOW RATE (ml/hr)
0.00INST FLOW RATE (ml/hr)
FLOW
AUTO START START END
ELAPSED TIME00:00:00
hqf07.eps
6. When the test is complete, touch End. The Product prompts you to save the results.
Infusion Device Analyzer Product Operation
13
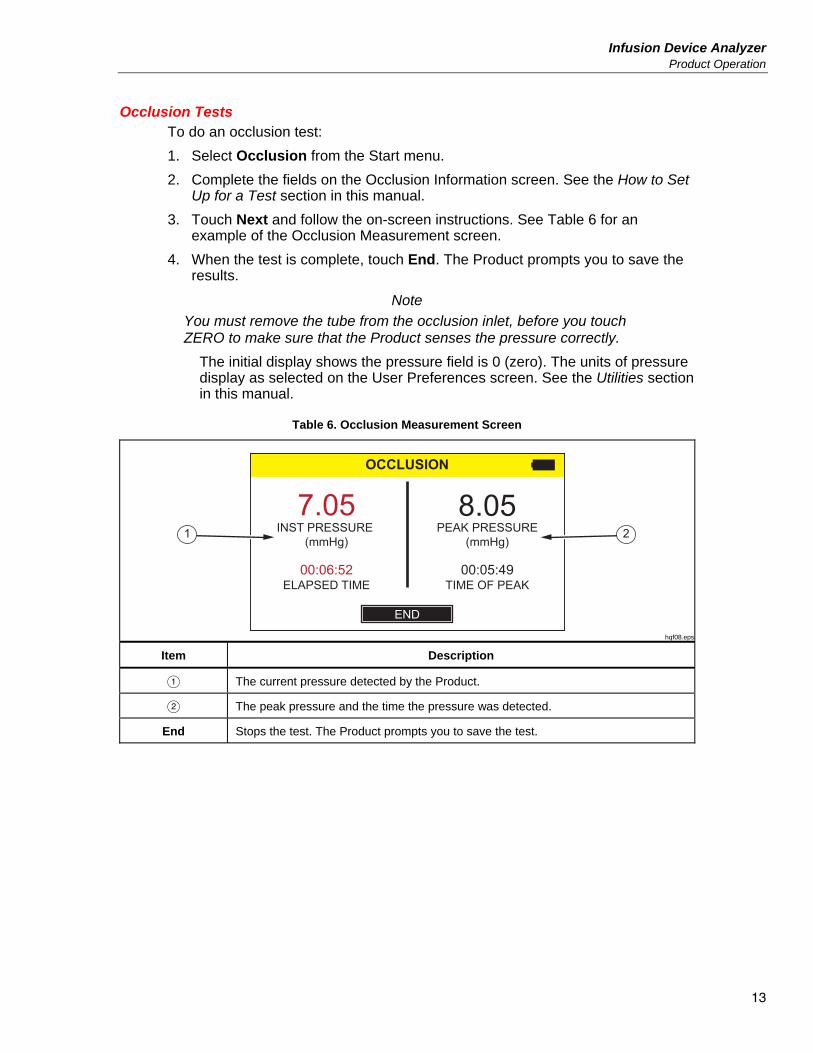
Occlusion Tests To do an occlusion test:
1. Select Occlusion from the Start menu.
2. Complete the fields on the Occlusion Information screen. See the How to Set Up for a Test section in this manual.
3. Touch Next and follow the on-screen instructions. See Table 6 for an example of the Occlusion Measurement screen.
4. When the test is complete, touch End. The Product prompts you to save the results.
Note
You must remove the tube from the occlusion inlet, before you touch ZERO to make sure that the Product senses the pressure correctly.
The initial display shows the pressure field is 0 (zero). The units of pressure display as selected on the User Preferences screen. See the Utilities section in this manual.
Table 6. Occlusion Measurement Screen
7.05INST PRESSURE
(mmHg)
OCCLUSION
END
8.05PEAK PRESSURE
(mmHg)
TIME OF PEAK00:05:49
ELAPSED TIME00:06:52
21
hqf08.eps
Item Description
The current pressure detected by the Product.
The peak pressure and the time the pressure was detected.
End Stops the test. The Product prompts you to save the test.

IDA-1S Users Manual
14
Utilities To open the Utilities menu screen, select Utilities from the Start menu. The Utilities menu has these options:
• Recall Tests
• User Preferences
• View Settings
• Set Clock
• Report Heading
• Instructions
• Calibration History
• Touch Calibration
• Start Menu
Recall Tests Use Recall Tests to view and delete test results for saved tests. Table 7 shows the menu controls on the Recall Tests screen. Flow tests display in blue and Occlusion tests display in red.
To select an individual test, touch anywhere on the line of the test. The Product displays the final test result in the same layout as the end screen for that test.
Table 7. Recall Tests Screen
RECALL TESTS
View Select All Delete Utilities
Control Number (Flow / Occlusion) Date & Time
01-MAR-2010 10:10OCCLUSION TEST 24 05-MAR-2010 09:10FLOW TEST - PUMP1 23-MAR-2010 16:10OCCLUSION - PUMP1 26-MAR-2010 13:10
Test 12345
hqf09.eps
Controls Description
View Display the selected test.
Select All Selects all the tests. If tests are selected, clears all the selections.
Delete Deletes all the selected tests.
Utilities Returns to the Utilities menu.
Scrolls up in the list
Scrolls down in the list

Infusion Device Analyzer Utilities
15
User Preferences Use the User Preferences screen to set the Pressure units and other display features. Table 8 explains the User Preferences screen.
Table 8. User Preferences Screen
USER PREFERENCES
mmHg
Utilities
05 Min
Pressure Unit psi Bar kPa
20 Min
Beep Volume
Display Brightness
Backlight off Time
Auto Shut Down Time
hqf10.eps
Option Description
Pressure Unit Set the type of pressure units to display on the test and results. Touch the type of pressure units to display. Options are:
• mmHg • psi • Bar • kPa
Beep Volume Sets the volume of the alert beep. Touch + or - to change the volume.
Display Brightness Sets the brightness of the LCD screen. Touch + or - to change the brightness.
Backlight Off Time Sets the time that the LCD screen stays on, after the last touch, if the Product is using battery power. Touch + or - to change the time in one minute increments from one minute to ten minutes.
Auto Shut Down Time Sets the time that the Product stays on, after the last touch, if the Product is using battery power. The feature is disabled during a test. Touch + or - to change the time in five minute increments from 10 minutes to 60 minutes.
Utilities Return to the Utilities menu.
IDA-1S Users Manual
16
View Settings Use View Settings to monitor the operation of the optical detectors on the measuring burette. The Sensor column lists the sensor numbers from the top to the bottom of the burette. The ADC column lists the output of each sensor. The values change to reflect the water position in the burette. Use this information to help diagnose fluid detection issues. Touch Utilities to return to the Utilities menu.
Set Clock Use Set Clock to set the date and time for your location. Touch the field and then touch + or - to change the value.
Report Heading Use Report Heading to enter a maximum of three lines of text. This text shows when saved records are transferred to a PC. Fluke Biomedical recommends using the first line for the name of the establishment. Touch a line and use the on-screen keyboard to enter up to 20 characters per line. Touch Utilities to return to the Utilities menu.
Instructions The Instructions selection displays brief operating instructions for the Product. Touch the Next and Prev (Previous) buttons to step through the instructions.
Calibration History Calibration History retrieves the calibration change history records from the measuring module and displays the details. Use the arrow buttons to scroll through the list. Touch Utilities to return to the Utilities menu.
Touch Calibration Use Touch Calibration to do a touch calibration process. Use a stylus to touch the reference points on the screen. Touch Utilities to cancel and return to the Utilities menu. The screen layout and calibration points follow the recommendations of the touch panel manufacturers.

Infusion Device Analyzer Troubleshooting
17
Troubleshooting Tables 9 and 10 list Bubble and Air Lock errors and their solutions.
Table 9. Bubble Errors
Possible causes Solution
Air caught in the delivery tubing. Make sure to remove all air when you connect the infusion device to the analyzer. Use care with the connections.
Incorrect priming. Use the method given in this manual to prime the product.
Degassing of the test fluid. For longer flow tests, let the test fluid become stable to room temperature before use.
Table 10. Air Lock Errors
Possible causes Solution
Incorrect arrangement of drain tubing. Use the method given in this manual. Use a syringe of air to gently push all excess water out of the measuring channel.
Blockage of the drains (such as trapped or kinked tubing).
Examine and unblock drains as necessary.
Contamination of the fluid measuring circuit. Use the cleaning instructions found in the Product Maintenance section of this manual.

IDA-1S Users Manual
18
Product Maintenance Warning
To prevent possible electrical shock, fire, or personal injury:
• Batteries contain hazardous chemicals that can cause burns or explode. If exposure to chemicals occurs, clean with water and get medical aid.
• Do not disassemble the battery.
• Do not disassemble or crush battery cells and battery packs.
• Do not put battery cells and battery packs near heat or fire. Do not put in sunlight.
• Do not short the battery terminals together.
• Do not keep cells or batteries in a container where the terminals can be shorted.
• Remove the input signals before you clean the Product.
• Use only specified replacement parts.
• Have an approved technician repair the Product.
For safe operation and maintenance of the product:
• Repair the Product before use if the battery leaks.
• Be sure that the battery polarity is correct to prevent battery leakage.
• Use only Fluke approved power adapters to charge the battery.
After troubleshooting or maintenance, restart the Product and ensure it starts without errors. (See Product Operation.)

Infusion Device Analyzer Product Maintenance
19
Clean the Product (Outside) To clean the outside of the Product, disconnect from the power supply and use only a damp cloth with mild detergent.
Clean the Product (Inside) It is possible that microbial growth can become present in the measuring module of the Product. It is recommended that you clean the fluid paths at 3 month intervals. To clean the inside of the Product, inject 20 ml of a warm water and detergent solution into the Fluid Inlet Port. After 5 minutes, flush with clean water. Always pass water from the fluid inlets to the outlets.
Replaceable Parts Table 11 lists the replaceable parts for the Product.
Table 11. Replaceable Parts
Item Fluke Biomedical
Part Number
IDA-1S Infusion Device Analyzer 4468525
Hydrograph software and IDA-1S Users Manual on CD 4418071
Plastic syringe (20 ml) 4497350
3-way Luer plastic stop-cock 4480194
Drain tube (1 m) 4478942
Micro-90 (225 ml) 4541948
USB Cable 1740487
Power supply, 4-plug mains adapter kit for US, UK, EURO, AUS 2461300
IDA-1S power supply cord without mains adapters, universal wall mount 4329971
NiMH Battery 4481150
IDA-1S Getting Started Manual 4426198

IDA-1S Users Manual
20
Test Fluid The Product operates with distilled or de-ionized water with added detergent. Fluids intended for use on patients, high viscosity fluids, oily, or corrosive substances will cause damage to the measurement system. Tap water can contain contaminates that can cause damage to the fluid paths.
You can make test fluid with de-ionized water and a wetting agent such as MICRO-90. Fluke recommends that you prepare a 0.1 % solution of MICRO-90 in de-ionized water (preferably degassed) in volume for daily use. Keep the solution in a sealed container. If the solution makes too much foam, then you can use a 0.05 % dilution.
MICRO-90 is available from:
International Product Corp. 201 Connecticut Dr. P.O. Box 70 Burlington, NJ 08016-0070 USA Tel 609 386 8770
also
International Product Corp. 1 Church Row Chistlehurst, Kent BR7 5PG United Kingdom Tel. 0208 467 8944
Storage Remove all water from the Product before storage, especially if temperatures can fall below 5 °C (41 °F). Do not pressurize the inlet ports. It is safest to use a medical suction pump to drain the measuring channels.
Shipping Remove all liquid from the Product before shipping. To prevent liquid from entering the ports, put the Product in a large plastic bag. Put the bagged Product into its shipping carton. If this is not available, make sure there is shock protection with a minimum of 5 cm compressible cushioning inside the carton (for example, 40 cm x 30 cm x 20 cm).

Infusion Device Analyzer General Specifications
21
General Specifications Battery Power ........................................................ 4 x Panasonic HHR210AB NiMh 2000 mAh batteries
Charger
Operating Voltage Range ................................... 100 V ac to 240 V ac
Supply Frequency ............................................... 50 Hz / 60 Hz
Supply Power ...................................................... <20 VA
Size (HxWxD) ......................................................... 30 cm x 17 cm x 10 cm (12 in x 8 in x 4 in)
Weight .................................................................... ~1.2 kg (2.7 lb)
Temperature
Operating ............................................................ 15 °C to 30 °C (59 °F to 86 °F)
Storage ............................................................... -20 °C to +40 °C (-4 °F to +104 °F) when drained of all liquid.
Humidity ................................................................. 10 % to 90 % non-condensing
Altitude ................................................................... 0 meters to 2000 meters (6500 feet)
Safety ..................................................................... IEC 61010-1: Overvoltage category II, Pollution Degree 2
Electromagnetic Environment ............................. IEC 61326-1: Basic
Emissions Classification...................................... IEC CISPR 11: Group 1, Class A. (Group 1 have intentionally generated and/or use conductively coupled radio-frequency energy which is necessary for the internal functioning of the equipment itself. Class A equipment is suitable for use in non-domestic locations and/or directly connected to a low-voltage power supply network.)
FCC ......................................................................... CFR47: Class A Part 15 subpart B
Storage of Results ................................................ Test results stored for later viewing, printing or transfer to PC. Typical practical capacity: 100 tests
Power Down .......................................................... The results of tests in progress will be saved in the case of accidental power down
Computer Control ................................................. The Product can be fully controlled from a PC using HydroGraph software
Performance Specifications Average Flow Rate Measurement
Technique ........................................................... Flow is calculated by measuring volume over time
Range ................................................................. 0.5 ml/h to 1000 ml/h
Accuracy ............................................................. 1 % of reading ±1 LSD for flows of 16 ml/h to 200 ml/h for volumes over 20 ml; otherwise 2 % of reading ±1 LSD for volumes over 10 ml under laboratory conditions
Max test duration ................................................ 10 hours on battery
Volume Measurement
Technique ........................................................... Volume is measured directly by the measuring module in minimum sample sizes of 60 µl
Range ................................................................. 0.06 ml to 999 ml
Accuracy ............................................................. 1 % of reading ±1 LSD for flow rates of 16 ml/h to 200 ml/h for volumes over 20 ml. Otherwise 2 % of reading ±1 LSD for volumes over 10 ml under laboratory conditions
Max test duration ................................................ 10 hours on battery
Pressure Measurement
Technique (Occlusion test) ................................. Direct measurement of pressure at the inlet port
Range ................................................................. 0 psi to 45 psi and equivalent in mmHg, Bar and kPa
Accuracy ............................................................. 1 % of Full Scale ±1 LSD under laboratory conditions
Max test duration ................................................ 30 minutes

IDA-1S Users Manual
22