ICS Education Workbook 2018 - Transfusion Guidelines · The equipment listed in Table 3 is required...
13
’+ Section 8 Practicalities – Blood Collection Aim • To introduce the basic theory and principles of collecting blood for Intraoperative Cell Salvage (ICS) Learning Outcomes • To identify the equipment used for blood collection and describe the function of each component • To describe the steps required in preparing for and commencing blood collection • To name the two main types of anticoagulant used in ICS, describe their function and mechanism of action • To describe methods of maximising blood salvage • To identify areas for potential problems during blood collection Introduction Whilst the practical set up of the equipment for the blood collection phase of ICS is specific to the machine in use, the basic theory and principles are the same. During the blood collection phase of ICS, blood lost during surgery is aspirated from the surgical field, mixed with anticoagulant to prevent clotting, filtered to remove large particulate debris and stored in a collection reservoir ready for processing. 8.1 Decision to Collect Blood The decision to collect blood is often based on a number of factors including: • The anticipated blood loss for a particular surgical procedure • Patient has risk factors for bleeding • The presence of low preoperative haemoglobin • Patient’s religious or other objection to receiving allogeneic (donor) blood • The decision to use ICS should be discussed with the patient prior to surgery and their acceptance recorded in the clinical record Collect Only – In situations where it is difficult to predict if the blood loss will be large enough to be processed, it’s good practice to set the ICS system for “collect only” whereby only the equipment required for blood collection is prepared. The processing set can be loaded later if a sufficient volume of blood has been collected for processing.
Transcript of ICS Education Workbook 2018 - Transfusion Guidelines · The equipment listed in Table 3 is required...

!'+!
Section 8 Practicalities – Blood Collection
Aim
• To introduce the basic theory and principles of collecting blood for Intraoperative
Cell Salvage (ICS)
Learning Outcomes
• To identify the equipment used for blood collection and describe the function of
each component
• To describe the steps required in preparing for and commencing blood collection
• To name the two main types of anticoagulant used in ICS, describe their function
and mechanism of action
• To describe methods of maximising blood salvage
• To identify areas for potential problems during blood collection
Introduction
Whilst the practical set up of the equipment for the blood collection phase of ICS is
specific to the machine in use, the basic theory and principles are the same.
During the blood collection phase of ICS, blood lost during surgery is aspirated from
the surgical field, mixed with anticoagulant to prevent clotting, filtered to remove
large particulate debris and stored in a collection reservoir ready for processing.
8.1 Decision to Collect Blood
The decision to collect blood is often based on a number of factors including:
• The anticipated blood loss for a particular surgical procedure
• Patient has risk factors for bleeding
• The presence of low preoperative haemoglobin
• Patient’s religious or other objection to receiving allogeneic (donor) blood
• The decision to use ICS should be discussed with the patient prior to surgery and their acceptance recorded in the clinical record
Collect Only – In situations where it is difficult to predict if the blood loss will be large enough to be processed, it’s good practice to set the ICS system for “collect only” whereby onlythe equipment required for blood collection is prepared. The processing set can be loaded later if a sufficient volume of blood has been collected for processing.

! '"!
8.2 Equipment
The equipment listed in Table 3 is required for blood collection.
Table 3. Blood Collection Equipment
Equipment Function
Anticoagulant (heparin saline (25-
30,000iu/l) or Citrate (ACD-A)
To prevent clotting of salvaged blood.
Aspiration & anticoagulation line (A&A line)
machine specific/sterile
Dual lumen suction line that delivers anticoagulant to
the point of blood collection within the surgical field,
and aspirates blood and anticoagulant away from the
surgical field into the ICS system. The design of the
A&A line prevents anticoagulant entering the surgical
field.
Collection reservoir
machine specific
Holds collected blood prior to processing. Contains a
filter to remove large particulate debris (clots, bone
fragments etc).
ICS machine or drip stand with collection
reservoir bracket
Holds the collection reservoir in position throughout the
procedure.
Vacuum source Connects to the collection reservoir allowing aspiration
of blood from the surgical field. Some machines have an
integrated vacuum, others must be attached to a
separate suction unit or the theatre wall suction.
Suction tip (wide bore/single lumen)
sterile
Attaches to A&A line to allow aspiration of blood within
the surgical field.
Suction tubing
standard theatre supplies or machine specific
Used to connect the vacuum source to the collection
reservoir.
Autologous transfusion label Identifies the blood as autologous, belonging to a
particular patient and enables the recording of
procedure
!
!'#!
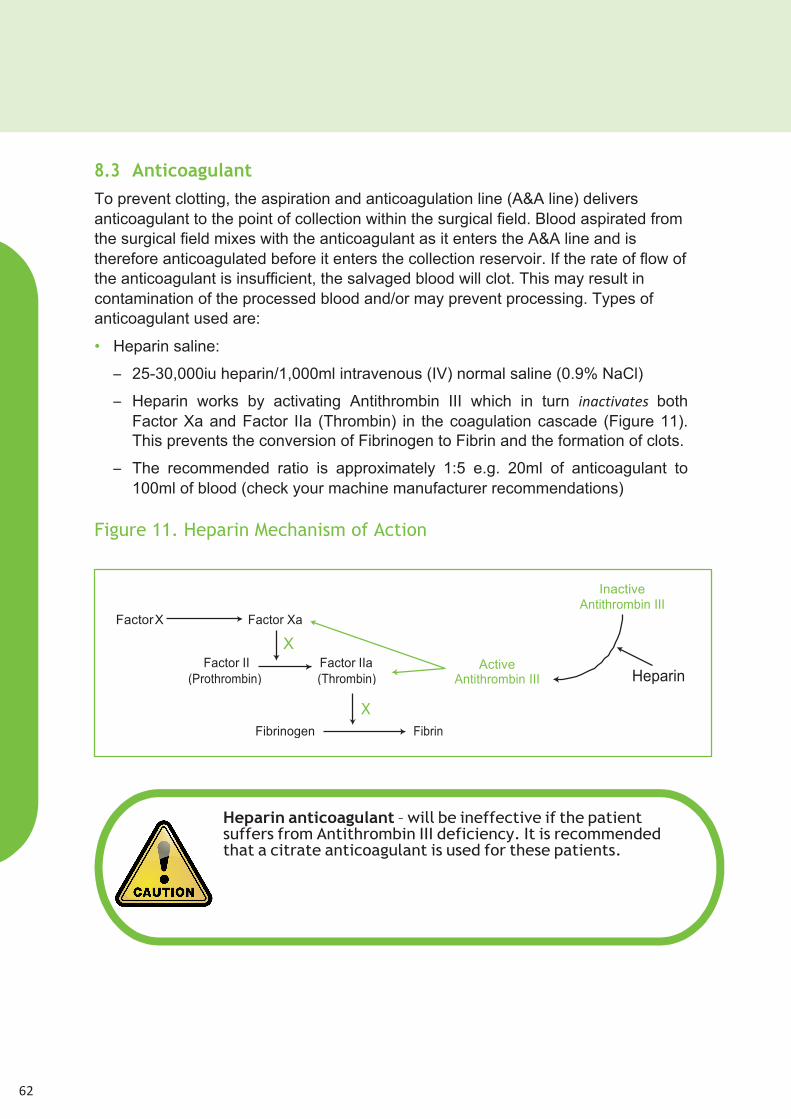
8.3 Anticoagulant
To prevent clotting, the aspiration and anticoagulation line (A&A line) delivers
anticoagulant to the point of collection within the surgical field. Blood aspirated from
the surgical field mixes with the anticoagulant as it enters the A&A line and is
therefore anticoagulated before it enters the collection reservoir. If the rate of flow of
the anticoagulant is insufficient, the salvaged blood will clot. This may result in
contamination of the processed blood and/or may prevent processing. Types of
anticoagulant used are:
• Heparin saline:
– 25-30,000iu heparin/1,000ml intravenous (IV) normal saline (0.9% NaCl)
– Heparin works by activating Antithrombin III which in turn ($#CD(B#D*%, both
Factor Xa and Factor IIa (Thrombin) in the coagulation cascade (Figure 11).
This prevents the conversion of Fibrinogen to Fibrin and the formation of clots.
– The recommended ratio is approximately 1:5 e.g. 20ml of anticoagulant to
100ml of blood (check your machine manufacturer recommendations)
Figure 11. Heparin Mechanism of Action
!
Heparin anticoagulant – will be ineffective if the patient suffers from Antithrombin III deficiency. It is recommended that a citrate anticoagulant is used for these patients.
Factor X Factor Xa
X Factor II Factor IIa
(Prothrombin) (Thrombin)
Inactive Antithrombin III
Active Antithrombin III Heparin
X
Fibrinogen Fibrin
! '$!
• Acid citrate dextrose anticoagulant (ACD-A):
– Citrate based anticoagulant
– Pre-prepared
– Citrate based anticoagulants work by binding to free calcium in the blood.
Calcium is a required cofactor in the activation of clotting factors; the action of
the citrate removes calcium from the coagulation cascade, therefore
preventing clot formation by inhibiting the coagulation cascade.
– The recommended ratio is approximately 1:7 e.g. approximately 15ml of
anticoagulant to 100ml of blood (check your machine manufacturer
recommendations)
The typical (minimum) flow rate for anticoagulant is around 45-60 drops per minute
for ACD-A and around 60-80 drops per minute for heparin saline. The anticoagulant
flow rate may need to be increased during the procedure to accommodate
increased levels of bleeding, this can then be returned to the minimum flow rate
once bleeding is under control. Minor adjustments to the flow rate of the
anticoagulant may be necessary throughout the duration of the procedure to
accommodate varying levels of bleeding.
8.4 Preparation of Equipment for Blood Collection
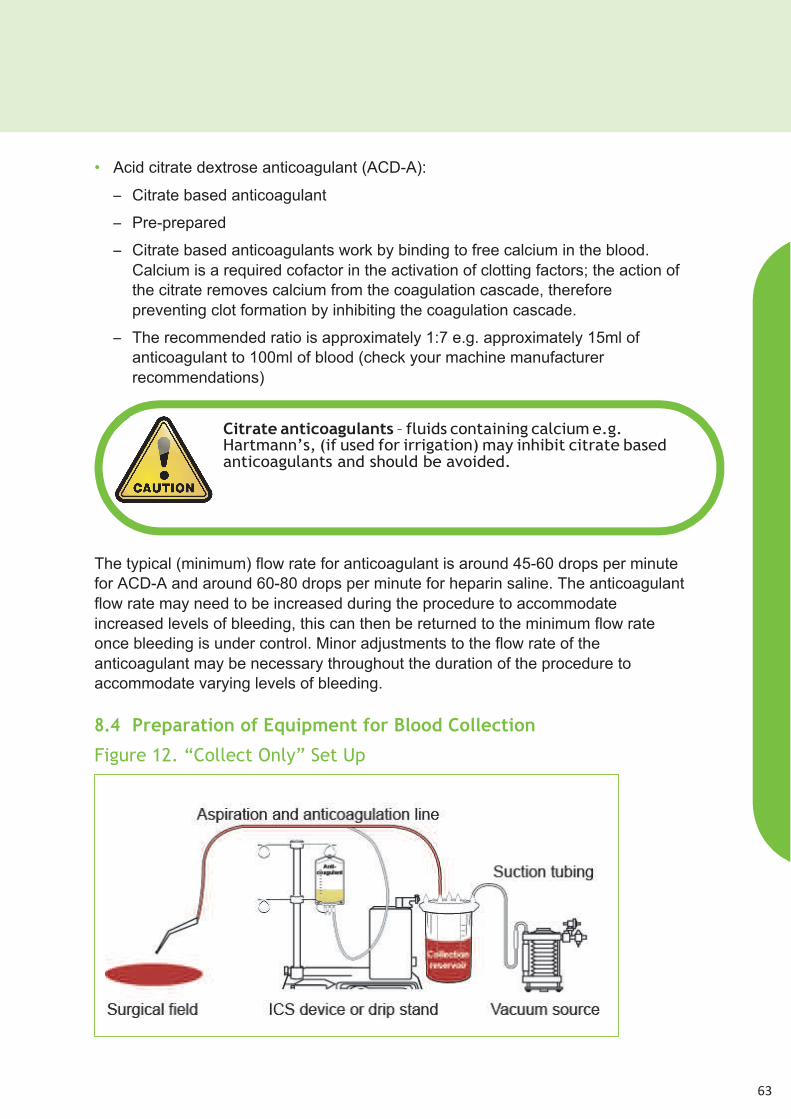
Figure 12. “Collect Only” Set Up
!
Citrate anticoagulants – fluids containing calcium e.g. Hartmann’s, (if used for irrigation) may inhibit citrate based anticoagulants and should be avoided.
!

!'%!
!
!
!
!
!
!
The set up of the blood collection equipment for ICS is represented in Figure 12.
As discussed earlier in this section, the practical set up of the equipment for ICS is
specific to the machine in use. However, the basic principles and theory are the
same. The main steps in the preparation of the blood collection equipment are outlined
below. Clean/aseptic technique should be used as appropriate and protective
clothing should be worn in accordance with local policy.
!
Suction Tip– to minimise damage to the red blood cells (RBCs) being aspirated, a wide bore (minimum 4mm), single lumen suction tip e.g. Yankauer sucker, should be used.
A&A Line/Suction Tip • Pass aseptically to the scrubbed person within
the sterile field.
• Ask them to attach a large bore/single port suction tip to
the A&A line.
!
Anticoagulant • Aseptically add 25-30,000iu of heparin to 1,000ml of
IV normal saline (0.9% NaCl) and label clearly with an
appropriate “drugs added label” )",select a bag of
pre-prepared citrate anticoagulant. In both cases check
the expiry date of the products before use.
• Hang the anticoagulant on the drip stand on the machine
or the drip stand with the collection reservoir bracket on if
the machine is not available.
Collection
Reservoir/Autologous
Transfusion Label
• Load the collection reservoir into the bracket on the
machine or drip stand.
• If appropriate (see manufacturer’s instructions) clamp off
the port that leads to the processing line.
• Enter the patient’s details (from the patient’s identification
band) onto the autologous transfusion label (Appendix 3)
and attach it to the collection reservoir.
!

! '&!
Time limits for consumable set up – unprimed disposables can be used for up to 24 hours providing they have not been primed. Once primed, they should be used within 8 hours or discarded.
Labelling the collection reservoir – to avoid errors in
patient identification, an autologous transfusion label
should be completed at the patient’s side, at the start of
M2))+,C)22*CD()$. The patient’s details should be taken from
the identification band attached to the patient. The label
should be securely attached to the collection reservoir. If a
processing set is subsequently loaded into the machine
(see section 9), the autologous transfusion label should be
transferred to the reinfusion bag immediately, or a new
label completed and attached to the bag.

!''!
Vacuum
Source/
Suction Tubing
• Attach the suction tubing to the vacuum source either
on the machine or the theatre wall suction, making
sure there is a secure connection.
• Attach the other end of the suction tubing to
the appropriate port on the collection
reservoir (see manufacturer’s guidelines).
Connect A&A Line • Prior to the start of the operation, ask the scrub
practitioner to pass the spiked end of the A&A line out of
the sterile field.
• Attach the wide bore line to the appropriate port on
the collection reservoir (see manufacturer’s guidelines).
• Close the roller clamp on the small bore line and spike
the line into the port on the anticoagulant bag.
Turn on Vacuum
• Turn on either the machine vacuum, (if available
see manufacturer’s guidelines), or the wall vacuum
source.
• For non-self regulating vacuums, set the vacuum to approximately –100mmHg to –150mmHg (follow your manufacturer’s guidance).
!
Vacuum Levels – High vacuum levels cause haemolysis
(destruction of the RBCs). Maintaining low vacuum levels
minimises haemolysis and maximises the red blood cells
available for reinfusion.

! '(!
8.5 Blood Collection
During the blood collection phase, it may be necessary for the operator to make minor
adjustments to the system:
• Regulating the vacuum – it may become necessary during periods of high blood loss
to increase the level of the vacuum at the request of the surgical team. The vacuum
should be returned to a standard level, (approximately –100mmHg to –150mmHg)
as soon as the bleeding is under control. This will minimise damage to the RBCs.
• Regulating the anticoagulant flow – the flow rate of the anticoagulant must be
regulated depending on the level of bleeding. Insufficient anticoagulant will result in
the system clotting off.
• Monitoring the volume of blood loss – when using a “collect only” system, the cell
salvage operator must decide if it is appropriate to process the blood based on the
volume of blood collected (see Section 9).
Prime A&A Line/
Collection Reservoir
• Fully open the roller clamp on the A&A line.
• Allow approximately 100ml – 150ml of anticoagulant
to run through the line to prime the collection
reservoir.
Regulate
Anticoagulant Flow
• Regulate the flow of anticoagulant to
approximately one drop per second.
Begin Blood Collection • Inform the surgical team that blood collection can begin.
• Record the time blood first enters the collection reservoir.
!
Patients with religious requirements – the set up of ICS
equipment for patients with religious requirement may differ.
The requirements should be discussed with the patient prior to
use, and all relevant staff should be made aware of these
requirements. Further information can be found in Appendix 2.
IV Grade fluids – Remember, anything that is aspirated from
the surgical field could potentially go back into the patient’s
circulation. Only IV grade fluids should be aspirated into the
ICS system. To avoid contaminating the ICS blood, the standard
theatre suction should be used for aspirating when non-IV
substances are being used within the surgical field. e.g.
orthopaedic cement, betadine, antibiotics not licensed for IV
use etc.

!')!
8.6 Maximising Blood Collection
There are several techniques that can be used to maximise the volume of RBCs
available for reinfusion. These include:
• Low vacuum level – Maintaining a low vacuum level minimises haemolysis, and
therefore maximises the RBCs available for reinfusion. High vacuum levels
cause RBC haemolysis, which can be measured by the concentration of plasma
(free) haemoglobin (haemoglobin that has been released from haemolysed
RBCs).
• Suction technique – where possible, the suction tip should be immersed in the
blood and not skimmed across the surface of tissues or pools of blood. Skimming
results in a large quantity of air mixing with the aspirated blood, this air interface
causes haemolysis and therefore reduces the number of viable RBCs available
for reinfusion.
Graph 1 (below) shows plasma haemoglobin at different vacuum levels and using
two types of suction technique1. The graph demonstrates that when blood only is
aspirated (i.e. when the suction tip is immersed in a pool of blood), even high
vacuum levels do not result in excessive RBC haemolysis. This supports
increasing vacuum levels during excessive bleeding.
However, when blood and air are aspirated, as occurs naturally during most of the
ICS process, even low vacuum levels result in excessive haemolysis and therefore
reduces the available RBCs for reinfusion.
Graph 1. Changes in Plasma Haemoglobin from Baseline Measurements
• Suction tip – as already mentioned, a wide bore, single lumen suction tip minimises
damage to the RBCs during collection
• Swab washing – see next page
!

! '*!
8.7 Swab Washing
Swab washing (Figure 13) allows blood that would normally be lost in swabs to be
salvaged during ICS and can significantly increase the volume of RBCs for
reinfusion.
• Equipment:!
– Sterile bowl
– 1,000mls IV normal saline (0.9% NaCl)
Figure 13. Swab Washing
Swabs are placed in a bowl, within the
sterile field, containing 1,000mls IV
normal saline (0.9% NaCl). The swabs
are left for approximately five minutes
and are then gently (to avoid damaging
the RBCs) squeezed out. The swabs
are then disposed of as per department
protocol.
At the end of the procedure (or sooner if
necessary) the swab wash is suctioned
into the ICS reservoir and processing is
undertaken as normal (see section 9).
In high blood loss procedures, it may be appropriate to suction the swab wash into
the ICS reservoir before the end of the procedure, to allow the blood to be
processed and returned to the patient. Once the contents of the bowl have been
aspirated into the collection reservoir, a further 1,000mls of IV normal saline (0.9%
NaCl) should be added to the sterile bowl to allow swab washing to continue.
Ensure the swab wash bowl is maintained within the sterile field. Ensure no substances not intended for IV use enter the swab wash bowl e.g. Betadine soaked swabs.

!(+!
8.8 Troubleshooting
As with any technical procedure, there is a potential for problems to arise during the
process, e.g.
• Loss of suction:
– Switch off flow of anticoagulant until vacuum is restored
– Check the vacuum source
– Check the suction tubing is securely connected to the vacuum source and the
collection reservoir
– Check the A&A line is securely connected to the collection reservoir
– Check the A&A line has not been clamped or otherwise obstructed
• Clotting in the collection reservoir:
– Check the anticoagulant is still flowing
– Increase the anticoagulant flow rate
– If excessive clotting has occurred it may be necessary to change the collection
reservoir. !
• Contamination with non-IV substances:
– Contamination of the salvaged blood with substances not intended for IV use
should be discussed with the lead clinician taking responsibility for ICS in the
procedure, (normally the lead anaesthetist, however, in some cases it may be
the lead surgeon). A clinical decision on how to proceed should be made by
this lead clinician. A list of potential contaminants and their associated
problems can be found in the UK Cell Salvage Action Group document
“Technical Factsheet 9 – Contraindications to ICS”2.
– The decision to use blood that is potentially contaminated with bacteria,
amniotic fluid or malignant cells should be made by the clinicians caring for the
patient, taking into account the latest evidence and consideration of the risks
and benefits of proceeding for the individual patient.
8.9 Documentation
The documentation required during the blood collection includes:
• Autologous transfusion label (Appendix 3)
• ICS data form (Appendix 4)

! ("!
Key Points
• The main equipment for blood collection includes an A&A line, a collection
reservoir and anticoagulant.
• The operator must maintain awareness throughout the procedure in order to
prevent errors occurring.
• In order to maximise blood collection, a number of techniques can be used in
conjunction with one another e.g. low vacuum levels, swab washing and suction
technique.
References
1. Gregoretti, S. (1996) Suction-Induced Haemolysis at Various Vacuum Pressures:
Implications for Intraoperative Blood Salvage. !"#$%&'%()$U,36:57-60
2. UK Cell Salvage Action GroupTechnical Factsheet 9 “Contraindications to ICS”.
6*DD*",62))+,Transfusion Toolkit www.transfusionguidelines.org.uk!
,
Further Reading
UK Cell Salvage Action Group Publications.
The following publications are available to download at:
KKKHD"#$%&'%()$L'(+*2($*%H)"LH'Z!,
• Policy for the provision of Intraoperative Cell Salvage
• Technical Factsheets
• Swab Washing
1 Anticoagulation
2 Blood Collection
3 Use of ICS in Jehovah’s Witness Patients
Other
• American Association of Blood Banks – Standards for Perioperative Autologous
Blood Collection and Administration 3rd Edition
• Manufacturer’s ICS Machine Specific Guidance

!(#!
Self-Directed Learning !
List the procedures in your department where ICS blood
collection is routinely set up.
What type of anticoagulant is used in your department?
List the types of machine used in your department.