
iCare with Verifone - Oracle with Verifone.pdf · VeriFone Vx570 The VeriFone Vx570 terminal is a...
52
iCare & Verifone Vx570 Integration Copyright 2008 MICROS Systems, Inc. Columbia, MD USA All Rights Reserved MD0015-036
Transcript of iCare with Verifone - Oracle with Verifone.pdf · VeriFone Vx570 The VeriFone Vx570 terminal is a...

iCare & Verifone Vx570Integration
Copyright 2008MICROS Systems, Inc.
Columbia, MD USAAll Rights Reserved
MD0015-036
General InformationAbout this Document
Part Number: CUST-MICROS-001End User Intruction Sheet
General Information
About this Document
This document contains instructions for configuring the Enterprise Information Portal and the VeriFone Vx570 for use with the iCare Customer Relationship Management Product.
The following topics are discussed in this document:
iCare GPL & VeriFone.................................................... 2Portal Configuration........................................................ 5Vx570 Configuration: Out of the Box ......................... 32Using the Vx570 with iCare ......................................... 42In Conclusion... ............................................................. 51
Declarations WarrantiesAlthough the best efforts are made to ensure that the information in this manual is complete and correct, MICROS Systems, Inc. makes no warranty of any kind with regard to this material, including but not limited to the implied warranties of marketability and fitness for a particular purpose. Information in this manual is subject to change without notice. No part of this manual may be reproduced or transmitted in any form or by any means, electronic or mechanical, including photocopying, recording, or information recording and retrieval systems, for any purpose other than for personal use, without the express written permission of MICROS Systems, Inc. MICROS Systems, Inc. shall not be liable for errors contained herein or for incidental or consequential damages in connection with the furnishing, performance, or use of this manual.
Trademarks Acrobat Reader® and FrameMaker® are registered trademarks of Adobe Corporation.
Microsoft®, SQL Server™, Excel®, Windows® are either registered trademarks or trademarks of the Microsoft Corporation on the United States and/or other countries.
Design and ProductionThis manual was written with Adobe FrameMaker.
Page 1 MICROS iCare & Verifone Vx570 Integration

iCare GPL & VeriFoneiCare Gift, Payment & Loyalty
Part Number: CUST-MICROS-001End User Instruction Sheet
iCare GPL & VeriFone
iCare Gift, Payment & Loyalty
The iCare Gift, Payment, and Loyalty (GPL) Product provides comprehensive customer relationship management. Typically, iCare is composed of Gift & Payment Programs and Loyalty Programs. MICROS has introduced the ability to interface the powerful iCare Product with the VeriFone Vx570 standalone terminal.
VeriFone Vx570 The VeriFone Vx570 terminal is a counter-top terminal capable of providing iCare support.
How it WorksOrganizations will be able to perform iCare GPL transactions on the VeriFone Vx570 via Simple Object Access Protocol (SOAP) via an HTTPS connection.
Hospitality employees will be able to communicate with the iCare Gift, Payment, and Loyalty Product using the Vx570 for smooth, seamless customer transactions and faster processing times.
Basic Functionality of the User Interface (UI)The UI is composed of function keys, an alpha-numeric keypad, configurable numeric keys, and a configuration menu key.
Page 2MICROS iCare & Verifone Vx570 Integration
iCare GPL & VeriFoneVeriFone Vx570
Part Number: CUST-MICROS-001End User Intruction Sheet
FUNCTION KEYS
The VeriFone Vx570 offers a number of functions in order to accomplish hospitality tasks. There are three categories of function keys:
Standard Function KeysPurple Function KeysColor-Coded Function Keys
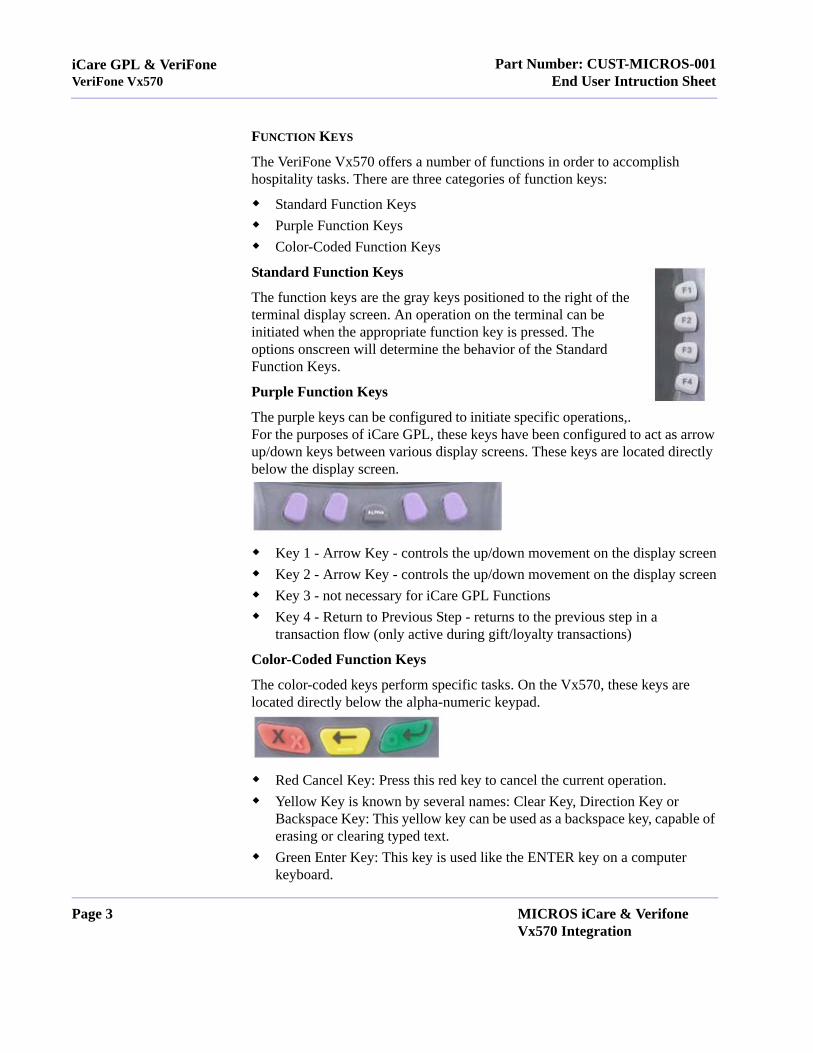
Standard Function Keys
The function keys are the gray keys positioned to the right of the terminal display screen. An operation on the terminal can be initiated when the appropriate function key is pressed. The options onscreen will determine the behavior of the Standard Function Keys.
Purple Function Keys
The purple keys can be configured to initiate specific operations,. For the purposes of iCare GPL, these keys have been configured to act as arrow up/down keys between various display screens. These keys are located directly below the display screen.
Key 1 - Arrow Key - controls the up/down movement on the display screenKey 2 - Arrow Key - controls the up/down movement on the display screenKey 3 - not necessary for iCare GPL FunctionsKey 4 - Return to Previous Step - returns to the previous step in a transaction flow (only active during gift/loyalty transactions)
Color-Coded Function Keys
The color-coded keys perform specific tasks. On the Vx570, these keys are located directly below the alpha-numeric keypad.
Red Cancel Key: Press this red key to cancel the current operation. Yellow Key is known by several names: Clear Key, Direction Key or Backspace Key: This yellow key can be used as a backspace key, capable of erasing or clearing typed text.Green Enter Key: This key is used like the ENTER key on a computer keyboard.
Page 3 MICROS iCare & Verifone Vx570 Integration
iCare GPL & VeriFoneVeriFone Vx570
Part Number: CUST-MICROS-001End User Instruction Sheet
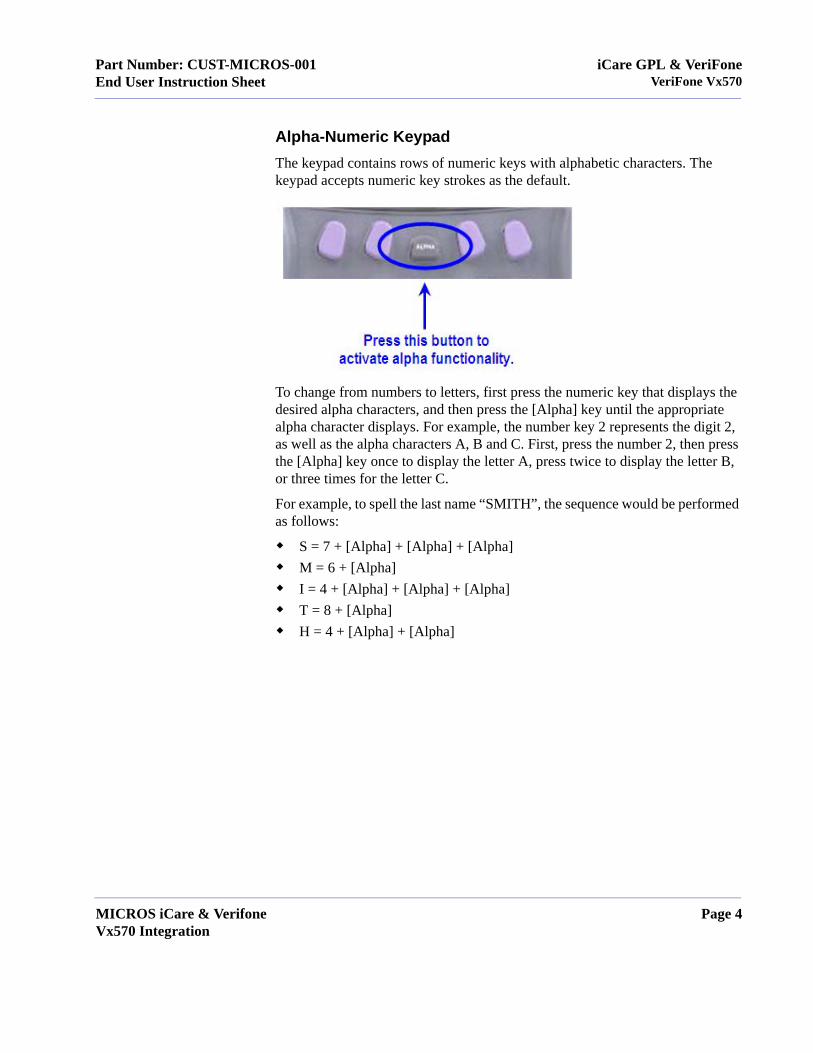
Alpha-Numeric KeypadThe keypad contains rows of numeric keys with alphabetic characters. The keypad accepts numeric key strokes as the default.
To change from numbers to letters, first press the numeric key that displays the desired alpha characters, and then press the [Alpha] key until the appropriate alpha character displays. For example, the number key 2 represents the digit 2, as well as the alpha characters A, B and C. First, press the number 2, then press the [Alpha] key once to display the letter A, press twice to display the letter B, or three times for the letter C.
For example, to spell the last name “SMITH”, the sequence would be performed as follows:
S = 7 + [Alpha] + [Alpha] + [Alpha]M = 6 + [Alpha]I = 4 + [Alpha] + [Alpha] + [Alpha]T = 8 + [Alpha]H = 4 + [Alpha] + [Alpha]
Page 4MICROS iCare & Verifone Vx570 Integration
Setup & ConfigurationPortal Configuration
Part Number: CUST-MICROS-001End User Intruction Sheet
Setup & Configuration
Portal Configuration
Support for VeriFone TerminalsMICROS has extended their iCare functionality to non-MICROS POS, specifically standalone terminals. This increased flexibility gives more organizations the ability to incorporate the powerful and comprehensive iCare Customer Relationship Management tool into their businesses.
iCare functionality for standalone terminals is configured on a location-by-location basis. The feature has been designed this way, since many organizations may choose to use of both MICROS POS, as well as other, third-party generic interfaces.
After designating the location available for standalone terminal configuration, six categories of configuration must be established. These default settings are the general or “standard” configuration for any standalone terminal. These settings include:
Default Parameter - establish basic default parameters for standalone terminal interfacing with the MICROS Stored Value Card ServerTerminal Type - provide available terminal types for useReceipt Configuration - define header and footer content that will appear on receipt chitsProgram Configuration - indicate which programs will be available for use at the standalone terminalRevenue Center Configuration - specify any and all revenue centers wherein standalone terminals will be used with iCarePOS Screen Configuration - assign the corresponding POS Configuration settings to the standalone terminal architecture
Default Parameter, Receipt Configuration, and Revenue Center Configuration settings may be overriden at the location level.
Note At this time, MICROS iCare can be configured to work with VeriFone Vx570 Terminals.VeriFone™ is a registered trademark of VeriFone.
Page 5 MICROS iCare & Verifone Vx570 Integration
Setup & ConfigurationPortal Configuration
Part Number: CUST-MICROS-001End User Instruction Sheet
REQUIREMENTS
For the VeriFone Vx570, an IP/Internet connection and internet availability must exist in order for it to operate. For more information on VeriFone functionality, please refer to www.verifone.com/product/devices/vx/Vx570.html.
LIMITATIONS
Since it is not fully integrated with the POS, standalone terminals have limitations with respect to iCare functionality.
Prior Visit Credit
Members will not be able to receive credit for prior visit.
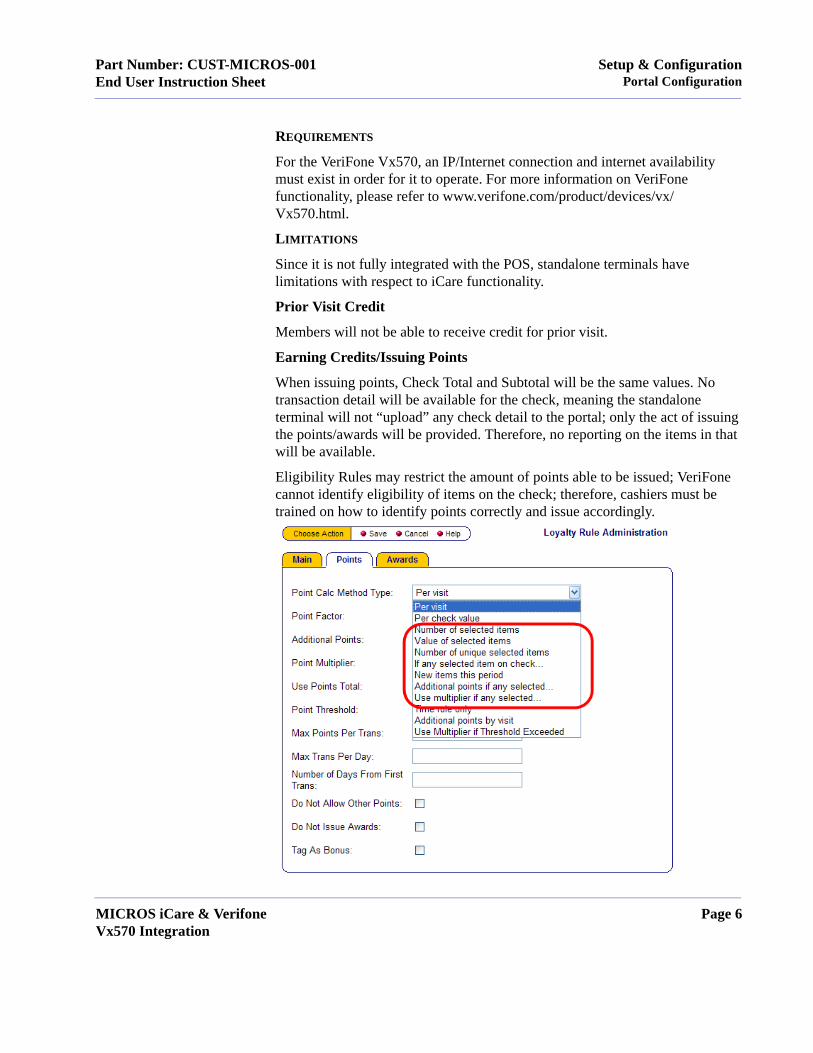
Earning Credits/Issuing Points
When issuing points, Check Total and Subtotal will be the same values. No transaction detail will be available for the check, meaning the standalone terminal will not “upload” any check detail to the portal; only the act of issuing the points/awards will be provided. Therefore, no reporting on the items in that will be available.
Eligibility Rules may restrict the amount of points able to be issued; VeriFone cannot identify eligibility of items on the check; therefore, cashiers must be trained on how to identify points correctly and issue accordingly.
Page 6MICROS iCare & Verifone Vx570 Integration
Setup & ConfigurationPortal Configuration
Part Number: CUST-MICROS-001End User Intruction Sheet
As such, using any of the following point calculation method types will result in no point issuance:
Number of Selected ItemsValue of Selected ItemsNumber of Unique Selected ItemsIf any item selected on CheckNew items this periodAdditional points if any selected...Use multiplier if any selected
If you decide to create a rewards program based on the purchase of specific menu items, (i.e., customer receives points for every sandwich ordered), the Vx570 has no means of verifying the presence of that menu item on the check.
Accepting Reward Coupons
VeriFone cannot check for coupon eligibility or calculate a coupon’s amount. Can only determine coupon validity, i.e., the coupon has not been used/is not expired. Therefore, employees must be trained on how to administer coupons when customers meet their threshold.
Coupons with Redemption Rules are not able to be evaluated by VeriFone; this does not mean Redemption Rules cannot be configured; rather, VeriFone is not able to process the Redemption parameters. Coupon value will be accepted in to match the amount in request, and will never exceed the amount in request. However, it may be less than the requested amount. For example, if it is a fixed amount of $5 coupon, $2.50 will be accepted if the requested amount is $2.50 instead of $5. $5 will be accepted if the requested amount is $50.
Page 7 MICROS iCare & Verifone Vx570 Integration
Setup & ConfigurationPortal Configuration
Part Number: CUST-MICROS-001End User Instruction Sheet
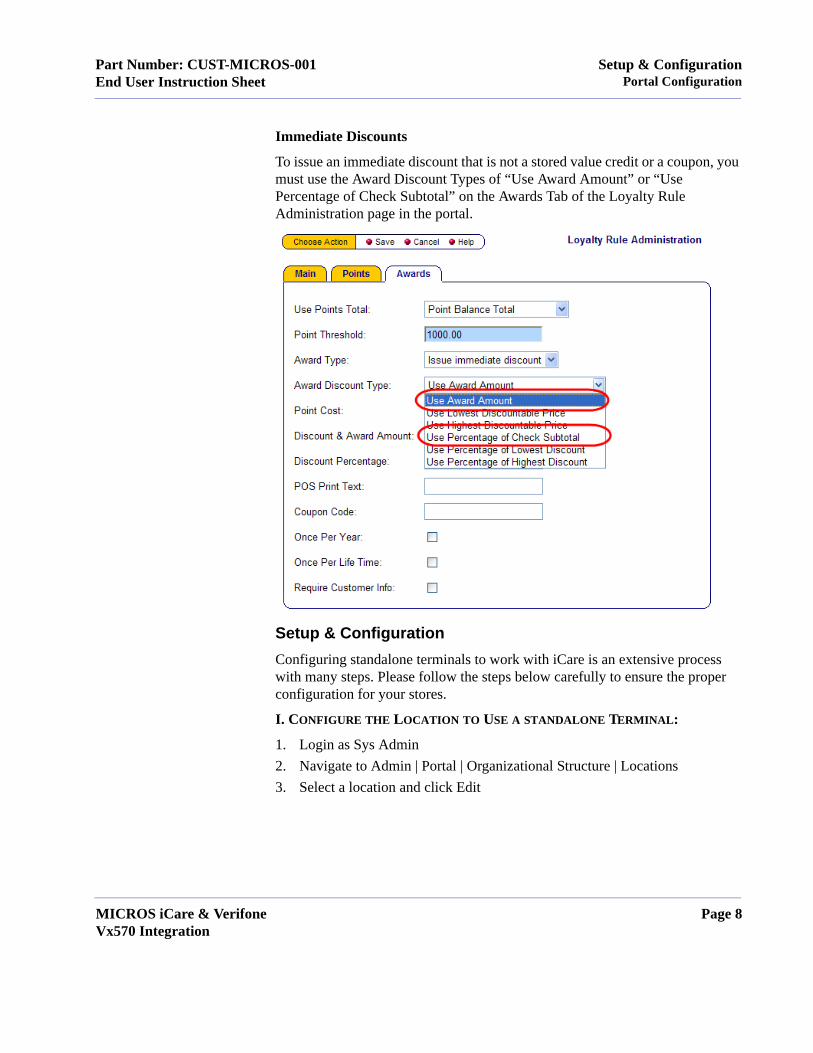
Immediate Discounts
To issue an immediate discount that is not a stored value credit or a coupon, you must use the Award Discount Types of “Use Award Amount” or “Use Percentage of Check Subtotal” on the Awards Tab of the Loyalty Rule Administration page in the portal.
Setup & ConfigurationConfiguring standalone terminals to work with iCare is an extensive process with many steps. Please follow the steps below carefully to ensure the proper configuration for your stores.
I. CONFIGURE THE LOCATION TO USE A STANDALONE TERMINAL:
1. Login as Sys Admin2. Navigate to Admin | Portal | Organizational Structure | Locations3. Select a location and click Edit
Page 8MICROS iCare & Verifone Vx570 Integration

Setup & ConfigurationPortal Configuration
Part Number: CUST-MICROS-001End User Intruction Sheet
4. Enable the option marked Use Standalone Terminal:
5. Save
Note This step may have been performed during the initial setup and implementation of the organization when locations are being added to the reporting structure.Please be sure this option bit is enabled, otherwise the location will not be available to receive standalone terminal configuration settings.As always, when locations are added or updated, you must remember to sync the information via iCare Admin | Initial iCare Setup & Configuration | DB Sync Schedule.
Page 9 MICROS iCare & Verifone Vx570 Integration

Setup & ConfigurationPortal Configuration
Part Number: CUST-MICROS-001End User Instruction Sheet
II. SETUP THE REWARDS PROGRAM
Typically, the MICROS Implementation Group will configure loyalty and award programs for your organization. However, for those organizations who will be setting up programs on their own, the following has been provided as a “quick overview” of the steps that must be taken in order to configure a successful awards program.
The following must be configured:
Card RuleLoyalty ProgramLoyalty Point Issue Rule & Point Award RuleEligibility RuleLink all Rules to the Program
Note This is not a full list of all loyalty and awards configurations steps for iCare. This is a sample of what a typical reward program may consist of. For more information on setting up loyalty programs, please refer to the iCare GPL Configuration Manual.
Note These steps must be configured, regardless of whether the enterprise is using a MICROS POS or a Standalone Terminal.
Page 10MICROS iCare & Verifone Vx570 Integration

Setup & ConfigurationPortal Configuration
Part Number: CUST-MICROS-001End User Intruction Sheet
Card Rule
Establish the sequence of card numbers that will be accepted for this program. This can be accomplished by navigating to iCare Admin | iCare Config | Programs, Cards, Coupons and Rules | Card Rules. Add the Card Rule, filling out the necessary fields:
Page 11 MICROS iCare & Verifone Vx570 Integration

Setup & ConfigurationPortal Configuration
Part Number: CUST-MICROS-001End User Instruction Sheet
Loyalty Program
Create the Rewards Program. It is to this program that all point issuance, award, eligibility rules, etc., will be associated. Navigate to iCare Admin | iCare Config | Programs, Cards, Coupons, and Rules | Programs. Add the Loyalty Program:
Page 12MICROS iCare & Verifone Vx570 Integration

Setup & ConfigurationPortal Configuration
Part Number: CUST-MICROS-001End User Intruction Sheet
Eligibility Rule
An Eligibility Rule must be associated with the Loyalty Point Issue Rule. This rule allows for items to be eligible for point issuance. Navigate to iCare Admin | iCare Config | Programs, Cards, Coupons, and Rules | Eligibility, and add an Eligibility Rule:
Eligibility Rules may have Time and Item Rules to provide guidelines for times of availability or available items for redemption.
Loyalty Point Issue Rule & Point Award Rule
Define the parameters by which points will be issued to an account and the circumstances under which an award will be issued. Specify the number of points to be issued, as well as the criteria by which they will be distributed, and, upon reaching a pre-defined threshold, the trigger which initiates an award. Navigate to iCare Admin | iCare Config | Programs, Cards, Coupons, and Rules | Loyalty Rules.
Note Loyalty Rules and Accept Coupon Rules may be associated with an Eligibility Item Rule. The VeriFone request is incapable of interpreting the presence of available items.This issue may be resolved by staff training.
Page 13 MICROS iCare & Verifone Vx570 Integration

Setup & ConfigurationPortal Configuration
Part Number: CUST-MICROS-001End User Instruction Sheet
Add the Point Issue Rule being sure to select the recently created Eligibility Rule:
Add the Point Award Rule:
Page 14MICROS iCare & Verifone Vx570 Integration

Setup & ConfigurationPortal Configuration
Part Number: CUST-MICROS-001End User Intruction Sheet
Link All Rules to the Program
All rules must be linked to the program. At the top of the Programs Overview page, there are a number of options for editing rules:
Navigate to iCare Admin | iCare Config | Programs, Cards, Coupons, and Rules | Programs. Highlight the Program Name and begin assigning the Card Rules, Loyalty Rules, and any other rules, as needed.
III. CONFIGURATION
There are six types of configuration (mentioned above) that must take place before standalone terminals may be assigned to locations. These settings must be configured before you can move forward. From the Configuration Overview page, both standard and location-specific standalone features may be enabled.
To access the Configuration Overview page:
1. Login as Sys Admin
Page 15 MICROS iCare & Verifone Vx570 Integration

Setup & ConfigurationPortal Configuration
Part Number: CUST-MICROS-001End User Instruction Sheet
2. Navigate to iCare Admin | iCare Config | Standalone Terminal Configuration | Terminal Configuration; the following page will appear:
Default Parameter:
1. Click the Configure button in the Default Parameter section2. Configure the page according the descriptions found in the table below:
Page 16MICROS iCare & Verifone Vx570 Integration

Setup & ConfigurationPortal Configuration
Part Number: CUST-MICROS-001End User Intruction Sheet
3. Save
Terminal Type:
1. Click the Configure button in the Terminal Type section
Field DescriptionIP Timeout Enter the number of seconds the terminal should
wait before retrying/canceling the transaction. The at least 15 seconds. The default is 60 seconds.
Dial Timeout Enter the number of seconds the terminal should wait before retrying or canceling the transaction. The timeout should be at least 30 seconds. The default is 60 seconds.
Retry Strategy Select the appropriate retry strategy:No Retry - system will not attempt to transmit dataSame Connection - system will use the same connection to transmit data, if retransmit data flag = YesDial Up - system will use the dial-up connection to transmit data, if retransmit data flag = Yes
Encrypted PIN Enable this option if an encrypted PIN will be used
Business Day Start Time
Enter the business day start time24-hour format (0:00 - 23:59)
View Configuration Password
Enter a password which can be entered to grant local level viewing of configurations.8-integer limit
Edit Configuration Password
Enter a password which can be entered to grant local level setup and configurations8-integer limit
Reversal Password
Enter a password which can be entered to grant point/award reversals at the local level.8-integer limit
Page 17 MICROS iCare & Verifone Vx570 Integration

Setup & ConfigurationPortal Configuration
Part Number: CUST-MICROS-001End User Instruction Sheet
2. Click Add from the top menu bar to add a new standalone terminal:
3. Configure the page according the descriptions found in the table below:
4. Save
Receipt Configuration:
1. Click the Configure button in the Receipt Configuration section
Field DescriptionName Enter a name for the terminalVendor Specify the terminal’s vendorModel Specify the terminal’s model numberVersion Specify the terminal’s application version
number
Page 18MICROS iCare & Verifone Vx570 Integration

Setup & ConfigurationPortal Configuration
Part Number: CUST-MICROS-001End User Intruction Sheet
2. Click Add from the top menu bar to configure text for a receipt:
3. Configure the page according the descriptions found in the table below:
Program Configuration:
1. Click the Configure button in the Program Configuration section
Field DescriptionName Enter a name for the receiptDescription Enter a brief description for the receipt’s
purposesHeader Line 1-5 Enter text to be included in the receipt header
lines. Blank lines will be omitted/suppressed. 32-character alphanumeric limit. Lines less than 32 characters will be automatically centered.
Trailer Line 1-5 Enter text to be included in the receipt trailer lines. Blank lines will be omitted/suppressed.32-character alphanumeric limit. Lines less than 32 characters will be automatically centered.
Page 19 MICROS iCare & Verifone Vx570 Integration
Setup & ConfigurationPortal Configuration
Part Number: CUST-MICROS-001End User Instruction Sheet
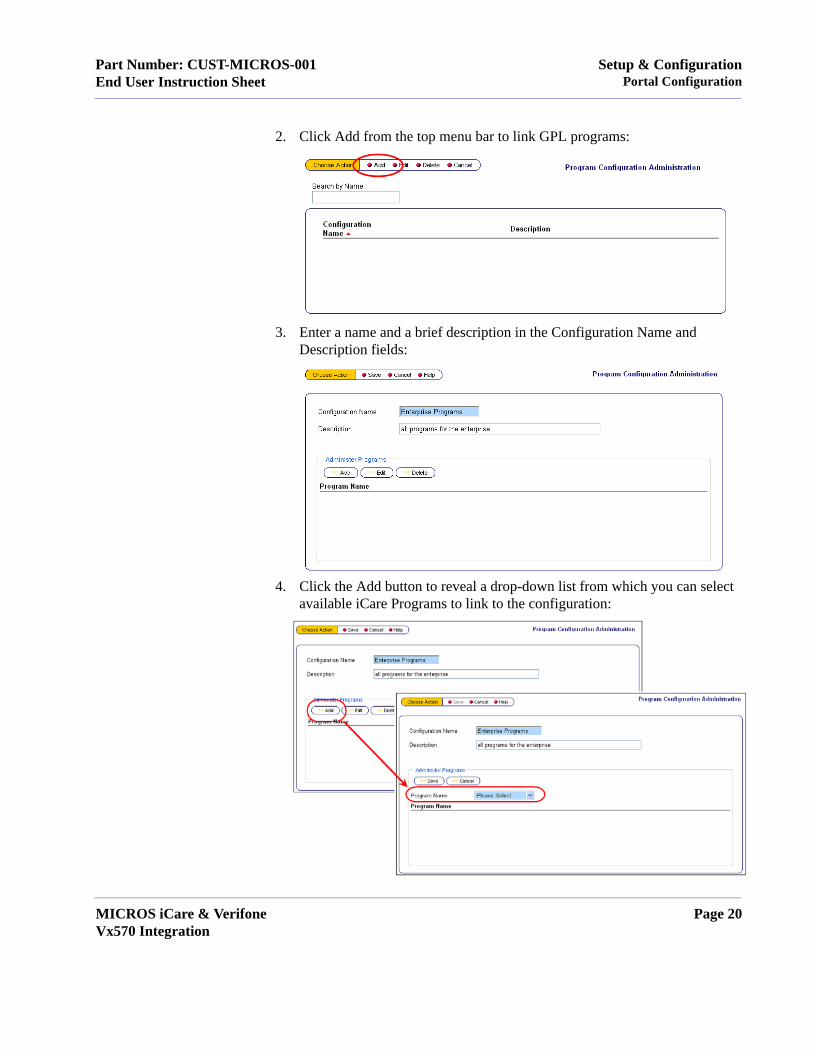
2. Click Add from the top menu bar to link GPL programs:
3. Enter a name and a brief description in the Configuration Name and Description fields:
4. Click the Add button to reveal a drop-down list from which you can select available iCare Programs to link to the configuration:
Page 20MICROS iCare & Verifone Vx570 Integration

Setup & ConfigurationPortal Configuration
Part Number: CUST-MICROS-001End User Intruction Sheet
5. Use the drop-down list to select an iCare Program and click Save
6. Repeat step 5 for any additional iCare Programs to be added to the Configuration
7. Click Save from the top menu bar to maintain your updates
Revenue Center Configuration:
1. Click the Configure button in the Revenue Center Configuration section
Note iCare Programs are typically configured by the mymicros Implementation Team via iCare Admin | iCare Config | Programs, Cards, Coupons, and Rules.
Page 21 MICROS iCare & Verifone Vx570 Integration

Setup & ConfigurationPortal Configuration
Part Number: CUST-MICROS-001End User Instruction Sheet
2. Click Add from the top menu bar to link Revenue Centers:
3. Enter a name and a brief description about the Revenue Centers:
4. Click the Add button to reveal an area where you can enter the Revenue Center Name (16-character alphanumeric limit) and its RVC Number (9-integer limit):
Page 22MICROS iCare & Verifone Vx570 Integration

Setup & ConfigurationPortal Configuration
Part Number: CUST-MICROS-001End User Intruction Sheet
5. Enter the name and number for the RVC in the fields provided and click Save to update the form
6. Repeat step 5 for any and all RVCs to be included in this configuration7. Click Save from the top menu bar to maintain all updates to this form
POS Screen Configuration:
1. Click the Configure button in the POS Screen Configuration section2. Click Add from the top menu bar to add a new POS Screen Configuration:
Page 23 MICROS iCare & Verifone Vx570 Integration

Setup & ConfigurationPortal Configuration
Part Number: CUST-MICROS-001End User Instruction Sheet
There are 2 tabs on the Add POS Screen Configuration Page: Main and Transaction Type
3. On the Main Tab, configure the fields according to the table below:
Field DescriptionConfiguration Name Enter a name for the POS Screen ConfigurationDescription Enter a brief description for the POS Screen
ConfigurationLine Feed Function Menu Placement
Enter the placement for the Line Feed Function in the menu (1, 10-99)2-integer limit
Display Version Function Menu Placement
Enter the placement of Display Version Function in menu (0, 10-99)2-integer limit
Reload Configuration Function Menu Placement
Enter the placement of Reload ConfigurationFunction in menu (0, 10-99)2-integer limit
Reprint Function Menu Placement
Enter the placement of Reprint Function in menu (0, 10-99)2-integer limit
Menu1-9 Descriptor Enter any menu descriptors to be placed in positions 1-9; only the first descriptor is required
Page 24MICROS iCare & Verifone Vx570 Integration

Setup & ConfigurationPortal Configuration
Part Number: CUST-MICROS-001End User Intruction Sheet
4. On the Transaction Type Tab, click Add to add a Transaction Type to the POS Screen:
5. Configure the page according the descriptions found in the table below:
Field DescriptionName Use the drop-down list to select from available
transaction typesSelect... to...Issue Account issue a stored value cardActivate Account activate a stored value cardReload Account recharge, reload, or add
additional value to a stored value account
Authorize Redemption
request authorization to debit a stored value account for a specified amount
Redeem Point redeem earned points through the terminal
Cash Out Account provide cash back for a stored value card
Page 25 MICROS iCare & Verifone Vx570 Integration
Setup & ConfigurationPortal Configuration
Part Number: CUST-MICROS-001End User Instruction Sheet
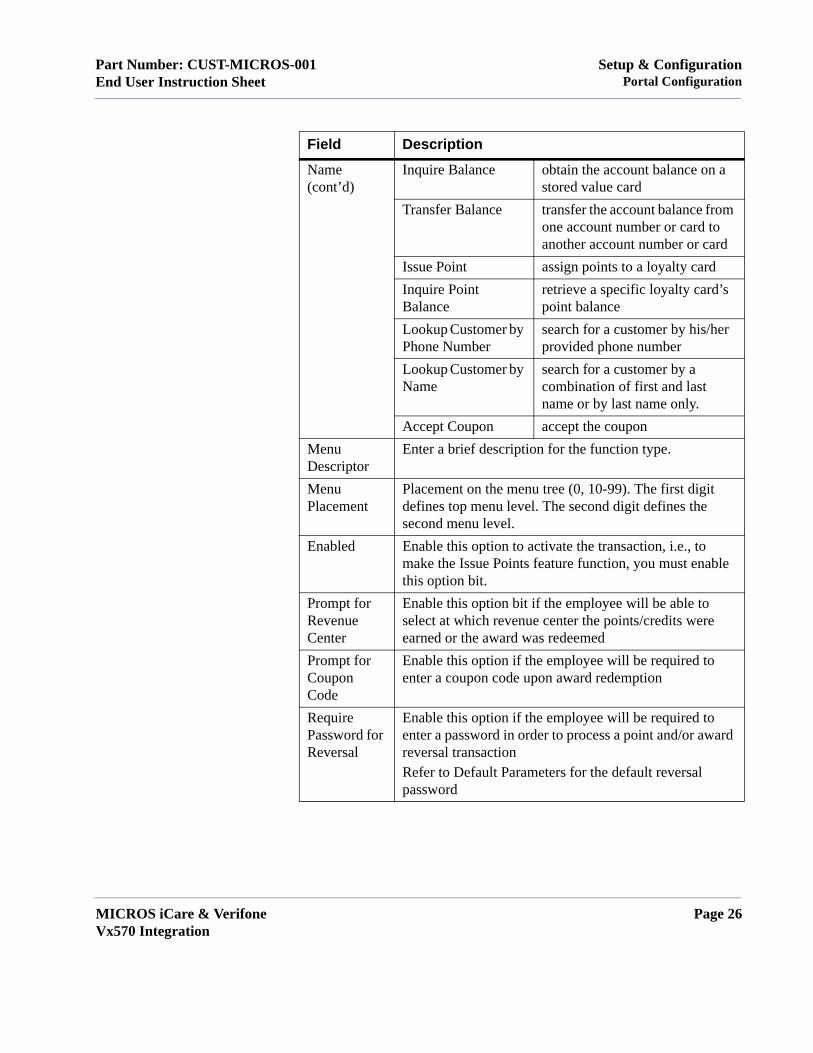
Name (cont’d)
Inquire Balance obtain the account balance on a stored value card
Transfer Balance transfer the account balance from one account number or card to another account number or card
Issue Point assign points to a loyalty cardInquire Point Balance
retrieve a specific loyalty card’s point balance
Lookup Customer by Phone Number
search for a customer by his/her provided phone number
Lookup Customer by Name
search for a customer by a combination of first and last name or by last name only.
Accept Coupon accept the couponMenu Descriptor
Enter a brief description for the function type.
Menu Placement
Placement on the menu tree (0, 10-99). The first digit defines top menu level. The second digit defines the second menu level.
Enabled Enable this option to activate the transaction, i.e., to make the Issue Points feature function, you must enable this option bit.
Prompt for Revenue Center
Enable this option bit if the employee will be able to select at which revenue center the points/credits were earned or the award was redeemed
Prompt for Coupon Code
Enable this option if the employee will be required to enter a coupon code upon award redemption
Require Password for Reversal
Enable this option if the employee will be required to enter a password in order to process a point and/or award reversal transactionRefer to Default Parameters for the default reversal password
Field Description
Page 26MICROS iCare & Verifone Vx570 Integration

Setup & ConfigurationPortal Configuration
Part Number: CUST-MICROS-001End User Intruction Sheet
6. Click Save to maintain your updates on this page - your updates will appear on the Transaction Types tab:
7. When the Main and Transaction Types Tabs have been updated appropriately, click Save from the top menu bar
When all configurations have been set, the Configurations Overview page will resemble the following:
Require PIN with Swipe
Enable this option if the employee will be required to enter a PIN when a loyalty card is swiped
Require PIN with Manual Entry
Enable this option if the employee will be required to enter a PIN when a loyalty card transaction must be processed manually
Field Description
Page 27 MICROS iCare & Verifone Vx570 Integration

Setup & ConfigurationPortal Configuration
Part Number: CUST-MICROS-001End User Instruction Sheet
IV. ASSIGN CONFIGURATIONS TO LOCATIONS
Configure location specific settings in this area of Standalone Configuration. Only locations designated as Standalone locations will appear in this list.
1. Login as Sys Admin2. Navigate to iCare Admin | iCare Config | Standalone Terminal
Configuration | Terminal Configuration3. After completing the configurations (see above), click Locations from the
top menu bar:
4. Select the corporate level or select locations individually by enabling the check boxes next to the location name:
Page 28MICROS iCare & Verifone Vx570 Integration

Setup & ConfigurationPortal Configuration
Part Number: CUST-MICROS-001End User Intruction Sheet
5. Use the drop-down lists to specify the types of configuration to be in effect at the selected location(s) [Currency and Terminal Type are not mandatory at this time]:
6. When all configurations have been set, click Save from the top menu bar
V. ASSIGN TERMINALS TO LOCATIONS
1. Login as Sys Admin2. Navigate to iCare Admin | iCare Config | Standalone Terminal
Configuration | Terminal Configuration3. After setting standard configurations and establishing location-specific
information, click Terminal from the top menu bar:
Page 29 MICROS iCare & Verifone Vx570 Integration

Setup & ConfigurationPortal Configuration
Part Number: CUST-MICROS-001End User Instruction Sheet
4. Select a location and click Configure Terminal from the top menu bar:5. Click Add from the top menu bar to begin adding terminals; a page similar
to the following will display:
6. In the Terminal fields, modify the following:Enter a Name for the terminal (ex. Bar, Bar 1, Side Station 2, etc.)Enter a brief descriptionSpecify the Terminal Number - you should not have duplicate terminal numbers at a single location Enter the Terminal Serial Number
Specify the Terminal TypeUse the drop-down list to designate a currency
Note This number can usually be found on the underside of the terminal
Page 30MICROS iCare & Verifone Vx570 Integration
Setup & ConfigurationPortal Configuration
Part Number: CUST-MICROS-001End User Intruction Sheet
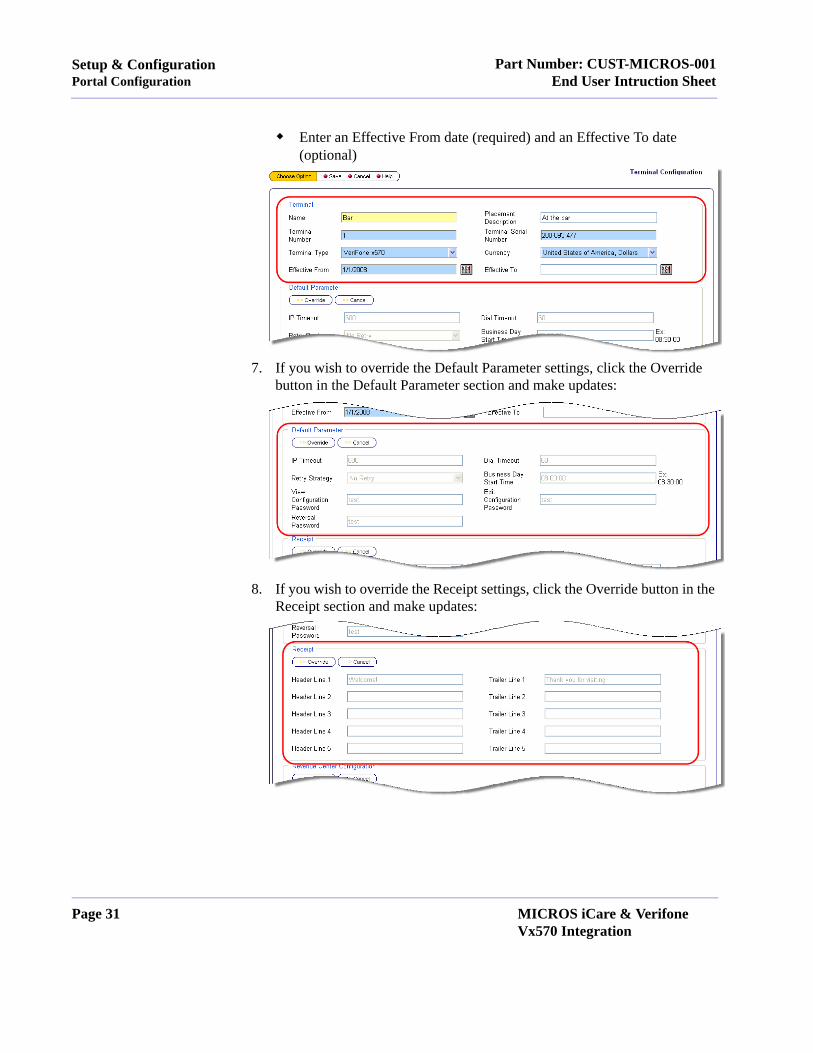
Enter an Effective From date (required) and an Effective To date (optional)
7. If you wish to override the Default Parameter settings, click the Override button in the Default Parameter section and make updates:
8. If you wish to override the Receipt settings, click the Override button in the Receipt section and make updates:
Page 31 MICROS iCare & Verifone Vx570 Integration
Setup & ConfigurationVx570 Configuration: Out of the Box
Part Number: CUST-MICROS-001End User Instruction Sheet
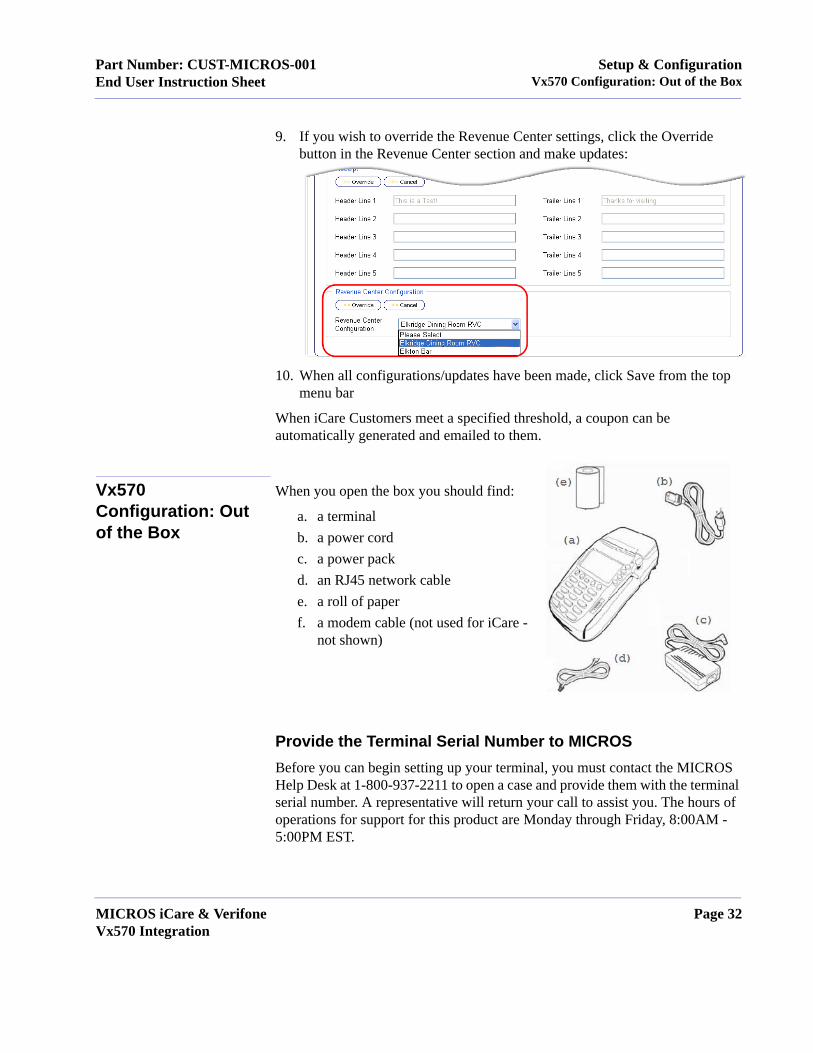
9. If you wish to override the Revenue Center settings, click the Override button in the Revenue Center section and make updates:
10. When all configurations/updates have been made, click Save from the top menu bar
When iCare Customers meet a specified threshold, a coupon can be automatically generated and emailed to them.
Vx570 Configuration: Out of the Box
When you open the box you should find:
a. a terminalb. a power cordc. a power packd. an RJ45 network cablee. a roll of paperf. a modem cable (not used for iCare -
not shown)
Provide the Terminal Serial Number to MICROSBefore you can begin setting up your terminal, you must contact the MICROS Help Desk at 1-800-937-2211 to open a case and provide them with the terminal serial number. A representative will return your call to assist you. The hours of operations for support for this product are Monday through Friday, 8:00AM - 5:00PM EST.
Page 32MICROS iCare & Verifone Vx570 Integration

Setup & ConfigurationVx570 Configuration: Out of the Box
Part Number: CUST-MICROS-001End User Intruction Sheet
All terminals have unique configurations that are based on this number. The serial number is located on the underside of the terminal. To locate the serial number, turn the terminal over. The serial number will be on a small white tag and will look similar to the example below (your serial numbers will be different):
After receiving the serial number, MICROS will provide you with the information necessary to complete the in-store configuration of the terminal, such as Terminal Name, Number, Location, required passwords, etc., in a Download Email.
Information Used in ConfigurationThroughout configuration of the Vx570, location and terminal specific information will be entered into the terminal. The following passwords and port will be used throughout setup; the steps provide guidance regarding proper usage of passwords/port:
System Password: 1[alpha][alpha]66831iCare Password: 42273Default Password: 11111Primary Authorization Port: 9443
The area below can be used to maintain terminal and location specific information that has been provided to you in the Download Email. Enter the information provided to you in the blanks below for quick reference.
Terminal Name:
Terminal Number:
Location Name:
Location Logon Name ID:
Location Logon Password:
Primary Authorization URL:
Page 33 MICROS iCare & Verifone Vx570 Integration

Setup & ConfigurationVx570 Configuration: Out of the Box
Part Number: CUST-MICROS-001End User Instruction Sheet
Setup the TerminalTo complete the Terminal Configuration section, you will need the System Password (1[alpha][alpha]66831), the Terminal Name, Terminal Number, and Location Name. This information will be provided to you in the Download Email. Refer to“Alpha-Numeric Keypad” on page 4for any alpha numeric functions.
1. Using the power pack, connect the power cord to the terminal and to an outlet. Your Vx570 will power on
2. Plug the network cable into the 10BaseT port on the back of the terminal.
Note If at any time your terminal “times out”, you will be required to restart configuration steps from the last saved step.
Note Often it is necessary to scroll through the display screens to locate the correct option. In the steps below, this procedure will be displayed as:
+ [Function Key]
Note The first time you turn on your VeriFone Vx570, an Error Message stating “Illegal Terminal” may display. This is normal. Press the green Enter key to access the Start Screen
Page 34MICROS iCare & Verifone Vx570 Integration

Setup & ConfigurationVx570 Configuration: Out of the Box
Part Number: CUST-MICROS-001End User Intruction Sheet
3. Select ICARE GL (F3)
4. Press number 6 on the keypad (your screen may be blank)5. Enter the System Password (1[alpha][alpha]66831) and press the green
Enter key; the Quick Setup screen will appear:
6. Select Terminal (F2)7. Select View (F2)8. Select Edit (F3), enter the Terminal Number (provided in Download Email),
and press the green Enter key
Page 35 MICROS iCare & Verifone Vx570 Integration

Setup & ConfigurationVx570 Configuration: Out of the Box
Part Number: CUST-MICROS-001End User Instruction Sheet
9. Select Next (F2) | Edit (F3), enter the Terminal Name (provided in Download Email), and press the green Enter key
10. Select Next (F2) | Edit (F3) enter the Location Name (provided in Download Email), and press the green Enter key
11. When all settings have been defined, select Exit (F4)12. At the save changes prompt, select OK (F2):
Enter the iCare Server URLTo complete this section, you will need the System Password (1[alpha][alpha]66831) and the Primary Authorization URL (the URL that connects to the iCare Data Center).
1. Select ICARE GL (F3)2. Press number 6 on the keypad
Page 36MICROS iCare & Verifone Vx570 Integration

Setup & ConfigurationVx570 Configuration: Out of the Box
Part Number: CUST-MICROS-001End User Intruction Sheet
3. Enter the System Password (1[alpha][alpha]66831) and press the green Enter key; you will be taken to the Quick Setup screen
4. Select the IP Hosts option (F4)5. Select View (F2)6. Press Edit (F3) to enter the Primary Authorization URL (ex.
www3.myiCard.net); then press the green Enter key
7. Select Next (F2) to call the Primary Authorization Port screen; press the Edit (F3) option to enter the Primary Authorization Port number (9443) then press the green Enter key;
Note Although Secondary Authorization URL and Port may be configured under IP Hosts configuration, they are not required for iCare support.
Page 37 MICROS iCare & Verifone Vx570 Integration

Setup & ConfigurationVx570 Configuration: Out of the Box
Part Number: CUST-MICROS-001End User Instruction Sheet
8. At the Save Changes prompt select OK (F2)
9. After the terminal saves your changes, push the Cancel/Red [X] key located on the keypad to return to the start screen
Enter Location Logon Name ID and Location Logon PasswordTo complete this section, you will need the Terminal Number (if not already configured), the information specified in the Standalone Configuration Default Parameter section of the Portal, and the Location Logon Name ID and Location Logon Password (both provided by MICROS).
1. Select ICARE GL (F3) 2. Press the green Enter key; the Configuration screen will appear
3. Select Setup (F2) and enter the system password (1[alpha][alpha]66831); the Setup screen will appear
Page 38MICROS iCare & Verifone Vx570 Integration
Setup & ConfigurationVx570 Configuration: Out of the Box
Part Number: CUST-MICROS-001End User Intruction Sheet
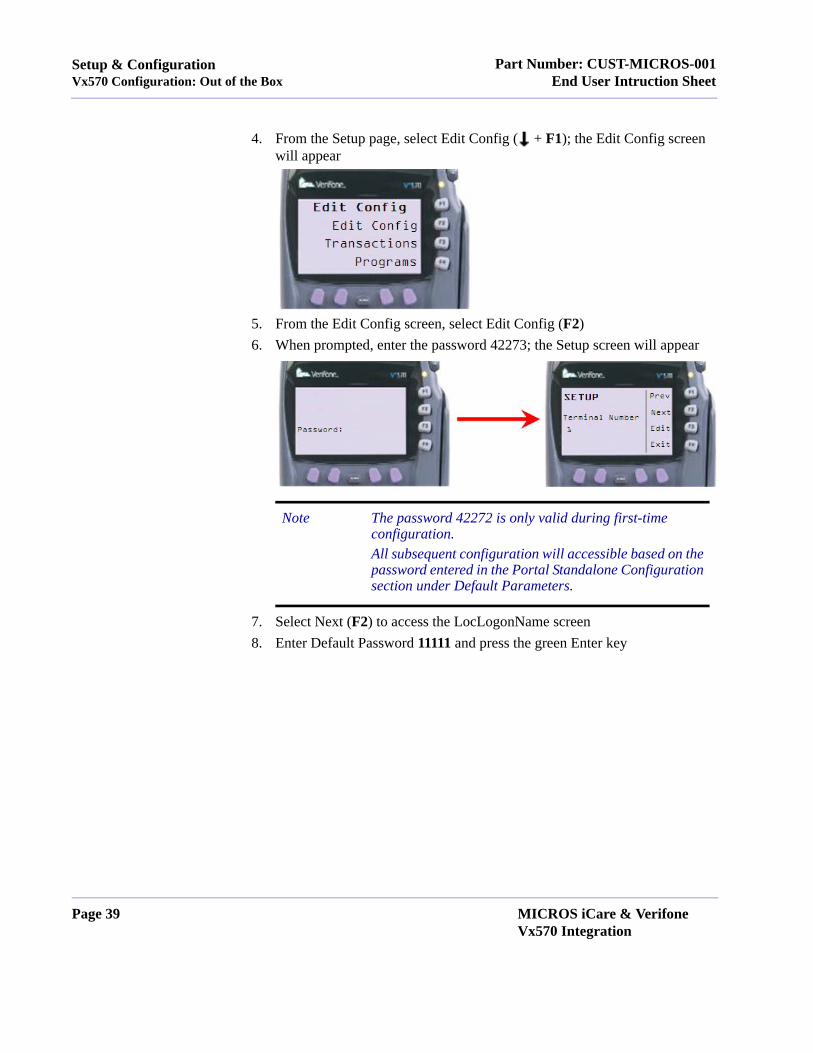
4. From the Setup page, select Edit Config ( + F1); the Edit Config screen will appear
5. From the Edit Config screen, select Edit Config (F2) 6. When prompted, enter the password 42273; the Setup screen will appear
7. Select Next (F2) to access the LocLogonName screen 8. Enter Default Password 11111 and press the green Enter key
Note The password 42272 is only valid during first-time configuration.All subsequent configuration will accessible based on the password entered in the Portal Standalone Configuration section under Default Parameters.
Page 39 MICROS iCare & Verifone Vx570 Integration

Setup & ConfigurationVx570 Configuration: Out of the Box
Part Number: CUST-MICROS-001End User Instruction Sheet
9. Select Edit (F3) to enter the Location Logon Name (ex. ABC001) and then press the green Enter key
10. Select Next (F2) to advance to the LocLogonPword screen, select Edit (F3) to enter the Location Logon Password and then press the green Enter key
11. When all settings have been defined, select Exit (F4)12. At the save changes prompt, select OK (F2) to confirm
13. Restart the Terminal - press (F2) and (F4) simultaneously; enter the System Password (1[alpha][alpha]66831) and then select F4 to Restart the terminal.
Configuration CompleteIf the connection to the iCare Data Center is successful, then the screen will refresh to the start screen. The Vx570 is then operating correctly and is ready to be used with the iCare Gift, Payment, and Loyalty Program.
Note DO NOT enter any underscores/underlines in this field. The system will not accept them.
Page 40MICROS iCare & Verifone Vx570 Integration

Setup & ConfigurationThe Vx570 Printer
Part Number: CUST-MICROS-001End User Intruction Sheet
If the Restart does not successfully connect with the iCare Data Center, then the terminal will beep 4 times. If this occurs, repeat the steps on this document. If you are still unsuccessful, please contact the MICROS Help Desk for assistance at 1-800-937-2211, Monday through Friday, 8:00AM - 5:00PM EST.
The Vx570 Printer For paper orders, contact POS Depot 1-877-767-4400 or www.posdepot.com for the correct size (2 1/4" (58M) 84') roll paper for the Vx570, part number POS-SP58V. The paper must be ordered by the case, which includes 72 rolls.
To replace the printer paper:
1. Open the lid to the paper roll by pressing the print roll release button
2. Remove the old roll and replace it with a new roll
3. Close the lid
Note Paper should feed from the bottom; the paper should not come “over the top” of the roll.
Page 41 MICROS iCare & Verifone Vx570 Integration
Using the Vx570 with iCareOverview of Functionality
Part Number: CUST-MICROS-001End User Instruction Sheet
Using the Vx570 with iCare
Overview of Functionality
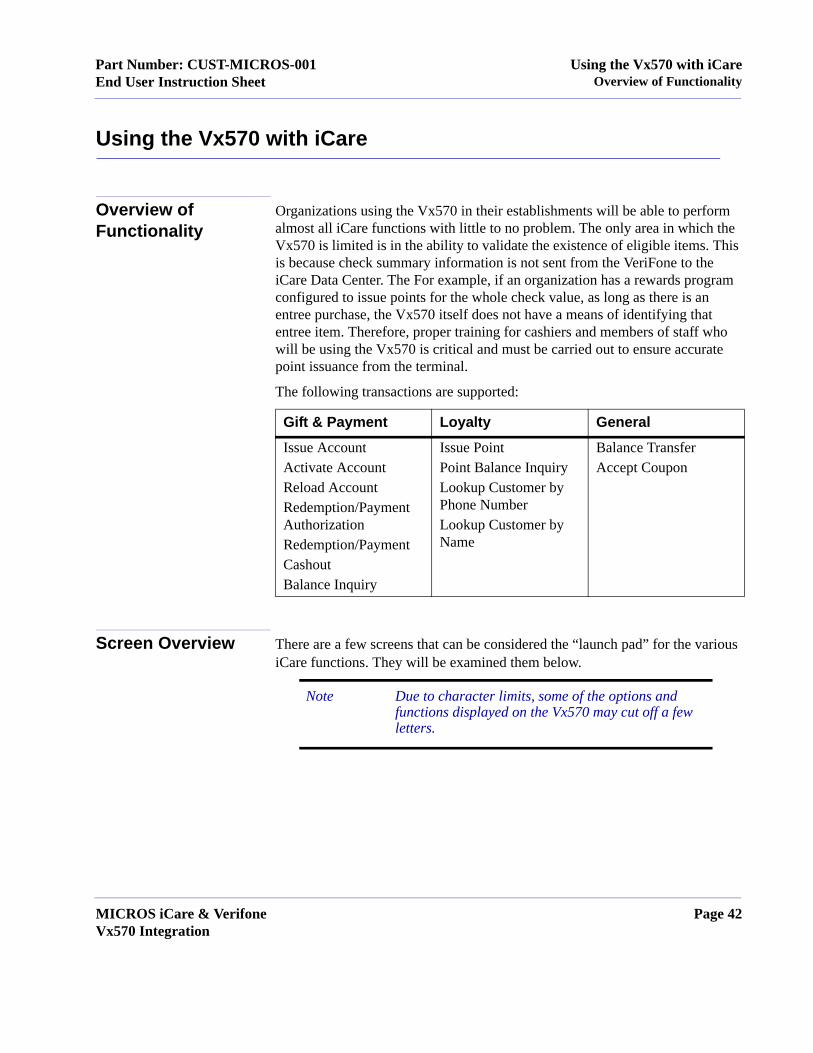
Organizations using the Vx570 in their establishments will be able to perform almost all iCare functions with little to no problem. The only area in which the Vx570 is limited is in the ability to validate the existence of eligible items. This is because check summary information is not sent from the VeriFone to the iCare Data Center. The For example, if an organization has a rewards program configured to issue points for the whole check value, as long as there is an entree purchase, the Vx570 itself does not have a means of identifying that entree item. Therefore, proper training for cashiers and members of staff who will be using the Vx570 is critical and must be carried out to ensure accurate point issuance from the terminal.
The following transactions are supported:
Screen Overview There are a few screens that can be considered the “launch pad” for the various iCare functions. They will be examined them below.
Gift & Payment Loyalty GeneralIssue AccountActivate AccountReload AccountRedemption/Payment AuthorizationRedemption/PaymentCashoutBalance Inquiry
Issue PointPoint Balance InquiryLookup Customer by Phone NumberLookup Customer by Name
Balance TransferAccept Coupon
Note Due to character limits, some of the options and functions displayed on the Vx570 may cut off a few letters.
Page 42MICROS iCare & Verifone Vx570 Integration

Using the Vx570 with iCareScreen Overview
Part Number: CUST-MICROS-001End User Intruction Sheet
Main ScreenOn the main screen, you will be able to access either the Communication Server or iCare Gift and Loyalty Functions:
From this screen, you will usually select ICARE GL (F3)
ICARE GL ScreensThe iCare Gift and Loyalty Screen is the screen from which all iCare Functionality will begin. There are three pages to the iCare GL screen, so you will need your purple arrow keys to scroll:
Page 43 MICROS iCare & Verifone Vx570 Integration

Using the Vx570 with iCareScreen Overview
Part Number: CUST-MICROS-001End User Instruction Sheet
Loyalty Functions Overview ScreenIf you select Loyalty (F2) from the ICARE GL screen, you will be taken to the Loyalty Functions Overview Screen. From this page, you will be able to issue points, perform balance inquiries, and look up customers by name or telephone number:
Gift & Payment Functions Overview ScreenIf you select GiftCard (F3) from the ICARE GL screen, you will be taken to the Gift Card Functions Overview Screen. From this page, you will be able to issue cards, activate accounts, redeem gift card balances, reload and cash out cards, and check card balances:
Page 44MICROS iCare & Verifone Vx570 Integration

Using the Vx570 with iCareGift & Payment Functions
Part Number: CUST-MICROS-001End User Intruction Sheet
Remaining FunctionsThere are additional functions which can be accessed from the ICARE GL Screen:
Accept Coupon - selecting this option will initiate the task of accepting a coupon; coupons do not necessarily need to be gift or loyalty functions, ergo the Accept Coupon function exists separately from the Gift/Loyalty Screens.Transfer Card - selecting this option permits users to transfer one card to another card. Transfer Card functions for both gift and loyalty type cards, ergo the function exists outside of the Gift/Loyalty Screens.Line Feed - pressing this option advances the paper rollAbout - pressing this option will display “About” informationReload Config - selecting this option will update the Vx570 to reflect any changes that may have been made to the portal configurationReprints - selecting this option will print the last transaction performed on the terminal with the word DUPLICATE written at the top of the chit
Gift & Payment Functions
Account FunctionsThe steps for issuing, activating, reloading, redeeming, and cashing out accounts, as well as Balance Inquiries and Redemption Authorizations are almost identical. The varying factor is the type of function which is specified in Step 1. For all other steps, the actions are the same or similar.
1. Navigate ICAREGL (F3) | GiftCard (F3)2. Select the desired Function Key:
Issue Card (F2)Activate Account (F3)Redeem (F4)Redeem Auth ( + F1)Reload ( + F2)Cash Out Account ( + F3)Card Balance ( + F4)
3. Enter the employee number and press the green Enter key
Note Often it is necessary to scroll through the display screens to locate the correct option. In the steps below, this procedure will be displayed as:
+ [Function Key]
Page 45 MICROS iCare & Verifone Vx570 Integration

Using the Vx570 with iCareGift & Payment Functions
Part Number: CUST-MICROS-001End User Instruction Sheet
4. Swipe the card/manually enter card account number and press the Enter key
5. Enter the check number and press the green Enter key
6. A prompt for Void/Reversal prompt will appear; select No (F1)7. Enter the amount and press the green Enter key
Depending on the function selected, a customer receipt will print with confirmation of the transaction, balance information, etc. This receipt should be presented to the customer as a record of the transaction. If unsuccessful, regardless of function selected, an error message will display on the terminal. The message may be cleared by pressing any button.
Gift/Payment Voids and ReversalsVoids and/or reversals may occur for a number of reasons, like accidentally issuing or reloading a gift card for the wrong amount. Depending on how the system has been configured, point voids/reversals may require a password. Follow the instructions below to apply a reversal to a gift card issue, activate, reload, redemption.
1. Navigate ICAREGL (F3) | GiftCard (F3)2. Select the desired Function Key
Issue Card (F2)Activate Account (F3)Redeem (F4)Reload ( + F2)
3. Enter the employee number and press the green Enter key4. Swipe the card/manually enter card account number and press the Enter key
Note If a prompt for revenue center appears, select the intended revenue center for the transaction.
Note If a prompt for program selection appears, select the intended program for the transaction.
Note Often it is necessary to scroll through the display screens to locate the correct option. In the steps below, this procedure will be displayed as:
+ [Function Key]
Note If a prompt for revenue center appears, select the intended revenue center for the transaction.
Page 46MICROS iCare & Verifone Vx570 Integration

Using the Vx570 with iCareLoyalty Functions
Part Number: CUST-MICROS-001End User Intruction Sheet
5. Enter the check number and press the green Enter key
6. Enter the amount and press the green Enter key7. A prompt for Void or Reversal will appear; select Yes (F2)8. Enter the password (if applicable) and press the green Enter key
The transaction will be voided/reversed. A receipt will print with the void/reversal information.
Loyalty Functions Issue Points
1. Navigate to ICARE GL (F3) | Loyalty (F2) | Issue Points (F2)2. Enter the employee number and press the green Enter key3. Swipe the card/manually enter card account number and press the green
Enter key
4. Enter the check number and press the green Enter key
5. Enter the amount and press the green Enter key6. A prompt for Void or Reversal will appear; select No (F1)
If approved, the customer account will be credited with the loyalty points and a customer receipt will be printed. This receipt should be presented to the customer as a record of the transaction. If declined, an error message will display on the terminal. The message may be cleared by pressing any button.
Note If a prompt for program selection appears, select the intended program for the transaction.
Note Often it is necessary to scroll through the display screens to locate the correct option. In the steps below, this procedure will be displayed as:
+ [Function Key]
Note If a prompt for revenue center appears, select the intended revenue center for the transaction.
Note If a prompt for program selection appears, select the intended program for the transaction.
Page 47 MICROS iCare & Verifone Vx570 Integration

Using the Vx570 with iCareLoyalty Functions
Part Number: CUST-MICROS-001End User Instruction Sheet
Point Balance Inquiry
1. Navigate to ICARE GL (F3) | Loyalty (F2) | Balance Inquiry ( + F3)2. Enter the employee number and press the green Enter key3. Swipe the card/manually enter card account number and press the green
Enter key
If the account is located, a point balance will be printed. This receipt should be presented to the customer as a record of the transaction. If no account is located, an error message will display on the terminal. The message may be cleared by pressing any button.
Lookup Customer by Phone/Name1. Navigate to ICARE GL | Loyalty | Look By Phone (F4) or Lookup By
Name ( + F1)2. Enter the employee number and press the green Enter key3. If searching by...
a. customer phone number: enter the customer’s phone number and press the green Enter key
b. If searching by customer name, then enter the customer’s last name and press the green Enter key (required); then enter the customer’s first name and press the green Enter key (optional)
If an account with the customer’s information is located, then a receipt will be printed.
Note Often it is necessary to scroll through the display screens to locate the correct option. In the steps below, this procedure will be displayed as:
+ [Function Key]
Note If a prompt for program selection appears, select the intended program for the transaction.
Note Format must be digits only; no dashes.Acceptable: 2125559465Unacceptable: 212-555-9465
Note Last name must start with an alpha character
Page 48MICROS iCare & Verifone Vx570 Integration
Using the Vx570 with iCareGeneral
Part Number: CUST-MICROS-001End User Intruction Sheet
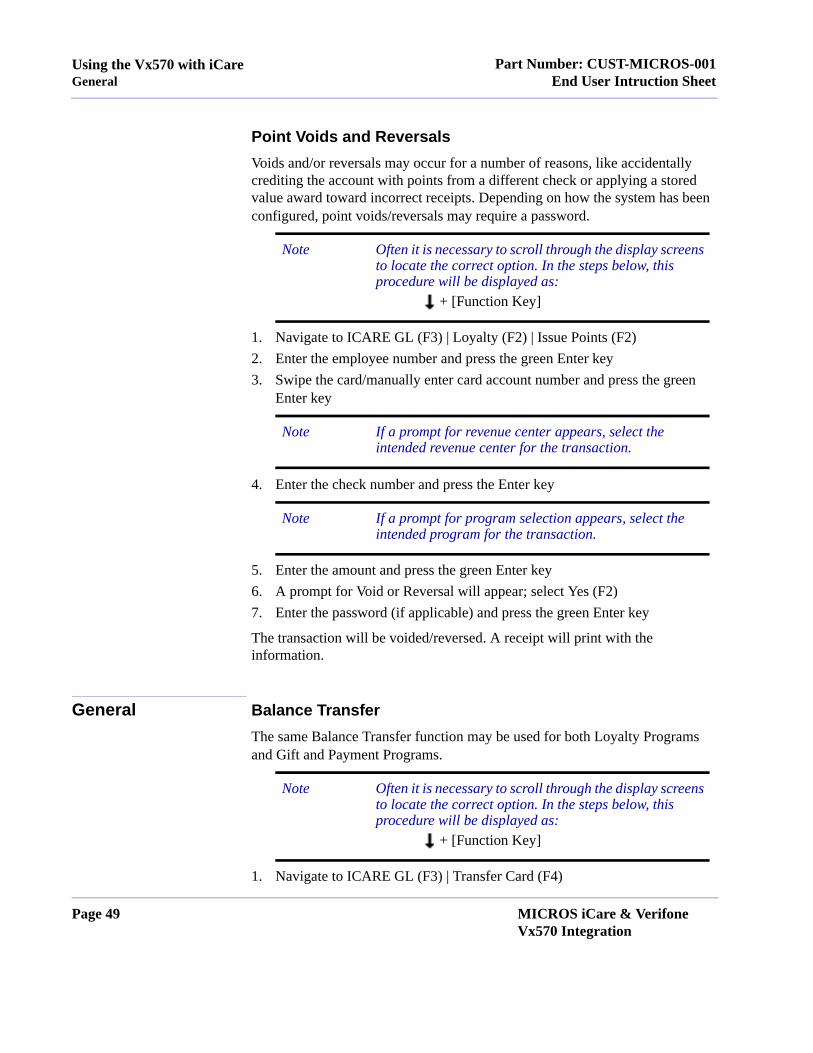
Point Voids and ReversalsVoids and/or reversals may occur for a number of reasons, like accidentally crediting the account with points from a different check or applying a stored value award toward incorrect receipts. Depending on how the system has been configured, point voids/reversals may require a password.
1. Navigate to ICARE GL (F3) | Loyalty (F2) | Issue Points (F2)2. Enter the employee number and press the green Enter key3. Swipe the card/manually enter card account number and press the green
Enter key
4. Enter the check number and press the Enter key
5. Enter the amount and press the green Enter key6. A prompt for Void or Reversal will appear; select Yes (F2)7. Enter the password (if applicable) and press the green Enter key
The transaction will be voided/reversed. A receipt will print with the information.
General Balance TransferThe same Balance Transfer function may be used for both Loyalty Programs and Gift and Payment Programs.
1. Navigate to ICARE GL (F3) | Transfer Card (F4)
Note Often it is necessary to scroll through the display screens to locate the correct option. In the steps below, this procedure will be displayed as:
+ [Function Key]
Note If a prompt for revenue center appears, select the intended revenue center for the transaction.
Note If a prompt for program selection appears, select the intended program for the transaction.
Note Often it is necessary to scroll through the display screens to locate the correct option. In the steps below, this procedure will be displayed as:
+ [Function Key]
Page 49 MICROS iCare & Verifone Vx570 Integration

Using the Vx570 with iCareGeneral
Part Number: CUST-MICROS-001End User Instruction Sheet
2. Enter the employee number and press the green Enter key3. Swipe/manually enter the new card account number and press the green
Enter key (destination card)4. Swipe/manually enter the old card account number and press the green
Enter key (source card)
If successful, the balance will transfer from the old card (swiped second) to the first card (swiped first). A receipt will be printed and should be provided to the customer for his/her records. If unsuccessful, an error message will display on the terminal. The message may be cleared by pressing any button.
Accept Coupon
1. Navigate to ICARE GL (F3) | Accept Coupon ( + F1)2. Enter the employee number and press the green Enter key
3. Enter the check number and press the green Enter key4. Enter the coupon number and press the green Enter key5. Enter the amount associated with the coupon and press the green Enter key6. A prompt for Void or Reversal will appear; select No (F1)
If successful, the check will be reduced by the amount entered into the Vx570. A receipt will be printed and should be provided to the customer for his/her records. If unsuccessful, an error message will display on the terminal. The message may be cleared by pressing any button.
Note If a prompt for program selection appears, select the intended program for the transaction.
Note Often it is necessary to scroll through the display screens to locate the correct option. In the steps below, this procedure will be displayed as:
+ [Function Key]
Note If a prompt for revenue center appears, select the intended revenue center for the transaction.
Page 50MICROS iCare & Verifone Vx570 Integration
In Conclusion...General
Part Number: CUST-MICROS-001End User Intruction Sheet
In Conclusion...
The Vx570 has been fully configured to work with iCare Gift, Payment, & Loyalty. Using this manual, you should have been able to successfully:
Configure the Portal to support VeriFoneSetup the Vx570 to communicate with the iCare Data CenterDownload the iCare Software to the Vx570Begin performing transactions on the Vx570
You may now take advantage of the powerful iCare Customer Relationship Management solution for your enterprise.
If you need additional information or assistance, please contact your MICROS Account Representative or refer to one of the many documents which can be found on the MICROS Member Services website.
Page 51 MICROS iCare & Verifone Vx570 Integration