IC L06 - Symantec Messaging Gateway (SMG) and Symantec ...
23
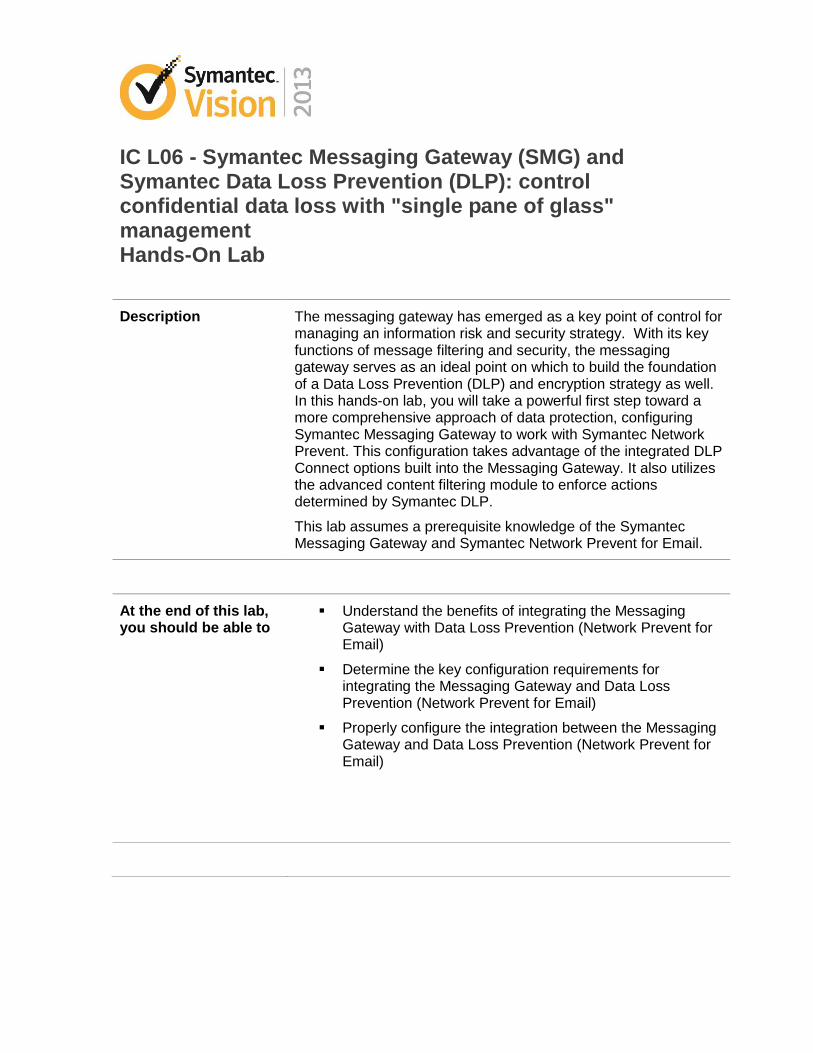
IC L06 - Symantec Messaging Gateway (SMG) and Symantec Data Loss Prevention (DLP): control confidential data loss with "single pane of glass" management Hands-On Lab Description The messaging gateway has emerged as a key point of control for managing an information risk and security strategy. With its key functions of message filtering and security, the messaging gateway serves as an ideal point on which to build the foundation of a Data Loss Prevention (DLP) and encryption strategy as well. In this hands-on lab, you will take a powerful first step toward a more comprehensive approach of data protection, configuring Symantec Messaging Gateway to work with Symantec Network Prevent. This configuration takes advantage of the integrated DLP Connect options built into the Messaging Gateway. It also utilizes the advanced content filtering module to enforce actions determined by Symantec DLP. This lab assumes a prerequisite knowledge of the Symantec Messaging Gateway and Symantec Network Prevent for Email. At the end of this lab, you should be able to Understand the benefits of integrating the Messaging Gateway with Data Loss Prevention (Network Prevent for Email) Determine the key configuration requirements for integrating the Messaging Gateway and Data Loss Prevention (Network Prevent for Email) Properly configure the integration between the Messaging Gateway and Data Loss Prevention (Network Prevent for Email)
Transcript of IC L06 - Symantec Messaging Gateway (SMG) and Symantec ...
IC L06 - Symantec Messaging Gateway (SMG) and Symantec Data Loss Prevention (DLP): control confidential data loss with "single pane of glass" management Hands-On Lab
Description The messaging gateway has emerged as a key point of control for managing an information risk and security strategy. With its key functions of message filtering and security, the messaging gateway serves as an ideal point on which to build the foundation of a Data Loss Prevention (DLP) and encryption strategy as well. In this hands-on lab, you will take a powerful first step toward a more comprehensive approach of data protection, configuring Symantec Messaging Gateway to work with Symantec Network Prevent. This configuration takes advantage of the integrated DLP Connect options built into the Messaging Gateway. It also utilizes the advanced content filtering module to enforce actions determined by Symantec DLP.
This lab assumes a prerequisite knowledge of the Symantec Messaging Gateway and Symantec Network Prevent for Email.
At the end of this lab, you should be able to
Understand the benefits of integrating the Messaging Gateway with Data Loss Prevention (Network Prevent for Email)
Determine the key configuration requirements for integrating the Messaging Gateway and Data Loss Prevention (Network Prevent for Email)
Properly configure the integration between the Messaging Gateway and Data Loss Prevention (Network Prevent for Email)

2 of 23
Notes A brief presentation will introduce this lab session and discuss key concepts.
The lab will be directed and provide you with step-by-step walkthroughs of key features.
Feel free to follow the lab using the instructions on the following pages. You can optionally perform this lab at your own pace.
Be sure to ask your instructor any questions you may have.
Thank you for coming to our lab session.
About The Virtual Machines
The messaging security environment leverages virtual machines configured to demonstrate the value of the integration and provide a platform for training and testing.
There are four virtual machine images that will be required that are listed below.
Virtual Machines
Name & Resources Description Username and Password
EnforcedemoX64(v11)
Disk: 60GB
RAM: 4GB
This image runs the Enforce platform and Network Prevent for SMTP. In addition it functions as the external server and mail host. After filtering, the SMG products will relay outbound messages to this host.
OS: Administrator/Symc4now! Enforce*: Administrator/ Symc4now!
*UI is available via browser favorites and https://enforcedemo64. Password for all users: Symc4now!
Symantec Messaging Gateway
Disk: 90GB
RAM: 1.3GB
Symantec Messaging Gateway Virtual Edition, this image runs version 10.0 of the appliance software
SMG UI: admin/ Symc4now!
Window 7x86(V11)
Disk: 16GB
RAM: 1GB
This image will be used to send test messages to the Messaging Gateway to trigger the encryption policy. In
OS: Joe/ Symc4now!
Outlook Users: [email protected] (internal) & [email protected]

3 of 23
addition it will be used to verify and retrieve the protected message.
(external)
Part 1: Symantec Network Prevent Configuration
Network Prevent Server (Email) monitors and analyses outbound email traffic and (optionally) blocks, redirects, or modifies email messages as specified in the policies. When integrating with Symantec Messaging Gateway, you should configure Network Prevent to modify the message header and allow SMG to enforce the necessary action. Configuring Network Prevent will require the following two steps:
Task1: Configure Network Prevent for reflecting mode
In reflecting mode, the Network Prevent Server (Email) acts as an SMTP proxy. It receives messages from an MTA, analyses them, and then sends them back to the same MTA.
1. Log into the EnforcedemoX64(V11) console with the following:
Username: Acme\Administrator
Password: Symc4now!
2. Open Internet Explorer. 3. The DLP Enforce UI should be the homepage, if not then go to:
https://enforcedemox64/ProtectManager/Navigate.do?menuID=default
4. Log into the Enforce UI with the following:
Username: Administrator
Password: Symc4now!
5. Select the System tab, under Servers, click on “Add Server” to add a new Network Prevent local Detection Server.
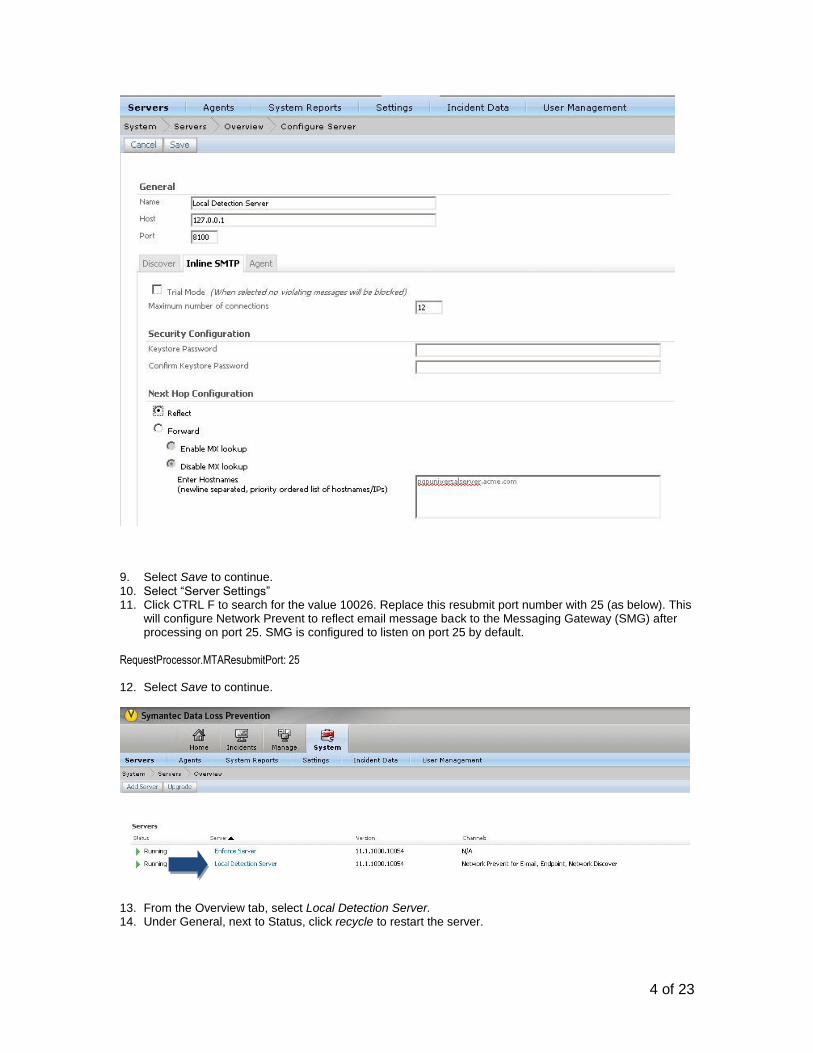
6. Choose Network Prevent for Email as the type of server to add then click on Next> 7. Enter the name Local Detection Server, and select the “Same as Enforce (single-tier install)” checkbox 8. Under Next Hop Configuration, select the Reflect radio button.
4 of 23
9. Select Save to continue.
10. Select “Server Settings” 11. Click CTRL F to search for the value 10026. Replace this resubmit port number with 25 (as below). This
will configure Network Prevent to reflect email message back to the Messaging Gateway (SMG) after processing on port 25. SMG is configured to listen on port 25 by default.
RequestProcessor.MTAResubmitPort: 25 12. Select Save to continue.
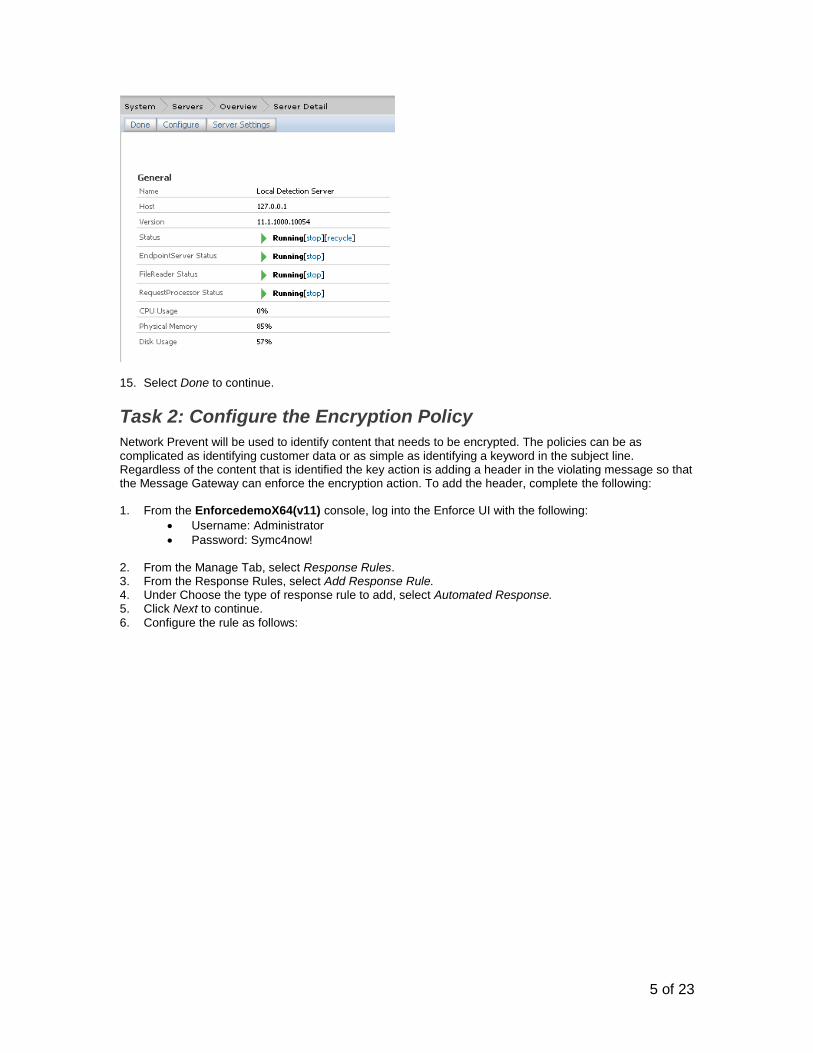
13. From the Overview tab, select Local Detection Server. 14. Under General, next to Status, click recycle to restart the server.
5 of 23
15. Select Done to continue.
Task 2: Configure the Encryption Policy
Network Prevent will be used to identify content that needs to be encrypted. The policies can be as complicated as identifying customer data or as simple as identifying a keyword in the subject line. Regardless of the content that is identified the key action is adding a header in the violating message so that the Message Gateway can enforce the encryption action. To add the header, complete the following: 1. From the EnforcedemoX64(v11) console, log into the Enforce UI with the following:
Username: Administrator
Password: Symc4now!
2. From the Manage Tab, select Response Rules. 3. From the Response Rules, select Add Response Rule. 4. Under Choose the type of response rule to add, select Automated Response. 5. Click Next to continue.
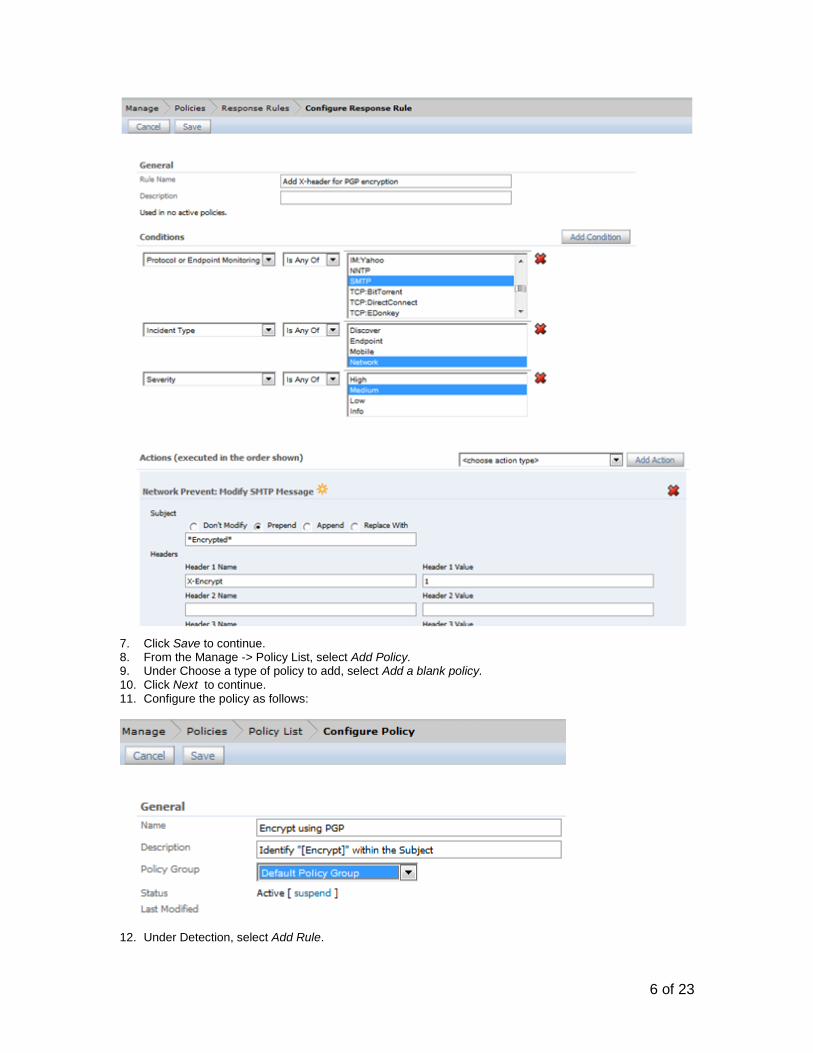
6. Configure the rule as follows:
6 of 23
7. Click Save to continue. 8. From the Manage -> Policy List, select Add Policy. 9. Under Choose a type of policy to add, select Add a blank policy. 10. Click Next to continue. 11. Configure the policy as follows:
12. Under Detection, select Add Rule.

7 of 23
13. Under Rule Type -> Content, select Content Matches Keyword 14. Click Next to continue. 15. Configure the rule as follows:
16. Click OK to continue. 17. Select the Response tab. 18. From the drop down box, select the rule, Add X-header for PGP encryption

8 of 23
Task 2b: Configure an EDM Encryption Policy
*(- you will only execute this rule if you have time at the end of the lab)*
Network Prevent will be used to identify content that needs to be encrypted or Blocked using an EDM policy. The policies can be as complicated as identifying customer data or as simple as identifying a keyword in the subject line. Regardless of the content that is identified the key action is adding a header in the violating message so that the Message Gateway can enforce the encryption action. To add the header, complete the following: 1. From the EnforcedemoX64(v11) console, log into the Enforce UI with the following:
a. Username: Administrator b. Password: Symc4now!
2. From the Manage Tab, select Policy List. 3. From the list click on the policy Credit Card Data. 4. Under General, next to Status, click on Activate.
5. Click OK to continue 6. Under General, select the Response tab. 7. From the drop down box, select the rule, Add X-header for PGP encryption

9 of 23
8. Click Add Response Rule to continue. 9. Click Save to continue.
Congratulations, you have completed Part 1!
Part 2: Symantec Messaging Gateway Configuration
The Messaging Gateway is used to manage routing of all messages destined to either the DLP or PGP servers. In addition as a good best practice it should be the main email gateway that sends messages to the Internet. The Messaging Gateway is designed for direct integration with DLP and users can enable the DLP Connect option to route all outbound messages automatically. However when integrating with PGP, users will need to configure policy routes leveraging the advanced content filtering engine within SMG. To complete the integration we will need to enable the DLP Connect option and configure content filtering policies by referencing information in Part 1 and 2.
Task1: Enable DLP Connect
When enabling DLP Connect, all outbound messages will be routed to the Network Prevent server. To enable DLP connect complete the following tasks.
1. From the EnforcedemoX64(v11) console, open Internet Explorer. 2. Go to Symantec Messaging Gateway favorites link in Firefox or type https://sms.acme.com
3. Log into the SMG UI with the following:
Username: admin
Password: Symc4now!
4. From the Content Tab, under Settings, select DLP Connect. 5. Edit the DLP Connect settings as follows:

10 of 23
6. Click Save continue. 7. Click on the “Enforce Server Access” tab. 8. Configure the settings as shown, using the password: Symc4now!

11 of 23
Task2: Create a Policy to Route Messages to Encryption Quarantine
For outbound filtering, leveraging SMG, DLP and PGP two policies will be required. Since all outbound mail is automatically routed to Network Prevent, you will not need to create a policy to route mail to Network Prevent. However, when the message is sent back from Network Prevent, the Messaging Gateway will need to enforce the action determined by Network Prevent. In this case if the header that we configured in Part 1 is inserted into the message, SMG will need to route that message to PGP for encryption. Since integration with PGP is outside the scope of this lab, we will send the message to a quarantine folder, and configure an action to route the message once it is approved, similar to the routing of the message to PGP:
1. Go to the SMG UI, https://sms.acme.com
2. Log into the SMG UI with the following:
Username: admin
Password: Symc4now! 3. From the Content Tab, under Policies, select Email. 4. Under Email Content Filtering Policies, select Add. 5. Under Content Filtering Police Templates, select Blank and click Select to continue. 6. Edit the first part of the Email Content Filtering Policy as follows:

12 of 23
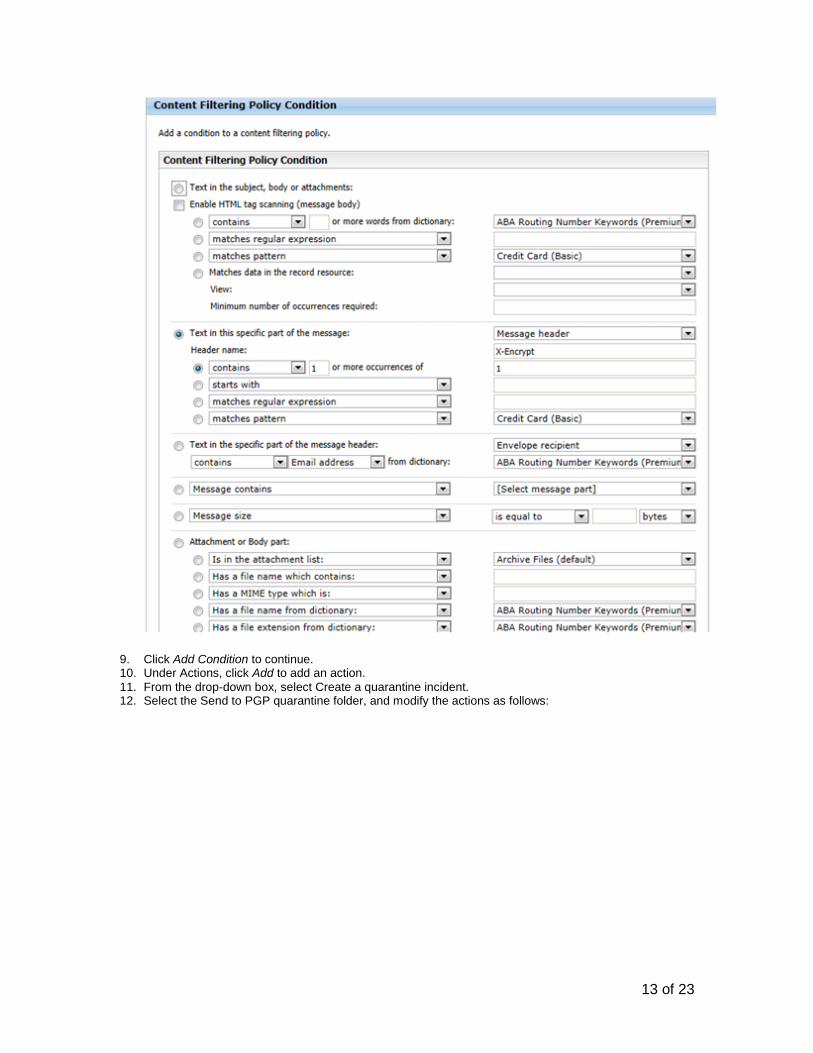
7. Under Conditions, click Add to customize the condition builder. 8. Based on Part 1, edit the Content Filtering Policy Condition as follows:
13 of 23
9. Click Add Condition to continue. 10. Under Actions, click Add to add an action.
11. From the drop-down box, select Create a quarantine incident. 12. Select the Send to PGP quarantine folder, and modify the actions as follows:
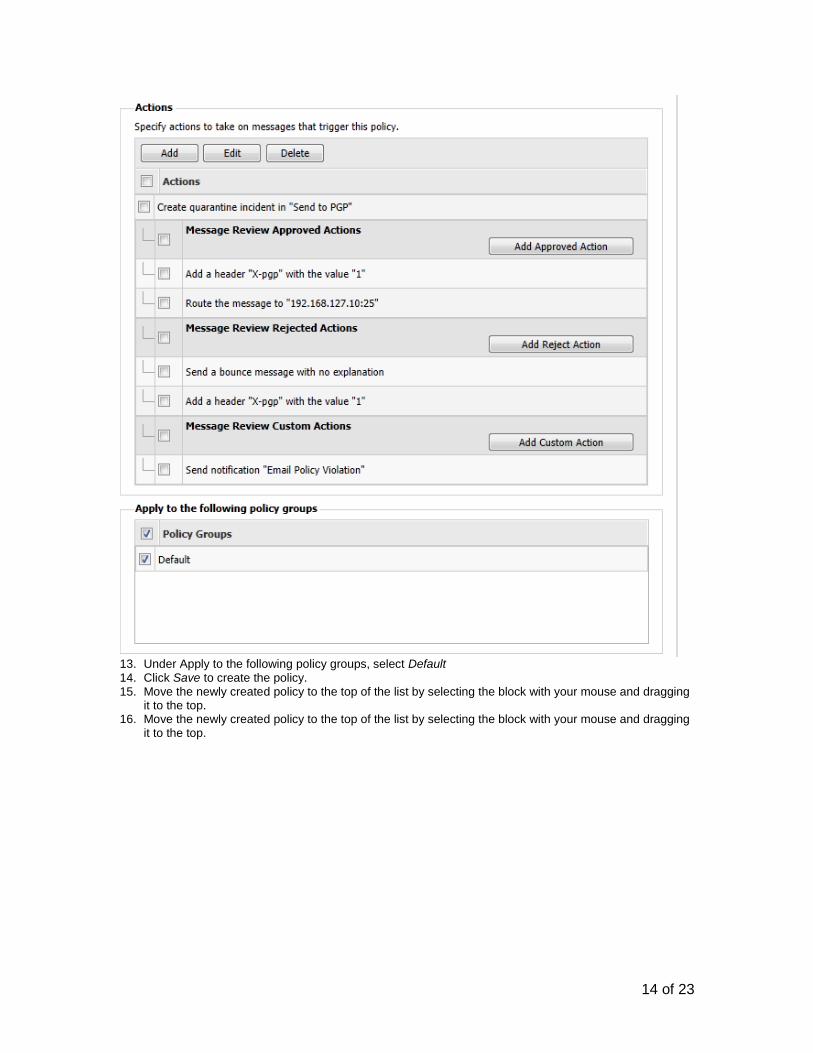
14 of 23
13. Under Apply to the following policy groups, select Default 14. Click Save to create the policy. 15. Move the newly created policy to the top of the list by selecting the block with your mouse and dragging
it to the top. 16. Move the newly created policy to the top of the list by selecting the block with your mouse and dragging
it to the top.

15 of 23
Task3: Create a Policy to Prevent a Mail Loop with PGP
The second policy is required to prevent a mail loop with PGP. In a typical production scenario all messages should be routed to the Messaging Gateway for final delivery to the Internet. When a message is routed from SMG to PGP, PGP will either generate a notification that a message has been encrypted or encrypt the original message and send it to the Messaging Gateway. In this scenario SMG may detect that the message contains the original header of X-Encrypt and resend that message back to PGP. To ensure that messages received by PGP are not sent back, create the following policy:
1. Go to the SMG UI, https://sms.acme.com
2. Log into the SMG UI with the following:
Username: admin
Password: Symc4now!
3. From the Content Tab, under Policies, select Email. 4. Under Email Content Filtering Policies, select Add. 5. Under Content Filtering Police Templates, select Blank and click Select to continue. 6. Edit the first part of the Email Content Filtering Policy as follows:
7. Under Conditions, click Add to customize the condition builder.
8. Edit the Content Filtering Policy Condition as follows:
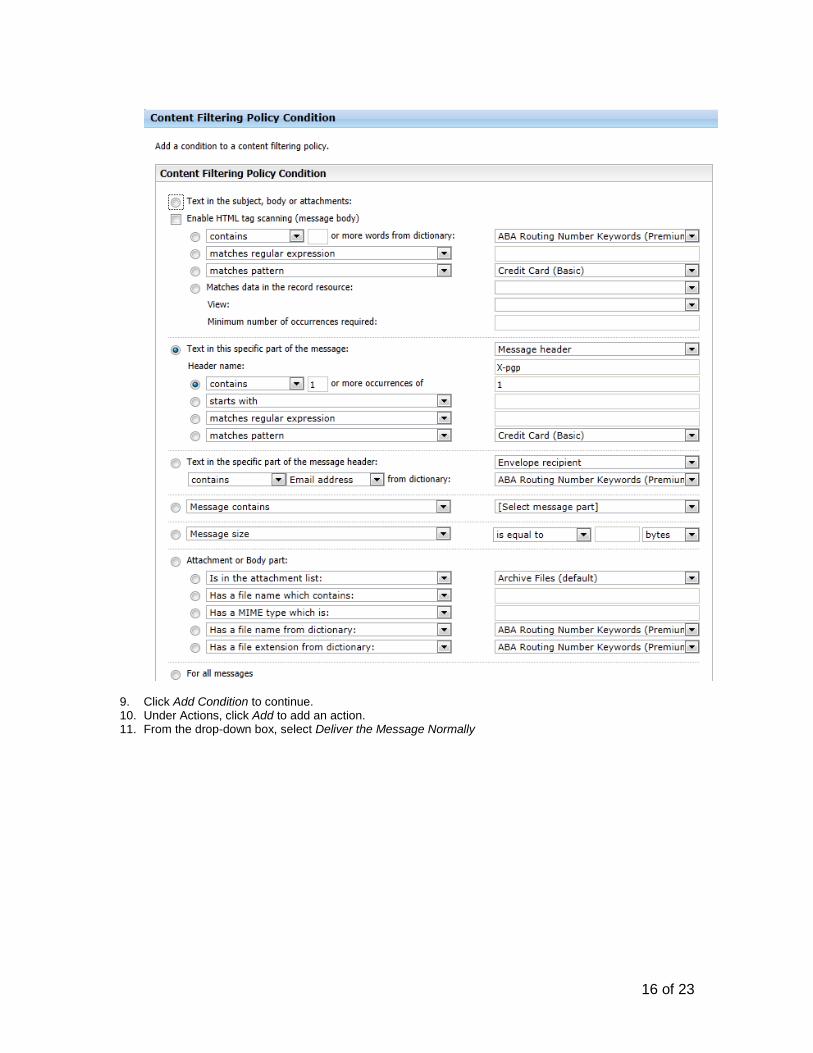
16 of 23
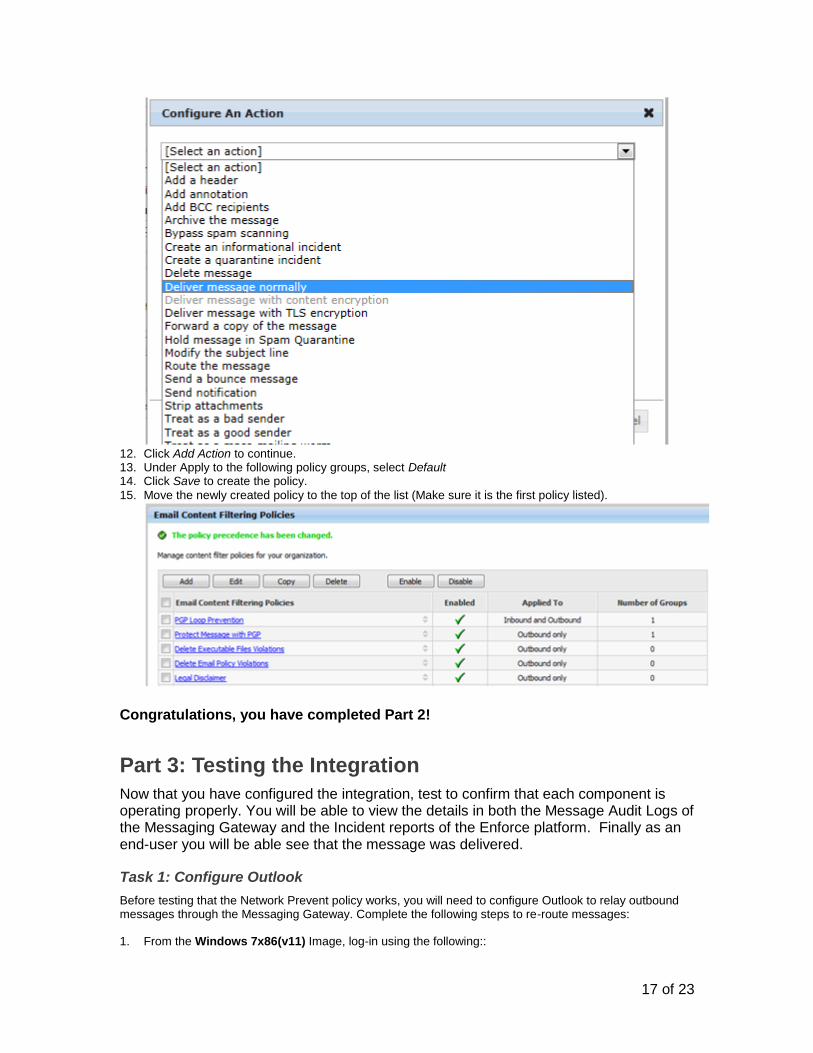
9. Click Add Condition to continue. 10. Under Actions, click Add to add an action. 11. From the drop-down box, select Deliver the Message Normally
17 of 23
12. Click Add Action to continue. 13. Under Apply to the following policy groups, select Default 14. Click Save to create the policy.
15. Move the newly created policy to the top of the list (Make sure it is the first policy listed).
Congratulations, you have completed Part 2!
Part 3: Testing the Integration
Now that you have configured the integration, test to confirm that each component is operating properly. You will be able to view the details in both the Message Audit Logs of the Messaging Gateway and the Incident reports of the Enforce platform. Finally as an end-user you will be able see that the message was delivered.
Task 1: Configure Outlook
Before testing that the Network Prevent policy works, you will need to configure Outlook to relay outbound messages through the Messaging Gateway. Complete the following steps to re-route messages: 1. From the Windows 7x86(v11) Image, log-in using the following::
18 of 23
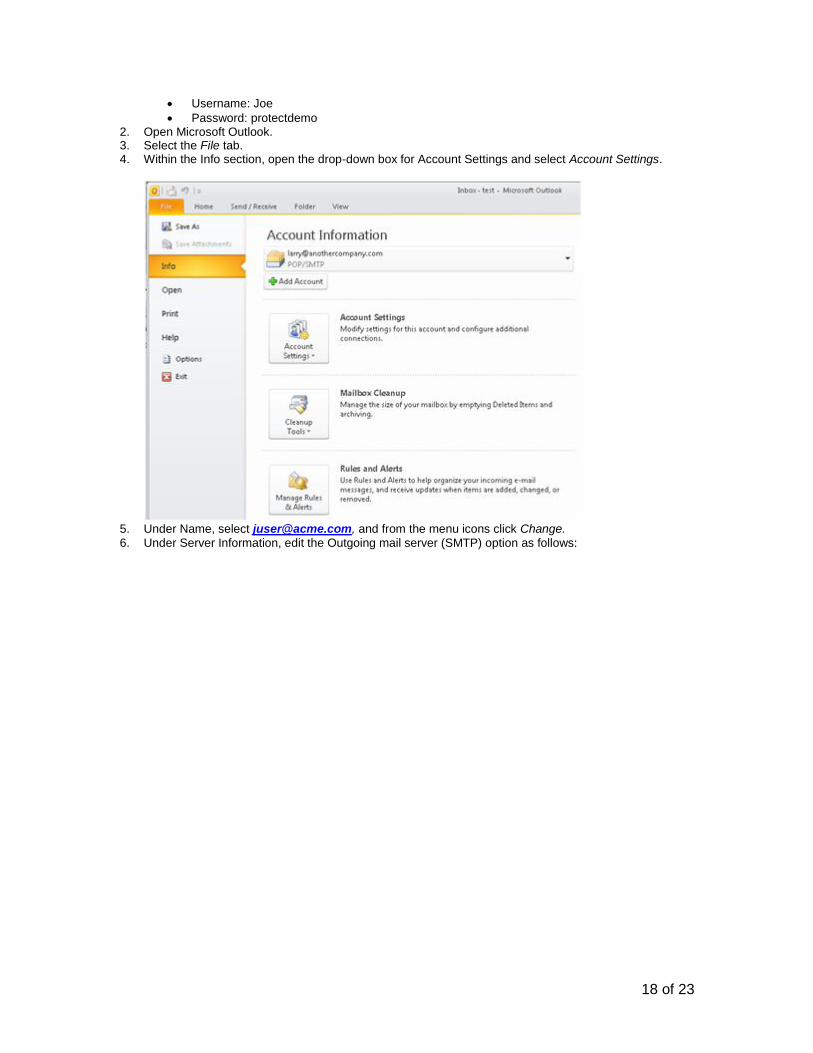
Username: Joe
Password: protectdemo 2. Open Microsoft Outlook. 3. Select the File tab. 4. Within the Info section, open the drop-down box for Account Settings and select Account Settings.
5. Under Name, select [email protected], and from the menu icons click Change.
6. Under Server Information, edit the Outgoing mail server (SMTP) option as follows:

19 of 23
7. Click Next to continue. 8. Click Finish to continue, and close the Account Settings pop-up.
Task 2: Message Route Test
You should be able to send a message to test that mail is relayed through the Messaging Gateway. Using Microsoft Outlook and the user Joe User, send a test message to [email protected]. This test is intended to simulate outbound mail going where [email protected] is the internal user and [email protected] is the external user. Complete this task as follows:
1. From the Microsoft Outlook, click New E-mail. 2. Edit the email as follows:
3. Click Send to continue. 4. You have two options to help verify that the message was routed properly:
a) From Microsoft Outlook. i. Go to [email protected]’s Inbox
20 of 23
ii. From the ribbon click on Send/Receive All Folders. The message should arrive in the inbox.
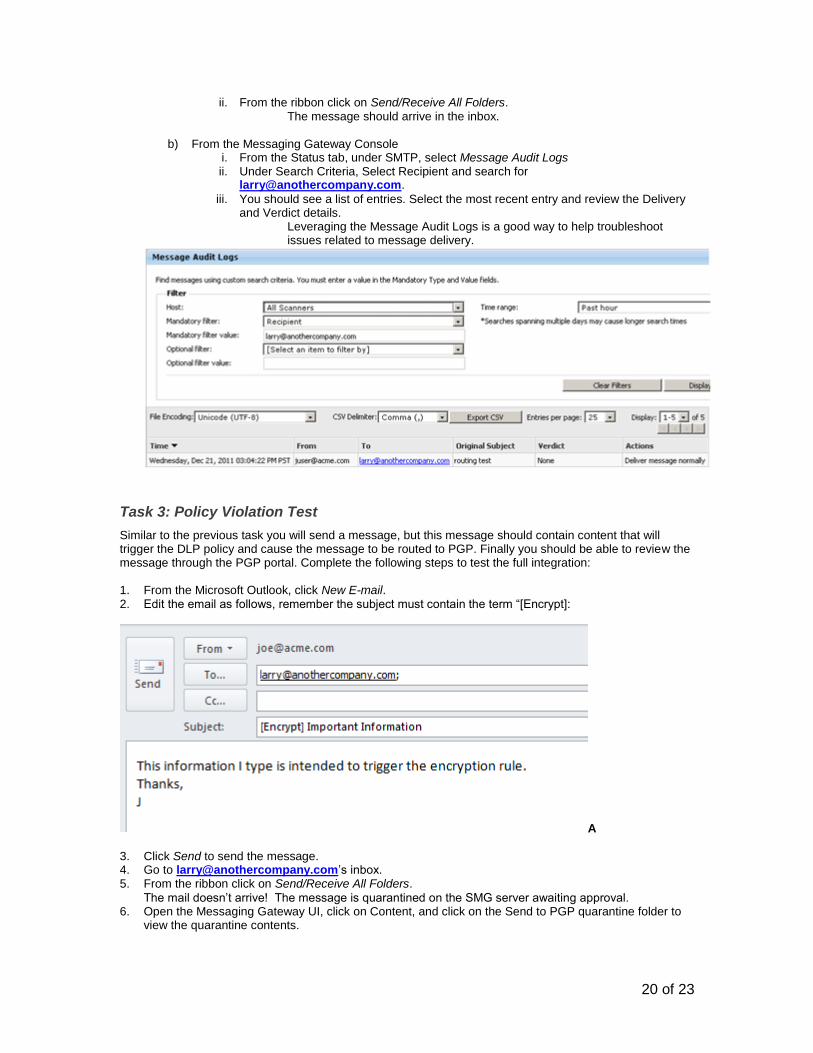
b) From the Messaging Gateway Console
i. From the Status tab, under SMTP, select Message Audit Logs ii. Under Search Criteria, Select Recipient and search for
iii. You should see a list of entries. Select the most recent entry and review the Delivery and Verdict details.
Leveraging the Message Audit Logs is a good way to help troubleshoot issues related to message delivery.
Task 3: Policy Violation Test
Similar to the previous task you will send a message, but this message should contain content that will trigger the DLP policy and cause the message to be routed to PGP. Finally you should be able to review the message through the PGP portal. Complete the following steps to test the full integration: 1. From the Microsoft Outlook, click New E-mail. 2. Edit the email as follows, remember the subject must contain the term “[Encrypt]:
A
3. Click Send to send the message. 4. Go to [email protected]’s inbox. 5. From the ribbon click on Send/Receive All Folders.
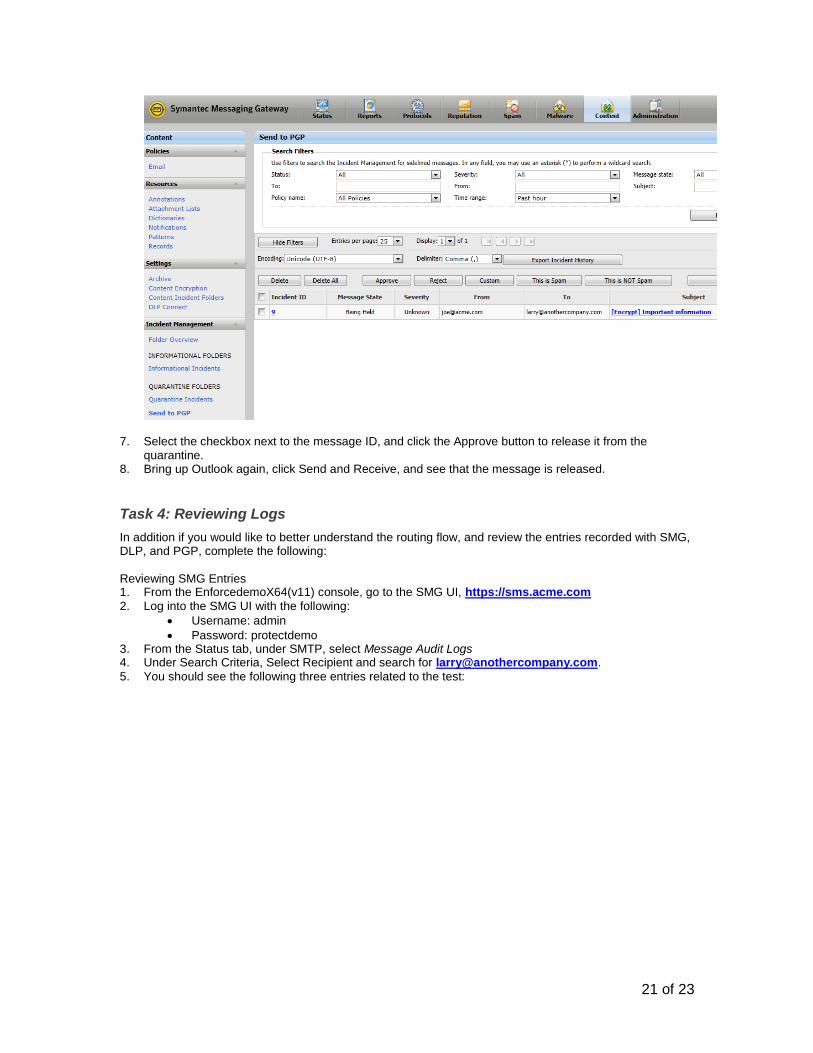
The mail doesn’t arrive! The message is quarantined on the SMG server awaiting approval. 6. Open the Messaging Gateway UI, click on Content, and click on the Send to PGP quarantine folder to
view the quarantine contents.
21 of 23
7. Select the checkbox next to the message ID, and click the Approve button to release it from the quarantine.
8. Bring up Outlook again, click Send and Receive, and see that the message is released.
Task 4: Reviewing Logs
In addition if you would like to better understand the routing flow, and review the entries recorded with SMG, DLP, and PGP, complete the following:
Reviewing SMG Entries 1. From the EnforcedemoX64(v11) console, go to the SMG UI, https://sms.acme.com
2. Log into the SMG UI with the following:
Username: admin
Password: protectdemo 3. From the Status tab, under SMTP, select Message Audit Logs 4. Under Search Criteria, Select Recipient and search for [email protected].
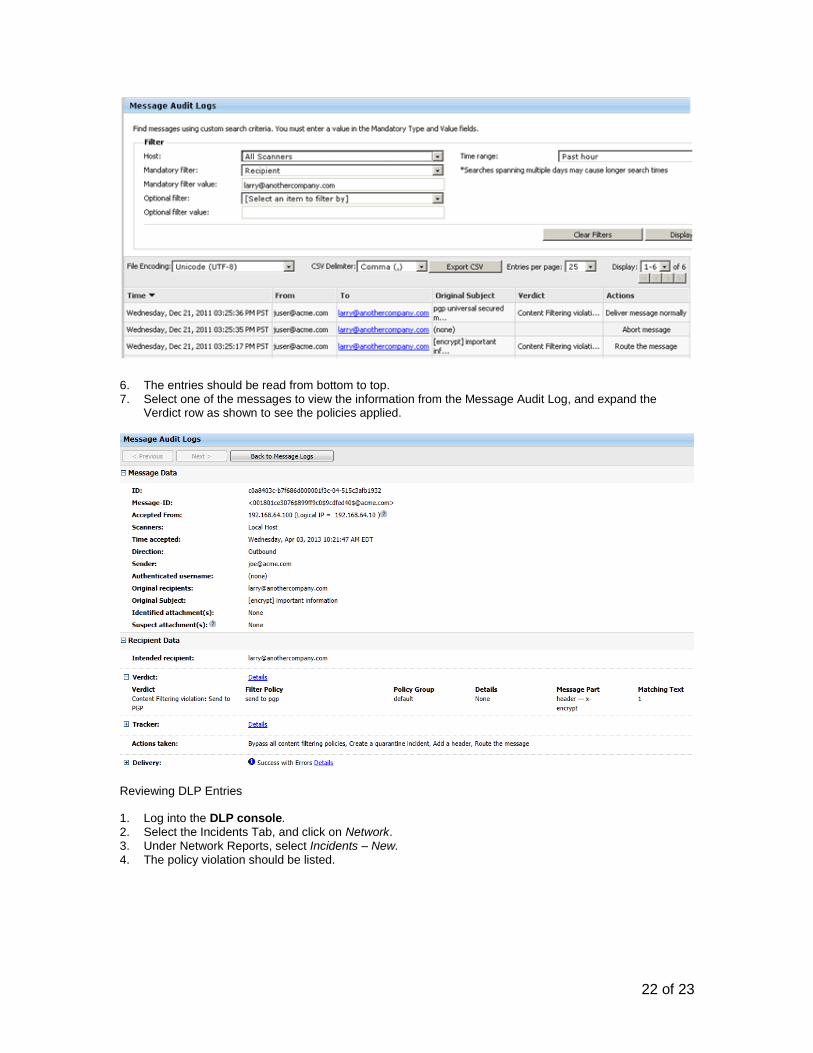
5. You should see the following three entries related to the test:
22 of 23
6. The entries should be read from bottom to top. 7. Select one of the messages to view the information from the Message Audit Log, and expand the
Verdict row as shown to see the policies applied.
Reviewing DLP Entries
1. Log into the DLP console. 2. Select the Incidents Tab, and click on Network. 3. Under Network Reports, select Incidents – New. 4. The policy violation should be listed.

23 of 23
5. Click on the current violation to review its details.
Congratulations, you have completed Part 3!
If you have time try triggering the Credit Card auto encrypt and block rules…
Task 4: Customer Data (EDM) Policy Violation Test
Similar to the previous task you will send a message, but this message should contain content that will trigger the Customer Data (EDM) Medium Severity policy and cause the message to be routed to PGP. 1. From the Microsoft Outlook, click New E-mail. 2. As before address the email to Larry Outsider but this time attach the Excel document :Customer Credit
Card Info-High Sev”. 3. Add subject line: Customer Data 1 4. Click Send to send the message. 5. As before, check the SMG quarantine to find that the message has been detected.