iBORESCOPE - pim-resources.coleparmer.com · immediately by text, or shared later by e-mail or...
20
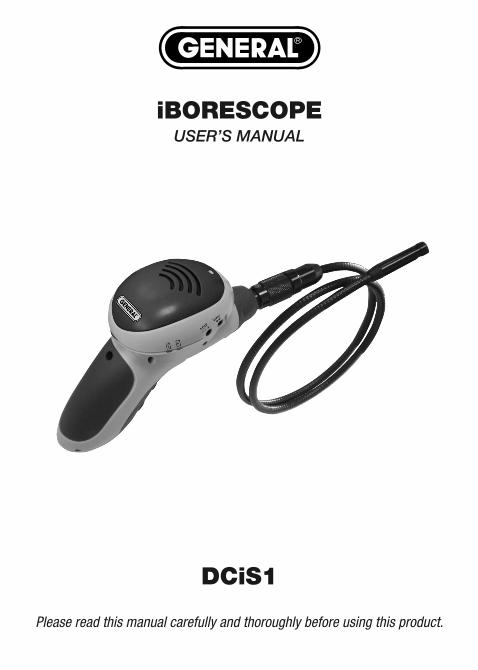
iBORESCOPE USER’S MANUAL DCiS1 Please read this manual carefully and thoroughly before using this product.
-
Upload
hoangkhuong -
Category
Documents
-
view
215 -
download
0
Transcript of iBORESCOPE - pim-resources.coleparmer.com · immediately by text, or shared later by e-mail or...
iBORESCOPEUSER’S MANUAL
DCiS1
Please read this manual carefully and thoroughly before using this product.
TABLE OF CONTENTS
Introduction . . . . . . . . . . . . . . . . . . . . . . . . . . . . . . . . . . . . . . . . . . 3
Key Features . . . . . . . . . . . . . . . . . . . . . . . . . . . . . . . . . . . . . . 3 – 4
Safety Instructions . . . . . . . . . . . . . . . . . . . . . . . . . . . . . . . . . . . . . 4
What’s in the Case . . . . . . . . . . . . . . . . . . . . . . . . . . . . . . . . . . . . . 4
Product Overview . . . . . . . . . . . . . . . . . . . . . . . . . . . . . . . . . . . 4 – 5
Setup Instructions . . . . . . . . . . . . . . . . . . . . . . . . . . . . . . . . . . 6 – 7
Charge the Battery . . . . . . . . . . . . . . . . . . . . . . . . . . . . . . . . 6
Download the App (Apple iOS and Android Devices) . . . . . . . 7
Operating Instructions—Apple iOS Platform . . . . . . . . . . . . . 8 – 11
Viewing Live Video . . . . . . . . . . . . . . . . . . . . . . . . . . . . . . . . . 8
Taking and Viewing Photos. . . . . . . . . . . . . . . . . . . . . . . . . . . 9
Recording and Playing Back Videos . . . . . . . . . . . . . . . . 9 – 10
Advanced Settings . . . . . . . . . . . . . . . . . . . . . . . . . . . . . . . . 11
Operating Instructions—Android Platform . . . . . . . . . . . . . . 11 – 16
Viewing Live Video . . . . . . . . . . . . . . . . . . . . . . . . . . . . 11 – 12
Taking and Viewing Photos. . . . . . . . . . . . . . . . . . . . . . . . . . 12
Recording and Playing Back Videos . . . . . . . . . . . . . . . . . . . 13
Advanced Settings . . . . . . . . . . . . . . . . . . . . . . . . . . . . 14 – 16
Using the Probe. . . . . . . . . . . . . . . . . . . . . . . . . . . . . . . . . . . . . . . 17
Installing Accessories . . . . . . . . . . . . . . . . . . . . . . . . . . . . . . 17 – 18
Specifications . . . . . . . . . . . . . . . . . . . . . . . . . . . . . . . . . . . . . . . 18
Operating & Maintenance Tips . . . . . . . . . . . . . . . . . . . . . . . . . . . 19
Warranty Information . . . . . . . . . . . . . . . . . . . . . . . . . . . . . . 19 – 20
Return for Repair Policy . . . . . . . . . . . . . . . . . . . . . . . . . . . . . . . . 20
2
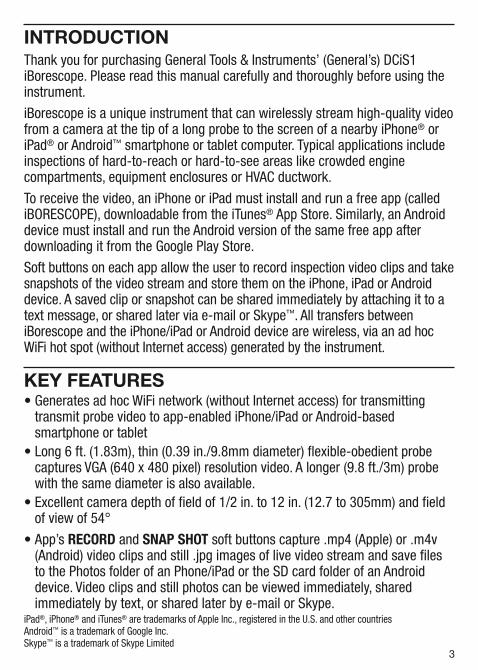
INTRODUCTIONThank you for purchasing General Tools & Instruments’ (General’s) DCiS1iBorescope. Please read this manual carefully and thoroughly before using theinstrument.
iBorescope is a unique instrument that can wirelessly stream high-quality videofrom a camera at the tip of a long probe to the screen of a nearby iPhone® oriPad® or Android™ smartphone or tablet computer. Typical applications includeinspections of hard-to-reach or hard-to-see areas like crowded enginecompartments, equipment enclosures or HVAC ductwork.
To receive the video, an iPhone or iPad must install and run a free app (callediBORESCOPE), downloadable from the iTunes® App Store. Similarly, an Androiddevice must install and run the Android version of the same free app afterdownloading it from the Google Play Store.
Soft buttons on each app allow the user to record inspection video clips and takesnapshots of the video stream and store them on the iPhone, iPad or Androiddevice. A saved clip or snapshot can be shared immediately by attaching it to atext message, or shared later via e-mail or Skype™. All transfers betweeniBorescope and the iPhone/iPad or Android device are wireless, via an ad hocWiFi hot spot (without Internet access) generated by the instrument.
KEY FEATURES• Generates ad hoc WiFi network (without Internet access) for transmittingtransmit probe video to app-enabled iPhone/iPad or Android-basedsmartphone or tablet
• Long 6 ft. (1.83m), thin (0.39 in./9.8mm diameter) flexible-obedient probecaptures VGA (640 x 480 pixel) resolution video. A longer (9.8 ft./3m) probewith the same diameter is also available.
• Excellent camera depth of field of 1/2 in. to 12 in. (12.7 to 305mm) and fieldof view of 54°
• App’s RECORD and SNAP SHOT soft buttons capture .mp4 (Apple) or .m4v(Android) video clips and still .jpg images of live video stream and save filesto the Photos folder of an Phone/iPad or the SD card folder of an Androiddevice. Video clips and still photos can be viewed immediately, sharedimmediately by text, or shared later by e-mail or Skype.
3
iPad®, iPhone® and iTunes® are trademarks of Apple Inc., registered in the U.S. and other countries Android™ is a trademark of Google Inc. Skype™ is a trademark of Skype Limited

• Non-replaceable Li-ion battery charges through included USB cable(compatible with iPhone/iPad/Android Power Adapter and all computers). Fullcharge is good for three hours of operation.
• Thumbwheel on pistol grip controls camera lighting• Apple app allows adjustment of video attributes (brightness, contrast, hue,saturation); Android app allows adjustment of video resolution
• Video Out jack and cable and Low Battery indicator• Includes three useful probe tip accessories (45° mirror, pickup hook,magnetic pickup)
SAFETY INSTRUCTIONS• WARNING! •
Do not use iBorescope to inspect spaces or enclosures known or suspected tocontain live electrical wiring.
WHAT’S IN THE CASEThe iBorescope’s grip and probe come pre-attached in a protective hard plasticcase along with a USB charging cable (compatible with the iPhone/iPad/AndroidPower Adapter and all computers), a video cable, three probe tip accessories (a 45° mirror, a magnetic pickup and a pickup hook) and this user’s manual.
PRODUCT OVERVIEWFig. 1 shows the controls, indicators and physical features of the iBorescopeinstrument. Fig. 2 shows the unit’s standard accessories. Familiarize yourselfwith the names and functions of all components before moving on to the SetupInstructions and Operating Instructions.
110
6
7
5 4
32
8
9
4
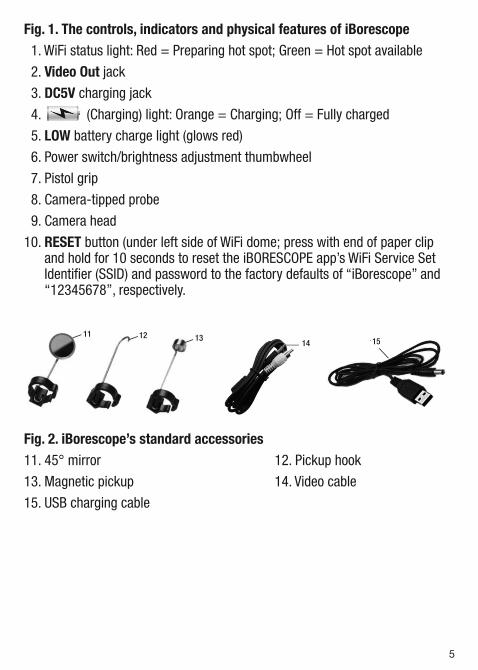
Fig. 1. The controls, indicators and physical features of iBorescope1. WiFi status light: Red = Preparing hot spot; Green = Hot spot available
2. Video Out jack 3. DC5V charging jack 4. (Charging) light: Orange = Charging; Off = Fully charged
5. LOW battery charge light (glows red)
6. Power switch/brightness adjustment thumbwheel
7. Pistol grip
8. Camera-tipped probe
9. Camera head
10. RESET button (under left side of WiFi dome; press with end of paper clipand hold for 10 seconds to reset the iBORESCOPE app’s WiFi Service SetIdentifier (SSID) and password to the factory defaults of “iBorescope” and“12345678”, respectively.
Fig. 2. iBorescope’s standard accessories11. 45° mirror 12. Pickup hook
13. Magnetic pickup 14. Video cable
15. USB charging cable
5
11 12 1314 15
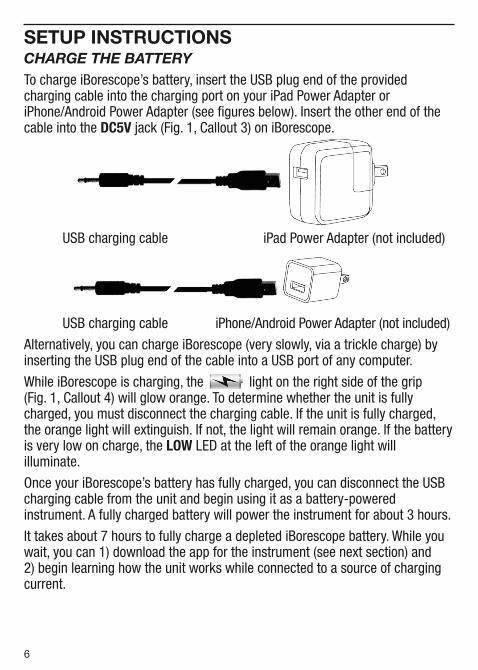
SETUP INSTRUCTIONSCHARGE THE BATTERYTo charge iBorescope’s battery, insert the USB plug end of the providedcharging cable into the charging port on your iPad Power Adapter oriPhone/Android Power Adapter (see figures below). Insert the other end of thecable into the DC5V jack (Fig. 1, Callout 3) on iBorescope.
USB charging cable iPad Power Adapter (not included)
USB charging cable iPhone/Android Power Adapter (not included)
Alternatively, you can charge iBorescope (very slowly, via a trickle charge) byinserting the USB plug end of the cable into a USB port of any computer.
While iBorescope is charging, the light on the right side of the grip (Fig. 1, Callout 4) will glow orange. To determine whether the unit is fullycharged, you must disconnect the charging cable. If the unit is fully charged,the orange light will extinguish. If not, the light will remain orange. If the batteryis very low on charge, the LOW LED at the left of the orange light willilluminate.
Once your iBorescope’s battery has fully charged, you can disconnect the USBcharging cable from the unit and begin using it as a battery-poweredinstrument. A fully charged battery will power the instrument for about 3 hours.
It takes about 7 hours to fully charge a depleted iBorescope battery. While youwait, you can 1) download the app for the instrument (see next section) and 2) begin learning how the unit works while connected to a source of chargingcurrent.
6
DOWNLOAD THE APP (APPLE iOS AND ANDROID DEVICES)To download the free Apple app that enables iBorescope (the instrument),first make sure that your iPhone or iPad is connected to the Internet. Thentouch the App Store icon to visit the Apple App Store. Then enter “iBorescope”in the Search box. When iBorescope’s landing page appears, touch the FreeApp link at the upper left of the page.You will be prompted to sign in to the iTunes Store using your Apple ID andpassword. If you do not have an Apple ID, you can create one now.
Before downloading the app, you will be shown Apple’s Privacy Policy page.Select the box indicating that “I have read and agree to these terms andconditions.” Then touch Agree. Doing so will return you to the landing page ofthe iBorescope app and begin downloading it.
To download the free Android app that enables iBorescope (the instrument):1. Make sure that your device is connected to the Internet.
2. Go to the Google Play Store and enter “iBorescope” in the Search box at thetop of the store’s home page.
3. On the APPS screen that appears next, touch the iBORESCOPE Teamforceicon.
4. On the iBORESCOPE app’s landing page that appears next, touch the Installbutton at upper right.
5. On the next screen, touch the “Accept & download” button.
6. While the app downloads, on the following screen check the “Allowautomatic updating”box
The installation should take less than a minute. Installation is complete whenyou receive a notification that “iBORESCOPE [has been] “Successfullyinstalled.”
To activate the iBORESCOPE app and begin displaying inspection video on yourApple iOS or Android device, you must disconnect from the Internet andestablish connectivity between your device and iBorescope's ad hoc WiFinetwork by following the Operating Instructions for your platform in the nextsection.
7
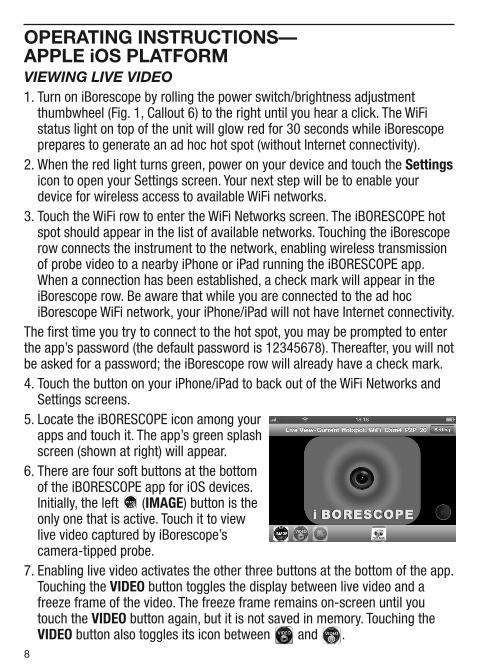
OPERATING INSTRUCTIONS—APPLE iOS PLATFORMVIEWING LIVE VIDEO1. Turn on iBorescope by rolling the power switch/brightness adjustmentthumbwheel (Fig. 1, Callout 6) to the right until you hear a click. The WiFistatus light on top of the unit will glow red for 30 seconds while iBorescopeprepares to generate an ad hoc hot spot (without Internet connectivity).
2. When the red light turns green, power on your device and touch the Settingsicon to open your Settings screen. Your next step will be to enable yourdevice for wireless access to available WiFi networks.
3. Touch the WiFi row to enter the WiFi Networks screen. The iBORESCOPE hotspot should appear in the list of available networks. Touching the iBorescoperow connects the instrument to the network, enabling wireless transmissionof probe video to a nearby iPhone or iPad running the iBORESCOPE app. When a connection has been established, a check mark will appear in theiBorescope row. Be aware that while you are connected to the ad hociBorescope WiFi network, your iPhone/iPad will not have Internet connectivity.
The first time you try to connect to the hot spot, you may be prompted to enterthe app’s password (the default password is 12345678). Thereafter, you will notbe asked for a password; the iBorescope row will already have a check mark.4. Touch the button on your iPhone/iPad to back out of the WiFi Networks andSettings screens.
5. Locate the iBORESCOPE icon among yourapps and touch it. The app’s green splashscreen (shown at right) will appear.
6. There are four soft buttons at the bottomof the iBORESCOPE app for iOS devices.Initially, the left (IMAGE) button is theonly one that is active. Touch it to viewlive video captured by iBorescope’scamera-tipped probe.
7. Enabling live video activates the other three buttons at the bottom of the app.Touching the VIDEO button toggles the display between live video and afreeze frame of the video. The freeze frame remains on-screen until youtouch the VIDEO button again, but it is not saved in memory. Touching theVIDEO button also toggles its icon between and .
8
TAKING AND VIEWING PHOTOS1. To save a still image (also called a screen grab) of live video or paused video,touch the SNAP SHOT soft button at the bottom of the app. The familiarsound of a camera shutter confirms that a picture was taken. Pictures arestored as .jpg files in the Camera Roll subfolder of the Photos folder of youriPhone/iPad.
2. To view your photos, touch the button on your device to back out of theiBORESCOPE app. Locate your Photos icon and select it. By default, all of thephotos you take with iBorescope are stored in the Camera Roll subfolder witha thumbnail view. Touch any thumbnail to expand the image to fill the screenof your iPhone/iPad using your preferred photo viewing app.
3. While your iPhone/iPad is connected to iBorescope’s ad hoc WiFi network,your mobile device will not have Internet access. So if you want to share anysnapshots immediately, you must do so by attaching them to text messagesyou send over your cellular network. After you have disconnected your devicefrom the iBorescope network, you can connect to another WiFi network withInternet access and share your pictures using e-mail or Skype.
RECORDING AND PLAYING BACK VIDEOSTo record a clip of live probe video appearing on your iPhone/iPad screen, touchthe soft (Record) button at the lower right of the app window. Pressing thebutton 1) causes the button to change color and begin flashing, 2) starts arunning clock indicating the clip’s duration so far on the left side of the window,and 3) begins to temporarily store an .avi video clip in the app. (To permanentlystore the clip in the Camera Roll subfolder of your iPad/iPhone’s Photos folder,see the instructions below for exporting video clips.)
To stop recording the video clip, touch the button again.
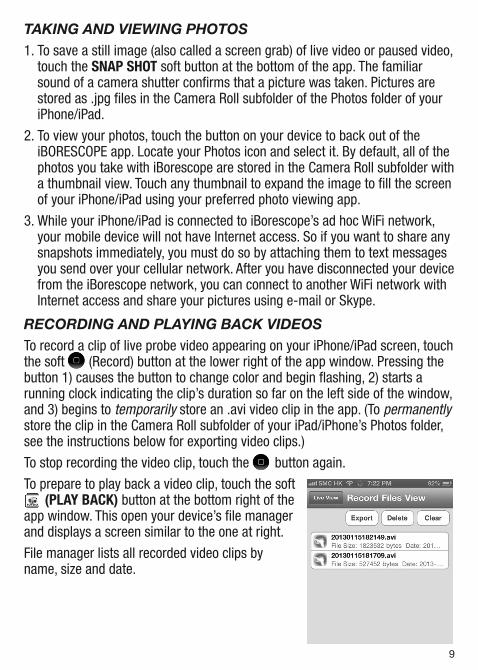
To prepare to play back a video clip, touch the soft(PLAY BACK) button at the bottom right of the
app window. This open your device’s file managerand displays a screen similar to the one at right.
File manager lists all recorded video clips by name, size and date.
9
To play back a video clip, touch its line.To delete a video clip:
1.Touch the Delete button in File Manager2. Apply a minus sign to the clip to be deleted
3. Touch the Trash button that appears4. Touch the Delete button again to return to normal view in File Manager
Another way to delete a video is to quickly swipe your finger over its listing witha motion from the right edge of the screen toward the center. This will causethe Trash button to appear. Touch it to delete the video clip.To delete all stored video clips, press the Clear button in File Manager.As mentioned earlier, video clips recorded using iOS devices are temporarilysaved as .avi files within the iBORESCOPE app. If you wish to view any clip afterclosing the app, share the clip with someone, or view the clip on another devicelater, you must “export” it. The process of exporting a clip permanently saves itto the Camera Roll subfolder of your iPad/iPhone’s Photos folder and changesits file type from .avi to .mp4. Video icons are attached to exported video clipsto distinguish them from stored images.
To export a video clip, touch the Export button in File Manager and select theclip by touching its listing. To confirm that you wish to proceed, touch the OKbutton on the next screen.
To attach an exported video clip to an e-mail message, you must first exitthe iBORESCOPE app and disconnect from the instrument’s ad hoc WiFi spot.Only then can you connect to a conventional WiFi hot spot with Internetconnectivity. Any stored .mp4 clip that you attach to an e-mail message isconverted to a .MOV file that—unlike the typical .MOV file—can be opened bythe PC platform’s most popular media player—Windows Media Viewer.
To exit File Manager and resume showing real-time video on your iPhone/iPadscreen, touch the Live View soft button at upper left.
10
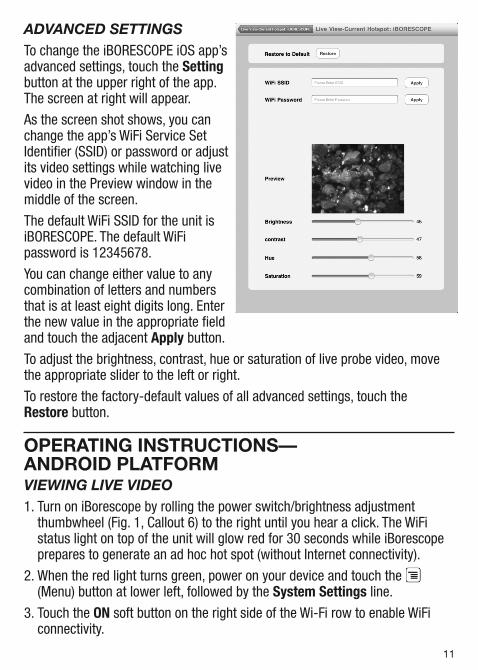
ADVANCED SETTINGSTo change the iBORESCOPE iOS app’sadvanced settings, touch the Settingbutton at the upper right of the app.The screen at right will appear.
As the screen shot shows, you canchange the app’s WiFi Service SetIdentifier (SSID) or password or adjustits video settings while watching livevideo in the Preview window in themiddle of the screen.
The default WiFi SSID for the unit isiBORESCOPE. The default WiFipassword is 12345678.
You can change either value to anycombination of letters and numbersthat is at least eight digits long. Enterthe new value in the appropriate fieldand touch the adjacent Apply button.To adjust the brightness, contrast, hue or saturation of live probe video, movethe appropriate slider to the left or right.
To restore the factory-default values of all advanced settings, touch theRestore button.
OPERATING INSTRUCTIONS—ANDROID PLATFORMVIEWING LIVE VIDEO1. Turn on iBorescope by rolling the power switch/brightness adjustmentthumbwheel (Fig. 1, Callout 6) to the right until you hear a click. The WiFistatus light on top of the unit will glow red for 30 seconds while iBorescopeprepares to generate an ad hoc hot spot (without Internet connectivity).
2. When the red light turns green, power on your device and touch the(Menu) button at lower left, followed by the System Settings line.
3. Touch the ON soft button on the right side of the Wi-Fi row to enable WiFiconnectivity.
11

4. Touch the left side of the Wi-Fi row to enter the Wi-Fi Networks screen.iBorescope’s hot spot should appear in the list of available networks. Touchthe iBORESCOPE row, and then the Connect soft button at the right of thenext screen. When “Connected” appears in the iBorescope row, your Androiddevice is ready to receive wireless transmissions of probe video. Be awarethat while you are connected to the ad hoc iBorescope WiFi network, yourdevice will not have Internet connectivity.
The first time you try to connect to the hot spot, you may be prompted to enterthe app’s password (the default password is 12345678). Thereafter, you will notbe asked for a password; the iBORESCOPE row will already have a check mark.
5. Touch the Home or button on your device to exit the Wi-Fi networksscreen.
6. Locate the iBORESCOPEicon among your appsand touch it. The screenat right will appear, with live video in themain viewing area.
TAKING ANDVIEWING PHOTOSTo save a still image (also called a screen grab) of live video or paused video,touch the SNAP SHOT soft button at the right side of the app. The familiarsound of a camera shutter confirms that a picture was taken. All photos youtake are immediately and permanently stored as .jpg files in a dedicated“iBORESCOPE” subfolder of the “sdcard” folder of your Android device. Anyphotos you take will be saved to this folder even if no SD card is installed inyour device, or an SD card is installed and it is full. If an SD card is missing orfull, when you touch the SNAP SHOT button an on-screen prompt will advise“Image Saved in Album!”
To view your pictures, touch the button on your device to exit theiBORESCOPE app. Locate your iBorescope subfolder and open it. The files of allof the photos you have taken on that phone using the iBORESCOPE app arestored as tiles. Touch any tile to view the corresponding photo. Use pinchmotions to expand or shrink any displayed image as desired.
12
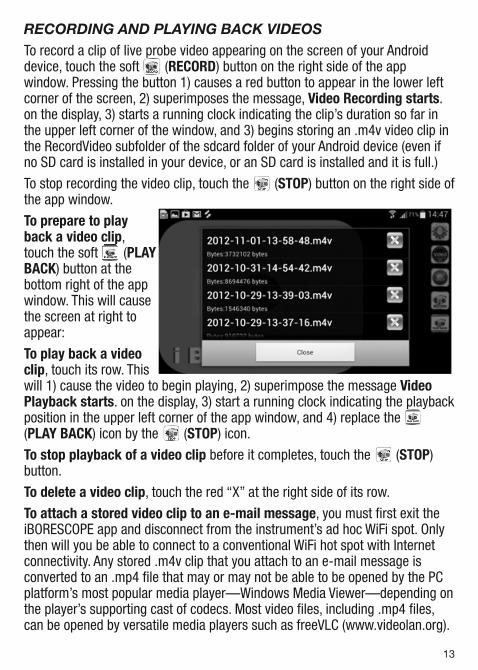
RECORDING AND PLAYING BACK VIDEOSTo record a clip of live probe video appearing on the screen of your Androiddevice, touch the soft (RECORD) button on the right side of the appwindow. Pressing the button 1) causes a red button to appear in the lower leftcorner of the screen, 2) superimposes the message, Video Recording starts.on the display, 3) starts a running clock indicating the clip’s duration so far inthe upper left corner of the window, and 3) begins storing an .m4v video clip inthe RecordVideo subfolder of the sdcard folder of your Android device (even ifno SD card is installed in your device, or an SD card is installed and it is full.)
To stop recording the video clip, touch the (STOP) button on the right side ofthe app window.
To prepare to playback a video clip,touch the soft (PLAYBACK) button at thebottom right of the appwindow. This will causethe screen at right toappear:
To play back a videoclip, touch its row. Thiswill 1) cause the video to begin playing, 2) superimpose the message VideoPlayback starts. on the display, 3) start a running clock indicating the playbackposition in the upper left corner of the app window, and 4) replace the(PLAY BACK) icon by the (STOP) icon.To stop playback of a video clip before it completes, touch the (STOP)button.
To delete a video clip, touch the red “X” at the right side of its row.To attach a stored video clip to an e-mail message, you must first exit theiBORESCOPE app and disconnect from the instrument’s ad hoc WiFi spot. Onlythen will you be able to connect to a conventional WiFi hot spot with Internetconnectivity. Any stored .m4v clip that you attach to an e-mail message isconverted to an .mp4 file that may or may not be able to be opened by the PCplatform’s most popular media player—Windows Media Viewer—depending onthe player’s supporting cast of codecs. Most video files, including .mp4 files,can be opened by versatile media players such as freeVLC (www.videolan.org).
13
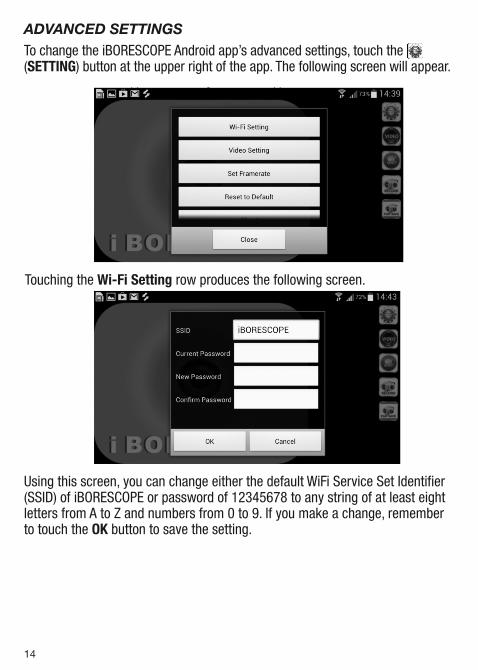
ADVANCED SETTINGSTo change the iBORESCOPE Android app’s advanced settings, touch the(SETTING) button at the upper right of the app. The following screen will appear.
Using this screen, you can change either the default WiFi Service Set Identifier(SSID) of iBORESCOPE or password of 12345678 to any string of at least eightletters from A to Z and numbers from 0 to 9. If you make a change, rememberto touch the OK button to save the setting.
14
Touching the Wi-Fi Setting row produces the following screen.

Touching the Video Settingrow of the initial Setting screenproduces the screen at right.
Note that although the app’sdefault video recordingresolution is QVGA (320 x 240pixels), the pulldown on theCurrent Profile line gives youthe option to increase theresolution to QVGA (640 x 480pixels).
Select MPEG4 VGA tomatch the resolution of thecamera at the tip of theprobe of iBorescope (theinstrument). The only reasonto record video clips at thelower, QVGA resolution is toproduce smaller clips thatrequire less memory spaceto store and less bandwidthto share via e-mail. If youmake a change, remember to touch the OK button to save the setting.Touching the Set Frameraterow of the initial Setting screenproduces the screen at right.
Note that although the app’sdefault video frame rate is 15 fps (frames per second),the pulldown on the CurrentFramerate line gives you theoption to increase the framerate to 25 fps.
15
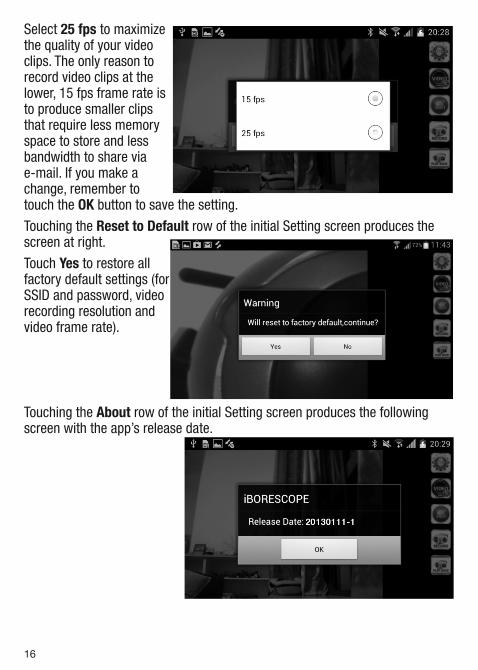
Select 25 fps to maximizethe quality of your videoclips. The only reason torecord video clips at thelower, 15 fps frame rate isto produce smaller clipsthat require less memoryspace to store and lessbandwidth to share via e-mail. If you make achange, remember totouch the OK button to save the setting.Touching the Reset to Default row of the initial Setting screen produces thescreen at right.
Touch Yes to restore allfactory default settings (forSSID and password, videorecording resolution andvideo frame rate).
Touching the About row of the initial Setting screen produces the followingscreen with the app’s release date.
16
USING THE PROBEIf you are unfamiliar with video borescopes, be aware that professional userslike contractors and technicians typically insert a borescope probe into anorifice (a hole in a wall or an engine’s cylinder, for example) or into aninaccessible or hazardous area (the back or an equipment rack or an enginecompartment, for example) to view components or environments that wouldotherwise be invisible. Use the brightness adjustment thumbwheel (Fig. 1,Callout 6) to match the intensity of camera lighting to the applicationenvironment.In practice, professionals usually insert flexible-obedient probes like the onethat comes with iBorescope head-on into an orifice or area as a first step. Theythen pull the probe out and adjust its bend one or more times until the camerain the tip is pointing directly at the target or area of interest. With the probeinserted, you can twirl it until video appears right-side up, but in many casesyou cannot change the probe’s angle of approach very much.
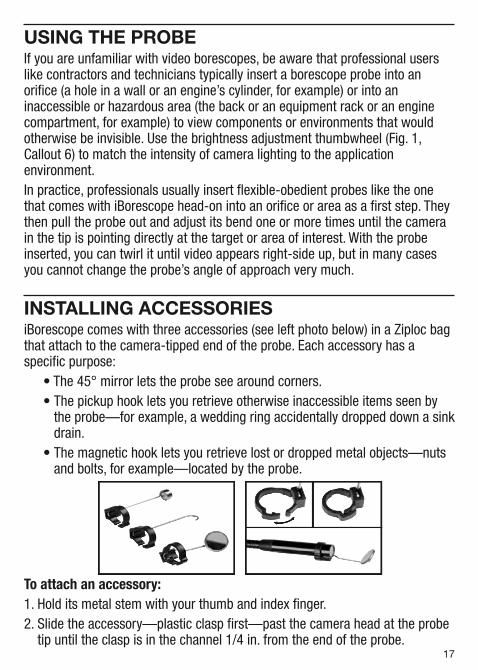
INSTALLING ACCESSORIESiBorescope comes with three accessories (see left photo below) in a Ziploc bagthat attach to the camera-tipped end of the probe. Each accessory has aspecific purpose:
• The 45° mirror lets the probe see around corners.• The pickup hook lets you retrieve otherwise inaccessible items seen bythe probe—for example, a wedding ring accidentally dropped down a sinkdrain.
• The magnetic hook lets you retrieve lost or dropped metal objects—nutsand bolts, for example—located by the probe.
To attach an accessory:1. Hold its metal stem with your thumb and index finger.2. Slide the accessory—plastic clasp first—past the camera head at the probetip until the clasp is in the channel 1/4 in. from the end of the probe.
17
3. Squeeze the clasp until you hear a click (see right photos on previous page),indicating that the two halves have joined.
To detach an accessory:1. Use the nail of your index finger to unhook the clasp, opening it up.2. Hold the accessory’s metal stem with your thumb and index finger and slidethe accessory and clasp past the camera head.
3. Put the accessory back in the Ziploc bag it came in.
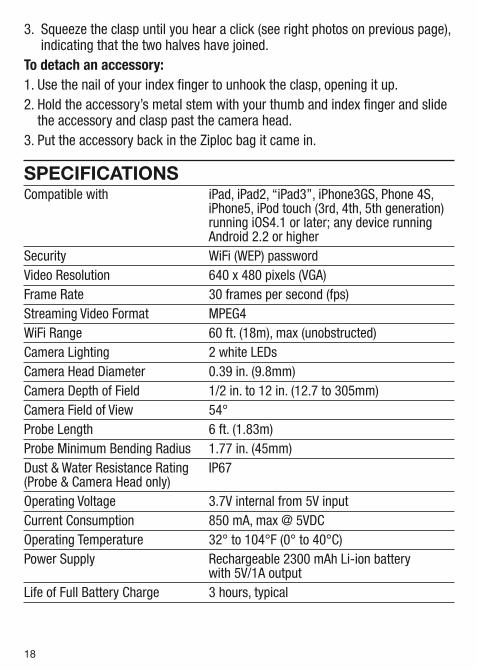
SPECIFICATIONSCompatible with iPad, iPad2, “iPad3”, iPhone3GS, Phone 4S,
iPhone5, iPod touch (3rd, 4th, 5th generation)running iOS4.1 or later; any device running Android 2.2 or higher
Security WiFi (WEP) passwordVideo Resolution 640 x 480 pixels (VGA)Frame Rate 30 frames per second (fps)Streaming Video Format MPEG4WiFi Range 60 ft. (18m), max (unobstructed)Camera Lighting 2 white LEDsCamera Head Diameter 0.39 in. (9.8mm)Camera Depth of Field 1/2 in. to 12 in. (12.7 to 305mm)Camera Field of View 54°Probe Length 6 ft. (1.83m)Probe Minimum Bending Radius 1.77 in. (45mm)Dust & Water Resistance Rating IP67(Probe & Camera Head only)Operating Voltage 3.7V internal from 5V inputCurrent Consumption 850 mA, max @ 5VDCOperating Temperature 32° to 104°F (0° to 40°C)Power Supply Rechargeable 2300 mAh Li-ion battery
with 5V/1A outputLife of Full Battery Charge 3 hours, typical
18
OPERATING & MAINTENANCE TIPSNever insert the probe into a fuel tank or a flammable liquid or gas such asunleaded gasoline, diesel fuel, machine oil, DOT 4 brake fluid or transmissionfluid.
The probe contains thin wires running along its entire length. Accordingly,handle it with care:
• Do not bend it more than 90° anywhere along its length.
• Do not bend the probe more than 70° within 1.2 in. (30mm) of its camera tip.
• Do not bundle the probe into a tight circle to store it.
• Never use the camera end to clear its own path of debris.
• Do not overtighten the collar that secures the probe to the handle.
To clean the camera lens and LEDs, use a cotton swab and a small amount ofmild detergent.
The grip requires no routine maintenance other than periodic cleaning with asoft, dry cloth. Never use a wet cloth, corrosive liquids, solvents or water. Avoidgetting the grip wet.
Operate and store iBorescope only in a cool (under 140°F or 60°C), dry, well-ventilated place. Avoid exposing the unit to sunlight for long periods of time.
iBorescope is designed for industrial and environmental use only. Never use itfor human or any other biological inspection.
WARRANTY INFORMATIONGeneral Tools & Instruments’ (General’s) DCiS1 iBorescope is warranted to theoriginal purchaser to be free from defects in material and workmanship for aperiod of one year. Subject to certain restrictions, General will repair or replacethis instrument if, after examination, the company determines it to be defectivein material or workmanship.
This warranty does not apply to damages that General determines to be froman attempted repair by non-authorized personnel or misuse, alterations, normalwear and tear, or accidental damage. The defective unit must be returned toGeneral Tools & Instruments or to a General-authorized service center, freightprepaid and insured.
19
Acceptance of the exclusive repair and replacement remedies described hereinis a condition of the contract for purchase of this product. In no event shallGeneral be liable for any incidental, special, consequential or punitive damages,or for any cost, attorneys’ fees, expenses, or losses alleged to be aconsequence of damage due to failure of, or defect in any product including,but not limited to, any claims for loss of profits.
RETURN FOR REPAIR POLICYEvery effort has been made to provide you with a reliable product of superiorquality. However, in the event your instrument requires repair, please contactour Customer Service to obtain an RGA (Return Goods Authorization) numberbefore forwarding the unit via prepaid freight to the attention of our ServiceCenter at this address:
General Tools & Instruments• 80 White Street • New York, NY 10013 • 212-431-6100 •
Remember to include a copy of your proof of purchase, your return address,and your phone number and/or e-mail address.
20
GENERAL TOOLS & INSTRUMENTS80 White Street
New York, NY 10013-3567PHONE (212) 431-6100FAX (212) 431-6499
TOLL FREE (800) 697-8665e-mail: [email protected]
www.generaltools.comDCiS1 User’s Manual
Specifications subject to change without notice©2013 GENERAL TOOLS & INSTRUMENTS
NOTICE - WE ARE NOT RESPONSIBLE FOR TYPOGRAPHICAL ERRORS.MAN #DCiS1
031413