IBM Tivoli Monitoring for Applicationspublib.boulder.ibm.com/tividd/td/ITMAN/GC23-4810...This guide...
164
IBM Tivoli Monitoring for Applications Installation and Setup Guide Version 5.1.0 GC23-4810-00
Transcript of IBM Tivoli Monitoring for Applicationspublib.boulder.ibm.com/tividd/td/ITMAN/GC23-4810...This guide...

IBM Tivoli Monitoring for Applications
Installation and Setup GuideVersion 5.1.0
GC23-4810-00
���

IBM Tivoli Monitoring for Applications
Installation and Setup GuideVersion 5.1.0
GC23-4810-00
���
NoteBefore using this information and the product it supports, read the information in Appendix F, “Notices” on page 141.
First Edition (September 2002)
This edition applies to version 5.1.0 of IBM Tivoli Monitoring for Applications and to all subsequentreleases and modifications until otherwise indicated in new editions.© Copyright International Business Machines Corporation 2002. All rights reserved.US Government Users Restricted Rights — Use, duplication or disclosure restricted by GSA ADP ScheduleContract with IBM Corp.
Contents
Figures . . . . . . . . . . . . . . . v
Tables . . . . . . . . . . . . . . . vii
About this guide . . . . . . . . . . . ixWho should read this guide . . . . . . . . . ixWhat this guide contains . . . . . . . . . . ixPublications . . . . . . . . . . . . . . x
IBM Tivoli Monitoring for Applications library . . xRelated publications . . . . . . . . . . xiAccessing softcopy publications . . . . . . xiiUsing the guide online . . . . . . . . . xiiViewing online help . . . . . . . . . . xiiOrdering publications . . . . . . . . . . xiiProviding feedback about publications . . . . xiii
Accessibility . . . . . . . . . . . . . . xiiiContacting Customer Support . . . . . . . . xiiiConventions used in this guide . . . . . . . xiii
Typeface conventions . . . . . . . . . . xiiiTivoli command syntax . . . . . . . . . xiv
Chapter 1. Overview . . . . . . . . . 1Choosing an installation method. . . . . . . . 1Migrating from previous Tivoli products . . . . . 2Elements of a Basic installation . . . . . . . . 2
Chapter 2. Guidelines for installationand setup . . . . . . . . . . . . . . 5
Chapter 3. Pre-installation . . . . . . . 7Supported operating systems . . . . . . . . . 7Required and optional software . . . . . . . . 8Disk space requirements . . . . . . . . . . 10Recommendation for a basic Tivoli environment . . 11Required permissions and privileges . . . . . . 12About automatic upgrades . . . . . . . . . 12Language requirements . . . . . . . . . . 12TCP/IP for endpoints . . . . . . . . . . . 13Backing up and restoring Tivoli databases . . . . 13Handling security across firewalls . . . . . . . 15
Firewall documentation . . . . . . . . . 16Verifying that the required software is running . . 16Completing installation planning sheets . . . . . 19
Chapter 4. Performing a Typicalinstallation . . . . . . . . . . . . . 23
Chapter 5. Performing a Custominstallation . . . . . . . . . . . . . 33Installing IBM Tivoli Monitoring for Applications. . 33Manually creating a Windows proxy endpoint. . . 50
Chapter 6. Installing the productmanually . . . . . . . . . . . . . . 55Using Tivoli Software Installation Service . . . . 55Accessing the Tivoli environment . . . . . . . 56Installing managed nodes through an existing Tivolienvironment . . . . . . . . . . . . . . 57Installing endpoints through an existing Tivolienvironment . . . . . . . . . . . . . . 60Installing Tivoli patches manually . . . . . . . 64Upgrading IBM Tivoli Monitoring manually . . . 67Manually installing IBM Tivoli Monitoring forApplications software . . . . . . . . . . . 69Installing the Web Health Console manually . . . 72
Chapter 7. Completing the installationof the product . . . . . . . . . . . 73Verifying the installation of the product . . . . . 74Installing the Java Runtime Environment . . . . 76Linking to an existing Java Runtime Environment 77Installing files to enable customization of resourcemodels . . . . . . . . . . . . . . . . 78Installing files to enable Tivoli Enterprise DataWarehouse for IBM Tivoli Monitoring forApplications . . . . . . . . . . . . . . 80Installing the Tivoli Enterprise Data WarehouseCollector for IBM Tivoli Monitoring forApplications: mySAP.com . . . . . . . . . 83Installing IBM Tivoli Language Support for thisproduct. . . . . . . . . . . . . . . . 84Updating Web Health Console files . . . . . . 87Changing the gateway assignment of an endpoint 88Integrating IBM Tivoli Monitoring for Applicationswith Tivoli Business Systems Manager . . . . . 89
Chapter 8. Migrating from previousversions of IBM Tivoli Monitoring forApplications, Version 5.1.0:mySAP.com . . . . . . . . . . . . 93Installing Patch 220-SAP-0001 . . . . . . . . 94Migrating R/3 objects . . . . . . . . . . . 95Deleting Reliant UNIX R/3 objects . . . . . . 96Completing migration to IBM Tivoli Monitoring forApplications: mySAP.com . . . . . . . . . 97Mapping monitors to resource models . . . . . 97Migrating tasks. . . . . . . . . . . . . 100Monitoring database status . . . . . . . . . 102Starting or stopping databases or servers . . . . 103Moving Transports to mySAP systems . . . . . 103Assigning mySAP system policy region names . . 103Memory windows on HP-UX . . . . . . . . 103Event server updates . . . . . . . . . . . 103
Appendix A. Problem determination 105Troubleshooting installer problems . . . . . . 105
iii

About the log files for installation errors . . . . 109Problems and workarounds . . . . . . . . 110Testing endpoint connectivity . . . . . . . . 112Cleaning up and removing the endpoint . . . . 113
Appendix B. Installation messages 117
Appendix C. Patches . . . . . . . . 131
Appendix D. Uninstalling the product 133Uninstalling IBM Tivoli Monitoring forApplications: Siebel eBusiness Applicationsendpoints . . . . . . . . . . . . . . 133Uninstalling IBM Tivoli Monitoring forApplications: Siebel eBusiness Applicationsmanaged nodes . . . . . . . . . . . . 134Creating the Uninstall Monitoring for mySAP.comtask . . . . . . . . . . . . . . . . 135
Uninstalling IBM Tivoli Monitoring forApplications: mySAP.com from the Tivoli server. . 136Uninstalling IBM Tivoli Monitoring forApplications: mySAP.com managed nodes andendpoints . . . . . . . . . . . . . . 137
Appendix E. Accessibility . . . . . . 139Using Assistive Technologies . . . . . . . . 139Magnifying What is Displayed on the Screen . . . 139Documentation in Accessible Formats . . . . . 139Using Alternative Text . . . . . . . . . . 139
Appendix F. Notices . . . . . . . . 141Trademarks . . . . . . . . . . . . . . 143
Index . . . . . . . . . . . . . . . 145
iv IBM Tivoli Monitoring for Applications: Installation and Setup Guide
Figures
1. Typical installation of a Tivoli managementregion . . . . . . . . . . . . . . . 4
2. Typical Installation: Typical option panel 253. Typical Installation: Basic tab for managed
nodes . . . . . . . . . . . . . . 264. Typical Installation: Advanced tab for
managed nodes . . . . . . . . . . . 265. Typical Installation: Basic tab for endpoints 286. Typical Installation: Advanced tab for
endpoints . . . . . . . . . . . . . 287. Sample Step List panel . . . . . . . . 308. Custom Installation: Region view in the
Planner . . . . . . . . . . . . . . 359. Custom Installation: Custom option panel 37
10. Custom Installation: Adding a managed nodein the Planner . . . . . . . . . . . . 38
11. Custom Installation: Setting managed nodeproperties in the Planner . . . . . . . . 39
12. Custom Installation: Adding a gateway in thePlanner . . . . . . . . . . . . . . 41
13. Custom Installation: Associating a gatewaywith a managed node in the Planner . . . . 42
14. Custom Installation: Adding an endpoint inthe Planner . . . . . . . . . . . . 43
15. Custom Installation: Setting endpointproperties in the Planner . . . . . . . . 44
16. Custom Installation: Adding the Web HealthConsole in the Planner . . . . . . . . . 45
17. Sample Step List panel . . . . . . . . 4918. Step List Installer panel sample . . . . . 10619. Detail dialog box of the Step List panel 107
v

vi IBM Tivoli Monitoring for Applications: Installation and Setup Guide
Tables
1. Guidelines for installation and setup . . . . 52. Supported operating systems for managed
nodes . . . . . . . . . . . . . . . 73. Supported operating systems for endpoints 84. Required and optional software for IBM Tivoli
Monitoring for Applications . . . . . . . 85. Disk space requirements for installing the
Tivoli environment . . . . . . . . . . 116. Firewall security features of the Tivoli
Management Framework . . . . . . . . 157. Managed resources and their purpose. . . . 198. Planning sheet for creating managed nodes 209. Planning sheet for creating endpoints . . . . 21
10. Software locations on installation CDs . . . 2911. Custom installation goals . . . . . . . . 3312. Removal of planner elements and possible
consequences . . . . . . . . . . . . 4613. Software locations on installation CDs . . . 4814. Guidelines for installing the product through
an existing Tivoli environment . . . . . . 5515. Manual installation of the product:
Specifications of required patches . . . . . 6516. Product locations on installation CDs . . . . 69
17. Guidelines for Completing the installation ofthe product . . . . . . . . . . . . 73
18. Language support and names ofcorresponding installation index (.IND) files . 85
19. Guidelines for migrating from previousversions of the product . . . . . . . . 93
20. Mapping monitors to resource models . . . 9821. Task migration . . . . . . . . . . . 10022. IBM Tivoli Monitoring for Applications:
mySAP.com start and stop tasks . . . . . 10323. Overview of problem determination topics
and procedures . . . . . . . . . . . 10524. Graphical user interface elements for the Step
List panel of the installer . . . . . . . 10725. Error logs and descriptions . . . . . . . 11026. Problems and workarounds . . . . . . . 11027. Patches that the installer installs
automatically . . . . . . . . . . . 13128. Required patches and APARs for required
and optional software . . . . . . . . . 13129. Guidelines for uninstalling the product 13330. mySAP_uninstall51.pl details . . . . . . 136
vii

viii IBM Tivoli Monitoring for Applications: Installation and Setup Guide
About this guide
This guide describes how to install and set up IBM® Tivoli® Monitoring forApplications to monitor and manage server resources and other objects in a Tivolienvironment.
Who should read this guideSystem administrators refer to this guide to learn how to install and set up thefollowing basic elements of the Tivoli environment:v A Tivoli serverv Managed nodesv Managed computers, which are hosts for the Tivoli endpoint software
Readers should be familiar with the following:v UNIX® or Windows® operating systemsv Administration of application servers
What this guide containsThis guide contains the following sections:v Chapter 1, “Overview” on page 1
Provides an overview of the installation and setup of IBM Tivoli Monitoring forApplications.
v Chapter 2, “Guidelines for installation and setup” on page 5
Provides guidelines for installing and setting up IBM Tivoli Monitoring forApplications.
v Chapter 3, “Pre-installation” on page 7
Describes how to plan and prepare for installing the product.v Chapter 4, “Performing a Typical installation” on page 23
Describes the Typical installation method.v Chapter 5, “Performing a Custom installation” on page 33
Describes the Custom installation method.v Chapter 6, “Installing the product manually” on page 55
Describes how to install the product manually.v Chapter 7, “Completing the installation of the product” on page 73
Describes how to verify and complete the installation of the product.v Chapter 8, “Migrating from previous versions of IBM Tivoli Monitoring for
Applications, Version 5.1.0: mySAP.com” on page 93
Describes how to migrate from Tivoli Manager for R/3 Version 2.2.0 to IBMTivoli Monitoring for Applications, Version 5.1.0: mySAP.com.
v Appendix A, “Problem determination” on page 105
Describes how to determine the source of common problems and suggestssolutions.
v Appendix B, “Installation messages” on page 117
Describes messages that the product can generate.
ix

v Appendix C, “Patches” on page 131
Lists required patches.v Appendix D, “Uninstalling the product” on page 133
Describes uninstallation of the product.v Appendix E, “Accessibility” on page 139
Describes accessibility features of the product.v Appendix F, “Notices” on page 141
Provides information on copyrights and trademarks.
Publications
This section lists publications in the IBM Tivoli Monitoring for Applications libraryand any other related documents. It also describes how to access Tivolipublications online, how to order Tivoli publications, and how to submit commentson Tivoli publications.
IBM Tivoli Monitoring for Applications libraryThe following documents are available in the IBM Tivoli Monitoring forApplications library.v IBM Tivoli Monitoring for Applications: Siebel eBusiness Applications User’s Guide,
SC23-4819-00Provides information about how to use IBM Tivoli Monitoring for Applications:Siebel eBusiness Applications to manage Siebel resources.
v IBM Tivoli Monitoring for Applications: mySAP.com User’s Guide, SC23-4812-00Provides information about how to use IBM Tivoli Monitoring for Applications:mySAP.com to manage mySAP.com resources.
v IBM Tivoli Monitoring for Applications: Siebel eBusiness Applications Reference Guide,SC23-4818-00Provides detailed information about IBM Tivoli Monitoring for Applications:Siebel eBusiness Applications resource models, tasks, and commands.
v IBM Tivoli Monitoring for Applications: mySAP.com Reference Guide, SC23-4813-00Provides detailed information about IBM Tivoli Monitoring for Applications:mySAP.com resource models, tasks, and commands.
v IBM Tivoli Monitoring for Applications Installation and Setup Guide, GC23-4810-00Provides instructions for installing Tivoli Manager for Applications and setting itup to manage endpoint resources.
v IBM Tivoli Monitoring for Applications, Release Notes, GI11-0941-00Describes product features and provides information about the latest changes tothe installation requirements and procedures. The release notes also describeknown limitations related to installation and explain how to work around eachlimitation.
v IBM Tivoli Monitoring for Applications: Siebel eBusiness Applications: Limitations andWorkarounds Supplement, SC23-4817-00Provides the latest information about known product limitations andworkarounds. To ensure that the information is the latest available, thisdocument is provided only on the Web, where it is updated on a regular basis.You can access the Limitations and Workarounds document through the IBMTivoli Monitoring for Applications link on the Tivoli Information Center Website:
x IBM Tivoli Monitoring for Applications: Installation and Setup Guide

http://www.tivoli.com/support/public/Prodman/public_manuals/td/TD_PROD_LIST.html
v IBM Tivoli Monitoring for Applications: mySAP.com: Limitations and WorkaroundsSupplement, SC23-4806-00Provides the latest information about known product limitations andworkarounds. To ensure that the information is the latest available, thisdocument is provided only on the Web, where it is updated on a regular basis.You can access the Limitations and Workarounds document through the IBMTivoli Monitoring for Applications link on the Tivoli Information Center Website:http://www.tivoli.com/support/public/Prodman/public_manuals/td/TD_PROD_LIST.html
Related publicationsThe following documents provide related information:v IBM Tivoli Monitoring: Workbench User’s Guide, SH19-4571
Describes how to use the IBM Tivoli Monitoring Workbench to create newresource models and to modify existing ones.
v IBM Tivoli Monitoring User’s Guide, SH19-4569Describes how to use the IBM Tivoli Monitoring user interface.
v IBM Tivoli Monitoring Collection Reference, SH19-4570Describes the resource models that come with IBM Tivoli Monitoring software.
v Tivoli Management Framework User’s Guide, GC31-8433-04Describes the Tivoli environment, including profiles and profile management.
v Tivoli Management Framework Reference Manual, SC31-8434-04Provides detailed information about Tivoli commands.
v Tivoli Management Framework, Version 3.7.1: Installation Guide, GC32-0395-01Provides information and procedures for installing and upgrading TivoliManagement Framework (Tivoli management region server, managed nodes,gateways, and endpoints), and provides the procedures for installing andupgrading Tivoli Enterprise products.
v Tivoli Management Framework, Version 3.7.1: Planning for Deployment Guide,GC32-0393-01Explains how to plan for deploying your Tivoli environment, and describesTivoli Management Framework and its services.
v Tivoli Enterprise Console User’s Guide, Version 3.7.1, GC32-0667-01Describes how to use the Tivoli Enterprise Console® to correlate events anddetermine the severity and relationship of those events.
v Tivoli Enterprise Console, Version 3.7: Rule Builder’s Guide, GC32-0669-00Provides information about developing rules for managing events with TivoliEnterprise Console with a text editor and a graphical rule builder.
v TME 10 Software Installation Service User’s Guide, sis36gaDescribes how to use the Tivoli Software Installation Service (SIS) to installTivoli products.
v Tivoli Business Systems Manager, Version 1.5: User’s Guide
Describes how to use the Tivoli Business Systems Manager product.v Tivoli Business Systems Manager Console, Version 1.5: User’s Guide
Describes how to use the Tivoli Business Systems Manager console.v Tivoli Enterprise Data Warehouse documentation
About this guide xi
Describes how to use Tivoli Enterprise Data Warehouse to compile historicaldata to monitor your system and to help you make strategic managementdecisions regarding your network.
The Tivoli Glossary includes definitions for many of the technical terms related toTivoli software. The Tivoli Glossary is available, in English only, at the followingWeb site:http://www.tivoli.com/support/documents/glossary/termsm03.htm
Accessing softcopy publicationsThe publications for this product are available in PDF and HTML formats throughthe following media:v IBM Tivoli Monitoring for Applications: Version 5.1.0 Documentation CD
The Documentation CD contains all of the English language publications for thisproduct, except for the Web-only Limitations and Workarounds supplements. Toaccess the publications, use a Web browser to open the start.html file, which islocated in the root directory of the CD.
v Tivoli Information CenterIBM posts publications for this product and all other Tivoli products, as theybecome available and whenever they are updated, to the Tivoli InformationCenter Web site:http://www.tivoli.com/support/public/Prodman/public_manuals/td/TD_PROD_LIST.html
Click the IBM Tivoli Monitoring for Applications link to access the productlibrary.
http://www.tivoli.com/support/documents/
Using the guide onlineThis document is available on the IBM Tivoli Monitoring for Messaging andCollaboration, Version 5.1.0: Documentation CD in PDF and HTML formats. Refer tothe readme.txt file on the CD for instructions on downloading the Acrobat Reader,Version 3.0 or later, to view, save, and print the manual.
Use your HTML browser to open the start.html file on the CD to access the .htmldocumentation files. Every navigation page also includes a link at the bottom todownload the Acrobat reader for viewing, saving, and printing the files.
Viewing online helpOnline help is available in several forms:v Desktop — Access online help by clicking the Help buttons in dialog boxes.v Commands — You can display command syntax and parameter information for
command line interface (CLI) commands by typing the name of the command ata command prompt and pressing the Enter key.
Ordering publicationsYou can order many Tivoli publications online at the following Web site:http://www.elink.ibmlink.ibm.com/public/applications/publications/cgibin/pbi.cgi
You can also order by telephone by calling one of these numbers:v In the United States: 800-879-2755v In Canada: 800-426-4968
xii IBM Tivoli Monitoring for Applications: Installation and Setup Guide
In other countries, see the following Web site for a list of telephone numbers:http://www.tivoli.com/inside/store/lit_order.html
Providing feedback about publicationsIf you have comments or suggestions about our products and documentation,contact us in one of the following ways:v Send an e-mail to [email protected] Complete our customer feedback survey at the following Web site:
http://www.tivoli.com/support/survey/
AccessibilityAccessibility features help users who have physical disabilities, such as restrictedmobility or limited vision, to use software products successfully. With this product,you can use assistive technologies to hear and navigate the interface. You can alsouse the keyboard instead of the mouse to operate features of the graphical userinterface.
For additional information, see the appendix on Appendix E, “Accessibility” onpage 139.
Contacting Customer SupportIf you have a problem with any Tivoli product, you can contact IBM CustomerSupport for Tivoli products. See the Tivoli Customer Support Handbook at thefollowing Web site:http://www.tivoli.com/support/handbook/
The handbook provides information about how to contact Customer Support,depending on the severity of your problem, and the following information:v Registration and eligibilityv Telephone numbers and e-mail addresses, depending on the country in which
you are locatedv What information you should gather before contacting Customer Support
Conventions used in this guideThis guide uses several conventions for special terms and actions and forcommand syntax.
Typeface conventionsThis guide uses the following typeface conventions:
Bold Commands, keywords, file names, authorization roles, URLs, orother information that you must use literally appear like this, inbold. Names of windows, dialogs, and other controls also appearlike this, in bold.
Italics Variables and values that you must provide appear like this, initalics. Words and phrases that are emphasized also appear like this,in italics.
Monospace Code examples, output, and system messages appear like this, ina monospace font.
About this guide xiii
Tivoli command syntaxThe commands in this book use the following special characters to define Tivolicommand syntax:
< > Indicates that the text enclosed in the angle brackets is a variable that yousupply.
[ ] Identifies optional elements. Elements that do not have brackets aroundthem are required.
... Indicates you can specify multiple values for the previous element.Separate multiple values by a space, unless the command informationspecifies differently.
If the ellipsis for an element follows a closing bracket ( ] ), use the syntaxwithin the brackets to specify multiple values. For example, to specify twoadministrators for the option [–a admin]..., use –a admin1 –a admin2.
If the ellipsis for an element is within brackets, use the syntax of the lastelement to specify multiple values. For example, to specify two hosts forthe option [–h host...], use –h host1 host2.
| Indicates mutually exclusive information, meaning you can use the elementon either the left or right of the vertical bar, but not both.
{ } Delimits a set of mutually exclusive elements when a command requiresone of them, but not multiple elements. Brackets ([ ]) are around elementsthat are optional.
\ A backslash indicates that a command continues on the next line.
In addition to the special characters, Tivoli command syntax uses the typefaceconventions described in “Typeface conventions” on page xiii.
The following examples illustrate the typeface conventions used in Tivolicommand syntax:v wcrtpr [–a admin]... [–s region] [–m resource]... name
The name argument is the only required element for the wcrtpr command. Thebrackets around the options indicate that they are optional. The ellipsis after the–a admin option means that you can specify multiple administrators multipletimes. The ellipsis after the –m resource option means that you can specifymultiple resources multiple times.
v wchkdb [–o outfile] [–u] [–x] {–f infile | –i | object...}The –f, –i, and object elements are mutually exclusive. The braces that surroundthe –f, –i, and object elements indicate that you are including required elements.If you specify the object argument, you can specify more than one object.
When you reference an object in a command issued from the command line, thereference is not an absolute object reference like those used in programming.Instead, the reference is a user-friendly name. This user-friendly name derives froma name given to the object by the user of the application, such as when creating apolicy region.
xiv IBM Tivoli Monitoring for Applications: Installation and Setup Guide
Chapter 1. Overview
This document describes installation and setup of IBM Tivoli Monitoring forApplications, monitoring and management software for business-critical hardwareand software. This document includes information on the following topics:v Determining the proper installation for your environmentv Information about a typical Tivoli environmentv Guidelines and worksheets for planning your installation and setupv Procedures for using the installation wizard or the Tivoli desktop to install your
monitoring productv Problem determination information for the installation wizardv Guidelines for migrating from Tivoli Manager for R/3, Version 2.2
Choosing an installation methodThe IBM Tivoli monitoring products offer several options for installing thesoftware, depending on the complexity of your environment and your knowledgeof Tivoli management systems. Your choices include the following:
Installation wizardThe installation wizard (referred to in the rest of this guide as the installer)creates a complete Tivoli environment, if none exists, and installs theproduct. The installer also installs supplemental software, such as the Javarun-time environment and language packs. Use the installer if you eitherhave no previous Tivoli software installations or you have TivoliManagement Framework, Version 3.7, Revision A or Revision B, installed.
If you use the installer, you must choose between a Typical or Custominstallation path. Use the following criteria to determine which path youwant to take:
Use the Typical installation path when the following conditions are true:
v You want to install the product on a target computer that matches one ofthe following profiles:– Has no software installed for the Tivoli Management Framework.
—OR—– Has one of the following versions of the Tivoli Management
Framework installed: Version 3.7 (Revision A or Revision B) orVersion 3.7.1. You cannot install this product on systems that runprevious versions of the Tivoli Management Framework.
v You are a first-time Tivoli user.v Your environment matches the “Elements of a Basic installation” on
page 2.
Use the Custom installation path if you want to use the Planner tool thatoffers a tree view of the entire installation and provides additional controlover directory paths and naming conventions. See Chapter 5, “Performinga Custom installation” on page 33. Use the Custom installation option ifyou are installing the Tivoli management region server on a UNIXcomputer and you want to create Windows endpoints.
1
Tivoli desktop and command line interfaceUse one of these options if you are a current Tivoli user with earlierversions of the Tivoli Management Framework. You might also want to useone of these options if you have expert knowledge of the Tivolienvironment and plan to extensively customize your installation. Themanual installation method enables you to create interconnected Tivolimanagement region servers and to create environments with more than 50endpoints.
Chapter 6, “Installing the product manually” on page 55 provides manualinstallation instructions. For further information, see the documentation onthe Tivoli Management Framework software CDs that come with IBMTivoli Monitoring for Applications.
The Tivoli Software Installation Service (SIS)Go to http://www.tivoli.com/support for information about obtaining andusing SIS.
Migrating from previous Tivoli productsThe following migration options exist for Tivoli Distributed Monitoring and TivoliManager for R/3:v Migrate or upgrade pre-existing software:
Note: The installer automatically migrates this software to IBM TivoliMonitoring for Applications. When you perform a manual installation ofthe product, you must manually install the upgrade patch as described inChapter 6, “Installing the product manually” on page 55.
– Upgrade previous versions of IBM Tivoli Monitoring to the required Version5.1.1. See “Upgrading IBM Tivoli Monitoring manually” on page 67.
– Migrate Tivoli Manager for R/3 software as described in Chapter 8,“Migrating from previous versions of IBM Tivoli Monitoring for Applications,Version 5.1.0: mySAP.com” on page 93.
v Map tasks in the Tivoli Manager for R/3 product to IBM Tivoli Monitoring forApplications.You use configuration tasks in the new product in the same way that you usedthem in Tivoli Manager for R/3. The program code in the new tasks haschanged to work with IBM Tivoli Monitoring for Applications, but the names ofthe tasks and their general purpose remains the same.
v Map monitors to resource models. See Chapter 8, “Migrating from previousversions of IBM Tivoli Monitoring for Applications, Version 5.1.0: mySAP.com”on page 93.IBM Tivoli Monitoring for Applications: Siebel eBusiness Applications does notsupport concurrency with Tivoli Distributed Monitoring. You must uninstallTivoli Manager for Siebel before using IBM Tivoli Monitoring for Applications:Siebel eBusiness Applications resource models.
Elements of a Basic installationThis section describes a basic Tivoli environment. The installer creates a basicTivoli environment during the Typical installation.
During the Typical or Custom installation, you can create the following elements:
2 IBM Tivoli Monitoring for Applications: Installation and Setup Guide

v One required Tivoli management region server to monitor endpoints. The Tivoliserver runs the Tivoli Management Framework and IBM Tivoli Monitoringsoftware.
v A managed node computer system on which Tivoli Management Framework isinstalled. Each managed node has gateway software that increases performancein the Tivoli environment by reducing traffic on the Tivoli management regionserver. The IBM Tivoli Monitoring software also runs on a managed node.
v Up to 50 endpoints for monitoring resources on your network. You distributemonitoring software to the endpoints. An endpoint is a computer system onwhich Tivoli software is installed to enable communication with a Tivolimanagement region server.
v One Web Health Console on any computer in the same network as the Tivolimanagement region. If you use the installation wizard, you can automaticallyinstall the console on endpoints or managed nodes that you select. The consoleshows the status and health of a server in a Web browser. You can create anunlimited number of Web Health Consoles. Web Health Consoles have thefollowing characteristics:– Can exist on an unlimited number of computers.– Can display the status of resources for an unlimited number of Tivoli
management regions– Require the deployment of the Java Runtime Environment, Version 1.3, on the
host computer.
Before you begin the installation process, you should have a basic understandingof the Tivoli environment. The Tivoli environment is software based on the TivoliManagement Framework that addresses network computing management issuesacross many platforms. In a Tivoli environment, a system administrator distributessoftware, manages user configurations, changes access privileges, automatesoperations, monitors resources, and schedules jobs.
Chapter 1. Overview 3
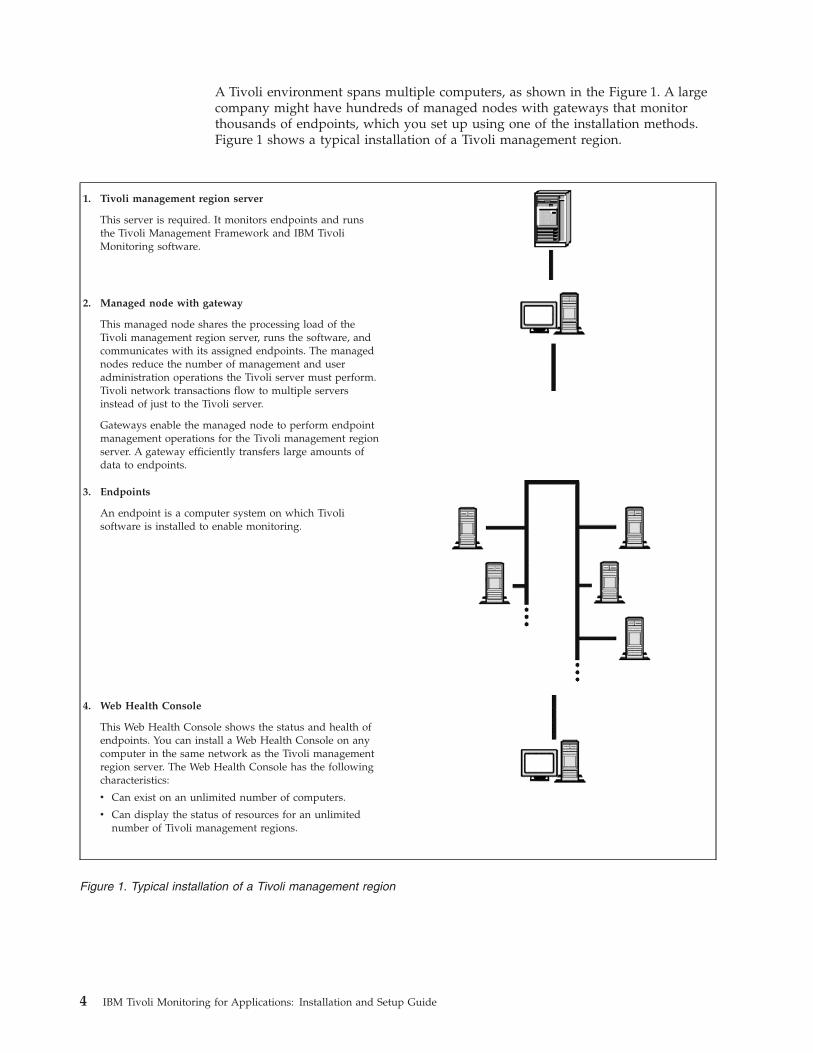
A Tivoli environment spans multiple computers, as shown in the Figure 1. A largecompany might have hundreds of managed nodes with gateways that monitorthousands of endpoints, which you set up using one of the installation methods.Figure 1 shows a typical installation of a Tivoli management region.
1. Tivoli management region server
This server is required. It monitors endpoints and runsthe Tivoli Management Framework and IBM TivoliMonitoring software.
2. Managed node with gateway
This managed node shares the processing load of theTivoli management region server, runs the software, andcommunicates with its assigned endpoints. The managednodes reduce the number of management and useradministration operations the Tivoli server must perform.Tivoli network transactions flow to multiple serversinstead of just to the Tivoli server.
Gateways enable the managed node to perform endpointmanagement operations for the Tivoli management regionserver. A gateway efficiently transfers large amounts ofdata to endpoints.
3. Endpoints
An endpoint is a computer system on which Tivolisoftware is installed to enable monitoring.
4. Web Health Console
This Web Health Console shows the status and health ofendpoints. You can install a Web Health Console on anycomputer in the same network as the Tivoli managementregion server. The Web Health Console has the followingcharacteristics:
v Can exist on an unlimited number of computers.
v Can display the status of resources for an unlimitednumber of Tivoli management regions.
Figure 1. Typical installation of a Tivoli management region
4 IBM Tivoli Monitoring for Applications: Installation and Setup Guide
Chapter 2. Guidelines for installation and setup
Table 1 summarizes the procedures for installing and setting up IBM TivoliMonitoring for Applications. It also lists where you can find the information andprocedures that guide you through the installation.
Table 1. Guidelines for installation and setup
What you do Refer to
Before Installation
1. Check the system for compliance with the systemrequirements and set up or check the prerequisitesoftware.
“Supported operating systems” on page 7
2. Back up an existing Tivoli environment, if youhave one. If you encounter a problem during aninstallation, use the backup to restore theenvironment to a known working state.
“Backing up and restoring Tivoli databases” on page 13
3. Complete the planning sheets for the managednodes and endpoints that you want to create.(Optional)
“Completing installation planning sheets” on page 19
4. Make sure Tivoli monitoring activity performsacross your network firewalls.
“Handling security across firewalls” on page 15
5. If you have a Solaris Operating Environment(referred to in the remainder of this document asSolaris), you must install certain fix packages onthe target computer to enable the installer.
Patches are available from the following Sun Website: http://sunsolve.sun.com.
Fix packages for Solaris 2.6105181-29, 105210-38, 105284-45, 105568-23, 105591-11,105633-59, 105669-10, 106040-17, 106125-11, 106409-01,106429-02, 106841-01, 106842-09, 107733-09, and108091-03
Fix packages for Solaris 7106327-10, 106541-17, 106950-14, 106980-17, 107081-37,107153-01, 107226-18, 107544-03, 107636-08, 107656-07,107702-09, 108374-05, 108376-29, and SUNWi1 fontspackageNote: You can obtain the fonts package on the Solarisinstallation CD.
Fix packages for Solaris 8108652-37, 108921-13, and 108940-32
6. If you have AIX Version 4.3.x systems, install IBMAIX maintenance package 9 to enable the installer.
Obtain the maintenance package at the following IBM Website:
http://techsupport.services.ibm.com/rs6k/ml.fixes.html
7. Hewlett-Packard Company requires a set ofpatches for the HP-UX environment
See the following Web site for the latest required patchesfor the HP-UX operating system:
http://www.hp.com/products1/unix/java/ \infolibrary/patches.html
8. Use the ping command to test network names ofthe target computers for the installation, whichensures the network recognizes the names. Thetarget computer replies to the ping command withits IP address and statistics regarding thetransaction if the name is valid, the networkconnection is active, and the target computer isrunning.
Ping command. Run a ping command to call each targetcomputer. For example, enter the following command in theMS-DOS command prompt on Windows:
ping name
where name is the name of the target computer.
5
Table 1. Guidelines for installation and setup (continued)
What you do Refer to
9. Confirm that the required software services arerunning on the target computers.
“Verifying that the required software is running” on page16
Installation
10. Install the product. The installation can includethe following:v managed nodesv endpointsv the Web Health Console
Note: You can create these components afterinstallation. You can also use the Web HealthConsole’s installation executable to install theconsole on any computer in your Tivolienvironment.
Chapter 4, “Performing a Typical installation” on page 23
—OR—
Chapter 5, “Performing a Custom installation” on page 33
—OR—
Chapter 6, “Installing the product manually” on page 55
—OR—
Use Tivoli Software Installation Service (SIS) to install IBMTivoli Monitoring for Applications. For information aboutobtaining and using SIS, go to the following Web site:
http://www.tivoli.com/support/
After Installation
11. Back up the Tivoli environment after installation.If you encounter a problem during finalconfiguration, use the backup copy to restore theenvironment to a known state.
“Backing up and restoring Tivoli databases” on page 13
12. Create managed nodes and endpoints if you didnot create them during installation.
Tivoli Enterprise, Version 3.7.1: Installation Guide that comeswith the Tivoli Management Framework software.
13. Verify the functionality of the Tivolimanagement region by running communicationcommands.
“Verifying the installation of the product” on page 74
14. Migrate or map older versions of Tivolimanagement and monitoring software to IBMTivoli Monitoring for Applications.
Chapter 8, “Migrating from previous versions of IBM TivoliMonitoring for Applications, Version 5.1.0: mySAP.com” onpage 93
15. Install software to enable resource models, theWeb Health Console, historical reporting, andnational language versions of the product.
Chapter 7, “Completing the installation of the product” onpage 73
16. Create server objects for the product to manage. See the following user’s guides:
v For IBM Tivoli Monitoring for Applications: SiebeleBusiness Applications, see IBM Tivoli Monitoring forApplications: Siebel eBusiness Applications User’s Guide
v For IBM Tivoli Monitoring for Applications: mySAP.com,see IBM Tivoli Monitoring for Applications: mySAP.comUser’s Guide.
6 IBM Tivoli Monitoring for Applications: Installation and Setup Guide
Chapter 3. Pre-installation
This chapter provides the following pre-installment requirements and proceduresfor IBM Tivoli Monitoring for Applications:v Supported operating systemsv Required and optional softwarev Disk space requirementsv Required permissions and privilegesv Upgradesv Language requirementsv TCP/IP for endpointsv Backing up and restoring the Tivoli environmentv Handling security across firewallsv Verifying that prerequisite software is runningv Planning and installation worksheets
Chapter 7, “Completing the installation of the product” on page 73 providesprocedures for product or platform-specific prerequisites.
Supported operating systemsThis section lists the supported operating systems that work with managed nodesor endpoints for IBM Tivoli Monitoring for Applications.
Table 2. Supported operating systems for managed nodes
Supported operating systems formanaged nodes1
Version Siebel mySAP.com
AIX 4.3.3 Yes Yes
5.1 No Yes
HP-UX2 10.2 Yes No
11.0 Yes Yes
11i No Yes
Solaris 2.7 Yes Yes
2.8 Yes Yes
Windows NT 4.0 (ServicePack 6A) or2000
Yes Yes
Notes:
1. IBM Tivoli Monitoring for Applications: mySAP.com provides support for Reliant UNIXsystems only with the new Remote Management capabilities.
2. The Tivoli Business Systems Manager task server is not available for this platform.
7
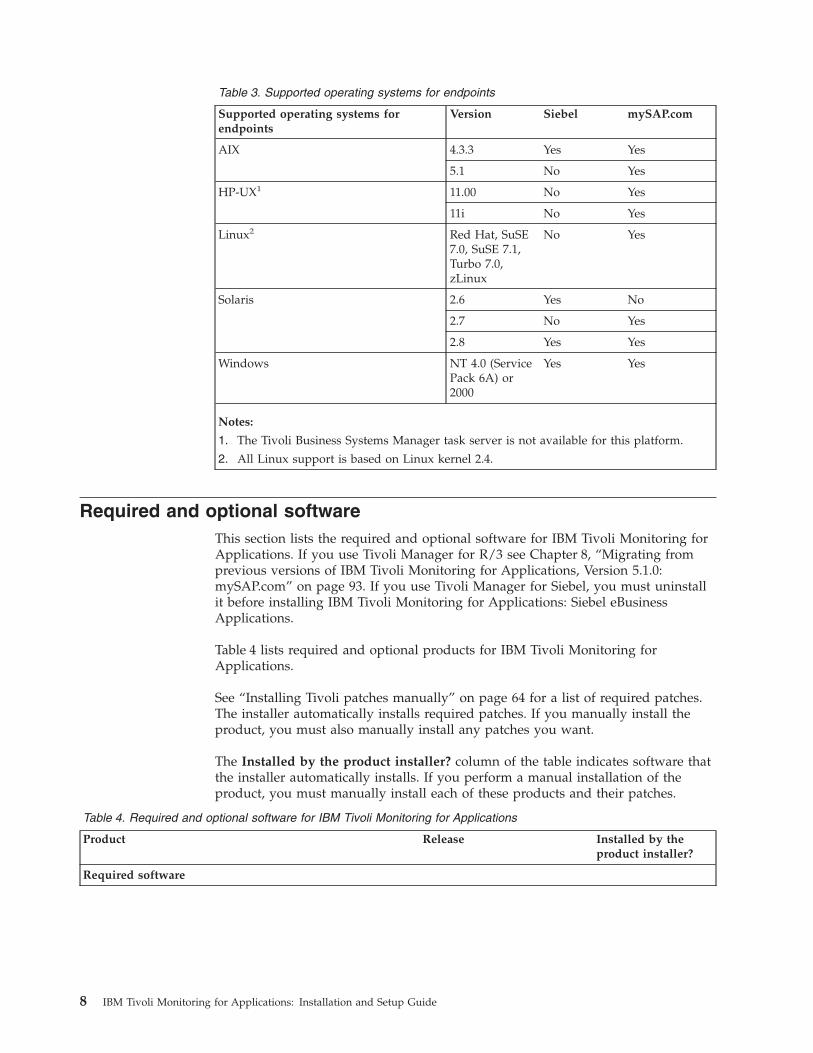
Table 3. Supported operating systems for endpoints
Supported operating systems forendpoints
Version Siebel mySAP.com
AIX 4.3.3 Yes Yes
5.1 No Yes
HP-UX1 11.00 No Yes
11i No Yes
Linux2 Red Hat, SuSE7.0, SuSE 7.1,Turbo 7.0,zLinux
No Yes
Solaris 2.6 Yes No
2.7 No Yes
2.8 Yes Yes
Windows NT 4.0 (ServicePack 6A) or2000
Yes Yes
Notes:
1. The Tivoli Business Systems Manager task server is not available for this platform.
2. All Linux support is based on Linux kernel 2.4.
Required and optional softwareThis section lists the required and optional software for IBM Tivoli Monitoring forApplications. If you use Tivoli Manager for R/3 see Chapter 8, “Migrating fromprevious versions of IBM Tivoli Monitoring for Applications, Version 5.1.0:mySAP.com” on page 93. If you use Tivoli Manager for Siebel, you must uninstallit before installing IBM Tivoli Monitoring for Applications: Siebel eBusinessApplications.
Table 4 lists required and optional products for IBM Tivoli Monitoring forApplications.
See “Installing Tivoli patches manually” on page 64 for a list of required patches.The installer automatically installs required patches. If you manually install theproduct, you must also manually install any patches you want.
The Installed by the product installer? column of the table indicates software thatthe installer automatically installs. If you perform a manual installation of theproduct, you must manually install each of these products and their patches.
Table 4. Required and optional software for IBM Tivoli Monitoring for Applications
Product Release Installed by theproduct installer?
Required software
8 IBM Tivoli Monitoring for Applications: Installation and Setup Guide
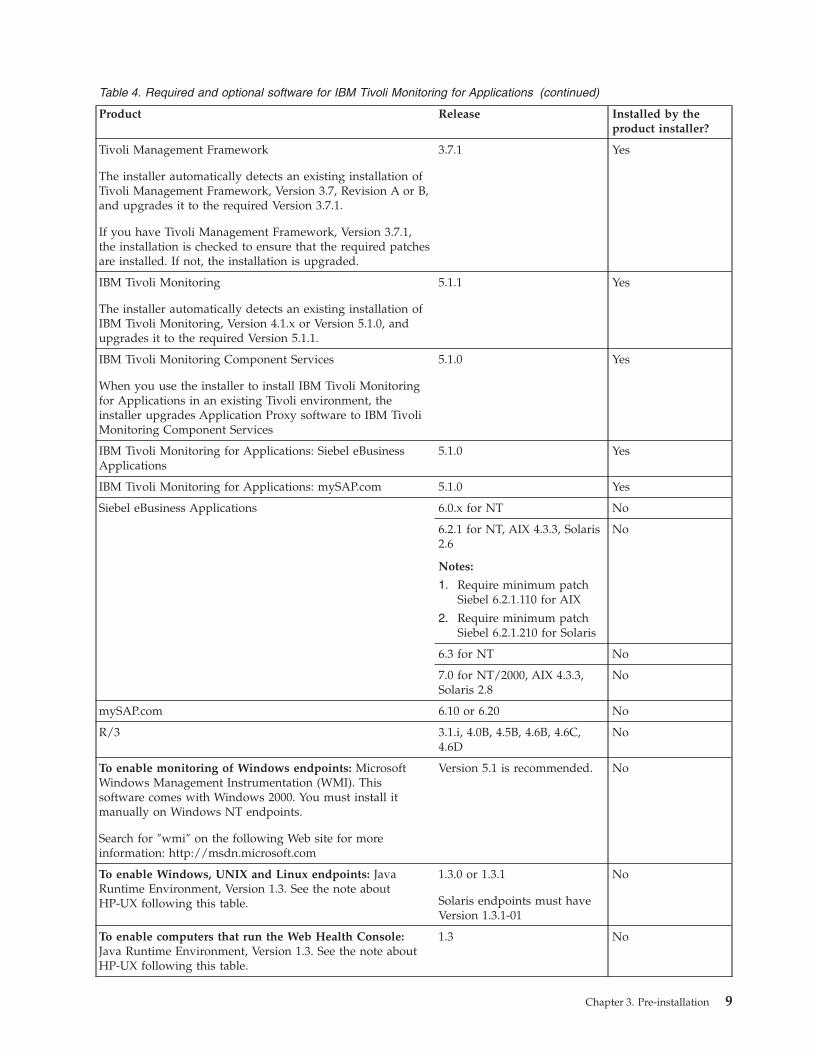
Table 4. Required and optional software for IBM Tivoli Monitoring for Applications (continued)
Product Release Installed by theproduct installer?
Tivoli Management Framework
The installer automatically detects an existing installation ofTivoli Management Framework, Version 3.7, Revision A or B,and upgrades it to the required Version 3.7.1.
If you have Tivoli Management Framework, Version 3.7.1,the installation is checked to ensure that the required patchesare installed. If not, the installation is upgraded.
3.7.1 Yes
IBM Tivoli Monitoring
The installer automatically detects an existing installation ofIBM Tivoli Monitoring, Version 4.1.x or Version 5.1.0, andupgrades it to the required Version 5.1.1.
5.1.1 Yes
IBM Tivoli Monitoring Component Services
When you use the installer to install IBM Tivoli Monitoringfor Applications in an existing Tivoli environment, theinstaller upgrades Application Proxy software to IBM TivoliMonitoring Component Services
5.1.0 Yes
IBM Tivoli Monitoring for Applications: Siebel eBusinessApplications
5.1.0 Yes
IBM Tivoli Monitoring for Applications: mySAP.com 5.1.0 Yes
Siebel eBusiness Applications 6.0.x for NT No
6.2.1 for NT, AIX 4.3.3, Solaris2.6
Notes:
1. Require minimum patchSiebel 6.2.1.110 for AIX
2. Require minimum patchSiebel 6.2.1.210 for Solaris
No
6.3 for NT No
7.0 for NT/2000, AIX 4.3.3,Solaris 2.8
No
mySAP.com 6.10 or 6.20 No
R/3 3.1.i, 4.0B, 4.5B, 4.6B, 4.6C,4.6D
No
To enable monitoring of Windows endpoints: MicrosoftWindows Management Instrumentation (WMI). Thissoftware comes with Windows 2000. You must install itmanually on Windows NT endpoints.
Search for ″wmi″ on the following Web site for moreinformation: http://msdn.microsoft.com
Version 5.1 is recommended. No
To enable Windows, UNIX and Linux endpoints: JavaRuntime Environment, Version 1.3. See the note aboutHP-UX following this table.
1.3.0 or 1.3.1
Solaris endpoints must haveVersion 1.3.1-01
No
To enable computers that run the Web Health Console:Java Runtime Environment, Version 1.3. See the note aboutHP-UX following this table.
1.3 No
Chapter 3. Pre-installation 9
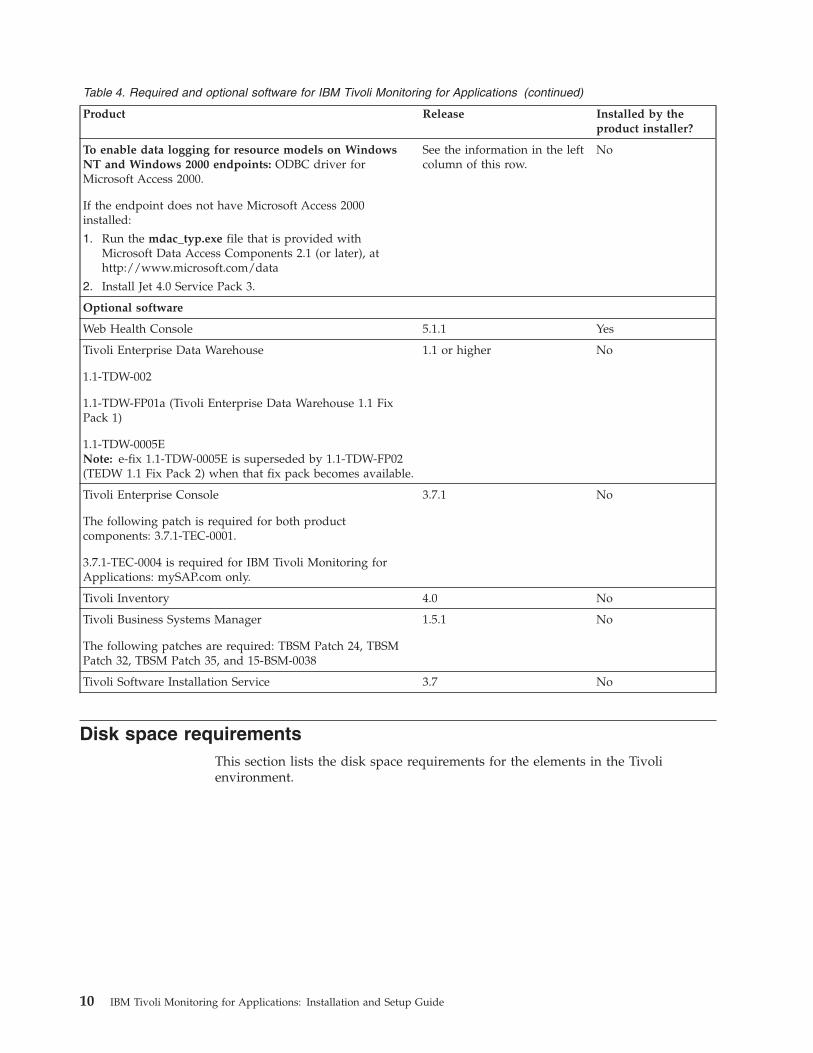
Table 4. Required and optional software for IBM Tivoli Monitoring for Applications (continued)
Product Release Installed by theproduct installer?
To enable data logging for resource models on WindowsNT and Windows 2000 endpoints: ODBC driver forMicrosoft Access 2000.
If the endpoint does not have Microsoft Access 2000installed:
1. Run the mdac_typ.exe file that is provided withMicrosoft Data Access Components 2.1 (or later), athttp://www.microsoft.com/data
2. Install Jet 4.0 Service Pack 3.
See the information in the leftcolumn of this row.
No
Optional software
Web Health Console 5.1.1 Yes
Tivoli Enterprise Data Warehouse
1.1-TDW-002
1.1-TDW-FP01a (Tivoli Enterprise Data Warehouse 1.1 FixPack 1)
1.1-TDW-0005ENote: e-fix 1.1-TDW-0005E is superseded by 1.1-TDW-FP02(TEDW 1.1 Fix Pack 2) when that fix pack becomes available.
1.1 or higher No
Tivoli Enterprise Console
The following patch is required for both productcomponents: 3.7.1-TEC-0001.
3.7.1-TEC-0004 is required for IBM Tivoli Monitoring forApplications: mySAP.com only.
3.7.1 No
Tivoli Inventory 4.0 No
Tivoli Business Systems Manager
The following patches are required: TBSM Patch 24, TBSMPatch 32, TBSM Patch 35, and 15-BSM-0038
1.5.1 No
Tivoli Software Installation Service 3.7 No
Disk space requirementsThis section lists the disk space requirements for the elements in the Tivolienvironment.
10 IBM Tivoli Monitoring for Applications: Installation and Setup Guide
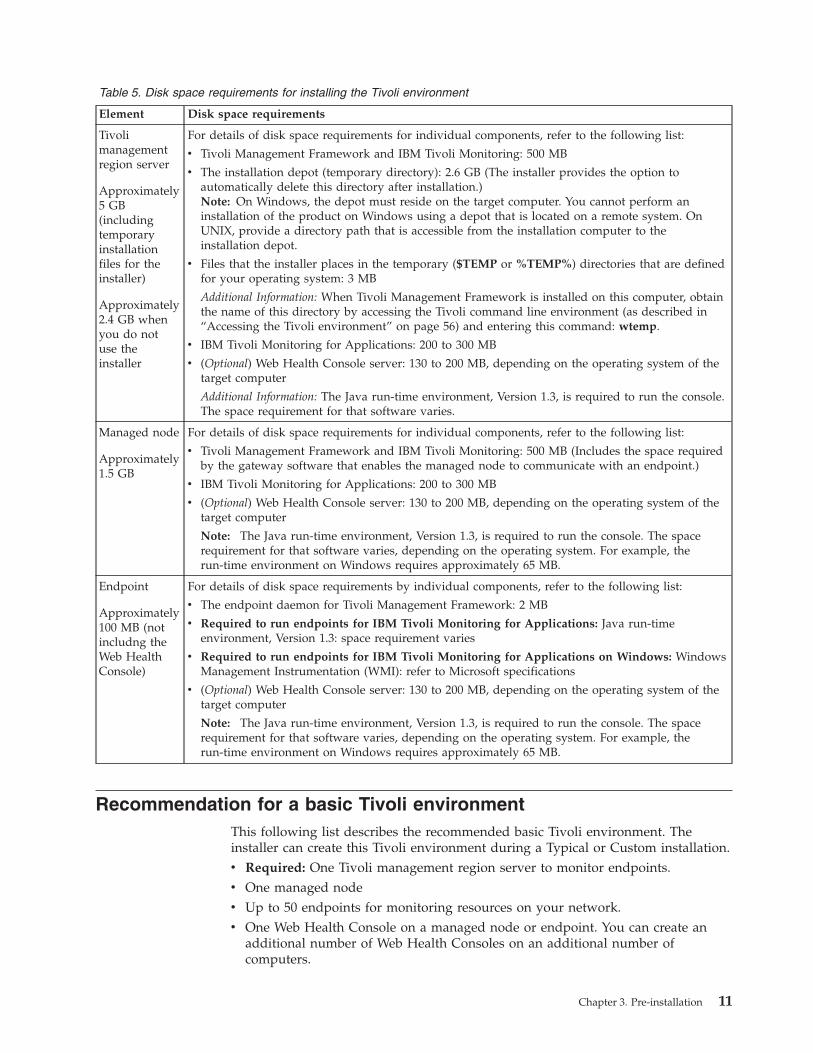
Table 5. Disk space requirements for installing the Tivoli environment
Element Disk space requirements
Tivolimanagementregion server
Approximately5 GB(includingtemporaryinstallationfiles for theinstaller)
Approximately2.4 GB whenyou do notuse theinstaller
For details of disk space requirements for individual components, refer to the following list:
v Tivoli Management Framework and IBM Tivoli Monitoring: 500 MB
v The installation depot (temporary directory): 2.6 GB (The installer provides the option toautomatically delete this directory after installation.)Note: On Windows, the depot must reside on the target computer. You cannot perform aninstallation of the product on Windows using a depot that is located on a remote system. OnUNIX, provide a directory path that is accessible from the installation computer to theinstallation depot.
v Files that the installer places in the temporary ($TEMP or %TEMP%) directories that are definedfor your operating system: 3 MB
Additional Information: When Tivoli Management Framework is installed on this computer, obtainthe name of this directory by accessing the Tivoli command line environment (as described in“Accessing the Tivoli environment” on page 56) and entering this command: wtemp.
v IBM Tivoli Monitoring for Applications: 200 to 300 MB
v (Optional) Web Health Console server: 130 to 200 MB, depending on the operating system of thetarget computer
Additional Information: The Java run-time environment, Version 1.3, is required to run the console.The space requirement for that software varies.
Managed node
Approximately1.5 GB
For details of disk space requirements for individual components, refer to the following list:
v Tivoli Management Framework and IBM Tivoli Monitoring: 500 MB (Includes the space requiredby the gateway software that enables the managed node to communicate with an endpoint.)
v IBM Tivoli Monitoring for Applications: 200 to 300 MB
v (Optional) Web Health Console server: 130 to 200 MB, depending on the operating system of thetarget computer
Note: The Java run-time environment, Version 1.3, is required to run the console. The spacerequirement for that software varies, depending on the operating system. For example, therun-time environment on Windows requires approximately 65 MB.
Endpoint
Approximately100 MB (notincludng theWeb HealthConsole)
For details of disk space requirements by individual components, refer to the following list:
v The endpoint daemon for Tivoli Management Framework: 2 MB
v Required to run endpoints for IBM Tivoli Monitoring for Applications: Java run-timeenvironment, Version 1.3: space requirement varies
v Required to run endpoints for IBM Tivoli Monitoring for Applications on Windows: WindowsManagement Instrumentation (WMI): refer to Microsoft specifications
v (Optional) Web Health Console server: 130 to 200 MB, depending on the operating system of thetarget computer
Note: The Java run-time environment, Version 1.3, is required to run the console. The spacerequirement for that software varies, depending on the operating system. For example, therun-time environment on Windows requires approximately 65 MB.
Recommendation for a basic Tivoli environmentThis following list describes the recommended basic Tivoli environment. Theinstaller can create this Tivoli environment during a Typical or Custom installation.v Required: One Tivoli management region server to monitor endpoints.v One managed nodev Up to 50 endpoints for monitoring resources on your network.v One Web Health Console on a managed node or endpoint. You can create an
additional number of Web Health Consoles on an additional number ofcomputers.
Chapter 3. Pre-installation 11
Required permissions and privilegesYou must have the following to install the product:v The license key for Tivoli Management Framework. Obtain this key in the
printed document that comes with the installation CDs for the TivoliManagement Framework.
v On UNIX, the user who installs the product must have root privileges. OnWindows, the user who installs the product must have membership in theAdministrators group. Tivoli recommends that you log on as root on UNIX andAdministrator on Windows.
v A valid host name for all managed nodes and endpoints you create. Specify theunique domain name for the host name when multiple computers in the systemhave the same host name. For example, the fully qualified name of the tokyocomputer might be tokyo.sales.mycompany.com, where sales is the domainname of the Sales Department’s domain at the company mycompany. The fullname distinguishes the Sales Department’s server from a tokyo server in themarketing domain called tokyo.marketing.mycompany.com.
About automatic upgradesThe installer automatically detects an existing installation of Tivoli ManagementFramework, Version 3.7, Revision A or B, and upgrades it to the required Version3.7.1. The installer also installs the required patches.
If you have an earlier version of Tivoli Management Framework, you mustmanually upgrade to Version 3.7 Revision A or B or Version 3.7.1 before you canrun the installer.
The installer automatically detects an existing installation of IBM TivoliMonitoring, Version 4.1x or 5.1.0, and upgrades it to the required Version 5.1.1.
The Tivoli Management Framework software CDs that come with IBM TivoliMonitoring for Applications contain the Tivoli Management Framework User’s Guide.
Chapter 6, “Installing the product manually” on page 55 describes how to installupgrade software through the Tivoli desktop or the command line interface,instead of using the installer.
Chapter 8, “Migrating from previous versions of IBM Tivoli Monitoring forApplications, Version 5.1.0: mySAP.com” on page 93 describes how to migrate fromprevious versions of Tivoli monitoring products.
Language requirementsAfter you complete the installation, you can enable other languages in the product.See “Installing IBM Tivoli Language Support for this product” on page 84 forprocedures regarding installing the product in these national languages: BrazilianPortuguese, Chinese (simplified), Chinese (traditional), French, German, Italian,Japanese, Korean, and Spanish.
12 IBM Tivoli Monitoring for Applications: Installation and Setup Guide
TCP/IP for endpointsYou must activate the TCP/IP communication protocol servers to enablecommunication with the Tivoli server. See the documentation for the serversoftware that runs on your systems for instructions on enabling TCP/IP on anapplications server. You can do this either before or after installing the software.
Backing up and restoring Tivoli databases
ObjectiveTo back up existing Tivoli object databases for all computers in the Tivolimanagement region so you can use these backup copies to restore the databases toa known working state if you encounter a problem during installation.
Background information
Note: This procedure describes a routine backup method that you can usefrequently. In addition to this backup, arrange a complete backup of Tivoliwhenever you make significant changes to the system, such as theinstallation of this product. If you encounter a problem during a changeoperation, you can use the system backup to restore the entire Tivolienvironment to a known working state.
This procedure provides a stable and complete snapshot of the Tivoli database anda safer alternative to manually compressing the database files in a .tar or .zipformat. For example, when you save a database to a .tar or .zip file, an error mightoccur if the Tivoli object dispatcher is simultaneously writing to the Tivolidatabase.
This procedure also enables you to estimate the size of the backup files to ensurethat you have sufficient disk space in the target directory to complete theoperation.
You back up or restore databases using the wbkupdb command. In a large Tivolimanagement region, the wbkupdb process can take a long time because backupsof the managed node databases are performed serially. Concurrent backupprocesses are not allowed in the same Tivoli management region. You mustcomplete one wbkupdb command before you execute a second instance of thecommand.
The Tivoli Management Framework must be running on the Tivoli managementregion server and on the managed node whose database is being restored.Otherwise, the wbkupdb command cannot restore any database (managed node orTivoli management region server). See the Tivoli Management Framework ReferenceGuide for a description of all the capabilities of the wbkupdb command.
Required authorization rolebackup or super
Before you beginYou must have a valid user login name and a group name for the computer onwhich the backup file is stored.
On UNIX, set umask to 022 for root.
Chapter 3. Pre-installation 13
When you finishNone
ProcedureYou can perform backups in the Tivoli desktop or in the command line interface.
You can perform restore operations in the command line interface only.
Command line: Use the wbkupdb command.
wbkupdb [–d device] –r [node_name ...]
where:
–d deviceSpecifies the file or device to which the backup file is saved or from whichthe backup file is retrieved. If you specify a file name with this option, youcan insert a file date and time anywhere in the file name by adding thevariable %t. The variable is replaced with a date/time stamp in the formMondd-hhmm. For example, if you specify –d /usr/backups/TMR1%t.bk,the resulting file is named TMR1Dec21-0955.bk. The time is displayed in24-hour mode.
–r Restores the databases for the specified nodes.
node_nameSpecifies the node to be backed up. You can specify multiple nodes.
See the description of the wbkupdb command in the Tivoli Management FrameworkReference Manual for more options.
Examples: The following example backs up the Tivoli databases for all managednodes in the Tivoli management region from which the wbkupdb command is run.The backups are written to the user-defined file /usr/backups/TMR1.bk.wbkupdb -d /usr/backups/TMR1.bk
The following example backs up the database of a single managed node, sherman.Use the wchkdb command to determine the names of databases that exist in theTivoli management region. In this example, the backup file is saved to the defaultlocation, which is the backups directory in the Tivoli database directory. Thebackups directory is created if it does not exist when you run the wbkupdbcommand.wbkupdb sherman
The following example restores a single managed node, sherman. The -r flagrestores the backed up database on sherman. The -d flag identifies/usr/backups/TMR1.bk as the backup file to restore.wbkupdb -r -d /usr/backups/TMR1.bk sherman
Tivoli desktop:
Note: The default directory to which backup files are written has root writepermissions only. If you cannot log in as the root administrator, you mustchange the location of the backup file to a directory for which you havewrite access.
14 IBM Tivoli Monitoring for Applications: Installation and Setup Guide
1. Select Backup from the Desktop menu to display the Backup TivoliManagement Region dialog box.
2. Select one or more managed nodes from the Available managed nodesscrolling list.
3. Click the left-arrow button to move them to the Backup these managed nodesarea.
4. Type the name of the managed node on which the backup image or device islocated in the Save image on node field.
5. Type the full path name for the backup file in the Device/File field.6. Click the Estimate Backup Size button to see the estimated backup size
required for each managed node. Be sure that sufficient disk space exists for thetarget directory.
7. Click Close to display the Backup Tivoli Management Region dialog box.8. Click Start Backup to display the Backup Status dialog box and begin backup
operation.9. Click Close to close the Backup Tivoli Management Region dialog box and
display the Desktop window.
Handling security across firewallsTivoli Management Framework, Version 3.7.1, enables security across firewalls forIBM Tivoli Monitoring for Applications. To protect privacy and data integrity, youcan choose options such as Bulk Data Transfer (BDT) proxy mechanism, SecureSocket Layer 3 (SSL3) encryption support or the features of the Tivoli ManagementFramework Firewall Security Toolbox.
Firewalls often restrict communication by ports, by protocols, and by direction. Forexample, a firewall might allow communications from the Internet using port 80and the HTTP protocol. Tivoli Management Framework features can work with acompany’s firewall security requirements as follows:v Limit the ports used for Tivoli management communicationsv Use Tivoli relay functions to navigate across multiple security zonesv Limit Tivoli communications to unidirectional transactions
The following table lists the security features available for Tivoli ManagementFramework and where to obtain the features:
Table 6. Firewall security features of the Tivoli Management Framework
Security feature Where to obtain it Description
Single Port BulkData Transfer
Included in the version of TivoliManagement Framework thatships with this product. See theTivoli Management Frameworkdocumentation for furtherinformation.
Consolidates communications between servers andgateways to a single port. For example, this feature canconsolidate software distribution transactions to a singleport.
Endpoint UpcallPort Consolidation
Included in the version of TivoliManagement Framework thatships with this product. See theTivoli Management Frameworkdocumentation for furtherinformation.
Channels all communication between an endpoint and itsgateway through the listening port of the endpoint’senabling software, the Tivoli Management Agent. Withoutthis feature, Tivoli uses multiple ports for sometransactions, including dynamically allocated ports, whichare especially difficult to secure.
Chapter 3. Pre-installation 15

Table 6. Firewall security features of the Tivoli Management Framework (continued)
Security feature Where to obtain it Description
Tivoli FirewallSolutions Toolbox
Patch 1.2-TFST-0001. Downloadfrom the Customer Support Website athttp://www.tivoli.com/support.
Enables these security features:
v Endpoint and gateway proxies to consolidatecommunication between multiple endpoints andgateways into a single port using a TCP protocol.
v Use of multiple relay functions to safely pass Tivoliinformation through a series of firewall sectors calledDemilitarized Zones (DMZs).
v Unidirectional communication that stores endpoint dataat a proxy gateway outside a firewall until the originalgateway calls for the data at scheduled intervals. Youlocate the original gateway inside a firewall so that thecall transactions for Tivoli always originate from themore secure side of the network.
v Event Sink for collecting events on an endpoint outside afirewall. A Tivoli Enterprise Console server inside afirewall can poll the Event Sink and capture the events asTivoli events, even events that have originated fromcomputers that are not part of the Tivoli environment.
Unlike the other elements of the firewall solutionstoolbox, the Event Sink requires that you install a Tivoliendpoint on the system. The Event Sink passes the eventsit receives to the endpoint. The endpoint can send asecure instance of the event through the TivoliManagement Framework to the Tivoli Enterprise Consoleserver.
Firewall documentationFor further information on security and firewall issues, refer to the followingdocumentation:v Tivoli Enterprise Management across Firewalls, Redbook number: SG24-5510-01
Provides background information and includes scenarios that refer to IBM TivoliMonitoring.
v Tivoli Firewall Magic, Redpaper number: REDP0227Provides an overview of firewall features in the Tivoli Management Framework.
v Tivoli Management Framework: Release Notes, Version 3.7.1, GI11-0836-00Provides information about security and new command options.
v Tivoli Management Framework: Planning for Deployment Guide, Version 3.7.1,GC32-0393-01Provides information about Secure Sockets Layer Data Encryption.
v IBM Tivoli Monitoring, Version 5.1.1: User’s Guide, SH19-4569-01Describes security capabilities of the Web Health Console. This console runsindependently from the Tivoli Management Framework and has uniquemechanisms for communicating with the other components across or within afirewall.
Verifying that the required software is running
ObjectiveTo confirm that software required to enable Tivoli transactions is running on theremote target computers that you configure during installation.
16 IBM Tivoli Monitoring for Applications: Installation and Setup Guide
Background informationOne of the following basic execution daemons must be running on managed nodesand endpoints to enable Tivoli transactions:v For installation on UNIX target computers, test the rexecd daemon.v For installation on Windows target computers, test the Tivoli Remote Execution
Service (TRIP) process.
Required authorization roleLogon access to the computer.
Before you beginNone
When you finishInstall the product using one of the following methods:v Chapter 4, “Performing a Typical installation” on page 23v Chapter 5, “Performing a Custom installation” on page 33v Chapter 6, “Installing the product manually” on page 55
ProcedureYou can perform this procedure from the command line only.
Command line to a UNIX target computer:
1. Run an rexec command string against the target computer. The rexec commandruns commands on remote hosts that are running the rexec service. Forexample, run the following command:rexec <target_computer_name> echo test
2. Respond to the prompt for a user ID and password by typing the root ID andpassword.If the command is unsuccessful, you receive an error, for example, anauthentication error, a notice that the server is down, or a notice that rexecfailed to run. Do not continue installing this product until you can enable therexec daemon on the target computer.
Command line to a Windows target computer:
1. Run an rexec command string against the target computer. The rexec commandruns commands on remote hosts that are running the rexec service. Forexample, run the following command:rexec <target_computer_name> cmd /c echo test
2. Respond to the prompt for a user ID and password by typing theAdministrator ID and password.
3. If the command is unsuccessful, you receive an error, for example, anauthentication error, a notice that the server is down, or a notice that theprocess failed to run.Do not continue installing this product until you complete these steps:a. Log on to the target computer on which you want to confirm that the Tivoli
Remote Execution Service exists.b. Access the Services user interface in the Windows control panel.c. Find the Tivoli Remote Execution Service in the Services list and perform
one of the following actions:v If this service exists and the status is Stopped, click the Start button.
—OR—
Chapter 3. Pre-installation 17

v If this service exists and the status is Started, resolve firewall blocks orother network connectivity problems between this computer and thecomputer on which you are installing IBM Tivoli Monitoring. Forexample, you can increase access privileges to resolve some typescommunication failure.—OR—
v If this service does not exist, run the setup.exe executable in the TRIPdirectory of the software installation CD for Tivoli ManagementFramework. Follow the instructions in the panels of the installationwizard for this service.
18 IBM Tivoli Monitoring for Applications: Installation and Setup Guide
Completing installation planning sheetsA planning.html planning sheet exists in the root directory of the documentationCD for IBM Tivoli Monitoring for Applications. Use the planning sheet to plan theinstallation of IBM Tivoli Monitoring for Applications. You can open this .html filein an HTML editor, a word processor, or a spreadsheet application and type thevalues for your installation plan. You can also photocopy the sheets in thisdocument or print the sheets from the PDF version of this document and completethem by hand.
This section describes the following types of managed resources that each planningsheet covers:v Managed nodes and the gateway on each managed node.v Endpoints.
Table 7. Managed resources and their purpose
Managed resource Purpose
Managed nodes Create managed nodes on servers to supplement the Tivoli management region server. Amanaged node runs the same software that runs on a Tivoli server. It can communicate withother managed nodes and can help the Tivoli server manage endpoints. When a managed nodesupplements the Tivoli server, the managed nodes share the processing burden of the Tivoliserver. The Tivoli server works more efficiently because it performs fewer management anduser administration operations.
Gateways Create gateways on managed nodes to enable the managed node to perform endpointmanagement operations on behalf of the Tivoli management region server. A gateway transferslarge amounts of data to endpoints more efficiently. By default, the maximum amount ofmemory to use for storing transient data is set to 10 MB. Always enable managed nodes forIBM Tivoli Monitoring for Applications as gateways so that they can perform endpointmanagement operations.
When you use the Typical path in the installer for this product, the installer automaticallyestablishes gateways on the managed nodes you create during installation. Be sure to creategateways on managed nodes that you create during a Custom installation or during aninstallation through an existing Tivoli environment. See “Installation options” on page 17 formore information on installation options.
Endpoints Create endpoints on the computers that you want to manage. Endpoints communicate with theTivoli management region through a specific gateway on a managed node.
Use the following planning sheets to compile the information you need duringinstallation:v Planning sheet for creating managed nodes in Table 8 on page 20v Planning sheet for creating endpoints in Table 9 on page 21
Chapter 3. Pre-installation 19
Tabl
e8.
Pla
nnin
gsh
eet
for
crea
ting
man
aged
node
s
Key
Con
cep
t:O
nem
anag
edno
de
mus
tex
ist
ina
Tivo
lim
anag
emen
tre
gion
.Thi
spr
inci
pal
man
aged
nod
eis
calle
dth
eTi
voli
man
agem
ent
regi
onse
rver
.
Hos
tn
ame
Nam
eof
the
targ
etco
mpu
ter
inth
ene
twor
k
Gat
eway
nam
e*
Nam
eof
the
gate
way
**
Pla
tfor
m
Ope
rati
ngsy
stem
ofth
em
anag
edno
de
Use
rn
ame
root
orA
dm
inis
trat
or
Pas
swor
d
Pass
wor
dof
the
user
onth
ese
rver
Des
tin
atio
nof
inst
alla
tion
file
s
Path
onth
eta
rget
com
pute
rfo
rin
stal
lati
onof
the
prod
uct
Exa
mpl
e:
visi
on03
Exa
mpl
e:
visi
on03
_gw
Exa
mpl
e:
Sola
ris
Exa
mpl
e:
root
—E
xam
ple:
/dat
a/my
node
*T
his
nam
eca
nin
clud
eal
phan
umer
icch
arac
ters
,und
ersc
ores
(_),
hyph
ens
(-),
and
peri
ods
(.).T
hena
mes
are
case
-sen
siti
ve.F
orex
ampl
e,th
ena
me
GW
Nam
eis
dif
fere
ntfr
omgw
nam
e.
**Yo
ush
ould
crea
tea
gate
way
onal
lm
anag
edno
des
for
this
prod
uct.
Aga
tew
ayen
able
sth
em
anag
edno
de
toco
mm
unic
ate
wit
hen
dpo
ints
.
Ina
Typi
cal
inst
alla
tion
,the
inst
alle
rau
tom
atic
ally
crea
tes
aga
tew
ayon
ever
ym
anag
edno
de
that
you
crea
te.T
hein
stal
ler
crea
tes
aun
ique
nam
efo
rth
ese
gate
way
sby
add
ing
the
-gat
eway
suff
ixto
the
host
nam
e.In
aC
usto
min
stal
lati
on,y
ouca
nus
ean
yun
ique
nam
ing
conv
enti
onfo
rth
ega
tew
ays
that
you
crea
te.
20 IBM Tivoli Monitoring for Applications: Installation and Setup Guide
Tabl
e9.
Pla
nnin
gsh
eet
for
crea
ting
endp
oint
s
An
end
poin
tis
aco
mpu
ter
onw
hich
Tivo
liso
ftw
are
isin
stal
led
toen
able
com
mun
icat
ion
wit
hth
eTi
voli
man
agem
ent
regi
onse
rver
.
Hos
tn
ame
Nam
eof
the
targ
etco
mpu
ter
inth
ene
twor
k
En
dp
oin
tn
ame
*
Nam
eyo
uas
sign
toth
een
dpo
int
Pla
tfor
m
Ope
rati
ngsy
stem
ofth
een
dpo
int
Use
rn
ame
root
orA
dm
inis
trat
or
Pas
swor
d
Pass
wor
dof
the
user
onth
ese
rver
Des
tin
atio
nof
inst
alla
tion
file
s
Path
onth
eta
rget
com
pute
rfo
rin
stal
lati
onof
the
prod
uct
Exa
mpl
e:
visi
on03
Exa
mpl
e:
visi
on03
_ep
Exa
mpl
e:
Sola
ris
Exa
mpl
e:
root
—E
xam
ple:
/dat
a/my
node
*T
his
nam
eca
nin
clud
eal
phan
umer
icch
arac
ters
,und
ersc
ores
(_),
hyph
ens
(-),
and
peri
ods
(.).T
hena
mes
are
case
-sen
siti
ve.F
orex
ampl
e,th
ena
me
EP
Nam
eis
dif
fere
ntfr
omep
nam
e.
Chapter 3. Pre-installation 21

22 IBM Tivoli Monitoring for Applications: Installation and Setup Guide
Chapter 4. Performing a Typical installation
ObjectiveTo use an installation wizard with predefined default values to automatically createa Tivoli environment and install IBM Tivoli Monitoring for Applications. Thewizard optionally creates managed resources in the Tivoli environment, asdescribed in this procedure.
Note: Perform a Custom installation option if you are installing the Tivolimanagement region server on a UNIX computer and you want to createWindows endpoints. See Chapter 5, “Performing a Custom installation” onpage 33. The Custom installation also provides more control overfile-naming and other installation details.
Background informationThe target computer, which becomes the Tivoli management region server, mustmatch one of the following profiles:v Has no software installed for the Tivoli Management Framework.
—OR—v Has Tivoli Management Framework, Version 3.7, Revision A or Revision B,
installed. You cannot install this product on systems that run previous versionsof the Tivoli Management Framework.
v Has Tivoli Management Framework, Version 3.7.1, installed but does not havethe required patches
Tivoli recommends that you close all other applications during an installation. ForWindows installations, the installer requires that you restart the computer.
When you are installing a Tivoli management region server on a Windowsoperating system, the installer automatically creates the Windows proxy endpointso you can create Windows endpoints in the domain of the Tivoli managementregion server.
You can also create managed nodes after installation.
Details of the Step List panel of the installer: “Background information” onpage 105 describes the status icons and buttons of the Step List panel.
Required authorizationOn UNIX, the user who installs the product must have root privileges. OnWindows, the user who installs the product must have membership in theAdministrators group.
Before you beginSee Chapter 2, “Guidelines for installation and setup” on page 5 for a checklist ofactivities prior to installation.
When you finishComplete the activities described in Chapter 7, “Completing the installation of theproduct” on page 73
23
Procedure1. Log on to the computer that you want to be the main Tivoli server for the
Tivoli management region.2. Run the setup executable in the root directory of the installation CD labeled
IBM Tivoli Monitoring for Applications, Version 5.1.0: Installation.Additional Information: The executable launches the IBM Tivoli Monitoring forApplications installer. Select the executable that matches your operatingsystem:v For Windows, run setupAPP.bat
v For UNIX, run ./setupAPP.sh
3. Click Next. The installer panel displays the name of the product that it isinstalling.
4. Click Next to display the license agreement.
Note: When you click the Cancel button in an installer panel, you stop theinstallation.
5. Select ″I accept the terms of the license agreement″ and click Next to set thetarget directory for installation.
6. Specify the directory path where you want to install the product.Additional Information: This prompt does not display if you are installing theproduct into an existing Tivoli management region.
7. Specify a directory path to an installation depot (temporary directory) that isaccessible from the target computer.
Note: On Windows, the depot must reside on the target computer. You cannotperform an installation of the product on Windows using a depot thatis located on a remote system. On UNIX, provide a directory path thatis accessible from the installation computer to the installation depot.
Additional Information: The depot directory contains all the files required forinstallation. After the installation is complete, the installer provides an optionto automatically delete this directory.
If you click Cancel in an installer panel always delete the temporary depotdirectory. You can begin installation again by running the setup executable onthe installation CD.
8. Click Next when the installer prompts you to restart the application andcontinue the installation.
9. Click Next to display the password panel.10. Type the password for the user who is listed under User ID in the Password
field.Additional Information: If you enter an invalid password in the Password andVerify Password fields, the installer accepts it. The installer detects the errorwhen it begins to install the software, and it displays an error message in theStep Detail dialog box. You can correct the error at that time.
11. Type the password again in the Verify Password field and click Next todisplay the license key panel.
12. Type the Tivoli Management Framework license key.Additional Information: Obtain this key in the printed document that comeswith the installation CDs for the Tivoli Management Framework.
24 IBM Tivoli Monitoring for Applications: Installation and Setup Guide
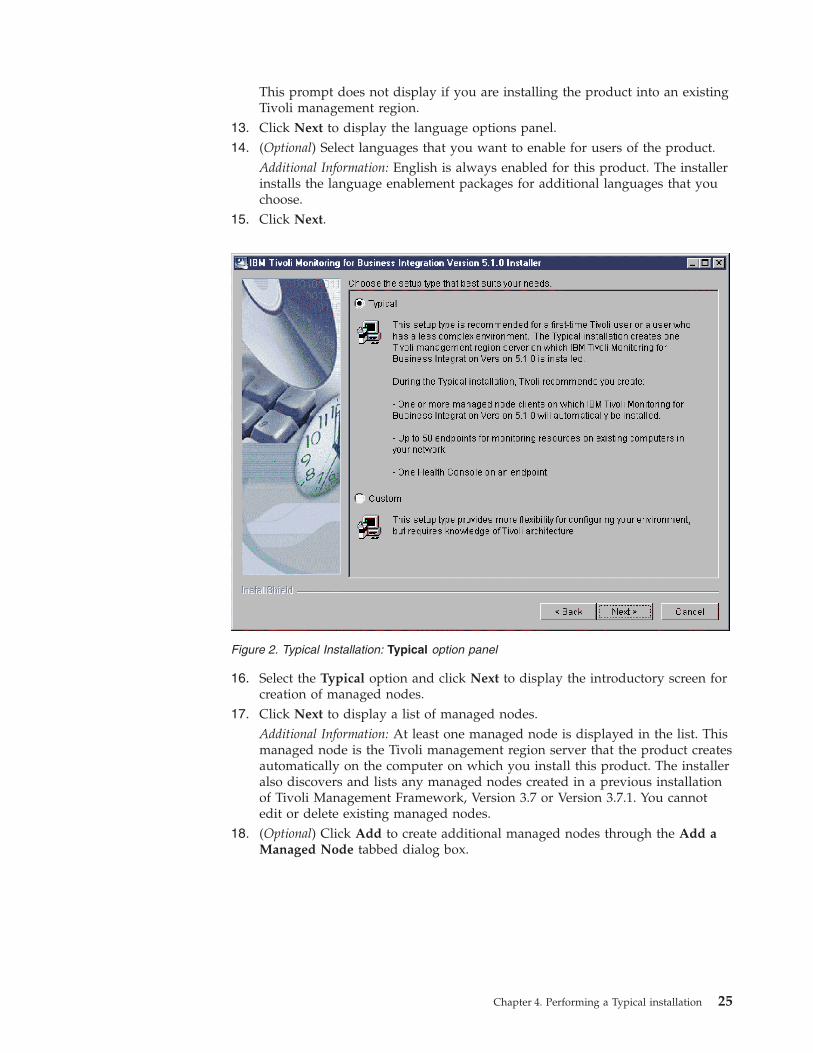
This prompt does not display if you are installing the product into an existingTivoli management region.
13. Click Next to display the language options panel.14. (Optional) Select languages that you want to enable for users of the product.
Additional Information: English is always enabled for this product. The installerinstalls the language enablement packages for additional languages that youchoose.
15. Click Next.
16. Select the Typical option and click Next to display the introductory screen forcreation of managed nodes.
17. Click Next to display a list of managed nodes.Additional Information: At least one managed node is displayed in the list. Thismanaged node is the Tivoli management region server that the product createsautomatically on the computer on which you install this product. The installeralso discovers and lists any managed nodes created in a previous installationof Tivoli Management Framework, Version 3.7 or Version 3.7.1. You cannotedit or delete existing managed nodes.
18. (Optional) Click Add to create additional managed nodes through the Add aManaged Node tabbed dialog box.
Figure 2. Typical Installation: Typical option panel
Chapter 4. Performing a Typical installation 25
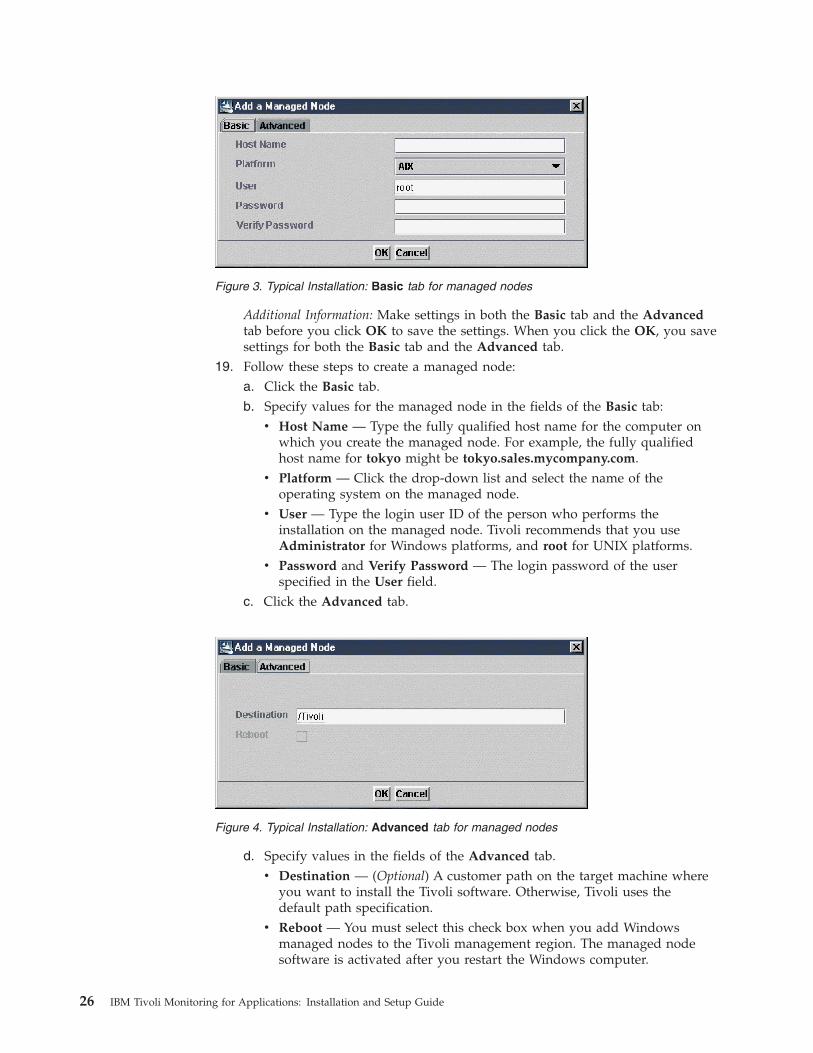
Additional Information: Make settings in both the Basic tab and the Advancedtab before you click OK to save the settings. When you click the OK, you savesettings for both the Basic tab and the Advanced tab.
19. Follow these steps to create a managed node:a. Click the Basic tab.b. Specify values for the managed node in the fields of the Basic tab:
v Host Name — Type the fully qualified host name for the computer onwhich you create the managed node. For example, the fully qualifiedhost name for tokyo might be tokyo.sales.mycompany.com.
v Platform — Click the drop-down list and select the name of theoperating system on the managed node.
v User — Type the login user ID of the person who performs theinstallation on the managed node. Tivoli recommends that you useAdministrator for Windows platforms, and root for UNIX platforms.
v Password and Verify Password — The login password of the userspecified in the User field.
c. Click the Advanced tab.
d. Specify values in the fields of the Advanced tab.v Destination — (Optional) A customer path on the target machine where
you want to install the Tivoli software. Otherwise, Tivoli uses thedefault path specification.
v Reboot — You must select this check box when you add Windowsmanaged nodes to the Tivoli management region. The managed nodesoftware is activated after you restart the Windows computer.
Figure 3. Typical Installation: Basic tab for managed nodes
Figure 4. Typical Installation: Advanced tab for managed nodes
26 IBM Tivoli Monitoring for Applications: Installation and Setup Guide

e. Click OK to save your settings and return to the installer.20. Click Next to display the panel for selection of product components.21. Select the component or components that you want to install.22. Click Next to display a list of managed nodes.23. Select the check box beside each managed node on which you want to install
the component or components you selected in Step 21.Additional Information: When the component is already installed on a managednode, the row is not in edit mode. The check box is selected and you cannotmodify it.
24. Click Next to display the Web Health Console panel.25. (Optional) Install the Web Health Console as follows:
a. Click Install the Health Console.b. Click Next to display the list of available managed nodes.c. Place a check mark in the Web Health Console column beside the name of
each managed node on which you want to install the console.Additional Information: When you specify the installation of the Web HealthConsole on a pre-existing managed node, you must supply the user IDand password. Select the name of the managed node and click Edit tosupply the password.If the Web Health Console is already installed, do not place a check markhere. Otherwise, the console is installed again because the installer cannotdetect previous installations of the console.
26. Click Next to display the endpoint option panel.27. (Optional) Create endpoints for Tivoli to monitor and manage. (You can also
create endpoints after installation, as described in “Installing endpointsthrough an existing Tivoli environment” on page 60.)Additional Information: By default, the installer for IBM Tivoli Monitoring forApplications assigns endpoints to managed nodes whenever possible. Theinstaller assigns endpoints to the Tivoli management region server only whenno managed node is available. If you want to change gateway assignments foran endpoint after installation, see “Changing the gateway assignment of anendpoint” on page 88.a. Click Create endpoints.b. Click Next.
Additional Information: The installer displays a list of existing endpoints, ifany. You cannot use the installer to edit or delete existing endpoints.
c. Click Add to display the Add an Endpoint tabbed dialog box.
Chapter 4. Performing a Typical installation 27

d. Click the Basic tab.e. Specify values for the endpoint in the fields of the Basic tab:
v Host Name — Type the fully qualified host name for the computer onwhich you create the endpoint. For example, the fully qualified hostname for tokyo might be tokyo.sales.mycompany.com.
v Label — Type a unique name for the endpoint. This name can includealphanumeric characters, underscores (_), hyphens (-), and periods (.).The names are case-sensitive. For example, the name EPName is differentfrom epname.
v Platform — Click the drop-down list and select the name of theoperating system on the endpoint.
v User — Type the login user ID of the person who performs theinstallation on the endpoint. Tivoli recommends that you useAdministrator for Windows platforms, and root for UNIX platforms.
v Password and Verify Password — The login password of the userspecified in the User field.
f. Click the Advanced tab.
g. Specify values in the fields of the Advanced tab, if necessary.v Port — A port number dedicated to communication with the Tivoli
server. The default is 9495.v Destination — Path on the target machine where you want to install the
Tivoli software.
Figure 5. Typical Installation: Basic tab for endpoints
Figure 6. Typical Installation: Advanced tab for endpoints
28 IBM Tivoli Monitoring for Applications: Installation and Setup Guide
v Reboot — You must select this check box when you add Windowsendpoints. The endpoint software is activated after you restart the targetWindows computer.
h. Click OK to save your settings and continue installation in the installerpanels.
28. Click Next to display a series of panels in which you specify the path forsoftware.Additional Information: You specify the path to the installation CDs that containthe software listed in the following table. Type a directory path or click theBrowse button to specify the path to CD.
Note: The installer also prompts you for Language Support CDs, if youspecified a language support option earlier in the installation process.
Table 10. Software locations on installation CDs
Software to install CD on which software is located
1. Version 3.7, Revision B, of theTivoli Management Framework
Tivoli Management Framework V 3.7, Revision B
2. Version 3.7.1 of the TivoliManagement Framework
Tivoli Management Framework Upgrade from 3.7 to 3.7.1
3. IBM Tivoli Monitoring software IBM Tivoli Monitoring V5.1.1
4. IBM Tivoli Monitoring forApplications
IBM Tivoli Monitoring for Applications, Version 5.1.0:mySAP.com Component Software
IBM Tivoli Monitoring for Applications, Version 5.1.0:Siebel eBusiness Applications Component Software
Depending on your choice of products earlier in theinstallation process, the installer prompts you for oneor both CDs.
5. IBM Tivoli Monitoring WebHealth Console
Tivoli Monitoring Web Health Console for AIX, HP, SUNv5.1.1
Tivoli Monitoring Web Health Console for Win, Linuxv5.1.1
6. IBM Tivoli MonitoringLanguage Support
IBM Tivoli Monitoring for Applications, Version 5.1.0:mySAP.com Language Support
IBM Tivoli Monitoring for Applications, Version 5.1.0:Siebel eBusiness Application Language Support
29. Click Next to access the Step List panel of the installer.Additional Information: The Step List shows the software components that theinstaller installs, and it displays status updates for the installation process. See“Troubleshooting installer problems” on page 105 for a description of statusicons and buttons in the Step List panel.
Chapter 4. Performing a Typical installation 29
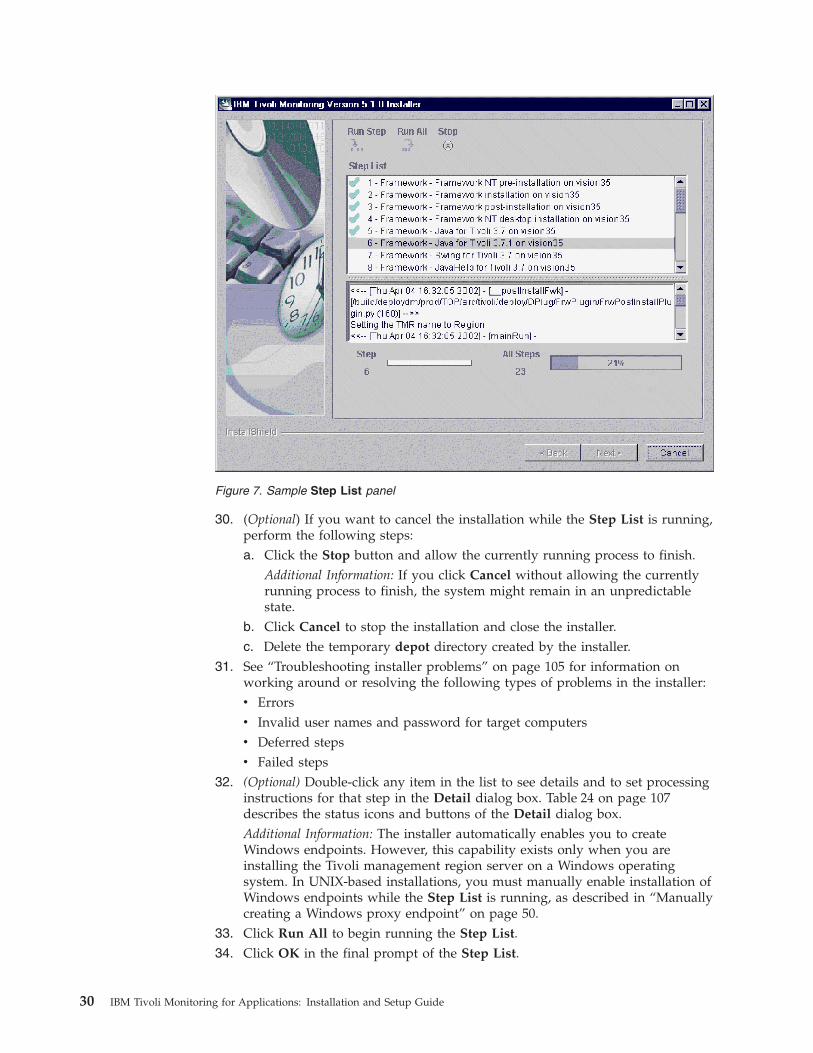
30. (Optional) If you want to cancel the installation while the Step List is running,perform the following steps:a. Click the Stop button and allow the currently running process to finish.
Additional Information: If you click Cancel without allowing the currentlyrunning process to finish, the system might remain in an unpredictablestate.
b. Click Cancel to stop the installation and close the installer.c. Delete the temporary depot directory created by the installer.
31. See “Troubleshooting installer problems” on page 105 for information onworking around or resolving the following types of problems in the installer:v Errorsv Invalid user names and password for target computersv Deferred stepsv Failed steps
32. (Optional) Double-click any item in the list to see details and to set processinginstructions for that step in the Detail dialog box. Table 24 on page 107describes the status icons and buttons of the Detail dialog box.Additional Information: The installer automatically enables you to createWindows endpoints. However, this capability exists only when you areinstalling the Tivoli management region server on a Windows operatingsystem. In UNIX-based installations, you must manually enable installation ofWindows endpoints while the Step List is running, as described in “Manuallycreating a Windows proxy endpoint” on page 50.
33. Click Run All to begin running the Step List.34. Click OK in the final prompt of the Step List.
Figure 7. Sample Step List panel
30 IBM Tivoli Monitoring for Applications: Installation and Setup Guide
Additional Information: This final prompt is displayed when all steps in theStep List show a Passed status. If all steps do not show a Passed status, see“Troubleshooting installer problems” on page 105 for troubleshootinginformation.
35. Click Next.36. Select one of the following options:
v Delete the temporary files. Select this option to delete the directory oftemporary installation files that you specified in at the beginning of theinstallation process.—OR—
v Do not delete the temporary files. Select this option to keep the temporaryfiles. You can manually delete the files at any time.
37. Click Next.38. Click Finish.
Chapter 4. Performing a Typical installation 31

32 IBM Tivoli Monitoring for Applications: Installation and Setup Guide
Chapter 5. Performing a Custom installation
Table 11 lists the goals of performing a Custom installation of IBM TivoliMonitoring for Applications.
Table 11. Custom installation goals
Goal Refer to
Install IBM Tivoli Monitoring forApplications using the Install wizard andrelated Planner tool.
“Installing IBM Tivoli Monitoring forApplications” on page 33
Manually create a Windows proxy endpointon a UNIX-based Tivoli management regionserver.
“Manually creating a Windows proxyendpoint” on page 50
Installing IBM Tivoli Monitoring for Applications
ObjectiveTo use the installer and related Planner tool to install IBM Tivoli Monitoring forApplications.
Background informationThe Custom installation method offers the following benefits:v You see all target computers in a single tree view for quick reference.v You control the naming of managed resources. (Naming is automatic in the
Typical installation method.)v You control the specification of target directories. For example, you can set a
customized path for the Tivoli database files. (You must accept the defaultdirectory paths in the Typical installation method.)
v You can export a Custom installation plan. In a later installation session you canimport the plan to restore its specifications. The imported configuration planoverwrites all existing settings the Planner. Step 30 on page 47 describes thisprocess.
Note: When you use the Custom installation path, you should define at least onegateway, as described in this procedure. If no gateway is defined, a severeerror can occur that prevents the deployment process from proceeding. Thiserror does not occur in the Typical installation path because in that optiongateways are defined automatically.
The target computer, which becomes the Tivoli management region server, mustmatch one of the following profiles:v Has no software installed for the Tivoli Management Framework.
—OR—v Has Tivoli Management Framework, Version 3.7, Revision A or Revision B,
installed. You cannot install this product on systems that run previous versionsof the Tivoli Management Framework.
Tivoli recommends that you close all other applications during an installation. ForWindows installations, the installer requires that you restart the computer after thefollowing events:
33

v Creation of the user ID for the Tivoli Management Framework softwarev Installation of the Tivoli Management Framework software
When you are installing a Tivoli management region server on a Windowsoperating system, the installer automatically creates the Windows proxy endpointso you can create Windows endpoints in the domain of the Tivoli managementregion server. When you are installing the Tivoli management region server on aUNIX-based operating system, see “Manually creating a Windows proxy endpoint”on page 50.
Details of the Step List panel of the installer: “Background information” onpage 105 describes the status icons and buttons of the Step List panel in theinstaller.
About the Planner tool: The Custom installation method features a Planner thatenables you to specify all elements to install. You must use the Planner tool whileyou perform a Custom installation.
The Planner makes no changes to any computer. After you complete actions in thePlanner, you return to the installer. The installer references the plan you created inthe Planner and implements it.
When a Tivoli environment already exists, the installer discovers existing managednodes, gateways, endpoints, and previously installed of IBM Tivoli Monitoringproducts. These elements are displayed in the Planner. You cannot modify thesediscovered managed nodes and endpoints, except to change the user ID andpassword setting. See “Completing installation planning sheets” on page 19 formore information on the role of managed nodes, gateways, and endpoints
The elements displayed in the tree view in Figure 8 represent a basic plan for aTivoli environment. The Planner automatically specifies these elements when youare creating a new Tivoli environment:v Region — A Tivoli policy region to contain the Tivoli environment.v Managed Nodes — A first managed node, which is the Tivoli management
region server. This node exists on the computer on which you are installing IBMTivoli Monitoring for Applications.
v Tivoli Gateway — (Windows only) A gateway on the first managed node.v Applications — Applications that enable IBM Tivoli Monitoring for Applications
or that enable optional features, for example:– Tivoli Management Framework, Version 3.7.1– IBM Tivoli Monitoring, Version 5.1.1, including the Web Health Console and
the IBM Tivoli Monitoring Component Services
34 IBM Tivoli Monitoring for Applications: Installation and Setup Guide
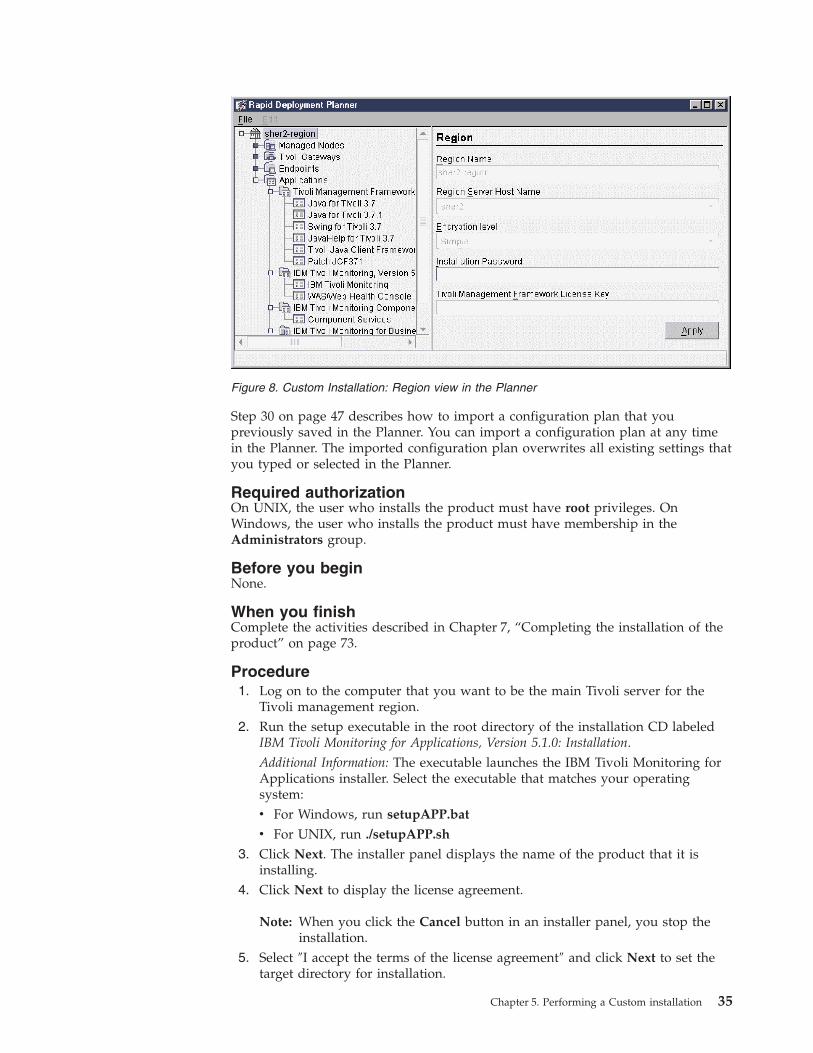
Step 30 on page 47 describes how to import a configuration plan that youpreviously saved in the Planner. You can import a configuration plan at any timein the Planner. The imported configuration plan overwrites all existing settings thatyou typed or selected in the Planner.
Required authorizationOn UNIX, the user who installs the product must have root privileges. OnWindows, the user who installs the product must have membership in theAdministrators group.
Before you beginNone.
When you finishComplete the activities described in Chapter 7, “Completing the installation of theproduct” on page 73.
Procedure1. Log on to the computer that you want to be the main Tivoli server for the
Tivoli management region.2. Run the setup executable in the root directory of the installation CD labeled
IBM Tivoli Monitoring for Applications, Version 5.1.0: Installation.Additional Information: The executable launches the IBM Tivoli Monitoring forApplications installer. Select the executable that matches your operatingsystem:v For Windows, run setupAPP.bat
v For UNIX, run ./setupAPP.sh
3. Click Next. The installer panel displays the name of the product that it isinstalling.
4. Click Next to display the license agreement.
Note: When you click the Cancel button in an installer panel, you stop theinstallation.
5. Select ″I accept the terms of the license agreement″ and click Next to set thetarget directory for installation.
Figure 8. Custom Installation: Region view in the Planner
Chapter 5. Performing a Custom installation 35
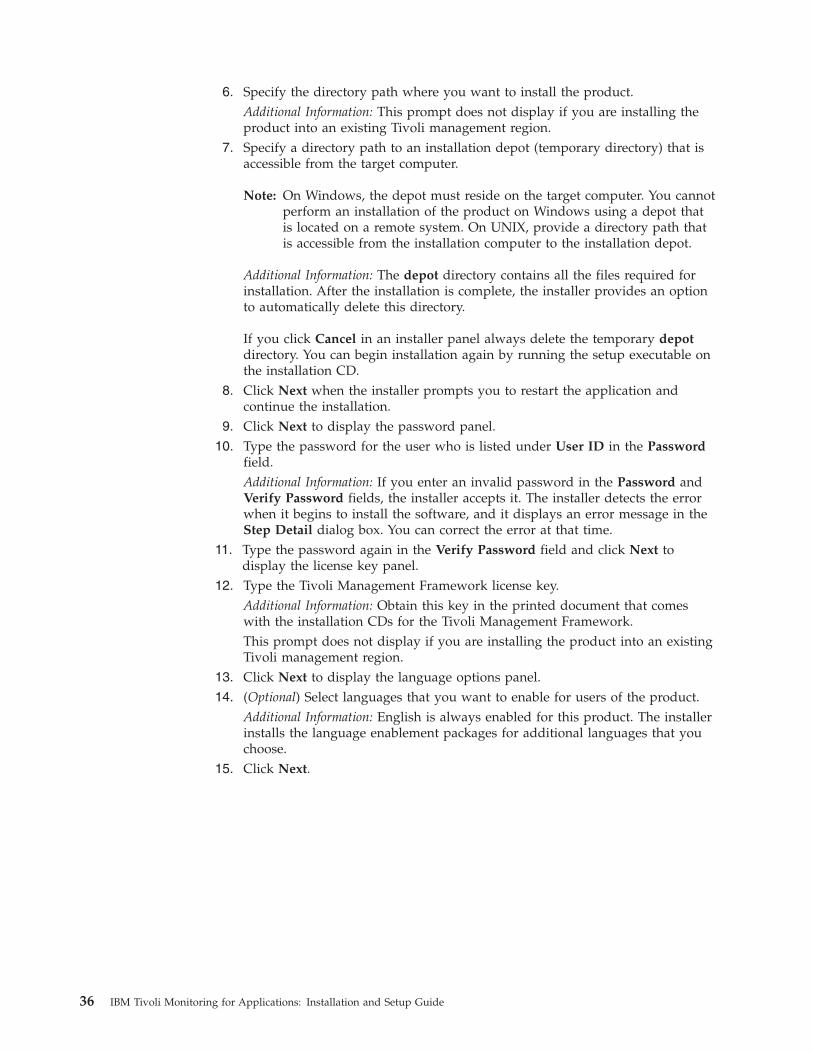
6. Specify the directory path where you want to install the product.Additional Information: This prompt does not display if you are installing theproduct into an existing Tivoli management region.
7. Specify a directory path to an installation depot (temporary directory) that isaccessible from the target computer.
Note: On Windows, the depot must reside on the target computer. You cannotperform an installation of the product on Windows using a depot thatis located on a remote system. On UNIX, provide a directory path thatis accessible from the installation computer to the installation depot.
Additional Information: The depot directory contains all the files required forinstallation. After the installation is complete, the installer provides an optionto automatically delete this directory.
If you click Cancel in an installer panel always delete the temporary depotdirectory. You can begin installation again by running the setup executable onthe installation CD.
8. Click Next when the installer prompts you to restart the application andcontinue the installation.
9. Click Next to display the password panel.10. Type the password for the user who is listed under User ID in the Password
field.Additional Information: If you enter an invalid password in the Password andVerify Password fields, the installer accepts it. The installer detects the errorwhen it begins to install the software, and it displays an error message in theStep Detail dialog box. You can correct the error at that time.
11. Type the password again in the Verify Password field and click Next todisplay the license key panel.
12. Type the Tivoli Management Framework license key.Additional Information: Obtain this key in the printed document that comeswith the installation CDs for the Tivoli Management Framework.This prompt does not display if you are installing the product into an existingTivoli management region.
13. Click Next to display the language options panel.14. (Optional) Select languages that you want to enable for users of the product.
Additional Information: English is always enabled for this product. The installerinstalls the language enablement packages for additional languages that youchoose.
15. Click Next.
36 IBM Tivoli Monitoring for Applications: Installation and Setup Guide
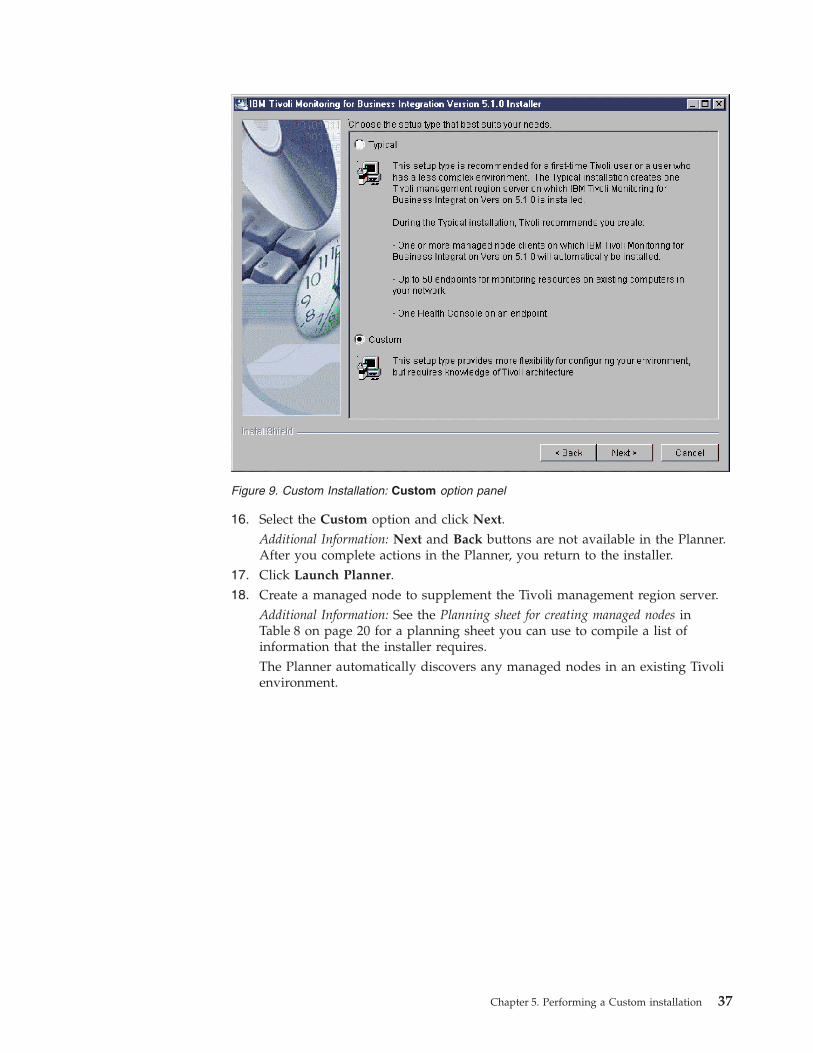
16. Select the Custom option and click Next.Additional Information: Next and Back buttons are not available in the Planner.After you complete actions in the Planner, you return to the installer.
17. Click Launch Planner.18. Create a managed node to supplement the Tivoli management region server.
Additional Information: See the Planning sheet for creating managed nodes inTable 8 on page 20 for a planning sheet you can use to compile a list ofinformation that the installer requires.The Planner automatically discovers any managed nodes in an existing Tivolienvironment.
Figure 9. Custom Installation: Custom option panel
Chapter 5. Performing a Custom installation 37
a. Right-click the Managed Nodes item in the tree view.b. Click Add in the pop-up menu.c. Select the name of the operating system on the managed node.
Additional Information: The following options are available: AIX, Windows,HP-UX, and Solaris. After you select an option, the Managed NodeProperties options are displayed in the right panel of the window.A red letter ″X″ is displayed on the icon of the managed node you created.When you provide the required configuration properties for the managednode and click Apply, the red ″X″ disappears.
Figure 10. Custom Installation: Adding a managed node in the Planner
38 IBM Tivoli Monitoring for Applications: Installation and Setup Guide
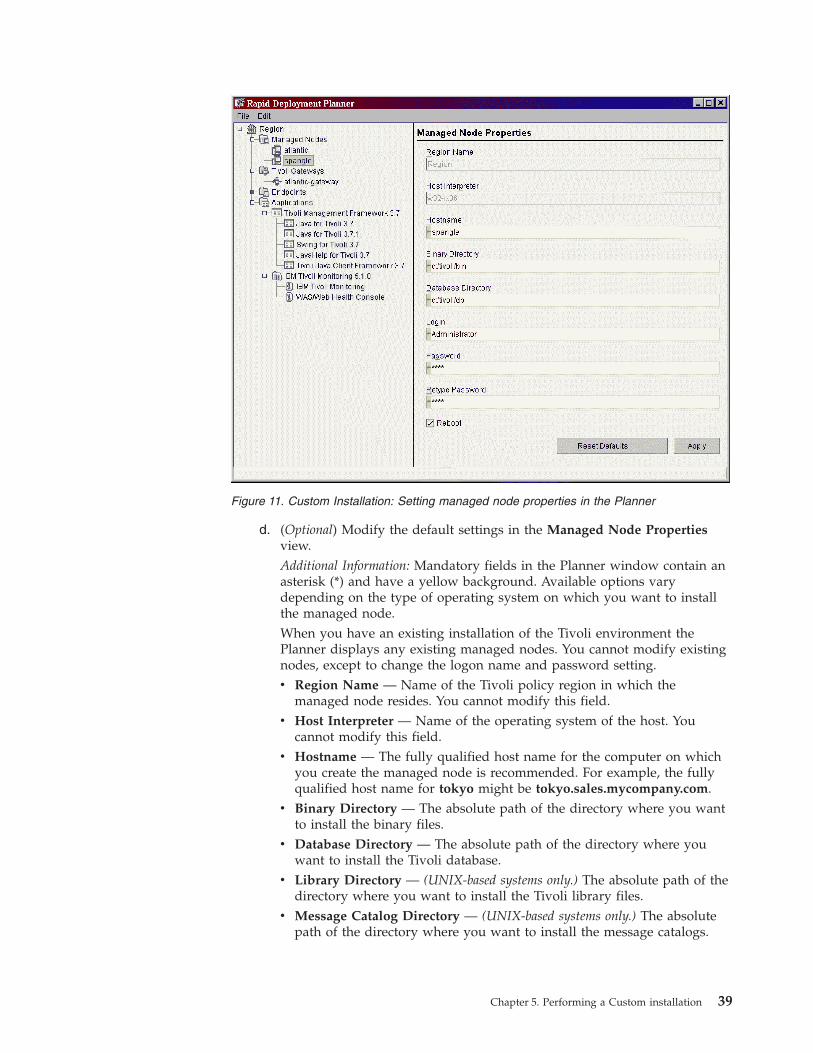
d. (Optional) Modify the default settings in the Managed Node Propertiesview.Additional Information: Mandatory fields in the Planner window contain anasterisk (*) and have a yellow background. Available options varydepending on the type of operating system on which you want to installthe managed node.When you have an existing installation of the Tivoli environment thePlanner displays any existing managed nodes. You cannot modify existingnodes, except to change the logon name and password setting.v Region Name — Name of the Tivoli policy region in which the
managed node resides. You cannot modify this field.v Host Interpreter — Name of the operating system of the host. You
cannot modify this field.v Hostname — The fully qualified host name for the computer on which
you create the managed node is recommended. For example, the fullyqualified host name for tokyo might be tokyo.sales.mycompany.com.
v Binary Directory — The absolute path of the directory where you wantto install the binary files.
v Database Directory — The absolute path of the directory where youwant to install the Tivoli database.
v Library Directory — (UNIX-based systems only.) The absolute path of thedirectory where you want to install the Tivoli library files.
v Message Catalog Directory — (UNIX-based systems only.) The absolutepath of the directory where you want to install the message catalogs.
Figure 11. Custom Installation: Setting managed node properties in the Planner
Chapter 5. Performing a Custom installation 39
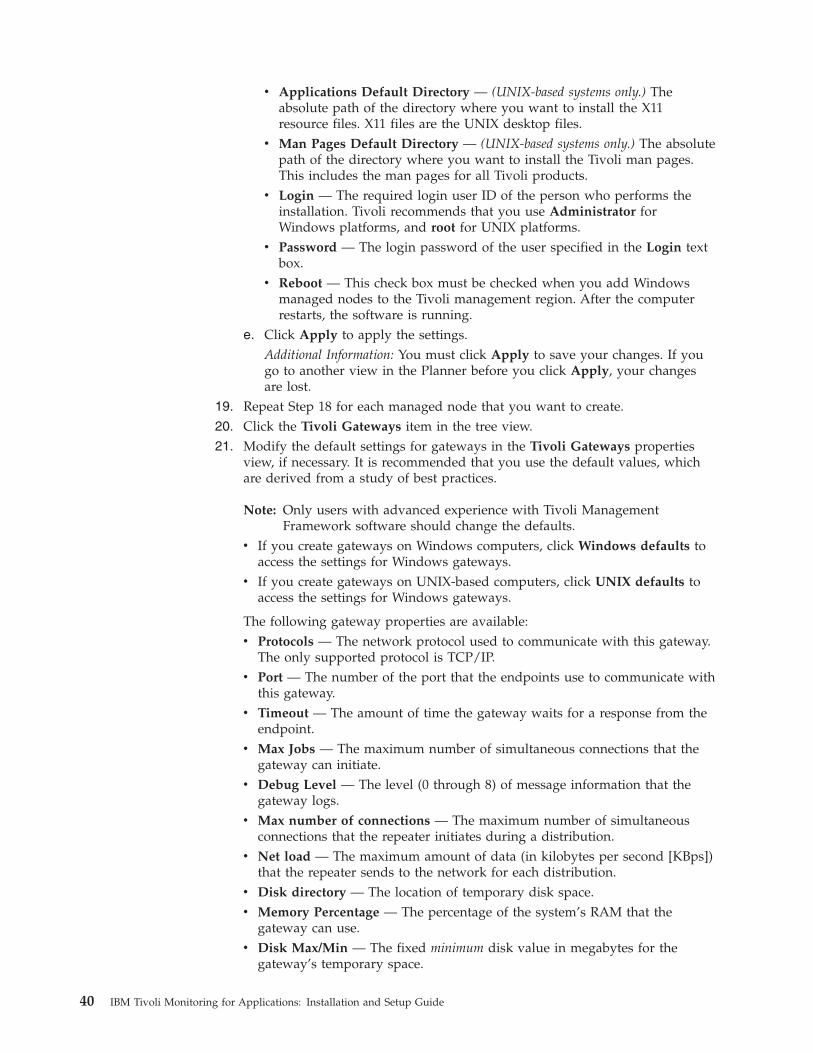
v Applications Default Directory — (UNIX-based systems only.) Theabsolute path of the directory where you want to install the X11resource files. X11 files are the UNIX desktop files.
v Man Pages Default Directory — (UNIX-based systems only.) The absolutepath of the directory where you want to install the Tivoli man pages.This includes the man pages for all Tivoli products.
v Login — The required login user ID of the person who performs theinstallation. Tivoli recommends that you use Administrator forWindows platforms, and root for UNIX platforms.
v Password — The login password of the user specified in the Login textbox.
v Reboot — This check box must be checked when you add Windowsmanaged nodes to the Tivoli management region. After the computerrestarts, the software is running.
e. Click Apply to apply the settings.Additional Information: You must click Apply to save your changes. If yougo to another view in the Planner before you click Apply, your changesare lost.
19. Repeat Step 18 for each managed node that you want to create.20. Click the Tivoli Gateways item in the tree view.21. Modify the default settings for gateways in the Tivoli Gateways properties
view, if necessary. It is recommended that you use the default values, whichare derived from a study of best practices.
Note: Only users with advanced experience with Tivoli ManagementFramework software should change the defaults.
v If you create gateways on Windows computers, click Windows defaults toaccess the settings for Windows gateways.
v If you create gateways on UNIX-based computers, click UNIX defaults toaccess the settings for Windows gateways.
The following gateway properties are available:v Protocols — The network protocol used to communicate with this gateway.
The only supported protocol is TCP/IP.v Port — The number of the port that the endpoints use to communicate with
this gateway.v Timeout — The amount of time the gateway waits for a response from the
endpoint.v Max Jobs — The maximum number of simultaneous connections that the
gateway can initiate.v Debug Level — The level (0 through 8) of message information that the
gateway logs.v Max number of connections — The maximum number of simultaneous
connections that the repeater initiates during a distribution.v Net load — The maximum amount of data (in kilobytes per second [KBps])
that the repeater sends to the network for each distribution.v Disk directory — The location of temporary disk space.v Memory Percentage — The percentage of the system’s RAM that the
gateway can use.v Disk Max/Min — The fixed minimum disk value in megabytes for the
gateway’s temporary space.
40 IBM Tivoli Monitoring for Applications: Installation and Setup Guide
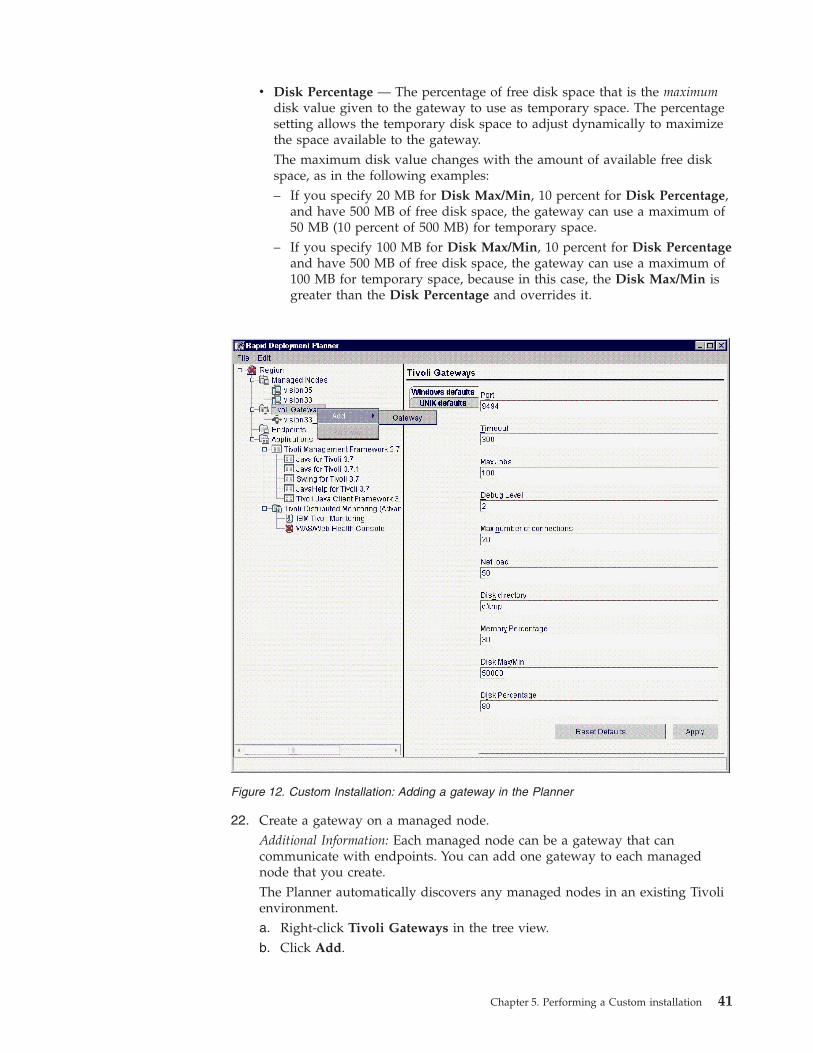
v Disk Percentage — The percentage of free disk space that is the maximumdisk value given to the gateway to use as temporary space. The percentagesetting allows the temporary disk space to adjust dynamically to maximizethe space available to the gateway.The maximum disk value changes with the amount of available free diskspace, as in the following examples:– If you specify 20 MB for Disk Max/Min, 10 percent for Disk Percentage,
and have 500 MB of free disk space, the gateway can use a maximum of50 MB (10 percent of 500 MB) for temporary space.
– If you specify 100 MB for Disk Max/Min, 10 percent for Disk Percentageand have 500 MB of free disk space, the gateway can use a maximum of100 MB for temporary space, because in this case, the Disk Max/Min isgreater than the Disk Percentage and overrides it.
22. Create a gateway on a managed node.Additional Information: Each managed node can be a gateway that cancommunicate with endpoints. You can add one gateway to each managednode that you create.The Planner automatically discovers any managed nodes in an existing Tivolienvironment.a. Right-click Tivoli Gateways in the tree view.b. Click Add.
Figure 12. Custom Installation: Adding a gateway in the Planner
Chapter 5. Performing a Custom installation 41
c. Select Gateway in the pop-up menu to create the gateway and display theGateway Properties view.A red letter ″X″ is displayed on the icon of the gateway you created. Whenyou provide the required configuration properties for the gateway andclick Apply, the red ″X″ disappears.
d. Type a unique name in the Gateway Name field.Additional Information: This can be any name. It is recommended to use<host name>_gw to distinguish this gateway from other gateways andendpoints. For example, if the host name of the managed node is vision35,name the gateway vision35_gw.
e. Select the node on which to install the gateway in the Managed NodeHost Name drop-down list.Additional Information: You cannot create an number of gateways thatexceeds the number of available managed nodes. Otherwise the ManagedNode Host Name list is empty and you are unable to associate thegateway with a managed node.When you have an existing installation of the Tivoli environment thePlanner displays any existing gateways. You cannot modify the name of anexisting gateway or change the managed node with which it is associated.
f. Click Apply.Additional Information: You must click Apply to save your changes. If yougo to another view in the Planner before you click Apply, your changes arelost.
23. Repeat Step 22 for each gateway that you want to create.
Figure 13. Custom Installation: Associating a gateway with a managed node in the Planner
42 IBM Tivoli Monitoring for Applications: Installation and Setup Guide

24. Create an endpoint to enable a computer to communicate with the Tivolimanagement region server:Additional Information: When you install an endpoint, required software mustbe running on the target computer. See the “Verifying that the requiredsoftware is running” on page 16 for more information. See Table 8 on page 20for a planning sheet you can use to compile a list of endpoint information thatthe installer requires.By default, the installer for IBM Tivoli Monitoring for Applications assignsendpoints to managed nodes whenever possible. The installer assignsendpoints to the Tivoli management region server only when no managednode is available. If you want to change gateway assignments for an endpointafter installation, see “Changing the gateway assignment of an endpoint” onpage 88.The Planner automatically discovers any endpoints in an existing Tivolienvironment.a. Right-click Endpoints in the tree view.b. Select Add in the pop-up menu.c. Select the operating system of the server on which you are creating an
endpoint.Additional Information: Most text boxes in the Endpoint Properties view arecommon to all the platforms. Endpoints installed on Windows platformsrequire a Windows proxy agent. See “Manually creating a Windows proxyendpoint” on page 50 for instructions on creating a proxy endpoint.
Figure 14. Custom Installation: Adding an endpoint in the Planner
Chapter 5. Performing a Custom installation 43

A red letter ″X″ is displayed on the icon of the endpoint you created.When you provide the required configuration properties for the endpointand click Apply, the red ″X″ disappears.
d. Enter required values and optionally modify the default settings in theEndpoint Properties view:When you have an existing installation of the Tivoli environment thePlanner displays any existing endpoints. You cannot modify existingendpoints, except to change the logon name and password setting.v Region Name — Name of the Tivoli policy region in which the
managed node resides. You cannot modify this field.v Host Interpreter — Name of the operating system of the host. You
cannot modify this field.v Proxy name — (Windows only.) Type the name of an existing Windows
endpoint that serves as the new endpoint’s proxy agent. This proxyshould share the same domain as the Tivoli management region domainbecause it uses Windows Universal Naming Convention (UNC) methodsto provide remote access to newly created Window endpoints. Theproxy endpoint enables creation of Windows endpoints in any domainthat has a trusted relationship with the domain that contains the proxy.
v Endpoint Name — The name you give to the endpoint. Tivolirecommends that you name it <host_name>_ep, in case you have agateway with the same name on the same computer. This namingconvention distinguishes the gateway from the endpoint. For example,vision35_ep and vision35_gw.
v Base directory — The absolute path of the directory where you want toinstall the endpoint.
Figure 15. Custom Installation: Setting endpoint properties in the Planner
44 IBM Tivoli Monitoring for Applications: Installation and Setup Guide
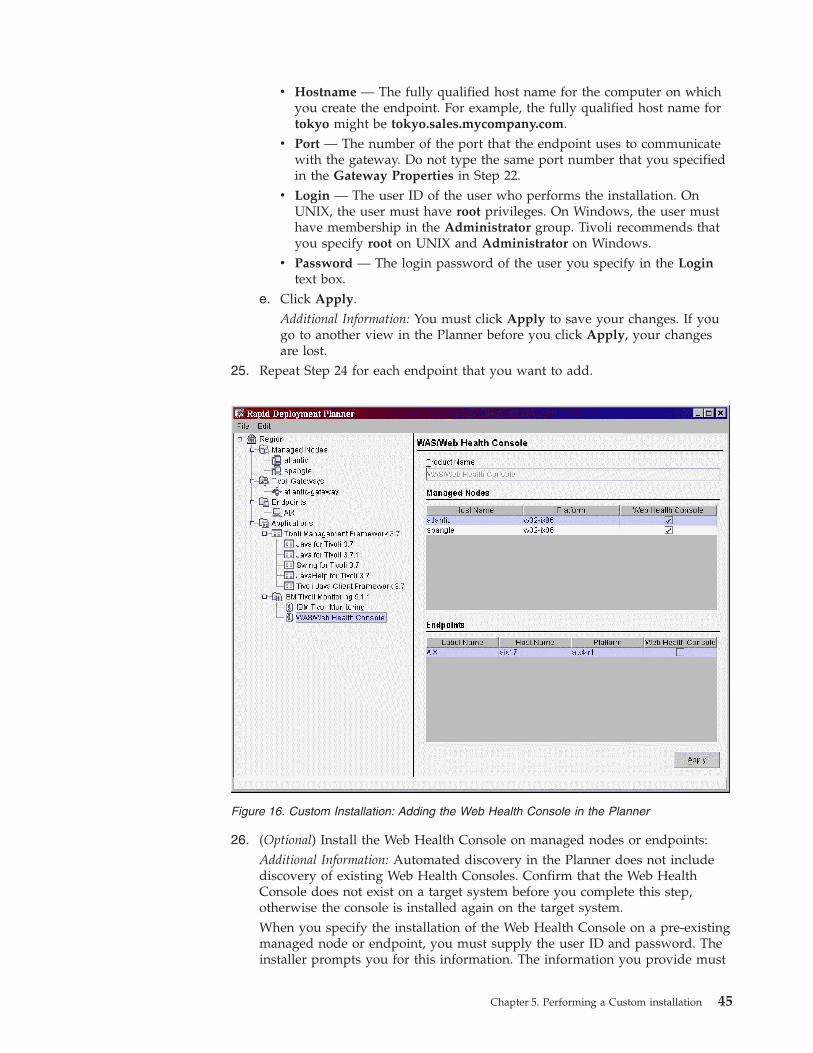
v Hostname — The fully qualified host name for the computer on whichyou create the endpoint. For example, the fully qualified host name fortokyo might be tokyo.sales.mycompany.com.
v Port — The number of the port that the endpoint uses to communicatewith the gateway. Do not type the same port number that you specifiedin the Gateway Properties in Step 22.
v Login — The user ID of the user who performs the installation. OnUNIX, the user must have root privileges. On Windows, the user musthave membership in the Administrator group. Tivoli recommends thatyou specify root on UNIX and Administrator on Windows.
v Password — The login password of the user you specify in the Logintext box.
e. Click Apply.Additional Information: You must click Apply to save your changes. If yougo to another view in the Planner before you click Apply, your changesare lost.
25. Repeat Step 24 for each endpoint that you want to add.
26. (Optional) Install the Web Health Console on managed nodes or endpoints:Additional Information: Automated discovery in the Planner does not includediscovery of existing Web Health Consoles. Confirm that the Web HealthConsole does not exist on a target system before you complete this step,otherwise the console is installed again on the target system.When you specify the installation of the Web Health Console on a pre-existingmanaged node or endpoint, you must supply the user ID and password. Theinstaller prompts you for this information. The information you provide must
Figure 16. Custom Installation: Adding the Web Health Console in the Planner
Chapter 5. Performing a Custom installation 45
match the user ID and password specified for the managed node or endpointin the Tivoli environment. Remember that the Planner gives you the option tochange the user ID and password specification for any managed node orendpoint as described in previous steps of this procedure.a. Click Applications in the tree view to expand the nested items.b. Click Add to display the WAS/Web Health Console.c. Place a check mark in the Web Health Console column of the Managed
Nodes table in the row for each host that should have a console.d. Place a check mark in the Web Health Console column of the Endpoints
table for each host that should have a console.e. Click Apply.
Additional Information: You must click Apply to save your changes. If yougo to another view in the Planner before you click Apply, your changesare lost.
27. Install IBM Tivoli Monitoring for Applications on managed nodes.a. Click Applications in the tree view to display the nested items.b. If IBM Tivoli Monitoring for Applications is not displayed in the tree view,
click Add to add it to the tree view.c. Place a check mark in the product column of the Managed Nodes table in
the row for each node on which you want to install the product.Additional Information: The IBM Tivoli Monitoring and IBM TivoliMonitoring Component Services software is required to install IBM TivoliMonitoring for Applications. The Planner automatically places a checkmark on IBM Tivoli Monitoring and IBM Tivoli Monitoring ComponentServices for the corresponding host. Also, the Managed Node tabledisplays any pre-existing versions of IBM Tivoli Monitoring forApplications and automatically places a check mark beside the names ofhosts on which a version of the product already exists. You cannot removethis check mark.
d. Click Apply.Additional Information: You must click Apply to save your changes. If yougo to another view in the Planner before you click Apply, your changesare lost.
28. Confirm that all managed nodes, gateways, and proxy agents that you haveconfigured are valid and necessary.Additional Information: In a complex plan you might need to remove anelement from your configuration plan, as in the following examples:v You cannot obtain required configuration information prior to installation of
the product.v You cannot access a server because it is temporarily down or inaccessible in
the network.
If you identify elements to remove, consult table 12 to plan the successfulremoval of the element without causing an error for other elements that itreferences.
Table 12. Removal of planner elements and possible consequences
Element toremove
Possible consequence Corrective Action
Managednode
The gateway associated with themanaged node you removebecomes invalid.
Select the invalid gateway. Change itsproperties. Associate it with an existingmanaged node. Click Apply.
46 IBM Tivoli Monitoring for Applications: Installation and Setup Guide
Table 12. Removal of planner elements and possible consequences (continued)
Element toremove
Possible consequence Corrective Action
Gateway All the endpoints associated withthe gateway you remove becomeinvalid.
Select the invalid endpoints and changetheir properties. Associate them with anexisting gateway. Click Apply.
(Windowsonly) Proxyendpoint
All endpoints associated with theproxy endpoint you removebecome invalid.
Select the invalid agents, and changetheir properties. Associate them with anexisting proxy endpoint. Click Apply.
29. Remove any unnecessary managed nodes, endpoints, or applications you havecreated.a. Right-click the entity you want to delete.b. Click Remove in the pop-up menu.c. Click OK.
30. (Optional) Export your Planner settings to a .xml file for future use in thePlanner:a. Select Export in the File menu.b. Select a directory in which to save the file.c. Name the file.d. Click Save.e. If a tree view item has a red X mark, you must supply missing values as
follows:1) Click the item.2) Complete or modify the data fields in the properties view.3) Click Apply.
Additional Information: A confirmation message, The changes have beenapplied successfully is displayed.
31. (Optional) Import configuration settings that you saved previously:a. Select Import in the File menu.
Additional Information: The Planner warns you that the imported fileoverwrites any settings you have made in the current planning session.
b. Click OK to confirm the importation of a configuration settings (.xml) file.c. Find the directory that contains the file.d. Select the file.e. Click Open to import the configuration settings to the Planner.
32. Click File menu.33. Select Save to save all configurations settings.34. Click File menu.35. Select Close to exit the Planner and return to the installer.36. Click Next to display a series of panels in which you specify the path for
software.Additional Information: You specify the path to the installation CDs that containthe software listed in the following table. Type a directory path or click theBrowse button to specify the path to CD.
Note: The installer also prompts you for Language Support CDs, if youspecified a language support option earlier in the installation process.
Chapter 5. Performing a Custom installation 47

Table 13. Software locations on installation CDs
Software to install CD on which software is located
1. Version 3.7, Revision B, of theTivoli Management Framework
Tivoli Management Framework V 3.7, Revision B
2. Version 3.7.1 of the TivoliManagement Framework
Tivoli Management Framework Upgrade from 3.7 to 3.7.1
3. IBM Tivoli Monitoring software IBM Tivoli Monitoring V5.1.1
4. IBM Tivoli Monitoring forApplications
IBM Tivoli Monitoring for Applications, Version 5.1.0:mySAP.com Component Software
IBM Tivoli Monitoring for Applications, Version 5.1.0:Siebel eBusiness Applications Component Software
Depending on your choice of products earlier in theinstallation process, the installer prompts you for oneor both CDs.
5. IBM Tivoli Monitoring WebHealth Console
Tivoli Monitoring Web Health Console for AIX, HP, SUNv5.1.1
Tivoli Monitoring Web Health Console for Win, Linuxv5.1.1
6. IBM Tivoli MonitoringLanguage Support
IBM Tivoli Monitoring for Applications, Version 5.1.0:mySAP.com Language Support
IBM Tivoli Monitoring for Applications, Version 5.1.0:Siebel eBusiness Application Language Support
37. Click Next to access the Step List panel of the installer.Additional Information: The Step List shows the software components that theinstaller installs, and it displays status updates for the installation process. See“Troubleshooting installer problems” on page 105 for a description of statusicons and buttons in the Step List panel.
48 IBM Tivoli Monitoring for Applications: Installation and Setup Guide
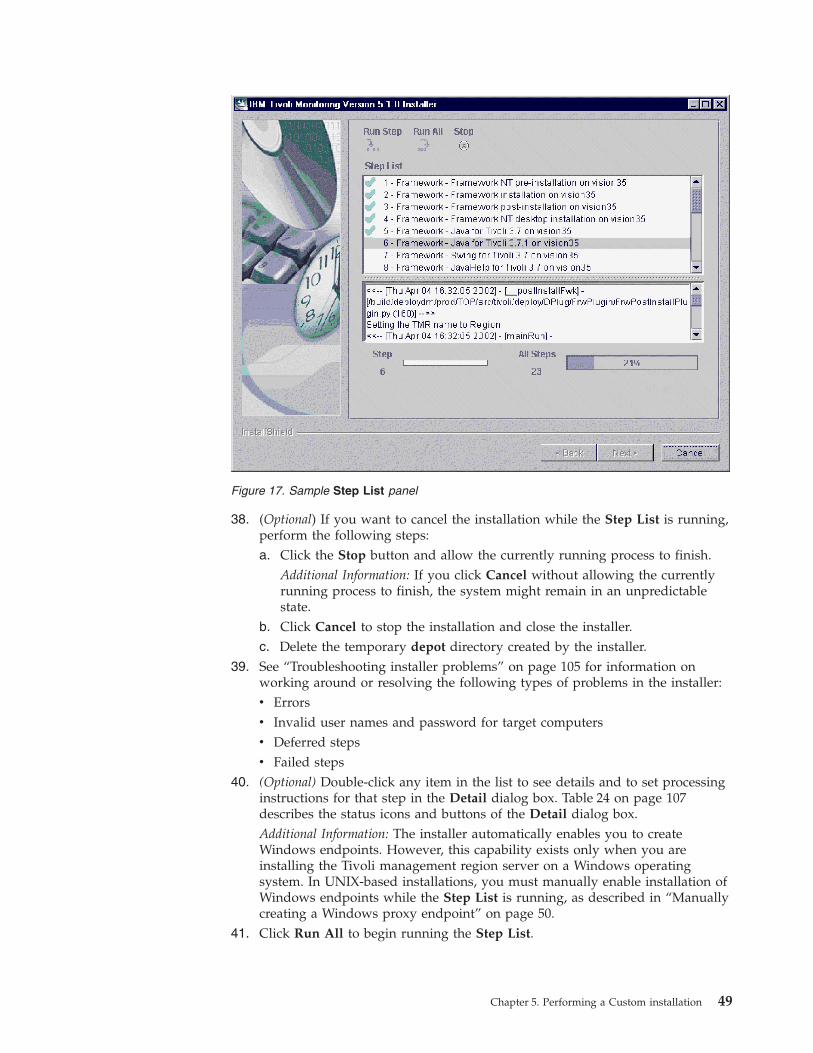
38. (Optional) If you want to cancel the installation while the Step List is running,perform the following steps:a. Click the Stop button and allow the currently running process to finish.
Additional Information: If you click Cancel without allowing the currentlyrunning process to finish, the system might remain in an unpredictablestate.
b. Click Cancel to stop the installation and close the installer.c. Delete the temporary depot directory created by the installer.
39. See “Troubleshooting installer problems” on page 105 for information onworking around or resolving the following types of problems in the installer:v Errorsv Invalid user names and password for target computersv Deferred stepsv Failed steps
40. (Optional) Double-click any item in the list to see details and to set processinginstructions for that step in the Detail dialog box. Table 24 on page 107describes the status icons and buttons of the Detail dialog box.Additional Information: The installer automatically enables you to createWindows endpoints. However, this capability exists only when you areinstalling the Tivoli management region server on a Windows operatingsystem. In UNIX-based installations, you must manually enable installation ofWindows endpoints while the Step List is running, as described in “Manuallycreating a Windows proxy endpoint” on page 50.
41. Click Run All to begin running the Step List.
Figure 17. Sample Step List panel
Chapter 5. Performing a Custom installation 49
Note: If you are installing the product on a UNIX-based computer and wantto create Windows endpoints in the Tivoli management region goimmediately to Step 42. Otherwise skip Step 42.
42. (Optional) UNIX-based Tivoli management region servers only: Click theStop button at the top of the Step List and perform the procedure describedin “Manually creating a Windows proxy endpoint” on page 50.
43. Click OK in the final prompt of the Step List.Additional Information: This final prompt is displayed when all steps in theStep List show a Passed status. If all steps do not show a Passed status, see“Troubleshooting installer problems” on page 105 for troubleshootinginformation.
44. Click Next.45. Select one of the following options:
v Delete the temporary files. Select this option to delete the directory oftemporary installation files that you specified in at the beginning of theinstallation process.—OR—
v Do not delete the temporary files. Select this option to keep the temporaryfiles. You can manually delete the files at any time.
46. Click Next.47. Click Finish.
Manually creating a Windows proxy endpoint
ObjectiveTo manually create a Windows proxy endpoint on a UNIX-based Tivolimanagement region server.
Background informationThe installation wizard can create Windows endpoints for the Tivoli managementregion server that you are installing. However, this capability exists only when youare installing the Tivoli management region server on a Windows operatingsystem. Chapter 4, “Performing a Typical installation” on page 23 and Chapter 5,“Performing a Custom installation” on page 33 describe the installation processwhich includes creation of endpoints.
A proxy endpoint must exist in a Windows domain to enable the installer to createWindows endpoints. When the Tivoli management region server runs on Windowsand you want to create Windows endpoints, the installer automatically creates theproxy endpoint in the domain in which that server resides. This proxy shouldshare the same domain as the Tivoli management region domain because it usesWindows Universal Naming Convention (UNC) methods to provide remote accessto newly created Window endpoints. The proxy endpoint enables creation ofWindows endpoints in any domain that has a trusted relationship with the domainthat contains the proxy. The Tivoli server uses the user ID and password for theproxy endpoint to obtain access to the file system of the other Windows servers.
The installation wizard also associates the proxy endpoint with a gateway in theTivoli management region. Otherwise, the Tivoli management region server cannotuse the proxy endpoint. You perform this procedure at a specific point during theinstallation process when a gateway has been created to associate with the proxyendpoint.
50 IBM Tivoli Monitoring for Applications: Installation and Setup Guide
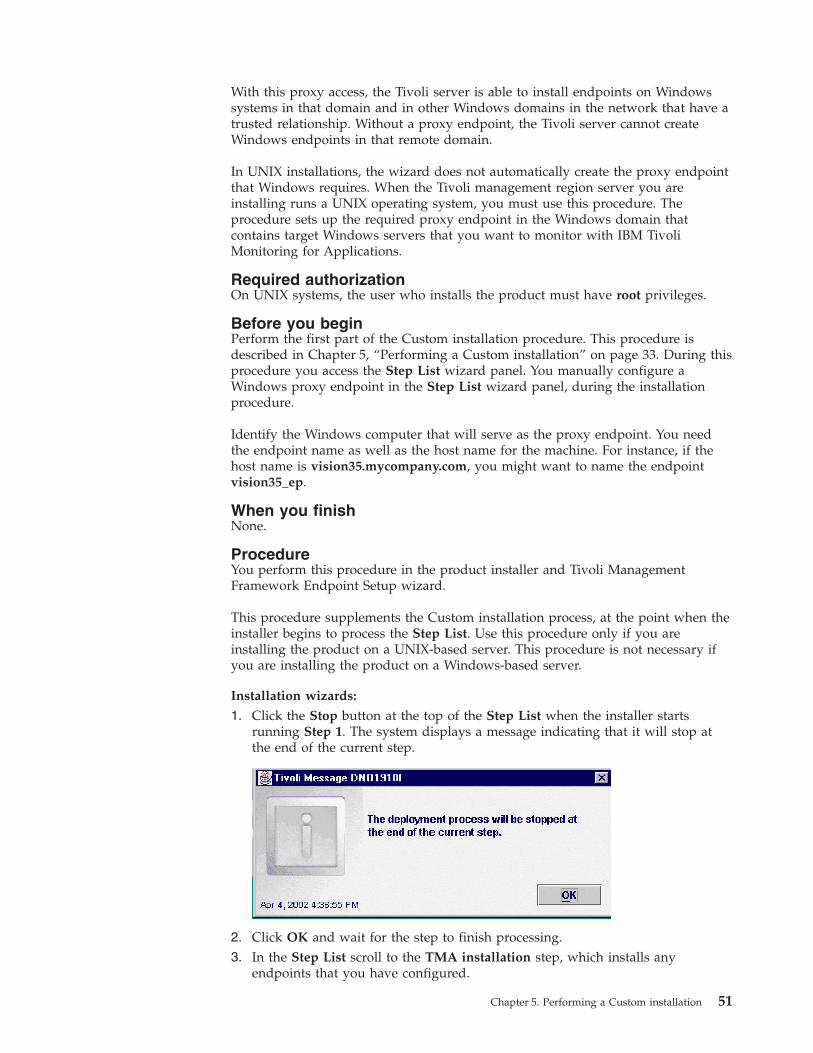
With this proxy access, the Tivoli server is able to install endpoints on Windowssystems in that domain and in other Windows domains in the network that have atrusted relationship. Without a proxy endpoint, the Tivoli server cannot createWindows endpoints in that remote domain.
In UNIX installations, the wizard does not automatically create the proxy endpointthat Windows requires. When the Tivoli management region server you areinstalling runs a UNIX operating system, you must use this procedure. Theprocedure sets up the required proxy endpoint in the Windows domain thatcontains target Windows servers that you want to monitor with IBM TivoliMonitoring for Applications.
Required authorizationOn UNIX systems, the user who installs the product must have root privileges.
Before you beginPerform the first part of the Custom installation procedure. This procedure isdescribed in Chapter 5, “Performing a Custom installation” on page 33. During thisprocedure you access the Step List wizard panel. You manually configure aWindows proxy endpoint in the Step List wizard panel, during the installationprocedure.
Identify the Windows computer that will serve as the proxy endpoint. You needthe endpoint name as well as the host name for the machine. For instance, if thehost name is vision35.mycompany.com, you might want to name the endpointvision35_ep.
When you finishNone.
ProcedureYou perform this procedure in the product installer and Tivoli ManagementFramework Endpoint Setup wizard.
This procedure supplements the Custom installation process, at the point when theinstaller begins to process the Step List. Use this procedure only if you areinstalling the product on a UNIX-based server. This procedure is not necessary ifyou are installing the product on a Windows-based server.
Installation wizards:
1. Click the Stop button at the top of the Step List when the installer startsrunning Step 1. The system displays a message indicating that it will stop atthe end of the current step.
2. Click OK and wait for the step to finish processing.3. In the Step List scroll to the TMA installation step, which installs any
endpoints that you have configured.
Chapter 5. Performing a Custom installation 51
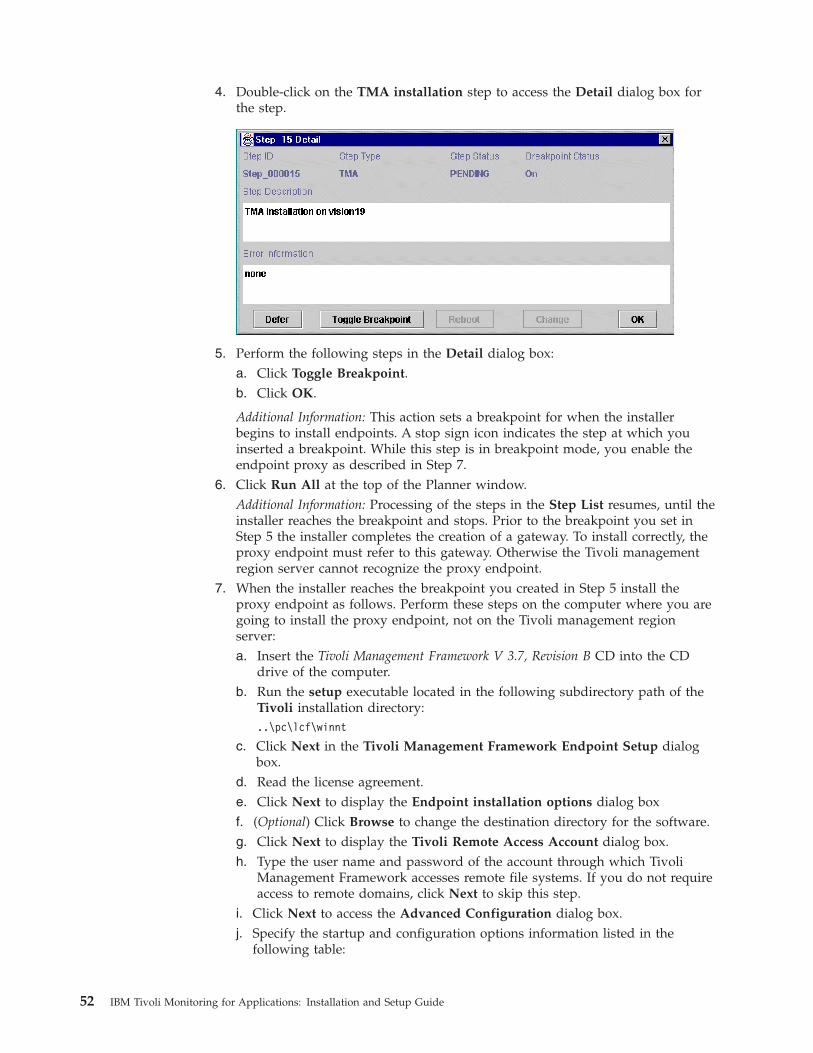
4. Double-click on the TMA installation step to access the Detail dialog box forthe step.
5. Perform the following steps in the Detail dialog box:a. Click Toggle Breakpoint.b. Click OK.
Additional Information: This action sets a breakpoint for when the installerbegins to install endpoints. A stop sign icon indicates the step at which youinserted a breakpoint. While this step is in breakpoint mode, you enable theendpoint proxy as described in Step 7.
6. Click Run All at the top of the Planner window.Additional Information: Processing of the steps in the Step List resumes, until theinstaller reaches the breakpoint and stops. Prior to the breakpoint you set inStep 5 the installer completes the creation of a gateway. To install correctly, theproxy endpoint must refer to this gateway. Otherwise the Tivoli managementregion server cannot recognize the proxy endpoint.
7. When the installer reaches the breakpoint you created in Step 5 install theproxy endpoint as follows. Perform these steps on the computer where you aregoing to install the proxy endpoint, not on the Tivoli management regionserver:a. Insert the Tivoli Management Framework V 3.7, Revision B CD into the CD
drive of the computer.b. Run the setup executable located in the following subdirectory path of the
Tivoli installation directory:..\pc\lcf\winnt
c. Click Next in the Tivoli Management Framework Endpoint Setup dialogbox.
d. Read the license agreement.e. Click Next to display the Endpoint installation options dialog boxf. (Optional) Click Browse to change the destination directory for the software.g. Click Next to display the Tivoli Remote Access Account dialog box.h. Type the user name and password of the account through which Tivoli
Management Framework accesses remote file systems. If you do not requireaccess to remote domains, click Next to skip this step.
i. Click Next to access the Advanced Configuration dialog box.j. Specify the startup and configuration options information listed in the
following table:
52 IBM Tivoli Monitoring for Applications: Installation and Setup Guide

Field name Use when ...
Gateway The gateway uses a port number other than the default 9494.
Endpoint You want to specify a port for the endpoint to use other than thedefault. The default is 9495.
Other Use the –g <host_name_of_the_gateway> option to specify theintercepting gateway. Use the –n <host_name_of_the_endpoint> optionto specify the name of the endpoint you are installing as the proxy.
Note: For a Custom installation of IBM Tivoli Monitoring for Applications,the parameters you supplied in the Planner tool must match theparameters you specify in this step for the -g and -n options.
k. Click Next to continue the installation process.Additional Information: The installer reports that communication of the proxyendpoint and the gateway was successful. The endpoint is installed andlogged into a gateway. The installation process configures the endpointsystem to automatically start the endpoint service when the system starts.If the system does not start, there might be a problem with thecommunication between the proxy endpoint and the gateway. See “Cleaningup and removing the endpoint” on page 113 to remove the endpoint, thenreinstall the endpoint.
l. Click Next to display the Setup Complete dialog box.m. Click Finish to display the Restart Windows dialog box.n. Select No to prevent the restarting of the operating system.
Additional Information: You can restart the system after the installation ofIBM Tivoli Monitoring for Applications is complete. When you restart thecomputer the Tivoli Endpoint service is created, with the startup type set toautomatic.
8. On the Tivoli management region server, click OK to complete the endpointinstallation.
9. On the Tivoli management region, click Run All in the installer and completethe Custom installation steps that follow Step 42 on page 50.Additional Information: After the Custom installation process finishes, youperform the procedures in Chapter 7, “Completing the installation of theproduct” on page 73 which include verification of the installation of allendpoints and managed nodes.
Chapter 5. Performing a Custom installation 53

54 IBM Tivoli Monitoring for Applications: Installation and Setup Guide
Chapter 6. Installing the product manually
This chapter describes how to install IBM Tivoli Monitoring for Applications andrelated software through an existing Tivoli environment. These procedures enableyou to install and set up the product without using the Typical or Custominstallation options in the installer.
An optional product, the Tivoli Software Installation Service (SIS), can installmultiple Tivoli products on multiple systems in parallel, as described in “UsingTivoli Software Installation Service”.
Version 3.7.1 of the Tivoli Management Framework must be installed in the Tivolienvironment before you begin performing any of the procedures in this section.This software comes with the installation CDs for this product.
Table 14. Guidelines for installing the product through an existing Tivoli environment
Goal Refer to
Access the Tivoli environment. “Accessing the Tivoli environment” on page 56
Install managed nodes to assist the Tivoli server withmanagement and monitoring operations.
“Installing managed nodes through an existing Tivolienvironment” on page 57
Install endpoint software to enable target computers tocommunicate in the Tivoli environment.
“Installing endpoints through an existing Tivolienvironment” on page 60
Upgrade an installation of IBM Tivoli Monitoring to therequired Version 5.1.1.
“Upgrading IBM Tivoli Monitoring manually” on page67
Install Tivoli software, including IBM Tivoli Monitoringand IBM Tivoli Monitoring for Applications
“Manually installing IBM Tivoli Monitoring forApplications software” on page 69
Install Tivoli patches to update performance of the TivoliManagement Framework software or to upgradesoftware.
“Installing Tivoli patches manually” on page 64
Install the Web Health Console on computers to displayreal-time status of managed resources.
“Installing the Web Health Console manually” on page72
See IBM Tivoli Monitoring User’s Guide for information onusing the console.
Using Tivoli Software Installation ServiceAn optional product, the Tivoli Software Installation Service (SIS), can installmultiple Tivoli products on multiple systems in parallel. This product can installmore products on more systems in less time than the Tivoli ManagementFramework’s installation facility. Tivoli Software Installation Service performsproduct prerequisite checks and, if defined, user-specified prerequisite checks toavoid or eliminate installation failure. In most cases, failures occur only whenmachines are turned off or removed from the network.
Tivoli Software Installation Service also creates an installation repository into whichyou can import the installation image of one or more Tivoli products. You canimport only the interpreter types you require in your environment, which savesdisk space and import time. The installation repository is then the source of allyour Tivoli installations. You can even share a single installation repository acrossmultiple Tivoli management regions.
55
For details of the platforms on which the Tivoli Software Installation Service canrun and for instructions on installing and using the product, see the Tivoli SoftwareInstallation Service User’s Guide and the release notes for that product.
Accessing the Tivoli environment
ObjectiveTo access the Tivoli environment so that you can use the operations and functionsof the Tivoli Management Framework.
Background informationYou can access the Tivoli desktop or the Tivoli command line interface in order touse the operations and functions of Tivoli Management Framework.
The Tivoli desktop is a user interface that provides point-and-click access tofeatures and functions. The Tivoli desktop provides a central control point for youto organize, manage, and delegate system management operations.
The command line interface (CLI) enables you to enter commands from thekeyboard. You can use these commands in shell scripts and with system utilitiessuch as the UNIX cron utility. For more information about using commands, referto the Tivoli Management Framework Reference Manual.
Required authorization roleThe installation routine for IBM Tivoli Monitoring for Applications creates theTivoli administrator who is authorized to perform this procedure. Depending onthe commands they want to run, other administrators might require the super,senior, admin, or user authorization roles.
Before you beginNone
When you finishPerform installation operations or administrative operations in the Tivolienvironment.
ProcedureYou can perform this procedure from the desktop of your workstation.
Command line: Use one of the following two methods to access the Tivolicommand line interface, depending on whether you use a Windows or UNIXoperating system:v Windows
1. Log on to a Windows managed node or Tivoli management region server.2. Access the MS-DOS command prompt:
– On Windows NT select Start → Command Prompt in the Windows taskbar.
– On Windows 2000 select Start → Programs → Accessories → CommandPrompt in the Windows task bar.
3. Enter the following command to run the environment initialization and setupscript:%SystemRoot%/system32/drivers/etc/Tivoli/setup_env.cmd
This command enables you to perform all of the Tivoli Manager forApplications operations.
56 IBM Tivoli Monitoring for Applications: Installation and Setup Guide

v UNIX
1. Log on to a UNIX managed node or Tivoli management region server.2. Run the environment initialization and setup script.
– If you are using the Bourne, Korn, or bash shell, run the followingcommand:. /etc/Tivoli/setup_env.sh
– If you are using the C shell, run the following command:source /etc/Tivoli/setup_env.csh
Tivoli desktop: Use one of the following two methods to access the Tivolidesktop, depending on whether you use a Windows or UNIX operating system:v Windows
1. Do one of the following to access the login screen of the Tivoli desktop:– Click Start in the Windows task bar and select Programs → Tivoli → Tivoli.
—OR—– Enter the tivoli command. See the Tivoli Management Framework Reference
Manual for more information on this command.2. Type the following values in the fields of the login screen:
– Host Machine specifies the Tivoli managed node, including the Tivoliserver where the Tivoli desktop should connect.
– Log In As specifies the login name to the managed node.– Password specifies the password for the specified login name.
3. Click OK. The Tivoli desktop appears.v UNIX
1. Enter the tivoli command. See the Tivoli Management Framework ReferenceManual for more information on this command.
2. (Windows only) Type the following values in the fields of the login screen:– Host Machine specifies the Tivoli managed node, including the Tivoli
server where the Tivoli desktop should connect.– Log In As specifies the login name to the managed node.– Password specifies the password for the specified login name.
3. (Windows only) Click OK. The Tivoli desktop appears.
Installing managed nodes through an existing Tivoli environment
ObjectiveTo install managed nodes using an existing Tivoli user interface.
Background informationThis procedure enables you to install and set up managed nodes without using theTypical or Custom installation options in the installer.
To enable a managed node to communicate with endpoints, you must install agateway on the managed node, as described in this procedure.
This procedure uses the default settings for a managed node. See the TivoliEnterprise Installation Guide to learn how to override the defaults.
Required authorization roleinstall_product
Chapter 6. Installing the product manually 57

Before you beginAs a precautionary measure, back up the Tivoli management region as described in“Backing up and restoring Tivoli databases” on page 13.
Start the command line interface or Tivoli desktop as described in “Accessing theTivoli environment” on page 56.
When you finishNone
ProcedureThis procedure describes creation of managed nodes and gateways in thecommand line.
Command line: Use the wclient command to create a managed node.
The following example creates managed nodes named everest:wclient -c F:\cdrom -d -p austin_pr everest
where
-c F:\cdromSpecifies the path to the installation image.
–d Sets installation variables to their last set values. Normally, each installedmanaged node uses the same set of installation variables. This optionprovides a shortcut for setting the variables. In this case, the managednode obtains settings for the installation variables from the Tivoli server.
–p austin_prSpecifies that the managed node is for the austin_pr policy region.
After creating a managed node on a Windows system, you must reboot the systemto complete the installation.
Configure your managed nodes with gateways to enable them to communicatewith endpoint. Use the wcrtgate command to create a gateway on the managednode. The following command creates a gateway on managed node everest usingthe default settings:wcrtgate -h everest
After creating the gateway, you can configure its behavior as a repeater and as avehicle for software distribution using the wrpt and wmdist commands.
For additional information see the Tivoli Management Framework Reference Manual.See “Tivoli command syntax” on page xiv for information on Tivoli command linesyntax.
Tivoli desktop:
1. Select Managed Node in the Create menu to display the Client Install dialogbox.Additional Information: The managed node is created in the current policyregion. See the Tivoli Enterprise Installation Guide to learn about creatingmanaged nodes in other policy regions.
2. In the TMR Installation Password field, type the installation password.
58 IBM Tivoli Monitoring for Applications: Installation and Setup Guide
Additional Information: If a password was not specified when the Tivolimanagement region server was created, leave this field empty. If a passwordwas specified, you must use this password for each managed node.
3. Select the radio button in the Default Access Method area to indicate how theTivoli management regions contacts each system:v Account—In the Account field, type the name and password of the
privileged user to contact the system. In the Password field, type thepassword for this user. This option applies to UNIX, Windows NT, andWindows 2000 systems.
v Trusted Host—(UNIX only) For trusted host access, the /.rhost file on eachsystem must grant access to the system performing the installation by addingan entry for root@hostname, where hostname is the host name of the Tivolimanagement region server or managed node performing the installation.
Note: You can override the access method when you add a single system, loadsystems from a file, or after the systems are added to the list.
4. Click Add Clients to display the Add Clients dialog box.5. Configure the client as follows:
a. In the Add Client field, type the name of the system you want to configureas a managed node.
b. Specify the access method that the Tivoli management region server uses tocontact the system:v Select Use Default Access Method to use the default access method that
you specified in Step 3.—OR—
v Select Account to use account access that you specified in Step 3.—OR—
v Select Trusted Host Access to use trusted host access in UNIX that youspecified in Step 3.
c. Click Add & Close to add the system to the list and return to the ClientInstall dialog box.
6. Repeat Steps 4 and 5 for each computer that you want to configure as amanaged node.
7. If you need to change the access method for any of the listed systems, performthe following steps in the Client Install dialog box:a. Select the system to change.b. Click Access Method to display the Select Access Method dialog box.c. Select the access method you want.d. Click Set to return to the Client Install dialog box.
8. Click Select Media to display the File Browser dialog box in which you specifythe path to the directory that contains the installation images.
9. Use the File Browser dialog box to navigate to the correct file.10. Click Set Media & Close to save your setting and display the Install Options
dialog boxAdditional Information: See the Tivoli Management Framework User’s Guide forinstructions on how to use the File Browser dialog box.
Note: Normally, you use same installation image to create the Tivolimanagement region server and managed nodes.
11. Modify the installation options, if necessary.
Chapter 6. Installing the product manually 59
Additional Information: The options in this dialog box apply to all listedsystems. For details on the fields available in this dialog box, refer to″Installation Options for Managed Nodes″ on page 11-4.
12. Click Set to save your changes and return to the Client Install dialog box.13. Click Install & Close to start the installation of the managed node.
Additional Information: The Client Install dialog box is displayed. This dialogbox lists operations that will take place during the installation and anyproblems that you might want to correct before continuing the installation.
14. Click Continue Install.
15. (Windows only) Perform the following steps in the Tivoli Remote AccessAccount dialog box that is displayed:a. Select one of the following radio buttons:
v Account—Defines an account other than the default access account.v None—Specifies that there is no Tivoli remote access account. If
reinstalling and there is a previous Tivoli remote access account, thisoption does not overwrite the original account.
v Use Installation ’Access Method’ Account—Specifies that Tivoli remoteaccess account is the default access account. This selection grants the fullrights that the default access account has. For more information aboutTivoli remote access account, see the Tivoli Enterprise Installation Guide.
b. Click Continue.Additional Information:The Client Install dialog box returns and displaysinformation on the progress of installation.
c. Click OK in the Confirm Reboot of Clients prompt to reboot these systems.Additional Information: You can click Close and restart the computer later, ifnecessary. The managed node is enabled only after you restart.
16. (UNIX only) When the installation completes, the Client Install dialog boxends with a completion message.
17. Click Close when the Client Install dialog box displays the Finished clientinstall message
18. Select Refresh in the Desktop menu to display the icon of the managed nodesyou created and verify success of this procedure.
19. Install gateway software on the managed node as follows:a. Right-click the EndpointManager icon and select Create Gateway to
access the Create Gateway dialog box.b. In the Name field, type a unique name for the gateway.c. In the Port field, type the port number through which the gateway will
communicate with its endpoints in TCP/IP.d. In the Managed Node Proxy field, type the name of the managed node on
which the gateway will run.e. Click Create & Close.
Installing endpoints through an existing Tivoli environment
ObjectiveTo install and configure the endpoint software on an endpoint using the Tivolidesktop or command line interface.
60 IBM Tivoli Monitoring for Applications: Installation and Setup Guide
Background informationCreation of endpoints during installation of the product is optional. This proceduredescribes how to create endpoints after you have installed the product.
You must install the endpoint software on an endpoint to enable communicationwith the Tivoli server. You perform this procedure from the Tivoli server. The useraccount you use to log on to the Tivoli server must have membership in theAdministrators group for the Windows operating system. For example, the defaultuser in the Windows operating system, Administrator, has membership in theAdministrators group by default. Tivoli strongly recommends that you log on asAdministrator or root.
You can perform this procedure in the endpoint wizard or in the command lineinterface. When you use the endpoint wizard, you specify the operating system ofthe endpoint. At the end of this procedure the endpoint is running on theendpoint.
For endpoints that reside on Windows machines, you must have at least one proxyendpoint in each Windows domain that contains servers that you want to installusing winstlcf. The installer for IBM Tivoli Monitoring for Applications creates aproxy endpoint for the domain of the Tivoli server. When a proxy endpointalready exists, you can use this procedure to create more endpoints. If a proxyendpoint does not exist, you can create one as described in “Manually creating aWindows proxy endpoint” on page 50.
Required authorization roleadmin
Before you beginOn Windows, if the Applications server on which you want to install the endpointresides in a domain other than the Tivoli server domain and you want to usewinstlcf, you must create a proxy endpoint for that domain. See “Manuallycreating a Windows proxy endpoint” on page 50 to learn how to create a proxyendpoint.
(Optional) Use the Planning sheet for creating endpoints in Table 9 on page 21 toprepare to perform this procedure for multiple endpoints.
When you finishNone
ProcedureThis procedure describes installation of endpoints from the command line or usingthe Endpoint Setup Wizard in Windows.
Endpoint Setup Wizard (for Windows only):
1. Insert the Tivoli Management Framework V 3.7, Revision B CD into the CD drive.2. Run the setup executable located in the following subdirectory path:
..\pc\lcf\winnt
3. Click Next in the Tivoli Management Framework Endpoint Setup dialog box.4. Read the license agreement.5. Click Next to display the Endpoint Installation Options dialog box6. Click Browse to change the destination directory for the software.
Chapter 6. Installing the product manually 61
7. If you do not want to use the default directory, click Browse to change thedefault directory to C:\Tivoli\lcf. This directory path matches the destinationdirectory of the other product software.
8. Click Next to display the Tivoli Remote Access Account dialog box.9. Type the user name and password of the account through which Tivoli
Management Framework accesses remote file systems. If you do not requireaccess to remote domains, click Next to skip this step.
10. Click Next to access the Advanced Configuration dialog box.11. Specify the startup and configuration options information listed in the
following table:
Field Name Use When ...
Gateway The gateway uses a port number other than the default 9494.
Endpoint You want to specify a port for the endpoint to use. The default is9495.
Other Use the –g hostname option to specify the intercepting gateway.Use the –n hostname of the endpoint option to specify the name ofthe endpoint you are installing as the proxy.
Note: For a Custom installation of IBM Tivoli Monitoring for Applications, theparameters you supply in the Planner tool must match the parametersyou specify in this step for the -g and -n options.
12. Click Next to continue the installation process.Additional Information: The wizard reports that communication of the proxyendpoint and the gateway was successful. The endpoint is installed andlogged into a gateway. The installation process configures the endpoint systemto automatically start the endpoint service when the system starts.
13. Click Next to display the Setup Complete dialog box.14. Click Finish to display the Restart Windows dialog box.15. Select No.
Additional Information: You can restart the system after the installation of IBMTivoli Monitoring for Applications is complete. When you restart thecomputer the Tivoli Endpoint service is created, with the startup type set toautomatic.
Command line: Use the winstlcf command to install an endpoint from thecommand line. This command enables you to remotely install endpoints on UNIX,Windows and Windows 2000 systems. For Windows systems, you must use theendpoint you created with the Endpoint Setup Wizard. See “Endpoint SetupWizard (for Windows only)” on page 61 for more information.
Partial CLI syntax for the winstlcf command is included in the following section.See the Tivoli Management Framework Reference Manual for a complete description ofthe winstlcf command.
Note: The installation password that you specify with the winstlcf commandbecomes the default for all subsequent installations.
winstlcf [–C <locale_name>] [–d <dir_name>] [–f <file_name>] [–g <machine[+port]>][–L <config_options>] [–l <ep_port>] [–N <endpoint>] [–n <ep_label>] [–P ] [–Y ]<host> [<user_acct> <password>]
62 IBM Tivoli Monitoring for Applications: Installation and Setup Guide
where:
–C <locale_name>(UNIX only) Specifies the language locale for endpoints that use the UNIXoperating system.
–d <dir_name>Specifies the target directory on which to install the endpoint. The defaultlocation is /opt/Tivoli/lcf for UNIX and C:\Tivoli\lcf for Windows andWindows 2000. When installing a Windows or Windows 2000 endpointfrom a UNIX server, forward slashes in path names are also supported.
–f <file_name>Specifies the file containing a list of systems on which to install endpoints.This file contains one system name per line, specifying the user ID andpassword to be used. Use the following format for each line in this file:host_name [ userID [ password]]
–g <machine[+port]>Specifies the Internet Protocol (IP) address or host name and, optionally,the port number of the gateway to which the endpoint logs in.
–L <config_options>Passes configuration options to the lcfd command for starting theendpoint. See the lcfd command in the Tivoli Management FrameworkReference Manual for a list of valid options. The example in this sectionshows how to specify options. If you specify multiple options or havespaces in a single option, you must enclose the text in double quotationmarks (″).
–l <ep_port>Specifies the port number for the endpoint. The default port number is9495.
–N <endpoint>Specifies the reference endpoint from which you install other endpoints ina Windows domain. In IBM Tivoli Monitoring for Applications specify oneof the following values for the <endpoint> in the Windows domain whereyou are installing the endpoint:v For server endpoints in the domain of the Tivoli server, specify
%HOST%_ep.v For endpoints in a domain other than the domain of the Tivoli server,
specify the name of the reference endpoint that you manually create, asdescribed in “Manually creating a Windows proxy endpoint” on page50.
–n Specifies an endpoint label provided by a user. If you do not assign aname, the command generates a unique name automatically.
–P This option is useful only when you are installing on remote hosts withdifferent passwords. If each machine has the same password or if you donot use the –P option, you are prompted for a global password to use foreach machine.
Specifies that the winstlcf command prompts for a password for eachmachine. Use this option only when you install endpoints on remote hoststhat use different passwords. If each machine uses the same password or ifyou do not use the –P option, the winstlcf command prompts you for aglobal password to use for each machine.
–Y Specifies that the installation proceeds without confirmation. By default,
Chapter 6. Installing the product manually 63
this command identifies the actions that you must take to perform theinstallation and requests confirmation before continuing. When you use the-Y option, the winstlcf command identifies the actions and performs theinstallation without requesting confirmation.
<host> [<user_acct> <password>]Specifies the name of the endpoint on which to install the endpoint. Whenyou specify only the host name, the winstlcf command uses the root orAdministrator account and prompts you for the password. If you want tospecify a different account and password on the host, enclose the hostname, account name, and password in single quotation marks. Forexample, the following command installs the endpoint on the host vernon,using the DOMAIN-NT\chris account with the password pa55word:winstlcf ’vernon DOMAIN-NT\chris pa55word’
where DOMAIN-NT is the domain in which chris is located. When theWindows or Windows 2000 domain and the local computer use the samename for user_acct, you must provide the fully qualified name for theaccount. For example, if you want to specify a user account namedAdministrator in a domain called DOMAIN-NT, you must use the fullyqualified name DOMAIN-NT\Administrator for the variable user_acct.
Examples:
v The following example installs and starts the endpoint software on a UNIXworkstation named vernon. The –C fr statement specifies that the endpointprocess uses the French locale. By default, winstlcf uses the root account andprompts you for the root password on vernon.winstlcf -C fr vernon
v The following example installs an endpoint on a machine named cedar andprompts you for a password. The password you enter becomes the defaultpassword for all subsequent installations.winstlcf -P cedar
v In the following example, the winstlcf command installs the endpoint on anendpoint named server06 in the domain mycompany.com. The winstlcfcommand passes configuration options to the lcfd command to use when itstarts the endpoint. The command assigns port 9131 for endpoint transactions.The –g option specifies the gateway cedar and the port 1616 as the endpoint tocontact for initial login. The –L flag specifies options for the –D flag of the lcfdcommand. The –D lcs.machine_name flag assigns the name server06_ep to theendpoint.winstlcf -g cedar+1616 -l 9131 -L "-D lcs.machine_name=server06_ep"server06.mycompany.com
Installing Tivoli patches manually
ObjectiveTo install Tivoli patches using an existing Tivoli desktop or command lineinterface.
Background informationThis procedure enables you to install patches for the Tivoli ManagementFramework without using the Typical or Custom installation options in theinstaller.
64 IBM Tivoli Monitoring for Applications: Installation and Setup Guide
You must perform this procedure on every managed node in the Tivolienvironment. Configure the wpatch command to install the patch on all managednodes automatically, as described in this procedure. The patches are located in thePATCHES directory of the following installation CDs:v IBM Tivoli Monitoring V5.1.1
v IBM Tivoli Monitoring, Version 5.1.0, Installation
v IBM Tivoli Monitoring for Applications, Version 5.1.0: Installation Disk 2
Note: See the limitations and workaround document for IBM Tivoli Monitoring forApplications components provides the latest information about knownproduct limitations and workarounds. To ensure that the information is thelatest available, this document is provided only on the Web, where it isupdated on a regular basis. You can access the Limitations and Workaroundsdocument through the following link on the Tivoli Information Center Website:
http://www.tivoli.com/support/public/Prodman/public_manuals/td/TD_PROD_LIST.html
The installer automatically installs the following patches for the TivoliManagement Framework. For a manual installation of the product, you mustinstall each of these patches as described in this procedure.
Table 15. Manual installation of the product: Specifications of required patches
Software release Patch name Prerequisitepatches
Purpose
Tivoli ManagementFramework 3.6
Provides requiredupdates to TivoliManagementFramework 3.7.1
3.6.1-TMF-0034 — Linux support (formySAP.com only)
3.6.1-TMF-0062 3.6.1-TMF-0034 Linux support (formySAP.com only)
Tivoli ManagementFramework 3.7
Provides requiredupdates to TivoliManagementFramework 3.7.1
3.7-TMF-0018 — OS/400 support (formySAP.com only)
3.7-TMF-0021 3.6.1-TMF-0034
3.6.1-TMF-0062
Linux-390 support (formySAP.com only)
3.7-TMF-0035 — Linux support (formySAP.com only)
Tivoli ManagementFramework 3.7.1
3.7.1-TMF-0059 — —
3.7.1-TMF-0066 — —
3.7.1-TMF-0073 —
3.7.1-TMF-0076 3.6.1-TMF-0034
3.6.1-TMF-0062
—
3.7.1-TMF-0087 3.7.1-TMF-0073 HP-UX support forproduct installer
Required authorization roleinstall_product
Before you beginAs a precautionary measure, back up the Tivoli management region as described in“Backing up and restoring Tivoli databases” on page 13.
Chapter 6. Installing the product manually 65

Start the command line interface or Tivoli desktop as described in “Accessing theTivoli environment” on page 56.
When you finishNone
ProcedureYou can perform this procedure from the Tivoli desktop or from the command line.
Command line: Use the wpatch command to install patches.wpatch [-c <source_dir>] -i patch_name.IND [-y][-n | <managed_node1> <managed_node2> ...]
where:
-c <source_dir>Specifies the complete path to the directory containing the installationimage.
-i patch_name.INDSpecifies the product index file to reference for the installation. You caninstall one patch at a time.
-n Installs the product on all managed nodes that do not currently have theproduct installed.
<managed_node>Installs the product on the managed nodes you specify. Use blank spacesto separate the names of multiple managed nodes. If you do not specifymanaged nodes, the patch is installed on all managed nodes in the Tivolimanagement region.
-y Installs the product without requesting confirmation.
Refer to the Tivoli Management Framework Reference Manual for more informationabout this command. Refer to “Tivoli command syntax” on page xiv forinformation on Tivoli command line syntax.
Tivoli desktop:
1. Select Install in the Desktop menu.2. Select Install Patch in the sub-menu to display the Install Patch dialog box.3. If necessary, click OK to bypass a harmless error message about the media
settings.4. Click Select Media to display the File Browser dialog box.5. In the Path Name text field, enter the full path to the patch installation files in
the CD-ROM drive. Be sure to use backward slashes (\) for Windows pathnames instead of forward slashes (/).
6. Click Set Path. The File Browser dialog box displays the contents of thespecified media in the Files scrolling list.
7. Click Set Media & Close.8. Select the patch from the Select Patch to Install scrolling list in the Install
Patch dialog box.9. Select the target clients on which to install the patch from the Available
Clients scrolling list,10. Click the right arrow to move the selected clients to the Clients to Install On
scrolling list.
66 IBM Tivoli Monitoring for Applications: Installation and Setup Guide
11. Click Install & Close to display the Patch Install window and a list ofpending installation actions.
12. Click Continue Install to begin the installation process.Additional Information: The Patch Install window displays the progress of theinstallation. View the messages in the task output dialog box to determinewhether the patch installation was successful. If necessary, see “About the logfiles for installation errors” on page 109 for information on problemdetermination.
13. Click Close to close the Patch Install window.14. Repeat Steps 4 to 13 for each patch.15. As a precautionary measure, back up the Tivoli management region databases
as described in “Backing up and restoring Tivoli databases” on page 13. Use aunique name for the new backup files.
Upgrading IBM Tivoli Monitoring manually
ObjectiveTo install the patches that upgrade IBM Tivoli Monitoring using an existing Tivolidesktop or command line interface.
Background informationThis procedure enables you to upgrade IBM Tivoli Monitoring without using theTypical or Custom installation options in the installer.
For IBM Tivoli Monitoring, Version 4.x: If you use Version 4.x of IBM TivoliMonitoring, you must perform this procedure twice. First install the patch toupgrade Version 4.x to Version 5.1.0. then run the patch to upgrade Version 5.1.0 toVersion 5.1.1, as described in this procedure.
Required authorization roleinstall_product
Before you beginAs a precautionary measure, back up the Tivoli management region as described in“Backing up and restoring Tivoli databases” on page 13.
Start the command line interface or Tivoli desktop as described in “Accessing theTivoli environment” on page 56.
When you finishNone
ProcedureYou can perform this procedure from the Tivoli desktop or from the command line.
Command line: Run the following command from the command prompt:wpatch [-c <source_dir>] -i patch_name.IND [-y][-n | <managed_node1> <managed_node2> ...]
where:
-c <source_dir>Specifies the complete path to the directory containing the installationimage.
Chapter 6. Installing the product manually 67
-i patch_name.INDSpecifies the product index file to reference for the installation. Install thesepatches from the IBM Tivoli Monitoring V5.1.1 installation CD in thefollowing order:1. If you are upgrading from IBM Tivoli Monitoring, Version 4.x, run this
patch: /upg41to51/DM51upg.IND. After you run this patch you haveVersion 5.1.0 of this product.
2. If you are upgrading from IBM Tivoli Monitoring, Version 5.1.0 toVersion 5.1.1, run this patch: /upgrade/DM51upg.IND.
-n Installs the product on all managed nodes that do not currently have theproduct installed.
<managed_node>Installs the product on the managed nodes you specify. Use blank spacesto separate the names of multiple managed nodes. If you do not specifymanaged nodes, the patch is installed on all managed nodes in the Tivolimanagement region.
-y Installs the product without requesting confirmation.
Refer to the Tivoli Management Framework Reference Manual for more informationabout this command. Refer to “Tivoli command syntax” on page xiv forinformation on Tivoli command line syntax.
Tivoli desktop:
1. Select Install in the Desktop menu.2. Select Install Patch in the sub-menu to display the Install Patch dialog box.3. If necessary, click OK to bypass a harmless error message about the media
settings.4. Click Select Media to display the File Browser dialog box.5. In the Path Name text field, enter the full path to the language support files in
the CD-ROM drive. Be sure to use backward slashes (\) for Windows pathnames instead of forward slashes (/). Install these patches from the IBMTivoli Monitoring V5.1.1 installation CD in the following order:a. If you are upgrading from IBM Tivoli Monitoring, Version 4.x, run this
patch: /upg41to51/DM51upg.IND. After you run this patch you haveVersion 5.1.0 of this product.
b. If you are upgrading from IBM Tivoli Monitoring, Version 5.1.0 to Version5.1.1, run this patch: /upgrade/DM51upg.IND.
6. Click Set Path. The File Browser dialog box displays the contents of thespecified media in the Files scrolling list.
7. Click Set Media & Close.8. Select the patch from the Select Patch to Install scrolling list in the Install
Patch dialog box.9. Select the target clients on which to install the patch from the Clients to
Install On scrolling list,10. Click the right arrow to move the selected clients to the Available Clients
scrolling list.11. Click Install & Close to display the Patch Install window and a list of
pending installation actions.12. Click Continue Install to begin the installation process.
68 IBM Tivoli Monitoring for Applications: Installation and Setup Guide
Additional Information: The Patch Install window displays the progress of theinstallation. View the messages in the task output dialog box to determinewhether the patch installation was successful. If necessary, see “About the logfiles for installation errors” on page 109 for information on problemdetermination.If you are upgrading from Version 4.1, repeat this process to complete theupgrade to Version 5.1.1.
13. Click Close to close the Patch Install window.14. Select Refresh from the View menu bar. The desktop displays the icon for the
patch you installed.15. As a precautionary measure, back up the Tivoli management region databases
as described in “Backing up and restoring Tivoli databases” on page 13. Use aunique name for the new backup files.
Manually installing IBM Tivoli Monitoring for Applications software
ObjectiveTo install Tivoli software manually using an existing Tivoli desktop or commandline interface.
Background informationThis procedure enables you to install and set up IBM Tivoli Monitoring and IBMTivoli Monitoring for Applications without using the Typical or Custom installationoptions in the installer.
Table 16 lists the installation CDs that contain the Tivoli software and the directorylocation of the software. Use the information in this table while you perform theinstallation procedure, when you identify the path to the index (.IND) file forproduct installation.
Table 16. Product locations on installation CDs
Product to install Name of installation CD on whichproduct is located
1. IBM Tivoli Monitoring software
Install this software when no version of IBM Tivoli Monitoring existson the computer. Otherwise, see “Upgrading IBM Tivoli Monitoringmanually” on page 67 to upgrade existing IBM Tivoli Monitoringsoftware.
IBM Tivoli Monitoring and its resource models can co-exist with aninstallation of Tivoli Distributed Monitoring. You do not need touninstall Tivoli Distributed Monitoring.
IBM Tivoli Monitoring V5.1.1
2. IBM Tivoli Monitoring Component Services, Version 5.1.0
The IBM Tivoli Monitoring Component Services software provides aset of extensions for Tivoli products. You must install IBM TivoliComponent Services on the same resources where you will install IBMTivoli Monitoring for Applications; in other words, on the Tivolimanagement region server and on each gateway and managed node.
IBM Tivoli Monitoring for Applications,Version 5.1.0: Installation
IBM Tivoli Monitoring for Applications,Version 5.1.0: Installation Disk 2
3. IBM Tivoli Monitoring for Applications
Depending on your choice of product components, you need to installproduct components from multiple Component Software CDs.
IBM Tivoli Monitoring for Applications,Version 5.1.0: mySAP.com ComponentSoftware
IBM Tivoli Monitoring for Applications,Version 5.1.0: Siebel eBusiness ApplicationsComponent Software
Chapter 6. Installing the product manually 69
Table 16. Product locations on installation CDs (continued)
Product to install Name of installation CD on whichproduct is located
4. Language Support for the product components in items 1 and 2. See “Installing IBM Tivoli LanguageSupport for this product” on page 84.
5. IBM Tivoli Monitoring Web Health Console “Installing the Web Health Consolemanually” on page 72
Required authorization roleinstall_product
Before you beginSee “Supported operating systems” on page 7 for a checklist prior to installation.
As a precautionary measure, back up the Tivoli management region as described in“Backing up and restoring Tivoli databases” on page 13.
Start the command line interface or Tivoli desktop as described in “Accessing theTivoli environment” on page 56.
When you finishAfter you install IBM Tivoli Monitoring for Applications, complete the activitiesdescribed in Chapter 7, “Completing the installation of the product” on page 73.
After you install IBM Tivoli Monitoring for Applications, see the product User’sGuide for each product component for information on setting up and using thecomponent.
If installation errors occur, view the following log files:v For IBM Tivoli Monitoring for Applications: Siebel eBusiness Applications:
$DBDIR/GMS/logs/siebel_init.log
v For IBM Tivoli Monitoring for Applications: mySAP.com:– $DBDIR/ABH/logs/trace_sapinit.log
– $DBDIR/ABH/logs/trace_sap_lcf_new_after.log
ProcedureYou can perform this procedure from the Tivoli desktop or from the command line.
Command line: Run the following command from the command prompt:winstall [-c <source_dir>] [-s <server>] -i product_code.IND [-y][-n | <managed_node1> <managed_node2> ...]
where:
-c <source_dir>Specifies the complete path to the directory containing the installationimage.
-s <server>Specifies the name of the managed node to use as the installation server.By default, the installation server is Tivoli server.
-i product_code.INDSpecifies the product index file to reference for the installation. In this case,the file is product_code.IND where the following codes identify the .INDfiles and software names:
70 IBM Tivoli Monitoring for Applications: Installation and Setup Guide
v /cdrom/DM511.IND for IBM Tivoli Monitoring, Version 5.1.1v /ITMCS/CMPTSVCS.IND for IBM Tivoli Monitoring Component
Services, Version 5.1.0v /PRODUCT/SAP.IND for IBM Tivoli Monitoring for Applications:
mySAP.comv /PRODUCT/SIEBEL.IND for IBM Tivoli Monitoring for Applications:
Siebel eBusiness Applications
-n Installs the product on all managed nodes that do not currently have theproduct installed.
<managed_node>Installs the product on the managed nodes you specify. Use blank spacesto separate the names of multiple managed nodes.
-y Installs the product without requesting confirmation.
Refer to the Tivoli Management Framework Reference Manual for more informationabout this command. Refer to “Tivoli command syntax” on page xiv forinformation on Tivoli command line syntax.
Tivoli desktop:
1. Select Install in the Desktop menu.2. Select Install Product in the menu to display the Install Product dialog box.3. If necessary, click OK to bypass a harmless error message about the media
settings.4. Click Select Media to display the File Browser dialog box.5. In the Path Name text field, enter the full path to the .IND file in the
CD-ROM drive. Be sure to use backward slashes (\) for Windows path namesinstead of forward slashes (/).
6. Click Set Path. The File Browser dialog box displays the contents of thespecified media in the Files scrolling list.
7. Click Set Media & Close.8. Select the product from the Select Product to Install scrolling list in the
Install Product dialog box.9. Select the target clients on which to install the product from the Available
Clients scrolling list.10. Click the left arrow to move the selected clients to the Clients to Install On
scrolling list. Tivoli installs the software on the computers in this list.11. Click Install & Close to display the Product Install window and a list of
pending installation actions.12. Click Continue Install to begin the installation process.
Additional Information: The Product Install window displays the progress ofthe installation. View the messages in the task output dialog box to determinewhether the product installation was successful. If necessary, see “About thelog files for installation errors” on page 109 for information on problemdetermination. If you are upgrading from version 4.1, repeat this procedure toupgrade from 5.1.0 to 5.1.1.
13. Click Close to close the Product Install window.14. Repeat Steps 4 to 13 for each software component.15. As a precautionary measure, back up the Tivoli management region databases
as described in “Backing up and restoring Tivoli databases” on page 13. Use aunique name for the new backup files.
Chapter 6. Installing the product manually 71
Installing the Web Health Console manually
ObjectiveTo install the Web Health Console using a command line interface.
Background informationThis procedure enables you to install and set up the Web Health Console withoutusing the Typical or Custom installation options in the installer.
The Web Health Console software comes from one of the following CDs dependingon the operating system:v Tivoli Monitoring Web Health Console for AIX, HP, SUN v5.1.1
v Tivoli Monitoring Web Health Console for Win, Linux 5.1.1
The language support for IBM Tivoli Monitoring comes on the IBM TivoliMonitoring Language Support v5.1.1 CD.
The language support for product components comes on these CDs:v IBM Tivoli Monitoring for Applications, Version 5.1.0: Siebel eBusiness Applications
Language Support
v IBM Tivoli Monitoring for Applications, Version 5.1.0: mySAP.com Language Support
Required authorization roleLog on privileges for the target computer.
Before you beginNone
When you finishSee the IBM Tivoli Monitoring User’s Guide for information on using the console.
ProcedureYou can perform this procedure from the command line only.
Command line:
1. Run the following setup executable to launch the installation wizard:v On UNIX: ./setupPLATFORM.bin
where PLATFORM is the name of the operating system.v On Windows: setup.exe
2. Follow the instructions in the wizard panels.Additional Information: See IBM Tivoli Monitoring User’s Guide for moreinfomation.
3. Copy the contents of the /HCONSOLE directory of catalog files from one of thefollowing installation CDs:v For the English language, copy catalog files from the IBM Tivoli Monitoring
V5.1.1 installation CD.v For other languages, copy catalog files from the IBM Tivoli Monitoring for
Applications: Language Support installation CD.4. Insert the contents of the directory in the resources directory in the following
path on the target computer:INSTALL_DIR/installedApps/dm.ear/dm.war/WEB-INF/classes/com/tivoli/DmForNt/resources
72 IBM Tivoli Monitoring for Applications: Installation and Setup Guide
Chapter 7. Completing the installation of the product
This section describes how to verify the installation and enable functionality forIBM Tivoli Monitoring for Applications. After you complete the relevantprocedures in this chapter, see the appropriate user’s guide to learn how to beginmonitoring resources:v If you use IBM Tivoli Monitoring for Applications: Siebel eBusiness Applications,
see IBM Tivoli Monitoring for Applications: Siebel eBusiness Applications User’sGuide.
v If you use IBM Tivoli Monitoring for Applications: mySAP.com, see IBM TivoliMonitoring for Applications: mySAP.com User’s Guide.
Table 17. Guidelines for Completing the installation of the product
Goal Refer to
Verify the success of the installation of the managednodes and endpoints.
“Verifying the installation of the product” on page 74
Set up the Java Runtime Environment, Version 1.3.0 onendpoints. This software enables distribution of resourcemodels.
v Install the Java software on endpoints that do not haveit.
v If the Java software already exists on the endpoint, runa Tivoli task to link the software to IBM TivoliMonitoring.
“Installing the Java Runtime Environment” on page 76
“Linking to an existing Java Runtime Environment” onpage 77
(Optional) Map monitors to IBM Tivoli Monitoring forApplications.
Chapter 8, “Migrating from previous versions of IBMTivoli Monitoring for Applications, Version 5.1.0:mySAP.com” on page 93
(Optional) Load class files that enable you to customizethe resource models that come with the IBM TivoliMonitoring for Applications.
“Installing files to enable customization of resourcemodels” on page 78
See the appropriate user’s guide for information on usingthe resource models:
v If you use IBM Tivoli Monitoring for Applications:Siebel eBusiness Applications, see IBM TivoliMonitoring for Applications: Siebel eBusiness ApplicationsUser’s Guide.
v If you use IBM Tivoli Monitoring for Applications:mySAP.com, see IBM Tivoli Monitoring for Applications:mySAP.com User’s Guide.
See IBM Tivoli Monitoring Workbench User’s Guide to learnhow to use the optional Workbench tool to create customresource models to use with IBM Tivoli Monitoring forApplications.
Enable the storage of historical data that you can use inthe Tivoli Enterprise Data Warehouse.
“Installing files to enable Tivoli Enterprise DataWarehouse for IBM Tivoli Monitoring for Applications”on page 80
73

Table 17. Guidelines for Completing the installation of the product (continued)
Goal Refer to
Assign authorization roles required to use the product tomanage and monitor servers.
See the appropriate user’s guide for information onrequired authorization roles:
v If you use IBM Tivoli Monitoring for Applications:Siebel eBusiness Applications, see IBM TivoliMonitoring for Applications: Siebel eBusiness ApplicationsUser’s Guide.
v If you use IBM Tivoli Monitoring for Applications:mySAP.com, see IBM Tivoli Monitoring for Applications:mySAP.com User’s Guide.
Install available language support packages afterinstallation when you choose to not install languagepacks during installation.
“Installing IBM Tivoli Language Support for thisproduct” on page 84
Update enablement files for the Web Health Consolewhen you upgrade or add components to the product.
“Updating Web Health Console files” on page 87
(Optional) Change the gateway assignment for anendpoint.
“Changing the gateway assignment of an endpoint” onpage 88
Install IBM Tivoli Monitoring for Applications integrationon the Tivoli Business Systems Manager server
“Integrating IBM Tivoli Monitoring for Applications withTivoli Business Systems Manager” on page 89
Verifying the installation of the product
ObjectiveTo verify successful installation of the product.
Background informationThis procedure describes how to use the Tivoli command line interface to list theelements of the Tivoli environment. You should complete this procedure beforerunning the product to confirm correct installation and connectivity for allelements.
Required authorization roleThe installation routine for IBM Tivoli Monitoring for Applications creates theTivoli administrator who is authorized to perform this procedure. On UNIX, theuser who runs the installer must have root privileges. On Windows, the user whoruns the installer must have membership in the Administrators group. For otherusers, one of the following Tivoli roles is recommended: user, admin, senior, orsuper
Before you beginAccess the Tivoli environment as described in “Accessing the Tivoli environment”on page 56.
When you finishIf you cannot verify connection with an endpoint, see “Testing endpointconnectivity” on page 112.
ProcedureYou can perform this procedure from the Tivoli desktop or from the command line.
74 IBM Tivoli Monitoring for Applications: Installation and Setup Guide
Command Line: Use the wlsinst command to list the products and patches in theTivoli environment. The following example lists the products and patches installed,with the host name and interpreter type on which each product or patch wasinstalled:wlsinst -ah
where -ah lists all products and patches installed in the Tivoli management region,including the host name and interpreter type of the computer, as in theseexamples:IBM Tivoli Monitoring for Applications, Version 5.1.0 - mySAP.comIBM Tivoli Monitoring for Applications, Version 5.1.0 - Seibel eBusiness \Applications
Run the following wep command to list the endpoints and their associatedgateway:wep -ls
You can also run the wep command to retrieve and set endpoint information,migrate an endpoint from one gateway to another, and update any endpoint datachanges within a Tivoli management region. Run the wep command withoutarguments to display the wep usage statement.
See the Tivoli Management Framework Reference Manual for a complete description ofall options available for these commands.
Desktop:
1. Access the Tivoli desktop as described in “Accessing the Tivoli environment”on page 56.
2. View the icons for the managed resources that you installed to verify that theyexist:v For IBM Tivoli Monitoring for Applications: Siebel eBusiness Applications
a. Verify that the Monitoring for Siebel policy region was created.b. Double-click on this policy region and verify the following were created:
Task LibrariesSiebel Event TasksSiebel Operational TasksSiebel Utility Tasks
Profile ManagersConnection Broker MonitorsSiebel Gateway MonitorsSiebel Server MonitorsConnection BrokersSiebel GatewaysSiebel Servers
v For IBM Tivoli Monitoring for Applications: mySAP.com
a. Verify that the Monitoring for mySAP policy region was created.b. Double-click on this policy region and verify the following were created
with it or its members:
Policy RegionsmySAP ConfigurationmySAP TBSM Tasks
Task Libraries
Chapter 7. Completing the installation of the product 75
TL_mySAP_5.1.0_Default_mySAPApplication_5.1.0_rgc-aix-regionTL_mySAP_5.1.0_Default_mySAPDatabase_5.1.0_rgc-aix-regionTL_mySAP_5.1.0_Default_mySAPITSServer_5.1.0_rgc-aix-regionmySAP App Server TasksmySAP Configuration TasksmySAP DB Server TasksmySAP ITS Server TasksmySAP Internal TasksmySAP List Maintenance TasksmySAP System Tasks
Profile ManagersmySAP App Server MonitorsmySAP ITS Server MonitorsmySAP System List
ProfilesmySAP App Server PerformancemySAP App Server StatusmySAP Connection StatusmySAP ITS Server StatusmySAP Job Status
Installing the Java Runtime Environment
ObjectiveTo install the Java Runtime Environment and link it to IBM Tivoli Monitoring.
Background informationEach endpoint in an IBM Tivoli Monitoring system requires a local installation ofthe Java Runtime Environment (JRE), Version 1.3.0 or 1.3.1. Solaris endpoints musthave Version 1.3.1-01. The runtime environment enables the distribution andrunning of resource models.
Installation images for the Java Runtime Environment 1.3.0 are available on theIBM Tivoli Monitoring, Version 5.1.1: Tools installation CD. You can choose oneof the following setup methods:v Use the wdmdistrib command or the Java Runtime Environment manual
installation process. The Java software for this installation options is available onthe product CD in compressed format. This procedure describes how to use thewdmdistrib command to install the Java Runtime Environment.
v If the endpoint already has an appropriate version of the Java RuntimeEnvironment installed, perform the procedure “Linking to an existing JavaRuntime Environment” on page 77 to link IBM Tivoli Monitoring forApplications to the runtime environment.
v Use the Tivoli Software Installation Service (SIS). See “Using Tivoli SoftwareInstallation Service” on page 55 for more information on using this method toinstall the runtime environment. After you use this method you must performthe “Linking to an existing Java Runtime Environment” on page 77 procedure.
If you do not install and link the Java Runtime Environment, the deployment ofresource models fails. The use of an IBM version of the Java Runtime Environmentis recommended for support purposes. All versions of the Java RuntimeEnvironment on the IBM Tivoli Monitoring CD are supplied by IBM, except for theHP-UX version. Prerequisites for the Java Runtime Environment are described in areadme file in the JRE directory on one of the product installation CDs for IBMTivoli Monitoring.
76 IBM Tivoli Monitoring for Applications: Installation and Setup Guide
Required authorization roleThe installation routine for IBM Tivoli Monitoring for Applications creates theTivoli administrator who is authorized to perform this procedure. On UNIX, theuser who runs the installer must have root privileges. On Windows, the user whoruns the installer must have membership in the Administrators group. Other usersmust have one of the following roles: admin, senior, or super.
Before you beginAccess the Tivoli environment as described in “Accessing the Tivoli environment”on page 56.
When you finishNone
ProcedureYou can perform this procedure from the command line.
Command Line: Run the following command to install the Java RuntimeEnvironment and link it to IBM Tivoli Monitoring:wdmdistrib –J "JRE_location_dir" –l subscriber
where
JRE_location_dirSpecifies the complete path of the directory where Java RuntimeEnvironment (JRE) is located on the installation CD (excluding theplatform directory). Enclose the path in quotation marks.
subscriberSpecifies the name of the subscriber to which you want to distribute thesoftware. See the IBM Tivoli Monitoring User’s Guide for full information onthis variable.
See the IBM Tivoli Monitoring User’s Guide for full information on the wdmdistribcommand.
Linking to an existing Java Runtime Environment
ObjectiveTo link the IBM Tivoli Monitoring software to an existing Java RuntimeEnvironment to enable IBM Tivoli Monitoring operations on an endpoint.
Background informationEndpoints must run the Java Runtime Environment (JRE), Version 1.3.0 or 1.3.1.Solaris endpoints must have Version 1.3.1-01. This software enables the distributionand running of resource models. The Tivoli DMLinkJre task enables the endpointto identify the correct path to the Java software.
When the required Java Runtime Environment is installed on the computer beforeyou install IBM Tivoli Monitoring for Applications, you must run the DMLinkJretask. You also must run the DMLinkJre task when you use Tivoli SoftwareInstallation Service or the installation routine that Sun Microsystems, Inc. providesto install the runtime environment. Running the DMLinkJre task is not requiredwhen you use the wdmdistrib command to install the runtime environment. See“Installing the Java Runtime Environment” on page 76 for more information onthese options.
Chapter 7. Completing the installation of the product 77
If you did not use wdmdistrib to install the Java Runtime Environment, you mustperform this procedure.
Required authorization roleOn UNIX, the user who runs the installer must have root privileges. On Windows,the user who runs the installer must have membership in the Administratorsgroup.
Before you beginInstall the Java Runtime Environment, as described in “Installing the Java RuntimeEnvironment” on page 76.
When you finishNone
ProcedureYou can perform this procedure from the Tivoli desktop only.
Tivoli desktop:
1. Select TMR Connections in the Desktop menu.2. Select Top Level Policy Regions in the sub-menu to display the Top Level
Policy Regions dialog box.3. Double-click the TivoliDefaultMw2kRegion icon to open this policy region.4. Double-click the IBM Tivoli Monitoring Tasks task library icon to open the
task library.5. Double-click the DMLinkJre task icon to display the Execute Task dialog box.6. Select the endpoint or endpoints that you want to link to the Java software.
Additional Information: Alternatively, you can select target endpoints by selectingthe profile managers that contain those endpoints. The installation path for theJava software on each endpoint must be the same on each target endpoint inthat profile.
Note: The task validates the link to the Java software and advises you of apath error. The path error becomes evident later, when the distribution ofresource models to the endpoint generates an error stating that the Javasoftware is missing or not installed.
7. Click Execute to display the Configure Task Arguments dialog box.8. Type the fully-qualified path to the top-level directory of the Java software.
Additional Information: For example, if the Java software is installed in the/usr/java/bin/java directory path, type this value in the text field:/usr/java
9. Click Set & Execute.Additional Information: To test this connection, distribute one of the resourcemodels that comes with IBM Tivoli Monitoring. When the DMLinkJre task issuccessful, distribution of the resource model completes without generating anerror message.
Installing files to enable customization of resource models
ObjectiveTo load class files that enable you to customize the resource models that come withthe product.
78 IBM Tivoli Monitoring for Applications: Installation and Setup Guide
Background informationThe IBM Tivoli Monitoring Workbench is a programming tool for creating,modifying, and packaging resource models for use with IBM Tivoli Monitoring.Samples of best practice resource models have also been provided for your usewithin the Workbench. You can use these resource models as working examples forcreating new resource models. The Tivoli Maintenance and Support Contractcovers assistance with problem and issues relative to the operation of the IBMTivoli Monitoring Workbench, but does not cover assistance for new or modifiedresource models other than the ones that are included in the Workbench.
The IBM Tivoli Monitoring Workbench User’s Guide describes how to use the optionalWorkbench tool to create custom resource models based on the standard resourcemodels that come with IBM Tivoli Monitoring for Applications. When youcustomize one of these resource models in the Workbench, you must associate thenew resource model with a class file called a Managed Object Format (MOF) file.This procedure describes how to make the .mof files for IBM Tivoli Monitoring forApplications available to Workbench.
A .mof file is an ASCII file that contains the formal definition of a resource. Forexample, the Siebel Server Resource Use resource model monitors CPU utilizationand process size of a Siebel server. The .mof file for this resource model defines theproperties (CPU utilization) of this resource.
The .mof file format adheres to the platform-neutral Common Information Model(CIM) standard of the Distributed Management Task Force (DMTF) industryconsortium. This standard reduces the cost and complexity of managing computerresources.
The Workbench tool is available on Windows only and it must have access to theresources of the Microsoft Windows Management Instrumentation (WMI) SoftwareDevelopers Kit (SDK). Information and software for the SDK is available throughthe Microsoft Corporation. Specifically, this procedure uses the MOF Compiler,mofcomp.exe, that comes with the SDK. See the Windows ManagementInstrumentation: Platform SDK online help for more information.
Required authorization roleYou must have log on privileges for the target computer.
Before you beginFor Windows NT only, install the Microsoft Windows ManagementInstrumentation (WMI) SDK from Microsoft Corporation. This software comes withWindows 2000.
When you finishSee IBM Tivoli Monitoring Workbench User’s Guide to learn how to use the optionalWorkbench tool. You use the Workbench to create resource models based on thestandard resource models that come with IBM Tivoli Monitoring for Applications.As part of the creation process, you create a dependency between the new resourcemodel and one of the .mof files you have installed.
ProcedureYou can perform this procedure from the command line only.
Command line:
1. Access the mofcomp.exe executable in the following directory path:%SystemRoot%\system32\wbem
2. Run the following command:
Chapter 7. Completing the installation of the product 79
mofcomp -N:\Root\Cimv2 mof_file_name
where mof_file_name is the name of a .mof file for IBM Tivoli Monitoring forApplications. \Root\Cimv2 refers to the namespace in the class repository thatincludes resource model information.
Additional Information: The product .mof files are located on the IBM TivoliMonitoring for Applications, Version 5.1.0: Component software installationCD.
Installing files to enable Tivoli Enterprise Data Warehouse for IBMTivoli Monitoring for Applications
ObjectiveTo install application warehouse packs that provide the extract, transform, andload (ETL) processes and that enable using data from Siebel eBusiness Applicationresource models in the Tivoli Enterprise Data Warehouse report interface.
Note: For information on using data from mySAP.com in the Tivoli EnterpriseData Warehouse report interface, you must perform the procedure in“Installing the Tivoli Enterprise Data Warehouse Collector for IBM TivoliMonitoring for Applications: mySAP.com” on page 83.
Background information
Note: This procedure describes installation of enablement files on a TivoliEnterprise Data Warehouse environment that exists on a single computer.This type of installation simplifies configuration and setup, but might serveonly as a test or demonstration environment, and can only be installed onWindows. Most monitoring environments require a distributed installationof Tivoli Enterprise Data Warehouse. To learn how to install and configureenablement files for a distributed environment, see Installing and ConfiguringTivoli Enterprise Data Warehouse, Version 1, Release 1.
You can extract, transform, and load operational data from resource models intothe central data warehouse database. Furthermore, you can extract, transform, andload historical data to produce historical reports. This procedure describesinstalling the warehouse packs on a single, dedicated computer that has all of theTivoli Enterprise Data Warehouse components. Specifically, the central datawarehouse ETL (ETL1) process and the data mart ETL (ETL2) process perform therespective tasks:v Extract operational data from the IBM Tivoli Monitoring for Applications
resource models and load it into the central data warehouse. This processenables data collection for software components that are based on IBM TivoliMonitoring, Version 5.1.1.
v Extract historical data from the central data warehouse for use in tabular andgraphical reports. This process enables custom functionality for IBM TivoliMonitoring for Applications.
Consider the following points:v The installer must have a valid, fully qualified host name to complete the
installation.v The user who performs the installation must have a valid user name and
password to access the DB2 instance for this product.
80 IBM Tivoli Monitoring for Applications: Installation and Setup Guide

See the Installing and Configuring Tivoli Enterprise Data Warehouse, Version 1, Release1, Guide for detailed information on all installation and configuration options forthe warehouse packs, as well as uninstallation information. See the Installing andConfiguring sections in the following document for information on softwareprerequisites, supported hardware and platforms, and limitations: IBM TivoliMonitoring for Applications: Siebel eBusiness Applications Warehouse Enablement Guide
Required authorization rolesuperadmin for the Tivoli Enterprise Data Warehouse environment.
Before you beginInstall Tivoli Enterprise Data Warehouse and the required DB2 database software(IBM DB2 Universal Database Enterprise Edition) as described in the Installing andConfiguring Tivoli Enterprise Data Warehouse, Version 1, Release 1 Guide and releasenotes.
When you finishRun ETL processes to extract, transform, and load mySAP.com and SiebeleBusiness Applications data. Generate tabular and graphical reports as described asdescribed in the the user’s guide of the component you are monitoring:v IBM Tivoli Monitoring for Applications: mySAP.com User’s Guide
v IBM Tivoli Monitoring for Applications: Siebel eBusiness Applications User’s Guide
(For Seibel eBusiness Applications only) Install and configure the Tivoli EnterpriseData Warehouse Support Component. See the “Integration with Tivoli EnterpriseData Warehouse” chapter in the IBM Tivoli Monitoring User’s Guide for details.You must install this component first on the Tivoli management region server andthen on all managed nodes.
ProcedureYou perform this procedure using the Tivoli Enterprise Data Warehouse installationprogram.
Installation wizard:
1. Log on to the computer that runs Tivoli Enterprise Data Warehouse.Additional Information: On Windows, the user who runs the installer must havemembership in the Administrators group.
2. Run the setup executable in the root directory of the Tivoli Enterprise DataWarehouse installation CD.Additional Information: The executable launches the installation wizard. Selectthe executable that matches your operating system:v For Windows, setup.exe
v For UNIX, setup_unix.sh
3. Install the IBM Tivoli Monitoring, Version 5.1.1 warehouse pack that providesthe central data warehouse ETL1 that extracts data and loads it into the centraldata warehouse by doing the following (This warehouse pack ships on the IBMTivoli Monitoring, Version 5.1.1 CD):a. Click Next to display the installation options panel.b. Select Application Installation only.c. Select the directory path where you want to install the program.
Additional Information: You must install the warehouse pack in theinstallation directory for Tivoli Enterprise Data Warehouse.
d. Click Next.
Chapter 7. Completing the installation of the product 81
e. Type the host name.Additional Information: The wizard requires the fully qualified host name forthe computer. For example, the fully qualified host name for myhost mightbe myhost.mycompany.com.
f. Type the user name and password for configuring DB2.g. Type the directory path for the warehouse pack configuration file.
Additional Information: The twh_app_install_list.cfg configuration file forthis warehouse pack is located on the IBM Tivoli Monitoring, Version 5.1.1CD in directory /tedw_apps_etl/amx.
h. Select Now to verify the source directory immediately.i. Click Next.j. If the wizard detects a path error, modify the source directory path and click
Next again.k. Click Next.
Additional Information: This procedure does not require use of the option toinstall additional packages.The wizard displays a summary of the program installation, including diskspace required.
l. Click Install.m. Click Finish in the final summary screen.
Additional Information: For troubleshooting information, see thetroubleshooting chapter in Installing and Configuring Tivoli Enterprise DataWarehouse, Version 1, Release 1, Guide.
4. Install the warehouse pack that provides the data mart ETL2 that extracts datafrom the central data warehouse for use in tabular and graphical reports. Thiswarehouse pack ships on the CD for your product component:v IBM Tivoli Monitoring for Applications, Version 5.1.0: mySAP.com Component
Software
v IBM Tivoli Monitoring for Applications, Version 5.1.0: Siebel eBusinessApplications Component Software
a. Repeat Steps 1 and 2 to re-launch the Tivoli Enterprise Data Warehouseinstallation wizard.
b. Click Next to display the installation options panel.c. Select Application Installation only.d. Select the directory path where you want to install the program.e. Click Next.f. Type the host name.
Additional Information: The wizard requires the fully qualified host name forthe computer. For example, the fully qualified host name for myhost mightbe myhost.mycompany.com.
g. Determine which warehouse pack you want to install and type the directorypath for the its configuration file.
h. Type the directory path of the program files.Additional Information: The twh_app_install_list.cfg configuration file islocated in the following paths:v For mySAP.com: IBM Tivoli Monitoring for Applications, Version 5.1.0:
mySAP.com Component Software CD in the /tedw_apps_etl/abh directory.
82 IBM Tivoli Monitoring for Applications: Installation and Setup Guide

v For Siebel eBusiness Applications: IBM Tivoli Monitoring for Applications,Version 5.1.0: Siebel eBusiness Applications Component Software CD in the/tedw_apps_etl/gms directory.
i. Select Now to verify the source directory immediately.j. Click Next.k. If the wizard detects a path error, modify the source directory path and
click Next again.l. Click Next.
Additional Information: This procedure does not require use of the option toinstall additional packages.The wizard displays a summary of the program installation, including diskspace required.
m. Click Install.n. Click Finish in the final summary screen.
Additional Information: The twh.log file lists events that occur during theinstallation. This file is located in the directory containing the installedTivoli Enterprise Data Warehouse program. By default, this directory path isC:\Program Files\TWH. The Environment tab of the Windows SystemProperties control panel displays the path value for the environmentvariable TWH_TOPDIR in your installation.
5. Stop and restart the following services for Tivoli Presentation Services:v Server for IBM Consolev Web Services for the IBM Console
See the “Starting and stopping Tivoli Presentation Services” appendix inInstalling and Configuring Tivoli Enterprise Data Warehouse, Version 1, Release 1Guide for further information.
6. If necessary, perform final configuration tasks to enable reporting and togenerate tabular and graphical reports as described as described in the user’sguide for the product component you use:v IBM Tivoli Monitoring for Applications: Siebel eBusiness Applications User’s Guide
v IBM Tivoli Monitoring for Applications: mySAP.com User’s Guide
Installing the Tivoli Enterprise Data Warehouse Collector for IBM TivoliMonitoring for Applications: mySAP.com
ObjectiveTo install the Tivoli Enterprise Data Warehouse Collector for IBM Tivoli Monitoringfor Applications: mySAP.com.
Background informationThe Tivoli Enterprise Data Warehouse component for IBM Tivoli Monitoring forApplications: mySAP.com is a data warehouse system that reports on theperformance of mySAP.com installations. The Tivoli Enterprise Data Warehousecomponent collects data via remote function calls (RFC) from mySAP.comapplication servers. The configurations for the Tivoli Enterprise Data Warehousecomponent are entered through the Tivoli Enterprise Data Warehouse configurationGUI. The configuration settings are stored in the Windows registry and in flat files.
After the data is inserted into the repository database it is aggregated and dataretention time frames are applied. The IBM Tivoli Monitoring for Applications:mySAP.com Tivoli Enterprise Data Warehouse repository database is a staging area
Chapter 7. Completing the installation of the product 83

where data is maintained for insertion into the Tivoli Enterprise Data Warehouse.The insertion of the data from the repository database into the Tivoli EnterpriseData Warehouse is accomplished via an extraction transform and load step (ETL).See the Tivoli Enterprise Data Warehouse documentation for more information.
Required authorization roleAdministrator
Before you beginYou must install this software on a Windows NT or Windows 2000 operatingsystem after you install Tivoli Enterprise Data Warehouse
When you finishComplete the configuration as described in the IBM Tivoli Monitoring forApplications: mySAP.com User’s Guide.
ProcedureYou can complete this procedure from the desktop or the command line.
Desktop:
1. Click Start.2. Click Run.3. Click Browse to browse for the location of the the installation media.4. Select COLLECT\Setup.exe from the IBM Tivoli Monitoring for
Applications: mySAP.com Component Software CD to display the Welcomedialog box.
5. Click Next to display the Choose Destination Location dialog box.6. If you want to change the Destination Folder, click Browse and select an
alternate installation path.7. Click Next to display the Select Program Folder dialog box.8. Use the default folder or select an existing folder9. Click Next to start copying the files. The Start Copying Files dialog box is
displayed.10. Click Next to complete the setup and display the Setup Complete.
Command Line: Run the following command to perform a silent installation ofthe collector for mySAP.com. The -s parameter invokes the InstallShield SilentResponse File (.iss) file, located in the installation media directory. The defaultinstallation location is C:\Monitoring for mySAP. To change the target installationdirectory edit the default directory path in .iss file.<installation_media>\Collect\Setup.exe -s
where <installation_media> is the fully qualified path to the installation media.
See the release notes for any updates regarding this procedure.
Installing IBM Tivoli Language Support for this product
ObjectiveTo install language support packages to enable one or more of the nine availablenational language versions of the product.
84 IBM Tivoli Monitoring for Applications: Installation and Setup Guide
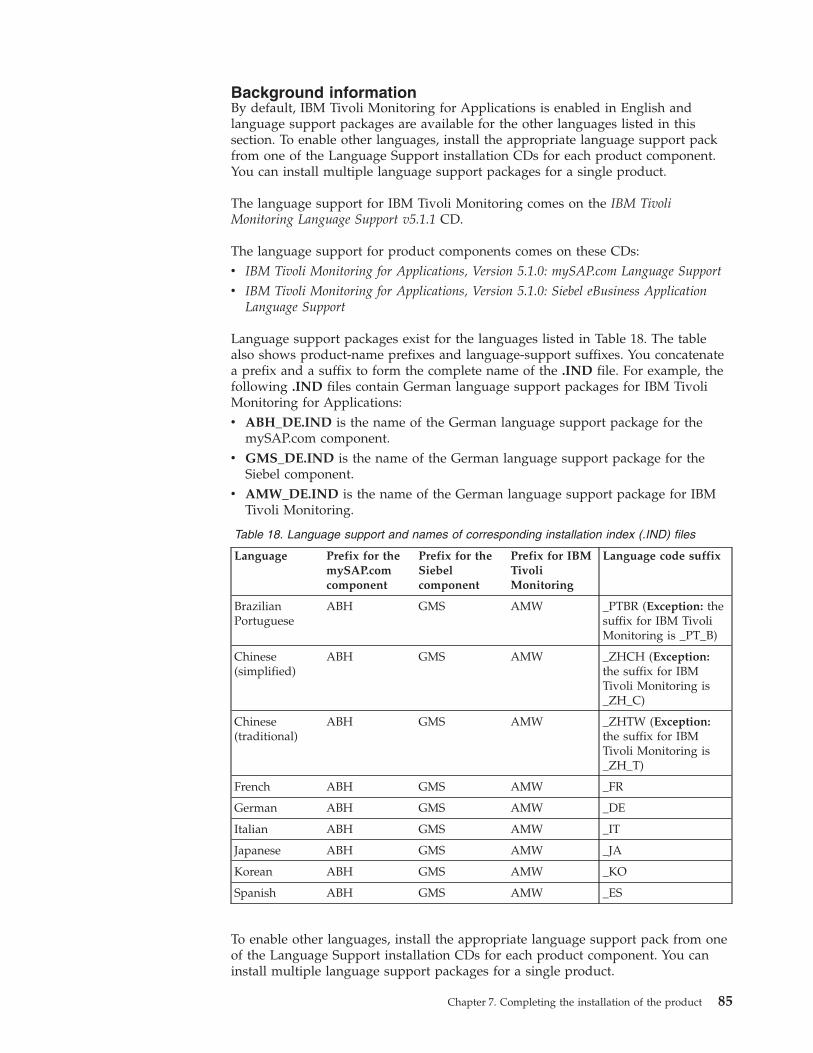
Background informationBy default, IBM Tivoli Monitoring for Applications is enabled in English andlanguage support packages are available for the other languages listed in thissection. To enable other languages, install the appropriate language support packfrom one of the Language Support installation CDs for each product component.You can install multiple language support packages for a single product.
The language support for IBM Tivoli Monitoring comes on the IBM TivoliMonitoring Language Support v5.1.1 CD.
The language support for product components comes on these CDs:v IBM Tivoli Monitoring for Applications, Version 5.1.0: mySAP.com Language Support
v IBM Tivoli Monitoring for Applications, Version 5.1.0: Siebel eBusiness ApplicationLanguage Support
Language support packages exist for the languages listed in Table 18. The tablealso shows product-name prefixes and language-support suffixes. You concatenatea prefix and a suffix to form the complete name of the .IND file. For example, thefollowing .IND files contain German language support packages for IBM TivoliMonitoring for Applications:v ABH_DE.IND is the name of the German language support package for the
mySAP.com component.v GMS_DE.IND is the name of the German language support package for the
Siebel component.v AMW_DE.IND is the name of the German language support package for IBM
Tivoli Monitoring.
Table 18. Language support and names of corresponding installation index (.IND) files
Language Prefix for themySAP.comcomponent
Prefix for theSiebelcomponent
Prefix for IBMTivoliMonitoring
Language code suffix
BrazilianPortuguese
ABH GMS AMW _PTBR (Exception: thesuffix for IBM TivoliMonitoring is _PT_B)
Chinese(simplified)
ABH GMS AMW _ZHCH (Exception:the suffix for IBMTivoli Monitoring is_ZH_C)
Chinese(traditional)
ABH GMS AMW _ZHTW (Exception:the suffix for IBMTivoli Monitoring is_ZH_T)
French ABH GMS AMW _FR
German ABH GMS AMW _DE
Italian ABH GMS AMW _IT
Japanese ABH GMS AMW _JA
Korean ABH GMS AMW _KO
Spanish ABH GMS AMW _ES
To enable other languages, install the appropriate language support pack from oneof the Language Support installation CDs for each product component. You caninstall multiple language support packages for a single product.
Chapter 7. Completing the installation of the product 85
Some command line and keyword options are not translated in the languagesupport packages. This approach avoids any programming complexities for scriptsthat can run under multiple locales. Run the scripts under the locale in which theretrieved data is stored.
Tivoli Management Framework uses the software in the language supportpackages. For more information, see the Release Notes and the chapter oninternationalization in the Tivoli Enterprise Installation Guide, which you can find onthe installation CDs for Tivoli Management Framework:v Chapter 2 ″Internationalization″ in the Tivoli Enterprise Installation Guidev Release Notes
Required authorization roleinstall_product
Before you beginAs a precautionary measure, back up the Tivoli management region as described in“Backing up and restoring Tivoli databases” on page 13.
Start the command line interface or Tivoli desktop as described in “Accessing theTivoli environment” on page 56.
When you finishThe installer enables language support automatically. If you manually installed theproduct, perform this procedure and the procedure in “Installing the Web HealthConsole manually” on page 72.
ProcedureYou can perform this procedure from the Tivoli desktop or from the command line.
Command line:
1. Insert the appropriate Language Support CD listed in Background information.2. Access the Tivoli command line interface as described in “Accessing the Tivoli
environment” on page 56.3. Type bash and press Enter to access the complete libraries of Tivoli commands.4. Execute the following command:
winstall -c /cdromdrive -i INDFILENAME –y
where INDFILENAME for the language you want to install and cdromdrive isthe path to the location of the .IND files.
Additional Information: When the command completes, the message FinishedProduct Installation is displayed.
5. Repeat Step 4 to install additional language support packages.
Refer to the Tivoli Management Framework Reference Manual for more informationabout the winstall command. Refer to “Tivoli command syntax” on page xiv forinformation on Tivoli command line syntax.
Tivoli desktop:
1. Select Install in the Desktop menu.2. Select Install Product in the sub-menu to display the Install Product dialog
box.
86 IBM Tivoli Monitoring for Applications: Installation and Setup Guide
3. If necessary, click OK to bypass a harmless error message about the mediasettings.
4. Click Select Media to display the File Browser dialog box.5. In the Path Name text field, enter the full path to the language support files in
the CD-ROM drive. Be sure to use backward slashes (\) for Windows pathnames instead of forward slashes (/).
6. Click Set Path to refresh the view.Additional Information: The Directories list displays .CFG files and the Files listdisplays the .IND files that include the names of all nine languages.
7. Click Set Media & Close to return to the Install Product dialog box.8. Select the language that you want to install in the Select Product to Install
list.Additional Information: For example, select IBM Tivoli Monitoring forApplications, Version 5.1.0, [de] German language to choose Germanlanguage support for installation. See Background information for more details.
9. Select the machines on which you want to install language support in theClients to install on list.
10. Click Install & Close to launch the installation progress window.11. Click Continue Install when the prompt is displayed.12. Click Close when the Finished Product Installation message is displayed.13. Repeat these steps to install another language support package.
Updating Web Health Console files
ObjectiveTo update the Web Health Console files when you install a new component orupgrade IBM Tivoli Monitoring for Applications.
Background informationThis procedure describes how to update the class files for the Web Health Consolewhen you add a component to the product. The class files specify the standard textthat the console displays.
Whenever you add or upgrade components for your installation of IBM TivoliMonitoring for Applications you must perform this procedure. For example, if youupgrade Version 5.1.0 of the product to a later release, you must update the classfiles located on the computer that hosts the Web Health Console. The new classfiles become available after you restart the Web Application Server that enables theconsole.
When you install the Web Health Console for the first time, the installerautomatically installs the required class files and this procedure is not necessary.When you install the product without using the installer, use the procedure“Installing the Web Health Console manually” on page 72.
Required authorization roleThe same authorization roles that are required for the target computer.
Before you beginNone
When you finishNone
Chapter 7. Completing the installation of the product 87
ProcedureYou can perform this procedure from the command line only.
Command line:
1. Copy the contents of the HCONSOLE directory of catalog files from one of thefollowing installation CDs:v For the English language updates to IBM Tivoli Monitoring, copy catalog
files from the IBM Tivoli Monitoring V5.1.1 installation CD.v For the English language updates to IBM Tivoli Monitoring for Applications,
copy catalog files from the IBM Tivoli Monitoring for Applications installationCDs.
v For other languages, copy catalog files from the IBM Tivoli Monitoring forApplications: Language Support installation CD.
2. Paste the contents of the HCONSOLE directory in the following resourcesdirectory on the target computer that hosts the Web Health Console:INSTALL_DIR/installedApps/dm.ear/dm.war/WEB-INF/classes/com/tivoli/DmForNt/resources
Changing the gateway assignment of an endpoint
ObjectiveTo assign an endpoint to a different gateway on a managed node.
Background informationAn endpoint communicates with the Tivoli management region through gatewaysoftware that exists on a managed node. By default, the installer for IBM TivoliMonitoring for Applications assigns endpoints to managed nodes wheneverpossible. The installer assigns endpoints to the Tivoli management region serveronly when no other managed node is available.
In IBM Tivoli Monitoring for Applications, the primary role of the Tivolimanagement region server is to administer managed nodes. The primary role ofmanaged nodes is to administer endpoints. If you use the Tivoli managementregion to administer endpoints, you decrease the amount of system resourcesavailable for the administration of managed nodes.
If you want the Tivoli management region to administer endpoints, you canchange the gateway assignment as described in this procedure.
Required authorization rolesenior
Before you beginNone
When you finishNone
ProcedureYou can perform this procedure from the command line.
Command line:
1. Access the Tivoli command line interface as described in “Accessing the Tivolienvironment” on page 56.
2. Run the wep ls command to generate a list of gateway assignments.
88 IBM Tivoli Monitoring for Applications: Installation and Setup Guide

3. Run the following command:wep <endpoint> migrate <gateway>
where <endpoint> is the name of the endpoint to migrate and <gateway> is thename of the new gateway assignment.
Integrating IBM Tivoli Monitoring for Applications with Tivoli BusinessSystems Manager
ObjectiveTo integrate IBM Tivoli Monitoring for Applications with Tivoli Business SystemsManager so you can receive IBM Tivoli Monitoring for Applications events on theTivoli Business Systems Manager and issue operational tasks.
Background informationTo enable Tivoli Business Systems Manager to manage IBM Tivoli Monitoring forApplications events, you must install an IBM Tivoli Monitoring for Applicationsintegration program on the Tivoli Business Systems Manager server. Thisintegration program does the following steps:v Defines the IBM Tivoli Monitoring for Applications objects in Tivoli Business
Systems Managerv Adds IBM Tivoli Monitoring for Applications tasks to the object types in Tivoli
Business Systems Managerv Defines a line of business for IBM Tivoli Monitoring for Applications resources
Required authorization roleYou must have administrator authority on the Tivoli Business Systems Managerserver.
Before you beginBefore you integrate IBM Tivoli Monitoring for Applications into Tivoli BusinessSystems Manager, perform the following prerequisite steps:v Install Tivoli Business Systems Manager, as described in the Tivoli Business
Systems Manager Installation and Configuration Guide. You must install TivoliBusiness Systems Manager Version 1.5 with patch 29.
v Install and configure the Tivoli Event Enablement (with patch 32) on all TivoliEnterprise Console event servers that receive events that you want to forward toTivoli Business Systems Manager. See the Tivoli Business Systems ManagerInstallation and Configuration Guide for more information.
v Configure Tivoli Business Systems Manager to communicate with each TivoliEvent Enablement installed in the previous step. See the Tivoli Business SystemsManager Installation and Configuration Guide for more information.
When you finishRun the following commands from the Tivoli Business Systems Manager databaseserver:
gemeconfigConfigures the list of event enablement hosts to which the Tivoli BusinessSystems Manager AgentListener connects at startup.
tgmtaskconfigConfigures the list of task servers.
Chapter 7. Completing the installation of the product 89
Refer to the Tivoli Business Systems Manager Administrator Guide for moreinformation on these commands.
Check the logfile to confirm that the event enablement host and task server weredefined in the Tivoli Business Systems Manager database server. The log files arelocated in the following paths:v For mySAP.com: c:\temp\ABH\trace_sap_tbsm_init.log
v For Siebel eBusiness Applications: c:\temp\GMS\trace_siebel_tbsm_init.log
You must restart the AgentListener after you run the gemeconfig andtgmtaskconfig commands to the confirm that the updates were made to the eventenablement host.
Configure the Tivoli Enterprise Console event server to forward events to TivoliBusiness Systems Manager. See the appropriate user’s guide for more informationon using event correlation:v If you use IBM Tivoli Monitoring for Applications: Siebel eBusiness Applications,
see IBM Tivoli Monitoring for Applications: Siebel eBusiness Applications User’sGuide.
v If you use IBM Tivoli Monitoring for Applications: mySAP.com, see IBM TivoliMonitoring for Applications: mySAP.com User’s Guide.
ProcedureUse the following steps to install the IBM Tivoli Monitoring for Applicationsintegration:1. On the Tivoli Business Systems Manager server, insert the IBM Tivoli
Monitoring for Applications CD for the product component you are using.2. Navigate to the \TBSM directory using a command prompt.3. Type install to start the installation wizard.4. Click Next on the welcome screen.5. Specify an installation locations for the Tivoli Business Systems Manager
integration.Additional Information: The default locations are as follows:v For mySAP.com: C:\tivoli\mysap
v For Siebel eBusiness Applications: C:\tivoli\siebel
Click Browse to select a different installation location or type in a new location.6. Click Next to continue and see a display of the installation location and total
installed size.7. Provide the following Microsoft SQL Server information and click Next to start
the installation.
SQL ServerThe name of the SQL server with which this Tivoli Business SystemsManager server is associated
SQL UseridThe SQL user ID.
SQL PasswordThe password for the user ID defined above.
A progress bar displays to show the progress of the installation. A messagedisplays when installation completes.
8. Click Finish to exit the installation wizard.
90 IBM Tivoli Monitoring for Applications: Installation and Setup Guide
9. Restart the Tivoli Business Systems Manager services.
Chapter 7. Completing the installation of the product 91

92 IBM Tivoli Monitoring for Applications: Installation and Setup Guide
Chapter 8. Migrating from previous versions of IBM TivoliMonitoring for Applications, Version 5.1.0: mySAP.com
This chapter provides guidelines for migrating from previous versions of IBMTivoli Monitoring for Applications, Version 5.1.0: mySAP.com. Previous versions ofIBM Tivoli Monitoring for Applications, Version 5.1.0: mySAP.com were calledTivoli Manager for R/3. This chapter also provides information that shows whichmonitors from previous versions of the product correspond to resource models inIBM Tivoli Monitoring for Applications, Version 5.1.0: mySAP.com. If you useTivoli Manager for R/3 2.1, you must upgrade it to Version 2.2.0 before migratingto IBM Tivoli Monitoring for Applications, Version 5.1.0: mySAP.com.
IBM Tivoli Monitoring for Applications, Version 5.1.0: mySAP.com supportsconcurrency with Tivoli Distributed Monitoring. You can continue to run the oldmonitoring systems based in Tivoli Distributed Monitoring after you have installedIBM Tivoli Monitoring for Applications, Version 5.1.0: mySAP.com. You cangradually reproduce the functionality of your old monitors in resource models andrun the resource models in IBM Tivoli Monitoring for Applications, Version 5.1.0:mySAP.com.
Table 19. Guidelines for migrating from previous versions of the product
Goal Refer to
Upgrade Tivoli Manager for R/3 software to Version2.2.0 if you use an earlier version. Migration to IBMTivoli Monitoring for Applications, Version 5.1.0:mySAP.com is supported only from Tivoli Manager forR/3 Version 2.2.0.
Tivoli Manager for R/3 Version 2.2.0 documentation andinstallation CDs.
Enable support in Tivoli Manager for R/3, Version 2.2.0for Tivoli Management Framework 3.7.1.
“Installing Patch 220-SAP-0001” on page 94
Migrate R/3 objects “Migrating R/3 objects” on page 95
Delete Reliant UNIX R/3 objects “Deleting Reliant UNIX R/3 objects” on page 96
Complete the mySAP migration process “Completing migration to IBM Tivoli Monitoring forApplications: mySAP.com” on page 97
Migrate Tivoli Distributed Monitoring software to IBMTivoli Monitoring software. IBM Tivoli Monitoring 5.1.1and Tivoli Distributed Monitoring 3.7 can coexist. InstallIBM Tivoli Monitoring early in the migration process. Donot uninstall Tivoli Distributed Monitoring 3.7.Note: If you do not use the installer and perform amanual install instead, you must manually install eachindividual software package.
“Upgrading IBM Tivoli Monitoring manually” on page67.
Map monitors in Tivoli Manager for R/3 to resourcemodels in IBM Tivoli Monitoring for Applications:mySAP.com, Version 5.1.0.
“Mapping monitors to resource models” on page 97
Map tasks in Tivoli Manager for R/3 to IBM TivoliMonitoring for Applications
“Migrating tasks” on page 100
93
Installing Patch 220-SAP-0001
ObjectiveTo install the 220-SAP-0001 patch using an existing Tivoli desktop or command lineinterface.
Background informationInstall the 220-SAP-0001 patch to provide support in Tivoli Manager for R/3Version 2.2.0 for Tivoli Management Framework Version 3.7.1. If you previouslyupgraded your system to support Tivoli Management Framework 3.7.1, the patchalready exists on that system.
You must install this patch wherever you intend to install IBM Tivoli Monitoringfor Applications: mySAP.com.
Configure the wpatch command to install the patch on all managed nodesautomatically, as described in this procedure. The patches are located onftp://ftp.tivoli.com/support/patches/index.html.
Required authorization roleinstall_product
Before you beginRun the wlsinst command on the Tivoli management region and managed node todetermine if the patch already exists on your Tivoli management region andmanaged nodes.
As a precautionary measure, back up the Tivoli management region as described in“Backing up and restoring Tivoli databases” on page 13.
Start the command line interface or Tivoli desktop as described in “Accessing theTivoli environment” on page 56.
When you finishNone
ProcedureYou can perform this procedure from the Tivoli desktop or from the command line.
Command line: Use the wpatch command to install patches.wpatch [-c <source_dir>] -i patch_name.IND[-n | <managed_node1> <managed_node2> ...] [-y]
where:
-c <source_dir>Specifies the complete path to the directory containing the installationimage.
-i patch_name.INDSpecifies the product index file to reference for the installation.
-n Installs the product on all managed nodes that do not currently have theproduct installed.
<managed_node>Installs the product on the managed nodes you specify. Use blank spaces
94 IBM Tivoli Monitoring for Applications: Installation and Setup Guide
to separate the names of multiple managed nodes. If you do not specifymanaged nodes, the patch is installed on all managed nodes in the Tivolimanagement region.
-y Installs the product without requesting confirmation.
Refer to the Tivoli Management Framework Reference Manual for more informationabout this command. Refer to “Tivoli command syntax” on page xiv forinformation on Tivoli command line syntax.
Tivoli desktop:
1. Select Install in the Desktop menu.2. Select Install Patch in the sub-menu to display the Install Patch dialog box.3. If necessary, click OK to bypass a harmless error message about the media
settings.4. Click Select Media to display the File Browser dialog box.5. In the Path Name text field, enter the full path to the patch files in the
CD-ROM drive. Be sure to use backward slashes (\) for Windows path namesinstead of forward slashes (/).
6. Click Set Path. The File Browser dialog box displays the contents of thespecified media in the Files scrolling list.
7. Click Set Media & Close.8. Select the patch from the Select Patch to Install scrolling list in the Install
Patch dialog box.9. Select the target clients on which to install the patch from the Clients to
Install On scrolling list,10. Click the right arrow to move the selected clients to the Available Clients
scrolling list.11. Click Install & Close to display the Patch Install window and a list of
pending installation actions.12. Click Continue Install to begin the installation process.
Additional Information: The Patch Install window displays the progress of theinstallation. View the messages in the task output dialog box to determinewhether the patch installation was successful. If necessary, see “About the logfiles for installation errors” on page 109 for information on problemdetermination.
13. Click Close to close the Patch Install window.14. As a precautionary measure, back up the Tivoli management region databases
as described in “Backing up and restoring Tivoli databases” on page 13. Use aunique name for the new backup files.
Migrating R/3 objects
ObjectiveTo migrate existing Tivoli Manager for R/3 objects to use Tivoli endpoints.
Background informationTivoli Manager for R/3, Version 2.2.0 supported SAP servers on both Tivolimanaged nodes and Tivoli endpoints. IBM Tivoli Monitoring for Applications:mySAP.com only supports SAP servers on Tivoli endpoints. If you usemanagement functions based on managed nodes, install a Tivoli endpoint on theseSAP server machines and convert the Tivoli Manager for R/3, Version 2.2.0management function to use Tivoli endpoints.
Chapter 8. Migrating from previous versions of IBM Tivoli Monitoring for Applications, Version 5.1.0: mySAP.com 95
Required authorization roler3_admin
Before you beginAs a precautionary measure, back up the Tivoli management region as described in“Backing up and restoring Tivoli databases” on page 13.
Start the command line interface or Tivoli desktop as described in “Accessing theTivoli environment” on page 56.
Save the configuration settings of your monitors and the event adapterconfiguration files.
When you finishRecreate the Tivoli Manager for R/3 objects using Tivoli endpoints after installingIBM Tivoli Monitoring for Applications: mySAP.com.
Procedure1. Check for any R/3 servers managed by Tivoli managed nodes.2. For each R/3 server managed by R/3, install a Tivoli endpoint on the managed
node machine (if one does not already exist),3. Delete the Tivoli Manager for R/3 objects used to manage the R/3 servers.4. Recreate the Tivoli Manager for R/3 objects using Tivoli endpoints, based on
the previous configuration settings of your monitors and the event adapterconfiguration files.
Deleting Reliant UNIX R/3 objects
ObjectiveTo delete existing Reliant UNIX R/3 objects used to manage R/3 servers fromTivoli endpoints.
Background informationTivoli Manager for R/3, Version 2.2.0, with patch 220-SAP-0002, supported ReliantUNIX endpoints. IBM Tivoli Monitoring for Applications: mySAP.com providessupport for Reliant UNIX systems only with the new Remote Managementcapabilities. You must delete all Tivoli Manager for R/3, Version 2.2.0 objectssupporting Reliant UNIX before installing IBM Tivoli Monitoring for Applications:mySAP.com.
Required authorization roler3_admin
Before you beginSave the configuration settings of your monitors and the event adapterconfiguration files.
When you finishUse the saved configuration settings to configure the IBM Tivoli Monitoring forApplications: mySAP.com objects after you install IBM Tivoli Monitoring forApplications: mySAP.com.
Procedure1. Check for any Reliant UNIX R/3 servers managed from Tivoli endpoints.2. Delete each Tivoli Manager for R/3 objects used to manage the R/3 servers on
this system.
96 IBM Tivoli Monitoring for Applications: Installation and Setup Guide
Completing migration to IBM Tivoli Monitoring for Applications:mySAP.com
ObjectiveTo complete a migration from Tivoli Manager for R/3 2.2.0 to IBM TivoliMonitoring for Applications: mySAP.com.
Background informationIn this procedure you use the Complete 2.2.0 Migration task to complete amigration from Tivoli Manager for R/3 2.2.0. The task removes the product filesfrom the managed nodes and endpoints.
Required authorization roleadministrator and install_product
Before you beginInstall IBM Tivoli Monitoring for Applications: mySAP.com
When you finishNone
Procedure
Command line:
1. Access the Tivoli command line interface as described in “Accessing the Tivolienvironment” on page 56.
2. Complete migration from the Tivoli server:
Note: This procedure fails if the installation was not successful in removing allTivoli Manager for R/3, Version 2.2.0 objects.
a. Run the following command to check for and repair databaseinconsistencies:wchkdb -u
b. Access the $BINDIR/../generic_unix/TME/ABH/sh directory and enter oneof the following commands:v UNIX: mySAP_uninstall22.plv Windows: perl mySAP_uninstall22.pl
The following example includes the optional -yes flag which runs thecommand without prompting you for confirmation:mySAP_uninstall22.pl -yes
c. Run the following command to check for and repair databaseinconsistencies:wchkdb -u
3. Complete migration of the managed nodes and endpoints by running theComplete 2.2.0 Migration task in the mySAP Configuration Tasks task libraryagainst the appropriate managed nodes and endpoints.
Mapping monitors to resource models
Note: Tivoli Manager for Siebel monitors can coexist with new IBM TivoliMonitoring for Applications: Siebel eBusiness Applications resource models.No mapping is necessary.
Chapter 8. Migrating from previous versions of IBM Tivoli Monitoring for Applications, Version 5.1.0: mySAP.com 97

The Tivoli Manager for R/3 monitoring collections and monitors work with TivoliDistributed Monitoring 3.7 and Tivoli Manager for R/3 objects. If you have TivoliManager for R/3, Version 2.2.0 installed, the IBM Tivoli Monitoring forApplications: mySAP.com upgrade process preserves the Tivoli Manager for R/3monitoring collections and monitors. The Tivoli Manager for R/3 monitoringcollections are not shipped with IBM Tivoli Monitoring for Applications:mySAP.com.
The IBM Tivoli Monitoring for Applications: mySAP.com installation migrates theTivoli Manager for R/3 objects to the new IBM Tivoli Monitoring for Applications:mySAP.com object types. You can run Tivoli Manager for R/3 monitors with thenew IBM Tivoli Monitoring for Applications: mySAP.com objects. The ability to runthe Tivoli Manager for R/3 monitors with IBM Tivoli Monitoring for Applications:mySAP.com objects is provided for migration support so you can convert yourmonitors to new IBM Tivoli Monitoring for Applications: mySAP.com resourcemodels.
Table 20 lists Tivoli Manager for R/3 monitors and corresponding resource models.
Table 20. Mapping monitors to resource models
Tivoli Manager for R/3 monitor IBM Tivoli Monitoring for Applications:mySAP.com resource model
Application Server Status mySAP Basis Application Server
ITS Server Status mySAP Basis ITS Server
CUA Menu and Text BufferFTAB Field Catalog BufferIRBD Initial Records BufferPRES Screen and Dynpro BufferPXA Program BufferSNTAB Short NameTab BufferTABL Generic Key BufferTABLP Single Key BufferTTAB Table Description Buffer
mySAP Buffer (Buffer Quality value only)
None mySAP Database Connection
98 IBM Tivoli Monitoring for Applications: Installation and Setup Guide
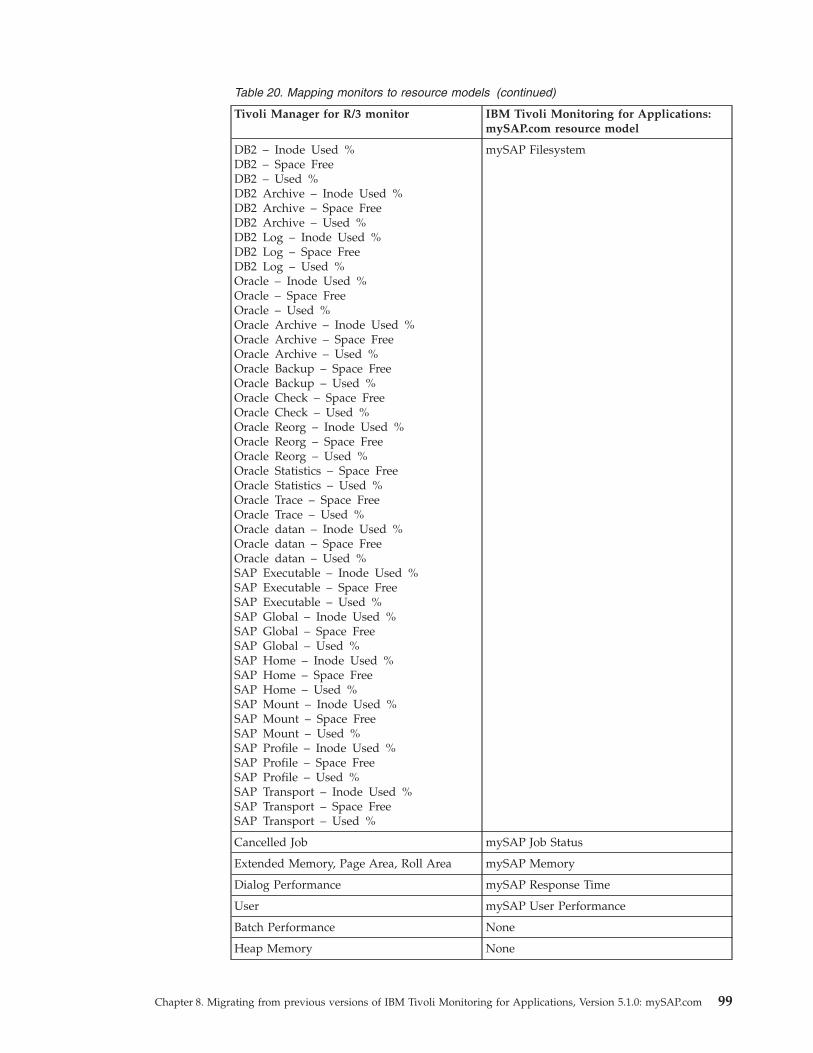
Table 20. Mapping monitors to resource models (continued)
Tivoli Manager for R/3 monitor IBM Tivoli Monitoring for Applications:mySAP.com resource model
DB2 – Inode Used %DB2 – Space FreeDB2 – Used %DB2 Archive – Inode Used %DB2 Archive – Space FreeDB2 Archive – Used %DB2 Log – Inode Used %DB2 Log – Space FreeDB2 Log – Used %Oracle – Inode Used %Oracle – Space FreeOracle – Used %Oracle Archive – Inode Used %Oracle Archive – Space FreeOracle Archive – Used %Oracle Backup – Space FreeOracle Backup – Used %Oracle Check – Space FreeOracle Check – Used %Oracle Reorg – Inode Used %Oracle Reorg – Space FreeOracle Reorg – Used %Oracle Statistics – Space FreeOracle Statistics – Used %Oracle Trace – Space FreeOracle Trace – Used %Oracle datan – Inode Used %Oracle datan – Space FreeOracle datan – Used %SAP Executable – Inode Used %SAP Executable – Space FreeSAP Executable – Used %SAP Global – Inode Used %SAP Global – Space FreeSAP Global – Used %SAP Home – Inode Used %SAP Home – Space FreeSAP Home – Used %SAP Mount – Inode Used %SAP Mount – Space FreeSAP Mount – Used %SAP Profile – Inode Used %SAP Profile – Space FreeSAP Profile – Used %SAP Transport – Inode Used %SAP Transport – Space FreeSAP Transport – Used %
mySAP Filesystem
Cancelled Job mySAP Job Status
Extended Memory, Page Area, Roll Area mySAP Memory
Dialog Performance mySAP Response Time
User mySAP User Performance
Batch Performance None
Heap Memory None
Chapter 8. Migrating from previous versions of IBM Tivoli Monitoring for Applications, Version 5.1.0: mySAP.com 99
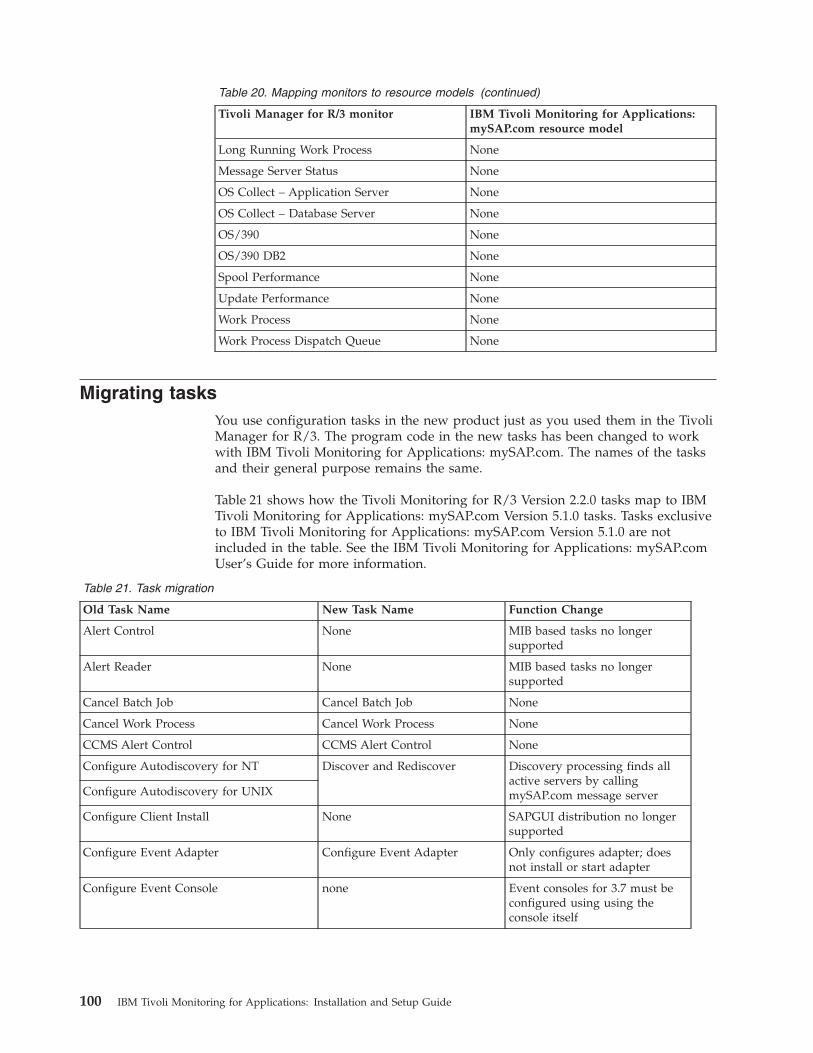
Table 20. Mapping monitors to resource models (continued)
Tivoli Manager for R/3 monitor IBM Tivoli Monitoring for Applications:mySAP.com resource model
Long Running Work Process None
Message Server Status None
OS Collect – Application Server None
OS Collect – Database Server None
OS/390 None
OS/390 DB2 None
Spool Performance None
Update Performance None
Work Process None
Work Process Dispatch Queue None
Migrating tasksYou use configuration tasks in the new product just as you used them in the TivoliManager for R/3. The program code in the new tasks has been changed to workwith IBM Tivoli Monitoring for Applications: mySAP.com. The names of the tasksand their general purpose remains the same.
Table 21 shows how the Tivoli Monitoring for R/3 Version 2.2.0 tasks map to IBMTivoli Monitoring for Applications: mySAP.com Version 5.1.0 tasks. Tasks exclusiveto IBM Tivoli Monitoring for Applications: mySAP.com Version 5.1.0 are notincluded in the table. See the IBM Tivoli Monitoring for Applications: mySAP.comUser’s Guide for more information.
Table 21. Task migration
Old Task Name New Task Name Function Change
Alert Control None MIB based tasks no longersupported
Alert Reader None MIB based tasks no longersupported
Cancel Batch Job Cancel Batch Job None
Cancel Work Process Cancel Work Process None
CCMS Alert Control CCMS Alert Control None
Configure Autodiscovery for NT Discover and Rediscover Discovery processing finds allactive servers by callingmySAP.com message serverConfigure Autodiscovery for UNIX
Configure Client Install None SAPGUI distribution no longersupported
Configure Event Adapter Configure Event Adapter Only configures adapter; doesnot install or start adapter
Configure Event Console none Event consoles for 3.7 must beconfigured using using theconsole itself
100 IBM Tivoli Monitoring for Applications: Installation and Setup Guide
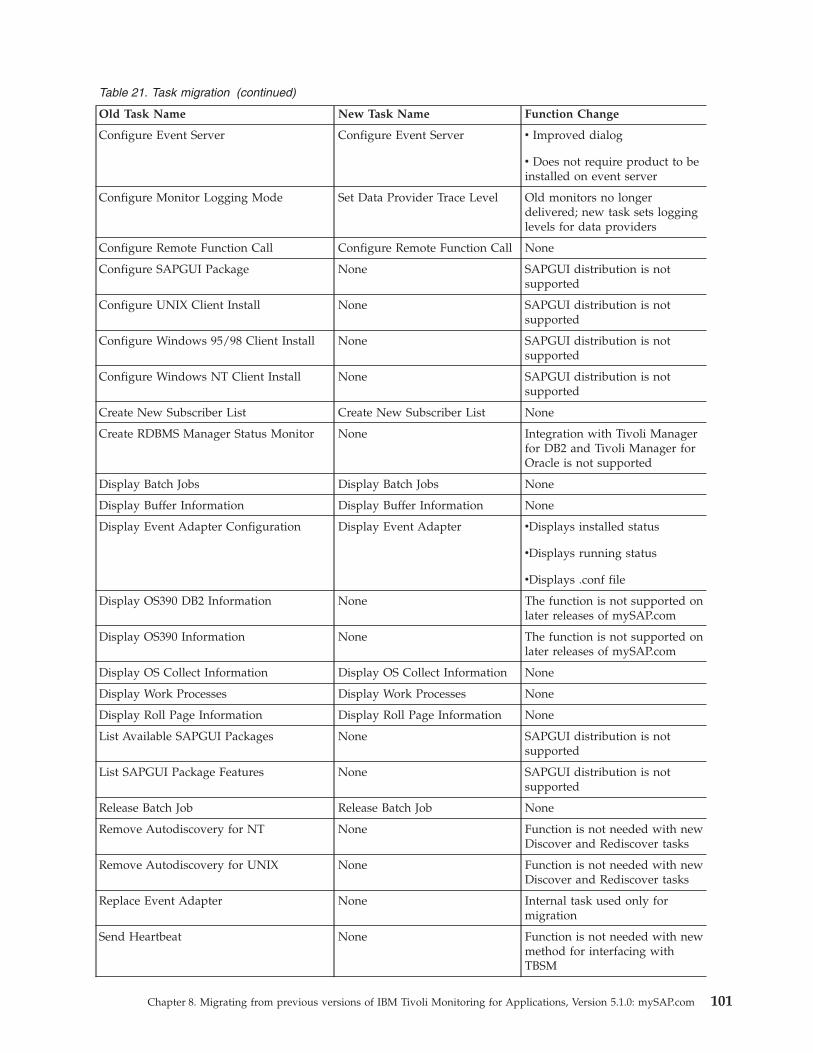
Table 21. Task migration (continued)
Old Task Name New Task Name Function Change
Configure Event Server Configure Event Server v Improved dialog
v Does not require product to beinstalled on event server
Configure Monitor Logging Mode Set Data Provider Trace Level Old monitors no longerdelivered; new task sets logginglevels for data providers
Configure Remote Function Call Configure Remote Function Call None
Configure SAPGUI Package None SAPGUI distribution is notsupported
Configure UNIX Client Install None SAPGUI distribution is notsupported
Configure Windows 95/98 Client Install None SAPGUI distribution is notsupported
Configure Windows NT Client Install None SAPGUI distribution is notsupported
Create New Subscriber List Create New Subscriber List None
Create RDBMS Manager Status Monitor None Integration with Tivoli Managerfor DB2 and Tivoli Manager forOracle is not supported
Display Batch Jobs Display Batch Jobs None
Display Buffer Information Display Buffer Information None
Display Event Adapter Configuration Display Event Adapter vDisplays installed status
vDisplays running status
vDisplays .conf file
Display OS390 DB2 Information None The function is not supported onlater releases of mySAP.com
Display OS390 Information None The function is not supported onlater releases of mySAP.com
Display OS Collect Information Display OS Collect Information None
Display Work Processes Display Work Processes None
Display Roll Page Information Display Roll Page Information None
List Available SAPGUI Packages None SAPGUI distribution is notsupported
List SAPGUI Package Features None SAPGUI distribution is notsupported
Release Batch Job Release Batch Job None
Remove Autodiscovery for NT None Function is not needed with newDiscover and Rediscover tasks
Remove Autodiscovery for UNIX None Function is not needed with newDiscover and Rediscover tasks
Replace Event Adapter None Internal task used only formigration
Send Heartbeat None Function is not needed with newmethod for interfacing withTBSM
Chapter 8. Migrating from previous versions of IBM Tivoli Monitoring for Applications, Version 5.1.0: mySAP.com 101
Table 21. Task migration (continued)
Old Task Name New Task Name Function Change
Set Remote Monitor Debug Mode None Old monitors are not delivered
Start Database Start Database none
Start dbaccess None SQL access to Informixdatabases is not supported
Start Event Adapter Start Event Adapter None
Start ITS Server Start ITS Server None
Start R/3 System None mySAP.com systems must bestarted using Start Database andStart Server tasks
Start Server Start Server None
Stop Database Stop Database None
Stop Event Adapter Stop Event Adapter None
Stop ITS Server Stop ITS Server None
Stop R/3 System None mySAP.com systems must bestopped using Stop Databaseand Stop Server tasks
Stop Server Stop Server None
Monitoring database statusTivoli Manager for R/3 provided two methods to monitor the status of an R/3database server:v The database server status was set based on the status of all application servers
in the R/3 system:– If an application server was up, the database server status was up.– If all application servers were down, the database server status was unknown.
v The status could be set based on the status reported by the Tivoli Manager forDB2 or Tivoli Manager for Oracle products.
IBM Tivoli Monitoring for Applications: mySAP.com does not support the statusreporting based on the status reported by the Tivoli database managementproducts. In IBM Tivoli Monitoring for Applications: mySAP.com, the databaseserver status is set based on the following:v Status of the application servers in the same mySAP.com system, as in Tivoli
Manager for R/3v Results of the new mySAP Database Connection resource model
The Create RDBMS Manager Status Monitor task does not exist in IBM TivoliMonitoring for Applications: mySAP.com. If you used Tivoli Manager for DB2 orTivoli Manager for Oracle products to report that status of your R/3 databaseserver, you must convert to the mySAP Database Connection resource model, orhave status reported based only on the status of the application servers.
102 IBM Tivoli Monitoring for Applications: Installation and Setup Guide
Starting or stopping databases or serversThe Start System and Stop System tasks do not exist in IBM Tivoli Monitoring forApplications: mySAP.com. Use the following tasks to start and stop a mySAPsystem with IBM Tivoli Monitoring for Applications: mySAP.com.
Table 22. IBM Tivoli Monitoring for Applications: mySAP.com start and stop tasks
Start tasks Stop tasks
Start Database Stop Database
Start Server (for central instance) Stop Server (for central instance)
Start Server (for each dialog instance) Stop Server (for each dialog instance)
Moving Transports to mySAP systemsIn Tivoli Manager for R/3, the R3 Transports profile manager contained a filepackage for the R/3 transports. This R3 Transports profile manager is not shippedin IBM Tivoli Monitoring for Applications: mySAP.com. To distribute the R/3transports in IBM Tivoli Monitoring for Applications: mySAP.com, transfer thetransport files from the Tivoli server to the mySAP system.
Assigning mySAP system policy region namesTivoli Manager for R/3 used a discovery configuration file to support mapping ofdatabase host names in OS/390 environments. In IBM Tivoli Monitoring forApplications: mySAP.com, the database host is obtained from the central instanceand the mapping file is not needed.
Memory windows on HP-UXThe SAP MIB-based support in Tivoli Manager for R/3 was dependent on HP-UXmemory windows. IBM Tivoli Monitoring for Applications: mySAP.com does notdepend on SAP MIB-based functions. Configuration options needed for TivoliManager for R/3 for HP-UX memory windows are not required in IBM TivoliMonitoring for Applications: mySAP.com
Event server updatesThe event processing methods were updated in IBM Tivoli Monitoring forApplications: mySAP.com. The following lists the changes:v The baroc files sap_server_monitor.baroc and sap_server_monitor_35.baroc for
the events from the Tivoli Manager for R/3 monitors are not shipped with IBMTivoli Monitoring for Applications: mySAP.com. If you created rules for eventsdefined in these files, remove them from your rule base to avoid rule basecompilation errors.
v Events for the MIB-based event adapter (SAP_ALERT_. . .) are not generated inIBM Tivoli Monitoring for Applications: mySAP.com, but the baroc file isshipped in IBM Tivoli Monitoring for Applications: mySAP.com. Remove rulesthat refer to the event classes from your rule base to avoid rule base compilationerrors.
Chapter 8. Migrating from previous versions of IBM Tivoli Monitoring for Applications, Version 5.1.0: mySAP.com 103

104 IBM Tivoli Monitoring for Applications: Installation and Setup Guide
Appendix A. Problem determination
This appendix describes how to determine the source of problems and how tocorrect those problems. Table 23 provides an overview of the topics covered in thisappendix.
Table 23. Overview of problem determination topics and procedures
Topic or procedure Where to find information
Use indicators and tools in the installer to identify andresolve problems.
“Troubleshooting installer problems”
Work with the error message log that the TivoliManagement Framework Endpoint Setup wizardgenerates when installing the agent.
“About the log files for installation errors” on page 109
Determine the source of a common problem and resolveit.
“Problems and workarounds” on page 110
Determine the source of connectivity errors in anendpoint and resolve the errors.
“Testing endpoint connectivity” on page 112
To clean up the endpoint process and remove endpointfiles from the Tivoli environment.Note: Use this procedure to resolve connectivityproblems. Remove the endpoint using this procedure andthen reinstall it. A completely new installation of theagent might resolve the connectivity problem.
“Cleaning up and removing the endpoint” on page 113
Troubleshooting installer problems
ObjectiveTo resolve or work around common problems that can arise during a typical orcustom installation.
Background informationThis procedure describes actions you can take in the Step List panel of theinstaller. The Step List provides detailed information about the progress ofinstallation. This panel is displayed near the end of the installation process, whenthe installer is processing all of your configuration settings.
105
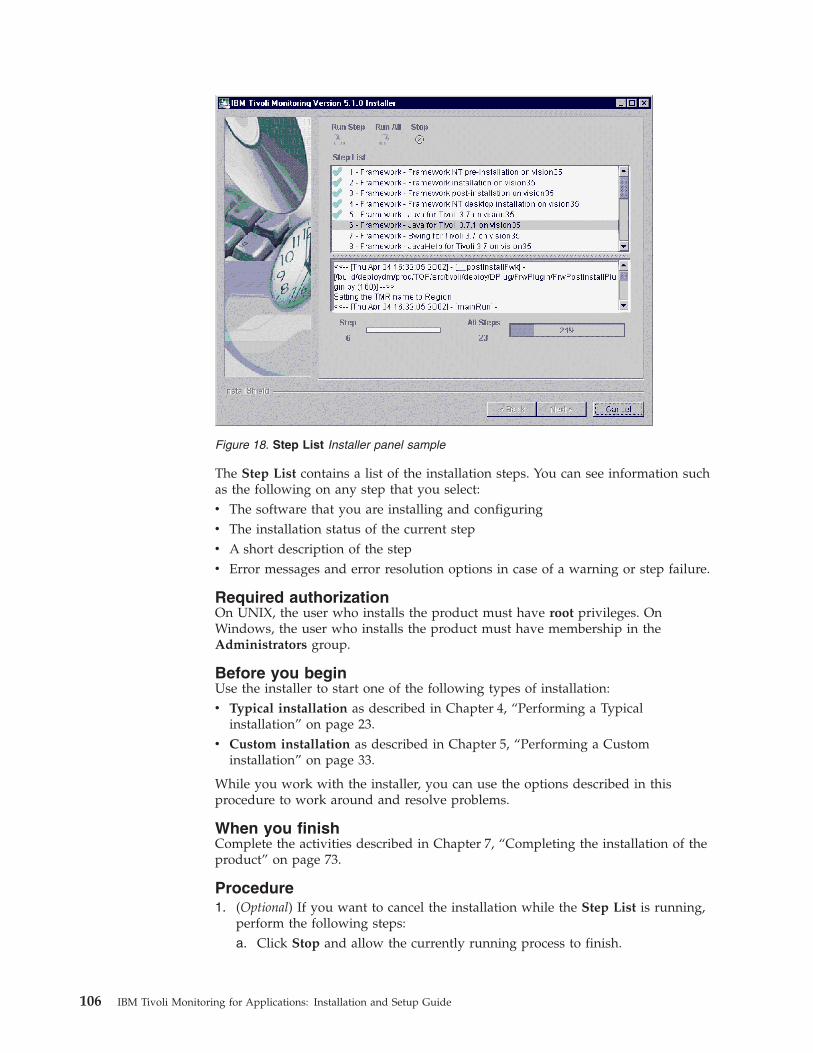
The Step List contains a list of the installation steps. You can see information suchas the following on any step that you select:v The software that you are installing and configuringv The installation status of the current stepv A short description of the stepv Error messages and error resolution options in case of a warning or step failure.
Required authorizationOn UNIX, the user who installs the product must have root privileges. OnWindows, the user who installs the product must have membership in theAdministrators group.
Before you beginUse the installer to start one of the following types of installation:v Typical installation as described in Chapter 4, “Performing a Typical
installation” on page 23.v Custom installation as described in Chapter 5, “Performing a Custom
installation” on page 33.
While you work with the installer, you can use the options described in thisprocedure to work around and resolve problems.
When you finishComplete the activities described in Chapter 7, “Completing the installation of theproduct” on page 73.
Procedure1. (Optional) If you want to cancel the installation while the Step List is running,
perform the following steps:a. Click Stop and allow the currently running process to finish.
Figure 18. Step List Installer panel sample
106 IBM Tivoli Monitoring for Applications: Installation and Setup Guide
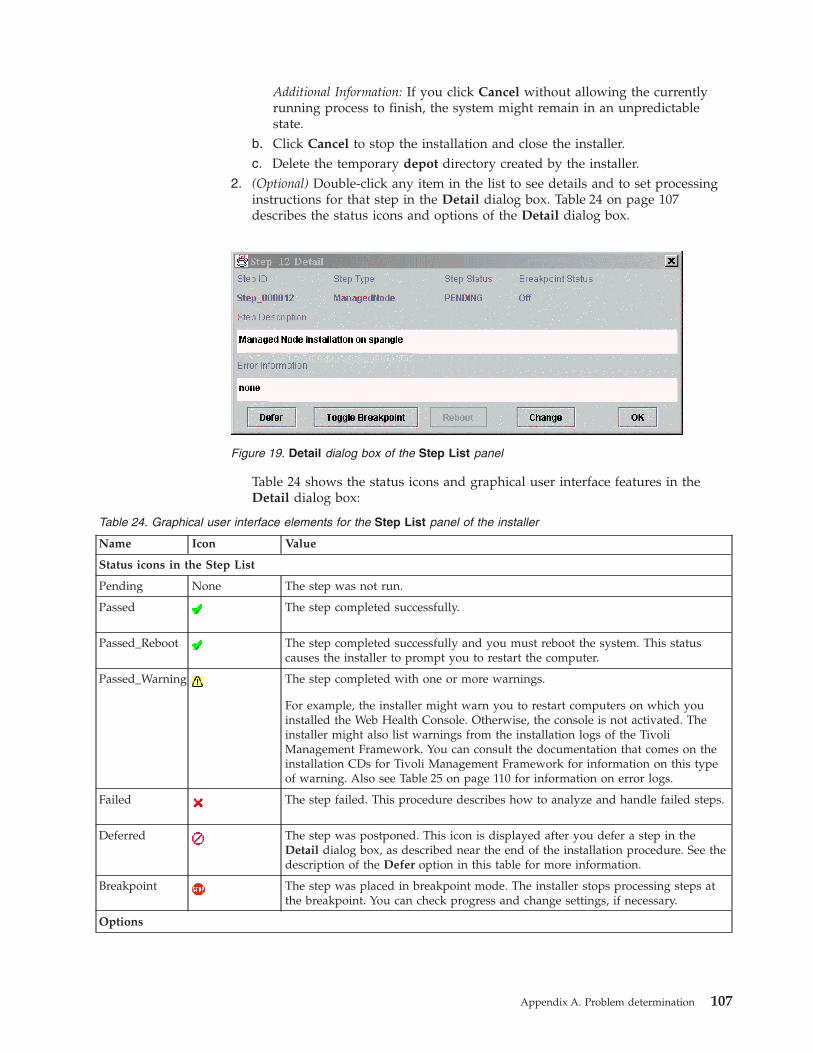
Additional Information: If you click Cancel without allowing the currentlyrunning process to finish, the system might remain in an unpredictablestate.
b. Click Cancel to stop the installation and close the installer.c. Delete the temporary depot directory created by the installer.
2. (Optional) Double-click any item in the list to see details and to set processinginstructions for that step in the Detail dialog box. Table 24 on page 107describes the status icons and options of the Detail dialog box.
Table 24 shows the status icons and graphical user interface features in theDetail dialog box:
Table 24. Graphical user interface elements for the Step List panel of the installer
Name Icon Value
Status icons in the Step List
Pending None The step was not run.
Passed The step completed successfully.
Passed_Reboot The step completed successfully and you must reboot the system. This statuscauses the installer to prompt you to restart the computer.
Passed_Warning The step completed with one or more warnings.
For example, the installer might warn you to restart computers on which youinstalled the Web Health Console. Otherwise, the console is not activated. Theinstaller might also list warnings from the installation logs of the TivoliManagement Framework. You can consult the documentation that comes on theinstallation CDs for Tivoli Management Framework for information on this typeof warning. Also see Table 25 on page 110 for information on error logs.
Failed The step failed. This procedure describes how to analyze and handle failed steps.
Deferred The step was postponed. This icon is displayed after you defer a step in theDetail dialog box, as described near the end of the installation procedure. See thedescription of the Defer option in this table for more information.
Breakpoint The step was placed in breakpoint mode. The installer stops processing steps atthe breakpoint. You can check progress and change settings, if necessary.
Options
Figure 19. Detail dialog box of the Step List panel
Appendix A. Problem determination 107
Table 24. Graphical user interface elements for the Step List panel of the installer (continued)
Name Icon Value
Defer Postpones the step to a later time. Before you use this option consider the following points:
v Do not defer a step that other steps depend on. For example, do not defer creation of a managednode when you plan to use the installer to create an endpoint that references that managednode. Endpoints must have a managed node assignment at the time they are created.
v You cannot undo a deferral. When you defer a step, you must perform Step 5 in this procedureto run it.
v When you run deferred steps, the status of all other steps in the list must be Passed.
v You must run all deferred steps in sequence, as they are listed in the Step List.
ToggleBreakpoint
Activate or Deactivate the breakpoint. If you activate the breakpoint, the automatic installationprocess is interrupted when it reaches that step and you are asked for input. If you want theinstaller to pause after specific steps are complete, activate a breakpoint on the subsequent step.For example, you can set a breakpoint to enable installation of proxy endpoints as described in“Manually creating a Windows proxy endpoint” on page 50.
Reboot Reboots the system when required.
OK Returns to the previous dialog box.
Change Enables you to make the following types of change:
v Change the user ID or password.
v Change the destination directory for the creation of a managed node or endpoint.
3. Respond to the Step List error, event, or action prompts that might bedisplayed.v Error message logs: Consult the following resources in case of installation
errors– The error log in the following directory:
../depot/DeployEngine/logs/deploy.log. (This file is located in the pathyou choose for the product during installation.) Customer Support usesthis file to determine the source of problems.
– See the Tivoli Enterprise Installation Guide that comes with TivoliManagement Framework, Version 3.7.1, for complete troubleshootinganalysis.
v Warnings: The step might complete with one or more warnings. Forexample, the installer might warn you to restart computers on which youinstalled the Web Health Console. Otherwise, the console is not activated.The installer might also list warnings from the installation logs of the TivoliManagement Framework. You can consult the documentation that comes onthe installation CDs for Tivoli Management Framework for information onthis type of warning. Also see Table 25 on page 110.
v Change value operations: Perform the following steps any time you becomeaware of a user name or password error:a. Double-click the step in which an error occurs to display the Detail
dialog box.b. Click Change to display the Change Value dialog box.c. Enter the new value in the Change Value dialog box for user ID,
password, and destination directory, as needed.d. Click OK.
4. If a Change Value operation fails, perform the following steps:a. See Table 24 on page 107 for a description of the proper use of the Defer
option.
108 IBM Tivoli Monitoring for Applications: Installation and Setup Guide

b. Click Defer in the Step Detail dialog box.c. Allow the installer to finish processing the Step List.
5. If you have made changes that will permit successful execution of deferredsteps, execute steps that you deferred.Additional Information: For example, you could successfully execute a deferredstep after this sequence of events:
Event 1: The installer initially failed to create a managed node on acomputer because the target computer was down.Event 2: You defer the step so that installation can continue while thetarget computer is restarting.Event 3: The installer to finishes processing the Step List and the targetcomputer for the managed node finishes restarting.
Execute deferred steps as follows:a. Double-click the first deferred step in the Step List to display the Detail
dialog box.b. Click Execute.c. Double-click the next deferred step in the Step List to display the Detail
dialog box.d. Click Execute.e. Continue executing the deferred steps in sequence until all steps are
complete.6. If failed steps remain in the Step List, perform the following steps:
Additional Information: The installation can be successful even when deferredsteps exist or when optional steps fail or generate warnings. For example, thecreation of the Tivoli environment and installation of the product is successfulwhen the following optional steps fail:v Creation of managed nodes or endpointsv Installation of the Web Health Console
For these types of failures, the installer does not display a completion dialogbox or other options, but the installation is successful. You can exit the installerand begin to run the product. Resolve failed steps and warnings as follows:a. Click Cancel to dismiss the user interface of the installer.b. If possible, resolve conditions that prevented failed steps or caused
warnings. For example, resolve network connectivity problems. Also, besure the prerequisite conditions exist on the computers on which failureoccurred, as described in Chapter 3, “Pre-installation” on page 7. You mightbe able to use the procedures in the Tivoli Enterprise Installation Guide thatcomes with the Tivoli Management Framework software to manuallycomplete failed steps, such as the installation of managed nodes andendpoints. See the the Tivoli Web site for the newest version of theLimitations and Workarounds Supplement to find all possible solutions to stepfailure.
c. Analyze the installation logs. See Table 25 on page 110 for furtherinformation.
About the log files for installation errorsThe installer prompts you when errors occur. In some cases, the installer guidesyou to resolution of the problem. In other cases, you can defer a step in the listand resolve it later.
Appendix A. Problem determination 109
If you encounter installation errors, see the details in the logs that areautomatically created in the directories listed in Table 25. If you need help, contactCustomer Support staff and send the installation log file. See “ContactingCustomer Support” on page xiii. The last entry in a log file often corresponds tothe event that caused the error.
Table 25. Error logs and descriptions
Log file name Location Description
deploy.log ../depot/DeployEngine/logs/deploy.log
This file is located in the path you choose forthe product during installation.
Lists the events for the installation ofthe Tivoli environment. See the TivoliEnterprise Installation Guide that comeswith Tivoli management regionVersion 3.7.1 for further information onthis set of errors.
For mySAP.cominstallations: ABH
For Siebel installations:GMSinstall.log
See the Tivoli temporary directory. Find thisdirectory as follows:
1. Access the Tivoli command lineenvironment as described in “Accessing theTivoli environment” on page 56.
2. Run wtemp to display the directory path.
Lists the events for the installation ofthe IBM Tivoli Monitoring forApplications.
BAMinstall.log The temporary ($TEMP or %TEMP%)directories that are defined for your operatingsystem.
Lists the events for that the installergenerates.
planner.log ../depot/DeployEngine/planner.log
This file is located in the path you choose forthe product during installation.
List the events for the Planner tool thatruns during a Custom installation.
Problems and workaroundsThis section lists problems that you might encounter when you install and set upIBM Tivoli Monitoring for Applications. The section also describes workaroundsfor those problems.
Table 26. Problems and workarounds
Problem Workaround
Some HP-UX operating systems might fail to findlong file names on the installation CDs for IBM TivoliMonitoring for Applications. These systems areunable to process the Rock Ridge extensions used toburn the IBM Tivoli Monitoring for Applications CDs.
You must change how the operating system mounts CDs.See the Hewlett-Packard Company Web site for information.The Patch Database in the Hewlett-Packard IT ResourceCenter has information for some versions. The release notesfor HP-UX 10.x systems also provide information.
In the Step List panel of the installer you might seethe following message box when installation of theTivoli desktop software begins: ″String variable isnot large enough for string. Check stringdeclarations. Error 401.″.
Click OK to continue the installation. After installation, ifyou are unable to launch the Tivoli desktop, run theinstallation wizard for this tool in the following directorypath of the Tivoli Management Framework, Upgrade fromVersion 3.7, Revision B to Version 3.7.1 installation CD:PC\DESKTOP\DISK1\SETUP.EXE.
110 IBM Tivoli Monitoring for Applications: Installation and Setup Guide

Table 26. Problems and workarounds (continued)
Problem Workaround
You might see the following message duringinstallation: ″This program must run on the TMRserver.″
This message occurs when an installation of TivoliManagement Framework existed previously on thetarget computer and was not completely uninstalled.An incomplete uninstallation leaves the script thatsets up the Tivoli environment, setup_env.sh onUNIX and setup_env.cmd on Windows. When theinstaller detects this file, it assumes that the TivoliManagement Framework is already installed andinstallation fails.
1. Click OK. The installer prompts you to end theinstallation.
2. Click Finish.
3. Delete the temporary depot directory created by theinstaller.
4. Delete the environment setup file from the followingdirectory:
v On UNIX: /etc/Tivoli
v On Windows:%SystemRoot%\system32\drivers\etc\Tivoli
5. Start the installation process again.
On Windows NT, software that IBM TivoliMonitoring, Version 5.1.1 requires might be missing.
Run the cscript command in the MS-DOS prompt to seewhat version of Windows Script Host you are running.
Refer to the IBM Tivoli Monitoring User’s Guide and the IBMTivoli Monitoring Release Notes.
The Browse option in the installer panels requires along time period to launch the file selection dialogbox.
This problem occurs when the computer has multiplefile systems mounted. The installer verifiesconnectivity with each file system before presentingthe dialog box.
Minimize the number of file systems mounted on thecomputer.
—OR—
Type the path of the target file system in the text box todirectly access that file system.
The Browse option in the installer panels fails todisplay a CD-ROM drive.
This problem occurs when you click Browse whilethe CD-ROM drive is empty. After the problemoccurs, you cannot resolve the problem by inserting aCD into the drive.
Type the path of the target file system in the text box todirectly access the CD.
Avoid the problem in subsequent installer panels by makingsure a CD is in the CD-ROM drive before you click Browse.
Language Settings: In non-English operating systems,characters might become illegible.
Try to resolve illegible characters by changing the localesettings of the operating system of the Tivoli server. Manyoperating systems that use double-byte character sets, suchas Chinese, have variable locale settings. If you adjust thelocale settings in the Tivoli server you might resolve thiserror. For example, a Chinese operating system might havemultiple locale variants that you can try until you find onethat works for the target language. However, not alloperating systems have variable locale settings. See thedocumentation for your operating system to learn about itscapabilities.
The system can generate an error regarding a missingDynamic Link Library that Tivoli requires.
For a non-English Tivoli environment, you must install thekbdus.dll file before installing IBM Tivoli Monitoring forApplications. This requirement applies to both the Tivoliserver and the endpoints in the Tivoli environment. You canobtain this file from Microsoft or on the product CDs forWindows NT or Windows 2000 in all language versions ofthese operating systems. The kbdus.dll file must reside inthe %SystemRoot%\system32 directory.
Appendix A. Problem determination 111
Testing endpoint connectivity
ObjectiveTo test whether the Tivoli server can communicate with a specific endpoint.
Background informationThe Tivoli server must be able to communicate with the endpoints it manages. Theendpoint is software that you install on an endpoint server to enablecommunication.
Required authorizationOn UNIX, the user who installs the managed nodes must have root privileges. OnWindows, the user who installs the product must have membership in theAdministrators group.
Before you beginNone
When you finishIf endpoint connectivity problems continue, see “Cleaning up and removing theendpoint” on page 113.
Procedure
Command line:
1. Access the Tivoli environment as described in “Accessing the Tivolienvironment” on page 56.
2. Run the ping command from the Tivoli server to confirm that the endpoint isaccessible over the network. If you receive connection or timeout errors, stop atthis point and contact your network administrator for help.
3. If you do not know the name of the endpoint, run the following command onthe Tivoli server to see a list of all endpoints that are connected to the server:wlookup -a -r Endpoint
4. Run the following command on the Tivoli server:wadminep <ep_name> view_version
where <ep_name> is the name of a specific endpoint on an endpoint server. Seethe list generated in Step 3 to obtain the names of endpoints.
5. If you receive a message other than one containing a single version number, theendpoint software must be restarted. You can manually restart the endpoint onthat server as follows:v On Windows systems:
a. Run the following command to stop lcfd, the process of the endpoint:net stop lcfd
b. Run the following command to start the lcfd process:net start lcfd
v On Solaris and AIX systems:
a. Use the following command to identify the lcfd process:ps -ef | grep lcfd
b. Kill this process using a command like the following:kill -9 <process_ID>
where <process_ID> is the ID of the process.
112 IBM Tivoli Monitoring for Applications: Installation and Setup Guide
c. To set the required environment variables:. /etc/Tivoli/lcf/<process_ID>/lcf_env.sh
d. To restart the lcfd process:$LCF_BINDIR/lcfd.sh
6. Monitor the state of the endpoint you have just restarted from a Web browserusing the following URL:http://<ep_host>:<ep_port>
where <ep_host> is the name of the endpoint and <ep_port> is the name of theport that you assigned for endpoint transactions in the Tivoli server. The valueof Status for the endpoint should be running.
Cleaning up and removing the endpoint
ObjectiveTo clean up the endpoint process and remove endpoint files from the Tivolienvironment.
Background informationClean up and remove an endpoint after you complete the diagnostic tests listed in“Testing endpoint connectivity” on page 112. Those tests can confirm that theendpoint is not working.
If you used the InstallShield endpoint installation option on Windows, you do notneed to perform this procedure. The endpoint installation wizard is described in“Installing endpoints through an existing Tivoli environment” on page 60. You canrun the following command to uninstall an endpoint:%SystemDrive%\Program Files\Tivoli\lcf\uninst.bat
where %SystemDrive% is the environment variable for system drive.
The endpoint is a process that runs at all times on an endpoint. Removal of theagent requires four actions that this procedure describes:v Stopping the IBM Tivoli Monitoring enginev Stopping the endpoint servicev Erasing the endpoint directories and files on the client computerv Removing startup statements from system configuration files on the client
computer
Step 5 of this procedure stops the IBM Tivoli Monitoring engine. If you do not stopthe engine during this procedure the $LCF_DATDIR/LCFNEW directory is notremoved and old resource model files continue to exist on the endpoint. When theengine is not removed the product might begin to behave unpredictably. Forexample, distribution of new resource models to the endpoint might fail.
On a partitioned endpoint server that runs in a Windows, UNIX, or AIXenvironment, each partition runs a separate copy of the endpoint. When youuninstall a endpoint, you must identify the specific agent that you want touninstall, as described in this procedure.
Required authorization roleThe installation routine for IBM Tivoli Monitoring for Applications creates theTivoli administrator who is authorized to perform this procedure. Otheradministrators must have the senior role to perform this operation.
Appendix A. Problem determination 113
Before you beginComplete the tests described in “Testing endpoint connectivity” on page 112.
When you finishIf you used this procedure to resolve a communications error with a serverendpoint, perform the following steps to re-install the endpoint software:1. Install a new endpoint as described in “Installing endpoints through an existing
Tivoli environment” on page 60.
Note: If you re-use the original name of the endpoint, wait 15 minutes beforeyou perform this step to ensure that no process is referencing the name.
2. Verify the new endpoint you installed as described in “Verifying the installationof the product” on page 74.
ProcedureYou can perform this procedure from the command line only.
Command line:
Note: The directories specified in the following procedure reflect the defaultlocations. Your installation path might differ.
1. Log on to the Tivoli server.2. Access a command prompt window.3. Start the command line interface as described in “Accessing the Tivoli
environment” on page 56.4. Run the wadminep command to obtain the ID number of the endpoint that
you want to uninstall.Additional Information: For example, the following wadminep command usesthe view_run_dir flag to determine the path of the directory for an endpointnamed WebServer01:wadminep WebServer01_ep view_run_dir
If the command returns the directory path \opt\lcf\dat\2, the ID number forthis endpoint is 2, the numerical name of the directory that contains theendpoint software.
Note: In partitioned endpoint servers, the dat directory contains a numberedsubdirectory for each partition that you configure as a endpoint.
5. Run the following command to stop the IBM Tivoli Monitoring engine andremove related files:wdmcmd -stop -e endpoint_name
where endpoint_name is the name of the endpoint in the Tivoli system, whichyou obtained earlier in Step 4.
6. If you do not know the name of the endpoint, run the following command onthe Tivoli server to see a list of all endpoints that are connected to the server:wlookup -a -r Endpoint
7. Log on to the server endpoint.8. Confirm success of the wdmcmd command as follows:
v On UNIX, run the following command to view processes that are running:ps -ef | grep ep_location
where ep_location is the directory in which the endpoint software is located.
114 IBM Tivoli Monitoring for Applications: Installation and Setup Guide
a. Go to Step 10 if the output does not contain the string../JRE/DMAE/bin/... This result indicates success, as in the followingexample:..oli-4558/lcf/bin/solaris2/mrt/../bin/sparc/native_thre..
b. Go to the UNIX instructions in Step 9 if the output contains the string../JRE/DMAE/bin/... This result indicates failure of the command, as inthe following example:..i-4558/lcf/bin/solaris2/mrt/../JRE/DMAE/bin/../bin/sparc/native_thre..
v On Windows, look for the Tmw2k process in the Processes tab of theWindows Task Manager.a. Go to Step 10 if the Tmw2k process is not running. This result indicates
success of the command in Step 5.b. Go to the Windows instructions in Step 9 if the Tmw2k process is not
running. This result indicates failure of the command in Step 5.9. If Step 8 shows that the wdmcmd command failed, manually stop the IBM
Tivoli Monitoring engine as follows:v On Windows, run the following command to kill the process:
ntprocinfo -k process_ID
where process_ID is the ID number of the monitoring engine process thatyou want to kill.
v On UNIX, kill the Tmw2k process.
Verify that $LC_DATDIR/LCFNEW has been deleted on the endpoint.10. Stop the endpoint as follows:
v On Windows, stop and remove the endpoint service by entering thefollowing command on one line:%SystemDrive%\Tivoli\lcf\bin\w32-ix86\mrt\lcfd -r "lcfd"
where %SystemDrive%\Tivoli\lcf is the default path where an endpoint isinstalled.
v On UNIX, use one of the following methods:– Enter the /opt/Tivoli/lcf/dat/1/lcfd.sh stop command.
—OR—– Obtain the process identification (PID) of the endpoint daemon and enter
the kill command against it.11. (Windows only) Run the following command to remove the Tivoli tool that
tracks connection statistics:%SystemDrive%\Tivoli\lcf\bin\w32-ix86\mrt\lcfep -s
12. Remove the endpoint installation directory and subdirectories from thefollowing default locations:v On UNIX: /opt/Tivoli/lcf
v On Windows: c:\Tivoli\lcf
13. Remove the endpoint environment directory, including its subdirectories andfiles from the following default locations:v On UNIX: /etc/Tivoli/lcf
v On Windows: %SystemRoot%\Tivoli\lcf
14. Remove the endpoint startup item in one of the following locations:v On AIX: /etc/inittab (You must use the following removal command:
/etc/rmitab rctma1)
Appendix A. Problem determination 115

v On HP-UX: /sbin/init.d/lcfd1.sh
v On Solaris: /etc/init.d/lcfd1.rc
v On Windows: (No action necessary. The endpoint startup item is the TivoliEndpoint service, and the command in Step 10 automatically removed it.)
15. (AIX only) Remove the /etc/rc.tma1 and /etc/inittab.before.tma1 files.16. (Solaris and HP-UX only) Remove the following symbolic links:
v On Solaris:– /etc/rc0.d/K50Tivoli_lcf1– /etc/rc1.d/K50Tivoli_lcf1– /etc/rc2.d/K50Tivoli_lcf1– /etc/rc3.d/S99Tivoli_lcf1
v On HP-UX:– /sbin/rc0.d/K100Tivoli_lcf1– /sbin/rc1.d/K100Tivoli_lcf1– /sbin/rc2.d/K100Tivoli_lcf1– /sbin/rc3.d/S500Tivoli_lcf1
17. Remove the userlink.htm file from the following location:v On UNIX: /etc/Tivoli/*/userlink.htm
v On Windows: %SystemRoot%\etc\tivoli\c\userlink.htm
18. Run the following command on the Tivoli server to delete the endpoint objectfrom the Tivoli database:wdelep <endpoint_name>
where <endpoint_name> is the name of the endpoint that you assign when youcreate an endpoint.
116 IBM Tivoli Monitoring for Applications: Installation and Setup Guide
Appendix B. Installation messages
This section lists the messages that the installer for IBM Tivoli Monitoring forApplications can generate.
DNO1000E Plugin creation failed %s
Explanation: The installer builds the Step List panelfrom your settings. Each step is represented by a pluginmodule. If the information needed for a step is corrupt,this message appears. Contact Customer Support.
DNO1001E The following plugin failed:
Explanation: The installer builds the Step List panelfrom your settings. Each step is represented by a pluginmodule. If the information needed for a step is corrupt,this message appears. Contact Customer Support.
DNO1051E Unable to find the XML model file
Explanation: The XML model file deployConfig.xmlshould exist under the <depot>/deployEnginedirectory.
DNO1052E Process model error --
Explanation: The installer cannot locate thedeployConfig.xml file. Check the deploy.ini file (in /etcon UNIX; in %SystemRoot% on Windows.
DNO1053E Unable to delete session :
Explanation: The installer attempted and failed todelete the <depot>/deployEngine/var/session directory.
DNO1151E Unable to get the step to run
Explanation: This message might result from asoftware problem. Check the<depot>/deployEngine/logs/deploy.log file forinformation about the problem. The end of the log filecontains the most recently logged information. Ifnecessary, ask Customer Support to help you resolvethe problem.
DNO1154E Unable to update the status of the step
Explanation: This message might result from asoftware problem. Check the<depot>/deployEngine/logs/deploy.log file forinformation about the problem. The end of the log filecontains the most recently logged information. Ifnecessary, ask Customer Support to help you resolvethe problem.
DNO1155E Unable to run theGenericPlugin.RebootPlugin
Explanation: This Windows error possibly occurredbecause a change to the Registry failed. Check the<depot>/deployEngine/logs/deploy.log file forinformation about the problem. The end of the log filecontains the most recently logged information. Ifnecessary, ask Customer Support to help you resolvethe problem.
DNO1200E Unable to find the required model inthe repository
Explanation: The deployConfig.xml file does not existin <depot>/deployEngine/var/models. Try restarting. Ifthe problem persists, contact Customer Support.
DNO1201E An error occurred during the creation ofthe model repository directory
Explanation: A system error can cause this message todisplay during creation of the directory<depot>/deployEngine/var/models in your depot.Check disk space and file permissions. If the problempersists, contact Customer Support.
DNO1202E The required model file does not exist
Explanation: The deployConfig.xml file does not existin <depot>/deployEngine/var/models. Try restarting. Ifthe problem persists, contact Customer Support.
DNO1203E Unable to copy the file in the modelrepository
Explanation: An error occurred during an attempt tocopy the file <depot>/deployEngine/deployConfig.xmlto the directory <depot>/deployEngine/var/models.Check disk space and file permissions. If the problempersists, contact Customer Support.
DNO1204E An error occurred: unable to delete thefile:
Explanation: An error occurred during an attempt todelete the file<depot>/deployEngine/var/models/deployConfig.xml.Check file permissions. If the problem persists, contactCustomer Support.
117
DNO1205E An error occurred during file deletion
Explanation: An error occurred during an attempt todelete the file<depot>/deployEngine/var/models/deployConfig.xml.Check file permissions. Contact Customer Support ifproblem cannot be fixed.
DNO1250E Unable to create plugin object of type%s
Explanation: This message might result from asoftware problem. Check the<depot>/deployEngine/logs/deploy.log file forinformation about the problem. The end of the log filecontains the most recently logged information. Ifnecessary, ask Customer Support to help you resolvethe problem.
DNO1300E Error updating %s
Explanation: An error occurred during an attempt toupdate %s, which is the full path to the file containingall search paths for your install images. Check filepermissions for this file.
DNO1350E The home directory for the followingsession already exists :
Explanation: The <depot>/deployEngine/var/sessiondirectory was created previously and this was notexpected. Delete this directory and restart the installerby running <depot>/restart.bat (on UNIX run<depot>/restart.sh).
DNO1351E Unable to create a home directory forthe session :
Explanation: The installer cannot create the<depot>/deployEngine/var/session directory. Check filepermissions and disk space.
DNO1352E Unable to create SessionStatus.p file ofthe session :
Explanation: The installer cannot create the file<depot>/deployEngine/var/session/SessionStatus.p.Check file permissions and disk space.
DNO1353E Unable to find the session:
Explanation: Problem locating directory<depot>/deployEngine/var/session. Contact CustomerSupport.
DNO1355E Unable to access the SessionStatus.p fileof session:
Explanation: The installer cannot read the file<depot>/deployEngine/var/session/SessionStatus.p.
Check file permissions and disk space.
DNO1356E Unable to find the home directory forthe session :
Explanation: Problem locating directory<depot>/deployEngine/var/session. Contact CustomerSupport.
DNO1357E Unable to delete the home directory forthe session:
Explanation: The installer cannot delete the directory<depot>/deployEngine/var/session. Check filepermissions and disk space.
DNO1358E Error open log file of step:
Explanation: The installer cannot read the file<depot>/deployEngine/var/session/Step_n/Step_n.log(where n is the number of the current step). Check filepermissions.
DNO1359E Unable to find the plugin input file :
Explanation: This message might result from asoftware problem. Check the<depot>/deployEngine/logs/deploy.log file forinformation about the problem. The end of the log filecontains the most recently logged information. Ifnecessary, ask Customer Support to help you resolvethe problem.
DNO1361E The session is not in begin sessionID:
Explanation: This message might result from asoftware problem. Check the<depot>/deployEngine/logs/deploy.log file forinformation about the problem. The end of the log filecontains the most recently logged information. Ifnecessary, ask Customer Support to help you resolvethe problem.
DNO1362E The step home directory for thefollowing step already exists:
Explanation: This error might occur because of acorrupted directory:<depot>/deployEngine/var/session. Delete thisdirectory and restart the installer.
DNO1363E Unable to create the step home directoryfor the session:
Explanation: The installer cannot create the directory<depot>/deployEngine/var/session. Check filepermissions and disk space.
118 IBM Tivoli Monitoring for Applications: Installation and Setup Guide

DNO1364E Unable to copy the pluginInput file :
Explanation: The installer cannot create the XML fileunder <depot>/deployEngine/var/session/Step_n(where n is the number of the current step). Check filepermissions and disk space.
DNO1365E Unable to access Step_x.p file :
Explanation: This message might result from asoftware problem. Check the<depot>/deployEngine/logs/deploy.log file forinformation about the problem. The end of the log filecontains the most recently logged information. Ifnecessary, ask Customer Support to help you resolvethe problem.
DNO1366E Unable to update the SessionStatus.pfile of the session :
Explanation: This message might result from asoftware problem. Check the<depot>/deployEngine/logs/deploy.log file forinformation about the problem. The end of the log filecontains the most recently logged information. Ifnecessary, ask Customer Support to help you resolvethe problem.
DNO1371E Found step status for :
Explanation: No error has occurred. No action isnecessary.
DNO1372E Unable to find step :
Explanation: This message might result from asoftware problem. Check the<depot>/deployEngine/logs/deploy.log file forinformation about the problem. The end of the log filecontains the most recently logged information. Ifnecessary, ask Customer Support to help you resolvethe problem.
DNO1900E Rapid Deployment Assistant incorrectlyinstalled. Missing or invalid deploy.inifile.
Explanation: The file deploy.ini could not be found inits usual location. On Windows, it is located in thesystem root directory. The directory c:\WINNT is usedas a default if the installer cannot resolve the rootdirectory from the system variables. On UNIX systems,the file should be located in the /etc directory. Makesure the file exists in the proper directory. The contentsof the file point to the location of the deployEnginedirectory located in the temporary depot directory. Forexample, the file might contain the following statement:
[Deploy]H:\Tivoli\depot\deployEngine
H:\Tivoli\depot becomes the default depot directorywhen the installer begins. If the problem cannot becorrected, contact Customer Support.
DNO1903E Be sure to load a valid model.
Explanation: An attempt was made to load an invalidXML model. Please select a valid XML model tocontinue.
DNO1903Ebis You have tried to load an invalidmodel, please try again.
Explanation: An attempt was made to load an invalidXML model. Please select a valid XML model tocontinue.
DNO1904E An error occurred during the modelregistration. Ensure you have therequired disk permissions and select amodel again.
Explanation: An error has occurred in registering theXML model that describes the installation. Ensure thatenough disk space is available and the current user hasthe correct file permissions. If the problem persists,contact Customer Support.
DNO1905E The session could not be openedbecause the following error occurred: {0}(return code: {1}). Select another modelto continue.
Explanation: An error has occurred in parsing theXML model describing the installation. Try to run theinstallation a second time. If it still fails, contactCustomer Support.
DNO1906E Unable to get status information for step{0}.
Explanation: The installer cannot retrieve the status ofthe last executed step. Contact Customer Support.
DNO1907E The step could not be deferred becausethe following error occurred: {0} (returncode: {1}).
Explanation: The installer cannot defer the step. Try todefer the step again. If deferral fails again, contactCustomer Support.
DNO1908E A fatal error occurred. Error message: {0}
Explanation: An installer command has failed. If thefailure occur before or after the Step List runs, contactCustomer Support. If the failure occurs while the StepList runs, try to rerun the current step. If it fails again,contact Customer Support.
Appendix B. Installation messages 119
DNO1909W Are you sure you want to exit theapplication?
Explanation: Click OK to confirm that you want toexit the installation process.
DNO1910I The installation process will stop at theend of the current step.
Explanation: This message is displayed when youclick the Stop button. The installation stops after thecurrent step completes execution.
DNO1911I Installation completed, press next tocontinue.
Explanation: This message confirms that theinstallation has completed. The Next button becomesactive after you close the message dialog box.
DNO1912I Installation completed. {0} steps passed.{1} steps deferred. Press next tocontinue.
Explanation: This message confirms that theinstallation has completed and lists the number of stepspassed and deferred. The Next button becomes activeafter you close the message dialog box.
DNO1913I Nothing to do for this install. Press Nextto continue.
Explanation: The settings you made in the installer donot require the installation of any software. Theautomatic discovery process indicates that all yoursettings are already implemented. The Next buttonbecomes active after you close the message dialog box.
DNO2001E Reboot failed
Explanation: The installer cannot reboot the localcomputer. Reboot the computer through normal means.If the installer does not automatically restart after thereboot operation, run the reboot.bat file in the depotdirectory.
DNO2054E Tivoli user account tmersrvd cannot becreated.
Explanation: A system error has occurred on aWindows computer. Make sure that properAdministrator authority exists for the user who iscurrently logged on.
DNO2055E This step is required only on Windowsoperating systems.
Explanation: This message might result from asoftware problem. Defer the step and continue. Reportthe problem to Customer Support.
DNO2056E The kbdus.dll is a prerequisite for theTivoli Management Frameworkinstallation. Install it before proceeding
Explanation: The file%SystemRoot%\System32\kbdus.dll was not found.This U.S. keyboard DLL is necessary for a completeinstallation on Windows. The DLL is available fromMicrosoft and also comes on the installation CDs forWindows.
DNO2057E Installation failed.
Explanation: Check the<depot>/deployEngine/logs/deploy.log file forinformation about the problem. The end of the log filecontains the most recently logged information. You canfind further information in /tmp/tivoli.cinstall(%Dbdir%\tmp\tivoli.cinstall on Windows). Also,check the install.cfg.error file in the same directory, if ithas been generated. If necessary, ask Customer Supportto help you resolve the problem.
DNO2059E Installation failed: directory dbdiralready exists.
Explanation: This error occurs in the rare case of anunsuccessful cleanup of remnants of an old Tivoliinstallation. Specifically, an attempt to rename an old$DBDIR failed.
DNO2060E Installation failed: directory bindiralready exists.
Explanation: This error occurs in the rare case of anunsuccessful cleanup of remnants of an old Tivoliinstallation. Specifically, an attempt to rename an old$DBDIR failed.
DNO2061E Installation failed: unable to createsilent install setup file.
Explanation: The installer could not create the%SystemRoot%\setup_tmf.iss file. Check disk spaceand file accessibility.
DNO2062E Installation failed: unable to create theinstallation directory.
Explanation: The installer could not create thedestination directory. Check disk space and fileaccessibility.
DNO2063E Installation failed: unable to installTivoli Management Frameworkpre-installation files.
Explanation: The installer could not executeWPREINSTALL.SH. Check disk space and fileaccessibility.
120 IBM Tivoli Monitoring for Applications: Installation and Setup Guide

DNO2064E Installation failed: some or allinstallation parameters are missing.
Explanation: Check the<depot>/deployEngine/logs/deploy.log file forinformation about the problem. The end of the log filecontains the most recently logged information. Youmight have to restart the Typical or Custom installationprocess to make sure all parameters are filled in.
DNO2065E Installation failed: unable to find TivoliManagement Framework binary files.
Explanation: The binary files needed for thisinstallation cannot be found in the depot search path.Check the <depot>/deployEngine/logs/deploy.log filefor information about the problem. The end of the logfile contains the most recently logged information.
DNO2066E Warning: unable to check that theinstallation succeeded.
Explanation: Check the<depot>/deployEngine/logs/deploy.log file for thename of the error file that is missing.
DNO2067E The Tivoli Object Dispatcher servicecould not be started.
Explanation: The oserv daemon did not start duringinstallation. Check the<depot>/deployEngine/logs/deploy.log file forinformation about the problem. The end of the log filecontains the most recently logged information. You canfind further information in /tmp/tivoli.cinstall(%Dbdir%\tmp\tivoli.cinstall on Windows). Also,check the install.cfg.error file in the same directory, if ithas been generated. If necessary, ask Customer Supportto help you resolve the problem.
DNO2070E Installation failed: encryption set failed
Explanation: The installation had a problem withmessage encryption. You can find further informationin /tmp/tivoli.cinstall (%Dbdir%\tmp\tivoli.cinstallon Windows). Also, check the install.cfg.error file inthe same directory, if it has been generated.
DNO2071E Installation failed: unable to set theTivoli Management Region Server name
Explanation: The installation had a problem updatingthe Tivoli database. You can find further information in/tmp/tivoli.cinstall (%Dbdir%\tmp\tivoli.sinstall onWindows). Also, check the install.cfg.error file in thesame directory, if it has been generated.
DNO2072E Installation failed: unable to set theinstallation password.
Explanation: This problem normally occurs only ifyou specify an installation password. Tivolirecommends that you do not set an installationpassword until later.
DNO2073E Installation failed: some or allinstallation parameters are missing.
Explanation: Check the<depot>/deployEngine/logs/deploy.log file for moredetails. The end of the log file contains the mostrecently logged information. You might have to restartthe Typical or Custom installation process to make sureall parameters are filled in.
DNO2074E Desktop Installation failed: unable tocreate silent install setup file.
Explanation: Check the<depot>/deployEngine/logs/deploy.log file for moredetails. This step can be deferred without affectingsubsequent steps.
DNO2075E Unable to install Tivoli Desktop on thisoperating system.
Explanation: Check the<depot>/deployEngine/logs/deploy.log file for moredetails. This step can be deferred without affectingsubsequent steps.
DNO2076E Unable to set Tivoli environment.
Explanation: The installer attempted to set up theTivoli environment and failed. To manually set up theTivoli environment on UNIX, run the setup_env.shscript in the /etc/Tivoli directory. On Windows, run thesetup_env.cmd command in the%SystemRoot%\System32\drivers\etc\Tivolidirectory.
DNO2077E Desktop Installation failed. Will notaffect remaining install. Please createDesktop through Framework cd:PC\\DESKTOP\\DISK1\\SETUP.EXE.
Explanation: Defer the step and continue. Install theoptional Desktop interface after installation is complete.The installation executable for this interface is locatedin the folowing path on the Tivoli ManagementFramework installation CDs:
PC\\DESKTOP\\DISK1\\SETUP.EXE
Appendix B. Installation messages 121
DNO2078E Installation failed: unable to findDesktop binary files.
Explanation: Check the<depot>/deployEngine/logs/deploy.log file forinformation about the problem. The end of the log filecontains the most recently logged information. Ifnecessary, ask Customer Support to help you resolvethe problem.
DNO2079E The Tivoli Management Frameworkinstalled on this machine is notsupported by the rapid DeploymentTool.
Explanation: The operating system of the localcomputer is not compatible with the TivoliManagement Framework installation. See the systemrequirements section of the installation and setup guideto see a list of supported operating systems.
DNO2080E Installation failed: Unable to create theRapidDeployment directory under the$BINDIR directory.
Explanation: An attempt to make the directoryRapidDeployment under the destination directory wasunsuccessful. Check disk space and file permissions.
DNO2084E Installation failed: Not enough diskspace.
Explanation: The file system or partition for thedestination directory of the target computer is toosmall. Allocate more disk space for this directory andrerun the step.
DNO2085E Installation failed: Problem encountered.
Explanation: Check the<depot>/deployEngine/logs/deploy.log file forinformation about the problem. The end of the log filecontains the most recently logged information. You canfind further information in /tmp/tivoli.sinstall(%Dbdir%\tmp\tivoli.sinstall on Windows). Also,check the install.cfg.error file in the same directory, if ithas been generated. If necessary, ask Customer Supportto help you resolve the problem.
DNO2086E Installation failed: Fatal error.
Explanation: Check the<depot>/deployEngine/logs/deploy.log file forinformation about the problem. The end of the log filecontains the most recently logged information. You canfind further information in /tmp/tivoli.sinstall(%Dbdir%\tmp\tivoli.sinstall on Windows). Also,check the install.cfg.error file in the same directory, if ithas been generated. If necessary, ask Customer Supportto help you resolve the problem.
DNO2087E Installation failed: unable to find theoutput file tivoli.sinstall
Explanation: Check the<depot>/deployEngine/logs/deploy.log file forinformation about the problem. The end of the log filecontains the most recently logged information. You canfind further information in /tmp/tivoli.sinstall(%Dbdir%\tmp\tivoli.sinstall on Windows). Also,check the install.cfg.error file in the same directory, if ithas been generated. If necessary, ask Customer Supportto help you resolve the problem.
DNO2104E Installation failed.
Explanation: Check the<depot>/deployEngine/logs/deploy.log file forinformation about the problem. The end of the log filecontains the most recently logged information. You canfind further information in /tmp/tivoli.cinstall(%Dbdir%\tmp\tivoli.cinstall on Windows). Also,check the install.cfg.error file in the same directory, if ithas been generated. If necessary, ask Customer Supportto help you resolve the problem.
DNO2106E Installation failed: unable to find theoutput file tivoli.cinstall
Explanation: Check the<depot>/deployEngine/logs/deploy.log file forinformation about the problem. The end of the log filecontains the most recently logged information. You canfind further information in /tmp/tivoli.cinstall(%Dbdir%\tmp\tivoli.cinstall on Windows). Also,check the install.cfg.error file in the same directory, if ithas been generated. If necessary, ask Customer Supportto help you resolve the problem.
DNO2107E Installation failed: incorrect return code.
Explanation: Check the<depot>/deployEngine/logs/deploy.log file forinformation about the problem. The end of the log filecontains the most recently logged information. You canfind further information in /tmp/tivoli.cinstall(%Dbdir%\tmp\tivoli.cinstall on Windows). Also,check the install.cfg.error file in the same directory, if ithas been generated. If necessary, ask Customer Supportto help you resolve the problem.
DNO2108E Installation failed: insufficient diskspace. You may change the destinationdirectory via the Change button.
Explanation: The file system or partition for thedestination directory of the target computer is toosmall. Allocate more disk space for this directory, oruse the Change button in the Detail dialog box tochange the destination directory.
122 IBM Tivoli Monitoring for Applications: Installation and Setup Guide
DNO2109E Installation failed: installation erroroccurred.
Explanation: Check the<depot>/deployEngine/logs/deploy.log file forinformation about the problem. The end of the log filecontains the most recently logged information. You canfind further information in /tmp/tivoli.cinstall(%Dbdir%\tmp\tivoli.cinstall on Windows). Also,check the install.cfg.error file in the same directory, if ithas been generated. If necessary, ask Customer Supportto help you resolve the problem.
DNO2110E Installation failed: communicationproblem occurred.
Explanation: Possible network problem. Check the<depot>/deployEngine/logs/deploy.log file forinformation about the problem. The end of the log filecontains the most recently logged information. You canfind further information in /tmp/tivoli.cinstall(%Dbdir%\tmp\tivoli.cinstall on Windows). Also,there is possibly a XXXInstall.log file in the samedirectory, where XXX is the product ID. If necessary,ask Customer Support to help you resolve the problem.
DNO2111E Installation failed: there is nothing toinstall.
Explanation: Check the<depot>/deployEngine/logs/deploy.log file forinformation about the problem. The end of the log filecontains the most recently logged information. You canfind further information in /tmp/tivoli.cinstall(%Dbdir%\tmp\tivoli.cinstall on Windows). Also,there is possibly a XXXInstall.log file in the samedirectory, where XXX is the product ID. If necessary,ask Customer Support to help you resolve the problem.
DNO2112E Installation failed: unable to access thesystem.
Explanation: Check the<depot>/deployEngine/logs/deploy.log file forinformation about the problem. The end of the log filecontains the most recently logged information. Makesure proper network communications are establishedbetween computers. If necessary, click Change in theDetail dialog box to provide a new, valid login andpassword.
DNO2113E Installation failed: unable to recognizethe Interp type.
Explanation: The operating system for the localcomputer is not compatible with the TivoliManagement Framework installation. See the systemrequirements section of the installation and setup guideto see a list of supported operating systems.
DNO2114E Installation failed: the managed nodeoserv would not start.
Explanation: The following message was receivedduring the installation process: Object Dispatcherservice could not be started. Check the<depot>/deployEngine/logs/deploy.log file forinformation about the problem. The end of the log filecontains the most recently logged information. You canfind further information in /tmp/tivoli.cinstall(%Dbdir%\tmp\tivoli.cinstall on Windows). Also,check the install.cfg.error file in the same directory, if ithas been generated. If necessary, ask Customer Supportto help you resolve the problem.
DNO2116E Installation failed: incorrect encryption,or installation password.
Explanation: This error arises when an installationpassword was previously set, and then the wrong onewas provided during this installation step. Also, it ispossible that the installer had a problem with messageencryption. You can find further information in/tmp/tivoli.cinstall (%Dbdir%\tmp\tivoli.cinstall onWindows).
DNO2117E Installation failed: Managed Node is notregistered.
Explanation: Check the<depot>/deployEngine/logs/deploy.log file forinformation about the problem. The end of the log filecontains the most recently logged information. Thiserror usually means that a fatal error occurred late inthe installation process, preventing the managed node’sname from being entered into the Tivoli Registry. Ifnecessary, ask Customer Support to help you resolvethe problem.
DNO2118E Installation failed: some or allinstallation parameters are missing.
Explanation: Check the<depot>/deployEngine/logs/deploy.log file forinformation about the problem. The end of the log filecontains the most recently logged information. Youmight have to restart the Typical or Custom installationprocess to make sure all parameters are filled in.
DNO2119E Installation failed: unable find TivoliManagement Framework binary files.
Explanation: The .IND file is the index file thataccompanies and defines the installation binary files.The installer cannot find this file. You can find the filesomewhere in the temporary depot directory or on theinstallation CD.
Appendix B. Installation messages 123

DNO2120E Installation halted: Managed node wasrebooted, but it is not active.
Explanation: The Windows managed node creationrequired a reboot. After this reboot, the computer is notresponding to a ping command within the allotted timeperiod.
DNO2152E Gateway creation failed.
Explanation: Check the<depot>/deployEngine/logs/deploy.log file forinformation about the problem. The end of the log filecontains the most recently logged information. Ifnecessary, ask Customer Support to help you resolvethe problem.
DNO2153E Gateway creation failed: incorrect returncode.
Explanation: Check the<depot>/deployEngine/logs/deploy.log file forinformation about the problem. The end of the log filecontains the most recently logged information. Ifnecessary, ask Customer Support to help you resolvethe problem.
DNO2154E Gateway creation failed: unable toaccess the system.
Explanation: Check the<depot>/deployEngine/logs/deploy.log file forinformation about the problem. The end of the log filecontains the most recently logged information. Makesure proper network communications are establishedbetween computers. If necessary, click Change in theDetail dialog box to provide a new, valid login andpassword.
DNO2155E Unable to create the gateway: some orall installation parameters are missing.
Explanation: Check the<depot>/deployEngine/logs/deploy.log file forinformation about the problem. The end of the log filecontains the most recently logged information. Youmight have to restart the Typical or Custom installationprocess to make sure all parameters are filled in.
DNO2156E Gateway creation failed: invalid portnumber.
Explanation: The default port number for a gateway is9494. Certain rules apply to alternative port numbers.For example, the port number must be unique on thetarget computer. You might have to restart the Typicalor Custom installation process to make sure allparameters are filled in. Check the<depot>/deployEngine/logs/deploy.log file forinformation about the problem. The end of the log filecontains the most recently logged information.
DNO2157E Unable to find the Managed Nodeselected as gateway.
Explanation: This message might result from asoftware problem. Check the<depot>/deployEngine/logs/deploy.log file forinformation about the problem. The end of the log filecontains the most recently logged information. Ifnecessary, ask Customer Support to help you resolvethe problem.
DNO2202E Installation failed.
Explanation: Check the<depot>/deployEngine/logs/deploy.log file forinformation about the problem. The end of the log filecontains the most recently logged information. Ifnecessary, ask Customer Support to help you resolvethe problem.
DNO2203E Installation failed: incorrect return code.
Explanation: Check the<depot>/deployEngine/logs/deploy.log file forinformation about the problem. The end of the log filecontains the most recently logged information. Ifnecessary, ask Customer Support to help you resolvethe problem.
DNO2204E Installation failed: unable to access thesystem.
Explanation: Make sure proper networkcommunications are established between computers. Ifnecessary, click Change in the Detail dialog box toprovide a new, valid login and password. Check the<depot>/deployEngine/logs/deploy.log file forinformation about the problem. The end of the log filecontains the most recently logged information. Ifnecessary, ask Customer Support to help you resolvethe problem.
DNO2205E Installation failed: some or allinstallation parameters are missing.
Explanation: You might have to restart the Typical orCustom installation process to make sure all parametersare filled in. Check the<depot>/deployEngine/logs/deploy.log file forinformation about the problem. The end of the log filecontains the most recently logged information. Ifnecessary, ask Customer Support to help you resolvethe problem.
DNO2206E Installation failed: invalid port number.
Explanation: The port number for an endpoint istypically 9495. Certain rules apply to alternative portnumbers. For example, the port number must beunique on the target computer. You might have torestart the Typical or Custom installation process to
124 IBM Tivoli Monitoring for Applications: Installation and Setup Guide

make sure all parameters are filled in. Check the<depot>/deployEngine/logs/deploy.log file forinformation about the problem. The end of the log filecontains the most recently logged information. Ifnecessary, ask Customer Support to help you resolvethe problem.
DNO2207E The endpoint proxy %s is not connectedto its gateway.
Explanation: An error occurred because the endpointproxy named %s is not connected to its gateway. Thiserror can occur during the installation of Windows NTendpoints. Be sure that the referenced proxy endpointis up and running. Use the following command tocheck endpoint status:
wep <endpoint> status
DNO2208E Installation failed: Unable to upgradethe endpoint proxy %s to requiredversion.
Explanation: An attempt to run the wadminep<endpoint> upgrade command failed. Check the<depot>/deployEngine/logs/deploy.log file forinformation about the problem. The end of the log filecontains the most recently logged information. Ifnecessary, ask Customer Support to help you resolvethe problem.
DNO2253E Installation failed: unable to run therequired command.
Explanation: A problem was encountered running theinstall command. This message might result from asoftware problem. Check the<depot>/deployEngine/logs/deploy.log file forinformation about the problem. The end of the log filecontains the most recently logged information. Ifnecessary, ask Customer Support to help you resolvethe problem.
DNO2254E Installation failed: unable to find theIND file.
Explanation: The .IND file is the index file thataccompanies and defines the installation binary files.The installer cannot find this file. You can find the filesomewhere in the temporary depot directory or on theinstallation CD.
DNO2255E Installation failed: unable to retrieveinformation from Tivoli database.
Explanation: The Tivoli oserv daemon might not berunning. Check the<depot>/deployEngine/logs/deploy.log file forinformation about the problem. The end of the log filecontains the most recently logged information. You canfind further information in /tmp/tivoli.cinstall
(%Dbdir%\tmp\tivoli.cinstall on Windows). Also,there is possibly a XXXInstall.log file in the samedirectory, where XXX is the product ID. If necessary,ask Customer Support to help you resolve the problem.
DNO2256E Installation failed: unable to find thetarget Managed Node.
Explanation: Make sure proper networkcommunications are established between computers. Ifnecessary, click Change in the Detail dialog box toprovide a new, valid login and password. Check the<depot>/deployEngine/logs/deploy.log file forinformation about the problem. The end of the log filecontains the most recently logged information. Ifnecessary, ask Customer Support to help you resolvethe problem.
DNO2257E Installation failed: incorrect return code.
Explanation: Check the<depot>/deployEngine/logs/deploy.log file forinformation about the problem. The end of the log filecontains the most recently logged information. You canfind further information in /tmp/tivoli.cinstall(%Dbdir%\tmp\tivoli.cinstall on Windows). Also,check the install.cfg.error file in the same directory, if ithas been generated. If necessary, ask Customer Supportto help you resolve the problem.
DNO2258E Installation failed: unable to access thetivoli.cinstall output file.
Explanation: The installer normally generates thetivoli.cinstall file after creation of a Managed Node. Thefile is placed in the /tmp directory in UNIX, or in the%Dbdir%\tmp directory in Windows. There is apossible disk access problem.
DNO2259E Installation failed: insufficient diskspace.
Explanation: The file system or partition for thedestination directory of the target computer is toosmall. Allocate more disk space for this directory andrerun the step.
DNO2260E An error occurred. The installationfailed.
Explanation: Check the<depot>/deployEngine/logs/deploy.log file forinformation about the problem. The end of the log filecontains the most recently logged information. You canfind further information in /tmp/tivoli.cinstall(%Dbdir%\tmp\tivoli.cinstall on Windows). Also,check the install.cfg.error file in the same directory, if ithas been generated. If necessary, ask Customer Supportto help you resolve the problem.
Appendix B. Installation messages 125
DNO2261E Installation failed: communicationproblem occurred.
Explanation: Possible network problem. Check the<depot>/deployEngine/logs/deploy.log file forinformation about the problem. The end of the log filecontains the most recently logged information. You canfind further information in /tmp/tivoli.cinstall(%Dbdir%\tmp\tivoli.cinstall on Windows). Also,there is possibly a XXXInstall.log file in the samedirectory, where XXX is the product ID. If necessary,ask Customer Support to help you resolve the problem.
DNO2262E Installation failed: there is nothing toinstall.
Explanation: Check the<depot>/deployEngine/logs/deploy.log file forinformation about the problem. The end of the log filecontains the most recently logged information. You canfind further information in /tmp/tivoli.cinstall(%Dbdir%\tmp\tivoli.cinstall on Windows). Also,there is possibly a XXXInstall.log file in the samedirectory, where XXX is the product ID. If necessary,ask Customer Support to help you resolve the problem.
DNO2263E Installation failed: unable to access thesystem.
Explanation: Make sure proper networkcommunications are established between computers. Ifnecessary, click Change in the Detail dialog box toprovide a new, valid login and password. Check the<depot>/deployEngine/logs/deploy.log file forinformation about the problem. The end of the log filecontains the most recently logged information. Ifnecessary, ask Customer Support to help you resolvethe problem.
DNO2264E Installation failed: unable to recognizethe Interp type.
Explanation: The operating system of the localcomputer is not compatible with the TivoliManagement Framework installation. See the systemrequirements section of the installation and setup guideto see a list of supported operating systems.
DNO2265E Installation failed: the managed nodeoserv would not start.
Explanation: The following message was receivedduring the installation process: Object Dispatcherservice could not be started.. Check the<depot>/deployEngine/logs/deploy.log file forinformation about the problem. The end of the log filecontains the most recently logged information. You canfind further information in /tmp/tivoli.cinstall(%Dbdir%\tmp\tivoli.cinstall on Windows). Also,check the install.cfg.error file in the same directory, if ithas been generated. If necessary, ask Customer Support
to help you resolve the problem.
DNO2266E Installation failed: incorrect encryptionor installation password.
Explanation: This error arises when an installationpassword was previously set, and then the wrong onewas provided during this installation step. Also, it ispossible that the installer had a problem with messageencryption. You can find further information in/tmp/tivoli.cinstall (%Dbdir%\tmp\tivoli.cinstall onWindows).
DNO2267E Installation failed: required parametersare missing.
Explanation: You might have to restart the Typical orCustom installation process to make sure all parametersare filled in. Check the<depot>/deployEngine/logs/deploy.log file forinformation about the problem. The end of the log filecontains the most recently logged information. Ifnecessary, ask Customer Support to help you resolvethe problem.
DNO2268E Installation failed: unable to find INDbinary files.
Explanation: The .IND file is the index file thataccompanies and defines the installation binary files.The installer cannot find this file. You can find the filesomewhere in the temporary depot directory or on theinstallation CD.
DNO2269E Installation failed: the description doesnot match the IND file.
Explanation: The .IND file is the index file thataccompanies and defines the installation binary files.The installer found this file but the description in itsfirst line does not match what was expected. Thecorrect .IND file should be somewhere in the depot oron the installation CD.
DNO2270E Installation failed: see log files fordetails.
Explanation: Check the<depot>/deployEngine/logs/deploy.log file forinformation about the problem. The end of the log filecontains the most recently logged information. You canfind further information in /tmp/tivoli.cinstall(%Dbdir%\tmp\tivoli.cinstall on Windows). Also,check the install.cfg.error file in the same directory, if ithas been generated. If necessary, ask Customer Supportto help you resolve the problem.
126 IBM Tivoli Monitoring for Applications: Installation and Setup Guide
DNO2271E Installation failed: product patch isrequired.
Explanation: This message might result from asoftware problem. Check the<depot>/deployEngine/logs/deploy.log file forinformation about the problem. The end of the log filecontains the most recently logged information. Ifnecessary, ask Customer Support to help you resolvethe problem.
DNO2272E Installation failed: product patch isrequired.
Explanation: This message might result from asoftware problem. Check the<depot>/deployEngine/logs/deploy.log file forinformation about the problem. The end of the log filecontains the most recently logged information. Ifnecessary, ask Customer Support to help you resolvethe problem.
DNO2273E Install Failed: Cannot reexec TivoliManagement Region.
Explanation: The installer ran the odadmin reexec allcommand and the oserv daemon did not correctlyrecycle. If you are unable to restart the oserv daemon,contact Customer Support.
DNO2302E Configuration failed: incorrect returncode.
Explanation: You might have to restart the Typical orCustom installation process to make sure all parametersare filled in. Typically, a configuration step can bedeferred without affecting the installation of otherproducts. Check the<depot>/deployEngine/logs/deploy.log file forinformation about the problem. The end of the log filecontains the most recently logged information. Ifnecessary, ask Customer Support to help you resolvethe problem.
DNO2303E Configuration failed: there is notanything to configure.
Explanation: This message might result from asoftware problem. Defer the step and continue. Reportthe problem to Customer Support.
DNO2304E Configuration failed: some or allconfiguration parameters are missing.
Explanation: You might have to restart the Typical orCustom installation process to make sure all parametersare filled in. Check the<depot>/deployEngine/logs/deploy.log file forinformation about the problem. The end of the log filecontains the most recently logged information. If
necessary, ask Customer Support to help you resolvethe problem.
DNO2453E Installation failed: unable to run therequired command.
Explanation: A problem was encountered running theinstall command. This message might result from asoftware problem. Check the<depot>/deployEngine/logs/deploy.log file forinformation about the problem. The end of the log filecontains the most recently logged information. Ifnecessary, ask Customer Support to help you resolvethe problem.
DNO2454E Installation failed: unable to find theIND file.
Explanation: The .IND file is the index file thataccompanies and defines the installation binary files.The installer cannot find this file. You can find the filesomewhere in the temporary depot directory or on theinstallation CD.
DNO2455E Installation failed: unable to retrieveinformation from Tivoli database.
Explanation: It is possible that the Tivoli oservdaemon is not running. Check the<depot>/deployEngine/logs/deploy.log file forinformation about the problem. The end of the log filecontains the most recently logged information. You canfind further information in /tmp/tivoli.cinstall(%Dbdir%\tmp\tivoli.cinstall on Windows). Also,there is possibly a XXXInstall.log file in the samedirectory, where XXX is the product ID. If necessary,ask Customer Support to help you resolve the problem.
DNO2456E Installation failed: unable to find thetarget Managed Node.
Explanation: Make sure proper networkcommunications are established between computers. Ifnecessary, click Change in the Detail dialog box toprovide a new, valid login and password. Check the<depot>/deployEngine/logs/deploy.log file forinformation about the problem. The end of the log filecontains the most recently logged information. Ifnecessary, ask Customer Support to help you resolvethe problem.
DNO2457E Installation failed: incorrect return code.
Explanation: Check the<depot>/deployEngine/logs/deploy.log file forinformation about the problem. The end of the log filecontains the most recently logged information. You canfind further information in /tmp/tivoli.cinstall(%Dbdir%\tmp\tivoli.cinstall on Windows). Also,there is possibly a XXXInstall.log file in the samedirectory, where XXX is the product ID. If necessary,
Appendix B. Installation messages 127
ask Customer Support to help you resolve the problem.
DNO2458E Installation failed: unable to access thetivoli.cinstall output file.
Explanation: The installer normally generates thetivoli.cinstall file after creation of a Managed Node. Thefile is placed in the /tmp directory in UNIX, or in the%Dbdir%\tmp directory in Windows. There is apossible disk access problem.
DNO2459E Installation failed: insufficient diskspace.
Explanation: The file system or partition for thedestination directory of the target computer is toosmall. Allocate more disk space for this directory andrerun the step.
DNO2460E An error occurred. The installationfailed.
Explanation: Check the<depot>/deployEngine/logs/deploy.log file forinformation about the problem. The end of the log filecontains the most recently logged information. You canfind further information in /tmp/tivoli.cinstall(%Dbdir%\tmp\tivoli.cinstall on Windows). Also,check the install.cfg.error file in the same directory, if ithas been generated. If necessary, ask Customer Supportto help you resolve the problem.
DNO2461E Installation failed: communicationproblem occurred.
Explanation: Possible network problem. Check the<depot>/deployEngine/logs/deploy.log file forinformation about the problem. The end of the log filecontains the most recently logged information. You canfind further information in /tmp/tivoli.cinstall(%Dbdir%\tmp\tivoli.cinstall on Windows). Also,there is possibly a XXXInstall.log file in the samedirectory, where XXX is the product ID. If necessary,ask Customer Support to help you resolve the problem.
DNO2462E Installation failed: there is nothing toinstall.
Explanation: Check the<depot>/deployEngine/logs/deploy.log file forinformation about the problem. The end of the log filecontains the most recently logged information. You canfind further information in /tmp/tivoli.cinstall(%Dbdir%\tmp\tivoli.cinstall on Windows). Also,there is possibly a XXXInstall.log file in the samedirectory, where XXX is the product ID. If necessary,ask Customer Support to help you resolve the problem.
DNO2463E Installation failed: unable to access thesystem.
Explanation: Make sure proper networkcommunications are established between computers. Ifnecessary, click Change in the Detail dialog box toprovide a new, valid login and password. Check the<depot>/deployEngine/logs/deploy.log file forinformation about the problem. The end of the log filecontains the most recently logged information. Ifnecessary, ask Customer Support to help you resolvethe problem.
DNO2464E Installation failed: unable to recognizethe Interp type.
Explanation: The operating system of the localcomputer is not compatible with the TivoliManagement Framework installation. See the systemrequirements section of the installation and setup guideto see a list of supported operating systems.
DNO2465E Installation failed: the managed nodeoserv would not start.
Explanation: The following message was receivedduring the installation process: Object Dispatcherservice could not be started. Check the<depot>/deployEngine/logs/deploy.log file forinformation about the problem. The end of the log filecontains the most recently logged information. You canfind further information in /tmp/tivoli.cinstall(%Dbdir%\tmp\tivoli.cinstall on Windows). Also,check the install.cfg.error file in the same directory, if ithas been generated. If necessary, ask Customer Supportto help you resolve the problem.
DNO2466E Installation failed: incorrect encryptionor installation password.
Explanation: It is possible that the installer had aproblem with message encryption. More probably, aninstallation password was previously set, and then thewrong one was provided during this installation step.You can find further information in /tmp/tivoli.cinstall(%Dbdir%\tmp\tivoli.cinstall on Windows).
DNO2467E Installation failed: required parametersare missing.
Explanation: You might have to restart the Typical orCustom installation process to make sure all parametersare filled in. Check the<depot>/deployEngine/logs/deploy.log file forinformation about the problem. The end of the log filecontains the most recently logged information. Ifnecessary, ask Customer Support to help you resolvethe problem.
128 IBM Tivoli Monitoring for Applications: Installation and Setup Guide
DNO2468E Installation failed: unable to find INDbinary files.
Explanation: The .IND file is the index file thataccompanies and defines the installation binary files.The installer cannot find this file. You can find the filesomewhere in the temporary depot directory or on theinstallation CD.
DNO2469E Installation failed: the description doesnot match the IND file.
Explanation: The .IND file is the index file thataccompanies and defines the installation binary files.The installer found this file but the description in itsfirst line does not match what was expected. Youshould be able to find all required .IND filessomewhere in the depot or on the installation CD.
DNO2470E Installation failed: see log files fordetails.
Explanation: Check the<depot>/deployEngine/logs/deploy.log file forinformation about the problem. The end of the log filecontains the most recently logged information. You canfind further information in /tmp/tivoli.cinstall(%Dbdir%\tmp\tivoli.cinstall on Windows). Also,check the install.cfg.error file in the same directory, if ithas been generated. If necessary, ask Customer Supportto help you resolve the problem.
DNO2473E Install Failed: Cannot reexec TivoliManagement Region.
Explanation: The installer ran the odadmin reexec allcommand and the oserv daemon did not correctlyrecycle. If you are unable to restart the oserv daemonmanually, contact Customer Support.
DNO2474E No hostname provided by user data
Explanation: This message might result from asoftware problem. Defer the step and continue. Reportthe problem to Customer Support.
DNO2475E No log information provided. Probableinstall failure.
Explanation: Check the<depot>/deployEngine/logs/deploy.log file forinformation about the problem. The end of the log filecontains the most recently logged information. You canfind further information in /tmp/tivoli.cinstall(%Dbdir%\tmp\tivoli.cinstall on Windows). Also,there is possibly a XXXInstall.log file in the samedirectory, where XXX is the product ID. If necessary,ask Customer Support to help you resolve the problem.
DNO3000E WRONG_MACHINE=This programmust run on the Tivoli ManagementRegion server.
Explanation: You must run the installer on a TivoliManagement Region server. If you are running theinstaller on the host computer for the TivoliManagement Region server, make sure the Tivoli ObjectDispatcher service or daemon is started and rerun theinstallation program. If you are not running theinstaller on the host computer for the TivoliManagement Region server, rerun the installer on thecomputer.
DNO3001E TME_TOO_OLD=The TivoliManagement Framework productinstalled on this Tivoli ManagementRegion is older than 3.7. You mustupgrade to at least 3.7 to use this tool.
Explanation: The minimum level of the TivoliManagement Environment must be version 3.7.Manually upgrade the Framework to version 3.7 thenproceed with the installation. See the manualinstallation instructions in the installation and setupguide for this product.
DNO3002E NOT_ADMINID=The current useriddoes not have the proper roles. Logon toa Tivoli administrator userid withadmin, super, install_client, andinstall_product roles.
Explanation: The user ID under which the installerruns must have the privileges of a Tivoli Administratoruser ID. Log on to a user ID that has admin, super,install_client, and install_product roles to run theinstaller.
DNO3003E DISCOVERY_FAILED=Discovery of thecurrent Tivoli environment failed. Theinstallation wizard cannot continue.
Explanation: The installer cannot continue because ofa condition that has already been logged. If there hasnot been an error message displayed, examine the logfor the error condition. Correct it and rerun theinstaller.
Appendix B. Installation messages 129

130 IBM Tivoli Monitoring for Applications: Installation and Setup Guide
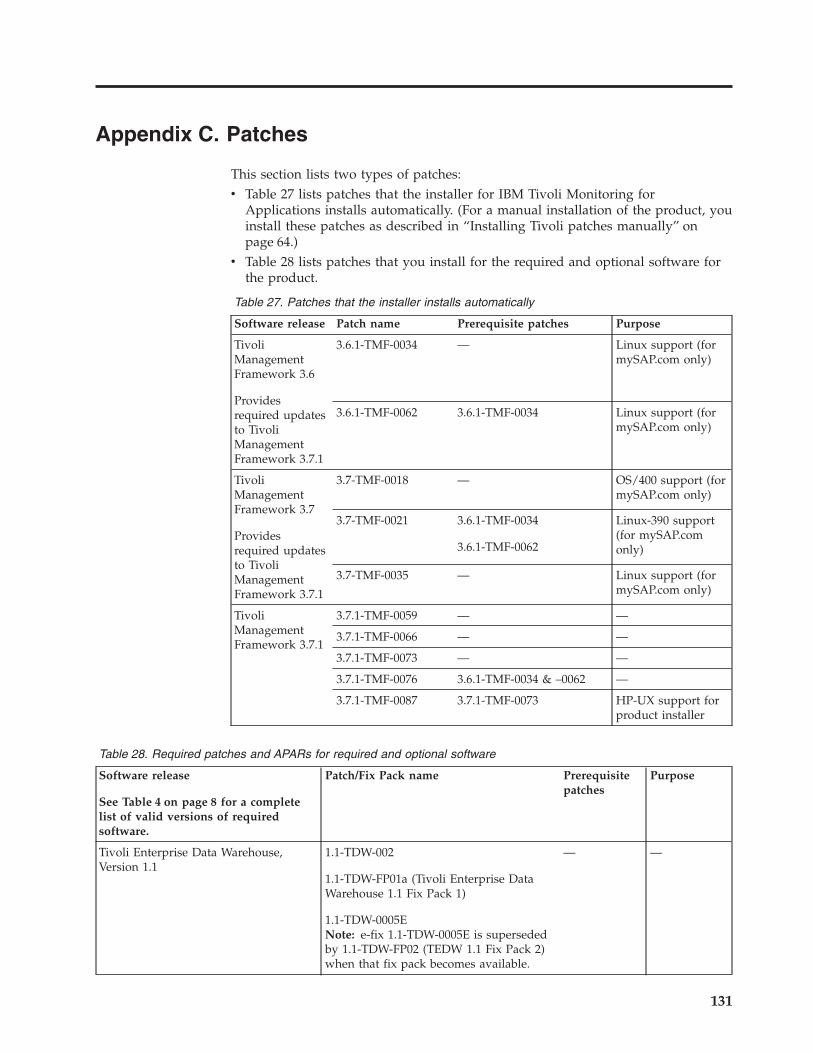
Appendix C. Patches
This section lists two types of patches:v Table 27 lists patches that the installer for IBM Tivoli Monitoring for
Applications installs automatically. (For a manual installation of the product, youinstall these patches as described in “Installing Tivoli patches manually” onpage 64.)
v Table 28 lists patches that you install for the required and optional software forthe product.
Table 27. Patches that the installer installs automatically
Software release Patch name Prerequisite patches Purpose
TivoliManagementFramework 3.6
Providesrequired updatesto TivoliManagementFramework 3.7.1
3.6.1-TMF-0034 — Linux support (formySAP.com only)
3.6.1-TMF-0062 3.6.1-TMF-0034 Linux support (formySAP.com only)
TivoliManagementFramework 3.7
Providesrequired updatesto TivoliManagementFramework 3.7.1
3.7-TMF-0018 — OS/400 support (formySAP.com only)
3.7-TMF-0021 3.6.1-TMF-0034
3.6.1-TMF-0062
Linux-390 support(for mySAP.comonly)
3.7-TMF-0035 — Linux support (formySAP.com only)
TivoliManagementFramework 3.7.1
3.7.1-TMF-0059 — —
3.7.1-TMF-0066 — —
3.7.1-TMF-0073 — —
3.7.1-TMF-0076 3.6.1-TMF-0034 & –0062 —
3.7.1-TMF-0087 3.7.1-TMF-0073 HP-UX support forproduct installer
Table 28. Required patches and APARs for required and optional software
Software release
See Table 4 on page 8 for a completelist of valid versions of requiredsoftware.
Patch/Fix Pack name Prerequisitepatches
Purpose
Tivoli Enterprise Data Warehouse,Version 1.1
1.1-TDW-002
1.1-TDW-FP01a (Tivoli Enterprise DataWarehouse 1.1 Fix Pack 1)
1.1-TDW-0005ENote: e-fix 1.1-TDW-0005E is supersededby 1.1-TDW-FP02 (TEDW 1.1 Fix Pack 2)when that fix pack becomes available.
— —
131

Table 28. Required patches and APARs for required and optional software (continued)
Software release
See Table 4 on page 8 for a completelist of valid versions of requiredsoftware.
Patch/Fix Pack name Prerequisitepatches
Purpose
IBM DB2 Universal Database EnterpriseEdition Version 7.2.
Required for Tivoli Enterprise DataWarehouse, Version 1.1
IBM DB2 Universal Database EnterpriseEdition, Version 7.2, Fixpak 6
1.1-TDW-0002 (required e-fixes to theversion of DB2)
—
Tivoli Enterprise Console 3.7.1 The following patch is required for bothproduct components: 3.7.1-TEC-0001.
3.7.1-TEC-0004 is required for IBM TivoliMonitoring for Applications: mySAP.comonly.
— —
Tivoli Business Systems Manager 1.5 TBSM Patch 24
TBSM Patch 32
TBSM Patch 35
15-BSM-0038
— —
132 IBM Tivoli Monitoring for Applications: Installation and Setup Guide
Appendix D. Uninstalling the product
This section describes how to uninstall IBM Tivoli Monitoring for Applications andthe entire Tivoli environment.
Table 29. Guidelines for uninstalling the product
Goal Refer to
Uninstall IBM Tivoli Monitoring for Applications: Siebel eBusiness Applications
Uninstall IBM Tivoli Monitoring for Applications: Siebel eBusinessApplications endpoints.
“Uninstalling IBM Tivoli Monitoring forApplications: Siebel eBusiness Applicationsendpoints” on page 133
Uninstall IBM Tivoli Monitoring for Applications: Siebel eBusinessApplications managed nodes, including the managed node on theTivoli server.
“Uninstalling IBM Tivoli Monitoring forApplications: Siebel eBusiness Applicationsmanaged nodes” on page 134
Uninstall IBM Tivoli Monitoring for Applications: mySAP.com
Create the Uninstall Monitoring for mySAP.com, Version 5.1.0 task. “Creating the Uninstall Monitoring formySAP.com task” on page 135
Uninstall IBM Tivoli Monitoring for Applications: mySAP.com on theTivoli server.
“Uninstalling IBM Tivoli Monitoring forApplications: mySAP.com from the Tivoliserver” on page 136
Uninstall IBM Tivoli Monitoring for Applications: mySAP.com on theTivoli managed nodes and endpoints.
“Uninstalling IBM Tivoli Monitoring forApplications: mySAP.com managed nodesand endpoints” on page 137
Uninstalling IBM Tivoli Monitoring for Applications: Siebel eBusinessApplications endpoints
ObjectiveTo uninstall endpoints for an IBM Tivoli Monitoring for Applications: SiebeleBusiness Applications installation.
Background informationUse this procedure to delete product files and log files at the end of the product’slife cycle. This procedure uses a Tivoli task that removes product files.
Required authorization roleadmin
Before you begin
Note: Do not perform the “Uninstalling IBM Tivoli Monitoring for Applications:Siebel eBusiness Applications managed nodes” on page 134 procedurebefore you uninstall endpoints. Otherwise, the Tivoli task you must use forthis procedure will be unavailable.
Start the command line interface as described in “Accessing the Tivolienvironment” on page 56.
When you finishNone
133
ProcedureYou can perform this procedure from the command line or from the Tivoli desktop.
Command line: Use the wruntask command to invoke theDelete_Endpoint_Utilities task in the Siebel Utility Tasks task library. Thefollowing command deletes the endpoint software from a server called pinball.The -a y flag causes the command to prompt you prior to the actual deletion of theendpoint.wruntask -t Delete_Endpoint_Utilities -l "Siebel Utility Tasks"-h @EndPoint:pinball -a y
Refer to the Tivoli Management Framework Reference Manual for more informationabout the wruntask command. Refer to “Tivoli command syntax” on page xiv forinformation on the Tivoli command line syntax.
Tivoli desktop: See the Running a task procedure in the IBM Tivoli Monitoring forApplications: Siebel eBusiness Applications User’s Guide. You access theDelete_Endpoint_Utilities task in the Siebel Utility Tasks task library. During thisprocedure you access the Configure Task Arguments dialog box. See the taskdescription in the IBM Tivoli Monitoring for Applications: Siebel eBusiness ApplicationsReference Guide or click Task Description to display the online help.
Uninstalling IBM Tivoli Monitoring for Applications: Siebel eBusinessApplications managed nodes
ObjectiveTo uninstall managed nodes for an IBM Tivoli Monitoring for Applications,including the principal managed node that enables the Tivoli server.
Background informationUse this command-line procedure to uninstall the product at the end of theproduct’s life cycle.
Required authorization roleThe installation routine for IBM Tivoli Monitoring for Applications creates theTivoli administrator who is authorized to perform this procedure. Otheradministrators must be the super, senior, admin, or user to run the wlsinstcommand.
Before you begin
Note: Do not perform this procedure before you uninstall endpoints. Otherwise,the Tivoli task you must use to uninstall endpoints will be unavailable.
As a precautionary measure, perform the following backupsv Save a compressed version (.tar or .zip format) of the Tivoli installation directory
in a separate directory.v Back up the Tivoli management region databases as described in “Backing up
and restoring Tivoli databases” on page 13.
Start the command line interface as described in “Accessing the Tivolienvironment” on page 56.
When you finishNone
134 IBM Tivoli Monitoring for Applications: Installation and Setup Guide
ProcedureYou can perform this procedure from the command line only.
Command line: Run the following command to display a list of managed nodesfor the product:wlsinst -h -s "IBM Tivoli Monitoring for Applications V5.1.0 - Siebel \eBusiness Applications"
Run the following script on each of the listed managed nodes, starting with themanaged node on the Tivoli server:$BINDIR/../generic_unix/TME/SIEBEL/SIEBEL.uninstall
For each managed node, the script creates a siebel_uninstall.log file in the$DBDIR/GMS/logs directory. Refer to these logs to determine the source of anyproblems that occur with uninstall operations. Refer to the log file on the Tivoliserver first.
Refer to the Tivoli Management Framework Reference Manual for more informationabout the wlsinst command. Refer to “Tivoli command syntax” on page xiv forinformation on Tivoli command line syntax.
Creating the Uninstall Monitoring for mySAP.com task
ObjectiveTo create the task to uninstall IBM Tivoli Monitoring for Applications: mySAP.com.
Background informationThe create_uninstall_task.sh command does the following:v Creates the Uninstall Monitoring for mySAP task that you run on managed
nodes and endpoints to uninstall IBM Tivoli Monitoring for Applications:mySAP.com.
v Creates the mySAP Product Management Tasks task library in the policy regionyou specify.
v Adds the Uninstall Monitoring for mySAP, Version 5.1.0 task to the mySAPProduct Management Tasks task library.
The create_uninstall_task.sh command is installed with IBM Tivoli Monitoring forApplications: mySAP.com in the $BINDIR/../generic_unix/TME/ABHUNINSTdirectory. If you do not find the script in the$BINDIR/../generic_unix/TME/ABHUNINST directory, get a copy of the scriptfrom the /UNINST directory on the IBM Tivoli Monitoring for Applications:mySAP.com Component Software CD.
Required authorization roleThe installation routine for IBM Tivoli Monitoring for Applications creates theTivoli administrator who is authorized to perform this procedure.
Before you beginStart the command line interface as described in “Accessing the Tivolienvironment” on page 56.
When you finishNone
ProcedureYou can perform this procedure from the command line only.
Appendix D. Uninstalling the product 135
Command line: Refer to “Tivoli command syntax” on page xiv for information onTivoli command line syntax.1. Go to the $BINDIR/../generic_unix/TME/ABHUNINST directory.2. Type the following command:
create_uninstall_task.sh Policy_Region_Name
where:
Policy_Region_NameSpecifies the name of an existing policy region in which you want tocreate the mySAP Product Management Tasks task library and theUninstall Monitoring for mySAP, Version 5.1.0 task. Because theUninstall Monitoring for mySAP, Version 5.1.0 task uninstalls IBMTivoli Monitoring for Applications: mySAP.com policy regions and tasklibraries, enter the name of an existing policy region that is not part ofthe IBM Tivoli Monitoring for Applications: mySAP.com software.
Uninstalling IBM Tivoli Monitoring for Applications: mySAP.com fromthe Tivoli server
ObjectiveTo uninstall IBM Tivoli Monitoring for Applications: mySAP.com from the Tivoliserver.
Background informationTable 30 on page 136 lists what the mySAP_uninstall51.pl command removes andwhat it does not remove. If you plan to reinstall IBM Tivoli Monitoring forApplications: mySAP.com, you do not need to remove the listed items in the Doesnot remove column. If you do not plan to reinstall IBM Tivoli Monitoring formySAP.com and you want to remove the listed items, you can manually removethe baroc classes, the Tivoli Enterprise Console rules, the event console filters, themySAP Product Management Tasks library, and the ABHUNINST directory.
Table 30. mySAP_uninstall51.pl details
Removes: Does not remove:
Event adapter baroc classes
All task libraries in the Monitoring formySAP policy region
The uninstall message catalog(R/3UninstallMsg.cat)
Resource models Tivoli Enterprise Console rules
Tivoli Enterprise Console sources(WR3CCMS, WR3SLOG, and WR3IDOC)
The ABHUNINST directory
IBM Tivoli Monitoring for Applications:mySAP.com policy regions
Log files
IBM Tivoli Monitoring for Applications:mySAP.com profile managers
Tivoli Business System Managerinstrumentation definition files from theTivoli Business System Manager server
IBM Tivoli Monitoring for Applications:mySAP.com profiles
mySAP Product Management Tasks librarycontaining the Uninstall Monitoring formySAP, Version 5.1.0 task
IBM Tivoli Monitoring for Applications:mySAP.com installed files
Tivoli Business System Manager installedfiles and tasks libraries
136 IBM Tivoli Monitoring for Applications: Installation and Setup Guide

Table 30. mySAP_uninstall51.pl details (continued)
Removes: Does not remove:
Objects and object classes (mySAPSystem,mySAPAppServer, mySAPDBServer, andmySAPITSServer)
Required authorization roleThe installation routine for IBM Tivoli Monitoring for Applications creates theTivoli administrator who is authorized to perform this procedure.
Before you beginAs a precautionary measure, perform the following backupsv Save a compressed version (.tar or .zip format) of the Tivoli installation directory
in a separate directory.v Back up the Tivoli management region databases as described in “Backing up
and restoring Tivoli databases” on page 13.
Start the command line interface as described in “Accessing the Tivolienvironment” on page 56.
Run the wchkdb –u command to check for and repair any database inconsistencies.
When you finishRun the wchkdb -u command to check for and repair database inconsistencies.
ProcedureYou can perform this procedure from the command line only.
Command line: Refer to “Tivoli command syntax” on page xiv for information onTivoli command line syntax.1. Go to the $BINDIR/../generic_unix/TME/ABHUNINST directory.2. Type of one of the following commands:
a. For UNIX:mySAP_uninstall51.pl[-yes]
b. For Windows:perl mySAP_uninstall51.pl[-yes]
where:
[-yes] Uninstalls the product without prompting for confirmation.
Uninstalling IBM Tivoli Monitoring for Applications: mySAP.commanaged nodes and endpoints
ObjectiveTo uninstall IBM Tivoli Monitoring for Applications: mySAP.com on managednodes and endpoints with the task you created in “Creating the UninstallMonitoring for mySAP.com task” on page 135.
Background informationr3_admin or senior
Appendix D. Uninstalling the product 137
Required authorization roleThe installation routine for IBM Tivoli Monitoring for Applications creates theTivoli administrator who is authorized to perform this procedure.
Before you beginStart the command line interface as described in “Accessing the Tivolienvironment” on page 56.
When you finishNone
ProcedureYou can perform this procedure from the Tivoli desktop only.
Desktop:
1. Double-click the the policy region icon to open the policy region.2. Double-click the mySAP Product Management Tasks icon to open the task
library that contains the Uninstall Monitoring for mySAP, Version 5.1.0 task toopen the task library.
3. Run the Uninstall Monitoring for mySAP, Version 5.1.0 task against themanaged nodes and endpoints from which you want to uninstall the product.
138 IBM Tivoli Monitoring for Applications: Installation and Setup Guide
Appendix E. Accessibility
Accessibility features help users who have physical disabilities, such as restrictedmobility or limited vision, to use software products successfully. The majoraccessibility features in Tivoli Manager for Applications enable users to:v Use assistive technologies such as screen-reader software and a digital speech
synthesizer to hear what is displayed on the screenv Operate specific or equivalent features using only the keyboardv Magnify what is displayed on the screen
In addition, the product documentation has been modified to include features toaid accessibility:v All documentation available in both HTML and convertible PDF formats to give
the maximum opportunity for users to apply screen-reader software.v All images provided with alternative text so that users of the documentation
with vision impairments can understand the contents of the images.
Using Assistive TechnologiesAssistive technology products such as screen-readers, function with both thetext-based and graphical user interfaces found in Tivoli Manager for Applications.Consult the assistive technology product documentation for specific informationabout using it to access command line or graphical interfaces.
Additional accessibility features might be included as part of the user interface of aparticular Tivoli Manager for Applications component. Check with the individualcomponent’s documentation for any additional information about accessibility.
Magnifying What is Displayed on the ScreenIn all components of Tivoli Manager for Applications other than the Web HealthConsole, users can magnify the screens used by the product’s user interfaces usingfacilities provided by the operating systems on which the product is run. Forexample, in a Windows® environment you can change the screen settings to alower resolution to enlarge the font sizes of the text on the screen. Informationabout these facilities is provided in the relevant operating system documentation.
Documentation in Accessible FormatsAll user documentation is provided in HTML format, which can be read directlyby assistive tools such as screen readers, or in convertible PDF format. ConvertiblePDF files are those that can be converted from PDF to HTML by the Adobe PDF toHTML converter. For information about converting PDF documents to HTML, referto the Adobe book Optimizing Adobe PDF Files for Accessibility
Using Alternative TextAll documentation images are provided with an alternative text that can be readby assistive tools such as screen readers.
139

140 IBM Tivoli Monitoring for Applications: Installation and Setup Guide
Appendix F. Notices
This information was developed for products and services offered in the U.S.A.IBM may not offer the products, services, or features discussed in this document inother countries. Consult your local IBM representative for information on theproducts and services currently available in your area. Any reference to an IBMproduct, program, or service is not intended to state or imply that only that IBMproduct, program, or service may be used. Any functionally equivalent product,program, or service that does not infringe any IBM intellectual property right maybe used instead. However, it is the user’s responsibility to evaluate and verify theoperation of any non-IBM product, program, or service.
IBM may have patents or pending patent applications covering subject matterdescribed in this document. The furnishing of this document does not give youany license to these patents. You can send license inquiries, in writing, to:
IBM Director of Licensing
IBM Corporation
North Castle Drive
Armonk, NY 10504-1785 U.S.A.
For license inquiries regarding double-byte (DBCS) information, contact the IBMIntellectual Property Department in your country or send inquiries, in writing, to:
IBM World Trade Asia Corporation
Licensing
2-31 Roppongi 3-chome, Minato-ku
Tokyo 106, Japan
The following paragraph does not apply to the United Kingdom or any othercountry where such provisions are inconsistent with local law:
INTERNATIONAL BUSINESS MACHINES CORPORATION PROVIDES THISPUBLICATION ″AS IS″ WITHOUT WARRANTY OF ANY KIND, EITHEREXPRESS OR IMPLIED, INCLUDING, BUT NOT LIMITED TO, THE IMPLIEDWARRANTIES OF NON-INFRINGEMENT, MERCHANTABILITY OR FITNESSFOR A PARTICULAR PURPOSE.
Some states do not allow disclaimer of express or implied warranties in certaintransactions, therefore, this statement might not apply to you.
This information could include technical inaccuracies or typographical errors.Changes are periodically made to the information herein; these changes will beincorporated in new editions of the publication. IBM may make improvementsand/or changes in the product(s) and/or the program(s) described in thispublication at any time without notice.
141

Any references in this information to non-IBM Web sites are provided forconvenience only and do not in any manner serve as an endorsement of those Websites. The materials at those Web sites are not part of the materials for this IBMproduct and use of those Web sites is at your own risk.
IBM may use or distribute any of the information you supply in any way itbelieves appropriate without incurring any obligation to you.
Licensees of this program who wish to have information about it for the purposeof enabling: (i) the exchange of information between independently createdprograms and other programs (including this one) and (ii) the mutual use of theinformation which has been exchanged, should contact:
IBM Corporation
2Z4A/101
11400 Burnet Road
Austin, TX 78758 U.S.A.
Such information may be available, subject to appropriate terms and conditions,including in some cases payment of a fee.
The licensed program described in this document and all licensed materialavailable for it are provided by IBM under terms of the IBM Customer Agreement,IBM International Program License Agreement or any equivalent agreementbetween us.
Any performance data contained herein was determined in a controlledenvironment. Therefore, the results obtained in other operating environments mayvary significantly. Some measurements may have been made on development-levelsystems and there is no guarantee that these measurements will be the same ongenerally available systems. Furthermore, some measurement may have beenestimated through extrapolation. Actual results may vary. Users of this documentshould verify the applicable data for their specific environment.
Information concerning non-IBM products was obtained from the suppliers ofthose products, their published announcements or other publicly available sources.IBM has not tested those products and cannot confirm the accuracy ofperformance, compatibility or any other claims related to non-IBM products.Questions on the capabilities of non-IBM products should be addressed to thesuppliers of those products.
All statements regarding IBM’s future direction or intent are subject to change orwithdrawal without notice, and represent goals and objectives only.
This information contains examples of data and reports used in daily businessoperations. To illustrate them as completely as possible, the examples include thenames of individuals, companies, brands, and products. All of these names arefictitious and any similarity to the names and addresses used by an actual businessenterprise is entirely coincidental.
COPYRIGHT LICENSE:
142 IBM Tivoli Monitoring for Applications: Installation and Setup Guide

This information contains sample application programs in source language, whichillustrate programming techniques on various operating platforms. You may copy,modify, and distribute these sample programs in any form without payment toIBM, for the purposes of developing, using, marketing or distributing applicationprograms conforming to the application programming interface for the operatingplatform for which the sample programs are written. These examples have notbeen thoroughly tested under all conditions. IBM, therefore, cannot guarantee orimply reliability, serviceability, or function of these programs. You may copy,modify, and distribute these sample programs in any form without payment toIBM for the purposes of developing, using, marketing, or distributing applicationprograms conforming to IBM’s application programming interfaces.
Each copy or any portion of these sample programs or any derivative work, mustinclude a copyright notice as follows:
© (your company name) (year). Portions of this code are derived from IBM Corp.Sample Programs. © Copyright IBM Corp. _enter the year or years_. All rightsreserved.
If you are viewing this information in softcopy form, the photographs and colorillustrations might not appear.
TrademarksThe following terms are trademarks of International Business MachinesCorporation in the United States, other countries, or both:
AIX, IBM, the IBM logo, Tivoli, the Tivoli logo, DB2, OS/400, and Tivoli EnterpriseConsole are trademarks or registered trademarks of International BusinessMachines Corporation in the United States, other countries, or both.
Lotus and Lotus Notes are registered trademarks of Lotus DevelopmentCorporation. Domino is a trademark of Lotus Development Corporation.
Microsoft, Windows, Windows NT, and the Windows logo are trademarks ofMicrosoft Corporation in the United States, other countries, or both.
UNIX is a registered trademark of The Open Group in the United States and othercountries.
Solaris Operating Environment, Java, and all Java-based trademarks are trademarksof Sun Microsystems, Inc. in the United States, other countries, or both.
Other company, product, and service names may be trademarks or service marksof others.
Appendix F. Notices 143

144 IBM Tivoli Monitoring for Applications: Installation and Setup Guide
Index
Aaccess, Tivoli environment 56accessibility 139automatic upgrades 12
Bbacking up
guidelines 105Tivoli databases 13Tivoli environment components 105
basic installation, elements 2books
feedback xonline xordering x
Cchange gateway assignment of
endpoint 88choose an installation method 1commands
lcf_env.sh 112lcfd.sh 113net start 112net stop 112ping 5ps 112special characters xivsyntax xivwadminep 112, 114wdelep 116winstlcf 62wlookup 112wping 112
completing installation of product 73configuring
Tivoli Enterprise Data Warehouse 84connectivity, testing endpoint 112create
Windows proxy endpointmanually 50
Custom installation 33Customer Support xiii
Ddeploy.log file, checking for error
messages 109Detail dialog box 105disk space requirements 10display characters and locale
settings 111
Ee-mail contact xiiielements of a basic installation 2
enable customization of resource models,installing 78
endpointremoving 113
Endpoint Setup Wizard to installendpoint 61
endpointsEndpoint Setup Wizard 61installing 60installing through existing Tivoli
environment 60TCP/IP 13troubleshooting 112
endpoints,process, stopping 113
error messagesSee messages
existing Java Runtime Environment,link 77
Ffeedback about publications xiiifirewalls 15
Ggateway assignment of endpoint,
change 88guidelines for installation and setup 5
Hhelp, online xii
Iillegible character display 111installation planning sheets 19installer problems, troubleshooting 105installing
choose a method 1endpoint 60endpoints through existing Tivoli
environment 60error messages 117
checking the deploy.log filefor 109
files to enable customization ofresource models 78
files to enable Tivoli Enterprise DataWarehouse 80
files to enable Tivoli Enterprise DataWarehouse for mySAP.com 83
guidelines for IBM Tivoli Monitoringfor Applications 5
IBM Tivoli Language Support for thisproduct 84
Java Runtime Environment 76
installing (continued)managed nodes through existing
Tivoli environment 57pre-installation 7product manually from an existing
Tivoli environment 55Tivoli patches manually 64Tivoli software manually 69Web Health Console manually 72
JJava Runtime Environment
link to existing 77Java Runtime Environment (JRE)
installing 76
Llanguage requirements 12lcf_env.sh command
using to access lcfd endpointprocess 112
lcf.sh command 113lcfd command 112locale settings, causing illegible character
display 111
Mmanual installation
create Windows proxy endpoint 50managed nodes through existing
Tivoli environment 57of product from existing Tivoli
environment 55Tivoli patches 64Tivoli software 69Web Health Console 72
manual upgrade of IBM TivoliMonitoring 67
manualsfeedback xonline xordering x
mapping monitors to resourcemodels 97
messageschecking the deploy.log file for 109installation 117
migrating 93from previous Tivoli products 2monitors 97
Nnet start command 112net stop command 112
145
Oonline help xiionline publications xiioperating systems, supported 7ordering publications xiioverview of IBM Tivoli Monitoring for
Applications 1
Ppatches 131perform
Custom installation 33Typical installation 23
permissions and privileges 12planning sheets 19port numbers for endpoints 53, 62privileges, permissions 12problem determination 105product, uninstalling 133ps command, use to identify lcfd
endpoint process 112publications
online xordering xrelated xsubmitting feedback about x
Rremoving and cleaning up endpoint
process and files 113removing endpoint process and files 113required and optional software 8required software for running
installer 16requirements
disk space 10language 12
restore Tivoli databases 13rexec 16
Sscripts
setup_env.csh 57security across firewalls 15setup
_env.sh script 57setup_env.csh script 57software
patches 131required and optional 8
Step List options in installer 105stopping endpoint process 113supported operating systems 7
TTCP/IP for endpoints 13Tivoli Customer Support xiiiTivoli databases, back up and restore 13Tivoli Enterprise Data Warehouse
enablement files for mySAP.com 83
Tivoli Enterprise Data Warehouse,enablement files 80
Tivoli environmentaccess 56defined 3
Tivoli management region, backing updatabases 13
Tivoli products, migrating fromprevious 2
Tivoli software, manual installation 69Tivoli Systems Manager 89troubleshooting
endpoint problems 112installer problems 105
Typical installation 23
Uuninstalling
guidelines 105Tivoli environment components 105
uninstalling, guidelines 133update Web Health Console files 87upgrade
automatic 12IBM Tivoli Monitoring manually 67
Vverify that required software is
running 16
Wwadminep command 114
using to test connectivity 112wdelep command 116Windows proxy endpoint, manually
create 50winstlcf command 62wlookup command 112wping command 112
146 IBM Tivoli Monitoring for Applications: Installation and Setup Guide

����
Part Number: CT18GIE
Printed in U.S.A.
GC23-4810-00
(1P)
P/N:
CT18GIE