IBM Tivoli Access Manager - Community Archive · IBM Tivoli Access Manager Single Sign On for SAP...
24
IBM Tivoli Access Manager Single Sign On for SAP NetWeaver September 2005
Transcript of IBM Tivoli Access Manager - Community Archive · IBM Tivoli Access Manager Single Sign On for SAP...

IBM Tivoli Access Manager Single Sign On for SAP NetWeaver September 2005
IBM Tivoli Access Manager Single Sign On for SAP NetWeaver
September 2005 2
1. Preface 3 1.1. Constraints 3 1.2. Definition 3 1.3. Intended Audience 3 1.4. Additional Documentation 3
2. Overview 5
3. TAM based SSO to SAP ITS 6 3.1. Overview 6 3.2. Configuring SAP R/3 for SSO 7 3.3. Configuring SAP ITS for SSO 9 3.4. Configuring WebSEAL for SSO to SAP ITS 13 3.5. Testing the configuration 15
4. TAM Based SSO to SAP EP 16 4.1. Overview 16 4.2. Configuring SAP EP for TAM based SSO 16 4.3. Configuring WebSEAL for SSO to SAP EP 21 4.4. Testing the configuration 22
5. Summary 23

IBM Tivoli Access Manager Single Sign On for SAP NetWeaver
September 2005 3
1. Preface
1.1. Constraints The texts, references and graphics contained in this manual have been compiled with utmost care; nevertheless, it is impossible to guarantee that they are fully without error. IBM and SAP cannot assume any responsibility for the correctness or completeness of the following documentation; the user alone is responsible for verifying the information contained therein.
IBM and SAP will only assume liability for damage arising from the use of this documentation – irrespective of the pertinent legal basis – in the case of intentional or active negligence, under no other circumstances will a warranty be made.
1.2. Definition This paper describes the configuration of using IBM Tivoli Access Manager (TAM, Version 5.1) for Single Sign-On (SSO) to the SAP backend-systems SAP Internet Transaction Server (ITS, Version 6.20) and SAP Enterprise Portal (EP, Version 6, SP 10). The configurations described herein should be reproducible given that the reader follows the operational model of our lab environment. If more information is needed please refer to the appropriate guides of the products in Table 1.
1.3. Intended Audience This guide is intended to be used by administrators or technical consultants who have to build interoperability scenarios. The users should be familiar with the above mentioned products. They should know how to use and configure the products.
1.4. Additional Documentation
Title Where to find Reference-Number
Using SAP Cryptographic Library for SNC, Release 6.20, Document Version 2.0, 03/05/02,
http://service.sap.com/instguides
when you search for the title of document
[1]
Pluggable Authentication Services for External Authentication Mechanisms, Release 6.20, Document Version 2.2, 12/27/2002
http://service.sap.com/instguides
when you search for the title of document
[2]
WebSphere IBM HTTP Server, Version 6, User’s guide, December 2004
http://www.ibm.com/software/webservers/httpservers/library/
[3]
IBM Tivoli Access Manager SAP ITS Integration Guide, Version 1.1.01
Infrastructure 2.0
http://www.ibm.com/software/sysmgmt/ products/support/IBMTivoliAccessManagerfore-business.html
when you search for “SAP ITS”.
[4]
IBM Tivoli Access Manager for e-business, WebSEAL Administration Guide”, Version 5.1.
http://www.ibm.com/software/tivoli/ products/access-mgr-e-bus/
[5]
IBM Tivoli Access Manager Single Sign On for SAP NetWeaver
September 2005 4
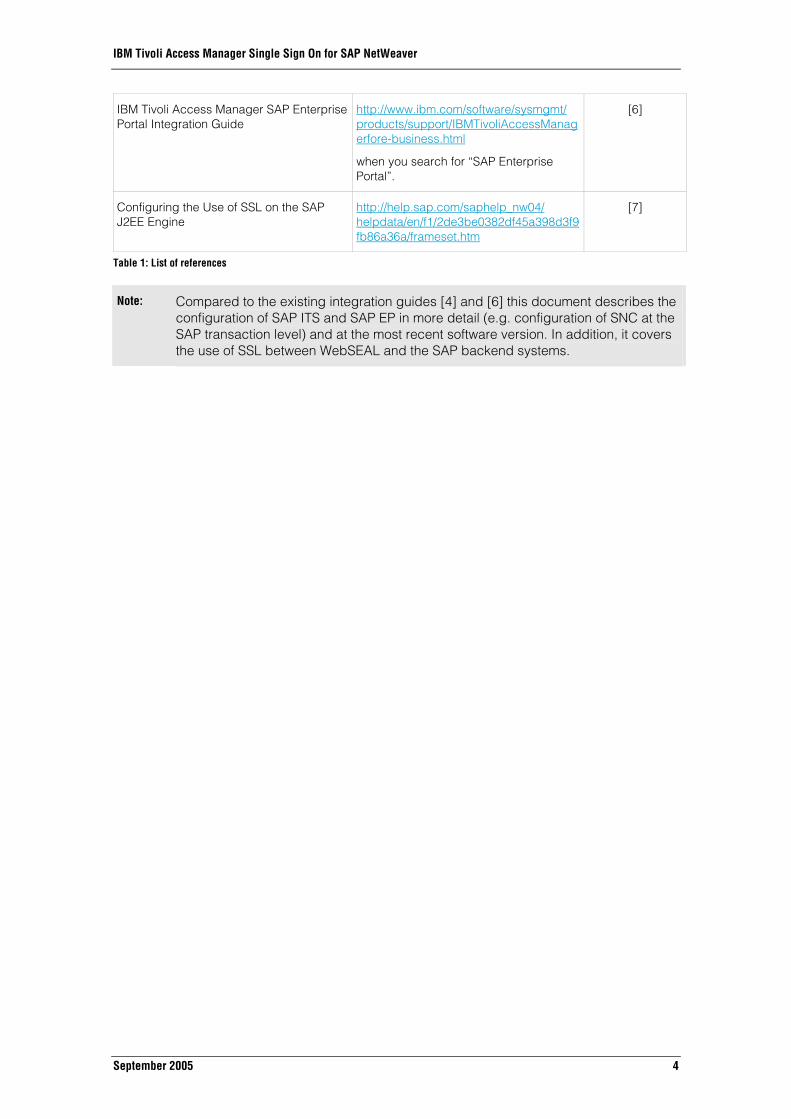
IBM Tivoli Access Manager SAP Enterprise Portal Integration Guide
http://www.ibm.com/software/sysmgmt/ products/support/IBMTivoliAccessManagerfore-business.html
when you search for “SAP Enterprise Portal”.
[6]
Configuring the Use of SSL on the SAP J2EE Engine
http://help.sap.com/saphelp_nw04/ helpdata/en/f1/2de3be0382df45a398d3f9fb86a36a/frameset.htm
[7]
Table 1: List of references
Note: Compared to the existing integration guides [4] and [6] this document describes the configuration of SAP ITS and SAP EP in more detail (e.g. configuration of SNC at the SAP transaction level) and at the most recent software version. In addition, it covers the use of SSL between WebSEAL and the SAP backend systems.

IBM Tivoli Access Manager Single Sign On for SAP NetWeaver
September 2005 5
2. Overview
Figure 1: Overview of configuration scenario
Figure 1 gives an architecture overview diagram of the scenario whose configuration is introduced in this document. In this scenario, the IBM Tivoli Access Manager (TAM) is used as a central authentication and authorization engine for web access with Single Sign-On (SSO) to the SAP backend systems SAP ITS and SAP EP.
The components of the IBM Tivoli Access Manager, which are important for this scenario, are
• an LDAP server (Tivoli Directory Server V5.2) that contains a registry of users, • the policy server that manages the authorization information in terms of access control
lists (ACLs), and • the WebSEAL server which is an authenticating reverse proxy.
WebSEAL acts as a security guard, ensuring that only authenticated and authorized users are given access to downstream systems as long as access to the backend systems is configured via WebSEAL.
As a reverse proxy, users do not directly access the backend systems, but only via WebSEAL. This means that WebSEAL accesses downstream backend systems on behalf of an authenticated user.
Thereby SSO can be achieved, meaning that once a user is authenticated to WebSEAL, it does not need to authenticate against any downstream backend system again given that:
• WebSEAL presents to a backend system the identity of an authenticated user (various mechanisms are possible);
• the backend systems trust WebSEAL to present the identity of authenticated users only;
• the backend systems provide itself a mechanism to use the trusted user information as a base for its own authentication.
The user information is known to WebSEAL and the SAP backend system and configured at both systems with appropriate authorization and access rights (e.g. by using a central user management system like Tivoli Identity Manager).
Thus SSO is based on a trust relationship between the reverse proxy and downstream backend systems. The configuration of this trust relationship between WebSEAL and SAP ITS is covered in chapter 3, whereas chapter 4 covers those between WebSEAL and SAP EP.
Thereby we describe the configuration of an actual lab environment, end-to-end, but only as far as SSO is concerned in the way it is depicted in Figure 1. Thus, we assume that the products involved are already installed and up and running. In particular, we do not make any assumption about the configuration of the authentication between the browser and WebSEAL.

IBM Tivoli Access Manager Single Sign On for SAP NetWeaver
September 2005 6
3. TAM based SSO to SAP ITS In this chapter we will first give an overview of the runtime and configuration steps for TAM based SSO to SAP ITS. Then a detailed description on how to configure the involved systems is provided.
3.1. Overview
Figure 2: Operational model of TAM based SSO to SAP ITS
Figure 2 shows the operational model of our lab environment that consists of:
• the node “tamImage.ctsc.com” where WebSEAL Version 5.1 is installed • the node “sap2tivoli.ctsc.com” with an installation of SAP ITS, Version 6.20, consisting
of the components “WGate” and “AGate”. Since SAP ITS requires an external Web Server, the IBM HTTP Server, Version 6.0, is installed on this node as well.
• the node “r3.ctsc.com” where SAP R/3 Enterprise, Release 4.7 resides
On all these nodes, Windows 2000 Server is installed.
In addition, Figure 2 shows the actual flows that happen between the different nodes within a SSO scenario:
1. Using a Web browser, a user accesses SAP ITS through WebSEAL as a reverse proxy in between. Thereby, WebSEAL ensures that the user is authenticated, using forms-based authentication in our scenario (which, as had been said before, is not of relevance for the discussion within this paper).
2. Once the authentication has succeeded, WebSEAL passes the request to SAP ITS, using a “junction” configured with mutually authenticated SSL. Thereby the authenticated user ID is passed as a HTTP header variable “iv-user”. Using SSL ensures the integrity of the user ID when it is transported as a HTTP header. SSL with mutual authentication enables SAP ITS to authenticate WebSEAL and therefore establishes and ensures the trust between the two parties.
3. SAP ITS forwards the user ID to the SAP R/3 backend using Secure Network Communication (SNC), a SAP proprietary technology with similar functionality than SSL, enabling a trust relationship between SAP ITS and SAP R/3.
4. The SAP R/3 system is configured to authenticate the user based on the received trusted user ID. As a result it sends back a SAP Logon Ticket, representing the user session for repeated access. SAP R/3 is set-up as the ticket-issuing system.
5. SAP ITS forwards the SAP Logon Ticket to WebSEAL, which finally passes it to the browser as a session cookie. Note we will talk about the Logon Ticket here, because it is simpler to us use this term than “mysapsso2” cookie, even though this is a synonym.
A prerequisite for the scenario above is that the user logs on to TAM with the same ID with which he is registered at SAP R/3. If the user IDs are different, you have to establish a mapping
IBM Tivoli Access Manager Single Sign On for SAP NetWeaver
September 2005 7
of user IDs either within TAM or SAP R/3 as described in [4]. Note in addition, that password change is disabled at R/3 for user with SSO.
The order of description in this document follows the operational model “from behind”, starting with presenting the configuration within SAP R/3, succeeded by the configuration of SAP ITS and WebSEAL.
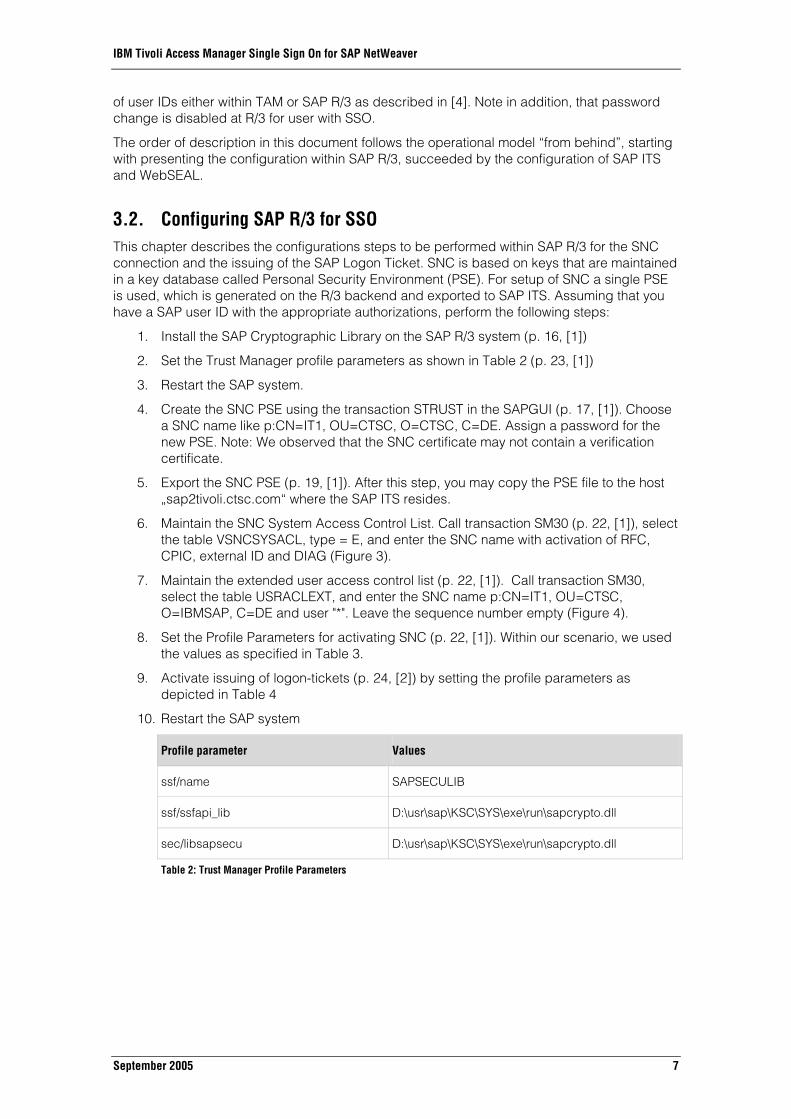
3.2. Configuring SAP R/3 for SSO This chapter describes the configurations steps to be performed within SAP R/3 for the SNC connection and the issuing of the SAP Logon Ticket. SNC is based on keys that are maintained in a key database called Personal Security Environment (PSE). For setup of SNC a single PSE is used, which is generated on the R/3 backend and exported to SAP ITS. Assuming that you have a SAP user ID with the appropriate authorizations, perform the following steps:
1. Install the SAP Cryptographic Library on the SAP R/3 system (p. 16, [1])
2. Set the Trust Manager profile parameters as shown in Table 2 (p. 23, [1])
3. Restart the SAP system.
4. Create the SNC PSE using the transaction STRUST in the SAPGUI (p. 17, [1]). Choose a SNC name like p:CN=IT1, OU=CTSC, O=CTSC, C=DE. Assign a password for the new PSE. Note: We observed that the SNC certificate may not contain a verification certificate.
5. Export the SNC PSE (p. 19, [1]). After this step, you may copy the PSE file to the host „sap2tivoli.ctsc.com“ where the SAP ITS resides.
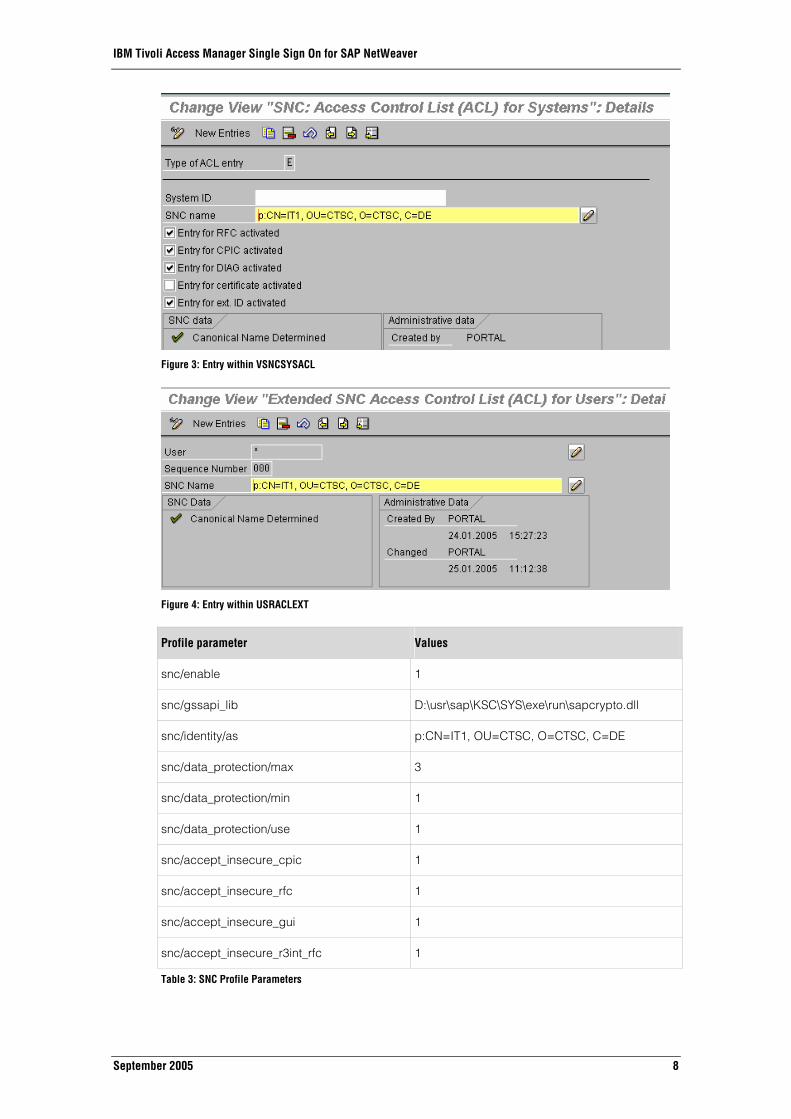
6. Maintain the SNC System Access Control List. Call transaction SM30 (p. 22, [1]), select the table VSNCSYSACL, type = E, and enter the SNC name with activation of RFC, CPIC, external ID and DIAG (Figure 3).
7. Maintain the extended user access control list (p. 22, [1]). Call transaction SM30, select the table USRACLEXT, and enter the SNC name p:CN=IT1, OU=CTSC, O=IBMSAP, C=DE and user "*". Leave the sequence number empty (Figure 4).
8. Set the Profile Parameters for activating SNC (p. 22, [1]). Within our scenario, we used the values as specified in Table 3.
9. Activate issuing of logon-tickets (p. 24, [2]) by setting the profile parameters as depicted in Table 4
10. Restart the SAP system
Profile parameter Values
ssf/name SAPSECULIB
ssf/ssfapi_lib D:\usr\sap\KSC\SYS\exe\run\sapcrypto.dll
sec/libsapsecu D:\usr\sap\KSC\SYS\exe\run\sapcrypto.dll
Table 2: Trust Manager Profile Parameters
IBM Tivoli Access Manager Single Sign On for SAP NetWeaver
September 2005 8
Figure 3: Entry within VSNCSYSACL
Figure 4: Entry within USRACLEXT
Profile parameter Values
snc/enable 1
snc/gssapi_lib D:\usr\sap\KSC\SYS\exe\run\sapcrypto.dll
snc/identity/as p:CN=IT1, OU=CTSC, O=CTSC, C=DE
snc/data_protection/max 3
snc/data_protection/min 1
snc/data_protection/use 1
snc/accept_insecure_cpic 1
snc/accept_insecure_rfc 1
snc/accept_insecure_gui 1
snc/accept_insecure_r3int_rfc 1
Table 3: SNC Profile Parameters

IBM Tivoli Access Manager Single Sign On for SAP NetWeaver
September 2005 9
Profile parameter Values
login/create_sso2_ticket 2
login/accept_sso2_ticket 1
login/ticket_expiration_time 60
login/password_change_for_SSO 0
Table 4: Ticket Issuing Profile Parameters
3.3. Configuring SAP ITS for SSO Given an installation of SAP ITS like depicted in Figure 2, this section first describes the configuration of SNC between SAP ITS and SAP R/3. After that the configuration of underlying Web Server for enabling SSL communication with WebSEAL is introduced. Finally the configuration of the PAS module is described.
Note: We do not configure SNC between WGate and AGate because both components reside on the same node.
Configuration of SNC between SAP ITS and SAP R/3
1. Install the SAP Cryptographic Library on the AGate (p. 24, [1])
2. Load the SAP Cryptographic Library on the AGate, (p. 25 in [1])
3. Copy the PSE from the SAP System (p. 7) and install it on the AGate (p. 27, [1]).
4. Create credentials for the AGate (p. 29, [1]).
5. Set AGate's service file parameters (p. 34, [1]). We selected the value sncQoPR3 = 1.
6. Test the SNC Connection between the AGate and SAP System using the ITS Administration tool (p. 41, [2])
Note: ensure that in the „\etc\hosts“ file there is no entry like "127.0.0.1 localhost"
Configuration of SSL
SSL with client authentication enables SAP ITS to trust the user ID that is provided as the value of a HTTP header variable by WebSEAL. To setup the HTTP Server accordingly, perform the steps described below.
Note: • we do not care in this paper about simultaneous access to the HTTP Server with mutual SSL authentication and without. This could be achieved through the definition of an additional WGate instance.
• we only describe the most basic steps here, using self signed certificates instead of ones signed by a trusted authority.
1. Start the tool “iKeyman” using the start menu (p. 38, [3]).
2. Create a key database, using the menu “key database file > new” (p. 38, [3]). Thereby choose the default name “key.kdb” and as a key database type “CMS” (Figure5)

IBM Tivoli Access Manager Single Sign On for SAP NetWeaver
September 2005 10
Figure 5: Create new key database
3. Set a password and stash the password in a file (p. 38 in [3])
4. Create a self signed certificate “Cert4WebSEAL” in the new key-database (p. 42 in [3], see also Figure 6)
Figure 6: Create certificate Cert4WebSEAL
5. Select “Cert4WebSEAL” and push the “Extract Certificate” button to extract the certificate to a file, e.g. “httpserver.arm” (Figure 7). Copy the file to a location where it is available to the WebSEAL node.
Figure 7: Extract Cert4WebSEAL

IBM Tivoli Access Manager Single Sign On for SAP NetWeaver
September 2005 11
6. Generate a client certificate on the WebSEAL as described on p. 13, export the certificate into the file “tamImage.arm” and copy it to the node of the SAP ITS server.
7. Using the iKeyman import the certificate within the file “tamImage.arm” into key database “key.kdb” by selecting “Signer Certificates”, push the “Add” button and browse to the location where the file “tamImage.arm” is stored.
8. Now that the key database has been constructed, the IBM HTTP server can be configured for SSL. For this purpose, stop the HTTP Server.
9. Configure the IBM HTTP server to enable SSL according to chapter 5, SSL and iKeyman in [3]. Table 5 lists the directives we have used within the http.conf file.
10. Restart the HTTP server.
Config Parameter Value
LoadModule ibm_ssl_module modules/mod_ibm_ssl.so
Listen sap2tivoli.ctsc.com:443
login/ticket_expiration_time 60
<VirtualHost sap2tivoli.ctsc.com:443>
SSLEnable
SSLStashfile "c:\Program Files\IBM HTTP Server\key.sth"
SSLClientAuth 2
SSLClientAuthRequire CommonName = tamImage
</VirtualHost>
Keyfile "C:/Program Files/IBM HTTP Server/key.kdb
Table 5: SSL related entries in http.conf
Configuration of the PAS module
The SSO between TAM and SAP ITS uses the “pluggable authentication services” (PAS) provided by SAP ITS. You can configure PAS as described in [2]. For your convenience, IBM provides an integration package, containing pre-built PAS configuration files and an integration guide [4] available under:
http://www.ibm.com/software/sysmgmt/products/support/IBMTivoliAccessManagerfore-business.html
when you search for “SAP ITS”. In the following we assume that you have downloaded the package and unpacked it.
1. Under the assumption that “C:\Program Files\SAP\ITS\6.20\” is the SAP-ITS installation directory and “IT1” is the instance name, copy the files from the installation package to the directories as described Table 6.
Filename Destination
saptamsso.srvc C:\Program Files\SAP\ITS\6.20\IT1\services
extautherror.html C:\Program Files\SAP\ITS\6.20\IT1\templates\saptamsso\99
login.html C:\Program Files\SAP\ITS\6.20\IT1\templates\saptamsso\99

IBM Tivoli Access Manager Single Sign On for SAP NetWeaver
September 2005 12
redirect.html C:\Program Files\SAP\ITS\6.20\IT1\templates\saptamsso\99
Table 6: Locations for the PAS files
2. Adapt the configurations in the file “saptamsso.srvc” to your local environment like the ones shown in Table 7.
Option Value Remarks
~client 800 R/3 client configured for SAP ITS
~language en language configured for SAP ITS
~redirectHost tamimage.ctsc.com hostname of WebSEAL node
~redirectPath /sapits/scripts/wgate/webgui/! junction name plus the path to SAP ITS
~redirectQS ~client=800&~language=en client and language for SAP ITS
~redirectHttps 0 user accessing WebSEAL with http
Table 7: Adopted values in saptamsso.srvc
3. Specify the name of the HTTP header variable to use in the “global” section of the WGate’s configuration file “ItsRegistryWGATE.xml” as shown in Table 8 (see also p. 38, [5]). Based on the information provided here, the WGate is able to forward the SSO-information, submitted in the variable “iv-user” to the AGate.
<key name="Headers"> <key name="Header1"> <value name="Name" type="text">http_iv-user</value> <value name="Set" type="text">0</value> <value name="Value" type="text"></value> </key> </key>
Table 8: Entries in ItsRegistryWGATE.xml
4. Generation of the SAP Logon-Ticket is performed on the SAP backend system (see above). SAP ITS thus must be configured to accept the SAP Logon Ticket as authentication information and pass it to the SAP application server by adding the entry to the file webgui.srvc as shown in Table 9
5. Configure the SAP ITS logout sequence to be redirected to the TAM logoff page by adding the entry to the file “global.srvc” as shown in Table 9 (this is necessary, if WebSEAL use any other authentication mechanism than basic authentication).
Option Value File
~mysapcomusesso2cookie
1 webgui.srvc in
C:\Program Files\SAP\ITS\6.20\IT1\services
~exiturl http://tamImage.ctsc.com/pkmslogout global.srv in
C:\Program Files\SAP\ITS\6.20\IT1\services
Table 9: Additional options to be configured

IBM Tivoli Access Manager Single Sign On for SAP NetWeaver
September 2005 13
Note: If you experience security warning messages about mixed “http/https” content, then follow the steps described in chapter “Configure the SAP ITS Menu” in (reference – integration guide)
3.4. Configuring WebSEAL for SSO to SAP ITS The essential task for the WebSEAL side is to define the junction to SAP ITS with mutual SSL authentication. A pre-condition for this is to prepare the respective key-database.
Prepare the key database for SSL
The configuration is performed on the key-database “pdrsv.kdb” which you find in the directory “C:\Program Files\Tivoli\PDWeb\www-default\certs”, given that C:\Program Files\Tivoli\PDWeb is your WebSEAL installation directory and “www-default” your WebSEAL instance. We also assume that on the node the tool “iKeyman” is installed.
For a general description of key management for WebSEAL see chapter 8 in [5]. For configuration of the scenario described in this paper, perform the following steps:
1. Open the key database “pdsrv.kdb” and create a new self signed certificate meant to be used for client authentication with key label “ClientSideCertificate” (see Figure 8)
Figure 8: Create "ClientSideCertificate"
2. Export the the certificate “ClientSideCertificate” by selecting it and pressing the button “Extract Certificate...” and save it to file “tamImage.arm”. Make the file with the exported certificate available to the node of SAP ITS.
3. Add the certificate from the IBM HTTP Server, contained in the file that was exported as shown in Figure 7 into the key database pdsrv.kdb by selecting “Signer Certificates” and pushing the “Add...” button (Figure 9)
Figure 9: Import the certificate from the http server
4. Restart the WebSEAL Server.

IBM Tivoli Access Manager Single Sign On for SAP NetWeaver
September 2005 14
Create the Junction
Using the pdadmin Command-Line interface, create the junction “/sapits” from the WebSEAL to the SAP ITS node as shown in the first row of Table 10. Also find there the explanation of the options used within the command (for more information, please see [5]).
pdadmin> server task default-webseald-tamimage.ctsc.com create –t ssl -K "ClientSideCertificate" –h sap2tivoli.ctsc.com –p 443 -c iv-user –j /sapits
option remarks
default-webseald-tamimage.ctsc.com name of WebSEAL instance
-t ssl use SSL for the junction
-K "ClientSideCertificate" use the certificate “ClientSideCertificate” for client authentication to the backend system
–h sap2tivoli.ctsc.com –p 443 name and port of the Backend system (= junction destination)
-c iv-user pass the id of the authentication user to the backend system in the form of a HTTP header “iv-user”
–j enable java script filtering
Table 10: Creating the junction to SAP ITS
WebSEAL Configuration options
To allow WebSEAL to filter the SAP ITS contents correctly, ensure that the settings in Table 11 below are defined within the WebSEAL configuration file webseald.conf (residing in E:\Program Files\Tivoli\PDWeb\etc within our environment):
Stanza Option
[junction] jmt-map = lib/jmt.conf
[filter-url] META = CONTENT
[filter-request-headers] header = Accept-Encoding
[script-filtering] script-filter = yes
[preserve-cookie-names] name = MYSAPSSO2
[server] process-root-requests = never
[session] ssl-id-sessions = no
Table 11: Settings in webseald.conf
Create a junction mapping table
WebSEAL must be able to map Server-relative URLs that are generated on the client side. This is supported by extending the junction mapping table by the entries in Table 12, which resides in the file that you have defined in the “[junction]” stanza as described above (e.g. “E:\Program Files\Tivoli\PDWeb\www-default\lib\jmt.conf” in our case).

IBM Tivoli Access Manager Single Sign On for SAP NetWeaver
September 2005 15
/sapits /scripts/wgate/*
/sapits /sap/its/*
Table 12: Entries in the junction mapping table
Configure the WebSEAL Logout Page
Since the SSO solution presented in this paper uses temporary cookies for handling session information, it is important that all theses cookies get deleted from the browser’s memory when the user logs out of IBM Tivoli Access Manager. This is performed by a JavaScript, which is contained within a file “logout.html” that you find within the integration package.
If you copy this file as described in Table 13, WebSEAL executes the contained JavaScript as part of its logout sequence.
File from Integration Package Destination
logout.html E:\Program Files\Tivoli\PDWeb\www-default\lib\html\C
Table 13: Location of logout.html
Restart the WebSEAL Server
All these configuration changes become effective after a restart of the WebSEAL server.
3.5. Testing the configuration In order to test the configured TAM based SSO to SAP ITS, open a browser and access the URL shown below.
http://tamimage.ctsc.com/sapits/scripts/wgate/saptamsso/!
WebSEAL will prompt you to authenticate, using the authentication you have configured (forms-based authentication in our case). After successful authentication, the SAP ITS main window is displayed (Figure 10).
Figure 10: SAP HTML GUI displayed after successful SSO
To log off from R/3 press ‘Shift+F3’ or select ‘Menu -> System -> Log off’. After successful log off the default message like configured in logout.html (Table 14) “User [USERNAME] has logged out” should be displayed.
IBM Tivoli Access Manager Single Sign On for SAP NetWeaver
September 2005 16
4. TAM Based SSO to SAP EP This chapter describes the configuration of TAM based SSO to the SAP Enterprise Portal. First, an overview of the configuration environment is given, followed by a detailed description of the SAP EP and TAM configuration.
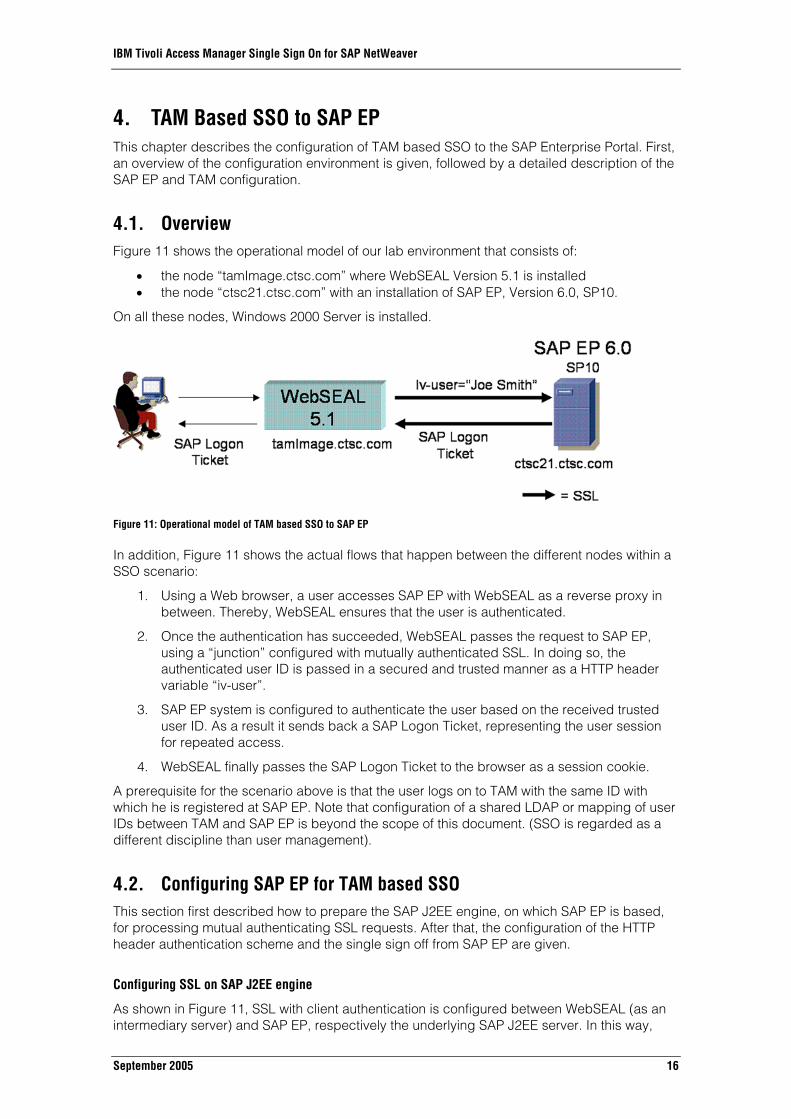
4.1. Overview Figure 11 shows the operational model of our lab environment that consists of:
• the node “tamImage.ctsc.com” where WebSEAL Version 5.1 is installed • the node “ctsc21.ctsc.com” with an installation of SAP EP, Version 6.0, SP10.
On all these nodes, Windows 2000 Server is installed.
Figure 11: Operational model of TAM based SSO to SAP EP
In addition, Figure 11 shows the actual flows that happen between the different nodes within a SSO scenario:
1. Using a Web browser, a user accesses SAP EP with WebSEAL as a reverse proxy in between. Thereby, WebSEAL ensures that the user is authenticated.
2. Once the authentication has succeeded, WebSEAL passes the request to SAP EP, using a “junction” configured with mutually authenticated SSL. In doing so, the authenticated user ID is passed in a secured and trusted manner as a HTTP header variable “iv-user”.
3. SAP EP system is configured to authenticate the user based on the received trusted user ID. As a result it sends back a SAP Logon Ticket, representing the user session for repeated access.
4. WebSEAL finally passes the SAP Logon Ticket to the browser as a session cookie.
A prerequisite for the scenario above is that the user logs on to TAM with the same ID with which he is registered at SAP EP. Note that configuration of a shared LDAP or mapping of user IDs between TAM and SAP EP is beyond the scope of this document. (SSO is regarded as a different discipline than user management).
4.2. Configuring SAP EP for TAM based SSO This section first described how to prepare the SAP J2EE engine, on which SAP EP is based, for processing mutual authenticating SSL requests. After that, the configuration of the HTTP header authentication scheme and the single sign off from SAP EP are given.
Configuring SSL on SAP J2EE engine
As shown in Figure 11, SSL with client authentication is configured between WebSEAL (as an intermediary server) and SAP EP, respectively the underlying SAP J2EE server. In this way,

IBM Tivoli Access Manager Single Sign On for SAP NetWeaver
September 2005 17
SAP EP can trust the user ID that is provided as the value of a HTTP header variable by WebSEAL.
To setup the SAP J2EE Server accordingly, perform the steps described below. For further information, please read [7].
Note that this paper does not care about simultaneous access to the SAP EP Server with mutual authentication and without. In addition, only the most basic steps are described here, using self signed certificates instead of ones signed by a trusted authority – or, what is even more, the default test certificate “ssl-credential-cert”.
1. Ensure that the SAP Java Cryptographic Toolkit is deployed on the SAP J2EE Engine
2. Using the J2EE admin tool, export the SAP J2EE server certificate “ssl-credential-cert”:
a. log onto the J2EE engine as a member with administrative rights and navigate to “Server -> Services -> KeyStorage”
b. select “service_ssl” and export the “ssl-credential-cert” as shown in Figure 12.
Figure 12: Export the default ssl certificate
3. Still using the J2EE admin tool, import WebSEAL’s client certificate “ClientSideCertificate” as being trusted:
a. If you have already configured SSO to SAP ITS, this certificate should be available in the file “tamImage.arm”. Otherwise extract the file as described on page 13, step 2, and rename it to “tamImage.cert”.
b. Then load the file as shown in Figure 13.

IBM Tivoli Access Manager Single Sign On for SAP NetWeaver
September 2005 18
Figure 13: Import WebSEAL's client certificate
4. Configure the use of client certificates using the SSL Provider service within the J2EE admin tool:
a. Navigate to “Server -> Services -> SSL Provider” b. Select the dispatcher service and your SSL port (50001 in this case), check
“Request client certificate” and choose “tamImage”, which is the name of WebSEAL’s client certificate imported before (Figure 14).
Figure 14: Select the client certificate
Configuring the HTTP Header Authentication Scheme
SSO between WebSEAL and SAP EP is based on the use of a HTTP header variable as the source of a trusted user ID. Perform the steps below for configuring this mechanism.
1. Start the J2EE admin tool. For each server node, perform the following procedure. Click on Security Provider under Services. Switch to the tab User Management and in the bottom right corner of the window click on Manage Security Stores (Figure 15).

IBM Tivoli Access Manager Single Sign On for SAP NetWeaver
September 2005 19
Figure 15: Adjusting the Login Module Stack for Using Header Variables
2. In the upcoming screen click on “Add Login Module”. Then simply confirm the dialog with “Ok”. In the window that pops up now enter the value com.sap.security.core.server.jaas.HeaderVariableLoginModule in the edit field class name, enter the value HeaderVariableLoginModule in the edit field display name as shown in Figure 16.
Figure 16: Add the HeaderVariableLoginModule
3. Still in the “Security Provider”, press the tab “Policy Configurations”. In the list Components select the item ticket and configure the security stack as depicted in Figure 17.

IBM Tivoli Access Manager Single Sign On for SAP NetWeaver
September 2005 20
Figure 17: Configure the HeaderVariableLoginModule
Note that this configuration allows password fallback. If you want to exclude this, configure the stack as depicted in Table 15.
EvaluateTicketLoginModule SUFFICIENT ume.configuration.active=true
HeaderVariableLoginModule REQUISITE ume.configuration.active=true,Header=iv-user
CreateTicketLoginModule OPTIONAL ume.configuration.active=true
Table 15: Security stack without password fallback
Configuring Single Sign Off from SAP EP
Pressing the “Log Off” button within SAP EP should force the user to logon again before using the SAP EP the next time. Thus, logging off should delete all session information between SAP EP and WebSEAL as well as between the user’s browser and WebSEAL.
This can be achieved if SAP EP is configured to redirect to WebSEAL’s logout page “pkmslogout” after performing an internal log off. For configuring this behavior follow the steps below (also see SAP note 696294).
1. Logon to SAP EP as a member with administrative rights.
2. Navigate to “System Administration -> System Configuration -> UM Configuration – Direct Editing” (Figure 18).
3. Insert the properties • ume.logoff.redirect.silent=FALSE • ume.logoff.redirect.url=http://tamimage.ctsc.com/pkmslogout • ume.logon.security_policy.password_change_allowed=FALSE
4. Restart SAP EP
Figure 18: Configure Single Sign Off from SAP EP

IBM Tivoli Access Manager Single Sign On for SAP NetWeaver
September 2005 21
4.3. Configuring WebSEAL for SSO to SAP EP The essential on for the WebSEAL side is to define the junction to SAP EP with mutual SSL authentication. A pre-condition for this is to prepare the respective key-database.
Prepare the WebSEAL’s key database for SSL
Import the SAP EP’s ssl-certificate, which you have exported before (see Figure 19), into WebSEAL’s key database “pdrsv.kdb”. Given that you have the file of the exported certificate available on node “tamImage”, you can follow the configuration step 3 on page 13.
Note that we can reuse the client certificate that was created for the SAP ITS scenario.
Create the Junction
Using the pdadmin Command-Line interface, create the junction “/ep” from WebSEAL to the SAP EP as shown in the first row of Table 16. Also find there the explanation of the options used within the command (for more information, please see [5]).
pdadmin> server task default-webseald-tamimage.ctsc.com create –t ssl -K "ClientSideCertificate" –h ctsc21.ctsc.com –p 50001 -c iv-user –j /ep
option remarks
default-webseald-tamimage.ctsc.com name of WebSEAL instance
-t ssl use SSL for the junction
-K "ClientSideCertificate" use the certificate “ClientSideCertificate” for client authentication to the backend system
–h ctsc21.ctsc.com –p 50001 name and port of the Backend system (= junction destination)
-c iv-user pass the id of the authentication user to the backend system in the form of a HTTP header “iv-user”
–j enable java script filtering
Table 16: Creating the junction to SAP EP
WebSEAL Configuration options
To allow WebSEAL to filter the SAP EP contents correctly, ensure that the settings in Table 11 are defined within the WebSEAL configuration file webseald.conf.
Create a junction mapping table
WebSEAL must be able to map Server-relative URLs that are generated on the client side. This is supported by extending the junction mapping table by the entries in Table 17.
/ep /irj/*
Table 17: Entries in junction mapping table for SAP EP
Configure the WebSEAL Logout Page
Follow the approach that is described in Table 13.

IBM Tivoli Access Manager Single Sign On for SAP NetWeaver
September 2005 22
Restart the WebSEAL Server
All these configuration changes become effective after a restart of the WebSEAL server.
4.4. Testing the configuration In order to test the configured TAM based SSO to SAP EP, open a browser and access the URL shown below.
http://tamimage.ctsc.com/ep/irj
WebSEAL will prompt you to authenticate, using the authentication you have configured (forms-based authentication in our case). After successful authentication, the SAP EP main window is displayed (Figure 20).
Figure 20: SAP EP displayed after successful SSO
IBM Tivoli Access Manager Single Sign On for SAP NetWeaver
September 2005 23
5. Summary This paper provides a Quick Guide for configuring Single Sign On scenarios to the SAP backend systems ITS and EP using IBM Tivoli Access Manager as an authenticating reverse proxy.
This document only presents the essential steps. For further configuration features please consult the extended information listed in Table 1.

IBM Tivoli Access Manager Single Sign On for SAP NetWeaver
September 2005 24
© Copyright IBM Corporation 2005 IBM Corporation Westchester Avenue White Plains, NY 10604 Ibm.com Printed in Germany All Rights Reserved IBM, the IBM logo, the e-business logo and WebSphere are trademarks or registered trademarks of International Business Machines Corporation in the United States, other countries, or both. Other company, product and service names may be trademarks or service marks of others.
© Copyright SAP AG 2005 SAP AG Neurottstrasse 16 D-69190 Walldorf Germany sap.com SAP, the SAP logo and all other SAP products and services mentioned herein are trademarks or registered trademarks of SAP AG in Germany and several other countries. Other product or service names mentioned herein are the trademarks of their respective owners. Microsoft and Windows are trademarks of Microsoft Corporation in the United States, other countries, or both. Java and all Java-based trademarks are trademarks of Sun Microsystems, Inc. in the United States, other countries, or both. For more information contact the IBM SAP International Competence Center (ISICC) at: [email protected] Please visit also our alliance website: www.ibm.com/solutions/sap