IBM SECURITY ACCESS MANAGER MOBILE DEMONSTRATION COOKBOOK ... · IBM Security Systems Access...
98
IBM Security Systems Access Management October, 2014 IBM SECURITY ACCESS MANAGER MOBILE DEMONSTRATION COOKBOOK BASED ON FIRMWARE 8.0.0.5 Version 2.5 Patrick Wardrop Andy Ybarra Matthew Duggan
Transcript of IBM SECURITY ACCESS MANAGER MOBILE DEMONSTRATION COOKBOOK ... · IBM Security Systems Access...

IBM Security Systems Access Management October, 2014
IBM SECURITY ACCESS MANAGER MOBILE DEMONSTRATION COOKBOOK BASED ON FIRMWARE 8.0.0.5
Version 2.5 Patrick Wardrop
Andy Ybarra Matthew Duggan

IBM Security Access Manager for Mobile Demonstration Cookbook P a g e | 2
Table of Contents
Introduction to the IBM Security Access Manager Appliance architecture ............................................................................. 6
Initial Appliance Configuration................................................................................................................................................. 7
1.1 Operating Environment ............................................................................................................................................. 7
1.2 Create the VMWare Virtual Machine ........................................................................................................................ 7
Step 1: Select “Create a New Virtual Machine” ............................................................................................................... 7
Step 2: Select the “Custom” radio button, select “Next” .................................................................................................. 7
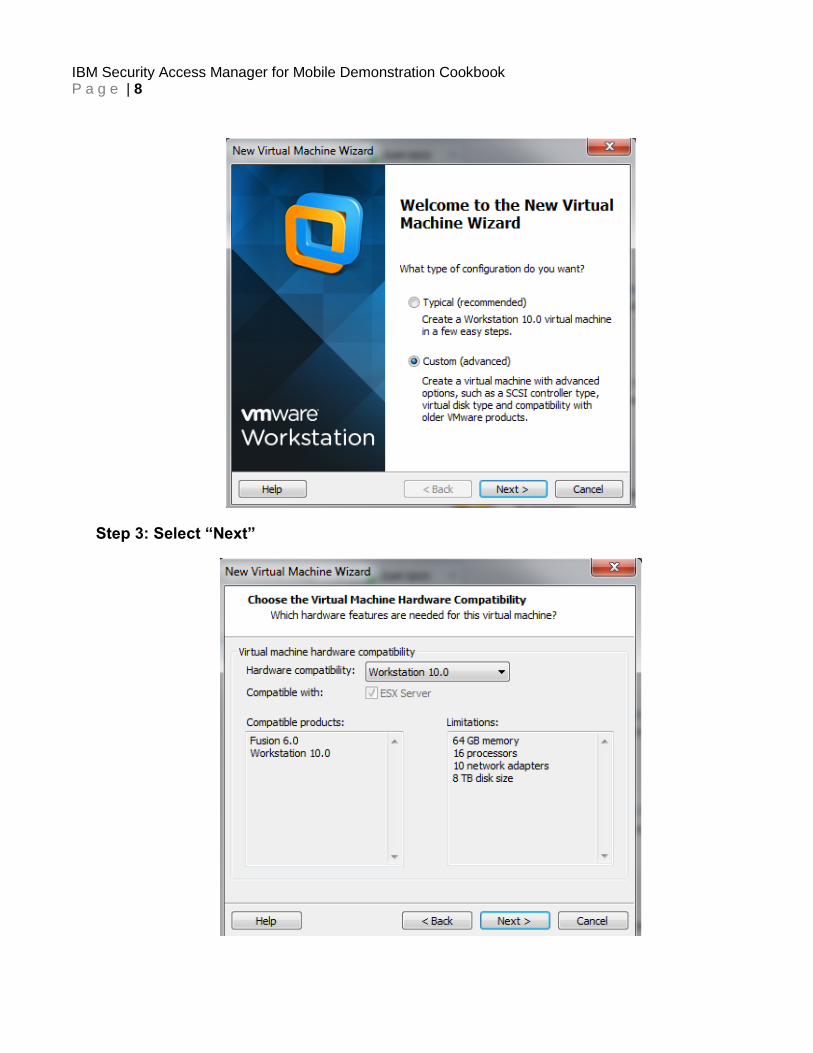
Step 3: Select “Next” ........................................................................................................................................................ 8
Step 4: Specify the location of the ISAM Virtual Image ISO file, Select “Next” ............................................................... 9
Step 5: Select “Next” ........................................................................................................................................................ 9
Step 6: Update the “Virtual machine name” and “Location” if desired, Select “Next” .................................................... 10
Step 7: Select “Next” ...................................................................................................................................................... 10
Step 8: Increase memory to “2048”, Select “Next” ........................................................................................................ 11
Step 9: Select “Next” ...................................................................................................................................................... 11
Step 10: Select “Next” .................................................................................................................................................... 12
Step 11: Select “Next” .................................................................................................................................................... 12
Step 12: Select “Next” .................................................................................................................................................... 13
Step 13: Set “Maximum disk size” to “20” GB, and Select the “Split virtual disk into multiple files” radio button .......... 13
Step 14: Select “Next” .................................................................................................................................................... 14
Step 15: Select “Customize Hardware” to add 2 more Network Adapters. ................................................................... 14
Step 16: Select “Network Adapter NAT” then select “Add” ............................................................................................ 15
Step 17: Select “Network Adapter”, Select “Next” ......................................................................................................... 15
Step 18: Select “Finish” .................................................................................................................................................. 16
Step 19: Repeat steps 16-18 to add a third Network Adapter. Once done the “Hardware” tab should show 3 Network Adapters as shown below. Then select “Close” ............................................................................................................ 16
Step 20: Select “Finish” .................................................................................................................................................. 17
Step 21: Select “Power on this virtual image” ................................................................................................................ 17
1.3 Install the Firmware ................................................................................................................................................ 18

IBM Security Access Manager for Mobile Demonstration Cookbook P a g e | 3
Step 1: Press <Enter> .................................................................................................................................................... 18
Step 2: Select your language and press <Enter> .......................................................................................................... 18
Step 3: Type “yes” and press <Enter> ........................................................................................................................... 18
Step 5: Unmount install image, Select VM Settings .................................................................................................. 19
Step 5: Unmount install image, Highlight “CD/DVD” and uncheck “Connected” and “Connect at power on”, and select “OK” ................................................................................................................................................................................ 20
Step 6: Select “Yes” ....................................................................................................................................................... 20
Step 7 Return to the VMWare console and press <Enter> ........................................................................................... 21
1.4 Configure the Appliance ......................................................................................................................................... 21
Step 1: Login using username:”admin” password:”admin” ............................................................................................ 21
Step 2: Press <Enter> .................................................................................................................................................... 21
Step 3: type “4” and press <Enter> ................................................................................................................................ 21
Step 4: type “1” and press <Enter> ................................................................................................................................ 21
Step 5: Type “n” and press <Enter> .............................................................................................................................. 22
Step 6: Type “n” and press <Enter> .............................................................................................................................. 22
Step 7: Type “1” and press <Enter> .............................................................................................................................. 22
Step 8: Enter a hostname (i.e. “isam8”) and press <Enter> .......................................................................................... 23
Step 9: type “n” and press <Enter> ................................................................................................................................ 23
Step 10: Type “3” to configure the management interface, and press <Enter> ............................................................ 23
Step 11: Type “2” to manually enter the parameters, and press <Enter> ..................................................................... 23
Step 12: Make sure the network settings are correct for the Virtual Network assigned to the VM ............................... 23
Step 13: Type “1” to automatically configure the IPV6 settings, and press <Enter> ..................................................... 24
Step 14: Type “n”, and press <Enter> ........................................................................................................................... 24
Step 15: Type “n” and press <Enter> ............................................................................................................................ 24
Step 16: Type 1,2,3 to set the time, date, and timezone. Once done accepts the changes and type “n” and press <Enter> .......................................................................................................................................................................... 24
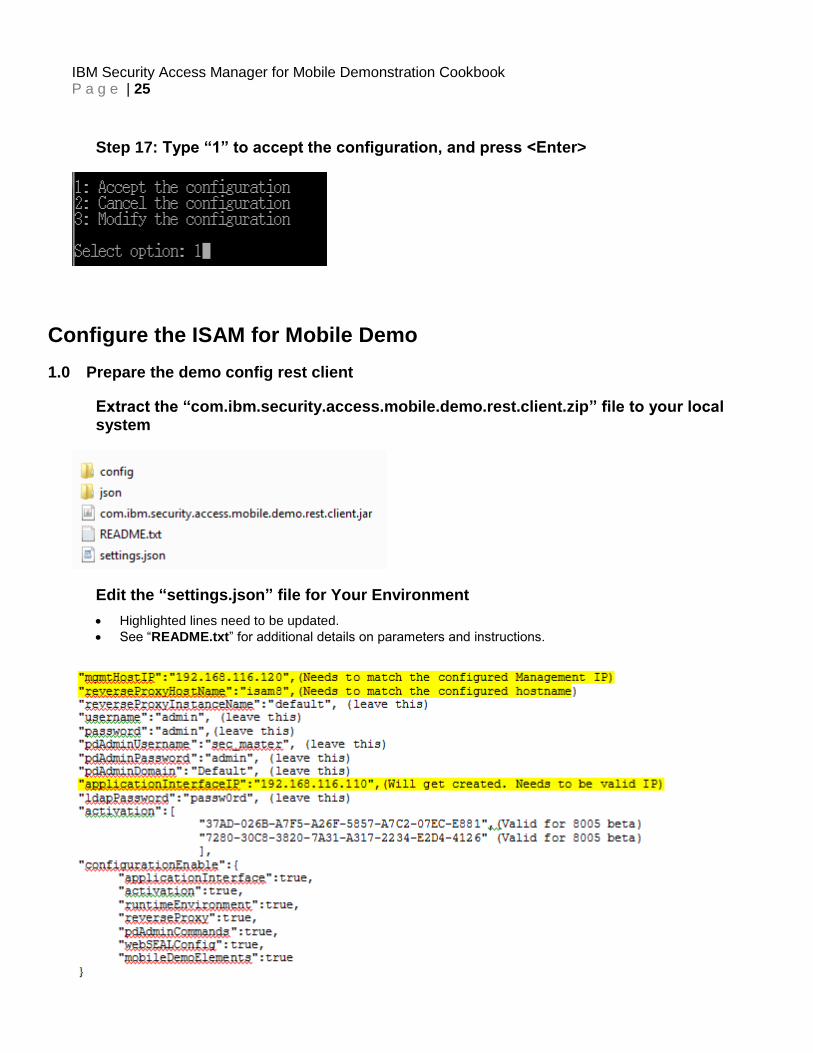
Step 17: Type “1” to accept the configuration, and press <Enter> ................................................................................ 25
Configure the ISAM for Mobile Demo ................................................................................................................................... 25
1.0 Prepare the demo config rest client ........................................................................................................................ 25

IBM Security Access Manager for Mobile Demonstration Cookbook P a g e | 4
Extract the “com.ibm.security.access.mobile.demo.rest.client.zip” file to your local system ........................................ 25
Edit the “settings.json” file for Your Environment .......................................................................................................... 25
1.1 Execute the Demo Config Tool ............................................................................................................................... 26
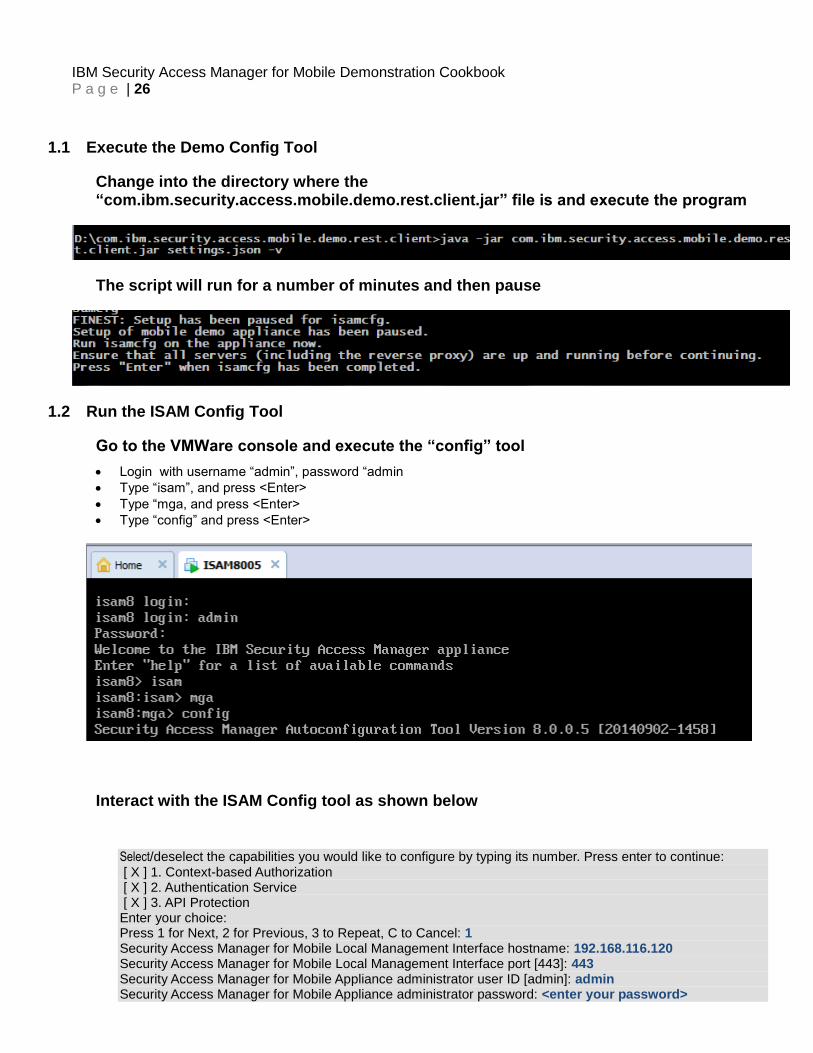
Change into the directory where the “com.ibm.security.access.mobile.demo.rest.client.jar” file is and execute the program .......................................................................................................................................................................... 26
The script will run for a number of minutes and then pause .......................................................................................... 26
1.2 Run the ISAM Config Tool ...................................................................................................................................... 26
Go to the VMWare console and execute the “config” tool ............................................................................................. 26
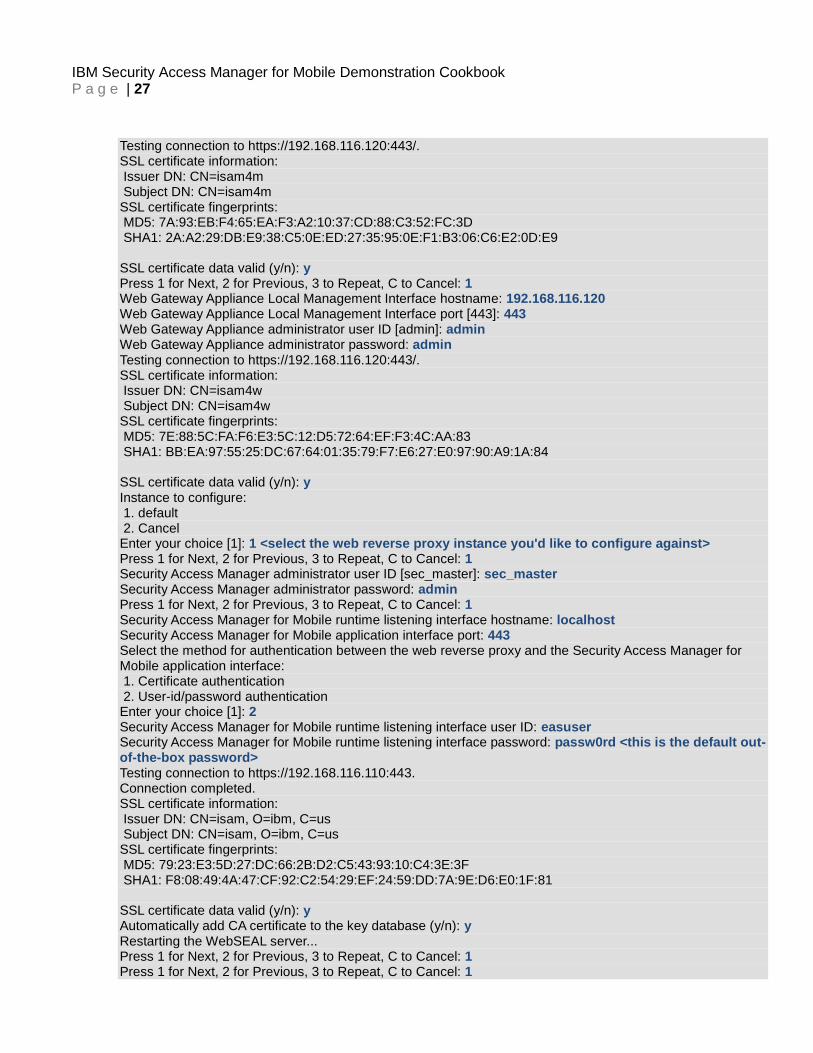
Interact with the ISAM Config tool as shown below ....................................................................................................... 26
1.3 Complete Executing the Demo Config Tool ........................................................................................................... 30
Return to the cmd shell in which the demo config tool is paused and Press <Enter> to continue running the tool ...... 30
When the Demo Config Tool is Complete it will Return ................................................................................................. 30
1.4 Final Configuration for the Mobile Demo ................................................................................................................ 30
From a Web Browser Login to the Admin Interface as the admin User ........................................................................ 30
Upload the Mobile Demo HTML Files (“default_root_wga_templates.zip”) ................................................................... 30
Set Demo Configuration Parameters ............................................................................................................................. 31
Set the Final Demo Configuration Parameters (Only required once) and select “Save” ............................................... 32
Scenario 1: Step-up authentication if device is not registered .............................................................................................. 33
Scenario 1: Testing ............................................................................................................................................................... 33
Register HOTP for “testuser” ......................................................................................................................................... 33
Use Google Authenticator and register the one-time-password by either entering the initialization key or scanning the QRCode ......................................................................................................................................................................... 33
Select “Home” from the menu and then select “Risk-based Access Scenario” ............................................................. 34
Enter your HOTP one-time password and select verify ................................................................................................. 34
If you see the screen below the Mobile Demo is Working!! ........................................................................................... 35
Scenario 2: Step-up authentication based on transaction context FORM Parameter example ........................................... 37
Scenario 2: Testing ............................................................................................................................................................... 37
Scenario 3: Payload Extraction using Mobile Application JSON .......................................................................................... 39
Scenario 3: Testing ............................................................................................................................................................... 39

IBM Security Access Manager for Mobile Demonstration Cookbook P a g e | 5
Scenario 4: Hijack Session Protection Scenario ................................................................................................................... 42
Scenario 4:Testing ................................................................................................................................................................ 42
Scenario 5: Trusteer Secure Mobile Browser ....................................................................................................................... 43
Scenario 5: Testing ............................................................................................................................................................... 43
Scenario 6: Oauth 2.0 ........................................................................................................................................................... 44
Scenario 6: Testing ............................................................................................................................................................... 44
Manual Installation and Configuration Instructions ............................................................................................................... 49
1.5 Install and configure the IBM Security Access Manager Appliance ....................................................................... 49
1.6 Configure application interfaces ............................................................................................................................. 49
1.7 Activate IBM Security Access Manager product capabilities .................................................................................. 49
1.8 Configuring the Web Reverse Proxy ...................................................................................................................... 50
1.9 Configuring the web reverse proxy to point at the IBM Security Access Manager for Mobile Authorization Decision Point ................................................................................................................................................................... 56
Mobile Demo Scenarios Manual Setup ................................................................................................................................. 62
Scenario 1: Step-up authentication if device is not registered .............................................................................................. 62
Scenario 1: Setup .......................................................................................................................................................... 62
Scenario 2: Step-up authentication based on transaction context FORM Parameter example ........................................... 68
Scenario 2: Setup .............................................................................................................................................................. 68
Scenario 3: Payload Extraction using Mobile Application JSON .......................................................................................... 76
Scenario 3: Setup .............................................................................................................................................................. 76
Scenario 4: Hijack Session Protection Scenario ................................................................................................................... 81
Scenario 4: Setup .............................................................................................................................................................. 81
Scenario 5: Trusteer Secure Mobile Browser ....................................................................................................................... 86
Scenario 5: Setup .............................................................................................................................................................. 86
Scenario 6: Oauth 2.0 ........................................................................................................................................................... 91
Scenario 6: Setup .............................................................................................................................................................. 91
Notices .................................................................................................................................................................................. 96

IBM Security Access Manager for Mobile Demonstration Cookbook P a g e | 6
IBM Security Access Manager Mobile Demo Cookbook
Introduction to the IBM Security Access Manager Appliance architecture
The IBM Security Access Manager Appliance includes a single ISO image which incorporates:
1. IBM Security Access Manager for Mobile (ISAM4M), providing advanced authentication and authorization capabilities.
2. IBM Security Access Manager for Web (ISAM4W), which provides web reverse proxy capabilities and also can act as an enforcement point for IBM Security Access Manager for Mobile.
Note: This document outlines the steps for setting up the mobile demo on an “All-In-One” Appliance.
192.168.116.110
192.168.116.120

IBM Security Access Manager for Mobile Demonstration Cookbook P a g e | 7
Initial Appliance Configuration
1.1 Operating Environment
The Virtual Appliance VMWare Image is a 64bit image and it must run on a host machine that can run 64bit (64bit processor).
For production use, the VirtualAppliance VMWare Image requires VMWare ESX/ESXi version 5.0 or newer. For the beta, you can run it on the following VMWare products but this is not officially supported.
VMWare Workstation 7.15 or newer VMWare Player version 6.0 or newer
1.2 Create the VMWare Virtual Machine
Step 1: Select “Create a New Virtual Machine”
Step 2: Select the “Custom” radio button, select “Next”
IBM Security Access Manager for Mobile Demonstration Cookbook P a g e | 8
Step 3: Select “Next”

IBM Security Access Manager for Mobile Demonstration Cookbook P a g e | 9
Step 4: Specify the location of the ISAM Virtual Image ISO file, Select “Next”
Step 5: Select “Next”

IBM Security Access Manager for Mobile Demonstration Cookbook P a g e | 10
Step 6: Update the “Virtual machine name” and “Location” if desired, Select “Next”
Step 7: Select “Next”

IBM Security Access Manager for Mobile Demonstration Cookbook P a g e | 11
Step 8: Increase memory to “2048”, Select “Next”
Step 9: Select “Next”

IBM Security Access Manager for Mobile Demonstration Cookbook P a g e | 12
Step 10: Select “Next”
Step 11: Select “Next”

IBM Security Access Manager for Mobile Demonstration Cookbook P a g e | 13
Step 12: Select “Next”
Step 13: Set “Maximum disk size” to “20” GB, and Select the “Split virtual disk into multiple files” radio button

IBM Security Access Manager for Mobile Demonstration Cookbook P a g e | 14
Step 14: Select “Next”
Step 15: Select “Customize Hardware” to add 2 more Network Adapters.

IBM Security Access Manager for Mobile Demonstration Cookbook P a g e | 15
Step 16: Select “Network Adapter NAT” then select “Add”
Step 17: Select “Network Adapter”, Select “Next”

IBM Security Access Manager for Mobile Demonstration Cookbook P a g e | 16
Step 18: Select “Finish”
Step 19: Repeat steps 16-18 to add a third Network Adapter. Once done the “Hardware” tab should show 3 Network Adapters as shown below. Then select “Close”

IBM Security Access Manager for Mobile Demonstration Cookbook P a g e | 17
Step 20: Select “Finish”
Step 21: Select “Power on this virtual image”

IBM Security Access Manager for Mobile Demonstration Cookbook P a g e | 18
1.3 Install the Firmware
Step 1: Press <Enter>
Step 2: Select your language and press <Enter>
Step 3: Type “yes” and press <Enter>

IBM Security Access Manager for Mobile Demonstration Cookbook P a g e | 19
Step 5: Unmount install image, Select VM Settings

IBM Security Access Manager for Mobile Demonstration Cookbook P a g e | 20
Step 5: Unmount install image, Highlight “CD/DVD” and uncheck “Connected” and “Connect at power on”, and select “OK”
Step 6: Select “Yes”

IBM Security Access Manager for Mobile Demonstration Cookbook P a g e | 21
Step 7 Return to the VMWare console and press <Enter>
1.4 Configure the Appliance
Step 1: Login using username:”admin” password:”admin”
Step 2: Press <Enter>
Step 3: type “4” and press <Enter>
Step 4: type “1” and press <Enter>

IBM Security Access Manager for Mobile Demonstration Cookbook P a g e | 22
Step 5: Type “n” and press <Enter>
Step 6: Type “n” and press <Enter>
Step 7: Type “1” and press <Enter>

IBM Security Access Manager for Mobile Demonstration Cookbook P a g e | 23
Step 8: Enter a hostname (i.e. “isam8”) and press <Enter>
Step 9: type “n” and press <Enter>
Step 10: Type “3” to configure the management interface, and press <Enter>
Step 11: Type “2” to manually enter the parameters, and press <Enter>
Step 12: Make sure the network settings are correct for the Virtual Network assigned to the VM

IBM Security Access Manager for Mobile Demonstration Cookbook P a g e | 24
Step 13: Type “1” to automatically configure the IPV6 settings, and press <Enter>
Step 14: Type “n”, and press <Enter>
Step 15: Type “n” and press <Enter>
Step 16: Type 1,2,3 to set the time, date, and timezone. Once done accepts the changes and type “n” and press <Enter>
IBM Security Access Manager for Mobile Demonstration Cookbook P a g e | 25
Step 17: Type “1” to accept the configuration, and press <Enter>
Configure the ISAM for Mobile Demo
1.0 Prepare the demo config rest client
Extract the “com.ibm.security.access.mobile.demo.rest.client.zip” file to your local system
Edit the “settings.json” file for Your Environment
Highlighted lines need to be updated.
See “README.txt” for additional details on parameters and instructions.
IBM Security Access Manager for Mobile Demonstration Cookbook P a g e | 26
1.1 Execute the Demo Config Tool
Change into the directory where the “com.ibm.security.access.mobile.demo.rest.client.jar” file is and execute the program
The script will run for a number of minutes and then pause
1.2 Run the ISAM Config Tool
Go to the VMWare console and execute the “config” tool
Login with username “admin”, password “admin
Type “isam”, and press <Enter>
Type “mga, and press <Enter>
Type “config” and press <Enter>
Interact with the ISAM Config tool as shown below
Select/deselect the capabilities you would like to configure by typing its number. Press enter to continue: [ X ] 1. Context-based Authorization [ X ] 2. Authentication Service [ X ] 3. API Protection Enter your choice: Press 1 for Next, 2 for Previous, 3 to Repeat, C to Cancel: 1 Security Access Manager for Mobile Local Management Interface hostname: 192.168.116.120 Security Access Manager for Mobile Local Management Interface port [443]: 443 Security Access Manager for Mobile Appliance administrator user ID [admin]: admin Security Access Manager for Mobile Appliance administrator password: <enter your password>
IBM Security Access Manager for Mobile Demonstration Cookbook P a g e | 27
Testing connection to https://192.168.116.120:443/. SSL certificate information: Issuer DN: CN=isam4m Subject DN: CN=isam4m SSL certificate fingerprints: MD5: 7A:93:EB:F4:65:EA:F3:A2:10:37:CD:88:C3:52:FC:3D SHA1: 2A:A2:29:DB:E9:38:C5:0E:ED:27:35:95:0E:F1:B3:06:C6:E2:0D:E9 SSL certificate data valid (y/n): y Press 1 for Next, 2 for Previous, 3 to Repeat, C to Cancel: 1 Web Gateway Appliance Local Management Interface hostname: 192.168.116.120 Web Gateway Appliance Local Management Interface port [443]: 443 Web Gateway Appliance administrator user ID [admin]: admin Web Gateway Appliance administrator password: admin Testing connection to https://192.168.116.120:443/. SSL certificate information: Issuer DN: CN=isam4w Subject DN: CN=isam4w SSL certificate fingerprints: MD5: 7E:88:5C:FA:F6:E3:5C:12:D5:72:64:EF:F3:4C:AA:83 SHA1: BB:EA:97:55:25:DC:67:64:01:35:79:F7:E6:27:E0:97:90:A9:1A:84 SSL certificate data valid (y/n): y Instance to configure: 1. default 2. Cancel Enter your choice [1]: 1 <select the web reverse proxy instance you'd like to configure against> Press 1 for Next, 2 for Previous, 3 to Repeat, C to Cancel: 1 Security Access Manager administrator user ID [sec_master]: sec_master Security Access Manager administrator password: admin Press 1 for Next, 2 for Previous, 3 to Repeat, C to Cancel: 1 Security Access Manager for Mobile runtime listening interface hostname: localhost Security Access Manager for Mobile application interface port: 443 Select the method for authentication between the web reverse proxy and the Security Access Manager for Mobile application interface: 1. Certificate authentication 2. User-id/password authentication Enter your choice [1]: 2 Security Access Manager for Mobile runtime listening interface user ID: easuser Security Access Manager for Mobile runtime listening interface password: passw0rd <this is the default out-of-the-box password> Testing connection to https://192.168.116.110:443. Connection completed. SSL certificate information: Issuer DN: CN=isam, O=ibm, C=us Subject DN: CN=isam, O=ibm, C=us SSL certificate fingerprints: MD5: 79:23:E3:5D:27:DC:66:2B:D2:C5:43:93:10:C4:3E:3F SHA1: F8:08:49:4A:47:CF:92:C2:54:29:EF:24:59:DD:7A:9E:D6:E0:1F:81 SSL certificate data valid (y/n): y Automatically add CA certificate to the key database (y/n): y Restarting the WebSEAL server... Press 1 for Next, 2 for Previous, 3 to Repeat, C to Cancel: 1 Press 1 for Next, 2 for Previous, 3 to Repeat, C to Cancel: 1

IBM Security Access Manager for Mobile Demonstration Cookbook P a g e | 28
The following files are available on the Web Gateway Appliance. Choose one for the '400 Bad Request' response page. 1. oauth_template_rsp_400_bad_request.html 2. oauth_template_rsp_401_unauthorized.html 3. oauth_template_rsp_502_bad_gateway.html Enter your choice [1]: 1 The following files are available on the Web Gateway Appliance. Choose one for the '401 Unauthorized' response page. 1. oauth_template_rsp_400_bad_request.html 2. oauth_template_rsp_401_unauthorized.html 3. oauth_template_rsp_502_bad_gateway.html Enter your choice [1]: 2 The following files are available on the Web Gateway Appliance. Choose one for the '502 Bad Gateway' response page. 1. oauth_template_rsp_400_bad_request.html 2. oauth_template_rsp_401_unauthorized.html 3. oauth_template_rsp_502_bad_gateway.html Enter your choice [1]: 3 Press 1 for Next, 2 for Previous, 3 to Repeat, C to Cancel: 1 The junction /mga contains endpoints that require Authorization HTTP header to be forwarded to the backend server. Do you want to enable this feature? [y|n]? y URLs allowing unauthenticated access: https://192.168.116.110/mga/sps/oauth/oauth20/authorize https://192.168.116.110/mga/sps/static URLs allowing all authenticated users access: https://192.168.116.110/mga/sps/ac https://192.168.116.110/mga/sps/xauth https://192.168.116.110/mga/sps/mga/user/mgmt/html https://192.168.116.110/mga/sps/oauth/oauth20/clients https://192.168.116.110/mga/sps/common/qr https://192.168.116.110/mga/sps/mga/user/mgmt/device https://192.168.116.110/mga/sps/mga/user/mgmt/otp https://192.168.116.110/mga/sps/mga/user/mgmt/grant URLs used for authentication: https://192.168.116.110/mga/sps/oauth/oauth20/session Press 1 for Next, 2 for Previous, 3 to Repeat, C to Cancel: 1 ----------------------------------------------- Planned configuration steps: A junction to the Security Access Manager server will be created at /mga. The POP oauth-pop will be created. The POP rba-pop will be created. ACLs denying access to all users will be attached to: /WebSEAL/isam8-default/mga ACLs allowing access to all users will be attached to: /WebSEAL/isam8-default/mga/sps/authsvc /WebSEAL/isam8-default/mga/sps/xauth

IBM Security Access Manager for Mobile Demonstration Cookbook P a g e | 29
/WebSEAL/isam8-default/mga/sps/authservice/authentication /WebSEAL/isam8-default/mga/sps/oauth/oauth20/authorize /WebSEAL/isam8-default/mga/sps/static /WebSEAL/isam8-default/mga/sps/oauth/oauth20/session /WebSEAL/isam8-default/mga/sps/oauth/oauth20/token ACLs allowing access to all authenticated users will be attached to: /WebSEAL/isam8-default/mga/sps/auth /WebSEAL/isam8-default/mga/sps/ac /WebSEAL/isam8-default/mga/sps/xauth /WebSEAL/isam8-default/mga/sps/mga/user/mgmt/html /WebSEAL/isam8-default/mga/sps/oauth/oauth20/clients /WebSEAL/isam8-default/mga/sps/common/qr /WebSEAL/isam8-default/mga/sps/mga/user/mgmt/device /WebSEAL/isam8-default/mga/sps/mga/user/mgmt/otp /WebSEAL/isam8-default/mga/sps/mga/user/mgmt/grant EAI authentication will be enabled for the endpoints: /WebSEAL/isam8-default/mga/sps/oauth/oauth20/session /WebSEAL/isam8-default/mga/sps/auth /WebSEAL/isam8-default/mga/sps/authservice/authentication /WebSEAL/isam8-default/mga/sps/authsvc Certificate authentication will be disabled. HTTP-Tag-Value header insertion will be configured for the attributes: user_session_id=user_session_id Press 1 for Next, 2 for Previous, 3 to Repeat, C to Cancel: 1 Beginning configuration... Attaching ACLs. Creating ACL isam_mobile_nobody. Creating ACL isam_mobile_unauth. Creating ACL isam_mobile_rest. Creating ACL isam_mobile_anyauth. Creating junction /mga. Editing configuration file... Disabling BA authentication. Enabling forms authentication. Restarting the WebSEAL server... Configuration complete.
Note: Make sure you wait about 30sec for the WebSEAL server to restart before moving to the next step

IBM Security Access Manager for Mobile Demonstration Cookbook P a g e | 30
1.3 Complete Executing the Demo Config Tool
Return to the cmd shell in which the demo config tool is paused and Press <Enter> to continue running the tool
When the Demo Config Tool is Complete it will Return
1.4 Final Configuration for the Mobile Demo
From a Web Browser Login to the Admin Interface as the admin User
Upload the Mobile Demo HTML Files (“default_root_wga_templates.zip”)
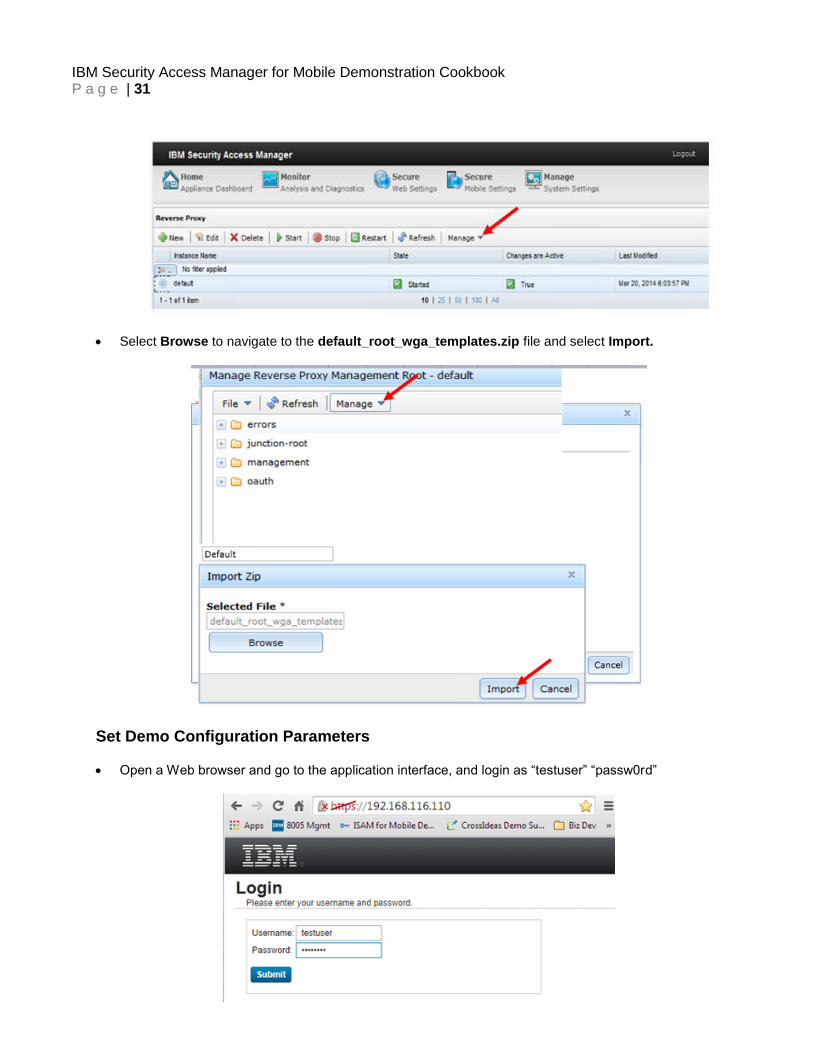
From the Reverse Proxy page, import custom templates for reverse proxy by selecting Manage → Management Root → Manage → Import Zip.
IBM Security Access Manager for Mobile Demonstration Cookbook P a g e | 31
Select Browse to navigate to the default_root_wga_templates.zip file and select Import.
Set Demo Configuration Parameters
Open a Web browser and go to the application interface, and login as “testuser” “passw0rd”

IBM Security Access Manager for Mobile Demonstration Cookbook P a g e | 32
Set the Final Demo Configuration Parameters (Only required once) and select “Save”

IBM Security Access Manager for Mobile Demonstration Cookbook P a g e | 33
Scenario 1: Step-up authentication if device is not registered
(Click For Manual Configuration Steps)
Scenario 1: Testing
Register HOTP for “testuser”
In the menu bar select “Profile” → “Manage one-time-password token registrations”
**For the one-time-password scenarios install Google Authenticator from the App Store or Google Play
Use Google Authenticator and register the one-time-password by either entering the initialization key or scanning the QRCode

IBM Security Access Manager for Mobile Demonstration Cookbook P a g e | 34
Select “Home” from the menu and then select “Risk-based Access Scenario”
Enter your HOTP one-time password and select verify

IBM Security Access Manager for Mobile Demonstration Cookbook P a g e | 35
If you see the screen below the Mobile Demo is Working!!
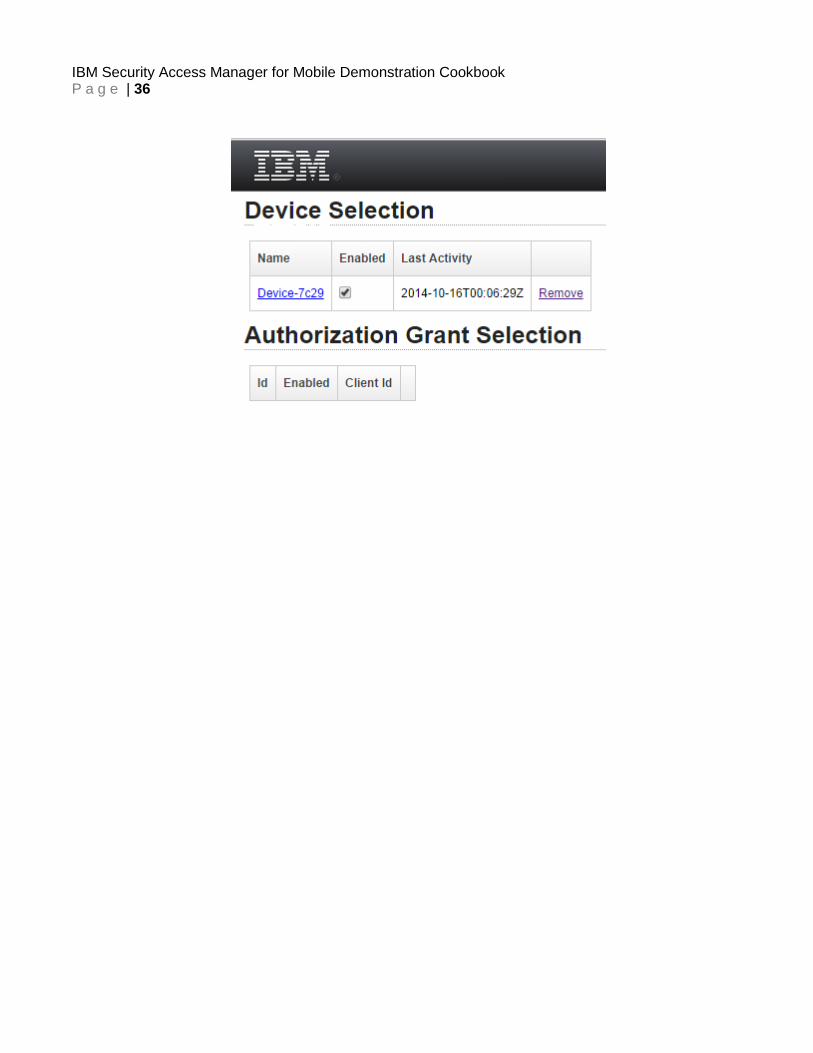
To confirm that the device was registered, go to “Profile” → “Manage registered devices”
You should see a registered device listed
IBM Security Access Manager for Mobile Demonstration Cookbook P a g e | 36

IBM Security Access Manager for Mobile Demonstration Cookbook P a g e | 37
Scenario 2: Step-up authentication based on transaction context FORM Parameter example
This scenario shows how to use POST data either in the form of a JSON message or encoded form parameter as
context attributes in an access control policy.
(Click For Manual Configuration Steps)
Scenario 2: Testing
Ensure you have registered the OTP secret with your soft token generator. See Scenario 1.
In a browser go to the web reverse proxy application interface URL: https://192.168.42.160 Note: If this is the first scenario you are running, you are directed to the settings page where you must enter the proper settings. See Scenario 1.
Now navigate to Context extraction from payload by clicking the following tile.
In the form on the left, you can enter test values 99,100, 501, and 1001 for the transaction amounts to see if all the policy branches are exercised.
For the transaction amount 99, you see the following message:
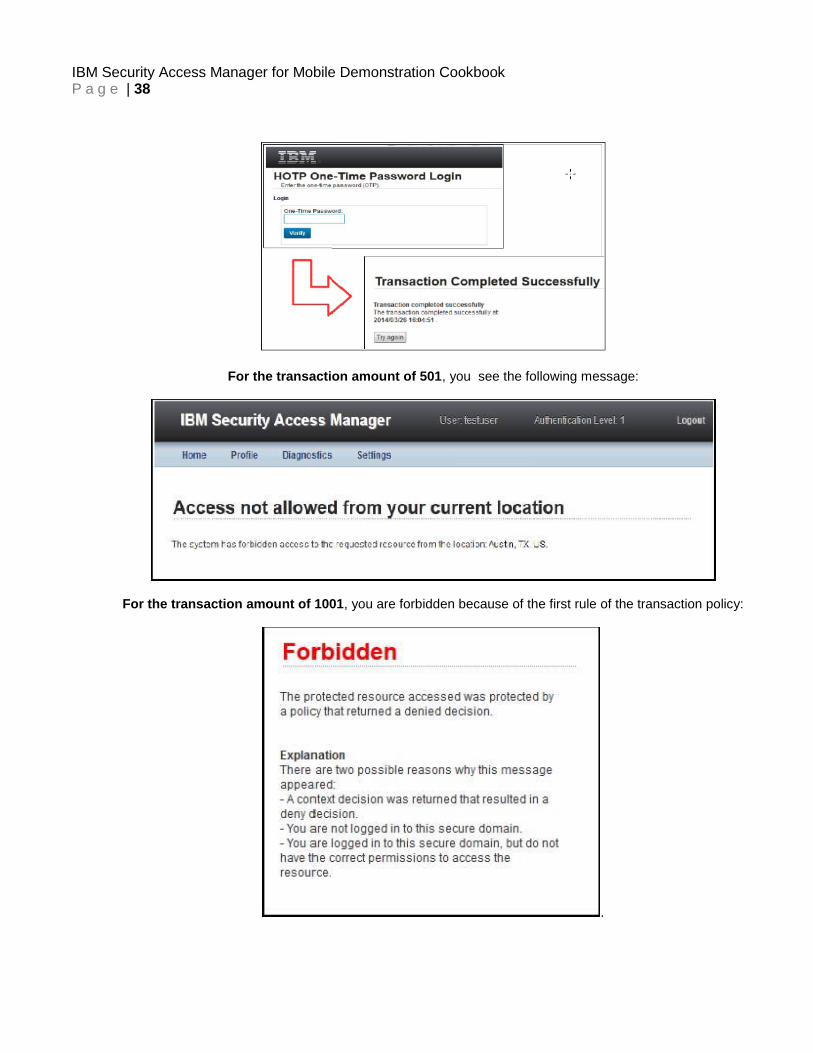
For the transaction amount of 100, you are prompted for an HOTP password. Upon Successful entry, your transaction completes successfully:
IBM Security Access Manager for Mobile Demonstration Cookbook P a g e | 38
For the transaction amount of 501, you see the following message:
For the transaction amount of 1001, you are forbidden because of the first rule of the transaction policy:
.

IBM Security Access Manager for Mobile Demonstration Cookbook P a g e | 39
Scenario 3: Payload Extraction using Mobile Application JSON
(Click For Manual Configuration Steps)
Scenario 3: Testing
Register the OTP secret with your soft token generator. See scenario 1. Access the web reverse proxy application interface URL: https://192.168.42.160
Note: If this is the first scenario you run, you are directed to the settings page where you must enter the proper settings. See Scenario 1.
Navigate to the Context extraction from payload by clicking the following tile.
In this scenario, select the right tile, which display a window resembling the following example:

IBM Security Access Manager for Mobile Demonstration Cookbook P a g e | 40
Test the different branches of the savings policy with savings amounts of 99,100,100, and 1001. For a savings amount of 99, the transaction completes successfully.
For a value of 100, you are prompted to enter an HOTP password; upon successful entry the transaction passes
If you retry the same transaction, it completes successfully without asking for the HOTP password again.

IBM Security Access Manager for Mobile Demonstration Cookbook P a g e | 41
If you enter 1001, you are denied by the access policy:
IBM Security Access Manager for Mobile Demonstration Cookbook P a g e | 42
Scenario 4: Hijack Session Protection Scenario
(Click For Manual Configuration Steps)
Scenario 4:Testing
Navigate to the mobile-demo homepage.
Note: If this is the first scenario you run, you are directed to the settings page where you must enter the proper settings. See Scenario 1.
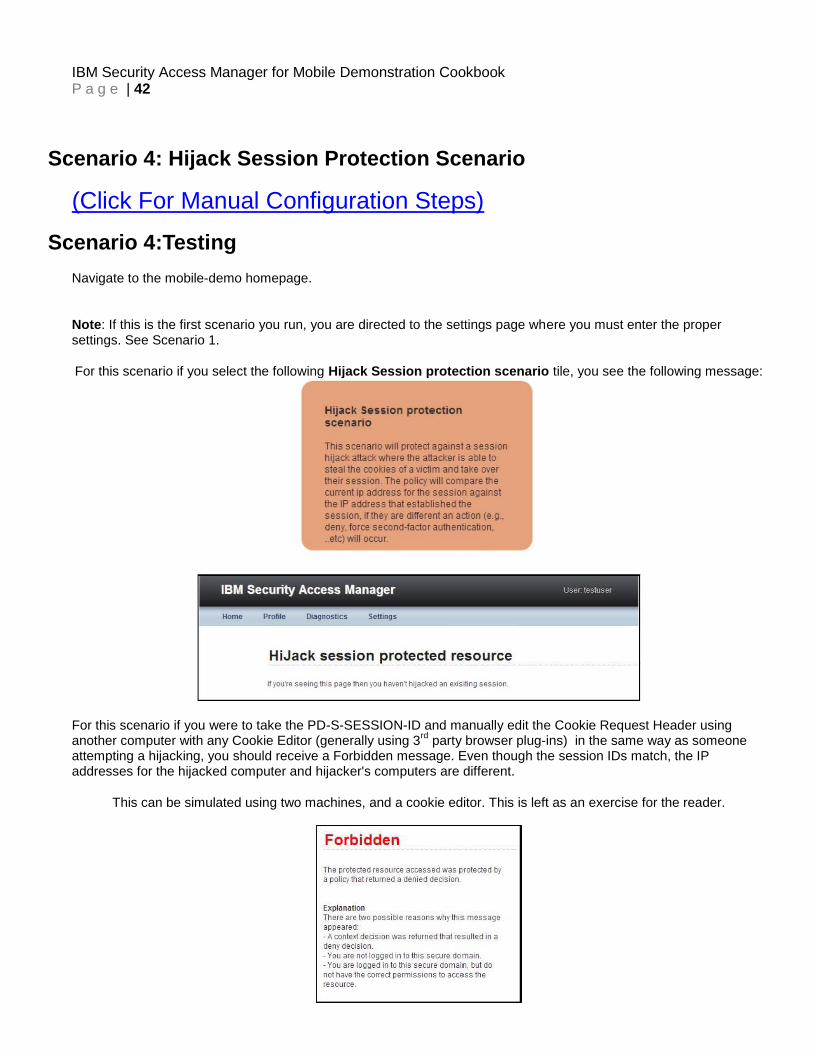
For this scenario if you select the following Hijack Session protection scenario tile, you see the following message:
For this scenario if you were to take the PD-S-SESSION-ID and manually edit the Cookie Request Header using another computer with any Cookie Editor (generally using 3
rd party browser plug-ins) in the same way as someone
attempting a hijacking, you should receive a Forbidden message. Even though the session IDs match, the IP addresses for the hijacked computer and hijacker's computers are different.
This can be simulated using two machines, and a cookie editor. This is left as an exercise for the reader.
IBM Security Access Manager for Mobile Demonstration Cookbook P a g e | 43
Scenario 5: Trusteer Secure Mobile Browser
(Click For Manual Configuration Steps)
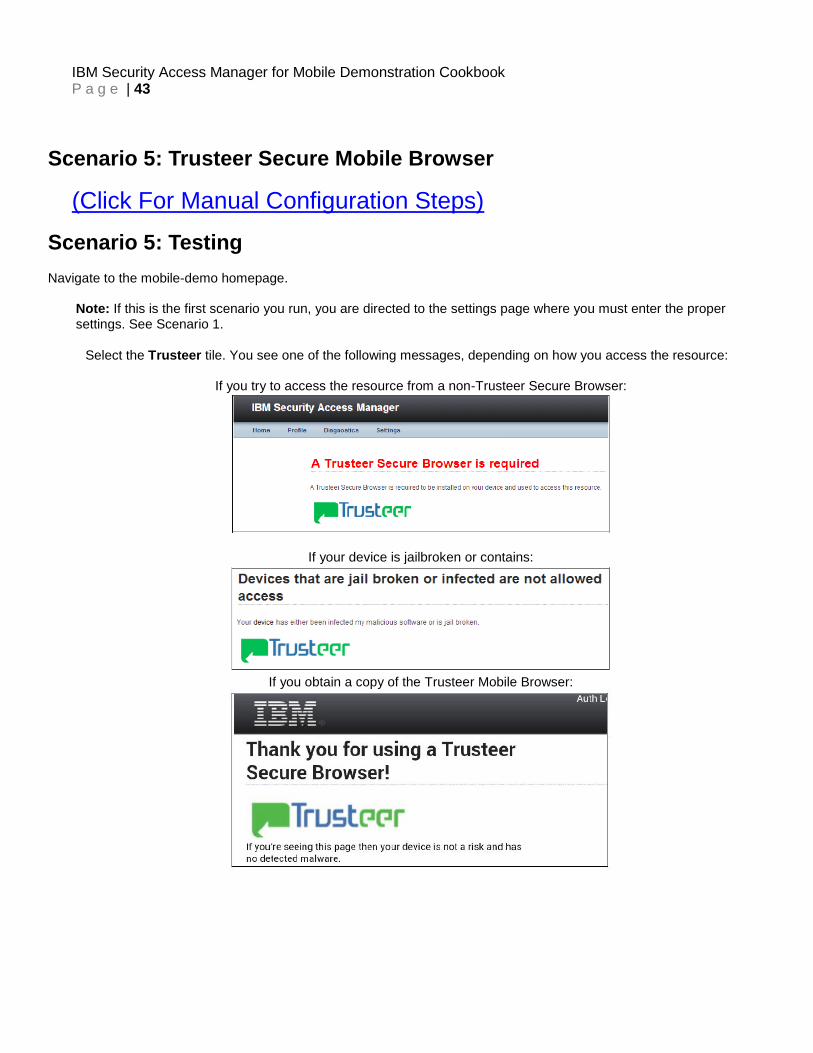
Scenario 5: Testing
Navigate to the mobile-demo homepage. Note: If this is the first scenario you run, you are directed to the settings page where you must enter the proper settings. See Scenario 1.
Select the Trusteer tile. You see one of the following messages, depending on how you access the resource:
If you try to access the resource from a non-Trusteer Secure Browser:
If your device is jailbroken or contains:
If you obtain a copy of the Trusteer Mobile Browser:

IBM Security Access Manager for Mobile Demonstration Cookbook P a g e | 44
Scenario 6: Oauth 2.0
(Click For Manual Configuration Steps)
Scenario 6: Testing
Navigate to the mobile-demo homepage. Note: If this is the first scenario you run, you are directed to the settings page where you must enter the proper settings. See Scenario 1.
If you attempt to access the Trusteer tile without obtaining an access token you receive the following message:
To obtain an access token, select the OAuth 2.0 tile.
Clicking the tile displays a form page similar to the following one:

IBM Security Access Manager for Mobile Demonstration Cookbook P a g e | 45
Using the client identifier from the client setup explained previously, copy and paste the identifier in Client Identifier.
Specify the Authorization Endpoint with the IP address of the application interface for your appliance, for example 192.168.42.160.

IBM Security Access Manager for Mobile Demonstration Cookbook P a g e | 46
Enter your testuser username and password again to display the next form page, which resembles the following
one:
Use the IP address from the previous form as the root of the URL for Token Endpoint, as shown in the following example, and click Request Access Token.

IBM Security Access Manager for Mobile Demonstration Cookbook P a g e | 47
If successful, you see a page that resembles the following one:
If you take the access token shown in red above and paste it as part of your URL for the OAuth resource shown below you are granted access to the resource.
Upon successful entry, you see the trusteer resource page.

IBM Security Access Manager for Mobile Demonstration Cookbook P a g e | 48
Please Note that the steps from this point on are not required and are present to show the user the
steps required to manually configure the appliance and the
Demo Scenarios.

IBM Security Access Manager for Mobile Demonstration Cookbook P a g e | 49
Manual Installation and Configuration Instructions
1.5 Install and configure the IBM Security Access Manager Appliance
The IBM Security Access Manager Appliance is provided as an ISO image. Perform the initial installation following the instructions in the document: "ISAM80 - Appliance Initial Configuration.pdf".
1.6 Configure application interfaces
Ensure that an Application interface is configured on the appliance.
On the appliance administration console go to “Manage System Settings” → “Application Interfaces” and ensure that you have two IP addresses assigned and at least one application interface is enabled. Once the new application interfaces are configured ensure you deploy your changes before continuing to the next step.
1.7 Activate IBM Security Access Manager product capabilities
A single appliance image supports multiple capabilities, including IBM Security Access Manager for Web and IBM Security Access Manager for Mobile.
After you install the appliance via the ISO file and define the application interfaces, obtain the activation code files from Passport advantage. You will find activation code files in the ISAM for Web and ISAM for Mobile assemblies in Passport advantage - the activation codes enable the ISAM4M and ISAM4W capabilities.
To upload the activation codes into the appliance follow these steps:

IBM Security Access Manager for Mobile Demonstration Cookbook P a g e | 50
1. Navigate to Licensing and Activation under Manage System Settings.
2. Click Import and select one of the activation files.
3. Click Save Configuration. A notice indicates that you must deploy pending changes.
4. Repeat steps 2 & 3 for the other activation file.
5. Click the link that opens the Deploy Pending Changes window and click Deploy.
Note: The deploy step currently takes about 90 seconds. A message indicates that the management UI will be restarted.
1.8 Configuring the Web Reverse Proxy
This section contains the steps to configure the IBM Security Access Manager runtime environment and a Web Reverse Proxy instance. This configuration example uses an embedded user registry and policy server.
NOTE: The web reverse proxy is also referred to in various places in this document as "WebSEAL".
1. Configure the IBM Security Access Manager Runtime:
i. Navigate to Runtime Component under Secure Web Settings.
ii. Select Configure.

IBM Security Access Manager for Mobile Demonstration Cookbook P a g e | 51
iii. Select a local policy server and local LDAP server from the Main tab.
iv. Enter a new administrator password in the Policy Server tab and select Finish.
The runtime takes a few moments to configure before displaying a screen that shows the runtime status. The status is Available.

IBM Security Access Manager for Mobile Demonstration Cookbook P a g e | 52
2. Configure a new Web Reverse Proxy instance.
i. Navigate to Reverse Proxy under Secure Reverse Proxy Settings.
ii. Select New.
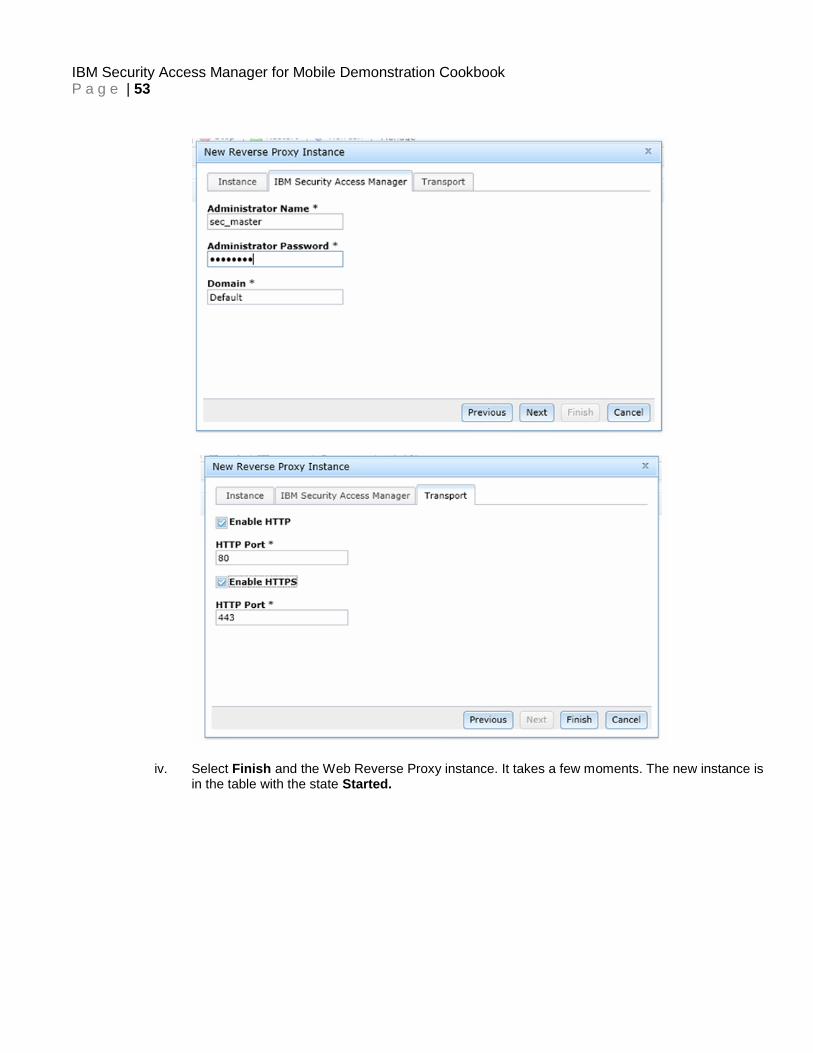
iii. Enter the details of the new Web Reverse Proxy instance.
IBM Security Access Manager for Mobile Demonstration Cookbook P a g e | 53
iv. Select Finish and the Web Reverse Proxy instance. It takes a few moments. The new instance is in the table with the state Started.

IBM Security Access Manager for Mobile Demonstration Cookbook P a g e | 54
v. From the Reverse Proxy page, import custom templates for reverse proxy by selecting Manage → Management Root → Manage → Import Zip.
vi. Select Browse to navigate to the default_root_wga_templates.zip file and select Import.
3. Create an IBM Security Access Manager for Web ‘testuser’ account for validating the scenarios using
either step a or b steps below:
a. Using the IBM Security Access Manager Local Management Interface
1. Navigate to Secure Web Settings → Manage: Policy Administration.
2. Log in with your sec_master user name and password.

IBM Security Access Manager for Mobile Demonstration Cookbook P a g e | 55
3. Create a new test user as shown below:
b. Use the pdadmin command prompt
1. SSH to the management interface of the IBM Security Access Manager appliance using the admin account.
$ ssh [email protected] [email protected]'s password:
Welcome to the IBM Security Access Manager
Welcome to the IBM Security Access Manager Appliance
Enter "help" for a list of available commands
2. Navigate to the admin command.
isam4w> isam
isam4w:isam> admin
pdadmin> login
Enter User ID: sec_master
Enter Password: pdadmin sec_master>
3. As the sec_master admin user, create an account called testuser. Use the text in bold blue as an example:
$ ssh [email protected]
[email protected]'s password:
Welcome to the IBM Security Access Manager
Welcome to the IBM Security Access Manager Appliance
Enter "help" for a list of available commands
isam4w> isam
isam4w:isam> admin
pdadmin> login
Enter User ID: sec_master
Enter Password:
pdadmin sec_master> user create testuser
cn=testuser,secAuthority=Default testuser testuser passw0rd
pdadmin sec_master> user modify testuser account-valid yes
pdadmin sec_master> user modify testuser password-valid yes

IBM Security Access Manager for Mobile Demonstration Cookbook P a g e | 56
1.9 Configuring the web reverse proxy to point at the IBM Security Access Manager for Mobile Authorization Decision Point
Configure the connection between the Web Reverse Proxy (External Authorization service plug-in) and the IBM Security Access Manager for Mobile service (Authorization Service).
This first step requires running the isamcfg tool. You can run this tool from the appliance or download it from Manage
System Settings → File Downloads under /mga/tools/isamcfg. In this example, it is run locally on the IBM
Security Access Manager appliance.
SSH to the IBM Security Access Manager management interface using the ID admin.
$ ssh [email protected]
The authenticity of host '192.168.42.151 (192.168.42.151)' can't be established.
ECDSA key fingerprint is 6b:7f:d4:67:01:36:e0:39:3c:f3:7e:ce:41:99:f6:89.
Are you sure you want to continue connecting (yes/no)? yes
Warning: Permanently added '192.168.42.151' (ECDSA) to the list of known hosts.
[email protected]'s password:
Last login: Wed May 11 04:43:22 2014
Welcome to the IBM Security Access Manager
Welcome to the IBM Security Access Manager appliance
Enter "help" for a list of available commands
isam4w>
At the menu prompt, navigate to the configuration tool isam → mga → config.
isam4w> isam
isam4w:isam> mga
isam4w:mga> config
Enter the following information when prompted. Note: the Items in blue are the user inputs for this example.
Security Access Manager Auto configuration Tool Version 8.0.0.3 [140224b] Select/deselect the capabilities you would like to configure by typing its number. Press enter to continue: [ X ] 1. Context-based Authorization [ X ] 2. Authentication Service [ X ] 3. API Protection Enter your choice: Press 1 for Next, 2 for Previous, 3 to Repeat, C to Cancel: 1 Security Access Manager for Mobile Local Management Interface hostname: 192.168.42.151 Security Access Manager for Mobile Local Management Interface port [443]: 443 Security Access Manager for Mobile Appliance administrator user ID [admin]: admin Security Access Manager for Mobile Appliance administrator password: <enter your password> Testing connection to https://192.168.42.151:443/. SSL certificate information: Issuer DN: CN=isam4m Subject DN: CN=isam4m SSL certificate fingerprints: MD5: 7A:93:EB:F4:65:EA:F3:A2:10:37:CD:88:C3:52:FC:3D SHA1: 2A:A2:29:DB:E9:38:C5:0E:ED:27:35:95:0E:F1:B3:06:C6:E2:0D:E9 SSL certificate data valid (y/n): y Press 1 for Next, 2 for Previous, 3 to Repeat, C to Cancel: 1 Web Gateway Appliance Local Management Interface hostname: 192.168.42.151 Web Gateway Appliance Local Management Interface port [443]: 443 Web Gateway Appliance administrator user ID [admin]: admin Web Gateway Appliance administrator password: <enter your password> Testing connection to https://192.168.42.151:443/. SSL certificate information: Issuer DN: CN=isam4w

IBM Security Access Manager for Mobile Demonstration Cookbook P a g e | 57
Subject DN: CN=isam4w SSL certificate fingerprints: MD5: 7E:88:5C:FA:F6:E3:5C:12:D5:72:64:EF:F3:4C:AA:83 SHA1: BB:EA:97:55:25:DC:67:64:01:35:79:F7:E6:27:E0:97:90:A9:1A:84 SSL certificate data valid (y/n): y Instance to configure: 1. default 2. Cancel Enter your choice [1]: 1 <select the web reverse proxy instance you'd like to configure against> Press 1 for Next, 2 for Previous, 3 to Repeat, C to Cancel: 1 Security Access Manager administrator user ID [sec_master]: sec_master Security Access Manager administrator password: <enter your password> Press 1 for Next, 2 for Previous, 3 to Repeat, C to Cancel: 1 Security Access Manager for Mobile runtime listening interface hostname: localhost Security Access Manager for Mobile application interface port: 443 Select the method for authentication between the web reverse proxy and the Security Access Manager for Mobile application interface: 1. Certificate authentication 2. User-id/password authentication Enter your choice [1]: 2 Security Access Manager for Mobile runtime listening interface user ID: easuser Security Access Manager for Mobile runtime listening interface password: passw0rd <this is the default out-of-the-box password> Testing connection to https://192.168.42.161:443. Connection completed. SSL certificate information: Issuer DN: CN=isam, O=ibm, C=us Subject DN: CN=isam, O=ibm, C=us SSL certificate fingerprints: MD5: 79:23:E3:5D:27:DC:66:2B:D2:C5:43:93:10:C4:3E:3F SHA1: F8:08:49:4A:47:CF:92:C2:54:29:EF:24:59:DD:7A:9E:D6:E0:1F:81 SSL certificate data valid (y/n): y Automatically add CA certificate to the key database (y/n): y Restarting the WebSEAL server... Press 1 for Next, 2 for Previous, 3 to Repeat, C to Cancel: 1 Press 1 for Next, 2 for Previous, 3 to Repeat, C to Cancel: 1 The following files are available on the Web Gateway Appliance. Choose one for the '400 Bad Request' response page. 1. oauth_template_rsp_400_bad_request.html 2. oauth_template_rsp_401_unauthorized.html 3. oauth_template_rsp_502_bad_gateway.html Enter your choice [1]: 1 The following files are available on the Web Gateway Appliance. Choose one for the '401 Unauthorized' response page. 1. oauth_template_rsp_400_bad_request.html 2. oauth_template_rsp_401_unauthorized.html 3. oauth_template_rsp_502_bad_gateway.html Enter your choice [1]: 2 The following files are available on the Web Gateway Appliance. Choose one for the '502 Bad Gateway' response page. 1. oauth_template_rsp_400_bad_request.html 2. oauth_template_rsp_401_unauthorized.html 3. oauth_template_rsp_502_bad_gateway.html Enter your choice [1]: 3 Press 1 for Next, 2 for Previous, 3 to Repeat, C to Cancel: 1 The junction /mga contains endpoints that require Authorization HTTP header to be forwarded to the backend server. Do you want to enable this feature? [y|n]? y URLs allowing unauthenticated access: https://192.168.42.160/mga/sps/oauth/oauth20/authorize https://192.168.42.160/mga/sps/static URLs allowing all authenticated users access: https://192.168.42.160/mga/sps/ac https://192.168.42.160/mga/sps/xauth

IBM Security Access Manager for Mobile Demonstration Cookbook P a g e | 58
https://192.168.42.160/mga/sps/mga/user/mgmt/html https://192.168.42.160/mga/sps/oauth/oauth20/clients https://192.168.42.160/mga/sps/common/qr https://192.168.42.160/mga/sps/mga/user/mgmt/device https://192.168.42.160/mga/sps/mga/user/mgmt/otp https://192.168.42.161/mga/sps/mga/user/mgmt/grant URLs used for authentication: https://192.168.42.161/mga/sps/oauth/oauth20/session Press 1 for Next, 2 for Previous, 3 to Repeat, C to Cancel: 1 ----------------------------------------------- Planned configuration steps: A junction to the Security Access Manager server will be created at /mga. The POP oauth-pop will be created. The POP rba-pop will be created. ACLs denying access to all users will be attached to: /WebSEAL/isam4w-default/mga ACLs allowing access to all users will be attached to: /WebSEAL/isam4w-default/mga/sps/authsvc /WebSEAL/isam4w-default/mga/sps/xauth /WebSEAL/isam4w-default/mga/sps/authservice/authentication /WebSEAL/isam4w-default/mga/sps/oauth/oauth20/authorize /WebSEAL/isam4w-default/mga/sps/static /WebSEAL/isam4w-default/mga/sps/oauth/oauth20/session /WebSEAL/isam4w-default/mga/sps/oauth/oauth20/token ACLs allowing access to all authenticated users will be attached to: /WebSEAL/isam4w-default/mga/sps/auth /WebSEAL/isam4w-default/mga/sps/ac /WebSEAL/isam4w-default/mga/sps/xauth /WebSEAL/isam4w-default/mga/sps/mga/user/mgmt/html /WebSEAL/isam4w-default/mga/sps/oauth/oauth20/clients /WebSEAL/isam4w-default/mga/sps/common/qr /WebSEAL/isam4w-default/mga/sps/mga/user/mgmt/device /WebSEAL/isam4w-default/mga/sps/mga/user/mgmt/otp /WebSEAL/isam4w-default/mga/sps/mga/user/mgmt/grant EAI authentication will be enabled for the endpoints: /WebSEAL/isam4w-default/mga/sps/oauth/oauth20/session /WebSEAL/isam4w-default/mga/sps/auth /WebSEAL/isam4w-default/mga/sps/authservice/authentication /WebSEAL/isam4w-default/mga/sps/authsvc Certificate authentication will be disabled. HTTP-Tag-Value header insertion will be configured for the attributes: user_session_id=user_session_id Press 1 for Next, 2 for Previous, 3 to Repeat, C to Cancel: 1 Beginning configuration... Attaching ACLs. Creating ACL isam_mobile_nobody. Creating ACL isam_mobile_unauth. Creating ACL isam_mobile_rest.
IBM Security Access Manager for Mobile Demonstration Cookbook P a g e | 59
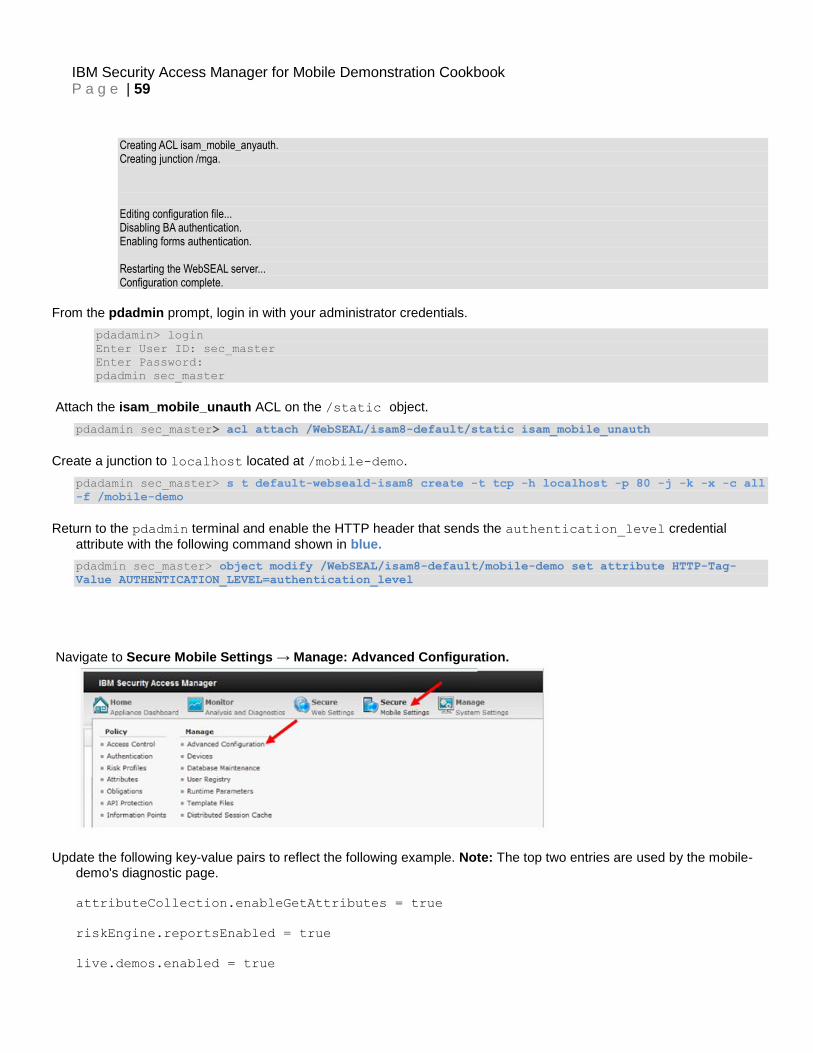
Creating ACL isam_mobile_anyauth. Creating junction /mga. Editing configuration file... Disabling BA authentication. Enabling forms authentication. Restarting the WebSEAL server... Configuration complete.
From the pdadmin prompt, login in with your administrator credentials.
pdadamin> login
Enter User ID: sec_master
Enter Password:
pdadmin sec_master
Attach the isam_mobile_unauth ACL on the /static object.
pdadamin sec_master> acl attach /WebSEAL/isam8-default/static isam_mobile_unauth
Create a junction to localhost located at /mobile-demo.
pdadamin sec_master> s t default-webseald-isam8 create -t tcp -h localhost -p 80 -j -k -x -c all
-f /mobile-demo
Return to the pdadmin terminal and enable the HTTP header that sends the authentication_level credential
attribute with the following command shown in blue.
pdadmin sec_master> object modify /WebSEAL/isam8-default/mobile-demo set attribute HTTP-Tag-
Value AUTHENTICATION_LEVEL=authentication_level
Navigate to Secure Mobile Settings → Manage: Advanced Configuration.
Update the following key-value pairs to reflect the following example. Note: The top two entries are used by the mobile-demo's diagnostic page. attributeCollection.enableGetAttributes = true
riskEngine.reportsEnabled = true
live.demos.enabled = true

IBM Security Access Manager for Mobile Demonstration Cookbook P a g e | 60
Change the attributeCollection cookieName to match the WebSEAL session cookie for the session hi-jacking
scenario, ie: PD-S-SESSION-ID.
Your advanced configuration matches the following example:
In the pdadmin terminal, recreate the /mga junction so it passes the WebSEAL session cookie with the following
command:
pdadmin sec_master> s t default-webseald-isam8 create -t ssl -h localhost -p 443 -c all -j -k -r
-f /mga
So info.js can work properly, create the /sps junction with the following command. This is a temporary workaround.
pdadmin sec_master> s t default-webseald-isam8 create -t tcp -h localhost -p 80 -j -k -x -c all
-f /sps
In the pdadmin terminal, create a QOP POP with privacy to force SSL and attach it to the root of the WebSEAL object space with the following commands:
pdadmin sec_master> pop create demo-pop
pdadmin sec_master> pop modify demo-pop set qop privacy
pdadmin sec_master> pop attach /WebSEAL demo-pop
The default index.html page that the web reverse proxy ships is used for this example, but you can leverage any page that requires authentication can be leveraged. The following steps enable the attribute collection on the default index.html page:
1. In the LMI console select Secure Web Settings → Reverse Proxy.
2. Select the web reverse proxy instance and then Manage → Management Root → junction-root → index.html → File → Open
3. In the <head> section of index.html, add the following line: <script src="https://192.168.42.160/mga/sps/ac/js/info.js"></script>

IBM Security Access Manager for Mobile Demonstration Cookbook P a g e | 61
NOTE: You must replace the hostname in the example with either the correct hostname or IP address of the application interface that the reverse proxy uses in your environment. The remainder of this document uses the IP address in this example. You must make the correct substitution in all the places where it is used.
4. Click Save.
5. Deploy the changes.
6. Restart that reverse proxy instance

IBM Security Access Manager for Mobile Demonstration Cookbook P a g e | 62
Mobile Demo Scenarios Manual Setup
Scenario 1: Step-up authentication if device is not registered
(Return to Scenario 1 Test Instructions)
This scenario provides the steps to setup silent device registration and step-up authentication to use HMAC one-time password authentication.
Scenario 1: Setup
Set the active Risk Profile to use for calculating the risk score. This scenario uses a copy of the Browser profile.
Navigate to Secure Mobile Settings → Policy: Risk Profiles.
Create a copy of the Browser risk profile in the left pane by selecting Browser risk profile and selecting Duplicate Risk Profile.
In Risk Profiles, select the Browser profile and click Set Active. Your Risk Profiles table resemble the following example:
Select Secure Mobile Settings → Policy: Access Control to create the policy for the scenario.

IBM Security Access Manager for Mobile Demonstration Cookbook P a g e | 63
If this is your first scenario, the policy table is empty. Select the green + to create a new policy.
Create a policy that triggers HOTP and device registration, the following example does both.

IBM Security Access Manager for Mobile Demonstration Cookbook P a g e | 64
Save the policy by clicking Save, which is located beneath Access Control.
Create a resource attachment point and attach the new policy.

IBM Security Access Manager for Mobile Demonstration Cookbook P a g e | 65
On Access Control, click Resources.
On Resources, click + to create a new resource attachment point and select the web reverse proxy instance
and the object where you want to attach the policy. Choose the junction point that you created earlier.
For this scenario. you must add the resource boxed in red.
Note: In this example, you must type /rba after the /mobile-demo root.

IBM Security Access Manager for Mobile Demonstration Cookbook P a g e | 66
Select the new resource and click Attach to display a list of Policy Sets and Polices.
Select the new policy by checking the box beside it and click OK.

IBM Security Access Manager for Mobile Demonstration Cookbook P a g e | 67
At the resource with Publish required, select the resource again and click Publish. The software displays the entries shown in green in step 11. It typically takes 30 seconds before the published policy to become active.

IBM Security Access Manager for Mobile Demonstration Cookbook P a g e | 68
Scenario 2: Step-up authentication based on transaction context FORM Parameter example
This scenario shows how to use POST data either in the form of a JSON message or encoded form parameter as
context attributes in an access control policy.
(Return to Scenario 2 Test Instructions)
Scenario 2: Setup
You must configure the web reverse proxy to forward the POST data (forms or JSON ) as context attributes in the authorization decision request. The reverse proxy provides a large amount of the context data that is input into the authorization decision. You can configure it to provide HTTP headers, Client IP Address, Cookies, credential attributes and POST data.
Follow these steps to pass both a form parameter and a value from a JSON message.
Open the reverse proxy instance configuration file and add the following configuration parameters.
In the appliance, the WebSEAL configuration requires additions and modifications. Navigate to Web Settings → Manage: Reverse Proxy → Manage → Configuration → Edit Configuration File.
Search for the following configuration options and make the edits and additions shown in blue.
# Each attribute name set in a junction object's HTTP-Tag-Value is # automatically prefixed by "tagvalue_" before locating it in the credential. # This prohibits access to credential attributes that don't have names # beginning with "tagvalue_" such as "AUTHENTICATION_LEVEL". When this option # is set to "no", the automatic prefixing of "tagvalue_" will not occur so all # credential attributes can be specified in HTTP-Tag-Value. force-tag-value-prefix = no
# That default behavior changes if WebSEAL is configured to pass the current # client IP address to the EAS in the [azn-decision-info] stanza. In order to # ensure that risk assessment is being performed using the most current # information, the AZN_CRED_NETWORK_ADDRESS_STR RBA EAS credential attribute # will contain the client IP address used for the current request. Setting # use_real_client_ip to 'false' provides backwards compatibility and enables # the previous behavior. # use_real_client_ip = false
[azn-decision-info] PD-S-SESSION-ID = cookie:PD-S-SESSION-ID urn:acme:transaction:amount = post-data:transaction-amount
IBM Security Access Manager for Mobile Demonstration Cookbook P a g e | 69
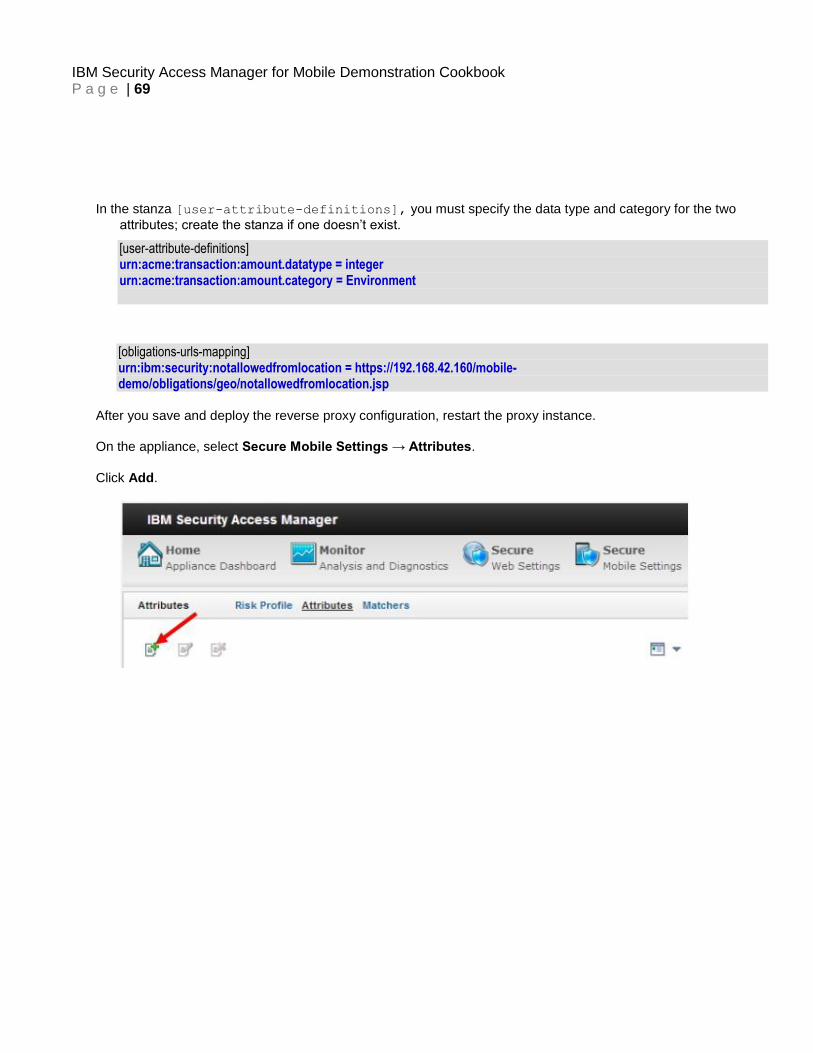
In the stanza [user-attribute-definitions], you must specify the data type and category for the two
attributes; create the stanza if one doesn’t exist.
[user-attribute-definitions] urn:acme:transaction:amount.datatype = integer urn:acme:transaction:amount.category = Environment
[obligations-urls-mapping] urn:ibm:security:notallowedfromlocation = https://192.168.42.160/mobile-demo/obligations/geo/notallowedfromlocation.jsp
After you save and deploy the reverse proxy configuration, restart the proxy instance.
On the appliance, select Secure Mobile Settings → Attributes.
Click Add.

IBM Security Access Manager for Mobile Demonstration Cookbook P a g e | 70
Create an attribute for the acme.transaction attribute using the following details:
Select Secure Mobile Settings → Policy: Authentication, and create a custom authentication policy with only HOTP and re-authentication enabled. Name: Custom – HOTP -Re-Authentication Identifier: urn:ibm:security:reauthentication:asf:custom:authn:reauth:hotp Description: This authentication policy will force a HOTP reauth everytime. Your authentication policy matches the following example:

IBM Security Access Manager for Mobile Demonstration Cookbook P a g e | 71
Select Secure Mobile Settings → Policy: Obligations, and create the obligation types for the following URIs: Name: Not Allowed From Current Location Identifier: urn:ibm:security:notallowedfromlocation Description: If this obligation is triggered it will notify the user that they aren't allowed to complete their current transaction from their current location.
Select Secure Mobile Settings → Policy: Access Control to create the policies that drive the scenarios.
Click on the + over the policy table to create policy sets and policies.
Create the following policy below that triggers HOTP if above 99 and conditionally denies using the Not Allowed From Current Location obligation.

IBM Security Access Manager for Mobile Demonstration Cookbook P a g e | 72
Create a resource attachment point and attach the new policy.

IBM Security Access Manager for Mobile Demonstration Cookbook P a g e | 73
On Access Control, click Resources.
On Resources, click + to create a new Resource attachment point and select the web reverse proxy instance and the object where you want to attach the policy.
Choose the junction point that you created earlier.

IBM Security Access Manager for Mobile Demonstration Cookbook P a g e | 74
For this scenario, add the following resources shown in the red box.
Select the new resource and click Attach. A list displays Policy Sets and Polices.
Select the new policy by checking the box beside it and click OK. There is decorator on the line with the resource
indicating that Publish is required.
Select the resource again and click Publish. You see the entries shown in the green box. Policy distribution typically takes 30 seconds before it becomes active.
Update the provided sample geolocation data to have a custom subnet location:
1. On the appliance go to the ‘File Downloads’ Panel (Manage System Settings -> File Downloads) and download the files at /mga/cba/geolocation
2. Open the file GeoLiteCity-Blocks.csv and at the very end of the file add a new row and add the following line:
"3232246272","3232246526","1603" Note: the integer 3232246272 is the integer presentation of the IP address 192.168.42.0 and 3232246526 is 192.168.42.254 which presents the subnet used in this cookbook. The 1603 represents the location for Austin, Texas from the GeoLiteCity-Location.cvs. There are many free tools to help convert IP addresses to their integer representation on the Internet.
3. Create a ZIP file with the the block and location CSV files called geo_austin.zip

IBM Security Access Manager for Mobile Demonstration Cookbook P a g e | 75
Navigate to Manage System Settings → Updates and Licensing: Geolocation Database.
Select Import to update the geolocation database with the geo_austin.zip file
Once the custom geo location data is uploaded restart the runtime profile. Go to ‘Secure Mobile Settings -> Runtime Parameters -> Runtime Status -> Restart Local Runtime
You can now drive a runtime flow using the testuser identity.

IBM Security Access Manager for Mobile Demonstration Cookbook P a g e | 76
Scenario 3: Payload Extraction using Mobile Application JSON
(Return to Scenario 3 Test Instructions)
Scenario 3: Setup
The first step is to configure the web reverse proxy to forward the POST data (JSON) as context attributes in the authorization decision request. The reverse proxy provides a large amount of the context data that is input into the authorization decision; You can configured it to provide HTTP headers, Client IP Address, Cookies, credential attributes and POST data. The following steps show how to pass both a form parameter and a value from a JSON message.
Open the reverse proxy instance configuration file so you can add configuration parameters.
In the appliance, the WebSEAL configuration requires additions and modifications. Select Web Settings → Manage: Reverse Proxy → Manage → Configuration → Edit Configuration File.
Search for the following stanzas and make the following edits and additions in blue:
In the stanza [user-attribute-definitions], you must specify the data type and category for the two
attributes; create the stanza if one doesn’t exist.
After you save the reverse proxy configuration, restart the proxy instance.

IBM Security Access Manager for Mobile Demonstration Cookbook P a g e | 77
On the appliance, select Secure Mobile Settings → Attributes and click Add.
Create the acme.savings attribute with the following details:

IBM Security Access Manager for Mobile Demonstration Cookbook P a g e | 78
Select Secure Mobile Settings → Policy: Access Control to create a new access policy.
Create a resource attachment point and to attach the new policy.
On Access Control, click Resources.
On Resources, click + to create a new Resource attachment point and select the web reverse proxy instance and the
object where you want to attach the policy. Choose the junction point that you created earlier.

IBM Security Access Manager for Mobile Demonstration Cookbook P a g e | 79
For this scenario, add the resources shown in red the red box.
Select the new resource and click Attach.
Select the new policy from the list of Policy Sets and Policies by checking the box beside it and click OK.
On the line with the resource indicating Publish required, select the resource again and click Publish. You see the entries shown in the green box. The policy distribution typically takes 30 seconds before it becomes active.

IBM Security Access Manager for Mobile Demonstration Cookbook P a g e | 80
You can now drive a runtime flow using the testuser identity.

IBM Security Access Manager for Mobile Demonstration Cookbook P a g e | 81
Scenario 4: Hijack Session Protection Scenario
(Return to Scenario 4 Test Instructions)
Scenario 4: Setup
Open the reverse proxy instance configuration file to add configuration parameters.
In the appliance, the WebSEAL configuration requires additions and modifications. Select Web Settings → Manage:
Reverse Proxy → Manage → Configuration → Edit Configuration File.
Search for the following stanzas and make the following edits and additions in blue:
Select Secure Mobile Settings → Policy: Attributes.
Select the green + to create a new attribute.

IBM Security Access Manager for Mobile Demonstration Cookbook P a g e | 82
Create the origIpAddress attribute with the following properties:
After saving the origIpAddress attribute, select the Policies tab to the left of Resources.
Select the green + to create a new access policy
Create the Protect against session hijack policy as shown in the following example:
Note: For this policy, you must use the ipAddress attribute as part of the first rule.

IBM Security Access Manager for Mobile Demonstration Cookbook P a g e | 83
Create a resource attachment point and attach the new policy.
On Access Control, click Resources.

IBM Security Access Manager for Mobile Demonstration Cookbook P a g e | 84
On Resources, click the + to create a new Resource attachment point and select the web reverse proxy instance and the object where you want to attach the policy. Choose the junction point that you created earlier.
For this scenario, add the resources shown in red box.
Select the new policy from the list of Policy Sets and Policies by checking the box beside it and click OK.
On the line with the resource indicating Publish required, select the resource again and click Publish. You see the entries shown in the green box. The policy distribution typically takes 30 seconds before it becomes active.

IBM Security Access Manager for Mobile Demonstration Cookbook P a g e | 85
You can now drive a runtime flow using the testuser identity.
IBM Security Access Manager for Mobile Demonstration Cookbook P a g e | 86
Scenario 5: Trusteer Secure Mobile Browser
(Return to Scenario 5 Test Instructions)
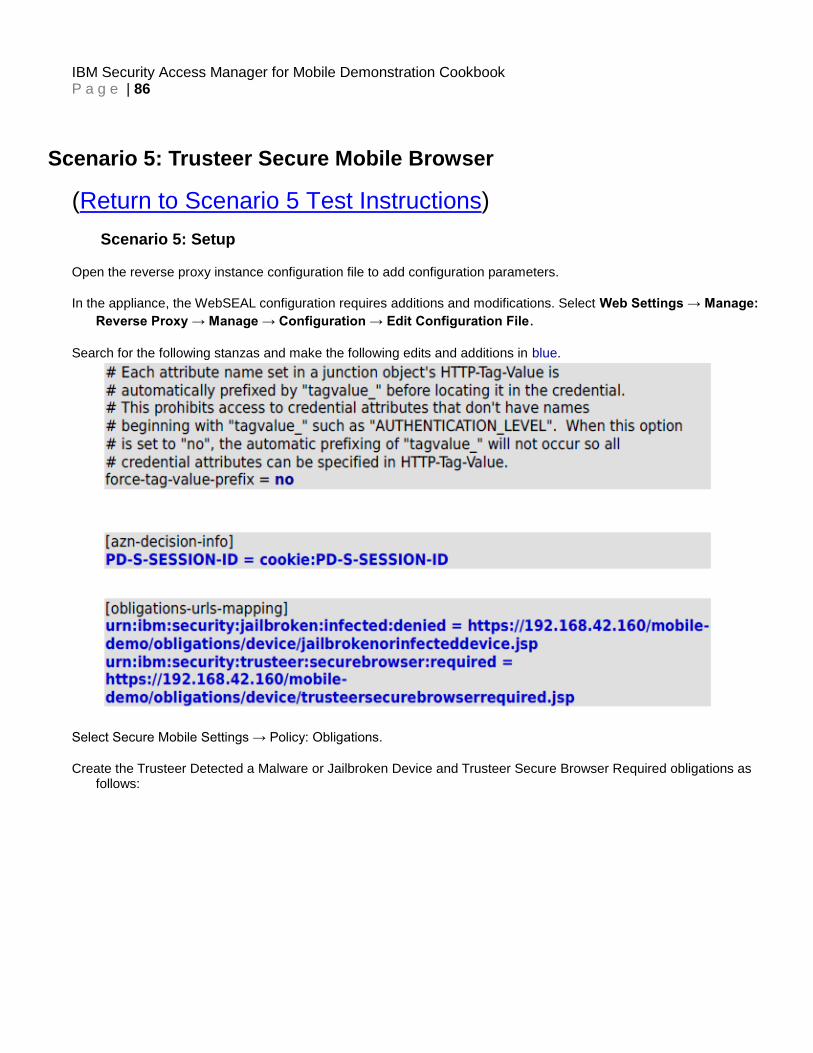
Scenario 5: Setup
Open the reverse proxy instance configuration file to add configuration parameters.
In the appliance, the WebSEAL configuration requires additions and modifications. Select Web Settings → Manage:
Reverse Proxy → Manage → Configuration → Edit Configuration File.
Search for the following stanzas and make the following edits and additions in blue.
Select Secure Mobile Settings → Policy: Obligations.
Create the Trusteer Detected a Malware or Jailbroken Device and Trusteer Secure Browser Required obligations as follows:

IBM Security Access Manager for Mobile Demonstration Cookbook P a g e | 87
After saving the two obligations, select the Policies tab to the left of Resources.
Select the green + sign to create a new access policy.

IBM Security Access Manager for Mobile Demonstration Cookbook P a g e | 88
Create the policy using the following example:
Create a resource attachment point and attach the new policy.

IBM Security Access Manager for Mobile Demonstration Cookbook P a g e | 89
On Access Control, click Resources.
On Resources, click the + to create a new Resource attachment point and select the web reverse proxy instance and the object where you want to attach the policy. Choose the junction point that you created earlier.
For this scenario, add the resources shown in red box.
After you create the new attachment point is created, select the new resource and click Attach.

IBM Security Access Manager for Mobile Demonstration Cookbook P a g e | 90
Select the new policy by checking the box beside it in the list of Policy Sets and Polices and click OK.
On the line with the resource indicating Publish required, select the resource again and click Publish. You see the entries shown in the green box. The policy distribution typically takes 30 seconds before it becomes active
You can now drive a runtime flow with the testuser identity.

IBM Security Access Manager for Mobile Demonstration Cookbook P a g e | 91
Scenario 6: Oauth 2.0
(Return to Scenario 6 Test Instructions)
Scenario 6: Setup
In this scenario, you apply an API protection policy to the Trusteer resource.
Repeat Setup Steps 1-5 of Scenario 5 to capture the WebSEAL config edits and the appropriate element creations.
Select Manage System Settings → Secure Settings: SSL Certificates.
Select the pdsrv Certificate Database entry.
Select Manage → Edit SSL Certificate Database.
Navigate to the Personal Certificates tab.
Select the WebSEAL-Test-Only certificate.
Select Manage → Export and your browser downloads the file.
Close the pop-up menu.

IBM Security Access Manager for Mobile Demonstration Cookbook P a g e | 92
Select the rt_profile_keys Certificate Database entry.
Select Manage → Edit SSL Certificate Database.
On the Signer Certificates tab, select Manage → Import. You are prompted to import the signer certificate.
Select Browse and navigate to the directory where you saved the WebSEAL-Test-Only certificate.
Click Import and close Edit SSL Certificate Database.
Create an API protection for the OAuth resource by selecting Secure Mobile Settings → Policy: API Protection.
Select the green + to create a new API definition.
Create the API Protection with the following parameters: Name: OAuth Auth Code Access Grant Type: Authorization Code

IBM Security Access Manager for Mobile Demonstration Cookbook P a g e | 93
Your API Definition resembles the following example:
Save the API Definition and click Clients in the same row as the API Protection header.
Click the green + to create a new client.
Enter the following for each of the listed parameters to create the new client and uncheck Confidential. Client name: <Insert client name here> The example uses OAuth_Client API definition: OAuth Auth Code Access Redirect URI: <Application interface hostname>/mobile-demo/oauth/oauth2Client.jsp Company name: <Insert your company name here> The example uses IBM.

IBM Security Access Manager for Mobile Demonstration Cookbook P a g e | 94
After you finish defining parameters, your client resembles the following example:
Make a note of the generated Client ID. It is used testing this scenario.
Deploy the changes made up to this point so you can attach the API protection to the /mobile-
demo/oauth/index.jsp resource.
From the Clients panel, click Resources to the left of Clients.
On Access Control, click Resources.
Select the /mobile-demo/oauth/index.jsp resource and attach the API Protection policy

IBM Security Access Manager for Mobile Demonstration Cookbook P a g e | 95
Check OAuth Auth Code Access API protection to attach and click OK. See the following example:
After publishing the OAuth resource, the setup is complete. You can drive a runtime flow with the testuser identity.

IBM Security Access Manager for Mobile Demonstration Cookbook P a g e | 96
Notices
This information was developed for products and services offered in the U.S.A. IBM may not offer the products, services, or features discussed in this document in other countries. Consult your local IBM representative for information on the products and services currently available in your area. Any reference to an IBM product, program, or service is not intended to state or imply that only that IBM product, program, or service may be used. Any functionally equivalent product, program, or service that does not infringe any IBM intellectual property right may be used instead. However, it is the user's responsibility to evaluate and verify the operation of any non-IBM product, program, or service.
IBM may have patents or pending patent applications covering subject matter described in this document. The furnishing of this document does not give you any license to these patents. You can send license inquiries, in writing, to:
IBM Director of Licensing IBM Corporation North Castle Drive Armonk, NY 10504-1785 U.S.A.
For license inquiries regarding double-byte character set (DBCS) information, contact the IBM Intellectual Property Department in your country or send inquiries, in writing, to:
Intellectual Property Licensing Legal and Intellectual Property Law IBM Japan, Ltd. 19-21, Nihonbashi-Hakozakicho, Chuo-ku Tokyo 103-8510, Japan
The following paragraph does not apply to the United Kingdom or any other country where such provisions are inconsistent with local law :
INTERNATIONAL BUSINESS MACHINES CORPORATION PROVIDES THIS PUBLICATION "AS IS" WITHOUT WARRANTY OF ANY KIND, EITHER EXPRESS OR IMPLIED, INCLUDING, BUT NOT LIMITED TO, THE IMPLIED WARRANTIES OF NON-INFRINGEMENT, MERCHANTABILITY OR FITNESS FOR A PARTICULAR PURPOSE.
Some states do not allow disclaimer of express or implied warranties in certain transactions, therefore, this statement might not apply to you.
This information could include technical inaccuracies or typographical errors. Changes are periodically made to the information herein; these changes will be incorporated in new editions of the publication. IBM may make improvements and/or changes in the product(s) and/or the program(s) described in this publication at any time without notice.
Any references in this information to non-IBM Web sites are provided for convenience only and do not in any manner serve as an endorsement of those Web sites. The materials at those Web sites are not part of the materials for this IBM product and use of those Web sites is at your own risk.
IBM may use or distribute any of the information you supply in any way it believes appropriate without incurring any obligation to you.
Licensees of this program who wish to have information about it for the purpose of enabling: (i) the exchange of information between independently created programs and other programs (including this one) and (ii) the mutual use of the information which has been exchanged, should contact:
IBM Corporation 2Z4A/101 11400 Burnet Road Austin, TX 78758 U.S.A.
Such information may be available, subject to appropriate terms and conditions, including in some cases payment of a fee.

IBM Security Access Manager for Mobile Demonstration Cookbook P a g e | 97
The licensed program described in this document and all licensed material available for it are provided by IBM under terms of the IBM Customer Agreement, IBM International Program License Agreement or any equivalent agreement between us.
Any performance data contained herein was determined in a controlled environment. Therefore, the results obtained in other operating environments may vary significantly. Some measurements may have been made on development-level systems and there is no guarantee that these measurements will be the same on generally available systems. Furthermore, some measurement may have been estimated through extrapolation. Actual results may vary. Users of this document should verify the applicable data for their specific environment.
Information concerning non-IBM products was obtained from the suppliers of those products, their published announcements or other publicly available sources. IBM has not tested those products and cannot confirm the accuracy of performance, compatibility or any other claims related to non-IBM products. Questions on the capabilities of non-IBM products should be addressed to the suppliers of those products.
All statements regarding IBM's future direction or intent are subject to change or withdrawal without notice, and represent goals and objectives only.
All IBM prices shown are IBM's suggested retail prices, are current and are subject to change without notice. Dealer prices may vary.
This information is for planning purposes only. The information herein is subject to change before the products described become available.
This information contains examples of data and reports used in daily business operations. To illustrate them as completely as possible, the examples include the names of individuals, companies, brands, and products. All of these names are fictitious and any similarity to the names and addresses used by an actual business enterprise is entirely coincidental.
COPYRIGHT LICENSE:
This information contains sample application programs in source language, which illustrate programming techniques on various operating platforms. You may copy, modify, and distribute these sample programs in any form without payment to IBM, for the purposes of developing, using, marketing or distributing application programs conforming to the application programming interface for the operating platform for which the sample programs are written. These examples have not been thoroughly tested under all conditions. IBM, therefore, cannot guarantee or imply reliability, serviceability, or function of these programs. You may copy, modify, and distribute these sample programs in any form without payment to IBM for the purposes of developing, using, marketing, or distributing application programs conforming to IBM's application programming interfaces.
Each copy or any portion of these sample programs or any derivative work, must include a copyright notice as follows:
© IBM 2014. Portions of this code are derived from IBM Corp. Sample Programs. © Copyright IBM Corp 2014. All rights reserved.
If you are viewing this information in softcopy form, the photographs and color illustrations might not be displayed.
Trademarks
IBM, the IBM logo, and ibm.com are trademarks or registered trademarks of International Business Machines Corp., registered in many jurisdictions worldwide. Other product and service names might be trademarks of IBM or other companies. A current list of IBM trademarks is available on the Web at Copyright and trademark information at ibm.com/legal/copytrade.shtml.
Statement of Good Security Practices
IT system security involves protecting systems and information through prevention, detection and response to improper access from within and outside your enterprise. Improper access can result in information being altered, destroyed, misappropriated or misused or can result in damage to or misuse of your systems, including for use in attacks on others. No IT system or product should be considered completely secure and no single product, service or security measure can be completely effective in preventing improper use or access. IBM systems, products and services are designed to be part of a comprehensive security approach, which will necessarily involve additional operational procedures, and may require other systems, products or services to be most effective. IBM DOES NOT WARRANT THAT ANY SYSTEMS, PRODUCTS OR SERVICES ARE IMMUNE FROM, OR WILL MAKE YOUR ENTERPRISE IMMUNE FROM, THE MALICIOUS OR ILLEGAL CONDUCT OF ANY PARTY.

IBM Security Access Manager for Mobile Demonstration Cookbook P a g e | 98
© International Business Machines Corporation 2014
International Business Machines Corporation New Orchard Road Armonk, NY 10504
Produced in the United States 10-2014
All Rights Reserved
References in this publication to IBM products and services do not imply that IBM intends to make them available in all countries in which IBM operates.