IBM Program Management System IBM Program Management...
98
1 IBM Program Management System IBM Program Management Portal Client User’s Guide Version 1.0 PgMP Release 20.2 Print date: 03.03.2020 (DD/MM/YYYY) Author: IBM Program Management Practice
Transcript of IBM Program Management System IBM Program Management...

1
IBM Program Management System
IBM Program Management Portal
Client User’s Guide
Version 1.0 PgMP Release 20.2
Print date: 03.03.2020 (DD/MM/YYYY)
Author: IBM Program Management Practice

2
Table of Contents
Chapter 1. Basic Navigation .................................................................................................. 7 1.1. Purpose .......................................................................................................................... 7 1.2. Navigation Options ......................................................................................................... 9 1.2.1. Basic Navigation........................................................................................................ 11 1.3. Create Page ................................................................................................................. 12 1.4. Filtering ......................................................................................................................... 13
Chapter 2. Work Lists ........................................................................................................... 14 2.1. Purpose ........................................................................................................................ 14 2.2. My Work List ................................................................................................................. 15 2.3. My Work Filters ............................................................................................................ 17 2.4. Active Work List............................................................................................................ 18 2.5. Completed Work List .................................................................................................... 20 2.6. On Hold Work List ........................................................................................................ 22 2.7. Deleted Work List ......................................................................................................... 24 2.8. Contract Calendar ........................................................................................................ 26 2.9. eSignature Packages ................................................................................................... 27
Chapter 3. Search for records ............................................................................................. 28 3.1. Purpose ........................................................................................................................ 28 3.2. Searching for records ................................................................................................... 28 3.3. Masthead Search enabled for searching for PgMP Records ...................................... 30
Chapter 4. Search for attachments ..................................................................................... 31 4.1. Purpose ........................................................................................................................ 31 4.2. Searching for Attachments ........................................................................................... 31
Chapter 5. Attachments........................................................................................................ 33 5.1. Purpose ........................................................................................................................ 33 5.2. Accessing and Creating Attachments .......................................................................... 33 5.2.1. Accessing / Creating Attachments through a record’s tab ........................................ 33 List attachments view .......................................................................................................... 33 5.3. Accessing / Creating Attachments through a work queue’s list view........................... 34 5.4. Accessing / Creating Attachments through the My Organizations view ...................... 34 5.5. Add one new attachment ............................................................................................. 35 5.5.1. Add one Attachment through an open record’s Fast Create box ............................. 35 5.5.2. Add one Attachment through an open record’s Attachment tab ............................... 38 5.6. Add multiple attachments at once ................................................................................ 38 5.6.1. Export list ................................................................................................................... 40 5.6.2. Set filter values .......................................................................................................... 40 5.7. Individual attachment view ........................................................................................... 41 5.7.1. Modify an existing Version ........................................................................................ 41 5.7.2. Add a New Version ................................................................................................... 41 5.7.2.1. Add New Version link ............................................................................................. 41 5.7.2.2. Add a New Version through Drag and Drop .......................................................... 42 5.7.3. Returning to the List attachments view ..................................................................... 42 5.7.4. Marking an attachment as obsolete .......................................................................... 42
Chapter 6. Notes ................................................................................................................... 45 6.1. Purpose ........................................................................................................................ 45 6.2. Adding a Note ............................................................................................................... 45 6.3. Adding to an Existing Note ........................................................................................... 46
Chapter 7. Explorer ............................................................................................................... 47

3
7.1. Purpose ........................................................................................................................ 47 7.2. Accessing the Explorer view ........................................................................................ 47 7.2.1. Accessing the Explorer view through a record’s Explorer tab .................................. 47 7.2.2. Accessing the Explorer view through a work list view .............................................. 47
Chapter 8. Supporting Assets ............................................................................................. 48 8.1. Accessing a record’s Supporting Assets...................................................................... 49 8.1.1. Accessing Supporting Assets through a record’s Supporting Assets tab ................. 49 8.1.2. Accessing Supporting Assets through a work list view ............................................. 50 8.2. View a Summary of an Object’s Supporting Assets .................................................... 51 8.3. View Details of a Supporting Asset .............................................................................. 53 8.4. Creating a Supporting Asset “child” object (e.g. Issue) ............................................... 54 8.4.1. Creating Supporting Assets through an open record’s Fast Create section ............ 54 8.4.2. Creating Supporting Assets through a record’s Supporting Assets tab ................... 54 8.5. Creating a Comment .................................................................................................... 56 8.6. Take Action Menu Added to The Record Details Section ........................................... 57 8.7. Issue Owner field has been made mandatory for Issue records ................................. 58
Chapter 9. Workflows ........................................................................................................... 59 9.1. Purpose ........................................................................................................................ 59 9.2. Workflows ..................................................................................................................... 59 9.3. Roles within the Defined Workflows ............................................................................. 59 9.4. Configuration Options for Request for Service, Catalog-only and PCR Objects ......... 59 9.5. Workflow tables for the Request for Service Object .................................................... 60 9.5.1. Client – Initiated / Proposal Pricing Terms: Firm ...................................................... 61 9.5.2. Client – Initiated / Proposal Pricing Terms: Indicative - Budget & Planning ............. 62 9.5.3. Client – Initiated / Proposal Pricing Terms: Predefined Solution Request ............... 63 9.6. Add New Survey Fields to the Predefined Solution Workflows ................................... 63 9.7. Catalog–only Request .................................................................................................. 64 9.8. General Objects Workflow ........................................................................................... 65 9.9. Contract Change Object Workflow ............................................................................... 66 9.10. Contract Deliverable Object Workflow ....................................................................... 67 9.11. Issues Object Workflow .............................................................................................. 69 9.12. Project Change Request (PCR) Object Workflow ..................................................... 70 9.13. Risk Object Workflow ................................................................................................. 72
Chapter 10. PgMP Notifications .......................................................................................... 74 10.1. Batch Notifications...................................................................................................... 75
Chapter 11. Exports .............................................................................................................. 76 11.1. Export record log ........................................................................................................ 78 11.2. Export history log........................................................................................................ 80 11.3. Manage scheduled Exports........................................................................................ 81 11.4. Exported Attachments ................................................................................................ 82 11.5. Export Changes - New Fields Must Be Applied to Custom Reports.......................... 82 11.6. Exported PDF Files .................................................................................................... 83
Chapter 12. PgMP Dashboard ............................................................................................. 84 12.1. Accessing Dashboard ................................................................................................ 84 12.2. Welcome Page ........................................................................................................... 85 12.3. Custom Views ............................................................................................................ 85 12.4. Annotations ................................................................................................................ 86 12.5. My saved templates ................................................................................................... 86 12.6. Survey Fields Visible in Dashboard and Available for Export .................................... 87 12.7. Adding of "Created by" field as filter in client PgMP dashboard ................................ 88
Chapter 13. PgMP 20.2 Enhancements .............................................................................. 91 13.1. PgMP - eSignature - Reflect the Language choice of the PgMP user

4
in the Signing email .................................................................................................... 91 13.2. PgMP Portal - Remove the possibility to add Obsolete attachments in Approval Supporting Asset ..................................................................................... 93 13.3. PgMP Portal/Dashboard - Changes to the Response type field in Risk record type 94 13.4. PgMP Dashboard - Update how Notes In Dashboard view and export are shown to IBM and Client users .......................................................... 95
Chapter 14. References ........................................................................................................ 97

5
About this document
This document describes the client’s use of the Program Management Portal.
Who should use this document?
• Client personnel using PgMP
• IBM personnel responsible for the operation of PgMP
Related documents
This document should be used in conjunction with the Introduction to PgMP video (see references).
Summary of changes
This section records the history of significant changes to this document. Only the most significant changes are described here.
Table 1 Document Versions
Version Date Author Description of change
1.0 03/03/2020
(DD/MM/YYYY) Krishna Murthy
All the topics that are on the list of enhancements for PgMP R20.2 have been posted. • PgMP Portal - eSignature -
Reflect the language choice of the PgMP user in the signing email
• PgMP Portal - eSignature - Reflect the language choice of the PgMP user in the signing email - Disclosure and email templates
• PgMP Portal - Remove the possibility to add obsolete attachments in Approval Supporting Asset
• PgMP Portal/Dashboard - Changes to the Response type field in Risk record type
• PgMP Dashboard - Update how Notes In Dashboard view and export are shown to IBM and Client users
Where significant changes are made to this document, the version number will be incremented by 1.1.
Where changes are made for clarity and reading ease only and no change is made to the meaning or intention of this document, the version number will be increased by 0.1.

6
The information in this plan is current as of the Version date. Information that changes between the review cycles will be updated during the normal review cycle.
Distribution
Notification of new versions of this document is managed as jointly agreed between Client and IBM.
Document control information
At the end of this document is a labeled box indicating the end of text.

7
Chapter 1. Basic Navigation
1.1. Purpose The top navigation pane within PgMP is used to provide the user with the menu options that are available within the tool.
Note: Sensitive Personal Information (SPI) should not be entered into PgMP.
Note: If you forget your password, click on the “Forgot password” and you will see the screen below,

8
Then enter your IBMid and click on continue to reset your password. You will see the screen displayed below:
You will receive an email to your associated email address allowing you to reset your password. As shown in the above screen print, make sure to check your spam folder for the note. When a user first logs into PgMP, they will be presented with Terms and Conditions:
To ensure compliance with GDPR, there will be a consent agreement page appearing during the login to PgMP, related to the usage of the IBMid.
• All client users will have to accept this consent agreement before they can proceed with Sign in to PgMP.
• The consent will be valid unless there are changes to the terms. If change occurs, then the consent agreement page will be presented again.
• This change is deployed on May 9 to the PgMP login page

9
The user is to read these Terms and Conditions and click I agree, if they agree. If they do not agree, they will not be able to log into the tool. Users must agree to Terms and Conditions on an annual basis. Users can view the terms he or she agreed to as well as the date it was last done by clicking on Terms and Conditions from the Settings drop down menu like shown below.
1.2. Navigation Options PgMP Home: Provides announcements related to planned outages, planned
updates, and new features in the tool as well as organization specific announcements. Additionally, it serves as a welcome page that orients users to navigating the tool and provides a fast way to create frequently used records.
Create: PgMP record: Creates a new record.

10
Export file: Provides the ability to request History and Record Logs in .csv format as well as access attachments and .pdf files users have exported out of the tool.
Lists: Organizations: Displays all organizations in which you
have assigned roles and includes the counts for both the “My Work” and “Active Work” queues. Users can also assign individual organizations any of their notification profiles configured on the My Preferences page.
My work: Displays the records currently assigned
to you within your selected organization(s) as well as Approval records and Comments assigned to you, that you have subscribed to, and/or is pending your approval.
Active work: Displays the active requests within your selected organization(s).
Completed work: Displays the completed requests for your selected organization(s).
On hold work: Displays the requests that have been placed “On Hold” for your selected organization(s).
Deleted work: Displays the deleted requests within your selected organization(s). eSignature packages: Displays the eSignature packages for the selected organization
Search PgMP: Search for records: Allows users to search for records across all record types and all work lists in an organization.
Search for attachments: Allows users to search for attachments across all record types and all work lists in an organization.
Settings: User preferences: Allows you to change your user
preferences for:
• Time zone
• Currency Format
• Time Format
• Language
• Default Organization
• Favorite Organizations
• Select position every time during Create
• Number of records per page
• Default login page
• Default record type for work lists
• Default record type for supporting assets
• Default contents of the Details tab
• Default record type for Dashboard

11
Notification Preferences: Allows users to enable/disable notifications for all positions and record types in PgMP.
Approval Profiles: Allows users to view, rename, or
delete an approval profile. Terms and conditions: Provides the last accepted version of
the PgMP terms and conditions as well as the date it was accepted.
Help: This link opens the Program Management Portal (PgMP) Client
Users Guide in English and in French languages.
Dashboard: Provides up-to-date views on PgMP RFS data with customizable tables and views.
See the Client Basic Overview module for more details on the elements of the top navigation not covered in detail in the guide.
1.2.1. Basic Navigation
Select your desired record type from the Fast Create section of the home page or select your desired work queue under “Lists” and then click on the title of a record to select it for processing or to submit a new record, select the “Create” option under Create. PgMP will guide you through the steps in the process via the automated workflow. For detailed information on workflows, please see the Workflows section of the User’s Guide.
-

12
1.3. Create Page On the Create page, the user first selects the account for which they desire to create a new record. Then, the user simply selects the object type desired, and a new page will open. Depending on the object type selected, the object’s workflow will be unique from the original to that object. For detailed information on workflows, please see the Workflows section of this Users Guide.

13
1.4. Filtering Filtering is used to quickly and easily locate a record or group of records that have specific values in predefined fields. You can set a single filter or any combination of the available filters to locate your records.

14
Chapter 2. Work Lists
2.1. Purpose
The Work Lists within PgMP are used to view, process, print, and export records.
There are five Work Lists within PgMP: My Work, Active Work, Completed work, On hold work, and Deleted work.

15
2.2. My Work List

16
1. Current Position: Allows you to select the organization(s). 2. Set filter values: Allows you to filter the requests viewed. 3. Record type selection Select the record type to view or filter. 4. Download as PDF: Allows you to create a printed version of all items in a Work List. 5. Download as CSV: Allows you to export the list to an Excel spreadsheet. 6. Take Action: Add new attachment – Allows you to add a new attachment
without having to open a record. Copy – Allows you to copy the basic data from the selected request into a new request (does NOT copy attachments) and opens the new request for editing. Move to another position – Allows users to move authorized records to another organization. Export as PDF – Allows you to export a record and specify which sections and data types to include in the PDF file. Reassign - Assigns the request to another resource. You will be provided with a list of authorized resources for the record in a drop-down box.
Subscribe / Unsubscribe - Allows you to subscribe to any future changes that occur to this record and receive an email notification when they occur or unsubscribe stop being notified of changes to a record.
View attachments – Allows you to jump to the Attachment list view.
View explorer - Allows you to jump to the Explorer tab. View notes – Allows you to jump to the Notes tab.
View supporting assets - Allows you to jump to the Supporting assets tab. View history - Allows you to jump to the History tab. Place/Remove from Hold – Allows you to place the selected request on hold removing it from an Active status or remove it from Hold and put it back in an Active status. An On Hold request cannot be moved forward or backward in the process until it is removed from On Hold. Delete/Undelete – Allows you to delete or undelete the record and all of its associated child records and attachments.
Withdraw/Unwithdraw – Withdraw the request from the Active work queue or Unwithdraw from the Completed work queue.
Note: visible actions are available to end users based on their
authority for the record and its current step. 7. Process records: Allows you to select the record for processing by clicking on the
record’s title in the “Title” column.

17
2.3. My Work Filters The My work list has additional filters that allow users to expand the view to include records where the user may be assigned or have an interest.

18
2.4. Active Work List
1. Current Position: Allows you to select the organization(s). 2. Set filter values: Allows you to filter the requests viewed. 3. Record type selection Select the record type to view or filter 4. Download as PDF: Allows you to create a printed version of all items in a Work List. 5. Download as CSV: Allows you to export the list to an Excel spreadsheet. 6. Take Action: Add new attachment – Allows you to add a new attachment
without having to open a record. Move to another position – Allows users to move authorized records to another organization. Export as PDF – Allows you to export a record and specify which sections and data types to include in the PDF file. Copy – Allows you to copy the basic data from the selected request into a new request (does NOT copy attachments) and opens the new request for editing. Reassign - Assigns the request to another resource. You will be provided with a list of authorized resources for the record in a drop-down box.

19
Subscribe / Unsubscribe - Allows you to subscribe to any future changes that occur to this record and receive an email notification when they occur or unsubscribe stop being notified of changes to a record.
View attachments – Allows you to jump to the Attachment list view.
View explorer - Allows you to jump to the Explorer tab. View notes – Allows you to jump to the Notes tab.
View supporting assets - Allows you to jump to the Supporting assets tab. View history - Allows you to jump to the History tab. Place/Remove from Hold – Allows you to place the selected request on hold removing it from an Active status or remove it from Hold and put it back in an Active status. An On Hold request cannot be moved forward or backward in the process until it is removed from On Hold. Delete/Undelete – Allows you to delete or undelete the record and all of its associated child records and attachments.
Withdraw/Unwithdraw – Withdraw the request from the Active work queue or Unwithdraw from the Completed work queue.
Note: visible actions are available to end users based on their
authority for the record and its current step. 7. Process records: Allows you to select the record for processing by clicking on the
record’s title in the ”Title” column.

20
2.5. Completed Work List
1. Current Position: Allows you to select the organization(s). 2. Set filter values: Allows you to filter the requests viewed. 3. Record type selection Select the record type to view or filter 4. Download as PDF: Allows you to create a printed version of all items in a Work List. 5. Download as CSV: Allows you to export the list to an Excel spreadsheet. 6. Take Action: Add new attachment – Allows you to add a new attachment
without having to open a record. Move to another position – Allows users to move authorized records to another organization. Export as PDF – Allows you to export a record and specify which sections and data types to include in the PDF file. Copy – Allows you to copy the basic data from the selected request into a new request (does NOT copy attachments) and opens the new request for editing.

21
Reassign - Assigns the request to another resource. You will be provided with a list of authorized resources for the record in a drop-down box.
Subscribe / Unsubscribe - Allows you to subscribe to any future changes that occur to this record and receive an email notification when they occur or unsubscribe stop being notified of changes to a record.
View attachments – Allows you to jump to the Attachment list view.
View explorer - Allows you to jump to the Explorer tab. View notes – Allows you to jump to the Notes tab.
View supporting assets - Allows you to jump to the Supporting assets tab. View history - Allows you to jump to the History tab. Delete/Undelete – Allows you to delete the record and all of its associated child records and attachments or undelete a record and any of its associated child records to an Active status.
Note: visible actions are available to end users based on their
authority for the record and its current step. 7. Process records: Allows you to select the record for processing by clicking on the
record’s title in the ”Title” column.

22
2.6. On Hold Work List
1. Current Position: Allows you to select the organization(s). 2. Set filter values: Allows you to filter the request viewed. 3. Record type selection Select the record type to view or filter 4. Download as PDF: Allows you to create a printed version of all items in a Work List. 5. Download as CSV: Allows you to export the list to an Excel spreadsheet. 6. Take Action: Add new attachment – Allows you to add a new attachment
without having to open a record. Move to another position – Allows users to move authorized records to another organization. Export as PDF – Allows you to export a record and specify which sections and data types to include in the PDF file. Copy – Allows you to copy the basic data from the selected request into a new request (does NOT copy attachments) and opens the new request for editing. Reassign - Assigns the request to another resource. You will be provided with a list of authorized resources for the record in a drop-down box.

23
Subscribe / Unsubscribe - Allows you to subscribe to any future changes that occur to this record and receive an email notification when they occur or unsubscribe stop being notified of changes to a record.
View attachments – Allows you to jump to the Attachment list view.
View explorer - Allows you to jump to the Explorer tab. View notes – Allows you to jump to the Notes tab.
View supporting assets - Allows you to jump to the Supporting assets tab. View history - Allows you to jump to the History tab. Place/Remove from Hold – Allows you to place the selected request on hold removing it from an Active status or remove it from Hold. An On Hold request cannot be moved forward or backward in the process until it is removed from On Hold. Delete/Undelete – Allows you to delete the record and all of its associated child records and attachments or undelete a record and any of its associated child records to an Active status.
Withdraw/Unwithdrawn – Withdraw the request from the Active work queue or Unwithdrawn from the Completed work queue.
Note: visible actions are available to end users based on their
authority for the record and its current step. 7. Process records: Allows you to select the record for processing by clicking on the
record’s title in the” Title” column.

24
2.7. Deleted Work List
1. Current Position: Allows you to select the organization(s). 2. Record type selection Select the record type to view or filter 3. Download as PDF: Allows you to create a printed version of all items in a Work List. 4. Download as CSV: Allows you to export the list to an Excel spreadsheet.

25
5. Take Action: Add new attachment – Allows you to add a new attachment without having to open a record.
Subscribe / Unsubscribe - Allows you to subscribe to any future changes that occur to this record and receive an email notification when they occur or unsubscribe stop being notified of changes to a record.
View attachments – Allows you to jump to the Attachment list view.
View explorer - Allows you to jump to the Explorer tab. View notes – Allows you to jump to the Notes tab.
View supporting assets - Allows you to jump to the Supporting assets tab. View history - Allows you to jump to the History tab. Place/Remove from Hold – Allows you to place the selected request on hold removing it from an Active status or remove it from Hold. An On Hold request cannot be moved forward or backward in the process until it is removed from On Hold. Delete/Undelete – Allows you to delete the record and all of its associated child records and attachments or undelete a record and any of its associated child records to an Active status.
Note: visible actions are available to end users based on their
authority for the record and its current step. 6. Process records: Allows you to select the record for processing by clicking on the
record’s title in the “Title” column.

26
2.8. Contract Calendar
1. Current position: Allows you to select the organization(s)
2. Include child organizations: Select Yes/No option to include child organizations
3. Dates to show: Select the date range
4. Download as PDF: Allows you to create a printed version of calendar
items
5. Download as CSV: Allows you to export the list to an Excel spreadsheet
6. Take Action: Select appropriate action on a calendar item
7. Date: Displays the date created for calendar item
8. Record ID: Displays the record ID
9. Client reference: Displays the client reference number
10. Contract: Displays the contract name
11. Title: Displays the title for a calendar item
12. Record type: Displays the record type
13. Assigned to: Displays the contract calendar assigned to a contact

27
2.9. eSignature Packages
1. Position: Allows you to select the organization(s).
2. Package status: Select package status
3. Package created by: Select the user who created the package
4. Expires on/before: Select the date the package expires on/before
5. Download as PDF: Allows you to create a printed version of all eSignature package list
6. Download as CSV: Allows you to export the list to an Excel spreadsheet.
7. Record ID: Displays the Record ID of a package
8. Client reference: Displays the Client reference ID
9. Record title, signer, signing sequence, signing status and date of latest activity: Displays all the relevant information of a package

28
Chapter 3. Search for records
3.1. Purpose The search for records function within PgMP is used to search for records across all record types and all work lists in an organization.
3.2. Searching for records Records can be searched using several criteria such as: Title fragment, Record type, Assigned To and Created by. Once all desired criteria is entered in click the Search button and scroll down to view the results.
Records found in a search can be shown in a Printable version; the attachment list can be exported. Individual or all attachments in the search list can be Subscribed or Unsubscribed. Additionally, records can be exported as a PDF. For more information on options available under Search for records review the Client Basic Overview module or contact your IBM Account Focal Point with additional questions.

29
Take Action: Add new attachment – Allows you to add a new attachment without having to open a record. Move to another position – Allows users to move authorized records to another organization. Export as PDF – Allows you to export a record and specify which sections and data types to include in the PDF file. Copy – Allows you to copy the basic data from the selected request into a new request (does NOT copy attachments) and opens the new request for editing. Reassign - Assigns the request to another resource. You will be provided with a list of authorized resources for the record in a drop-down box.
Subscribe / Unsubscribe - Allows you to subscribe to any future changes that occur to this record and receive an email notification when they occur or unsubscribe stop being notified of changes to a record.
View attachments – Allows you to jump to the Attachment list view.
View explorer - Allows you to jump to the Explorer tab. View notes – Allows you to jump to the Notes tab.
View supporting assets - Allows you to jump to the Supporting assets tab. View history - Allows you to jump to the History tab. Place/Remove from Hold – Allows you to place the selected request on hold removing it from an Active status or remove it from Hold and put it back in an Active status. An On Hold request cannot be moved forward or backward in the process until it is removed from On Hold. Delete/Undelete – Allows you to delete the record and all of its associated child records and attachments or undelete a record and any of its associated child records to an Active status.
Withdraw/Unwithdraw – Withdraw the request from the Active work queue or Unwithdraw from the Completed work queue.

30
3.3 Masthead Search enabled for searching for PgMP Records When using the PgMP application and the masthead search, the user will see a checkbox option labelled "Search PgMP". When "Search PgMP" is checked, the masthead search searches PgMP record data with the search criteria and results displayed on PgMP's normal "Search for records" page: If the search string adheres to the format specified below then the entered criteria is used as search input for the Record ID:
• Optional: 1-4 character prefix configured for the Org, followed by a dash. • Always required: 3-character "record type abbreviation" which is always uppercase and
English alphabetic, followed by a dash. • Always required: 6-digit numeric sequence number.
• If the search string does not adhere to the format specified on previous slide, then the entered criteria is used as search input for the Title
NOTE: The search for record will be performed on the user's default organization set in the PgMP Preferences therefore a default organization has to be selected to avail of functionality to use the masthead search box to search for PgMP records. If the user does not have a default organization, the search cannot be executed - in that case, the "Search for records" page is displayed with a flash message "You must have a default organization selected in your user preferences settings in order to use the masthead search."
• When "Search PgMP" is unchecked, the masthead search searches ibm.com.

31
Chapter 4. Search for attachments
4.1. Purpose The attachments function within PgMP is used to search for attachments across all record types and all work lists in an organization.
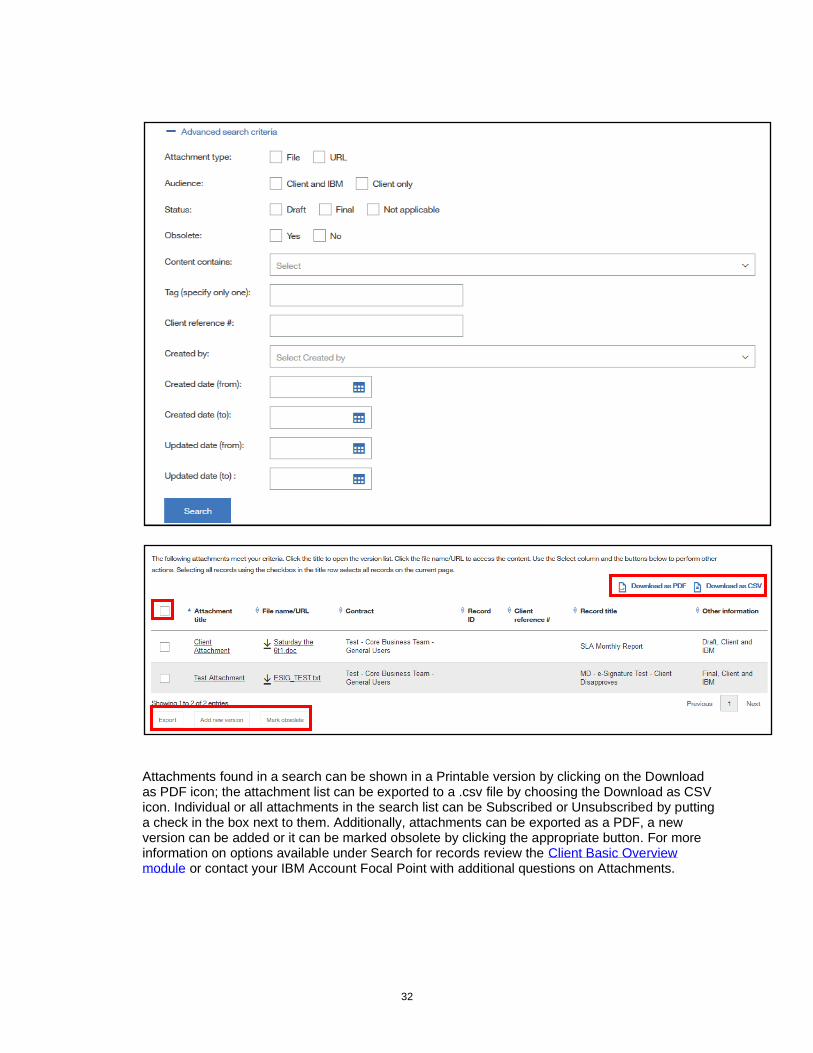
4.2. Searching for Attachments Attachments can be searched using several criteria such as: Title fragment, Attachment type, Audience and Created by clicking in Search for Attachments from the left-hand navigation. Once all desired criteria is entered in click the Search button and scroll down to view the results.
32
Attachments found in a search can be shown in a Printable version by clicking on the Download as PDF icon; the attachment list can be exported to a .csv file by choosing the Download as CSV icon. Individual or all attachments in the search list can be Subscribed or Unsubscribed by putting a check in the box next to them. Additionally, attachments can be exported as a PDF, a new version can be added or it can be marked obsolete by clicking the appropriate button. For more information on options available under Search for records review the Client Basic Overview module or contact your IBM Account Focal Point with additional questions on Attachments.

33
Chapter 5. Attachments
5.1. Purpose The attachments function within PgMP is used to store supporting documentation that is related to a Record or Organization.
5.2. Accessing and Creating Attachments Attachments can be accessed in several ways. Through a record’s Attachments tab or Fast Create box, through a work queue’s list view using the Select option, and through the My Organizations view.
5.2.1. Accessing / Creating Attachments through a record’s tab
Once you click on the Attachments tab of a record you will see the Attachment list view.
List attachments view
The List attachments view is chosen by clicking the Attachments tab. It will show the attachments visible to you. Placing a check box in the box to the left or a record will make the Add new version button accessible. Putting a check in one or multiple boxes allows users to export attachments or mark them obsolete.

34
5.3. Accessing / Creating Attachments through a work queue’s list view
Click Select next to a record and choose View attachments to be taken to the Attachment list view or Add new attachment to add a new attachment.
5.4. Accessing / Creating Attachments through the My Organizations view
Users who want to view or add an attachment at the Organization level verses the record level click on My Organizations from the left-hand navigation. Additionally, users can add a new version of an existing attachment or export one or multiple attachments. Exported attachments appear in the Exports view. More details are included on this later on in the guide.

35
5.5. Add one new attachment
5.5.1. Add one Attachment through an open record’s Fast Create box
Users can create an Attachment directly from an open record using the Fast Create box.
Once the Attachment link is clicked the Add new Attachment window pops up:

36

37
Attachment type: Allows you to choose the source of the attachment. File name or URL: If the Attachment type is File, use the Browse button to locate the file
(shown above). If Attachment type is URL, enter the URL (not shown).
Title: Allows you to identify attachment with a title. Audience indicator: Allows you to determine who will be able to see this attachment.
• Client and IBM – visible to both client and IBM employees authorized in the tool.
• Client only – visible to only the client employees authorized in the tool.
Status: Allows you to indicate if the attachment is Draft or Final. Note: Once an attachment is marked Final, it can no longer be updated. Description: Allows you to provide more detail on the attachment (optional). Tags: Allows you to group attachments. These tags can be entered in Search
attachments criteria. Mark obsolete Allows you to indicate if the attachment should be hidden from view. When you have completed the required fields, click Submit. If you have chosen to share the attachment with IBM, you will see an additional pop-up and asked to confirm or return to the previous screen.
Note once an attachment is marked Final, it can no longer be updated. Privileges must be set for users as to whether he or she can view cost price data fields and attachments. If “No” is chosen for a user he or she will not be able to view an attachment containing cost price information. Tags can be added to the search criteria in the Search for attachments. Marking an attachment obsolete allows users to remove them from view without replacing them. Review the Advanced Overview module or contact your IBM Account Focal Point with additional questions on Attachments.

38
5.5.2. Add one Attachment through an open record’s Attachment tab
Click on the Attachments tab, click Add new attachment, and complete the required fields. As previously mentioned Attachments can also be added from the list view, the work list view and the My Organizations view.
5.6. Add multiple attachments at once From the Attachments tab, Attachment list view, and/or at the Organization information and attachments level, users can select multiple attachments and drag and drop them into the attachment list view.

39

40
Once attachments are dragged onto the list view of a record or organization a pop up appears such as the one shown above. The file name and title is copied from the attachment files and information entered in for the first attachment is copied into the next attachment. Users click the Continue button until the last attachment is reached. At that time, the Submit button appears and all attachments are added. If the Cancel button is clicked at any time none of the attachments are added. A Back button appears for all attachments but the first allowing a user to make further updates before Submitting.
5.6.1. Export list
Export a list of attachments and their basic metadata to an excel spreadsheet. To export the files themselves click the Download as CSV link.
5.6.2. Set filter values
Attachment Filtering is used to quickly and easily locate an attachment or group of attachments that have specific values in predefined fields. You can set a single filter or any combination of the available filters to locate your attachments.

41
5.7. Individual attachment view To view details on an individual attachment, click on the title field.
5.7.1. Modify an existing Version
This function enables you to change the basic metadata of an existing attachment. There are two ways to modify an existing Draft document. You can Click on the attachment number and continue as described earlier.
• You can modify the existing metadata in an attachment by selecting the fields and updating them.
• You can also delete the current attachment by clicking on the “Delete current file version” verbiage.
You can replace the current attachment with a new file by clicking on the “Delete current file version” verbiage and when this screen is returned click either “File” or “URL” in the attachment type field as described above in Adding an attachment. NOTE: You can only delete the latest version of the attachment. Prior versions cannot be deleted. Also, attachments must have unique titles.
5.7.2. Add a New Version
There are two ways to add a new version of an existing Draft attachment.
5.7.2.1. Add New Version link

42
The first involves clicking on the Add new version button and continuing on as described earlier.
5.7.2.2. Add a New Version through Drag and Drop
Another way to add a new version of a Draft document is to drag and drop it just as described under Add Multiple attachments. First click on the Attachment title of the attachment you would like to update in either at the record or the Organization level. Next select the new version of the attachment and drag it onto the Attachment versions page as shown below. As with adding multiple attachments a pop up will appear on your screen. It is titled, “Add new version”. The information previously entered stays the same but can be changed if desired. Click Submit to complete the attachment update.
5.7.3. Returning to the List attachments view
You may return to the overall list of attachments by clicking either the Attachments tab or the “View at attachments list” link.
5.7.4. Marking an attachment as obsolete
This function enables you to remove one attachment from view. Click on the Version number and click Yes for the Mark obsolete radio button at the bottom of the pop up window and click Submit to remove it from view in the tool.

43
To mark more than one attachment as obsolete users select the check box for an attachment row or multiple rows. Next, he or she clicks on the "Mark Obsolete“ button. Then he or she confirms the attachments to be made obsolete, by clicking on the OK button on the pop up validation screen.
The default in PgMP is to “Hide obsolete attachments”. If you would like to see attachments marked obsolete uncheck this box.
The Obsolete column in the List Attachments view will indicate any attachments that have been removed from view. Users can click on the File name/URL to view an obsolete attachment or click on a Title to modify it to no longer be marked as obsolete. Please Note: Client users will not be able to add Obsolete attachments for Approval supporting asset, because they are not relevant for Approval record type. This update is applicable from PgMP 20.2 release.

44

45
Chapter 6. Notes
6.1. Purpose The Notes function within PgMP is used to be associate notes with a record within PgMP. Notes cannot be added to Attachments or Comments and they cannot be exported.
6.2. Adding a Note Adding Notes can be of two types,
• Client-only, and
• Client and IBM To add a Note, click the “Add a Note” button in the Notes tab of a record.

46
6.3. Adding to an Existing Note
To add to an existing Note, click the “Add a New Note” button. As with creating a new Note, type your note in the Text field and click the Submit button.

47
Chapter 7. Explorer
7.1. Purpose The Explorer view within PgMP provides an easy way to see child records for a record or its parent if it is a child record itself. This view even displays hotlinks to allow users to access associated parent or child records without having to navigate to the tab view.
7.2. Accessing the Explorer view The Explorer Tab can be accessed in two ways. Through a record’s Explorer tab or access it through a work queues list view.
7.2.1. Accessing the Explorer view through a record’s Explorer tab
Users click the Explorer Tab of a record’s detail list view. Clicking a title allows a user to jump directly to that record. Attachments can be opened directly from this view as well.
7.2.2. Accessing the Explorer view through a work list view
Users click Select next to the record they are interested in and choose View explorer. He or she will be taken directly to that record’s Explorer tab.

48
Chapter 8. Supporting Assets
“Child objects” can be attached to (or “hung off of”) a “parent” object. Users have 10 child objects available to them. Users view all objects that are children of the current object, regardless of the type of either the parent or child object, from the Supporting Assets tab.
The following “child objects” are available to Clients in PgMP:
• Action • Approvals • Comment • Contract Change • Project • Issue • Project Change Request • Risk • Catalog Request Change • RFS Deliverable
Please Note: RFS Deliverable supporting asset cannot be created by the client. It is an IBM created supporting asset that Client can participate in the approval of the deliverable completion.

49
8.1. Accessing a record’s Supporting Assets To see a summary of all of the currently defined instances of one of the supporting object types, the user has two options to access this data: Click on the Supporting Assets tab of a record or access it through a work queue’s list view using the Select option.
8.1.1. Accessing Supporting Assets through a record’s Supporting Assets tab
When viewing the Details of an object, users can click on the “Supporting assets” tab. As shown below, all child object types allowed for the object being viewed are shown at the top of the tab. A count of the current number of each type is shown in parentheses after each type’s name. Even child records that are allowed for an object but not yet created are shown. Note: The Supporting Assets tab lists the child records created for the parent record. However, though these records are listed, they may not be available for creation by clients. Depending on the parent record and supporting asset selected, the client may or may not be allowed to add a new record. Contract Deliverables cannot be created by Clients but can be viewed.

50
8.1.2. Accessing Supporting Assets through a work list view
Once view Supporting assets is clicked the Supporting Assets tab is opened showing the information discussed above.

51
8.2. View a Summary of an Object’s Supporting Assets To see a summary of all the currently defined instances of one of the supporting object types, the user does the following:
1. Clicks on the Supporting Assets tab. 2. Examines the resulting display which shows the following:
• A summary of all the Supporting Assets types that this user is authorized to see along with a count of the number of each type that is connected to the current record.
3. The list of the records of the type of Supporting Asset that was last selected by the user 4. If the currently displayed type is not the type the user is interested in seeing, the user clicks
the hotspot (name and count) for the desired type, and the list for that type is displayed in place of the prior list.
5. The list of supporting objects can be filtered (see image below). Each object type can have its own filters. Most object types will have some common filters, provided they have the corresponding data attributes. These common filters are the following:
• Audience
• Condition
• Assigned to user
• Due date (range)
• Not complete

52

53
8.3. View Details of a Supporting Asset
The user can open Supporting Assets in two ways. Through the Supporting Assets tab of a record or through a work queues list view. To see a summary listing of the Supporting Assets for a record, the user does the following:
1. Go to the Supporting Assets tab 2. View the list of a supporting asset by clicking on the supporting asset-type as described
above. 3. Scroll/filter the list to find the requested supporting asset (optional) 4. Click on the title of the supporting asset record. 5. View the Details page for the chosen supporting asset record.
Some Supporting Asset types may support additional actions from the list, such as initiating a download of an Attachment or possibly launching an application/URL for an Action. A Select button is present on some object types for reassignment, on hold, or withdrawal.

54
8.4. Creating a Supporting Asset “child” object (e.g. Issue)
8.4.1. Creating Supporting Assets through an open record’s Fast Create section
Client users who can view the Details page of an existing object record can manually create a new supporting asset (depending on the type of child record). In this example, a new Issue object will be directly connected to the existing object as follows: 1. Click Action under the Fast Create of a supporting asset section. 2. A new Action record opens. 3. Fill in the Title and Description. 4. Select the Audience. It is always Public when created by clients 5. Specify the Due Date. 6. Provide or accept defaults for the fields available on the form 7. Add Attachment and/or Comment child objects to the Issue using the steps listed above. As
with any record in PgMP, the Action must be saved at least once before any child objects can be created.
8. Save the new Action by selecting “Initiate” in the “Select a task and submit” section and choose the Assigned To role for the Action and click Submit at the bottom of the details page or Cancel it if it should not be saved.
8.4.2. Creating Supporting Assets through a record’s Supporting Assets tab
Client users who can view the Details page of an existing object record can manually create a new supporting asset (depending on the type of child record). In this example, a new Action object will be directly connected to the existing object as follows:
1. Click the Supporting Assets tab of the current object to view all its supporting assets, and proceed to display the list of Issues
2. Click “Add new record” above the list of existing Actions (if any). Only users currently capable of making changes to the existing object can create an Issue off it. NOTE: if the desired asset is not selected prior to clicking the “Add new record”, the application will attempt to create whichever asset type is selected.

55
3. Fill in the Title and Description. 4. Select the Audience. It is always Public when created by clients 5. Specify the Due Date. 6. Provide or accept defaults for the fields available on the form 7. Add Attachment and/or Comment child objects to the Issue using the steps listed above. As with
any record in PgMP, the Action must be saved at least once before any child objects can be created.
8. Save the new Action by selecting Initiate” in the “Select a task and submit” section and choose the Assigned To role for the Action and click Submit at the bottom of the details page or Cancel it if it should not be saved. The new Action is not initially not On Hold.
Note: The Supporting Assets tab lists the child records created for the parent record. However, though these records are listed, they are not necessarily available to the client for creation. Depending on the parent record and supporting asset selected, the client may or may not be allowed to add a new record. Also, Contract Change, PCRs, Project and Project Deliverable child records will have some fields auto populated from parent records. "Fast Create" shortcuts will also appear for each Supporting Asset created aside from Comments that cannot have child records.

56
8.5. Creating a Comment
Users viewing the Details page of an existing object that allows Comment child objects can create a new Comment. It will be directly connected as a child Supporting Asset of that existing object as follows:
1. Click the Supporting Assets tab of the current object to view all its supporting assets, and proceed to display the list of Comments.
2. Click “Add new comment” above the list of existing comments (if any). Anyone who can view the to-be parent object can create a comment (or add a response in an existing "open” comment).
3. Fill in the subject of the Comment. 4. Fill in the text of the Comment. 5. Specify notification options:
• Provide a list of one or more PgMP users who should be notified that the Comment was created and who should be automatically notified every time there is a response to the Comment.
• Provide a list of one or more PgMP users who should be notified only that the Comment was created. Users in this list will not be notified of subsequent changes unless they are also in the automatic notification list described above or are specified by a subsequent responder.
6. Comments created by clients are always only Public. 7. Indicate if the comment is “Open” for responses to be added, or “Closed” which prevents
responses. Even when a Comment is “Closed”, the creator can make some further changes to the Comment.
Note on Comments:
• Only the creator of a Comment can edit a comment.
• Users edit a Comment by navigating to the Comment’s parent object, selecting the comment, and proceeding with changes. Note that the text of the comment cannot be edited and its Audience value and automatic notification list cannot be changed.
• Once a Comment or a response is saved, it cannot be changed. If that were allowed, subsequent responses might no longer make sense. If Comment creators decide that the initial comment text is no longer applicable, they can add a final response, close the Comment, and then perhaps create a new Comment.

57
8.6 Take Action Menu Added to The Record Details Section PgMP users will be able to select all the options that would be available to them in the “Take Action” drop down menu. The Take Action drop-down menu will be located on the right side of the green area on top of the PgMP Record.

58
8.7 Issue Owner field has been made mandatory for Issue records
Currently we have the "Issue Owner" field as optional for issue records. This field will be made mandatory in 17.7 release for the Issue workflows starting at "Qualify Issue" step based on the below criteria. Acceptance Criteria: 1. The "Issue Owner field will be made R/W mandatory to the button pusher at the Qualify Issue step and all further steps in issue workflow. 2. The "Issue Owner field is made R/W optional to the button pusher in the first step (Create Issue) 3. The "Issue Owner field will be R/O to all users in the final (Complete) 4. The "Issue Owner field will be R/O to non-button pusher for all steps

59
Chapter 9. Workflows
9.1. Purpose The workflow function within PgMP is used to push a record through the defined process by passing the records from step to step. When one step of the process is completed, PgMP moves the record to the next step and into the work queue of the person with the assigned role for that step.
9.2. Workflows PgMP introduced several new client-initiated workflows in addition to the original RFS workflows. The following workflows can be created by client-users:
• RFS - Predefined Service Request
• RFS - Indicative / Budget & Planning
• RFS - Firm
• Action
• Contract Change
• Catalog-Only Request
• Issue
• Project Change Request (PCR)
• Risk
9.3. Roles within the Defined Workflows For more detailed information on the defined workflows in PgMP: refer to the PgMP Roles matrix which includes a grid of all object types and their associated creator role(s).
9.4. Configuration Options for Request for Service, Catalog-only and PCR Objects
• These record types can be configured for the following roles:
• Client requestor
• Client approver
• Client focal point
• Client budget approver
• Specific routes can be configured through the Client-controlled steps in the following workflow phases:
• Submission
• Requirements
• Solution
• Proposal approval
• Implementation
Set paths can be set up to route records from one role to the next versus giving options of who can receive the record next if desired. Contact your IBM Account Focal Point to discuss your needs and set up your requested configurations.

60
9.5. Workflow tables for the Request for Service Object The following tables show the logic for each of the three-defined client-initiated workflows. The table contains the following fields:
• Process step – The name of the step within the defined workflow
• Role – The role that is responsible for the execution of the step
• Submit Verbs – The actions that can be taken at this step within the workflow. The most logical path/verb will be displayed first in the list.
• The default path is shown. It can be configured to flow differently on your account as previously mentioned.

61
9.5.1. Client – Initiated / Proposal Pricing Terms: Firm
The process steps at the Initiation stage will be determined by the discussions that you have had with the IBM account team to set up the tool. Shown are three steps; your process steps in PgMP may include just two or one.
Table 2 Client Initiated Proposal Flow - Firm
Process Visual Process step Role Submit verbs
Initiation Initiation/Rework Client Requestor
Send to client approver** Send to focal point for approval Send directly to IBM Save changes without change to workflow step
Initiation
Initiation approval Client Approver
Approve and send to focal point** Return to creator for rework Return to creator as rejected Save changes without change to workflow step
Initiation Submission
Client Focal Point**
Submit to IBM Return to creator for rework Return to creator as rejected Save changes without change to workflow step
Acknowledge and Qualify
Acknowledgement IBM RFS Manager
Acknowledge receipt
Requirements Definition
Requirements approval
Client Focal Point Client Requestor Client Approver
Approve requirements Send to another client role Reject requirements Save changes without change to workflow step
Solution Design Solution design approval
Client Focal Point Client Requestor Client Approver
Approve solution design Send to another client role Reject solution design Save changes without change to workflow step
Proposal Development
Proposal approval Client Focal Point**
Approve proposal* Send to another client role Reject and request rework of the proposal Reject the proposal and close this request Save changes without change to workflow step
Closure Closure Client Focal Point
Complete
*There is an optional loop for the IBM PE to countersign a proposal after the Client has approved. **Any or all 4 Client roles can perform this task if configured to do so.

62
9.5.2. Client – Initiated / Proposal Pricing Terms: Indicative - Budget & Planning
The process steps at the Initiation stage will be determined by the discussions that you have had with the IBM account team to set up the tool. Shown are three steps; your process steps in PgMP may include just two or one. Table 3 Client Initiated Proposal Flow – B&P
Process Visual Process step Role Submit verbs
Initiation Initiation/Rework Client Requestor
Send to client approver** Send to focal point for approval Send directly to IBM Save changes without change to workflow step
Initiation Initiation approval Client Approver**
Approve and send to focal point Return to creator for rework Return to creator as rejected Save changes without change to workflow step
Initiation Submission Client Focal Point
Submit to IBM Return to creator for rework Return to creator as rejected Save changes without change to workflow step
Acknowledge and Qualify
Acknowledgement IBM RFS Manager
Acknowledge receipt
Requirements Definition
Requirements approval
Client Focal Point Client Requestor Client Approver
Approve requirements Reject requirements Save changes without change to workflow step
Solution Design Solution design approval
Client Focal Point Client Requestor Client Approver
Approve solution design Reject solution design Save changes without change to workflow step
Proposal Development
Proposal confirmation
Client Focal Point Client Requestor Client Approver Client Budget Approver
Confirm receipt of Indicative proposal Confirm receipt of Budget and Planning proposal Reject and request rework of the proposal Reject the proposal and close this request Save changes without change to workflow step
Closure
Closure Client Focal Point
Complete
**Any or all 4 Client roles can perform this task if configured to do so.

63
9.5.3. Client – Initiated / Proposal Pricing Terms: Predefined Solution Request
The process steps at the Initiation stage will be determined by the discussions that you have had with the IBM account team to set up the tool. Shown are three steps; your process steps in PgMP may include just two or one.
Table 4 Client Initiated Prop - Predefined Sol.
Process Visual Process step Role Submit verbs
Initiation Initiation/Rework Client Requestor
Send to client approver** Send to focal point for approval Send directly to IBM Save changes without change to workflow step
Initiation Initiation approval Client Approver**
Approve and send to focal point Return to creator for rework Return to creator as rejected Save changes without change to workflow step
Initiation Submission Client Focal Point
Submit to IBM Return to creator for rework Return to creator as rejected Save changes without change to workflow step
Acknowledge and Qualify
Acknowledgement IBM RFS Manager
Acknowledge receipt
Proposal Development
Proposal approval
Client Focal Point Client Requestor Client Approver Client Budget Approver
Confirm agreement with the predefined services and prices Reject and request rework of the proposal Reject the proposal and close this request Save changes without change to workflow step
Implementation Implementation approval
Client Focal Point Client Requestor Client Approver
Approve implementation Reject implementation Save changes without change to workflow step
Closure Closure Client Focal Point
Complete
**Any or all 4 Client roles can perform this task if configured to do so.
9.6. Add New Survey Fields to the Predefined Solution
Workflows • Starting from PgMP R17.7, two new fields will be introduced to predefined solution workflows.
The fields will contain information about proposal and implementation survey recipient. The fields are ‘’Read’’ only. The information displayed is based on the user’s authorization to view personal information.
64
9.7. Catalog–only Request
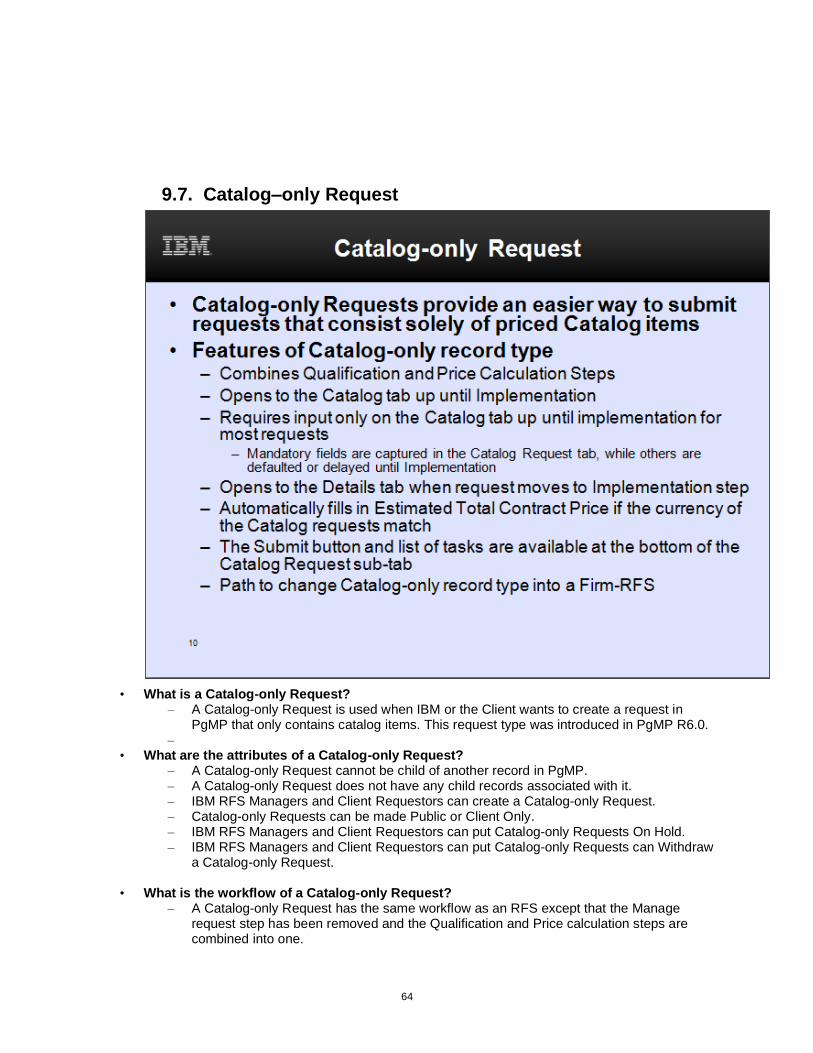
• What is a Catalog-only Request? – A Catalog-only Request is used when IBM or the Client wants to create a request in
PgMP that only contains catalog items. This request type was introduced in PgMP R6.0. –
• What are the attributes of a Catalog-only Request? – A Catalog-only Request cannot be child of another record in PgMP. – A Catalog-only Request does not have any child records associated with it. – IBM RFS Managers and Client Requestors can create a Catalog-only Request. – Catalog-only Requests can be made Public or Client Only. – IBM RFS Managers and Client Requestors can put Catalog-only Requests On Hold. – IBM RFS Managers and Client Requestors can put Catalog-only Requests can Withdraw
a Catalog-only Request.
• What is the workflow of a Catalog-only Request? – A Catalog-only Request has the same workflow as an RFS except that the Manage
request step has been removed and the Qualification and Price calculation steps are combined into one.

65
9.8. General Objects Workflow
The General Record types that can be shared with the client in PgMP are:
• Customer Satisfaction
• Formal Correspondence
• Governance
• These records share the same 3-step process in PgMP: Create, Active and Complete.
• General Records have a fast-path flow from Create directly to Complete for times when its creator completes the record in one session (anyone with the IBM Business Office role in the tool).
• Although these records can be shared with the client, only an IBM User of PgMP can work on it in the Active step.
• Only any member of the IBM Business Office can complete the process for a General Record.
Image Description: The IBM Business Office role creates the record, Any IBM User of PgMP can work on the record in the active state and finally the IBM Business Office role completes the process.
8
Create
Workflow for a General Record
Active
Complete
Any IBM User of PgMP
IBM Business Office
IBM Business Office

66
9.9. Contract Change Object Workflow
• What is a Contract Change? – A Contract Change is a change to the contract Term, Conditions or Schedules
• What are the attributes of a Contract Change?
– A Contract Change can be a stand-alone record or a child of a Request or Baseline record.
– A Contract Change can be created by an IBM Contract Change Manager or a Client Contract Change Manager
– A Contract Change can be made Public, IBM-only or IBM-Restricted Only. – A Contract Change can have the following child records associated with it:
• Actions • Approvals • Attachments • Baselines • Comments
• Contract Deliverable • Issues • Notes • Risks
Image Description: The Client Contract Change Manager enters the request for the contract change into the tool. Then the IBM Contract Change Manager qualifies it and prepares the change. Then Legal Contract Support provides IBM's approval and sends it on to the IBM PE or approves its release to the Client, the Client Contract Change Manager provides the Client's approval and finally the IBM Contract Change Manager executes the changes and closes the record out which completes the process.

67
9.10. Contract Deliverable Object Workflow • What is a Contract Deliverable?
– A deliverable contained in an Outsourcing Contract
• A Contract Deliverable record in PgMP can be:
– An IBM Deliverable that requires client notification (DND) – An IBM Deliverable that requires client approval (DAD) – Client Deliverable to IBM – A Deliverables list
• What are the attributes of a Contract Deliverable?
– A Contract Deliverable can be a top-level record or a child of a Contract Change record
– A Contract Deliverable can have the following child records associated with it: Action, Approval, Attachment, Comment, Issue and Risk
Image Description: The IBM Business Office role Registers the deliverable in the tool. Then any IBM User of PgMP can Define it. The IBM Deliverables Manager Reviews the definition, approves it, and records the Client’s approval, and assigns the Deliverable an owner. Text on the image states, “*DNDs flow moves from Register to Assign Deliverable Owner”. There is an * next to Register deliverable in the graphic.

68
Image Description: Next any IBM User of PgMP develops the deliverable and passes it on to the IBM Deliverables Manager who Records IBM’s Deliverable Completion approval. Next the Client Deliverables Manager who Records the Client’s Deliverable Completion approval and sends it on to the IBM Deliverables Manager who Records the Client’s Completion approval, and this completes the process.

69
9.11. Issues Object Workflow
• What is an Issue Object? – An issue that requires the intervention of the Project Executive and / or the Account
management team to facilitate resolution. • What are the attributes of an Issue?
– An Issue can be a parent record or a child of another record. – Any IBM or Client user of PgMP can create a Program Issue. – An Issue can be made Public, IBM-only or IBM-Restricted Only. – An Issue can have the following child records associated with it:
• Actions • Approvals • Attachments • Comments • Notes
Image Description: Any Client user creates the issue. Then, the IBM Issues Manager qualifies it. Any user of PgMP can resolve the issue and finally the IBM Issues Manager completes the process with the Client Issues Manager’s agreement.
70
9.12. Project Change Request (PCR) Object Workflow
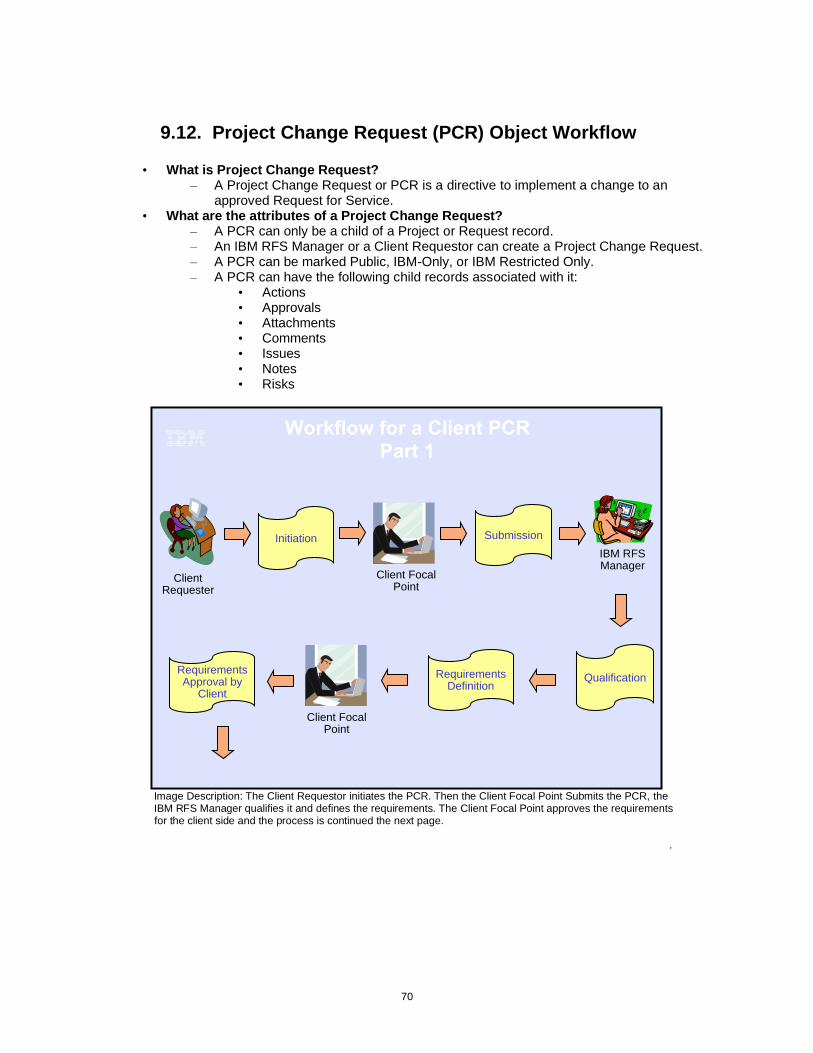
• What is Project Change Request? – A Project Change Request or PCR is a directive to implement a change to an
approved Request for Service. • What are the attributes of a Project Change Request?
– A PCR can only be a child of a Project or Request record. – An IBM RFS Manager or a Client Requestor can create a Project Change Request. – A PCR can be marked Public, IBM-Only, or IBM Restricted Only. – A PCR can have the following child records associated with it:
• Actions • Approvals • Attachments • Comments • Issues • Notes • Risks
Image Description: The Client Requestor initiates the PCR. Then the Client Focal Point Submits the PCR, the IBM RFS Manager qualifies it and defines the requirements. The Client Focal Point approves the requirements
for the client side and the process is continued the next page.
.
Initiation
Workflow for a Client PCR
Part 1
Submission
Qualification
Client Requester
Client Focal Point
IBM RFS Manager
Requirements Definition
Client Focal Point
Requirements Approval by
Client
IBM RFS Manager

71
Image Description: The IBM Solution Design TL designs the solution, the Client Focal Point provides the
Client’s approval of the solution design. The IBM Solution Design TL packages the solution, the IBM RFS Manager develops the proposal and the process is continued in the next image.
Image Description: The IBM PE proposes the release of the PCR by IBM. The Client Focal Point provides The client's approval of the proposal. There is an optional loop for the IBM PE to countersign a proposal after the Client has approved. The IBM RFS Manager closes the RFS and this completes the process.
Workflow for a Client PCR
Part 2
Solution
Packaging
Solution Design
Approval by Client
Client Focal Point
IBM Solution
Design TL
IBM Solution
Design TL
Solution Design
IBM RFS Manager
Proposal Development
Workflow for a Client PCR
Part 3
Proposal Approval (Client)
Closure Complete
Client Focal Point
IBM RFS Manager
Proposal Release
(IBM)
IBM PE

72
9.13. Risk Object Workflow
• What is a Program Risk? – A Program Risk is a potential event or future situation that may adversely affect the
program that requires the intervention of the PE and / or the Account management team to facilitate effective management.
• What are the attributes of a Program Risk? – A Program Risk can be a standalone record or a child or another record – Any IBMer or Client can create a Program Risk – A Program Risk can be made Public, IBM-only or IBM-Restricted Only – A Program Risk can have the following child records associated with it:
• Actions • Approvals • Attachments • Comments • Issues • Notes
Image Description: Any Client user of PgMP can create a risk. The IBM Risk Manager qualifies the risk; any IBM user of PgMP can analyze the risk and plan a response. The IBM Risk Manager approves the risk response plan.

73
Image Description: Any IBM user of PgMP can Track and Control a risk. Finally, the IBM Risk Manager closes the risk and this completes the process.

74
Chapter 10. PgMP Notifications
PgMP users can elect to be notified of changes made to records in PgMP beyond the ones that are assigned to them. Notifications are set up under Notification preferences link from the top menu settings drop down. They are enabled or disabled on the Profile notifications field in the My notification preferences screen.
• Notification profile identifies the records and their events for which the user should be notified.
• Users will only be notified about records that they are authorized to view
A user’s “My defaults” profile defaults to providing no notifications. All organizations are initially set to the “My defaults” profile for notifications. Click Add to create a new notification profile or View or Edit to modify an existing profile.
75
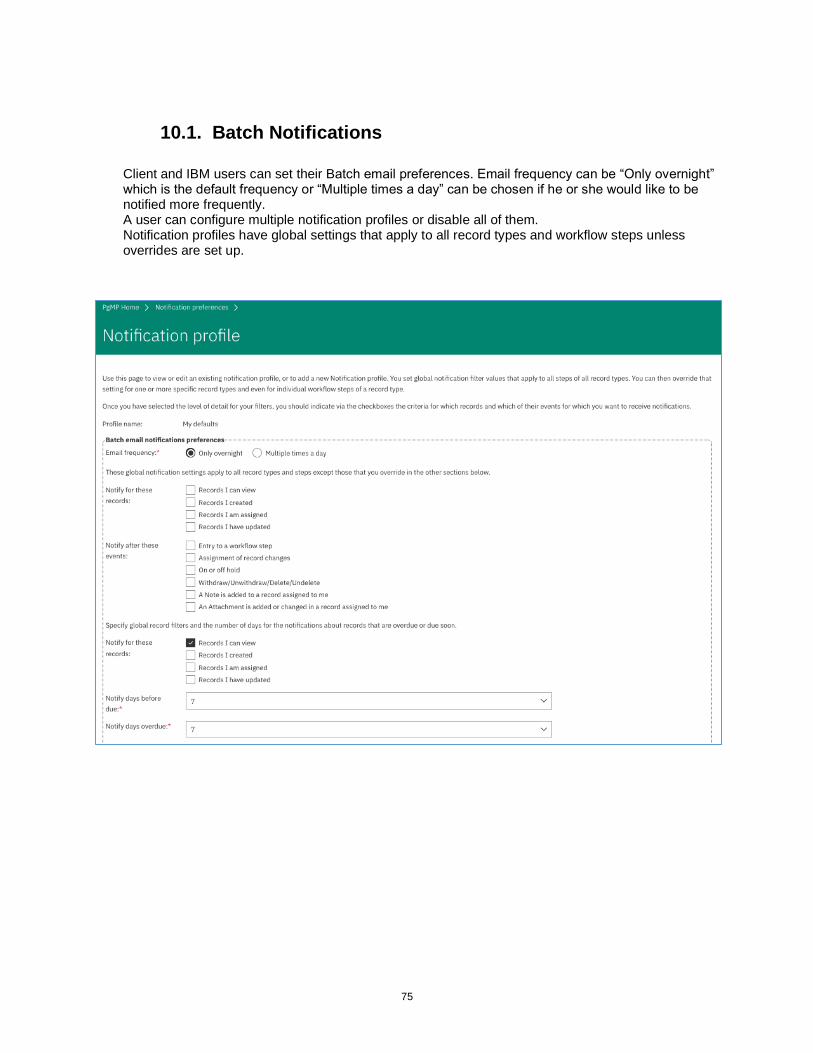
10.1. Batch Notifications
Client and IBM users can set their Batch email preferences. Email frequency can be “Only overnight” which is the default frequency or “Multiple times a day” can be chosen if he or she would like to be notified more frequently. A user can configure multiple notification profiles or disable all of them. Notification profiles have global settings that apply to all record types and workflow steps unless overrides are set up.

76
Chapter 11. Exports
Clients can export information out of PgMP by going to the Export file section of the top navigation under Create. Once a user clicks on Export file they will see the Exports page. There are four batch exports available in PgMP, Export record log and Export record history, shown here, as well as Attachment and PDF exports which are requested from other sections of the tool but whose results appear on this page. A “Manage scheduled exports” link is also located on the Exports page to access exports that have been scheduled.
Note: There is a message on the Export screen that states, “Request an export by clicking one of
the following choices. Export files are produced by a batch process and made available to you in the list below when they are ready. Click the title of a completed request to download the export file to your workstation. The results might not include any changes you have made within the past 10 minutes. Export files are kept in PgMP for seven days and then are deleted.”
PgMP lets you know that up to 5 export requests can run at the same time. It also lets you know how many requests are currently running and how many are in the queue. Additionally, it lets you know the average number of minutes the request(s) currently running waited to start and when the oldest currently running request was in your selected time zone. Exports can be deleted by putting a check in the box to the left of the desired Export and clicking the Delete button. Any exported attachments will also appear on this page. Click the Export title to access the documents. Exported attachments are added to PgMP as a zip file.
There is an option to "Export combined Request, Catalog- Only and PCR records”

77
Users select individual positions, All production, All test, or All production and test positions for an export
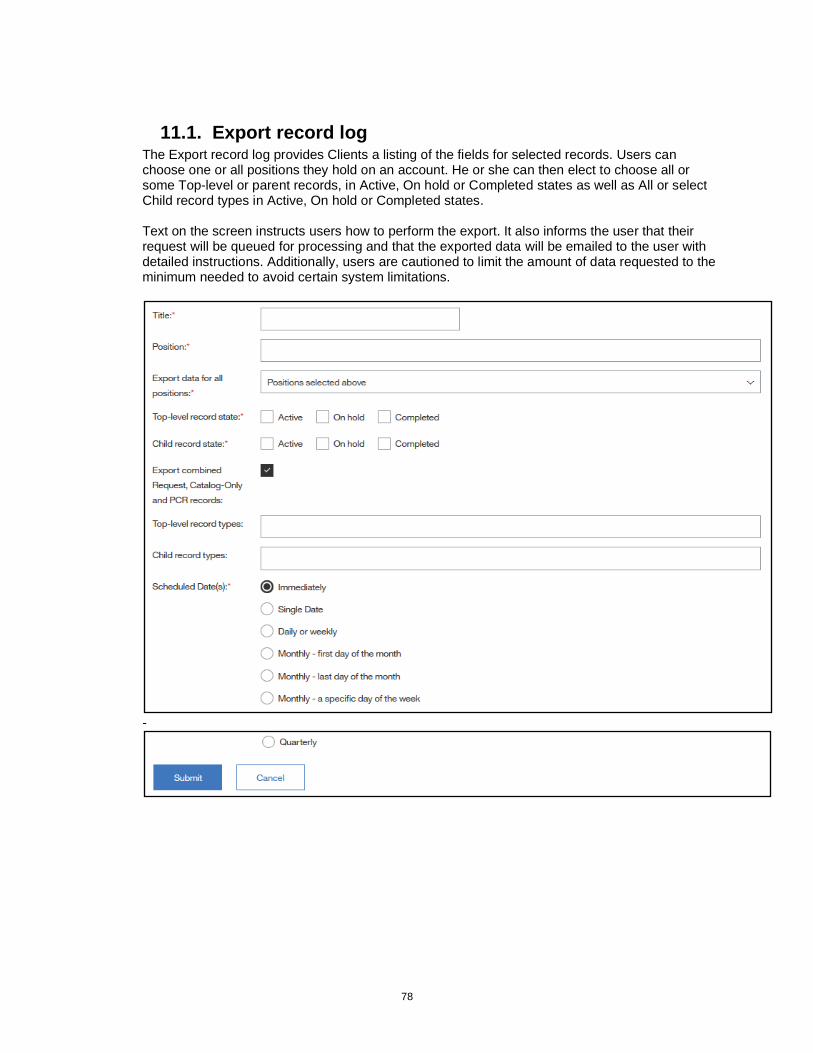
78
11.1. Export record log The Export record log provides Clients a listing of the fields for selected records. Users can choose one or all positions they hold on an account. He or she can then elect to choose all or some Top-level or parent records, in Active, On hold or Completed states as well as All or select Child record types in Active, On hold or Completed states. Text on the screen instructs users how to perform the export. It also informs the user that their request will be queued for processing and that the exported data will be emailed to the user with detailed instructions. Additionally, users are cautioned to limit the amount of data requested to the minimum needed to avoid certain system limitations.
-

79

80
11.2. Export history log The Export record history provides the history of the steps a record has gone through, the user assigned to each step and the time and date it was changed. It has the same export options as the Export Record Log, users can choose all or some Top-level and Child record types in Active, On hold or Completed states. Text on the screen instructs users how to perform the export. It also informs the user that their request will be queued for processing and that the exported data will be emailed to the user with detailed instructions.

81
11.3. Manage scheduled Exports Request logs can be scheduled to be run daily, weekly, monthly or quarterly if desired as well as once on a specific date. We will cover this feature in this and the next slide. When users click on Export record log from Exports he or she will find Scheduled Date(s) section shown here. This section defaults to an immediate export as previously done but it can be changed for one date in the future or a repeating frequency in the future.
The first column shown on the Manage scheduled exports section, “Title”, lists the scheduled exports and its hotspot which allows users to alter future exports. Buttons located here allow users to Delete, disable existing scheduled export requests or Enable previously Disabled export report requests. Note: Users should remove a scheduled request when it is no longer needed as it will cause other exports to take longer to run. PgMP will periodically check to see whether scheduled exports are being accessed and if they are not accessed for more than 6 weeks PgMP will send the user an email warning that the export will be disabled if it is not accessed in the next week. Disabled reports can be re-enabled if required.

82
11.4. Exported Attachments Attachment exports are requested from other sections of the tool but their results appear on the Exports page. Multiple attachments can be exported from the Search for attachments view or a record’s Attachment list. Users place checkmarks in the checkboxes to the left of the attachments they wish to export and click the Export button. A pop up window lets users know, “Provide a title for this export request and click OK. Export files are produced by a batch process and are made available for you to download usually within an hour. An email will be sent once the download is complete and the user can click on the link provided in the email or directly on Exports from the left-hand navigation to locate them. Attachments are provided to users in the Export section of the tool in a zipped file.
11.5. Export Changes - New Fields Must Be Applied to Custom
Reports • Accounts that use custom labels will want to work with their representative to obtain the
account specific export files.
• Owners of custom reports that use the PgMP Exports as their base input file will want to work with these representatives so they may apply the new fields to their custom reports ahead of PgMP Release 17.7.

83
11.6. Exported PDF Files
PDF exports are requested from other sections of the tool but their results appear on the Exports page. PDF exports can be exported from the Search for records view but also from the Take Action column of a work queue. In this case users choose the data to include: record types, Personal Information, cost and Price and sections (Details, Supporting Assets /Attachments list and/or Notes). Once the options are selected the message shown here appears letting the Requestor know the export has been submitted and will appear in the Exports section in the left-hand navigation. An automatic email is also sent when the PDF export is available. It provides a link to view the list of your currently available exported files.
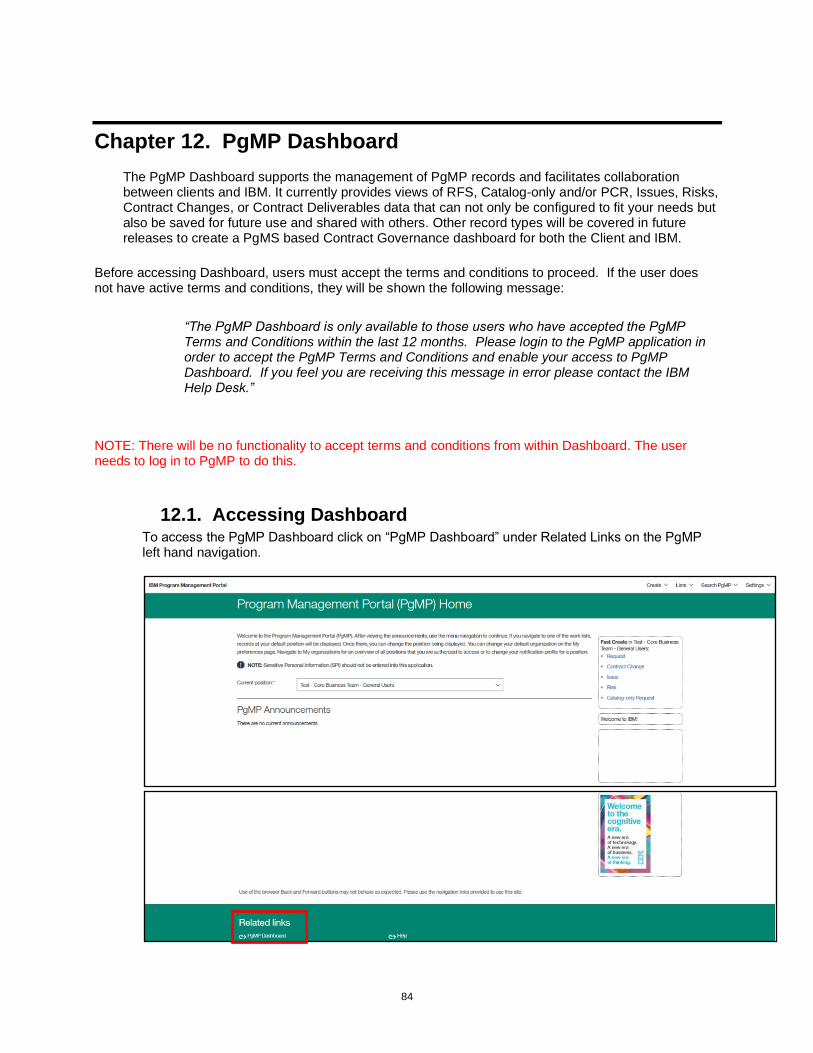
84
Chapter 12. PgMP Dashboard
The PgMP Dashboard supports the management of PgMP records and facilitates collaboration between clients and IBM. It currently provides views of RFS, Catalog-only and/or PCR, Issues, Risks, Contract Changes, or Contract Deliverables data that can not only be configured to fit your needs but also be saved for future use and shared with others. Other record types will be covered in future releases to create a PgMS based Contract Governance dashboard for both the Client and IBM.
Before accessing Dashboard, users must accept the terms and conditions to proceed. If the user does not have active terms and conditions, they will be shown the following message:
“The PgMP Dashboard is only available to those users who have accepted the PgMP Terms and Conditions within the last 12 months. Please login to the PgMP application in order to accept the PgMP Terms and Conditions and enable your access to PgMP Dashboard. If you feel you are receiving this message in error please contact the IBM Help Desk.”
NOTE: There will be no functionality to accept terms and conditions from within Dashboard. The user needs to log in to PgMP to do this.
12.1. Accessing Dashboard To access the PgMP Dashboard click on “PgMP Dashboard” under Related Links on the PgMP left hand navigation.

85
12.2. Welcome Page Users can multi select the Contract name or names he or she would like to view in PgMP and choose the Record type or types: RFS, Catalog-only and/or PCR, Issues, Risks, Contract Changes, or Contract Deliverables data for the requested Contract.
12.3. Custom Views This section provides the ability to customize your view of RFS, Catalog-only and/or PCR, Issues, Risks, Contract Changes, or Contract Deliverables data. You choose which view you would like using the Record Type filter on the Welcome page. Custom Views provide quick overviews of the current status of in-flight RFS and Catalog-only records and/or PCRs and allows users to create notes called “Annotations” for any PgMP record shown here. In addition, customized views can be created for particular client, IBM, or collaborative purposes, including joint status review meetings and client internal review requirements. These customized views are saved as templates for repeated use and can be exported as .csv or .xls files.

86
12.4. Annotations Annotations can be added, viewed, completed or deleted.
12.5. My saved templates This section lists the templates that have been customized by an individual. Customizations include the ability to select and order PgMP fields and add filters to template views. Templates can be named and saved for later use and can also be shared with others.

87
12.6. Survey Fields Visible in Dashboard and Available for Export
As part of further Medallia survey solution integration in PgMP, two new survey fields (Proposal survey recipient and Implementation survey recipient) will be available in Custom View within PgMP Dashboard.
The custom view templates can be:
• saved for later use
• shared with other users

88
The Dashboard view including the new survey fields can be exported to CSV file.
Users can see the fields and their values, according to normal Dashboard and PgMP rules including authorization for Personal Information display. If the user type could not see a value now for the field if they opened the record in the Portal, then no value is shown in the Dashboard. These fields are included in the Dashboard export, subject to all the same rules. The special "None available" value is shown if the record is at a point in the workflow when that field is shown in the RFS records. This occurs if there are no client users holding a role used to assign the recipient AND the record has been saved at or following a step where the recipient field became mandatory. Users should not confuse this with empty fields prior to the time that data can be stored in this field.
12.7. Adding of "Created by" field as filter in client PgMP dashboard
A "Created by" field as a filter in the client PgMP dashboard has been added.
The requester field in PgMP portal does not address its absence, as this field is updated with the "Created By"' name by default, but later during the life cycle of the record can be updated and overwritten.
Criteria:
• The "Created By" field is offered as a filter on the "Custom Views" tab.
• When the "Created By" field is chosen as a filter, the list of users in the Add Filters overlay contains all users, who have created a record within the current range of displayable records.
• Users are displayed in the list of users in the "Add Filters" overlay in the same manner and style as users are listed when the "Assigned to" filter is chosen.
• Multiple users can be selected or deselected as values for the “Created By” filter, just like they can currently be for the "Assigned To" filter, by use of the ">" and "<" buttons.
• When users are selected in the overlay and then the Close button is clicked in the overlay, the selected users are displayed separately as "Created by" filter values in the filter area on the underlying "Custom Views" page.
• Once "Created By" users are displayed in the filter area on the "Custom Views", the list of records will correctly show all records created by those users and no records created by any other users.
• When other fields are also filtered, the list of records correctly shows the results of all filters that are specified. Remember that the filters of the same name are combined with “OR”

89
operator together, and those groups are then combined with “AND” operator together to determine the records that should be displayed.

90

91
Chapter 13. PgMP 20.2 Enhancements
13.1. PgMP - eSignature - Reflect the Language choice of the
PgMP user in the Signing email
This story is being implemented for the following reasons and user needs:
• Display the eSignature iFrame in the language of the PgMP user.
• Send the eSignature notification email(s) to the assigned user(s) in his language defined in PgMP.
• Signing page and the invitation that will be sent will be translated in signer's language.
Please note that this apply for both proposal and implementation. If the signer is a client and it's not a PgMP user, default language will be set to English.
So far activate, complete and reassign templates are currently active.
Screenshot showing Signing email sample:

92
Screenshot showing another example of the language selected by the user for IBM eSignature Signature email

93
13.2. PgMP Portal - Remove the possibility to add Obsolete attachments in Approval Supporting Asset
From PgMP release 20.2, Client users will not be able to add Obsolete attachments for Approval supporting asset, because they are not relevant for Approval record type.
Below is the list of changes for Approval supporting asset record type at the Define approval step:
1. Hide obsolete attachments check box will be removed from Identify existing attachments to be reviewed overlay. 2. Obsolete attachments will no longer be displayed in the list of existing attachments in Identify existing attachments overlay. 3. Obsolete column will be removed from the table in the Identify existing attachments overlay.
Screenshot showing difference between the languages selected from previous to current release

94
13.3. PgMP Portal/Dashboard - Changes to the Response type field in Risk record type
To improve productivity and to simplify the Program Risk workflow and to be consistent with the PgMS process, we have changed the Response Type values in the drop-down menu.
New values are:
Acceptance --> Accept/Retain
Insurance --> Use Insurance
Use reserve --> Use Risk Reserve
Containment --> Contain/Reduce
Avoid - no change
Transfer - no change

95
13.4. PgMP Dashboard - Update how Notes In Dashboard view and export are shown to IBM and Client users
Until now, Dashboard was having only one column for Notes where both IBM-only/Client Only and Public notes were displayed and only the most recent one was visible.
From PgMP 20.2 Release onwards, for the current column "Notes", a new Notes column is added.
• If there is only one note in the record, it is shown in the "Notes" column, but if there are multiple notes, they appear in the column where they were entered.
• For Client users, the new column shows as "Client only notes" and it is visible for clients only and when Public view is ON it is hidden.
Below is the print screen showing the Notes column with a link to View all

96

97
Chapter 14. References
PgMP Education
What’s New in PgMP PPT
PgMP Education Videos
There are 6 education modules that should be used in conjunction with this guide: PgMP Basic Overview for the Client PgMP Advanced Overview for the Client PgMP Request Management, PCRs and the Client PgMP Contract Management and the Client PgMP Catalog and the Client
PgMP Dashboard and the Client
View or download the PgMP Client Education Index to find more information on the contents of each module
To watch a video module, click the link of the module listed above, that you would like to access. The zipped files will be downloaded to your computer. You can open them or save them to your hard drive. Open the .html file in your local browser to view the module. If you have any questions or problems, please contact your IBM Account Focal Point.
Accessibility
IBM is committed to accessibility. The videos available through the links in the section above are closed-captioned. To further assist two additional files are available for each module:
• A copy of the Microsoft PowerPoint file used in each video can be obtained in the links below:
o PgMP Basic Overview for the Client PPT
o PgMP Advanced Overview for the Client PPT
o PgMP Request Management, PCRs and the Client PPT
o PgMP Contract Management and the Client PPT
o PgMP Catalog and the Client PPT
o PgMP Dashboard and the Client PPT

98
END OF DOCUMENT. PgMP Client User Guide