IBM InfoPrint Manager 3.1 for AIX - Massachusetts Institute · PDF file ·...
73
IBM InfoPrint Manager 3.1 for AIX Procedures Documentation from the Internet
Transcript of IBM InfoPrint Manager 3.1 for AIX - Massachusetts Institute · PDF file ·...

IBM InfoPrint Manager 3.1 for AIX
Procedures Documentation from the Internet

Page ii 01/05/99
Contents
Procedures Overview . . . . . . . . . . . . . . . . . . . . . . . . . . . . . . . . . . . . . . . . . . . . 1
Printing from SAP R/3 . . . . . . . . . . . . . . . . . . . . . . . . . . . . . . . . . . . . . . . . . . . . . . . . . . . . . . . 2
Defining Output Devices for Printing ABAP and OTF on SAP R/3 Version 3 . . . . . . . . . . . . . . .3
Defining Output Devices for Printing PCL and PostScript on SAP R/3 Version 3 . . . . . . . . . . . 5
Defining Devices that Use Access Method L . . . . . . . . . . . . . . . . . . . . . . . . . . . . . . . . . . . . . . . 6
Defining Devices that Use Access Method U . . . . . . . . . . . . . . . . . . . . . . . . . . . . . . . . . . . . . . . 8
Printing from SAP R/3 Version 4 (Enhanced Status) . . . . . . . . . . . . . . . . . . . . . . . . . . . . . . . . . 10
Defining Devices that Use InfoPrint Manager . . . . . . . . . . . . . . . . . . . . . . . . . . . . . . . . . . . . . 11
Activating End-User Pop-Ups . . . . . . . . . . . . . . . . . . . . . . . . . . . . . . . . . . . . . . . . . . . . . . . . . . 13
Organizing OMS Output Devices into LOMSs . . . . . . . . . . . . . . . . . . . . . . . . . . . . . . . . . . . . 16
Moving OMS Definitions Between Systems . . . . . . . . . . . . . . . . . . . . . . . . . . . . . . . . . . . . . . . 17
Selecting Event Report Levels . . . . . . . . . . . . . . . . . . . . . . . . . . . . . . . . . . . . . . . . . . . . . . . . . . 19
Viewing Enhanced Job Status, Job Events, and Querying Jobs . . . . . . . . . . . . . . . . . . . . . . . . 21
Displaying Device Status . . . . . . . . . . . . . . . . . . . . . . . . . . . . . . . . . . . . . . . . . . . . . . . . . . . . . . 23
Canceling Jobs on a SAP R/4 Version 4 System . . . . . . . . . . . . . . . . . . . . . . . . . . . . . . . . . . . . 26
Shutting Down the SAP Callback Daemon . . . . . . . . . . . . . . . . . . . . . . . . . . . . . . . . . . . . . . . 27
Using AFP Printing (sap2afp transform) Procedures . . . . . . . . . . . . . . . . . . . . . . . . . . . . . . . . . 28
Defining a Customized Device Type . . . . . . . . . . . . . . . . . . . . . . . . . . . . . . . . . . . . . . . . . . . . 29
Defining New Formats . . . . . . . . . . . . . . . . . . . . . . . . . . . . . . . . . . . . . . . . . . . . . . . . . . . . . . . . 31
Connecting a New Format to a Device Type . . . . . . . . . . . . . . . . . . . . . . . . . . . . . . . . . . . . . . 39
Enabling Multi-Byte Character Sets for Japanese Fonts . . . . . . . . . . . . . . . . . . . . . . . . . . . . . . 42
Setting Up New OTF User Fonts . . . . . . . . . . . . . . . . . . . . . . . . . . . . . . . . . . . . . . . . . . . . . . . . 43
Setting Up New OTF User Barcodes . . . . . . . . . . . . . . . . . . . . . . . . . . . . . . . . . . . . . . . . . . . . . 45
Barcodes and Printing from SAP R/3 through InfoPrint Manager . . . . . . . . . . . . . . . . . . . . . 47

Page iii 01/05/99
Adding Box Shading Values to Printed Output . . . . . . . . . . . . . . . . . . . . . . . . . . . . . . . . . . . . . 50
Submitting Faxes from SAP R/3 . . . . . . . . . . . . . . . . . . . . . . . . . . . . . . . . . . . . . . . . . . . . . . . . . 51
Creating an R/3 Fax Device . . . . . . . . . . . . . . . . . . . . . . . . . . . . . . . . . . . . . . . . . . . . . . . . . . . 52
Submitting a Fax from SAP R/3 to InfoPrint Manager . . . . . . . . . . . . . . . . . . . . . . . . . . . . . . . 54
Sending and Receiving Fax Jobs . . . . . . . . . . . . . . . . . . . . . . . . . . . . . . . . . . . . . . . . . . . . . . . . . 55
Submitting Fax Jobs . . . . . . . . . . . . . . . . . . . . . . . . . . . . . . . . . . . . . . . . . . . . . . . . . . . . . . . . . . 56
Specifying Fax Cover Sheets . . . . . . . . . . . . . . . . . . . . . . . . . . . . . . . . . . . . . . . . . . . . . . . . . . . 58
Submitting Email Jobs . . . . . . . . . . . . . . . . . . . . . . . . . . . . . . . . . . . . . . . . . . . . . . . . . . . . . . . . . 61
Using AFP Upload to Print MVS Data. . . . . . . . . . . . . . . . . . . . . . . . . . . . . . . . . . . . . . . . . . . . . 67
Using InfoPrint Library . . . . . . . . . . . . . . . . . . . . . . . . . . . . . . . . . . . . . . . . . . . . . . . . . . . . . . . . 68

Page 1 of 70 01/05/99
ProceduresPrinting from SAP R/3
Submitting Fax Jobs
Submitting Email Jobs
Using AFP Upload to Print MVS Data
Using InfoPrint Library
This page last updated on December 16, 1998
Copyright © 1998 IBM Corporation

Page 2 of 70 01/05/99
Printing from SAP R/3Defining Output Devices for Printing ABAP and OTF on SAP R/3 Version 3
Defining Output Devices for Printing PCL and PostScript on SAP R/3 Version 3
Printing from SAP R/3 Version 4 (Enhanced Status)
Using AFP Printing (sap2afp transform) Procedures
Submitting Faxes from SAP R/3
This page last updated on December 16, 1998.
Copyright © 1998 IBM Corporation

Page 3 of 70 01/05/99
Defining Output Devices for Printing ABAP and OTF onSAP R/3 Version 3Before you can use a device type for printing from SAP R/3, you must create a new outputdevice. The following topics describe how to perform this task: Defining Devices to InfoPrintManager 3.1 on SAP R/3 Version 3.
To enable this support, a SAP R/3 administrator must perform the following procedure fromthe SAP R/3 graphical user interface:
1. From the R/3 main menu, access the Spool Administration window by selectingthe Tools main menu and then selecting the Tools-- Administration--Spool--Spool Administration path,
or typing /nSPAD in the ok-Code field.
2. From the Spool Administration window, select the Output devices option andselect the Change push-button.

Page 4 of 70 01/05/99
3. Select the Create icon and fill in the following information on the Create OutputDevice window:
Field Value
Output Device Prt1
Specify the case-sensitive name that R/3 users will need toaccess the printer. Note that the system generates the shortname, which is used internally by the spool system.
Device type IBMAFP
Specify the device type that has been defined in the R/3system for the printer model. IBMAFP is the 240-pel printerdesignation, while IBMAFP3 is the 300-pel printerdesignation.
Spool server us01d2_P40_41
Specifies the name of the R/3 application server which will bethe spool server. This spool server can transfer output acrossa network link.
Host printer prt1-lp
Specifies the name of the InfoPrint Manager logical printer.
Device class Enter a space so that this field accepts the default value of printer.
Access methodin host spool
Z
Specifies the method that the spool work process uses topass data to the host spool system.
4. From the menu bar, click on the Back icon and the system will prompt you to savethe new output device.
Defining the Data Type for Printing ABAP
To ensure that the InfoPrint printer recognizes the correct data type, you must open an AIXwindow on the InfoPrint AIX server and specify the following at the command line:
pdset -xdoc-formats-sup+=sap-abap printername
where printername indicates the InfoPrint Manager physical destination (printer).
Note that this change cannot be added through the printer notebook on the InfoPrintManager graphical user interface. If you do not make this change, ABAP input data will notprint.
This page last updated on December 16, 1998.
Copyright © 1998 IBM Corporation

Page 5 of 70 01/05/99
Defining Output Devices for Printing PCL and PostScript onSAP R/3 Version 3Defining Devices that Use InfoPrint Manager with Access Method L
Defining Devices that Use InfoPrint Manager with Access Method U
This page last updated on December 16, 1998.
Copyright © 1998 IBM Corporation

Page 6 of 70 01/05/99
Defining Devices that Use InfoPrint Manager for AccessMethod LBefore you can use a device type for printing from SAP R/3, you must create a new outputdevice. The following topic describes how to perform this task for printing PCL andPostScript data locally to InfoPrint Manager 3.1 on SAP R/3 Version 3.
To enable this support, a SAP R/3 administrator must perform the following procedure fromthe SAP R/3 graphical user interface:
1. From the R/3 main menu, access the Spool Administration window by selectingthe Tools main menu and then selecting the Tools-- Administration--Spool--Spool Administration path.
or typing /nSPAD in the ok-Code field.
2. From the Spool Administration window, select the Output devices option andselect the Change push-button.

Page 7 of 70 01/05/99
3. Select the Create icon and fill in the following information on the Create OutputDevice window:
Field Value
Output Device Prt1
Specify the case-sensitive name that R/3 users will need toaccess the printer. Note that the system generates the shortname, which is used internally by the spool system.
Device type POSTSCPT
Specify the device type that has been defined in the R/3system for the printer model. POSTSCPT applies to anyPostScript printer, while HPLJ4 applies to a Hewlett-PackardLaserJet 4 printer.
Spool server us01d2_P40_41
Specifies the name of the R/3 application server which willbe the spool server. When possible, you should specify aspool server that is running in the host system to which thepriner is attached.
Host printer prt1-lp
Specifies the name of the InfoPrint Manager logical printer.
Device class Enter a space so that this field accepts the default value of printer.
Access method inhost spool
L
Specifies the method that the spool work process uses topass data to the host spool system.
4. From the menu bar, click on the Back icon and the system will prompt you to savethe new output device.
This page last updated on December 16, 1998.
Copyright © 1998 IBM Corporation

Page 8 of 70 01/05/99
Defining Devices that Use InfoPrint Manager for AccessMethod UBefore you can use a device type for printing from SAP R/3, you must create a new outputdevice. The following topic describes how to perform this task for printing through a remotehost, such as an Hewlett-Packard system, to InfoPrint Manager 3.1 on SAP R/3 Version 3.
To enable this support, a SAP R/3 administrator must perform the following procedure fromthe SAP R/3 graphical user interface:
1. From the R/3 main menu, access the Spool Administration window by sSelectingthe Tools main menu and then selecting the Tools-- Administration--Spool--Spool Administration path.
or typing /nSPAD in the ok-Code field.
2. From the Spool Administration window, select the Output devices option andselect the Change push-button.

Page 9 of 70 01/05/99
3. Select the Create icon and fill in the following information on the Create OutputDevice window:
Field Value
Output Device Printer1
Specify the case-sensitive name that R/3 users will need toaccess the printer. Note that the system generates the shortname, which is used internally by the spool system.
Device type POSTSCPT
Specify the device type that has been defined in the R/3system for the printer model. POSTSCPT applies to anyPostScript printer, while HPLJ4 applies to a Hewlett-PackardLaserJet 4 printer.
Spool server us01d2_P40_41
Specifies the name of the R/3 application server which willbe the spool server. This spool server can transfer outputacross a network link.
Host printer prt1-lp
Specifies the name of the InfoPrint Manager logical printer.
Device class Enter a space so that this field accepts the default value of printer.
Access methodin host spool
U
Specifies the method that the spool work process uses topass data to the host spool system.
4. From the menu bar, click on the Back icon and the system will prompt you to savethe new output device.
This page last updated on December 16, 1998.
Copyright © 1998 IBM Corporation

Page 10 of 70 01/05/99
Printing from SAP R/3 Version 4 (Enhanced Status)Defining Devices that Use InfoPrint Manager
Activating End-User Pop-Ups
Organizing OMS Output Devices into LOMSs
Moving OMS Definitions Between Systems
Selecting Event Report Levels
Viewing Enhanced Job Status, Job Events, and Querying Jobs
Displaying Device Status
Canceling Jobs on a SAP R/3 Version 4 System
Shutting Down the SAP Callback Daemon
This page last updated on December 16, 1998.
Copyright © 1998 IBM Corporation

Page 11 of 70 01/05/99
Defining Devices that Use InfoPrint Manager 3.1Use the following procedure to define devices to SAP R/3 Version 4. For more information,you might want to consult the "Connecting a Printer to an External Output ManagementSystem" topic in the SAP R/3 online documentation.
1. Ensure that you have a logical printer defined in InfoPrint Manager, which will sendjobs to your physical printer device.
2. From the SAP R/3 graphical user interface, specify the spad transaction.
3. From the Spool Administration: Initial Screen window, click the Output Devicesbutton, click the Change (red pencil f8 key) icon, and push the Output Devicespush-button.
4. From the Spool Administration: List of Output Devices window, click the Create(white paper image to the right of the trash can) icon
5. From the Spool Administration: Create Output Device window displayed below,fill in the following pieces of information:
Field Examples
Output device: Specify a long name and allow the system togenerate a short name.
IPM
Device type: Specifies the output data stream. SAPGOF
Host printer: Specify the InfoPrint Manager logical printer name. ip01-sam
Access method to host spool: Ensure you specify this AccessMethod.
E
LOMS: Specify the LOMS to which this device should be assigned.You specified this value on the Spool Admin.: Logical OutputManagement System window under Define the InfoPrintManager OMS to SAP R/3.
IPM001
Spool server: Choose an applicable spool server from theentries list on the field. ibmbtt15_BTF_15

Page 12 of 70 01/05/99
6. Save this information by clicking on the folder icon (or specifying the Ctrl + S keys),then exit the interface.
Once you have saved these changes, you have a devices that will print to InfoPrintManager using Access Method E.
Because this device is defined to send jobs to InfoPrint Manager, you can, among othertasks, View Job Status, Job Events, and Job Queries, Display Device Status, Cancel a Job,and Shut Down the SAP Callback Daemon.
This page last updated on December 16, 1998.
Copyright © 1998 IBM Corporation

Page 13 of 70 01/05/99
Activating End-User Pop-UpsInfoPrint Manager Version 3.1 allows you to obtain information from the spooler aboutoutput requests (print jobs) as they complete processing. To activate this support, ensurethat you have done the following while installing and configuring InfoPrint Manager with SAPR/3 Version 4 for enhanced status reporting.
1. From the SAP R/3 graphical user interface, complete the Logical Output ManagementSystem (LOMS) definitions by specifying the spad transaction.
2. From the Spool Administration: Initial Screen window, click on the Extendedadmin push-button (f6 key) and select the Logical OMS push-button from theOutput management systems pane to obtain a list of the Logical OutputManagement Systems (LOMS) available on your installation.
3. From the Spool Admin.: List of Logical Output Management Systems window,select the Ipm001 LOMS and click on the Choose (checkmark with a clock or f2 key)icon.
4. From the Spool Admin.: Logical Output Management (Display) window, clickthe Change (red pencil f8 key) icon.

Page 14 of 70 01/05/99
5. From the Spool Admin.: Logical Output Management System window that isdisplayed below, check the Status dialog box field in the Jobs pane.

Page 15 of 70 01/05/99
6. Once you have specified this setting, information from the InfoPrint Manager spooleris sent back to your SAP R/3 application server in the form of a pop-up window. Forexample, if you have deleted an output request that has already finished processingat the printer, InfoPrint Manager sends back a pop-up Information window(displayed below) to inform you of the output requests' status.
This page last updated on December 16, 1998.
Copyright © 1998 IBM Corporation

Page 16 of 70 01/05/99
Organizing OMS Output Devices into LOMSsWhile you can assign all of your R/3 OMS output devices to a single Logical OutputManagement System (LOMS), it might be useful to group output devices into separateLOMS. These separate LOMS can be based upon the functions that they perform, such as:
• Using separate command groups
• Using different OMS services
• Distributing the callback workload
Using Separate Command Groups
You can define a different set of OMS command for each LOMS that you have defined. Forexample, your InfoPrint Manager printers may require different submit command options,depending upon whether you are printing from ABAP and OTF input, or PCL and PostScriptinput. You can assign both sets of printers to their own LOMS and define a special commandgroup that uses the special options for each LOMS.
Using Different OMS Services
You can define LOMSs to allow for the use of different OMS services, based upon the printer.For example, you may want the InfoPrint Manager callback daemon to provide status onlyfor printers that accept ABAP and OTF input data streams. For print jobs submitted to PCLand PostScript printers, you might only require polling of data. By defining a separate LOMSfor each group, you can ensure that you have activated the callback support (refer toActivating End-User Pop-Ups).
Distributing the Callback Workload
You can define separate LOMSs to distribute the workload of processing status reports fromthe InfoPrint callback daemon. For each LOMS, specify a different R/3 server as the callbacktarget. Before implementing this feature, consult the online documentation about LOMS thatis provided with your SAP R/3 Version 4 system, as well as Moving OMS Definitions BetweenSystems and Shutting Down the SAP Callback Daemon.
This page last updated on December 16, 1998.
Copyright © 1998 IBM Corporation

Page 17 of 70 01/05/99
Moving OMS Definitions Between SystemsYou can maintain OMS definitions on a single application server by replicating your InfoPrintManager OMS definitions in other SAP R/3 systems. If you need to make changes to OMSdefinitions, you can then transport the OMS objects from the maintenance system to yourother systems.
This maintenance model requires you to use only logical spool servers in the following:
• OMS ROMS and LOMS definitions
• InfoPrint Manager Output device definitions
Logical servers allow you to organize your printing architecture and manage printers. Byusing only logical spool servers, you will not have to change server names in the OMSdefinitions after you have transported them. For more information about Logical Servers,refer to the "Spool Server Definitions: Classifying Servers, Using Logical Servers, and UsingAlternate Servers" topic in your SAP R/3 Version 4 online documentation.
The following procedure describes how you can use the R/3 logistics (transport) system tomove OMS definitions between SAP R/3 systems:
1. From the R/3 main menu, access the Real OMS window by using the following pathTools > CCMS > and Spool > Spool Administration, or type spad in the ok-Code field.
2. From the Spool Admin.: Initial Screen window, click on the Extended adminpush-button (f6 key) and select the Real OMS push-button from the Outputmanagement systems pane to obtain a list of the Real Output ManagementSystems (ROMS) available on your installation.
3. From the Spool Admin.: List of Real Output Management Systems window,select the Change mode push-button from the ROMS list and double-click on theROMS definition that you want to transport.
4. From the the Spool Admin.: Real Output Management System window, choosethe appropriate transport function:
• To transport only the ROMS definition, push the Transport (truck) icon orspecify the Ctrl + f5 key.
• To transport both the ROMS definition and all LOMS definitions that referenceit, push the Transport all (truck) icon to the right or specify the Ctrl + f6key.
In either case, a transport request is created for transporting the OMS definitionobjects to other R/3 systems.
5. To transport your OMS definitions, type /SE09 in the ok-Code field so you can

Page 18 of 70 01/05/99
complete this task from the R/3 software logistics transport system.
To perform this transport and verify that it is successful, refer to the SAP R/3 onlinelogistics documentation.
This page last updated on December 16, 1998.
Copyright © 1998 IBM Corporation

Page 19 of 70 01/05/99
Selecting Event Report LevelsThe following procedure describes how you can specify the level of Events that the callbackdaemon reports for jobs submitted thorugh InfoPrint Manager.
1. From the SAP R/3 graphical user interface, complete the Logical Output ManagementSystem (LOMS) definitions by specifying the spad transaction.
2. From the Spool Administration: Initial Screen window, click on the Extendedadmin push-button (f6 key) and select the Logical OMS push-button from theOutput management systems pane to obtain a list of the Logical OutputManagement Systems (LOMS) available on your installation.
3. From the Spool Admin.: List of Logical Output Management Systems window,select the Ipm001 LOMS and click on the Choose (checkmark with a clock or f2 key)icon.
4. From the Spool Admin.: Logical Output Management (Display) window, clickthe Change (red pencil f8 key) icon.

Page 20 of 70 01/05/99
5. From the Spool Admin.: Logical Output Management (Change) windowdisplayed below, specify a value for the Event report level field in the SAPconfiguration pane. Use the downward arrow to determine the message level youwant (1 is the least and 5 is the most).
This page last updated on December 16, 1998.
Copyright © 1998 IBM Corporation
Page 21 of 70 01/05/99
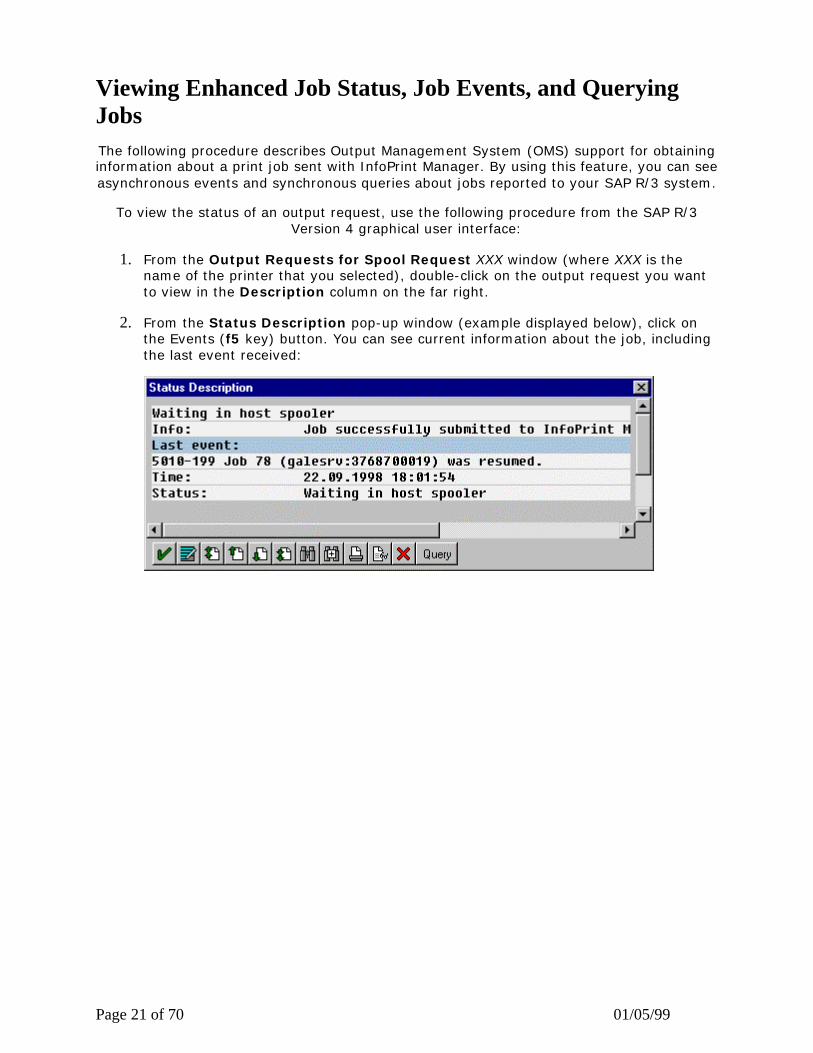
Viewing Enhanced Job Status, Job Events, and QueryingJobsThe following procedure describes Output Management System (OMS) support for obtaininginformation about a print job sent with InfoPrint Manager. By using this feature, you can seeasynchronous events and synchronous queries about jobs reported to your SAP R/3 system.
To view the status of an output request, use the following procedure from the SAP R/3Version 4 graphical user interface:
1. From the Output Requests for Spool Request XXX window (where XXX is thename of the printer that you selected), double-click on the output request you wantto view in the Description column on the far right.
2. From the Status Description pop-up window (example displayed below), click onthe Events (f5 key) button. You can see current information about the job, includingthe last event received:

Page 22 of 70 01/05/99
3. From the Events for Output Requests pop-up window (displayed below), you canview all the events concerning this job.
Note: This Events for Output Requests pop-up window is displayed three times toshow (1) the date, time, and current status of the job; (2) the left-side of thewindow with its message text.
4. From the Status Description pop-up window, you can also click on the Query (f8key) button and receive a query with the current information for a job, including itsposition in the queue. For example, the following displays the result of a 'Query' for ajob that has been successfully submitted for printing:
When you close this 'query' Status Description window, the system updates thelatest status for that job in other displays.
This page last updated on December 16, 1998.

Page 23 of 70 01/05/99
Displaying Device StatusTo display the status InfoPrint Manager printers and the queue of jobs that have been sentto an InfoPrint printer, use the following procedure from the SAP R/3 graphical userinterface:
1. From the R/3 main menu, access the Spool Administration: Initial Screenwindow by selecting the Tools main menu and then selecting the Tools--Administration--Spool--Spool Administration path
or typing /nSPAD in the ok-Code field.
2. From the Spool Administration: Initial Screen window, click on the Outputdevices button from the Configuration area.
3. From the Spool Administration: List of Output Devices window, do the following:
1. Highlight the your InfoPrint printer from the Devices column.
2. Press the Output device pull-down menu and select the Choose option (orspecify the f2 key).
4. From the Spool Administration: Change Output Device (Display) window, clickon the External jobs button.
5. The Device Information of Host Spool pop-up window displays the status of thisdevice.

Page 24 of 70 01/05/99
1. Note that this window is displayed twice to capture both the right and the left sides.
(1) This section indicates that there are six jobs in the queue which could be printed:

Page 25 of 70 01/05/99
(2) The list of jobs includes information about each job, including its current status inInfoPrint Manager:
This page last updated on December 16, 1998.
Copyright © 1998 IBM Corporation

Page 26 of 70 01/05/99
Canceling Jobs on a SAP R/3 Version 4 SystemThe following procedure describes how you can cancel SAP print jobs that you have sent tothe InfoPrint Manager through the SAP R/3 spool work process. Use the following procedurefrom the SAP R/3 Version 4 graphical user interface. Note that this procedure provides onlyone of many methods for accessing the Spool Output Requests for Spool RequestXXXXXXXXXX window.
1. From the R/3 main menu, access the Spool Administration: Initial Screenwindow by typing /nspad in the ok-Code field.
2. From the Spool Administration: Initial Screen window, click on the Outputdevices button from the Configuration area.
3. From the Spool Administration: List of Output Devices window, do the following:
1. Highlight the your InfoPrint printer from the Devices column.
2. Press the Spool Requests (shift + f6 key) button.
4. From the Spool Requests for Device XXX (where XXX is the name of the printerthat you selected), double-click on the spool request you want to cancel.
5. From the Spool: Attributes window, click on the Output requests button.
6. From the Spool Output Requests for Spool Request XXXXXXXXXX window(where XXXXXXXXXX is the number of your spool request), click on the outputrequest you want to cancel to highlight it and then click on the trash can icon (orspecify the shift + f2 key) to delete the output request from the system.
This step invokes the InfoPrint Manager command for canceling a job (pdrm).

Page 27 of 70 01/05/99
Shutting Down the SAP Callback DaemonThe following procedure describes how you can shut down the SAP callback daemonand restart it. This procedure is useful if you are moving the SAP callback daemon toanother instance of your SAP R/3 application server, or another SAP R/3 applicationserver.
From an AIX command line on the application server where the SAP callback daemonis currently running,type:
stopcbd systemname
where systemname is your 3-character SAP R/3 system name.
This command stops the callback daemon, enabling you to migrate it from oneserver or instance to another.
This page last updated on December 16, 1998.Copyright © 1998 IBM Corporation

Page 28 of 70 01/05/99
Using AFP Printing (sap2afp transform) Procedures
Defining a Customized Device Type
Defining New Formats
Connecting a New Format to a Device Type
Enabling Multi-Byte Character Sets for Japanese Fonts
Setting Up New OTF User Fonts
Setting Up New OTF User Barcodes
Adding Box Shading Values to Printed Output
This page last updated on December 16, 1998.
Copyright © 1998 IBM Corporation

Page 29 of 70 01/05/99
Defining a Customized Device TypeA Device Type is a collection of table entries that you can access and modify online todescribe the fonts, the printer driver to use to create the data, and the formats that can beused for SAPscript printing. Every Output Device must have a Device Type that is used toprocess the Output Document. A physical printer can have many Output Devices, withdifferent Device Types for each one.
For basic printing, the SAP transform can use existing Device Types (such as IBMAFP,IBMAFP3, or SAPGOF) and existing formats, such as LETTER or X_65_255. However, if youplan on customizing any of these print characteristics, you should create a customizeddevice type so that you will not loose data when you upgrade your SAP R/3 system.
To create a customized device type, a SAP R/3 administrator must perform the followingprocedure from the SAP R/3 graphical user interface:
1. From the R/3 main menu, access the Spool Administration window by selectingthe Tools main menu and then selecting the Tools-- Administration--Spool--Spool Administration path.
or typing /nSPAD in the ok-Code field.
2. From the Spool Administration window, select the Utilities-->Copy device typepull-down option.
3. From the Copy Device Type window, specify the device type you want to customize(in this case, SAPGOF) in the Copy device type field and provide a name for yourcustomized Device Type (in this case, ZDOCGOF) in the to device type field.
Note that any customized Device Type must start with the Z character or it will beoverwritten when you upgrade to a new level of SAP R/3.
4. From the menu bar, click on the execute icon.

Page 30 of 70 01/05/99
5. From the Create object catalog entry window directly below, decide whether ornot you want to be able to copy this customized device type to another SAP system.If you do, specify a Development class field value.
If you do not need to copy this Device Type to another SAP system, click on theLocal object push-button as displayed in the example below:
6. Click on the save icon.
SAP R/3 provides a screen to show the customized Device Type and the originaldevice type from which it was copied.
This page last updated on December 16, 1998.
Copyright © 1998 IBM Corporation

Page 31 of 70 01/05/99
Defining New FormatsThe sap2afp transform allows you to enhance the quality of your printing from a SAP R/3enterprise through the use of form definitions. Form definitions allow you to use electronicoverlays and specify both media orientation (how the page is printed) and bin selection. Aform definition can consist of multiple copy groups, which are also known as media maps.The sap2afp transform defines which form definition should be used for printing throughthe use of Formats. Every spool job in R/3 requires a Format (Paper type), whether it isABAP data ("X_65_80") or OTF data ("LETTER").
SAP R/3 formats are mapped to Advanced Function Presentation (AFP) form definitions inthe pagedef.tab configuration file. You can display the Format of a spool request in theoutput controller (SP01).
The following describes how to specify media orientation through media maps:
• For an Entire Document
• For Each Page of a Document
Supporting Media Map Selection for an Entire Document
By mapping a SAP Format to a form definition in the pagedef.tab file, the first media mapwithin the form definition defines the media style for the entire job. If you have a job thatcontains different electronic overlays on each page, you might have to switch media styleson each page. The SAPscript editor, the formatter used for the Output Text Format (OTF)data stream that is native to SAP, can invoke a media map on a page-by-page basis if youhave defined paper resources for pages within Layout Sets.
Each resource name that is passed on in the OTF PAGE command defines a media map. TheAFP data that the sap2afp transform produces contains Invoke Media Map (IMM)commands, which specify a media map within a form definition. A media mapping remainsin effect for a job until another media mapping is invoked. By default, the sap2afptransform uses F1SAP (link here), which contains 25 separate media maps for simplexprinting, duplex printing, bin selection, and page orientation. In addition, InfoPrint Managerprovides an assortment of form definitons, which are documented in the IBM InfoPrintManager Commands Reference.
The remainder of this topic describes how you can define a customized form definition forspecific jobs that you print regularly. Depending upon your installation, there are twoseparate procedures:
• Defining a New ABAP Format
• Defining a New OTF Format

Page 32 of 70 01/05/99
Defining a New ABAP Format
If you are printing Advanced Business Application Programming (ABAP) jobs that containvarying media styles on different pages, you must create a blank ABAP Format in the SAPsystem by using the following procedures:
1. From the R/3 main menu, access the Spool Administration window by selectingthe Tools main menu and then selecting the Tools-- Administration--Spool--Spool Administration path.
or typing /nSPAD in the ok-Code field.
2. From the Spool Administration: initial screen window, select the Formats optionand click the Change push-button.
3. From the Spool Administration: Format window, select an existing Format (in thiscase, X_65_255) from which to copy.
Note that all ABAP system formats follow the naming convention of X_number-of-rows_number-of-columns.

Page 33 of 70 01/05/99
4. From the Spool Administration: Copy Format from X_65_255 panel, specify thename of your customized Format with the naming convention of Z_number-of-rows_number-of-columns_more-identifying-text as shown below:
5. Select the back icon (the left-pointing arrow) and the system prompts you to savethe new format.

Page 34 of 70 01/05/99
Defining a New OTF Format
If you are printing Output Text Format (OTF) jobs that contain varying media styles ondifferent pages, you must create page format with the same name as the customized formatyou plan to apply.
1. From the R/3 main menu, access the Spool Administration window by selectingthe Tools main menu and then selecting the Tools-- Administration--Spool--Spool Administration path.
or typing /nSPAD in the ok-Code field.
2. From the Spool Administration: initial screen window, select the Page formatsoption and click the Change push-button.
3. Select the page format that you want to copy (in this case, LETTER) and click on thecopy from push-button.
4. From the Spool Administration: Copy Page Format from LETTER window,specify the name of the customized paper type that you are creating (in this case,ZLETDOC).
5. Select the back icon (the left-pointing arrow) and the system prompts you to savethe new page format.
6. Specify /nSPAD in the ok-Code field.
7. From the Spool Administration: initial screen window, select the Formats optionand click the Change push-button.
8. Select the Format that you wish to copy (in this case, ZLETDOC), and select the copyfrom push-button.

Page 35 of 70 01/05/99
9. From the Spool Administration: Copy Format from LETTER window, fill in thevalues as displayed below:
10. Select the back icon (the left-pointing arrow) and the system prompts you to savethe new OTF format.

Page 36 of 70 01/05/99
Supporting Page-by-Page Media Map Selection
The following procedure shows how you can define a name for each defined page within anexisting Layout Set. Page-by-page mapping is necessary only if different pages within adocument are formatted differently. You should use a custom layout set when making thesechanges. If you use a system Layout Set, your changes are overwritten each time youupgrade your SAP R/3 system. Remember that each media map remains in effect until SAPR/3 encounters a new media map.

Page 37 of 70 01/05/99
1. From the first page of the job, double-click so that it is highlighted and fill in theResource Name field as shown below:

Page 38 of 70 01/05/99
2. Double-click on the next page that you intend to modify and fill in the ResourceName field on the second page as shown below:
3. Continue with the same procedure on any page where you want to specify a newmedia style.
This page last updated on December 16, 1998.

Page 39 of 70 01/05/99
Connecting a New Format to a Device TypeIf you are printing Advanced Business Application Programming (ABAP) jobs that containvarying media styles on different pages, you must create a blank ABAP Format in the SAPsystem by using the following procedures:
1. From the R/3 main menu, access the Spool Administration window by selectingthe Tools main menu and then selecting the Tools-- Administration--Spool--Spool Administration path.
or typing /nSPAD in the ok-Code field.
2. From the Spool Administration: initial screen window, select the Deviceformats option and click the Change push-button.
3. From the Spool Administration: Choose Format for Device Type window,specify the Device Type (in this case, ZDOCGOF) and your customized Format name(in this case, Z_65_255_DOC) in the appropriate fields.
Note that all ABAP customized user Formats follow the naming convention ofZ_number-of-rows_number-of-columns_descriptive-text.
4. Select the Execute icon.

Page 40 of 70 01/05/99
5. From the Maintain Format for Device Type window displayed immediately below,the blank left column indicates that the customized format has not yet beeninitialized:
6. Click on the Copy format push-button.

Page 41 of 70 01/05/99
7. From the Spool Administration: Copy Format window, you can see that thesystem has filled in the information from the Maintain Format for Device Typewindow:
8. Press the Copy from push-button to initialize your new Format.
9. Select the back icon (the left-pointing arrow) and the system prompts you to savethe new format.
This page last updated on December 16, 1998.
Copyright © 1998 IBM Corporation

Page 42 of 70 01/05/99
Enabling Multi-Byte Character Sets for Japanese FontsThe sap2afp data stream transform supports the use of multi-byte character sets (MBCS)through the use of the iconv utility on an AIX operating system. To use this support, youmust run the SAPGOF (or a compatable) device type on a SAP R/3 system at Release 4.0Aor higher.
To enable this support, an InfoPrint Manager AIX administrator must perform the followingprocedure:
1. Ensure that the iconv utility is installed on the InfoPrint Manager system where thesap2afp transform is running.
To support the printing of box characters, IBM now provides three new customizedconversion file with the sap2afp transform:
• IBM-932-SAP2AFP: which extends the IBM-932 conversion file
• IBM-1030-SAP2AFP: which extends the IBM-930 conversion file
• IBM-1031-SAP2AFP: which extends the IBM-939 conversion file
For Japan, the sap2afp transform uses the conversion file IBM-932-SAP2AFP_IBM-1031-SAP2AFP by default. You can modify the 'convert to'segment of the 80000000.tab and defcp.tab.japan to match by setting the valueto IBM-1030-SAP2AFP.
2. Create a backup copy of the current /usr/lpp/psf/sap2afp/defcp.tab file.
3. Copy the /usr/lpp/psf/sap2afp/defcp.tab.japan file to the/usr/lpp/psf/sap2afp/defcp.tab file.
4. Create a backup copy of the current /usr/lpp/psf/sap2afp/pagedef.tab file.
5. Copy the /usr/lpp/psf/sap2afp/pagedef.tab.japan to the/usr/lpp/psf/sap2afp/pagedef.tab file.
6. Obtain the fonts needed for printing.
Font recomendations are given in both the files /usr/lpp/psf/sap2afp/fonts.taband /usr/lpp/psf/sap2afp/pagedef.tab.
This page last updated on December 16, 1998.
Copyright © 1998 IBM Corporation

Page 43 of 70 01/05/99
Setting Up Your SAP R/3 System to Support New OTF UserFontsUse the following procedure when using the sap2afp data stream transform to print with anew font that you have created for the job:
1. From the R/3 main menu, access the Font window so you can create a font familyfor this new, customized font, by selecting the Tools main menu and then selectingthe Word Processing -- Font path.
or typing /nSP73 in the ok-Code field.
2. From the SAPscript Font Maintenance: Initial Screen window, select the Fontfamilies option and select the Change push-button.
3. Select the Create icon and fill in the font information on the Create/Change FontFamily window as shown in below:
4. Select the Continue push-button.
5. When the system prompts you for a Change Request Query request, select theCancel push-button.
6. From the SAPscript Font Maintenance: Initial Screen window, select the SystemFonts option and select the Create push-button.

Page 44 of 70 01/05/99
7. Fill in the information from the Create System... window as indicated below:
8. Select the Continue push-button.
9. When the system prompts you for a Change Request Query request, select theCancel push-button.
10. From the SAPscript Font Maintenance: Initial Screen window, select the Printerfonts/AFM metrics option and select the Change push-button.
11. From the Create/Change... window displayed below, select the intended devicetype (ZDOCOGF) and fill in the remaining information:
12. Select the Continue push-button.
Before you can use this new Output Text Format (OTF) font, you must define alayout set that contains this new font to use your device type.
13. Add an entry in the fonts.tab configuration file that identifies this new OTF font andensure that these resources are on the InfoPrint AIX server where your InfoPrintphysical printer resides.

Page 45 of 70 01/05/99
Setting Up Your SAP R/3 System to Support New OTF UserBar CodesUse the following procedure when using the sap2afp data stream transform to print with anew bar code that you have created for the job:
1. From the R/3 main menu, access the Font window by either taking the WordProcessing -- Font path. or typing /nSP73 in the ok-Code field.
2. From the SAPscript Font Maintenance: Initial Screen window, select the Systembar codes option and select the Change push-button.
3. Select the Create icon and fill in the bar code information on the Create/ChangeSystem Bar Code window as shown in below:
4. Select the Continue push-button.
5. When the system prompts you for a Change Request Query request, select theCancel push-button.
6. From the SAPscript Font Maintenance: Initial Screen window, select the Printerbar codes option and select the Change push-button.
Page 46 of 70 01/05/99
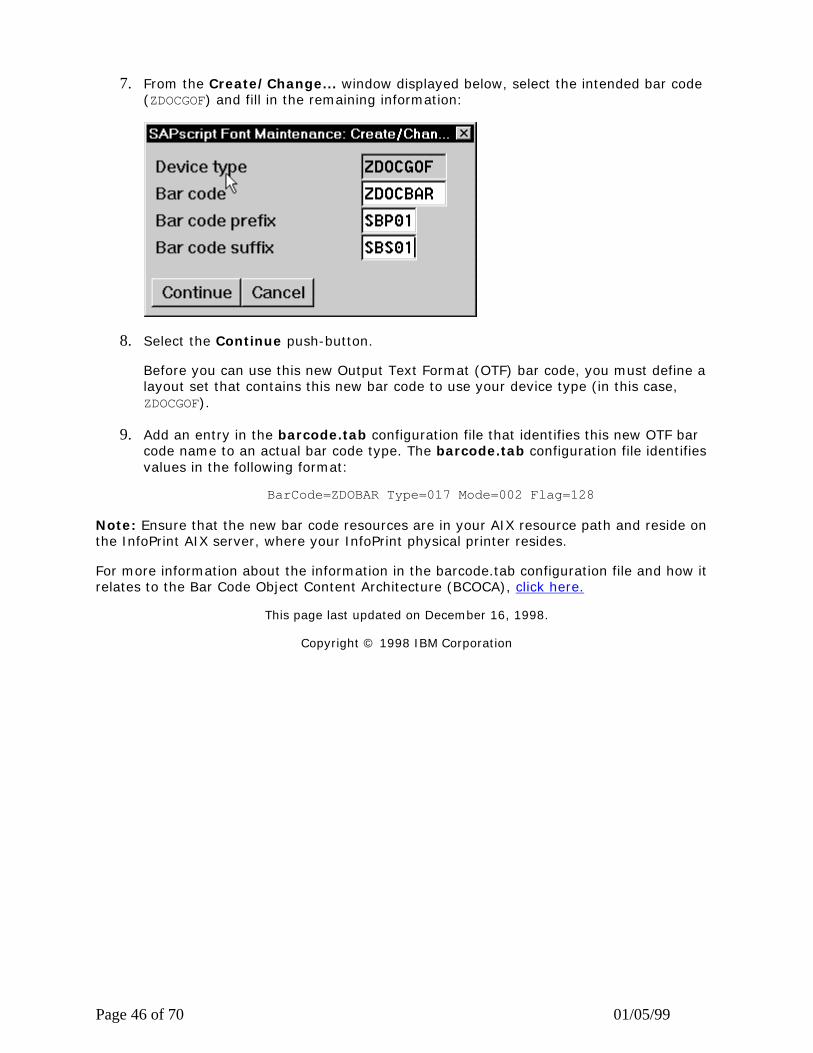
7. From the Create/Change... window displayed below, select the intended bar code(ZDOCGOF) and fill in the remaining information:
8. Select the Continue push-button.
Before you can use this new Output Text Format (OTF) bar code, you must define alayout set that contains this new bar code to use your device type (in this case,ZDOCGOF).
9. Add an entry in the barcode.tab configuration file that identifies this new OTF barcode name to an actual bar code type. The barcode.tab configuration file identifiesvalues in the following format:
BarCode=ZDOBAR Type=017 Mode=002 Flag=128
Note: Ensure that the new bar code resources are in your AIX resource path and reside onthe InfoPrint AIX server, where your InfoPrint physical printer resides.
For more information about the information in the barcode.tab configuration file and how itrelates to the Bar Code Object Content Architecture (BCOCA), click here.
This page last updated on December 16, 1998.
Copyright © 1998 IBM Corporation

Page 47 of 70 01/05/99
Barcodes and Printing from SAP R/3 Through InfoPrintManagerThe following information maps the Bar Code Object Content Architecture values with theSAP R/3 system values found in the barcode.tab configuration file.
Barcode Type Field Values Description
X'01' Code 3 of 9
X'02' MSI
X'08' EAN-8
X'09' EAN-13
X'0C' Interleaved 2 of 5
X'11' Code 128
X'18' POSTNET

Page 48 of 70 01/05/99
'Mode'FieldValues
BarcodeType Meaning
1 X'01' Present the bar code without a generated check digit.
2 X'01' Generate a check digit and present it with the bar code.
1 X'02' Present the bar code without check digits generated by the printer.
2 X'02'Present the bar code with generated IBM modulo-10 check digit. Thischeck digit will be the second check digit; the first check digit is thelast byte of the BSA data.
3 X'02' Present the barcode with two check digits. Both check digits aregenerated using the IBM modulo-10 algorithm.
5 X'02'
Present the barcode with two check digits. The first check digit isgenerated using the IBM modulo-11 algorithm; the second using theIBM modulo-10 algorithm. The first check digit equals the remainder;exception condition EC-0E00 exists if the first check-digit calculationresults in a value of 10.
0 X'08'Present an EAN-8 barcode symbol. The input data consists of sevendigits: two flag digits and five article digits. All seven digits areencoded along with a generated check digit.
0 X'09'
Present an EAN-13 barcode symbol. The input data consists of twelvedigits: two flag digits and ten article digits, in that order. The first flagdigit is not encoded. The second flag digit, the article number digits,and generated check digits are encoded. The first flag digit ispresented in HRI form at the bottom of the left quiet zone. The firstflag digit governs the A and B number-set pattern of the barcode andspace coding of the six digits to the left of the symbol center pattern.
1 Present the bar code without a generated check digit. In sequence, theinput data consists of a start character, digits to be encoded, and astop character.
2 X'0C'Generate a check digit and present it with the bar code. In sequence,the input data consists of a start character, digits to be encoded, and astop character.
2 X'11'
Generate a Code 128 symbol using subset A, B, or C as appropriate, toproduce the shortest possible bar code from the given data. The Code128 code page is used to interpret the bar code symbol data. Generatea check digit and present it with the data.
0 X'18' Present the ZIP code as 5 digits.
1 X'18' Present the ZIP code as 9 digits.

Page 49 of 70 01/05/99
Flag Field Values Meaning
128 Present without Human Readable Text (HRI)
0 Present with Human Readable Text
This page last updated on December 16, 1998
Copyright © 1998 IBM Corporation

Page 50 of 70 01/05/99
Adding Box Shading Values to Printed OutputInfoPrint Manager for AIX supports both Output Text Format (OTF) shading values andborder thicknesses. If your printer supports the graphics object content architecture (GOCA)feature, you can use the BX OTF command to print boxes that are either clear, solid, orcontain four different levels of shading. The levels of shading are a percentage between 0and 100, with 0 indicating a clear box and 100 a solid box. To recognize input from the BXOutput Text Format (OTF) command, specify the following command on the SAP R/3 panel:
rspo/host_spool/custom_print=/usr/lpp/psf/bin/sap2afp -d&S -f &F -g
This command allows you to print boxes that are either clear, solid, or contain four differentlevels of shading. You perform this task during installation when you define the printcommand while Activating Access Method Z. Just add the -g option to the end of the line.For more information on the BX command values required to specify box shading, refer toyour SAP R/3 documentation.
TIP: If you specify this option to an InfoPrint logical printer that is not enabled for GOCA,the file will print a presentation text object content architecture (PTOCA) box or boxes andthe following message sequence for each box:
0420-535:ERROR: One or more graphics objects wereencountered. The printer does not support thistype of object.
:
:
0420-879:
InfoPrint continues processing the print job:The STOP when errors found in IMAGE and GRAPHICSdata field on the InfoPrint SMIT Error HandlingOptions panel is set to no.
This page last updated on December 16, 1998.
Copyright © 1998 IBM Corporation

Page 51 of 70 01/05/99
Submitting Faxes from SAP R/3Faxing jobs from SAP R/3 to InfoPrint Manager is similar to printing jobs from SAP R/3 toInfoPrint Manager: you must define a SAP device that is connected to an InfoPrint Managerdestination. However, you must define the SAP device so that a fax number can be passedto InfoPrint Manager.
You can submit faxes from both SAP R/3 Version 3 and SAP R/3 Version 4 systems,providing that you have installed the InfoPrint Fax option on the InfoPrint AIX server. If youare running on a SAP R/3 Version 3 system, you must have configured Access Method L touse the ipm_print command. If you are running on a SAP R/3 Version 4 system, you musthave installed and configured InfoPrint Manager as an Output Management System (OMS).
Once you have verified that the prerequisites cited above have been applied, use thefollowing two procedures to implement sending faxes from SAP R/3:
Creating an R/3 Fax Device
Submitting a Fax from SAP R/3 to InfoPrint Manager
This page last updated on December 16, 1998.
Copyright © 1998 IBM Corporation
Page 52 of 70 01/05/99
Creating an R/3 Fax DeviceThe following procedure describes how you can create a SAP R/3 fax device for submittingjobs to an InfoPrint AIX server.
1. From the SAP R/3 graphical user interface, specify the spad (Tools->Administration,Spool->Spool Administration) transaction.
2. From the Spool Administration: Initial Screen window, click the Output Devicesbutton, click the Change (red pencil f8 key) icon, and push the Output Devicespush-button.
3. From the Spool Administration: List of Output Devices window, click the Create(white paper image to the right of the trash can) icon
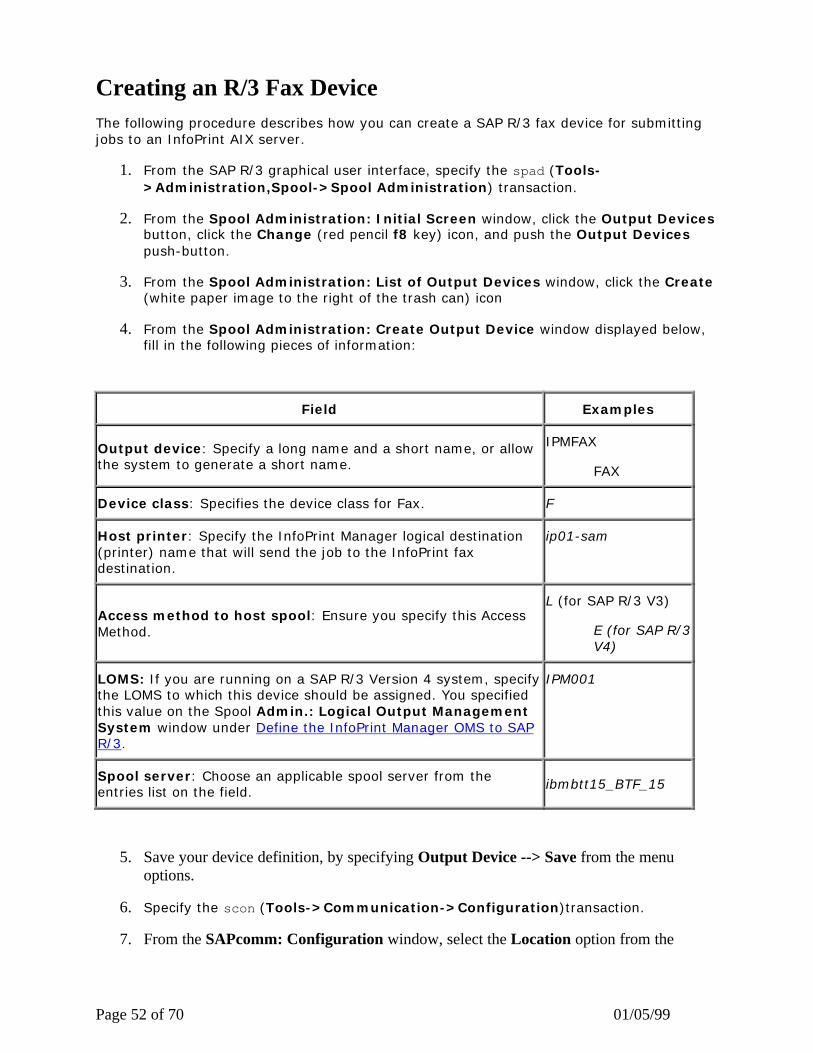
4. From the Spool Administration: Create Output Device window displayed below,fill in the following pieces of information:
Field Examples
Output device: Specify a long name and a short name, or allowthe system to generate a short name.
IPMFAX
FAX
Device class: Specifies the device class for Fax. F
Host printer: Specify the InfoPrint Manager logical destination(printer) name that will send the job to the InfoPrint faxdestination.
ip01-sam
Access method to host spool: Ensure you specify this AccessMethod.
L (for SAP R/3 V3)
E (for SAP R/3V4)
LOMS: If you are running on a SAP R/3 Version 4 system, specifythe LOMS to which this device should be assigned. You specifiedthis value on the Spool Admin.: Logical Output ManagementSystem window under Define the InfoPrint Manager OMS to SAPR/3.
IPM001
Spool server: Choose an applicable spool server from theentries list on the field. ibmbtt15_BTF_15
5. Save your device definition, by specifying Output Device --> Save from the menuoptions.
6. Specify the scon (Tools->Communication->Configuration)transaction.
7. From the SAPcomm: Configuration window, select the Location option from the

Page 53 of 70 01/05/99
Destination pane and click on the Change push-button.
8. Click on the check box to close the pop-up message window that displays informationabout the table's client independent status.
9. From the SAPcomm: "destination location": Overview window, click on the Newentries push button and specify the Output Device that you created in step 4 above.
Note: Specify the appropriate country code in the Ctry column. For example, specify"US" for an installation in the United States.
10. From the New Entries: Details of Created Entries window, click on the save foldericon (or specify the Ctrl + S keys) to save your changes.
11. From the SAPcomm: Configuration window, select the Selection option from theDestination pane and click on the Change push-button.
12. Click on the check box to close the pop-up message window that displays informationabout the table's client independent status.
13. From the SAPcomm: "destination selection" window, click on the New Entries field.
14. From the New Entries: Details of Created Entries window, fill in the following valueson the Selection pane:
Field Examples
Service: Specify the type of service. TELEFAX
Cntry: Specify the country code that you specified in step 9above.
US
Note that the Key, Type, Area Served, and Device group fields should all be left blank.
15. Under the Destination pane, specify the output device that you created in step 4:
Field Examples
Output device: Specify the short name for the device you createdin step 4 above.
FAX
Note that the Country of location field should be left blank.
16. Save your fax definition, by clicking the Save folder icon (or using the Ctrl + S keys).
Once you have completed this procedure, you are ready to submit a fax request from SAP R/3 toInfoPrint Manager.

Page 54 of 70 01/05/99
Submitting a Fax from SAP R/3 to InfoPrint ManagerThe following procedure describes how you can submit a fax from your SAP R/3 system tothe InfoPrint AIX server. Note that you must have already created an R/3 fax device beforeusing the following procedure:
1. From the SAP R/3 graphical user interface, create a spool request for a documentthat you want to fax.
Note: Ensure that the Print immediate push button is not selected.
2. Enter sp01 in the OK-Code field.
3. From the Spool Requests window, select the spool request that you specified instep 1 and click on the Printer icon.
4. From the Spool: Output Request window, specify the relevant fields in the Printparameters and Title page pane, then click on the Fax icon button.
5. From the Spool: Query FAX Number pop-up window, specify the number to whichyou are sending the fax in the Recipient number field and the appropriate countrykey in the Country key field.
6. Click on the Fax button.
Your fax job will be sent to the InfoPrint Manager fax destination.
This page last updated on December 16, 1998.
Copyright © 1998 IBM Corporation.

Page 55 of 70 01/05/99
Sending and Receiving Fax JobsUse these procedures after you have installed the Fax option and completed theconfiguration tasks.
Submitting Fax Jobs
Specifying Cover Sheets
This page last updated on December 16, 1998.
Copyright © 1998 IBM Corporation

Page 56 of 70 01/05/99
Submitting Fax JobsOnce you have installed the Fax option and defined destinations through either the BasicServer or the Advanced Server configuration, you can submit jobs to a particular outputdestination by using either the command-line on the InfoPrint AIX server, or the InfoPrintSelect component.
Note: You cannot submit ASCII data through the InfoPrint Manager fax option.
Using the AIX Command Line
Faxes are sent through the pdpr command using the following syntax:
pdpr -p logical_destination -X fax_options -x fax_number=xxxxx....faxfilename
For an explanation of each variable in the command-line, consult the following table:
Variable Definition
logical_destination
Example:
-p fax-out-ld
Specifies the logical destination that you defined whenconfiguring the Fax option through either the Basic or theAdvanced Server graphical user interface.
fax_options
Example:
-X/fax_scripts/samp.attr.sc1
Specifies the job attributes that you can specify for faxoutput. These attributes include cover sheet information,billing code information, and other options.
To simplify the printing process, IBM recommends that youcreate a sample attribute script. In this example, there is asamp.attr.sc1 scripts file that resides in the /fax_scriptsdirectory.
For specific information about the pdpr command and itsattributes, refer to the IBM InfoPrint Manager for AIXReference Guide Version 3 Release 1, which is provided onthe documentation CD-ROM.
fax_number=xxxxx....
Example:
-xfax_number=3131234567
Specifies the fax number to which the fax is being sent.
Note that for internal site faxes, you may not need to entera 10-digit number.
Faxfilename
Example:
...faxcover memo1
Specifies the name of the file that you are faxing.
Note that this can include more than a single file (forexample, a cover sheet and a body file) specified in thesequence they should be received..

Page 57 of 70 01/05/99
The sample attribute file should look similar to the following:
# Sample Attribute File for InfoPrint Manager Fax Option
# = comment
#
fax-to-name="Mr. John Doe"
account-text="Accounting Code 1234"
subject-text'"Status Report for Quarter"
job-comment="Status Report"
callback-number=(123)555-5555
originating-company-text="My Digital Document Company"
destination-company-text="Your Destination Company"
document-type=printable
Using the InfoPrint Select Client
Once you have successfully installed InfoPrint Select and defined a Fax destination on theapplication, you can use the following procedure to print:
1. Specify Print from the screen menu.
2. From the Print window, ensure that the Name field contains the name of the logicaldestination that you defined to the InfoPrint AIX server, then click on the OK button.
3. From the InfoPrint Fax pop-up window, specify the attribute information in thefields as indicated.
Note: You must specify a number for the Fax number field, or InfoPrint Selectcannot submit the job to the server.
This page last updated on December 16, 1998
Copyright © 1998 IBM Corporation

Page 58 of 70 01/05/99
Specifying Fax Cover SheetsYou can specify two different types of cover sheets with the InfoPrint Fax Manager outputdevice:
• Text cover page
• PCL cover page
For examples, see the directory /var/psf/faxserver/covers. When making a PCL headersheet, make sure that your PCL driver outputs non-image PCL data, so that the PCL datahas characters and font references. If your PCL driver creates image data, the PCL coverpage that you have created will not work with the defined variable names.
You can customize your fax header sheets by using the following set of Lightning Faxparameters:
Configuration Value Mapping
@LFVAR_FAX_NUMBER@ Telephone number of the fax machine called.
@LFVAR_APPLICATION_NAME@ Job ID from InfoPrint Manager.
@LFVAR_CSID@ Identity of the person sending the fax.
@LFVAR_CAll_BACK_NUMBER@ Number to call in case the fax did not come out ofthe receiving fax machine.
@LFVAR_BILLING_CODE@ Department code to bill for the fax.
@LFVAR_DESTINATION_NAME@ Person to whom you have addressed the fax
@LFVAR_COMPANY@ Company for which the person to whom you aresending the fax works
@LFVAR_SUBJECT@ Subject of the fax
@LFVAR_USER_DEFINED1@ User-defined text.
@LFVAR_USER_DEFINED2@ User-defined text.
@LFVAR_USER_DEFINED3@ User-defined text.
@LFVAR_USER_DEFINED4@ User-defined text.
@LFVAR_COMMENTARY@ Fax document commentary
Page 59 of 70 01/05/99
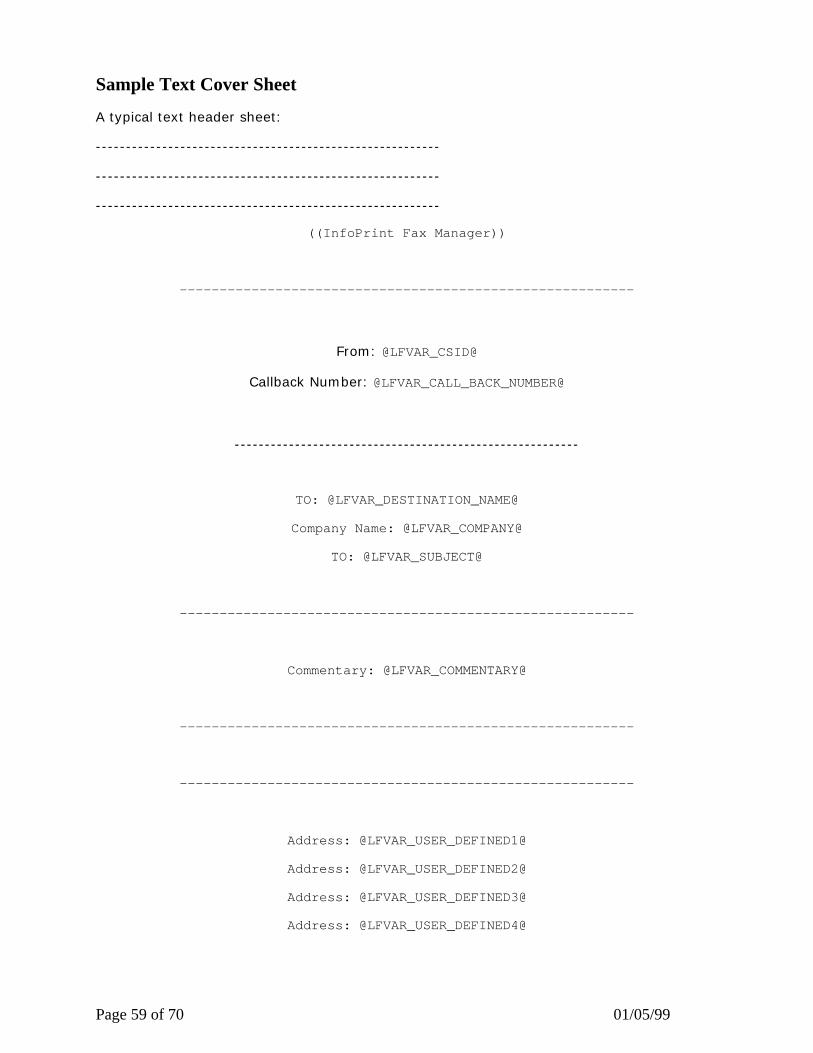
Sample Text Cover Sheet
A typical text header sheet:
---------------------------------------------------------
---------------------------------------------------------
---------------------------------------------------------
((InfoPrint Fax Manager))
---------------------------------------------------------
From: @LFVAR_CSID@
Callback Number: @LFVAR_CALL_BACK_NUMBER@
---------------------------------------------------------
TO: @LFVAR_DESTINATION_NAME@
Company Name: @LFVAR_COMPANY@
TO: @LFVAR_SUBJECT@
---------------------------------------------------------
Commentary: @LFVAR_COMMENTARY@
---------------------------------------------------------
---------------------------------------------------------
Address: @LFVAR_USER_DEFINED1@
Address: @LFVAR_USER_DEFINED2@
Address: @LFVAR_USER_DEFINED3@
Address: @LFVAR_USER_DEFINED4@

Page 60 of 70 01/05/99
---------------------------------------------------------
---------------------------------------------------------
--Job Number: @LFVAR_APPLICATION_NAME@ <--
--Billing Code: @LFVAR_BILLING_CODE@ <--
---------------------------------------------------------
This page last updated on December 16, 1998.
Copyright © 1998 IBM Corporation

Page 61 of 70 01/05/99
Submitting Email JobsOnce you have installed and configured the Email option, you can submit jobs to a particularoutput destination by using the command-line anywhere that you have the pdpr commandinstalled. The following topic shows the command syntax and provides three examples forsubmitting email jobs:
• Submitting attributes through a file with the -Z option
• Submitting files with a Korn Shell Script
• Submitting text files with a Korn Shell Scriptesub3esub3esub3
For specific information about the pdpr command and its attributes, refer to the IBMInfoPrint Manager for AIX Reference Guide Version 3 Release 1, which is provided on thedocumentation CD-ROM (S5445475).
For an explanation of each variable on the command-line, consult the following table:
Variable Definition
logical_destination
Example:
-p email-ld
Specifies the logical destination that you definedwhen configuring the Email option througheither the Basic or the Advanced Servergraphical user interface.
emailfilename
Example:
-Z /email_script/samp.script
Specifies a file that contains the job attributes,the name of the file you are sending, and theemail destination to which you are sending thee-mail.
Email attributes include cover sheet information,billing code information, and other options.
IBM recommends that you create sample attribute scripts that you can customize for yourparticular site. While you can specify email attributes on the command line, IBMrecommends using an attribute file.

Page 62 of 70 01/05/99
Example 1: Submitting Attributes through a File with the -Z Option
You can create a sample attribute file and submit it as the emailfilename for the syntaxlisted above:
-x subject-text="Test Script"
-x document-type=printable
/usr/lpp/ps/sample.pdf
-x document-type=email-body
/email_script/body.txt
-x document-type=email-signature
/email_script/sig.txt
At the command-line, this attribute file would use the following syntax:
pdpr -p logical_destination -Z emailfilename
where logical_destination is email-ld and emailfilename could be named/email_script/samp.script and stored on your local system.
This attribute file sends a report to a 'johndoe' Internet ID, using a logical destination(printer) named email-ld that you specify from the command line. Note that the conventionus.name.com is used to indicate a company-wide addressing system, where it indicates thecountry (us), the company name (name) and the communications name (com) for all fully-qualified addresses in the company.
In this example, note that the document being sent (sample.pdf), the body of the note(body.txt), and the signature for the Email note (sig.txt) all reside in the email_scriptdirectory of the AIX InfoPrint server where you configured the Lotus Notes server.
Note that you cannot put comments in an attributes file using the -Z option.

Page 63 of 70 01/05/99
Example 2: Submitting Files with a Korn Shell Script
You can create a Korn shell script (named sendfile for this example) with a simplercommand syntax because the pdpr command is included within the shell script.
Create a file that contains the pdpr command and all its attributes. Create the followingKorn shell script and place it in a directory on the AIX system where you have installed thepdpr command.
The file should look similar to the following:
# Sample Attribute File for InfoPrint Manager Email
# using a script to submit
# sendemail $1 $2
# $1 is required as the name of the file to send.
# $2 is optional as the recipient of the email.
#
#! /usr/bin/ksh
if [[ -a $1 && -n $1]]
then
if [ $2 ]
then
WHOTO=$2
else
WHOTO="[email protected]"
fi
/usr/lpp/pd/bin/pdpr -p email-ld \
-r brief
-x [email protected] \
-x [email protected] \
-x "subject-text='Your requested Email file'" \
-x document-type=printable $1 \
-x document-type=email-body ~/email_script/body.txt \
-x document-type=email-signature ~/email_script/sig.txt

Page 64 of 70 01/05/99
else
echo " sendmail: $1 $2 could not locate file [$1]"
fi
At the command-line, this Korn shell script would use the following syntax:
sendfile outputfilename [destination]
where outputfilename specifies the file that you are sending (sample.pdf) and destinationis the email address (johndoe) to which you are sending the file.
This script sends a note to either the [destination] value that you specify as the thirdargument on the AIX command line, or a '[email protected]' Lotus Notes ID, if youtake the default. The script uses a logical destination (printer) named email-ld on yourInfoPrint AIX server.
Note that the convention us.name.com is used to indicate a typical Internet address for abusiness.

Page 65 of 70 01/05/99
Example 3: Submitting Text Files with a Korn Shell Script
You can create a Korn shell script (named sendtxtfile for this example) to submit ASCIItext files as Email.
Create a file that contains the pdpr command and all its attributes. Create the followingKorn shell script and place it in a directory on the AIX system where you have installed thepdpr command.
The file should look similar to the following:
# Sample Korn Shell Script for InfoPrint Manager Email Text
#
# Uses a script to submit:
# sendtxtemail $1 $2
# $1 is required as the name of the file to send.
# $2 is optional as the recipient of the email.
#
# This script takes an ASCII file as input and creates
#PostScript output that is submitted with the pdpr command
# as email.
#! /usr/bin/ksh
if [[ -a $1 && -n $1]]
then
if [ $2 ]
then
WHOTO=$2
else
WHOTO="[email protected]"
fi
# Make temporary PostScript file
enscript -p /tmp/$$email.txt $1

Page 66 of 70 01/05/99
/usr/lpp/pd/bin/pdpr -p email-ld \
-r brief
-x [email protected] \
-x [email protected] \
-x "subject-text='Your requested Email file'" \
-x document-type=printable /tmp/$$email.txt \
-x document-type=email-body ~/email_script/body.txt \
-x document-type=email-signature ~/email_script/sig.txt
# Delete temporary PostScript file
rm /tmp/$$email.txt
else
echo " sendtxtemail: $1 $2 could not locate file [$1]"
fi
At the command-line, this Korn shell script would use the following syntax:
sendtxtfile outputfilename [destination]
where outputfilename specifies the file that you are sending (email.txt) and destination isthe email address (johndoe) to which you are sending the file.
This script sends an email to either the [destination] value that you specify as the secondargument on the AIX command line, or to 'johndoe' Internet ID, if you take the default. Thescript uses a logical destination (printer) named email-ld on your InfoPrint AIX server. Thisfile uses the enscript AIX command to convert the text file to PostScript, stores thatPostScript file in the /tmp directory on the submitting AIX system, and then deletes thatfile once the pdpr command has submitted the PostScript file to the InfoPrint AIX server.
Note that the convention us.name.com is used to indicate a typical Internet address for abusiness.
This page last updated on December 16, 1998.
Copyright © 1998 IBM Corporation

Page 67 of 70 01/05/99
Using InfoPrint Manager Commands with AFP UploadBecause the AIX client program for AFP Upload operates as an InfoPrint Manager printer, ityou can control and monitor it through the commands used with other InfoPrint printers:
• To shutdown an AFP Upload physical printer, use the pdshutdown command that isdocumented in the IBM InfoPrint Manager for AIX: Reference Guide, (S5445475-00).
• To find status about AFP Upload printers, you can use the psfstat command that isdocumented in the IBM InfoPrint Manager for AIX: PSF Direct Configuration Guide forSystem/370, (S544-5486-00).
Both manuals are included on the documentation CD-ROM that is provided with InfoPrintManager 3.1.
Note: There are limitations to the tasks you can perform with an AFP Upload printer. Youcannot forwardspace, backspace, or pause a job sent to an AFP Upload printer. To resume ajob that has been paused on an AFP Upload printer, you should cancel a document withretention, then resubmit the job to the AFP Upload printer, because the pdresumecommand is not supported.
This page last updated on December 16, 1998.
Copyright © 1998 IBM Corporation

Page 68 of 70 01/05/99
Using the InfoPrint Library OptionInfoPrint Library indexes data for fast search and retrieval. Library also stores data for aslong as necessary and can move less frequently accessed data to less expensive storagemedia. The storage media needed to support your archiving requirements will be basedupon the size of your data.
This page consists of the following sections:
• Managing Library
• About Library Groups
• Starting Library
• Stopping Library
Managing Library
The IBM InfoPrint Library administrator is responsible for the Library environment, whichincludes hardware, software applications, and end users.
• Hardware includes library and object servers, client PCs, the TCP/IP network, and theMagstar MP tape subsystem.
• Software includes the base operating system, prerequisite software, such asDB2/6000 and ADSM with the HSM feature, and client and server programs.
The following are typical tasks required to administer and maintain Library:
• Installing and maintaining Library programs and prerequisite software
• Defining and labelling storage volumes
• Working with end users to determine Library retrieval requirements
• Defining Library users
• Backing up Library data bases.
Defining users to Library and placing those users in defined Library groups is similiar todefining a new user account in the AIX operating system; you assign the names andpasswords end users need to access Library.
You can use the Users and Groups Manager to change passwords and add users to yourInfoPrint AIX system. To access the Users and Groups Manager, select the ApplicationManager control that is located on the front panel. A window containing other icons willdisplay. Select the Systems Administration icon to display the Users and GroupsManager.
The Users and Groups Manager provides easy visual management of the user accounts andgroups on your system. To start the application, select this icon. To learn the basics aboutusing a Visual System Management (VSM) interface, select:
• Template Area

Page 69 of 70 01/05/99
• Actions
• Work Area
• View Controls
• Display Controls
The Actions area contains activities you can perform. Each activity or action has an icon thatgraphically represents the task or tasks associated with managing user accounts and groupson your system.
Adding a User
To add a user, select the newuser icon located in the Users Templates area and drag itinto the Users Work Area. You will be prompted ot provide a name and additional optionalinformation for the new user you create.
Changing a Password
Drag the Password icon onto the user icon representing the account you want to change.
The Password action displays a dialog window for you to set or change a user's password.Because a password is known only by the account user and the system, you must know theuser's password to change a user's password.
You are prompted to enter the new password and then enter the new password again. Asystem message signals that the password has been changed successfully. The password ischanged immediately in the user data base files and takes effect the next time the user logsin.
Note that changing the password while a user is logged in does not affect the user's currentsession and processes.Also, if you are the root user when you change a user's password,the system sets the ADMCHG flag on teh password so that the user is forced to change thepasswrod the next time they log in.
About Library Groups
As a library administrator, you can add users to the following AIX groups that were createdwhen InfoPrint Library was installed:
libwrite
Users in this group can archive files to the library and retrieve files from the library.
libuser
Users in this group can archive files to the library and retrieve and delete files from thelibrary.

Page 70 of 70 01/05/99
libadmin
Users in this group can archive files to the library and retrieve and delete files from thelibrary.
libread
Users in this group can only retrieve files from the library.
Starting Library
When you power on the InfoPrint AIX server, the IBM InfoPrint Library server daemon andother related Library processes automatically start as part of AIX initialization. InfoPrintSubmit users must specify their AIX user ID and password defined by the Libraryadministrator before they can access InfoPrint Library.
Stopping Library
If you need to power off or reboot the InfoPrint AIX server, or stop InfoPrint Library for anyreason, stop AIX with the shutdown command. Then power off the InfoPrint AIX server.The InfoPrint Library client is automatically stopped when InfoPrint Submit is stopped.
This page last updated on December 16, 1998.
Copyright © 1998 IBM Corporation