IB PULSE TESTING PROGRAM MANUAL - Interstate Batteries
24
IB PULSE ® TESTING PROGRAM MANUAL
Transcript of IB PULSE TESTING PROGRAM MANUAL - Interstate Batteries

IB PULSE® TESTING PROGRAM MANUAL

2
IB Pulse
Contents
1 – Introduction 3Description 3Personal Precautions 3
Testing Out-of-Vehicle 3Testing In-Vehicle 3Connecting To A Battery 3
Symbols Conventions 3Wi-Fi Hub 4
Included Components 4Connections 4Wi-Fi Hub Location 4Wi-Fi Hub Installation 5Wi-Fi Hub Troubleshooting 5
IB Pulse 6Front 6Back 6
Navigation 6Initial IB Pulse Power Up 6
Setting User Preferences 7Charging Dock 8
Front 8Side 8Charging Dock Mounting (Optional) 8
2 – VIN Scan In Vehicle Testing 9Inspecting the Battery 9Battery Test 9
Battery Test Results 11Battery Decisions 11
System Test 12System Test Results 12Cranking Health Decisions 13Charging Health Decisions 13
Battery Replacement 13Reset 13Lookup Replacement 13
3 – Out Of Vehicle Test 14Battery Test 14Battery Test Decisions 14
Battery Test Results 15
4 – Menu 16Settings 16
Wi-Fi 16Adding A Wi-Fi Network 16Deleting A Wi-Fi Network 16
Email 16Auto Email 16Add Email Address 16Edit Email Address 16Deleting An Email Address 16Favorites 16
Printers 17Auto Print 17Add Printer 17Deleting A Printer 17Default Printer 17
Languages 17System Language 17Test Result Language 17Email Language 17Print Language 17
Display 18Brightness 18Auto Brightness 18Sleep Time 18Dim Time 18
Shop Info 18Users 18
Add User 18Editing A User 18Deleting A User 18
Date Time 19Select Time Format 19Select Date Format 19Select Time Zone 19Set Date 19Set Time 19
Test Settings 19Temperature Units 19Default Test Mode 19Create MDCA Log File 19
Software Update 19Relocation Mode (Admin Only) 19About 20
Tester Software Version 20Promotions 20
Promotion Samples 20
Appendix 21Battery Information Screen Descriptions 21Scanning Tips 21Wi-Fi Printer Setup/Troubleshooting 22Product Specifications 23
IB Pulse 23

3
1 – IntroductionIB Pulse
DescriptionThe IB Pulse provides a complete analysis of 12-volt and 6-volt vehicle batteries and 12-volt and 24-Volt starting/charging systems. Using patented conductance technology, the IB Pulse will display battery condition (Good, Replace, Good-Recheck Soon, etc.) as well as voltage and available cranking power based on the temperature of the battery. The IB Pulse can perform battery tests on Automobile, Group 31 , Lawn & Garden, Marine, Powersports and Commercial 4D/8D batteries.
The IB Pulse integrates the in-vehicle battery test along with the starting and charging system test. The charging system analysis takes multiple measurements while the charging system is exercised under varying conditions to determine if it can charge the battery while supplying the necessary power for the electrical system. Test results can be displayed on the full-color screen, printed, or via email.
Personal Precautions
Risk of explosive gases. Never smoke or allow a spark or flame in the vicinity of a battery.Batteries can produce a highly explosive mix of hydrogen gas and oxygen, even when the battery is not in operation. Always work in a well-ventilated area.
PROPOSITION 65 WARNING: Battery posts, terminals and related accessories contain lead and lead com-pounds, chemicals known to the state of California to cause cancer and reproductive harm. Batteries also contain other chemicals known to the state of California to cause cancer. Wash hands after handling.
Inspect the battery for damage and check the electrolyte level. If the electrolyte level is too low, replenish it and fully charge the battery. Always use the necessary safety precautions when working with batteries to prevent severe injury or death. Follow all manufacturers’ instructions and BCI (Battery Council International) safety recommendations, which include the following precautions: • Battery acid is highly corrosive. If acid enters your eyes, im-
mediately flush them thoroughly with cold running water for at least 15 minutes and seek medical attention. If battery acid gets on your skin or clothing, wash immediately with a mixture of water and baking soda.
• Always wear proper safety glasses or face shield when work-ing with or around batteries.
• Keep hair, hands, and clothing as well as the tester cords and cables away from moving engine parts.
• Remove any jewelry or watches before you start servicing the battery.
• Use caution when working with metallic tools to prevent sparks or short circuits.
• Never lean over a battery when testing, charging, or jump starting.
Testing Out-of-VehicleThe preferred battery test location is in the vehicle. However when testing out of the vehicle:
• Always disconnect the negative cable from the battery first and reconnect it last.
• Always use a carry tool or strap to lift and transport the battery.
Failure to properly install lead terminal adapters, or using adapters that are dirty or worn, may cause false test results.When testing side-post or Group 31 batteries, always use lead terminal adapters provided with the tester—do not test at the battery’s steel bolts. To avoid damage, never use a wrench to tighten the adapters more than ¼ turn.
Testing In-VehicleThe preferred test position is at the battery posts. If you must test at a remote-post location, it should have both a positive and negative post. Otherwise, you must remove the battery and perform an out-of-vehicle test.
At the start of the test, make sure all vehicle accessory loads are off, the key is not in the ignition, and the doors are closed.
Connecting To A Battery
Do not connect the tester to a voltage source greater than 30 Vdc.
Connect the clamps to the tester: the red clamp to the positive (+) terminal and the black clamp to the negative (–) terminal.
If you connect the clamps in the wrong polarity (positive to negative or negative to positive), the tester displays CLAMPS REVERSED! Reconnect the clamps.
To make sure both sides of the clamps are gripping the terminals, rock each clamp back and forth. A poor connection will prevent testing, and the tester will display the message CHECK CONNECTION. If the message reappears after you have correctly reconnected the clamps, clean the terminals and reconnect.
Symbols Conventions
Symbol Description
The safety symbol with the words CAUTION, WARNING, or DANGER indicates instructions for avoiding hazardous conditions and personal injury.
The wrench symbol indicates procedural notes and helpful information.
1 – Introduction

4
1 – Introduction IB Pulse
Wi-Fi HubThe Wi-Fi Hub is required at every shop using an IB Pulse battery tester. The Hub transmits its own Wi-Fi signal and easily connects to existing Internet hardware devices. Once paired with an IB Pulse, it automatically downloads local shop information; transmits test data wirelessly to a printer or via email; and allows IB Pulse software updates.
Included Components • IB Pulse Wi-Fi Hub
• Four (4) Antennas
• 10 ft Ethernet cable
• Power Supply
• Quick Start Guide
Connections
12V Power Supply: Utilize the power supply included with the Wi-Fi Hub. Any other power supply can cause damage to the unit.
Reset Button: Push & release to reset the device. Push & hold for 5 seconds, then release to install factory presets.
SIM Card Access: Slide the door to access the SIM holder.
Version 1
Version 2
LAN Port(s): NOT USED
WAN Port: Utilize the WAN port on the front of the Wi-Fi Hub and connect the open WAN port on the existing shop router using the supplied Ethernet cable. Solid Green indicates link has been established with stores router, flashing green indicates data is being transmitted.
RS-232 Port: NOT USED IN VERSION 2
USB Port: NOT USED IN VERSION 2
Antennas: The Hub includes easy to attach and adjust antennas for maximum reception.
Mounting Holes: Use the mounting holes to attach the Wi-Fi Hub to a wall or secure location.
NOTE: Screws not included.
Wi-Fi: Orange: Wi-Fi is connected / Off: No Wi-Fi
Power: Yellow: Power is connected / Off: unit is off
Signal Strength: Indicates the level of cellular signal.
• One (1) green bar: Signal is poor
• Five (5) green bars: Signal is very strong.
Wi-Fi Hub Location • Select a central location: The Wi-Fi Hub communicates in all
directions. To optimize coverage, place the device in a cen-tral location where the IB Pulse will be used. Avoid placing in a closet or behind concrete walls.
• Raise the Hub: The Hub signal angles downward, so mount the Wi-Fi Hub as high as possible to maximize coverage.
• Avoid other electronics: Select a location away from other electronics and large metal objects.

5
1 – IntroductionIB Pulse
Wi-Fi Hub TroubleshootingThe following troubleshooting information is not inclusive and is meant as a guide only. Other issues and solutions may arise that are not stated here. The following description of terms are provided for reference as used in the following troubleshooting chart.
Issue Probable Cause Remedy
No lights displaying on front of Wi-Fi Hub Device is not connected to a power source
• Check power source connection
• If there is no LED activity, unplug the device and wait several minutes before restarting
No red light, amber light on
Red light on, amber light off
No green lights displayed
Not connecting to the Internet
• Check Hub connection and setup
• Check Ethernet WAN connections
• Unplug the Wi-Fi Hub and wait several minutes before restarting
Wi-Fi connection drops or disconnects intermittently Wi-Fi signal strength insufficient
• Check Wi-Fi strength
• Ensure all antennas are securely attached
• Move Wi-Fi Hub to a more central location
• Move away from interference from metal objects and walls
Cannot email battery test results IB Pulse is not connected to the Wi-Fi Hub
• Check Hub connection and setup
• Move closer to the Wi-Fi Hub
• Check Ethernet WAN connections
• Unplug the Wi-Fi Hub and wait several minutes before restarting
• Delete the Wi-Fi Hub and then reconnect
Dealer/Shop information did not download to IB Pulse IB Pulse is not connected to the Wi-Fi Hub
• Check Hub connection and setup
• Check Ethernet connections
• Unplug the Wi-Fi Hub and wait several minutes before restarting
• Delete the Wi-Fi Hub and then reconnect
Software update doesn’t complete or shows unavailable IB Pulse is not connected to the Wi-Fi Hub
• Check Hub connection and setup
• Ensure IB Pulse is charged at a minimum of 40%
• Place IB Pulse in charging dock during update attempt
• Check Ethernet connections
• Unplug the Wi-Fi Hub and wait several minutes before restarting
No Wi-Fi Hub listed in the Wi-Fi section of the IB Pulse Wi-Fi Hub was never paired during setup
• Connect Wi-Fi Hub
• Go to Setting, then Wi-Fi and select the plus “+” button
• Select available Hub listed in section. Displayed in a HUB-xxxxxxxx format.
Wi-Fi Hub Installation1. Hand-tighten the four antennas. For best coverage, posi-
tion the antennas at a 45-degree angle from the base.
2. Plug the power supply into the Wi-Fi Hub and into a wall outlet.
NOTE: Select a non-switched outlet that is not powered off at night.
3. Insert the Ethernet cord cable into the WAN port on the front of the Hub and into an open port on your router. If a longer cable is required, ensure it is a CAT-5, CAT-5e, or CAT-6 type.
4. The Wi-Fi Hub boots up and automatically connects to the Internet.
NOTE: The start-up process may take up to five (5) minutes.

6
1 – Introduction IB Pulse
IB PulseFront Back
NavigationThe IB Pulse features a touch screen for accessing various functions and options.
The arrow buttons ( ) at the bottom of the tool can also be used for highlighting and selecting.
Press ■ to enter a selection.
Initial IB Pulse Power Up1. Press the I/O Power button on the top of the tester to power
it up.
2. Select Next > to begin the setup process.
3. Date Time: Select the correct time zone, date, and time and select Next >.
NOTE: Time zone, date, and time must be cor-rectly set in order for the IB Pulse to connect to the WI-FI Hub.
4. Connect To Hub: When only one HUB is detected, the tool automatically detects and configures to the HUB. If more than one HUB is available, identify the last 4 digits of the HUB IMEI (on the back label) and select from the displayed list.
Last Four Digits
Once connected, the tester automatically searches for any software updates.
5. Software Update: Installs any available updates.
Power Button
Light Sensor
Charging Indicator
Touchpanel Display
Keypad
Auxiliary Charge Port
Scan Light
Barcode Scanner
Temperature Sensor
Clamp Holster
Battery Compartment
Cable Connection

7
1 – IntroductionIB Pulse
6. Add Bluetooth Printer (Optional Equipment): Select Yes to add.
• Turn the printer on.
• Tap the displayed printer name to select it.
• Tap Next > to connect.
• A confirmation message is displayed when successful.
NOTE: Not all Wi-Fi and Bluetooth printers are supported by the IB Pulse. For a complete list of supported printers, go to:
www.interstatebatteries.com/ibpulse
Add Wi-Fi Printer (Optional Equipment): Select Yes to add.
NOTE: A Wi-Fi Printer can be added at any time once the IB Pulse setup process is complete. See "Printers" in Chapter 4 - Menu -> Settings.
• A confirmation message is displayed when successful.
7. Shop Info: Review and edit information as needed. The in-formation listed will appear on battery test, emails, and print outs
8. Complete: The Complete screen is displayed at the end of the setup process. Select the Begin checkmark to continue.
The Home Screen is displayed.
Setting User PreferencesRefer to Chapter 5 - Menu -> Settings ( ) to adjust the IB Pulse default setting and parameters.

8
1 – Introduction IB Pulse
Charging DockFront
Power Supply Connection
Wall Mounting Bracket
Side
Charging Dock Mounting (Optional)1. Release the two (2) holding tabs on the bottom of the Charg-
ing Dock to remove the wall mounting plate.
2. Use four (4) screws to securely mount the plate onto a wall or other vertical surface.
3. Slide the dock onto the wall mount until the holding tabs lock.
4. Connect the Power Supply to the jack on the Charging Dock.
5. Guide the Power Supply wire through the wire channel mold-ed into the bottom of the Charging Dock.
The Charging Dock is now ready to use.

9
2 – VIN Scan In Vehicle TestingIB Pulse
Use the IB PulseTM to perform a battery test with two simple scans.
Scanning the vehicle VIN and battery barcodes pre-populates vehicle information and the battery information into the tester, providing the information needed to run an accurate battery test. Scanning the VIN or selecting the year, make, and model also provides:
• Battery Location Diagrams for finding the battery location within the vehicle.
• Electronics Reset Instructions to access vehicle electronics reset instructions for most major vehicle brands.
• Recommended Batteries to match and recommend batter-ies by part number
By default, the IB Pulse is configurated to test in-vehicle automotive batteries using test parameters determined by vehicle VIN or the year, make, and model of the vehicle being tested. A System Test is also available.
Select < at any time during the test to return to the previous screen or to return to the Main Menu.
1VW76C56AHQ1235488811477121 31
Step 1: Scan VIN
Step 2: Scan Battery
Barcode
Step 3: Connect clamps to the battery
Inspecting the BatteryVisually inspect the battery before testing for the following:
• Cracked, buckled, or leaking case. If you see any of these defects, replace the battery.
• Corroded, loose, or damaged cables and connections. Re-pair or replace them as needed.
• Corrosion on the battery terminals, and dirt or acid on the case top. Clean the case and terminals using a wire brush and a mixture of water and baking soda.
• Low electrolyte level. If the electrolyte level is too low, add distilled water to fill to ½" above the top of the plates and fully charge the battery. Do not overfill!
• Corroded or loose battery tray and hold-down fixture. Tight-en or replace as needed.
Battery Test1. Power on the IB Pulse tester.
2. If the function is enabled, select a User from the displayed list.
3. If the function is enabled, enter the Job Number and select Next >.
4. The main test screen is displayed.
Out of Vehicle
For testing batteries not electrically connected to a vehicle. This test bypasses VIN entry.
See Chapter 4 - Out Of Vehicle Test.
Last Test
Most recent test result history. Select a displayed result for specific details. Select Full Test History to access test totals searchable by vehicle, user, or test results.
Test
Modes
Automotive (only option with IB Pulse XP)
Marine
Group 31
Powersports
Lawn & Garden
Commercial 4D/8D
Menu
Access tester settings, defaults and Promotion information.
See Chapter 5 - Menu.
5. The active Test Mode is displayed below the VIN scan win-dow. Tap Test Modes to change it.
NOTE: Select to change the Test Mode. VIN is not used for Marine, Powersports, Lawn & Garden, and Commercial 4D/8D applications.
2 – VIN Scan In Vehicle Testing

10
2 – VIN Scan In Vehicle Testing IB Pulse
6. Scan VIN or QR code. Use the camera view window to align the scanner on the back of the tool with the vehicle's VIN barcode, usually located in the right corner of the vehicle's front windshield or on the driver’s side door frame.
Barcode Scanner
Driver's Door Frame
Windshield
Select the flashlight icon if more light is required.
Flashlight On Flashlight Off
Enter VIN: VIN scan is always preferred. If necessary, use the displayed keypad to manually enter the VIN. Select Next > to continue.
Y/M/M: Select to manually enter year, make, and model data.
7. Scan the battery. Aligning the battery barcode within the camera view window and scan the battery barcode. The bat-tery temperature is measured at the same time.
Manual Entry: If a battery barcode is not in the tester database, not scannable, or the battery data is not available, select Manual Entry to enter the Battery Units, Rating, Type, and Post Location.
Refer to the Appendix in back of this manual for specific battery parameter information.
Battery Location: Select Battery Location to display the battery location in the vehicle based on vehicle year, make, and model determined by the scanned VIN or information entered manually.
8. Connect the IB Pulse clamps to the battery posts and select Start.
IMPORTANT: If the entered VIN is a start-stop vehicle and the IB Pulse has been paired to a IB Pulse XP module, connect the IB Pulse XP to the battery.
The IB Pulse XP module is paired to the IB Pulse using a Bluetooth connection. See Chapter 2 - VIN Scan In Vehicle Testing.
9. If prompted, capture the battery temperature.

11
2 – VIN Scan In Vehicle TestingIB Pulse
Align the battery within the camera view window and hold the sensor on back of tester 6 to 12 inches from battery surface.
10. Tap Capture to capture the live reading temperature and begin the test.
Battery Test ResultsUse < and > to view the battery test results, cranking health, and the test record for the vehicle tested.
The dots at the bottom of the results screen indicate additional screens are available. Use < or > to move between screens.
Screen 1 Screen 2 Screen 3
Send Results
Via email or through a configured printer.
Done
Exit the test and return to the Home Screen. For Replace Battery decisions, select to continue or to access the Reset Electronics checklist.
Look Up
Replacement
Select to display recommended replacement batteries.
System Test
Continue to the System Test.
Battery DecisionsDecision Description
Good Battery
The battery is in good condition. Recommend retesting the battery in 90 days or at next service opportunity.
Good Recharge
Battery good, but low on charge. Fully charge for optimal performance and life. Check for causes of low charge.
Good - Recheck
Soon
The battery performance has started to decline and may fail to start the vehicle. Consider replacing the battery before it is exposed to temperature extremes.
Charge & Retest (Analysis
Unavailable)
State of charge too low for diagnosis. Fully charge & retest.
Replace Battery
Battery no longer meets minimum standards & replacement is recommended. It is likely to fail soon, especially if exposed to temperature extremes.
Frozen Battery
Completely thaw battery before retesting, charging or starting the vehicle. See Danger warning below.
Bad Cell – Replace
Bad cell detected. Replace immediately. See Danger warning below.
Risk of explosive gases. Can cause death or serious personal injury.Never attempt to charge a frozen battery or a battery with a bad cell. The battery must be replaced.

12
2 – VIN Scan In Vehicle Testing IB Pulse
System Test
System Test
For the System Test, follow the instructions displayed on the IB Pulse tester screen.
1. After the System Test is initialized, start the vehicle's engine when prompted and leave it running for 15 seconds.
The IB Pulse will detect the engine start and analyze the cranking voltage and time.
2. Turn off the engine when prompted.
System Test ResultsUse < and > to view the battery test results, cranking health, and the test record for the vehicle tested.
The dots at the bottom of the results screen indicate additional screens are available. Use < or > to move between screens.
Screen 1 Screen 2 Screen 3
Battery Results
Battery Results (cont.)
Cranking ResultSelect to view the Cranking Voltage results.
Charging ResultSelect to view the Charging and Ripple Voltage test results.

13
2 – VIN Scan In Vehicle TestingIB Pulse
Cranking Health DecisionsDecision Action
Cranking Normal
Starter voltage normal & battery is fully charged.
Low Voltage
Starter voltage low & battery is fully charged.
Charge Battery
Starter voltage low & battery is discharged. Fully charge & repeat test.
Replace Battery
For REPLACE or BAD CELL, replace battery before testing starter.
No Start Engine didn’t start & test was aborted or vehicle starting profile not detected & Starter Test was skipped.
Charging Health DecisionsDecision Action
Charging Normal
The output from the alternator is normal.
No Output
No output detected. Check belts to ensure alternator is rotating when engine is running.
• Check all alternator connections including to the battery. Clean or replace if necessary and retest.
• If the belts and connections are in good working condition, replace alternator or external voltage regulator.
Low Output
Alternator not providing enough current to power electrical loads and charge the battery.
• Check belts to ensure the alternator is rotating with the engine running.
• Check alternator connections to and from the battery. If loose or heavily corroded, clean or replace the cable and retest.
High Output
Alternator voltage to the battery exceeds normal limits of a functioning regulator.
• Check for loose and normal ground connections. If no connection problems are found, replace the regulator.
The normal high limit of a typical automotive regulator is 14.5 volts +/–0.5. Refer to the manufacturer specifications for the correct limit, which may vary by vehicle type.
Battery Replacement
Battery
Replacement
The Battery Replacement option is given following a Replace Battery decision. Use Battery Replacement to access the Reset Electronics checklist and to look up correct replacement Interstate battery options.
1. Select Done following a Replace Battery decision. The op-tion to replace the battery is given.
Battery Replacement can also be accessed through the Last Test function when Replace Battery is selected.
2. Select Yes to continue.
Based on the entered VIN, any battery replacement notices and warnings are displayed.
Reset
Reset
Displays a checklist of vehicle-specific procedures to ensure the vehicle electronics are functioning properly following the installation of a new battery.
1. Select .
2. Select each module and perform the reset procedures to ensure the vehicle electronics function properly.
3. Check each item in the list after it has been completed.
4. Select < to go back to the Reset Electronics screen.
Lookup Replacement
Lookup
Replacement
Displays a list of recommended replacement batteries based on the entered data during the testing process.
1. Select the Reset icon.
A list of recommended replacement batteries based on the entered VIN is displayed.
2. Tap X to close the window and return to the Battery Re-placement screen.

14
3 – Out Of Vehicle Test IB Pulse
Out Of Vehicle
Use Out Of Vehicle Test to perform tests on batteries disconnected and/or removed from a vehicle, using test parameters determined by the scanned barcode on the battery. Battery parameters can also be entered manually.
Select < to return to the previous screen or to return to the Main Menu at any time during the test.
Battery Test1. Connect the IB Pulse tester clamps to the battery terminals.
2. At the Home Screen, select a User from the displayed list.
3. At the main testing screen select the Out of Vehicle icon.
4. Scan the battery barcode. The battery temperature is mea-sured at the same time.
If a battery barcode is not available, tap Manual Entry to enter the Battery Units, Rating, Type, and Post Location.
If prompted, capture the battery temperature by holding the sensor on back of tester 6 to 12 inches from battery surface and tap .
The test begins once the battery temperature is captured.
Battery Test DecisionsDecision Description
Good Battery
The battery is in good condition. Recommend retesting the battery in 90 days or at next service opportunity.
Good Recharge
Battery good, but low on charge. Fully charge for optimal performance and life. Check for causes of low charge.
Good – Recheck
Soon
The battery performance has started to decline and may fail to start the vehicle. Consider replacing the battery before it is exposed to temperature extremes.
Charge & Retest
State of charge too low for diagnosis. Fully charge & retest.
Replace Battery
Battery no longer meets minimum standards & replacement is recommended. It is likely to fail soon, especially if exposed to temperature extremes.
Frozen Battery
Completely thaw battery before retesting, charging or starting the vehicle. See Danger warning below.
Bad Cell – Replace
Bad cell detected. Replace immediately. See Danger warning below.
Risk of explosive gases. Can cause death or serious personal injury.Never attempt to charge a frozen battery or a bat-tery with a bad cell. The battery must be replaced.
3 – Out Of Vehicle Test

15
3 – Out Of Vehicle TestIB Pulse
Battery Test ResultsUse < and > to view the battery test results, cranking health, and the test record for the vehicle tested. The dots at the bottom of the results screen indicate additional screens are available. Use < or > to move between screens.
Screen 1 Screen 2 Screen 3
Send Results
Via email or through a configured printer.
Done
Exit the test and return to the Home Screen.

16
4 – Menu IB Pulse
Settings
Settings
Use the Settings functions to adjust and customize the IB Pulse to match shop requirements. Select < to return to the previous screen. Swipe up or down on the screen to scroll, or use or on the keypad.
Wi-FiUse Wi-Fi to view, add, and delete all available Wi-Fi Hub connections.
Select to access Wi-Fi Hub functions.
Wi-Fi Hub Connected Wi-Fi Communicating
Add: Add a detected Wi-Fi Hub
Reload: Re-scan for detectable Wi-Fi Hubs
Additional Menu Options
Adding A Wi-Fi Network1. Select to add a Wi-Fi Hub.
A list of detected wireless networks is displayed. The icon indicates a Wi-Fi Hub.
2. Select a displayed Wi-Fi Hub. The IB Pulse will automatically configure the tester to the Wi-Fi Hub.
3. Select Next > to return to the Wi-Fi screen. The selected Wi-Fi Hub is displayed.
Deleting A Wi-Fi Network1. Select next to a displayed network.
2. Select to delete the network and select Yes to confirm.
EmailAdd, edit, and delete email addresses used for test results.
Select to access Email functions.
✩ Select/Deselect Favorite Additional Menu Options
Add Email Auto Email
Delete Selected Address Edit Address
Send Test Email
Auto Email1. Select to view the list of entered email addresses.
2. Select an addresses to automatically send test results. A green dot indicates the selected address.
3. Select X to exit and return to the email list.
Add Email Address1. Select to add an email address.
2. Use the displayed keypad to enter the contact name and email address.
3. Select to add the address to the email list or Cancel to exit and return to the email list.
Edit Email Address1. Select next to a displayed email address.
2. Select to edit the address.
3. Use the displayed keypad to edit the contact name and email address.
4. Select to add the address to the email list or Cancel to exit and return to the email list.
Deleting An Email Address1. Select next to a displayed email address.
2. Select to delete the address and tap Yes to confirm or Cancel to exit and return to the email list.
Favorites1. Tap ✩ to select an email address add it as a Favorite.
2. Tap ✩✩ to deselect and remove a Favorite email address.
NOTE: A maximum of three (3) email addresses may be selected as Favorite.
4 – Menu

17
4 – MenuIB Pulse
PrintersThe Printer Setup function detects and displays a list of connected and available Wi-Fi and Bluetooth printers.
Select to access the Printer Setup functions.
NOTE: To connect a Wi-Fi printer, Wi-Fi network communication must be successfully established be-fore any printers can be detected and setup.
Additional Menu Options Add Printer
Delete Selected Printer Auto Print
Printer Setup Bluetooth Printer
Print Test Page Wi-Fi Printer
Auto Print1. Select to view a list of connected printers.
2. Select one of the displayed printers to automatically print-out test results at the conclusion of a successful test. A green dot indicates the selected printer.
3. Select X to exit and return to the printer list.
Add Printer1. Select to add a Wi-Fi or Bluetooth printer.
2. Select the printer type, Wi-Fi or Bluetooth.
For A Wi-Fi Printer
• The IB Pulse must be connected to the same shop Wi-Fi network as the Printer
• The printer is Wi-Fi capable
• The printer is supported by the IB Pulse
NOTE: Not all Wi-Fi and Bluetooth printers are supported by the IB Pulse. For a com-plete list of supported printers, go to:
www.interstatebatteries.com/ibpulse
Select Use Email Address or Continue to Wi-Fi.
For Email Address: Enter the Name and Email Address of the target printer and select Next to add it to the Printer list.
For Wi-Fi Printer: Confirm the following.
• The Wi-Fi printer is powered up
• The IB Pulse is connected to the same Wi-Fi network.
• The selected Wi-Fi network as internet access.
NOTE: A Warning message is displayed if no Wi-Fi printer has been detected on the Wi-Fi Hub being used by the IB Pulse. Tap Settings to select a dif-ferent Wi-Fi Hub or add a new Hub. See Settings/Wi-Fi in this chapter for additional information.
After the IB Pulse adds the printer, it will switch back to the HUB network.
NOTE: A test print can be completed by selecting next to the printer name in the printers list.
NOTE: Refer to the Wi-Fi Printing section in the Appendix of this manual for additional Wi-Fi printer connection information.
For a Bluetooth Printer: Power on the printer and make sure it is within 10 feet of the IB Pulse tester.
3. Select Next > to connect to the selected printer. A mes-sage is displayed when the configuration is successful.
4. Select Next > to return to the printer list.
Deleting A Printer1. Select next to a displayed printer.
2. Select to delete the printer and tap Yes to confirm.
Default Printer
Select to select a default printer from the displayed list.
If any of the printers are set for Autoprint, the Battery and System Test results are automatically printed out at the end of each completed test.
LanguagesSelect the default language for System, Test Results, Email, and Print functions.
Select to access the Language settings.
System LanguageSelect the technician System Language default for the IB Pulse to display on the tool screen.
Test Result LanguageSelect the Test Result language default for all tests and results displayed on the tester screen.
Email LanguageSelect the default language for all tests and results sent via email.
Print LanguageSelect the default language for all tests and results printed using a configured printer.
18
4 – Menu IB Pulse
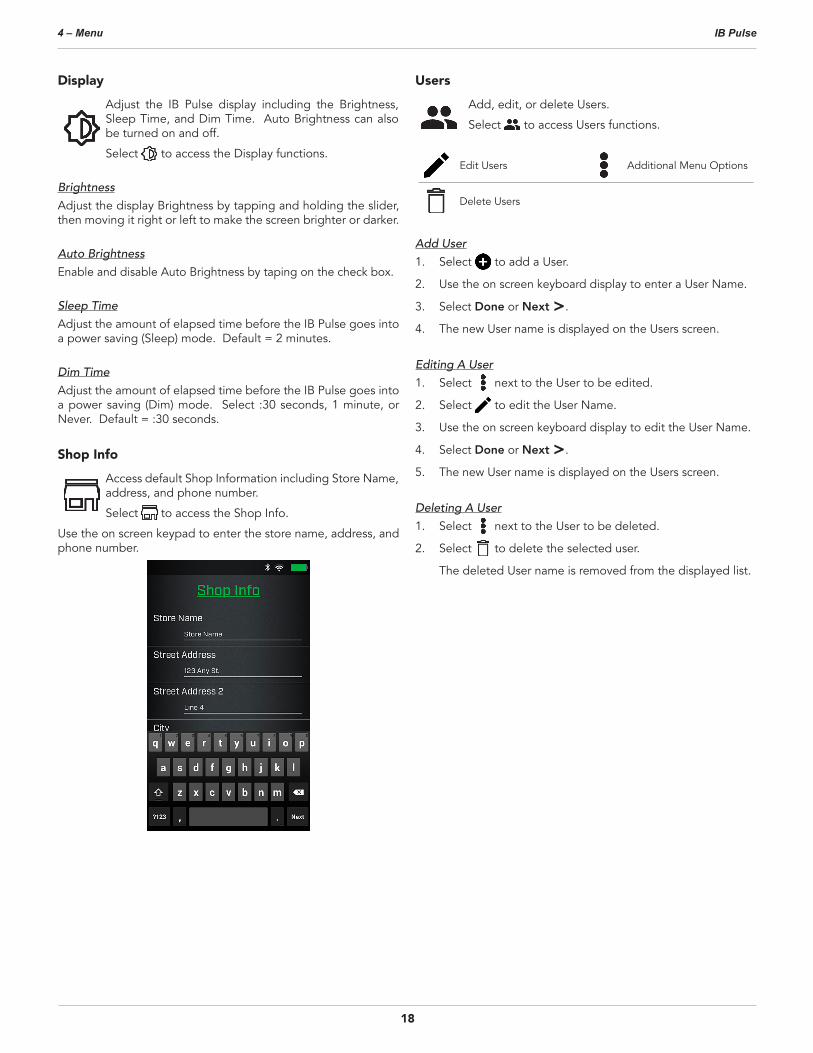
DisplayAdjust the IB Pulse display including the Brightness, Sleep Time, and Dim Time. Auto Brightness can also be turned on and off.
Select to access the Display functions.
BrightnessAdjust the display Brightness by tapping and holding the slider, then moving it right or left to make the screen brighter or darker.
Auto BrightnessEnable and disable Auto Brightness by taping on the check box.
Sleep TimeAdjust the amount of elapsed time before the IB Pulse goes into a power saving (Sleep) mode. Default = 2 minutes.
Dim TimeAdjust the amount of elapsed time before the IB Pulse goes into a power saving (Dim) mode. Select :30 seconds, 1 minute, or Never. Default = :30 seconds.
Shop InfoAccess default Shop Information including Store Name, address, and phone number.
Select to access the Shop Info.
Use the on screen keypad to enter the store name, address, and phone number.
UsersAdd, edit, or delete Users.
Select to access Users functions.
Edit Users Additional Menu Options
Delete Users
Add User1. Select to add a User.
2. Use the on screen keyboard display to enter a User Name.
3. Select Done or Next >.
4. The new User name is displayed on the Users screen.
Editing A User1. Select next to the User to be edited.
2. Select to edit the User Name.
3. Use the on screen keyboard display to edit the User Name.
4. Select Done or Next >.
5. The new User name is displayed on the Users screen.
Deleting A User1. Select next to the User to be deleted.
2. Select to delete the selected user.
The deleted User name is removed from the displayed list.

19
4 – MenuIB Pulse
Date TimeAdjust the IB Pulse Date and Time format and the Time Zone in which the tester will be used. The date and time can also be set. Select the boxes to change the values.
Select to access Date Time functions.
Tap to access. Scroll up/down to set the day, month, and year
Additional Menu Options
Select Time Format12 or 24 hour format
Select Date Format
MM/DD/YYYY Month/Day/Year
DD/MM/YYYY Day/Month/Year
YYYY/DD/MM Year/Day/Month
Select Time ZoneTime zone in which the IB Pulse tester is being used.
Set DateSelect or to enter the month, day, and year. Select Done to exit.
Set TimeSelect or to enter the hours, minutes, and AM/PM. Select Done to exit.
Select < to return to the Date Time screen.
Test SettingsSet the default Test Settings for Temperature Units and Test Mode.
Select to access the Test Settings defaults.
Select the boxes to change the values.
Temperature Units
0 F
Default Test Mode
Automotive
Create MDCA Log File
Temperature UnitsDefault temperature units used when measuring battery temperature.
Default Test ModeThe selected test default: Automotive, Marine, Group 31, Powersports, Lawn & Garden, Commercial 4D/8D
Create MDCA Log FileThe MDCA function is used for technical support purposes.
Select < to return to the Test Settings screen.
Software UpdateUse this function to check via the Internet connection for any updates to the tester software.
Select to check for any software updates.
NOTE: Wi-Fi network communication must be suc-cessfully established before a software update can proceed.
Relocation Mode (Admin Only)
Use this function to return the tool to the original as built configuration including all history and test settings.
Select to activate Relocation Mode.
IMPORTANT: All previous modifications to the original settings will be overwritten.

20
4 – Menu IB Pulse
About
For technical assistance, replacement parts, or service, call 877.464.3318.
Serial Number IB Pulse SW Version
Wi-Fi MAC Address Tester SW Version
Configuration Version
Tester Software VersionSelect © to display software attribution and copyright information. The tester must be connected to the Internet.
Promotions
Promotions
The Promotions displayed on the IB Pulse are created and controlled by Interstate Batteries. Users do not have the ability to delete or change any promotion or promotion schedule.
• Promotions can be automatically displayed whenever a user logs into the IB Pulse.
• More than one Promotion can be active at one time.
• Every promotion has a specific start and end date.
• View all active Promotions at Menu -> Promotions. Expired Promotions are removed and cannot be displayed.
• Promotions can be setup for a specific number of displays for each user. For example, a Promotion will display for the first five days a user logs into the IB Pulse, but still valid be-yond that time.
• Promotions can also be emailed or printed using a Wi-Fi printer. Promotions emailed or printed prior to expiration, are invalid after the expiration date.
NOTE: Promotions cannot be printed using a Bluetooth printer.
Promotion Samples
21
AppendixIB Pulse
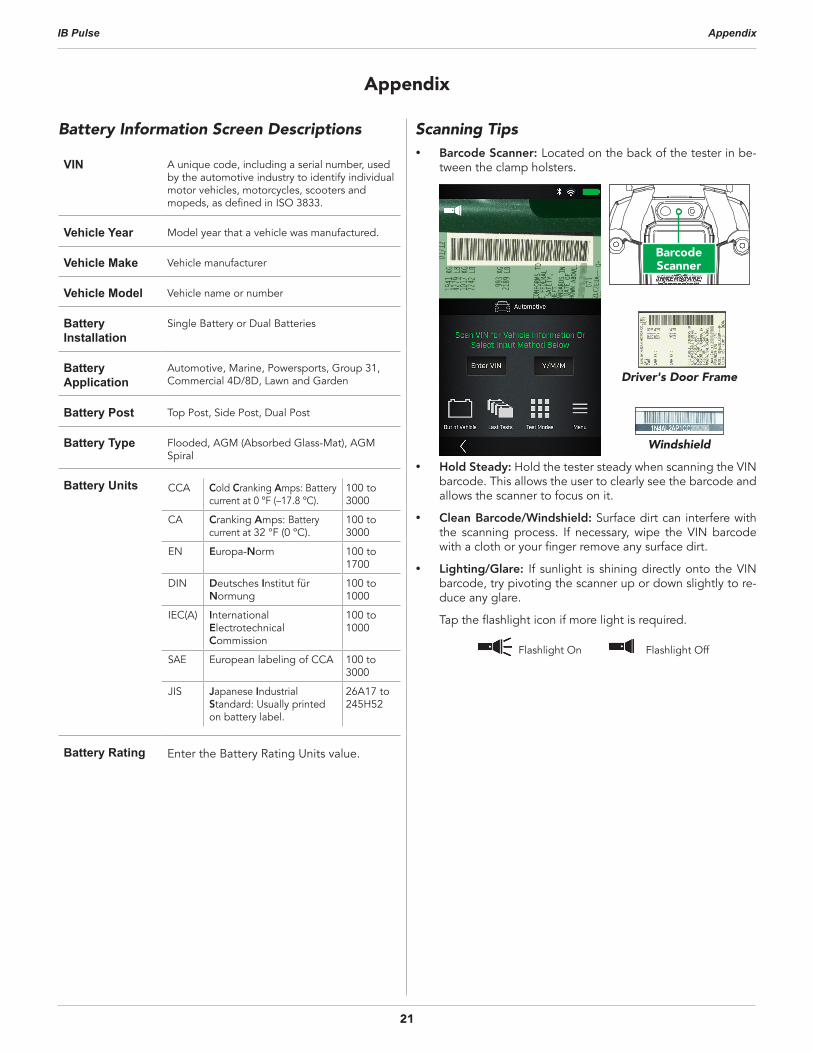
Battery Information Screen Descriptions
VIN A unique code, including a serial number, used by the automotive industry to identify individual motor vehicles, motorcycles, scooters and mopeds, as defined in ISO 3833.
Vehicle Year Model year that a vehicle was manufactured.
Vehicle Make Vehicle manufacturer
Vehicle Model Vehicle name or number
Battery Installation
Single Battery or Dual Batteries
Battery Application
Automotive, Marine, Powersports, Group 31, Commercial 4D/8D, Lawn and Garden
Battery Post Top Post, Side Post, Dual Post
Battery Type Flooded, AGM (Absorbed Glass-Mat), AGM Spiral
Battery Units CCA Cold Cranking Amps: Battery current at 0 ºF (–17.8 ºC).
100 to 3000
CA Cranking Amps: Battery current at 32 °F (0 ºC).
100 to 3000
EN Europa-Norm 100 to 1700
DIN Deutsches Institut für Normung
100 to 1000
IEC(A) International Electrotechnical Commission
100 to 1000
SAE European labeling of CCA 100 to 3000
JIS Japanese Industrial Standard: Usually printed on battery label.
26A17 to 245H52
Battery Rating Enter the Battery Rating Units value.
Scanning Tips • Barcode Scanner: Located on the back of the tester in be-
tween the clamp holsters.
Barcode Scanner
Driver's Door Frame
Windshield
• Hold Steady: Hold the tester steady when scanning the VIN barcode. This allows the user to clearly see the barcode and allows the scanner to focus on it.
• Clean Barcode/Windshield: Surface dirt can interfere with the scanning process. If necessary, wipe the VIN barcode with a cloth or your finger remove any surface dirt.
• Lighting/Glare: If sunlight is shining directly onto the VIN barcode, try pivoting the scanner up or down slightly to re-duce any glare.
Tap the flashlight icon if more light is required.
Flashlight On Flashlight Off
Appendix

22
Appendix IB Pulse
Wi-Fi Printer Setup/TroubleshootingThe following troubleshooting information is not inclusive and is meant as a guide only. Other issues and solutions may arise that are not stated here. The following description of terms are provided for reference as used in the following troubleshooting chart:
Issue Probable Cause(s) Remedy
No printers are listed when searching for Wi-Fi printers
Printer is turned off Power up the printer and restart setup process
Printer is connected to a different network than the IB Pulse
Connect the IB Pulse to the same wireless network as the printer or connect the Wi-Fi printer to the same wireless network as the IB Pulse
No printers are configured on the selected network
Choose a different Wi-Fi network with printer already configured, or add a Wi-Fi printer to the selected network
Wireless network is down
Retry when wireless network is up and functioning
Wireless signal is weak
Move closer to the Wi-Fi network access point
Printer is not supported by the IB Pulse
For a complete list of supported printers, go to www.interstatebatteries.com/ibpulse
Unable to send a test record to the Wi-Fi printer (error message will be displayed by the IB Pulse)
Printer is turned off Power up the printer and attempt to print the test record again
Printer has been connected to a different Wi-Fi network
Follow the Wi-Fi printer setup instructions above to re-add the Wi-Fi printer to the IB Pulse
Test records are not printing when successfully sent to a Wi-Fi printer
Printer is out of paper Add paper to the paper tray
Printer low on ink or toner
Replace ink or toner cartridges
Go to the Print Hand website

23
AppendixIB Pulse
Product Specifications
IB Pulse
IB Pulse Includes: Pulse Tester, 3’ test cables, charging/storage dock, AC power adapter
Application 6V & 12V Batteries
12V & 24V Charging/Starting System
Automotive, Group 31, Lawn & Garden, Marine,
Powersports, Commercial 4D/8D Batteries
Rating System CCA • CA • JIS • DIN • SAE • IEC • EN
Battery Type Regular Flooded, Gel, AGM Flat Plate, AGM Spiral,
Enhanced Flooded (EFB), AGM (Start-Stop)
Operation Range 100 - 3000 CCA (SAE)
Voltmeter 1.5V - 35V via Battery Clamp
Detachable Test Leads 3’ (Field Replaceable)
Operating Range 0° - 50° C (32° F - 122° F)
Languages English, Canadian French, Latin Spanish
Test Discharged Batteries Down To 1.5V
Display 5” Diagonal Color Touchscreen (Portrait Orientation)
Housing Material High-impact ABS-PC blend plastic with durable TPE over-molded rubber
Dimensions 5.5” (W) x 8.9” (L) x 2.6” (D)
Weight 2.1 lbs
Wireless Communications Class 2 Bluetooth
Wi-Fi Communications 2.4 Ghz 802.11 b, g, n
Internal Battery Rechargeable lithium-ion battery pack
Features Color touchscreen & 5 button navigation keypad
Camera w/ flashlight for automotive barcode and VIN scanning
Battery location diagrams1
Provides recommended battery part numbers
Fully customizable printout
Temperature sensor
1 Not available for all cars

24
Appendix IB Pulse
167-000866EN-C 1/20 ©2020 All rights reserved.
PatentsThis product is protected by one or more U.S. and foreign patents. For specific patent information contact 630.323.2800.
Limited WarrantyRefer to your local Interstate Batteries Distributor with questions regarding warranty.
ServiceContact your local Interstate Batteries Distributor for service assistance or call 877.464.3318.
interstatebatteries.com/IBPulse
IBSA NAC-994