I -Il -F, C) CD Cj, -o CD -, 0 B Q n CD .1 ik I · PDF filedust, and loose cloth. ... mely...
124
.1 ik CD 0 3 CD C) CD Cj, 1 I -Il -F, I I -o CD -, 0 B Q n CD IS iI . ‘ J S
-
Upload
truongquynh -
Category
Documents
-
view
219 -
download
3
Transcript of I -Il -F, C) CD Cj, -o CD -, 0 B Q n CD .1 ik I · PDF filedust, and loose cloth. ... mely...

.1 ik
CD 0 3 CD C)
CD
Cj,
1 I
-Il
-F,
I
I
-o CD -, 0 B Q n CD
IS
iI
.
‘
JS

IMPORTANT SAFETY INSTRUCTIONSWhen using an electrical appliance, basic safety precautions should always be followed,including the following:Read all instructions before using this household Sewing machine.Ak DANGER - To reduce the risk of electric shock:• A sewing machine should never be left unattended when plugged in. Always unplug thissewing machine from the electric outlet immediately after using and before cleaning.• Always unplug before relamping. Replace bulb with same type rated 5 Watt.
WARNING - To reduce the risk of burns, fire,electric shock, or injury to persons:
• Do not allow to be used as a toy. Close attention is necessary when this sewing machine isused by or near children.
• Use this sewing machine only for its intended use as described in this manual. Use onlyattachments recommended by the manufacturer as contained in this manual.• Never operate this sewing machine if it has a damaged cord or plug, if it is not workingproperly, if it has been dropped or damaged, or dropped into water. Return the sewingmachine to the nearest authorised dealer or service center for examination, repair; electricalor mechanical adjustment.
• Never operate the sewing machine with any air openings blocked. Keep ventilationopenings of the Sewing machine and foot controller free from the accumulation of lint,dust, and loose cloth.
• Keep fingers away from all moving parts. Special care is required around the Sewingmachine needle.
• Always use the proper needle plate. The wrong plate can cause the needle to break.• Do not use bent needles.
• Do not pull or push fabric while stitching. It may deflect the needle causing it to break.• Switch the sewing machine off (“0”) when making any adjustment in the needle area, suchas threading needle, changing needle, threading bobbin, or changing presser foot, etc.• Always unplug the sewing machine from the electrical outlet when removing covers,lubricating, or when making any other user servicing adjustments mentioned in theinstruction manual.
• Never drop or insert any object into any opening.• Do not use outdoors.
• Do not operate where aerosol (spray) products are being used or where oxygen is beingadministrated.
• To disconnect, turn all controls to the off (“0”) position, then remove plug from outlet.• Do not unplug by pulling on cord. To unplug, grasp the plug, not the cord.
SAVE THESE INSTRUCTIONS
11
peiformance 2O4
12345678 910
34
33
32
a 12
3
15
16V
31
i.
24—
peJormance 2054
25
2312
22
21
4

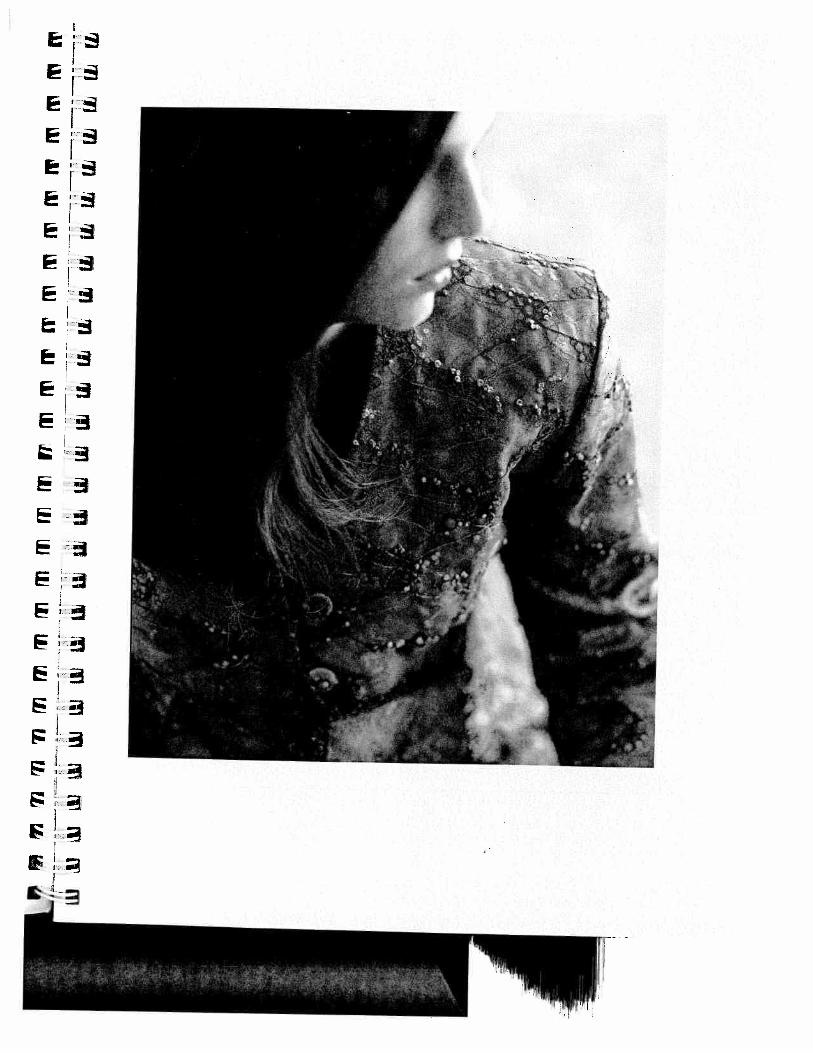
31.
32.
33.
34.
35.
36.
37.
38.
Needle button
Sew slowly button
Pattern start button
Touch screen (Welcome screen)More options buttonMain menu button, opens category selectionAdjust buttons, adjust + andScroll buttons, scroll to next column or sewingpatter0 - 9 button, opens pattern selection by numbersInfo button, opens information or the context menuHandle
Handwheel
Connection socket, lead cordConnection, foot controlMaster switch
Slide for lowering feed dogSpool holder with spool capLid with stitch program chartHole for second spool holderBobbin winder
Bobbin door
Free arm
Needle plate
Thread cutter
Needle holder with retaining screw
Touchscreen
Take up lever
Thread guide
Knee lift attachment hole
Base plate
Removable accessory tray
Presser foot holder with presser foot
IDT - Integrated Dual Feed
Integrated needle threder
Presser foot lifter
Reverse sewing button
Threading slots
Needle thread tension
2.
3.
4.
5.
6.
7.
8.
9.
10.
11.
12.
13.
14.
15.
16.
17.
18.
19.
20.
21.
22.
23.
24.
25.
26,
27.
28.
29.
30.
r- —

Stitch chartUtility stitches
—— < d “Ic V1 :i! > :‘ > >>> <( N-: (% [ < <<‘C A> I c 1> 74‘F 3 4 5 6 8 9 10 11 12 1 14 15!
1 Straight stitch with 19needle positions
2 Stretch triple straightstitch with 19 needlepositions
For all straight stitch and topstitching jobs, stitch length can beincreased up to 6 mm. 19 needle positions are available, for edgefinishing or sewing in zippers.
For all straight stitch and topstitching jobs, particulary on stretchfabrics, e.g. trouser seams, sportswear and work wear. Stitch lengthcan be increased up to 6 mm for decorative stitching.3 Zigzag stitch For finishing seams, overcasting, appliqué work, inserting lace etc. 94 Elastic stitch with two For sewing on elastic, darning tears and applying patches. 9perforations
5 Reverse straight stitch A durable reverse straight stitch. Suitable for stitch combinations institch sequences. See stitch No 1.
For decorative hems particulary on stretch fabrics, e.g. underwear. 6
For sewing on elastic thread, overstitching terry cloth seams and for 7ornamental hem seams (smocking effect).
For sewing on elastic, darning tears and applying patches. 79 mm stitch length.
8 Elastic stitch with oneperforation
9 Stretch triple elastic stitch For inserting elastic tape in sportswear and bathing suits. (Extremely durable seam for open-knit materials.)
Stitch Description ApplicationNo. Width up
to mm
6 Shell-edging stitch
7 Honeycomb stitch
10 Purl stitch
11 Faggoting stitch
12 Decorative stitch
13 Cross-hem stitch
14 Stretch triple zigzag stitch
15 Blindhem stitch
7
Particulary suitable for appliqué work thanks to its stitch density. 9
For joining foundation garments. Provides a decorative hemstit- 7ching effect.
For overstitching elastic cords and wool threads as well as for 6gathering and smocking.
Provides a highly elastic, decorative seam for hem finishing on 7sportswear and casuals.
For sewing elastic tape on sportswear and bathing suits. Also suita- 7ble for hem finishing.
For securing hems invisibly.6
6

% f% L.%. — —r A ? ISi &? tJi
II!3’ 32 33 34 35 36 37 38 39 40 55 57
For serging, appliqué work and inserting lace. (May be sewn fromleft to right or from right to left, using the stitch mirroring key.)
35 Open overedge stitch Elastic serging with selvage thread, most suited for stretchy, easilyfraying fabrics.
36 Open overedge stitch For joining and serging light-knit and open-knit fabrics in oneoperation.
37 Light-knit fabric mending Very elastic, durable stitch most suited for sewing and darningstitch light-knit fabric.
38 Closed overedge stitch For joining and serging stretch and non-stretch abrics in one opera- 6tion.
Elastic assembly and serging seam for open-knit fabrics and jersey. 75
For joining terry cloth and stretchy fabrics, for inserting patches. 75For overstitching hem seams and facings.
56 Unen buttonhole ButtonheforMouses,shtsandnen.
57 Standard buttonhole Buttonhole for blouses and shirts.
—
/
Stitch Description ApplicationNo. Width up
to mm16 Stretch blindhem stitch For securing hems invisibly on stretch fabrics. 617 Basting stitch For basting cut-out parts together.
—
18 Stemstitch Durable elastic seam, e.g. for working on leggins, and embroidery 2work.
31 Closed overedge stitch For joining and serging very stretchy and easily fraying fabrics in 7,5with selvage thread one operation.
32 Closed overedge stitch For joining and serging in one operation. 633 Edge binding stitch For hemming and decorative edge finishing on stretch fabrics. 7534 Zigzag stitch (needle posi
tion variablw from rightto left)
9
7,5
7,5
39 Pullover stitch
40 Cover stitch

Utility stitches
Stitch DescriptionNo.
62 Eyelet buttonhole withcrosswise bar
63 Fancy buttonhole
64 Program for sewing onbuttons’
For two-hole or four-hole buttons. 6
65 Bartack For reinforcing zippers or pocket openings on trousers. 466 Pocket tack For reinforcing pocket openings on trousers. 967 Arrowed bartack For reinforcing skirt vents. 768 Labyrinth For darning damaged areas. Also suitable for embroidering. 969 Darning program, For darning damage areas. 9lengthwise
70 Darning program, For reparing little holes.lengthwise and crosswise
71 Automatic eyelet Various sizes in the memory. Also suited for embroidery work. 9
OOftROs1Di58 59 60 61 62 63 465 66 67 68 69 70 71
AppicationWidth upto mm
58 Stretch buttonhole Buttonhole for stretch materials and knitwear 5,559 Cross-stitch buttonhole Buttonhole for fine stretch materials, also suitable as decorativebutton hole.
60 Round buttonhole with Buttonhole for shirts, blouses and dresses. 7longitudinal bar
61 Eylet buttonhole with Buttonhole for jackets, overcoats and trousers. 8,5tapered bar
Buttonhole for jackets, overcoats and trousers.
Decorative buttonhole for shirts, blouses and dresses.
8,5
8,5
9
8

LL
LW
LL
LL
LL
LL
LL
LL
LL
1
CD
t1 0 CD 1.0 1.0
I CD 3 CD
n 0 CD vI
0 P.
P.
CD Id,’
OJI
DnT
m
cou
U
eeeee
f’w
’Jw
a 1ff1
ff
C P.
P.
P.
P.
CD Id,’
AJ
.I’I
1,
a VL
dI
w.
F44
9J
I It:j1
D’.
‘7
ujuu
u
NV
g
aiU
LJf
l$h
flai
IAjA
01

C
(D 0 CD CD VI
rpy
jra
n‘n
rnrr
nT
i1’
inin
i’ti
Ti
rnin
iii
itii
iin
inin
inin
inin
fta

Index of headingsGetting started
Carrying caseLid
Electrical connectionConnecting the foot controlOn / Off switchVoltage switchAccessory traySewing with free armPreparing the machinefor bobbin windingWinding the bobbin from the spool pinWinding from the second spool pinInserting the bobbinTaking out the bobbin caseSetting the needle thread tensionThreading the needleIntegrated Needle ThreaderChanging the presser footWinding a bobbin through the needleThreading the twin needleChanging the needleIDT (Integrated Dual Feed)Lowering the feed dogElectronic knee lift
Operating yourperformance 2054
Instructions on operating your Pfaffperformance 2054Function buttonsSewing menu
Altering the stitch settingsMore options for sewing
19
Selecting a stitch
Selection by categoryAll stitches selectionSelection by numberDirect selectionExiting a sewing menuThe Context menuThe functions in the Context menuInfo system
Information in the main menu
20 Sequences21
Available sewing functions inthe stitch sequenceCreating a stitch sequenceEditing a stitch sequenceSaving a Stitch SequenceCreating a new stitch sequenceOpening a memoryAlphabets
Creating a word SequenceEdit a word sequence inthe Stitch sequence menu
Utility stitches
Sewing in zippers - No 1Straight stitch - No 1Basting stitch - No 17Top stitching - No 1Elastic blind hem stitch — No 16Blind hem stitch — No 5Zig zag stitch — 3
Stretch triple zig zag stitch — 14
page
16
16
17
17
17
17
18
19
43
43
43
43
43
43
44
44
46
47
page
50
50
52
52
53
53
54
55
55
page
58
58
59
59
60
60
61
61
22
22
23
24
25
27
28
29
29
30
32
33
page
36
36
38
39
12

Decorative sewingspecialty techniques
Quilting
Free Motion EmbroideryNostalgia /HeirloomHome DecoratingFashion
Eyelets
Hemstitching
Cross Stitch
Twin needle sewingTapering
Appliqué designs
Accessories
Standard presser feetand accessories
Felling foot
Appliqué foot
Pintuck foot
62
62
62
63
63
63
64
65
68
68
69
70
71
71
page
74
79
81
83
85
86
90
91
93
Pintuck blade
Cording foot
Gathering foot
Knit edge/piping/beading footRuffle r
Open toe appliqué footQuilting guide
Eyelet plate
Bridging guide
1/4 inch Quilting foot with IDTQuilting of the fabric layersFree motion quilt footBias binder
Pintuck Foot withDecorative Stitch GuideNon-stick Foot with IDT7/9 Hole Cord Foot with IDTCouching/Braiding Foot with IDTCircular Embroidery GuideFringe Presser Foot with IDTNarrow Edge Foot with IDTTriple needle
Fancy patterns with twin needlesStabilizer
Changing the needle plateCleaning
Changing the light bulbBulb removalSewing proberns and their solutionsTechnical dataPackage contents
I‘ Elastic stitch — No 4
• Honeycomb stitch — No 7
I Stretch triple straight stitch — No 2Darning with the elastic stitch — No 4
• Sewing-on patches — No 4
I Repairing tears
Overlock stitches
! Buttonholes
I Sewing on buttons — No 64Eyelets—No 71
Automatic darning — No 69
I Free motion darningGathering with straight stitch — No 1Gathering with elastic threads — No 7
F
F
F
F
87Maintenance88
L
page
96
98
98
99

Pt

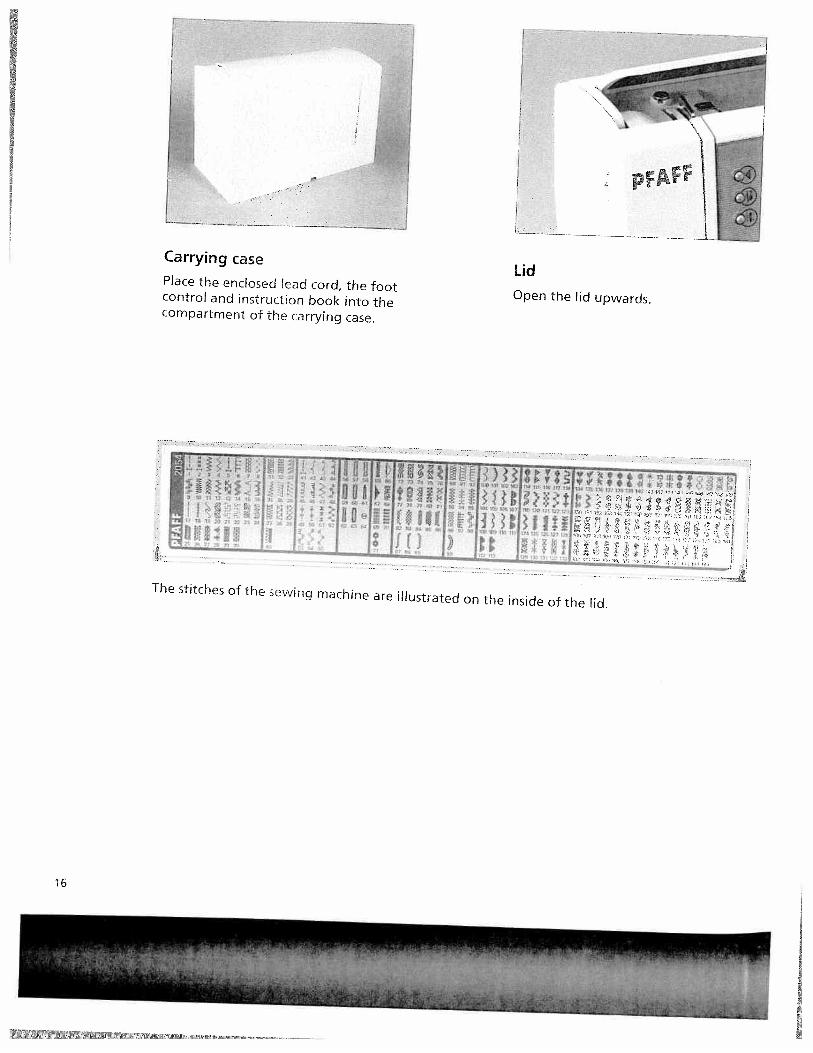
Carrying casePlace the enclosed lead cord, the footcontrol and instruction book into thecompartment of the carrying case.
Lid
Open the lid upwards.
fi jj- pL‘ L
I F0
The stitches of the sewing machine are illustrated on the inside of the lid.
PFRFF
16

Er
F
Electrkal connection
Connect the lead cord between the socket of the sewing macband the wall outlet.
For the USA and Canada:This sewing machine has a polarized plug (one blade wider ththe other), To reduce the risk of electric shock, this plug is inteto fit in a polarized outlet only one way. If the plug does not ffully in the outlet, reverse the plug. If it still does not fit, contqualified electrician to install the proper outlet.
DO NOT modify the plug in any wayl
Connecting the foot controlConnect the plug of the foot control to theconnection socket of the sewing machine.
The sewing speed is controlled by pressing the footcontrol.
The foot control type ATK 0070 has to be used forthis sewing machine.
On I Off switch
When the On I Off switch is switched on (switchfunction I) the sewing lamp lights up and thewelcome screen appears on the touch screen.The sewing machine is now ready to sew.
= OFF
= ON
Voftage swrch
220V-24OVorl2OVThe sewing machine is set to thevoltage for Europe 220 V - 240 V.To change the voltage to 120 V,you must remove the small plasticprotection and slide the dual voltageswitch to 120 V on the underside ofyour machine.
vI
I
/
I—

Open the accessory tray by placingyour left index finger on the ridgedarea on the left of the lid and openthe lid upwards and towards you.
Arranging the accessoriesThe standard accessories are markedwith numbers. Arrange the parts inthe respective compartments of theaccessory tray.
L
Accessory tray
—
18

1
8) 188 189 190 191 192 193 194 195 J
Sewing with free armIn order to sew using the free arm, swing theaccessory tray to the left and lift it upwards out ofthe hole.
When replacing the tray, make sure it is flush withthe free arm of the sewing machine.
Preparing the machine for bobbing windingPlace an empty bobbin so that the black pin of thebobbin winder snaps into the slot of the bobbin.
Push the bobbin to the right.
Note: The bobbin can only be wound if it is moved fully to theright
0
0
0
E
E
—i dh 88

Place the sewing thread on the spool pin. Slide aspool cap, slightly larger than the the spool, firmlyagainst the spool.
ThreadingPlace the thread into guide A from the front andpull it counterclockwise around the pre-tensiondevice B. Pull the thread under the thread guide C(from back to front). Wind the start of the threadaround the bobbin several times in a clockwisedirection.
Turn on the machineHold the end of the thread firmly and press thefoot control. As soon as the bobbin is full, thewinding action will be stopped automatically. Pushthe bobbin to the left, cut the thread and removebobbin from the winder.
Winding the bobbin from the spool pin
20

Winding from the second spool pinInsert the second spooi pin in the hole provided.
ThreadingE Thread as shown on page 24.
Turn on the machineFHold the end of the thread firmly and press the foot
F control. As soon as the bobbin is full, the windingaction will stop automatically. Cut the thread, pushthe bobbin to the left and remove bobbin from theFwinder.
FR
RR
r,fcrn,?O5a

Bobbin doorOpen the bobbin door at the left sideswinging it open towards the front
Lift the latch of the bobbin caseand pull the bobbin case out of themachine. Release the latch and takethe empty bobbin out of the bobbincase.
Inserting the bobbinInsert the full bobbin in the bobbincase. When doing so, pull the threadthrough slot A, then under tensionspring B until it rests in the opening(see arrow),
Check: When you pull the thread, the bobbinmust turn clockwise.
Inserting the bobbin caseLift latch E and push the bobbin casefully onto pin C of the sewing hook.Opening D of the bobbin case mustface upwards.
check: Pull the bobbin thread sharply. Thebobbin case must not fall out of the hook.
-B
Taking out the bobbin case
A
22

Setting the needle thread tension
Set the required amount of the needle thread tensionusing the markings on the tension dial.
! The normal setting for sewing is 4 - 5. For using
decorativestitches, darning and buttonhole sewing 3.
pFAFF4
Thread tension
EI
_____________
For the best stitch appearance and durability makesure the needle and bobbin thread tensions arebalanced with one another, i.e. the threads evenlymeet between the two fabric layers.
The following is valid for general sewing work:
Bobbin thread is visible on the top side of thefabric:
Theneedle thread tension is too tight or the bobbin
thread tension is too loose.
The thread tension must be corrected.FH
__________
Top thread is visible on the underside of thefabric:
The needle thread tension is too loose or the bobbin
__________________________________
thread tension is too tight.
The thread tension must be corrected.
For decorative stitches and buttonholes the topthread should be visible on the underside of thefabric.

Threading the needleRaise the presser foot lifter. Place the thread on thespool pin and fit a spool cap.
Using both hands, pull the thread into thread guideA from the front. Place the thread from right to leftinto the pretension guide B.
Now pass it through the left threading slotdownwards. Pull the thread around the stop C andinto the right threading slot and upwards to thetake-up lever. The thread must be pulled into thetake-up lever from left to right Pass the threaddownwards in the right-hand threading slot.Pull the thread from the side behind one of the twothread guides D.
TTTTT I I[[7!1LJ’
I
24

-
——
Integrated Needle ThreaderIn order to make threading the needle easier andquicker use the PFAFF Integrated Needle Threader.Lower the presser foot. Press the threader downwith the handle.
Threader hook F swivels through the needle eye.Place the thread over hook E and under the threadhook E and hold the end of the thread taut.
Reduce the pressure so that the needle threaderslowly moves upwards. At the same time thethreader hook rvvivels out of the needle eye andpulls the thread through the eye.
Release the end of the thread so a thread loop formsbehind the needle. Release the threader and pull therest of the thread end through the needle eye.
F

Presser foot ‘iftThe presser foot is raised or lowered with thepresser foot lifter.
Bringing up the bobbin threadRaise the presser foot While holding the end of theneedle thread, press the foot control so the needlemoves down and up.
Pull the needle thread to draw up the bobbinthread.
\
ii 1
Close the bobbin door and pull the top and bobbinthreads under the presser foot to the left
Thread cutterPull the thread from the back to the front over thethread cutter.
V
-‘-
4 4E ‘
26

11% .i
Changing the presser footPress the front part of the presser foot upwards andat the same time the rear part downwards until itdisengages from the presser foot holder.
Snap on the presser foot• Place the presser foot under the presser foot shank,
so that when the presser foot lifter is lowered, thepins of the foot snap in the presser foot shank.
Check that the presser foot is properly attached byraising the presser foot lifter.

Winding a bobbin through theneedle
It is possible to wind bobbins evenwhen the machine is fully threaded.
Raise the presser foot lifter to thetop position. Pull the needle threadunderneath the presser foot andupward through the right-handthreader slot.
L
Place the thread from left to rightthrough the take-up lever D.Note The take-up ever must be at its highestposItion
Wind the beginning of the thread several times around the bobbin in a clockwise direction.Hold the end of the thread firmly and press the foot control.
— - -— - — — —--- --—------—-——— —-- ----—--- —
$J(2 fCfl rngnc(. ‘(jt,3
Guide the thread to the right under thread guide C.
28

F
F
F
F
F
F
F
BA
Changing the need’eTurn off the machine.
To remove: Lower the presser foot and setthe needle to its highest position. Loosenthe needie screw and pull the needle outdownwards.
To insert: The flat side A of the needle mustface to the rear. Lower the presser foot andinsert the needle, pushing it up as far as itwill go. Hold the needle and tighten theneedle screw firmly.
ii
Threading the twin need’eReplace the sewing needle with a twin needle. Insert the second spool pin and place one spoolof thread on each of the spool pins. When threading make sure to pass one thread to the leftand one thread to the right side of tension disk E.
Continue threading in the usual manner, making sure the threads do not twist together.Pull one thread into the right guide and one in the left thread guide above the needle, andthread the needles.Note: It is not possible to use the Integrated Needle Threader with a twin needle.

IDT (Integrated Duai Feed)For sewing difficult materials PFAFF provides theideal solution: the Integrated Dual Feed, IDT system.As on industrial machines, the IDT feeds the fabricfrom the top and bottom at the same time. Thematerial is fed precisely.
On light or difficult fabrics such as silk or rayon thedual fabric feed prevents puckering of the seam. Theeven feeding action also ensures perfect matching ofchecked and striped fabrics. The IDT keeps all layersof quilt projects aligned to prevent stretching of thetop layers.
r
30

Engaging the IDTImportant: For all sewing with the IDT - IntegratedDual Feed, use presser feet with the center backcut out.
Raise the presser foot. Press the black elbow of theIDT down until it engages.
‘— \
4jjE: \Disengaging the IDTHold the black elbow of the IDT with two fingers.
Pull the IDT down, then back away from the machineand release the IDT slowly upward.
Stripes and plaids match perfectly dueto the even feed of the IDT.
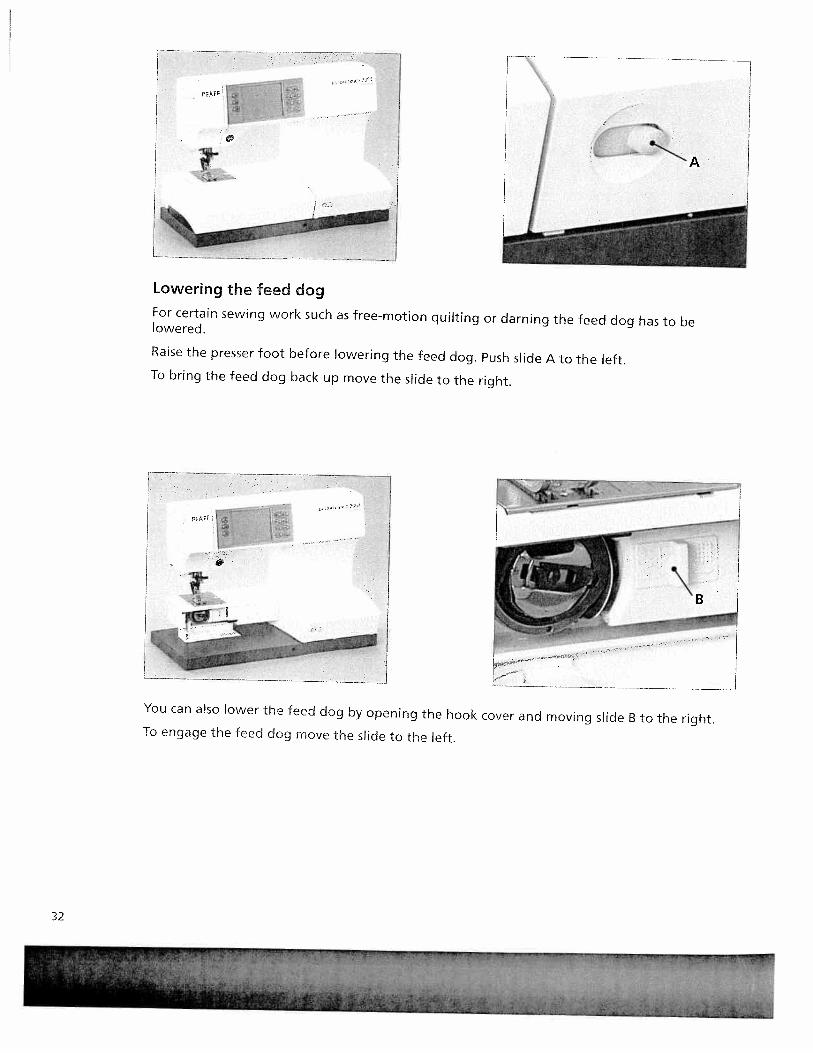
Lowering the feed dogFor certain sewing work such as free-motion quilting or darning the feed dog has to belowered.
Raise the presser foot before lowering the feed dog. Push slide A to the left.To bring the feed dog back up move the slide to the right.
H-
You can also lower the feed dog by opening the hook cover and moving slide B to the right.To engage the feed dog move the slide to the left.
14
32

Electronic knee ‘iftYour Pfaff performance 2054 is provided with an electronic knlift for regulating the presser foot height.1. Push the knee lift fully into the provided hole on the machir
Note: the fiat side must face upwards.1 2. Adjust the rectangular bar on the knee lift until it is positionat a comfortable height for you.If you press the knee lift to the right, the presser foot will raise•Now you can guide the fabric with both hands.
i
To remove the knee lift, pull it gently out of the hole.
I
ir
Ii
‘3
0
1. 2.
‘“‘
--
r1

SI
III
I.i
SR
11f
I!I
lii
r’i’
1”is
a,
0 CD —U
0
-o CDI 0 3 n CD 0
(D
(D
t
‘I
z €D g3
4 fP I
(D z Itt
r
4.
‘w

instructions on operating yourPfaff performance 2054Turn on your machine and a welcome screen appears. Touch thescreen to close it, Your machine is always ready to sew when mainmenu, stitch selection menu, sewing menu or stitch sequencemenu is visible. Your Pfaff performance 2054 is operated bytouching the appropriate icon on the touch screen.Sewing functions for the machine can be individually altered.Touch OR to close a window, save your altered settings and beable to select a new function.
Touch esc, to continue without saving any settings.
Pop-up messages are closed simply by touching the screen. You canalso close the messages by switching on the function or by pressingthe foot control.
Function buttons
:: St[tchTouch Stitch re-start to return to the start of a stitch sequenceor program that has already been started.
Sew slow
Touch Sew slow to reduce sewing to half speed.Needle up I down
Touch Needle up I down to set the needle to automatically stop—in the lower position when you stop sewing. A window opensto set whether and how far the presser foot is raised whenyou take your foot off the foot control. The basic setting is tomanually raise the presser foot.
Yoach[sembetween
“No”, “low”=3 mm, “medium”=6 mm
When you press the foot contro again, the presser foot isautomatically lowered again. This allows you to pivot turn thefabric
If the icon is touched the needle goes to the up position,when the reverse button is touched. But the needle downfunction remains active.
Press again to deactivate the function.Tip: You can pre set the presser foot height in the context menu. See page xx-yy
36

Reverse sewing buttonThis button has several functions
I e If you press this button while sewing, the machine sews inreverse for as long as you keep the button pressed.I • For permanent reverse, press this button before starting to sI
the machine sews in reverse until you press the button agairWhen the function is activated, a reverse sewing arrow appeon the touch screen.
I • If you have activated the tie-off program, tie-off at the end i:initiated via this button.
• In the Patchwork’, “Tapering’ and “Darning’ programs, yeIdetermine the length of the seams with this button.
I • If you are programming the length of a buttonhole, youI determine the length of the buttonhole seam with this buttc
These buttons have several functionsSelection menus: Scrolls by column or by page to select a stit
• Sewing menus: Selects the next or the previous stitch innumerical order.
• Fonts. Moves the stitch sequence cursor after the input fieldbeen actively selected.
• Stitch sequence: Moves the stitch sequence cursor after theaction field has been selected for changing a stitch. Stitchselection added to stitch sequence after the preview field haF been actively selected.
• Info: If more than one information page is available, you scrpage by page with this buttons.
E EE Function field buttons
F Touch stitch parameter icon or stitch balance on the displayadjust them with the Function field buttons.
F Main menuTouch this button to switch back step by step to the main rnF for selection of all stitches.
0-9 ButtonOpens the stitch selection by number.
More options buttonOpens the more options window, for processing or modifyinselected stitch.
Info button I Context menuOpens information or context menu.Touch this button to open the info menu.Touch and hold the button until the contex menu opens.

Sewing menuThe sewing menu is divided into three sections.1. Status bar, where the activated sewing functions are shown.It is always active and is automatically updated by selecting orchanging a sewing function.
2. Action field, where the chosen stitch is displayed. In the stitchsequence the action field is activated by touching the screen forselecting and changing a stitch.3. Function field with function buttons and parameter setting.The figure in the upper left corner of the function fieldindicates the selected stitch number. In Sequence a previewfield appears in the function field. More options windowappear when the button is pressed.Icon status
Inactive, the function cannot be selected.Active, but can not be unactivated.
m Active, the function can be unactivated,+ Actively selected, the function is selected.
Aftering the stitch settingsOFor straight stitch. Move the needle positions with the Lz.buttons. There are 19 needle positions available. + The needlemoves to the right in nine positions. - The needle moves to theleft in nine positions.
Stitch width. You can change the stitch width (max 9 mm)with the EZ buttons.
Stitch length. You can change the length (max 6 mm) of thepattern with the buttons.
Pattern length. For decorative stitches, buttonholes, satinstitches, scallop stitches and some utility stitches. You canincrease or reduce the length of the stitch with thebuttons.
Balance. Fine tune your stitch balance withthe6 buttons.
Density. change the stitch density, of satin stitches, scallopedges and buttonholes, with the —Z buttons, withoutchanging the patternlength or buttonhole length
38

Side to side mirroring. Mirror stitches and sequences side toside. Each stitch is mirrored individually.
- End to end mirroring. Mirror stitches end to end.m This icon stores the stitch in a stitch sequence. The stitch
sequence menu appears automatically by actively selecting ft“m+” icon.
An adjustment is reflected immediately on the screen. All settincan also be adjusted during sewing. With some Utility stitches ftchange takes place immediately, with all other stitches the chanoccurs at the next repeat.
If you exit a screen, the stitch settings are reset to the defaultsettings. For aving the basic settings, pre set it in context ment
More options for sewing
By touching iEE you can call up a dialogue window with furthfunctions for processing or modifying the stitch. Only sewingfunctions that can be selected are visible. Selected functions aredisplayed in the status bar.
Icons in the More options window
Ok OK. The More options window closes and all settings aresaved. You can also press the foot control. The More optionswindow or another dialogue window remains open so thatF further settings can be made.
E esc Closing without saving. You close a window without themodified settings being saved.
FTie off at start. The start of the seam or stitch is tied off wit[
F four stitches. This icon is only active at the start of a seam anusually after a new stitch is selected or when the Stitch re-stEbutton is touched.
Tie off at end. The end of the seam or stitch is tied off withfour stitches. Touch the Reverse button to trigger the Tie offend function The machine ties off and stops.
{. Raise presser foot. The machine will lower the presser footat the start of the seam and raise it at the end of the seamautomatically. If this function is active, the presser foot is alvraised 10.5 mm when the machine stops.
If the • and icons are selected, the presser foot is onlyraised at the end of the seam or pattern when the Reversebutton is pressed.
The Needle up I down overrides the Raise presser foot functi
F
F

Free motion sewing When activated the presser foot islowered automatically to the free motion position by steppingon the foot control.
Single stitch. Pattern and stitch sequences can be sewn assingle stitches.You can also define a number of stitches as asingle stitch. The number of repetitions are displayed in thestatus bar. Tieoff is automatically performed at the end of theseam or stitch.
Touch ) a little longer and a window appears, to changethe number of repetitions with c÷ confirm by touching thescreen.
Twin needle safety. With this function, you reduce thewidth of your stitch in order to use a twin needle.It remains active even after a stitch has been changed, includingafter the machine has been switched off and back on again.Touch the icon again to switch off the function.This function must be switched off when you remove the twinneedle from the machine.
pat Programmable seam length function. Specify a particular seamlength for joining together several pieces of fabric of equallength.
Press the reverse button when you reach your desired length,it will be tied off. All subsequent seams are now automaticallysewn in your specified length until pat is pressed to deactivatethis function.
It Symmetrical tapering (increase). The width of the zigzag stitchstarts with 0 mm and becomes wider until it reaches (max) 9mm.
IIi: Symmetrical tapering (reduce). The width of the zigzag stitchstarts at (max) 9 mm and tapers to 0 mm when the reversebutton is touched. It stops with the needle in the lower position. Asymmetrical tapering (increase). The width of the zigzagstitch starts with 0 mm and becomes wider until it reaches (max)9 mm.
Dkt Asymmetrical tapering (reduce). The width of the zigzag stitchstarts at (max) 9 mm and tapers to 0 mm when the reversebutton is touched. It stops with the needle in the lower position
40

The selection menusWhen the Welcome screen is turned off the main menu appears.
UtiHty stitchesStitches 1 -30
This menu provides a selection of stitch types that you can use fca variety sewing techniques.Note. if you press the foot control once at
this point, the corresponding sewing menuopens. if you press the foot control oncemore the machine starts to sew. OVerCastrng
Stitches 31 - 40
This menu provides a selection of all stitch types suitable forovercasting.
The closed overedge stitches can be used for joining andovercasting in one operation.
Antique quift stitchesStitches 41 -55
This menu provides a selection of quilt stitches suitable for qrazpatch quilting.
Crosstitches
Stitches 72 -89Pre-programmed
cross stitches allow you to create traditionalborders. lndividual cross stitches allow you to program your owrdesigns.
Decorative stitches
This menu includes a selection of decorative stitches.
They are sub-divided into four different categories for ease ofselection.
Hemstitches allow you to create heirloom stitches.Stitches 90 - 99
Scalloped edging, for sewing decorative edges on table linerclothing.Stitches 100- 113

• Satin stitches have a three-dimensional look that offer a widerange of options for embellishing garments or items for thehome.Stitches 114- 133
• Decorative stitches. Stitches 134 - 145 are leaves and flowerswhich can be sewn individually to create larger motifs. They areideal for decorative borders. Stitches 146 - 166 are pictorial orthree-dimensional decorative stitches which can be combined.Stitches 167 -188 are floral patterns. Stitches 189 - 195 areAnimal stitches which are especially suitable for childrensgarments.Stitches 134- 195.
Buttonholes
Stitches 56 - 64This menu provides a selection of 8 different buttonhole stylesand one program for sewing on buttons. Each buttonhole style isdesigned for a specific application and fabric.
Darning and bartacks
Stitches 65 - 71
This menu provides a selection of bartacks, darning stitches, Thevarious different bartacks are for reinforcing pocket corners, skirtplackets/slit and attaching belt loops.
The fully automatic darning programs are for repairing damagedareas and darning tears or small holes.
Alphabets
This menu provides a selection of various fonts. One font includesupper and lower case letters, numbers and symbols.
Stitch sequence
In this menu, you can create sewing sequences from the machine’sstitches.
42

DC
D-
0 B 0 n CDI
0 C,,
1..
cr ml
LI¶r
0
-n
I
J

Selecting a stitchThere are several ways to select a stitch.
Selection by categoryTouch “Utility stitches”.
This category contains 30 stitches that are suitable for utilitysewing.You can browse one column at a time with thebuttons.
You can touch any stitch to select it and open the screen for thatstitch. When you open the screen the most important settings anvisible.
All stitches selectionIn this menu, all stitches are displayed one after another innumerical order.
Touch “All stitches” in the main menu.
You can browse through the menu one page at a time by pressirthe L buttons.
To select a stitch, touch the icon for that stitch.
Selection by number
Touch button to open to the selection by number menu.
Enter the stitch number and confirm by touching ok
The delete button deletes the right hand digit. If more thanthree digits are entered, they are deleted from the left. If a stitclthat does not exist is entered, a message is displayed:
“Invalid stitch number!”
The pop up message is closed when the display is touched.
Direct selection
When in a sewing menu, a different stitch can be selected bypressing the fE buttons. You can scroll back and forwardsthrough the stitches in numerical order.
Exiting a sewing menu• The main menu can be called up again at any time by
touching ( twice.
• Scroll with the arrow buttons (ZZ.
• Touch the number selection button
B
B
B
B
B
B
B
B
B
B
B

The Context menuAdjust basic settings of the machine, such as “Language”, or stitchsettings. You can calibrate the touch screen and adjust the touchscreen contrast.
All “context” Machine Settings are not available from all menus.
Open the Info menu by pressing the button Press and holdthis button to open the Context menu.
Press this button again to close the menu.
If the Context menu is closed with the button when asubordinate window is open, the menu is closed without settingsbeing saved.
The functions in the Context menuWindows for altering your basic settings or functions are openedwith the various icons in the context main menu.
Language (available from main menu)In this menu, you can select the language of your Pfaffperformance 2054. Touch the “Language selection” icon. Touchthe language of your choice.
Audio signal (available from all menus)Different audio signals can be heard when you touch icons orwhen screen messages appear.
You can choose to have two different signals: One when you touchan icon and one for pop-up messages.
CalibrationIf you want to adjust the sensitivity of the touch screen it ispossible to do it here.There are two possible ways to open the Calibration screen.
1. Context menu (available from main menu)Touch “Calibration” in the context machine settings menu.
In the upper left corner, a small circle appears in a larger, flashingcircle. Touch the area inside the larger circle to fix the first point.Fix the two following points the same way.
The calibration display closes after finished calibration.
2. When switching on the machineIf you press the button as you switch the machine on theCalibration screen opens automatically.
44

F
F
F
F
F
F
E
p
p
p
Contrast (available from all menus)
Adjust the touch screen so the graphics are easy to see in the hgavailable.
Touch the contrast.
Adjust the contrast with the E. or use the arrows on thetouchscreen. Touch the contrast window outside the arrows toclose it and save the settings.
Revert to original settings (available from main-, pattern selecticpattern- and sequence menu)If the ‘Revert to original settings” icon is touched, the followirnmessage appears:
“Do you really want to delete all the changes you have made airestore the original settings?”
Pattern parameter (available from pattern- and sequence menu)You can specify whether your pattern and / or sewing parametesettings are to be discarded (“Back to default setting”), or savec(“custom setting”). “Do not save” is the standard setting.
Show keyboard (available from alphabet menu)You can specify how to choose letters in the “Alphabets menu”,toggle between basic and keyboard view.
Selection view (available from sequence select menu)Touch the button “Selection view” to toggle between the twodiffrent stitch sequence menus.
1. 10 memory view, memory number are showed (Ml, M2..).
2. 5 memory view, graphical preview of the memories.
Raise presserfoot (available from main-, pattern- and sequence mYou can specify that the presser raises automatically to a certairpre set position every time the needle down, is selected.the following positions are available:
“Display window selection”is the standard setting.
Option for messages (available from main-, pattern- and sequencmenu)
1. You can switch off the messages that automatically appear iithe machine.
2. You can specify whether the machine should stop when amessage appears.
An X in the icon means that the function is switched on.All functions are active as standard.

Machine test (available from main menu)
This function is for Pfaff certified service technicians only.
Version (available from main menu)
The current software version number in your machine is shownhere.
Software updates (available from main menu)
This function is for Pfaff certified service technicians only.
Wekorne screen (available from main menu)
The welcome screen that appears when the machine is switched oncan be deactivated. Touch the button ‘Welcome screen” to toggleon / off, the welcome screen is active if the button is highlighted.The setting is made when the context menu is closed.
Delete all (available from main menu)
This function will reset your performance settings to defaultsettings. Use with care!
If the “Deleting memory” icon is touched, the following messageappears: “Do you want to delete the pattern parameters plus a/Ipattern sequences?”
Deete parameters (available from pattern selection menu)
This function deletes all changed parameters in all stitches.
Deete all stitch sequences (available from sequence select menu)
This function deletes all stitch sequences.
nfo systemThere is an Info system function in your sewing machine to helpyou; it can be cahed up at any orne by pressing the button.The info system includes information on preparing the machine forsewing, using the sewing functions, recommendations regardingaccessories and settings.
An “info” text may extend over sm’erai paces. Use thebuttons to browse through the pages.
Touch to close the Info sysTem. if the Context menu” is alsoopen, the first touch closes the Context menu; the “info” is closedwith a second touch.
Depending on when you the cfo ourton the informationmay appear in different v.ays.
46

information in the main menu
if you press the button in the main menu the info systemgives you the foflowing information:
nreathng the top thread.
Threading the needles.
0 Winding the bobbin.
Winding through the needle.
inserting the bobbin.
Touch the desired area.Graphics and text will describe the function.
Press the buttons to scroll through multiple pages.
Information about individual patterns in the sewing mem
If you press the button when a stitch is selected the infosystem gives you the following information:
Needle size/type recommendation, to engage or disengage theIDT, recommended presser foot and upper thread tension.
For tapering, patchwork, buttonhole sewing, quilt stitches anddarning program there is a more detailed information.
:
•-1
Information in the more options window
When you press the button when the More options windois open, an information window opens with information aboutdifferent sewing functions.
There are eight areas to choose from:
neon
j Raise oresser foot
L Free modon sewing
i Singe sdtch
1’ Twin neeJi
pat Patchwork program
Tapering decrease
Tapering increase
Press the ZL buffers cc sc:o through muitice gages.
j

I
I
I
I
I
I
I
I
I
I
I
F
F
48
F
I
£

!!
!fI
Ill
IJI
II
II
Ill
lii
(II
rNii
m1
Ls
II
Ill
Ill
l111
1il
l‘i
I”iw
-—
—
v) LI, (D (D

St[tch sequencesYour performance 2054 offers you the possibility of storing
stitch and word sequences in the memories of the machine. The
stitch sequences are stored and remain in the memory until you
overwrite or delete it.
Up to 99 stitches or letters can be stored in each of the 50
memories.
AvaiabIe sewing functions In the stitch sequence
These sewing functions depend on the stitch type.
This sewing function is determined by the stitch type.
By pressing the key you can set the following sewing
functions:
These now set the function for the entire stitch sequence.
Creating a stitch sequence
n a sewing menu each stitch can be saved in a stitch sequence by
touching m the display changes to the stitch sequence display.
The stitch can be sewn immediately and can later be stored in a
permanent memory.
When the stitch is saved to seouence,
This display includes a preview field which shows every next stitch
to add to the stitch sequence. To delete a selected stitch touch m.
To insert a stitch throu the insertion button, touch to open the
main menu.
Note: Touch to call up shiches hat you wish to add in the sewing sequence.
Touch to exit stitch sequence menu ann return to the main menu.
so

Selecting another stitch
There are various ways to select another stitch in the stitch
sequence.
1. Selection by number
Touch to open the selection by number menu.
If a stitch is selected that cannot be used in stitch sequence, for
example, a buttonhole, a message is displayed.
2. Selection by Stitch selection keys.
Touch ZE to browse the stitches in the preview field.
3. Selection by category
Touch i to open the stitch sequence selection menu. Only
categories with stitches can be entered in a stitch sequence can be
selected.
The selected stitch appears in the preview field and all specific
parameters and sewing functions can be changed.
Touching m inserts the stitch into the stitch sequence, following
the position of the cursor. The cursor jumps to the end of the
inserted stitch. The preview field remains active so that a new
stitch can be chosen.
4. Selection by repetition
iIi€jL
• ,
JWIIYL
LJ
_
Touching the m inserts the same stitch once more with the same
settings.
If the same stitch is to be saved with changed settings, these can
be changed immediately.
The selected stitch appears in the preview field and all settings and
sewing functions can be changed.
Touch m to insert the stitch into the action field following the
position of the cursor.
If a stitch sequence extends over more than one display width, an
arrow appears on the left border of the action field, indicating one
or more preceding pages.
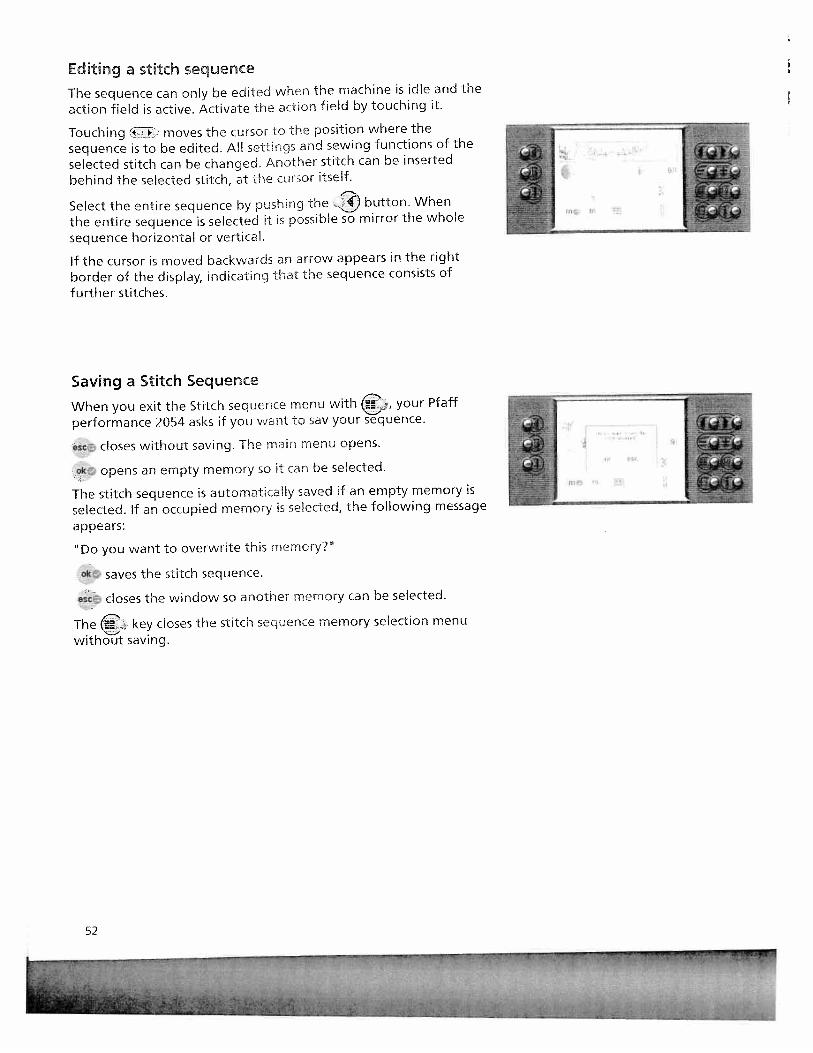
Editing a stitch sequence
The sequence can only be edited when the machine is idle and the
action field is active. Activate the action field by touching it.
Touching moves the cursor to the position where the
sequence is to be edited. All settings and sewing functions of the
selected stitch can be changed. Another stitch can be inserted
behind the selected stitch, at the cursor itself.
Select the entire sequence by pushing the button. When
the entire sequence is selected it is possible so mirror the whole
sequence horizontal or vertical.
If the cursor is moved backwards an arrow appears in the right
border of the display, indicating that the sequence consists of
further stitches.
Saving a Stitch Sequence
When you exit the Stitch sequence menu with , your Pfaff
performance 2054 asks if you want to say your sequence.
ec closes without saving. The main menu opens.
ok opens an empty memory so it can be selected.
The stitch sequence is automdticdily saved if an empty memory is
selected. If an occupied memory is s&ected, the following message
appears:
Do you want to overwrite this memory?
Ok saves the stitch sequence.
esc closes the window so another memory can be selected.
The key closes the stitch sequence memory selection menu
without saving.
52

— ,4
Creatng a new stitch sequence
I If the Stitch sequence huon is touched in the main menu and aI memory is already full, a dialog window opens to “New”, Open’
and ‘Delete” a stitch sequence. If “New” is touched the stitchI sequence menu opens.
The stitch sequence buttons are active except for . The stitch 1,
I straight stitch, is displayed in the preview field.
All buttons and keys are active, ready to create a new stitch
sequence.
Opening a memory
I If the “Stitch sequence” button in the main menu is pressed,
the stitch sequence memory menu opens. Memory 1 is actively
selected.
To select another memory again touch the button, or touch the
“Stitch selection buttons” and open it with the “More options”
button.
If an empty memory is touched, an empty stitch sequence display
opens. The straight stitch (stitch numberl) is shown.
If a memory that is occupied is touched, a dialog window opens:
If “New” is touched, the saved sequence is deleted and an
empty stitch sequence display opens to create new sequences.
If “Open” is touched, the saved stitch sequence is opened. The
preview field is actively selected.
If “Delete” is touched, the selected memory is deleted.

Aphabets
You can write an entire sequence of words using the built infonts and save it permanently in the performance 2054 memory.All fonts should be sewn with the IDT integrated Dual Feeddisengaged. All fonts include upper case letters, special charactersand numbers. The Script font also include lower case letters.
Touch the ‘Alphabets’ icon and select a font. The machineswitches automatically to the stitch sequence menu. If only oneletter is to be sewn, it must be sewn in the stitch sequence menu.
Available functions
Upper case letter
i5i Lower case letter
° Special characters
Numbers
> * Letter selection buttons If l’ is touched characters areactively selected one after another. If h is touched, the selectionjumps 5 characters further on, You can scroll backwards andforwards.
90 Size setting button Touch s non and set he font sizewith EZ.
A selected character is saved in the stitch sequence field bytouching this button.
Eraser. Deletes a selected character from the stitch sequencefield in this case the y” is deletedand then the ‘a is selected automatically.
mt Save button. The stitch sequence menu opens when thisbutton is touched.
Mirror image button if toe button is actively selectedbefore the first character is entered or if the whole sequenceis selected by pushing the “mirror image’ refers to thewhole sequence.
54

Creating a word sequence
Touch the “Alphabets” icon in the main menu.
Select a font.
When the menu is opened, the , uppercase button, is selecteby default.
When the sequence field is open, the character selection fieldis actively selected. The chosen font is displayed i
the upper right corner.
Touch t 1* to choose the desired character. To Show keyboarsee page 45.
Touch ok to save the chosen charcter in the font input field.
If you enter a sequence that is longer than the input field thesequence moves to the left, and a small arrow appears on the eof the display. Any further stitch will be added after the cursor.cursor always selects the last entered character.
Touch the input field to select it.
The stitch selection keys j. move the cursor to select anothercharacter or to subsequently delete or insert characters.
The selected character is deleted.
• Insertions are made after the cursor line.
Touch the character selection field n J and anothercharacter can be chosen.
You can alter the font size by touching 90 and set the size wiT] The font size refers to capital letters.
When the size is set before characters are entered, the size isfor the entire sequence.
If one character is selected in 1 ,the size of theindividual character can be changed. The following charactewill also be saved in this size until a new size is set.
Edit a word sequence in the Stitch sequence menu
If m is touchel in the word sequence menu, the stitch sequendisplay opens and displays the word sequence.
The letters entered are shown in the action field in the selecteafont type. Touch ‘‘ to change the size of the individual seleccharacters with
You can add stitches, leUers and edt sze. T0 save foflowinstructions under “Saving a SLch Sequence”.
F
F
F
F
F
F
F
F

56

t1
LiL
LL
L
C Vba
2Q
O%.
4D
a)
a)-
2 0-‘
CD
a)
00
_)
DCD
0)
-f
(•)
I0
J CD N N 0) (0 C, 0
(0
N
:T
;t
CDi
D3Z2 0
V) 0
(11
_
2 0
0 0
C, 0
2 0 w2 0

Straight stitch - No 1
Stitch 115 the basic straight stitch in center needle position. Thestitch length can be increased up to 6 mm. Change the needleposition of the straight stitch to sew in a zipper or topstitch alongthe edge of a collar. Your Pfaff performance 2054 has 19 needle
positions that can be adjusted with the. icon andbutton.
Tip: Use the “needle up / down” button to easily pivot at collar points.
Sewing in zippers - No I
There are different ways to sew in zippers. Follow the directionsincluded with your pattern for best results.
For all types of zippers it is important to sew close to the teethof the zipper. The zipper foot can be snapped to the presser footankle on the left or right, depending on how you will insert yourzipper. Then set the needle position so that it enters close to theedge of the zipper teeth by using one of the 19 needle positionsavailable.
Note: If the presser foot is attached on the right side, the needle must be moved tothe right. If the foot is attached on the left the needle must be moved to the left.
58
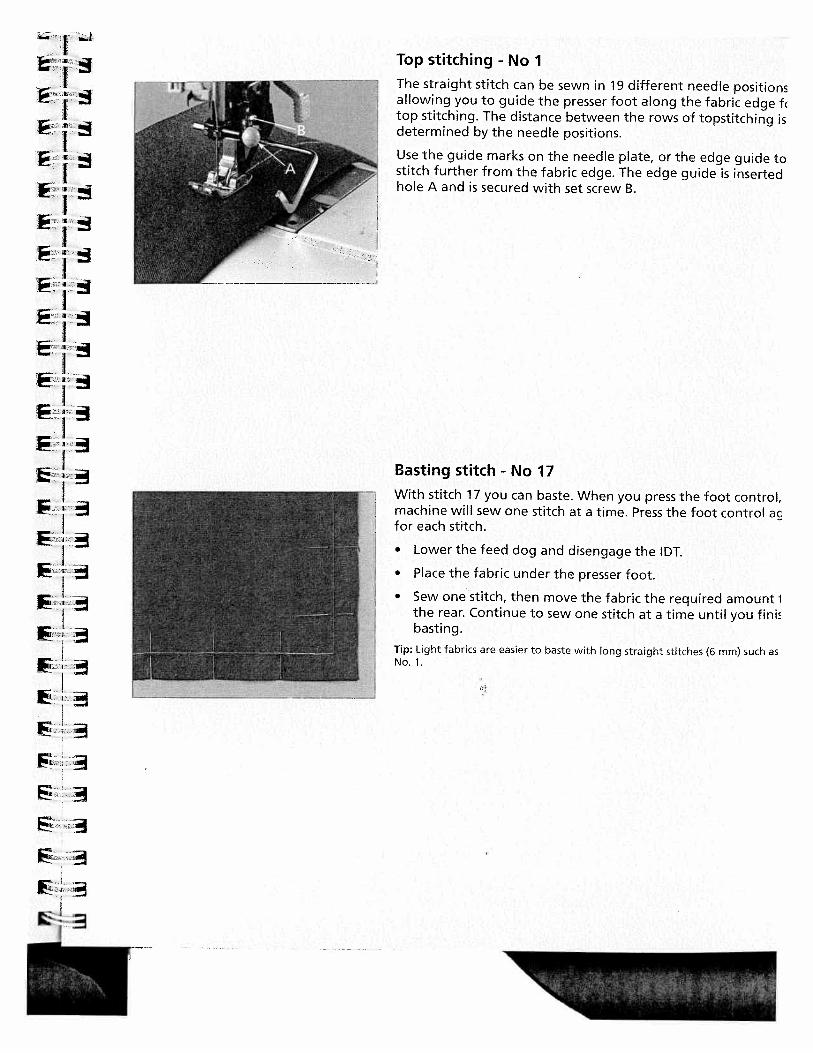
Top stitching - No II The straight stitch can be sewn in 19 different needle positions
allowing you to guide the presser foot along the fabric edge fI top stitching. The distance between the rows of topstitching isdetermined by the needle positions.
I Use the guide marks on the needle plate, or the edge guide to
I stitch further from the fabric edge. The edge guide is insertedhole A and is secured with set screw B.
I Basting stitch - No 17With stitch 17 you can baste. When you press the foot control,
• machine will sew one stitch at a time. Press the foot control acfor each stitch.
j • Lower the feed dog and disengage the IDT.
• Place the fabric under the presser foot.
F . Sew one stitch, then move the fabric the required amount Il
the rear. Continue to sew one stitch at a time until you finibasting.
Tip: Light fabrics are easier to baste with long straight stitches (6 mm) such as
F No.1.
r

Bhnd hem stitch * No 15The blind hem stitch is used to make invisible hems on skirts,trousers and home decorating.
• Finish the edge of the hem.
Fold and press the hem allowance to the wrong side.
• Fold the hem back on itself so approximately 3/8’ (1 cm) of thefinished edge extends beyond the fold. The wrong side of yourproject should now be facing up.
• Place the fabric under the presser foot so that the fold runsalong edge guide A.
• When the needle swings into the fold it should catch a smallamount of fabric. If the stitches are visible on the right side,adjust edge guide A by turning adjusting screw B, until thestitch that catches the hem just slightly barely showns.
The elastic blind hem stitch is especially suitable for stretchyfabrics, because the zig zag in the stitch lets the stitch stretch. Thehem is finished and sewn at the same time. There is no need tofinish the raw edge first on most knits.
Create the blind hem as described above.
Stitch 16Stitch i5
Elastic bhnd hem stitch — No 16
60

—I
E
F
F
F
F
F
Zigzag stitch — No 3
Raw edges can be finished easily with zigzag stitch 3. Make sure
the needle pierces the fabric on the left swing of the needle anc
overcasts the edge of the fabric on the right swing of the needl
Stretch tripe zigzag stitch — No 14
The stretch triple zigzag stitch produces a highly elastic anddecorative seam. This stitch can be used for T-shirt hems and wi
decorative threads on denim.
• Fold up a hem the correct width.
• Topstitch the hem from the right side, or thread the top witdecorative thread and sew.
Tip: Use lower needle thread tension and stabilizer under the fabric for decora
threads.
::::;:: :‘ .:
.
.,.:...
:.:..:;. .:., :::..:;:.:.
,.:•: :. -:.,:::::: :.: :::‘::::,..

Stretch trip’e straight stitch — No 2This stitch is used for sewing seams where strength is needed,such as under arm and crotch seams. The heavier the fabric, thelonger the stitch length required. Your Pfaff performance 2054 has19 needle positions that can be adjusted with the o. icon and
button.
L
E’astic stitch — No 4Use stitch 4 to add elastic to pajamas, skirts and sportswear.• To create a waistband, finish the top edge of the garment.• Cut elastic to comfortably fit around waist.
• Sew the ends of the elastic together.
• Divide the garment edge and elastic into quarters.
• Stretch the elastic to fit the fabric. Sew on elastic.
Honeycomb stitch — No 7The honeycomb stitch is an elastic and decorative hem, which isvery suitable for childrens clothes and lingerie.
62

Darning with the elastic stitch — No 4
__
I Use the elastic stitch to repair holes, tears and damaged areas.
• If the area is only slightly damaged, sew over it with severalrows of stitching until it is well covered.
• For tears, frayed edges or small holes, place a piece of fabricslightly larger than the damaged area and of the same coloron the wrong side of the fabric. Stitch over the damaged arthen cut away the excess material close to the stitching on tIback side of your repair.
Sewing-on patches — No 4—
— The best way to repair larger holes is to patch the damaged arwith a new piece of fabric.
Cut a piece of fabric slight!y larger than the damaged areahole.
• Stitch the fabric patch, over the damaged area, along the ewith the elastic stitch.
e Cut away the damaged fabric on the reverse side close to thstitching.
Repairing tears
On tears, frayed edges or small holes place a piece of fabric un
the reverse side of the tear. The underlayed fabric reinforces tworkpiece and ensures perfect repair.
Lay a piece of fabric underneath the damaged fabric. It rnu
a little larger than the damaged area.
• Now sew over the damaed area.
Cut the under layed piece of fabric close to the stitching.

Overlock stitchesFor elastic, knits and stretch fabrics, your performance 2054provide a selection of overlock stitches. These stitches Join multiplelayers of fabric and overcast them in one operation. These stitchescan stretch and are more durable than standard stitches.
Closed overlock stitch — No 38This stitch, in a single operation, is suitable for sewing and sergingfabrics that fray easily. The closed overlock is also a good stitch forattaching knit cuffs and collars to garments.
Open overlock stitch — No 36The open overlock stitch works well when Joining or edge-finishingfabrics that do not fray excessively.
Tip: Use blind stitch foot No. 3 when sewing overcast seams, This guides the fabricmore precisely and prevents tunneling of the seam at wider stitch widths. Adjustthe stitch width and guide of the foot to ensure that the right swing of the needleclears the raw edge of the fabric and the pin of the presser foot.
Closed overlock stitch with edge thread — No 31If you wish to sew a fabric that frays easily, select stitch 31. Withthis stitch an additional edge thread protects the fabric edgeagainst further fraying.
Pullover stitch — No 39This stitch can be used for open-knit and heavy knit fabrics.Garments can be joined effortlessly with this stitch.
Tip: To prevent the seam from stretching while sewing, overcast a woolen thread ortwill tape in the seam.
-
I - -
64

Buttonho’es
There are 8 buttonhole styles built-in to your Pfaff performanc2054. Each buttonhole is especially adapted for a particular usand fabric type.
Your performance 2054 is equipped with the Sensormaticbuttonhole guide 10 and sensor technology to ensure that evebuttonhole is sized accurately. Beautiful buttonholes can be seon even the most difficult fabrics such as velvet, plush, knittedfabrics and heavy knits.
Inserting the sensormatic buttonhole guidePush the metal part of the buttonhole guide into the slot(between the two arrows) on the housing at the back of theneedle plate. The white plastic part extends over the needle p1covering the feed dogs.
Slide the guide towards you until it lies against the rear of thearm. The guide will spring rear slightly so that there is a smallbetween the needle plate and the guide.
Inserting the sensormatic buttonhole guide activates the senso
:
(see “Changinu the presser foot” page 27).
Snap on buttonhole foot No. 5.
Use buttonhole foot No. 5 to sew buttonholes.
Before starting to sew, pull the runner of the foot toward thefront to the second red mark
Attaching buttonhole foot No 5:
—

Buttonhole with gimp cordButtonholes that are sewn with gimp cord under the satin stitchcolumns are more stable, durable and professional appearing. Usepearl cotton or regular gimp thread.
Insert the Sensormatic buttonhole guide.
Place the center of a length of gimp cord over the metal hookextending from the center back of the buttonhole foot. Pass thecord ends under the foot and pull up into the right and left guideson the front of the presser foot.
Snap on the buttonhole foot. Before starting to sew, pull itbackward as far as the second red mark.
Buttonhole 56, 57, 58 or 59 can now be sewn.
After completing the buttonhole, pull the ends of gimp cord untilthe loop of thread is hidden under the buttonhole bartack.Thread the gimp cord ends into a hand sewing needle and pullthem to the wrong side of the garment. Tie the gimp threads andcut off the excess thread.
Eyelet buttonhole with gmp cordsInsert the Sensormatic buttonhole guide. Place the center of alength of gimp cord over the metal hook extending from thecenter front of the buttonhole foot. Pass the cord ends under thefoot and pull up into the right and left guides on the back of thepresser foot.
Snap on the buttonhole foot and pull it backward as far as thesecond red mark.
Before starting to sew, press the needle down” button.Sew the right side of the buttonhole.
4.
L.
66

After the machine sews the first few stitches of the curved endthe gimp cords down from the metal hook with a straight stitcpin.
Warning: The presser foot must not be raised from the fabricsurface!
Pull the gimp cord on the left towards the rear until the loop ijust in front of the needle. Carefufly sew the curve, guiding thEgimp cord under the stitching.
After sewing the curve, hold the gimp cords into a needle andthem to the vvrong side of the garment. Tie the gimp cords ancoff excess cord.
The round buttonhole with gimp cord is sewn in the same way
Tip: This buttonhole is particularly attractive when sewn wth a heavier-weighithread.
Buttonhole tipsButtonholes that are to be sewn very close to a reinforced edgmay sometimes not feed optimally with the buttonhole footbecause of the bulk at the edge of the fabric. In this case, usepresser foot 1A with the Integrated Dual Feed engaged.Fabrics that shft or stretch easily should be reinforced with wasoluble or liahtweight stabilizer,
Buttonholes are particuiary sTable and durable if a gimp cord iinserted while sewing (see “ Buttonholes, with girnp cord”).Linen buttonholes are particularly attractive if you use a heaviEweight thread through a topstitch needle.
Buttonholes arc normally selected a little larger than the buttodiameter. It is important to alvvays sew a test buttonhole on thsame fabric/stabilizer as your project.

Sewing on buttons — No 64
With Button sewing program 64 you can easily sew on two andfour-hole buttons.
• Remove the presser foot and lower the feed dog. (Make surethe IDT is disengaged.)
• Mark the button position on your fabric. Place the button onthe marked fabric.
• Turn the handwheel towards you and position the button sothe needle enters the left hole in the button.
• Lower the presser foot lifter. The button will be held in placeby the shank of the foot. Turn the handwheel to make sure theneedle also enters the right hole of the button.
• Continue sewing on the button. The machine will complete theprogram for you.
Tip! use the optional Sew on Button Foot to sew optimal buttons.
Sewing on buttons with shanks — No 64• Attach the presser foot.
• Leave the feed dogs lowered. Place a toothpick between theholes of the button and sew it on as described on the left.
• Remove the toothpick and pull the button and fabric apart.
• Wrap the stem with sewing thread and knot it.
Tip! use the optional Sew on Button Foot to sew optimal buttons with shanks.
Eye’ets — No 71
To stitch eyelets on a belt or linen items, select stitch 71,
68
r
‘it
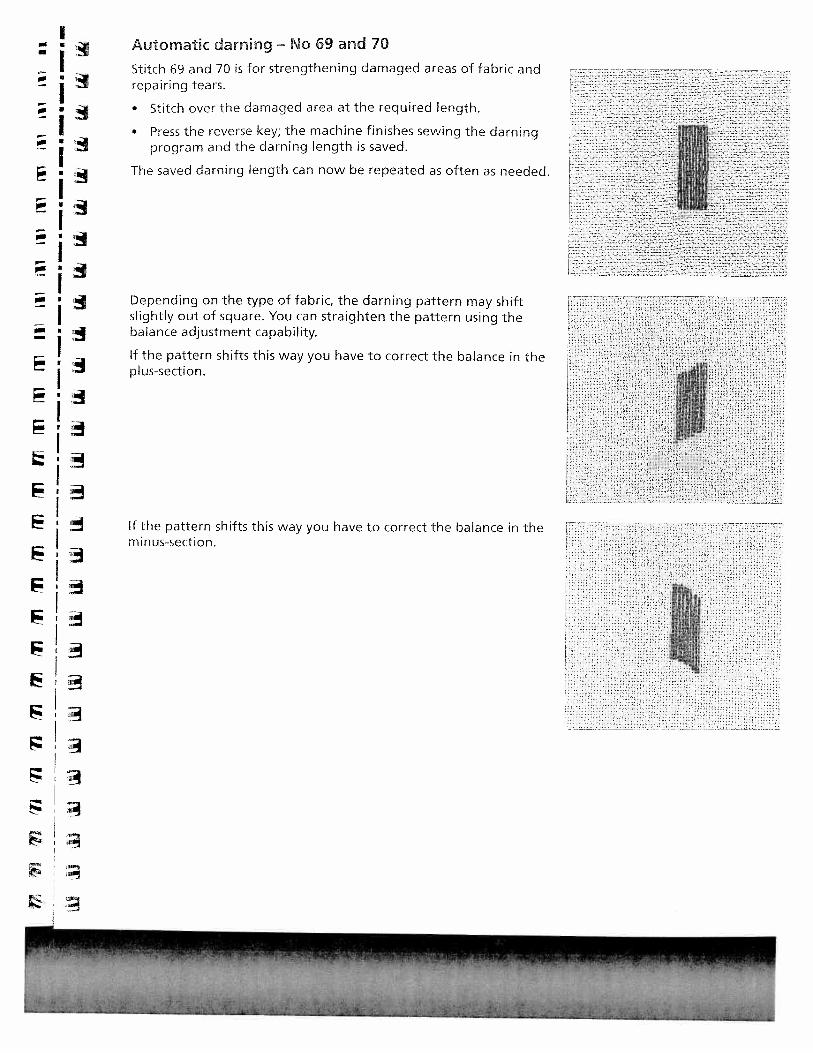
Automatic darning — No 69 and 70
Stitch 69 and 70 is for strengthening damaged areas of fabric and— repairing tears.
• Stitch over the damaged area at the required length.
I • Press the reverse key; the machine finishes sewing the darning. • program and the darning length is saved.
• The saved darning length can now be repeated as often as needed.
‘-I!i:
‘Depending on the type of fabric, the darning pattern may shift
I slightly out of squareS You can straighten the pattern using thea balance adjustment capability..— If the pattern shifts this way you have to correct the balance in the
plus-section.
I
‘ If the pattern shifts this way you have to correct the balance in theI minus-section.

Free motion darningAttach darning foot No. 6. Make sure the needle is at its positionhighest position. With thumb and index finger press the darningfoot together. Insert the pin of the darning foot as far as it willgo into the hole of the presser foot holder. The “C-shaped” guideshould place itself around the presser bar. The long, plastic armmust be behind the needle clamp/needle se screw.Lower the feed dog.
Hoop your project to be repaired in a round embroidery hoop.Select the straight or zigzag stitch. Touch and selectAs you begin sewing, the darning foot automatically engages inthe darning position.
Draw up the bobbin threaad and sew a few stitches to secure. Clipthe threads close to the project and continue sewing.Repair the damaged area/hole by guiding the fabric evenlyforwards and backwards slightly longer than the length of therepair area.
When you have covered the damaged area, turn the fabric 90degrees and stitch over the area again. Darning in both directionsover a tear will produce a stronger repair.
Tip: Remember, when sewing with the feed dogs lowered, the stitch length isdetermined by you. An even, medium-to fast sewing speed will allow you to sew amore consistent length of straight stitch, Sewing too slowly may cause small knotsto appear on the reverse side of your work.
--__j
N ‘\
N \NN ‘ N
N
70

‘-
Gathering with straight stitch No IA straight stitch can be used to gather sleeves, cuffs, skirts orvalances. To obtain neat and even gathers you should sew twothree rows of gathering stitches.
Set your stitch length to 6.0 mm. Lower needle thread tensito 3.
Mark the first gathering line on the right side of the fabric.along this line. Leave about 4 - 5 inches (10-13 cm) of threa(the beginning and end of the seam.
Sew 1 or 2 more rows of stitching, using the edge of the pnfoot as a guide.
• Gather the fabric by pulling the bobbin (bottom) threads tcdesired fullness.
• Distribute the gathers evenly and knot the thread endstogether to secure the gathering.
Gathering with e’astic threads — No 7Gathering with elastic thread is particularly suitable for visible,elastic gathering seams such as bouse sleeves, waist seams ornecklines.
• Mark the first gathering row on the fabric. Sew a few stitchuntil the needle is in the middle of the presser foot. Turn thhand-wheel towards yourself until the needle is in the loweposition. Raise the presser foot and place the elastic threadaround the back of the needle,
Lower the presser foot and sew a few more stitches to securthe elastic thread to the fabric. Continue attaching elasticthreads to fabric. Make sure you do not catch the elastic thr
____________
in the stitching.
When you are finished attaching the elastic thread, pull onends of the elastic threads to gather. The amount of gatheris determined by the amount you pull on the elastic thread.Secure all thread ends.
i4( t 1?t: 1313Li3Lw
fr
F

U

a
,*I.-
•r
‘
IL
1±
2:,
00
a’CD n
0
fl oz
0s
(00 3
0 CD
WS
At

QuiWngPatchwork
Patchwork and quilting are traditional hand craft techniques to
make use of left-over fabric. Over the years it has developed into a
creative hobby.
Traditionally patchwork was sewn by hand. Today your creative
ideas can be realized in a much shorter time with your Pfaff
performance 2054.
A quilt consists of three layers, two layers of fabric with a layer of
batting sandwiched between.
Piedng the quNt topCut out the pieces of fabric for your quilt top using templates. A
seam allowance of ¼” (6 mm) should already be included in the
templates. Snap on the optional 1/4” quilting foot, Sew the pieces
together following the design instructions to piece the quilt top.
The seam allowance of quilts are usually pressed towards the
darker fabric side. Baste the completed quilt top to the batting
and backing. In traditional quilts these three layers of material
are then sewn together by hand with small stitches. However, it is
quicker and more practical with your Pfaff performance 2054, e.g.
with stitch 41 using monofilament thread on top and regular or
decorative thread in the bobbin.
When the quilting is finished simply bind the edges or n]ake it into
cushions, wearable art or other smaller projects.
74

Quift Piecing
Use the ¼” Quilting foot with DT as an easy guide for optimalquilting. Set your Pfaff performance 2054 for center needlestraight stitch and engage the IDT.
For optimal quilt piecing set up your Pfaff performance 2054 wa Straight Stitch (1), stitch length 2.5, Needle Position 4 to theright and your IDT engaged. The fabric pieces should meet undthe right of presser foot 0. Moving the needle position gives yoscant ¼” seam.
Patch work program
Select Straight Stitch (1) and set up as above.
Select the Patchwork program in the more options menu and ttouch OK. Now sew your seam length. When you get to the enthe seam, touch the reverse button. The seam is now tied off aiready to be sewn again. Continue to sew the fabric pieces of tbsize together.
When you are finished with this size, re-choose the Patchvvorkprogram and sew the next seam length.
LJ

Stitch in the Ditch
One way to hold the quilt top, batting and backing all togetheris using the stitch in the ditch method of quilting. Stitching in theDitch means following the seams in the quilt blocks.
Set your Pfaff performance 2054 with a Straight Stitch (1), stitchlength 2.5, Center needle position and the IDT engaged. Use theoptional narrow edge foot for optimal guiding.
Begin by pin basting your quilt through all layers with safety pins— starting from the middle of your quilt and working out. Place apin about every 6—8 inches (15 — 20 cm).
To begin quilting, start sewing from the middle of the quilt andcontinue out. Starting from the middle and sewing out will helpkeep layers in place. Plan which seams you will actually follow. Thisstitching will not only hold the quilt together it will also create thepattern on the quilt back. You do not need to follow every seamin the quilt, sew every 3 —4 inches to keep the quilt in place. Ofcourse you can sew more to create a more decorative pattern forthe back.
Tip: Try using one of the Antique Applique quilt stitches (41 55) instead of thestraight stitch to add interest to your quilt, using monofilament thread on top.
change to a quilting or jeans needle when sewing through thick quilts. Test sew tomake sure your stitching is proper before you start quilting your piece.
Use stitch 41 to make your stitch in the ditch look hand sewn.
Antique Quilt Stitches
Beutiful Crazy Patch quilting was originally sewn by hand. Thishand stitched look can be accomplished faster and easier with thePfaff Antique quilt stitches.
• Use invisible (monofilament) thread in the needle. Use acontrast or matching polyester or cotton thread in the bobbin.
• Set the needle thread tension to 7-9.
• When you sew the stitch on the three layers of your quilt, youshould only see your bobbin thread. Create the stitch patternon top of the fabric. The intermediate stitch disappears andthus produces a handstitched appearance. Adjust your needletension as needed to produce the desired effect.
L.
(
76

— I
_
I
:I4
II
L
Tying the Quilt
Tying a quilt is another way to hold the quilt top, batting andtogether. Previously done by hand, your Performance 2054 hasgreat decorative stitches that will “tie” your quilt with ease.
Choose a decorative stitch that is a forward moving stitch, sud117 or 157. Set up your 2054 as explained in the information.
Prepare your quilt as explained in the Stitch in the Ditch methc
Engage the Single Stitch Program for one stitch. Now sew thisstitch every 3 4” (7 — 10 cm) all over the quilt. Again plan youstitch placement so that there is a nice pattern on the front anthe back.
This is a very simple and beautiful way to secure a quilt.
Free Motion Stippling
Free Motion Stippling not only keeps the top, batting and badtogether, but it also adds texture and interest to your quilt.
Set your Pfaff performance 2054 for stippling with a Straight S(1) and the Free Motion Program. Attach the free motion quiltfoot. Pin baste your quilt layers..
Prepare your quilt as explained in the Stitch in the Ditch meth
Practice stippling on scraps of fabric and batting. When the fe<dog is lowered, you move the fabric to determine the stitch lerSewing with a constant speed will help to keep the stitches ev
Begin near the center of your quilt. Take one stitch and pull thbobbin thread to the top of the quilt. Take a few stitches rightnext to one another to secure the threads. Now move the quilthat your stitching creates scrolls and swirls, The stitching shounot cross itself — but travel in swivling stitches all over the quill
Tip: Use the Free Motion Guide grip to help move the quilt in a more consisterway. The Quilting table and Free Motion Guide foot are extra accessories creamaLe your stippling easier. See your authorized Pfaff dealer to purchase.
/
(I

QuHt Apphques
Appliques add a special touch to your quilt.
There are many different ways to stitch appliques to a quilt. One
way is to add the applique to the block before the quilt is put
together.
Set your performance 2054 for a satin stitch. Choose stitch 10,
stitch length 0.4 - 0.5, stitch width 3 — 6, presser foot 2.
Fuse the applique piece to the biock with invisible web. Place
stabilizer under the block. Sew around the applique with the satin
stitch. Make sure the stitch mostly on the applique — covering the
raw edge of the applique.
Another way to add an applique to a quilt is to finish the edge of
the applique and sew it on with the hand applique stitch (44).
First prepare the applique. Cut the applique shape out of fabric
and a piece of light weight iron on interfacing. Place the right
side of the fabric and the rough (iron-on) side of the interfacing
together. Use a Straight Stitch (1), stitch length 2.0, center needle
position and sew the fabric and interfacing together around the
outside edge with a ¾” seam. Trim around the applique leaving
1/8” seam allowance and clip into curves. Slash the interfacing and
turn the applique right side out. Finger press the applique.
Place the applique on the quilt. When you are satisfied with the
position, iron it down.
Select stitch 18, snap on applique foot and sew around the edge of
the applique with the straight part of the hand applique stitch. Let
the horizontal part of the stitch just catch into the applique. This is
the part that will keep the applique in place.
78

Free Motion SewingWith Free Motion Sewing you can create the most fantastic wo
It is possible to sew just as you would draw with a pencil, using
the various types of threads that are on the market today and
your performance 2054. You can a!so vary the shade of your FrE
Motion Sewing by sewing in different directions or patterns.
Top tension 2-3
Presser foot Darning foot
Feed dog Lowered
Stitch length 0
Stitch width 0-9
Fabric Cotton type fabric
Needle size 90-100
Stitch Straight stitch!
Zig zag
Free motion program On
Thread your machine with a good quality cotton or synthetic
thread. You can use the same thread for bobbin thread, or an
embroidery weight bobbin thread. Hoop your fabric tight as a
drum into a round machine embroidery hoop. You can use a
wooden ring hoop bound with tape for a better grip. Select ei
the straight stitch or the zig zag and set the stitch length to 0.
From now on, you control the stitch length. The movement of
hoop along with the sewing speed creates the stitch length.
mportant: Never engage the IDT when free motion embroidering.

Touch and select Darning/Quilting to activate the free motionfunction. When you press the foot control, the presser foot goesdown to the Darning/Quilting position. Place your hooped fabricunder the needle.
Make one complete stitch. Pull the bobbin thread up to thetop of the fabric. Hold both threads and sew a few stitches tosecure them. Clip the threads close to the fabric and continuesewing. Make sure that you hold the hoop on the machine bedand move it steadily. Experiment sewing different patterns andsee what different stitch directions will do with the look of yourembroidery. Try different stitch widths for shading effects. Alsotest different threads, such as variegated and metallic threads. Youcan also print, paint or apply fabric shapes on your fabric beforeembroidering. Finish your embroidery by adding free motionstitches over the edges.
Tip: Draw a straight line with a water or air dissapering marking pen on the fabricin your hoop. Keep this line parallel with the front of your machine.
•r’: .
S S
“..
S 55
5-
5.
S .5
.5.,
\ 1 ,
S
80

Nostagia /H&Hoom
Wing Needle
Sewing with a wing needle creates the look of “hemstitching”
woven natural fiber fabrics by creating “holes” where the neec
goes in and out of the fabric.
Replace standard needle with a wing needle. Choose any stitch
that goes back and forth into the same holes several times (3, 9
92). Use the recommended presser foot for that stitch.
Thread the top and bottom with lightweight thread in color th
matches the fabric you are using. (Remember you want to see I
holes that are created and not the thread.)
Tip: For fine fabrics, place a Iightweignt tear away stabilizer under stitching.
Begin sewing. Use the Sew Slow button to reduce your speed
while using the wing needle.
GimpingGimping adds texture to nostalgia projects. Previously done by
hand, sewing over gimp cord with your performance 2054 will
not only save time but add that special touch to bags, tableclol
handkerchiefs and more.
Set up your performance with a zig zag stitch (2), stitch length
stitch width 2.0, presser foot IA, IDT engaged.
Tip: Use the 7/9 hole cord foot to help guide your cord
Thread your Performance with polyester or cotton thread that
matches the color of your fabric in both the top and bobbin. (decorative thread in the top if desired.) Use crochet cotton as t
gimp cord.
Tip: Use a fade away or water soluble pen to mark your pattern before you se’
Place the gimping cord under the presser foot, guiding the cor
in the slot in the middle of the foot. Begin sewing over the cor
Create curves and swirls as you sew. Sewing over the cord adds
raised texture to your designs.
—I

CD 0 3 CD C-)
CD
cD
‘1r*
jI:*!z,
J---I-’
‘
9’
I
n CD4I
0 0
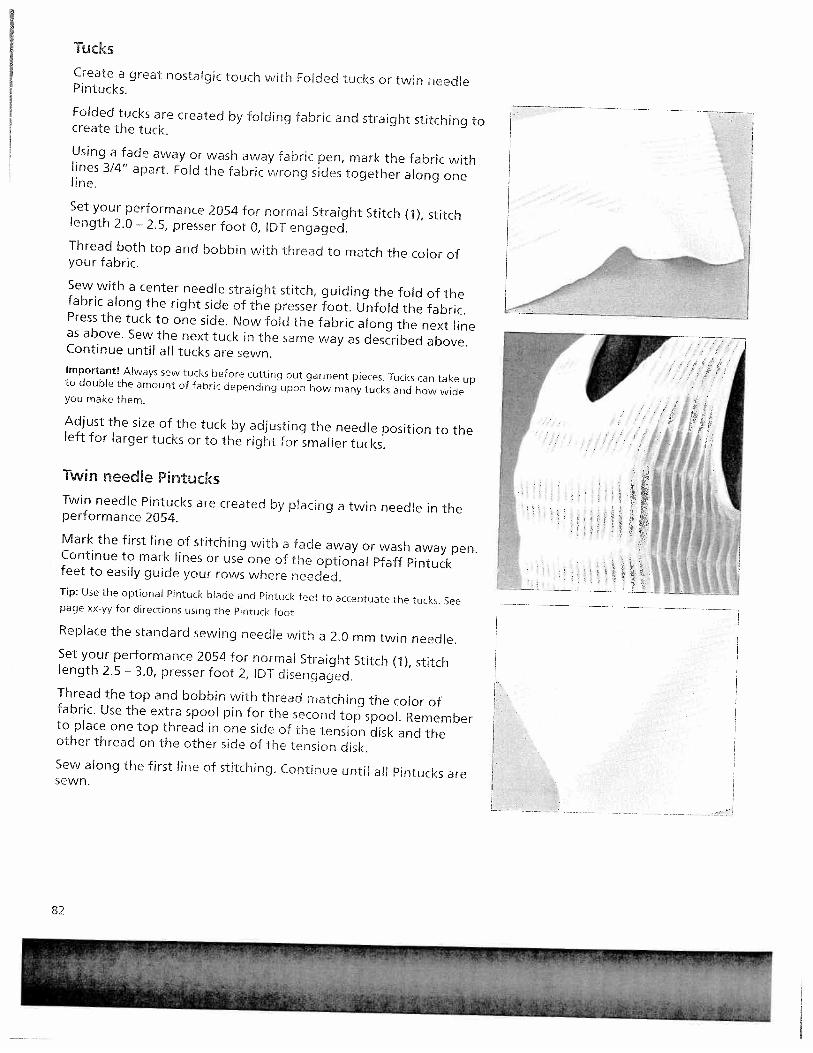
Tucks
Create a great nostalgic touch with Folded tucks or twin needlePintucks.
Folded tucks are created by folding fabric and straight stitching tocreate the tuck.
Using a fade away or wash away fahric pen, mark the fabric withlines 3/4” apart. Fold the fabric wrong sides together along oneline.
Set your performance 2054 for normal Straight Stitch (1), stitchlength 2.0 — 2.5, presser foot 0, IDT engaged.Thread both top and bobbin with thread to match the color ofyour fabric.
Sew with a center needle straight stitch, guiding the fold of thefabric along the right side of the presser foot. Unfold the fabric.Press the tuck to one side. Now fold the fabric along the next lineas above. Sew the next tuck in the same way as described above.Continue until all tucks are sewn.Important! Always sew tucks before cutting out garment pieces. Tucks can take upto double the amount of fabric depending upon how many tucks and how wideyou make them.
Adjust the size of the tuck by adjusting the needle position to theleft for larger tucks or to the right for smaller tucks.
Twin need’e PintucksTwin needle Pintucks are created by placing a twin needle in theperformance 2054.
Mark the first line of stitching with a fade away or wash away pen.Continue to mark lines or use one of the optional Pfaff Pintuckfeet to easily guide your rows where needed.Tip: use the optional Pintuck blade and Pintuck feet to accentuate the tucks. Seepage xx-yy for directions using the Pintuck foot
Replace the standard sewing needle with a 2.0 mm twin needle.Set your performance 2054 for normal Straight Stitch (1), stitchlength 2.5 — 3.0, presser foot 2, IDT disengaged.Thread the top and bobbin with thread matching the color offabric. Use the extra spool pin for the second top spool. Rememberto place one top thread in one side of the tension disk and theother thread on the other side of the tension disk.Sew along the first line of stitching. Continue until all Pintucks aresewn.
82

Home Decorating“Square” PiNowsCreate pillows beautiful pillows.
Choose a Straight Stitch (1), stitch length 2.5, presser foot 0, lDengaged.
Using a fade away or wash away marking pen, measure 3-4” (7— 10 cm) from each corner and mark on each edge. Then measI 5/8” (4 cm) from each corner diagonally and mark.
F
Begin sewing around the pillow with a 5/8” (16 mm) seam, leaI
an opening on one edge to turn the pillow. Continue stitching- to the 3-4” mark along one edge. Now sew toward the diagon,/‘ marking. Pivot and continue to sew to the other 3-4” mark. Do
to each corner.L
I
Crss-Cross Piping or RuffleF Create an easy and attractive way to start and stop piping or
a ruffle. This criss-cross method will add interest to any homeF decorating item.
I Tip: Use the optional piping foot, ruffler or shirring foot to help create your piF or ruffle.
F Create your piping or ruffle 6” (16cm) longer than what is neeforyourproject.
F Begin by placing your piping perpendicular (make a cross) wit[the front project piece. Pin. Curve the piping to become parallF (in line) with the project. Continue pinning the piping aroundproject at the proper seam aliowance. When the piping is bachI the start, simply place the end across the beginning, making bIends of the piping perpendicular with the piece.
Place the back of the project right sides together with the frorand piping. Sew, making sure to catch all layers. Your perforrr
I 2054 with IDT makes sewing through all the layers easy. The ILalso keeps the layers even.

Env&ope ClosureWhen making piflows, rather than leaving an opening along anedge that needs to be hand sewn, create an Envelope closure forthe back.
Cut the piHow back 6” (16 cm) longer in one direction than thefront, creating a rectangle. Cut the rectangle in half across thewidth. Finish the two cut edges.Tip: Use the multiple Zig Zag (4), stitch length 1.0, stitch width 5,0, presser foot 0,lOT engaged as one possible finish to the edge.
Press under 2” (5 cm) on the finished edge. Stitch with a straightstitch (1), straight length 2.5, presser foot 0, IDT engaged, 1 1/2”from the folded edge on the right side.Overlap the folded edges to create the pillow back in the samesize as the front.Tip: Use buttons and the sensormatic buttonholes to keep the envelope closed.
84

Use a French Seam when working with lightweight, see throufabric that frays. The French seam encases the fabric edges.
Set your performance 2054 for a Straight Stitch (1), stitch Iengt2.0 — 2.5, presser foot 0, IDT engaged.
Follow the pattern instructions on how to construct the garmeFollow the directions below to create the seams.
With the wrong sides of the fabric together, sew with a 3/8”(10 mm) seam allowance. Trim near the stitching leaving 1/8”(3 mm) of the fabric seam allowance. Turn the garment with risides of the fabric together, press and then sew a 1/4” (6 mm)seam. The raw edges of the fabric are now encased in the sean
“flat” shirt constructionOne of the fastest ways to make a shirt or blouse is the “flat”construction technique. Use this when the top of the sleeve donot need to be gathered or eased. This method works well forsportswear.
Tip: Use stitch 37 for a decorative hem on tne sleeve and garment bottom. Turthe hem and sew from the right side of the garment. Make sure to catch the hunderneath.
Choose an overlock stitch (32, 36, 39) to make the garment. Usthe presser foot and IDT recommendation for the stitch.
If making a t-shirt with a ribbed band, sew one shoulder seamadd the neck band. Sew the other shoulder seam. Pin the sleavto the garment at the shoulder seam and matching the notcheSew with the sleeve down, against the feed teeth. Gently holdupper fabric as needed so the sleeve will ease into the garmen
Now finish the sleeves by sewing the sleeveseam and the sidesof the garment in one long seam. Start at the sleeve edge.
Fashion1 French Seams
I
KL
-J
/

Twin Needle Top StitchingTwin needle topstitching is great when you want two rows ofstraight decorative topstitching. Twin needle stitching can alsobe used for knit fabrics. The two straight stitches on top areconnected with one bobbin thread creating a zig zag on thebottom and giving a small amount of stretch.
Replace the standard sewing needle with a 4.0 or 6.0 mm twinneedle.
Set your performance 2054 for normal Straight Stitch (1), stitchlength 2.5
— 3.0, presser foot 0, iDT engaged.Thread the top with the contrasting thread and the bobbin withthread matching the fabric. Use the extra spool pin for the secondtop spool. Remember to place one top thread in one side of thetension disk and the other thread on the other side of the tensiondisk.
Touch the twin needle safety icon and enter the twin needle tolimit the stitch width and prevent needle breakage.Begin to sew. Make sure to tie off the beginning and end of thetopstitch ing.
Eyelets Eyelet plate
Eyelet sewing has a long tradition as linen embroidery and ispopular for creating table linens and garments. Achieve greateffects, using the eyelet plate and various stitches.• Remove the presser foot, use a screwdriver to remove the
presser foot shank.
• Place the eyelet plate onto the needle plate making sure thatpin A fits into the middle cut out of the needle plate. Push theplate down at the front.
• Mark on you fabric where to sew the eyiets.• Tightly hoop the fabric.
• With small scissors snip one or two of the fabric threads at thecenter of the marking and push the fabric over the pin of theeyelet plate. The fabric must fit tightly around the pin.
• Lower the presser foot lifter.
• Draw up the bobbin thread and hold it for the first few stitches.• Stitch around the cut with the desired stitch.important: While doing so, turn the hoop with the fabric slowly and evenly. Thestitches should be very close to each other.
• Secure with a few straight stitches.
86

• S
Stitch examples for eyelets- a) Select stitch no. 34. Stitch slowly and evenly, manually turnirS the hoop. Then form a second circle with stitch no. 34. Set tl
stitch width to 2 mm. Then secure with a few stitches usingS reverse button.
s b) Select stitch no.6 with stitch mirroring. Finish the pattern w- zigzag stitch no. 34, left needle position, 2 mm stitch width.E S Secure with a few stitches using the reverse button.c) Slowly stitch around the cut using elastic blind stitch no. 16,E S mirrored. Secure with a few stitches using the reverse buttod)Usestitchno.ll7wfthastitchwidthof9mm.e) Use stitch no. 115 with a sVtch width of 9 mm. Secure after5 S petals.
f) Embroider with stitch no. 111 by turning the hoop steadily.a
Then stitch around the cut using zigzag stitch no. 34, mirror: S g) Use zigzag stitch no.3 with a width of 6 to 9 mm. Secure wifew straight stitches with the needle in right position.S
a
5 Hemstitching5
-
- This is a technique everyone recognizes as embroidered by harWith your Pfaff performance 2054, you can produce hemstitch5 much more quickly and easily. With ten special hemstitches an(by changing the stitch length and width, you can create variatiE S hemstitch effects.
A wing needle (a special needle with a wide, winglike shaft) isrequired for hemstitching work. When entering the fabric the
. wing needle forms holes which are typical for hemstitching.Hemstitching will be most successful on relatively coarse linencotton fabrics from which single threads can be easily pulled.
I If you pull additional threads and sew along the edges close tcthreads you have pulled out, you will achieve even more beatr— — - — — -
—— hemstitching effects as the remaining threads are bundled.
La
—- r —
- —-s asaasati aapaa&,sfla itt-s

Hemstftching stftchesStitch 93, 98 and 99.For these stitches use wing needle size 100, 130/705 H Wing,without pulling threads.Stitch no. 99 can also be used for curved edging and hem securing.Tip: If you use the “sew slow” function, the needle will evenly enter the fabric andneatly bunch the threads.
“Ladder” hemstitchingStitch no. 90, 91, 92, 94, 97.• Pull out threads from the fabric until a desired width, the sameas when hemstitching by hand.• Sew along both fabric edges with any of the above stitches.When doing this, the needle must enter the pulled threads onboth sides close to the edges, thus bundling the threads.
Tip: If you use the “sew slow” function the needle will evenly enter the fabric andneatly bundle the threads.
Making a hem w[th a hemsttch seamThis seam provides a perfect edge fVsh to hemstitching work ontable linen, napkins or towels.Needle size 80, 130/705 H
Stitch 92, 94 and 97.
• ron the hem folding twice to mark the desired width.• Pull one or more of the threads just above the hem.
Using one of the hemstitches, sew along the pulled threads.When doing this, the needle must enter the right side of thehem and bundle the pulled threads to the left.
• V * C V * — — • . , S —Sat s •Saa •t*,t 4 — e
I/.
. I
88

H
Cross StitchNo other embroidery technique is as closely associated with thterm “needlework” as cross-stitching. With your Pfaff perform2054 and its wide range of cross sutcOeS this traditionalembroidery technique can be created remarkably easily andquickly. Whether you select one of the pre-programmed crossstitch borders or create your own combination with the crossstitches these look handsewn and lend a distinctive character ttable linens, towels or clothes.
Tips for cross stitch sewing:Always work using the “sew slow” and “needle up/down”functions.
Attach decorative foot no. 2A. Its red guide-grooves are exadapted to the size of the cross stitches.
Sew cross stitch borders with 72-81These programs consist of small cross stitches and are especiallsuitable for borders. They have been pre-programmed into thcmachine with optimum stitch length and width. However, youchange these settings as needed.
Sew cross stitch bordersand cross stitch with 32-89Combine the individual cross stitches using your imagination tachieve large areas of cross stitch or beautiful borders.Enter these combinations into different memories and sew thesuccession.
Please note:When combining cross stitches, the start and end points of therespective cross-stitch are irnpotant. A cross stitch that finisheon the right can always be combined with a cross-stitch that stto the right. The starting and end points of the cross stitches amarked by a circle an a dot on the stitch lid.
S

Twin needle sewingStitch beautiful effects when sewing with the twin needle. Twinneedle sewing is particularly effective if you use decorative sewingthreads in matching colors.
To sew with the twin needle, touchFor the default 2.5 mm twin needle touch ii quickly.Touch a little longer and a dialogue window opens. The needlewidth can be set with the buttons.
This will limit the stitch width so the needle is not broken ondecorative stitches.Touch the screen or step on the foot control toclose the dialogue window.
The twin needle function remains active even when the stitch hasbeen changed, even after the machine has been swithed off andback on. The twin needle function must be turned off when youremove the twin needle from the machine.
To turn the function off, touch . Confirm with ok
(See page 29 for threading.)
90

-
I TaperingThe tapering program for the zigzag stitch allows you to put ycI creative ideas into action and create stitcheswith an attractive,three-dimensional appearance, which are very easy to sew.
I When tapering the stitch width of the zig zag stitch is increasecdecreased during sewingto create symmetric or asymmetric tap
In stitch no. 3 and 10, the stitch width is altered from center ne
i position so that you can create satin points (symmetric tapers).
In stitch no. 34, the right position of the needle remains constaI while the left position changes; using the mirror key you canreverse the needle position; this stitch is most suited for cornerI and borders (asymmetric tapers).
I
Tip: Select needle stop down when tapering.
Symetricaf stitch 3 and 10
• Symmetrical tapering (increase). The width of the zigzag
— I starts with 0 mm and becomes wider until it reaches 9 mm.
Symmetrical tapering (decrease). The width of the zigzagI stitch starts at up to 9 mm and tapers to 0 mm and stops wilthe needle in the lower position when the reverse button istouched.
I Asymmetnc tapenng StItLfl z4
j U Asymmetrical tapering (increase). Width 0 mm to9 mm.
‘i Asymmetrical tapering (decrease). Width 9 mm to 0 mm.I Use to reverse the needle position. The corner is turned in
other direction.

Automatic tapering
Symmetric taper, stitch no. 3 orincreasing the width
Select stitch no. 3 or 10 and pre:s he button. Touch . Thezig zag starts from 0 mm and becomes wider until the preset stitchwidth is reached. Stitch the desred stitch length.
Reducing the widthPress the reverse button. The wchh of the zig zag is reduced to 0mm. The machine stops with the needle in the fabric and you canpivot the fabric to stitch the corner. Press the foot control again,and the stitch width increases.
If you touch rthe taper begns with the preset stitch width.
Asymmetric taper, Stitch no. 34Select stitch no. 34 and proceed es described above.
Decorative buttonholeFor beutiful decorative button hoies. any length, select stitch 34.This buttonhole is suitable for terry oth or for decorating jackets.Tip: to create the decorative tour color buttonhole as pictured, sew with decorativeRayon thread on top and change color ar -‘.! pivot.
Select stitch no. 34.V
Touch needle stop down and proorarn the presser foot liftaccording to the tnickness of ynur abric
• Touch andtouch
Set the stitch width to 6 mm.
Sew the first buttonhole side in t m desired length and touchthe reverse button. The machir.n ed ces the width to 0 mm.Turn the fabric 90° and sew the rack. Sew about 1/4 (6 mm)and press the reverse button aCan: ne machine reduces thewidth to 0 mm.
• Turn the fabric 90° again and sf hc second buttonhole side.Touch reverse turn the fabdc he secood bartac asdescribed above.
92

Appliqués are easily created and produce a beautiful effect. Byusing different fabrics and prints you create many different loolYou can sew a perfect satin stitch with the optional applique toThe special cutout on the unde:scJe allows the extra thickness ca satin stitch zigzag to feed snroco.y under the foot. Fusible wkeeps the appliqué in place so yo can easily stitch around theshape.
Snap on the applique foot.
Transfer your pattern to the paper side of the fusible webbir- remember that any letters or numbers have to be drawn asmirror image.
Iron the paper-backed web to tne wrong side of the appliqufabric. Cut the motif out and pull off the paper.
Place the appliqué pieces on base fabric arid iron securely.
Stitch around all appliqués wth r’pplique stitch (No. 44) or ta narrow, satin-stitch zigzag, stitch width 2 - 4 mm, stitch Icr9.2 to 0.6 mm. Make sure the stitch covers the outer edge 01appliqué to prevent fraying.
TiP: ta caper is requiicd you can narrow the satin stitch zigzag in 0.5 mmincrements wth the -1+ key a (see Tapeiinp, page 91).
I
&
kJ


‘!fl!!
7i1rJfliT
I
S1
is-.--—
—
4
CD VI
VP,
0 VP,
D CD CD 0 VI
—
IWJ
I I0
rCD
T-
r+
CD
OCD
00
-‘
‘-n
C0
Da
CD:
-I
a CDC CD
CD CD CD
-U C C 0 CD
—‘
-I
=
0—hO
Q)
0,
a CDCD
O
1
(D
::: 1
O,
D.
V”i
flu)
.CD
CD -4
’CD CD -I
,
-L
.
OO
OO
Qó

Fancy stitch foot No. IA(for diai feed)
Fancy s: tc foot No. 2A(not fo dual feed)
Blind sf d and overlock foot No. 3
Zfp3er rr cJgpesserootNo,4
Btrt&wc e u ,&.
Standard presser feetand accessodes Standard nrescer foot No. CA
2
96

Darning foot No. 6
iRoll hemmer No, 7
i1
! - Edge guide No. 8
ensormatc buttonhoie guce o. 10
StyhsI Second spoo koerI
S€am riperBru3h
I

FeNing foot
Flat felled seams are particularly strong and are commonly knownas jeans seams. Seams on sportswear and children’s weai blousesand shirts are more durable with this technique. You can makethese seams particularly decorative by using a sewing thread ofa contrasting color. The felling foot is available in two differentwidths.
Snap on the felling foot to the presser foot shank.
Place the fabrics wrong sides together.
• Overlap the raw edge of the lower fabric by about 3/8 “ to 5/8(1 - 1.5 cm).
• Place this overlapping edge over the tongue of the felling foot.The fabric must be placed fully under the presser foot.
• Sew along the folded edge with a straight stitch.
• Separate the fabric and feed the extending hem into the fellingfoot. The hem is turned by the foot and is stitched along theedge. Pull the two fabric layers taut during sewing.
Appliqué foot
Appliqués are easily sewn and always produce a beautiful effect.By using different materials and patterns you can create countlessnew designs. Sew dense satin stitches with the appliqué foot,which has a special cutout on the underside to feed over the thesatin stitch.
Snap on the appliqué foot.
• Transfer your drafted pattern to the paper side of a fusible,paper-backed webbing. Remember that any letters or numbershave to be drawn as mirror images.
• Iron the fusible paperbacked webbing on to the appliquéfabric. Cut out your appliqué and peel the paper from the back.
• Position and press your appliqué pieces in place on your basefabric.
• Place a stabilizer under your work area.
o Stitch all edges with a narrow satin stitch zigzag. Make surethat the needle sews over the outer edge so that no frayingoccurs later.
Felling Foot, 6,5 mm
Stitch: 1Stitch length: 3Tension: 1-5
Applique Foot
Stitch: 3Stitch length: 0.35Stitch width: 1.5 2Tension: 2 - 3
820219-096
8202111-096
-
98

Pntuck footThis classic heirloom sewing technique can be easily duplicatedon many types of fabric such as cotton and lightweight woolerUndergarments and children’s clothes are given a nostalgic toiby pintucking.
o Snap on the pintuck foot
Insert a twin needle (e.g. 130/705 H-ZWI; 1.6 or 2.0 mm neespacing; size 80).
• Thread the two needles (see page xx-yy).
• Using a water-soluble marker, draw a placement line for yo;first pintuck.
• Sew your first pintuck. When you start on the second pintuallow the first pintuck to run parallel in a groove in the foo
820225-096 This will produce evenly spaced pintucks.
Tip: If you would like to emphasize the pintuck effect, you can attach a pirblade (special accessory) on the front edge of the needle plate. The pintuclblade pre shapes the fabric prior to sewing and produces a betterdefinedpintuck.
Pintuck bladeFor thin materials use the pintuck foot with 7 grooves and thesmall pintuck blade, for heavier materials use the pintuck footwith 5 grooves and the large pintuck blade.
Snap the round knob of the pintuck blade into the round holethe throat plate with the blade pointing towards the needle.will raise your fabric into the groove of the foot.
Gently pull the fabric taut while sewing the pintucks.
Pintuck toot 9 mm
Stitch: 1Stitch length: 2.5Tension: 5
F’
Pintu k Blade 820223 096
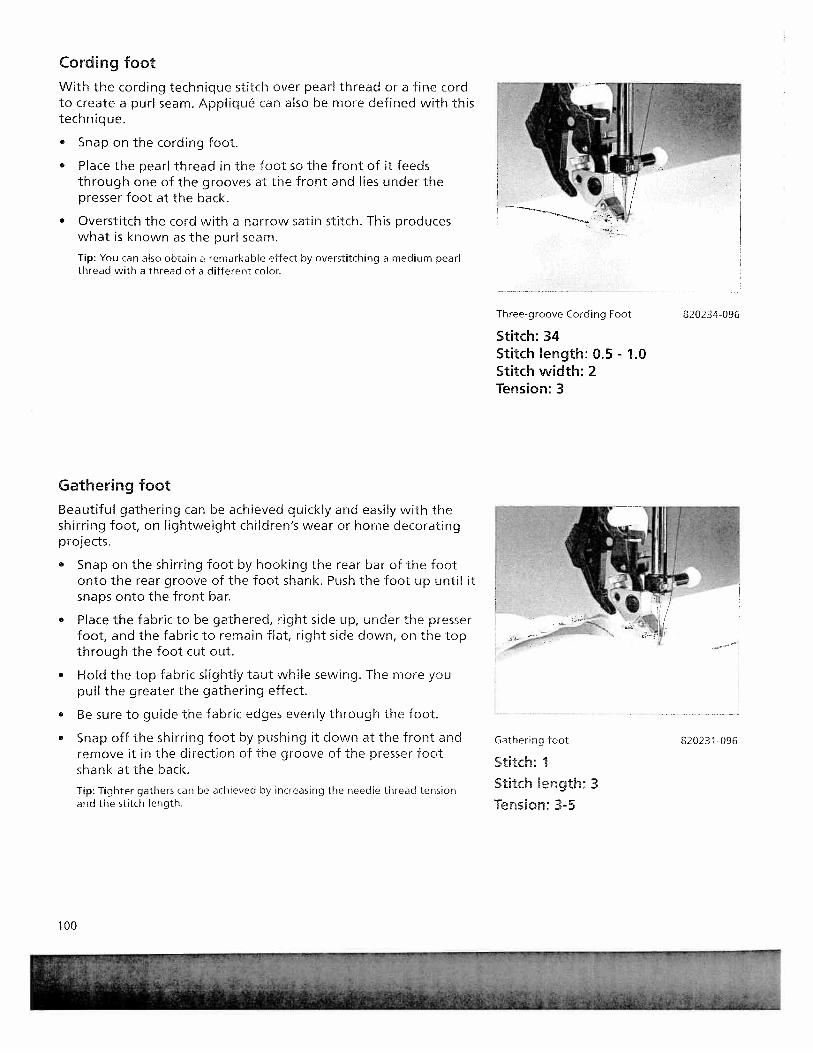
Cording foot
With the cording technique stitch over pearl thread or a fine cordto create a purl seam. Appliqué can also be more defined with thistechnique.
• Snap on the cording foot.
• Place the pearl thread in the foot so the front of it feedsthrough one of the grooves at the front and lies under thepresser foot at the back.
• Overstitch the cord with a narrow satin stitch. This produceswhat is known as the purl seam.
Tip: You can also obtain a remarkable effect by overstitching a medium pearlthread with a thread of a different color.
Gathering foot
Three—groove cording Foot
Stitch: 34Stitch ‘ength: 0.5 - 1.0Stitch width: 2Tension: 3
820234-096
Beautiful gathering can be achieved quickly and easily with theshirring foot, on lightweight children’s wear or home decoratingprojects.
• Snap on the shirring foot by hooking the rear bar of the footonto the rear groove of the foot shank. Push the foot up until itsnaps onto the front bar.
• Place the fabric to be gathered, right side up, under the presserfoot, and the fabric to remain flat, right side down, on the topthrough the foot cut out.
• Hold the top fabric slightly taut while sewing. The more youpull the greater the gathering effect.
• Be sure to guide the fabric edges evenly through the foot.
• Snap off the shirring foot by pushing it down at the front andremove it in the direction of the groove of the presser footshank at the back.
Tip: Tighter gathers can be achieved by increasing the needle thread tensionand the stitch length.
Gathering foot
Stftch: I
Stitch length: 3
Tension: 3-5
820231-096
, I—/
- -,
J
100

Ruffier Attachment
Stftch 1
820216-096
820255 096
Knit edge/piping/beading footThick seams in knitted fabrics or imitation furs can be sewn easiwith the knit edge foot. In order to obtain a perfect seam on krfabrics (e.g. shoulder seams), we recommend sewing over a corribbon, pulled slightly taut into the seam. This will give the searadditional strength and keep it from stretching out of shape.
Piping is easily inserted into a seam. Place the corded edge of t
piping in the groove of the foot on the right side of one layer cfabric. Use a straight stitch moving the needle position to be cIto the corded edge. Baste using a long stitch length. Layer ontop, your second piece of fabric with right sides together. PlacEthe corded edge into the groove of the foot and stitch on topslightly to the right of the previously stitch line. Turn and press
For beading, place beads into groove. Note: Do not use beadslarger than 4mm. Use a zigzag stitch 1 mm larger than the beand stitch over the beads.
Ruffle r
With the ruffler you can make closely or widely spaced pleatsautomatically while sewing, This is very useful for ruffles, linenhome decorating, etc.
The ruffler can be used in three different ways:
1. Folding and securing pleats in fabric.
2. Folding pleats in fabric and securing to a second fabric in otoperation.
3. Folding pleats in fabric, attaching lace and securing to anotfabric in one operation.
When you buy the ruffler from your PFAFF dealer, completeinstructions are included.
Stftch iength: 3
Tension: 35
‘I
Knit-Edge/Piping/Beading Foot
Stitch: 36
Stitch length: 6.0
Tension: 3-5
r”’

Open toe appiique foot
Appliqués are easy to sew and always produce a beautiful effect.Select stitch 18 for an appliqué that looks hand sewn..
Cut out your appliqué pieces without any seam allowance.
Iron a paper-backed fusible web onto the back of your basefabric, and peel the paper from the back. Position and press theappliqué pieces on the fabric.
• Snap on the open toe appliqué foot.
• Select stitch 18 and guide the edge of the appliqué along theright inner edge of the foot. The straight stitch will be almostentirely hidden, which creates the hand sewn look.
The open toe applique foot makes it very easy to see your edges.
QuNting guide
This guide is especially useful when quilting. The guide can beattached either to the left or to the right side of the presser foot.
Insert the guide in the hole and tighten the screw.
Stitch No: 18Stitch length: 2.5 mmStitch width: 1.5 mm
820215 096
Quilting guide
Stitch No: Optiona’
820279O96
Stitch Ienght: According to thestitch
Stitch width: According to thestitch
Open Toe Appliqué Foot 6 mm
$
102
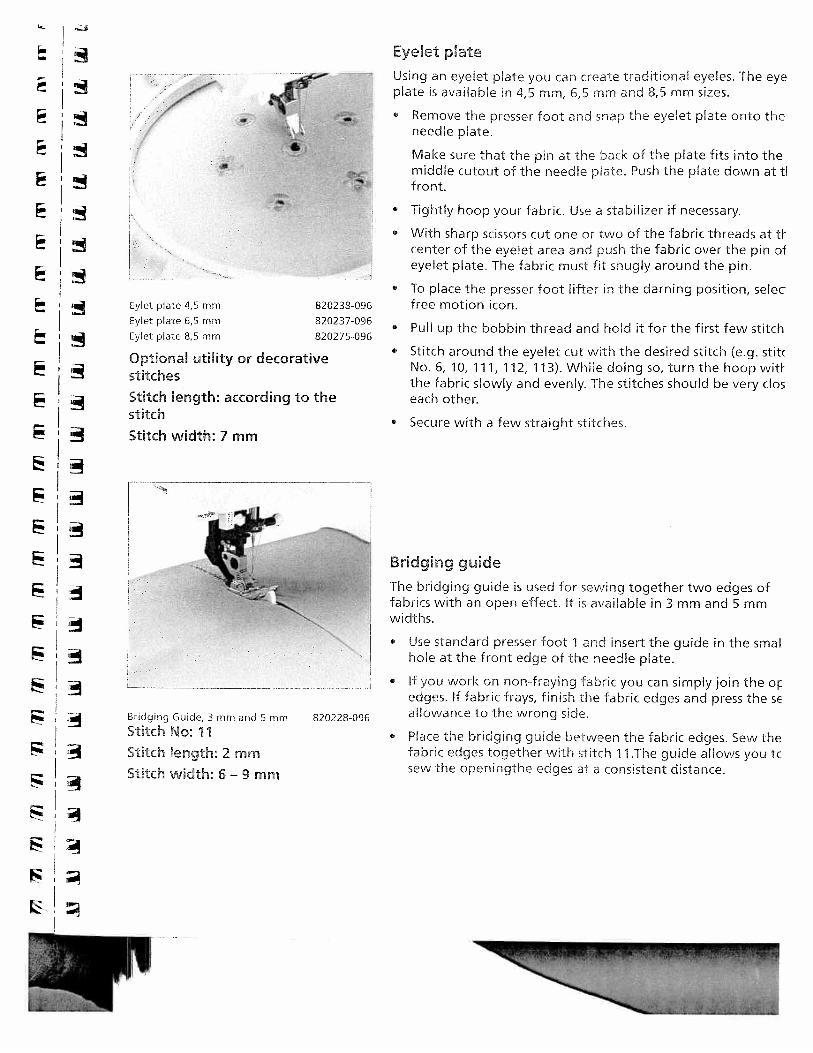
Eyelet plateUsing an eyelet plate you can create traditional eyeies. The eyeplate is available in 4,5 mm, 6,5 mm and 8,5 mm sizes.
• Remove the presser foot and snap the eyelet plate onto theneedle plate.
Make sure that the pin at the back of the plate fits into themiddle cutout of the needle plate. Push the plate down at tifront.
• Tightly hoop your fabric. Use a stabilizer if necessary.
o With sharp scissors cut one or two of the fabric threads at tcenter of the eyelet area and push the fabric over the pin oleyelet plate. The fabric must fit snugly around the pin.
• To place the presser foot lifter in the darning position, selecfree motion icon.
• Pull up the bobbin thread and hold it for the first few stitch
• Stitch around the eyelet cut with the desired stitch (e.g. stitcNo. 6, 10, 111, 112, 113). While doing so, turn the hoop withthe fabric slowly and evenly. The stitches should be very cbseach other.
• Secure with a few straight stitches.
Bridging guide
The bridging guide is used for sewing together two edges offabrics with an open effect. It is available in 3 mm and 5 mmwidths.
• Use standard presser foot I and insert the guide in the smalhole at the front edge of the needle plate.
If you work on non-fraying fabric you can simply join the oicedges. If fabric frays, finish the fabric edges and press the s€allowance to the wrong side.
Place the bridging guide between the fabric edges. Sew thefabric edges together with stitch 11 .The guide allows you tcsew the openingthe edges at a consistent distance.
Eylet plate 4,5 mm 820238-096
Eylet plate 6,5 mm 820237-096
Eylet plate 8,5 mm 820275-096
Optional utility or decorativestitches
Stitch length: according to thestitch
Stitch width: 7 mm
-
Bridging Guide, 3 mm and 5 mm
Stitch No: 11Stitch length: 2 mmStitch width: 6 — 9 mm
820228-096
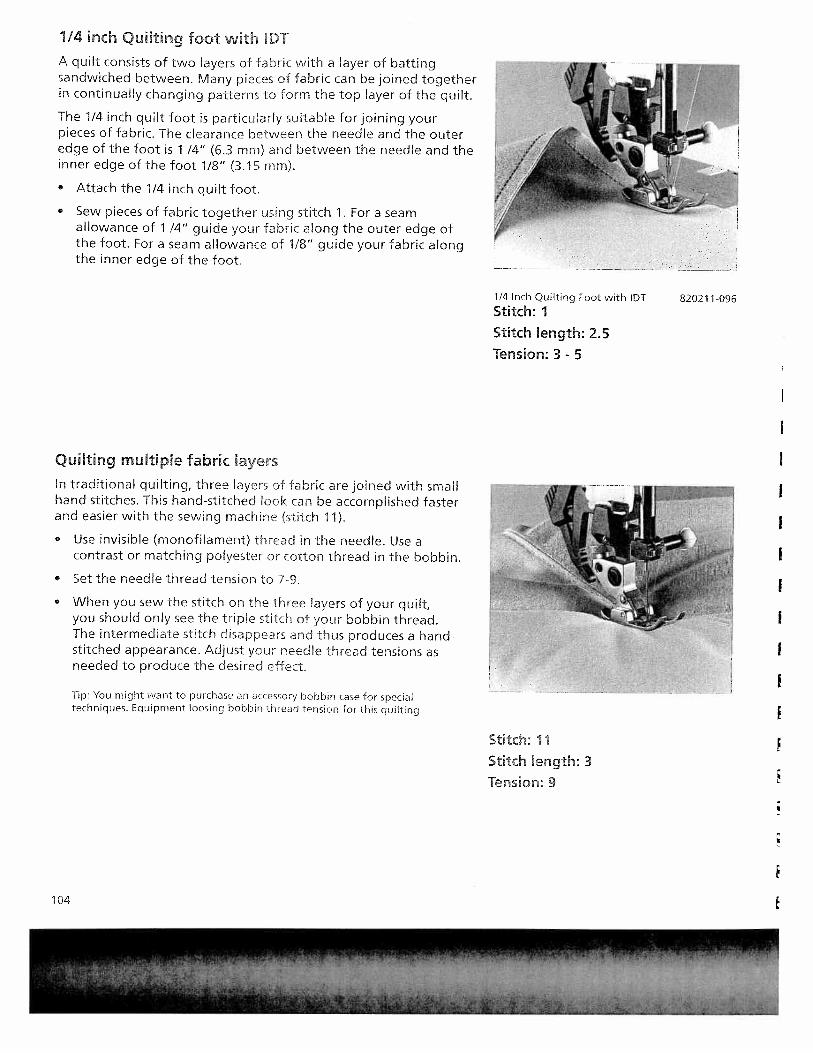
114 inch Quifting foot with DT
A quilt consists of two layers of fabric with a layer of battingsandwiched between. Many pieces of fabric can be joined togetherin continually changing patterns to form the top layer of the quilt.
The 1/4 inch quilt foot is particularly suitable for joining yourpieces of fabric. The clearance between the needle and the outeredge of the foot is 1 /4” (6.3 mm) and between the needle and theinner edge of the foot 1/8” (3.15 mm).
• Attach the 1/4 inch quilt foot.
• Sew pieces of fabric together using stitch 1. For a seamallowance of 1 /4” guide your fabric along the outer edge ofthe foot. For a seam allowance of 1/8” guide your fabric alongthe inner edge of the foot.
1/4 Inch Quilting Foot with IDT
Stitch: 1
Stitch !ength: 2.5
Tension: 3 5
Qui[ting multiple fabric layers
in traditional quilting, three layers of fabric are joined with smallhand stitches. This handstitched look can be accomplished fasterand easier with the sewing machine (stitch 11).
• Use invisible (monofilament) thread in the needle. Use acontrast or matching polyester or cotton thread in the bobbin.
• Set the needle thread tension to T9.
• When you sew the stitch on the three layers of your quilt,you should only see the triple stitch of your bobbin thread.The intermediate stitch disappears and thus produces a hand-stitched appearance. Adjust your needle thread tensions asneeded to produce the desired effect.
Tip: You might want to purchase an accessory bobbin case for specialtechniques. Equipment loosing bobbin thread tension for this quilting.
Stitch: 11
Stitch length: 3Tension: 9
82021 1096
104

I.a Free motion quilt foot
Free Motion Quilt Foot
Stitch: 1
Stitch length: 2.5
Tension: 3-5
Bias binder
Stitch: optional
Tension: 3-5
The free-motion quilt foot in combination with the straight stitclwell suited for free-motion quilting. The three layers of your quiare guided manually during free-motion quilting. The faster youthe more consistent and uniform your stitches will become.Practice this technique first on a test piece. Free-motion quiltingpossible in both curved and straight lines. For free-motion, straigline quilting (center needle position), with a spacing of 1/4 inch(6 mm), use the four red markings on the corners of the foot as aguide.
• Loosen the notched screw on the back of the presser footshank.
• Press the free motion quilt foot gently together with thumiand index finger.
820242M96 Guide the pin of the free-motion quilt foot into the hole ofpresser foot holder as far as it will go. The long fork of the Imotion quilt foot must be positioned behind the needle clai
• Tighten the notched screw.
• Bring the free motion quilt foot into the darning position bselecting the free motion icon and lower the feed dog.Tip: Free-motion embroidery can also be completed using the free-motionfoot.
Bias binder
Binding with bias tape is a very easy method of fabric edgesfinished with a smooth and neat appearance. For this you needunfolded bias tape about 1” (24 mm) wide.
• Remove the presser foot and shank. Attach the bias binder.
• Cut the beginning of the bias tape at a diagonal.
• Feed the tape into the scroll of the binder and pull out to thback.
• Adjust the binder and/or the needle position so that the necpierces the fabric approximately 1/16” (1 - 1.5 mm) from theedge of the bias tape.
• Stitch about 1” (2.5 cm) along the bias tape.
Insert the edge of the fabric to be bound between the bias Iedges into the slot of the binder. The bias tape will bind theraw edge automatically during sewing.Tip: You can obtain an additional decorative effect by using a zig zag ordecorative stitch.
1jIIIII
•
4
4
820245-096

Pintuck Foot with Decorative Stitch Guide, 9 mmWith this foot you can accurately sew pintucks with a spacing of 5or 11 mm. The same foot allows you to precisely space decorativestitches up to 9 mm wide between the pintucks.
• Snap on the pintuck foot with guide. The foot can be snappedon with the guide pointing to the left or the right (turn footaround 1800).
• Insert a twin needle (1.6 or 2 mm space between needles).
• Thread the two needles. Set the needle thread tension tight(4 - 5) and sew one pintuck with or without gimp thread.
• Place the first pintuck under the groove in the extended guide.Sew a second pintuck. The second pintuck will automaticallybe spaced to allow a decorative stitch to be sewn in the areabetween pintucks.
• Sew all remaining pintucks.
• Replace the twin needles with a normal sewing needle.
• Set the needle thread tension to 3.
• Place stabilizer under sewing area.
• Place two pintucks in the guides on either side of the centerof the foot. Embroider your desired decorative stitches in thisspace.
Note: Use the Pintuck Foot with Decorative Stitch Guide, 6mm for smallerdecorative stitches up to 6mm.
Non-stick Foot with IDT
The synthetic coating on the underside of this foot makes itparticularly suitable for sewing decorative and utility stitchesup to 6 mm wide on leather, synthetic leather and vinyl. It maybe helpful to back these fabrics with a fusible woven or knitinterfacing. Due to the stretch of these fabrics, it is important touse a stabilizer under the fabric when sewing. A needle with alonger eye (system 130 N) is recommended for thicker leather. Onsofter leathers an embroidery needle works well.
• Snap on non-stick decorative stitch foot.
• Stitch leather as desired.
• Remove stabilizer.
WARNING! Carefuly set stitch, i.e. soort stitch length/tight stitchdensity, may cause leathers, synthetic leathers and vinyl’s toperforate. It is important to remember that needle piercing points Non-stick Foot with DI 820240 096will remain visible in leather. Practice on scraps first. Stitch: optonaI
820225-096Pintuck Foot with DecorativeStitch Guide, 9 mm
Stitch: 1Stitch length: 15Tension: 3-5
106

7/9 Hose Cord Foot with IDT
Beautiful decorative effects can easily be achieved with this prefoot. Up to 9 cords may he overstitched using decorative stitchand a variety of embroidery threads.
Cut your cords to the desired length. Thread the cords throuthe holes in the foot from the top to the bottom. Lead thecords under the presser foot and out the back. Leave the thrtails extending about 1 1/2 inches to 2 inches (4 - 5 cm) at thback,
• Attach the 719 hole foot
• Overstitch the threads with a stitch and thread of your choic
Tip: Pearl thread or embroidery twist is well suited.
7/9 Hole cord Foot with lOT 820222-096
Stitch: optionalTension: 3
Couching/Braiding Foot with DT
This special foot is best suited for overstitching heavy/bulky cor
(e.g.loosely twisted wool) or a narrower tape/ribbon.
Thread your cord or ribbon through the wire loop/guide atfront of the foot. Feed it down through the hole in the ceni
i of the foot and guide under the foot and to the back
• Attach the braiding foot to the machine.
Select a stitch and decorative thread of your choice andoverstitch the cord or ribbon.
Couching/Braiding Foot with IDT 820230 096
•Stitch: optional
Tension:3
‘a
I

Circular Embroidery Guide
The circular embroidery guide allows you to sew perfect circles.
The creative possibilities are endless! Your fabric is automatically
fed in a circle, allowing you to embellish your clothing and
household items.
The guide is marked in 1 cm increments.
• Mark a center point with a fabric marker on your fabric.
• Insert the circular embroidery guide from the left into the hole
at the back of the presser foot shank. The radius of the circle
is determined by the placement of the guide in the holder.
The full width of the circle will be equal to twice the distance
between the needle and the rubber tip.
• The guide is secured with the screw on the presser foot holder.
• Place stabilize under your fabric.
• Place the center marked point of your fabric directly below the
rubber tip of the embroidery guide.
• Select the desired decorative stitch pattern and begin sewing.
• Change the radius with every new circle by loosening the screw
and sliding the circular embroidery guide to another mark on
the guide arm.
Circular Embroidery Guide 820246-096
Stitch: optional
108

Fringe Presser Foot with IDT
Stitch: 3
Stitch length: 0.5 - 1
Stitch width: 1.5 - 2.5
Tension: 2 - 3
Stitch: 1
Stitch length: 2.5
Tension: 3-5
Fringe Presser Foot with IDT
With this special foot for fringe stitching you can produce fanta
effects in no time.
• Mark your desired pattern with a fabric marking pen.
• Place a piece of stabilizer under he fabric.
Snap on the fringe foot.
• Set the upper thread tension to 2 - 3.
• Sew the stitches row by row. For circles you must work from
outside inwards.
• When using heavier threads, you should select a slightly lonç
stitch length. Always sew a test sample first.
• When you have finished, pull the work carefully from the
machine by holding the last loops. If you pull too quickly, yoi
will pull the end loops flat/tight.
Knot the beginning and end threads on the reverse side.
For narrow edge topstitching place the center guide of the pre
foot against the fabric edge. Move the needle into the desired
position and topstitch.
Sewing ‘ace to fabricPlace the folded/pressed edge of your fabric to the left of the
center guide and the finished edge of your lace to the right of
the center guide. Both fabric and lace should be placed under
foot right side up. The center guide will keep the fabrics prop
separated allowing for more precise stitching. Choose zigzag s
No. 3 and sew catching the edge of the fabric and the lace. Ac
the width and length of your zigzag as desired.
——
820232-096
Narrow Edge Foot with IDT
This presser foot makes narrow-edge topstitching easier and
makes edge-joining fabric and lace pieces easy, i.e. attaching Ia
to a finished fabric edge. The metal guide in the center of the -
keeps the two fabrics evenly spaced.
-Topstitching with a narrow edge
820217 096Narrow Edge Foot with IDT
Stitch: 3Stitch ength: I - 3.0
Stitch width: 1.5 - 3.5Tension: 3-5

Using the correct needle gut rti -s tt er stitching of the fah’lc.Change the needle often.
Fabric weight19 ht
needle size60/70/75
abric weightmed urn
needle size80190
Fabric weightn eaw’
needle size100/110/120
Light Sail nointo-.g eye
0i7O5 H-MSi:e: 60-80
c:-:Lcto en
130!705 h-Q5:ze: 80/90
130/705 H ESize: 75-90
hi; I urnhall point
System & No. Point and eye Suitabe for
130/705 H Liht ball point Universal needle for synthetics, chiffon,Size: 60-130 —rZ batiste, organd woolens, velvet,
fancy seams and embrodery work.
130/705 H-SUK Medium Coarse knitted fabrics. Latex, double-knitSize: 70-100 hall point fabrics, Quiana and Simplex.
130/705 H-PS Medium Stretch-fabric needle developedSize: 75-100 SaIl point especially for Pfafl. Particularly sutabe
for delicate stretch and knitted fabrics.
130/705 H-SKF ,——— Heavy Wide-meshed corsetry. Lycra, SimplexSize: 90-1 10 - ball point and Latex
130/705 H-i Sf a Twill, vvork weafl heavy linen, blue jeansSize: 90 - 110 point and light canvas.
130/705 H-LR ‘irrrow twist Leather, suede, calf and goatskin leathersSize. 80-100 nnt (cuts rioht)
30/05 Ch i / st rna’on cal es p as c mateSize: $0 - 1 10 saint sth left sheeting and oil cloth.
tw:st groove
130 H-NSize. 70-110
130/705 H-WI iG —
Size: 00/i20r’Cf siIcr,ing0 1
Topstitched seams wih b ttonhoe sHkor No, 30/3 synthetic thread, metallic th cad
Effective hemstitching on ha fly dressedrnaterals, organdy, qass can,bi :c
110

2.5 •cim 1.6 mm2.5 mm 2.0 mm
30/705
SLz. 09\‘ery nm
ma nintucksnnrma pintucks
wide pintucksextra vvide pintuckstopstitch i ng
ecorJe hem tteffect. V2eU finshedwoven fabric andbatiste areparucularly una IC
Stikh zed e Suitab’e farer;gth wdtn scacing
______ ___________
ZVV1
_) I 05s:ze e:0)5ze: 90c.ze: 100
2.5 mm2.5 mm3.0 mm
2,5 mm3.0 mm4.3 mm
•—r
-: :9EtLrcs with twin needles
Lefre sewing ike desired embroidery sttches, check whether the needles can penetrate freely, by
ur9nq dc handwheel. In this way, needle breakage is avoided as much as possible.
Ornamental stitch patterns/:iezag patterns
30I705 H-ZWISize. 83 0.5-1.5mm wide 1.6mm decorative stitchinc
Size. 80 0.5i 5mm arrow 2.0mm decorative sttchinc
3ize: 30 0.5-1.5 mm narrow 2 5 mm decoratbe stitchinc
2,3-3.2 nm.c
0 c C0’.9 d’ cmmd nIboiderj sdtcHes, cck v’Icdr 9e neccOes can preLrcce ircey,I r ‘ I-a’ 0rcw ci “-v r1 ml c b cOmge 0cm i ed cs ouch ar oms’ Ic.
I09 .0 ‘ 1 ccc” E

0
Stabilizer
Always place stabilizer under the fabric before sewing any
decorative stitch, applique satin stitch, buttonholes, or any other
stitch that will build up thread to prevent puckering and ensure a
smooth beautiful result. This is most important on lighter weight
and stretchy fabric because when the fabric is not stable enough
to support the stitch, it may distort and pucker. Stabilizer prevents
this.
Stabilizers fall into basic categories:Tear-away stabilizers are made from a fiber that will tear awayfrom the fabric easily after stitching. Use tear-away stabilizerswith stable woven fabrics. Place underneath the fabric beforestitching. Tear away the excess stabilizer after stitching. The small
amount left in the back of the stitching will not effect the wear.Experiment with different brands and weights of stabilizers tofind the ones that give the best results on your projects. Try using
several layers of lightweight stabiIizer then tear them away one at
a time to keep stitches from pulling.
Iron on tear away is a paper stabilizer with a slick side that williron on to fabric. It is recommended for knits and all unstable
fabrics. Fuse it to the wrong side of the fabric before decorative
stitching. Fusing stabilizes the fabric in the relaxed state and keeps
it from stretching while stitching. For dense stitching, if the fusible
tear away is punctured by the needle too many times it can pullaway and no longer stabilize. Use cut away stabilizer for densestitching on knits.
Cut away stabilizer is a soft non woven fabric recommended
to stabilize dense stitching on knits and all unstable fabrics. It
does not tear and is available in different weights. Decorativestitching on ready-to-wear T-shirts is often stabilized with cut away
stabilizer. Place the cut away stabilizer under the knit. Stitch, then
cut the excess stabilizer away. The cut away will remain in andaround the stitching to stabilize it through washing and wearing.
¶1
I
112

:fWater soluble stabilizer looks like a clear plastic sheet but thisstabilizer will dissolve in water. Place it on the top of the fabric
-
before sewing decorative stitching on textured, napped andlooped fabrics such as terry cloth, velvet, and textured knits to
-
keep the loops from coming through the stitching. Use watersoluble stabilizer under the fabric for techniques like cutworkwhen it is important that all stabilizer residue be removed afterstitching. Choose heavy or lightweight water soluble accordingyour project. Fuse layers together with your iron for even heavilayers. After stitching, cut away the excess stabilizer and place t
[ work in water to remove all residues. Water soluble stabilizer isalso used to transfer pattern, especially onto dark fabrics. Trace
- [ pattern onto water soluble stabilizer with a fine line permanenmarking pen then tape it to the garment for free motion
F embroidery, applique or other decorative applications.— i
E 11Disintegrating stabilizer is a very stable loosely woven fabric th
[ stabilizes specialty techniques such as cutwork and the crochet?tatting technique which is stitched off the edge of the fabric e
— [ Place it under fabric before stitching and then remove by presswith a DRY iron set at cotton or linen. Disintegrating stabilizerturns to a dark ash and can be brushed away with a toothbrus[CAUTIONI Never let water or moisture near this stabilizer beca
[ water activates a chemical in the stabilizer that can disintegratyour fabric
— I - Your Pfaff performance 2054 features the most beautifuldecorative stitches to create with. Be sure to place stabilizer ur
I the fabric before sewing for the best results.

I
I
I
I
I
I
I
I
1
I

ntenance
1 1
IWChanging the needle plate
Cleaning
Changing the Ujt bulb
Bulb removal
Sewing problems and thek %qons
Technical data
Package contents
117
117
118
120
120
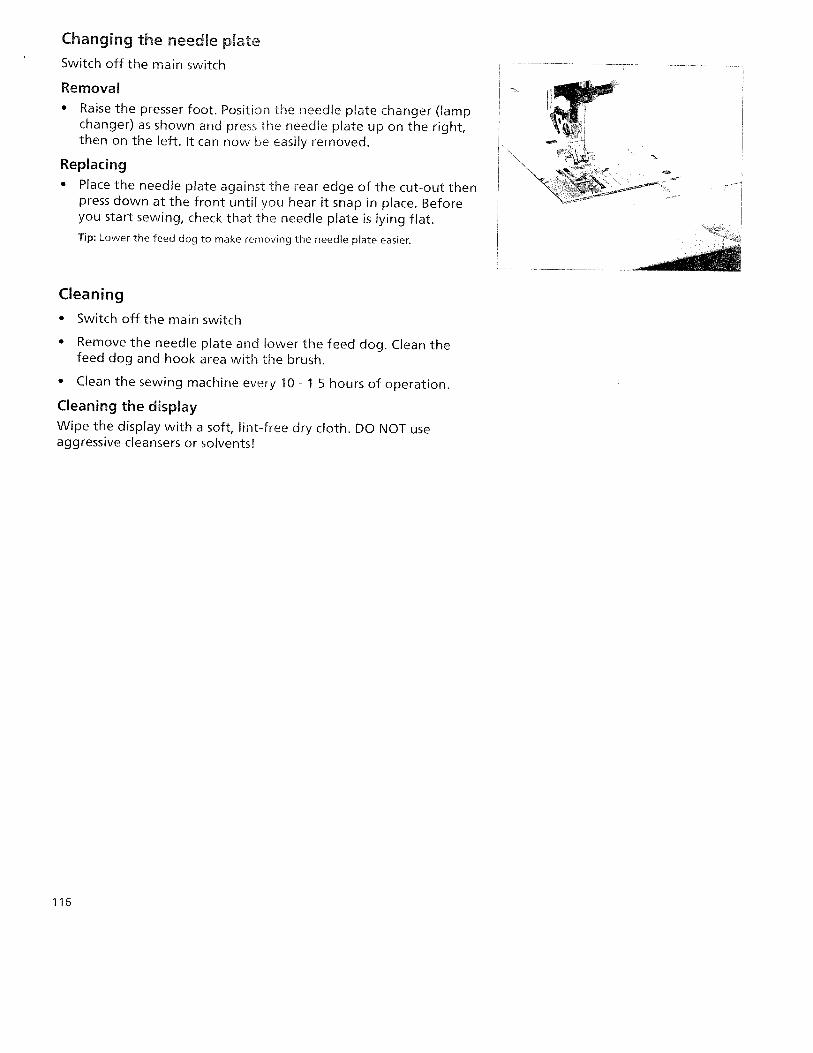
Changing the needle plateSwitch off the main switch
Removal• Raise the presser foot. Position the needle plate changer (lamp
changer) as shown and press the needle plate up on the right,then on the left. It can now be easily removed.
Replacing• Place the needle plate against the rear edge of the cut-out then \\
press down at the front until you hear it snap in place. Beforeyou start sewing, check that the needle plate is lying flat.Tip: Lower the feed dog to make removing the needle plate easier.
Cleaning
• Switch off the main switch
• Remove the needle plate and lower the feed dog. Clean thefeed dog and hook area with the brush.
• Clean the sewing machine every 10 - 1 5 hours of operation.
Cleaning the display
Wipe the display with a soft, lint-free dry cloth. DO NOT useaggressive cleansers or solvents!
116

Changing the fight bulb
Switch off the main switch. Disconnect the lead cord and thfoot control plug from the machine.
Remove the accessory tray. The light bulb is located inside t[
sewing machine near the needie ‘threader.
Bub remov&
Push the bulb removei as shown ri the figure, up as far as it wgo. Now turn the bulb half a rotation counter clock-wise andremove the bulb.
nsertion of the bu!b— Insert the bulb in the lamp changer. Guide the bulb into the
diagonal holder and turn it uriI the pins of the bulb engage.the bulb upward into the holder as far as it will go and turn it Ia rotation in a clock-wise direction. Remove the bulb changer fthe bulb, the bulb is held firmly.
Important: The maximum wattage of the bulb is 5 watts,
Bulbs can be purchased from your PFAFF dealer
wV
-

Sewing problems and their solutions
Problem/Cause
The machine skips stitches
Re-thread machine, making sure presser foot israised to its highest position. This ensures thatneedle thread is securely in thread tension system.
Remedy
The needle is not properly nserted. Push needle fully upwards. Flat side facing theback.
Wrong needle is in use. Use needle system 130/705 H.Needle is bent or blunt Insert a new needle.
The machine is not properly threaded Check how the machine is threaded.Needle is too small for thread. Use a larger needle
Needle thread breaks
See reasons above. See above.
Thread tension is too tight. Adjust thread tension.Thread is poor or has slubs in it orhas become dry Only use good quality threads.after overlong storage.
Thread is too thick, Use needle with large eye (system 130 N).
Needle breaks off
Needle is not pushed fully in. Insert new needle and push fully in.
Needle is bent Insert different type of needle.
Needle is too thick or too thin. See needle table (Page 92, 93)
Needle is bent, and has hit the needle plate Only guide the fabric lightly.because you are pulling or pushing the fabric.
The bobbin case is not properly inserted. When you insert the bobbin case, push it fullyinto the stop. Pull lightly on the end of the threadto make sure bobbin case is secure.
The seam is sewn unevenly
The tension needs adjusting. Check needle thread tension
Thread is too thick, stubbed or hard. Only use good quality threads.The bobbin thread is unevenly wound. Do not wind thread by hand. Make sure thread is
pulled solidly into bobbin tension spring. Checkbobbin threading path.
Thread loops at top or underside of fabric.
118

I Problem/Cause Remedy
I The machine does not feed or feedsI
irregularly— Sewing lint has collected between the feed dog Remove needle plate, remove lint with brush.
I teeth rows
Feed dog is lowered. Raise feed dogs (see page xx-yy).
The machine is running with difficufty
There are thread remnants in the hook Remove the threads.I The machine does not sew the selected stitch
Select the desired stitch again. Switch off themachine, wait 10 seconds ano switch on again.
Display incorrect or no display
When static electricity is being discharged some Switch off the machine on completion of thesegments of the display may fail. sewing operation and then turn it back on again
after approx. 10 seconds. Select the desired stitchagain.
The contrast on the display may bedisturbed
When the machine is cleaned or is transported Set the contrast using the contrast adjustment.(display is illegible or dark)
if problems remain contact an authorized Pfaff dealer.
Have your Pfaff performance 2054 serviced regularly by your Pfaff dealer.
When leaving the machine, even for only a short time, switch off the main switch.This is important if there are any children nearby.
-J

Technical data
Dimensions (w x h x d) 408 x 290 X 187 mm
Weight 8.3 kg
Nominal voltage (reversible) 120 V/220 ... 24o VPower consumption 85 W
Sewinglamp 12V/5W
Sewing speed max 950 Stitches/mmmi,i. 80 stitches/mm
Stitching width 0 ... 9 mm
Stitching length 0 ... 6 mmPresser foot lift 8 mmMax. presser foot height 10.5 mm
Needle System 130 / 705 H
Package contents
Sewing machine
Carrying caseFoot controlLead cord
Accessories
Instruction manual
120

I
I

0 C -o . U,
, o
c) D U,
0,
0 0,
2:
oD
•‘
CD
CDCD 0 D
-D CD 1—I
0 -‘ B Q D n CD
N)
0 C,,
412
7660
26A
•In
hous
epro
du
ctio
n•
02002
VSM
Gro
upA
S•
All
stat
emen
tsva
lid
atti
me
ofpri
nti
nq
•P
rin
ted
inS
wed
enon
env
iro
nm
enta
lfr
ierr
dlv
narr
er