FLIPPED Barbara Penprase, PhD, RN CLASSROOM FLIPPED CLASSROOM.

April 2018
I-DEA CONFERENCE
Northlake, IL Midwest Conference Center

2

Unless otherwise specified, the Project I-DEA content is licensed under CC BY 4.0. The Project I-DEA was funded by the Bill & Melinda Gates Foundation and managed by the Washington State Board for Community and Technical Colleges.
OBJECTIVE & AUDIENCE
To provide English language faculty and administrators with the information and tools necessary to successfully implement and deliver Integrated Digital English Acceleration (I-DEA.). Faculty attend for both days and bring a laptop with them. Administrators attend for ½ of the first day and additionally as interested and available.
CONFERENCE LOCATION & DETAILS:
Conference will be hosted at Midwest Conference Center, Northlake, Illinois. This conference is provided free of charge and includes breakfast and lunch. Lodging, dinners, and travel to the conference is not covered. DAY 1: Thursday, April 26, 2018
Time Agenda Room 8:00a – 9:00a Sign-in, Registration, and Breakfast Midwest Ballroom 1
9:00a – 9:30a Welcome & Introductions Midwest Ballroom 1
9:30a – 10:45a I-DEA Overview • Washington State’s Journey: Challenges,
Innovations, & Successes • What Is the Flipped Classroom? • Communicating Expectations • Module Overview • Skills Taught – ELA, Math, Grammar, Writing,
Technology
Midwest Ballroom 1
10:45a – 11:00a BREAK Midwest Ballroom 1 11:00a – 11:45a Q & A Midwest Ballroom 1 11:45a – 12:00p Logistics for 2nd half of Day 1 Midwest Ballroom 1
12:00p – 1:00p LUNCH Midwest Ballroom 1
1:00p – 3:00p Focus Session 1 – Train 2 Fall Modules • 2 Faculty Groups (Blue & Yellow) • Director’s Session on Implementation & Cost
(Orange Group)
Blue Group Salon A
Yellow Group Grand Ballroom 1
Orange Group Midwest Ballroom 1
3:00p – 3:15p BREAK Midwest Ballroom 1 3:15p – 5:00p Focus Session 2 – Train 2 Winter Modules
• 2 Faculty Groups (Blue & Yellow) • Director’s Session on Implementation & Cost
(Orange Group)
Blue Group Salon A
Yellow Group Grand Ballroom 1
3

Unless otherwise specified, the Project I-DEA content is licensed under CC BY 4.0. The Project I-DEA was funded by the Bill & Melinda Gates Foundation and managed by the Washington State Board for Community and Technical Colleges.
Time Agenda Room Orange Group Midwest Ballroom 1
5:00p – 5:30p Wrap Up & Plan for Day 2 Midwest Ballroom 1
DAY 2: Friday, April 27, 2018
Time Agenda Room 8:00a – 9:00a Sign-in, Registration, and Breakfast Midwest Ballroom 1
9:00a – 10:30a The ‘Odd’ Modules (Beginning and End of Quarter) Q & A
Midwest Ballroom 1
10:00a – 10:15a BREAK Midwest Ballroom 1
10:15a – 12:00p Focus Session 3 – Train 2 Spring Modules • 2 Faculty Groups (Blue & Yellow)
Blue Group Salon A
Yellow Group Grand Ballroom 1
12:00p – 1:00p LUNCH Midwest Ballroom 1
1:00p – 2:45p Focus Session 4 – Train 2 Summer Modules • 2 Faculty Groups (Blue & Yellow)
Blue Group Salon A
Yellow Group Grand Ballroom 1
2:45p – 3:00p BREAK Midwest Ballroom 1
3:00p – 5:00p Faculty Panel • Getting Started & Next Steps
Midwest Ballroom 1
4

Bar
Ph
on
es
Frei
ght
Doo
r 10
'H x
10'
6"W
AIR
WA
LL
AIR
WA
LL
Salon A 51'8" x 34'5"
2nd Floor Ballroom 1
2nd Floor Ballroom 2
Meeting Room Specs: 2nd Floor Ballroom: 127' x 53' 2nd Floor Ballroom 1: 63' x 53' 2nd Floor Ballroom 2: 64' x 53' Ballroom Foyer: 31' x 31'
Entrance
Salon B 42' x 22'
Ballroom Foyer
Entrance
Meeting Room Specs.
Continental 2: 47' x 22'
47.0 ' 13'.2"
21' 6 ." 22'. 0" 14' 6.0"
Continental 1
Continental 2
Continental 3
Board Room: 20' x 19'4"
Exhibit Hall: 150' x 100' Booths: 90 - 8'x10'
Restrooms Stairs Elevator
Coat
Check
Lake Street Entrance
2nd Floor - Breakout rooms are Salon A & Grand Ballroom 1
1st Floor – General Session in Midwest Ballroom 1
5

6

INTEGRATED DIGITAL ENGLISH ACCELERATION (I-DEA)
Watch our I-DEA video http://bit.ly/2mT3rM0
A better idea for Adult English Language Learners As the world shrinks and global competition grows, the places that attract a world population have a distinct advantage. People born in other countries add a wealth of talent and diverse thinking to the workforce, along with the ability to work with other cultures and countries.1
Washington state is one of those places. Our state has a large and rapidly growing foreign-born population. In 2015, immigrants made up 17.2 percent of Washington’s civilian employed workforce, up from 7.1 percent in 1990.2
These new arrivals create jobs by forming businesses, spending income in local economies and raising employers’ productivity.
Thanks to project I-DEA (Integrated Digital English Acceleration), adult English language learners who face the largest language gaps are learning English while gaining skills for college and careers.
Washington State Board for Community and Technical Colleges 360-704-4306 | www.sbctc.edu | Oct. 12, 2017
How it worksOriginally funded with a pilot grant from the Bill and Melinda Gates Foundation, I-DEA features:
• Modularized instruction: Students participate in 33, week-long instructional modules that blend English language instruction with college and career skills. Topics range from navigating your community and information literacy, to professional communication, job exploration and interview skills.
• Integrated learning: Unlike traditional approaches — in which learners are expected to learn English before pursuing job-training — I-DEA teaches English in tandem with college and career skills. Students quickly learn skills relevant to their lives and careers.
• “Flipped” classes: Students complete online modules to learn, practice and develop knowledge of concepts before coming to class. They then use classroom time to apply and practice what they’ve learned. In-class instructors and peer support guide and enhance skill acquisition.
• Computer access: Students receive computers and 24-7 internet access to complete coursework that prepares them for college and family-wage jobs.
• Transition to I-BEST: I-DEA is based on Washington’s I-BEST program, which integrates instruction using team-teaching to combine college-readiness classes with job training. I-DEA connects to I-BEST and other programs that lead to certificates, degrees and family-wage jobs. (I-BEST stands for Integrated Basic Education and Skills Training.)
7

Results that countI-DEA continues to show great promise. Outcomes from the third year of instruction show student learning gains that are 10 percent to 12 percent higher than the gains of English language learners in traditional programs.
Additionally, the number of I-DEA students generating student achievement points — academic momentum points tracked by the community and technical college system — was 11 percent higher than the number of students in traditional English as a Second Language classes.3
Topics taught• Technology Skills Pre-Assessment
(given at the beginning of each quarter)
• Introduction to I-DEA (beginning of each quarter)
• Computer Skills
• Study Skills
• The American Education System
• Libraries and Library Resources
• Navigating Your Community
• Health and Wellness
• Stress Management
• Money Management
• Time Management
• Personal Inventory
• Career Exploration
• Math Basics
• Budgeting and Consumer Economics
• Cross Cultural Communications
Washington State Board for Community and Technical Colleges 360-704-4306 | www.sbctc.edu | Oct. 12, 2017
• Contemporary World Problems
• Creating Powerful Presentations
• Writing Basics
• Washington State History
• U.S. History and Citizenship
• Interpersonal Communications
• Job Search and Interviewing
• Work Readiness
• Environmental Issues
• Effective Presentations
• Internet Basics
• Information Literacy
• Business Websites
• Team Collaboration
• End of Quarter Presentations (given at the end of each quarter)
• Technology Skills Post-Assessment (given at the end of each quarter)
Laying the groundwork for the American journeyCommunity and technical colleges provide the bulk of English-language instruction in Washington. Project I-DEA is transforming instruction statewide. In doing so, it is helping English Language learners pursue their dreams and bring their talents to our communities and economy. This broadens the view along our shared American journey.
Sources:1. Adapted from “The Importance of Immigration” by Steven Cohen, HuffPost Politics blog, Jan. 28, 2013.2. Migration Policy Institute’s Data Hub. See http://www.migrationpolicy.org/programs/data-hub/charts/immigrant-share-us-popula-tion-and-civilian-labor-force?width=1000&height=850&iframe=true3. Program year 2015-16 annual data, SBCTC, per I-DEA Program Administrator Jodi Ruback.
Note: All material licensed under Creative Commons except photo on front page.
8

FOCUS
SESSION 1
9

10
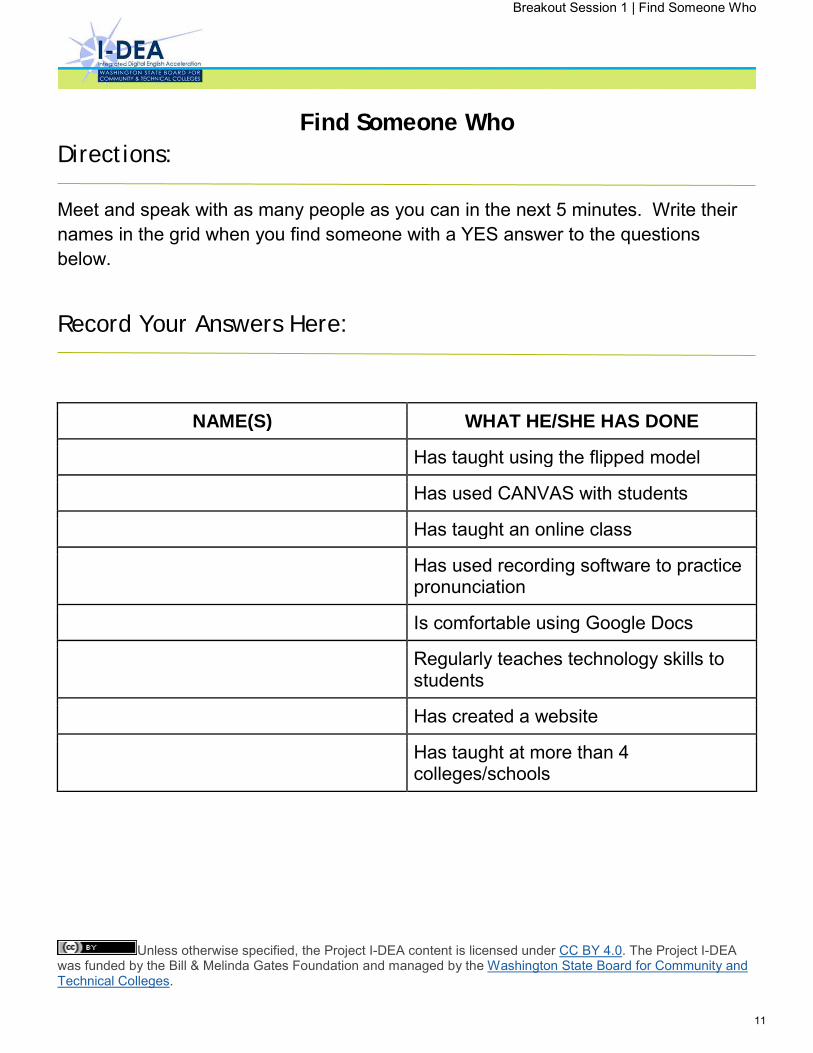
Breakout Session 1 | Find Someone Who
Unless otherwise specified, the Project I-DEA content is licensed under CC BY 4.0. The Project I-DEA was funded by the Bill & Melinda Gates Foundation and managed by the Washington State Board for Community and Technical Colleges.
Find Someone Who Directions:
Meet and speak with as many people as you can in the next 5 minutes. Write their names in the grid when you find someone with a YES answer to the questions below.
Record Your Answers Here:
NAME(S) WHAT HE/SHE HAS DONE
Has taught using the flipped model
Has used CANVAS with students
Has taught an online class
Has used recording software to practice pronunciation
Is comfortable using Google Docs
Regularly teaches technology skills to students
Has created a website
Has taught at more than 4 colleges/schools
11

Breakout Session 1 | Scavenger Hunt
Canvas & Google Drive Scavenger Hunt
Directions:
Log into your I-DEA Conference Course. Take the next 15-20 minutes to explore both Canvas & the Google Drive.
Questions:
1. Locate Study Skills. Practice: Expanding & Contracting the Module with the
small arrow.
2. Click on the first blue link in the Study Skills Module.
3. Where does that take you?
4. Where can you find the IG (Instructional Guide)?
5. What are the titles of the first 5 sections the Study Skills IG? *(This is the same
in all modules.)
6. Handouts for face-to-face activities are located in which 2 places in the Google
Drive?
7. Open a face-to-face handout in the Study Skills Google Folder. Make a copy,
rename and edit some of the content on the document.
8. What is the 3rd subtopic in the Study Skills Module?
9. What is the first activity in Learn: Successful Students?
10. What does the first question in Learn: Successful Students ask students to do?
11. How many new vocabulary words are presented in each Learn activity?
12. What type of activity always follows a Learn activity in a module?
Unless otherwise specified, the Project I-DEA content is licensed under CC BY 4.0. The Project I-DEA was funded by the Bill & Melinda Gates Foundation and managed by the Washington State Board for Community and Technical Colleges.
12

FOCUS
SESSION 2
13

14

Personal Inventory | Career Test
Career Test
Directions:
You will take a career test online. It is not a real test. It will ask questions about things you like to do. Then, it will give you information about your personality and jobs that might interest you.
Before the Test:
Open a browser and go to: https://www.123test.com/career-test/
Take the Test:
Look at the four (4) activities on each page.
Click the X on one (1) thing you do not like.
Click the ✓ (checkmark) on one (1) thing you like.
Click NEXT to go to the next page. There are 15 pages.
Unless otherwise specified, the Project I-DEA content is licensed under CC BY 4.0. The Project I-DEA was funded by the Bill & Melinda Gates Foundation and managed by the Washington State Board for Community and Technical Colleges.
15

Personal Inventory | Career Test
After the Test:
1. On page 15, click RESULT. 2. Choose an education level for the jobs. 3. Complete the sentences.
○ I am male/female. ○ My age is ____. (Choose a number.) ○ I am from _____________. (Choose a country.) ○ My education level is ______________. (Choose a level.)
Save your results. You can send yourself an email or copy the URL. STOP HERE.
➔ Use the Pie Charts handout to practice reading the test results.
Career Test Result:
After you finish the Pie Chart handout, use your computer again. Look at the Career Test Result page to find your test result.
Read about the six (6) personality types. Write one (1) or two (2) words that help you understand the meaning of each type:
realistic
investigative
artistic
social
enterprising
conventional
Unless otherwise specified, the Project I-DEA content is licensed under CC BY 4.0. The Project I-DEA was funded by the Bill & Melinda Gates Foundation and managed by the Washington State Board for Community and Technical Colleges.
16

Personal Inventory | Career Test
Scroll down the page to see the percentages (%) of the personality types you prefer. These are shown in a pie chart. Scroll down more to see a list of suggested occupations.
Think and Talk About Your Results:
First, answer the questions:
1. What is your strongest personality type?
_______________________________________________
2. What is your weakest personality type?
_______________________________________________
3. List three (3) examples of jobs that fit your personality type:
_______________________________________________ _______________________________________________ _______________________________________________
Then, share your answers with a classmate.
Unless otherwise specified, the Project I-DEA content is licensed under CC BY 4.0. The Project I-DEA was funded by the Bill & Melinda Gates Foundation and managed by the Washington State Board for Community and Technical Colleges.
17

Personal Inventory | Career Test
What Are You?:
Write one (1) sentence about yourself. Use the verb be and an adjective from the test results. Then, talk to a classmate. Write a sentence using you and he or she. I ____________________________________________________________ You ___________________________________________________________ He ____________________________________________________________ She ___________________________________________________________
Unless otherwise specified, the Project I-DEA content is licensed under CC BY 4.0. The Project I-DEA was funded by the Bill & Melinda Gates Foundation and managed by the Washington State Board for Community and Technical Colleges.
18

Personal Inventory | Pie Charts
Pie Charts
Directions:
Complete the activities to practice using pie charts and practice reading the results of the career test. Then, use the Career Test handout to read your test result.
Read a Pie Chart:
Look at the pie chart. Answer the questions below.
Which personality type is the strongest for this person? _______________________ Which personality type is the weakest for this person _________________________
Unless otherwise specified, the Project I-DEA content is licensed under CC BY 4.0. The Project I-DEA was funded by the Bill & Melinda Gates Foundation and managed by the Washington State Board for Community and Technical Colleges. Pie Chart image by projectidea, CC BY 2.0.
19

Personal Inventory | Pie Charts
Review the chart you saw in Canvas:
List one (1) or two (2) occupations or professions that might be a good fit for this person’s personality:
_________________________ _________________________ List one (1) or two (2) occupations or professions that might not be a good fit for this person’s personality:
_________________________ _________________________
Unless otherwise specified, the Project I-DEA content is licensed under CC BY 4.0. The Project I-DEA was funded by the Bill & Melinda Gates Foundation and managed by the Washington State Board for Community and Technical Colleges. Pie Chart image by projectidea, CC BY 2.0.
20

Personal Inventory | Pie Charts
Make a Pie Chart:
Sally took the career test and found out her personality results. Draw a pie chart that represents her results:
realistic 30% enterprising 25%
social 10% artistic 20%
investigative 10% conventional 5%
Unless otherwise specified, the Project I-DEA content is licensed under CC BY 4.0. The Project I-DEA was funded by the Bill & Melinda Gates Foundation and managed by the Washington State Board for Community and Technical Colleges. Pie Chart image by projectidea, CC BY 2.0.
21

Personal Inventory | Career Test Results Example (Workshop Handout)
Career Test Result Example
Directions:
This is an example of the results page produced by the Career Test at http://www.123test.com/career-test/.
Use this sample to preview/explore the Career Test Result section (final section) of the Career Test activity handout. You may also use your own test results if you have completed the online test.
Sample Result:
(A) Social (C) Investigative (E) Enterprising
(B) Artistic (D) Conventional (F) Realistic
Unless otherwise specified, the Project I-DEA content is licensed under CC BY 4.0. The Project I-DEA was funded by the Bill & Melinda Gates Foundation and managed by the Washington State Board for Community and Technical Colleges.
22

FOCUS
SESSION 3
23

24

Environmental Issues| Activity Handout
Environmental Issues Activity Handout
Directions:
Tomorrow you will be teaching the “Garbage and Recycling” section of Environmental Issues and you need to prepare. You will review the canvas and F2F activities for this section.
1. Begin with the Canvas portion and complete the activities in Canvas as a student would.
2. Go to Instructor’s Guide and preview the F2F activities 3. Complete the activity handout as you work through sections 4. Note any questions in the “Questions” google doc.
You have 30 minutes to complete this activity
Canvas:
1. What are the Canvas activities for Recycling and Garbage?
2. What is the purpose of the learn activity? What material might be helpful for a student before completing the first learn activity of this section? How would you teach a student to complete this activity?
3. How does a student record in the Learn activity? What two options are there for recording in the Learn activity? If a student can’t record in Canvas, what advice can you give him/her to work around the technical issue?
4. How does a student reply to a discussion?
Unless otherwise specified, the Project I-DEA content is licensed under CC BY 4.0. The Project I-DEA was funded by the Bill & Melinda Gates Foundation and managed by the Washington State Board for Community and Technical Colleges.
25

Environmental Issues| Activity Handout
5. If a video in a “Read and Watch” activity plays too fast for a student, how can he or she make it more accessible?
Face to Face Activities:
Instructions: Go to the Instructor’s Guide, find the section on Garbage and Recycling, open the section, and preview the activities
6. What are the F2F activities for this section?\
7. Which activities will require additional advanced planning (i.e. require tech coach, cutting, sorting, etc..)? (Hint-- look at module overview)
8. What activities do you think will be of the greatest interest to your students? Any challenges you anticipate? How will you address these?
9. How do the F2F activities complement the Canvas activities?
10. What pre-work should you assign at the end of this section to prepare students for the next day’s in-class activities?
Unless otherwise specified, the Project I-DEA content is licensed under CC BY 4.0. The Project I-DEA was funded by the Bill & Melinda Gates Foundation and managed by the Washington State Board for Community and Technical Colleges.
26

Effective Presentations | Public Speaking Activity Handout
Public Speaking Activity
Directions: Task 1
Each pair (A-B) will be assigned one of the two parts below by reviewing the “Public Speaking” subtopic. Complete only the questions for your part below.
● Pair A: Review the online portion of the “Public Speaking” subtopic ● Pair B: Open the instructional guide and review the Face-to-Face content
which include the lesson sequence and links to handouts.
Pair A - Public Speaking Canvas Content:
Steps: Go to the online content for the “Public Speaking” subtopic, and review the online pre-work. Preview the activities, and answer the questions below. Review each item in the module before answering the questions: 1) What are the Canvas activities for your assigned section? 2) Is there a standard progression (including a “Learn” activity, followed by a discussion, 1-2 content pages, and a practice quiz), or is there a modified progression of activities for this section? 3) Are there any handouts that students will need prior to completing the online content? Do students need to submit any work to you in class the next day? 4) How is the Read & Do: Practice Makes Perfect activity different from the Read & Watch activity?
Unless otherwise specified, the Project I-DEA content is licensed under CC BY 4.0. The Project I-DEA was funded by the Bill & Melinda Gates Foundation and managed by the Washington State Board for Community and Technical Colleges.
27

Effective Presentations | Public Speaking Activity Handout
Pair B - Public Speaking Face-to-Face:
Steps: Go to the Effective Presentations Instructional Guide, and review the content from the “Public Speaking” subtopic. Preview the activities, and answer the questions below: 1) What are the Face-to-Face activities for Public Speaking? 2) Which activities will require additional advance planning (i.e., require tech coach, cutting, sorting, etc..)? 3) Which activities do you think will be of the greatest interest to your students? 4) What are the English skills that have been integrated into the lesson (i.e. reading, writing, listening, speaking)?
Unless otherwise specified, the Project I-DEA content is licensed under CC BY 4.0. The Project I-DEA was funded by the Bill & Melinda Gates Foundation and managed by the Washington State Board for Community and Technical Colleges.
28

Effective Presentations | Public Speaking Activity Handout
Directions - Task 2:
You will now work in a group of 4 so that you have both A-B pairs. Each group will have to share information with each other. Steps:
1. Form a group of four participants. Each pair will share information from their assigned part in Task 1.
2. Then, listen to the information from each pair and take notes. 3. Finally, make connections between the content students will work on in
Canvas and the content that students will practice in class by answering the questions below in your groups.
Questions - Task 2:
1) How do the Face-to-Face activities complement the Canvas activities? 2) Which English skills are integrated into this subsection? 3) How will students practice their tech skills in class? 4) How can an instructor help students successfully complete the project for this subsection?
Unless otherwise specified, the Project I-DEA content is licensed under CC BY 4.0. The Project I-DEA was funded by the Bill & Melinda Gates Foundation and managed by the Washington State Board for Community and Technical Colleges.
29

30

FOCUS
SESSION 4
31

32
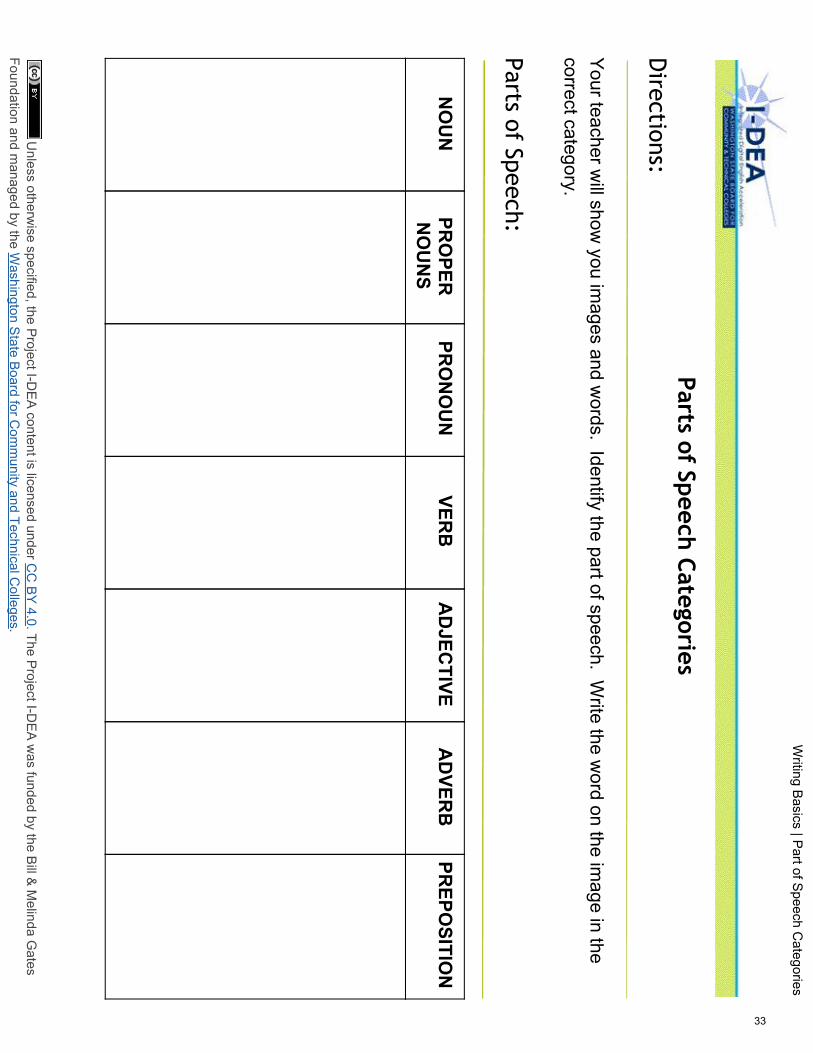
Writing Basics | Part of Speech C
ategories
Parts of Speech Categories
Directions:
Your teacher will show
you images and w
ords. Identify the part of speech. Write the w
ord on the image in the
correct category. Parts of Speech:
NO
UN
PR
OPER
N
OU
NS
PRO
NO
UN
VER
B
AD
JECTIVE
AD
VERB
PR
EPOSITIO
N
Unless otherw
ise specified, the Project I-DEA content is licensed under C
C BY 4.0. The Project I-D
EA was funded by the Bill & M
elinda Gates
Foundation and managed by the W
ashington State Board for Com
munity and Technical C
olleges.
33

Writing Basics | Sentence Cards
Sentence Cards
Directions for Teacher:
Copy and cut up the following cards so there is a set for each pair or group of students plus a copy for the teacher.
Options:
1. Mix cards up completely. 2. Separate each sentence but mix the words up. 3. Separate the cards into parts of speech. Some Ss have subjects, some have
verbs, some adjectives, some have objects.
Sentences:
<make a card for each cell>
The bear climbs the tree.
Laurencia calls her teacher.
Ofelia works tomorrow.
Unless otherwise specified, the Project I-DEA content is licensed under CC BY 4.0. The Project I-DEA was funded by the Bill & Melinda Gates Foundation and managed by the Washington State Board for Community and Technical Colleges.
34

Writing Basics | Sentence Cards
My first name is Olga.
Qinhua likes movies.
Unless otherwise specified, the Project I-DEA content is licensed under CC BY 4.0. The Project I-DEA was funded by the Bill & Melinda Gates Foundation and managed by the Washington State Board for Community and Technical Colleges.
35

Writing Basics | Sentence Jigsaw
Sentences Jigsaw
Directions:
Review the subjects, verbs, and objects in the sentences. Work with a partner or group to make sentences with the sentence cards. Then, in Part 2 write the sentences.
Part 1 - Identify the Parts of the Sentence:
What is the subject? What is the verb? What is the object?
1. The man makes jokes with the children.
2. The teacher says the homework is easy.
3. She likes her class.
4. Paolo brings his laptop to class.
5. Danilo and Kenji read their books.
Part 2:
Write the sentences you created with the sentence cards.
1. ___________________________________________________________
2. ___________________________________________________________
3. ___________________________________________________________
4. ___________________________________________________________
5. ___________________________________________________________
Unless otherwise specified, the Project I-DEA content is licensed under CC BY 4.0. The Project I-DEA was funded by the Bill & Melinda Gates Foundation and managed by the Washington State Board for Community and Technical Colleges.
36

Internet Basics | Wi-Fi Advantages & Disadvantages
Wi-Fi Advantages & Disadvantages
Directions:
In this activity, you will write about the advantages and disadvantages of using Wi-Fi. Use the ideas from your group discussion.
Pre-Writing:
Will you write about the advantages or disadvantages of Wi-Fi? ________________
If you are writing about advantages, list two to three advantages that you will include. Or, if you are writing about disadvantages, list two to three disadvantages that you will include.
1.________________________________________
2.________________________________________
3.________________________________________
Draft:
Now it's time to write your sentences. Use the template on the next page to fill in your sentences.
Unless otherwise specified, the Project I-DEA content is licensed under CC BY 4.0. The Project I-DEA was funded by the Bill & Melinda Gates Foundation and managed by the Washington State Board for Community and Technical Colleges.
37

Internet Basics | Wi-Fi Advantages & Disadvantages
________________________________________ (Title)
There are many ____________________________ to using Wi-Fi. The first
________________ is _______________________________________________.
The second _____________________ is _______________________________
___________________________________________. The final _____________ is
_____________________________________________________. In conclusion, I
think Wi-Fi is ____________________________________________.
After you are done writing, read your sentences carefully. Make any corrections that are needed. If you think that they are correct, ask a classmate or teacher to review your sentences.
Unless otherwise specified, the Project I-DEA content is licensed under CC BY 4.0. The Project I-DEA was funded by the Bill & Melinda Gates Foundation and managed by the Washington State Board for Community and Technical Colleges.
38

Internet Basics | Wi-Fi Advantages & Disadvantages
Final Copy:
Make any corrections needed and write your final copy of the sentences below.
_______________________
_________________________________________________
_________________________________________________
_________________________________________________
_________________________________________________
_________________________________________________
_________________________________________________
_________________________________________________
_________________________________________________
Unless otherwise specified, the Project I-DEA content is licensed under CC BY 4.0. The Project I-DEA was funded by the Bill & Melinda Gates Foundation and managed by the Washington State Board for Community and Technical Colleges.
39

40

INSTRUCTOR
RESOURCES
41

42

The Project I-DEA Instructional Model
ESL Levels 1 - 3
Project I-DEA was developed for ESL levels 1 - 3. It is a rigorous curriculum intended for students to move to college-ready courses in less time. Upon first review, some instructors feel that the curriculum is too high for low level ELL. However, over the course of a three-year pilot in Washington State, Project I-DEA students made more significant gains than non-I-DEA students.
For those new to Project I-DEA, we encourage you to raise the bar set for your students - you will be amazed at what they are capable of!
The Flipped Classroom
Project I-DEA uses the flipped classroom model. 'Flipped' refers to a class where students are introduced to concepts and content online at home. Then, they come to class where they practice and apply the concepts that they learned from home.
This is a fairly simple model, but it takes awhile to get used to and relies on students doing the work prior to class (we use the term 'pre-work'), as opposed to after class as homework. It is important for instructors to consistently encourage and remind students of the importance to do the pre-work as this will greatly impact the success of in-class activities.
However, the first module, Intro to Project I-DEA, is intended to be taught in class - allowing the students to familiarize themselves with Canvas and their computer before launching into a true flipped module.
Tech Coach
Since one of the primary goals of Project I-DEA is to increase technology skills of ELLs, we recommend having a technology coach, or tech coach, available to assist in class. During the three-year pilot across Washington State's Community & Technical Colleges, participating colleges developed their own ways of selecting/hiring a tech coach, resulting in variety of different roles and responsibilities. In some cases, the tech coach was another ESL instructor
Unless otherwise specified, the Project I-DEA content is licensed under CC BY 4.0. The Project I-DEA was funded by the Bill & Melinda Gates Foundation and managed by the Washington State Board for Community and Technical Colleges.
43

that handled most of the online activities and grading. In other cases, a staff member from the eLearning or IT departments spent time in the class.
This role is incredibly important and valuable when you first begin I-DEA and familiarize yourself with the technology and apps. As you and your students progress, you will likely discover that the tech coach's support is needed less often - many times returning students will begin assisting and supporting their classmates.
Modules
There are 30 total modules in Project I-DEA. Each module was developed to be taught over the course of one week - 9 hours in class, and 9 hours of pre-work outside of class. I-DEA is an 18-credit course. The instructional materials are arranged for a course that is taught 5 days a week (4 two-hour days, and 1 one-hour day). If your class meets less than 5 days a week, or for less than 9 hours, you will want to adjust how many activities students complete online and in class.
Additionally, the Project I-DEA modules were developed with some light scaffolding for writing, technology, and math. Therefore, if you elect to mix and match modules on your own as opposed to using one of our "pre-packed" quarterly course cartridges, please pay close attention to the objectives of each module in order to ensure students are introduced to concepts and skills in a logical manner.
The next page addresses how to select and remix modules.
Grading
Project I-DEA uses the Learner Mastery model to award distance education hours. What that means is that the score a student receives for their online work is used to determine how many hours the student has spent completing the pre-work online (distance) work. The model and grading scheme used in the Project I-DEA pilot is listed in the course syllabus and in the grading scheme (under the course settings).
More information will be provided in the next couple of pages.
Unless otherwise specified, the Project I-DEA content is licensed under CC BY 4.0. The Project I-DEA was funded by the Bill & Melinda Gates Foundation and managed by the Washington State Board for Community and Technical Colleges.
44

Module
Tech Objectives
Writing O
bjectivesG
ramm
ar Objectives
Math O
bjectives
Introduction to I-DEA
Navigate and use C
anvas and G
mail.
Write sentences using the sim
ple present tense.
Write sentences using the sim
ple present tense.
Com
puter SkillsIdentify and use basic parts of a com
puter and various computer
applications.Produce w
ritten yes / no questions.Identify and use: subject pronouns, possessive adjectives, and sim
ple past tense verbs.
Use the calculator tool to do basic
math operations.
Study SkillsU
se Google D
ocs to write about
habits.U
se graphic organizers to organize ideas for reading and w
riting notes.
Practice basic gramm
ar structures of sim
ple present and present continuous tenses.
Create and read a pie chart to
analyze time m
anagement and
percents.
American Education
SystemC
reate a Google D
oc and share the link w
ith your class.
Construct sentences utilizing verbs
in the past simple tense and
structures related to writing
numbers..
Construct sentences using verbs in
the past simple tense and structures
related to writing num
bers.
Calculate averages in relation to
grades.
Libraries & Library
Resources
Create a Pow
erPoint presentation about the library.
Produce written w
h questions and answ
ers.Apply w
h questions to the library experience.
Apply addition and multiplication to
calculate library fines.
Navigating Your
Com
munity
Format a Pow
erPoint presentation slide w
ith extras.Interpret and com
plete forms from
com
munity agencies.
Apply structures and functions related to plural nouns and the possessive S.
Locate data in a table.
Health &
Wellness
Use M
icrosoft Word for
brainstorming and organizing
ideas for writing.
Brainstorm, m
ake notes, and write
complete sentences about
symptom
s, such as aches and pains.
Practice the use of indefinite articles a and an and dem
onstrative pronouns this, these, that, and those. D
istinguish measurem
ents used in the U
nited States.
Stress Managem
entU
se Microsoft W
ord to write about
stress.Plan, organize, and w
rite a paragraph.
Write com
plex sentences using "because" and "w
hen" to express reason and tim
e and use future tense verbs.
Interpret statistics expressed in percentages.
Money M
anagement
Use M
icrosoft Word to w
rite a paragraph.
Write an organized paragraph,
including all the parts of a paragraph.
Practice structures and functions related to gram
mar in areas of count
and non-count nouns and com
parative adjectives.
Calculate w
ith money in a variety of
settings, including banking, shopping, and budgeting.
FALL QU
ARTER
End of Quarter Projects
45

Module
Tech Objectives
Writing O
bjectivesG
ramm
ar Objectives
Math O
bjectives
Introduction to I-DEA
Navigate and use C
anvas and G
mail.
Write sentences using the sim
ple present tense.
Write sentences using the sim
ple present tense.
Time M
anagement
Use G
oogle Calendar for real life
application.C
reate complete sentences about
time m
anagement.
Apply the simple present tense and
adverbs of frequency.Apply fractions to tim
e.
Personal InventoryC
reate a presentation about yourself and your interests, using G
oogle Slides.
Develop topics and supporting
details.
Practice and apply infinitives and gerunds, yes/no questions, subject pronouns, and subject-verb agreem
ent.
Read pie charts and interpret
information about your personality
traits.
Career Exploration
Create a G
oogle Slides presentation w
ith images.
Organize ideas into a topic,
supporting details, and conclusion for a presentation.
Apply the simple past tense and W
h questions.
Use m
ultiplication and division to determ
ine weekly and m
onthly earnings.
Math B
asicsU
se a calculator and/or the W
indows calculator for sim
ple m
ath functions.
Write num
bers (digits and words)
and write sim
ple sentences about m
ath.
Form w
h questions and look for main
ideas and keywords to solve m
ath story problem
s and apply punctuation appropriately w
hen writing num
bers.
Practice basic math, including
addition, subtraction, multiplication,
division, place value, fractions, and percents.
Budgeting &
Consum
er Econom
icsC
reate a pie chart in Google
Sheets.D
ifferentiate between the m
ain idea and details.
Apply the gramm
ar structure for the verbs 'have', 'should', 'w
ould like to' and the possessive s.
Calculate percentages.
Cross C
ultural C
omm
unication Practice and use M
icrosoft Word.
Organize ideas into an outline.
Practice and apply possessive adjectives and dem
onstrative adjectives.
Apply fractions to data about people.
Contem
porary World
Problems
Use M
icrosoft Word to type a
paragraph.
Apply parts of the writing process,
identify parts of a paragraph, and w
rite a paragraph with an
introduction, body, and conclusion.
Practice and apply conjunctions.Analyze charts and graphs.
Powerful Presentations
Prepare and deliver a completed
presentation to an audience, using effective speaking habits and Pow
erPoint.
Apply organization of ideas to a Pow
erPoint presentation.Practice and apply im
peratives.U
se imperatives to talk about basic
math operations.
WIN
TER Q
UAR
TER
End of Quarter Projects
46

Module
Tech Objectives
Writing O
bjectivesG
ramm
ar O
bjectivesM
ath Objectives
Introduction to I-DEA
Navigate and use C
anvas and G
mail.
Write sentences using the sim
ple present tense.
Write sentences using the
simple present tense.
Writing B
asicsU
se the computer application
Google D
ocs.Explain the w
riting process.Apply the sim
ple present verb tense.
Write num
bers as words.
WashingtonState H
istoryU
se Google D
ocs to write and
submit a paragraph.
Use the w
riting process to write a
paragraph.Apply the sim
ple past tense.Apply addition and subtraction to historical dates and data.
US H
istory & C
itizenshipU
se Google Slides to create a
simple presentation.
Write a narrative in the past tense.
Use irregular past tense verbs
to talk about history.
Use m
ath in the context of US
History to calculate a m
ean (average).
Interpersonal C
omm
unicationsApply basic form
atting to a presentation in G
oogle Slides.
Write com
plete and concise sentences and questions to talk about routines.
Apply adverbs of frequency to sentences that describe habits and routines.
Calculate percents from
information
collected from a survey.
Job Search and Interview
ingU
se the application Microsoft
Word to w
rite and submit a
document in C
anvas.
Practice writing a paragraph and
cover letter.
Com
municate about the past
using regular and irregular verbs.
Examine online charts to calculate
minim
um w
ages.
Work R
eadiness
Practice writing w
ith Microsoft
Word.
Write an em
ail to an employer
with clarifying questions.
Apply the gramm
ar concepts of m
ore than/less than, clarifying questions, and could/w
ould.
Use m
ultiplication and division to determ
ine hourly wage and annual
income using inform
ation provided on a pay stub.
Environmental Issues
Make a sim
ple PowerPoint
presentation and post it to C
anvas.
Organize w
riting by outlining the m
ain idea, supporting details, and conclusion, as w
ell as identify these in other w
ritings.
Recognize and practice tw
o form
s of the future tense.Analyze a variety of charts and graphs.
Effective Presentations
Work in a group to create,
submit, and present a
PowerPoint presentation.
Use paragraphs to w
rite a speech that includes an introduction, body, and conclusion.
Use im
peratives to give and understand instructions.
Use required functions to solve m
ath w
ord problems.
SPRIN
G Q
UAR
TER
End of Quarter Projects
47

Module
Tech Objectives
Writing O
bjectivesG
ramm
ar O
bjectivesM
ath Objectives
Introduction to I-DEA
Navigate and use C
anvas and G
mail.
Write sentences using the sim
ple present tense.
Write sentences using the
simple present tense.
Writing B
asicsU
se the computer application
Google D
ocs.Explain the w
riting process.Apply the sim
ple present verb tense.
Write num
bers as words.
Com
puter SkillsIdentify and use basic parts of a com
puter and various com
puter applications.
Produce Yes / No questions and
answers.
Identify and use: subject pronouns, possessive adjectives, and sim
ple past tense verbs.
Use the calculator tool to do basic
math operations.
Internet Basics
Access and use the internet in a safe, secure, and appropriate m
anner.
Com
pose questions and statem
ents with the auxiliary verb
'do'.
Use im
peratives to give directions.
Analyze internet service provider plans to find the average cost.
Information Literacy
Create a Pow
erPoint presentation based on a problem
solving process.
Write questions and answ
ers related to inform
ation literacy.U
nderstand, ask, and answer
WH
questions.Identify place value using reliable resources.
Team C
ollaborationU
se the application Microsoft
Word to w
rite a paragraph.Apply the w
riting process to write
a reflection paragraph.
Use the future tense and
could/should/would to plan and
talk about what you w
ill do.
Solve mathem
atical word problem
s related to project w
ork.
Business W
ebsitesU
se the application Microsoft
Word to w
rite a paragraph.Apply the w
riting process to write
a review paragraph.
Use the future tense to plan
and talk about what you w
ill do and could/should to give advice and suggestions.
Solve mathem
atical word problem
s related to business w
ebsites.
NO
TE: Team C
ollaboration and Business W
ebsites have very simliar objectives to allow
Ts the option to pick one of the two or assign both.
SUM
MER
QU
ARTER
End of Quarter Projects
48

Notes on Selecting / Mixing I-DEA Modules
Background Project I-DEA was originally envisioned to consist of 30+ modules that could be mixed and matched as desired. The 30+ modules would provide a full year’s worth of integrated curriculum that contextualized language, writing, technology, and math. However, writing, technology, grammar and to an extent, math, require a certain level of sequencing and scaffolding. As a result, allowing the Project I-DEA modules to be standalone modules that could be mixed and matched in any order and combination became problematic.
Remixing Modules
Scaffolding The final I-DEA modules have since been developed as a set of lightly scaffolded quarterly packages. However, instructors are able to mix and match modules as they please, as long as they swap out modules in a “horizontal manner” rather than vertical (i.e., replacing the week three module from fall with week three from spring, as opposed to replacing it with a module that falls later in the term. A full scope and sequence spreadsheet has been developed to allow instructors to see what lessons are taught in each module so that they can make a more informed decision when remixing course packages.
Module Pairs Additionally, the modules used for I-DEA have been designed and developed to be taught, most often, in pairs. The rationale behind this was to allow students two weeks to practice the technology introduced in each module - one week to become acquainted with the application and the second week to dive a little bit deeper and get enough practice and repetition that they will feel more comfortable using the technology when they encounter it in the future. Keep this in mind if taking the second module of a pair and moving it - you will need to build in a bit more support for the technology as students will be missing out on the introduction to the technology. Additionally, we attempted to keep the modules’ themes paired in such a way that it would be a smooth(er) transition between modules and allow for modules with similar topics to be folded together if time was tight. For example, Math Basics and Budgeting are paired, Study Skills and the American Education System, Job Search & Interviewing and Work Readiness.
Technology Considerations We also wanted to allow for students to be introduced to both MS Office Applications and Google Apps over the course of a quarter. While MS Office is the standard product used in many classrooms and work environments, Google Apps can be accessed for free and used when the student is no longer enrolled at a college. Our experience taught us that starting with Google Apps (Google Docs, Google
Unless otherwise specified, the Project I-DEA content is licensed under CC BY 4.0. The Project I-DEA was funded by the Bill & Melinda Gates Foundation and managed by the Washington State Board for Community and Technical Colleges.
49

Slides, etc.) was a better experience for students as these apps automatically save all files and can be accessed on any computer. Many campus/classroom computers require extra steps to save and find files - sometimes preventing the student from accessing files from home. A full scope and sequence is available for instructors to review, and we encourage you to refer to that when selecting and reordering modules. After three years of piloting, the following sequence was developed (to be used on a quarterly schedule):
Fall Winter Spring Summer
0. Intro to I-DEA 1. Computer Skills 2. Study Skills 3. American Education
System 4. Libraries & Library
Resources 5. Navigating Your
Community 6. Health & Wellness 7. Stress Management 8. Money
Management 9. End of Quarter
Projects
0. Intro to I-DEA 1. Time Management 2. Personal Inventory 3. Career Exploration 4. Math Basics 5. Budgeting &
Consumer Economics
6. Cross-Cultural Communication
7. Contemporary World Problems
8. Creating Presentations
9. End of Quarter Projects
0. Intro to I-DEA 1. Writing Basics 2. Washington State
History 3. U.S. History 4. Interpersonal
Communication 5. Job Search &
Interviewing 6. Work Readiness 7. Environmental
Problems 8. Effective
Presentations 9. End of Quarter
Projects
0. Intro to I-DEA 1. Writing Basics 2. Computer Skills 3. Internet Basics 4. Information Literacy 5. Team Collaboration 6. Business Websites 7. End of Quarter
Projects
3-Day Modules There are two 3-day modules that have been developed for Project I-DEA: Stress Management and Computer Skills. Stress Management was developed to span three days rather than five. Given its spot in Fall quarter - right around Thanksgiving break - we felt a shorter module, and one about dealing with stress, would be welcomed. Additionally, there are two modules for Computer Skills. The 5-day module was developed to be taught in fall and summer. This module follows the standard I-DEA module format - integrating math, grammar, and writing with technology. The 3-day version can be used as a refresher on the computer or for students that enroll late. The 3-day version is identical to the 5-day version, except that it excludes math, writing, and grammar. From our experience, instructors who had the same students enrolled in past quarters would often replace Intro to I-DEA with Computer Skills or would have returning students work through Computer Skills while new students completed the Intro to I-DEA module.
Unless otherwise specified, the Project I-DEA content is licensed under CC BY 4.0. The Project I-DEA was funded by the Bill & Melinda Gates Foundation and managed by the Washington State Board for Community and Technical Colleges.
50

Setting Up the Gradebook
Assignment Groups
Remixing the I-DEA modules is an exciting way to customize your course in order to best meet your students' needs and your instructional interests. However, there are a few extra steps that you will need to take in order to get your Canvas classroom all set to go.
The first thing you need to do, after importing your selected modules, is to create an assignment group for each module.
Canvas help page: How do I add an Assignment Group to my course?
Next, you'll need to drag each assignment from the module into the new assignment group. This is relatively easy as the module that each assignment is filed in is listed on the screen. Simply drag and drop the assignments into the proper group.
Unless otherwise specified, the Project I-DEA content is licensed under CC BY 4.0. The Project I-DEA was funded by the Bill & Melinda Gates Foundation and managed by the Washington State Board for Community and Technical Colleges.
51

Assignment Group Weights
Depending on the number of modules you are using, you will set each assignment group to count evenly towards the final grade. For ten modules, each module is worth 10% of the final grade. For eight modules, each module should count as 12.5%. Etc. If you do not get through all of your modules, simply readjust the assignment group weights and unpublish the group that you did not complete. (Please note, if even one student completes an assignment it can no longer be unpublished - thus, it’s very important to set the assignment group to 0% and to unpublish an assignment or module as soon as you realize it will not be assigned.)
Canvas help page: How do I weight the final course grade based on Assignment Groups?
In-Class Activities
Last, if you are using the learning mastery model to measure distance hours, you will need to create one more assignment group called "In-Class Activities." This group should not count towards the final grade, set it to 0%. Then, drag any activity that has 'Do in Class' in the title, or any activity that you end up having your students complete in class, to this assignment group.
Calculating Distance Hours
To determine your students' distance hours, go to the Gradebook. Using the gradebook settings tool (the wheel in the top right), set all ungraded activities to count as 0 (this prevents you from manually having to add in 0s for assignments that students did not complete). If you skipped a module or assignment, or did not assign a graded activity to your students, unpublish the assignment or assignment group to prevent it from being counted towards the final grade.
Unless otherwise specified, the Project I-DEA content is licensed under CC BY 4.0. The Project I-DEA was funded by the Bill & Melinda Gates Foundation and managed by the Washington State Board for Community and Technical Colleges.
52

Making Assignment Changes in Canvas:
● If you do not to assign an activity (something worth points) in Canvas, mute/unpublish the assignment: Click on the green cloud to make it grey.
● If you move an activity to a different module, go to the Assignments tab in the course menu (on the left side of the page in Canvas). Find the assignment, then drag it into the other module’s assignment group.
● If you decide to do an online activity in class, go to the Assignments tab in the course menu (on the left side of the page in Canvas). Find the assignment, then drag it to the In-Class Activities assignment group.
● If you skip/drop an entire module, first, unpublish the module: Click on the green cloud at the top of the module to make it grey. Then, go to the Assignments tab in the course menu (on the left side of the page in Canvas). Unpublish each activity - turning the green clouds grey. Next, click on the editing wheel, select edit, then change the 10% to 0%. Change the percentages of the remaining assignment groups to add up to 100% (11.11% each for 9 modules, 12.5% for 8 modules, etc.).
○ Tech assessments, extra practice, and in-class activities should all remain as 0% of the grade.
Other Things to Be Aware Of:
● Removing an assignment from a module does not delete the assignment. If it is still published, with a due date, it will appear in the students to-do lists and calendar. You need to unpublish the assignment from the Assignments tab.
● If a student has already completed an activity it cannot be unpublished.
Unless otherwise specified, the Project I-DEA content is licensed under CC BY 4.0. The Project I-DEA was funded by the Bill & Melinda Gates Foundation and managed by the Washington State Board for Community and Technical Colleges.
53

● Students can take quizzes multiple times - the highest score is recorded in the gradebook. Some instructors prefer to limit the number of times an assignment that requires manual grading be submitted. If you want to limit the number of times an assignment is submit, edit the assignment and specify how many attempts a student gets.
● For Tech Skills Assessments, students are only given one chance to complete the assessment. If they accidentally submit it before they are done you can give them another attempt. Navigate to the assignment in Canvas, in the top right click on Moderate Quiz. Find the student’s name and click on the editing pencil. Specify how many attempts the student is allowed then click save.
● Setting a due date does not prevent students from completing an activity after the due date (in fact, we want you to encourage them to go back and continue to practice). However, to prevent a student from turning something in beyond the due date you can specify when the activity is no longer available in the activity settings. This will lock the activity and prevent students from being able to access it.
● When you import the course cartridge, all modules (except the Instructor’s Resources module) will be published. If you want to limit what a student can see you can unpublish upcoming modules by clicking on the green cloud at the top of the module.
Unless otherwise specified, the Project I-DEA content is licensed under CC BY 4.0. The Project I-DEA was funded by the Bill & Melinda Gates Foundation and managed by the Washington State Board for Community and Technical Colleges.
54

How to Edit a Quizlet Deck
To edit a Quizlet you will need to open a new tab and login to your personal Quizlet account (accounts are free, if you need to create one). Then, return to the Learn and click "View the study set" in the lower left.
Create a copy - the copy will be your own, allowing you to make edits.
To embed your new Quizlet, click "More" and get the embed code for Flashcards.
Unless otherwise specified, the Project I-DEA content is licensed under CC BY 4.0. The Project I-DEA was funded by the Bill & Melinda Gates Foundation and managed by the Washington State Board for Community and Technical Colleges.
55

Return to the Learn question. Enter edit mode and click on the HTML Editor for the question.
Replace the original embed code (highlighting everything between the two <iframe> and pasting in the new embed code.
Click Update Question. Then, save quiz.
Unless otherwise specified, the Project I-DEA content is licensed under CC BY 4.0. The Project I-DEA was funded by the Bill & Melinda Gates Foundation and managed by the Washington State Board for Community and Technical Colleges.
56

How to Edit a Google Doc:
● All course materials are shared with you as View Only. We must do this because if
one person makes a change to a document that change will impact everyone else.
● To edit a Google Doc: ○ First, make sure you are signed in to your Google/Gmail account.
○ Click on File.
■ If you cannot see file, but your doc is “floating” with black space around it, click on the box with an arrow shooting out of it in the top right corner - this should open the doc in a new tab where the File menu is viewable.
○ Click on Make a copy… ■ You will be able to edit this doc - it will be housed in your Google drive.
How to Share a Google Doc:
● Do not copy and paste the URL in the address bar. That will force people to
request access through your email accounts. You must get a shareable link.
● To share a Google Doc (or slideshow or spreadsheet), click on the blue Share button in the top right of the screen of your document.
○ Alternatively, you can right click on it from your drive and select “Share…”
○ In the pop-up, select “Get shareable link…” if the link is not already shown.
○ Select the sharing settings that you prefer (view only, can edit, can comment)
○ Click “Copy link”
○ Paste the link into the page/email.
Unless otherwise specified, the Project I-DEA content is licensed under CC BY 4.0. The Project I-DEA was funded by the Bill & Melinda Gates Foundation and managed by the Washington State Board for Community and Technical Colleges.
57

Pre-Publish Checklist:
❏ The syllabus has been edited and updated to include institution/course specific info.
❏ The section at the top of the syllabus page (info for teachers) has been removed.
❏ Modules are all published, but links to the Instructor's Guides remains unpublished. (See below.)
❏ Assignment due dates have been set.
❏ For instructions, go here: http://bit.ly/canvasduedates
❏ Please add module lock date settings and module completion pre-reqs if you want to use them. You can read more about setting lock dates here:
❏ http://guides.instructure.com/s/2204/m/4152/l/41432-how-do-i-lock-a-module
❏ Check that there are separate assignment groups
❏ If there is a group called “Imported Assignments” with assignments from multiple modules, follow the steps from the video to create and arrange new assignments groups - adjust the group names to correspond to the modules in the course: http://screencast.com/t/3MUggDl6tI
❏ Make sure the Project I-DEA homepage is displaying or select the homepage that you plan to use (you now have multiple options - follow the instructions below to select the homepage).
❏ Go to Pages, next to the page titled “Homepage” click the editing wheel and select Use as Front Page.
Unless otherwise specified, the Project I-DEA content is licensed under CC BY 4.0. The Project I-DEA was funded by the Bill & Melinda Gates Foundation and managed by the Washington State Board for Community and Technical Colleges.
58

❏ Then, go back to the Course home page and click on Choose Home Page (top right corner). Select Pages and click Save.
❏ Remove any course navigation buttons that you do not plan on using. For instructions, go
to this website: http://bit.ly/navbutton
❏ Make sure your Flash plugins are up to date on student computers (this is important for recording in Canvas)!!
❏ To find out what version you need, go to this website: http://bit.ly/canvasupdates
❏ If you are not going to use an assignment, be sure to unpublish it (you cannot unpublish it once a student has interacted with an assignment).
❏ To unpublish, click on the green cloud next to the assignment (from module view or from Assignments page). If the cloud is grey, the assignment is no longer publish it.
❏ Once everything has been edited/checked, published the course. ❏ Go to the home page, click on publish in the top right.
❏ You do not need to do this before publishing the course, but there are some Canvas pages you will need to edit. These pages have “Ts EDIT” in the title - that means you will need to edit the page to include information specific to your institution/location. Further details for each page will be provided in the Instructor’s Guide or on the page in red text.
Unless otherwise specified, the Project I-DEA content is licensed under CC BY 4.0. The Project I-DEA was funded by the Bill & Melinda Gates Foundation and managed by the Washington State Board for Community and Technical Colleges.
59

Additional Quarter Prep Ideas:
Courtesy of Tom Braziunas, former Associate Dean of eLearning at North Seattle College
● Check in with your campus eLearning office!
● Contact guest speakers ahead of time if needed.
● Check wireless connectivity with student laptops in your classroom before the quarter begins.
● Check readiness of quarter-specific course Canvas shell (item number in system, students are registered, etc.)
Student Hardware
● Check with eLearning or IT Services on the imaging of student computers:
○ Confirm how students will get their devices
○ Check that imaging of devices includes appropriate browser versions (Chrome, Firefox) and plug-ins (e.g. Windows Media Player)
○ Lockdown admin rights as needed - browsers should not auto-update
○ Is there a statement about student responsibility for damage?
● Is there a process in place for repairs?
● Customize the information for your own students regarding how the devices work.
● Check that students have Gmail accounts - provide students with information if necessary.
● Check with the tech coach on preparations:
○ How will students be oriented to their devices?
○ How will late students be handled?
○ All students (including late ones) need to complete "Intro to I-DEA"
Student Tutorials
● Convey where students go to get additional information (eLearning, tech coach, IT, Canvas help
guides, etc.)
● An Additional Resources page has been added to every module. These pages include links to vocabulary charts, flashcards, and external links that allow students to explore the topics and grammar lessons further. Please encourage students to explore these resources!
Unless otherwise specified, the Project I-DEA content is licensed under CC BY 4.0. The Project I-DEA was funded by the Bill & Melinda Gates Foundation and managed by the Washington State Board for Community and Technical Colleges.
60

End of Quarter Checklist:
❏ In the End of Quarter Projects module, select which format(s) your students will do for the project and unpublish the ones you are not using.
❏ If you give students the option to pick the format, go to Assignments, in the Assignment Group “End of Quarter” and click the editing wheel and select ‘Edit’ define how many scores to drop (if you give the students the option to pick from all 5 options, drop the lowest 4 grades, if you give them 3 options, drop the 3 lowest, etc.)
❏ Remember, students need to do work at home for distance hours. If the entire project is completed in class you will need to edit the assignment, then select In-class Assignments under Assignment Group.
❏ Define which project you will do in the Canvas page “Read & Listen: End of Quarter Presentation” - add your text and record yourself reading the page.
❏ For directions on recording audio, go to this website: http://bit.ly/recaudio
❏ If any modules were not taught, unpublish all of the assignments from the module.
❏ Then, go “Assignments” and set that assignment group to count as 0% of the grade.
❏ Recalculate the weight of the remaining modules so that they add up to 100%.
❏ For instructions on how to do this, go here: http://bit.ly/weighgroups
❏ Go to the Gradebook, click on the editing wheel in top right, select “Treat Ungraded as 0”.
❏ Note, this will change students’ final scores, sometimes dramatically, so you may want to warn students and encourage them to go back and complete assignments that they skipped.
Unless otherwise specified, the Project I-DEA content is licensed under CC BY 4.0. The Project I-DEA was funded by the Bill & Melinda Gates Foundation and managed by the Washington State Board for Community and Technical Colleges.
61

❏ Your gradebook should display students’ final scores with hours next to the score. If it does not, use the scale below to report hours.
90 hours 100 - 75%
75.5 hours 75% - 50%
50 hours 50% - 25%
20.5 hours 1% - 25%
0 hours 0% - 1%
Unless otherwise specified, the Project I-DEA content is licensed under CC BY 4.0. The Project I-DEA was funded by the Bill & Melinda Gates Foundation and managed by the Washington State Board for Community and Technical Colleges.
62

Counting Student Contact Hours
Face-to Face: As with all basic skills students, face-to-face hours for Project I-DEA students will be reported according to the policies included in the BEdA Handbook.
Distance Education (CANVAS): All work completed in CANVAS will be counted towards distance education hours.
For Project I-DEA, all colleges will report distance education hours for I-DEA students using the Learner Mastery Model which assigns a fixed number of hours of credit based on the learner passing an assessment on the content of each lesson. Learners work with the curriculum and materials and when they feel they have mastered the material, take an assessment. A high percentage of correct answers (typically 70% - 80%) earn the credit hours attached to the material. Proxy contact hours are assigned for each lesson prior to the learner attempting it. SBCTC has determined how hours will be counted for the distance component of Project I-DEA. This information must be included in the course syllabus and made transparent to students. Documentation of distance education hours will be maintained according to the BEdA Handbook. Instructors should download, print and sign a copy of their CANVAS grade book at the end of each quarter or more often as determined by the college.
Grading Scale/Syllabus Language: You will earn credit for completing each I-DEA module. The amount of credit you earn will be based on a percentage of the points you earn in the module. This is the scale that will be used to determine the credit you will earn:
Percentage of Points Credit Earned 75 -100 % 9 hours 50 -74 % 7.5 hours 25 – 49 % 5.5 hours 1 -24 % 2 hours
0 0
Unless otherwise specified, the Project I-DEA content is licensed under CC BY 4.0. The Project I-DEA was funded by the Bill
& Melinda Gates Foundation and managed by the Washington State Board for Community and Technical Colleges.
63

64

TECH
INSTRUCTIONS
65

66

How to Create Word Document
1. Open the Start Menu and select All Programs.
2. Open the Microsoft Office folder. (You may need to scroll down to find it.)
3. Click on Microsoft Word.
4. A blank document will open. Begin typing in the document.
Unless otherwise specified, Project I-DEA Content is licensed under a Creative Commons Attribution 3.0 Unported License. Project I-DEA was funded by the Bill & Melinda Gates Foundation and managed by the Washington State Board for Community and Technical Colleges. Images by projectidea, CC BY 2.0
67

How to Save a Word Document
1. Click File in the upper left corner of the Word screen.
2. Select Save As.
3. Choose Desktop. This will save your document temporarily. If you turn off your computer, the document will be erased. If you want to save something permanently, save it to a flash drive.
4. Click Save.
5. Now you can close your document.
Unless otherwise specified, Project I-DEA Content is licensed under a Creative Commons Attribution 3.0 Unported License. Project I-DEA was funded by the Bill & Melinda Gates Foundation and managed by the Washington State Board for Community and Technical Colleges. Images by projectidea, CC BY 2.0
68

How to Use Google Slides
Creating A Google Slide Presentation
First, go to https://docs.google.com/presentation/ . You need to login with your Gmail account. To create a new slideshow, click on the plus sign.
Select a theme. Click OK.
You need to title your slideshow. Click on ‘Untitled presentation’. Type the name of your document. Click OK.
Unless otherwise specified, the Project I-DEA content is licensed under CC BY 4.0. The Project I-DEA was funded by the Bill & Melinda Gates Foundation and managed by the Washington State Board for Community and Technical Colleges. Images by projectidea, CC BY 2.0.
69

How to Use Google Slides
Type your text into the boxes on the screen. To add a new slide, click the + button.
Unless otherwise specified, the Project I-DEA content is licensed under CC BY 4.0. The Project I-DEA was funded by the Bill & Melinda Gates Foundation and managed by the Washington State Board for Community and Technical Colleges. Images by projectidea, CC BY 2.0.
70

How to Use Google Slides
Sharing Your Slideshow
1. If you want to share this slideshow, click ‘Share’.
2. Click ‘Get Shareable Link’.
3. Click on ‘copy’.
4. Then you can paste the link in Canvas or in an email by hitting ‘Ctrl’ and ‘V’ at the same time, or by right clicking and selecting ‘Paste’. Then click your spacebar.
Unless otherwise specified, the Project I-DEA content is licensed under CC BY 4.0. The Project I-DEA was funded by the Bill & Melinda Gates Foundation and managed by the Washington State Board for Community and Technical Colleges. Images by projectidea, CC BY 2.0.
71

How to Use Google Sheets
Creating A Google Sheet
First, go to https://docs.google.com/spreadsheets/. You need to login with your Gmail account. To create a new spreadsheet, click on the plus sign.
You need to title your spreadsheet. Click on ‘Untitled presentation’. Type the name of your document. Click OK.
Unless otherwise specified, the Project I-DEA content is licensed under CC BY 4.0. The Project I-DEA was funded by the Bill & Melinda Gates Foundation and managed by the Washington State Board for Community and Technical Colleges. Images by projectidea, CC BY 2.0.
72

How to Use Google Sheets
Type your titles into the first row. Click on the box, the type the title. Then click and type your categories.
Click on the box to type your number next to your categories.
Unless otherwise specified, the Project I-DEA content is licensed under CC BY 4.0. The Project I-DEA was funded by the Bill & Melinda Gates Foundation and managed by the Washington State Board for Community and Technical Colleges. Images by projectidea, CC BY 2.0.
73

How to Use Google Sheets
Sharing Your Spreadsheet
1. If you want to share this spreadsheet, click ‘Share’.
2. Click ‘Get Shareable Link’.
3. Click on ‘copy’.
4. Then you can paste the link in Canvas or in an email by hitting ‘Ctrl’ and ‘V’ at the same time, or by right clicking and selecting ‘Paste’.
Unless otherwise specified, the Project I-DEA content is licensed under CC BY 4.0. The Project I-DEA was funded by the Bill & Melinda Gates Foundation and managed by the Washington State Board for Community and Technical Colleges. Images by projectidea, CC BY 2.0.
74

How to Record & Post to a Discussion
1. Click in the discussion Reply field.
2. Click your cursor into the content editor if you want to type.
3. Click the Media button to record your video.
You have the option to record video or audio.
Click the webcam icon to record a video.
Click the microphone icon to record audio only .
4. Click on Allow.
Unless otherwise specified, Project I-DEA Content is licensed under a Creative Commons Attribution 3.0 Unported License. Project I-DEA was funded by the Bill & Melinda Gates Foundation and managed by the Washington State Board for Community and Technical Colleges; Images by projectidea, CC BY 2.0.
75
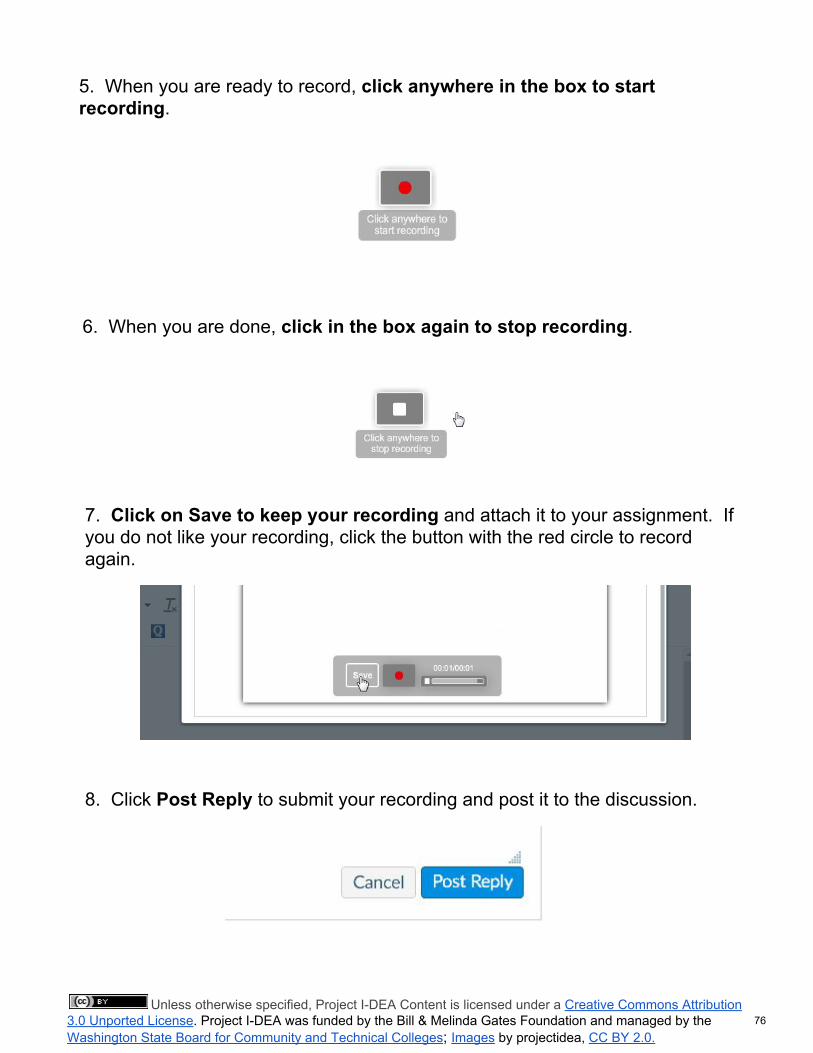
5. When you are ready to record, click anywhere in the box to start recording.
6. When you are done, click in the box again to stop recording.
7. Click on Save to keep your recording and attach it to your assignment. If you do not like your recording, click the button with the red circle to record again.
8. Click Post Reply to submit your recording and post it to the discussion.
Unless otherwise specified, Project I-DEA Content is licensed under a Creative Commons Attribution 3.0 Unported License. Project I-DEA was funded by the Bill & Melinda Gates Foundation and managed by the Washington State Board for Community and Technical Colleges; Images by projectidea, CC BY 2.0.
76

How to Record & Submit
1. Go to the assignment you want to submit.
2. Click on +Submit Assignment.
3. Click the Record Upload Media button.
You have the option to record video or audio.
Click the webcam icon to record a video.
Click the microphone icon to record audio only.
4. Click on Allow.
5. When you are ready to record, click anywhere in the box to start recording.
Unless otherwise specified, Project I-DEA Content is licensed under a Creative Commons Attribution 3.0 Unported License. Project I-DEA was funded by the Bill & Melinda Gates Foundation and managed by the Washington State Board for Community and Technical Colleges; Images by projectidea, CC BY 2.0
77

6. When you are done, click in the box again to stop recording.
7. Click on Save to keep your recording and attach it to your assignment. If you do not like your recording, click the button with the red circle to record again.
8. Click on the Submit Assignment button to submit your recording.
Unless otherwise specified, Project I-DEA Content is licensed under a Creative Commons Attribution 3.0 Unported License. Project I-DEA was funded by the Bill & Melinda Gates Foundation and managed by the Washington State Board for Community and Technical Colleges; Images by projectidea, CC BY 2.0
78

Tech Handout | How to Save & Submit
How to Save Your Word Document or PPT
1. Click “File” in the upper left corner of the Word or PPT screen.
2. Select “Save As”.
3. Choose “Desktop”. This will save your document temporarily. If you turn off your computer, the document will be erased. If you want to save something permanently, save it to a flash drive.
4. Click “Save”.
5. Now you can close your document.
Unless otherwise specified, Project I-DEA Content is licensed under a Creative Commons Attribution 4.0 Unported License. Project I-DEA was funded by the Bill & Melinda Gates Foundation and managed by the Washington State Board for Community and Technical Colleges. Images by projectidea, CC BY 2.0.
79

Tech Handout | How to Save & Submit
How to Submit Your Assignment in Canvas
1. In the module for your assignment, click “Submit Assignment” in the upper
right corner of the screen.
2. Click “Choose File”.
3. Select “Desktop” from the list on the left.
4. Scroll down to find your Word document or PPT.
5. Click on the document, click “open”.
6. The document should be listed on your Canvas page next to the “Choose File” button.
7. Click “Submit Assignment”.
Unless otherwise specified, Project I-DEA Content is licensed under a Creative Commons Attribution 4.0 Unported License. Project I-DEA was funded by the Bill & Melinda Gates Foundation and managed by the Washington State Board for Community and Technical Colleges. Images by projectidea, CC BY 2.0.
80

How to Share a Google Doc or Slideshow
1. If you want to share this document, click ‘Share’.
2. Click ‘Get Shareable Link’.
3. Click on ‘copy’.
4. Then you can paste the link in Canvas or in an email by hitting ‘Ctrl’ and ‘V’ at the same time, or by right clicking and selecting ‘Paste’. Then press your spacebar.
Unless otherwise specified, the Project I-DEA content is licensed under CC BY 4.0. The Project I-DEA was funded by the Bill & Melinda Gates Foundation and managed by the Washington State Board for Community and Technical Colleges. Images by Project I-DEA, CC BY 4.0.
81

How to Submit a File in Canvas
1. In the module for your assignment, click Submit Assignment in the upper
right corner of the screen.
2. Click Choose File.
3. Select Desktop (or the location where you saved your file) from the list on the left.
4. Scroll down to find your file. Double click on the file, (or click once, then click
Open).
Unless otherwise specified, the Project I-DEA content is licensed under CC BY 4.0. The Project I-DEA was funded by the Bill & Melinda Gates Foundation and managed by the Washington State Board for Community and Technical Colleges. Images by Project I-DEA, CC BY 4.0.
82

5. Click Submit Assignment.
Unless otherwise specified, the Project I-DEA content is licensed under CC BY 4.0. The Project I-DEA was funded by the Bill & Melinda Gates Foundation and managed by the Washington State Board for Community and Technical Colleges. Images by Project I-DEA, CC BY 4.0.
83

How to Submit a Google Doc or Slideshow
1. Go to the assignment you want to submit.
2. Click on +Submit Assignment.
3. Go to your document. Click the Share button.
4. Click on Get shareable link.
5. Click on Copy link.
6. Go back to Canvas. Paste your link in the Website URL box.
7. Click on the Submit Assignment button to submit your link.
Unless otherwise specified, the Project I-DEA content is licensed under CC BY 4.0. The Project I-DEA was funded by the Bill & Melinda Gates Foundation and managed by the Washington State Board for Community and Technical Colleges. Images by Project I-DEA, CC BY 4.0.
84

Unless otherwise specified, the Project I-DEA content is licensed under CC BY 4.0. The Project I-DEA was funded by the Bill & Melinda Gates Foundation and managed by the Washington State Board for Community and Technical Colleges. Images by Project I-DEA, CC BY 4.0.
85

How to Submit a Text Entry in Canvas
1. In the module for your assignment, click Submit Assignment in the upper
right corner of the screen.
2. Click in the box and type your answer / response.
3. Click Submit Assignment.
Unless otherwise specified, the Project I-DEA content is licensed under CC BY 4.0. The Project I-DEA was funded by the Bill & Melinda Gates Foundation and managed by the Washington State Board for Community and Technical Colleges. Images by Project I-DEA, CC BY 4.0.
86

How to Create a Gmail Account
Canvas is the program you use to study at home. You need to use the internet to use Canvas. Follow the instructions below to login to Canvas.
Directions:
1. Go to: www.gmail.com and click on Create an Account.
2. Type your name.
3. Create a username. This will be your email address. Keep it simple.
4. Create a password. Use letters (A, b, C, D, e), numbers (1, 2, 3), and symbols (!, #, %).
5. Type your password again - the same way you did before.
6. Fill in your birthday and select your gender (male or female).
7. Enter a phone number or another email address, if you have one.
8. Type the numbers or letters that you see in the picture.
9. Check the box to agree to Google’s Terms of Service and click Next Step.
10. Click Continue to Gmail.
Unless otherwise specified, the Project I-DEA content is licensed under CC BY 4.0. The Project I-DEA was funded by the Bill & Melinda Gates Foundation and managed by the Washington State Board for Community and Technical Colleges. Images by Project I-DEA, CC BY 4.0.
87

How To Send an Email
1. Click Compose.
2. Type the recipient’s email address in the To line and type the topic of the email in the Subject line.
3. Type your message in the box, then click Send.
To reply to an email, just click in the box below the email and type your message. Then click Send.
Unless otherwise specified, the Project I-DEA content is licensed under CC BY 4.0. The Project I-DEA was funded by the Bill & Melinda Gates Foundation and managed by the Washington State Board for Community and Technical Colleges. Images by Project I-DEA, CC BY 4.0.
88

Creating A Google Doc
First, go to www.google.com/docs. You need to login with your Gmail account. To create a new document, click on the plus sign.
You need to title your document. Click on ‘Untitled Document’. Type the name of your document. Click OK.
Unless otherwise specified, the Project I-DEA content is licensed under CC BY 4.0. The Project I-DEA was funded by the Bill & Melinda Gates Foundation and managed by the Washington State Board for Community and Technical Colleges. Images by Project I-DEA, CC BY 4.0.
89

Sharing Your Document
1. If you want to share this document, click ‘Share’.
2. Click ‘Get Shareable Link’.
3. Click on ‘copy’.
4. Then you can paste the link in Canvas or in an email by hitting ‘Ctrl’ and ‘V’ at the same time, or by right clicking and selecting ‘Paste’. Then press your spacebar.
Unless otherwise specified, the Project I-DEA content is licensed under CC BY 4.0. The Project I-DEA was funded by the Bill & Melinda Gates Foundation and managed by the Washington State Board for Community and Technical Colleges. Images by Project I-DEA, CC BY 4.0.
90

Creating A Google Sheet
First, go to https://docs.google.com/spreadsheets/. You need to login with your Gmail account. To create a new spreadsheet, click on the plus sign.
You need to title your spreadsheet. Click on ‘Untitled presentation’. Type the name of your document. Click OK.
Unless otherwise specified, the Project I-DEA content is licensed under CC BY 4.0. The Project I-DEA was funded by the Bill & Melinda Gates Foundation and managed by the Washington State Board for Community and Technical Colleges. Images by projectidea, CC BY 2.0.
91

Type your titles into the first row. Click on the box, the type the title. Then click and type your categories.
Click on the box to type your number next to your categories.
Unless otherwise specified, the Project I-DEA content is licensed under CC BY 4.0. The Project I-DEA was funded by the Bill & Melinda Gates Foundation and managed by the Washington State Board for Community and Technical Colleges. Images by projectidea, CC BY 2.0.
92

Sharing Your Spreadsheet
1. If you want to share this spreadsheet, click ‘Share’.
2. Click ‘Get Shareable Link’.
3. Click on ‘copy’.
4. Then you can paste the link in Canvas or in an email by hitting ‘Ctrl’ and ‘V’ at the same time, or by right clicking and selecting ‘Paste’.
Unless otherwise specified, the Project I-DEA content is licensed under CC BY 4.0. The Project I-DEA was funded by the Bill & Melinda Gates Foundation and managed by the Washington State Board for Community and Technical Colleges. Images by projectidea, CC BY 2.0.
93

Creating A Google Slide Presentation
First, go to https://docs.google.com/presentation/ . You need to login with your Gmail account. To create a new slideshow, click on the plus sign.
Select a theme. Click OK.
You need to title your slideshow. Click on ‘Untitled presentation’. Type the name of your document. Click OK.
Unless otherwise specified, the Project I-DEA content is licensed under CC BY 4.0. The Project I-DEA was funded by the Bill & Melinda Gates Foundation and managed by the Washington State Board for Community and Technical Colleges. Images by Project I-DEA, CC BY 4.0.
94

Type your text into the boxes on the screen. To add a new slide, click the + button.
Unless otherwise specified, the Project I-DEA content is licensed under CC BY 4.0. The Project I-DEA was funded by the Bill & Melinda Gates Foundation and managed by the Washington State Board for Community and Technical Colleges. Images by Project I-DEA, CC BY 4.0.
95

Sharing Your Slideshow
1. If you want to share this slideshow, click ‘Share’.
2. Click ‘Get Shareable Link’.
3. Click on ‘copy’.
4. Then you can paste the link in Canvas or in an email by hitting ‘Ctrl’ and ‘V’ at the same time, or by right clicking and selecting ‘Paste’. Then click your spacebar.
Unless otherwise specified, the Project I-DEA content is licensed under CC BY 4.0. The Project I-DEA was funded by the Bill & Melinda Gates Foundation and managed by the Washington State Board for Community and Technical Colleges. Images by Project I-DEA, CC BY 4.0.
96

EXAMPLE
INSTRUCTOR’S
GUIDE
97

98

Job Search & Interviewing Instructional Guide
Job Search & Interviewing Instructional Guide
Module Overview:
Looking for a job can be an especially challenging endeavor when one does not have the required technology skills. Most jobs and job applications are located online now, or require knowledge of basic computer programs, such as Microsoft Word, to write a resume or complete basic job tasks. Having a personal connection does not always help in the 21st century, as online searching and online application completion are essential to acquire employment. This module will introduce students to the necessary job skills, employment searching methods, resume building, cover letter writing, and paper and online application completion necessary to be successful. Students will apply knowledge of past tense grammar in written and oral form. They will also use Microsoft Word to write and send documents in Canvas, including a paragraph and cover letter. Students will examine various minimum wages from different states in the U.S. and apply skills gained through pre-work in Canvas for calculation of mathematical equations.
Module Outcomes:
● Identify and communicate your job skills. ● Examine cover letter and resume vocabulary and format. ● Use a resume builder to create a resume. ● Decipher abbreviations in job descriptions. ● Fill out an online job application. ● Prepare for and communicate during an job interview. ● Communicate about the past using regular and irregular verbs. ● Practice writing a paragraph and cover letter. ● Examine online charts and calculate minimum wages. ● Use the application Microsoft Word to write and submit a document in Canvas.
Unless otherwise specified, the Project I-DEA content is licensed under CC BY 4.0. The Project I-DEA was funded by the Bill & Melinda Gates Foundation and managed by the Washington State Board for Community and Technical Colleges.
99

Job Search & Interviewing Instructional Guide
College and Career Readiness Standards (CCRs):
Speaking & Listening: CCRA.SL. 1, 2, 6 Reading: CCRA.R. 1, 2, 4, 5, 7 Writing: CCRA.W. 2, 3, 4, 6 Math: CCRA.M. 1, 2
Module Delivery Notes:
● Prior to the first Canvas session, Ss will need the Talking About Job Skills handout to use in Read, Listen, & Do: Job Skills and the Common Irregular Past Tense Verbs and Verbs in the Past Tense handouts for reference in the past tense activities.
● Job Skills: Job Seekers activity - Sticky notes are required for this activity.
● Resume & Cover Letter: Resume Builder - instructor should do the Resume Builder activity prior to class (link in Canvas: Do (in class): Resume Builder) to familiarize themselves with how to use the program.
● Resume & Cover Letter: Cover Letter Cut and Paste - T will need to cut out a set of cover letter parts for each group.
● Job Descriptions and Applications (CANVAS): Read, Watch & Do: Microsoft Word & Pre-writing - In the face-to-face session following this Canvas activity, T will need to collect and check Ss’ pre-writing they did in their notebooks for this activity, use the rubric in Canvas to grade it, and manually enter in scores for this assignment. T will need to return Ss’ writing to them in the following face-to-face session.
● Job Descriptions and Applications: Completing an Online Application - Instructor should familiarize themselves with the online application (http://bit.ly/JSI-onlinejob). This activity is intended to allow for practice only. Instructor should not submit a job application in this activity.
● Interview Basics: Writing & Submitting My Dream Job Paragraph - T will need to review/edit the second page of My Dream Job Paragraph Handout if using.
● TC is recommended for the following activities:
○ Resume Builder
○ Writing a Cover Letter
○ Microsoft Word
○ Completing an Online Application
○ Writing and Submitting My Dream Job Paragraph
● Some colleges may need flash/thumb drives for saving documents in this module.
Unless otherwise specified, the Project I-DEA content is licensed under CC BY 4.0. The Project I-DEA was funded by the Bill & Melinda Gates Foundation and managed by the Washington State Board for Community and Technical Colleges.
100

Job Search & Interviewing Instructional Guide
● All information related to minimum wage (in Canvas, Face-to-Face, & HOs) will need to be reviewed and updated as necessary. This data may change on a yearly basis.
● Students are asked to write a paragraph in this module based on a Dream Job. T may wish to adjust this prompt to focus on a past job if more practice of the past tense is desired. If T chooses to do this, content will need to be adjusted in Canvas as well as Face-to-Face.
● The vocabulary presented in Canvas Learns can also be found in the online components folder.
● There are additional resources for self-directed learning or additional practice at the end of the module. Please review these prior to starting the module in case they can be used to supplement any activities.
Module at a Glance:
Activity Description Mode & Time
Job Skills
Pre-Class Preparation
Using the flipped model, students complete work online that prepares them for face-to-face (F2F) activities. Students will complete the following activities online in Canvas:
● Learn: Job Skills ● Discuss: Job Skills ● Read, Listen & Do: Job Skills ● Read & Watch: Verbs in the Past
Tense ● Practice: Verbs in the Past Tense
Online in Canvas 2 Hours
Job Skills In-class Students will work through a series of activities that will reinforce their online learning. The following activities are included in this face-to-face session:
● Warm up: Job Skills ● Job Seekers Activity ● Your Job Skills ● Past Job Experience ● Your Past Experience ● Preview Canvas
Face-to-Face 2 Hours
Resume & Cover Letter
Pre-Class Preparation
Using the flipped model, students complete work online that prepares them for face-to-face (F2F) activities. Students will complete the following activities online in Canvas:
Online in Canvas 2 Hours
Unless otherwise specified, the Project I-DEA content is licensed under CC BY 4.0. The Project I-DEA was funded by the Bill & Melinda Gates Foundation and managed by the Washington State Board for Community and Technical Colleges.
101

Job Search & Interviewing Instructional Guide
● Learn: Resumes, Cover Letters, and Applications
● Discuss: Resumes, Cover Letters, and Applications
● Read & Listen: What is a Resume? ● Read & Listen: Cover Letters ● Practice: Cover Letter
Resume & Cover Letter
In-class Students will work through a series of activities that will reinforce their online learning. The following activities are included in this face-to-face session:
● TPS Warm up: Resumes ● Resume Builder ● Cover Letter Cut and Paste ● Writing a Cover Letter ● Preview Canvas
Face-to-Face 2 Hours
Job Descriptions & Applications
Pre-Class Preparation
Using the flipped model, students complete work online that prepares them for face-to-face (F2F) activities. Students will complete the following activities online in Canvas:
● Read: Job Descriptions ● Read & Listen: Calculating Minimum
Wage ● Read & Listen: Applications ● Practice: Completing Applications ● Read Watch & Do: Microsoft Word
& Pre-writing
Online in Canvas 2 Hours
Job Descriptions & Applications
In-class Students will work through a series of activities that will reinforce their online learning. The following activities are included in this face-to-face session:
● Warm up: Job Descriptions ● Job Ads with Abbreviations ● Reading Job Descriptions ● Microsoft Word ● Completing an Online Application ● Calculating Minimum Wages
(Optional) ● Preview Canvas
Face-to-Face 2 Hours
Interview Basics
Pre-Class Preparation
Using the flipped model, students complete work online that prepares them for face-to-face (F2F) activities. Students will complete the following activities online in Canvas:
Online in Canvas 2 Hours
Unless otherwise specified, the Project I-DEA content is licensed under CC BY 4.0. The Project I-DEA was funded by the Bill & Melinda Gates Foundation and managed by the Washington State Board for Community and Technical Colleges.
102

Job Search & Interviewing Instructional Guide
● Learn: Interview Basics ● Discuss: Interview Basics ● Read & Listen: Interview Tips ● Read & Watch: Professional Attire ● Read & Do: Job & Interview Skills
Interview Basics
In-class Students will work through a series of activities that will reinforce their online learning. The following activities are included in this face-to-face session:
● Warm Up: Interview Tips ● Preparing for an Interview ● Professional Attire PowerPoint ● Writing & Submitting My Dream Job
Paragraph ● Preview Canvas
Face-to-Face 2 Hours
During an Interview
Pre-Class Preparation
Using the flipped model, students complete work online that prepares them for face-to-face (F2F) activities. Students will complete the following activities online in Canvas:
● Read, Listen & Watch: Job Interview Questions & Answers
● Do: Record Your Responses to Interview Questions
Online in Canvas 1 Hour
During an Interview
In-class Students will work through a series of activities that will reinforce their online learning. The following activities are included in this face-to-face session:
● Warm Up: Interview Questions ● Interviews ● Preview Canvas
Face-to-Face 1 Hour
Instructional Guide:
S(s) = Student(s) T = Teacher/Instructor TC = Tech Coach
Job Skills
Pre-Class Introduction (Online in Canvas) - 2 hours
Unless otherwise specified, the Project I-DEA content is licensed under CC BY 4.0. The Project I-DEA was funded by the Bill & Melinda Gates Foundation and managed by the Washington State Board for Community and Technical Colleges.
103

Job Search & Interviewing Instructional Guide
Prior to the first instructional day for the Job Search and Interviewing module, students will complete work online that prepares them for face-to-face (F2F) activities. Students will complete the following activities online in Canvas:
● Learn: Identifying Your Skills ● Discuss: Identifying Your Skills ● Read Listen & Do: Job Skills ● Read & Watch: Verbs in the Past Tense ● Practice: Verbs in the Past Tense
Vocabulary Covered in Learn: Identifying Your Skills
● good qualities ● flexible ● positive attitude ● soft skills ● hard skills ● bilingual ● goals ● self-motivated ● computer skills ● organized ● time management ● team player
Because Project I-DEA uses the flipped classroom model, it is very important that students complete the assigned work in Canvas prior to the face-to-face class in the Job Search and Interviewing module so that they are prepared to participate in the in class activities.
Face-to-Face (In-class) - 2 hours
Warm Up: Job Skills - 15 minutes
Materials Needed
None
Activity Description
T elicits examples of job skills and writes them on the board. T writes two columns on the board titled “Soft Skills” and “Hard Skills”. T asks Ss which column the job skills they listed belong to, and writes them once again in the proper column.
Examples: Soft Skills: a positive attitude, communication, curiosity, a strong work ethic, organized, flexibility, etc. Hard Skills: computer skills, language, nursing, mechanical, electrical, artistic, accounting, mathematical, etc.
Unless otherwise specified, the Project I-DEA content is licensed under CC BY 4.0. The Project I-DEA was funded by the Bill & Melinda Gates Foundation and managed by the Washington State Board for Community and Technical Colleges.
104

Job Search & Interviewing Instructional Guide
Job Seekers Activity - 30 minutes
Materials Needed
Job Seekers handout Job Ads for Job Seekers handout Sticky notes
Activity Description
T puts Ss into groups of 2-4. T gives Ss Job Seekers handout and four (4) sticky notes per group. T instructs the Ss to follow the instructions on the handout for each person (Ss write the name of each job seeker and their job skills on the four sticky notes -- one person and their skills per sticky note.) Once Ss complete the sticky notes, T gives Ss the Job Ads for Job Seekers handout. T instructs Ss to read the job ads, pick a job that would be best for each person, and post the job seeker’s sticky note next to the job that is right for them. Ss share out to the class which job they selected for each person and why.
Your Job Skills - 25 minutes
Materials Needed
None
Activity Description
T elicits from Ss what types of jobs or careers they would like to have and writes them on the board. T asks Ss what kinds of skills are required for each job and writes a few examples next to each one. T tells Ss that they will now take out a piece of paper and write about their own job skills. T models a sentence on the board first (e.g., My soft skills include good communication and flexibility. My hard skills include computer skills and teaching.) T gives Ss time to write their sentences. T asks for a few volunteers to share out their sentences. T asks Ss: What skills do you need to have for the career you want? Do you have those skills? Ss write a list of skills they need to have (that they don’t have now) under their sentences. T asks Ss “How can you develop these skills?” (Possible answers: Work experience, training, education, etc.)
Past Job Experience - 20 minutes
Materials Needed
Verbs in the Past Tense handout (already given to Ss prior to the first Canvas session-can be found in the Online Components folder) Job History Info Gap handout
Unless otherwise specified, the Project I-DEA content is licensed under CC BY 4.0. The Project I-DEA was funded by the Bill & Melinda Gates Foundation and managed by the Washington State Board for Community and Technical Colleges.
105

Job Search & Interviewing Instructional Guide
Activity Description
T tells Ss to take out the Verbs in Past Tense handout (used in Canvas). T gives Ss the Job History Info Gap handout. T instructs Ss to fill in the blank using the past tense to describe past work experience and skills. Then, in pairs, Ss practice the conversation.
Your Past Experience - 15 minutes
Materials Needed
Common Irregular Past Tense Verbs (already given to Ss prior to the first Canvas session-can be found in the Online Components folder)
Activity Description
T instructs Ss to now write about their own past work experience and job skills. T passes out Common Irregular Past Tense Verbs handout for Ss to use as a reference. Ss can write 3-5 sentences, or one paragraph. Ss explain in their paragraph how they have demonstrated those skills in the past at work or in their personal life (Ss can refer to the sentences they wrote in the “Your Job Skills” activity). Ss can refer to examples from the previous activity.
Optional: If time allows, Ss can practice typing their paragraph in a Word document
Preview Canvas - 15 minutes
Materials Needed
T will need access to projector/Canvas
Activity Description
T opens Canvas and shows Ss what they will work on next.
Resume & Cover Letter
Pre-Class Introduction (Online in Canvas) - 2 hours Prior to the second instructional day for the Job Search and Interviewing module, students will complete work online that prepares them for face-to-face (F2F) activities. Students will complete the following activities online in Canvas:
● Learn: Resumes, Cover Letters, and Applications ● Discuss: Resumes, Cover Letters, and Applications ● Read & Listen: What is a Resume? ● Read & Listen: Cover Letters ● Practice: Cover Letter
Vocabulary Covered in Learn: Resumes, Cover Letters, and Applications
Unless otherwise specified, the Project I-DEA content is licensed under CC BY 4.0. The Project I-DEA was funded by the Bill & Melinda Gates Foundation and managed by the Washington State Board for Community and Technical Colleges.
106

Job Search & Interviewing Instructional Guide
● fill out an application ● work history ● resume ● qualifications ● cover letter ● salutation ● body ● reference letter ● sender ● recipient ● accomplishments ● interview
Because Project I-DEA uses the flipped classroom model, it is very important that students complete the assigned work in Canvas prior to the face-to-face class in the Job Search and Interviewing module so that they are prepared to participate in the in class activities.
Face-to-Face (In-class)-2 hours
TPS Warm Up: Resumes - 15 minutes
Materials Needed
None
Activity Description
Think-Pair-Share (TPS) is a collaborative activity with 3 parts that allows students to work together to solve a problem or discuss a question or topic. Students are given some time to think individually about the topic. Then, they talk with a partner, which encourages full participation. Finally, the groups share their thoughts with the class as a whole. The process gives students time to develop ideas, find the language, and build confidence to speak publicly.
T reviews TPS activity format with Ss and gives instructions: The topic of this activity is resumes. Think about the following question:
● What information is included in a resume?
First, you will: Think = Think about the topics by yourself Then, you will Pair = Pair with a partner and discuss your ideas with your partner Finally, you will Share = Share your ideas with the class
Resume Builder - 50 minutes
Materials Needed
Career Coach Resume Builder handout Student computers, internet access
Unless otherwise specified, the Project I-DEA content is licensed under CC BY 4.0. The Project I-DEA was funded by the Bill & Melinda Gates Foundation and managed by the Washington State Board for Community and Technical Colleges.
107

Job Search & Interviewing Instructional Guide
Instructor computer, internet access and projector
Activity Description
Optional: T models to Ss how to access this activity in Canvas: Do (in class): Resume Builder and briefly models how to build a resume (follow instructions in handout). T gives Ss the handout and instructs them to follow the steps in order to build a resume. Ss can save their resume, or email it to themselves or the instructor.
Cover Letter Cut and Paste - 15 minutes
Materials Needed
Cover Letter Activity handout - one set of cover letter parts for each group Glue or tape Cover Letter Puzzle (do not print; access in Google Docs, download, and use to demonstrate a correct cover letter; see below)
Activity Description
T puts Ss into groups of 2-3. T gives each group a set of cover letter parts (cut out from the handout above). T instructs Ss to glue or tape the elements of a cover letter onto a piece of paper in the order and format they belong to create a complete cover letter. When Ss are done placing the pieces where they think they belong, the instructor can then model the correct format (This can be done using the Word document in Google Drive titled “Cover Letter Puzzle”. Download the document. Then, drag the pieces into the correct place by clicking on the box and dragging by the border). Ss remain in their groups for the next activity.
Writing a Cover Letter - 25 minutes
Materials Needed
Student computers
Activity Description
In the same groups as the previous activity, Ss will work together to write a simple cover letter in Word. Ss will select someone in their group to be the one who types. The other Ss will help the that student by offering the appropriate content. Ss can use the template from the previous activity for ideas, but should not copy it word for word. T circles the room checking for correct format and answering questions, if any. If time allows, Ss can share what they did by rotating around to read others’ work.
Preview Canvas - 15 minutes
Materials Needed
T will need access to projector/Canvas
Unless otherwise specified, the Project I-DEA content is licensed under CC BY 4.0. The Project I-DEA was funded by the Bill & Melinda Gates Foundation and managed by the Washington State Board for Community and Technical Colleges.
108

Job Search & Interviewing Instructional Guide
Activity Description
T opens Canvas and shows Ss what they will work on next.
Job Descriptions & Applications
Pre-Class Introduction (Online in Canvas) - 2 hours Prior to the third instructional day for the Job Search and Interviewing module, students will complete work online that prepares them for face-to-face (F2F) activities. Students will complete the following activities online in Canvas:
● Read: Job Descriptions ● Read & Listen: Calculating Minimum Wage ● Read & Listen: Applications ● Practice: Completing Applications ● Read, Watch & Do: Microsoft Word & Pre-writing
Because Project I-DEA uses the flipped classroom model, it is very important that students complete the assigned work in Canvas prior to the face-to-face class in the Job Search and Interviewing module so that they are prepared to participate in the in class activities.
Face-to-Face (In-class) - 2 hours
Warm up: Job Descriptions - 10 minutes
Materials Needed
None
Activity Description
T asks Ss where and how they look for jobs. T then asks Ss “Where can you find job descriptions or advertisements (ads)?” Ss offer ideas already known or learned from Canvas, i.e. Worksource, employment boards in the community, online website for a specific company, Craigslist, the local newspaper, etc.) T writes a few ideas from Ss on the board.
Job Ads with Abbreviations - 15 minutes
Materials Needed
Job Ads with Abbreviations handout
Activity Description
T elicits job ad abbreviations from Ss and writes a few examples on the board. Ex. ben. = benefits; PT = Part Time
T gives Ss the Job Ads with Abbreviations handout. Students work individually or in pairs to answer the questions for each job ad.
Unless otherwise specified, the Project I-DEA content is licensed under CC BY 4.0. The Project I-DEA was funded by the Bill & Melinda Gates Foundation and managed by the Washington State Board for Community and Technical Colleges.
109

Job Search & Interviewing Instructional Guide
T brings Ss together to go over the answers.
Reading Job Descriptions - 30 minutes
Materials Needed
Job Ads handout Reading Job Descriptions handout
Activity Description
T puts each job description (from the Job Ads handout) at a different station around the room. T puts Ss into five different groups, one group at each station. T explains to Ss that there is a job description/ad at each station. T gives each S the Reading a Job Description handout. Ss work together to answer the questions based on the information in the job ad.
Note: Ss will practice math in order to calculate the salary amounts for Question #5 for each job ad.
Ss rotate to each station to answer the questions. T can collect the handouts to evaluate understanding, or, if time allows, T can briefly discuss answers with the class.
Microsoft Word - 25 minutes
Materials Needed
Instructor computer, projector, and internet access Thumb/USB/Flash Drive Student Computers How to Create & Save a Word Doc (Ts edit if using a different version of MS Word)
Activity Description
T gives Ss the How to Create & Save Word Document T explains and demonstrates on the projector and T computer, step by step how to create and Save a MS Word Document (i.e. click on File, Save As, Click on Desktop and then enter the title of the saved document: My Dream Job Paragraph). ***Note: some colleges may need flash/thumb drives for saving documents. Ss practice creating and saving their Word Doc: My Dream Job Paragraph (should be the name of the saved document). T instructs Ss to type the title of their paragraph at the top “My Dream Job” (centered and bold). Then, T instructs Ss to click the save icon to re-save. Tech coach should be on-hand to support Ss in saving and naming the saved document. ***T needs to collect Ss pre-writing. T will need to manually grade this in Canvas: Read, Watch & Do: Microsoft Word & Pre-writing, and then return it to Ss in the next face-to-face session. Optional Activity (purpose is to practice selecting, copying, and pasting): Once all Ss have successfully created, saved and named the document,
Unless otherwise specified, the Project I-DEA content is licensed under CC BY 4.0. The Project I-DEA was funded by the Bill & Melinda Gates Foundation and managed by the Washington State Board for Community and Technical Colleges.
110

Job Search & Interviewing Instructional Guide
T models for students how to minimize the MS Word Document screen and open up Chrome to log into Canvas. Students must find the page in Canvas called: Read, Watch & Do: Microsoft Word & Pre-writing. T instructs and demonstrates for Ss how to highlight & copy (Control “c” or Right Click “copy”) the questions with sentence stem answers into their newly created Word Document. T reminds and demonstrates to Ss how to re-save the document with the newly copied questions. T models for ss how to Select All, choose 12 point font and change font to Arial for the copied questions from Canvas. **Note: If time allows, Ss may begin typing their responses to the questions (responses to the questions were already written in Ss’ notebooks as part of the pre-work activities in Canvas).
Completing an Online Application - 25 minutes
Notes: This activity is intended to allow for practice only. Instructor should not submit a job application in this activity.
Materials Needed
Online Application Profile handout Instructor computer, projector, and internet access
Activity Description
Give Ss the Online Application Profile handout. T opens the internet and goes to http://bit.ly/JSI-onlinejob. T elicits information from Ss located in the mock profile on the handout to fill out the online application. T fills out the application using the projector so all can see. T points out * used to indicate required fields. (As an example application, you will be able to submit without filling in required fields.) Optional: For higher level Ss, Ts may want to use http://bit.ly/JSI-longjobapp instead.
Additional (Optional) Activity: Calculating Minimum Wages - 30 minutes
Materials Needed
Teacher computer, Projector Student computers and internet Wage Calculations Handout Hand held or online calculator
Activity Description
T writes on the board: What is minimum wage? T allows Ss to explain: It is the amount of money someone receives for working by the hour.
Unless otherwise specified, the Project I-DEA content is licensed under CC BY 4.0. The Project I-DEA was funded by the Bill & Melinda Gates Foundation and managed by the Washington State Board for Community and Technical Colleges.
111

Job Search & Interviewing Instructional Guide
T explains it is the lowest amount of money per hour that workers must be paid according to the law. T goes to the website http://tinyurl.com/kxlue7a T scrolls half way down the page to the Minimum Wage by State Table and explains that all 50 states as well as U.S. territories minimum wages are listed. Teacher hands out Wage Calculations handout and instructs Ss to work in pairs to complete the handout. Class reviews answers.
Preview Canvas - 15 minutes
Materials Needed
T will need access to projector/Canvas
Activity Description
T opens Canvas and shows Ss what they will work on next.
Interview Basics
Pre-Class Introduction (Online in Canvas) - 2 hours Prior to the fourth instructional day for the Job Search and Interviewing module, students will complete work online that prepares them for face-to-face (F2F) activities. Students will complete the following activities online in Canvas:
● Learn: Interview Basics ● Discuss: Interview Basics ● Read & Listen: Interview Tips ● Read & Watch: Professional Attire ● Read & Do: Job & Interview Skills
Vocabulary Covered in Learn: Interview
● professional attire ● make a good impression ● weaknesses ● strengths ● under pressure ● demonstrates ● clarify ● abilities ● career ● job interview ● punctual ● describe a situation
Because Project I-DEA uses the flipped classroom model, it is very important that students complete the assigned work in Canvas prior to the face-to-face class in the Job Search and Interviewing module so that they are prepared to participate in the in class activities.
Unless otherwise specified, the Project I-DEA content is licensed under CC BY 4.0. The Project I-DEA was funded by the Bill & Melinda Gates Foundation and managed by the Washington State Board for Community and Technical Colleges.
112

Job Search & Interviewing Instructional Guide
Face-to-Face (In-class) - 2 hours
Warm Up: Interview Tips - 10 minutes
Materials Needed
None
Activity Description
T elicits from Ss tips to follow for a job interview. T writes examples on the board for Ss to reference. Ss learned about these tips in Canvas: ex. be on time, know the location, make a good impression, turn off your cell phone, dress professionally (dress for success), introduce yourself, shake hands, make eye contact, listen carefully, and get to the point.
Interview Video and Mistakes - 15 minutes
Materials Needed
Instructor projector, computer and internet access Video YouTube: https://www.youtube.com/watch?v=U9rn5kuTpHw
Activity Description
T explains to Ss that they will watch a video of an interview. Based on the interview tips discussed in the warm up, Ss will identify mistakes made by the person being interviewed. Ss should write down as many mistakes as they can (ex. She was chewing gum coffee; She was late; She answered her phone; etc.) and the tips offered by the video. T plays the video on YouTube: https://www.youtube.com/watch?v=U9rn5kuTpHw Watch the interview more than once if necessary. Ss will suggest, orally as a class, what she did wrong and what she can do better if she were to do the interview again. T asks the Ss if they think she will get the job, and why or why not?
Preparing for an Interview - 25 minutes
Materials Needed
Preparing for an Interview handout
Activity Description
T explains to Ss that they will prepare for an interview by writing examples of how they demonstrated job skills in the past. In the first face-to-face session, Ss discussed their job skills. Now they will discuss examples of how they demonstrate those job skills. T reminds Ss to use the past tense.
Ex. organized; I always had a clean desk at work. I always knew where something was.
T gives Ss the Preparing for an Interview handout. Ss complete the handout, using complete sentences in the past tense.
Unless otherwise specified, the Project I-DEA content is licensed under CC BY 4.0. The Project I-DEA was funded by the Bill & Melinda Gates Foundation and managed by the Washington State Board for Community and Technical Colleges.
113

Job Search & Interviewing Instructional Guide
Professional Attire PowerPoint - 15 minutes
Materials Needed Professional Attire PowerPoint Slideshow
Activity Description
T asks Ss why it’s important to wear professional attire and why. T asks Ss to brainstorm 3 things you should wear to an interview and 3 things you should not wear to an interview. T opens and reads the PowerPoint presentation "Professional Attire" to learn about appropriate interview attire. T gives mini verbal quiz to Ss, showing Ss the photos in PowerPoint and asking: What is appropriate attire for an interview and why? Are the people in the photos dressed in professional attire, and why or why not?
Writing and Submitting My Dream Job Paragraph - 40 minutes
Materials Needed
Student computers, internet My Dream Job Paragraph Handout (Ts - review/edit second page if using)
Activity Description
T puts Ss into pairs and asks Ss to share their written answers to the questions from the pre-work session in Canvas: Read, Watch and Do: Microsoft Word & Pre-writing activity with a time limit of 5 or so minutes. T demonstrates how to find and open their saved Word Doc entitled: My Dream Job Paragraph from the prior face-to-face session. **Note this may vary depending on whether Word Docs were saved to thumb drives or the Desktop. T gives Ss My Dream Job Paragraph Handout (*Students should have already answered the questions in writing from this handout in their notebooks at home from the online pre-work session). T reminds Ss of paragraph format: title, margins, indent, Main Idea (Topic Sentence) vs. Details of a paragraph. T explains that the answers to each question will be put together to form a paragraph. Ss begin to type their answers to the questions into their saved Word doc and put the responses together in paragraph form. *Remind Ss to SAVE their work multiple times. T instructs Ss to open Canvas and submit their assignment in Do: My Dream Job Paragraph. T leaves 10 minutes at the end of the activity to go over the How To Submit A File from the bottom section of the assignment page in Canvas. Students should practice submitting what they have even if they have not finished typing (assignment can be deleted and re-submitted) *If time allows, students can add a photo of their dream job to their document.
Unless otherwise specified, the Project I-DEA content is licensed under CC BY 4.0. The Project I-DEA was funded by the Bill & Melinda Gates Foundation and managed by the Washington State Board for Community and Technical Colleges.
114

Job Search & Interviewing Instructional Guide
Preview Canvas - 15 minutes
Materials Needed
T will need access to projector/Canvas Read, Listen & Watch: Job Interview Questions & Answers
Activity Description
T opens Canvas and shows Ss what they will work on next. T gives Ss the transcript above to follow along with the interview as they watch in Canvas: Read, Listen & Watch: Job Interview Questions & Answers. T should also point out to Ss that they only need to record two (2) answers to the questions in Do: Record Your Answers to Interview Questions.
During an Interview
Pre-Class Introduction (Online in Canvas) - 1 Hour Prior to the fifth instructional day for the Job Search and Interviewing module, students will complete work online that prepares them for face-to-face (F2F) activities. Students will complete the following activities online in Canvas:
● Read, Listen & Watch: Job Interview Questions & Answers ● Do: Record Your Responses to Interview Questions
Because Project I-DEA uses the flipped classroom model, it is very important that students complete the assigned work in Canvas prior to the face-to-face class in the Job Search and Interviewing module so that they are prepared to participate in the in class activities.
Face-to-Face (In-class) -1 Hour
Warm-up: Interview Questions - 10 minutes
Materials Needed
None
Activity Description
T elicits from Ss examples of interview questions (questions from the interviewer - see Canvas content or the Common Interview Questions & Answers handout for guidance, if needed; Ss can refer to the transcript given prior to the previous Canvas session for ideas if needed). T asks Ss for examples of questions they, as the interviewee, can ask in an interview, as well as a couple examples of inappropriate questions.
Interviews - 35 minutes
Materials Needed
Common Interview Questions & Answers handout
Unless otherwise specified, the Project I-DEA content is licensed under CC BY 4.0. The Project I-DEA was funded by the Bill & Melinda Gates Foundation and managed by the Washington State Board for Community and Technical Colleges.
115

Job Search & Interviewing Instructional Guide
Activity Description
Ss practice interviewing each other in pairs. Ss can use the handout as a guide, and more advanced Ss should try to answer interview questions without the guide. Ss rotate partners and practice with multiple classmates. Each S should be an interviewer and interviewee at least twice.
Preview Canvas - 15 minutes
Materials Needed
T will need access to projector/Canvas
Activity Description
T opens Canvas and shows Ss what they will work on next.
Unless otherwise specified, the Project I-DEA content is licensed under CC BY 4.0. The Project I-DEA was funded by the Bill & Melinda Gates Foundation and managed by the Washington State Board for Community and Technical Colleges.
116

GLOSSARY &
COMPUTER
SPECIFICATIONS
117

118

National Conferences | I-DEA Terminology
I-DEA Terminology & Canvas Icons
Description:
Below is a list of acronyms and terminology used in I-DEA to be used as reference during the National I-DEA Conferences. We have also included a key to the icons in Canvas for your reference.
Glossary of Terms:
Term/Acronym Meaning Canvas The Learning Management System used in
Washington State; where students complete their pre-work
Canvas Commons A Canvas site where instructor’s can share materials
Cartridge A Canvas Course package; can be downloaded from Canvas Commons
CCRA College and Career Readiness Anchor
CCRS College and Career Readiness Standards
Clearinghouse A Google Sheet that houses all the work used to create a module
Creative Commons A US based non-profit organization devoted to expanding the range of creative works available
Unless otherwise specified, the Project I-DEA content is licensed under CC BY 4.0. The Project I-DEA was funded by the Bill & Melinda Gates Foundation and managed by the Washington State Board for Community and Technical Colleges.
119

National Conferences | I-DEA Terminology
for others to build upon legally and share.
Discuss A Canvas Discussion; provides students with directions and a prompt
Do A Canvas Assignment; provides students with directions, a prompt, and submission instructions
F2F Face to Face; instruction/classwork done after pre-work is complete
Google Drive The Google App used to house all I-DEA materials
IG Instructor’s Guide
Learn A Canvas Quiz; designed to teach students new vocabulary
Link Hyperlinks to instructional materials for both students and teachers
LMS Learning Management System
Module A topic of instruction; similar to a unit in a text
OER Open Educational Resource
Practice A Canvas Quiz; used to assess students mastery of pre-work
Sandbox The Conference Training Course; hosted in the free Canvas LMS
Unless otherwise specified, the Project I-DEA content is licensed under CC BY 4.0. The Project I-DEA was funded by the Bill & Melinda Gates Foundation and managed by the Washington State Board for Community and Technical Colleges.
120

National Conferences | I-DEA Terminology
Canvas Icons:
ICON WHAT IT STANDS FOR
Assignment
Discussion
Link
Page
Unless otherwise specified, the Project I-DEA content is licensed under CC BY 4.0. The Project I-DEA was funded by the Bill & Melinda Gates Foundation and managed by the Washington State Board for Community and Technical Colleges.
121

National Conferences | I-DEA Terminology
Publish
Quiz
Record
Un-publish
Unless otherwise specified, the Project I-DEA content is licensed under CC BY 4.0. The Project I-DEA was funded by the Bill & Melinda Gates Foundation and managed by the Washington State Board for Community and Technical Colleges.
122

I-DEA Conference | Technology Specifications
I-DEA Technology Specifications
Browsers:
Keeping your browser up to date is essential. The browser Canvas developers recommend is Chrome, but Firefox and Safari typically work well, too. Internet Explorer is not a recommended browser for Canvas. For additional information please see Which browsers does Canvas support?
Operating Systems:
● Windows 7 and newer (users on Windows 10 need to download the Windows 10 Anniversary Update to submit Canvas assignments)
● Mac OSX 10.6 and newer ● Linux - chromeOS
Microphone, Headsets & Webcams:
● In Quarter 1, Quarter 2, Quarter 3, and Quarter 4 courses, students will be asked to record their voices in Canvas and post their recordings.
● Computers with built-in cameras are ideal as there are many activities like Conferences and Discussions with recording that would be enhanced by using a webcam.
Unless otherwise specified, the Project I-DEA content is licensed under CC BY 4.0. The Project I-DEA was funded by the Bill & Melinda Gates Foundation and managed by the Washington State Board for Community and Technical Colleges.
123

I-DEA Conference | Technology Specifications
Gmail Account:
● In Quarter 1, Quarter 2, Quarter 3, and Quarter 4 courses, students will be participating in Google-based activities. In order for them to fully participate in these types of activities, every student will need to have a Gmail account.
● Google Docs will need to be enabled in each institution’s Canvas instance for students to participate in these activities.
Skype:
● Some schools use Skype to provide support and communicate with students. Additionally, webcams could be beneficial and allow students to participate in Skype videoconferencing.
● For more information see Access Skype system requirements
Canvas:
● Each student needs individual access to their Project I-DEA classroom in Canvas.
● Canvas has a set of basic computer specifications . ● The Project I-DEA classroom contains Canvas media comments and
activities that require students to record their own media comments. Students will also need to upload files to submit some assignments. Make sure Adobe Flash Player and Java are installed on your computer and updated for recording or viewing audio/video and uploading files.
Unless otherwise specified, the Project I-DEA content is licensed under CC BY 4.0. The Project I-DEA was funded by the Bill & Melinda Gates Foundation and managed by the Washington State Board for Community and Technical Colleges.
124

Getting Started
& Next Steps
125

126

Setting-up Your Class in Canvas
Overview:
The I-DEA content has been posted on Canvas Commons in two ways - by quarter and by individual module. This was done to assist programs wishing to adopt I-DEA in easily accessing the content that they wished to use. The directions that follow are for a module by module import from Canvas Commons. All instructions should be followed as written for successful course set up including importing the course template as the template module includes the course homepage, grading scheme, syllabus, and other information that is needed for I-DEA.
If your program wishes to import a full quarter of content, you can skip the I-DEA Course Template import and follow the steps for module import to import the entire quarter which will include the homepage, grading scheme, syllabus, and other information needed.
Please note that a full quarter import is only suggested if you will be using all content. If you only wish to use some of the content from the quarter, a module by module and I-DEA Course Template import is highly encouraged.
I-DEA Course Template Import:
1. Log into Canvas. a. You can use your “free account” (canvas.instructure.com), or b. Your institutional account if your program uses Canvas.
2. Click on Start a New Course to create a New Course. a. Name the Course. b. Set the Content License to CC Attribution.
127

c. Click Create Course.
3. When the course opens, click on the Canvas Commons Logo on the left side of your screen.
4. In Canvas Commons, search I-DEA Course Template. Your search will begin as soon as you start typing.
5. When you locate the I-DEA Course Template, click on the blue hyperlink. Note: You may need to scroll through a list of resources to locate it.
128

6. You will see a gray Import into Canvas box on the right of your screen. 7. Scroll through the list of courses to find your course, and click on the box next
to your course name. 8. Then click the green Import into Course button. You will see a green box at
the top of your screen that tells you you have successfully started your import.
9. Next return to your Dashboard, and open your course. When you open your course, in dark gray you will see the:
a. Course Homepage
129

b. Syllabus Tab c. Grades Tab d. Settings Tab
Note: Attendance will show as an active tab (ie. the tabs that students can see in Dark Gray) in the “free” Canvas site. It is not part of the I-DEA settings, but it shows due to how the “free” Canvas course is configured.
If you click on modules, you will see an instructor resource folder. Do Not publish this folder - it is for instructors only.
Importing Module Content:
After you have imported the I-DEA Course template, you are ready to import the module content you selected after reviewing the I-DEA Scope and Sequence. Please remember when first starting with I-DEA, we recommend keeping the module pairs together.
You will want to import the Technology Skills Pre & Post Assessments, Introduction to I-DEA, and End of Quarter Projects to be used with students.
To Import Module Content:
1. With your course open, click on the Canvas Commons Logo on the left side of your screen.
2. In Canvas Commons, you can search I-DEA and scroll through the modules or you can search I-DEA Module Name. NOTE: If you are importing a quarter’s worth of content, you will search I-DEA Final Course Package (Fall, Winter, Spring, or Summer).
130

3. When you locate the I-DEA module you were searching for, click on the blue hyperlink.
4. You will see a gray Import into Canvas box on the right of your screen. 5. Scroll through the list of courses to find your course, and click on the box next
to your course name. 6. Then click the green Import into Course button. You will see a green box at
the top of your screen that tells you you have successfully started your import.
7. Next return to your dashboard, and open your course. When you open your course, click on Assignments.
131

8. You will see two Assignment Groups (Assignments and Imported
Assignments).
9. Rename the Imported Assignment Group. a. To do this click on the gear icon, and click edit.
132

b. Type the Module Name in the Group Name box. c. Set the percent % of the total grade, if you know how many modules you
will use over the number of weeks. If you don’t know this, you can come back and set the weights later.
d. Click save.
Note: The Tech Skills Pre and Post Assessment Modules are always weighted as 0.
10. Continue to repeat the above steps until you have all content added to your Canvas course. If you are importing a full quarter of content, you will only need to complete this step once. NOTE: Some of the Final Course Packages import at a larger size than the “free” Canvas site allows. We are working on this. If you run into this issue, please try a module by module import.
133

Remember, to STOP and rename the Imported Assignment Group after each import from Canvas Commons.
HELPFUL HINT: Importing content in the order you will use it, will prevent having to rearrange modules later.
One Additional Assignment Group:
After you have imported all of your course content, you will need to create one additional Assignment Group. To do this:
1) Open your course and click on Assignments. 2) Click on +Group to Add an Assignment Group. 3) Type Do In Class next to Group Name, and set the weight as 0. 4) Click save.
5) Drag any Canvas Discussions, Assignments, or Quizzes that have (Do in Class) next to the name into this group. Please don’t forget this step! Doing this will ensure that students do not earn distance education hours for any activities housed in Canvas which are done in class.
134

Other Course Set-up Reminders:
● When setting up your Canvas course, please be sure to read and follow all instructions contained in the Pre-Publish Checklist.
● You will also want to review Setting Up the Gradebook to ensure that all categories are weighted correctly. This is especially important if your program will be reporting distance hours.
● Remember, you will want to un-publish any content that you do not want students to have access to before you publish your class.
Adding Students to Your Course:
Once your class is set-up, you can add students to your course. To do this: 1. Open your Canvas course, and click on People.
2. Click on +People, and select how you will add students to your course. Your
choices are: a. Email address b. Login ID c. SIS ID
3. Select the method you will use to add individuals to your course, and their role from the drop down box.
135

4. You can type the information in by hand or you can copy paste a list into the box. Be sure to enter each name on a different line or use a comma between names.
5. After entering all of the names, click next.
6. You will see Click to Add a Name in the name column. Click on Click to Add
a Name and type the names of the individuals you are adding to your course, and click next.
Note: If the person already has a Canvas account, their name will appear.
7. Then click Add Users.
136

8. You will then see a list of all students in your course. 9. After you publish the course, invitations will be sent to the students. They will
need to accept the invitation by clicking Get Started. They will then follow the directions/prompts to participate in the course.
Remember, to follow all steps on the Pre-Publish Checklist before publishing your course. HELPFUL HINTS:
137

● You may want to send the invitations while students are in class, so that you can assist them in accepting the invitations and entering a password.
● Keep a log of the Email Addresses, Login IDs, or SIS IDs that you used to register students and their passwords.
● If students don’t have email, set them up with a Gmail Account since they will need it for class.
If you work on a campus, please check with your eLearning Department. They may have a different process for adding students to a class. The process described above is geared toward those who will be using the “free” Canvas site (canvas.instructure.com).
138

Presenter
Bios
139

140

Presenters
Jodi L. Ruback is the Program Administrator for I-DEA and ELA in Basic Education for Adults at the Washington State Board for Community and Technical Colleges. Her primary responsibilities include supporting and scaling up Project I-DEA and providing technical assistance and guidance for both English Language Acquisition and Project I-DEA, with the ultimate goal that all adult English Language Learners will have access to innovative, high quality education programs that prepare them to access I-BEST and other post-secondary programs, enabling them to develop the job-specific skills required for Washington’s current and future workforce. In addition, she supports the development and expansion of Project I-DEA across the nation. Formerly, Jodi taught Japanese in K-12 and ELA at various colleges. Additionally, she served as the Senior Specialist for ELA at the College of Southern Nevada before joining the team at SBCTC. She earned an MS in Teaching English to Speakers of Other Languages (1996) and a BA in Japanese Studies (1993) from the University at Albany, State University of New York.
William S. Durden is the Policy Associate for Guided and I-BEST Pathways in Basic Education for Adults at the Washington State Board for Community and Technical Colleges. His primary responsibilities include supporting and scaling up I-BEST and guided pathways with Basic Education for Adults as the foundation of those pathways, with the ultimate goal that all adult Washingtonians will have access to innovative, high quality education programs that provide the knowledge, skills, and credentials necessary for securing living wage employment that strengthens the state and local economies. In addition, he supports the development and expansion of I-BEST nationwide, having provided I-BEST training and technical assistance to 33 states and counting. A former I-BEST instructor, William served as English faculty at Clark College for six years. He earned an MA in English Studies from Western Washington University (2008) and a BA in English from Washington State University (2005).
Monica Wilson is the Program Administrator for High School Completion and Professional Development in Basic Education for Adults at the Washington State Board for Community and Technical Colleges. Her primary responsibilities include supporting and expanding HS 21+, Washington’s competency based high school diploma program for adults, and leading professional development activities for faculty in effective, evidence-based instructional approaches. Prior to joining the State Board, Monica worked as the Transitional Studies Program Manager at Clark College where she collaborated with faculty and staff to develop, expand and implement initiatives for the program, including High School 21+ and Integrated Digital English Acquisition (I-DEA). She completed a BS at Portland State University with a double major in Political Science and Liberal Studies in 2008 and is currently completing a Master’s in Public Policy.
141

Presenters
Julie Palomino Drews has taught ESL at Edmonds Community College to both International students and immigrants and refugees since 2006. Prior to this, she taught English in Bari, Italy to high school students, working professionals and military personnel on base. She has lived in London, England; Morelia, Mexico; Bari, Italy; and Salinas, Ecuador. She believes in a world community and being part of something bigger than herself. As a tenured ESL instructor, she supports her students by teaching intentional living and innovative learning. I-DEA is an extension of her desire to share creativity and ingenuity with immigrant and refugee adults. Julie has been a part of the I-DEA revision team, developing the curriculum and teaching both full I-DEA and Tailored I-DEA for 3 years and counting. Julie holds degrees in TESOL (MA, Seattle Pacific University, 2006), and Speech Communication & Latin American Studies (B.A., University of Washington, 2003.)
Danica M. Garcia is an instructor at the Intensive American Language Center at Washington State University Tri-Cities. There she delivers high-quality student centered instruction in Academic English for international students preparing for university pathways. Previously, Danica served as an English Language Acquisition instructor for ten years at Columbia Basin College. While at CBC, Danica led the college’s Phase III pilot of the Project I-DEA curriculum. Having witnessed the transformative power of I-DEA in her own classroom, she championed the initiative for a departmental expansion of Project I-DEA and trained, mentored, and provided technical assistance to faculty to support the initiative. She is honored to support the current development and expansion of I-DEA nationwide. Danica earned a MA in Applied Linguistics from University of Massachusetts, Boston (2008), and a BA in Communication from Western Washington University (2000).
Adria Katka has taught in Basic and Transitional Studies at North Seattle College, first in IEP and now in ESL, since 2013. Prior to this, she taught Japanese for 15 years in the K-12 world. In her current ESL/ELA work with adult immigrant and refugee students, she is strongly aware of and motivated by learners’ needs for not only language development and "life skills," but also academic and workplace skills to support growth and progress toward their diverse, multilayered goals. She has worked with Project I-DEA as a member of the curriculum development and revision team, as well as being the primary instructor for I-DEA on her campus throughout the three-year pilot and beyond. She has also served as a faculty trainer for a statewide initiative to develop curriculum and instruction around Employability Skills. Her experience with the I-DEA curriculum has broadened the spectrum of her instructional goals and learning targets for students, and drives her continued development and application of this expanded content in other courses. She holds degrees in TESOL (MA, Seattle Pacific University, 2012) and Japanese (BA, Western Washington University, 1998), as well as K-12 teacher certification (1998) in Washington State.
142

Presenters
Shannon Potter is full-time ESOL faculty at Olympic College in Washington State. She has been instructing English to speakers of other languages since 2000 in both private language schools and, for nearly 12 years, in the community college system. She has been involved with I-DEA for over three years as an instructor, a member of the revision team, and as a National I-DEA trainer. She is passionate about connecting her students not only to the language they require, but also to the 21st century technology skills they need to succeed in achieving their goals.
143