Hyperion Planning - Home | UBC Finance · PDF fileHyperion Planning Page 3 Introduction The...
67
Hyperion Planning Planning Training Guide Prepared By: UBC Management Reporting and Budgeting [email protected]
Transcript of Hyperion Planning - Home | UBC Finance · PDF fileHyperion Planning Page 3 Introduction The...

Hyperion Planning Planning Training Guide
Prepared By: UBC Management Reporting and Budgeting
Hyperion Planning
Page 2
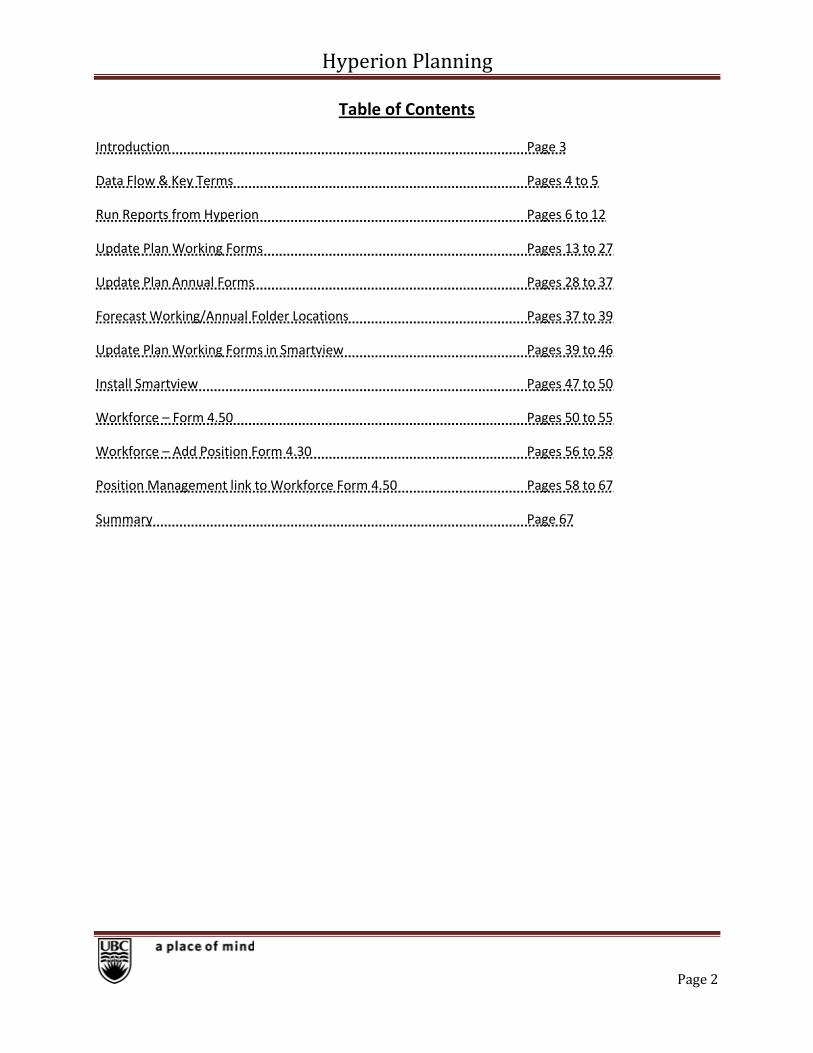
Table of Contents
Introduction Page 3
Data Flow & Key Terms Pages 4 to 5
Run Reports from Hyperion Pages 6 to 12
Update Plan Working Forms Pages 13 to 27
Update Plan Annual Forms Pages 28 to 37
Forecast Working/Annual Folder Locations Pages 37 to 39
Update Plan Working Forms in Smartview Pages 39 to 46
Install Smartview Pages 47 to 50
Workforce – Form 4.50 Pages 50 to 55
Workforce – Add Position Form 4.30 Pages 56 to 58
Position Management link to Workforce Form 4.50 Pages 58 to 67
Summary Page 67

Hyperion Planning
Page 3
Introduction
The Hyperion Planning Application is a tool used to prepare UBC’s consolidated budget for submission to
the Board and Ministry. Hyperion Planning Training should be used to supplement the Hyperion
Forecast training for the Operating Report for Executive. An updated forecast is important because it
allows users to project their carry forward balance, and this projected carry forward balance will be part
of the estimated spending for their future year budget (Plan).
New for this year is the availability of Working and Annual versions for both the current year Forecast
and the future year Plan. Before users begin to make updates in Hyperion, please discuss with your
Dean’s Office or VP level finance head to find out which version (Working or Annual) they would like the
users to be working in.
For this training guide, we will go through the following:
Data flow between FMS, Hyperion and Position Management/HRMS
Running reports from Hyperion
Update forms for Plan Working and Plan Annual
Form locations for Forecast Working and Forecast Annual
Run Aggregation
Create new positions in Workforce
Review Position Management and Workforce
If you have any questions, please send an email to [email protected]
Hyperion Planning
Page 4
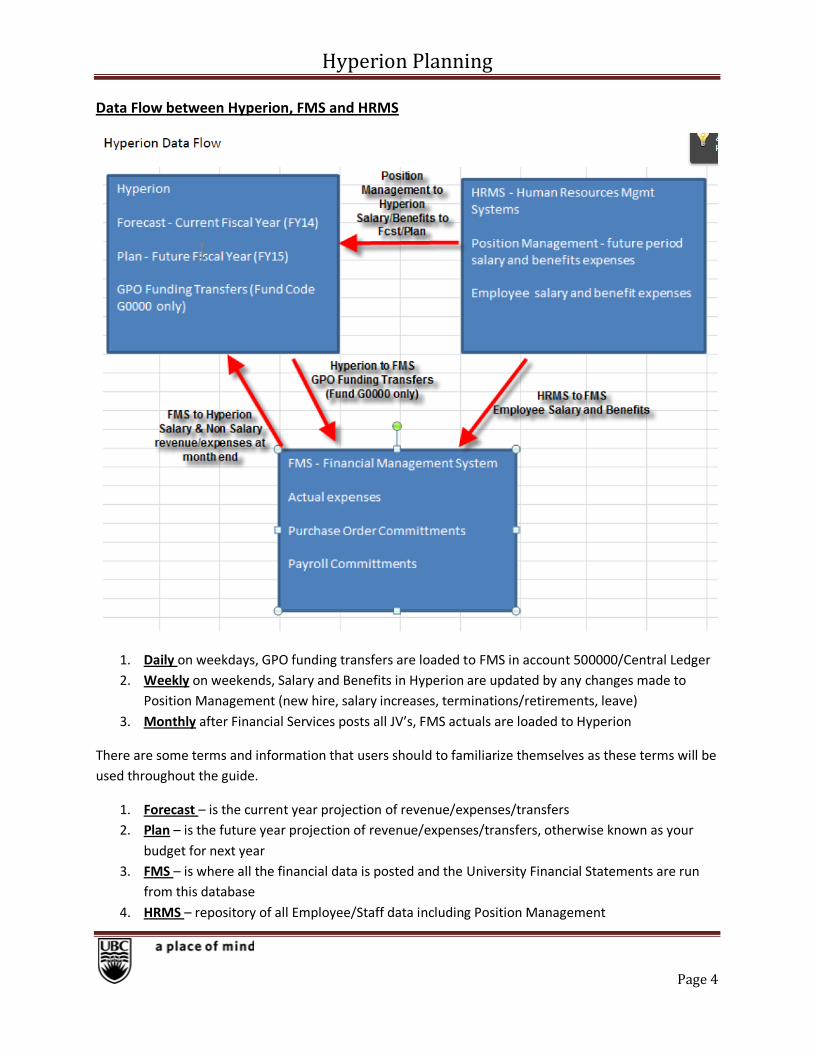
Data Flow between Hyperion, FMS and HRMS
1. Daily on weekdays, GPO funding transfers are loaded to FMS in account 500000/Central Ledger
2. Weekly on weekends, Salary and Benefits in Hyperion are updated by any changes made to
Position Management (new hire, salary increases, terminations/retirements, leave)
3. Monthly after Financial Services posts all JV’s, FMS actuals are loaded to Hyperion
There are some terms and information that users should to familiarize themselves as these terms will be
used throughout the guide.
1. Forecast – is the current year projection of revenue/expenses/transfers
2. Plan – is the future year projection of revenue/expenses/transfers, otherwise known as your
budget for next year
3. FMS – is where all the financial data is posted and the University Financial Statements are run
from this database
4. HRMS – repository of all Employee/Staff data including Position Management

Hyperion Planning
Page 5
5. Workforce – Position Management sends salary and benefits expenses to Workforce every
weekend and any future open month salary and benefits expenses in the Forecast and Plan are
updated
6. UBCPlan – module in Hyperion where the Forecast, Plan and Workforce forms can be found
7. FundPlan – module in Hyperion where users can make GPO funding transfers or future period
planned interfund transfers
8. Version Working – is the version that receives Position Management, Actuals and Funding
updates. Forecast Working receives actuals as months close in FMS and its carry forward
balance is the Plan Working opening carry forward balance.
9. Version Annual – is a copied version from Working. This version does not receive any Position
Management Updates. Forecast Annual does not receive Funding updates or Actual loads from
FMS. Plan Annual still receives future year Funding updates but no changes from Position
Management.

Hyperion Planning
Page 6
Run Reports in Hyperion
1. Open Hyperion Planning from FMS (for training environment, please use the login/password
handed to you in class, and the link setup on the monitor)
2. Hyperion home page will appear and then click Explore

Hyperion Planning
Page 7
3. Open Reports folder “Reports – Management and Income Statement” -> “Budget Reviews” and
right click or double click on the report “Planning Snapshot –Plan_Act_Fcst_NextPlan”.
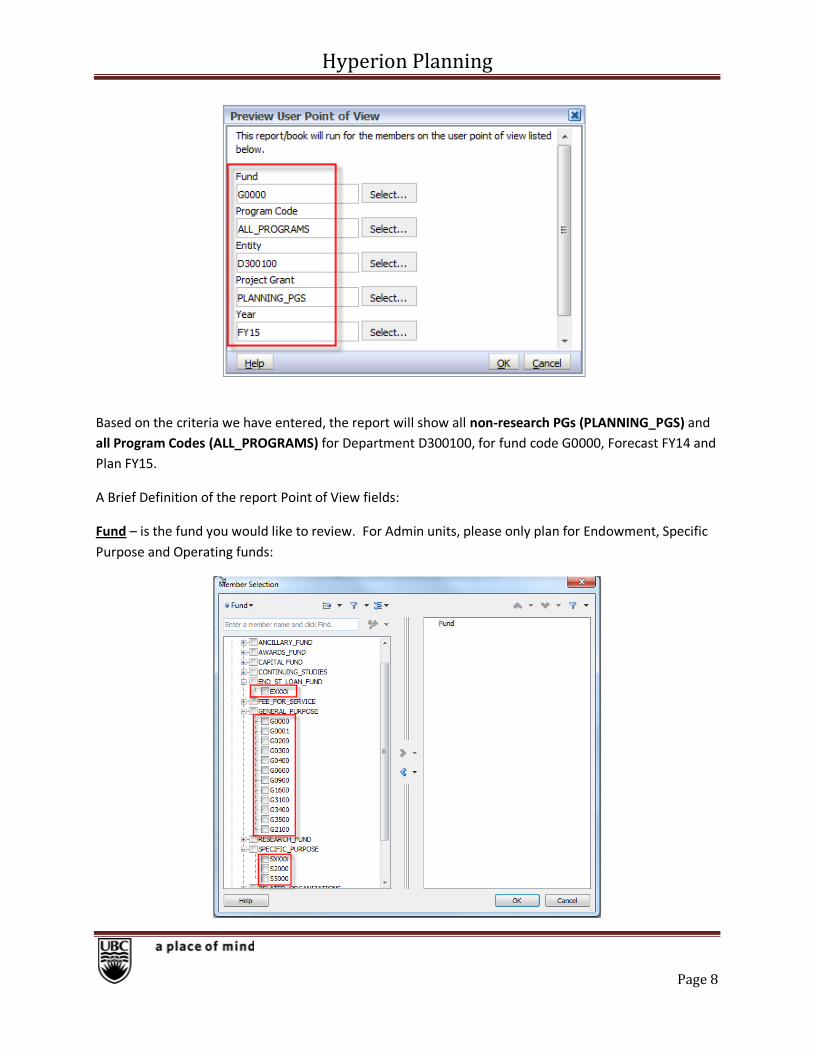
4. Update the User Point of View
For the purposes of this exercise the instructor will use D300100 as an example. (For users, please run
the report based on your own Department ID)
Fund: G0000 Program Code: ALL_PROGRAMS Entity: D300100 (Users, please use your own Department ID) Project Grant: PLANNING_PGS Year: FY14
Hyperion Planning
Page 8
Based on the criteria we have entered, the report will show all non-research PGs (PLANNING_PGS) and
all Program Codes (ALL_PROGRAMS) for Department D300100, for fund code G0000, Forecast FY14 and
Plan FY15.
A Brief Definition of the report Point of View fields:
Fund – is the fund you would like to review. For Admin units, please only plan for Endowment, Specific
Purpose and Operating funds:
Hyperion Planning
Page 9
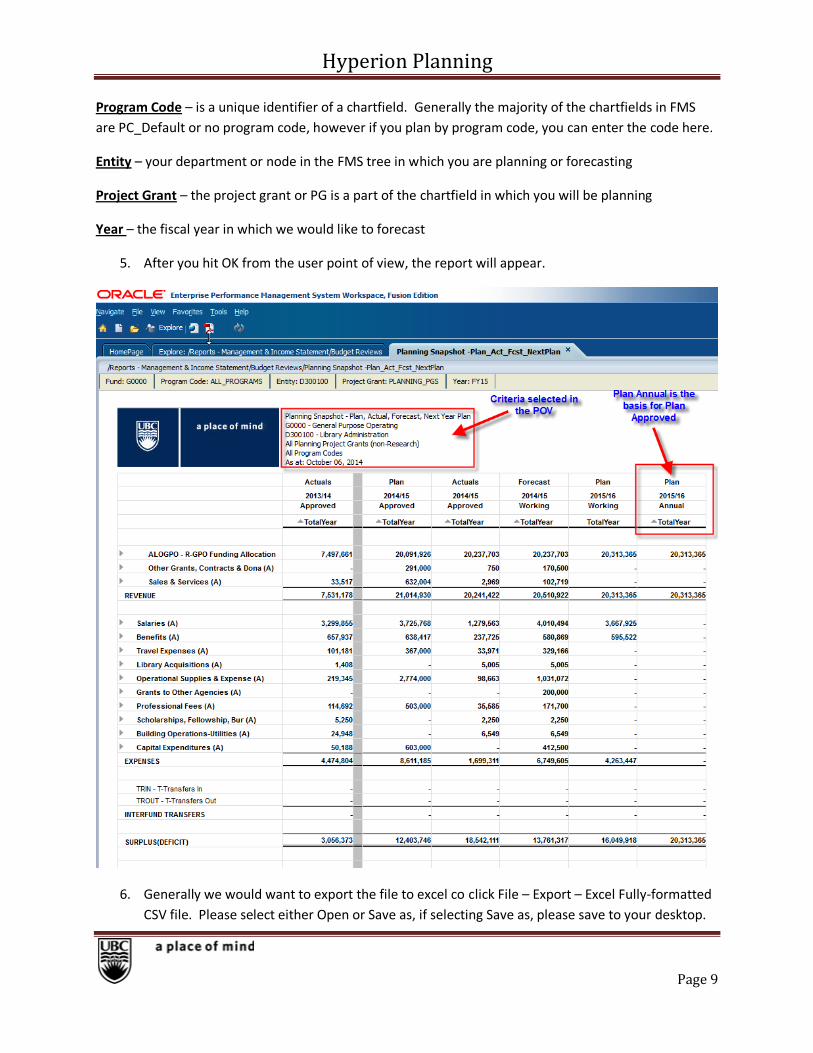
Program Code – is a unique identifier of a chartfield. Generally the majority of the chartfields in FMS
are PC_Default or no program code, however if you plan by program code, you can enter the code here.
Entity – your department or node in the FMS tree in which you are planning or forecasting
Project Grant – the project grant or PG is a part of the chartfield in which you will be planning
Year – the fiscal year in which we would like to forecast
5. After you hit OK from the user point of view, the report will appear.
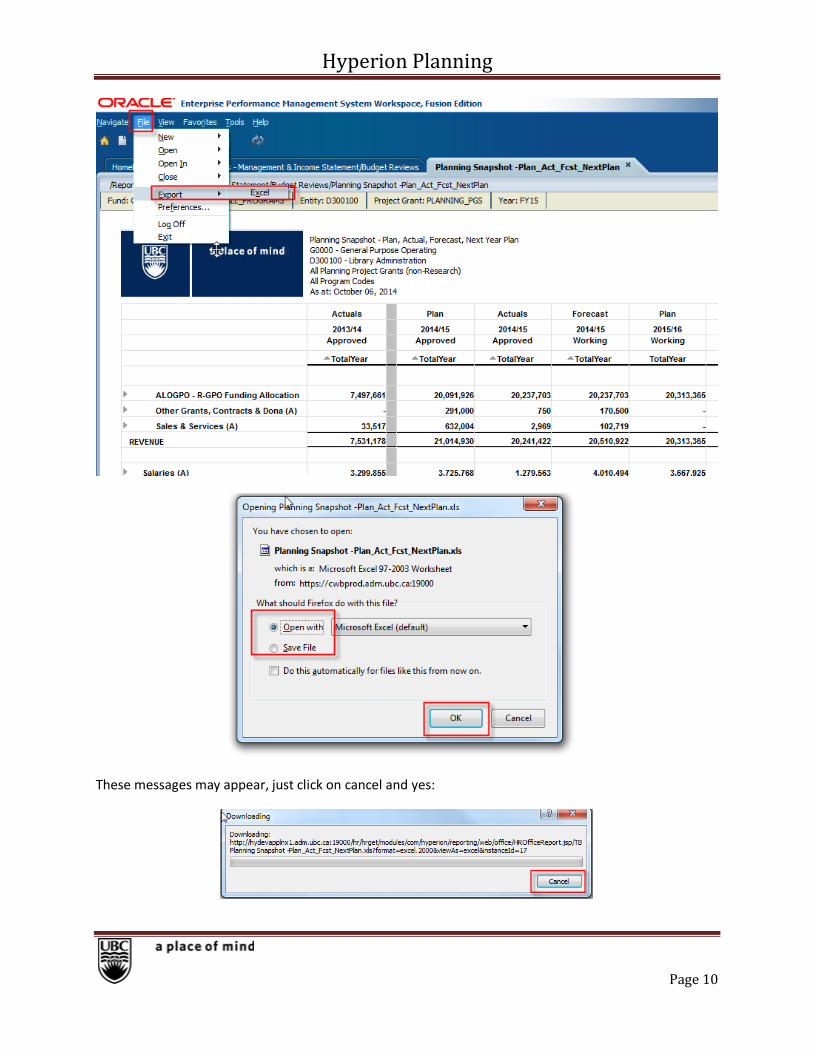
6. Generally we would want to export the file to excel co click File – Export – Excel Fully-formatted
CSV file. Please select either Open or Save as, if selecting Save as, please save to your desktop.
Hyperion Planning
Page 10
These messages may appear, just click on cancel and yes:

Hyperion Planning
Page 11
Here’s the excel output:
Or export the report to PDF if you are going to a meeting to discuss the Department Financials:

Hyperion Planning
Page 12
Here’s a brief description of the columns for the report:
Actual 2013/14 = Prior year actuals Plan 2015/16 Approved = prior year board approved budget Actuals 2014/15 Approved = FMS actuals loaded to Hyperion Forecast Working 2014/15 = is a mix of Actual FMS closed months and future planned months Plan Working 2015/16 = the working version of the future year budget that still receives Position Management Updates Plan Annual 2015/16 = the consolidated budget we will submit for next year’s budget, no Position Management Updates once this version is created The Planning Snapshot report is the standard report users can use to view a snapshot of their entire Department or a Department/Project Grant by Fund or all Funds. There are many other reports in Hyperion that users can use, and for Admin Units, they have to submit the Budget Review Template. The template and other reports definitions and how to run them can be found at the Management Reporting and Budgeting website at this link: http://www.finance.ubc.ca/reporting/management-reporting/hyperion-reporting

Hyperion Planning
Page 13
Working or Annual versions for Plan and Forecast
Please contact your Dean’s office or VP Level Finance head to see if they would like to use the version of
the Forecast or Plan they would like to use. They have two options - Working or Annual. If they
mention they would like to use Annual, please use only the sections related to Forecast Annual and Plan
Annual and if they want you to use Working please refer to the guide in sections for Forecast Working
and Plan Working. The Dean’s Office and VP level finance heads will be making the decision on which
version to use so please contact them first before updating forms in Hyperion.
Plan Working Department Level Changes
In Hyperion, users have the option to update at the Department level or the Project Grant level. Let’s pretend that for the department that we are planning for (D300100), we are content with the current numbers in our report, and will just need to add a few items to make the Plan complete. For the Plan, we are going to add/adjust the following data:
1. Plan for two new hires using ALPHA accounts ($55K x 2 plus benefits of 10% or $5.5K x 2) 2. Travel expenses for staff and faculty ($10K) 3. Supply expense increase ($5K) 4. Increase Sales and Service revenue for sale of used books and supplies ($100K)
Open Plan Working Forms:
1. In the Hyperion homepage click on Applications and then UBCPlan.
2. Expand Forms -> and click on 2.Plan to see the forms available for Plan Working

Hyperion Planning
Page 14
3. Double click on the form “2.20 Alpha Account Input Only – Plan Working”

Hyperion Planning
Page 15
4. Edit the Department ID and Fund code (for the in class demonstration, the instructor will use D300100, fund code G0000, users please input your own Department ID, and G0000)
5. And then click on the go arrow.

Hyperion Planning
Page 16
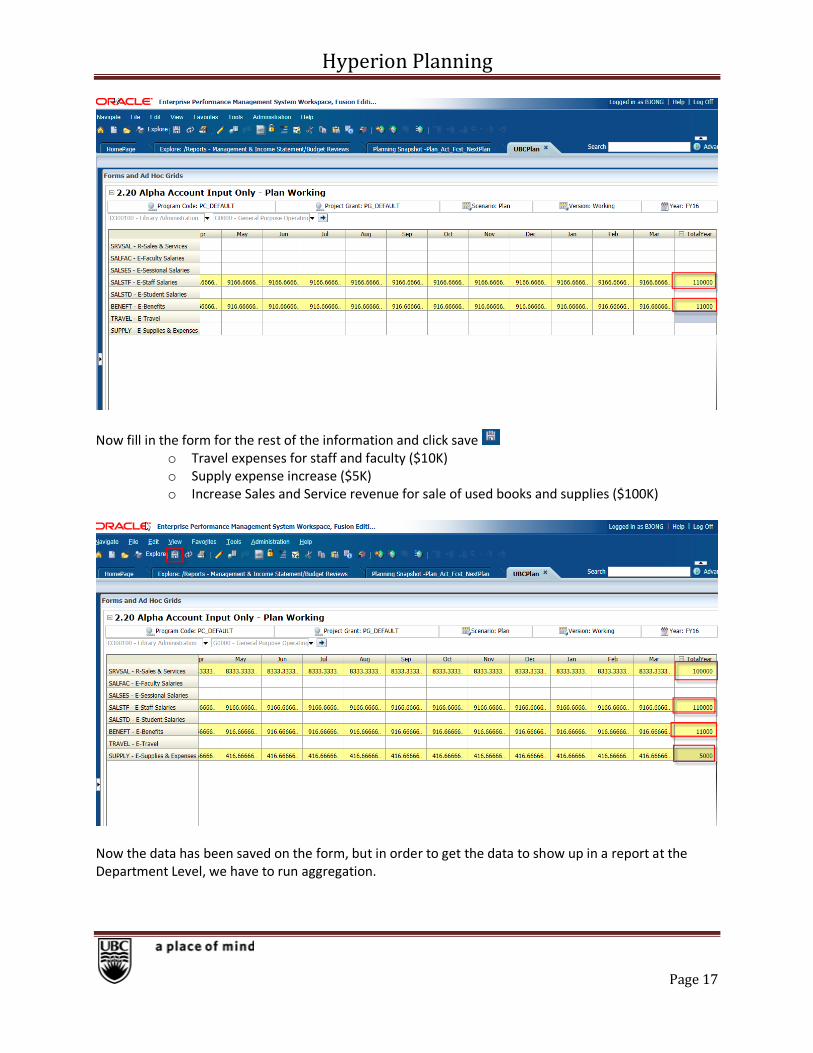
6. Add expenses and revenue to the form based on our pretend meeting with the Department Managers.
o Plan for two new hires using ALPHA accounts ($55K x 2 plus benefits of 10% or $5.5K x
2) – so $110K in salary expenses and $11K in benefits
Locate the SALSTF expenses and BENEFT expenses and update the form for the additional expenses. Update the TotalYear for the total salary and benefits.
Hyperion Planning
Page 17
Now fill in the form for the rest of the information and click save o Travel expenses for staff and faculty ($10K) o Supply expense increase ($5K) o Increase Sales and Service revenue for sale of used books and supplies ($100K)
Now the data has been saved on the form, but in order to get the data to show up in a report at the Department Level, we have to run aggregation.

Hyperion Planning
Page 18
Aggregation (optional)
1. In the same form, click on the arrow to show the folders, forms and business rules:

Hyperion Planning
Page 19
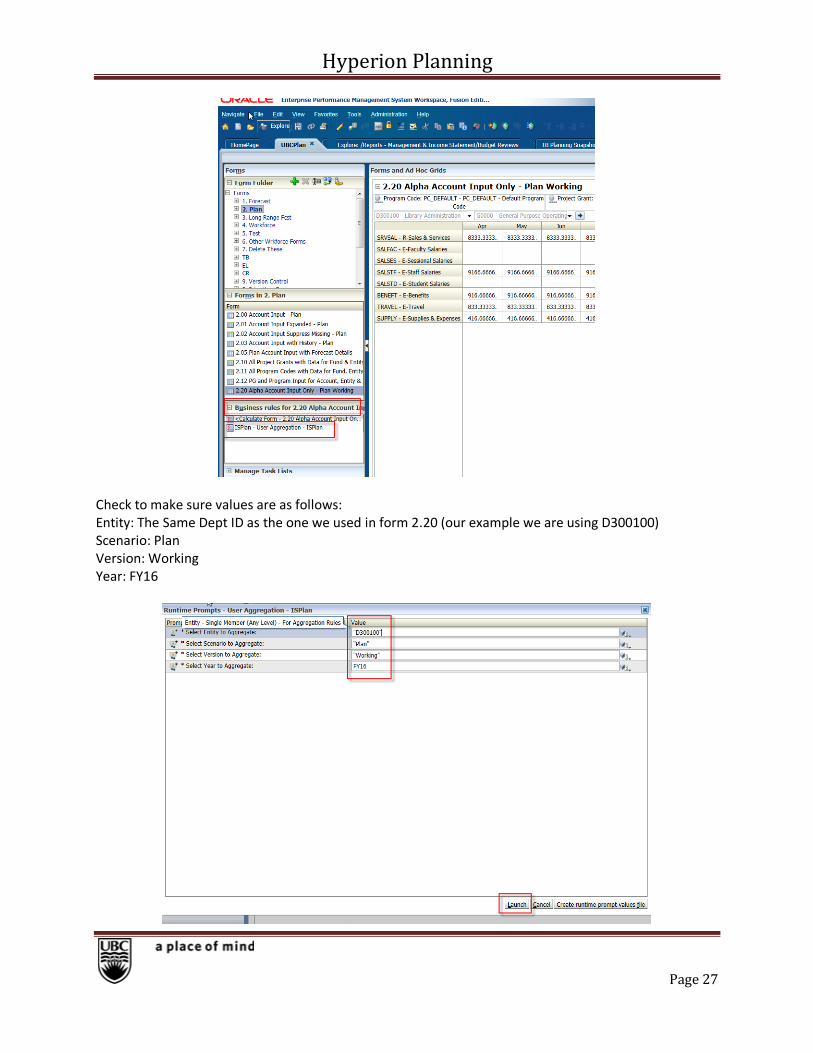
2. Double Click on the business rule “ISPlan – User Aggregation – ISPlan” Check to make sure values are as follows: Entity: The Same Dept ID as the one we used in form 2.20 (our example we are using D300100) Scenario: Plan Version: Working Year: FY16
1. Once the values have been updated click on Launch
Aggregation is now optional. We have updated Hyperion to automatically aggregate the moment users click on the save button. Now we have learned how to update forms at the Department level. For the PG level, there are additional forms to use, we recommend to use form 2.10 and then drill down to form 2.02, however users can skip directly to form 2.02 if they know the Fund/Dept/PG/Program code they would like to use.

Hyperion Planning
Page 20
Plan Working at the PG level
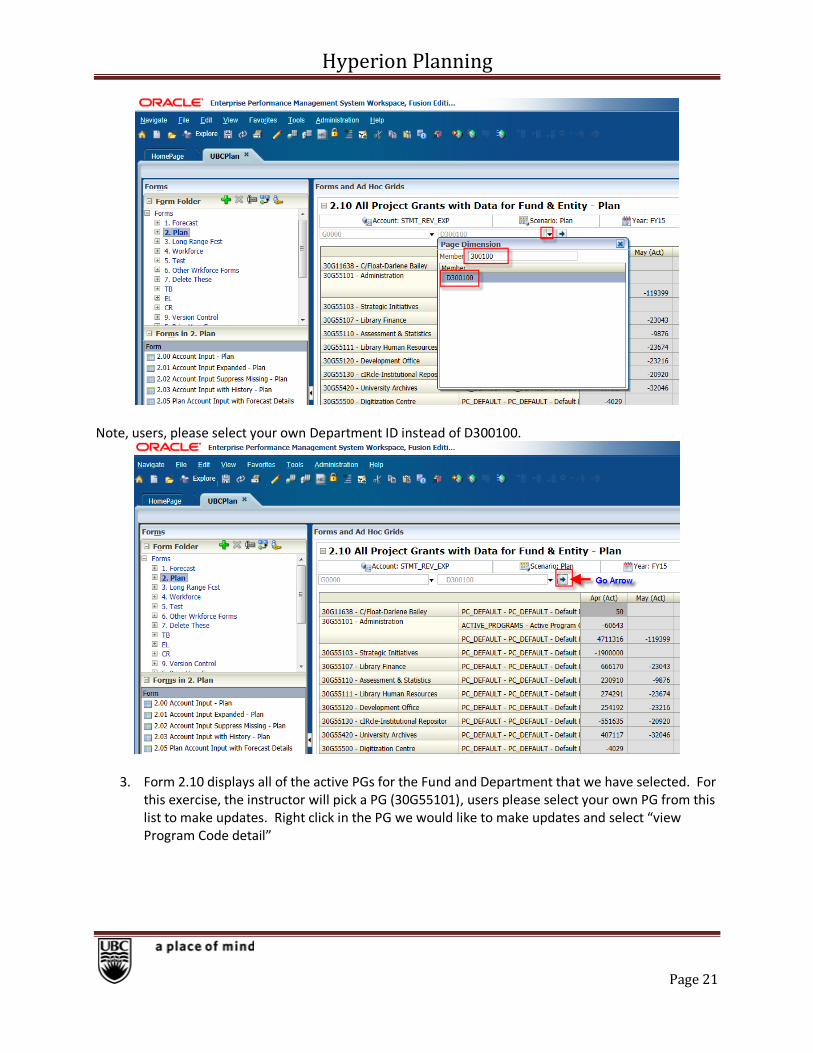
1. In UBCPlan, click on folder 2.Plan and double click on form 2.10 All Project Grants with Data for Fund & Entity – Plan
2. Pick the Fund and Dept ID you would like to plan for and click on the “Go” arrow:
Hyperion Planning
Page 21
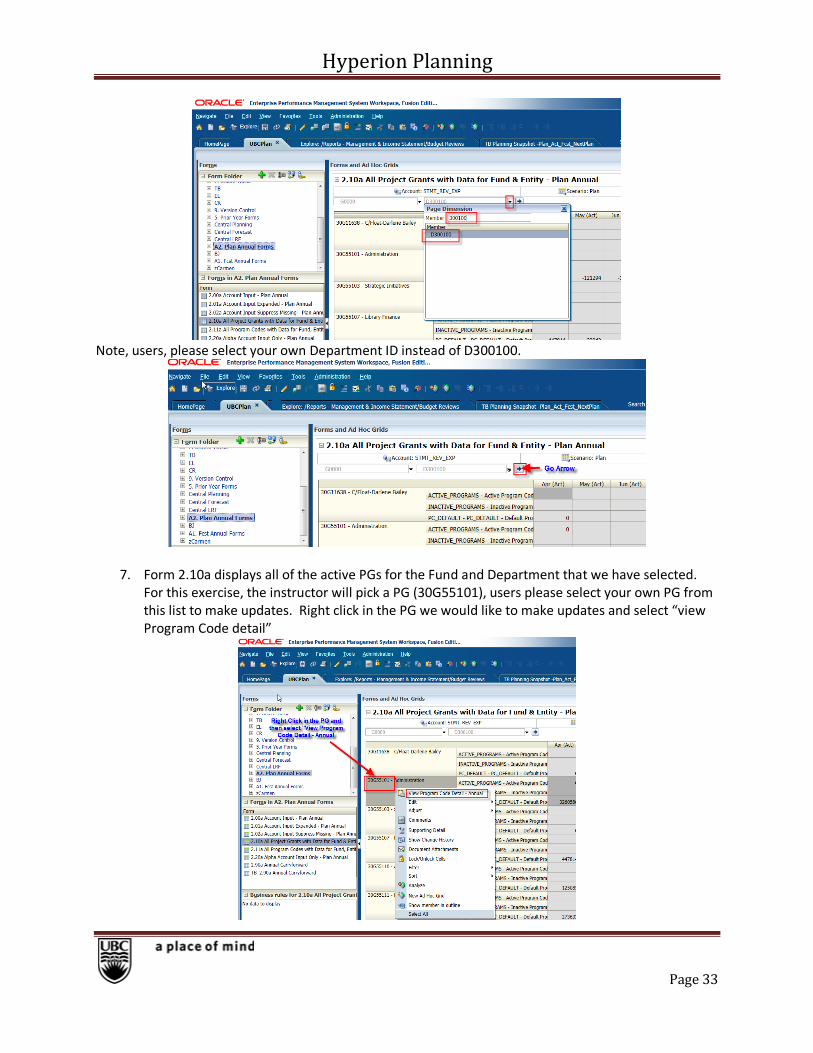
Note, users, please select your own Department ID instead of D300100.
3. Form 2.10 displays all of the active PGs for the Fund and Department that we have selected. For this exercise, the instructor will pick a PG (30G55101), users please select your own PG from this list to make updates. Right click in the PG we would like to make updates and select “view Program Code detail”
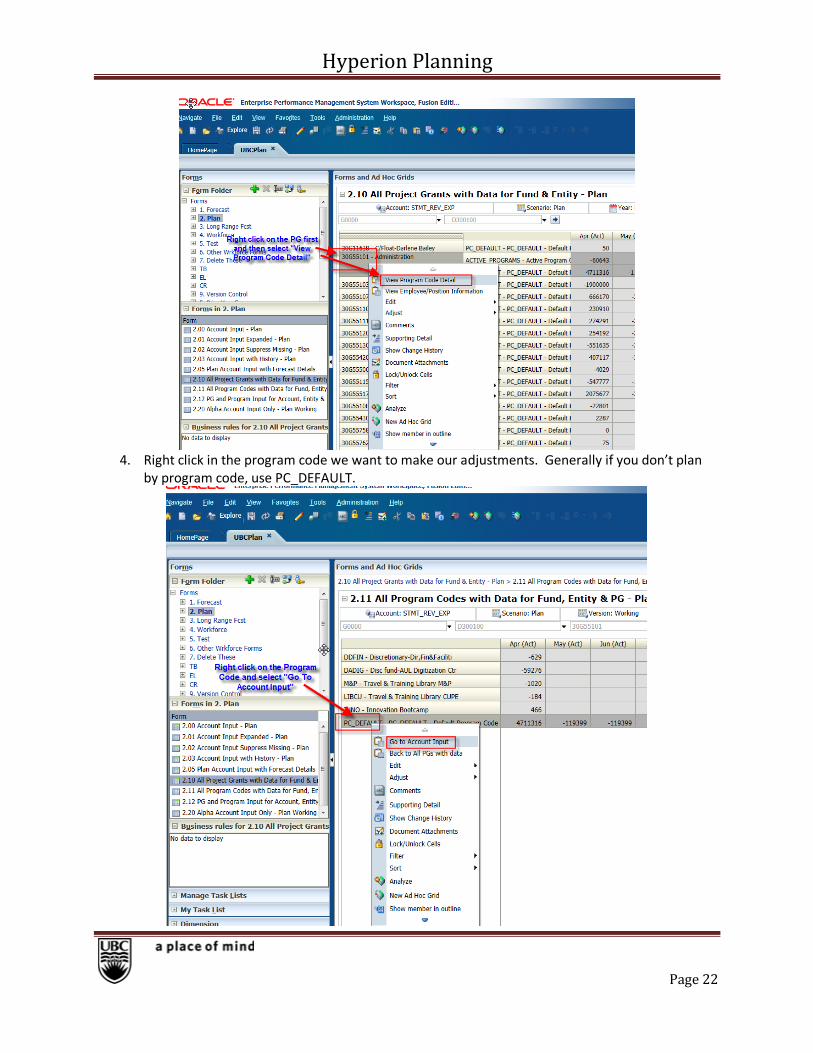
Hyperion Planning
Page 22
4. Right click in the program code we want to make our adjustments. Generally if you don’t plan
by program code, use PC_DEFAULT.
Hyperion Planning
Page 23
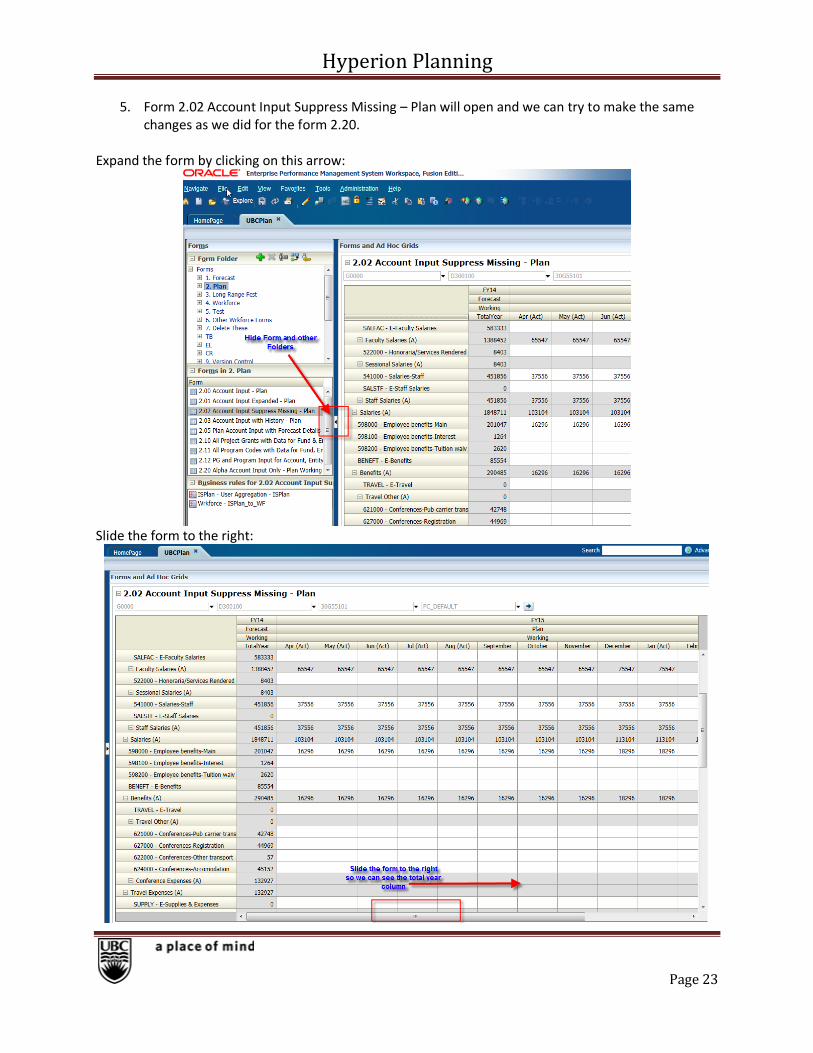
5. Form 2.02 Account Input Suppress Missing – Plan will open and we can try to make the same changes as we did for the form 2.20.
Expand the form by clicking on this arrow:
Slide the form to the right:
Hyperion Planning
Page 24
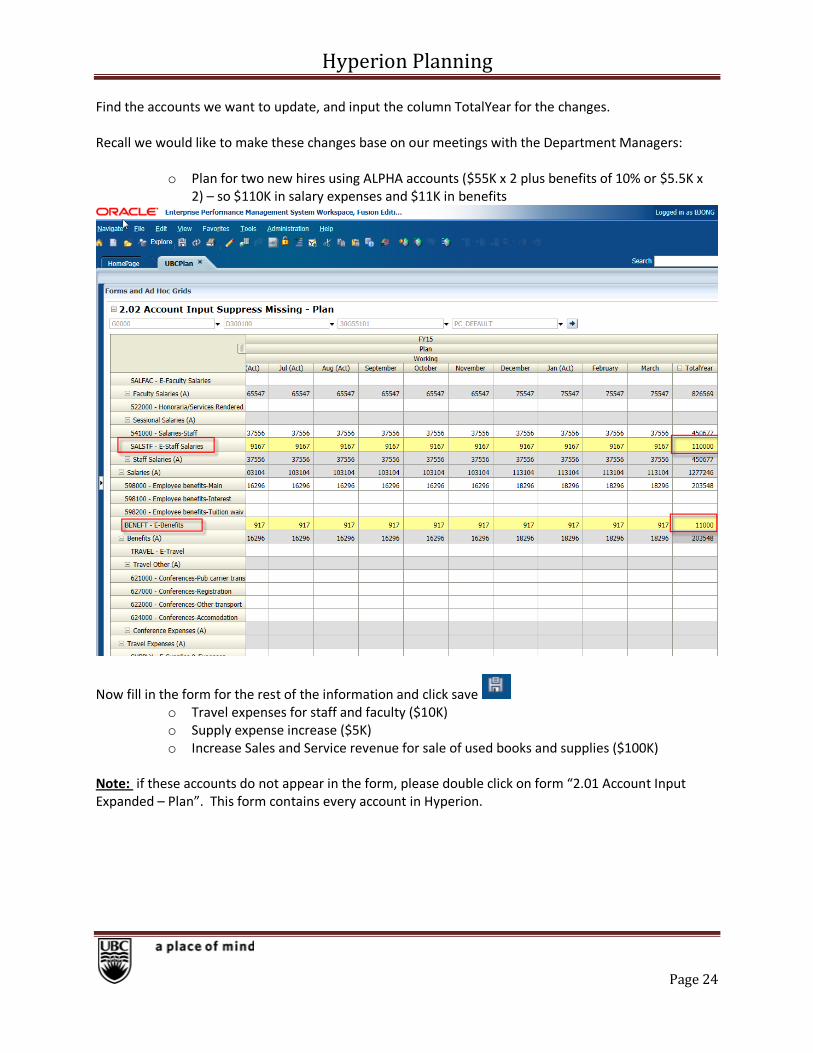
Find the accounts we want to update, and input the column TotalYear for the changes. Recall we would like to make these changes base on our meetings with the Department Managers:
o Plan for two new hires using ALPHA accounts ($55K x 2 plus benefits of 10% or $5.5K x 2) – so $110K in salary expenses and $11K in benefits
Now fill in the form for the rest of the information and click save o Travel expenses for staff and faculty ($10K) o Supply expense increase ($5K) o Increase Sales and Service revenue for sale of used books and supplies ($100K)
Note: if these accounts do not appear in the form, please double click on form “2.01 Account Input Expanded – Plan”. This form contains every account in Hyperion.

Hyperion Planning
Page 25
Hyperion Planning
Page 26
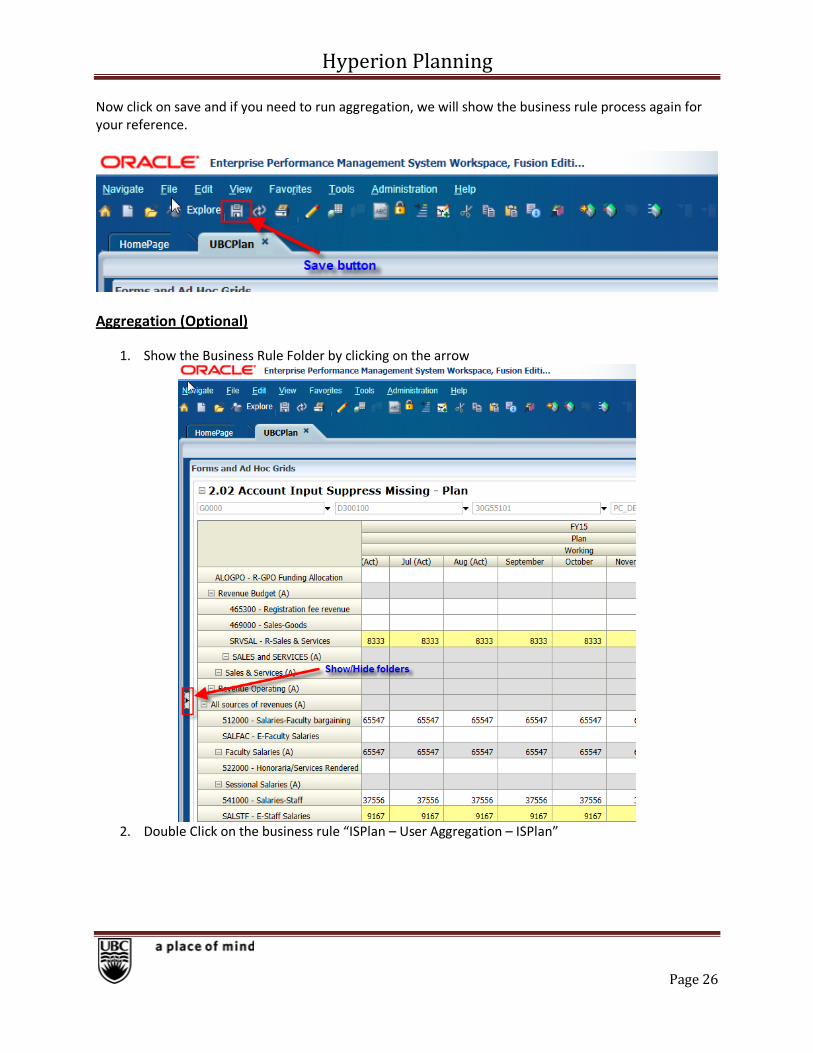
Now click on save and if you need to run aggregation, we will show the business rule process again for your reference.
Aggregation (Optional)
1. Show the Business Rule Folder by clicking on the arrow
2. Double Click on the business rule “ISPlan – User Aggregation – ISPlan”
Hyperion Planning
Page 27
Check to make sure values are as follows: Entity: The Same Dept ID as the one we used in form 2.20 (our example we are using D300100) Scenario: Plan Version: Working Year: FY16
Hyperion Planning
Page 28
Plan Annual Department Level Changes
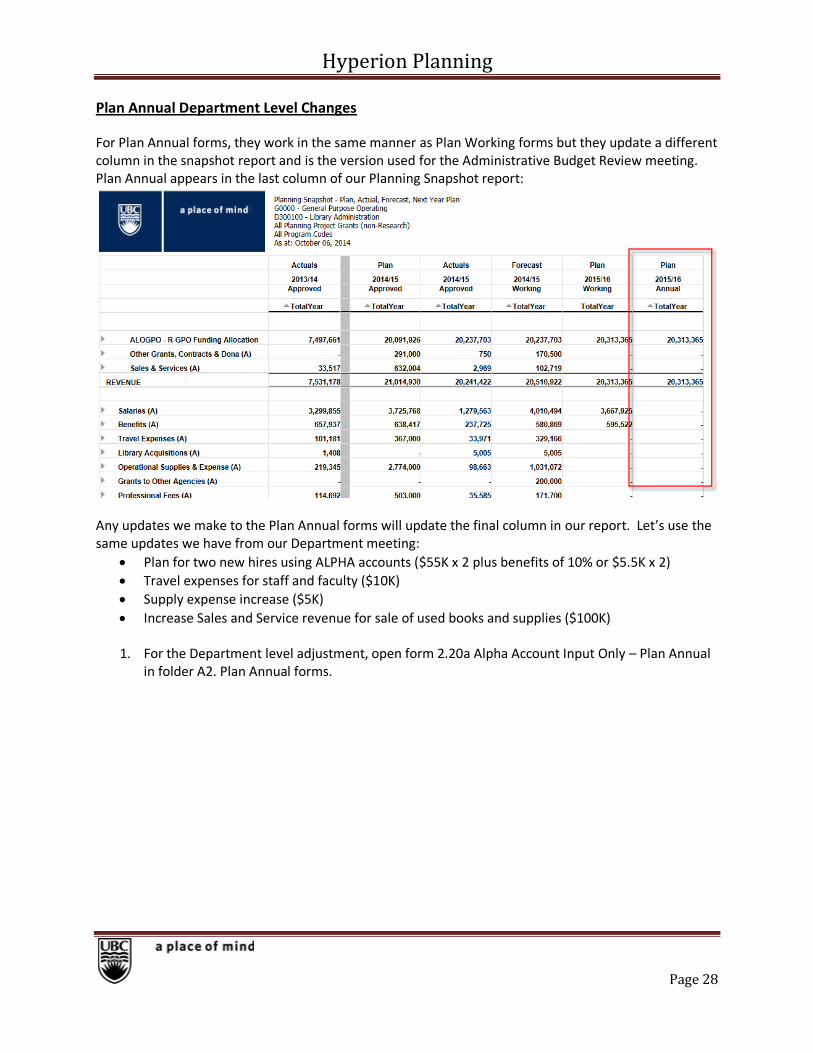
For Plan Annual forms, they work in the same manner as Plan Working forms but they update a different column in the snapshot report and is the version used for the Administrative Budget Review meeting. Plan Annual appears in the last column of our Planning Snapshot report:
Any updates we make to the Plan Annual forms will update the final column in our report. Let’s use the same updates we have from our Department meeting:
Plan for two new hires using ALPHA accounts ($55K x 2 plus benefits of 10% or $5.5K x 2)
Travel expenses for staff and faculty ($10K)
Supply expense increase ($5K)
Increase Sales and Service revenue for sale of used books and supplies ($100K)
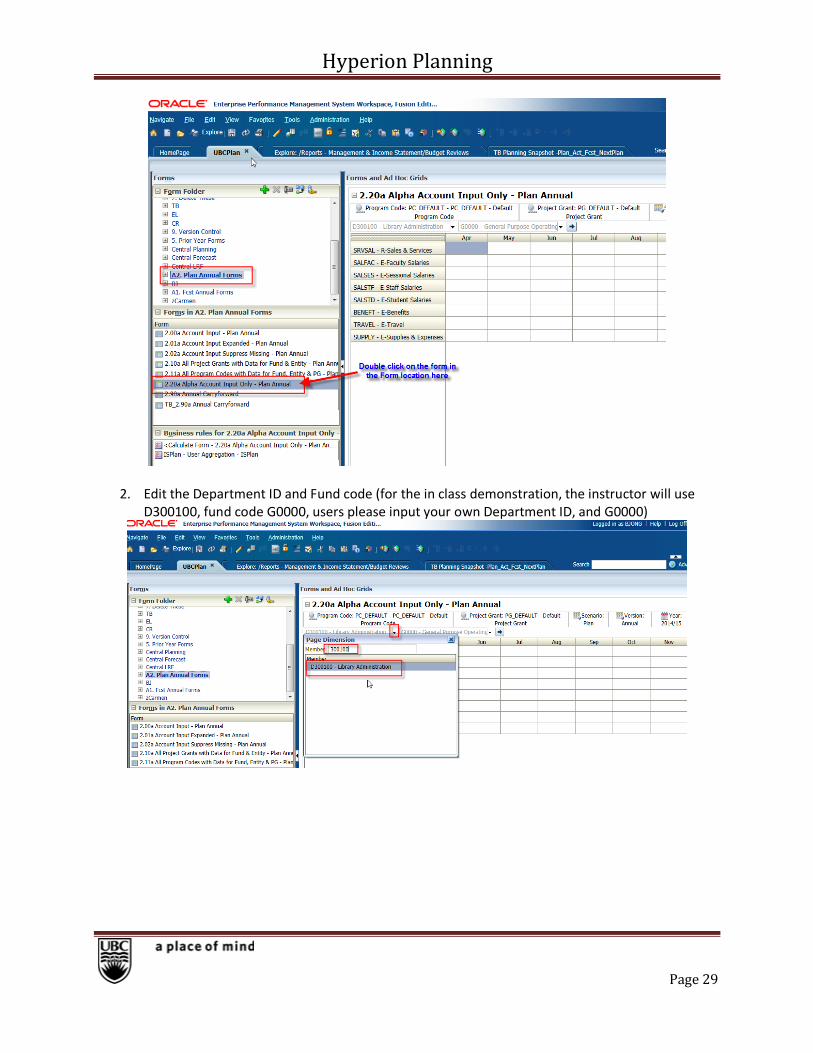
1. For the Department level adjustment, open form 2.20a Alpha Account Input Only – Plan Annual in folder A2. Plan Annual forms.
Hyperion Planning
Page 29
2. Edit the Department ID and Fund code (for the in class demonstration, the instructor will use D300100, fund code G0000, users please input your own Department ID, and G0000)
Hyperion Planning
Page 30
3. And then click on the go arrow.
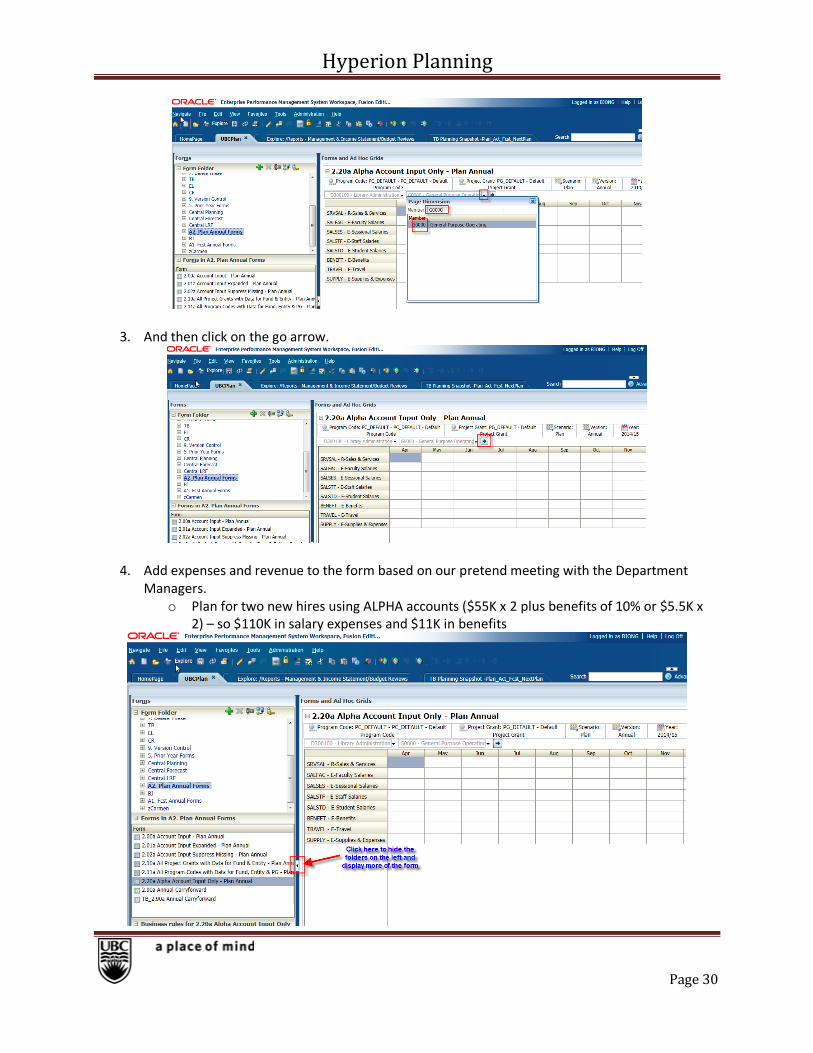
4. Add expenses and revenue to the form based on our pretend meeting with the Department Managers.
o Plan for two new hires using ALPHA accounts ($55K x 2 plus benefits of 10% or $5.5K x 2) – so $110K in salary expenses and $11K in benefits

Hyperion Planning
Page 31
Locate the SALSTF expenses and BENEFT expenses and update the form for the additional expenses. Update the TotalYear for the total salary and benefits.
Now fill in the form for the rest of the information and click save o Travel expenses for staff and faculty ($10K) o Supply expense increase ($5K) o Increase Sales and Service revenue for sale of used books and supplies ($100K)

Hyperion Planning
Page 32
Plan Annual at the PG level
1. In UBCPlan, click on folder “A2.Plan Annual Forms” and double click on form 2.10a All Project Grants with Data for Fund & Entity – Plan
6. Pick the Fund and Dept ID you would like to plan for and click on the “Go” arrow:
Hyperion Planning
Page 33
Note, users, please select your own Department ID instead of D300100.
7. Form 2.10a displays all of the active PGs for the Fund and Department that we have selected. For this exercise, the instructor will pick a PG (30G55101), users please select your own PG from this list to make updates. Right click in the PG we would like to make updates and select “view Program Code detail”

Hyperion Planning
Page 34
8. Right click in the program code we want to make our adjustments. Generally if you don’t plan
by program code, use PC_DEFAULT.
9. Form 2.02a Account Input Suppress Missing – Plan will open and we can try to make the same
changes as we did for the form 2.20a. Expand the form by clicking on this arrow:

Hyperion Planning
Page 35
Slide the form to the right so we can see the TotalYear field:
Find the accounts we want to update, and input the column TotalYear for the changes. Recall we would like to make these changes base on our meetings with the Department Managers:
o Plan for two new hires using ALPHA accounts ($55K x 2 plus benefits of 10% or $5.5K x 2) – so $110K in salary expenses and $11K in benefits
Hyperion Planning
Page 36
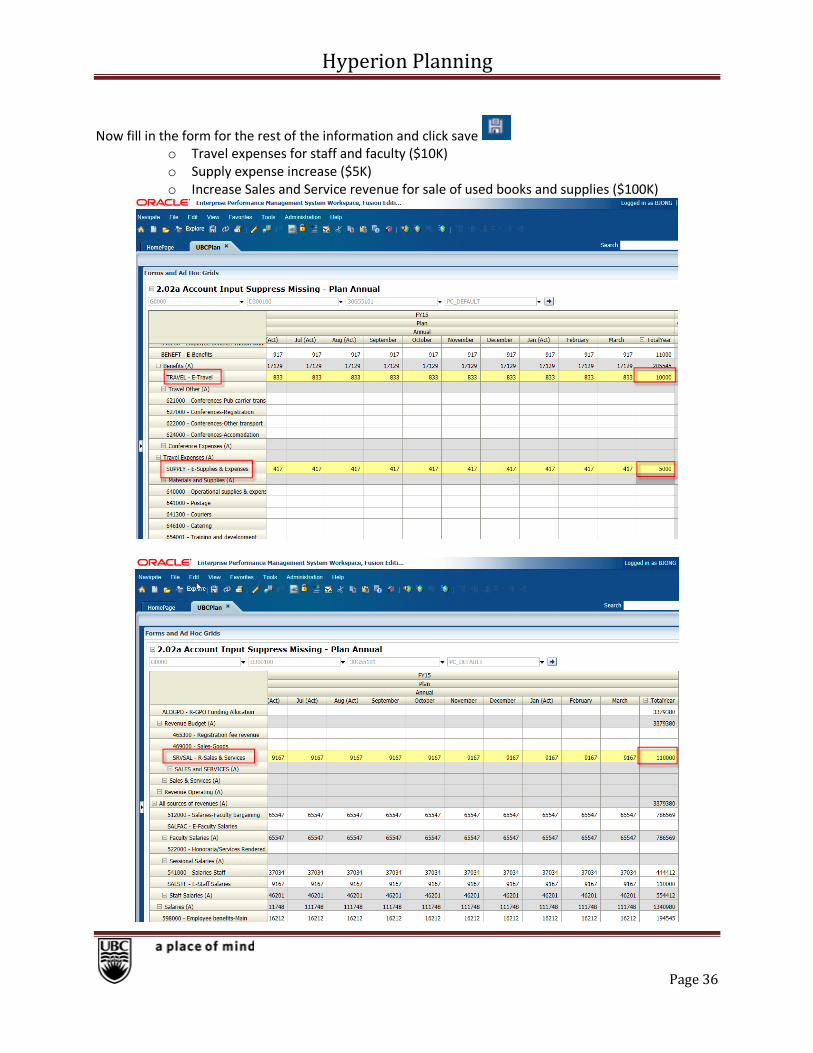
Now fill in the form for the rest of the information and click save o Travel expenses for staff and faculty ($10K) o Supply expense increase ($5K) o Increase Sales and Service revenue for sale of used books and supplies ($100K)

Hyperion Planning
Page 37
Now click on save and if you need to run aggregation, we will show the business rule process again for your reference.
Forecast Working and Annual Forms
During the Operating Report Forecast training we go in depth on how to update the forecast and we won’t go through that process in this guide but will provide the Folder and Form locations to the Forecast Working and Annual versions. Here’s the location of the Forecast Working folder and forms, use these if your Dean’s Office or VP Level finance head advises to use the version Forecast Working:
Note: Forecast Working forms are in the folder 1. Forecast whereas Forecast Annual forms are in A1. Forecast Annual Forms

Hyperion Planning
Page 38
Updating at the Department level and PG level are similar to how we update Plan Working and Annual. For Department level updates please use form “1.20” (for version working) or “1.20a Alpha Account Input Only – Fcst” (for version Annual, note the a for Annual) and for PG level updates please use form “1.10” (for Working) and “1.10a All Project Grants with Data for Fund and Entity” (for Annual). Forms to update Department level and PG level – Forecast Working:

Hyperion Planning
Page 39
Forms to update Department level and PG level – Forecast Annual:
Smartview – Update Hyperion from Excel Users can then update and submit the form in Excel through an application called Hyperion Smartview. Before they can use Smartview, please contact your local IT services and ask them to load the application to your PC. Here’s the steps that users can go through to establish a Smartview connection.
1. Export report to Smartview (run any planning snapshot report)
2. At the bottom of the report, there’s a link called “Export In Query Ready Mode”, click on this link

Hyperion Planning
Page 40
If the system asks you for a URL, for the training environment, please use the following:
https://cwbtrn.adm.ubc.ca:19000/workspace/SmartViewProviders
When you are planning for real, this is the link to production:
https://cwbprod.adm.ubc.ca:19000/workspace/SmartViewProviders
Your report will now open in Hyperion Smartview:
3. Click on the Smartview tab and then Panel:
Hyperion Planning
Page 41
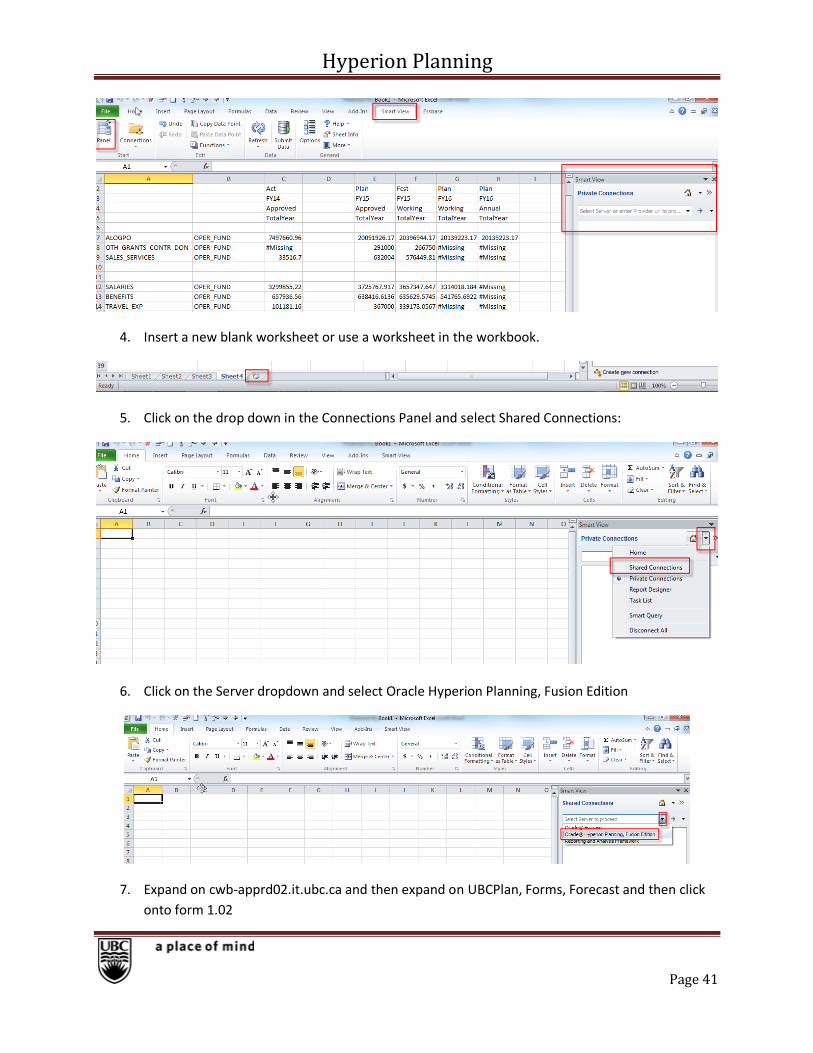
4. Insert a new blank worksheet or use a worksheet in the workbook.
5. Click on the drop down in the Connections Panel and select Shared Connections:
6. Click on the Server dropdown and select Oracle Hyperion Planning, Fusion Edition
7. Expand on cwb-apprd02.it.ubc.ca and then expand on UBCPlan, Forms, Forecast and then click
onto form 1.02

Hyperion Planning
Page 42
8. Now click on Open Form:
9. Now the form is opened to the last Fund/Dept/PG that we were reviewing in Hyperion.

Hyperion Planning
Page 43
The same logic exists in Hyperion on the web where yellow cells are writeable and grey cells are
read/only. If you edit any data in the form and want to save it to Hyperion, click on “Submit data”.
Please note, submitting data will not trigger the auto aggregation that clicking save in Hyperion on the
web. If you want to see your data in reports immediately you have to run ad hoc aggregation or simply
click save in the same form on the web and all changes submitted in Smartview will be aggregated.
Once you reach a form you can edit, like 1.01/1.02 or 2.01/2.02 then follow the next steps to edit the form:
1. Freeze panes at cell B5

Hyperion Planning
Page 44
Make the same updates as earlier:
Plan for two new hires using ALPHA accounts ($55K x 2 plus benefits of 10% or $5.5K x 2)
Travel expenses for staff and faculty ($10K)
Supply expense increase ($5K)
Increase Sales and Service revenue for sale of used books and supplies ($100K)
2. Update Salary/Benefits
3. Update Travel and Supply expenses.

Hyperion Planning
Page 45
4. Update Sales and Service revenue.
5. Click on the Smart View tab and click on “Submit Data” (this is the same as the “Save” function)

Hyperion Planning
Page 46
6. Now refresh the form and we can choose to save your Smartview excel grid or close it, the changes are made to Hyperion once you click on submit data)
In the form we can view our changes:

Hyperion Planning
Page 47
Install Smartview onto your PC Please note, users can install the Smartview application to their PC only if they have administrator rights
to their computer. If not, please contact UBC Desktop Support at the following link:
https://it.secure.ubc.ca/forms/internal/
For those users who have local IT Services, please contact them and ask them to load Hyperion
Smartview version 11.1.2.2 onto your PC.
The following are the steps to load Smartview onto your PC:
1. On the Hyperion home page click on Tools Install Smartview

Hyperion Planning
Page 48
2. This message may appear, just click on Run:
3. Language – select English
4. Run the Install Wizard
5. Change the file location to “C:/Program Files/Hyperion/Smartview” or wherever your program
applications are located

Hyperion Planning
Page 49
And then click on install:
Once the software is loaded, open Microsoft Excel and there will be an additional tab called
“Smartview”:

Hyperion Planning
Page 50
Workforce form 4.50
1. Open folder 4. Workforce
2. Click on form 4.50
3. Select the fund/Dept ID/PG you would like to review, for our exercise its G0000, D300100, PG
30G55101 (Users, please use a real Fund/Dept/PG in your own portfolio)

Hyperion Planning
Page 51

Hyperion Planning
Page 52
Compare TotalYear in ALL_POSITIONS line against the form 2.02 totals for total salary and benefits.

Hyperion Planning
Page 53
Here’s the summary of the comparison between form 2.02 and 4.50:
Form 2.02 Salaries (A) 1,277,246
Form 2.02 Benefits (A) 203,548
Form 2.02 Total Compensation 1,480,794
Form 4.50 Total Compensation 1,480,793
Variance 1
So form 4.50 lists out employees/positions at the Dept/PG/Program code level. It defaults to “Total
Compensation” however we can review the Salary/Benefit split by employee by clicking on the expand
button on Total Compensation:
Hyperion Planning
Page 54
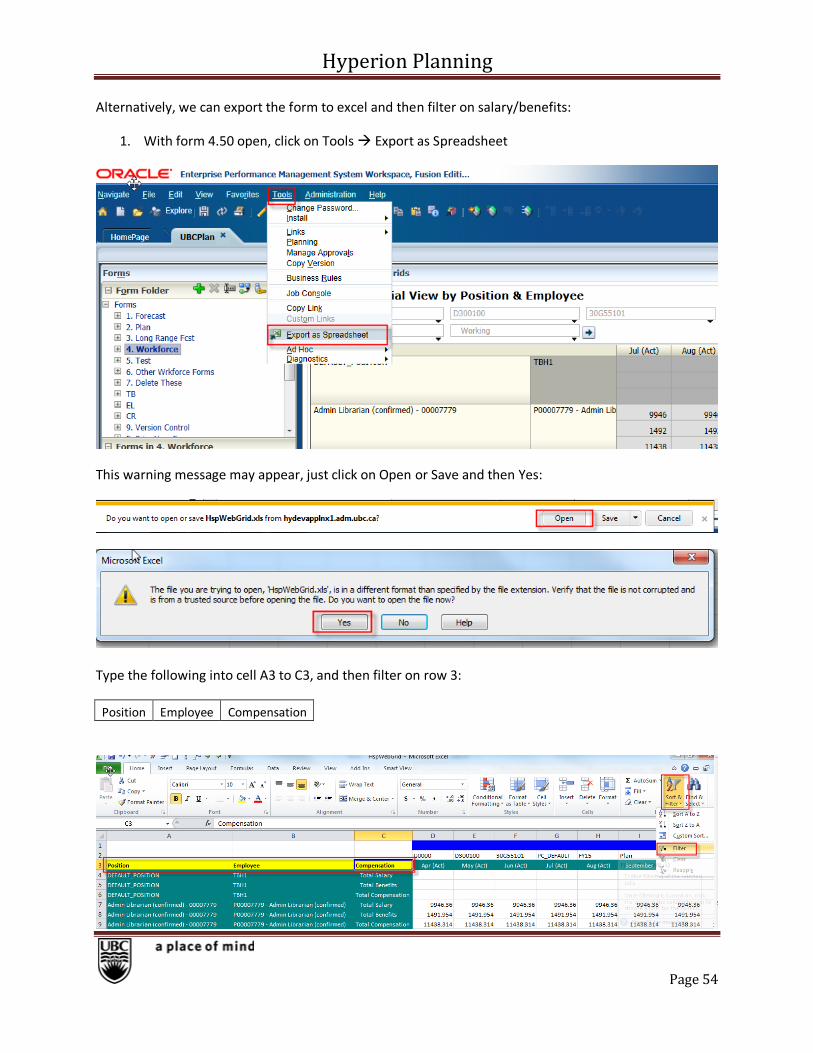
Alternatively, we can export the form to excel and then filter on salary/benefits:
1. With form 4.50 open, click on Tools Export as Spreadsheet
This warning message may appear, just click on Open or Save and then Yes:
Type the following into cell A3 to C3, and then filter on row 3:
Position Employee Compensation
Hyperion Planning
Page 55
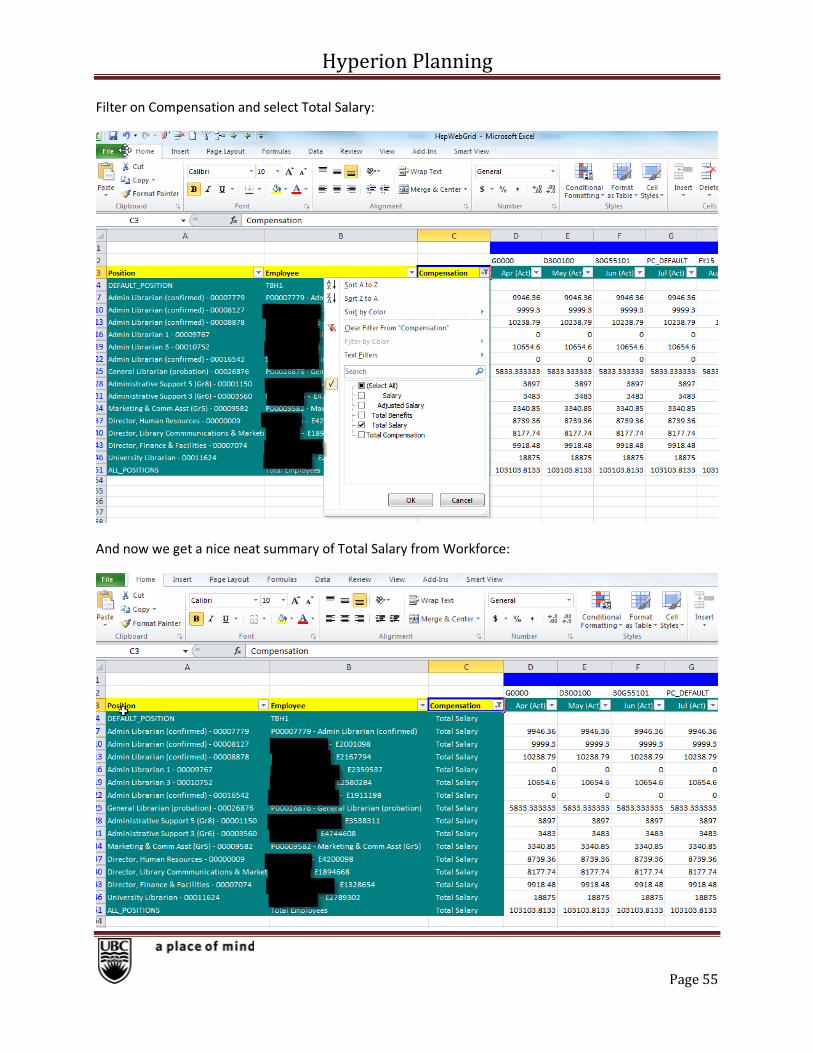
Filter on Compensation and select Total Salary:
And now we get a nice neat summary of Total Salary from Workforce:
Hyperion Planning
Page 56
Add Position in Workforce
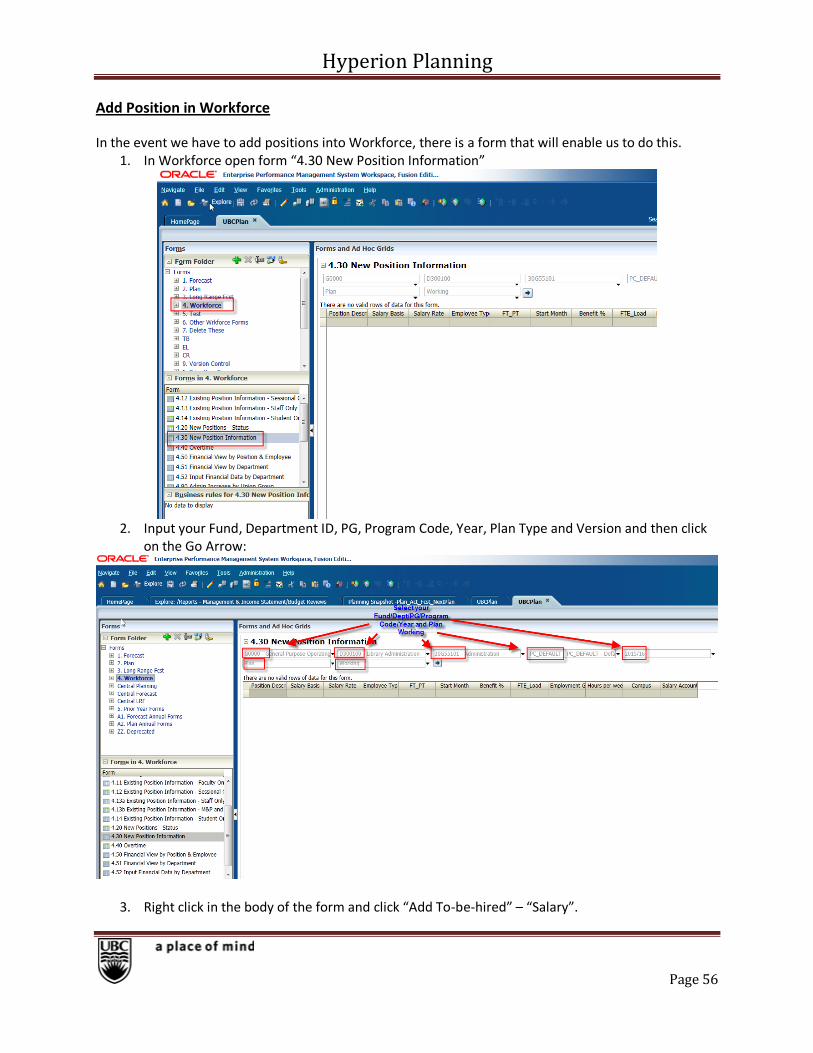
In the event we have to add positions into Workforce, there is a form that will enable us to do this. 1. In Workforce open form “4.30 New Position Information”
2. Input your Fund, Department ID, PG, Program Code, Year, Plan Type and Version and then click
on the Go Arrow:
3. Right click in the body of the form and click “Add To-be-hired” – “Salary”.
Hyperion Planning
Page 57
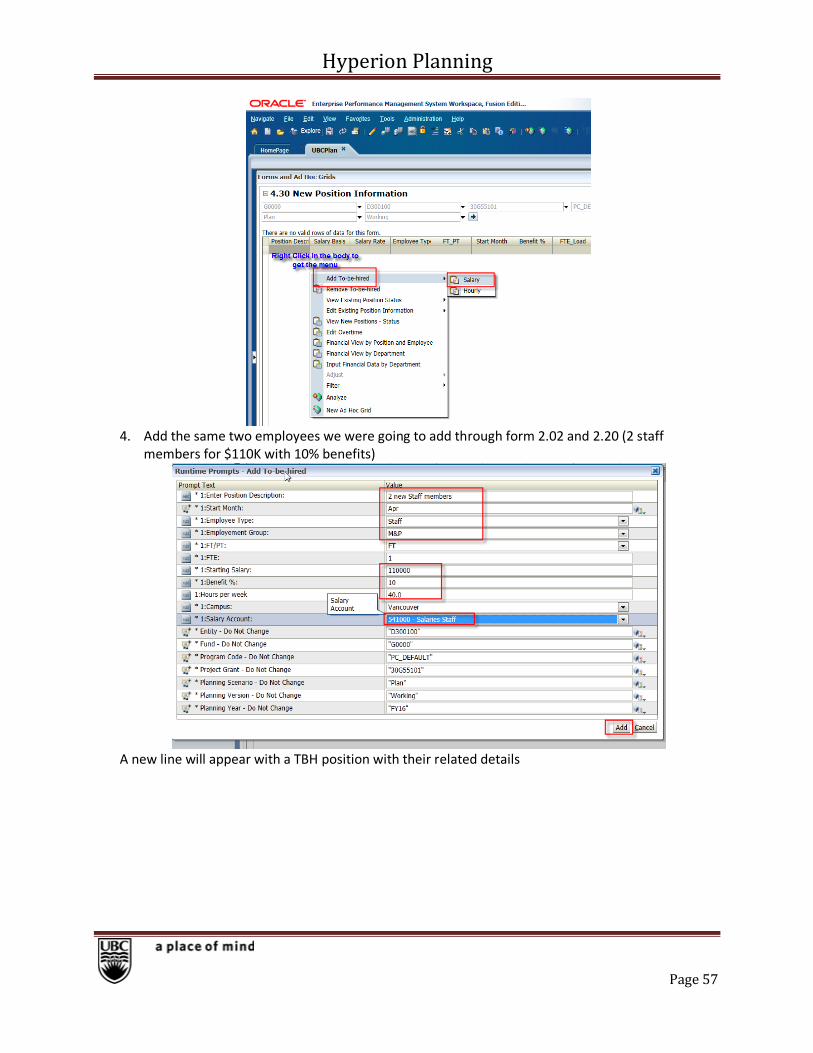
4. Add the same two employees we were going to add through form 2.02 and 2.20 (2 staff
members for $110K with 10% benefits)
A new line will appear with a TBH position with their related details

Hyperion Planning
Page 58
Now on form 4.50, the employee also shows up as TBH2:
Position Management and Employee Data in form 4.50
Information in Workforce form 4.50 generally comes from these sources:
1. Position Management
2. HRMS
3. Payroll Entries
4. Alpha Salary from Forecast forms
5. Create a position in Hyperion Form 4.30
We will review a position/employee in form 4.50, to observe the outcome based on the selections we
make in Position Management.
The column on the left represents Position numbers and the 2nd column represents the employee ID#
and the incumbent name and the third column is the total compensation (Salary and Benefits). In the
months is salary and benefit expense from either Position Management or HRMS. In order to view the
split between salary and benefit click on the expand button beside Total Compensation.
Hyperion Planning
Page 59
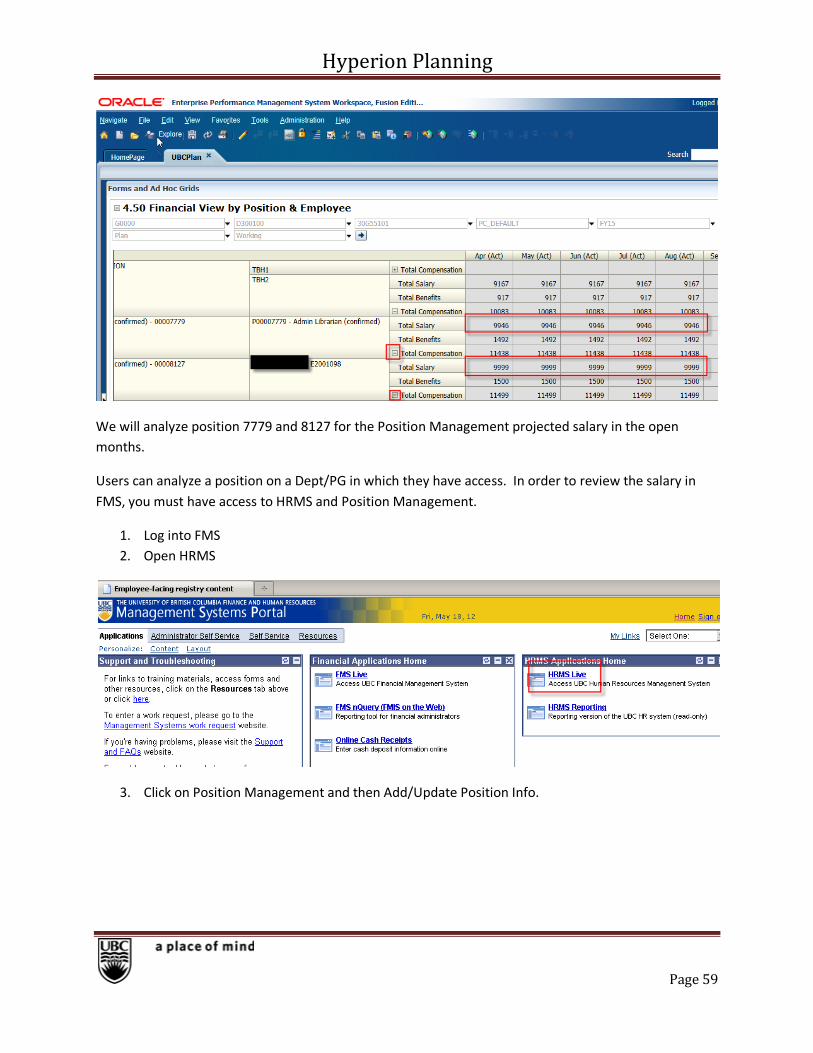
We will analyze position 7779 and 8127 for the Position Management projected salary in the open
months.
Users can analyze a position on a Dept/PG in which they have access. In order to review the salary in
FMS, you must have access to HRMS and Position Management.
1. Log into FMS
2. Open HRMS
3. Click on Position Management and then Add/Update Position Info.

Hyperion Planning
Page 60
4. Type the Position number into the Position Number field. Note you will have to add zeroes to
the beginning of the Position number.
5. Check off the position and click “Update”
Hyperion Planning
Page 61
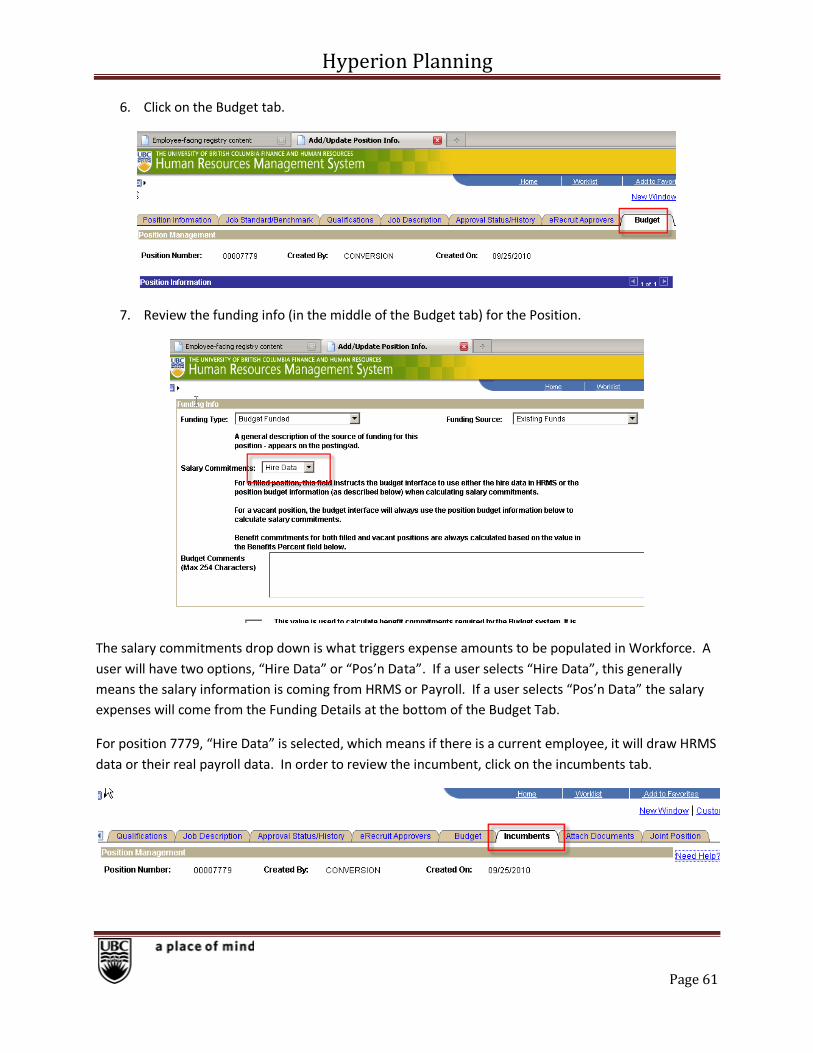
6. Click on the Budget tab.
7. Review the funding info (in the middle of the Budget tab) for the Position.
The salary commitments drop down is what triggers expense amounts to be populated in Workforce. A
user will have two options, “Hire Data” or “Pos’n Data”. If a user selects “Hire Data”, this generally
means the salary information is coming from HRMS or Payroll. If a user selects “Pos’n Data” the salary
expenses will come from the Funding Details at the bottom of the Budget Tab.
For position 7779, “Hire Data” is selected, which means if there is a current employee, it will draw HRMS
data or their real payroll data. In order to review the incumbent, click on the incumbents tab.
Hyperion Planning
Page 62
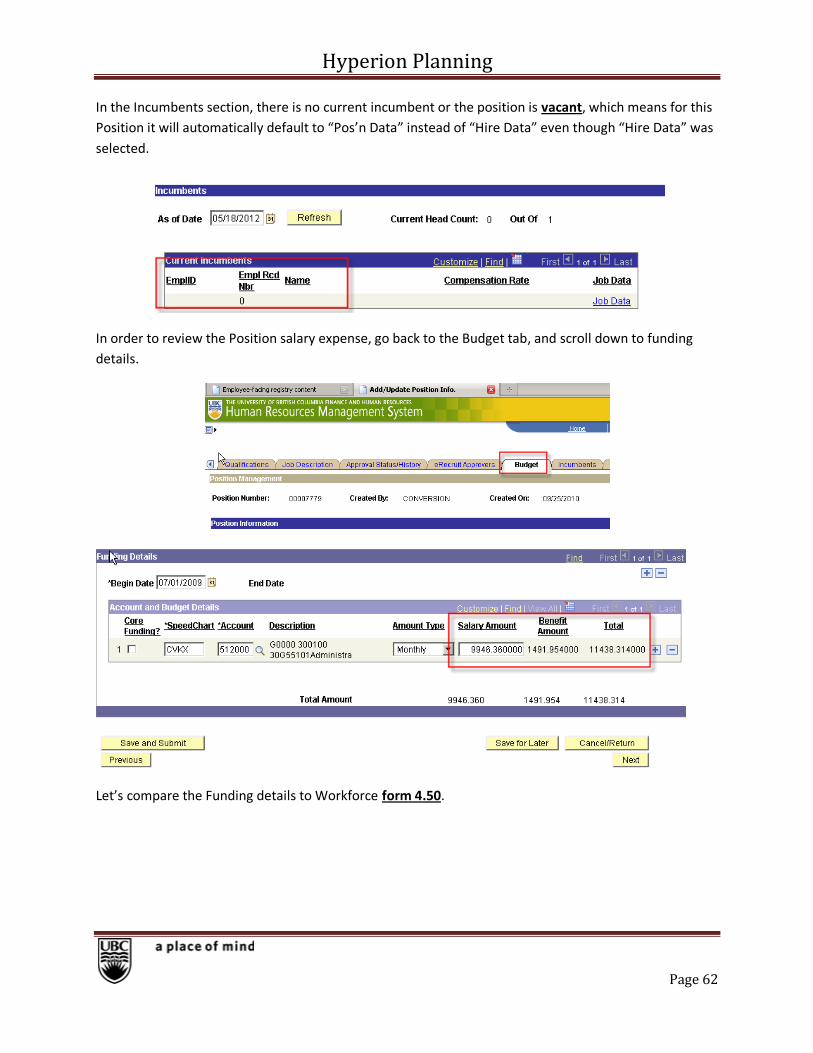
In the Incumbents section, there is no current incumbent or the position is vacant, which means for this
Position it will automatically default to “Pos’n Data” instead of “Hire Data” even though “Hire Data” was
selected.
In order to review the Position salary expense, go back to the Budget tab, and scroll down to funding
details.
Let’s compare the Funding details to Workforce form 4.50.
Hyperion Planning
Page 63
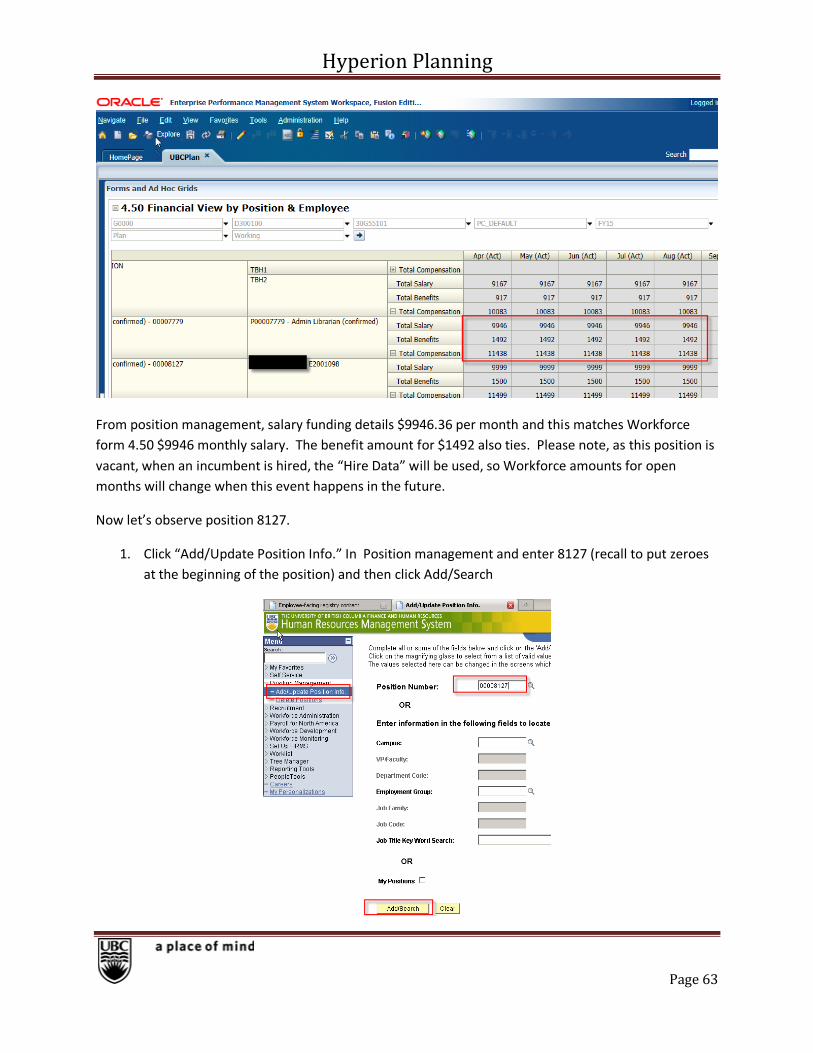
From position management, salary funding details $9946.36 per month and this matches Workforce
form 4.50 $9946 monthly salary. The benefit amount for $1492 also ties. Please note, as this position is
vacant, when an incumbent is hired, the “Hire Data” will be used, so Workforce amounts for open
months will change when this event happens in the future.
Now let’s observe position 8127.
1. Click “Add/Update Position Info.” In Position management and enter 8127 (recall to put zeroes
at the beginning of the position) and then click Add/Search

Hyperion Planning
Page 64
2. Check off the position and click Update.
3. Go to the Budget tab.
4. Review Funding Info
Hyperion Planning
Page 65
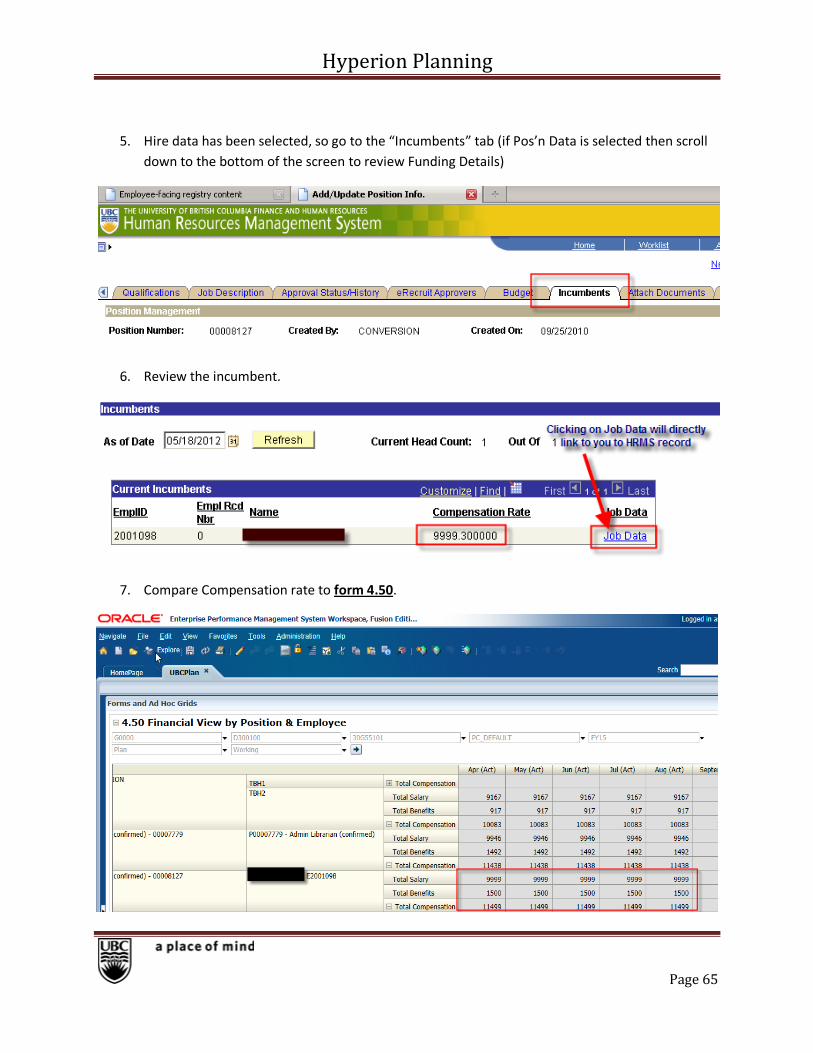
5. Hire data has been selected, so go to the “Incumbents” tab (if Pos’n Data is selected then scroll
down to the bottom of the screen to review Funding Details)
6. Review the incumbent.
7. Compare Compensation rate to form 4.50.

Hyperion Planning
Page 66
The compensation rate of $9999 in Position Management ties to the Salary line for $9999 in Workforce
form 4.50. The benefit amount is just a calculation based on the % set in Position Management. The
percentage can be seen in the Budget tab, funding details.
If we calculate $9999 time 15%, this equals $1499.85 or $1500 and it ties to Workforce form 4.50.
Position Management will yield the following results based on what we select in the Budget Tab:

Hyperion Planning
Page 67
1. “Hire Data” the compensation rate is from HRMS/Payroll and reflects the real salary expense.
2. “Pos’n Data” the compensation rate is the Funding Details at the bottom of the Budget tab for
the position
Things to consider:
Pool positions where there are more than one incumbent are always “Pos’n Data’. Even if we
select “Hire Data”, it will default to “Pos’n Data”.
Vacant position – default to “Pos’n Data” where there is no incumbent
Frequency of Workforce Updates
Workforce is currently updated every weekend except the week that users are asked to update their
Forecast for the Operating Report.
Actuals Loaded to Hyperion
Actuals are loaded to Hyperion on a monthly basis. Generally the load occurs one day after Financial
Services sends out an email stating all the journals are posted and reports can be run.
Please view the Universal Schedule for details on the exact dates of the Workforce Updates and FMS
Actuals loaded to Forecast.
http://www.finance.ubc.ca/budget/budget-schedule-guidelines-references-and-updates
And then click “Universal Schedule”.
Summary
This guide should be used as a supplement to the Forecast training guide and the Fund transfer training
guides. For more information on these other guides, please visit the Management Reporting and
Budgeting website at this link:
http://www.finance.ubc.ca/budget-office/hyperion-campus-wide-budgeting
This guide did not go over every component of Hyperion, however we went through the key processes
in how to update your Plan using either Working or Annual versions. And we also went through how
data flows into Hyperion from other systems which is vital when trying to understand the information in
your Forecast or Plan.
If you have any questions in regards to the guide or anything Hyperion related, please send an email to
End of Training Document