Hybrid assembly at Glasgow. Placing ASICs Arrange 20 ASICs in ASIC tray with strip bond pads facing...
9
Hybrid assembly at Glasgow
-
Upload
wilfrid-thomas-atkinson -
Category
Documents
-
view
216 -
download
0
Transcript of Hybrid assembly at Glasgow. Placing ASICs Arrange 20 ASICs in ASIC tray with strip bond pads facing...

Hybrid assembly at Glasgow

Placing ASICs• Arrange 20 ASICs in ASIC tray with strip bond pads facing outwards
– ASICs to be used in ‘Cat A’ sample boxes which hold 15 at a time
• Use battery operated pick up tool– Clean with PCB wash before lifting ASICs
• Check if all ASICS are sitting flat on tray
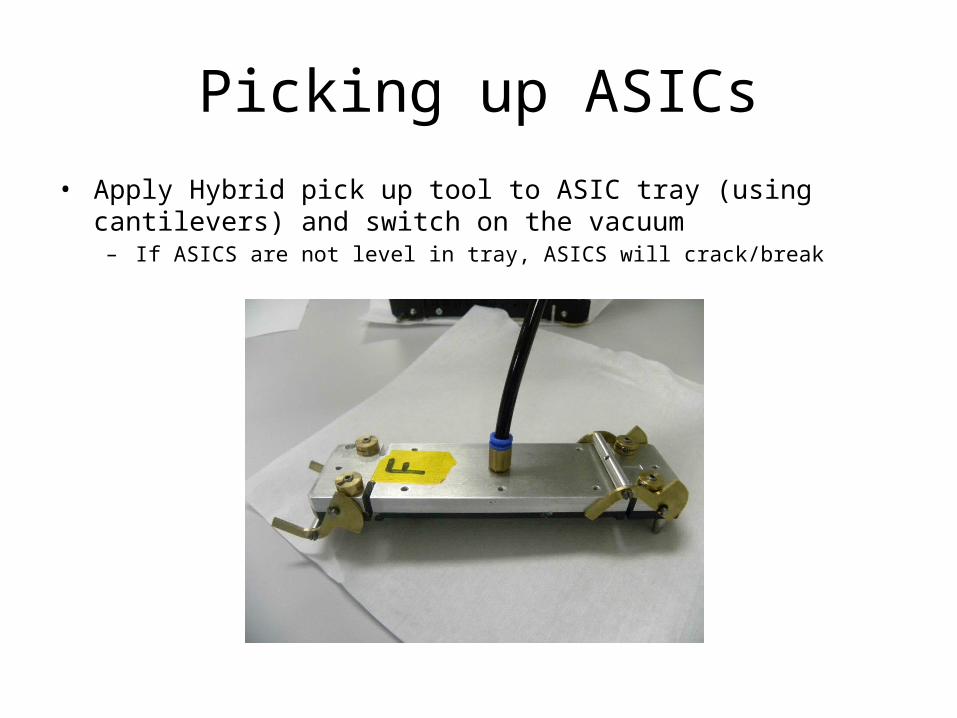
Picking up ASICs• Apply Hybrid pick up tool to ASIC tray (using cantilevers) and switch on the
vacuum– If ASICS are not level in tray, ASICS will crack/break

Picking up ASICs• Lift up Pick up Tool by rotating 2 cantilevers
– All 20 ASICs should now be held to tool by vacuum– Place on Pick up holder– Inspect for dust and any x-y movement

Glue Stencil• Attach glue stencil (and 2 outer Al holders) to top of pick up tool
– Glue stencil should be flush against ASICs• Attach clamps to either side of stencils where clamp points on PUT jig are
Preparing Glue• Open Glue package
– Undo plastic part with screwdriver– Mix sides with fingers for 30s– Use scalpel to remove 1 small corner
• Cut on clean room paper– Squeeze glue on to inside of glue package (shiny side)
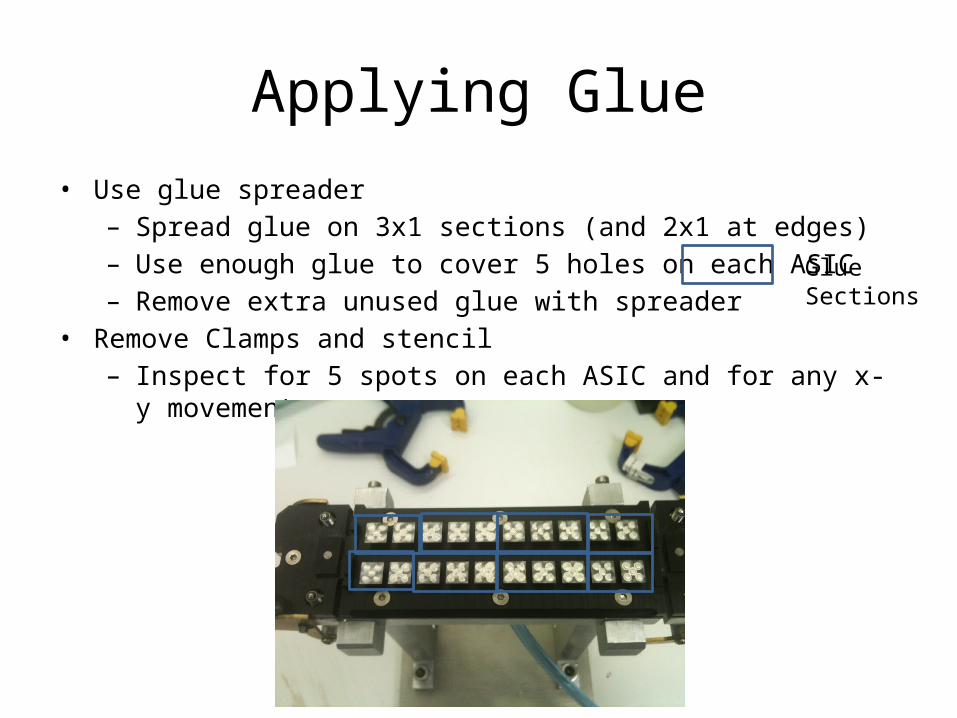
Applying Glue• Use glue spreader
– Spread glue on 3x1 sections (and 2x1 at edges)– Use enough glue to cover 5 holes on each ASIC– Remove extra unused glue with spreader
• Remove Clamps and stencil– Inspect for 5 spots on each ASIC and for any x-y movement
Glue Sections

Gluing ASICs to hybrid• Move HPUT and holder onto next bench• 8 way jig should have vacuum on for chosen panel• Place HPUT on to chosen hybrid panel rolling back cantilevers
– ‘T’ on jigs should be on same side
• Place 2 brass heights (inverted) on to HPUT (might need to lift cantilevers slightly– Leave for at least 8 hours
Cantilever not in position yet

Cleaning up
• Rub remaining glue from spreader on top paper– Use PCB wash to remove final amounts
• Use clean room paper to remove majority of glue from stencil– Used clean room paper with PCB wash to remove
rest