
HUMAN DNA TYPING with - STLCC.eduusers.stlcc.edu/departments/fvbio/Bio219_Lab_Manual/LAB 16...
14
LAB 16 HUMAN DNA TYPING USING PCR Written by Eilene Lyons; last revised 1/12/2010 16-1 LAB 16 HUMAN DNA TYPING USING POLYMERASE CHAIN REACTION (PCR) STUDENT GUIDE GOAL The goal of this lab is to use polymerase chain reaction (PCR) to compare a human DNA polymorphism. OBJECTIVES After completion, the student should be able to: 1. Isolate his or her DNA from cheek cells and perform PCR using that DNA. 2. Interpret the results of the PCR reaction, given information about polymorphisms in humans and about the molecular process of PCR. 3. Answer questions regarding the genotype of DNA donors when given PCR VNTR results. 4. List the reagents used for PCR and describe what occurs (to the DNA) in each step of a cycle. 5. Describe several applications of PCR. BACKGROUND Human DNA Polymorphisms Most of the DNA in our chromosomes is more like that of other people than it is different. However, there are regions of human chromosomes that are different in different individuals. These variable sites in the DNA are called "polymorphic" which means "many forms." These polymorphic sites are the regions that are used in forensics, DNA fingerprinting, disease diagnosis, identification of human remains, testing products for bacterial contamination and paternity testing. Polymorphisms are found mainly in the regions of the DNA between the genes, a region that comprises about 90% of the human genome. Some of these polymorphic regions are composed of a particular sequence in the DNA that is repeated over and over. Longer repeating sequences of up to 16 base pairs of DNA that get repeated over and over are called micro-satellites or sometimes VNTRs, which stands for variable number of tandem repeats. Shorter ones, such as GAT in GATGATGATGATGATGAT, are called mini-satellites or STRs, for small tandem repeats. STRs are used by the FBI and law enforcement agencies for DNA fingerprinting in criminal investigations. In 1998, the FBI launched its CODIS database (Combined DNA Index System) consisting of 13 different amplified STR regions for each DNA sample. Multiplexing, or running all 13 PCR reactions together in the same tube, gives a distinctive DNA fingerprint for each sample entry in the database. In this lab, you will amplify a polymorphic region of DNA using PCR (polymerase chain reaction). The site is VNTR D1S80, which is from a non-coding region of chromosome
-
Upload
nguyenkhue -
Category
Documents
-
view
215 -
download
0
Transcript of HUMAN DNA TYPING with - STLCC.eduusers.stlcc.edu/departments/fvbio/Bio219_Lab_Manual/LAB 16...

LAB 16 HUMAN DNA TYPING USING PCR
Written by Eilene Lyons; last revised 1/12/2010 16-1
LAB 16
HUMAN DNA TYPING USING
POLYMERASE CHAIN REACTION (PCR)
STUDENT GUIDE
GOAL
The goal of this lab is to use polymerase chain reaction (PCR) to compare a human DNA
polymorphism.
OBJECTIVES
After completion, the student should be able to:
1. Isolate his or her DNA from cheek cells and perform PCR using that DNA.
2. Interpret the results of the PCR reaction, given information about polymorphisms in
humans and about the molecular process of PCR.
3. Answer questions regarding the genotype of DNA donors when given PCR VNTR
results.
4. List the reagents used for PCR and describe what occurs (to the DNA) in each step of
a cycle.
5. Describe several applications of PCR.
BACKGROUND
Human DNA Polymorphisms
Most of the DNA in our chromosomes is more like that of other people than it is
different. However, there are regions of human chromosomes that are different in
different individuals. These variable sites in the DNA are called "polymorphic" which
means "many forms." These polymorphic sites are the regions that are used in forensics,
DNA fingerprinting, disease diagnosis, identification of human remains, testing products
for bacterial contamination and paternity testing. Polymorphisms are found mainly in the
regions of the DNA between the genes, a region that comprises about 90% of the human
genome. Some of these polymorphic regions are composed of a particular sequence in
the DNA that is repeated over and over. Longer repeating sequences of up to 16 base
pairs of DNA that get repeated over and over are called micro-satellites or sometimes
VNTRs, which stands for variable number of tandem repeats. Shorter ones, such as GAT
in GATGATGATGATGATGAT, are called mini-satellites or STRs, for small tandem
repeats. STRs are used by the FBI and law enforcement agencies for DNA fingerprinting
in criminal investigations. In 1998, the FBI launched its CODIS database (Combined
DNA Index System) consisting of 13 different amplified STR regions for each DNA
sample. Multiplexing, or running all 13 PCR reactions together in the same tube, gives a
distinctive DNA fingerprint for each sample entry in the database. In this lab, you will amplify a polymorphic region of DNA using PCR (polymerase chain
reaction). The site is VNTR D1S80, which is from a non-coding region of chromosome

LAB 16 HUMAN DNA TYPING USING PCR
Written by Eilene Lyons; last revised 1/12/2010 16-2
1 where there are 29 possible allele variations in the human population. After
amplification, you will determine your own DNA "fingerprint" for VNTR D1S80 by
using agarose gel electrophoresis to separate the PCR fragments. The alleles with fewer
repeated units will be smaller and will migrate faster through the gel while those with
more repeated units will be larger and migrate more slowly. Because each person has
inherited one allele for VNTR D1S80 from each of two parents, it is possible that there
are two different size bands of DNA in the gel. Running DNA fragments of known size
alongside your alleles can help determine the size of the D1S80 alleles, i.e. the number of
DNA base pairs. The size of the VNTRs will range from 224 to 814 base pairs. Polymerase Chain Reaction (PCR)
PCR is DNA replication in a test tube. In a cell, several enzymes are required to replicate
DNA prior to cell division. One enzyme specializes in unwinding the double helix, while
another unzips the two polymers of DNA by breaking the hydrogen bonds between the
base pairs. Single strand binding proteins stabilize the two strands while another enzyme
adds a short complementary RNA primer to the site where replication will begin on one
of the strands. See Figure 1.
Primase enzyme adds the primer
Newly synthesized „leading‟ strand
Primer
DNA Polymerase adds new nucleotides 5‟ to 3‟
DNA Ligase (Seals the nicks between Okazaki fragments)
Helicases (unwind the DNA) DNA Polymerase adds new nucleotides 5‟ to 3‟
Newly synthesized „lagging‟ strand
Okazaki fragments
3’
5’
3’
5’
5’
3’
Figure 1. The enzymes of DNA Replication. Synthesis always occurs in the 5’ to 3’
direction. Therefore, the lagging strand must be synthesized in short pieces called
Okazaki Fragments, which are later ligated together. The Leading strand is synthesized
in a continuous fashion, 5’ to 3’.
DNA Single Strand
Binding Protein stabilizes the
denatured strands.

LAB 16 HUMAN DNA TYPING USING PCR
Written by Eilene Lyons; last revised 1/12/2010 16-3
The primer is required because the replication enzyme, DNA polymerase, must have a
free 3‟ OH group in order to fit onto the DNA strand and then to add the next nucleotide.
See Figure 2. Single nucleotides are then added opposite their complementary
nucleotides to build two complete DNA molecules, each with one old strand and one new
strand. The primer concentration is very important in PCR; if it is too high, amplification
of nonspecific products may result. If too low, not enough of the target product will be
amplified. The ideal concentration is between 0.1 and 0.5 M.
For PCR, the only enzyme required is DNA polymerase. Magnesium is added to the
buffer because it acts as a co-enzyme. Too much magnesium can reduce the ability of the
polymerase to stay attached to the template, however (i.e., fidelity is decreased). Heating
to 94 C unzips the DNA by increasing the kinetic energy of the atoms, which breaks the
hydrogen bonds between the base pairs. Complementary primers
(oligodeoxyribonucleotides) are synthesized in a laboratory to match the known DNA
sequences that surround the VNTR. These primers anneal (H-bond) to their
complementary sequences as the temperature is lowered to 50 - 65 C (the temperature
used depends on the sequence of the primers). The temperature is then increased to 72 C,
which serves to keep the single strands of template DNA apart. This is also the optimum
temperature for Taq polymerase to add complementary nucleotides starting from the 3‟
OH end of the primers. Enough time is allowed, (30 seconds – 1 minute) for the enzyme
to work. The concentration of the deoxynucleotides in the reaction is also critical; if the
concentration of dNTPs is too high, for example, fidelity of the polymerase will be
decreased. Two complete double-stranded DNA molecules will result, each containing
primer sequences on either end. The reaction is heated again to 94 C to denature the
strands and begin another cycle of replication. Since all newly synthesized DNA
molecules have both primer sequences, these steps can be repeated to yield an
exponential increase in the DNA. Subsequent cycles result in an exponential increase in
the VNTR region. After about 30 cycles, one VNTR is replicated to give over one million
copies. See Figure 3.
Figure 2. DNA Replication. Shows how new nucleotides are joined to a primer.

LAB 16 HUMAN DNA TYPING USING PCR
Written by Eilene Lyons; last revised 1/12/2010 16-4
In review, PCR requires four types of organic molecules: template DNA, DNA
polymerase, deoxynucleotides, and DNA primers. PCR consists of four basic steps:
1. Denaturing the template DNA
2. Annealing the primers
3. Extension (replication) of complementary strands by DNA polymerase
4. Repeating the cycle
Gel electrophoresis of PCR products is usually performed on an agarose gel of higher
concentration. This is because the products are small (in this case, 224 to 814 bp) and
concentrated agarose works better to separate small DNA fragments.
STEP 1:
DENATURATION
HEATING TO 94 C
STEP 2: PRIMER
ANNEALING
primer
primer
COOLING TO 58 C
STEP 3:
EXTENSION
HEATING TO 72 C
FIGURE 3. Steps of PCR
primer
primer

LAB 16 HUMAN DNA TYPING USING PCR
Written by Eilene Lyons; last revised 1/12/2010 16-5
LABORATORY OVERVIEW
In this lab, you will use cells from your cheek as a source of DNA. The cells will be lysed
and the DNA will serve as the template for PCR. After the thermal cycler amplification
cycles, the PCR reactions will be run on a gel to determine if you have two different
alleles (heterozygous) or two identical alleles (homozygous) for VNTR D1S80. The base
pair size of each allele will be estimated using a standard curve.
TIMELINE
DAY 1: Cheek cell DNA will first be isolated. The PCR reactions will be set up and
amplified in a thermal cycler. When the thermal cycler is finished the reactions will be
remove and stored at -20 C. Make sure that the thermal cycler is set to maintain a
temperature of 4 C until the reactions can be removed. Designate someone to remove
them the next day and place them in -20 C storage.
DAY 2: The 1.5% agarose gel will be cast and the reactions will be electrophoresed. The
gel will be stained, photographed and analyzed.
SAFETY GUIDELINES
Ethidium bromide is a strong mutagen. Gloves must always be worn when handling
gels or buffers containing this chemical.
Boiling agarose can cause burns. Wear hot gloves when removing agarose from hot
plate or microwave oven.
The electric current in a gel electrophoresis chamber is extremely dangerous. Never
remove a lid or touch the buffer once the power is turned on. Make sure the counter
where the gel is being run is dry.
UV light, used to illuminate the DNA stained with ethidium bromide, is dangerous. Eye
protection must be used.

LAB 16 HUMAN DNA TYPING USING PCR
Written by Eilene Lyons; last revised 1/12/2010 16-6
MATERIALS
FOR PCR (DAY 1):
D1S80 primer mix
Tris Buffer
Chelating agent/Resin
10x PBS
200 base pair marker DNA
PCR Tubes with beads that contain:
dNTP nucleotide mixture
Taq DNA polymerase buffer
Taq DNA polymerase
MgCl2
20 mL graduated cylinder
200 mL graduated cylinder (to measure
150 mL)
250 mL beaker
1.5 mL microcentrifuge tubes
1.5 mL conical tubes with screw caps
15 mL conical tubes with screw caps
racks for 15 mL tubes
sterile swabs
Thermal cycler
Microcentrifuges
Vortex mixers
Centrifuge and rotor that accommodates
15 mL conical tubes
Automatic micropipetters and tips
Tips for PCR with aerosol barrier
Beakers for used tips
Beakers for cheek cell waste
Heating block at 100 C (1.5 mL tubes)
dH2O
10 mL serological pipettes
electric pipette pumps
250 mL flasks or beakers
ice buckets and ice
FOR GEL ELECTROPHORESIS (DAY 2)
Sharpie marking pen
gloves
250 ml flask
balance, spatula and weigh boats
agarose
microwave oven
heating block set at 50 C (1.5 mL tubes)
hot gloves
1x TAE electrophoresis buffer (dilute
from 50x, if needed)
100 ml graduated cylinder
dH2O
horizontal gel electrophoresis rig
automatic micropipetters and tips
used tip container
Kim wipes
1.5 ml microcentrifuge tubes
microfuge tube rack
D.C. power supply
UV Transilluminator
UV Camera and film
UV safety goggles and face shields
Metric ruler
DNA InstaStain sheets
200 base pair ladder
10x gel loading solution

BIOTECHNOLOGY I – HUMAN DNA TYPING USING PCR
Written by Eilene Lyons; last revised 1/12/2010 16-7
PROCEDURE
NOTE: Aerosol tips are used in forensic laboratories to decrease the chance of
contaminating the DNA samples with foreign DNA.
Part I. Prep for PCR
PROGRAMMING THE THERMAL CYCLER
One group should program the thermal cycler and then have the instructor verify it. This
group will then explain to another group how the programming was performed. The
second group will then explain the programming to a third group, who will explain it to a
fourth group, etc. The instructor must listen to make sure all the explanations are correct.
Step 1: 94 C for 5 minutes
Step 2: 94 C for 30 seconds
Step 3: 65 C for 30 seconds
Step 4: 72 C for 30 seconds
Step 5: Go back to Step 2 31 more times
Step 6: 4 C for 99 hours, 59 minutes, 59 seconds (refrigerates the reactions until they can
be removed.)
CHELATING AGENT (RESIN)
1. Use a Sharpie marker to label a 1.5 mL microcentrifuge tube as “RESIN” for each
class member plus 2 extra tubes.
2. Add 4 mL of Tris buffer (component B) to the tube containing the chelating resin
(Component D). MAKE SURE YOU HAVE YOUR MEASUREMENT VERIFIED
BEFORE ADDING.
3. Cap the tube and invert until it is a uniform suspension and then quickly pipette 120
L and transfer to a labeled 1.5 mL microcentrifuge tube. Repeat this procedure,
making sure that the resin is uniformly suspended before each aliquot is taken and
transferred.
4. Place any remaining resin mixture back with the kit supplies.
1X PBS DNA EXTRACTION BUFFER
1. The stock solution in the kit is 10X PBS. Dilute to 1X with dH2O to make 100 mL.
2. Label one 15 mL conical tube per student, plus two extra tubes, as “1X DNA
EXTRACTION BUFFER.”
3. Aliquot 2 mL to each of the labeled tubes, using a serological pipette and electric
pipette pump.

BIOTECHNOLOGY I – HUMAN DNA TYPING USING PCR
Written by Eilene Lyons; last revised 1/12/2010 16-8
ALIQUOTING OTHER SOLUTIONS
D1S80 primer mix (Tube A) – 50 L per group, plus one extra, into 0.5 mL
microtubes labeled as “PRIMERS.” Place on ice.
Aliquot 10 L of the 200 base pair ladder (Tube C) per group, plus one extra, into
1.5 mL microtubes labeled as “200 bp Ladder DNA – PCR.”
50 L of 10X gel loading solution per group.
DISTRIBUTING MATERIALS
Each student should have the following before beginning:
Each group should have the following before beginning:
Part II. Isolating Cheek Cell DNA
Make sure there is a heating block for 1.5 mL tubes that is heated to 100 C.
1. Use a sterile cotton swab to scrub the inside of ONE of your cheeks about 20 times.
Use as much pressure as you can and swirl the swab to get the maximum number of
cells covering the surface of the swab. DO NOT SWAB YOUR TEETH OR
TONGUE.
2. Transfer the cheek cells to the 2 mL of DNA Extraction Buffer contained in a 15 mL
conical tube. Twist the swab around and around for 1 minute to dislodge as many
cells as possible.
3. Repeat the above two steps from the other side of your mouth using a new swab to
transfer cheek cells into the same tube of DNA Extraction Buffer.
4. Transfer to a 2 mL screw cap microfuge tube and spin at 6000 rpm for one minute.
2 sterile cotton tipped swabs
One 0.5 mL microtube containing a PCR bead One 15 mL capped conical tube with 2 mL of 1X DNA EXTRACTION BUFFER (PBX)
One 1.5 mL tube with 120 L of RESIN
One 1.5 mL tube containing 40 L of Qualified water labeled as ddH2O
One 1.5 mL screw cap microcentrifuge tube
One 0.5 mL microtube containing 50 L of PRIMERS
One 1.5 mL microtube with 10 L of 200 bp Ladder DNA
20 L of 10X gel loading solution

BIOTECHNOLOGY I – HUMAN DNA TYPING USING PCR
Written by Eilene Lyons; last revised 1/12/2010 16-9
5. There should be a visible white pellet that is at least 5 mm in height up the side of the
tube from the bottom. If you do not have enough cells, you must scrub your cheeks
again, transfer the 2 mL of DNA Extraction Buffer from an extra tube into your tube
of cells, dislodge the cells from the swab into the buffer, and spin again.
6. Once you have enough cells, pour off the supernatant into a waste beaker, without
dislodging the pellet of cells. Use an automatic micropipetter to aspirate the slight
amount of buffer left in the tube, but be careful not to disturb the pellet.
7. Invert your microtube of Resin to resuspend all the resin particles, and using a P-1000
micropipetter quickly transfer the 100 L of resin to the cheek cells in the conical
tube.
8. Vortex the cells gently on a vortex mixer. The resin contains a chelating agent, which
binds to cations that are released by cells. The cations can interfere with PCR, so
must be removed from the solution.
9. Lyse the cells by placing the tube in a heating block set at 100 C for 10 minutes.
10. Vortex the cells for 10 seconds.
11. Spin the tube in a balanced centrifuge at 6000 rpm for 2 minutes to pellet the cell
debris. The DNA will be in the supernatant.
12. Remove 30-50 L of the supernatant into a new 1.5 mL tube, being careful not to
dislodge or aspirate any of the debris pellet.
13. Place the supernatant with chromosomal DNA on ice.
14. Disinfect any liquid waste with 10% bleach solution before disposing down the drain.
Place any other contaminated items, such as swabs, in the hazardous waste bag.
Part III. Amplification of the D1S80 VNTR by PCR
1. Label with your initials, the date and PCR, one of the 0.5 mL microtubes containing a
reaction pellet. Remember that the pellet, when dissolved, releases the Taq
polymerase enzyme, the buffer that the enzyme requires to function properly, and the
free nucleotides that will be used to build the new DNA molecules.
2. Tap the tube to make sure the pellet is in the very bottom.
3. Use a P-20 automatic micropipetter and PCR tips that contain an aerosol barrier to
add 20 L of the primer mix to the labeled reaction tube.
4. Add 5 L of your cheek cell DNA isolated in Part II, above, and mix all by pipetting
up and down.

BIOTECHNOLOGY I – HUMAN DNA TYPING USING PCR
Written by Eilene Lyons; last revised 1/12/2010 16-10
5. Pulse spin in a microcentrifuge.
6. Place your reaction on ice until all students are ready to amplify in the thermal cycler.
7. All students should place their PCR reactions in the thermal cycler at the same time
and then attach the Hot Bonnet. (This keeps the tubes heated throughout so that
condensation does not form on the sides and lids. If a Hot Bonnet is not available, a
layer of sterile oil is added to the top of the reaction mix).
8. Start the thermal cycler. The 32 cycles will take approximately 90 minutes.
9. When the amplification is completed, remove the tubes and store the reactions at
-20 C until separation by gel electrophoresis.
NOTE: The gel casting can be performed on Day 1, if time permits.
Part IV. Casting a 1.5% Gel for Electrophoresis of PCR Products
To cast a 1.5% agarose gel, follow previous directions for casting a gel, except use 0.75
gram of agarose with 50 mL of 1x TAE Electrophoresis Buffer. Swirl the agarose
after every 25 seconds in the microwave. The gel will appear much thicker and may
contain more bubbles when poured. After pouring, hold an automatic pipette tip and use
it to pop any bubbles that remain in the agar – they can interfere with the progress of the
DNA through the gel.
Part V. Gel Electrophoresis of PCR Products
Two students can use one gel to run their reactions.
1. Thaw your PCR reaction if it was just removed from the -20 C freezer.
2. Pulse spin your PCR reactions to move the fluid to the bottom of the tubes.
3. Add 3 L of 10x Gel Loading Solution to each reaction and pipette up and down to
mix. Spin again if all the fluid is not in the bottom of the tubes.
4. Heat your reactions along with the 200 bp DNA Ladder in a heating block set at
50 C for two minutes.
5. Immediately pulse spin the reactions & DNA ladder to move all the fluid to the
bottom of the tubes. Place on ice.
6. Load 20 L of your PCR reaction on the gel.
7. Load 20 L of the 200 bp DNA ladder in the next well.
BIOTECHNOLOGY I – HUMAN DNA TYPING USING PCR
Written by Eilene Lyons; last revised 1/12/2010 16-11
8. If the instructor has a positive control, load 20 L on the gel.
9. Skip several wells and then your teammate should load 20 L of his/her PCR reaction,
20 L of the 200 bp DNA Ladder and 20 L of the positive control.
10. Run the gel, as per previous instructions, except use 125 volts and run it until the dye
has migrated at least 8 centimeters. This will take 1½ to 2 hours.
11. After electrophoresis, stain the gel and photograph as you have done previously.
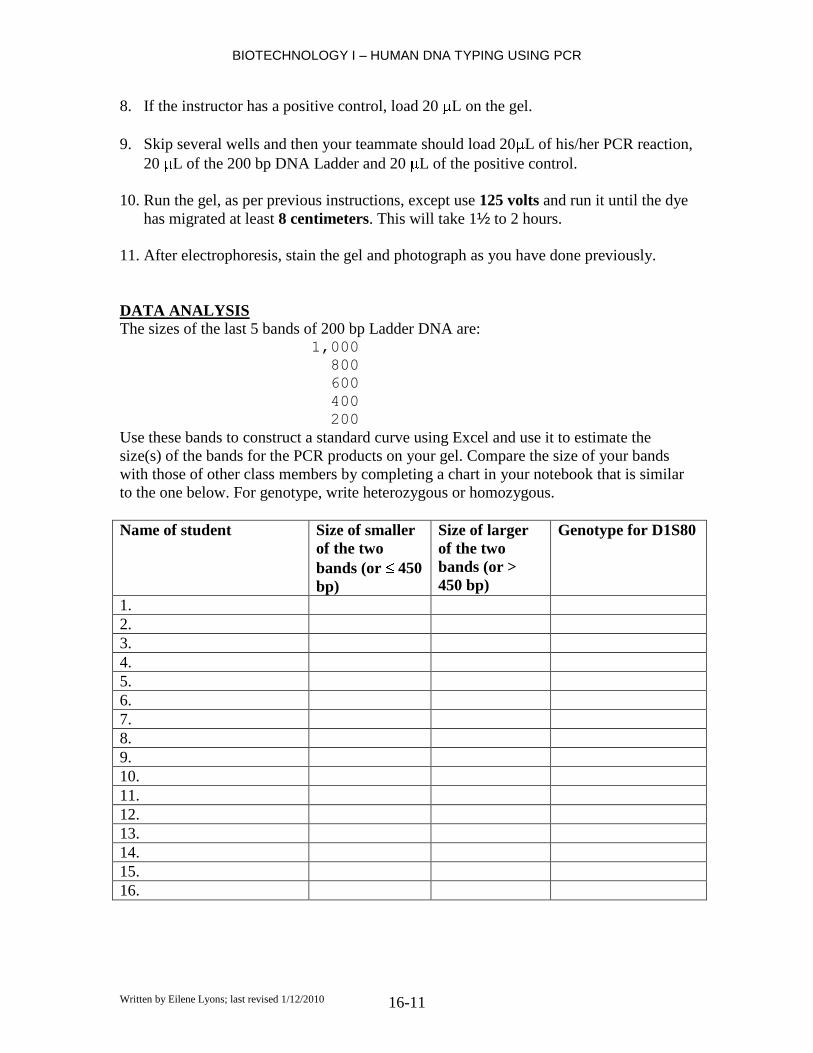
DATA ANALYSIS
The sizes of the last 5 bands of 200 bp Ladder DNA are: 1,000
800
600
400
200
Use these bands to construct a standard curve using Excel and use it to estimate the
size(s) of the bands for the PCR products on your gel. Compare the size of your bands
with those of other class members by completing a chart in your notebook that is similar
to the one below. For genotype, write heterozygous or homozygous.
Name of student Size of smaller
of the two
bands (or 450
bp)
Size of larger
of the two
bands (or >
450 bp)
Genotype for D1S80
1.
2.
3.
4.
5.
6.
7.
8.
9.
10.
11.
12.
13.
14.
15.
16.
BIOTECHNOLOGY I – HUMAN DNA TYPING USING PCR
Written by Eilene Lyons; last revised 1/12/2010 16-12
QUESTIONS
1. It is possible that a person could have two different size bands of DNA representing
the VNTR D1S80 region of chromosome #1. Explain why this can occur.
2. The known range of most D1S80 alleles of people in the US is from 224 to 640 base
pairs. Does everyone in the class fall within this range? Can you explain any outliers?
3. What was the size of the smallest and the largest alleles observed in the class?
4. How many variations of the D1S80 allele were represented in the class?
5. Population studies have identified 29 different alleles at the D1S80 locus. It is
believed that 90% of people are heterozygous for this locus. How does your class data
compare with that of the general population?
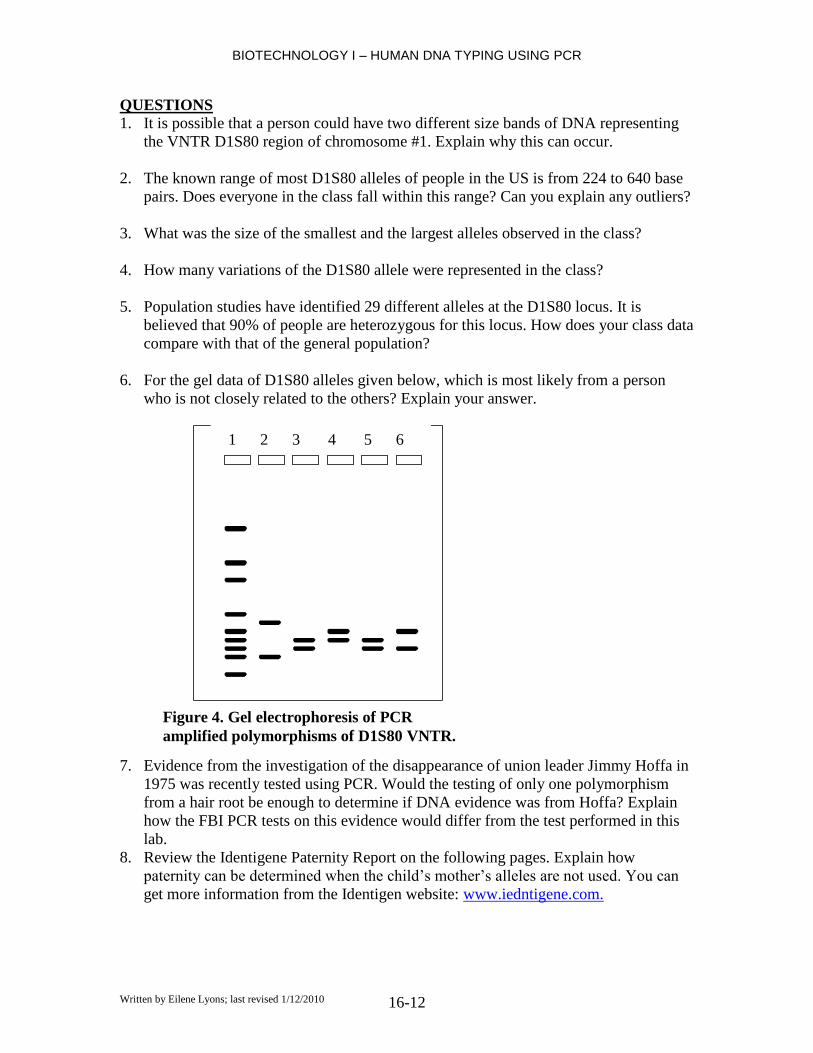
6. For the gel data of D1S80 alleles given below, which is most likely from a person
who is not closely related to the others? Explain your answer.
7. Evidence from the investigation of the disappearance of union leader Jimmy Hoffa in
1975 was recently tested using PCR. Would the testing of only one polymorphism
from a hair root be enough to determine if DNA evidence was from Hoffa? Explain
how the FBI PCR tests on this evidence would differ from the test performed in this
lab.
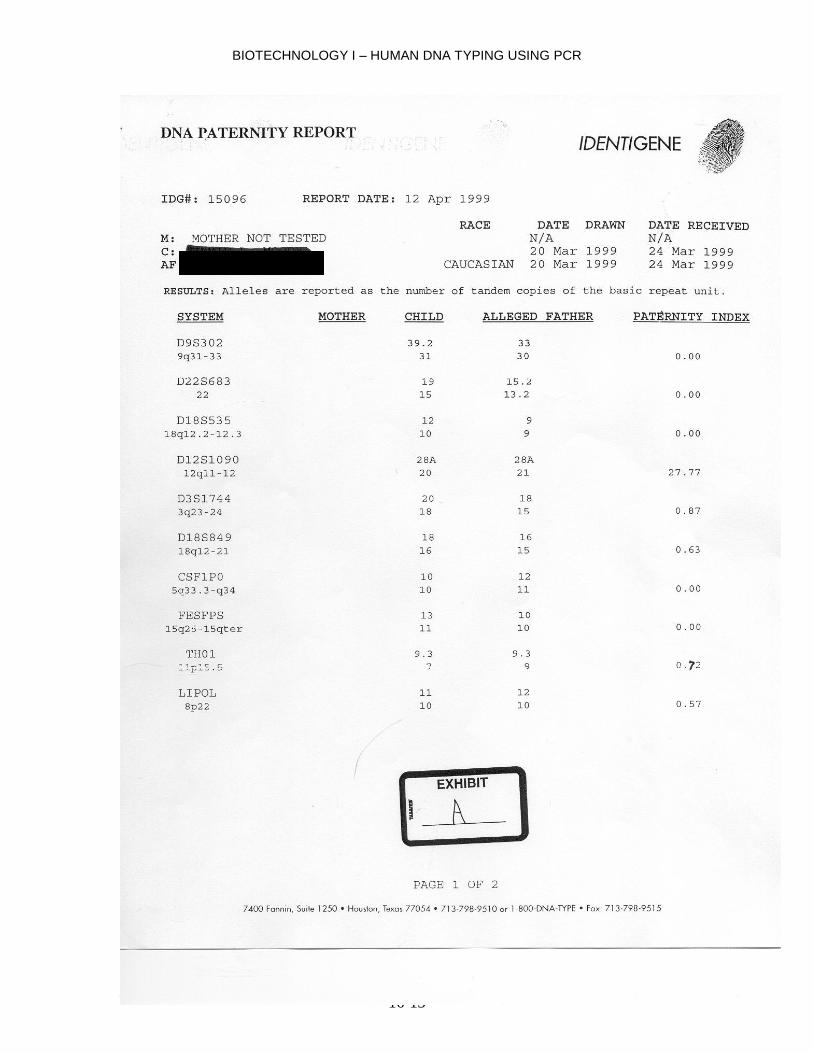
8. Review the Identigene Paternity Report on the following pages. Explain how
paternity can be determined when the child‟s mother‟s alleles are not used. You can
get more information from the Identigen website: www.iedntigene.com.
1 2 3 4 5 6
Figure 4. Gel electrophoresis of PCR
amplified polymorphisms of D1S80 VNTR.
BIOTECHNOLOGY I – HUMAN DNA TYPING USING PCR
Written by Eilene Lyons; last revised 1/12/2010 16-13

BIOTECHNOLOGY I – HUMAN DNA TYPING USING PCR
Written by Eilene Lyons; last revised 1/12/2010 16-14


