
Human Capital Management 9.1 Process Guideims.uthscsa.edu/.../HCM9_1_ProcessGuide_July2013.pdf ·...
60
DCATS 210‐567‐7777, Option 5 Information Management Client Support Services Training Guide | Version 3| July 2013 Human Capital Management 9.1 Process Guide
Transcript of Human Capital Management 9.1 Process Guideims.uthscsa.edu/.../HCM9_1_ProcessGuide_July2013.pdf ·...

DCATS 210‐567‐7777, Option 5
Information Management Client Support Services
Training Guide | Version 3| July 2013
Human Capital Management 9.1 Process Guide

Process Guide PeopleSoft HCM9.1
2
TableofContents ......................................................................................................................................................... 1 Introduction and Objectives ............................................................................................................ 3 A Closer Look at the Portal Menu and its options .......................................................................... 5 Chapter 1 – New Hire ..................................................................................................................... 8
What is a New Hire? ................................................................................................................... 9 Chapter 2 – Concurrent Job .......................................................................................................... 11
Home Department ..................................................................................................................... 11 Host (Concurrent) Department ................................................................................................. 11 Empl Records ............................................................................................................................ 12 How to Change the Check Route .............................................................................................. 12
Chapter 3 – Job Maintenance ........................................................................................................ 15 Example of a Promotion ........................................................................................................... 17 Example of a Data Change ....................................................................................................... 20 Example of Leave Of Absence ................................................................................................. 21 Example of a Return From Leave ............................................................................................. 22 Example of a Termination ........................................................................................................ 23 Example of a Position Change .................................................................................................. 24 Example of a Transfer ............................................................................................................... 25 Example: Rehire into same department .................................................................................... 26 Example: Rehire in a different department ............................................................................... 27 Example of a Retirement .......................................................................................................... 28 Information for Tenure Status page .......................................................................................... 29 Information for Workforce Job Summary page ........................................................................ 30 Information for Multiple Job Summary page ........................................................................... 31
Chapter 4 – Performance Evaluations ........................................................................................... 32 Chapter 5 – Entering Merits into PeopleSoft HCM ...................................................................... 35 Chapter 6 – Employee Biographical Data .................................................................................... 39 Chapter 7 – Person Of Interest (POI) ............................................................................................ 42
Example of Completing a POI Request Form .......................................................................... 43 Example of Inactivating a POI .................................................................................................. 46
Chapter 8 – Position Management ................................................................................................ 47 Example of Viewing Vacant Positions ..................................................................................... 49 Commonly Used Pay Group Codes .......................................................................................... 50 Example of Creating a Position ................................................................................................ 51 Example of Modifying a Vacant or Filled Position .................................................................. 53 Example of Inactivate/Activate a Position ................................................................................ 55
Chapter 9 – Tracking a PCM ........................................................................................................ 57 Chapter 10 – Running a Query ..................................................................................................... 58

Process Guide PeopleSoft HCM9.1
3
Introduction and Objectives UTHSCSA implemented the Workflow process to assist users in navigating through the various panels needed to make any changes to an employee. The Workflow guides the user through the different panels involved in the making any changes to an employee from the time of new hire through to termination. The processes we will review are:
Describe the New Hire process
Describe the Concurrent job process
Describe the Employee Biographical Data process
Describe the Job Maintenance process
Signing onto the HSC Portal To access Human Capital Management (HCM) v9.1, click on the inside.uthscsa (portal) link.

Process Guide PeopleSoft HCM9.1
4
Enter your Domain Username and Password
From the Enterprise Menu, click on the HSC Business Applications link. You will see a listing of expanded menu items, click on the sub‐level link for Human Capital Management.
A new window and menu will display.
Process Guide PeopleSoft HCM9.1
5
A Closer Look at the Portal Menu and its options Favorites Clicking on Favorites allows you to view the current Recently Used links within HCM for this session. You also have the ability to save the HCM links to pages that you may use on a daily basis in the My Favorites section. HSC Custom Components Clicking on HSC Custom Components allows you to view additional sub‐menus. Selecting a sub‐menu will display another list of options explained below.
Budget The HCM User will click on the Budget link to navigate to the Budget Summary and Employee/Position Funding. This is used to access a budget summary for their department or make position changes to an employee’s position.
Use Budget Summary
Employee/Position Funding HR User will click on the HR icon to navigate to: Inquire and Use. The HR link is for Users who will need to access an Employee Summary or to access the Employee Review.
Inquire HSC Employee Summary
Use HSC Employee Review
HSC Tenure Data HSC General Comments
HSC Merit Increases
Person of Interest Users will click on Person of Interest to navigate to: Person of Interest Form. The Person of Interest link is for Users who will need to request a Person of Interest for their department.
Use Person of Interest Request Planning Budget User will click on Planning Budget to navigate to: Category Summary, Non‐Salary Category update and Position Budgets.
Use Position Budgets
Position Management User will click on Position Management to navigate to: Create Position, Modify Position, Inactivate/Activate a Position or Position Data. The Position Management link is for

Process Guide PeopleSoft HCM9.1
6
Users who will need to create a position, modify a current position or inactivate or activate a position and to view the department’s positions.
Use Create Position Modify Position Inactivate/Activate a Position Position Data
Self Service Clicking on Self Service allows you to view and choose sub‐menus. By clicking on each of the sub‐menus you will be directed to another list of options. Self Service is available to all UT Health Science Center employees. Each sub‐menu is explained below.
Personal Information User will click on Personal Information to navigate to: Personal Information Summary. This link is for Users to review and update personal information: address, phone numbers, emergency contact information, email addresses, or marital status.
Personal Information Summary
Payroll and Compensation User will click on Payroll and Compensation to navigate to: View Paycheck. This link is available to all UTHSC employees needing to review/print a copy of their current and prior pay stubs.
View Paycheck W‐4 Tax Information View W‐2/W‐2c Forms W‐2/W‐2c Consent W‐2 Reissue Request
Benefits User will click on Benefits to navigate to: Dependents and Beneficiaries, or Benefits Summary. A UTHSC employee can view their current dependents and beneficiaries in addition to viewing current benefits.
Benefits Summary Dependent/Beneficiary Info Benefits Enrollment
Process Guide PeopleSoft HCM9.1
7
Workforce Administration Clicking on Workforce Administration allows you to view and choose sub‐menus. By clicking on each of the sub‐menus you will be directed to another list of options. Each sub‐menu is explained below.
Personal Information User will click on Personal Information to navigate to: Modify a Person, Biographical, Organizational Relationships, and Personal Relationships. These links will allow you to maintain information about a person, regardless of Jobs.
Biographical Modify a Person Additional Names General Comments
Organizational Relationships Maintain a Person’s POI Reltn Person Checklist Person Assignment Checklist
Personal Relationships Emergency Contact
Job Information User will click on Job Information to navigate to: Review Job Information. This link will allow you to maintain information about a person tied down to a specific job record.
Job Data Review Job Information Workforce Job Summary Multiple Jobs Summary
Organizational Development Clicking on Organizational Development allows you to view and choose sub‐menus. By clicking on each of the sub‐menus you will be directed to another list of options. Each sub‐menu is explained below.
Review Position/Budget Info Position Summary Position History Budget Status Vacant Budgeted Positions
Reporting Tools Clicking on Reporting Tools allows you to view and use select queries to gather information.
Query Viewer

Process Guide PeopleSoft HCM9.1
8
Chapter 1 – New Hire

Process Guide PeopleSoft HCM9.1
9
What is a New Hire?
New Hire definition: A person who has never been employed by UTHSCSA or a person terminated before September 1, 2000. If the employee has a prior work record with the Health Science Center after September 1, 2000, the employee should be entered as a Re‐hire.
Note: The position must already been created or modified in HCM prior to funding the position. If a position must be created, please submit a PCM Create form in HCM. If a position requires modification, please submit a PCM Modify form in HCM. Upon approval, the Budget office will forward the request to Human Resources. OHR will either add the new position to your budget or modify the existing position. A system generated email notification will be sent to the department. At that point, the department must proceed with funding the position before OHR can enter the New Hire status in HCM. Use the following navigation path to access the Employee / Position Funding search menu:
HSC Custom Components>Budget>Use>Employee/Position Funding
Process Guide PeopleSoft HCM9.1
10
Employee/Position Funding o If this is a new position or has not been funded, click the Add a New Value tab
and complete the necessary fields o Verify the fiscal year. o Enter position number to be funded o Click on Search
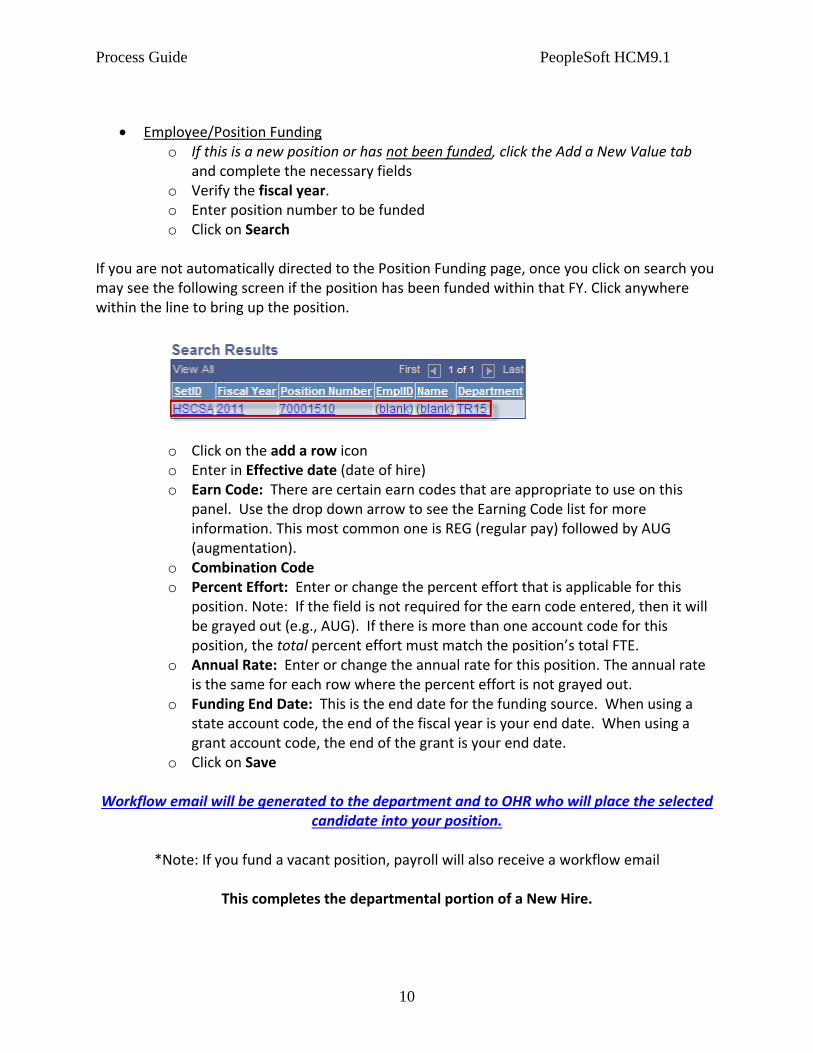
If you are not automatically directed to the Position Funding page, once you click on search you may see the following screen if the position has been funded within that FY. Click anywhere within the line to bring up the position.
o Click on the add a row icon o Enter in Effective date (date of hire) o Earn Code: There are certain earn codes that are appropriate to use on this
panel. Use the drop down arrow to see the Earning Code list for more information. This most common one is REG (regular pay) followed by AUG (augmentation).
o Combination Code o Percent Effort: Enter or change the percent effort that is applicable for this
position. Note: If the field is not required for the earn code entered, then it will be grayed out (e.g., AUG). If there is more than one account code for this position, the total percent effort must match the position’s total FTE.
o Annual Rate: Enter or change the annual rate for this position. The annual rate is the same for each row where the percent effort is not grayed out.
o Funding End Date: This is the end date for the funding source. When using a state account code, the end of the fiscal year is your end date. When using a grant account code, the end of the grant is your end date.
o Click on Save
Workflow email will be generated to the department and to OHR who will place the selected candidate into your position.
*Note: If you fund a vacant position, payroll will also receive a workflow email
This completes the departmental portion of a New Hire.
Process Guide PeopleSoft HCM9.1
11
Chapter 2 – Concurrent Job This process involves hiring employees appointed to two or more positions at the Health Science Center. Cross–Appointment(s): At least two or multiple positions in different departments with 0% FTE in WOS pay group for each position. Joint–Appointments(s): At least two or multiple positions in different departments with 1%+ FTE sharing identical pay groups for each position. If the pay groups are not identical, the employee’s benefits will be adversely affected. In PeopleSoft, employees occupying two or more positions are said to have concurrent jobs. This process requires coordination between the home department and the host department(s). Before you fund a CCJ, you must request the below information from the home department.
o Employee ID o Employee record number o Date of hire in home department o Pay group o Percent time o Benefits Eligibility
Home Department
The Home Department is the department that initially hires/appoints the employee and provides the primary appointment for the employee. The Home Department must always maintain the Academic role for Faculty appointments. Administrative roles may also be maintained by the Home Department. Communication is very important between the Home Department and the Host Department(s) and should be initiated by the Home Department.
Host (Concurrent) Department
The Host Department is any department providing an additional appointment for an employee. The Host Department may maintain the Administrative role when the Host Department is a Center or Institute.

Process Guide PeopleSoft HCM9.1
12
Empl Records
In PeopleSoft, Empl Rcd 0 (Employee Record number zero) is generally associated with the employee’s Primary Department that maintains the Administrative role. The Empl Rcd 0 denotes the default check route. The first position into which an employee is hired is accomplished using the New Hire Process and is assigned Empl Rcd 0 by PeopleSoft. All subsequent positions into which an employee is hired will be accomplished using the Concurrent Job Process and will be assigned an Empl Rcd number greater than zero.
Remember:
Each position an employee occupies must have a separate Empl Rcd number.
Empl Rcd 0 = Primary/Administrative Appointment only
How to Change the Check Route
By default, the department associated with Empl Rcd 0 (The Home Dept) is the default check route in PeopleSoft. If the employee desires a different check route, submit an e‐mail to the Payroll Office at PAY‐[email protected]. In the e‐mail, you must provide the following information:
The employee’s Empl ID (employee identification number)
The employee’s name
The default check route (the Home department ID)
The ID of the department which will be the new check route
Before beginning the CCJ business process, confirm that the home and host departments have communicated. Below is a sample email:

Process Guide PeopleSoft HCM9.1
13
For each cross appointed employee, it is important to remember the employee’s pay group MUST MATCH the pay group listed in their home department. Positions with a pay group of WOS are the only exceptions. If this procedure is not followed, it causes an overstatement of benefit deductions to that particular employee. Suggestion: The Home department can e‐mail the Host department with the Empl ID and the Employment Rcd Nbr. This allows both departments to have a record of the transaction.
The Home department is responsible for maintaining the employee’s personal data in PeopleSoft. Before a concurrent job can be added for an employee, the Home department must have completed the hiring of the employee into his/her primary appointment (Empl Rcd Nbr 0). Steps to funding a CCJ (Concurrent Job) are exactly the same as funding a New Hire. Use the following navigation path to access the Employee / Position Funding search menu:
HSC Custom Components>Budget>Use>Employee/Position Funding
Employee/Position Funding o If this is a new position or has not been funded, click the Add a New Value and
complete the necessary fields o Verify the fiscal year. o Enter position number to be funded o Click on Search
Process Guide PeopleSoft HCM9.1
14
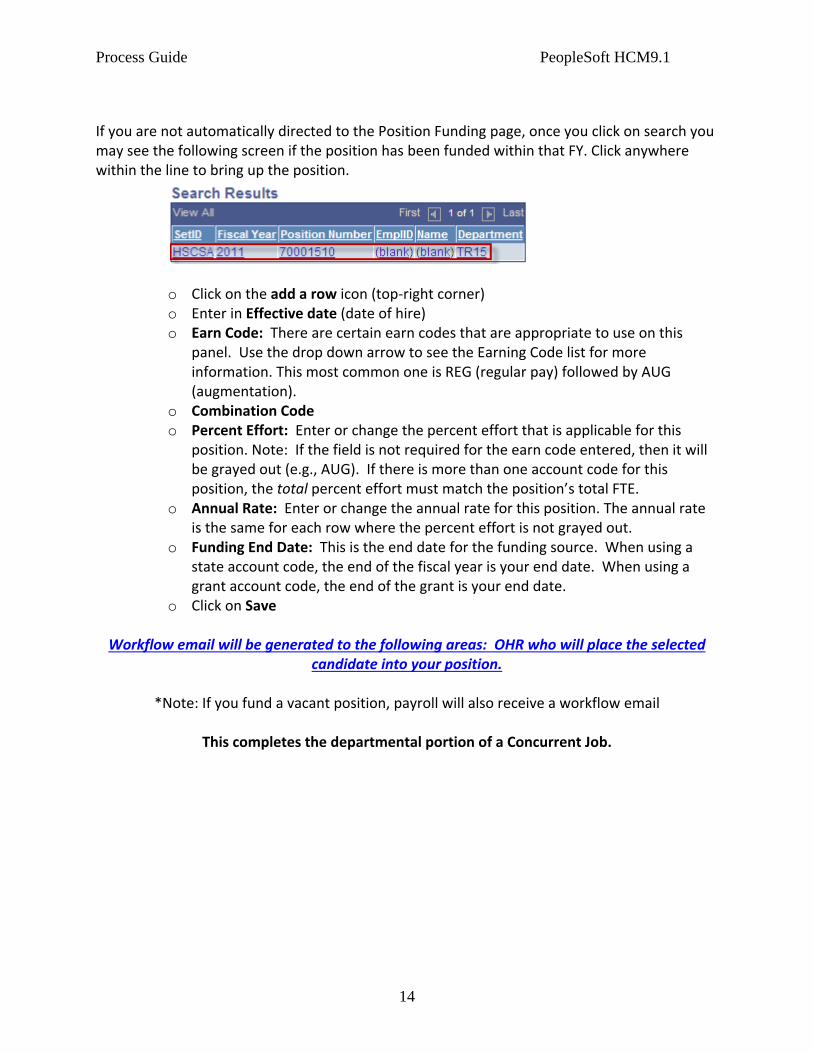
If you are not automatically directed to the Position Funding page, once you click on search you may see the following screen if the position has been funded within that FY. Click anywhere within the line to bring up the position.
o Click on the add a row icon (top‐right corner) o Enter in Effective date (date of hire) o Earn Code: There are certain earn codes that are appropriate to use on this
panel. Use the drop down arrow to see the Earning Code list for more information. This most common one is REG (regular pay) followed by AUG (augmentation).
o Combination Code o Percent Effort: Enter or change the percent effort that is applicable for this
position. Note: If the field is not required for the earn code entered, then it will be grayed out (e.g., AUG). If there is more than one account code for this position, the total percent effort must match the position’s total FTE.
o Annual Rate: Enter or change the annual rate for this position. The annual rate is the same for each row where the percent effort is not grayed out.
o Funding End Date: This is the end date for the funding source. When using a state account code, the end of the fiscal year is your end date. When using a grant account code, the end of the grant is your end date.
o Click on Save
Workflow email will be generated to the following areas: OHR who will place the selected candidate into your position.
*Note: If you fund a vacant position, payroll will also receive a workflow email
This completes the departmental portion of a Concurrent Job.

Process Guide PeopleSoft HCM9.1
15
Chapter 3 – Job Maintenance

Process Guide PeopleSoft HCM9.1
16

Process Guide PeopleSoft HCM9.1
17
Example of a Promotion
Promotion: The movement of an employee from one position to another position at a higher rank. The department will need to update the funding information on the position and also the job maintenance on the employee page. When processing a promotion within your department, you will begin with the NEW position number, not the current position number.
*Note: Position must already be modified in HCM prior to funding the position. Use the following navigation path to access the Position Funding menu:
HSC Custom Components>Budget>Use>Employee/Position Funding
Employee/Position Funding o Verify fiscal year o Enter the position number o Click on Search o On the Position Budget page, enter the following:
Click on the Add a row icon Enter in the Effective date (Date must match the date of promotion) Change Annual Rate Click Save
Workflow will be generated to the following areas: OHR and Payroll for informational purposes only.
Process Guide PeopleSoft HCM9.1
18
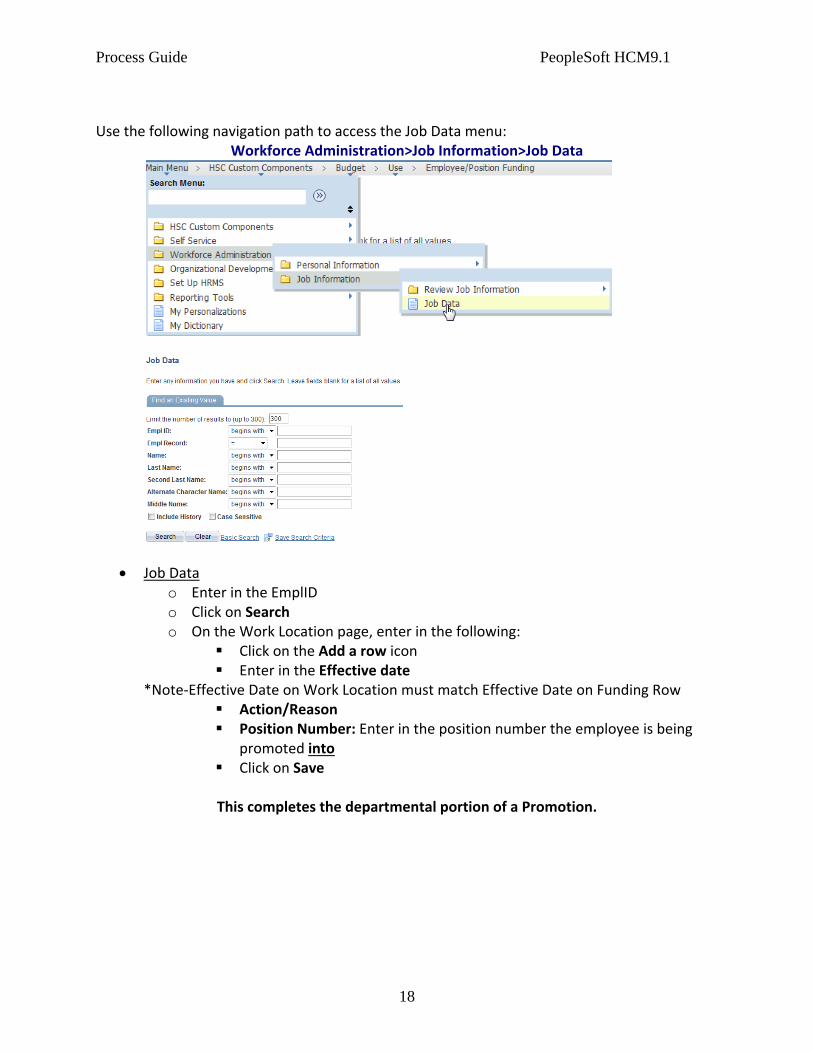
Use the following navigation path to access the Job Data menu: Workforce Administration>Job Information>Job Data
Job Data o Enter in the EmplID o Click on Search o On the Work Location page, enter in the following:
Click on the Add a row icon Enter in the Effective date
*Note‐Effective Date on Work Location must match Effective Date on Funding Row Action/Reason Position Number: Enter in the position number the employee is being
promoted into Click on Save This completes the departmental portion of a Promotion.

Process Guide PeopleSoft HCM9.1
19
*N0TE: On the Workforce Administration/Job Data page, you will see a “Go To Row” button. This button is used if you have more than one page in the employee’s history.
Example: 1 of 10
You will enter the page number you want to be directed to instead of clicking on the Left or Right arrows.
Also on the Job Data page is an “Override Position Data” button. This is not used by the front office users. It is for the Office of Human Resources. This button should be grayed out, if it is available, do not click on this button.

Process Guide PeopleSoft HCM9.1
20
Example of a Data Change
This action is used to record changes to the funding source, funding end date, etc. The department will need to update the funding information on the position and also the job maintenance on the employee page.
Use the following navigation path to access the Position Funding menu: HSC Custom Components>Budget>Use>Employee/Position Funding
Employee/Position Funding o Verify fiscal year o Enter the position number o Click on Search o On the Position Budget page, enter the following:
Click on the Add a row icon Enter in the Effective date
*Note‐Effective Date on Work Location must match Effective Date on Funding Row Change Combination Code Click Save
Workflow email will be generated to the following areas: OHR and Payroll for informational purposes only.
Use the following navigation path to access the Job Data menu:
Workforce Administration>Job Information>Job Data
Job Data o Enter in the EmplID o Click on Search o On the Work Location page, enter in the following:
Click on the Add a row icon Enter in the Effective date
*Note‐Effective Date on Work Location must match Effective Date on Funding Row Action/Reason Click on Save
This completes the departmental portion of a Data Change.
Process Guide PeopleSoft HCM9.1
21
Example of Leave Of Absence
This action is used to record time off granted to an employee without pay. PLOA is ONLY for Military Leave. If you have an employee in a CCJ that is funded, it must also be LOA. Note: An individual cannot be placed on LOA unless ALL pools are exhausted. The department will need to update the funding information on the position and also the job maintenance on the employee page.
Use the following navigation path to access the Position Funding menu: HSC Custom Components>Budget>Use>Employee/Position Funding
Employee/Position Funding o Verify fiscal year o Enter the position number o Click on Search o On the Position Budget page, enter the following:
Click on the Add a row icon Enter in the Effective date(The effective date should be the last day
worked, plus 1 day) Verify/edit funding row Click Save
Use the following navigation path to access the Job Data menu:
Workforce Administration>Job Information>Job Data
Job Data o Enter in the EmplID o Click on Search o Select Empl Rcd Nbr 0 o On the Work Location page, enter in the following:
Click on the Add a row icon Enter in the Effective date
*Note‐Effective Date on Work Location must match Effective Date on Funding Row Enter in Action / Reason Enter Expected Return Day Click on Save
Workflow email will be generated to the following areas: Employee, Payroll, Benefits and the requesting Department.
This completes the departmental portion of a Leave Of Absence.

Process Guide PeopleSoft HCM9.1
22
Example of a Return From Leave
This action is used to record the return of an employee from LOA, to active payroll status. Note: We strongly suggest an individual not be placed back on payroll (RLOA) until you see them in the office to confirm their physical return. The department will need to update the funding information on the position and also the job maintenance on the employee page.
Use the following navigation path to access the Position Funding menu: HSC Custom Components>Budget>Use>Employee/Position Funding
Employee/Position Funding o Verify fiscal year o Enter the position number o Click on Search o On the Position Budget page, enter the following:
Click on the Add a row icon Enter in the Effective date (Date must be the date the employee reported
to the office for work) Verify/edit funding row Click Save
Workflow email will be generated to the following areas: OHR and Payroll.
Use the following navigation path to access the Job Data menu:
Workforce Administration>Job Information>Job Data
Job Data o Enter in the EmplID o Click on Search o On the Work Location page, enter in the following:
Click on the Add a row icon Enter in the Effective date (same as Position Funding Effective date)
*Note‐Effective Date on Work Location must match Effective Date on Funding Row Enter in Action / Reason (Return From Leave) Expected date of return is removed Click on Save
This completes the departmental portion of a Return from leave of absence.

Process Guide PeopleSoft HCM9.1
23
Example of a Termination
This action is the separation from employment of a UTHSCSA employee from one or more positions. Terminations of concurrent jobs are the responsibility of each host department who granted the appointment. If the primary job (Home Department) is terminating, and the concurrent jobs will remain active, the host department must contact OHR (Office of Human Resources) to rotate the employee records. The department will need to update the funding information on the position and also the job maintenance on the employee page. Use the following navigation path to access the Position Funding menu:
HSC Custom Components>Budget>Use>Employee/Position Funding
Employee/Position Funding o Verify fiscal year o Enter the position number o Click on Search o On the Position Budget page, enter the following:
Click on the Add a row icon Enter in the Effective date (the date will be the last day worked, plus one) Click Save
Use the following navigation path to access the Job Data menu:
Workforce Administration>Job Information>Job Data
Job Data o Enter in the EmplID o Click on Search o On the Work Location page, enter in the following:
Click on the Add a row icon Enter in the Effective date (the date will be the last day worked, plus one)
*Note‐Effective Date on Work Location must match Effective Date on Funding Row Enter in Action / Reason Click on Save
Workflow email will be generated to the following areas: Department, Employee***, Bursars, UT Police, Library, Payroll, Computing Resources, Office of Human Resources, and HCM
security.
This completes the departmental portion of a Termination.

Process Guide PeopleSoft HCM9.1
24
Example of a Position Change An inTRAdepartmental transfer from one position to another, within the same department. This transfer can be completed by the department only if both positions belong to the same department. An inTERdepartmental transfer is a move from one department to another (Job Data Entry made by HR only). The department will need to update the funding information on the position and also the job maintenance on the employee page. After completing these steps, the department also needs to clear out the old position. *Note: Position must already be modified in HCM prior to funding the position.
Use the following navigation path to access the Position Funding menu: HSC Custom Components>Budget>Use>Employee/Position Funding
Position Funding o Verify fiscal year o Enter the new position number the employee is being transferred into o Click on Search o On the Position Budget page, enter the following:
Click on the Add a row icon Enter in the Effective date Verify/edit funding row Click Save
Workflow email will be generated to the following areas: OHR and Payroll. Use the following navigation path to access the Job Data menu:
Workforce Administration>Job Information>Job Data
Job Data o Enter in the EmplID o Click on Search o On the Work Location page, enter in the following:
Click on the Add a row icon Enter in the Effective date
*Note‐Effective Date on Work Location must match Effective Date on Funding Row Enter in Action / Reason (“New Position”) Enter in the new position number the employee is being transferred into Click on Save

Process Guide PeopleSoft HCM9.1
25
After completing the above steps, the department must clear out the old position to show status of Vacant. This rule ONLY applies when the position change occurs within your department. To clear out the old position: Use the following navigation path to access the Position Funding menu:
HSC Custom Components>Budget>Use>Employee/Position Funding
Position Funding o Verify fiscal year o Enter the old position number the employee was in o Click on Search o On the Position Budget page, enter the following:
Click on the Add a row icon Enter in the Effective date to show the position is vacant
*Note‐Effective Date must match Effective Date on Work Location Click Save
This completes the Position Change within department.
Example of a Transfer
A Transfer is an interdepartmental move from one department to another (Job Data Entry made by HR only). If the transfer is from one department to a different department, the department receiving the transfer employee will need to fund their position. OHR will place the transferring employee into the position. OHR will update the funding row which will vacate the losing department’s position.
This completes the Transfer to another department.

Process Guide PeopleSoft HCM9.1
26
Example: Rehire into same department
Rehire of a former employee of HSC is someone who has been terminated (not retired) from the UTHSCSA on or after September, 1st, 2000. A department must have an employees’ PeopleSoft Employee ID number before entering a Rehire into PeopleSoft. (Please note, once an employee has a PeopleSoft emplID number assigned to them, it remains with them permanently even when terminated). If a previous employee last worked in the same department that wants to re‐hire this person, the employee records and PeopleSoft Employee ID number will be accessible to the hiring department.
HSC Custom Components>Budget>Use>Employee/Position Funding
Employee/Position Funding o Verify fiscal year o Enter the position number o Click on Search o On the Position Budget page, enter the following:
Click on the Add a row icon Enter in the Effective date Update Combination code and Funding Click Save
Workflow will be generated to the following areas: OHR and Payroll for informational purposes only.
Use the following navigation path to access the Job Data menu:
Workforce Administration>Job Information>Job Data
Job Data o Enter in the EmplID o Click on Search o On the Work Location page, enter in the following:
Click on the Add a row icon Enter in the Effective date
*Note‐Effective Date on Work Location must match Effective Date on Funding Row Action/Reason Position Number: Enter in the position number the employee is being
hired into Click on Save
This completes the departmental portion of a Rehire‐Same Department.

Process Guide PeopleSoft HCM9.1
27
Example: Rehire in a different department
If the department a previous employee last worked in is different than the department rehiring the person, the employee records and PeopleSoft Employee ID number will not be accessible to the hiring department Note: The department will fund the position. HR will place the employee in the departments’ position upon completion of position funding row.
HSC Custom Components>Budget>Use>Employee/Position Funding
Employee/Position Funding o If this is a new position or has not been funded, click the Add a New Value tab
and complete the necessary fields o Enter fiscal year. o Enter position number to be funded o Click on Search o Click on the add a row icon o Enter in Effective date o Earn Code: There are certain earn codes that are appropriate to use on this
panel. Use the drop down arrow to see the Earning Code list for more information. This most common one is REG (regular pay) followed by AUG (augmentation).
o Combination Code o Percent Effort: Enter or change the percent effort that is applicable for this
position. Note: If the field is not required for the earn code entered, then it will be grayed out (e.g., AUG). If there is more than one account code for this position, the total percent effort must match the position’s total FTE.
o Annual Rate: Enter or change the annual rate for this position. The annual rate is the same for each row where the percent effort is not grayed out.
o Funding End Date: This is the end date for the funding source. When using a state account code, the end of the fiscal year is your end date. When using a grant account code, the end of the grant is your end date.
o Click on Save
Workflow email will be generated to the department and to OHR who will place the selected candidate into your position.
This completes the departmental portion of a Rehire‐Different Department.

Process Guide PeopleSoft HCM9.1
28
Example of a Retirement
The separation of employment of a UTHSCSA employee from all positions and has been approved for annuity benefits from Teacher Retirement System or the Optional Retirement Plan. Use the following navigation path to access the Position Funding menu:
HSC Custom Components>Budget>Use>Employee/Position Funding
Employee/Position Funding o Verify fiscal year o Enter the position number o Click on Search o On the Position Budget page, enter the following:
Click on the Add a row icon Enter in the Effective date (the date will be the last day worked, plus one) Click Save
Use the following navigation path to access the Job Data menu:
Workforce Administration>Job Information>Job Data
Job Data o Enter in the EmplID o Click on Search o On the Work Location page, enter in the following:
Click on the Add a row icon Enter in the Effective date (the date will be the last day worked, plus one)
*Note‐Effective Date on Work Location must match Effective Date on Funding Row Enter in Action / Reason Click on Save
Once an employee has been retired, you will no longer be able to view the employee in the Budget Summary panel.
This completes the departmental portion of a Retirement.

Process Guide PeopleSoft HCM9.1
29
Information for Tenure Status page
The Tenure Data Page provides a Faculty’s Track Start Date, Rank/Sts Change Effect and Granted Date.
Use the following navigation path to access and view the Tenure Data information. Go to HSC Custom ComponentHRUSETenure Data
Track Start Date: Will identify the date when Tenure Tracking began Ranks/ Sts Chg Effect: Will identify the date of last Job Title Change Granted Date: Will identify the date when Tenure Status was granted Note: The Track Start Date and Granted Date will not necessarily be the same.

Process Guide PeopleSoft HCM9.1
30
Information for Workforce Job Summary page
The Workforce Job Summary page provides general Job Information, Work Location, Salary Plan and Compensation for a Faculty and Staff employee. Use the following navigation path to access the Position Funding menu:
Workforce Administration Job InformationReview Job InformationWorkforce Job Summary
When clicking on the Expand View Option. The five tabs are combined providing a view of ONE page of information. The Go To Job column will take you to the Job Data page that was entered for that particular transaction.
Process Guide PeopleSoft HCM9.1
31
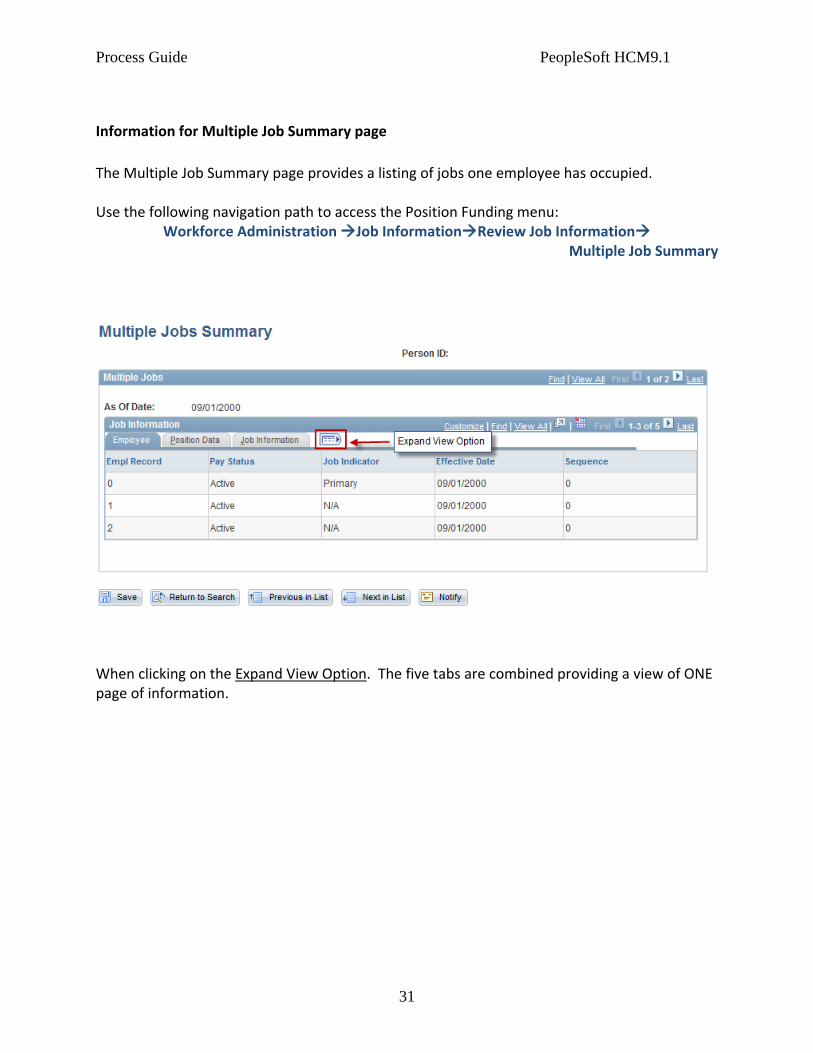
Information for Multiple Job Summary page
The Multiple Job Summary page provides a listing of jobs one employee has occupied. Use the following navigation path to access the Position Funding menu:
Workforce Administration Job InformationReview Job Information Multiple Job Summary
When clicking on the Expand View Option. The five tabs are combined providing a view of ONE page of information.

Process Guide PeopleSoft HCM9.1
32
Chapter 4 – Performance Evaluations Every year each department is responsible completing annual performance evaluations for all Non‐Faculty and Non‐Probationary employees. This process includes having a conversation with your employee that references performance for the fiscal year and goals for the next fiscal year. After you have completed meeting with your employees, you must enter the information into PeopleSoft HCM. Use the following navigation path to access the HSC Employee Review:
HSC Custom Components>HR>Use>HSC Employee Review
HSC Employee Review o Enter the Emplid or Last Name o Click on Search o You must complete all three tabs for the review
Click on Employee Review tab: Enter correct date of review

Process Guide PeopleSoft HCM9.1
33
Note: If this is the first review for the employee, the effective date will default to today’s date. Do not insert a row. Simply type in the correct date of the review and continue.
If the employee has been reviewed before, the last review date will show. Insert a new row then type in the correct effective date of the review and continue.
Review Type is Annual From/To Date: Change these to be the next fiscal year Click SAVE on the bottom left corner
Click on Review Comments tab Enter the Supervisor’s employee id number into the Reviewer ID field. If
it is unknown, click on the search icon to search for it. Click Save in the bottom left corner
Click on Performance Rating tab Select whether this employee is a Supervisor or Non‐Supervisor Enter RAW score in Points field; DO NOT enter the average score in this
field. Click Save in the bottom left corner Click on Return to Search or Next in List to continue to the next employee

Process Guide PeopleSoft HCM9.1
34
This completes the departmental portion of entering Performance Evaluations.

Process Guide PeopleSoft HCM9.1
35
Chapter 5 – Entering Merits into PeopleSoft HCM The Merit page in PeopleSoft HCM will only be available for entry at the announcement of the Budget and Planning Office. After the window for entry is passed, departments will not be able to enter data. Use the following navigation path to access the Request to Inactivate/Activate a Position:
HSC Custom Components>HR>Use>Merit Increases
Merit Increases o Enter the Deptid and the Fiscal Year (Leave the Deptid field blank to view a listing
of all Deptid’s you have access to) o Click on Search o A listing of eligible employees will be displayed for the Deptid entered. You
cannot add employees to this listing. Note: Only employees that meet the merit requirements will be listed on the HCM Merit Increases page.

Process Guide PeopleSoft HCM9.1
36
Enter the Proposed Annual Rate for each employee that will receive a merit increase (Users may enter merit notes if needed)
Note: The HCM merit page was designed to capture merits at the position level. The proposed annual rate should reflect the full HSC funded portion of the position regardless of the funding owner. However, the department user must include a comment in the Dept/EC Merit Note indicating how much, if any, of the merit will be funded by an outside department and include the name of the outside department.
The following fields will be calculated in HCM based on the amount entered in the Proposed Annual Rate field:
Dollar Increase = ((Proposed Annual Rate - Current Annual Rate) * (% Effort/100))
Percent Increase = ((Dollar Increase / Total Compensation) * 100)
Proposed Compensation Total = (Proposed Annual Rate * (% Effort/100))

Process Guide PeopleSoft HCM9.1
37
The Increase Total at the top of the page is the sum of the Dollar Increase amounts for that DEPTID.
If the proposed Annual Rate is greater than 6%, the following warning message will display. Click OK.
Note: The user will not be able to save the page if any of the Proposed annual Rates exceeds 6%. The user must adjust the Proposed Annual Rate to lower the Percent Increase to 6% or less.

Process Guide PeopleSoft HCM9.1
38
If the proposed Annual Rate is entered with decimal numbers, the following warning message will display. Click OK.
Note: The user will not be able to save the page if any of the Proposed Annual Rate amounts have decimal numbers. The user must enter whole dollar amounts.
When you have completed entering the merits for a DEPTID, click Save
This completes the departmental portion of entering Merit Increases.

Process Guide PeopleSoft HCM9.1
39
Chapter 6 – Employee Biographical Data
Employee Biographical Data process updates the personal data about an employee, such as campus directory name, home telephone, change of address, degrees earned, emergency contacts, etc. Caution! ONLY HR is responsible for changing:
Legal Name
Marital Status
Social Security Number
Directory Please do not attempt to make any of these changes in PeopleSoft!
Name (Legal)/Address Panel: It is extremely important that the name appearing on the Name/Address Panel match the name appearing on the employee’s social security card. The department will not be able to make any changes to the employee’s name. Human Resources will correct the name, if necessary. Address changes: Changes for an employee’s address should be entered at the departmental level. Do not send address changes to the Human Resources Department or the Benefits Office. Make any necessary changes on the Name/Address panel via the Employee Biographical Data workflow in PeopleSoft. The individual may also enter address changes using the Employee Self Service link (ESS).
How does HR get the necessary information from the employee: When the employee begins work, on the first day of employment they must visit Human Resources and complete the I‐9 Form. During this process, if the employee provides his/her social security card as one of the verification documents, the legal name is verified.

Process Guide PeopleSoft HCM9.1
40
If the name the employee has been using differs from their legal name, Human Resources will update the name in PeopleSoft using the legal name. As a consequence, upon subsequently retrieving the employee’s data, the department may notice that the employee’s name has been changed. The department will not be able to modify the name. Human Resources must complete any name changes such as those that result from marriage or divorce. The employee must visit Human Resources and bring the appropriate legal document that supports the name change (e.g. marriage certificate, divorce decree) along with an updated social security card or receipt from SSA with both the new name and SSN indicated on the receipt.
Current Addresses: To enter address changes, click on “View Address Detail”, then Insert a row. Effective date will default to today’s date. Be sure to follow postal regulations listed below: For those employees who live in apartments, the apartment number should be put in the Address 1 field on the Name/Address panel, followed by the street address on Address 2. If there is no apartment number, enter the street address in the Address 1. This can also be done by the employee through Employee Self Service (ESS) To enter an additional address, do not click on View Address Detail, click on the + sign all the way to the right. Select the type of address this is and enter information. All NAME changes must be processed through the Office of Human Resources.

Process Guide PeopleSoft HCM9.1
41
Phone Number Changes: To enter changes on the phone number, type over the old information. To add a phone type, highlight field, insert row and enter new information. If the employee wishes to designate that his or her personal address and home phone number be public information, the “show personal data” box should be checked. If it is unchecked, personal data information will be suppressed in the phone directory. Remember to update this information for newly hired, rehired, transferred and promoted employees upon receipt of the automated email in the department’s HRMS Inbox.
Employee Room Information: This information must be maintained and updated by the Departmental Administrator. Insert a new effective dated row with the correct building\ room information. This information is used by UT Police in emergency situations. Some Faculty/Staff may have several listings of locations, one of these should be selected as the Primary location. Education: To update the Education Level go to the Biographical Detail page, insert a new effective dated row and enter the Highest Education Level. As this status changes, please come and update this information.

Process Guide PeopleSoft HCM9.1
42
Chapter 7 – Person Of Interest (POI)

Process Guide PeopleSoft HCM9.1
43
Example of Completing a POI Request Form
NOTE: A signed Criminal Background Check form must be submitted to OHR for retention prior to completing the POI Request Form. If the department elects to appoint a Person Of Interest, it is the department’s responsibility to complete the Person Of Interest form and submit it to the Office of Human Resources. When the form has been processed, OHR will place the requested appointee into PeopleSoft HCM. Use the following navigation path to access the Person of Interest Form:
HSC Custom Components>Person of Interest>Use>Person of Interest Request

Process Guide PeopleSoft HCM9.1
44
Person of Interest Form
o Click on Add a New Value tab o POI Request number should be NEW o Click on Add o Change Department ID by selecting the magnifying glass o Enter in Action: New Appointment o Select POI Type o Enter in Effective Date o Enter Planned Exit date (HR will always assigned as 08/31 of the current
fiscal year) o Enter Supervisor ID (If not known, click on magnifying glass) o Click on Look Up button o Select Empl ID of Supervisor o Under Appointee section Click on the Edit Name o Select Prefix (if applicable) o Enter First Name o Enter Middle Name (if applicable) o Enter Last Name o Select suffix (if applicable) o Click Ok o Enter Mailing Address 1 o Select Citizenship Status o Enter Employer/School o Enter Sponsor (if the Sponsor is a Temp Agency, enter the name here)

Process Guide PeopleSoft HCM9.1
45
o Select YES/NO if person will handle Select Agents o Enter Date of Birth o Select Gender o Enter Home phone o Enter Work phone o Under Former Name section Click on Edit Name (if applicable) o Under Building use the magnifying glass to select Building o Under Level use the magnifying glass to select appropriate Floor Level o Under Room use the magnifying glass to select appropriate Room
number o Under Corridor use the magnifying glass to select appropriate Corridor o Under Int Room use the magnifying glass to select appropriate Internal
room number o Click on Primary check box
If a POI will be at multiple locations, insert additional rows and repeat the necessary steps and appoint one location as the Primary
Click on the Intent Tab o Intent: This is a required field where your department will provide a
detailed explanation/reason for hiring POI. (Visit The “Helpful Hints” in HR Records website for instructions)
Click on Duties Tab o Duties: This is a required field where you will type a detailed description
of duties the POI will perform. (Visit The “Helpful Hints” in HR Records website for instructions)
Click on the Comments tab o Comments: This is where you will enter any additional comments your
department will want to be notated. Double check all information on previous tabs before you Save. When the form has been submitted, it cannot be edited by the department.
o Click on Save o Notate your POI Request Number
Workflow email will be generated to the following areas: OHR, UT Police and EHS once the
POI Request form is submitted by the department. OHR will enter POI in HCM, which will generate a workflow email to the department.
This completes the departmental portion of preparing a Person Of Interest form.

Process Guide PeopleSoft HCM9.1
46
Example of Inactivating a POI
It is the department’s responsibility to inactivate POIs when appointments have been completed. All POIs should be reviewed by the Departmental Administrator on a monthly basis. Note: POI’s who have gone past their “Planned Exit Date” will not be automatically inactivated. It is the responsibility of the Departmental HCM User to expire these POI’s. If you elect to extend the time a POI is in your department, please send an email to the Office of Human Resources and include the following information:
POI name
POI id number
Begin Date
Original Planned Exit Date
NEW Planned Exit Date
Reason for extension Use the following navigation path to access the Person of Interest Relationship: Workforce administration>Personal Information>Organizational Relationships>Maintain a
Person’s POI Reltn
Edit Person of Interest Relationship o Enter Employee Id o Click on Search o Click on the add a row icon o Effective date is last day worked plus one o In the Status field, use the magnifying glass to select “I” to inactivate o In the Planned Exit Date field, should stay blank o Click on Save
Workflow email will be generated to the following areas: Department, Bursars, UT Police, Library, Computing Resources, Office of Human Resources, and HCM security.
This completes the departmental Inactivation of a Person Of Interest.

Process Guide PeopleSoft HCM9.1
47
Chapter 8 – Position Management

Process Guide PeopleSoft HCM9.1
48

Process Guide PeopleSoft HCM9.1
49
Example of Viewing Vacant Positions
You are the Administrator of a department and you would like to request a brand new position. Before you do so, you should view all of your vacant and inactive positions. If there is an inactive position you would like to use, submit the request to modify the position instead of creating one. To view Vacant Positions in your department, follow the steps below: Use the following navigation path to access the Vacant Position Report:
Organizational Development>Position Management>Review Position/Budget Info>Vacant
Budgeted Positions
Vacant Budgeted Positions o In Set ID type HSCSA o Department o Click on Search
You will now see a listing of all Budgeted Vacant positions for your department. You have the option of utilizing a current position and have it modified or continue to request a newly created position.

Process Guide PeopleSoft HCM9.1
50
Commonly Used Pay Group Codes
9MY This pay group is used for employees who work 9 months but are paid on a 12 month pay cycle. This pay group code only determines an employee’s pay frequency. Benefits eligibility is addressed through written comments in a Position Create Modify (PCM) Request.
HRL This pay group is used for employees who are paid by the hour, who work 50% or more, are employed for 4 ½ months or more and benefits eligible. This pay group determines an employee’s pay frequency and Benefits eligibility.
N24 This pay group is used for employees who are paid by the hour, who work 49%* or less, are employed for less than 4 ½ months and not benefits eligible. This pay group determines an employee’s pay frequency and Benefits eligibility. *When the percent time exceeds 49%, the pay group is ultimately determined by the length of employment.
SAL This pay group is used for employees who are paid once a month, who work 50% or more, are employed for 4 ½ months or more and benefits eligible. This pay group determines an employee’s pay frequency and Benefits eligibility.
N12 This pay group is used for employees who are paid once a month, who work 49%* or less, and are employed for less than 4 ½ months. This pay group determines an employee’s pay frequency and Benefits eligibility. *When the percent time exceeds 49%, the pay group is ultimately determined by the length of employment.
RWH This pay group is for Return to Work Retirees who are paid by the hour. This pay group code only determines a Return to Work Retiree’s pay frequency and prevents active payroll deductions. Benefits eligibility is addressed through written comments in a Position Create Modify (PCM) Request.
RWS This pay group is for Return to Work Retirees who are paid by the hour. This pay group code only determines a Return to Work Retiree’s pay frequency and prevents active payroll deductions. Benefits eligibility is addressed through written comments in a Position Create Modify (PCM) Request.
STP This pay group is for employees who are paid on a Stipend, not benefits eligible, identified as having a record number 10 in HCM and monitored through Payroll Services.
WOS This pay group is for individuals who are not employees, do not have a pay frequency, and do not record a percent time recorded. This is a non‐benefits eligible pay group code.

Process Guide PeopleSoft HCM9.1
51
Example of Creating a Position
When it is determined your department needs to create a new position, proceed with the below steps to Create a Position. Faculty: The FAF must be reviewed and verified by the VPAA’s office before a PCM request can be submitted. A PCM request submitted before the FAF is reviewed and verified by the VPAA’s office will result in a denial of your PCM request. Use the following navigation path to access the Request to Create a Position:
HCS Custom Components>Position Management>Use>Create Position

Process Guide PeopleSoft HCM9.1
52
Create Position o Click the Add a New Value tab o Verify Fiscal year o Verify PCM is set to NEW o Click on Add o Verify Dept id is correct by selecting magnifying glass o Enter the effective date o Verify Fiscal Year o Select Position Type
If the position is being funded in any way by State Funds Check the box for State Funding and enter the % amount of State funding.
o Click in the Job Code Field (if unknown click on magnifying glass for a list of job codes and corresponding titles)
o Click the radio button to select Appointment Duration o Click the radio button to select the Percent Time o Enter Total FTE amount o Click in the Pay Group Field (Visit the “Helpful Hints” section of the HR Records
website for instructions. An incorrect pay group code requested will result in a denial of your PCM request)
o Click Reports To Position Number ‐‐ If not known, click on magnifying glass. o Click on the hyperlink for the appropriate person o Click on the Comments Tab (intended incumbent must be provided for Faculty
positions or your PCM request will result in a denial). o Type additional comments as needed o Click on the Save button
When the department submits the form, the system will provide it a PCM #. Workflow email will be generated to the following areas: Department and Budget Office who
will then route it to OHR.
This completes the departmental portion of a creating a position.

Process Guide PeopleSoft HCM9.1
53
Example of Modifying a Vacant or Filled Position
When it is determined your department does not want to create a new position, proceed with the steps below to modify a current position in your department. When modifying a position you must complete every field on the form or it cannot be submitted. Faculty: The FAF must be reviewed and verified by the VPAA’s office before a PCM request can be submitted. A PCM request submitted before the FAF is reviewed and verified by the VPAA’s office will result in a denial of your PCM request. Use the following navigation path to access the Request to Modify a Position:
HSC Custom Components>Position Management>Use>Modify Position

Process Guide PeopleSoft HCM9.1
54
Modify Position o Click the Add a New Value tab o Verify Fiscal year o Verify PCM is set to NEW o Click on Add o Verify Dept id by selecting magnifying glass o Enter the effective date o Verify Fiscal Year is correct o Enter the position number o Enter job code (press tab to populate information) o Enter in Percent Time Change and press Tab
Anytime a percent time change is entered, the system will automatically open a Combo Code (funding source) window. Percentage cannot exceed 100% total.
o Enter Combo code o Enter 100 % in the Percent Time Change combo codes box. o Enter Department Id. o Enter the Pay Group (Visit the “Helpful Hints” section of the HR Records website
for instructions. An incorrect pay group code requested will result in a denial of your PCM request)
o Enter the Reason o Enter Reports to Position Number – If not known, click on magnifying glass. o Select the Comments tab at the top of the page o Enter any comments that are necessary o Click on Save
When the department submits the form, the system will issue a PCM Request Number. Workflow email will be generated to the following areas: Department and Budget Office who
will then route it to OHR.
This completes the departmental portion of Modifying a Vacant or Filled Position

Process Guide PeopleSoft HCM9.1
55
Example of Inactivate/Activate a Position
When it is determined your department must inactivate a position, proceed with the steps below. A position cannot be inactivated if it is currently occupied. Note: Before completing a PCM form to inactivate a position, the department must first zero out the dollars on the position. It is not necessary to zero out the percent on the position. You will not be able to activate and inactivate positions on the same request. Additionally, if you need to modify an Inactive position, you must first submit a PCM request to activate an inactive position before modifying the position in a separate PCM request. Use the following navigation path to access the Request to Inactivate/Activate a Position:
HSC Custom Components>Position Management>Use>Inactivate/Activate A Position

Process Guide PeopleSoft HCM9.1
56
Inactivate/Activate o Click the Add a New Value tab o Verify Fiscal Year o Verify PCM is set to NEW o Click on Add o Verify Dept id by selecting magnifying glass o Enter the effective date o Verify the Fiscal Year is current o Enter the position number o View the Position Action to verify status
If you are inactivating a position it will read Inactivate; if you are activating a position it will read Activate.
Verify the status (the position should not be filled) o Click on the Add a Row icon if processing multiple positions and follow
appropriate steps o Select the Comments page (additional comments should go in the comments
section) o Click on Save
When the department submits the form, the system will issue a PCM Request number. Workflow email will be generated to the following areas: Department and Budget Office who
will then route it to OHR. This completes the departmental portion of inactivating/activating a position.
Process Guide PeopleSoft HCM9.1
57
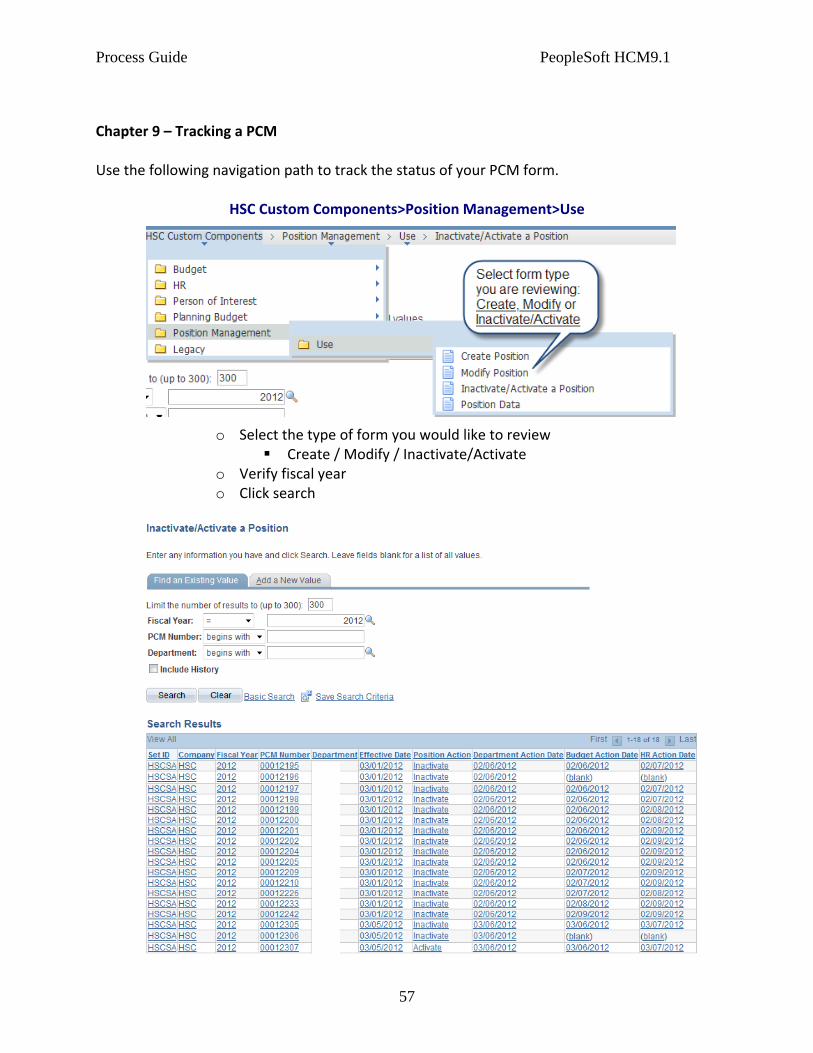
Chapter 9 – Tracking a PCM Use the following navigation path to track the status of your PCM form.
HSC Custom Components>Position Management>Use
o Select the type of form you would like to review Create / Modify / Inactivate/Activate
o Verify fiscal year o Click search

Process Guide PeopleSoft HCM9.1
58
Chapter 10 – Running a Query To run a selected query you will need to start with the following steps: Use the following navigation path to access the Benefits Summary:
Reporting Tools>Query> Query Viewer
In the Search By field leave the defaulted selection, Query Name. o Type in HSC_DEPT o Click on Search
You will be provided with the listing of Queries that are available for you to run. Select a query from the listing provided.
o Click on either Excel or HTML to view your query results o Depending on the query you select, you may be asked to provide your Dept ID,
the Fiscal year or Effective date.

Process Guide PeopleSoft HCM9.1
59
o After entering the required criteria, click on View Results If you run your query using Excel, you have the ability to either Open or Save your query. By clicking on open you will be able to view your requested query within an excel spreadsheet. Clicking on save will allow you to save the query to your desktop or any other designated location.

Process Guide PeopleSoft HCM9.1
60
Example of a Budget Query:
Example of the Birthday List Query:
When you run your query, the columns default to an extended format. To reduce the size of your columns, click on the top between two columns and you see a plus sign. Double clicking on this area will collapse your columns.
Repeat the above process for any of listed queries you may want to run.
This concludes running queries.


![15 Turf Toe MCasillas.pptx [Read-Only] - UTHSCSA](https://static.fdocuments.in/doc/165x107/620f7a6a87ec914cd709ec06/15-turf-toe-read-only-uthscsa.jpg)


