
Http://ece.unlv.edu Analog IC Test-Chip See the “An_Analog_testchip” cell in...
75
http:// ece.unlv.edu Analog IC Test-Chip See the “An_Analog_testchip” cell in MOSIS_SUBM_PADS_C5.zip located at http://cmosedu.com/cmos1/electric/electric.htm Christian Vega R. Jacob Baker UNLV Electrical & Computer Engineering
-
Upload
sharleen-kelly -
Category
Documents
-
view
214 -
download
1
Transcript of Http://ece.unlv.edu Analog IC Test-Chip See the “An_Analog_testchip” cell in...

http://ece.unlv.edu
Analog IC Test-ChipSee the “An_Analog_testchip” cell in MOSIS_SUBM_PADS_C5.zip
located at http://cmosedu.com/cmos1/electric/electric.htm
Christian Vega
R. Jacob Baker
UNLV Electrical & Computer Engineering

http://ece.unlv.eduTesting An Op-Amp
In order to get you comfortable with these chips lets quickly run a few tests with the op-amps inside the IC
When testing any chip we must first ensure the pins needed for the test
The 40 pin Dual-in-line package (DIP) pin orientation is shown to the right, note where the groove is

http://ece.unlv.eduOutline
We will test all op-amps in the chip using a buffer (follower) configuration
Afterwards one op-amp will be put in an inverting configuration and tested, testing the rest will be up to the reader
There are two tests we will run, a small signal and a large signal test (using square waves)
Small signal parameters: 100 mV peak to peak square wave 2.55 V offset 1 MHz
Large signal parameters: 1 V peak to peak square wave 3.5 V offset 1 MHz
http://ece.unlv.eduOutline
After all the actual testing has been finished, the tutorial will cover the following: Layout of the IC and some safety measures used Analyzing the test results with simulations Explaining certain issues about physical limitations (why simulations
and actual results may differ) Finally an explanation on measurement (this ties in with the previous
bullet) The next slide shows a top-level schematic of the entire circuit
inside the chip Followed by a table relating the assigned names given to the op-
amps in the schematic file available at CMOSedu.com

http://ece.unlv.eduAnalog IC Test Chip
There are 5 op-amps in this chip along with a bias circuit A simple block schematic is provided below We will simulate some of the circuits after the tests

http://ece.unlv.eduOp-Amp Name & Type
OP-AMP TYPE NAME
A SLDP Opamp_2stage_4
B 3 stage/ SLDP Opamp_3stage_1
C Miller Compensation Opamp_2stage_1
D SLCL Opamp_2stage_3
E Miller With Resistor Opamp_2stage_2
http://ece.unlv.eduBias Circuit
Notice how there is a port on all op-amps labeled Vbias It needs an external resistor for ensuring proper operation of the IC For now we will use a 100k Ohm resistor Also for better performance a 1nF capacitor will be used from VDD
to Vbias and another from VDD to GND These op-amps were made using the C5 process (from ON
semiconductor) The C5 parameters can be found on the CMOSedu website (also in
text format for use in spice modeling) More detail about the bias circuit will be given at the end of the
tutorial

http://ece.unlv.eduTest Chip Pin Out
This is the pin out of the IC you have
In this chip all the VDD terminals are tied together and all the GND terminals are tied together
So you just need to use one VDD terminal and one GND terminal to power the IC
Connect pin 34 (VDD) to 5V (positive terminal) and pin 35 to the negative terminal (GND) on your power supply

http://ece.unlv.eduTesting An Op-Amp
The first op-amp we will be using is op-amp “A”
Remember to orientate the chip on your breadboard with the groove facing up, as if you are looking at the board in front of you
Also if you look closely there is a small square painted on the chip, the pin next to it is pin 1

http://ece.unlv.eduTesting Op-Amp “A”: Split-Length Diff-
Pair (SLDP) Compensation Follow the diagram below to
properly wire the circuit Also when looking at plots
note the time and voltage scale

http://ece.unlv.eduOp-Amp “A” Small-Signal Response
You should see signals similar to those seen below Input is yellow and output is blue

http://ece.unlv.eduOp-Amp “A” Small-Signal Response
As a convention for this presentation from now and on the output is blue and input is yellow
Looking closely notice how the function generator can not immediately change voltage level (it has a finite rise/fall time even though it seems like it is a perfect square)
Also note how the output (blue) is slightly under from the input (yellow), this shows that the op-amp has an offset

http://ece.unlv.eduOp-Amp “A” Small-Signal Response
It should be mentioned that the op-amp does follow the input very closely despite there being a small offset (a few mV)
Looking at the input, the function generator does create some ripple, though tiny the op-amp mimics the ripple
The function generator you have may differ and have a much smaller ripple and rise/fall time

http://ece.unlv.eduOp-Amp “A” Large-Signal Response
With that in mind lets now run the large-signal test (slide 10) You should see a response like what is presented below Note that the scope inputs are AC coupled so there will be a small
offset due to the average of the waveforms being slightly different
http://ece.unlv.eduOp-Amp “A” Large-Signal Response
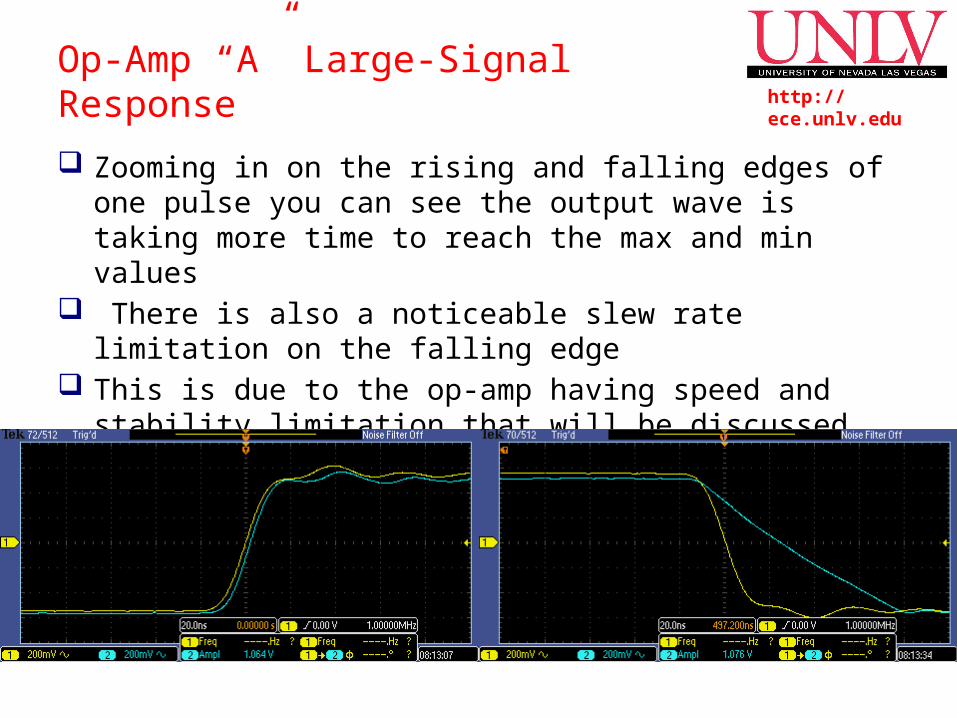
Zooming in on the rising and falling edges of one pulse you can see the output wave is taking more time to reach the max and min values
There is also a noticeable slew rate limitation on the falling edge This is due to the op-amp having speed and stability limitation that
will be discussed in more detail later It is a very crucial performance factor

http://ece.unlv.eduOp-Amp “B”: 3-stage SLDP Compensation
Now it is time to run the same two tests for the second op-amp called in the schematic op-amp “B”
Below is a diagram of what pins to connect along with the DIP pin-out for reference

http://ece.unlv.eduOp-Amp “B” Small-Signal Response
You should see the following response

http://ece.unlv.eduOp-Amp “B” Small-Signal Response
Looking at the rising and falling edges one can tell this op-amp has a small offset and some delay associated with it
However this particular op-amp seems to follow the input very closely because the output is almost identical

http://ece.unlv.eduOp-Amp “B” Large-Signal Response
Output seems to follow input closely except some small slewing on the falling edge

http://ece.unlv.eduOp-Amp “B” Large-Signal Response
Zooming in, now it can be seen that the op-amp is showing some slow behavior
It is very evident on the rising edge where it takes about 60 ns to reach the maximum
For the falling edge it takes about 20ns to reach the minimum

http://ece.unlv.eduOp-Amp “C”: Miller Compensation
Now we will use op-amp “C” The connection diagram is
provided below
http://ece.unlv.eduOp-Amp “C” Small-Signal Response
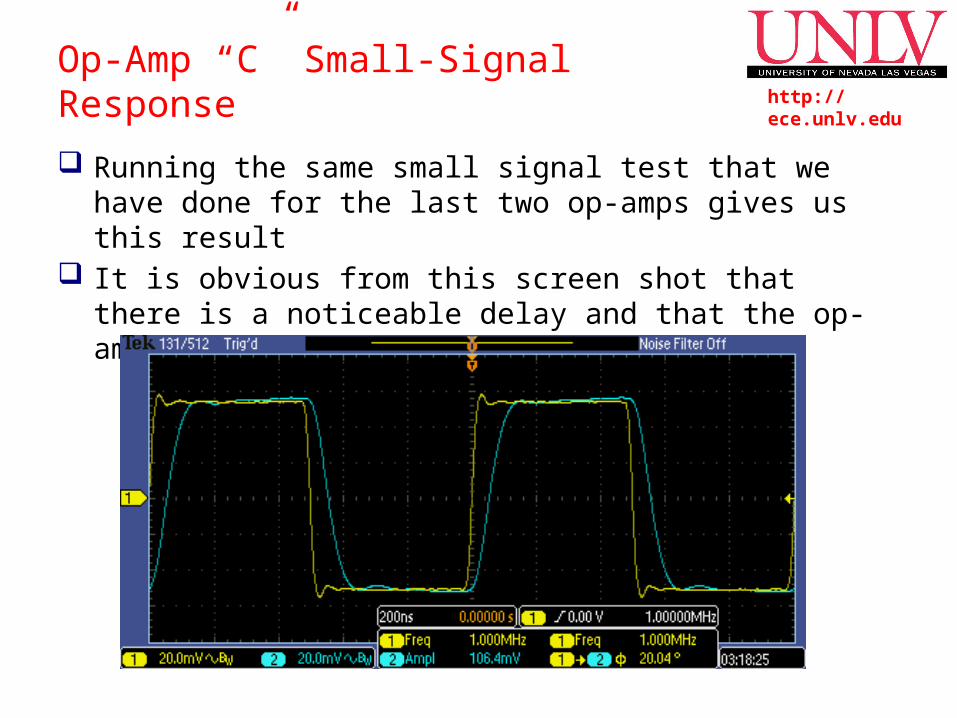
Running the same small signal test that we have done for the last two op-amps gives us this result
It is obvious from this screen shot that there is a noticeable delay and that the op-amp is somewhat slow to respond

http://ece.unlv.eduOp-Amp “C” Small-Signal Response
Notice the same exponential behavior on the pulse edges

http://ece.unlv.eduOp-Amp “C” Large-Signal Response
Now applying a large signal to this op-amp shows the same type of response from the small signal test
In other words the shape of the outputs look similar Looking closely, the speed limitation is a little greater than in the
small signal test

http://ece.unlv.eduOp-Amp “C” Large-Signal Response
The op-amp clearly is slow to respond more so than the previous test It should be pointed out that there is no noticeable offset (both the
input and output wave seemed to be centered around the same point)

http://ece.unlv.eduOp-Amp “D”: Split-Length Current Mirror
Load (SLCL) Compensation The connection diagram for
op-amp “D” is shown below

http://ece.unlv.eduOp-Amp “D” Small-Signal Response
With this op-amp there is a very small delay However it seems this op-amp has a much faster response than the
previous one tested
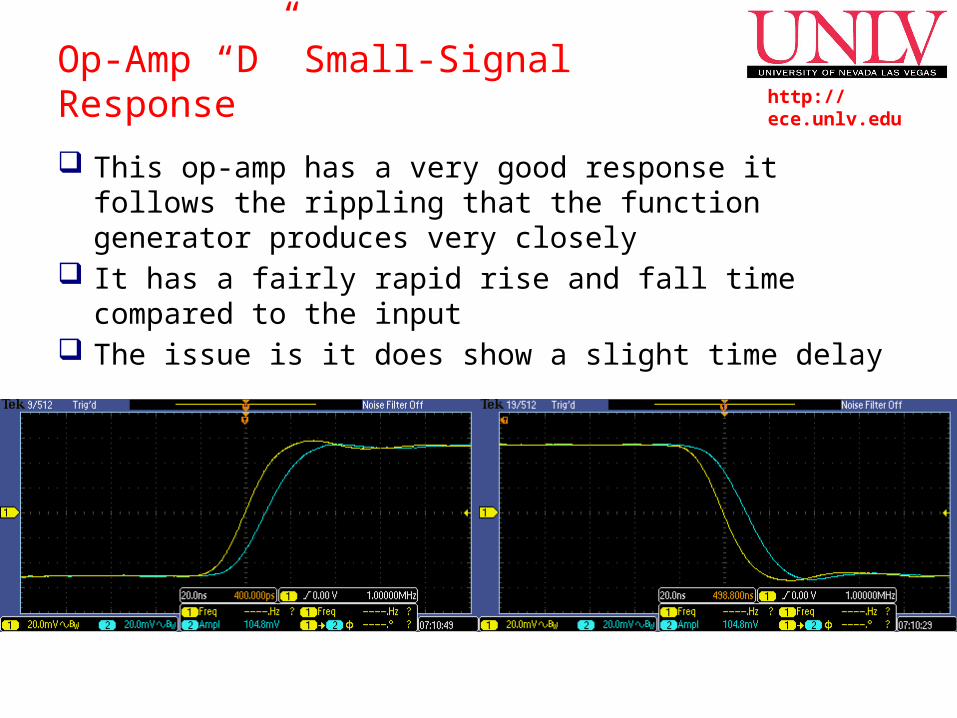
http://ece.unlv.eduOp-Amp “D” Small-Signal Response
This op-amp has a very good response it follows the rippling that the function generator produces very closely
It has a fairly rapid rise and fall time compared to the input The issue is it does show a slight time delay

http://ece.unlv.eduOp-Amp “D” Large-Signal Response
The op-amp does not exhibit the same behavior when a large pulse is applied
The op-amp seems to respond slowly on both edges with fairly pronounced slew rate limitation on the falling edge

http://ece.unlv.eduOp-Amp “D” Large-Signal Response
A close up shows how slowly op-amp “D” behaves on the edges Notice the linear slope of the falling edge of the output

http://ece.unlv.eduThe Decoupling Capacitor
When the initial setup was given it was mentioned that capacitors had to be added to the circuit in order to ensure good performance
If the capacitors were to be removed from Op-Amp “D” and the same large signal test was done, then this will be the result

http://ece.unlv.eduThe Decoupling Capacitor
Compare this result to the original large signal test There is a significant slow down right near the maximum value on
the rising edge This behavior is caused by feedback into the bias circuit from the
op-amp itself in the form of noise The feedback changes the bias and hence changes the operation of
the transistors that form the op-amp In order to deal with this the capacitors were added to reduce noise
and to maintain VDD and the Vbias pin at the same noise level (so if there are any fluctuations they both move at the same rate)

http://ece.unlv.eduOp-Amp “E”: Compensated with Miller and
Resistor Its now time to test the final
op-amp, the one labeled “E”

http://ece.unlv.eduOp-Amp “E” Small-Signal Response
It is very easy to tell that the op-amp has RC limitations on the edges with fairly large time constants

http://ece.unlv.eduOp-Amp “E” Small-Signal Response
Zooming in one can see the characteristic RC exponential curves Keep in mind the shape of the output wave on the rising and falling
edges Remember even the previous tests for the other op-amps had these
exponential rising and falling characteristic

http://ece.unlv.eduOp-Amp “E” Large-Signal Response
Similar looking response with the large-signal input

http://ece.unlv.eduOp-Amp “E” Large-Signal Response
Same characteristic exponential curves on the edges The decay rate is significantly slow to the point that the output is
distorted and no longer a square wave Note that some tests had a linear trend on the falling edge while
others an exponential

http://ece.unlv.eduInverting Configuration
Now lets make op-amp “E” invert the input signal with a gain of 2
The diagram with the necessary pins and parameters are shown
http://ece.unlv.eduSetting The Common Mode Voltage
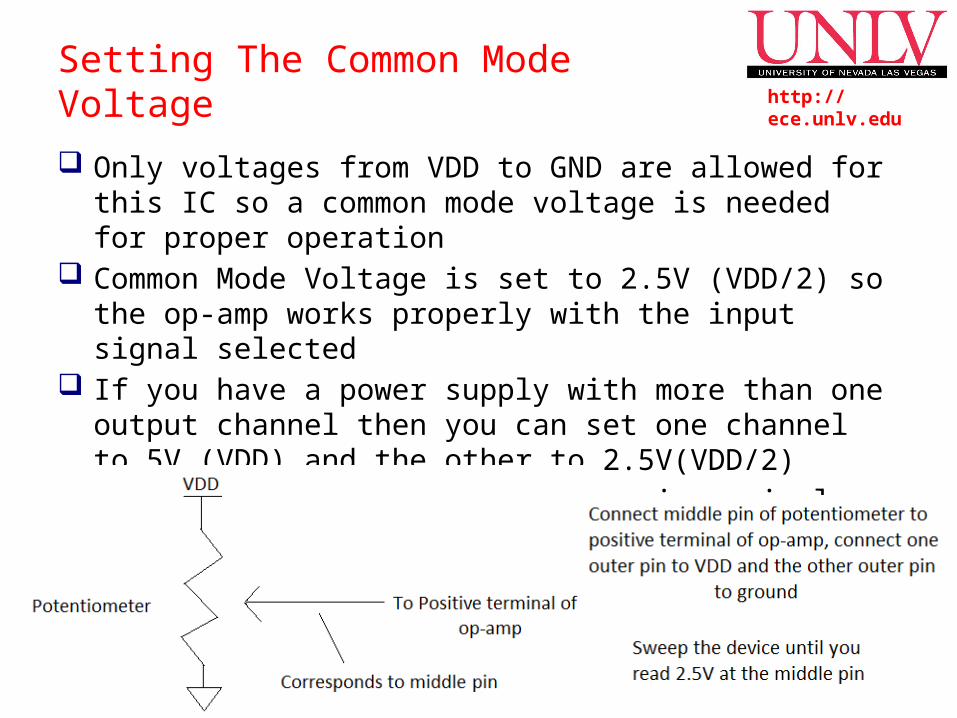
Only voltages from VDD to GND are allowed for this IC so a common mode voltage is needed for proper operation
Common Mode Voltage is set to 2.5V (VDD/2) so the op-amp works properly with the input signal selected
If you have a power supply with more than one output channel then you can set one channel to 5V (VDD) and the other to 2.5V(VDD/2)
However if you don’t then there is a simple way to set the common mode voltage to 2.5V using a potentiometer

http://ece.unlv.eduInverting Op-Amp Results
Inputting a sine wave will give you this result As you can see the input and output are centered at 2.5V and the
output has 2 times the amplitude and a 180 degree phase shift Exactly what was expected for this configuration

http://ece.unlv.eduPad Types
Moving along to the layout of the chip, in any IC each pin is connected to some kind of pad, listed below
Analog pad – this kind is used for both analog inputs and outputs (the chip you have has these)
Digital Input/Output (Bidirectional) pad – used for digital logic ICs, has a special bidirectional circuit that can be programed for use as an input or output (this kind is not present on your test chip)
VDD – connected to the “+” terminal of your power supply these ports allow the IC to be powered
GND – connected to the “-” terminal of your power supply, these ports allow a common ground to be set up

http://ece.unlv.eduAnalog Pad
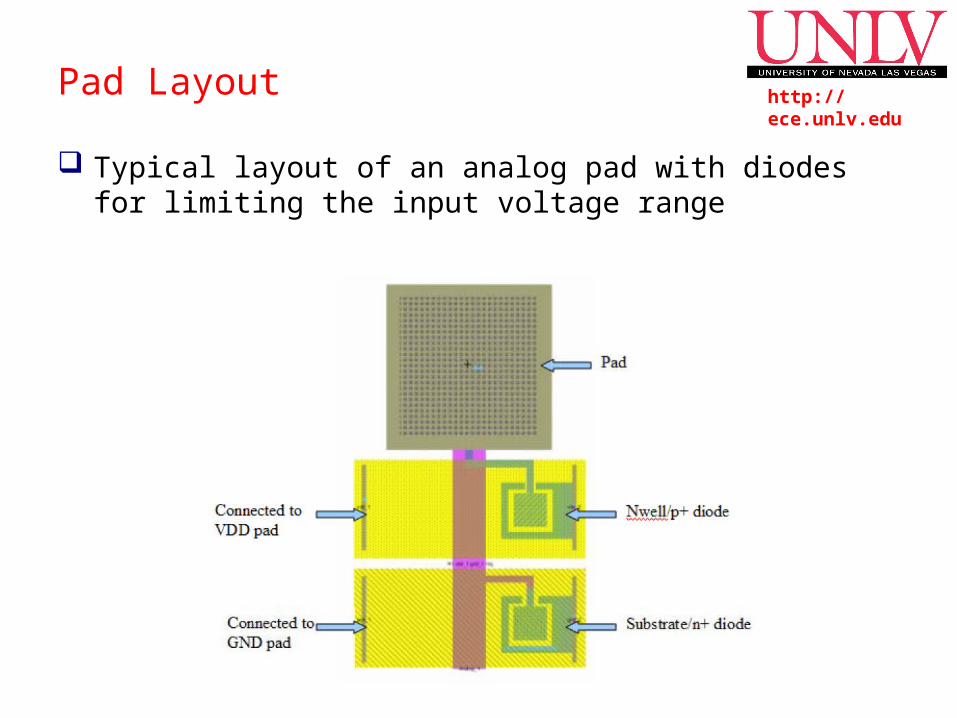
Lets take a look at the analog pad: Layout of pad Example chip using the pads ESD (electrostatic discharge) protection:
One diode is connected to VDD and one diode is connected to ground Limits the swing on the pad to VDD + 0.7 to 0 V – 0.7 V
http://ece.unlv.eduPad Layout
Typical layout of an analog pad with diodes for limiting the input voltage range

http://ece.unlv.eduExample Layout
Layout of a 12 pin analog chip (just the frame)

http://ece.unlv.eduESD Protection
Lets pause and qualitatively look at a typical protection scheme used for the analog pads
The MOSFET connected to pin 1 can be connected to a large sensitive circuit whose input (the gate of the MOSFET) is limited by the VDD to GND voltage rail

http://ece.unlv.eduLayout Of ESD Diodes
Note that the other diode in each case is reversed biased Just by simply adding diodes to a pin can protect the IC from static
and voltages that exceed the allowed rails The figure below shows how a diode would be laid out, the
terminals are labeled to show which ones correspond to the anode and cathode

http://ece.unlv.eduThe IC
The die where all the circuitry is located is inside of the DIP mounted on a special frame in the center
So the chip itself is nothing more than a ceramic housing to protect the die and for convenience
The die itself has bonding wires going from every port connecting to a certain pin on the DIP

http://ece.unlv.eduBonding Diagram
MOSIS (the manufacturer of these test chips) uses the 40 pin DIP package for its educational program
The figure on the bottom is a bonding diagram that shows how the connections are made from the pad frame to the numbered DIP package pins

http://ece.unlv.eduDie On DIP
On top of the chip there is a label covering the center If you were to take off that label you will find a flap (DO NOT
TAKE OFF THE LABEL, IT COULD DAMAGE THE IC !!!!) Lifting the flap will show this (the die is very tiny compared to the
mounting frame)

http://ece.unlv.eduThe Insides
Now lets look at the schematics of the circuits inside There are four types of two stage op-amps and one that is three
stages (op-amp “B”) along with a bias circuit These circuits have different topologies and performance
specifications, as you saw earlier
http://ece.unlv.eduThe Biasing Circuit
In order for an op-amp to work properly the internal circuitry needs to be biased right
In other words the transistors need to have the right gate voltages and the proper currents flowing to be in the desired mode of operation
Then at certain points of the bias circuit you can produce different voltage levels
The external resistor gives the user control over this property

http://ece.unlv.eduThe Biasing Circuit
The biasing circuit is designed in such a manner so it can do its job by only being powered by a fixed voltage
That is why the user needs to supply VDD and ground to the chip In the case of this chip you can set the bias voltages with an external
resistor However simulations need to be done to find the right value for the
desired modes of operation That is why the value of the bias resistor was given, simulations
were done using a 100k resistor which showed the best results

http://ece.unlv.eduBias Circuit Schematic

http://ece.unlv.eduA Look Inside An Op-Amp
Let us take a look inside of one the op-amps and learn more about it The actual op-amp ( “A” in this case) as shown has two stages

http://ece.unlv.eduThe First Look
Now that you have physically tested the op-amps inside the chip lets simulate the same type of test to see if the results match
We will only do the simulations for op-amp “A” Lets put a capacitor (shown below) at the output of this op-amp
using a unity follower (buffer) configuration for the op-amp The inputs are the same two we have been using

http://ece.unlv.eduBuffer Performance
Small signal simulation for op-amp “A” The results are very close to the test done at the beginning of the
tutorial, ignoring the rippling caused by the power supply

http://ece.unlv.eduThe Slew Rate
An issue that can occur when testing is slew rate limitations Which basically is the maximum rate a load capacitance can be
charged by your circuit Another way to think about it is how fast your circuit can charge a
load capacitance It works the other way as well with the capacitor being fully charged
and discharging current into your circuit

http://ece.unlv.eduThe Slew Rate
It is very easy to see slewing when you are applying an input where your voltage instantly changes by a large magnitude
For example look at the response of op-amp “A” to our large signal test simulation on the next slide compared to the real output from the test done at the beginning of the tutorial
Looking at all the output waveforms for the large signal test, slew rate limitation played a role on why the output was different from the input

http://ece.unlv.eduSlew Rate Limitation

http://ece.unlv.eduSlew Rate & Bandwidth Limitation
Running the same large signal test except with a 2V peak to peak input with a 2.5V offset results in this:

http://ece.unlv.eduSlew Rate & Bandwidth Limitation
Physically testing the op-amp with 2V peak to peak results in this:

http://ece.unlv.eduSlew Rate Defined
Notice the falling edge where there is a linear drop This pertains to slew rate limitations Remember capacitors take time to charge/discharge and the rate of
the charging/discharging depends on the current being sourced/sinked along with the value of the capacitance
Simply Slew Rate = = Another effect that was pointed out in the previous plot was
bandwidth limitation

http://ece.unlv.eduConcerning Measurement
You may be wondering why when we simulated the buffer with a capacitive load it matched almost exactly the test result for op-amp “A”
In reality when you put a scope probe to read the output you are essentially adding a load to your circuit
This may cause issues when measuring because the probe can have an adverse effect on your circuit and produce a wrong result
It can cause slewing and rippling on the output To your circuit the probe and the cable that goes to the oscilloscope
looks like a capacitor

http://ece.unlv.eduConcerning Measurement
Typically the probes used in academic labs have capacitance in the tens of pF
Probes come with tunable compensation to ensure an accurate voltage division over a wide frequency range
The oscilloscope has an input impedance that can be modeled as a parallel RC circuit
The cable, for frequencies under 100 MHz, behaves as a capacitor At higher frequencies it begins to act like a transmission line and
introduce delay and distortion

http://ece.unlv.eduConcerning Measurement
The following is a visual on how to model the probe (compensated), cable, and oscilloscope input impedance
The values used are arbitrary (the real associated values can be found on the data sheets for the equipment itself)

http://ece.unlv.eduConcerning Measurement
As can be seen in the previous slide right at the probe tip there is a series impedance made from a parallel resistor and variable capacitor
Adjusting the capacitor such that the series compensation impedance cancels out the capacitance introduced by the probe cable

http://ece.unlv.eduConcerning Measurement
Below shows the approximation of the probe when tuned correctly as noted the capacitance has been reduced significantly
The resistance has been increased resulting in the probe having less of an effect on your circuit

http://ece.unlv.eduBandwidth
You may have noticed that the term “speed limitation” and “stability limitation” was used a lot in explaining the shape of the output on the edges through out the testing
This is due to the bandwidth of the op-amp The bandwidth is simply the range of frequencies a device can
operate normally (in other words being stable) If the frequency is too high the op-amp will not operate as a linear
device and could become unstable and oscillate

http://ece.unlv.eduBandwidth
For all the op-amps inside the chip, the bandwidth is technically in the MHz range according to the simulations
However the useful range for the tests being conducted was in the around 1MHz with the decoupling capacitors
Using 1MHz was right around the limit so that is why you would see this unusual exponential behavior on the edges
Using a lower frequency for the input should remedy this For the inverting op-amp test a 60 kHz was used because the op-
amp was not working properly at higher frequencies

http://ece.unlv.eduBandwidth
Looking at the edges on any of the outputs we saw, notice how the response looks like an exponential on the edges (RC behavior)
Slew rate is characterized by linear jumps/drops In this case both effects are playing a role The delay that was seen on some plots is also attributed to the
bandwidth issue

http://ece.unlv.eduProcess Shifts
Process shifts are another thing to keep in mind, so what is it? Lets say out of 100 chips coming from a factory, 5 can have defects
and completely not work The remaining 95 can have slight variation in performance because
when they were made there is a slight physical difference from chip to chip
This may cause an offset or change the bandwidth (slightly) It is something that users and manufactures must deal with, chips
can not be made ideally the same However there is some range of precision that is upheld when
fabricating the chip (depends on the manufacturer)
http://ece.unlv.eduAnother Look Inside
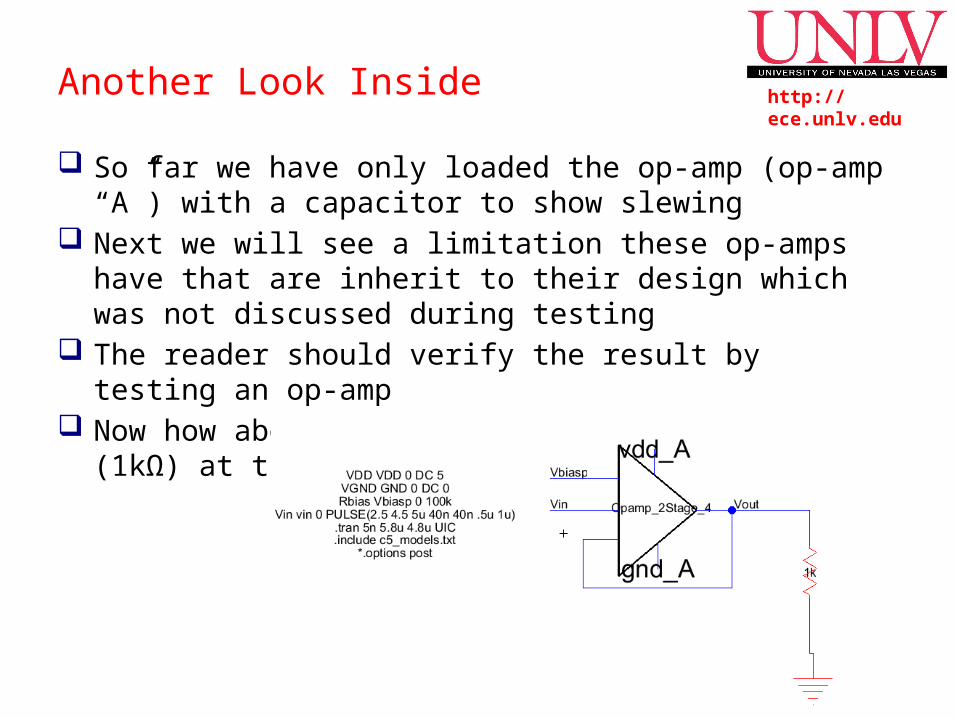
So far we have only loaded the op-amp (op-amp “A”) with a capacitor to show slewing
Next we will see a limitation these op-amps have that are inherit to their design which was not discussed during testing
The reader should verify the result by testing an op-amp Now how about putting a small load resistor (1kΩ) at the output of
the op-amp

http://ece.unlv.eduAnother Look Inside
Applying a voltage pulse results in the following As can be seen the output is significantly less in magnitude than the
input The op-amp can’t drive a resistive load (see comments next slide)

http://ece.unlv.eduAnother Look Inside
Why would the output do that? Simply because the op-amp we are using has no output buffer
With no output buffer present the output impedance of the final stage in the op-amp is around a few MΩ so any small value resistor will kill the signal gain
Generally these types of op-amps are meant to only drive very small capacitive loads and large resistors

http://ece.unlv.eduHaving No Output Buffer
Think of a huge resistance in parallel with a small one if the current coming out of the device is fixed the output voltage is small
Buffers are there as sort of impedance transformers where they shield the circuit from the load so to speak
The discussion about buffers is not necessary for this tutorial but it is recommended the reader look up information on their own time


![Http://. zip Developing browser based applications [SysReader Programmers Festival ‘97] T.N.C.Venkata Rangan Vishwak Associates.](https://static.fdocuments.in/doc/165x107/56649ed35503460f94be3bfb/httpwwweasytoolscomfestival-zip-developing-browser-based-applications.jpg)