HTML5 Game Engine - web.wpi.edu · PDF fileHTML5 GAME ENGINE A Major Qualifying ... build...
40
1 Project Number: MBJ-1102 HTML5 GAME ENGINE A Major Qualifying Project Report submitted to the Faculty of the WORCESTER POLYTECHNIC INSTITUTE in partial fulfillment of the requirements for the Degree of Bachelor of Science by Ryan Cassidy, Addison Jones-Mulaire and Michael Wall Advisors: Brian Moriarty, Professor of Practice Gary Pollice, Professor of Practice Date: April 26, 2012
Transcript of HTML5 Game Engine - web.wpi.edu · PDF fileHTML5 GAME ENGINE A Major Qualifying ... build...
1
Project Number: MBJ-1102
HTML5 GAME ENGINE
A Major Qualifying Project Report
submitted to the Faculty
of the
WORCESTER POLYTECHNIC INSTITUTE
in partial fulfillment of the requirements for the
Degree of Bachelor of Science
by
Ryan Cassidy, Addison Jones-Mulaire and Michael Wall
Advisors:
Brian Moriarty, Professor of Practice
Gary Pollice, Professor of Practice
Date: April 26, 2012

2
Abstract
ARM (Adventure Running Machine) is a game engine and editor which can be used to
build top-down adventure games without knowing how to program. It includes documentation
and tutorials for using the software. Games built utilize the HTML5 canvas for playability in most
web browsers.

3
Table of Contents Abstract ............................................................................................................................................. 2
Table of Contents ............................................................................................................................... 3
Introduction ...................................................................................................................................... 4
Technical Information ........................................................................................................................ 9
Editor Information ........................................................................................................................... 15
Project Outcome Analysis................................................................................................................. 17
Demo Game Design Document ......................................................................................................... 18
Dorian’s Song – The Cursed Monocle ..................................................................................................... 18
Characters ............................................................................................................................................... 18
Mood ....................................................................................................................................................... 19
Appearance ............................................................................................................................................. 19
Game World ............................................................................................................................................ 19
Player Actions .......................................................................................................................................... 23
Items ....................................................................................................................................................... 23
Mechanics/Game Progression ................................................................................................................ 24
Appendix: Tutorial ........................................................................................................................... 27
4
Introduction
The objective of this MQP is to create a game editing tool with complete documentation.
This project is not simply a game engine. A game engine is the force behind any game, and
those with the appropriate technical skill can use an engine to create a game. But what about
users who don’t have much skill? There are amateur designers who want to create a game, who
have a design or mechanic or story in mind, but do not know how to readily program all the
features they want. A game editor solves this problem.
A game editor is a graphical interface that displays important aspects of a game to a
user. Often a game editor will include abstracted tools and functions that allow designers to
create games without having to write thousands of lines of code. Advanced users can attach
scripts to objects to create custom behaviors that go beyond the default behaviors defined by
the engine. An editor with this sort of functionality has a wider potential user base, as both
newcomers and veterans can make games with it.
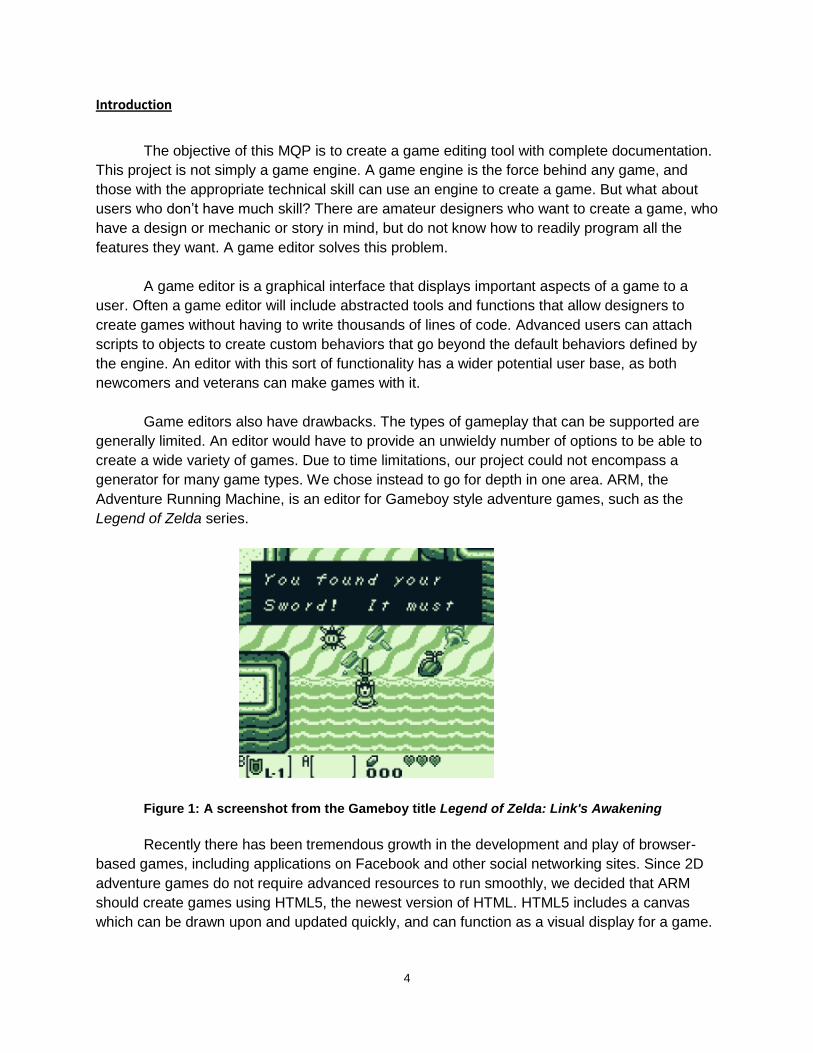
Game editors also have drawbacks. The types of gameplay that can be supported are
generally limited. An editor would have to provide an unwieldy number of options to be able to
create a wide variety of games. Due to time limitations, our project could not encompass a
generator for many game types. We chose instead to go for depth in one area. ARM, the
Adventure Running Machine, is an editor for Gameboy style adventure games, such as the
Legend of Zelda series.
Figure 1: A screenshot from the Gameboy title Legend of Zelda: Link's Awakening
Recently there has been tremendous growth in the development and play of browser-
based games, including applications on Facebook and other social networking sites. Since 2D
adventure games do not require advanced resources to run smoothly, we decided that ARM
should create games using HTML5, the newest version of HTML. HTML5 includes a canvas
which can be drawn upon and updated quickly, and can function as a visual display for a game.
5
The last defining influence on this MQP is the documentation of ARM. As many
developers know, an engine without documentation is like a car without a key. A user can look
at it and perform limited actions with it, but the true functionality is kept hidden from all but the
creators. Engines that do not have thorough, consistent and clear documentation are reviled
throughout the gaming community. Therefore ARM has complete documentation of all its
functions online, where anyone can download the engine, view functions and read tutorials.
As noted above, a game engine is an application designed to create games of a certain
style. For instance, the Warcraft III engine developed by Blizzard creates real-time strategy
games where players can manipulate one or more units against other human or AI players.
Unity is an engine with much greater scope. It can be used to develop 3D games of many
different varieties. So what makes these two engines different?
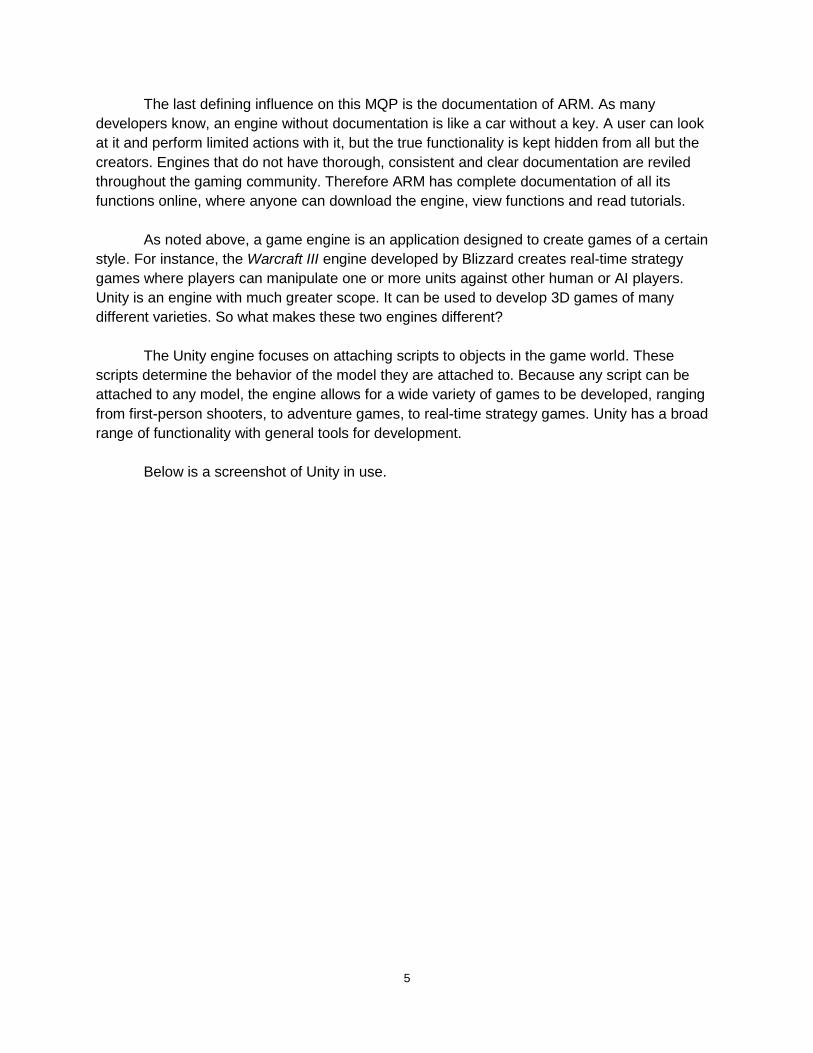
The Unity engine focuses on attaching scripts to objects in the game world. These
scripts determine the behavior of the model they are attached to. Because any script can be
attached to any model, the engine allows for a wide variety of games to be developed, ranging
from first-person shooters, to adventure games, to real-time strategy games. Unity has a broad
range of functionality with general tools for development.
Below is a screenshot of Unity in use.
6
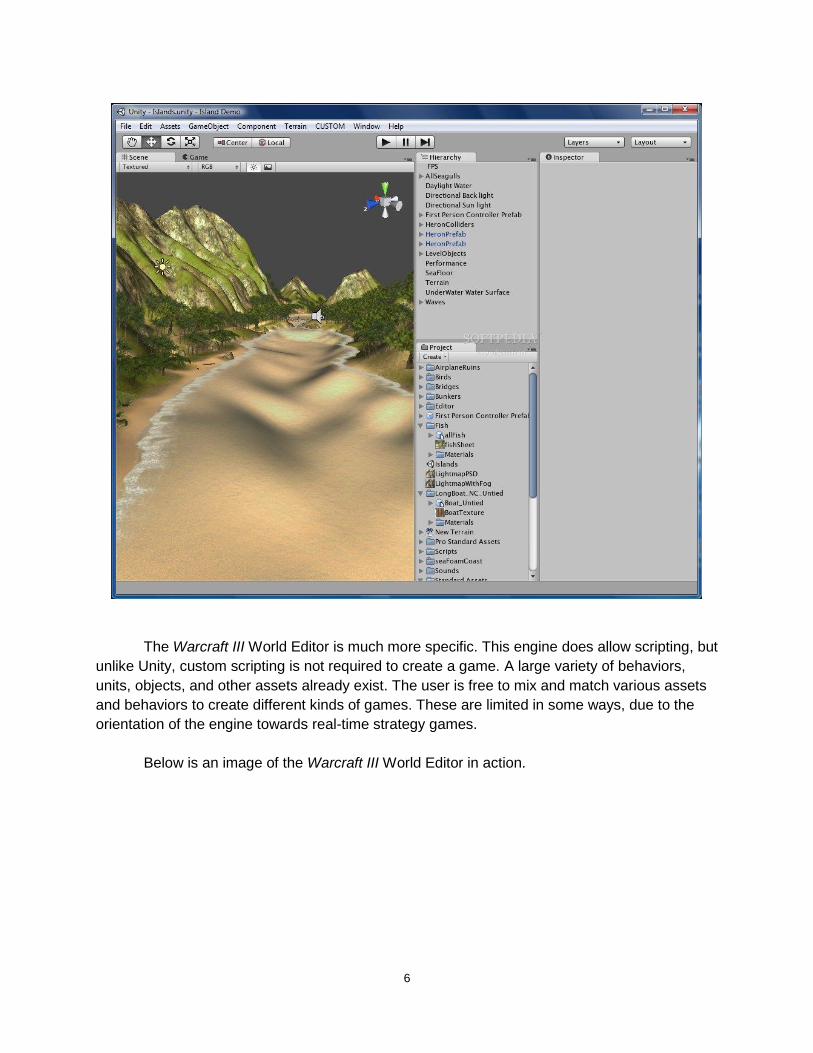
The Warcraft III World Editor is much more specific. This engine does allow scripting, but
unlike Unity, custom scripting is not required to create a game. A large variety of behaviors,
units, objects, and other assets already exist. The user is free to mix and match various assets
and behaviors to create different kinds of games. These are limited in some ways, due to the
orientation of the engine towards real-time strategy games.
Below is an image of the Warcraft III World Editor in action.

7
Both engines are smooth and functional, and run with few errors on a consistent basis.
However, there is a key difference between the two game development tools. Unity has
thorough documentation online on its web page. The Warcraft III World Editor has no official
support whatsoever. Third party forums and tutorials exist for those that wish to learn more, but
Blizzard made a point of telling users there would be no support for the World Editor. Unity is
frequently used and well known, since it has thorough documentation and a simple interface.
Many developers have experienced the difficulties presented by tools with no written
resources. The experience is ultimately frustrating, time consuming and stressful. A simple
game engine with adequate documentation, such as Perlenspiel (www.Perlenspiel.org), can be
used to more effect than an engine like C4 (www.terathon.com/c4engine/), which has a much
greater scope, but lacks reliable online resources. Understanding a simple tool fully is better
than trying to use something incredibly complicated with no frame reference. Unity and
Perlenspiel show how important it is to provide support for game development tools.
8
Nevertheless, despite its lack of formal documentation and support, the Warcraft III
World Editor is also widely used by developers. What is it about the Warcraft III World Editor
that makes it noteworthy and usable?
The answer lies in the user interface. Along with having a sturdy engine, Warcraft III also
has a unique style of game building. While other engines rely on scripting even for the most
primitive actions, Warcraft III comes with all the resources needed to create a game without
writing a single line of code. Users may edit terrain, objects on the map, units and all their
values (including model, color, health, spells, etc.), and game events. Blizzard has not just
delivered a game engine into hands of users, but a game editor, with prebuilt assets and
behavior for developers to access, use and recombine to make new games. The strength in this
style of game creation is that a user does not require any technical knowledge to create a new
game. With all the actions and assets given to a user, the only limitations are what the editor
provides and user’s ingenuity.

9
These observations were the drive behind ARM: an editor built using Java and HTML5
to create games for web browsers. The resulting editor would have both the thorough
documentation of Unity and the usability of the Warcraft III World Editor. The final goal was to
create a demonstration game that displays all of the functionality of ARM, playable in a short
period of time.
Technical Information
ARM exists in two parts. The editor, a stand-alone Java application, allows the user to
create a game that others can play. The engine, a series of HTML and Javascript files, has
functions to run the games and interpret what the player has created in the editor. The two
pieces interact creating a series of .xml files, created by the editor, that represent the game
maps as well as a file that contains information the designer has assigned to every tile, entity,
and item. The Javascript engine is able to interpret this information to make a playable game.
The editor is divided into multiple sections based on function. This design splits the
major actions into simple steps. This does require the player to jump between sections to
complete some actions, but generally keeps the UI cleaner and neater than grouping sections
together. For instance, the Asset tab handles the importing and naming of assets explicitly.
There is a separate Animation tab for assembling assets into moving pictures for the game.
The editor uses several terms for component pieces of a game. Tiles create the
environment of the map, which determine how freely the designer can move around and what
the area looks like. Entities are NPCs, monsters, and anything that interacts with the player and
the world, being the pieces that have actions. A map is a collection of tiles and entities the user
puts together to make a playable game world. A player cannot move between maps unless they
have built an entity that transports them between maps. Maps are saved whenever the user
updates them and they are usable with the engine as long as the map exists. This allows the
player to view the map in the game at any state of completeness as long as they build a way to
get onto the map, and can utilize this to build the world by building each map as a component of
it. Alternately, the player can focus on building each individual map, which they can view
separately from the rest of the world by setting that map as the default map. The player can
build a series of individual maps and then tie them together later to make a complete world.
The first editor section is the default, Game Settings. On this tab the user is able to set
some starting information about their project. The New Project button allows the user to set the
directory where assets will be imported, and where the game and engine files will be saved. The
Load Project button allows a user to load a project by loading its game.xml file. The Save
Project button saves the game.xml file and the maps. The Compile Project button puts the
engine code required to run the game into the project folder set by the user. There are generic
settings for the size the engine expects all the tiles to be, the name of the game, the canvas size
the engine utilizes, and the starting map. This tab also lets the user define the animation set for
the player character of the game, the player’s starting position, the player’s step size and their
starting hit points. This will generally be the first and last tab the user visits in the engine.

10
The second tab is the Map Editor. This contains a visual representation of the map the
player can manipulate, as well as a list of all the tiles and entities the player has added. The
map is a fifteen by fifteen grid of images, not a single object. Each image is thirty-two pixels by
thirty-two pixels, to keep the size of the grid reasonable. Images that had been imported are
internally sized to this size for the editor so they can fit on the grid and be displayed properly,
though this does not affect the size they are displayed in the engine. Once a tile has been
selected, it can be painted onto the grid. Deleting is done the same way by painting the null tile.
Entities cannot be painted; each must be placed individually.
Though the map only displays a fifteen by fifteen section, the editor and engine can
support maps of a much larger size. 500 x 500 is the practical limit; it takes several seconds to
save such a large map, but it will save successfully. If the map is larger than fifteen by fifteen,
the user can scroll the map by either using the arrow keys to scroll or right clicking on the map
to enable scrolling, the same way left-clicking enables painting. Tiles and entities can be
accessed for use on the map by using the two lists next to the map; simply clicking on one of
the elements of the list selects it.
This tab also contains the ability to load another map from the project or add a new one
specified by the player. This is where the bulk of the work is done, as each map is designed and
populated here before being exported for use with the engine.
11
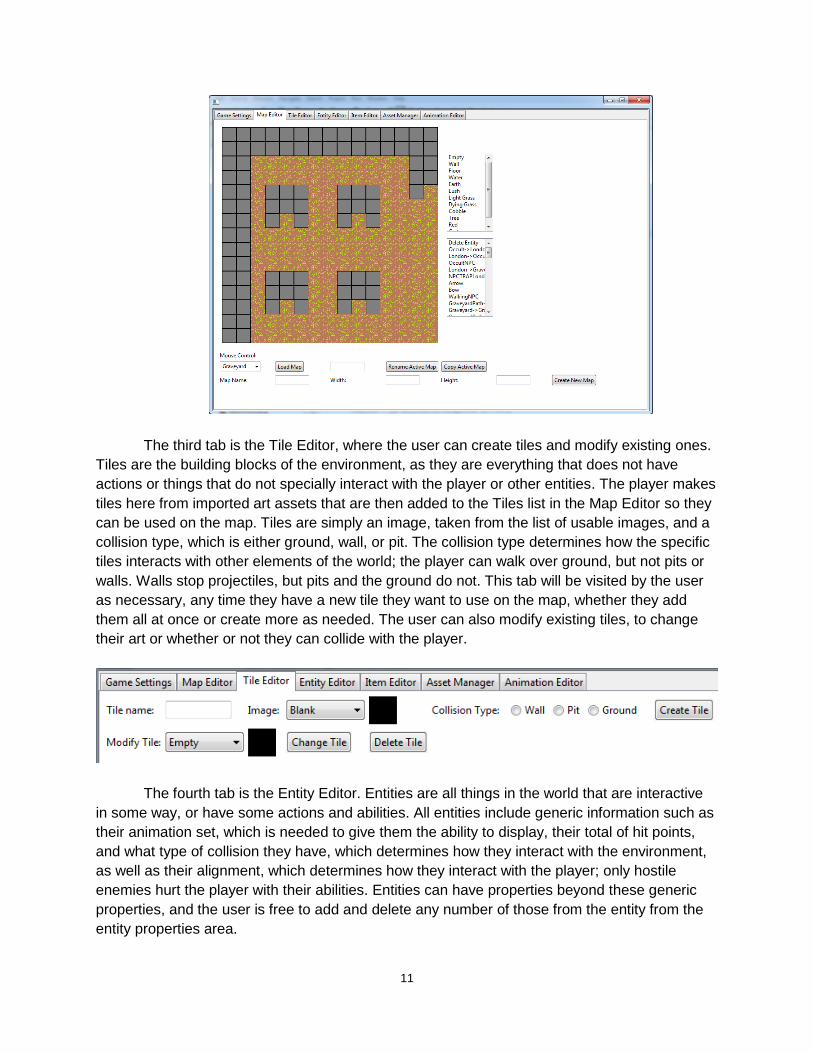
The third tab is the Tile Editor, where the user can create tiles and modify existing ones.
Tiles are the building blocks of the environment, as they are everything that does not have
actions or things that do not specially interact with the player or other entities. The player makes
tiles here from imported art assets that are then added to the Tiles list in the Map Editor so they
can be used on the map. Tiles are simply an image, taken from the list of usable images, and a
collision type, which is either ground, wall, or pit. The collision type determines how the specific
tiles interacts with other elements of the world; the player can walk over ground, but not pits or
walls. Walls stop projectiles, but pits and the ground do not. This tab will be visited by the user
as necessary, any time they have a new tile they want to use on the map, whether they add
them all at once or create more as needed. The user can also modify existing tiles, to change
their art or whether or not they can collide with the player.
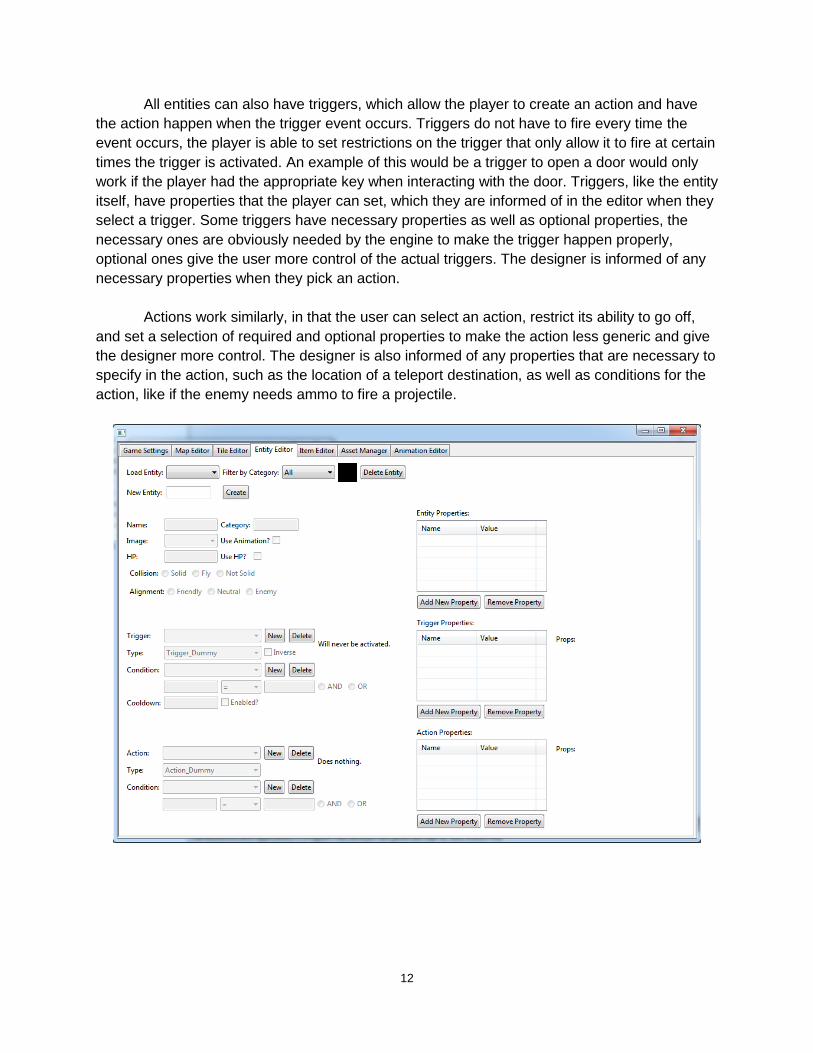
The fourth tab is the Entity Editor. Entities are all things in the world that are interactive
in some way, or have some actions and abilities. All entities include generic information such as
their animation set, which is needed to give them the ability to display, their total of hit points,
and what type of collision they have, which determines how they interact with the environment,
as well as their alignment, which determines how they interact with the player; only hostile
enemies hurt the player with their abilities. Entities can have properties beyond these generic
properties, and the user is free to add and delete any number of those from the entity from the
entity properties area.
12
All entities can also have triggers, which allow the player to create an action and have
the action happen when the trigger event occurs. Triggers do not have to fire every time the
event occurs, the player is able to set restrictions on the trigger that only allow it to fire at certain
times the trigger is activated. An example of this would be a trigger to open a door would only
work if the player had the appropriate key when interacting with the door. Triggers, like the entity
itself, have properties that the player can set, which they are informed of in the editor when they
select a trigger. Some triggers have necessary properties as well as optional properties, the
necessary ones are obviously needed by the engine to make the trigger happen properly,
optional ones give the user more control of the actual triggers. The designer is informed of any
necessary properties when they pick an action.
Actions work similarly, in that the user can select an action, restrict its ability to go off,
and set a selection of required and optional properties to make the action less generic and give
the designer more control. The designer is also informed of any properties that are necessary to
specify in the action, such as the location of a teleport destination, as well as conditions for the
action, like if the enemy needs ammo to fire a projectile.

13
The fifth tab is the Item Editor. This tab allows the player to design the items the player
character in the created game will use. Items are similar to entities, except they only have
actions, because the trigger is always player input. Items have properties and actions, and their
values are settable by the user, just like entities. This allows the designer flexibility in what the
user can make items do in the game. The designer could implement a sword that hits enemies
in melee, a bow that shoots arrows as long as it has ammo, a bell that destroys the nearest
enemy and play the sound of a bell, or even a potion that heals the player and destroys itself.
Items are not just restricted to weapons, but anything the player can design that requires player
actions, such as a hook shot to let the player pull themselves to a distant point, or an item that
allows a player to cross otherwise uncrossable terrain.
The sixth tab is the Asset Manager. This tab is where the designer imports external
images and sounds to use in the game. Imported assets are copied into the project folder and
can then be freely used in the editor and engine. Art assets can be of any size, and will be
resized to fit within the editor, but will use its original size when brought over to the engine, so
the use must be consistent with the tile size they specify in the Game Settings Tab. Sound
assets can be of any length and can be used as long as the user uses the play sound action
somewhere, but must be a .wav or .ogg file to guarantee its ability to work properly over the
widest amount of browsers.
The designer can either import an image or sound individually, which will allow them to
name and preview the import as it is brought in, or import a large number of sounds or images
at once, which does not allow the user to preview the import or name it, each file in the group

14
will be given the name of the actual file. This tab will probably be the second one the user visits,
since they need to import assets to begin using the other parts of the editor, and will be revisited
as the player needs additional art or sounds to use in the game.
The designer will need to import images to use on tiles to make the terrain for their
games, as well as images to use to create animations for the player or enemies that move
around. They will also want to import sound to use background music in their game, as well as
sound effects, such as a twang for a bow, a yell for enemies, the sound of a hook shot, or any
other audio the player wants.
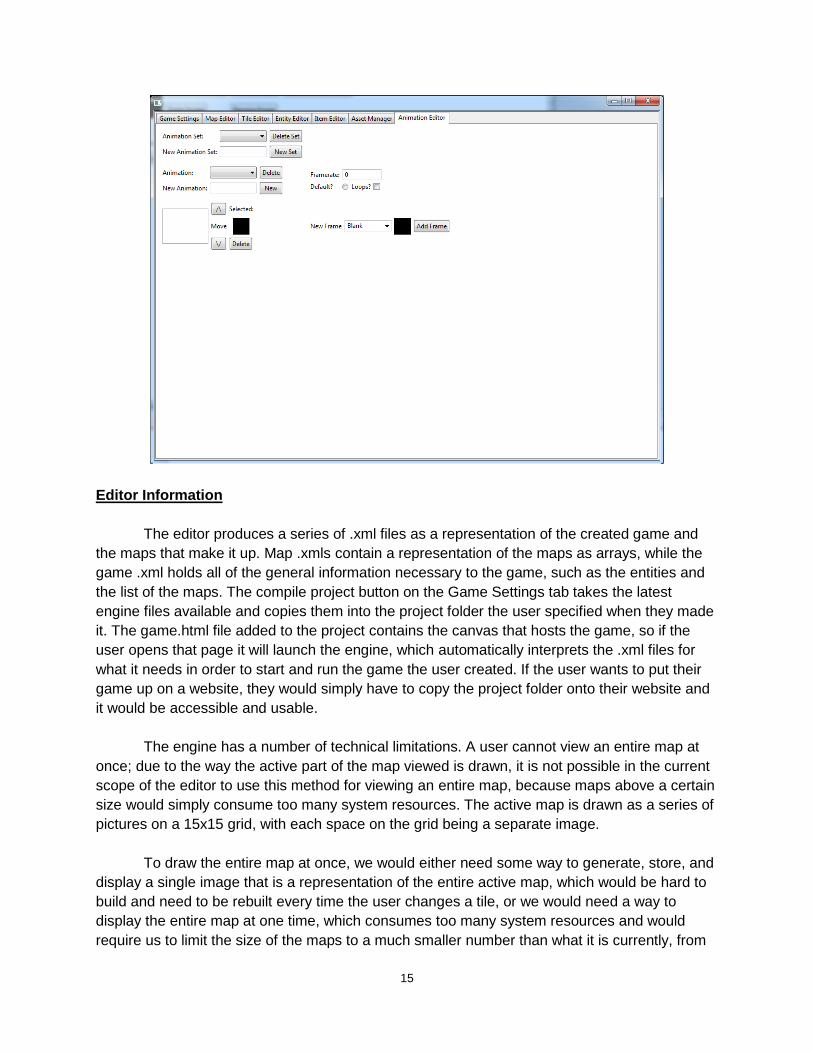
The seventh tab is the Animation Editor. This tab allows the player to use a series of
images to create an animation set. An animation set is a series of images that are tied together
to represent a full suite of actions a particular entity can take, such as walking in the four
cardinal directions. The animations are built out of a series of individual images, not a sprite
sheet. This tab will be visited frequently, since the player will need an animation set for each
entity that needs it.
15
Editor Information
The editor produces a series of .xml files as a representation of the created game and
the maps that make it up. Map .xmls contain a representation of the maps as arrays, while the
game .xml holds all of the general information necessary to the game, such as the entities and
the list of the maps. The compile project button on the Game Settings tab takes the latest
engine files available and copies them into the project folder the user specified when they made
it. The game.html file added to the project contains the canvas that hosts the game, so if the
user opens that page it will launch the engine, which automatically interprets the .xml files for
what it needs in order to start and run the game the user created. If the user wants to put their
game up on a website, they would simply have to copy the project folder onto their website and
it would be accessible and usable.
The engine has a number of technical limitations. A user cannot view an entire map at
once; due to the way the active part of the map viewed is drawn, it is not possible in the current
scope of the editor to use this method for viewing an entire map, because maps above a certain
size would simply consume too many system resources. The active map is drawn as a series of
pictures on a 15x15 grid, with each space on the grid being a separate image.
To draw the entire map at once, we would either need some way to generate, store, and
display a single image that is a representation of the entire active map, which would be hard to
build and need to be rebuilt every time the user changes a tile, or we would need a way to
display the entire map at one time, which consumes too many system resources and would
require us to limit the size of the maps to a much smaller number than what it is currently, from

16
five-hundred by five-hundred to about ninety by ninety. On the other hand, since the entire map
is not drawn at once, maps can be rather large without causing problems since the amount
shown at any time is predetermined. For this same reason, map scrolling can’t just be horizontal
and vertical scroll bars, since they would also require drawing more of the map than we display
as the active portion.
The editor also has no support for using tiles that are a different size. It assumes the
player is only using tiles of a single size they designate, and while it resizes images to fit in the
editor, it uses the originals when it writes the .xml files, so the engine reads the originals.
It is also currently limited to only working in Firefox, as HTML5 has varying amounts of
compatibility with the various Internet browsers, and we focused on Firefox due to Firebug
support for checking bugs in the engine. We opted for decisions that would leave us open on as
many browsers as possible, such as using .wav and .ogg files for audio, but some functions of
the canvas we use are currently incompatible with anything but Firefox.
The ARM engine is a Javascript-based game engine that was developed to allow games
created with the ARM editor to be played. It uses the XML files created by the editor as the
game’s content, as well as any assets that the developer specified. Because all of the game’s
content is stored in the XML files and assets folder, it is easy to distribute or upload to a website
by simply placing the engine files in the same directory and opening an editor-generated web
page.
The engine’s feature set is fairly simple. It works by reading the game.xml file in the
same directory (if it exists) and begins the game based on the data contained in the file. The
game.xml file contains all the necessary information for the overall game architecture, such as a
list of the map and information on all the entities, while map files contain a representation of
their map based on which tiles are on them. Map files are loaded as the player travels to those
maps as the active map drawn on the canvas. The player switches map by having an entity on
the map that serves as a teleporter to another specified map.
The HTML5 engine uses the same assets imported into the editor, including tiles for the
environment, sprites for animation, and sounds for triggered audio. These objects are
referenced from the assets folder of the project the user created, since they are copied there
where imported into the editor. The triggers and actions that are assignable in the editor are
implemented in the engine as functions in the engine code that are called when specified, not as
separate libraries.
17
Project Outcome Analysis
The strength of ARM lies in the style of game we set out to make it create best, Zelda-
like games. The designer has a lot of creative freedom in how they create their game. It also
has the strength of being very portable. The editor is usable on any platform that has a Java
runtime environment. The engine is built for Firefox, but is also useable without problems on
Google Chrome.
It does have the weakness of the user being limited in what they can make entities and
items do. In our goal of allowing the user to not script anything, they are prevented from doing
things not covered by the preprogrammed triggers and actions, outside of using a bit of
creativity to get new effects. This weakness is partially alleviated for designer who knows some
Javascript, since they can alter the engine files for their game. The user interface of the editor
could probably be improved by a good degree as well; it is very space consuming on certain
sections, but uses basically no space on others, as well as some options being placed rather
oddly.
As a team, our strength was on our collaboration in designing the editor and engine to
work together from the start, rather than trying to force two independent pieces together later in
the development process. At the beginning, we worked out how we wanted the interaction to
occur, and while it underwent a few changes, none of them were major and the original design
survived in some form from start to end.
Our team weakness was communication. We often had difficulty communicating
between some of our group members, which caused otherwise known bugs to exist for far
longer than they should have, or cause some feature to be implemented in a completely
different manner than expected. This also resulted in problems in timelines for feature
completeness in the editor or game, especially the game, which could not be completed due to
a missing feature or known bugs, but was not properly reported in a timely manner.
The strength of our documentation is twofold. It is very thorough in describing every
trigger and action, so the user should be very clear about what information they need to provide
for any trigger or action, and it is also built into the editor. The designer does not need to go to
an external source to get the necessary properties, since those properties are added to the
properties for the trigger or action being made. A description of the necessary properties is also
displayed next to the properties window.
The demo game’s strength is that it is good at showing off features of the editor. It has a
decent variety of items that do different things, it has enemies that act differently, it has puzzles;
basically, it has a little bit of everything in a way that shows off the features of the editor pretty
well. The weakness of it is that it is rather unpolished, being completed extremely late in the
development cycle of the MQP, and as such is inadequately tested. Due to this, the story and
gameplay might be a little weak or unintuitive for the average user.

18
In terms of usability, we think this would be a good tool for newer developers. The user
has a solid number of options, but by not allowing the user to script, reins them in to a degree.
This makes it a good learning tool for a newer user but allows for a creative user to make
interesting things happen, but not likely to do something out of scope. The UI is a bit ugly, but
the user can easily find everything.
Demo Game Design Document
The following is the design document for the demo game we created, Dorian’s Song.
Dorian’s Song – The Cursed Monocle
Sir Dorian Hawthorne was your average British gentleman of the early 19th century –
until he entered an occult goods store in the dark alleyways of London. There, he made the
mistake of trying on a monocle. The eyepiece was cursed by one of the dark older gods.
Whoever wears it has their soul ripped from their body in a week’s time. But it also conferred a
unique ability: through the monocle, he was able to see things others cannot. Vampires, spirits,
shades and monsters; their true forms were revealed through the eyepiece.
Help Dorian make his way through the city, battling the darkness, discovering magic
items, solving puzzles, and unraveling the mystery of the cursed monocle!
Characters
Sir Dorian Hawthorne. Dorian is a less than average English gentleman. While he
sports the clothes and talks the talk, in the end he is rather inept at most everything. The player
discovers this early on as Dorian walks through London, being insulted and generally frowned
upon. Dorian, while gentlemanly, gives off an air of shabbiness and false importance. This all
changes when Dorian puts on the monocle. After seeing the world for what it really is, he is able
to see himself for what he really is by the end, the most gentlemanly of warriors.
The Occult shopkeeper. As far as evil villains go he is typical; his personality is rather
over the top. It’s as if he watched the early live action Batman television series as his training to
be evil. While ridiculous, the shopkeeper is also able to pose something of threat; not in the
sense that he is powerful, but that the player is simply unable to catch him to put an end to his
shenanigans. He is later revealed to be Henry the VIII, returned from the dead to harass
England once more. He is just as obnoxious in death as he was in life. He appears heavily but
somewhat poorly garbed, not in the sense that you can see through it, but that he comes off as
kind of shabby and not well put together.
19
Cloaked Figure. The cloaked figure acts as a mysterious guide for Dorian. Through all
of Dorian’s (mis)adventures, the Cloaked Figure is always present, directing Dorian to his goal,
giving him advice and preventing him from killing himself in stupid situations. This cloaked
figure, unlike the shopkeeper, is well-dressed and comes off far more intimidating. He is present
at the start of each dungeon, to educate the player on what lies ahead. Unlike everyone else
Dorian meets, the Cloaked Figure is rather dour, straightforward, and bland. This makes sense
when he reveals himself to be none other than Oliver Cromwell, returned from the dead to make
sure that the undead Henry VIII does not create an unending dynasty. The player has the option
to combat him: to step aside and let Cromwell destroy what’s left of the monarchy, or oppose
him and save the Queen.
There are other characters involved as well, but with much smaller roles that are not plot
essential. They simply add flavor to the game, and in some cases can make the player’s life
easier by providing hints and tips.
Mood
This game has a unique style of storytelling and writing. Most games decide between
being lighthearted, meaningful, or action-packed and serious. Dorian’s Song is a mix of both
foolish comedy and a serious, grim game world. Thus it is what most would call a black comedy,
light hearted humor that deals with grim, sometimes disturbing subjects. The key in making this
world work is exaggeration. There is nothing that is only a little British in this game. By
emphasizing everything British, the player sees a truly absurd world, full of both humor and
action. Too many adventure games have a serious note to them, and more games in this kind of
genre would help expand the territory of comedic games. It must be kept in mind that if this
game does not give the player a few chuckles, it has not done its job.
Appearance
The game takes place in 19th-century England, in the dark and dirty alleyways of
London, in the once-lush countryside outside the city, and beneath it, in catacombs, tunnels,
and hazy opium dens. The game atmosphere should come off as dark and mysterious, as the
player is able to see things most other ordinary citizens cannot. This should be accentuated by
neutral NPCs wandering through the game as though none of what is happening around the
player is real. The game will have 2D sprite-based art, so the graphics will be able to run on a
variety of platforms with little difficulty.
Game World
The game will feature 5 different areas. The first is the main world, from which the player
accesses dungeons. This will be the city of London and the surrounding countryside. Enemies
can be found but will not be common. Shops and NPCs can be found in the city. There are three
dungeons followed by one final dungeon.

20
The first dungeon can be found just outside the city in a graveyard. Beneath are series
of catacombs which the player must navigate through.
The second dungeon can be found in the sketchier part of London. Beneath the opium
den is a cult safe house which traffics the opium. The player must survive opium-smoking thugs
and not succumb to the appeal of the drug.
The third dungeon takes place in some of the railway tunnels just beginning to come into
use. In these tunnels the player will find soot, heat and monsters.
The last dungeon is Buckingham Palace. The player will re-encounter puzzles from
previous dungeons, use all the tools he has found, and employ all their skills against the final
boss.
A concept of Dorian Hawthorne:
An image of the city with a grim, creepy feel:
21
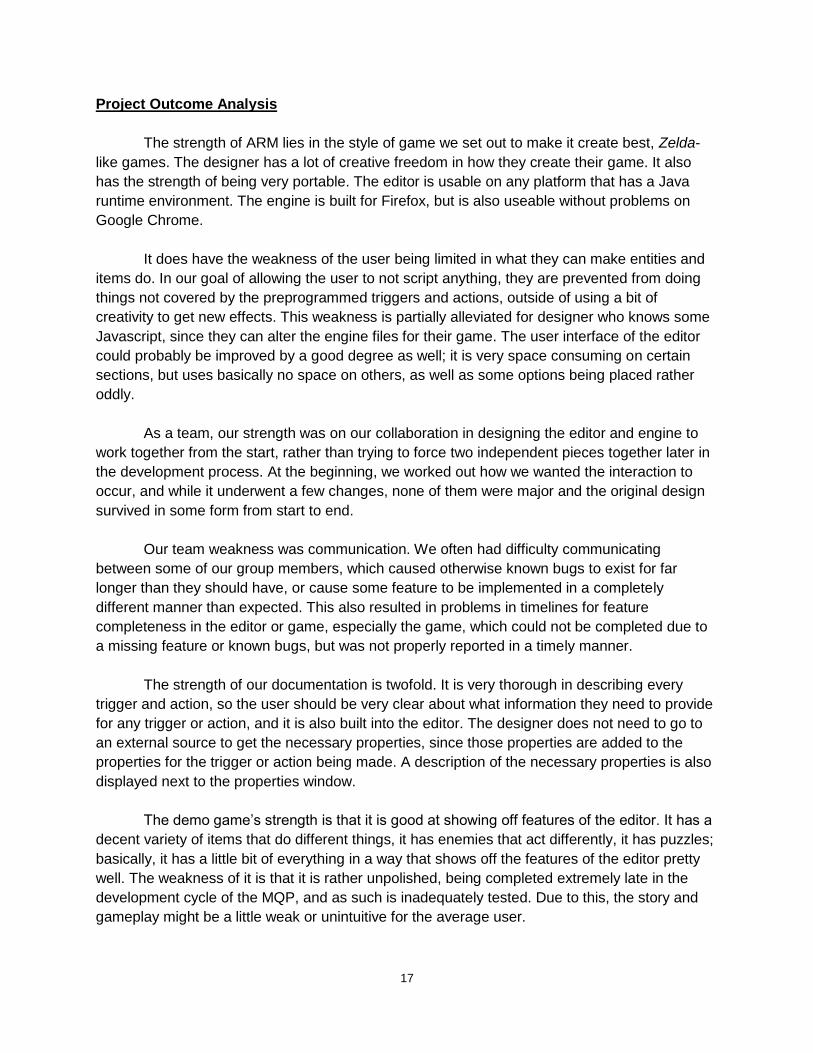
Print of North London Cemetery, showing catacombs, terrace and sepulchers (Egyptian
style of the time):
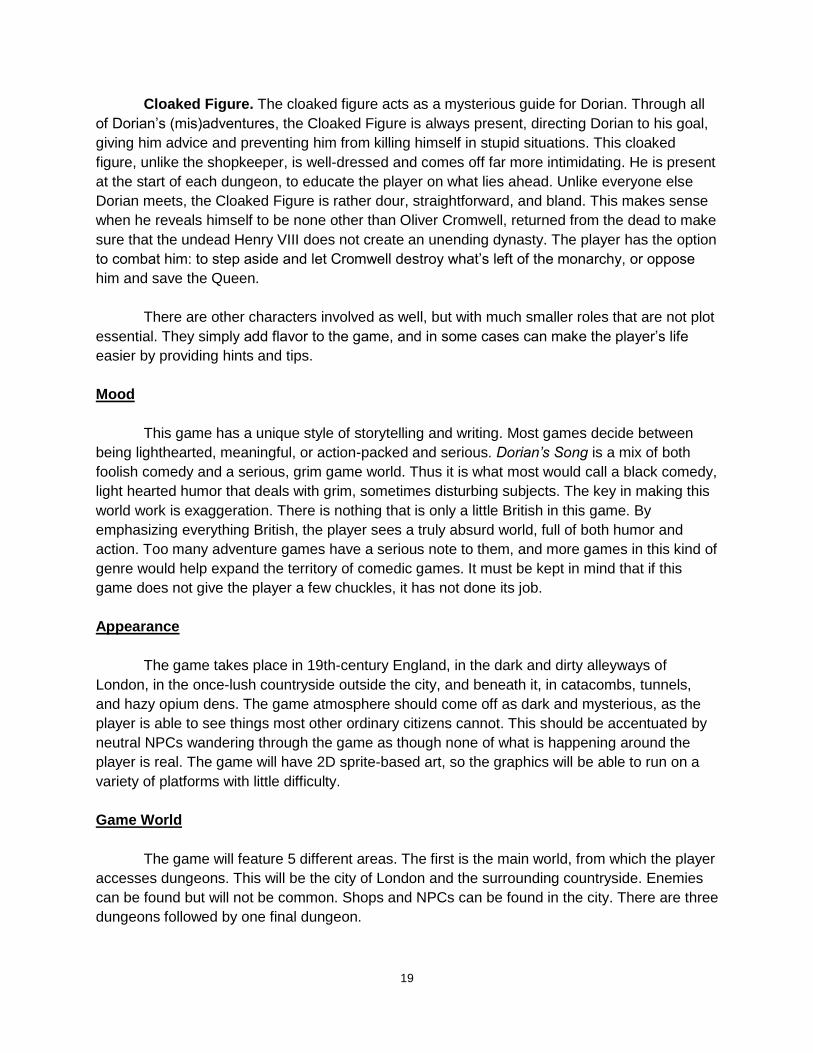
Print of Paris catacombs:
22
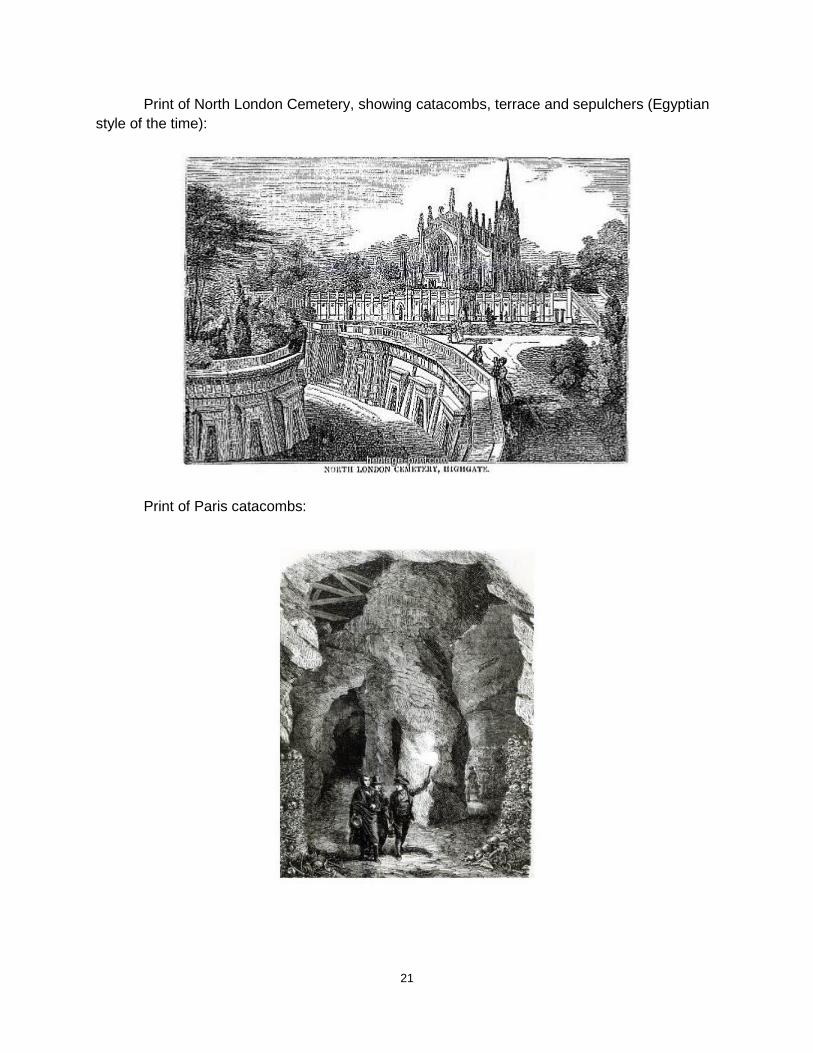
Print of an Opium Den in East London:
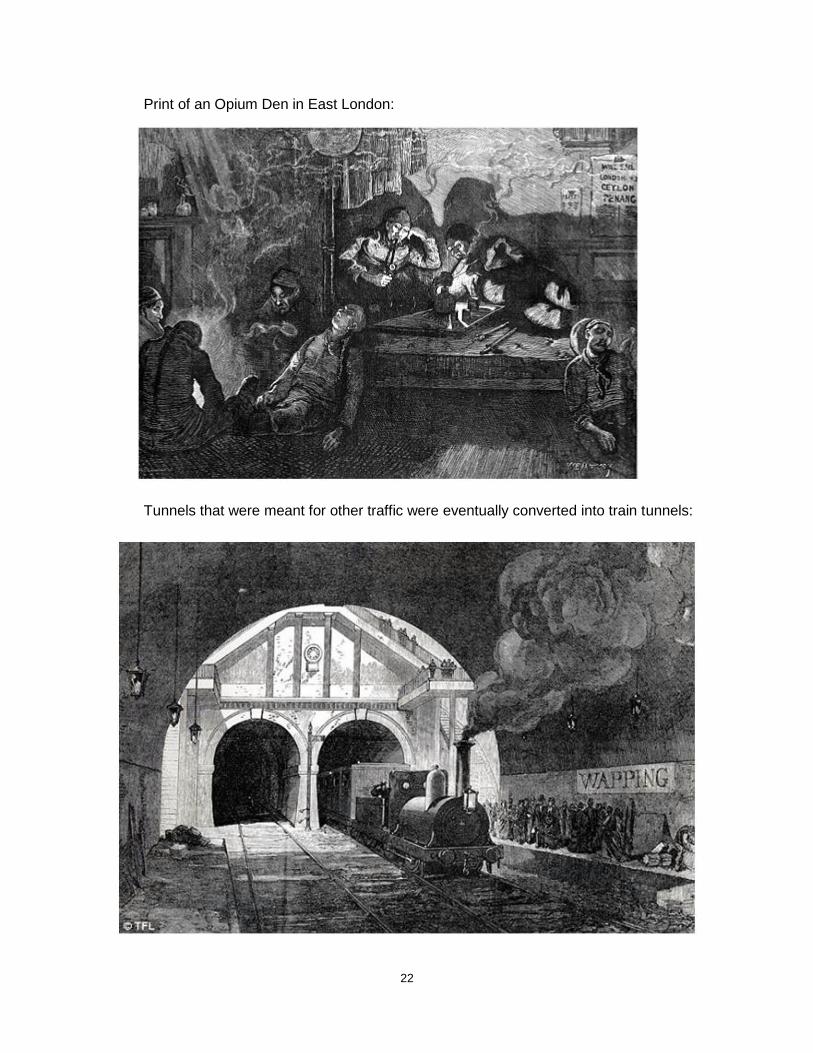
Tunnels that were meant for other traffic were eventually converted into train tunnels:

23
Player actions
The player, acting as Sir Dorian Hawthorne, will undergo a tasking and difficult
adventure through the setting described above. Players move in the four cardinal directions,
using ranged and melee weapons as well as use tools to solve puzzles. The player has a health
bar (measured in hearts, a staple of Zelda-like games) and a magic energy bar. These will be
updated as the player loses and gains health, and uses abilities that require magic energy. The
player’s main form of attack is Dorian’s gentleman’s walking stick. Tried and true, this stick has
served him for many years and is decent enough for any duel.
Dorian also has an inventory of items, accessed from the inventory menu. Selecting an
item from the menu will either equip that item (such as the grappling hook) or consume it (such
as health potion). Quest items will also be displayed here.
Dorian will lose health when hit by an enemy projectile, an enemy, or is hit by a trap or
other environment hazard.
Players using a keyboard will use the arrow keys or WASD to move. Those using a
mobile device will have touch buttons onscreen. The other input a player will have will be an
“attack” button, a “use device” button, and a menu button, where the player can save, examine
their inventory and equip items.
Items
The game has a variety of items that can be found (F), sometimes in an item chest,
purchased (P), or dropped (D) from enemies. Walking over or touching an item removes it from
the screen and adds it to your inventory. Here is a list of items that will be included in the game.
Dorian’s Walking Stick: The player starts the game with the stick. It is Dorian’s basic
melee attack, and has average reach and damage (NA).
Basic Health Potion: This restores 1 heart tick of the player’s health. If the player’s health
is full, it will not be consumed (FP).
Advanced Health Potion: This restores all of the player’s health (FP).
Heart: When picked up, it restores 1 tick of the player’s health (FD).
Dark Heart: These rare hearts increase the player’s health by one heart slot. The effect
is permanent. (FD)
Magic Potion: Restores a portion of the player’s magic energy (FP).
24
Alchemy Formula: Extends the player’s magic energy meter, allowing them to cast more
spells than before (F).
Spell: Cone of Fire: When equipped, the player can use magic energy to call forth a
cone of flame to damage enemies (F).
Spell: Cone of Frost: When equipped, the player can use magic energy to call forth a
cone of frost to damage and slow enemies (P).
Spell: Heal: When equipped, the player can use magic energy to restore health (P).
Bow: Found in the catacombs, the player can equip this item to shoot arrows at enemies
and hard to reach switches (F).
Bundle of Arrows: Adds arrows to the player’s inventory (FPD).
Grappling Hook: Found in the opium den, the player can equip this item to pull them to
certain surfaces, enemies, and pull items to them (F).
Reflector Shield: Found in the tunnels, the shield bounces back projectiles that hit it. The
player must equip and press the use button to do this. Note that the player cannot move or
attack while using the shield (F).
Key: Keys unlock doors in dungeons. These are dungeon specific and cannot be used in
other dungeons (F).
Money: Money can be found throughout the world to buy items with (FD).
Mechanics/Game Progression
The game will feature Zelda-esque mechanics. The game starts right after Dorian tries
on the monocle, and discovers it is cursed. The shopkeeper then cackles “Back to the castle,
soon it will be time”. The player exits the shop and finds a signpost. The signpost offers
directions to a few locations, one of these being Buckingham Palace. The player follows the
shopkeeper there, fighting enemies along the way.
Before the player can enter the castle, a mysterious figure appears, thickly garbed from
head to toe. The figure explains that the shopkeeper is trying to steal Dorian’s soul, and that the
curse cannot be broken unless he slays the shopkeeper’s three servants: a spirit in the
catacombs, a cultist beneath an opium den, and a demon in the tunnels beneath London.
Dorian must acquire the Dark Hearts of each of these beings before he can enter the castle.
Without that strength, the dark energies surrounding the castle will bleed the life from Dorian.
25
The player will need to complete the sequence of dungeons to win the game. These will
be done in a specific order. The player will first play through the Catacombs. The tool of this
dungeon is the bow. The player will need to shoot enemies from afar and activate hard to reach
switches using arrows. The dungeon boss, the so-named King of Ghasts, can throw objects at
the player, and will disappear when the player tries to get close. The player must use the bow to
stun the spirit, and then attack with the walking stick. The King of Ghasts drops a Dark Heart
when defeated.
After the catacombs, the player has the one Dark Heart required to enter the safe house
beneath the Opium Den. The grappling hook is found in this dungeon. The player will need to
grapple from place to place to pass through this dungeon. The dungeon boss is the Cultist
Leader. He has magic that allows him to teleport around the room, making him far too quick for
the player to run up to. He cannot be damaged by arrows; he will block all incoming projectiles.
The player instead must use the grappling hook to pull themselves to the Cultist Leader and
then attack him. When defeated, he will drop a Dark Heart.
The last dungeon is in the tunnels beneath London. Again, the player must have the
required number of Dark Hearts (2) to enter. The reflector shield is found in this dungeon. The
dungeon boss is a Flame Demon, who launches waves of fireballs at the player. These will be
difficult to dodge. Arrows will be incinerated before they can reach the demon. The player must
use the shield to reflect fireballs back at the demon, which will stun him. While he is stunned the
player then approaches him and strikes with melee attacks. When defeated, the Flame Demon
drops the third and final Dark Heart.
Armed with all three hearts, the player may finally enter Buckingham Palace,
encountering a few rooms full of enemies before discovering the shopkeeper again. In a
dramatic reveal, the shopkeeper shows himself to be Henry VIII, trying to restore himself by
leeching off the souls of other men, so he may feast and lust once more. He launches
projectiles at the player, which can be dodged or reflected. He is tougher than the other
dungeon bosses, but not terribly so.
After defeating Henry VIII, the player sees the mysterious figure enter the throne room.
In another twist, the figure reveals himself to be Oliver Cromwell, returned from the dead to
destroy monarchy everywhere. He tells the player how he set up Henry VIII with the monocle in
the first place, seeking to absorb his power and the power of his servants, and how he had the
player gather it for him.
After this dialogue, the player has a choice. The player may have Dorian battle Cromwell
to preserve the monarchy, OR may let him pass, and let a new republic dawn in Great Britain. If
the player chooses to fight Cromwell, he must employ all the tools of the previous fights, using
the shield to reflect projectiles to break Cromwell’s aura, the bow to stun him, and the grappling
hook to pull themselves to Cromwell when he is stunned. These steps will be spaced apart
enough for the player to switch items and not lose precious game time reorienting after pausing
and un-pausing.
26
If the player lets Cromwell pass, he is treated to an information dialogue about how
terrible the reign of Cromwell was. In either case, the monocle is removed from Dorian and the
player wins!
Each area has a checkpoint for loading. When the player saves the game and quits, or
runs out of health, they will be brought back to that point to continue. These will typically be at
the entrance points to dungeons.
There is a shop in the city the player may access at any time. The inventory of the store
will update based on the player’s progress. For example, the player will be able to buy arrows at
the shop after receiving the bow. Players will use the currency found in game to buy items.
Dungeons, in addition to having enemies, will also have simple puzzles for the player to
solve. These can range from a series of switches being activated in the right order, to timing a
grappling hook throw. Like the Legend of Zelda series, the game will be a combination of both
combat and problem solving.

27
Appendix. Tutorial
1. Getting Started
Upon opening ARM, you are
greeted with the Game Settings tab
for a blank project, as pictured to the
right. This tab also has project
controls, letting you create new
projects, load old ones, or save your
current one. Set up your project by
either clicking either the “New
Project” or “Save Project” button
to specify a directory before
starting. If you want to load this
project later, click “Load Project”, go to the directory you previously created, and open
“game.xml”.
The first thing to do in a project is to load your art assets into the project, in order to use
them in other tabs. This is done through the asset manager, pictured below. Your art assets
(which should be separate images) can be imported one at a time, or together. Single assets
imported can be named, but if multiple images are imported, then they will be given names in
the editor corresponding to their file names (although this can be altered later). Sounds can be
imported in the same manner. Import all of your assets by clicking the “Import Multiple
Images” button, then shift-clicking to select all of the images you want to import. If you
do not have assets available, you can use the sample assets included with the editor.
Your images can now be used in the other tabs. You might want to save your project using
the “Save Project” button on the game settings tab. You also might want to do this
periodically throughout the tutorial.

28
2. Tiles & Maps
Maps are places in the world for the player to explore. They are made up of tiles (pieces
of the world, such as floors and walls) and entities (objects with behaviors). To begin with, we
need to create some tiles. Open the Tile
editor (shown to the right), enter a
name, and click “Create”.
Tiles have a name, a category
(optional), an image, and a collision type.
The name and category are used
exclusively in the editor and have no
effect on the game, but it is a good idea to define them in order to make finding specific tiles
easier. The name of the tile is used for reference in the editor, in order to describe what it is.
Categories help to sort groups of tiles together by their content – for example, you might have a
category for outdoor tiles that include objects like rocks and trees. Enter a category for your
new tile.
The image of the tile can be any image
from the previously imported assets.
Their names are all listed in the “Image”
list. Select an image to use for the tile.
Finally, a collision type must be chosen.
Collision types determine how the player
and entities will interact with the tile. Wall
tiles will block the player and any entities
with collision. Pit tiles will block the player and any entities that are not flying. Ground tiles do
not block movement at all. Select an appropriate collision type for your new tile.
29
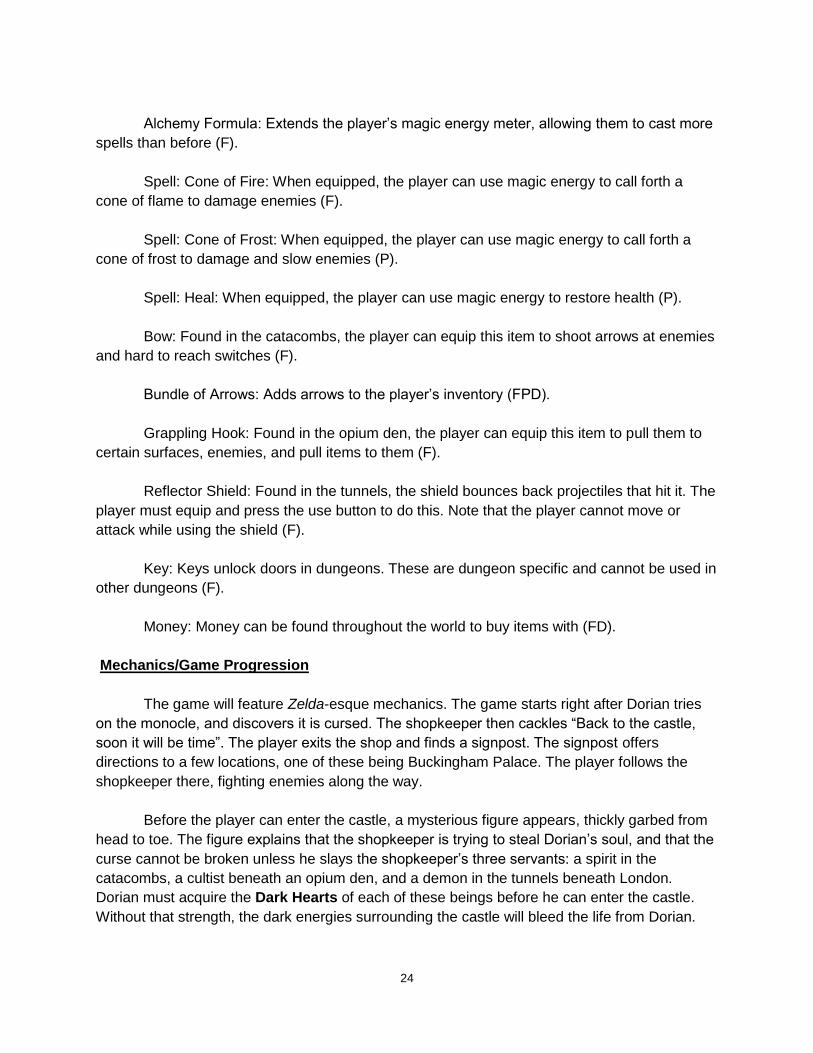
Once you have created several tiles
(for this tutorial you should have at least
one wall tile and one ground tile), you
can move on to the map editor. The map
editor has a canvas (which starts off as a
large, completely black box in the middle of
the screen), two palettes to the right of the
canvas, and some additional controls
below. To draw on the canvas, pick a tile
from the tile palette and click on the
canvas. You will draw tiles on the canvas
on wherever you drag your mouse
cursor until you click again. Use your
tiles to create a nice looking map. Leave
room for an exit.
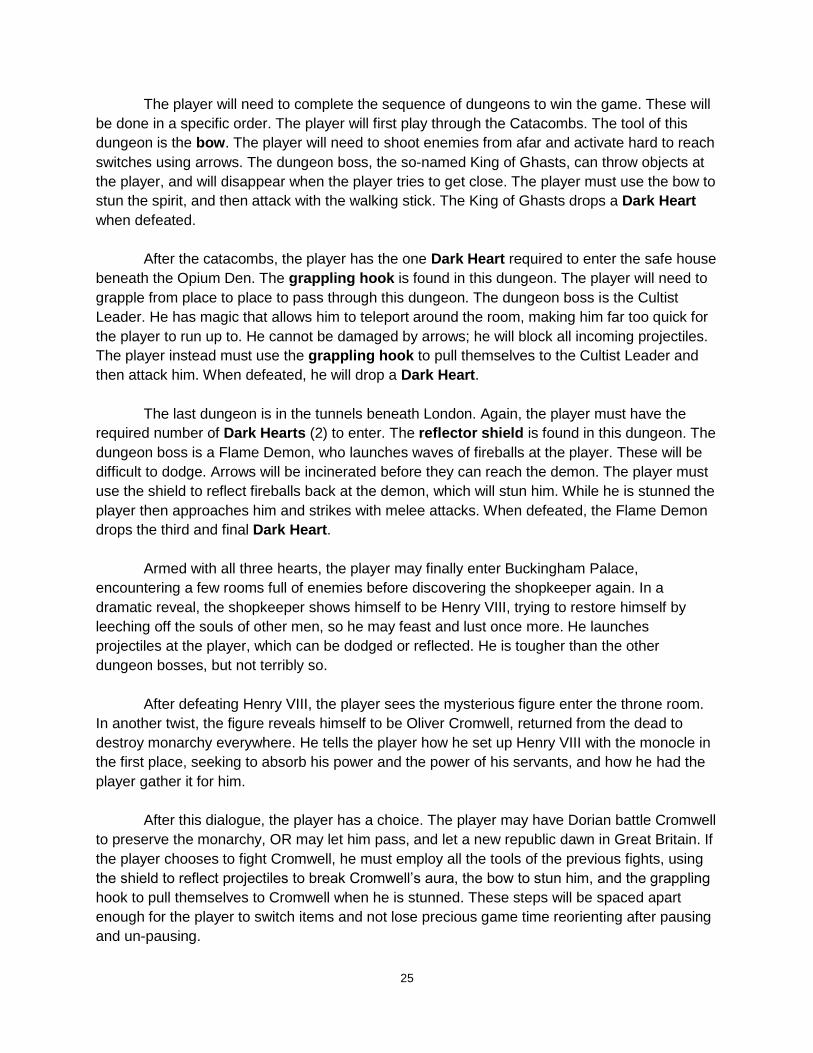
The controls at the bottom of the editor allow you to create multiple maps. This lets you
create different sections of the game world, such as different rooms in a dungeon or different
environments. Enter the new map’s name and size (in tiles), then click “Create New Map”.
This will show the new (empty) map. If you wish to load the old map, select it from the list
and click “Load”.
Keep in mind that the canvas shows 15 by 15 tiles. Maps can be larger or smaller than this. If a
map is larger than 15 by 15, use the arrow keys to scroll the canvas to see more of the
map. If a map is smaller than 15 by 15, you cannot draw on the right or bottom edge of
the map farther than the distance of the map.
Finally, you can use the “rename” function to change a map’s name if you desire.
30
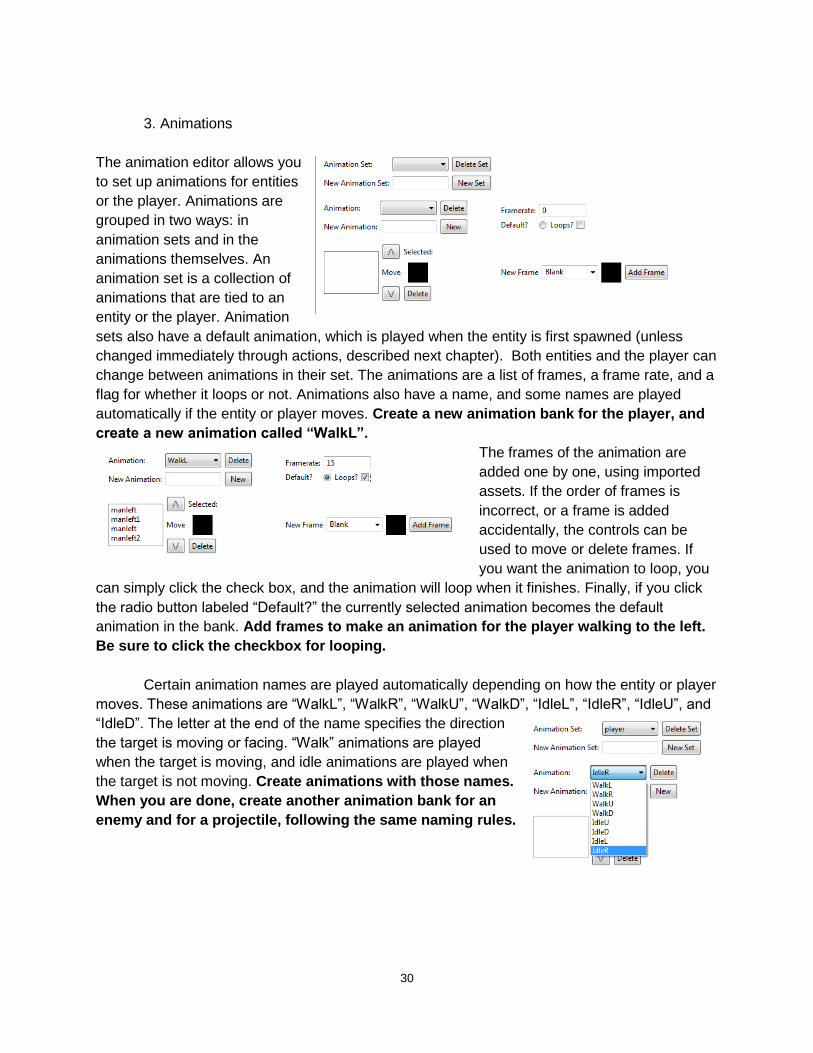
3. Animations
The animation editor allows you
to set up animations for entities
or the player. Animations are
grouped in two ways: in
animation sets and in the
animations themselves. An
animation set is a collection of
animations that are tied to an
entity or the player. Animation
sets also have a default animation, which is played when the entity is first spawned (unless
changed immediately through actions, described next chapter). Both entities and the player can
change between animations in their set. The animations are a list of frames, a frame rate, and a
flag for whether it loops or not. Animations also have a name, and some names are played
automatically if the entity or player moves. Create a new animation bank for the player, and
create a new animation called “WalkL”.
The frames of the animation are
added one by one, using imported
assets. If the order of frames is
incorrect, or a frame is added
accidentally, the controls can be
used to move or delete frames. If
you want the animation to loop, you
can simply click the check box, and the animation will loop when it finishes. Finally, if you click
the radio button labeled “Default?” the currently selected animation becomes the default
animation in the bank. Add frames to make an animation for the player walking to the left.
Be sure to click the checkbox for looping.
Certain animation names are played automatically depending on how the entity or player
moves. These animations are “WalkL”, “WalkR”, “WalkU”, “WalkD”, “IdleL”, “IdleR”, “IdleU”, and
“IdleD”. The letter at the end of the name specifies the direction
the target is moving or facing. “Walk” animations are played
when the target is moving, and idle animations are played when
the target is not moving. Create animations with those names.
When you are done, create another animation bank for an
enemy and for a projectile, following the same naming rules.
31
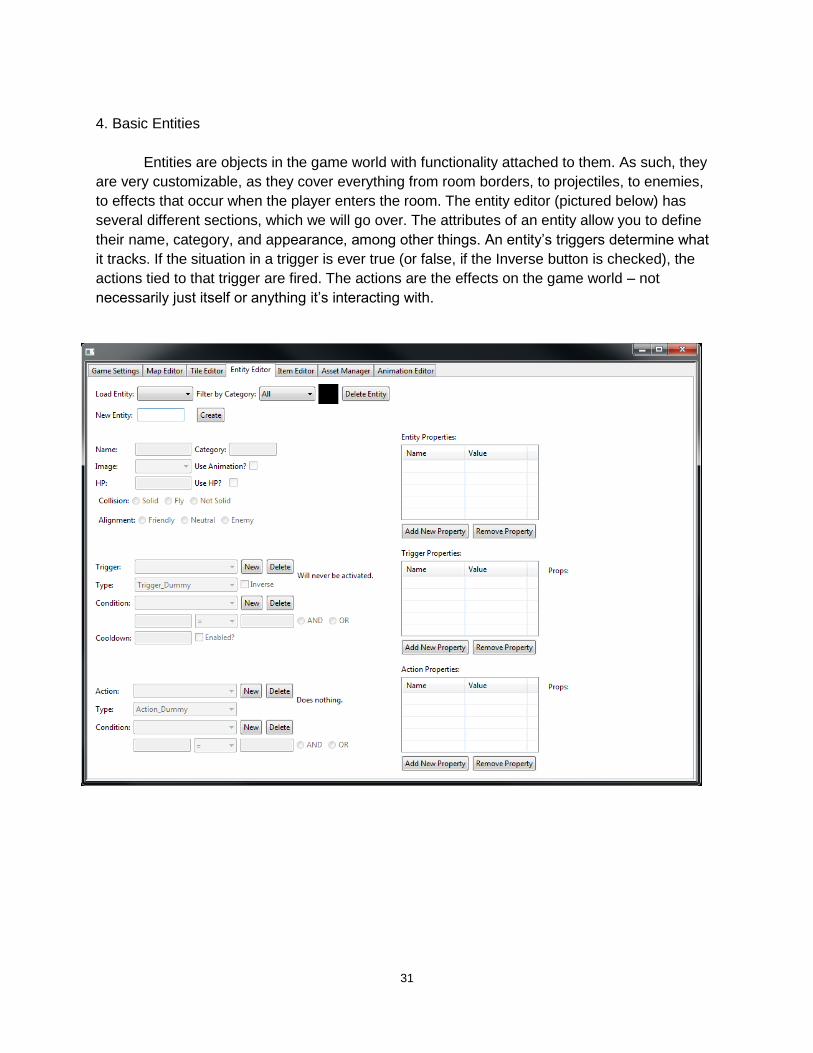
4. Basic Entities
Entities are objects in the game world with functionality attached to them. As such, they
are very customizable, as they cover everything from room borders, to projectiles, to enemies,
to effects that occur when the player enters the room. The entity editor (pictured below) has
several different sections, which we will go over. The attributes of an entity allow you to define
their name, category, and appearance, among other things. An entity’s triggers determine what
it tracks. If the situation in a trigger is ever true (or false, if the Inverse button is checked), the
actions tied to that trigger are fired. The actions are the effects on the game world – not
necessarily just itself or anything it’s interacting with.
32
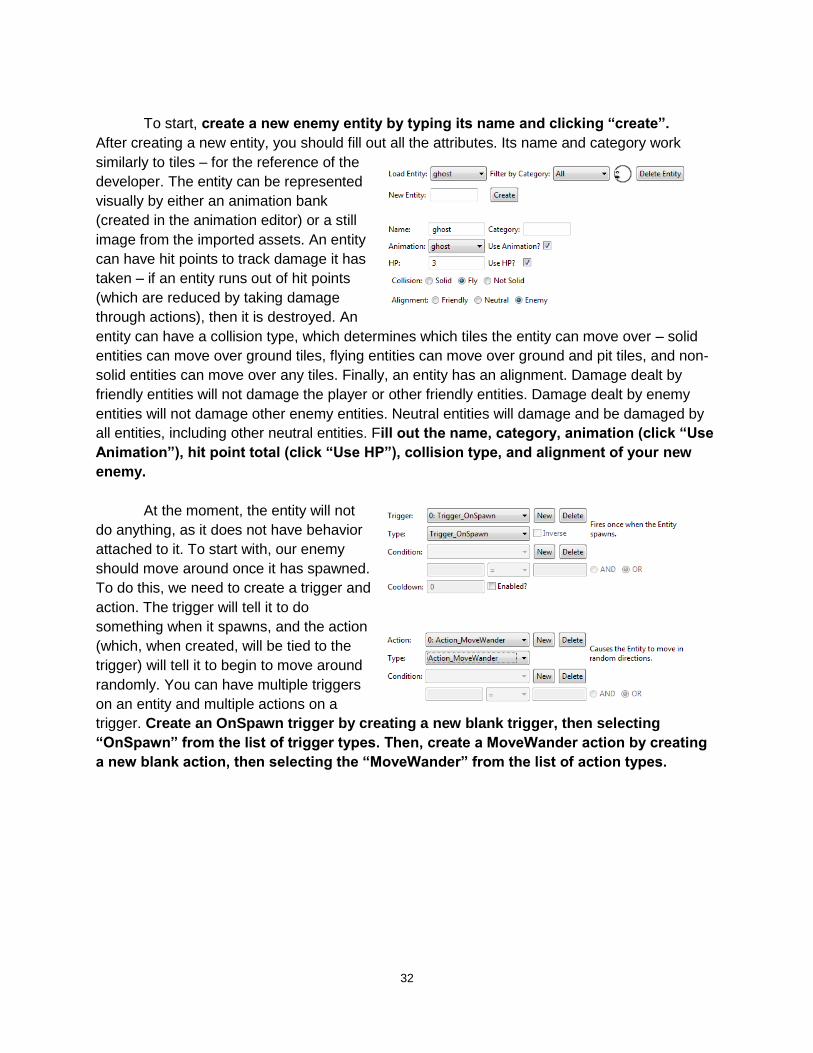
To start, create a new enemy entity by typing its name and clicking “create”.
After creating a new entity, you should fill out all the attributes. Its name and category work
similarly to tiles – for the reference of the
developer. The entity can be represented
visually by either an animation bank
(created in the animation editor) or a still
image from the imported assets. An entity
can have hit points to track damage it has
taken – if an entity runs out of hit points
(which are reduced by taking damage
through actions), then it is destroyed. An
entity can have a collision type, which determines which tiles the entity can move over – solid
entities can move over ground tiles, flying entities can move over ground and pit tiles, and non-
solid entities can move over any tiles. Finally, an entity has an alignment. Damage dealt by
friendly entities will not damage the player or other friendly entities. Damage dealt by enemy
entities will not damage other enemy entities. Neutral entities will damage and be damaged by
all entities, including other neutral entities. Fill out the name, category, animation (click “Use
Animation”), hit point total (click “Use HP”), collision type, and alignment of your new
enemy.
At the moment, the entity will not
do anything, as it does not have behavior
attached to it. To start with, our enemy
should move around once it has spawned.
To do this, we need to create a trigger and
action. The trigger will tell it to do
something when it spawns, and the action
(which, when created, will be tied to the
trigger) will tell it to begin to move around
randomly. You can have multiple triggers
on an entity and multiple actions on a
trigger. Create an OnSpawn trigger by creating a new blank trigger, then selecting
“OnSpawn” from the list of trigger types. Then, create a MoveWander action by creating
a new blank action, then selecting the “MoveWander” from the list of action types.
33
Sometimes, a trigger or action type
needs more information in order to know what to
do. In this example, the MoveWander action
needs to know how fast the entity should move,
and how frequently it should change directions.
These parameters are entered through the
Properties pane, on the right side of the editor.
There are 4 levels of properties (from highest to lowest) – a global level, an entity level, a trigger
level, and an action level. If a trigger or action needs to reference a property, it will check its own
list of properties, and then continue to higher levels if it can’t find the property. If a type of trigger
or action needs properties, it will be filled in the property window, along with the type it is
expecting, and also be shown in a list on the right. More information on what a property means
is provided in the entity help file, and can be quickly referenced by placing your mouse cursor
over the property name on the help list. Enter the speed of the entity and the wander
interval.
Now the Entity needs to do damage to the player when it touches him/her. This is done
by making a second trigger, for player collision. When you create a new trigger, you get a new
list of actions – each trigger has an independent list of actions it fires. The action involved,
DamageTarget, has several optional properties. Optional properties have default functionality if
they are undefined. As such, they can often be ignored. In this case, though, we will need to
define “target”, because by default it will damage itself. In this case, the target is the player. Set
up the damage trigger and action for the new enemy.
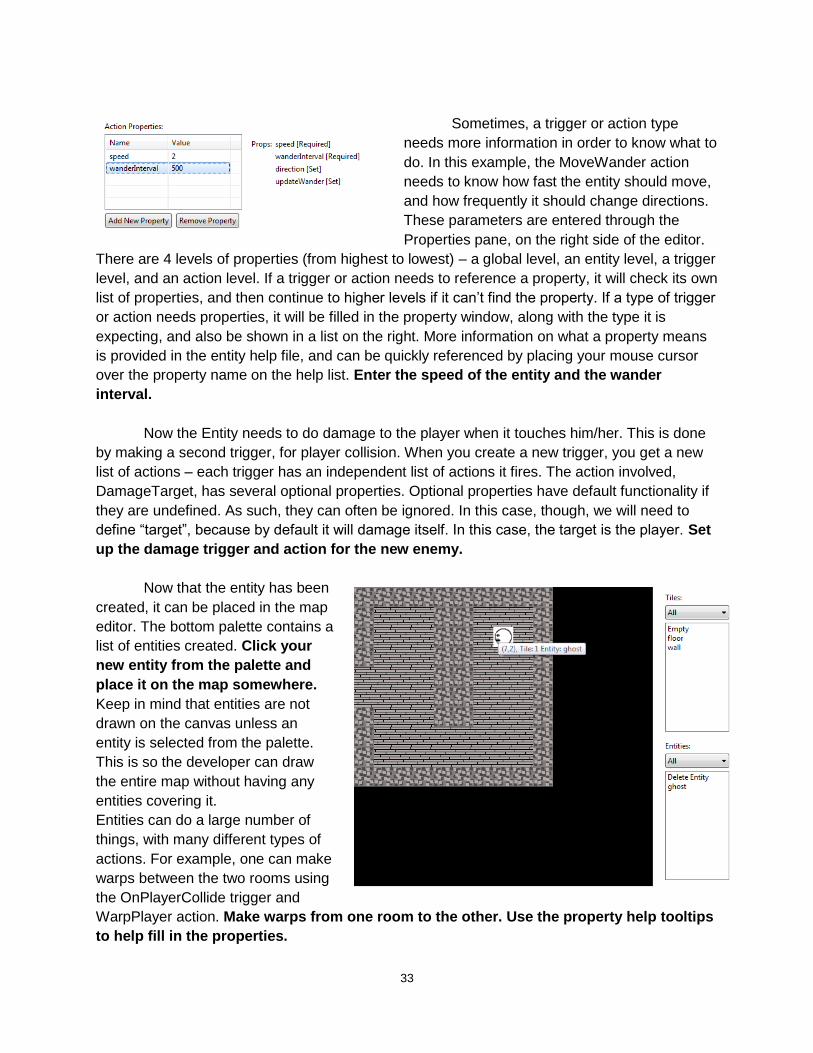
Now that the entity has been
created, it can be placed in the map
editor. The bottom palette contains a
list of entities created. Click your
new entity from the palette and
place it on the map somewhere.
Keep in mind that entities are not
drawn on the canvas unless an
entity is selected from the palette.
This is so the developer can draw
the entire map without having any
entities covering it.
Entities can do a large number of
things, with many different types of
actions. For example, one can make
warps between the two rooms using
the OnPlayerCollide trigger and
WarpPlayer action. Make warps from one room to the other. Use the property help tooltips
to help fill in the properties.

34

35
5. Items
Now that an enemy has been created, the player needs a way to fight it. This is done by
the Item editor. The Item editor has some things in common with the entity editor (namely, the
actions and properties) but function completely differently. Items in the game are tools the
player can select and use in order to fire actions. This can be anything from weapons, to keys,
to consumable items.
Note that Items have no presence in the game world – they only fire actions. Usually this
means that the item needs to spawn entities with the SpawnEntity action in order to interact with
the game world. For example, if you want to have a sword Item, the sword should spawn an
entity in front of the player which plays a swinging animation, damages anything it collides with,
and disappears once the animation ends.

36
We will be making a bow weapon,
which fires arrows in the direction the
player is facing. These arrows will travel
until they hit an entity (damaging it) or
terrain, at which point they will disappear.
Create a new Item now.
Items, like entities and tiles before them, also have a name and category. They also
have an image, which is an imported asset (not an animation) that represents the item in the
menus of the game. They can have an ammo count, which determines how many times it can
be fired (this value can be restocked though certain actions). Finally, they can have a cooldown,
which is a period of time after the item is fired before it can be fired again, to prevent the player
from overusing the item. Fill in values for these attributes.
The actions for our bow weapon involve creating an arrow. All of the behaviors of the
arrow will be on the arrow entity itself – the bow simply spawns one on the player’s position.
Create a SpawnEntity action to create an arrow. However, we have not made an arrow in the
entity editor! Making the arrow is a bit more involved than the enemy, and involves some more
advanced features of the entity editor.

37
6. Advanced Entities
Entities have a few advanced features that allow the developer to have more control
over any entities they create. Here we will be making more entities, which use some of these
features. To start, the arrow projectile the will be spawned whenever the player fires the bow.
The OnEntityCollide trigger has several properties that are set on the trigger whenever it
collides. One of them, “collide”, is the entity ID of the target it’s colliding with. This entity ID is
used for lookups on specific entities, and can be used to allow interaction between entities that
collide.
We can use this to have the arrow deal damage to enemies. Because we do not know
what entity will be hit, we need some way to tell the engine to damage “whatever the arrow hits”.
This is done through property references. If the value of a property is a % followed by a property
name, then it copies whatever the value of that property is at the time. In this case, if we list the
target as “%collide”, it will use the entity ID from the target’s collide, which is the functionality we
want. Create an arrow entity using the previously set up animation bank. Set up the entity
to DamageTarget (using property references) and DestroyEntity (on “self” to destroy
itself). Create a second Trigger, OnTerrainCollide, which just fires DestroyEntity.
38
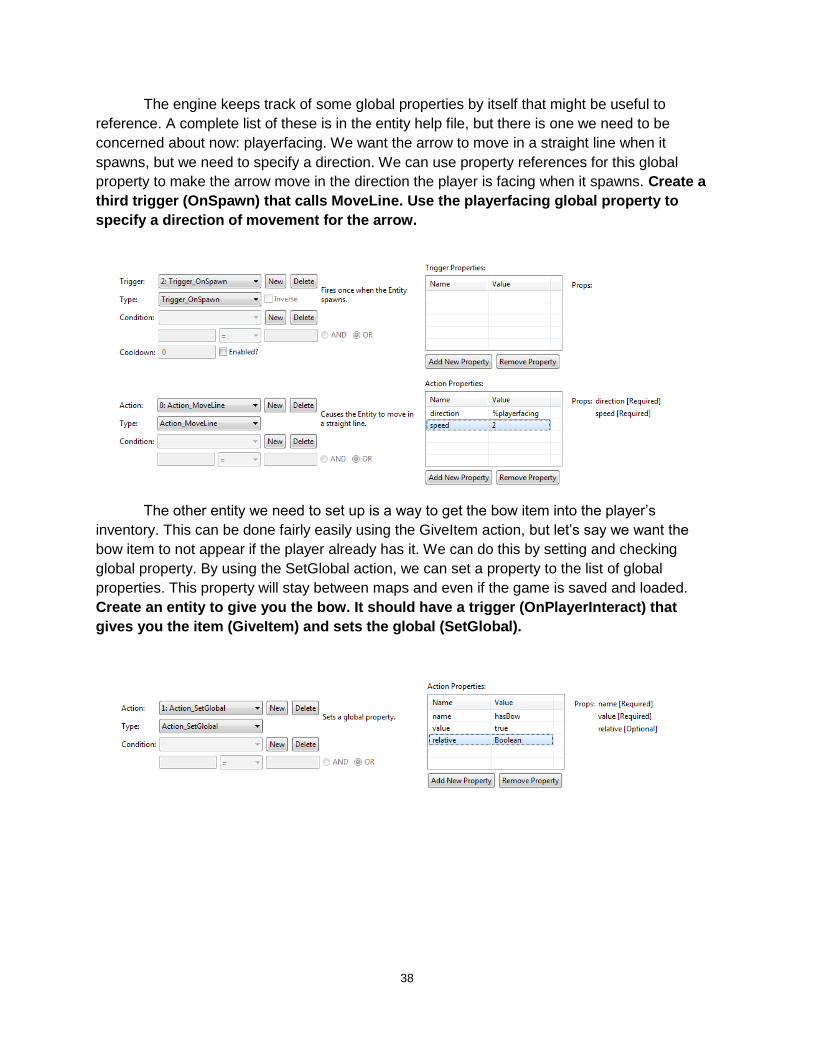
The engine keeps track of some global properties by itself that might be useful to
reference. A complete list of these is in the entity help file, but there is one we need to be
concerned about now: playerfacing. We want the arrow to move in a straight line when it
spawns, but we need to specify a direction. We can use property references for this global
property to make the arrow move in the direction the player is facing when it spawns. Create a
third trigger (OnSpawn) that calls MoveLine. Use the playerfacing global property to
specify a direction of movement for the arrow.
The other entity we need to set up is a way to get the bow item into the player’s
inventory. This can be done fairly easily using the GiveItem action, but let’s say we want the
bow item to not appear if the player already has it. We can do this by setting and checking
global property. By using the SetGlobal action, we can set a property to the list of global
properties. This property will stay between maps and even if the game is saved and loaded.
Create an entity to give you the bow. It should have a trigger (OnPlayerInteract) that
gives you the item (GiveItem) and sets the global (SetGlobal).
39
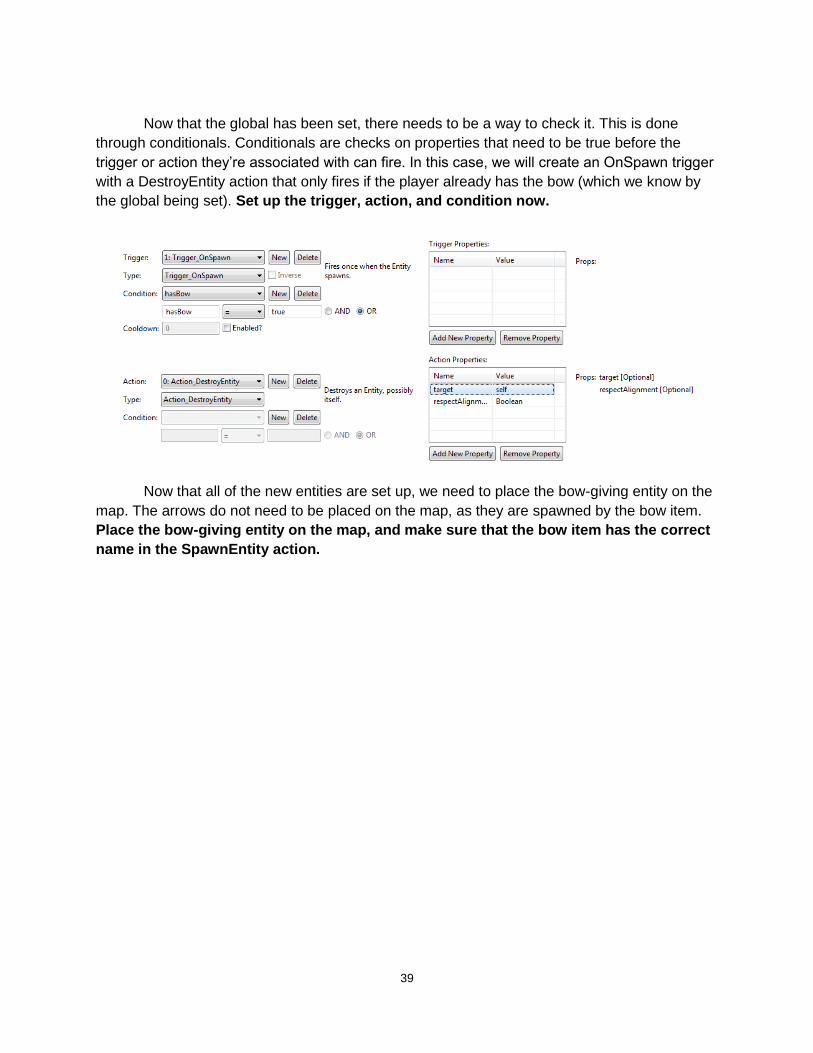
Now that the global has been set, there needs to be a way to check it. This is done
through conditionals. Conditionals are checks on properties that need to be true before the
trigger or action they’re associated with can fire. In this case, we will create an OnSpawn trigger
with a DestroyEntity action that only fires if the player already has the bow (which we know by
the global being set). Set up the trigger, action, and condition now.
Now that all of the new entities are set up, we need to place the bow-giving entity on the
map. The arrows do not need to be placed on the map, as they are spawned by the bow item.
Place the bow-giving entity on the map, and make sure that the bow item has the correct
name in the SpawnEntity action.
40
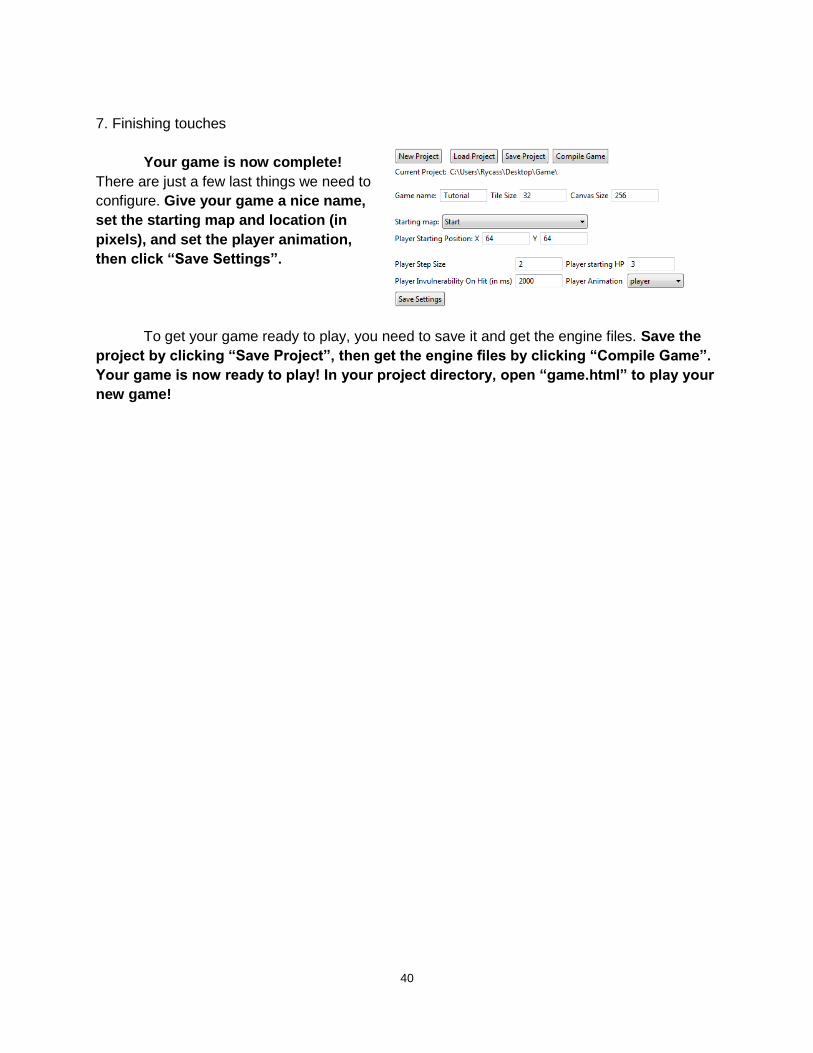
7. Finishing touches
Your game is now complete!
There are just a few last things we need to
configure. Give your game a nice name,
set the starting map and location (in
pixels), and set the player animation,
then click “Save Settings”.
To get your game ready to play, you need to save it and get the engine files. Save the
project by clicking “Save Project”, then get the engine files by clicking “Compile Game”.
Your game is now ready to play! In your project directory, open “game.html” to play your
new game!