HTML Module “Web Page Design”grandmanan.org/BBT/HTML/HTML_module2017.pdfHTML Module HTML Module...
41
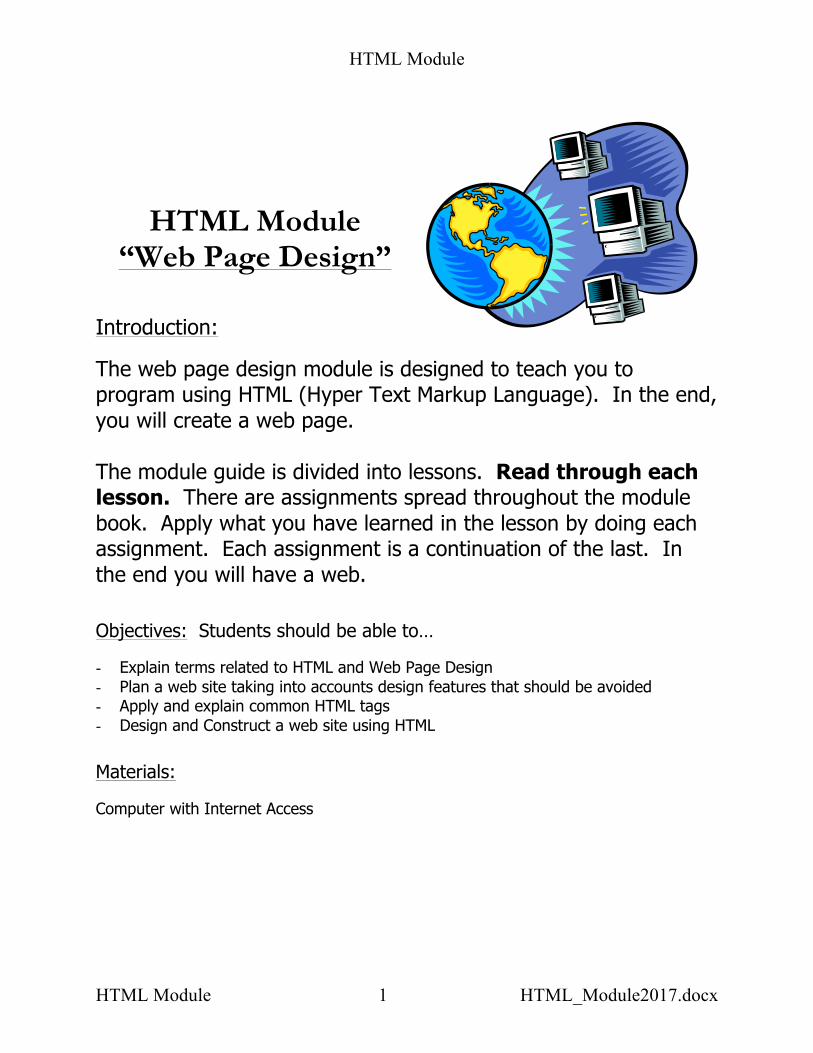
HTML Module HTML Module 1 HTML_Module2017.docx HTML Module “Web Page Design” Introduction: The web page design module is designed to teach you to program using HTML (Hyper Text Markup Language). In the end, you will create a web page. The module guide is divided into lessons. Read through each lesson. There are assignments spread throughout the module book. Apply what you have learned in the lesson by doing each assignment. Each assignment is a continuation of the last. In the end you will have a web. Objectives: Students should be able to… - Explain terms related to HTML and Web Page Design - Plan a web site taking into accounts design features that should be avoided - Apply and explain common HTML tags - Design and Construct a web site using HTML Materials: Computer with Internet Access
-
Upload
trinhduong -
Category
Documents
-
view
223 -
download
2
Transcript of HTML Module “Web Page Design”grandmanan.org/BBT/HTML/HTML_module2017.pdfHTML Module HTML Module...
HTML Module
HTML Module 1 HTML_Module2017.docx
HTML Module “Web Page Design”
Introduction:
The web page design module is designed to teach you to program using HTML (Hyper Text Markup Language). In the end, you will create a web page. The module guide is divided into lessons. Read through each lesson. There are assignments spread throughout the module book. Apply what you have learned in the lesson by doing each assignment. Each assignment is a continuation of the last. In the end you will have a web.
Objectives: Students should be able to… - Explain terms related to HTML and Web Page Design - Plan a web site taking into accounts design features that should be avoided - Apply and explain common HTML tags - Design and Construct a web site using HTML Materials: Computer with Internet Access
HTML Module
HTML Module 2 HTML_Module2017.docx
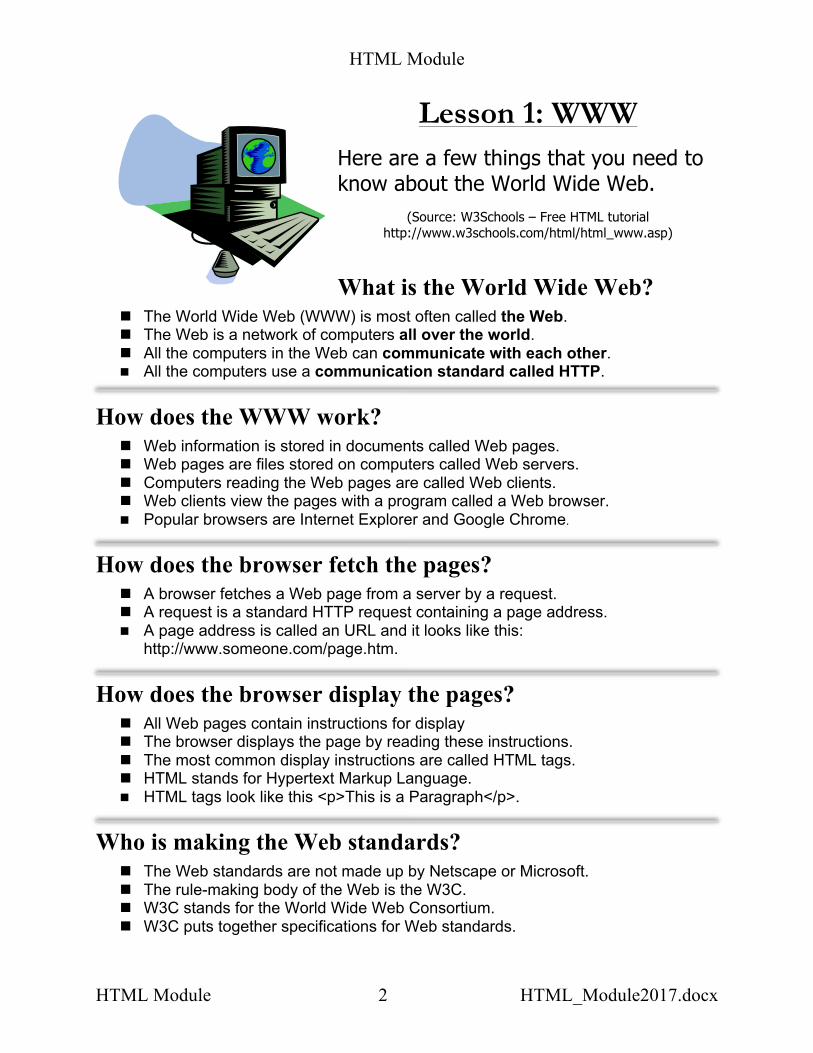
Lesson 1: WWW
Here are a few things that you need to know about the World Wide Web.
(Source: W3Schools – Free HTML tutorial http://www.w3schools.com/html/html_www.asp)
What is the World Wide Web? n The World Wide Web (WWW) is most often called the Web. n The Web is a network of computers all over the world. n All the computers in the Web can communicate with each other. n All the computers use a communication standard called HTTP.
How does the WWW work? n Web information is stored in documents called Web pages. n Web pages are files stored on computers called Web servers. n Computers reading the Web pages are called Web clients. n Web clients view the pages with a program called a Web browser. n Popular browsers are Internet Explorer and Google Chrome.
How does the browser fetch the pages? n A browser fetches a Web page from a server by a request. n A request is a standard HTTP request containing a page address. n A page address is called an URL and it looks like this:
http://www.someone.com/page.htm.
How does the browser display the pages? n All Web pages contain instructions for display n The browser displays the page by reading these instructions. n The most common display instructions are called HTML tags. n HTML stands for Hypertext Markup Language. n HTML tags look like this <p>This is a Paragraph</p>.
Who is making the Web standards? n The Web standards are not made up by Netscape or Microsoft. n The rule-making body of the Web is the W3C. n W3C stands for the World Wide Web Consortium. n W3C puts together specifications for Web standards.

HTML Module
HTML Module 3 HTML_Module2017.docx
Assignment 1: Answer these questions on your workbook page.
1. All the computers on the Internet use a standard called _________ to communicate.
a. HTTP b. WWW
c. URL d. W3C
2. Web clients view the pages on the Internet with a program called a__________.
a. Web server b. Web Client
c. Web Browser d. Web page
3. A browser fetches pages from a server by request based on a _______
a. HTTP b. WWW
c. URL d. W3C
4. A web page displays pages on your computer screen based on the instructions
called ___________. a. URL b. Tags
c. Paragraphs d. WWW
5. Who makes decisions that govern the internet?
a. The US Government b. Microsoft c. Anybody d. W3C (World Wide Web Consortium)
6. HTML stands for: a. Hot Mail Language b. Hypertext Mark-up Language c. Hypertext Made-up Language d. Hypertext mail Language

HTML Module
HTML Module 4 HTML_Module2017.docx
Lesson 2: Your First Tags HTML works through codes called TAGS that give the computer instructions about the way the page should look. Tags are put in upper case letters so they can easily be distinguished from the information on your webpage. All tags are enclosed in brackets <>. Most instructions have a beginning and an ending tag. If they have both, they are called container tags. Container tags could cause a change in formatting throughout the document, like Bold text, or, underlining, so you have to tell them when you want them to end. If they only have a beginning tag, they are called separator tags. Separator tags are used to insert things like line breaks or a horizontal line (things that can’t continue throughout the document). You’ll see some examples of each later on. Example Beginning and Ending Tags:
<TITLE> </TITLE>
If you put tags in upper they are easily distinguished from the content of the page. This makes it easier to edit your work.

HTML Module
HTML Module 5 HTML_Module2017.docx
There are a few documentation tabs that are required in every web page so your pages will be recognized on the World Wide Web.
<HTML> <HEAD> <TITLE> <BODY>
HTML The first and last tags in a document should always be the HTML tags. These are the tags that tell a Web browser where the HTML in your document begins and ends.
HEAD The HEAD tags contain all of the document's header information. When I say "header," I don't mean what appears at the top of the browser window, but things like the document title and so on. Speaking of which...
TITLE This container is placed within the HEAD structure. Between the TITLE tags, you should have the title of your document. This will appear at the top of the browser's blue title bar, and also appears in the history list. Also, the contents of the TITLE container go into your bookmark file, if you create a bookmark to a page. So, put in a title that represents your page content. TITLE

HTML Module
HTML Module 6 HTML_Module2017.docx
BODY
BODY comes after the HEAD structure. Between the BODY tags, you find all of the stuff that you would consider your web page. All of the text, the graphics, and links, and so on -- these things occur between the BODY tags. You will start filling in between the beginning and ending body tags when you learn some other tabs in the next lesson.
Summary: So, putting everything we've covered thus far into one file, we have: <HTML> <HEAD> <TITLE>Document Title</TITLE> </HEAD> <BODY> </BODY> </HTML>
This diagram shows how there is a beginning and an end to each tag and the way it relates to the overall web page.

HTML Module
HTML Module 7 HTML_Module2017.docx
Assignment 2
1. Open Notepad and start your page with the tags shown in the diagram.
Ø Use Notepad (START – PROGRAMS – ACCESSORIES – NOTEPAD) as your text editor.
• Enter the code exactly as shown in the
diagram on the right.
If all you use is these four tags, all your web page would have is a Title in the blue bar at the top and a blank screen. When you have your tags typed in, save your work. Be very careful to follow the instruction for saving exactly as they are below.
Save it!
Saving
Ø Make a folder in your network drive called: Web_Page. Everything for your web page goes in that folder.
Ø Save each page the first time by clicking: FILE – SAVE AS. Direct the save to your Web_Page folder. Give the page a name but don’t use special characters or spaces in the name. Be sure to put a period and HTML after your file name (Call this page Practice.html)
A file extension (Example:.html) indicates the type of file it is. Html extensions open as web pages.
HTML Module
HTML Module 8 HTML_Module2017.docx
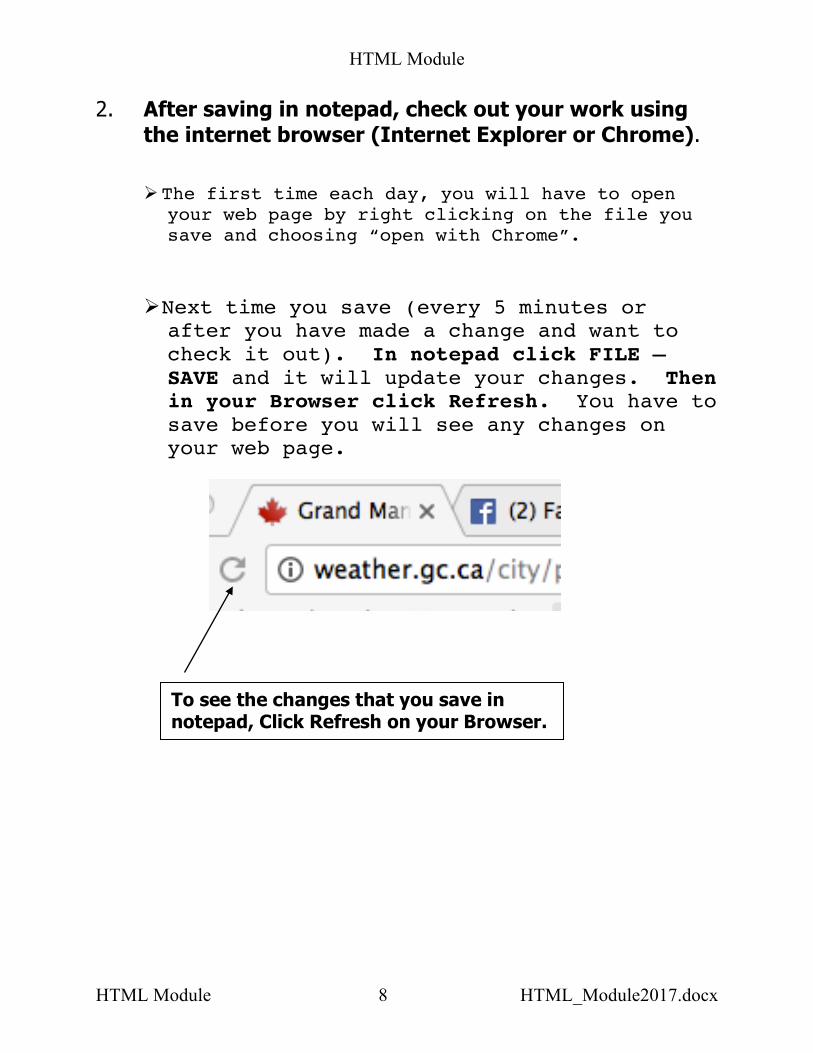
2. After saving in notepad, check out your work using the internet browser (Internet Explorer or Chrome).
Ø The first time each day, you will have to open
your web page by right clicking on the file you save and choosing “open with Chrome”.
Ø Next time you save (every 5 minutes or after you have made a change and want to check it out). In notepad click FILE – SAVE and it will update your changes. Then in your Browser click Refresh. You have to save before you will see any changes on your web page.
To see the changes that you save in notepad, Click Refresh on your Browser.

HTML Module
HTML Module 9 HTML_Module2017.docx
Lesson 3: Body Tags Lets review: There are two parts to every web page, a HEAD and a BODY. The HEAD contains the title of your page and the body is the main contents of the page. Tags are commands that tell the browser how to display the page. Container tags have both a start, and an ending. Separator tags only have a beginning tag. Now, lets learn some basic body tags, such as…
Text Formatting Tags: Tag Results
<P>This is a paragraph.</P> <P>This is a paragraph.</P> <P>This is a paragraph.</P> <H3 ALIGN="left"> Title </H3> <H3 ALIGN ="center"> Title </H3> <H3 ALIGN ="right"> Title </H3> <H6> ALIGN =”justified” There once was an old lady who lived in a shoe. She had so many children, she didn’t know what to do.</H6> Note: Justified means aligned on both sides.
Title Title
Title There once was an old lady who lived in a shoe. She had so many children, she didn’t know what to do.
HTML Module
HTML Module 10 HTML_Module2017.docx
This headline uses H1 This headline uses H2
This headline uses H3 This headline uses H4
This headline uses H5 This headline uses H6
This is font size=+1
This is font size=+2
This is font size=+3
This is font size=+4
This is font size=-1
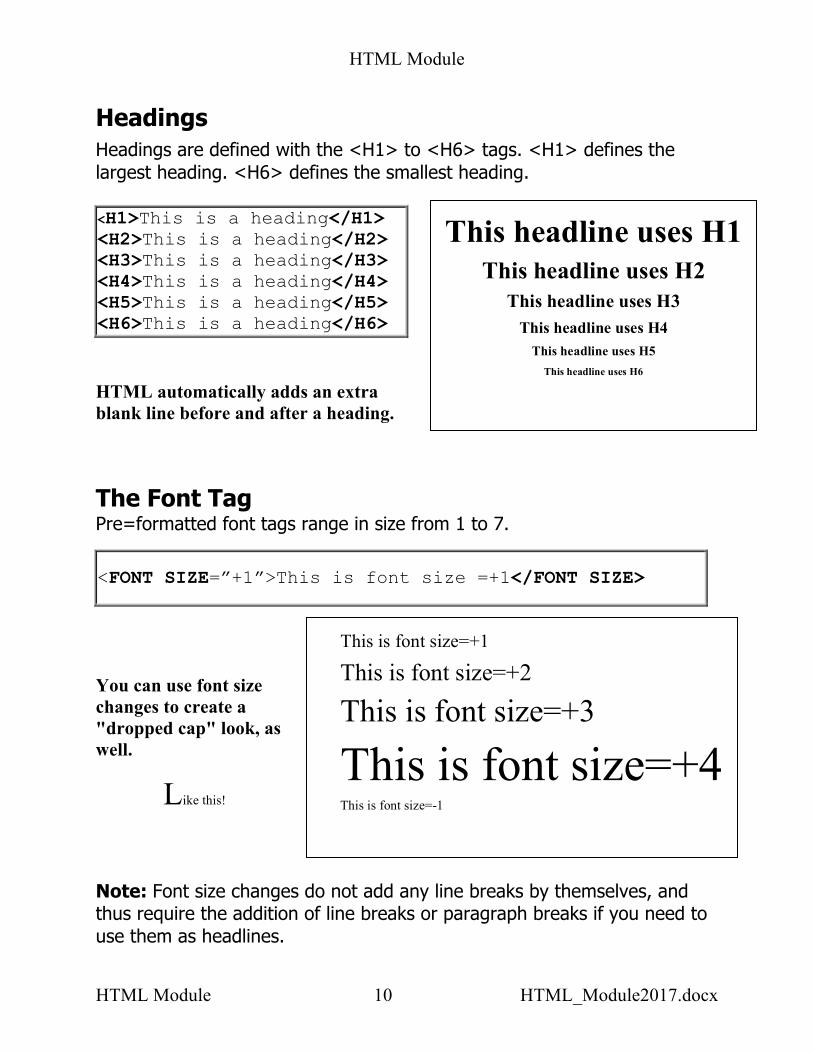
Headings Headings are defined with the <H1> to <H6> tags. <H1> defines the largest heading. <H6> defines the smallest heading. <H1>This is a heading</H1> <H2>This is a heading</H2> <H3>This is a heading</H3> <H4>This is a heading</H4> <H5>This is a heading</H5> <H6>This is a heading</H6> HTML automatically adds an extra blank line before and after a heading.
The Font Tag
Pre=formatted font tags range in size from 1 to 7.
<FONT SIZE=”+1”>This is font size =+1</FONT SIZE>
You can use font size changes to create a "dropped cap" look, as well.
Like this!
Note: Font size changes do not add any line breaks by themselves, and thus require the addition of line breaks or paragraph breaks if you need to use them as headlines.

HTML Module
HTML Module 11 HTML_Module2017.docx
The font tag can be used in other ways as well. Look at the example bellow and see how three different conditions are included in the one tag (Color, Type of font, and Size). <FONT COLOR="green" FACE="arial" SIZE="4"> Note: You can use specific colors by referring to the COLOR codes (Hexadecimal Codes) later in this guide.
Line Breaks The <br> tag is used when you want to end a line, but don't want to start a new paragraph. The <br> tag forces a line break wherever you place it.
<P>This <BR> is a para<BR>graph with line breaks</P>
The <BR> tag is an Separator tag. It has no closing tag. Horizontal Lines Horizontal lines are included in the text tag lesson because lines are useful to separate text. The <HR> tag will create a line but some conditions will allow you to size the line and determine the thickness.
<HR SIZE=10 WIDTH=75%>
Note: You can play with the size and width to see what looks best on your page.
HTML Module
HTML Module 12 HTML_Module2017.docx
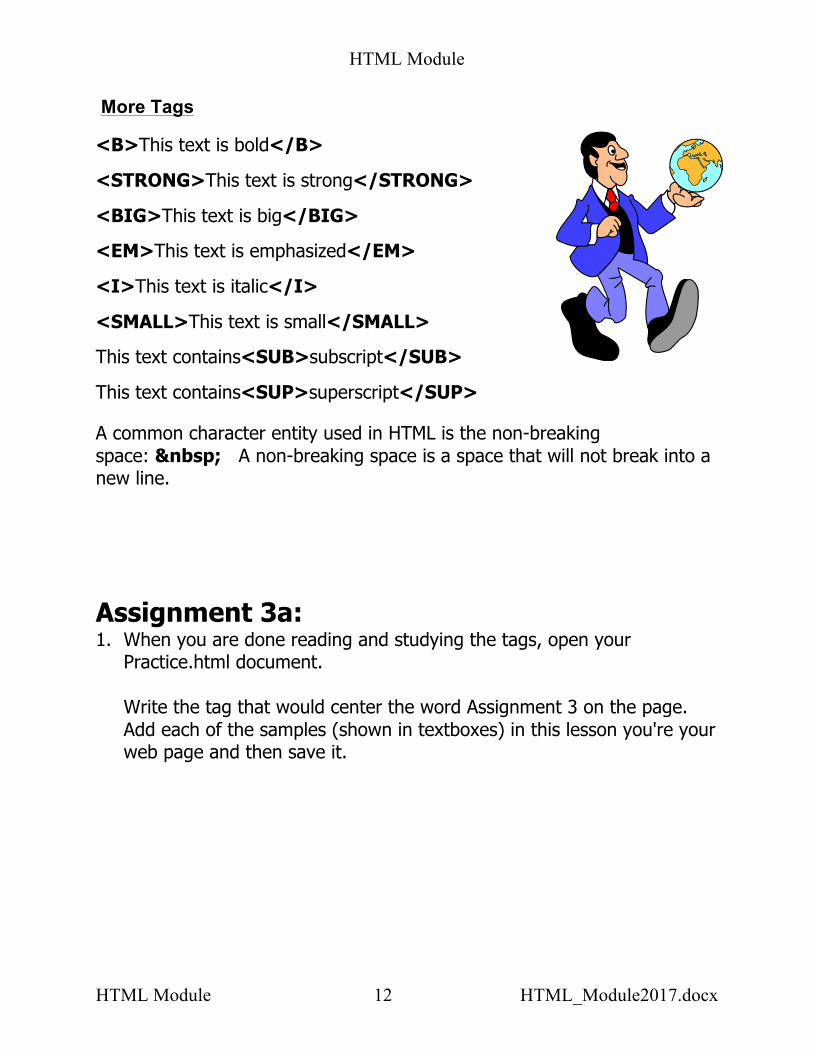
More Tags
<B>This text is bold</B>
<STRONG>This text is strong</STRONG>
<BIG>This text is big</BIG>
<EM>This text is emphasized</EM>
<I>This text is italic</I>
<SMALL>This text is small</SMALL>
This text contains<SUB>subscript</SUB>
This text contains<SUP>superscript</SUP>
A common character entity used in HTML is the non-breaking space: A non-breaking space is a space that will not break into a new line.
Assignment 3a: 1. When you are done reading and studying the tags, open your
Practice.html document. Write the tag that would center the word Assignment 3 on the page. Add each of the samples (shown in textboxes) in this lesson you're your web page and then save it.

HTML Module
HTML Module 13 HTML_Module2017.docx
Assignment 3b: Answer these questions on your workbook page 1. The opening and closing tags for the title of a web page, in order, are: A. <TITLE> and </TITLE> B. </TITLE> and <TITLE>
C. TITLE and /TITLE D. <TITLE> and </HEAD>
2. In the correct order and format, the eight tags that are the basics for an HTML Web page are:
A. HTML> <HEAD> </HEAD> <TITLE> </TITLE> <BODY> </BODY> </HTML>
B. <HTML> <BODY> <HEAD> <TITLE> </TITLE> </HEAD> </BODY> </HTML>
C. <HTML> <HEAD> <TITLE> </TITLE></HEAD> </HTML> <BODY> </BODY>
D. <HTML> <HEAD> <TITLE> </TITLE> </HEAD> <BODY> </BODY> </HTML>
3. What is a file extension? A. A period and letters added to the end of a file name to identify what type of file it is. B. The name of a folder. C. The name of a text editor program. D. An addition to the name of a file so that it is different from another file of the same name. 4. If I want to use an Arial style font on my page, the tag would be:
A. <font=”arial”> B. <face=”arial”>
C. <letter=”arial”> D. <type=”arial”
5. The heading level that is the biggest is:
A. H1 B. H3 C. H5 D. H6
6. The heading level that is the smallest is: A. H1 B. H3 C. H5 D. H6

HTML Module
HTML Module 14 HTML_Module2017.docx
7. The line of code that you would use to center a level 5 heading of Things To Do Today would be:
A. <H5> <CENTER> Things To Do Today </H5> B. <H5> <CENTER> Things To Do Today <CENTER> C. <H5> <CENTER> Things To Do Today </CENTER> </H5> D. <H3> <CENTER> Things To Do Today </CENTER> </H3>
8. The smallest pre-formatted font size is: A. 1 B. 2 C. 5 D. 7
9. The biggest pre-formatted font size is: A. 1 B. 2 C. 5 D. 7
10. The tag used to insert a line break is: A. <B> B. <HR> C. D. <BR>
11. The tag used to insert a blank space is: A. < > B. C.   D. <BR>
12. The tag used to insert a horizontal rule is: A. HR B. <HR> C. D. <BR>
13. Line breaks, horizontal rules, headers, and blank spaces are used to: A. make the Web page longer. B. create links to other Web pages. C. help organize the information on the Web page. D. confuse the designer of the Web page.
14. The HTML you would use to center This is fun! in size 5, red text is:
A. <FONT SIZE=5> <FONT COLOR=RED> <CENTER> This is fun! </CENTER> </FONT> </FONT>
B. <FONT SIZE=”5”> <FONT COLOR=”RED”> This is fun! <CENTER> </CENTER> </FONT> </FONT>

HTML Module
HTML Module 15 HTML_Module2017.docx
C. <FONT SIZE=”5”> <FONT COLOR=”RED”> <CENTER> This is fun! </CENTER></FONT> </FONT>
D. <FONT SIZE=”5”> <CENTER> This is fun! <FONT COLOR=”RED”> </CENTER> </FONT> </FONT>
15. What is the HTML that would create the following line of text?
This is our amazing web site!! A. <FONT COLOR=”BLUE”> This is our <B> <I> amazing web site!!
</I> </B> </FONT> B. <FONT COLOR=”BLUE”> This is our <B> <I> amazing </I> </B>
web site!! </FONT> C. <FONT COLOR=BLUE> This is our <B> <I> amazing </I> </B>
web site!! </FONT> D. <FONT=”BLUE”> This is our <B> <I> amazing </I> </B> web site!!
</FONT>
16. <FONT COLOR=”#FF0000”> <I> BBT is <B>lots </B> of fun. </I> </FONT> will create a line of text that looks like: A. BBT is lots of fun. B. BBT is lots of fun. C. BBT is lots of fun. D. BBT is lots of fun.
Note: For security reason you shouldn’t put student names with student pictures on your web site. Instead, you can put the student’s initials, or if there is a group of students in the picture, create a list of student names in alphabetical order.
HTML Module
HTML Module 16 HTML_Module2017.docx
Lesson 4: Graphics Tags
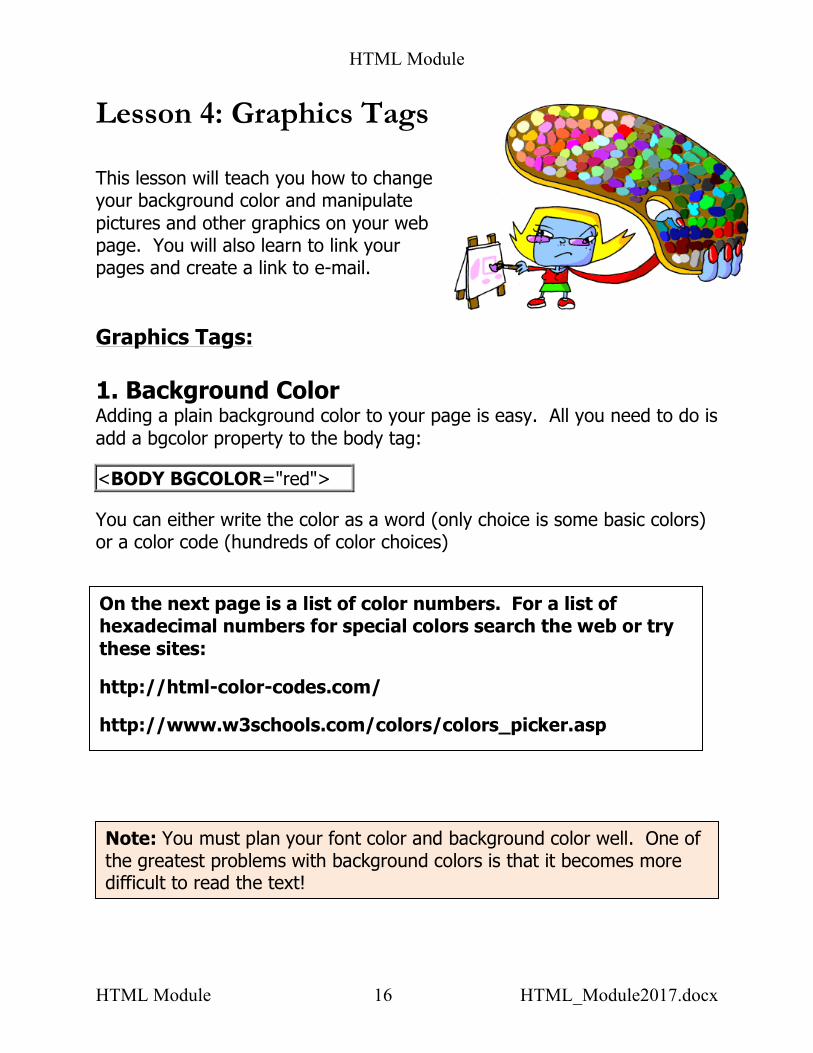
This lesson will teach you how to change your background color and manipulate pictures and other graphics on your web page. You will also learn to link your pages and create a link to e-mail. Graphics Tags: 1. Background Color Adding a plain background color to your page is easy. All you need to do is add a bgcolor property to the body tag:
<BODY BGCOLOR="red">
You can either write the color as a word (only choice is some basic colors) or a color code (hundreds of color choices)
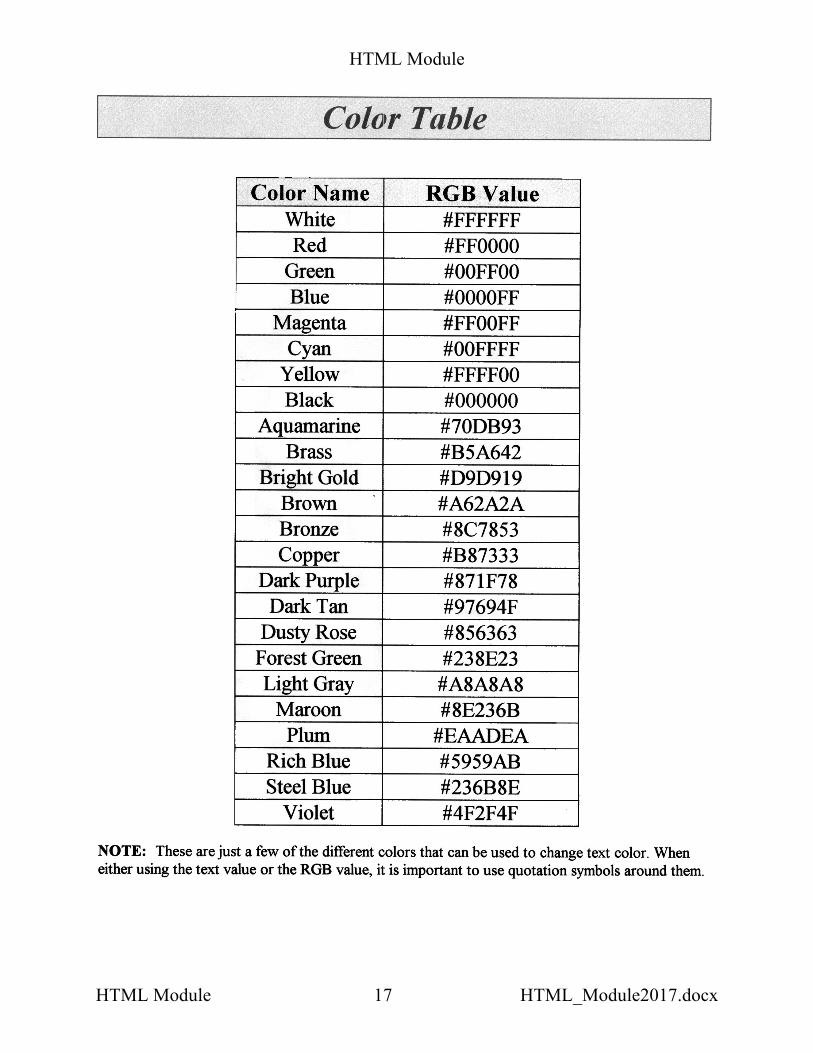
On the next page is a list of color numbers. For a list of hexadecimal numbers for special colors search the web or try these sites:
http://html-color-codes.com/
http://www.w3schools.com/colors/colors_picker.asp
Note: You must plan your font color and background color well. One of the greatest problems with background colors is that it becomes more difficult to read the text!
HTML Module
HTML Module 17 HTML_Module2017.docx

HTML Module
HTML Module 18 HTML_Module2017.docx
2. Background Image Here are few things to consider before using a background image:
• Will the background picture overpower the text on the page?
• Will the background image work with the text colors and link colors on the page?
• How long will the page take to load my background image? Is it simply too big?
• Will the background image work when it is copied to fill the entire page? In all screen resolutions?
If you want to add a background image instead of a background color, you will need to specify in the <body> tag which image should be used for the background.
<BODY BACKGROUD="school.jpg">
Caution: unless an image is actually yours (you took the photo, you drew the art, etc.), you MUST acknowledge the rightful owner of the image if you copy it for your Web page. Not to do so is a form of theft called plagiarism.
HTML Module
HTML Module 19 HTML_Module2017.docx
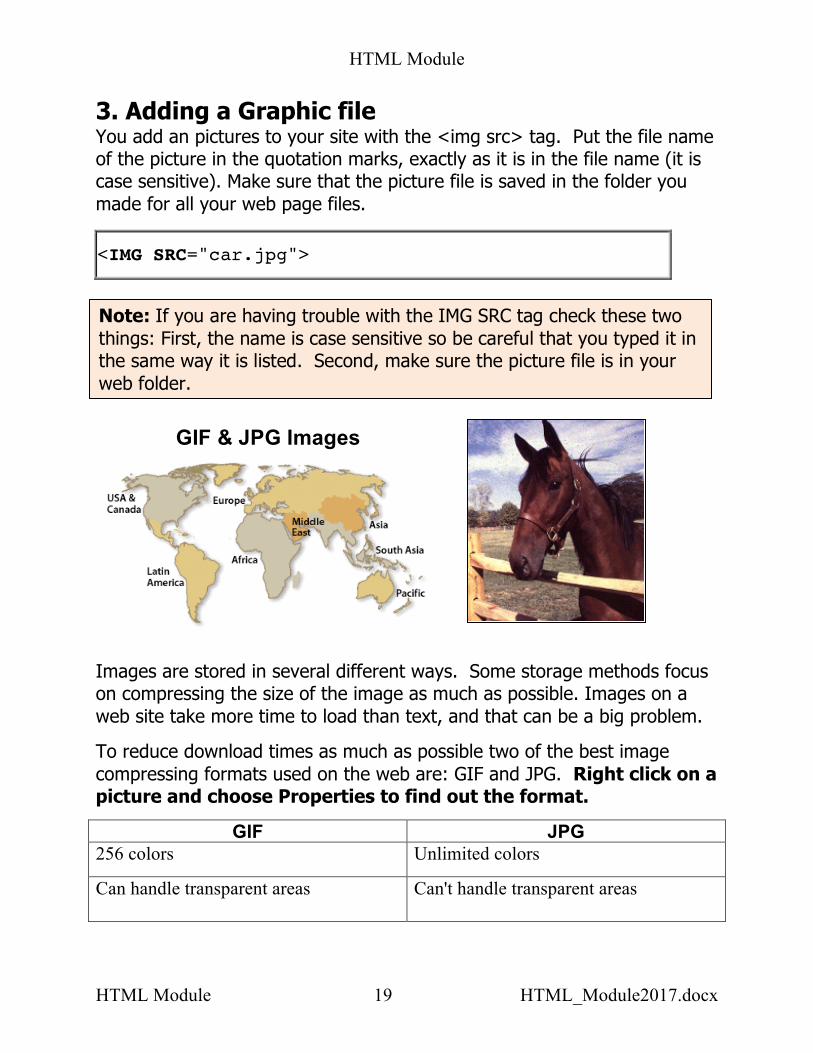
3. Adding a Graphic file You add an pictures to your site with the <img src> tag. Put the file name of the picture in the quotation marks, exactly as it is in the file name (it is case sensitive). Make sure that the picture file is saved in the folder you made for all your web page files.
<IMG SRC="car.jpg">
Images are stored in several different ways. Some storage methods focus on compressing the size of the image as much as possible. Images on a web site take more time to load than text, and that can be a big problem.
To reduce download times as much as possible two of the best image compressing formats used on the web are: GIF and JPG. Right click on a picture and choose Properties to find out the format.
GIF JPG 256 colors
Unlimited colors
Can handle transparent areas Can't handle transparent areas
Note: If you are having trouble with the IMG SRC tag check these two things: First, the name is case sensitive so be careful that you typed it in the same way it is listed. Second, make sure the picture file is in your web folder.
GIF & JPG Images

HTML Module
HTML Module 20 HTML_Module2017.docx
This format is not good at compressing photographs
Excellent for compressing photographs and complex images
In general, it is excellent for banners, buttons and clipart
In general, it is not good for banners, buttons and clipart
This means that:
√ Banners, buttons, dividers, clipart and other simple images usually work best as GIF's.
√ Photographs and other complex images usually work best as JPG's.
Assignment 4a: When you are done reading and studying the tags, open your Practice.html document.
Write the tag that would center the word Assignment 4 on the web page. Add each of these to the page:
• Add an appropriate background color to your page
• Find a photo on the internet. Save it to your webpage folder. Add the photo to the page and center it.
• Under the picture write the PROPER source reference that will appear under the photo.
Assignment 4b: Answer these questions on your worksheet:
1. Plagiarism is: A. allowed by copyright laws.
B. when you do not state where unoriginal text and images come from.
C. using HTML to place images on a Web page. D. the extension used to shown that a file is an image.
HTML Module
HTML Module 21 HTML_Module2017.docx
2. Two examples of image file extensions are: A. .gif and .jpg B. .html and .gif C. .doc and jpg D. .html and .jpg 3. The image contained in Santa.gif is to be centered on the Web page. The correct HTML is: A. <CENTER> <IMG SRC=”santa.gif”> </CENTER> B. <CENTER> <IMG SRC= Santa.gif> </CENTER> C. <IMG SRC=”santa.gif”> D. <CENTER> <IMG SRC=”Santa.gif”> </CENTER>
4. To make the background color red, the correct tag is:
A. <BODY BACKGROUND=”RED”> B. <BODY BGCOLOR= RED> C. <BACKGROUND=”RED”> D. <BODY BGCOLOR=”RED”>
5. To insert the image pastels.jpg as a background, the correct tag is: A. <BODY BACKGROUND=”pastels.jpg”> B. <BODY BGCOLOR= “pastels.jpg”> C. <BODY IMG SRC=”pastels.jpg”> D. <BODY BGIMAGE=”pastels.jpg”>
6. When using colored backgrounds, an important consideration is: A. to ensure that the image or color is pretty. B. to ensure that the image is colorful. C. to ensure that the image makes a statement.
D. to ensure that the text information can be easily read.

HTML Module
HTML Module 22 HTML_Module2017.docx
Lesson 5: Resizing, Borders, and ALT You can re-size your picture so it fits your space by adding the height and width condition to the <IMG SRC> tag as shown below. You can also add in a border with the border condition. The next feature is really interesting, if you run you mouse over the picture the <alt> tag will display text about the picture. Use the same alignment tags that you learned in the last lesson to position your picture.
<iIMG SRC="car.jpg" WIDTH="60" HEIGHT="40" border=”2” ALT=”Nice Car” ALIGN=”center”>
Note: It is usually best to use the width and height tag to reduce the image. Enlarging the image may cause it to be distorted. Make sure you keep the proportions the same so it doesn’t appear stretched. Note: Netscape will not show a border unless the picture is linked.
Web graphics should be saved at 75 dpi. The maximum file size should be less than 25 kb. Right click on your picture and choose Properties. This will tell you the file size. Name files and pictures without leaving spaces in the name.

HTML Module
HTML Module 23 HTML_Module2017.docx
Assignment 5: When you are done reading and studying the tags, open your Practice.html document.
Write the tag that would center the word Assignment 5 on the practice web page.
• Resize the photo you used in Assignment 4 to half size and place it on the practice webpage.
HTML Module
HTML Module 24 HTML_Module2017.docx
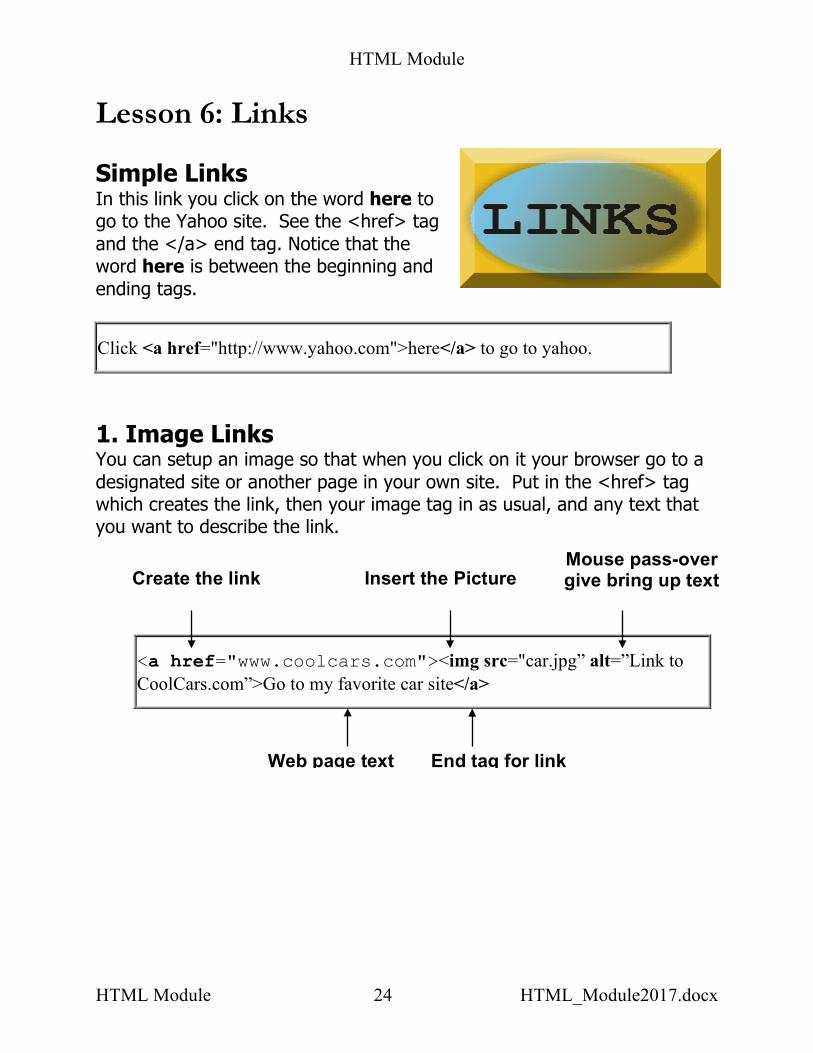
Lesson 6: Links Simple Links In this link you click on the word here to go to the Yahoo site. See the <href> tag and the </a> end tag. Notice that the word here is between the beginning and ending tags.
Click <a href="http://www.yahoo.com">here</a> to go to yahoo.
1. Image Links You can setup an image so that when you click on it your browser go to a designated site or another page in your own site. Put in the <href> tag which creates the link, then your image tag in as usual, and any text that you want to describe the link.
<a href="www.coolcars.com"><img src="car.jpg” alt=”Link to CoolCars.com”>Go to my favorite car site</a>
Create the link Insert the Picture Mouse pass-over give bring up text
Web page text page
End tag for link
HTML Module
HTML Module 25 HTML_Module2017.docx
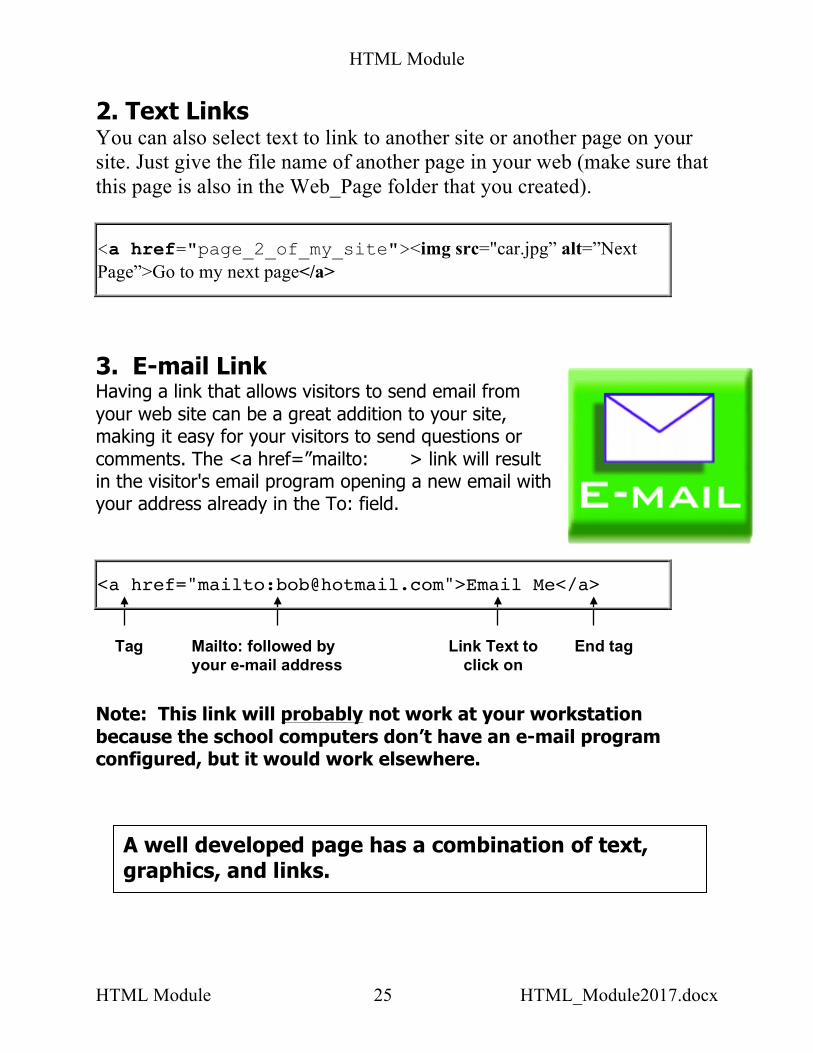
2. Text Links You can also select text to link to another site or another page on your site. Just give the file name of another page in your web (make sure that this page is also in the Web_Page folder that you created).
<a href="page_2_of_my_site"><img src="car.jpg” alt=”Next Page”>Go to my next page</a>
3. E-mail Link Having a link that allows visitors to send email from your web site can be a great addition to your site, making it easy for your visitors to send questions or comments. The <a href=”mailto: > link will result in the visitor's email program opening a new email with your address already in the To: field.
<a href="mailto:[email protected]">Email Me</a>
Note: This link will probably not work at your workstation because the school computers don’t have an e-mail program configured, but it would work elsewhere.
Tag Mailto: followed by your e-mail address
Link Text to click on
End tag
A well developed page has a combination of text, graphics, and links.
HTML Module
HTML Module 26 HTML_Module2017.docx
Assignment 6a: When you are done reading and studying the tags, open your Practice.html document.
Write the tag that would center the word Assignment 6 on the practice web page.
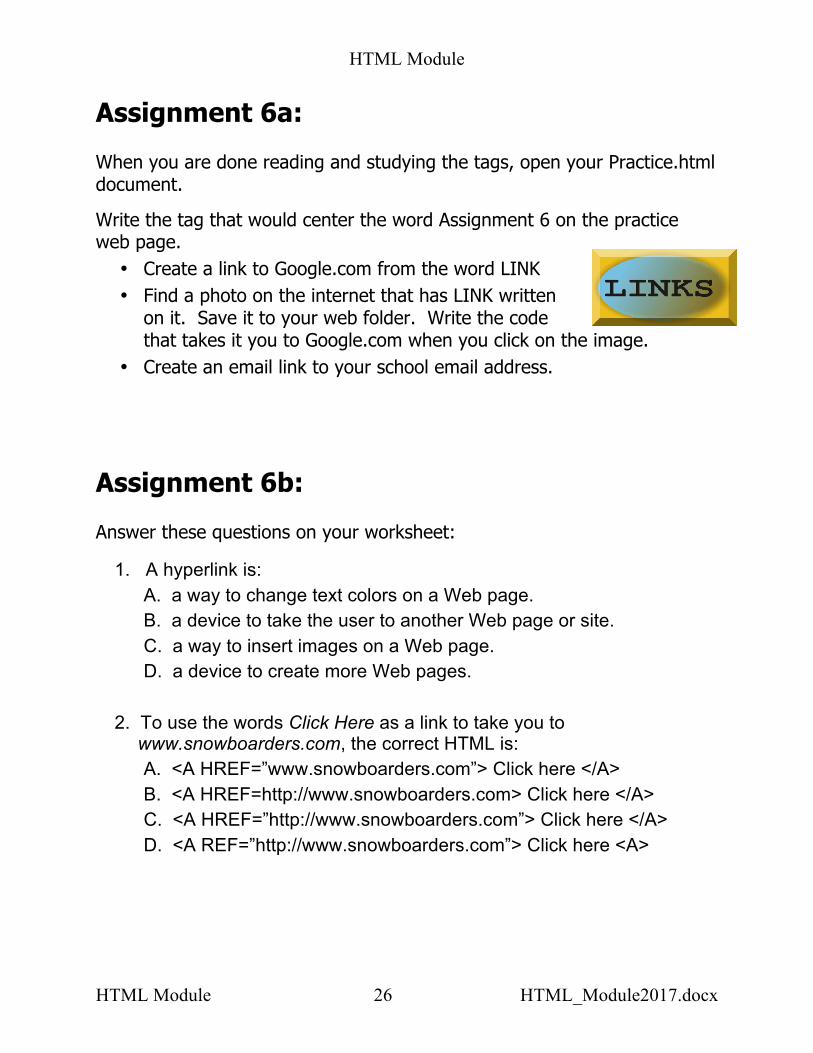
• Create a link to Google.com from the word LINK • Find a photo on the internet that has LINK written
on it. Save it to your web folder. Write the code that takes it you to Google.com when you click on the image.
• Create an email link to your school email address.
Assignment 6b: Answer these questions on your worksheet:
1. A hyperlink is: A. a way to change text colors on a Web page. B. a device to take the user to another Web page or site. C. a way to insert images on a Web page. D. a device to create more Web pages. 2. To use the words Click Here as a link to take you to
www.snowboarders.com, the correct HTML is: A. <A HREF=”www.snowboarders.com”> Click here </A> B. <A HREF=http://www.snowboarders.com> Click here </A> C. <A HREF=”http://www.snowboarders.com”> Click here </A> D. <A REF=”http://www.snowboarders.com”> Click here <A>

HTML Module
HTML Module 27 HTML_Module2017.docx
3. To use the image icecream.gif as a link to take you to icecreamshoppe.com, the correct HTML is:
A. <A HREF=”http://icecreamshoppe.com”> <IMG SRC=”icecream.gif”> </A>
B. <A REF=http://icecreamshoppe.com> <IMG SRC=icecream.gif> </A>
C. <A HREF=”http://icecreamshoppe.com”> <IMG LNK=”icecream.jpg”> </A>
D. <A HREF=”http:// icecream.gif”> <IMG SRC=”icecreamshoppe.com”> </A>
4. To link to a second page within a Web site, second.html, that is in the
same folder as the home page, using Page 2 as the text link, the correct HTML is:
A. <A HREF=”http://www.second.html”> Page 2 </A> B. <A HREF=”Page 2”> Page 2 </A> C. <A REF=”second.html”> Page 2 </A> D. <A HREF=”second.html”> Page 2 </A> 5. A hyperlink should always: A. work! B. be easy to find. C. let the user know where they’re going. D. all of the above.

HTML Module
HTML Module 28 HTML_Module2017.docx
HTML Project
Congratulations! You have now finished all of the activities in this module. This means that you now have the basic skills needed to design your own Web site. Here’s your chance to let your creativity and knowledge shine!
Organizing Your Web A well organized web site has a Home Page that links to other pages in your web site or to other sites. Each page in your web site should focus on one theme. For example, the school web site that you will design will have a Home Page that will link you to a Sports Page, a Staff Page, a Picture Page, a Courses Page, and a Personal Page for you and your partner. We do this because one long page takes too long to load for
Sample Web Layout

HTML Module
HTML Module 29 HTML_Module2017.docx
Project Assignment:
Now, in your workbook, start planning your web by writing HOME PAGE in the center of the page. Now, think of the different themes that you might want to include in your site. Draw these themes in like the spokes of a wheel, leaving the home page as the center or axle. You can choose the theme of your pages but you must do a home page (Index.html) and one other page about something you are interested in. Show this to your instructor for approval before going on.
As soon as you open the page in Notebook, save it as Index.html.
Index.html is often used for the Home Page of your web because it allows users to open the page with a shortened URL. Page 1
v Main title and headings. v Information on your topic – at least two original paragraphs
of text. v A background selection. v A section titled Links with a minimum of five working links to
Web sites related to your topic. v At least one image. v A link to your second page.
Page 2 v Main title and headings. v A picture and a paragraph about each of the Web page
designers. v A background selection. v A bibliography of any images used. v A link back to your home page.

HTML Module
HTML Module 30 HTML_Module2017.docx
Lesson 7:
Now… the Tables tags! Tables are useful to organize information on your page. However, you will have to look at the examples closely to she how they are used. The <table> tag tells the page that you are setting up a table, but then you have to designate the number of rows and columns. Use the <tr> tag for each row, and the <td> tag for each cell (box) in that row.
<table border="1"> <tr> <td>Row one, left side</td> <td>Row one, right side</td> </tr> <tr> <td>Row two, left side</td> <td>Row two, right side</td> </tr> </table>
Results
Row one, left side Row one, right side Row two, left side Row two, right side
PASSING POINT – at this point (if you did the work correctly) you have passed the module. The next activities will increase your mark. You must do them if you have time… your teacher can excuse you from them if you are out of time
HTML Module
HTML Module 31 HTML_Module2017.docx
Results
Name Telephone Telephone Bill Smith 852-9107 856-2314
Note: There is a lot more that can be done with tables. To go a little farther, try this site, or do a search for HTML tags on the World Wide Web.
http://www.echoecho.com/html.htm
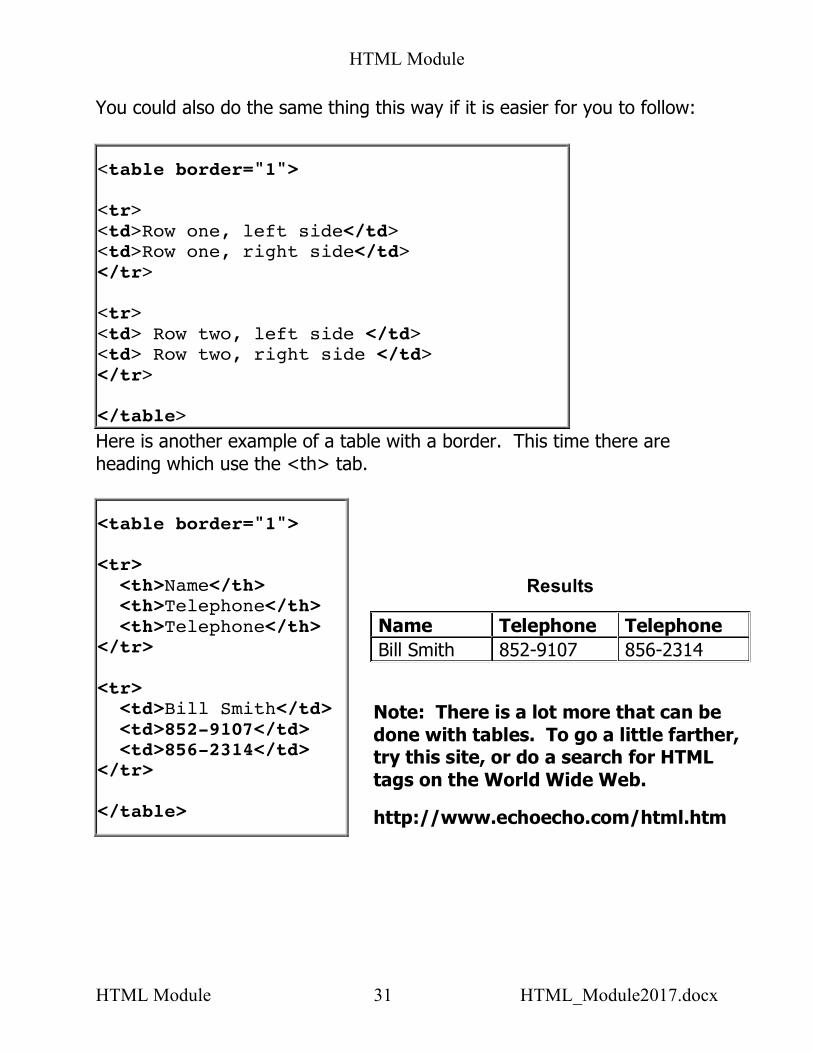
You could also do the same thing this way if it is easier for you to follow:
<table border="1"> <tr> <td>Row one, left side</td> <td>Row one, right side</td> </tr> <tr> <td> Row two, left side </td> <td> Row two, right side </td> </tr> </table>
Here is another example of a table with a border. This time there are heading which use the <th> tab.
<table border="1"> <tr> <th>Name</th> <th>Telephone</th> <th>Telephone</th> </tr> <tr> <td>Bill Smith</td> <td>852-9107</td> <td>856-2314</td> </tr> </table>

HTML Module
HTML Module 32 HTML_Module2017.docx
Results
• Coffee • Milk
Results
1. Coffee 2. Milk
List Tags We often create lists of things with either bullets (unordered lists) or numbers (ordered lists). Bullets can be a variety of symbols but these bullets will be small round circles. To create a bulleted list you need to add a <ul> and a </ul> tag at the beginning and the end of the list. Numbered lists have <ol> tags instead of <ul> tags. For each item in the list use <li> and </li> tags. There are special settings that you can use to customize the lists on your page. Unordered List
<ul> <li>Coffee</li> <li>Milk</li> </ul>
Ordered List
<ol> <li>Coffee</li> <li>Milk</li> </ol>
Assignment 7:
- Create a table of Grade 9 teachers and a table with grade 0 courses (this can be a separate page or on the school page).
- Create a list of your 5 favorite hobbies or your 5 favorite foods on your
Home Page

HTML Module
HTML Module 33 HTML_Module2017.docx
Assignment 8: Review Answer each question below on your own paper. Call your page Assignment 10 questions. The answers are contained in this user guide. 1. What does HTML stand for? 2. Who sets the rules for the world wide web? 3. What is a web browser? 4. Give two examples of the most popular web browsers. 5. What type of software is used to upload a web site to a web server? 6. What is wrong with having a really long web page? 7. What type of tags have both a beginning tag and an ending tag? 8. What are the 4 main tags that are required in every web page? 9. What file name extension do you have to add to create a web page
when you are saving it? 10. What icon on the browser updates any changes that you have saved in
your text editor? 11. What is another name for a web page address? 12. The beginning page of you web site that has links to all the other
pages is called the __________? 13. What type of tag is the tag for a horizontal line? 14. What should we do when creating web pages to protect the identity of
students who appear in pictures on our web site?

HTML Module
HTML Module 34 HTML_Module2017.docx
15. Which tag shows a message when you leave your mouse pointer over
a picture? 16. At what resolution should pictures be scanned to put on the web? 17. What is the best picture format for the web? 18. Does an unordered list have numbers or bullets? 19. Which search engine is set up as a “catalogue”? 20. What does the meta tag do?

HTML Module
HTML Module 35 HTML_Module2017.docx
Lesson 9: FTP (File Transfer Protocol) In order for your site to be viewed around the world, you must send it to a web server by using an FTP (File Transfer Protocol) program. There are sites such as Angelfire.com and others who offer free web site hosting. There may also be room on the Department of Education server for your site (ask your instructor). There are a variety of FTP programs available. One popular one that can be downloaded free of charge is called CuteFTP. Your site wouldn’t be much good if no one could find it. There are a couple of ways that search engines are able to offer your site when someone does a search. Some search engines are use Indices and others use Catalogues.
(Source: HTML: An interactive Tutorial for Beginners http://www.davesite.com/webstation/html/chapP1.shtml)
Indices - An Index is a collection of the text off web pages that it has “spidered” or “crawled”, as it visits new pages it collects links from it, and visits the linked pages, and so on. It slowly makes its way around the web collecting more pages and links, updating the index about old pages and deleting pages that no longer exist or that have moved. Normally all you will need to get into an index search engine is submit your URL, and the spider (program that collects the data) will visit your page. Most search engines fit this category including Google, Excite, MSN, and AltaVista. Catalogs - A Catalog doesn't actually visit your page, instead you submit your URL, Title, and Description to it, and place it in the proper category. Often these are verified by a real person which usually delays entry a few weeks, but sometimes your entry is automatically added once you have submitted. Yahoo is an example of a catalogued search engine. Also, the <meta> tag can help your site get recognized, especially if it is listed with an Indices Search Engine. Many search engines now support the <META> tags, which allow you to give keywords and a description to your page. This gives you more control over how your page will

HTML Module
HTML Module 36 HTML_Module2017.docx
show up during a search, and will often cause more traffic to your page. The <META> tag can be used for a few different purposes. Usually, you should place the <META> tag within the <head> tags at the beginning of your document. To improve search engine results, we will use two specific attributes within the meta tag. Place the <meta> tag after the <title> tag but before the </head> tag. Here is an example: <meta name="description" content="description of page goes here – up to 200 characters long"> <meta name="keywords" content="keywords go here – up to 1000 characters long">
Assignment 9: Write a meta name tag for your homepage.

HTML Module
HTML Module 37 HTML_Module2017.docx
Lesson 10: Evaluating Web Pages A website can be evaluated on these criteria:
• Accuracy. If your page lists the author and institution that published the page and provides a way of contacting him/her and . . .
• Authority. If your page lists the author credentials and its domain is preferred (.edu, .gov, .org, or .net), and, . .
• Objectivity. If your page provides accurate information with limited advertising and it is objective in presenting the information, and . . .
• Currency. If your page is current and updated regularly (as stated on the page) and the links (if any) are also up-to-date, and . . .
• Coverage. If you can view the information properly--not limited to fees, browser technology, or software requirement, then . . .
Top 10 List of Things to Avoid
Large, Screaming Fonts – Size does matter! Pick a font and size that is suitable for your page. Viewers don’t want to be screamed at when they view your page. Like everything on a page, check to see if it tastefully done. A lot of Animated Gifs – One animation is neat. More than one is too much! Make sure that the animation is appropriate to your page. Huge Images – Images should be small enough so that the entire image can be seen on the screen without scrolling. If your pictures are large than only put a couple on each page. The best solution is to “thumbnail” the pictures in a table. Then the view can click on the ones he/she wants to see and they enlarge. This allows the page to be must neater, loads faster, and allows the view to make choices.
Some URL endings: .com companyl .edu education .gov government .mil military .org organization .net network
HTML Module
HTML Module 38 HTML_Module2017.docx
Clashing Text and Backgrounds – Black text on a white background is the most popular web style because it stands out best. Colors that don’t stand out well make your page unreadable, so choose your colors carefully. Auto play background music – Music takes considerable time to load, so avoid it! Anything that "pops up" without warning – Pop-ups are usually used for advertising. They are frustrating to users. Scrolling Marquees – These are messages that scroll across the bottom of your screen. They are annoying, so avoid them. Extremely long pages – If your page is long, divide it into two or more pages, grouped by topic. Outdated information – It is important to maintain your web site monthly. Update it by getting rid of old information and including new work. It is best to put the date that it was last updated on the bottom of the home page so that viewer can tell that it is up to date. Long Load times – Most people are not willing to wait more than a few seconds for a page to load. Check your graphics and make sure that they are not too large. Also, music that plays on start-up takes considerable time to load. Non standard link colors – It is important for views to know which text links to other pages/sites. Standard link colors are blue and they turn red or purple when you have already visited the link.
Assignment 10: Click on the Assignment 7 links on the BBT website and evaluate the three 2 sites based on the criteria above. Use the Web Site Evaluation sheets in your workbook.

HTML Module
HTML Module 39 HTML_Module2017.docx
Web Site Evaluation Site URL: _________________
CRITERIA RATING 1 = poor 5 = exceptional
1 2 3 4 5
ACCURACY
1. Accuracy of Web Documents
• Does it say who wrote the information?
• Do you know the reason the page was produced?
• Is the person qualified to write this document?
2 2 2 2 2
AUTHORITY 2. Authority of Web Documents
• Check the domain of the document Was it a reputable institution that publishes this document?
• Does the publisher list his or her qualifications?
2 2 2 2 2
OBJECTIVITY 3. Objectivity of Web Documents
• What goals/objectives does this page meet?
• How detailed is the information?
• What opinions (if any) are expressed by the author
2 2 2 2 2
CURRENCY
4. Currency of Web Documents
• Does it say when it was produced?
• Does it say when it was updated'
• Do all the links work?
2 2 2 2 2
COVERAGE
5. Coverage of the Web Documents
• Are there links to other sites?
• Is there a balance of Text and graphics?
• Are there references for the information?
2 2 2 2 2
HTML Module
HTML Module 40 HTML_Module2017.docx
HTML Check Sheet Assignment 1:
q 6 questions Assignment 2:
q Start “Practice” webpage Assignment 3:
q Add tags to your “Practice” webpage - Paragraph tag - “H” tags - Align tag - Headings tag
- Font tag - Brake tag - Horizontal Line
tag q 16 questions
Assignment 4:
q Add tags to your “Practice” webpage - Background Tag - Photo Tag - Source Reference
q 6 questions Assignment 5:
q Add tags to your “Practice” webpage - Resize photo
Assignment 6:
q Add tags to your “Practice” webpage - Word Link Tag - Photo Link Tag

HTML Module
HTML Module 41 HTML_Module2017.docx
- Email Link q 5 questions
Project Assignment:
q Draw a web structure q Create a homepage and at least one other page
Assignment 7:
q Add tags to your “Practice” webpage - Tables Tags
- Lists Tag
- Lists Tags
Assignment 8:
q Answer 20 questions about your module
Assignment 9:
q Meta name tag Assignment 10:
q Evaluate two web sites
PASSING POINT – at this point (if you did the work correctly) you have passed the module. The next activities will increase your mark. You must do them if you have time… your teacher can excuse you from them if you are out of time