HTML, CSS, And JavaScript Mobile Development for Dummies html css javascript tutorial
HTML Exercise 29 Page 1
HTML Exercise 29Adding JavaScript To Your Web Pages
Here’s Joe Burn’s explanation of JavaScript.
“What is the difference between Java and JavaScript anyway?
They are both similar and quite different depending on how you look at them. First their lineage:Java is an Object Oriented Programming (OOP) language created by James Gosling of SunMicrosystems. The fine people at Netscape created JavaScript. JavaScript is a distant cousin of Java. Itis also an OOP language. Many of their programming structures are similar. However, JavaScriptcontains a much smaller and simpler set of commands than does Java. It is easier for the averageweekend warrior to understand.
Now let us talk about how Java and JavaScript differ. The main difference is that Java can stand on itsown while JavaScript must be placed inside an HTML document to function. Java is a much larger andmore complicated language that creates "standalone" applications. A Java "applet" (so-called because itis a little application) is a fully contained program. JavaScript is text that is fed into a browser that canread it and then is enacted by the browser.JavaScript is text-based. You write it to an HTML document and it is run through a browser. You canalter it after it runs and run it repeatedly.JavaScript is wholly reliant on the browser to understand it and make it come to life.
In my opinion (Joe Burns, not your teacher), JavaScript's main benefit is that it can be understood by thecommon human. It is much easier and more robust than Java. It allows for fast creation of Web pageevents. Many JavaScript commands are what are known as Event Handlers. They can be embeddedright into existing HTML commands. JavaScript is a little more forgiving than Java. It allows morefreedom in the creation of objects. Java is very rigid and requires all items to be denoted and spelledout. JavaScript allows you to call on an item that already exists, like the status bar or the browser itself,and play with just that part. JavaScript is geared to Web pages. Java is geared toward where it isneeded most at the time.
JavaScript are most often offered on the Net as fully functioning items. You simply grab them from theNet and use them on your page (provided you are given permission). Many, many sites out there donothing more than hand out applets or JavaScript. Gamelan.com is a good one for applets. Look atjavascripts.com for over 2300 free JavaScript scripts. The HTML Goodies Applet and JavaScriptTutorials will teach you how to implement these items on your pages. They will not teach you to writethe languages, but rather instruct you on placing functioning applets and JavaScript scripts on your Webpages. It is a good introduction to the formats. Once you know how to get these pups on your pages,you'll understand more about their structures and can then more easily attempt to learn the language andcreate functioning JavaScripts or applets yourself.”1
Where to Place JavaScriptJavaScript is often placed in between the <HEAD>…</HEAD> tags. This makes the code startimmediately. Whatever, is between the <HEAD>…</HEAD> tags will not show up in the document.Another common area to place JavaScript is in the opening <BODY> tag.
1 This comes from www.HTMLgoodies.com by Joe Burns
HTML Exercise 29 Page 2
Other scripts will require you to place part of the script in between the <HEAD>…</HEAD> tags, inthe opening <BODY> tags and somewhere in the body of the page itself. You have to read thedirections carefully.In this exercise you will have a chance to spiff up your Web pages by adding JavaScript code that youcan copy right from the Web. You don’t have to know anything about writing JavaScript, only how toplace it within your HTML code.
JavaScript 1: Adding a Roller Coaster Heading1. Double-click your HTML folder to open it.
2. Double-click the javascript.html document to open it.3. Right-click a blank spot on the page and select View Source.
4. Change the Revision Date in the footer of the page to today’s date.5. Below the date, add this line of code.
Revised--Date<BR>HTML Exercise 29<BR>
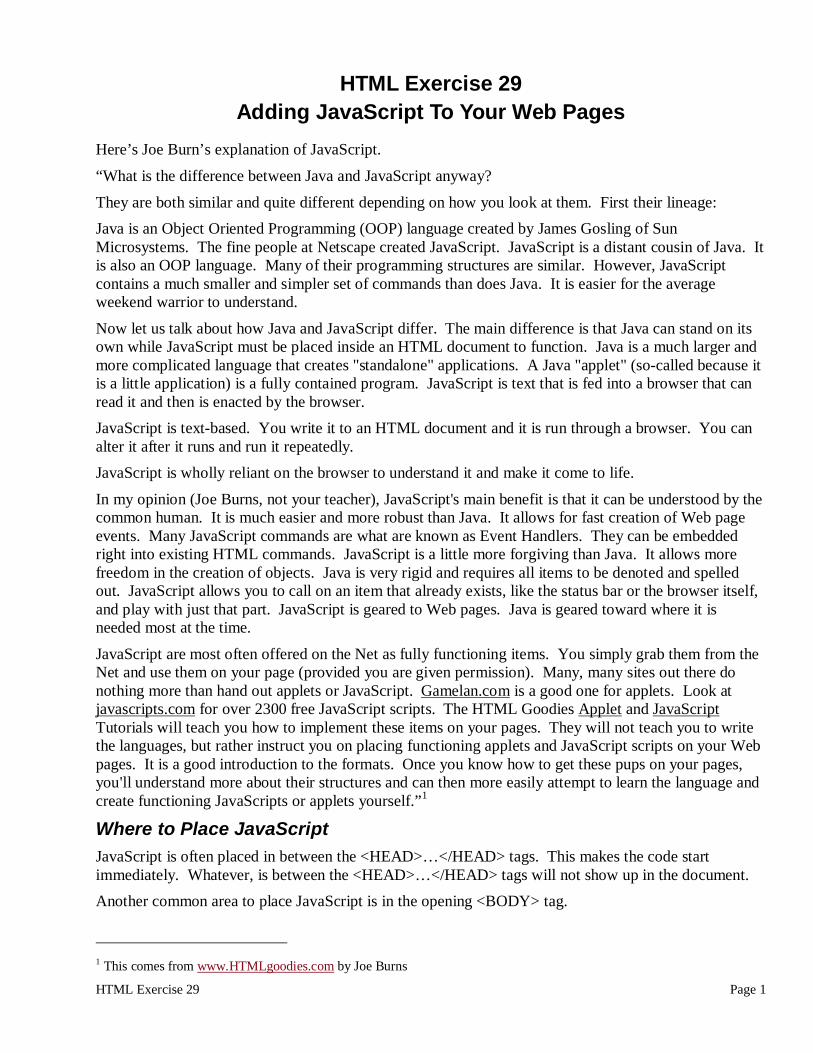
6. Click the Internet Explorer button on the Taskbar.
7. In the Address bar text box type http://www.dynamicdrive.com/dynamicindex10/rollertext.htm.
Figure 1
HTML Exercise 29 Page 3
8. Click the Select All hyperlink.9. Press Ctrl+C to copy the script.
10. Click the Notepad button on the Taskbar.11. Select the text in the second row that reads:
JavaScript is Cool!
12. Change the Font Size subcommand to make the text large.
<FONT FACE="arial black" SIZE="+6">
13. Press Ctrl+V to paste the JavaScript.
14. Click File on the Menu bar and select Save.15. Click the Internet Explorer button on the Taskbar.
16. Under Step 2, select onload="doWave(0)".17. Press Ctrl+C to copy the script.
18. Click the Notepad button on the Taskbar.19. In the opening <BODY> tag, move the insertions point to the left of the closing bracket.
20. Press the Spacebar.21. Press Ctrl+V to paste the script.
22. It should look something like this:
<BODY BACKGROUND="marble_bg.jpg" BGCOLOR=#9598FF LINK="red"onload="doWave(0)">
23. Click File on the Menu bar and select Save.
24. Click the Internet Explorer button on the Taskbar.25. Click the Back button to return to your javascript.html document.
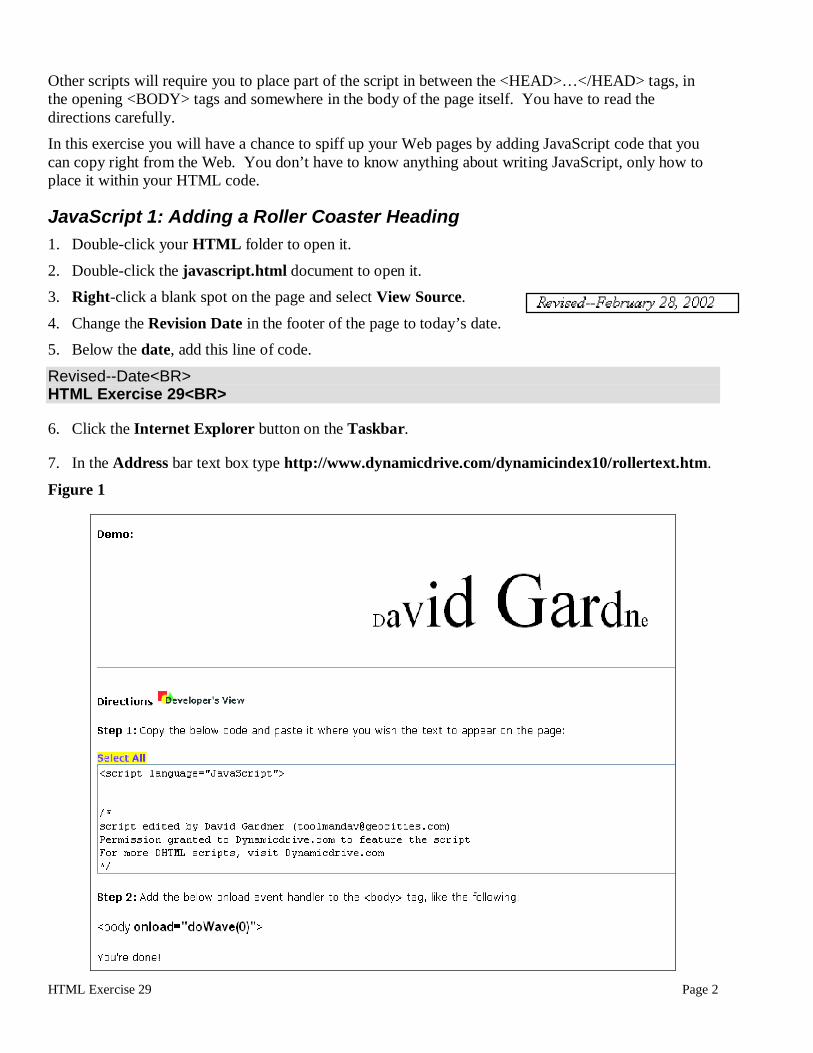
26. Click the Refresh button.27. You should see David Gardner’s animated name in Row 2.
28. Notice that the rolling name is the font that you wrote in the opening<FONT> tag.29. Look at Figure 2.
Figure 2
HTML Exercise 29 Page 4
Making Some ChangesHere is how to create your own text.
30. Click the Notepad button on the Taskbar.31. Find these lines in the JavaScript.
//put your text herevar theText = "David Gardner";
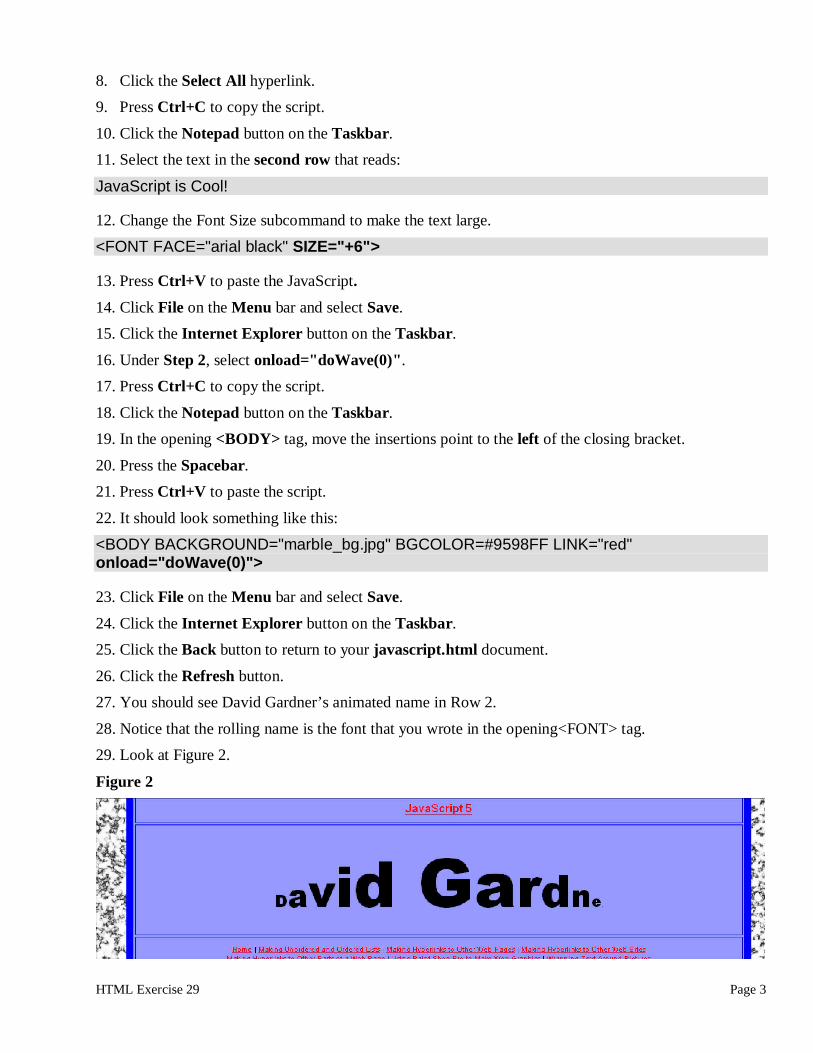
32. Select the name David Gardner.33. Type JavaScript is Cool!
34. Let’s make Row 2 a set height. Add this line of code in Row 2.<TR ALIGN="center" Height="300"><TD VALIGN="center"><FONT FACE="arial black" SIZE="+6">
35. Click File on the Menu bar and select Save.36. Click the Internet Explorer button on the Taskbar.
37. Click the Refresh button.38. You’re done.
39. Look at Figure 3.
Figure 3
40. Close all open windows.
JavaScript 2: Creating Scrolling Ticker41. Double-click your HTML folder to open it.42. Double-click the index.html document to open it.

HTML Exercise 29 Page 5
43. Right-click a blank spot on the page and select View Source.44. Change the Revision Date in the footer of the page to today’s date.
45. Click the Internet Explorer button on the Taskbar.46. In the Address bar text box type http://dragon.ep.usm.edu/~yuen/howto/ticker.htm.
47. Click and drag to select the ENTIRE JavaScript—from the opening <SCRIPT> tag to the closing</SCRIPT>tag.
48. This first line of the script is:<SCRIPT LANGUAGE="JavaScript">.
49. The last line of the script is:
</SCRIPT>
50. Press Ctrl+C to copy the text.51. Click the Notepad button on the Taskbar.
52. Move the insertion point immediately after the closing</TITLE> tag.53. Press Enter.
54. Press Ctrl+V to paste the JavaScript.55. Click File on the Menu bar and select Save.
56. Click the Internet Explorer button on the Taskbar.57. Under the closing </Script> tag, select:
ONLOAD="timerONE=window.setTimeout('scrollit_r2l(100)',500);".
58. Press Ctrl+C to copy the script.
59. Click the Notepad button on the Taskbar.60. In the opening <BODY> tag, move the insertions point to the left of the closing bracket.
61. Press the Spacebar.62. Press Ctrl+V to paste the script.
63. It should look something like this:
<BODY BACKGROUND="logo_bg.gif"ONLOAD="timerONE=window.setTimeout('scrollit_r2l(100)',500);">
64. Click File on the Menu bar and select Save.
65. Click the Internet Explorer button on the Taskbar.66. Click the Back button to return to your index.html document.
67. Click the Refresh button.68. You should see the scrolling ticker in the Status bar.
69. Look at Figure 4.
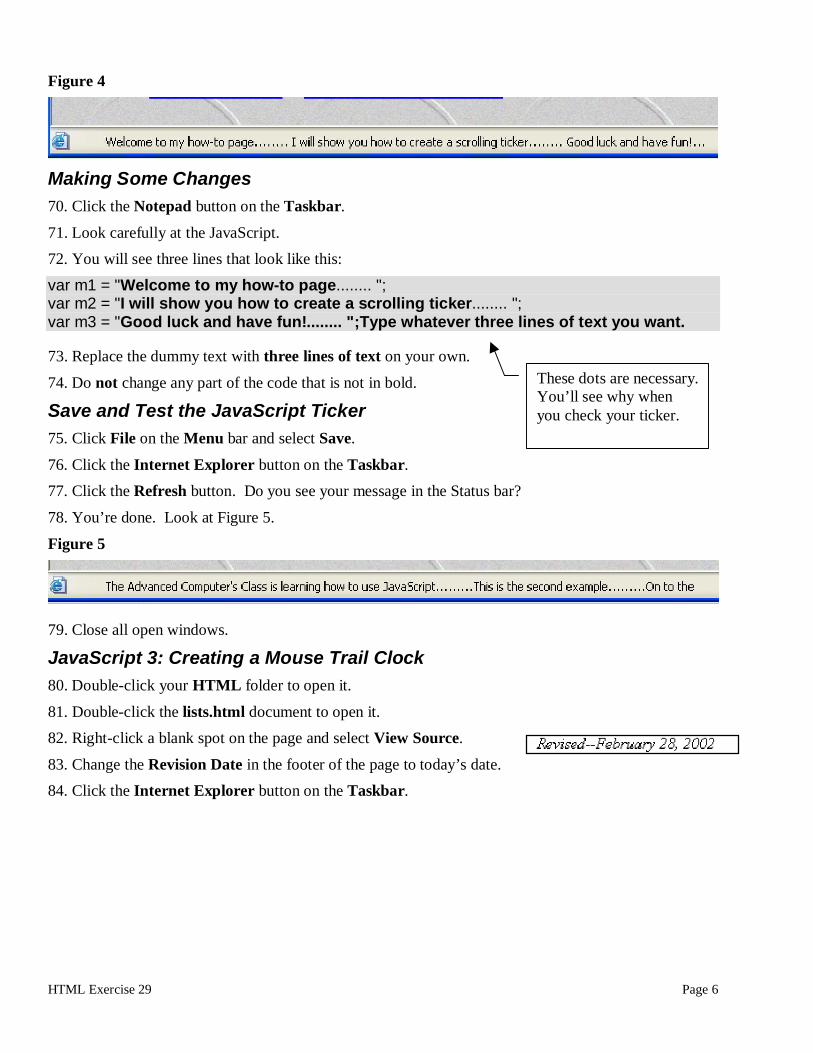
HTML Exercise 29 Page 6
Figure 4
Making Some Changes70. Click the Notepad button on the Taskbar.
71. Look carefully at the JavaScript.72. You will see three lines that look like this:
var m1 = "Welcome to my how-to page........ ";var m2 = "I will show you how to create a scrolling ticker........ ";var m3 = "Good luck and have fun!........ ";Type whatever three lines of text you want.
73. Replace the dummy text with three lines of text on your own.
74. Do not change any part of the code that is not in bold.
Save and Test the JavaScript Ticker75. Click File on the Menu bar and select Save.
76. Click the Internet Explorer button on the Taskbar.77. Click the Refresh button. Do you see your message in the Status bar?
78. You’re done. Look at Figure 5.
Figure 5
79. Close all open windows.
JavaScript 3: Creating a Mouse Trail Clock80. Double-click your HTML folder to open it.
81. Double-click the lists.html document to open it.82. Right-click a blank spot on the page and select View Source.
83. Change the Revision Date in the footer of the page to today’s date.84. Click the Internet Explorer button on the Taskbar.
These dots are necessary.You’ll see why whenyou check your ticker.

HTML Exercise 29 Page 7
Figure 7
85. In the Address bar text box type http://www.dynamicdrive.com/dynamicindex6/analog3.htm.
Figure 6
86. Click the Select All hyperlink.
87. Press Ctrl+C to copy the script.88. Click the Notepad button on the Taskbar.
89. Move the insertion point directly to the right of the opening <BODY> tag.90. Press Enter.
91. Press Ctrl+V to paste the script.
Save and Test your Script92. Click File on the Menu bar and select Save.
93. Click the Internet Explorer button on the Taskbar.94. Click the Refresh button.
95. Do you see a mouse trail clock?96. You’re done.
Look at Figure7.
97. Close all openwindows.

HTML Exercise 29 Page 8
JavaScript 4: Creating a Browser-quake98. Double-click your HTML folder to open it.
99. Double-click the hyperlinks1.html document to open it.100. Right-click a blank spot on the page and select View Source.
101. Change the Revision Date in the footer of the page to today’s date.102. Click the Internet Explorer button on the Taskbar.
103. In the Address bar text box typehttp://www.dynamicdrive.com/dynamicindex12/earthquake.htm.
Figure 8
104. Under Step 1, click the Select All hyperlink.
105. Press Ctrl+C to copy the script.106. Click the Notepad button on the Taskbar.
107. Move the insertion point directly to the right of the closing </TITLE> tag.108. Press Enter.

HTML Exercise 29 Page 9
109. Press Ctrl+V to paste the script.110. Click File on the Menu bar and select Save.
111. Click the Internet Explorer button on the Taskbar.112. Under Step 2, click the Select All hyperlink..
113. Press Ctrl+C to copy the script.114. Click the Notepad button on the Taskbar.
115. In the opening <BODY> tag, move the insertions point to the right of the closing bracket.116. Press the Enter.
117. Press Ctrl+V to paste the script.118. Click File on the Menu bar and select Save.
119. Click the Internet Explorer button on the Taskbar.120. Under Step 3, select onLoad="earthquake()".
121. Press Ctrl+C to copy the script.122. Click the Notepad button on the Taskbar.
123. In the opening <BODY> tag, move the insertions point to the left of the closing bracket.124. Press the Spacebar.
125. Press Ctrl+V to paste the script.126. It should look something like this:
<BODY BGCOLOR="#FFFFCC" onLoad="earthquake()">
127. Click File on the Menu bar and select Save.
128. Click the Internet Explorer button on the Taskbar.129. Click the Back button to return to your hyperlinks1.html document.
130. Click the Refresh button.131. You should have an earthquake on the monitor.
Making Some ChangesHere is how make the earthquake occur every time you refresh your document.132. Click the Notepad button on the Taskbar.
133. Find these lines in the JavaScript.//configure the likelihood that an earthquake will occur (100% means always)var chance_of_occurence="50%"
134. Change 50% to 100%.
135. Click File on the Menu bar and select Save.136. Click the Internet Explorer button on the Taskbar.
137. Click the Refresh button.

HTML Exercise 29 Page 10
138. Get ready to rumble!139. Look at Figure 9.
Figure 9: Did your Web page shake? Hold on to the table!
140. Close all open windows.
JavaScript 5: Creating a Drop Down List of HyperlinksThis script could replace your navigation strip at the bottom of each page. It is easy to make because ituses a wizard to generate the JavaScript for you.
141. Double-click your HTML folder to open it.142. Double-click the hyperlinks2.html document to open it.
143. Right-click a blank spot on the page and select View Source.144. Change the Revision Date in the footer of the page to today’s date.
145. Click the Internet Explorer button on the Taskbar.146. In the Address bar text box type http://www.js-examples.com/example/?ex=913&mode=2.
147. In the upper right hand corner of the Web page, click .
HTML Exercise 29 Page 11
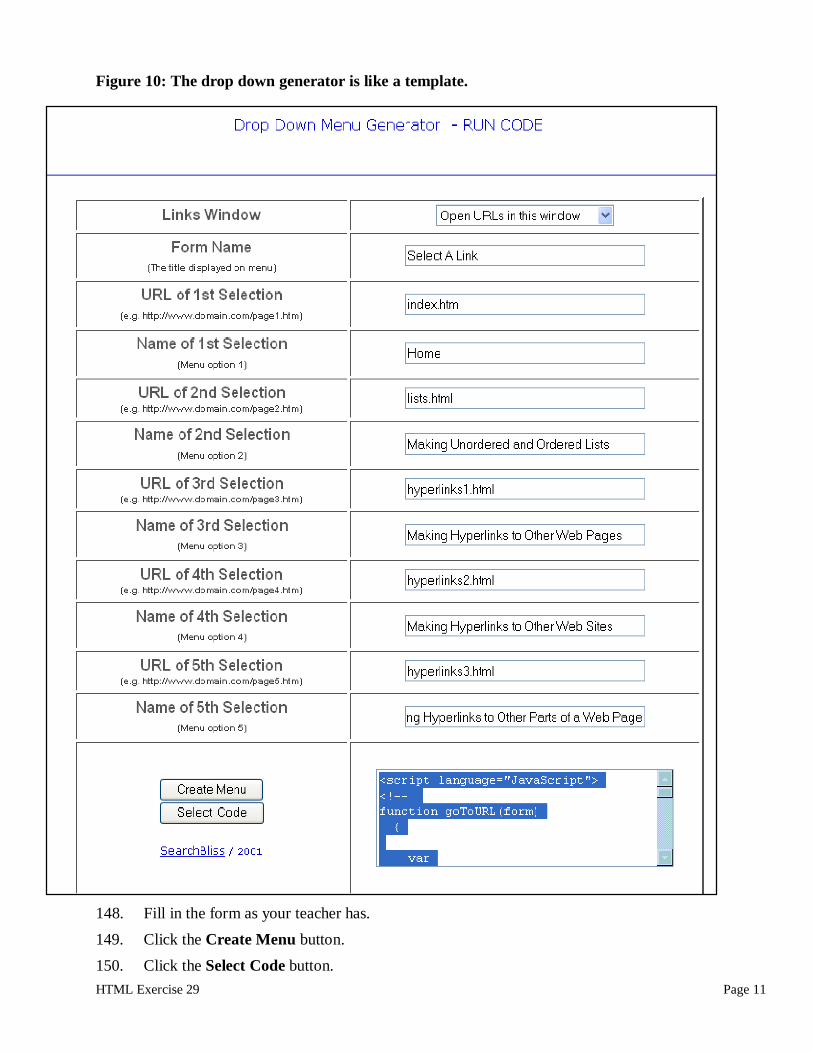
Figure 10: The drop down generator is like a template.
148. Fill in the form as your teacher has.149. Click the Create Menu button.150. Click the Select Code button.

HTML Exercise 29 Page 12
151. Press Ctrl+C to copy the code.152. Click the Notepad button on the Taskbar.
153. Find the line below:<P ALIGN="center"><IMG SRC="heading4.gif"></P>
154. Move the insertions point to the right of the last closing bracket.155. Press the Enter.
156. Press Ctrl+V to paste the script.157. Locate the line that says:
<!--Paste code above between your head tags-->
158. Select the JavaScript code above the line.
159. Press Ctrl+X to cut out the code.160. Move the insertion point immediately after the closing</TITLE> tag.
161. Press Enter.162. Press Ctrl+V to paste the JavaScript.
Save and Test Your Script163. Click File on the Menu bar and select Save.
164. Click the Internet Explorer button on theTaskbar.
165. Click the Back button to return to yourhyperlinks2.html document.
166. Do you see the drop down list? Do your links work?167. Look at Figure 11.
Figure 11
HTML Exercise 29 Page 13
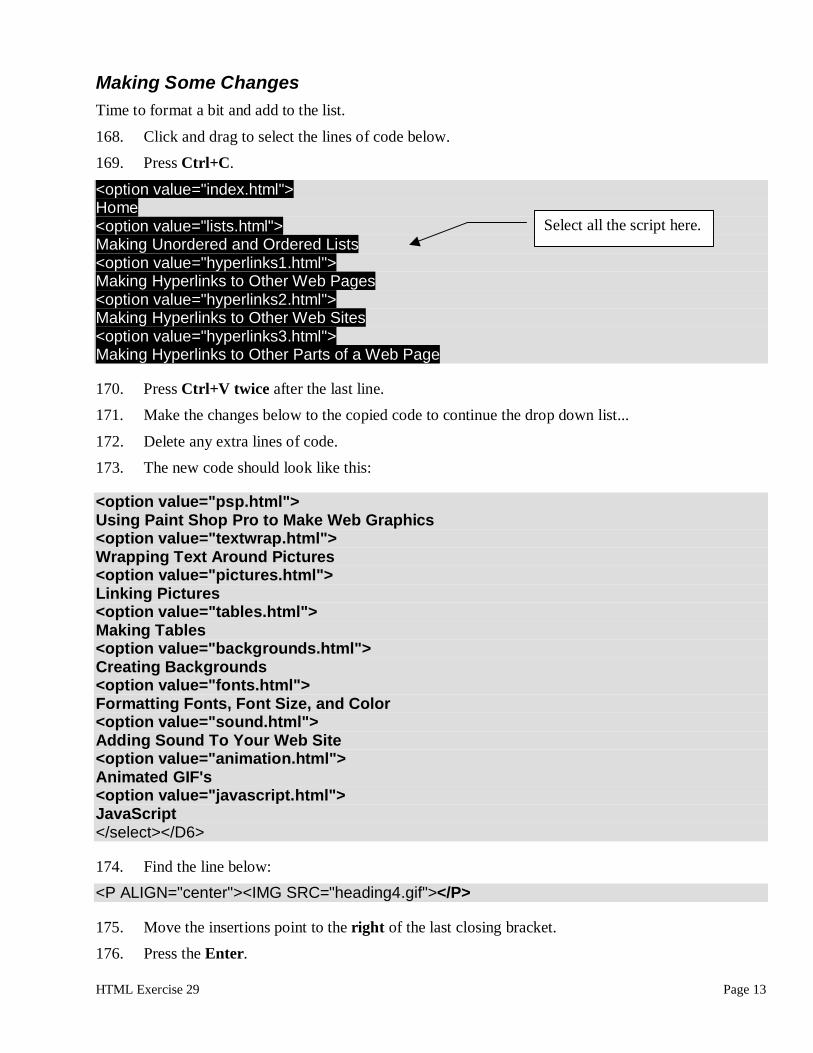
Making Some ChangesTime to format a bit and add to the list.
168. Click and drag to select the lines of code below.169. Press Ctrl+C.
<option value="index.html">Home<option value="lists.html">Making Unordered and Ordered Lists<option value="hyperlinks1.html">Making Hyperlinks to Other Web Pages<option value="hyperlinks2.html">Making Hyperlinks to Other Web Sites<option value="hyperlinks3.html">Making Hyperlinks to Other Parts of a Web Page
170. Press Ctrl+V twice after the last line.171. Make the changes below to the copied code to continue the drop down list...
172. Delete any extra lines of code.173. The new code should look like this:
<option value="psp.html">Using Paint Shop Pro to Make Web Graphics<option value="textwrap.html">Wrapping Text Around Pictures<option value="pictures.html">Linking Pictures<option value="tables.html">Making Tables<option value="backgrounds.html">Creating Backgrounds<option value="fonts.html">Formatting Fonts, Font Size, and Color<option value="sound.html">Adding Sound To Your Web Site<option value="animation.html">Animated GIF's<option value="javascript.html">JavaScript</select></D6>
174. Find the line below:<P ALIGN="center"><IMG SRC="heading4.gif"></P>
175. Move the insertions point to the right of the last closing bracket.176. Press the Enter.
Select all the script here.

HTML Exercise 29 Page 14
177. Type the tag in bold to center the drop down list.
<P ALIGN="center"><IMG SRC="heading4.gif"></P><Center><!--Paste code below between your body tags-->
178. Find the line below:</select></D6>
179. Move the insertions point to the right of the last closing bracket.180. Press the Enter.
181. Type the tag in bold to close the center tag...
</select></D6></Center>
Save and Test Your Script182. Click File on the Menu bar and select Save.183. Click the Internet Explorer button on the Taskbar.
184. Click the Refresh button.
185. Do you see the drop down list? Do your links work?186. Look at Figure 12.
Figure 12
Uploading Your Documents187. In Internet Explorer, type www.geocities.com in the Address bar text box and press Enter.
Now you have twoways to link to yourWeb pages

HTML Exercise 29 Page 15
188. Type your user name and password.189. Press Enter or click the Sign in button.
190. Under Advanced Toolbox, click .191. Upload javascript.html.
192. Upload hyperlinks1.html.193. Upload hyperlinks2.html.
194. Upload lists.html.195. Upload index.html.
196. Click the button to copy the files to the Geocities server.197. A new page will open telling you that you have successfully uploaded the files.
198. Click the hyperlink to your home page .
199. Click .
Printing the Web Page200. Before printing, click View on the Menu bar, point to Text Size, and select Medium.
201. Press Ctrl+P. The Print dialog box opens.202. Change the Name to Ireland.
203. Change the Number of copies to 2.204. Click OK.
205. Ask your teacher for a screen check.206. Close all windows.
On Your Own Extra Credit OfferTry adding other JavaScripts to your Web pages. Check your teachers Useful Links Web page for goodJavaScript sites. Carefully read all the directions. Add more hyperlinks to your javascript.htmldocument. For example JavaScript 6, JavaScript 7… Upload the Web pages and t so that yourteacher can check the new scripts. Have fun.