HRMS - Deskera India€¦ · Deskera HRMS – view, create, edit, delete, change or reset password....
48
Access Deskera HRMS User Manual online at: http://www.deskera.in/docs/Deskera+HRMS HRMS Handbook Answer to all your “HOW TOs...?”
Transcript of HRMS - Deskera India€¦ · Deskera HRMS – view, create, edit, delete, change or reset password....

45
Access Deskera HRMS User Manual online at: http://www.deskera.in/docs/Deskera+HRMS
HRMSHandbookAnswer to all your “HOW TOs...?”

Table of Content
1
2
3
4
5
6
7
8
9
10
11
12
13
14
Deskera Applications Dashboard
Basic Settings
Deskera HRMS
Deskera HRMS Dashboard
User Administration
Employee Self Service
Appraisal Settings
Salary Settings
Master Configuration
Payroll
Performance Appraisal
Recruitment Management
Timesheet Management
Document Management
1
2
5
6
9
11
12
13
15
19
25
29
39
43
1 2
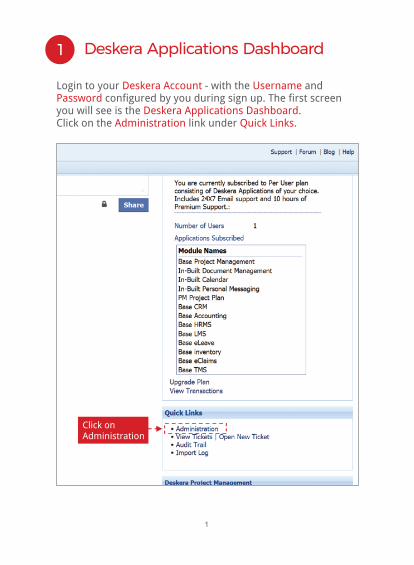
Login to your - with the and Deskera Account UsernamePassword configured by you during sign up. The first screen you will see is the Deskera Applications Dashboard.Click on the link underAdministration Quick Links.
Click onAdministration
Deskera Applications Dashboard1
Ÿ Clicking on the link will take you to a page with Administrationtwo tabs – and User Administration Company Administration. Click on the button to create new users by User Managemententering required information. Define user roles for accessing Deskera HRMS – view, create, edit, delete, change or reset password.
Basic Settings2
Click to create user

1 2
Login to your - with the and Deskera Account UsernamePassword configured by you during sign up. The first screen you will see is the Deskera Applications Dashboard.Click on the link underAdministration Quick Links.
Click onAdministration
Deskera Applications Dashboard1
Ÿ Clicking on the link will take you to a page with Administrationtwo tabs – and User Administration Company Administration. Click on the button to create new users by User Managemententering required information. Define user roles for accessing Deskera HRMS – view, create, edit, delete, change or reset password.
Basic Settings2
Click to create user

3 4
Ÿ Click on button to grant Manage Application Accessaccessibility permissions to the users for other Deskera software that your organization has subscribed to. The user permissions can be updated through the green arrow buttons shown in the appended image.
5
Click to move users
Click to updatechanges
Click to grantaccessibility permissions
Ÿ Now that the user basic settings have been set up, as the next step switch to the tab to configure Company Administrationsettings for your company.
Update logo
Enter companydetails
Set time zone and currency
Click to update
Configure email
Update contact details

5 6
Close the current opened tabs and go back to On the Home.left side under >> click on the link to Apps Deskera HRMSaccess Deskera HRMS.
Alternatively, you login directly to your Deskera HRMS account through – - with hrms.deskera.com/a/<your domain name>/ your username sand password.
Deskera HRMS3
Click to accessDeskera HRMS
Login to your Deskera HRMS account through – - with your hrms.deskera.com/a/<yourdomainname>username and password.The first screen you view is the Deskera HRMS Dashboard.
Deskera HRMS Dashboard4
Payroll
All activities related to payroll processes can be handled from here.
PerformanceAppraisal
All activities related to employee performanceappraisal can be handled from here.

7 8
AdministrationAll activities related to user management can be handled from here.
TimesheetManagement
All activities related to employee work hours can be handled fromhere.
RecruitmentManagementAll activities related to the hiring process can be handled from here.
DocumentManagement
All activities relatedto employee documentation can be handled from here.
Payroll Report
All activities related to different employee payroll reports can be handled from here.

9 10
User Administration5
Ÿ Go to under User administration Administration.
Click to view/edit user profile
Ÿ Select an employee from the user list. Click the Personnel Actions button on the menu bar to view/edit user profile
Click here
Enter details here
Click Save to update details
Ÿ Fill in the employee details under different tabs andclick to update the profile .Save

11 12
Employee Self Service6
Ÿ By clicking on the link present on the top of the My Accountdashboard, employees can enter/update personal details under different tabs.
Enter all details here
Click Save to update details
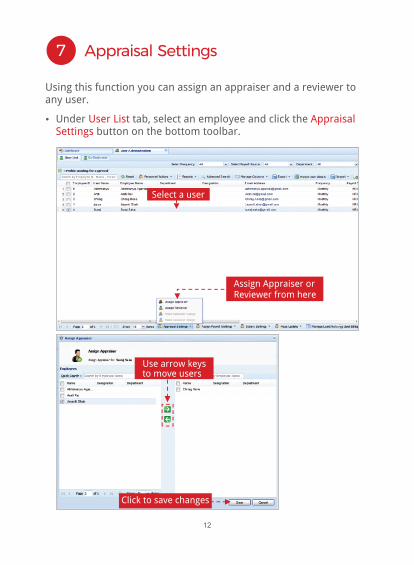
Ÿ Under tab, select an employee and click the User List Appraisal Settings button on the bottom toolbar.
Appraisal Settings7
Select a user
Assign Appraiser or Reviewer from here
Click to save changes
Use arrow keys to move users
Using this function you can assign an appraiser and a reviewer to any user.
11 12
Employee Self Service6
Ÿ By clicking on the link present on the top of the My Accountdashboard, employees can enter/update personal details under different tabs.
Enter all details here
Click Save to update details
Ÿ Under tab, select an employee and click the User List Appraisal Settings button on the bottom toolbar.
Appraisal Settings7
Select a user
Assign Appraiser or Reviewer from here
Click to save changes
Use arrow keys to move users
Using this function you can assign an appraiser and a reviewer to any user.
13 14
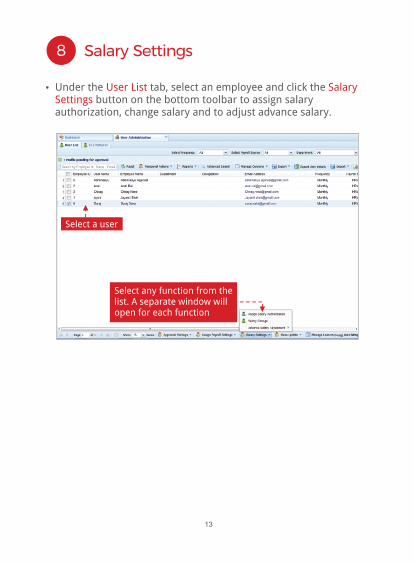
Salary Settings 8
Ÿ Under the tab, select an employee and click the User List Salary Settings button on the bottom toolbar to assign salary authorization, change salary and to adjust advance salary.
Select a user
Select any function from the list. A separate window will open for each function
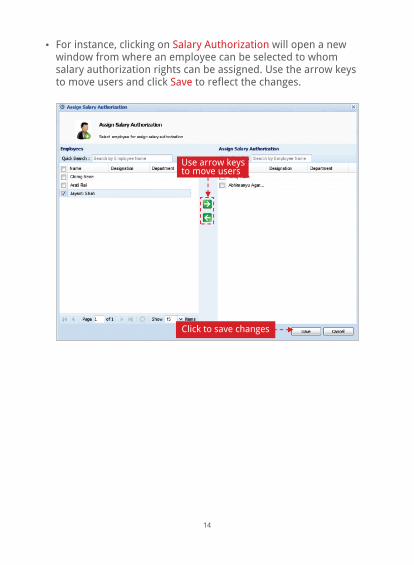
Ÿ For instance, clicking on will open a new Salary Authorizationwindow from where an employee can be selected to whom salary authorization rights can be assigned. Use the arrow keys to move users and click to reflect the changes.Save
Use arrow keys to move users
Click to save changes
13 14
Salary Settings 8
Ÿ Under the tab, select an employee and click the User List Salary Settings button on the bottom toolbar to assign salary authorization, change salary and to adjust advance salary.
Select a user
Select any function from the list. A separate window will open for each function
Ÿ For instance, clicking on will open a new Salary Authorizationwindow from where an employee can be selected to whom salary authorization rights can be assigned. Use the arrow keys to move users and click to reflect the changes.Save
Use arrow keys to move users
Click to save changes

15 16
Master Configuration 9
Ÿ Click under the widget to define Master Settings Administrationsettings for Salary Components, Component Sub Types, Cost Centers, Business Goals, Employee Departments and Designations, Employee Levels, Goal Weightage and more.
Click Master Configurationon the dashboard
Ÿ Define Sub Fields for different system categories or Master Types, such as Designation, Department, Qualification, Business Goals and more.
Ÿ Click the button present at the bottom of the Add Sub Fieldspage to add sub-categories under the selected Master Type.
Add a Sub FieldA
Select any Master Type from here
Click here to add a new Sub Field
Enter Sub Field name and click here
17 18
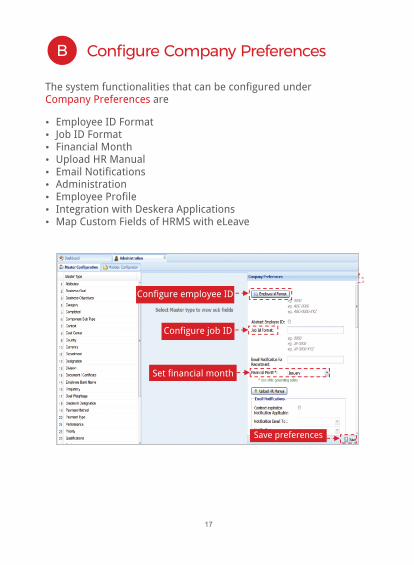
Configure Company Preferences
Ÿ Employee ID FormatŸ Job ID FormatŸ Financial MonthŸ Upload HR ManualŸ Email NotificationsŸ AdministrationŸ Employee ProfileŸ Integration with Deskera ApplicationsŸ Map Custom Fields of HRMS with eLeave
B
The system functionalities that can be configured under Company Preferences are
Configure employee ID
Configure job ID
Set financial month
Save preferences
Ÿ Switch to the tab to activate modules Modules Configurationsuch as Performance Appraisal, Recruitment Management, Payroll Management, Timesheet Management, Employee Management and more.
Modules ConfigurationC
Select modules for dashboard access
Scroll downwards for more settings
Choose default job view from here
Save preferences

17 18
Configure Company Preferences
Ÿ Employee ID FormatŸ Job ID FormatŸ Financial MonthŸ Upload HR ManualŸ Email NotificationsŸ AdministrationŸ Employee ProfileŸ Integration with Deskera ApplicationsŸ Map Custom Fields of HRMS with eLeave
B
The system functionalities that can be configured under Company Preferences are
Configure employee ID
Configure job ID
Set financial month
Save preferences
Ÿ Switch to the tab to activate modules Modules Configurationsuch as Performance Appraisal, Recruitment Management, Payroll Management, Timesheet Management, Employee Management and more.
Modules ConfigurationC
Select modules for dashboard access
Scroll downwards for more settings
Choose default job view from here
Save preferences

19 20
Payroll10
Ÿ Click under the widget on Master Configuration Administrationthe dashboard.
Ÿ An window will open.AdministrationŸ Switch to the tab. Modules ConfigurationŸ Tick the checkbox to activate the function.Payroll ManagementŸ Under the section, define other module Payroll Management
functionalities by selecting the applicable options. Ÿ Click Save.
Check the box to activate the function
Define other payroll functionalities under respective columns
Save preferences
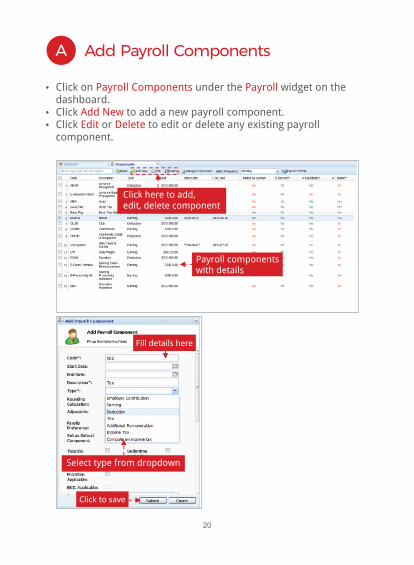
Ÿ The module helps you to manage employee payroll Payrollcomponents, generate payroll, authorize payroll, process payroll, customize payslips and more.
Ÿ Click on under the widget on the Payroll Components Payrolldashboard.
Ÿ Click to add a new payroll component.Add NewŸ Click or to edit or delete any existing payroll Edit Delete
component.
Add Payroll Components A
Click here to add,edit, delete component
Payroll components with details
Fill details here
Click to save
Select type from dropdown
19 20
Payroll10
Ÿ Click under the widget on Master Configuration Administrationthe dashboard.
Ÿ An window will open.AdministrationŸ Switch to the tab. Modules ConfigurationŸ Tick the checkbox to activate the function.Payroll ManagementŸ Under the section, define other module Payroll Management
functionalities by selecting the applicable options. Ÿ Click Save.
Check the box to activate the function
Define other payroll functionalities under respective columns
Save preferences
Ÿ The module helps you to manage employee payroll Payrollcomponents, generate payroll, authorize payroll, process payroll, customize payslips and more.
Ÿ Click on under the widget on the Payroll Components Payrolldashboard.
Ÿ Click to add a new payroll component.Add NewŸ Click or to edit or delete any existing payroll Edit Delete
component.
Add Payroll Components A
Click here to add,edit, delete component
Payroll components with details
Fill details here
Click to save
Select type from dropdown

21 22
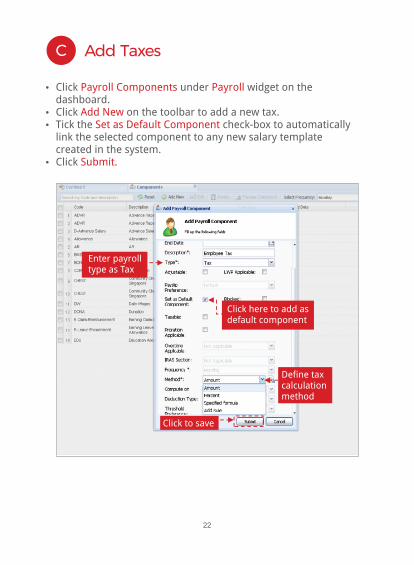
Ÿ Click under widget on the Payroll Components Payrolldashboard.
Ÿ Click on the toolbar to add a new tax.Add NewŸ Tick the check-box to automatically Set as Default Component
link the selected component to any new salary template created in the system.
Ÿ Click Submit.
Add TaxesC
Enter payroll type as Tax
Click here to add as default component
Define tax calculationmethod
Click to save
Add DeductionsB
Ÿ Click under widget on the Payroll Components Payrolldashboard.
Ÿ Click on the toolbar to add a new deduction.Add NewŸ Tick the check-box to automatically Set as Default Component
link the selected component to any new salary template created in the system.
Ÿ Click Submit.
Enter payroll typeas Deduction
Click here to add as default component
Definedeductioncalculationmethod
Click to save
21 22
Ÿ Click under widget on the Payroll Components Payrolldashboard.
Ÿ Click on the toolbar to add a new tax.Add NewŸ Tick the check-box to automatically Set as Default Component
link the selected component to any new salary template created in the system.
Ÿ Click Submit.
Add TaxesC
Enter payroll type as Tax
Click here to add as default component
Define tax calculationmethod
Click to save
Add DeductionsB
Ÿ Click under widget on the Payroll Components Payrolldashboard.
Ÿ Click on the toolbar to add a new deduction.Add NewŸ Tick the check-box to automatically Set as Default Component
link the selected component to any new salary template created in the system.
Ÿ Click Submit.
Enter payroll typeas Deduction
Click here to add as default component
Definedeductioncalculationmethod
Click to save

23 24
Ÿ Click under widget on the dashboard. Generate Payroll PayrollŸ Sort users by designation or payroll status. Ÿ Select a user and click Manage Components.Ÿ Select or Assign Default Components Assign Previous Salary
Components.Ÿ Default Component window will open.Ÿ Use the arrow keys to move components and click Save.
Generate PayrollD
Click here
Filter by Department and Status
Select user
Click here
Use arrow keys tomove components
Click to generate payroll
Click OK

25 26
Performance Appraisal 11
Ÿ Click under the widget on Master Configuration Administrationthe dashboard.
Ÿ An window will open.AdministrationŸ Switch to the tab. Modules ConfigurationŸ Tick the checkbox to activate the Performance Appraisal
function.Ÿ Under the section, activate other Performance Appraisal
module functions by ticking the respective checkboxes. Ÿ Click Save.
Activate other functions by clicking on the respective boxes
Check the box to activate the function
Save preferences
Ÿ The module helps you to set employee Performance Appraisalappraisal cycles; manage competencies and goals; initiate appraisal and view appraisal reports.
Set Appraisal Cycle A
Ÿ Click under widget on the Set Appraisal Cycle Administrationdashboard.
Ÿ Click on the menu bar to add a new appraisal cycle.AddŸ Enter appraisal cycle details and click Submit.
Click here to set appraisal cycle
Click here to add new appraisal cycle
Fill in cycle details and click here to submit

27 28
Ÿ Click under widget on the Initiate Appraisal Administrationdashboard.
Ÿ Select an appraisal cycle.Ÿ Select user for whom appraisal is to be initiated and click
Initiate.
Initiate AppraisalB
Click here to initiate employee appraisal
Select an appraisal cycle from dropdown
Select an employee
Select here to initiate appraisal
Click Yes
Review AppraisalC
Ÿ Click under widget on the Review Appraisal Administrationdashboard.
Ÿ Select appraisal cycle, select employee.Ÿ Appraisal details will be displayed. Click Approve Appraisal.
Click here toreview appraisal
Click here to approve appraisal
View appraisal details here

29 30
Ÿ Click under the widget on Master Configuration Administrationthe dashboard.
Ÿ An window will open.AdministrationŸ Switch to the tab. Modules Configuration Ÿ Tick the checkbox to activate the Recruitment Management
function.Ÿ Under the section, define other Recruitment Management
module functionalities by selecting the applicable options. Ÿ Click Save.
Recruitment Management12
Define other recruitmentfunctionalities under respective columns
Check the box to activate the function
Save preferences
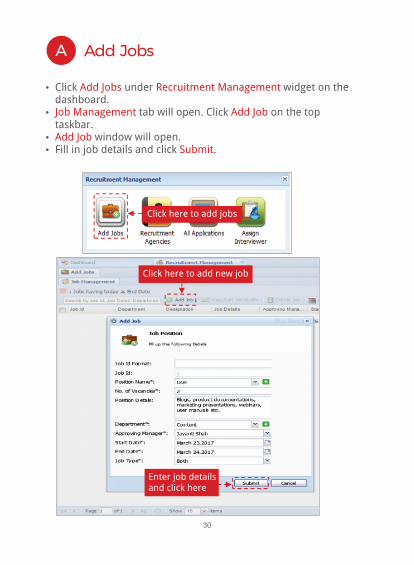
Add JobsA
Ÿ Click under widget on the Add Jobs Recruitment Managementdashboard.
Ÿ tab will open. Click on the top Job Management Add Jobtaskbar.
Ÿ window will open.Add JobŸ Fill in job details and click Submit.
Click here to add jobs
Click here to add new job
Enter job details and click here
29 30
Ÿ Click under the widget on Master Configuration Administrationthe dashboard.
Ÿ An window will open.AdministrationŸ Switch to the tab. Modules Configuration Ÿ Tick the checkbox to activate the Recruitment Management
function.Ÿ Under the section, define other Recruitment Management
module functionalities by selecting the applicable options. Ÿ Click Save.
Recruitment Management12
Define other recruitmentfunctionalities under respective columns
Check the box to activate the function
Save preferences
Add JobsA
Ÿ Click under widget on the Add Jobs Recruitment Managementdashboard.
Ÿ tab will open. Click on the top Job Management Add Jobtaskbar.
Ÿ window will open.Add JobŸ Fill in job details and click Submit.
Click here to add jobs
Click here to add new job
Enter job details and click here

31 32
Ÿ On the tab, select the job that is to be Job Managementedited/updated.
Ÿ Click on the top task bar.View/Edit Job ProfileŸ New job profile window will open.Ÿ Under add responsibilities for the job profile.Responsibilities,Ÿ Under add the skills required for the job Skills Required,
profile.Ÿ Under add the qualifications required Qualification Required,
for the job profile.Ÿ Click to update job profile details. Save
View/Edit Job ProfileB
Select a job profile
Click here to view/edit job profile
Using this function, you can select the job profile you want to edit/update from the list of displayed jobs.
Enter job responsibilities here
Enter job skills here
Enter qualifications here
Click to save

33 34
Ÿ Click under Recruitment Agencies Recruitment Managementwidget on the dashboard.
Ÿ tab will open. Manage Job AgenciesŸ Click on the top task bar.Add AgencyŸ Fill in agency details and click Save.
Add Recruitment AgencyC
Click here to manage recruitment agencies
Enter agency details and click here to save
Click here to add new agency
Ÿ On the tab, select the agency to which Manage Job Agenciesjob is to be assigned.
Ÿ Click on the top taskbar.Assign JobsŸ New tab with existing open jobs will open.Ÿ Select the job to be assigned and click on Assign To Agency.
Assign Jobs to AgencyD
Click here to assign job to agency
Select agency
Select jobs and click here
Using this function, you can assign jobs to recruitment agencies.Using this function, you can add new recruitment agencies.

35 36
Ÿ Under tab, select an applicant and click Pending ApplicationsView Profile on the top taskbar to view the profile and resume of the applicant.
Ÿ Click under widget All Applications Recruitment Managementon the dashboard.
Ÿ Click under widget All Applications Recruitment Managementon the dashboard.
Resume ManagementE
Click here to view applicant profile
Select applicant
View applicant profile
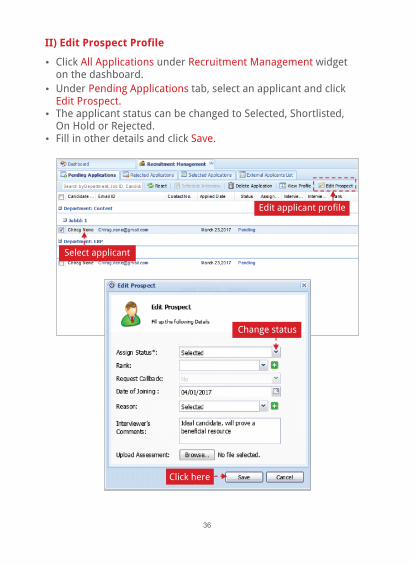
Ÿ Under tab, select an applicant and click Pending ApplicationsEdit Prospect.
Ÿ The applicant status can be changed to Selected, Shortlisted, On Hold or Rejected.
Ÿ Fill in other details and click Save.
Select applicant
Edit applicant profile
Change status
Click here
I) View Applicant Profile
II) Edit Prospect Profile
35 36
Ÿ Under tab, select an applicant and click Pending ApplicationsView Profile on the top taskbar to view the profile and resume of the applicant.
Ÿ Click under widget All Applications Recruitment Managementon the dashboard.
Ÿ Click under widget All Applications Recruitment Managementon the dashboard.
Resume ManagementE
Click here to view applicant profile
Select applicant
View applicant profile
Ÿ Under tab, select an applicant and click Pending ApplicationsEdit Prospect.
Ÿ The applicant status can be changed to Selected, Shortlisted, On Hold or Rejected.
Ÿ Fill in other details and click Save.
Select applicant
Edit applicant profile
Change status
Click here
I) View Applicant Profile
II) Edit Prospect Profile

37 38
Ÿ Click under Assign Interviewer Recruitment Managementwidget on the dashboard.
Ÿ tab will open.Interviewer's ListŸ Select an employee and click the button on Set as Interviewer
the top taskbar.
Using this function, you can create and manage an interviewer list by assigning interviews to your employees.
Using this function, you can create interview schedules for shortlisted candidates.
Assign InterviewerF
Click here to assign interviewer
Click here to appoint employee as interviewer
Select employee
Click Yes
Schedule InterviewG
Ÿ Click under widget All Applications Recruitment Management on the dashboard.
Ÿ Under select a shortlisted applicant.Pending Applications,Ÿ Click the button on the top taskbar.Schedule InterviewŸ Enter interview details and click Save.
Enter all details here
Click here to save
Select shortlisted applicant
Click here to schedule interview
39 40
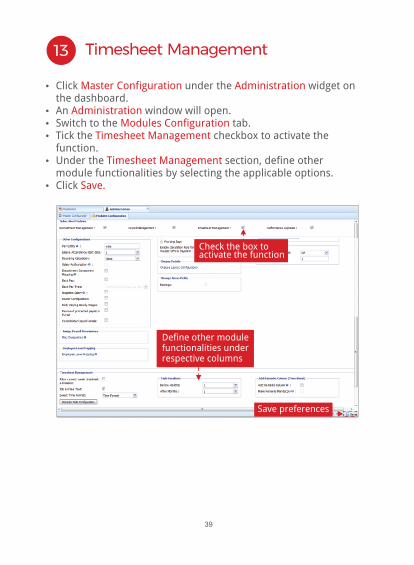
Ÿ Click under the widget on Master Configuration Administrationthe dashboard.
Ÿ An window will open.AdministrationŸ Switch to the tab. Modules ConfigurationŸ Tick the checkbox to activate the Timesheet Management
function.Ÿ Under the section, define other Timesheet Management
module functionalities by selecting the applicable options. Ÿ Click Save.
Timesheet Management13
Check the box to activate the function
Define other module functionalities under respective columns
Save preferences
My TimesheetA
Ÿ Click under widget on My Timesheet Timesheet Managementthe dashboard.
Ÿ Enter the job and the work hours under each date.Ÿ Select the timesheet and click Submit Timesheet.
Click here on the dashboard
Enter hours for each day
Enter job
Click here to submit timesheet
Using this function, you can submit the hours you’ve spent working on different tasks throughout a week. Timesheets are forwarded to managers for approval.

39 40
Ÿ Click under the widget on Master Configuration Administrationthe dashboard.
Ÿ An window will open.AdministrationŸ Switch to the tab. Modules ConfigurationŸ Tick the checkbox to activate the Timesheet Management
function.Ÿ Under the section, define other Timesheet Management
module functionalities by selecting the applicable options. Ÿ Click Save.
Timesheet Management13
Check the box to activate the function
Define other module functionalities under respective columns
Save preferences
My TimesheetA
Ÿ Click under widget on My Timesheet Timesheet Managementthe dashboard.
Ÿ Enter the job and the work hours under each date.Ÿ Select the timesheet and click Submit Timesheet.
Click here on the dashboard
Enter hours for each day
Enter job
Click here to submit timesheet
Using this function, you can submit the hours you’ve spent working on different tasks throughout a week. Timesheets are forwarded to managers for approval.
41 42
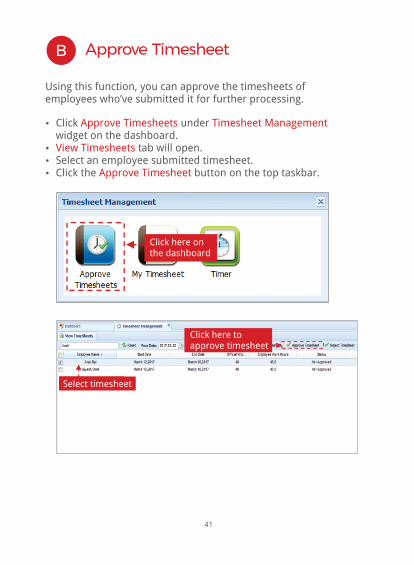
Ÿ Click under Approve Timesheets Timesheet Management widget on the dashboard.
Ÿ tab will open.View TimesheetsŸ Select an employee submitted timesheet.Ÿ Click the button on the top taskbar.Approve Timesheet
Approve TimesheetB
Click here on the dashboard
Click here to approve timesheet
Select timesheet
Using this function, you can approve the timesheets of employees who’ve submitted it for further processing.
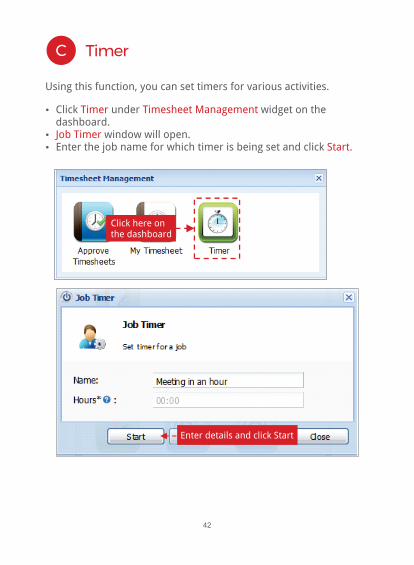
TimerC
Ÿ Click under widget on the Timer Timesheet Managementdashboard.
Ÿ window will open.Job TimerŸ Enter the job name for which timer is being set and click Start.
Enter details and click Start
Click here on the dashboard
Using this function, you can set timers for various activities.
41 42
Ÿ Click under Approve Timesheets Timesheet Management widget on the dashboard.
Ÿ tab will open.View TimesheetsŸ Select an employee submitted timesheet.Ÿ Click the button on the top taskbar.Approve Timesheet
Approve TimesheetB
Click here on the dashboard
Click here to approve timesheet
Select timesheet
Using this function, you can approve the timesheets of employees who’ve submitted it for further processing.
TimerC
Ÿ Click under widget on the Timer Timesheet Managementdashboard.
Ÿ window will open.Job TimerŸ Enter the job name for which timer is being set and click Start.
Enter details and click Start
Click here on the dashboard
Using this function, you can set timers for various activities.

43 44
Ÿ Click under Document Manager Document Managementwidget on the dashboard.
Ÿ Click the button on the top taskbar.Add DocumentŸ Select and Employee Name Department.Ÿ Upload Document.Ÿ Click Save.
Document Management14
Click here toadd document
Upload employee document andclick Save
Click here on the dashboard
Using the Document Management feature, you can upload and store employee related documents. Employees can also add, edit or delete document personal documents.
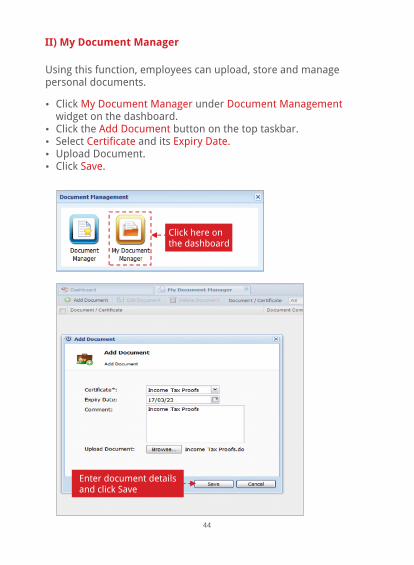
Ÿ Click under My Document Manager Document Managementwidget on the dashboard.
Ÿ Click the button on the top taskbar.Add DocumentŸ Select and its Certificate Expiry Date.Ÿ Upload Document.Ÿ Click Save.
Click here on the dashboard
Enter document details and click Save
II) My Document Manager
I) Upload Employee Documents
Using this function, employees can upload, store and managepersonal documents.
43 44
Ÿ Click under Document Manager Document Managementwidget on the dashboard.
Ÿ Click the button on the top taskbar.Add DocumentŸ Select and Employee Name Department.Ÿ Upload Document.Ÿ Click Save.
Document Management14
Click here toadd document
Upload employee document andclick Save
Click here on the dashboard
Using the Document Management feature, you can upload and store employee related documents. Employees can also add, edit or delete document personal documents.
Ÿ Click under My Document Manager Document Managementwidget on the dashboard.
Ÿ Click the button on the top taskbar.Add DocumentŸ Select and its Certificate Expiry Date.Ÿ Upload Document.Ÿ Click Save.
Click here on the dashboard
Enter document details and click Save
II) My Document Manager
I) Upload Employee Documents
Using this function, employees can upload, store and managepersonal documents.

45 44
www.deskera.com © Deskera 2017 | All rights reserved | ISO 9001 Certified
Help and Support
If you have any queries or suggestions regarding features or topic that is not covered in this guide,
write to us at: [email protected]
If you are unable to find any feature setup or functionality, kindly access the detailed Deskera
HRMS User Manual at: http://www.deskera.in/docs/Deskera+HRMS
Thank You!