HRIS Module - mytraining.sdbor.edumytraining.sdbor.edu/resources/banner/HR...HRIS Module South...
41
Correction Payroll Processing Procedures Manual Version Number 1.1 Updated 8/19/2010 H H R R I I S S M M o o d d u u l l e e South Dakota Board of Regents Human Resources/Finance Information Systems
Transcript of HRIS Module - mytraining.sdbor.edumytraining.sdbor.edu/resources/banner/HR...HRIS Module South...
Correction Payroll Processing Procedures Manual Version Number 1.1 Updated 8/19/2010
HHRRIISS MMoodduullee
South Dakota Board of Regents
Human Resources/Finance Information Systems
HRIS Module Correction Payroll Processing Manual
Page | 1
Table of Contents
Introduction ................................................................................................................................................................... 2
Overview ................................................................................................................................................................... 2 Intended Audience ..................................................................................................................................................... 2 Documentation and Disclaimer ................................................................................................................................. 2
Glossary ......................................................................................................................................................................... 3 Rule, Validation, Maintenance Forms ........................................................................................................................... 5
A. Tax Reporting Validation Form ........................................................................................................................... 5 B. Tax Code Rules .................................................................................................................................................... 5 C. Tax Filing Status Rules ........................................................................................................................................ 6 D. Tax Set Up ........................................................................................................................................................... 7 E. Tax Reporting Rules............................................................................................................................................. 8
Business Process .......................................................................................................................................................... 10
A. Payroll Hierarchy Pyramid ................................................................................................................................ 10 B. Monthly Payroll Process Flow ........................................................................................................................... 11 C. Disposition Description ...................................................................................................................................... 12 D. Processing a Correction Payroll (PHAADJT).................................................................................................... 13
1. Voids .............................................................................................................................................................. 13 2. Making Payroll Adjustments – Manual Pay Transactions ............................................................................. 15 3. Making Payroll Adjustments – Adjustments ................................................................................................. 18 4. Making Payroll Adjustments – Reissues ....................................................................................................... 21 5. Making Payroll Adjustments – Duplicates .................................................................................................... 22 6. Erasing an Adjustment ................................................................................................................................... 23 7. Making Payroll Adjustments – General Queries ........................................................................................... 24
E. Processing a Labor Redistribution Correction Payroll (PHAREDS) ................................................................. 25 Queries and Reports ..................................................................................................................................................... 39 Other Information ........................................................................................................................................................ 40
Rules and Validation Tables .................................................................................................................................... 40 Business Process Analysis ....................................................................................................................................... 40
HRIS Module Correction Payroll Processing Manual
Page | 2
Introduction Overview Welcome to the South Dakota Board of Regents Human Resource Information System. This chapter explains the Correction Payroll Processing module in the Banner Human Resources System. The goal of this workbook is to provide you with the knowledge and practice for correction paycheck calculation and generation, and pay history data maintenance.
Intended Audience The intended audience for this manual is the Shared Payroll Center, Human Resource Departments, Finance Departments, Budget Departments, Grants Departments and general employees understanding the payroll processing. Documentation and Disclaimer All information that is entered into this system must be free of discriminatory intent. All information used should be reflective of the position or work required or related information. It is the policy of the South Dakota Board of Regents to take affirmative action and to ensure that all employment practices are free of discrimination. In addition, the Board of Regents fully supports incorporation of non-discrimination and Affirmative Action rules and regulations into all of its employment practices. South Dakota Board of Regents is an equal employment opportunity employer.
HRIS Module Correction Payroll Processing Manual
Page | 3
Glossary Default Hours – This is established on PTRECLS for all employee classes that are exempt from Overtime. For those positions that are Overtime eligible an institution can override the work schedule on NBAJOBS to have a set work schedule which would manually populate in the timesheet. Default hours on ECLS or NBAJOBS will cause the hours/pay to default to the Default Earnings block, and subsequently to PHAHOUR.
EEO Contract Group – Used for Institutional Post-Secondary Education Data Summary (IPEDS) reporting. This is established on PTRECLS on all employee classes. The options include: 9/10 month, 11/12 month, < 9 month faculty, full time employees, other part time employees, and non-EEO reportable.
Eligible Earning Codes – All potential earning codes that could be paid to an employee in a particular employee class must be identified. If it is not listed on PTRECLS, it cannot be paid. This is used to control paying employees types of earnings that they are not allowed to receive.
Employer Code – This is identified on PTREMPR and identified as defaulted to BOR on PTRECLS. This will default on NBAJOBS and must be changed to the individual institutions to identify the job belongs to the appropriate institution. This is key for tax reporting, for report generation, and security access to the Job.
Hours Per Pay – Used to identify the typical hours for employee's in the employee class on PTRECLS. This can and should be overridden on NBAJOBS for any position that is less than one FTE. On NBAJOBS, encumbrance calculations (system calc) use the hours/pay in the formula. This means that part-time positions should be as accurate as possible. Budget and HR may need to run reports on actual hours and update this annually based on past history.
Roster Indicator – This field specifies the type of SCT Banner time sheets to be printed for employee in the employee class. Options are: Roster, Organizational, Timesheet. Most employees will have Organizational identified.
Salary Budget – This is identified on PTRECLS and will default to NBAPBUD. This can be overridden. This identifies the starting point for position budget rolling. Budget roll is defined on NTRBROL by employee class and can be rolled with increases/decreases by percent or fixed dollar amount. The NTRBROL is completed by the system BOR office as it is a process that impacts every institution. Choices are: Current Budget, Current Salary, Remaining Budget, Midpoint of Salary range, Encumbrance Value, Actual Expense. It was agreed that all employee classes are set to default to Current Budget with the exception of Chief Executive Officer (01) which are set to current salary.
HRIS Module Correction Payroll Processing Manual
Page | 4
Salary Indicator – There are three options: hourly, salaried, or variable. This field indicates if the employees are paid a salary (the same pay each pay period), or paid by the hour (hours X rate). All exempt from overtime employee classes are established as salaried and all employee classes that are overtime eligible are established as hourly.
Shift Code – If assigned to an employee class, will be in effect for ALL employees in class; however, will only calculate shift differential if rules are met on PTRSHFT. When shift premium is calculated using the PTRSHFT code, premium amounts are included in the applicable gross pay on the pay stub and are NOT broken out. This has been identified to be set up on PTRECLS 04 to allow those institutions that need shift differential to place on NBAPOSN and to identify on NBAJOBS for the work schedule. Institutions should place STND in the NBAPOSN as a default for all positions and those positions needing shift differential shall select SHFT (as well as identify the schedule on NBAJOBS in the work schedule tab).
Time Entry Breakdown Period – South Dakota has identified the time entry breakdown as the Pay Period (22nd – 21st).
HRIS Module Correction Payroll Processing Manual
Page | 5
Rule, Validation, Maintenance Forms The Payroll Processing Module relies on rule and validation set up as defined in all of the manuals. For a greater understanding of the rules and validations identified, please review the following manuals: Position Control, Employee Compensation, Benefit Deductions, and Payroll Installation = PTRINST Pay ID = PTRPICT Calendar = PTRCALN Employee Class = PTRECLS Position Class = NTRPCLS Position = NBAPOSN Jobs = NBAJOBS Labor Distribution = NBAJOBS and NBAPBUD Benefits and Deductions = PTRBDCA Benefit Categories = PTRBCAT A. Tax Reporting Validation Form The Tax Reporting Validation Form establishes tax report codes for entry on the Tax Reporting Rule Form (PXAREPT). This will be maintained by SDBOR. Warning: This form is delivered to you with predefined tax report codes. Do not revise it unless you are advised to do so by SunGard SCT. B. Tax Code Rules The Tax Code Rules Form establishes tax codes and associates them with tax definitions. The codes defined on this form are used in the remaining tax forms and in the Benefit/Deduction Administration module. This will be maintained by SDBOR. This form requires a password before it can be edited. (You can obtain a view-only access without a password via the security procedures outlined in Chapter 4, “Security”.) To gain update access to this form, follow the steps below. 1. Select Enter Password for Changes in the Options menu (this is limited to BOR). 2. Call SunGard SCT to obtain the password used to authorize changes to your tax rules. (Refer
to the Preface of this manual for SunGard SCT's Customer Service number.) 3. Enter the required password at the Enter Password prompt. 4. Select OK to return to the Main window and revise your tax codes. Warning: The value you enter at the Annualization Method prompt establishes the way your taxes are calculated when you use annualizing (that is, when you enter Annual at the Starting Point prompt). If you entered Annual at Starting Point, you must enter one of the following values at Annualization Method:
HRIS Module Correction Payroll Processing Manual
Page | 6
Annualize. The system uses the straight annualizing method. This method annualizes only the current period's earnings (that is, it multiplies the current pay amount by the number of pays per year). It does not consider year-to-date gross.
Cumulative. The system uses the cumulative annualizing method. This method considers year-to-date gross when it calculates tax withholding amounts.
Note that the annualization method you select affects the tax calculation of supplemental and one-time earnings: Supplemental earnings are taxed at the rate specified in the Supplemental Percent field. If you use the cumulative annualization method (that is, if you enter Cumulative at the Annualization Method prompt), these earnings are considered when subsequent payrolls are processed. This increases the accuracy of the annual withholding. If you use the straight annualization method (that is, if you enter Annualize at Annualization Method), these earnings are not considered when subsequent payrolls are processed.
One-time earnings are taxed as one-time payments and added to the annualized gross. As with supplemental earnings, they are considered when subsequent payrolls are processed only if you entered Cumulative at the Annualization Method prompt. If you entered Annualize, the one-time earnings will correctly be included in the pay period in which they occur, but will not be considered in subsequent payrolls. Therefore, combining the straight annualizing method with one-time earnings may result in under withholding. Because the average pay (and therefore the projected yearly earnings) changes with each pay event following a rate change, the cumulative method adjusts the tax calculation rate with each subsequent pay. Although this results in withholding amounts that vary from one pay to the next, it also produces a more accurate yearly withholding amount.
Note: This form is delivered to you with current tax codes as defined and required by federal, state, and local governments. Do not revise it unless you are advised to do so by SunGard SCT. If SunGard SCT informs you of a change in government tax reporting requirements that affects the codes defined on this form, access the form and amend it to make it match the new requirements. Do not alter any fields except those specified by the revised law. C. Tax Filing Status Rules The Tax Filing Status Rules Form associates filing status information with a specified tax code. Data includes status code, description, minimum income for collection, and minimum YTD gross. This form requires a password before it can be edited. (You can obtain view-only access without a password via the security procedures outlined in Chapter 4, “Security”.) To gain update access to this form, follow the steps below. 1. Select Enter Password for Changes from the Options menu.
HRIS Module Correction Payroll Processing Manual
Page | 7
2. Call SunGard SCT to obtain the password used to authorize changes to your tax rules. (Refer to the Preface of this manual for SunGard SCT’s Customer Service Number.)
3. Enter the required password at the Enter Password prompt. 4. Select OK (or press the Save key) to return to the main window and revise your tax filing
status. Note: This form is delivered to you with current tax filing status codes as defined and required by federal, state, and local governments. Do not revise it unless you are advised to do so by SunGard SCT. If SunGard SCT informs you of a change in government tax reporting requirements that affects the codes defined on this form, access the form and amend it to make it match the new requirements. Do not alter any fields except those specified by the revised law. D. Tax Set Up The Tax Set Up Form (PXATAXS) establishes calculation and exemption parameters for a specified tax. It identifies wage brackets and their associated tax percentages, and can be used to establish rules for calculating amounts for other graduated withholding (for example, deduction of union dues that increase with income). This form requires a password before it can be edited. (You can obtain view-only access without a password via the security procedures outlined in Chapter 4 of the HR User’s Guide, “Security”.) To gain update access to this form, follow the steps below. Refer to the “Tax Administration” section of Chapter 5 of the HR User’s Guide, “Processing”, for additional information on this form. 1. Select Enter Password for Changes from the Options menu. The system displays a window
on which you can enter your password. 2. Call SunGard SCT to obtain the password used to authorize changes to your tax rules. (Refer
to the Preface of this manual for SunGard SCT's Customer Service number.) 3. Enter the required password at the Enter Password prompt. 4. Select OK to return to the Main window and revise your tax setup parameters. Note: This form is delivered to you with current annual graduated tax tables as defined and required by federal, state, and local governments. Do not revise your tax tables unless you are advised to do so by SunGard SCT. If SunGard SCT informs you of a change in government tax reporting requirements that affects the data defined in this block, access the form and amend it to make it match the new requirements. Do not alter any fields except those specified by the revised law. Graduated Tax Table Window
The Graduated Tax Table window establishes graduated tax tables entries and maintains graduated tax table parameters. Records appear in Low Range (that is, “greater than” or “over”)
HRIS Module Correction Payroll Processing Manual
Page | 8
order and are accessed eight at a time. To access this window, select Graduated Tax Table in the Options menu. The system calculates graduated taxes for a specified tax code and filing status by locating the correct wage bracket, subtracting the value in the second Over field, multiplying by the percentage in Plus Percent (that is, by the value divided by 100), and adding the value in Amount. Additional Step Window
The Additional Step window maintains additional steps for calculation of taxes. Steps established in this block are executed after the taxable wage has passed through the graduated tax tables (above) in the tax calculation process. Records appear in Sequence Number order and are accessed four at a time. To access this window, select Additional Step in Tax Calculation in the Options menu. 1. At the Sequence Number prompt, indicate when this step should be performed in relationship
to the other steps defined in this block. 2. At Option Code, enter 2, 3, 4, or 5. The value you enter at this prompt identifies the
Employee Benefit or Deduction Form (PDADEDN) option code to be used in the calculation. (To review option code values, check the value in the Calculation Rule field in the Deduction Block of the Employee Benefit or Deduction Form (PDADEDN). Then refer to the matrix in the Benefits and Deductions Rules Form (PTRBDCA) section of Chapter 3, “Rule Forms”.)
3. At Multiply or Add Indicator, enter X if the amount in the next field is a multiplier. Enter + if it should be added.
4. At Amount, enter the amount to be added or used as a multiplier. E. Tax Reporting Rules The Tax Reporting Rule Form enables you to define and maintain rules for the data supplied in tax reports (for example, W-2, T4, 1099-R). It identifies the boxes associated with the report and the benefit or deduction codes associated with specified boxes. You can also associate earnings codes with a tax form box. A box can contain only deduction codes, only earning codes, both, or neither. Warning: If you do not complete this form correctly, your tax reporting will be wrong. Be sure to follow the instructions below when you use this form. 1. At Tax Report Code, enter the code of the tax report for which you are defining rules. The
code you enter must be predefined in the Tax Report Code Validation Form (PTVREPT). To view a list of defined codes, double-click in the Tax Report Code field. Note: These tax report codes are delivered by SunGard SCT. The system displays the full name of the report whose code you entered. Move to the Box Identification block.
2. The Box Identification block displays box numbers from the tax report. The Box Code field provides box number descriptions for the report whose Tax Report code was entered in the previous block. Note: This form is delivered to you with box identifications as established by SunGard SCT for use with your Banner Human Resources payroll module. Do not revise them unless you are advised to do so by SunGard SCT.
HRIS Module Correction Payroll Processing Manual
Page | 9
3. Move to the Benefit or Deduction Code block. Note: Data in this block is site-specific and should be carefully defined on the basis of your benefit or deduction code and other rules. Because it controls your tax reporting, it is particularly important that you complete this block accurately.
4. The box number and description from the Box Identification block (above) are displayed in the Benefit or Deduction Code block. At Benefit or Deduction Code, enter the benefit or deduction code(s) associated with this box. The value you enter must be predefined on the Benefit and Deductions Rules Form (PTRBDCA). To view a list of defined values, double-click in the Benefit or Deduction Code field. The system displays the description defined for the deduction code you entered.
5. At Deduction Amount Indicator, indicate the nature of the amount appearing in this box. Be sure to enter the correct indicator. If you make a mistake, your ax report will be inaccurate. Enter one of the following indicators:
E Employee amount R Employer amount A Applicable gross N None To enter another benefit or deduction code, use the scroll bar to the right or the Next Record function. When all desired codes have been entered, move to the Earnings Code block.
6. At Earn Code, enter the earnings codes associated with this tax form box. The values you enter must be predefined on the Earnings Code Rules Form (PTREARN). To view a list of defined codes appropriate for this field, select the Search feature for the Earn Code field. To enter more than one earnings code, use the scroll bar to the right or the Next Record function. The system displays the description defined for the earnings code you entered.
7. Use the Save function to commit the tax reporting rule for this box to the database. 8. To define rules for another box, press Previous Block twice to return to the Box
Identification Block. Then use the Next Record or Previous Record function to select a box.
HRIS Module Correction Payroll Processing Manual
Page | 10
Business Process
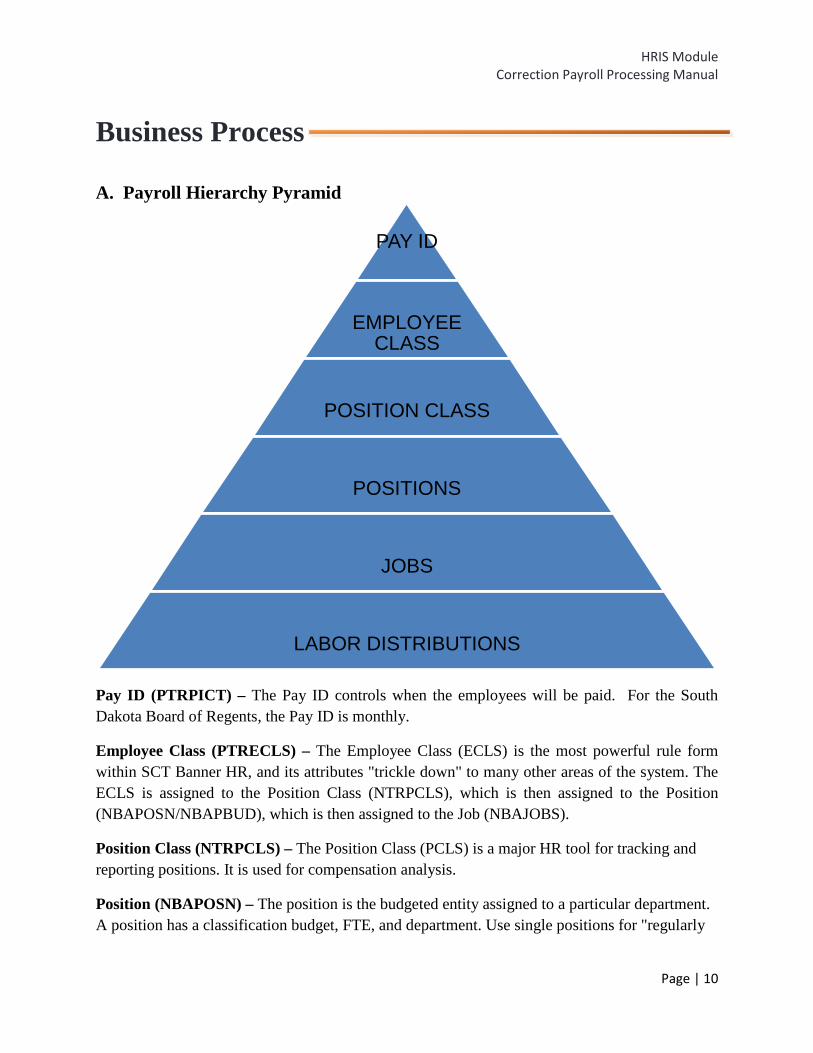
A. Payroll Hierarchy Pyramid
Pay ID (PTRPICT) – The Pay ID controls when the employees will be paid. For the South Dakota Board of Regents, the Pay ID is monthly.
Employee Class (PTRECLS) – The Employee Class (ECLS) is the most powerful rule form within SCT Banner HR, and its attributes "trickle down" to many other areas of the system. The ECLS is assigned to the Position Class (NTRPCLS), which is then assigned to the Position (NBAPOSN/NBAPBUD), which is then assigned to the Job (NBAJOBS).
Position Class (NTRPCLS) – The Position Class (PCLS) is a major HR tool for tracking and reporting positions. It is used for compensation analysis.
Position (NBAPOSN) – The position is the budgeted entity assigned to a particular department. A position has a classification budget, FTE, and department. Use single positions for "regularly
PAY ID
EMPLOYEE CLASS
POSITION CLASS
POSITIONS
JOBS
LABOR DISTRIBUTIONS
HRIS Module Correction Payroll Processing Manual
Page | 11
budgeted positions"; use pooled positions for students, temporary help, etc. NBIJLST and NBIPINC are used to track position related data.
Jobs (NBAJOBS) – The Job is where you assign the employee to the position. An employee can have more than one job with more than one position.
Labor Distributions (NBAPBUD and NBAJOBS) – Institutions can establish multiple labor distributions. It also indicates the importance of the Labor Distribution overrides that can occur based on Employee Class for Benefits/Deductions and Fringe Budgeting. Permanent labor distributions default to NBAJOBS from NBAPBUD. Temporary labor distributions may only be changed on NBAJOBS or if needed on PHAHOUR and PHAREDS.
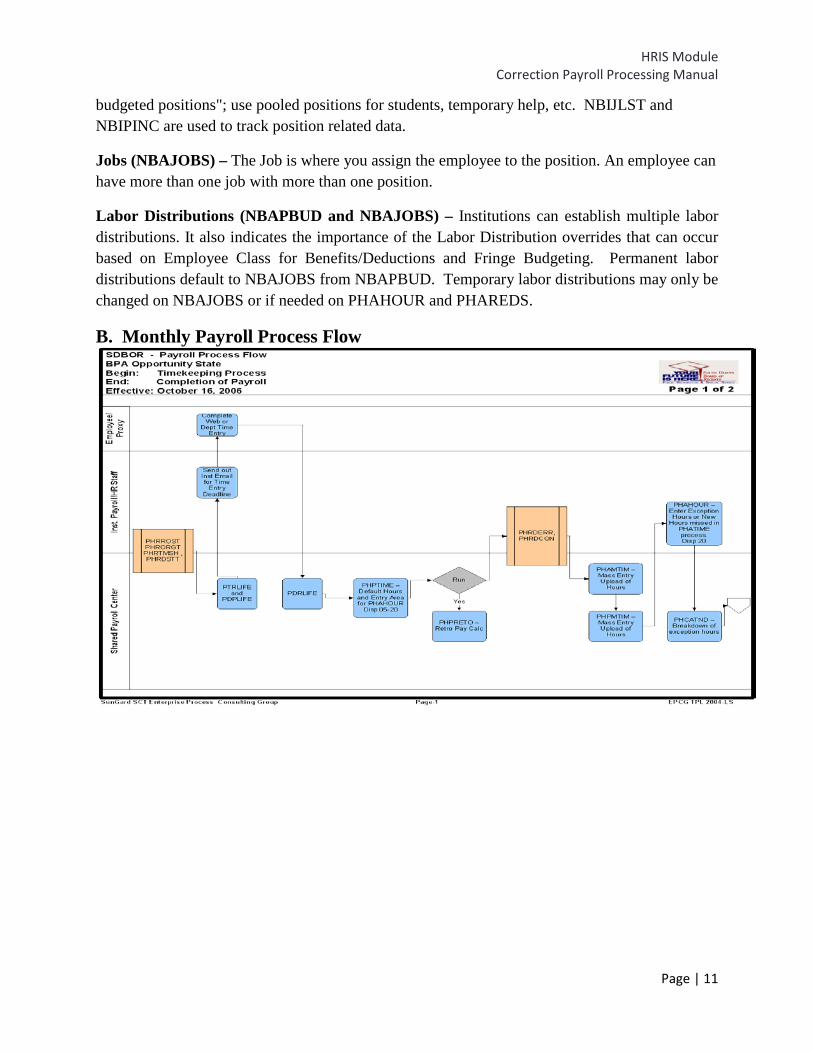
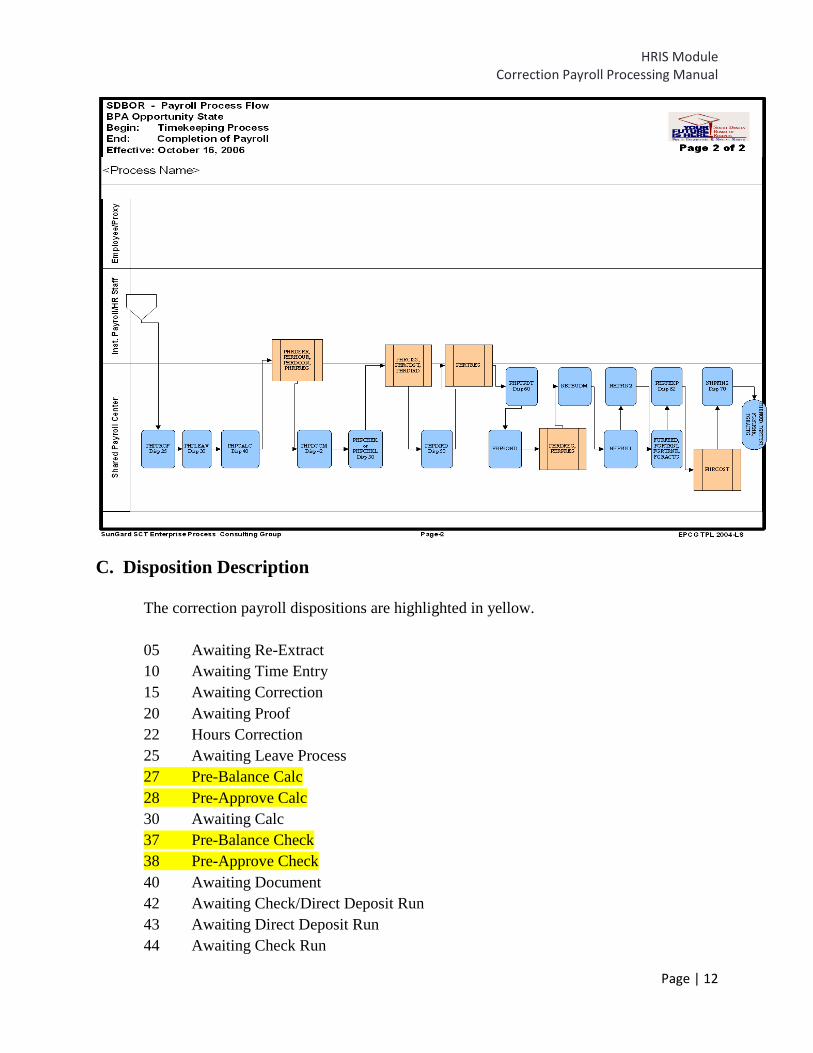
B. Monthly Payroll Process Flow
HRIS Module Correction Payroll Processing Manual
Page | 12
C. Disposition Description The correction payroll dispositions are highlighted in yellow. 05 Awaiting Re-Extract 10 Awaiting Time Entry 15 Awaiting Correction 20 Awaiting Proof 22 Hours Correction 25 Awaiting Leave Process 27 Pre-Balance Calc 28 Pre-Approve Calc 30 Awaiting Calc 37 Pre-Balance Check 38 Pre-Approve Check 40 Awaiting Document 42 Awaiting Check/Direct Deposit Run 43 Awaiting Direct Deposit Run 44 Awaiting Check Run
HRIS Module Correction Payroll Processing Manual
Page | 13
47 Pre-Balance Update 48 Pre-Approve Update 50 Awaiting Update 60 Finance Extract 62 Finance Interface/Feed 70 Complete
D. Processing a Correction Payroll (PHAADJT) If adjusting an original event, the disposition must be 60 or higher. An adjustment does NOT alter leave balances. If the change impacts leave, the leave will have to be adjusted after completing PHAADJT directly on PEALEAV.
Sequence numbers are assigned by the system. The original event has a value of 0. Each subsequent transaction is incremented by 1.
Payroll Adjustment Types:
V = Void
I = Reissue
M = Manual
J = Adjustment
D = Duplicate
1. Voids This adjustment process will void or nullify a paycheck that was processed in error. Events cannot be voided that are at a disposition of less than 60, Awaiting Finance Extract. To view payroll dispositions for a particular employee, access the Pay Event List Form (PHILIST) either directly or from the Adjustment Processing Form (PHAADJT). To access PHILIST from PHAADJT, either click the Search button next to the Sequence field; or, with your cursor in any of the first four fields following Pay Event, select List from the Help Menu.
Follow these steps to complete the process.
1. Access the Adjustment Processing Form (PHAADJT). 2. Select the Search function in the ID field and select the required employee ID from
the Employee Search Form, POIIDEN. If the Banner ID is known, enter the ID, and verify you have the correct record. If the Banner ID is not known, a thorough search must be performed when searching for a record, to avoid duplication, and ensure the proper information is being viewed and/or updated.
HRIS Module Correction Payroll Processing Manual
Page | 14
3. Enter the calendar year in YYYY format in the Year field. 4. In the Payroll ID field, enter MN (Monthly). 5. Enter the number of the pay period to be run in the Payroll Number field, or click on
the Search button next to the Sequence field if you need to view the Pay Event List Form, PHILIST.
6. If you are voiding an original pay event enter 0 in the Sequence Number field; if you are voiding a subsequent event enter the sequence number assigned to the event in this field.
7. Select Void from the drop-down list in the Adjustment Action field. 8. Enter the date you want this transaction to be recorded for tax purposes in the History
Date field. Note: Enter the date you want reflected for the employee’s year-to-date totals for W-2, 941, and T4 reporting purposes.
9. Enter the date that the adjustment is to be posted to the general ledger in the Posting Override Date field. Perform a Next Block function. The information in the Adjustment Detail block will be populated.
10. Click the Save icon to Void the pay event.
Notes: At this point, the disposition of the adjustment is 47, Pre-Balance Update. This value is displayed in the Disposition field in the Adjustment Detail block of the form.
Notice that the system assigned a new sequence number in the Key block. Typically, the sequence number assigned in a void transaction is 1 since the original pay event is usually the one to be voided.
Because a void is automated and does not generate a physical check, the Calc Method and Print Method cannot be changed for void transactions.
The gross and net amounts in the Adjustment Detail block are negative to reflect the amounts to be “backed out” or voided from the original event. The system defaults the sequence number and date of the original event.
To finish the Void process, follow these steps:
11.Perform the Rollback function. 12.Select Balance from the drop-down list in the Adjustment Action field. 13.Click the Save icon. The disposition is now 48, Pre-Approve Update. 14.Select Approve from the drop-down list in the Adjustment Action field. 15.Click the Save icon. The disposition is now 50, Awaiting Update. 16.Click on the Comments tab and document the reason for the void. Click the Save icon. 17.The Shared Service Payroll Center will perform the necessary processes to complete the correction payroll.
HRIS Module Correction Payroll Processing Manual
Page | 15
2. Making Payroll Adjustments – Manual Pay Transactions This adjustment process is used to generate a manual pay event for an employee who did not receive a paycheck during the original pay cycle, or to produce a replacement check after the original has been voided. It can also be used to refund a deduction to an employee.
There are two options for the Manual Pay Transactions: Manual Calculation Method and Computer Calculation Method.
A. Manually Calculated/Computer Print Method 1. Access the Adjustment Processing Form (PHAADJT). 2. Select the Search function in the ID field and select the required employee ID from
the Employee Search Form (POIIDEN). If the Banner ID is known, enter the ID, and verify you have the correct record.
3. Enter the calendar year in YYYY format in the Year field. 4. In the Payroll ID field, enter MN (Monthly). 5. Enter the number of the pay period to be run in the Payroll Number field, or click on
the Search button next to the Sequence field if you need to view the Pay Event List Form (PHILIST).
6. Select Manual from the drop-down list in the Adjustment Action field. 7. Enter the date you want this transaction to be recorded for tax purposes in the History
Date field. 8. Enter the date that the adjustment is to be posted to the general ledger in the Posting
Override Date field. 9. Perform a Next Block function. 10. The relevant information in the Adjustment Detail block will be populated.
a. The distribution is now 47, Pre-Balance Update. b. The Event Type will be M, which defaults based on the entry made in the
Adjustment Action field. c. When you are generating manual checks, it is important to note the values in the
Calculation Method and Print Method fields. The default value in each of these fields is Manual, indicating that the gross and net for a manual check are to be calculated and printed manually. If you want the computer to calculate these values, you must reset the value of Calculation Method to Computer. Similarly, if you want the computer to print the check, you must reset the Print Method to Computer. Different processes are required for computer versus manual calculations The print method should always be “Computer”.
11.Change the print method to “computer”. 12.Enter the gross amount that has been manually calculated in “Entered Gross” field. 13.Enter the net amount that has been manually calculated in “Entered Net” field. 14.Click the Save icon. 15.Click the Job Information tab.
HRIS Module Correction Payroll Processing Manual
Page | 16
16.Click on the drop down arrow and choose the employee’s position/suffix. Save the record. 17.Select Earnings History (PHAHOUR) from the Options menu on this screen. Accessing PHAHOUR in any other way will not give you the same results. 18.On the Earnings History (PHAHOUR) form, enter the earn code(s), hour(s), and/or amount(s). 19.If you need to change the Labor Distribution from the default for this action, click Next Block to access the Time Distribution section of the form and manually override the appropriate FOAP fields. 20.Save the record and press Exit. This returns you to the Job Information tab. 21.Select Deductions History (PHCDEDN) from the Options menu on this screen. Accessing PDADEDN in any other way will not give you the same results. 22.Enter the necessary employer and employee paid deduction amounts and applicable gross for each. Any deductions not entered will not be deducted. 23.Save the record and press Exit. This returns you to the Job Information tab. 24.Click the Rollback icon to access the Adjustment Action list. 25.Select Balance from the drop-down list in the Adjustment Action field. 26.Perform a Next Block function. 27.Click the Save icon. The disposition is now 38 (Pre-Approve Update). 28.Select Approve from the drop-down list in the Adjustment Action field. 29.Perform a Next Block function. 30.Click the Save icon. The disposition is at 40 (Awaiting Document). 31.Click on the Comments Tab and document the reason for the correction and save. The Shared Service Payroll Center will perform the necessary processes to complete the correction payroll in accordance with the normal payroll processing starting at PHPDOCM and remaining items.
B. Computer Calculated/Computer Print Method 1. Access the Adjustment Processing Form (PHAADJT). 2. Select the Search function in the ID field and select the required employee ID from the Employee Search Form (POIIDEN). If the Banner ID is known, enter the ID, and verify you have the correct record. 3. Enter the calendar year in YYYY format in the Year field. 4. In the Payroll ID field, enter MN (Monthly). 5. Enter the number of the pay period to be run in the Payroll Number field, or click on the Search button next to the Sequence field if you need to view the Pay Event List Form (PHILIST). 6.Select Manual from the drop-down list in the Adjustment Action field. 7. Enter the date you want this transaction to be recorded for tax purposes in the History Date field.
HRIS Module Correction Payroll Processing Manual
Page | 17
8. Enter the date that the adjustment is to be posted to the general ledger in the Posting Override Date field. 9.Perform a Next Block function. 10. The relevant information in the Adjustment Detail block will be populated. a. The disposition is now 47 (Pre-Balance Update).
b. The Event Type will be M, which defaults based on the entry made in the Adjustment Action field. c. The default value in the Calculation Method and Print Method fields is Manual. Both of these fields need to be changed to “computer”.
11. Click the Save icon. The disposition changes to 27 (Pre-Balance Update). 12. Click the Job Information tab. 13. Click on the drop down arrow under “Position” and choose the employee’s position/suffix. Save the record. 14. Select Earnings History (PHAHOUR) from the Options menu on this screen. Accessing PHAHOUR in any other way will not give you the same results. 15. On the Earnings History (PHAHOUR) form, enter the earn code(s), hour(s), and/or amount(s). 16.If you need to change the Labor Distribution from the default for this action, click Next Block to access the Time Distribution section of the form and manually override the appropriate FOAP fields. 17.Save the record and press Exit. This returns you to the Job Information tab. 18.Select Deductions History (PHCDEDN) from the Options menu on this screen. Accessing PDADEDN in any other way will not give you the same results. 19.Double check the deductions. Use the Record Remove function to delete deductions not needed. 20.Save the record and press Exit. This returns you to the Job Information tab. 21.Click the Rollback icon to access the Adjustment Action list. 22.Select Balance from the drop-down list in the Adjustment Action field. 23.Perform a Next Block function. 24. You will receive a warning message, “Out of balance, gross/net will be overlaid by Payroll calc”. Click OK. 25. Save the record. The disposition will be 28 (Pre-Approve Calc). 26.Select Approve from the drop-down list in the Adjustment Action field. 27. Perform a Next Block function. 28. Click the Save icon. 29. The disposition is now at 30 (Awaiting Calculation). 30. Perform a Next Block function. 31. Select Payroll Calculation from the Options list. 32. A screen will momentarily appear stating that the “Payroll calculation is in process. Please wait”.
HRIS Module Correction Payroll Processing Manual
Page | 18
33. When the calculation is complete, the disposition will be at 40 (Awaiting Document). 34. Perform a Next Block function. 35. Click on the Comments Tab and document the reason for the correction and save. 36. The Shared Service Payroll Center will perform the necessary processes to complete the correction payroll. 3. Making Payroll Adjustments – Adjustments This adjustment process is used to process a check for an employee who was not paid enough during the normal payroll cycle due to unreported hours, incorrect hour entries, or excessive deduction amounts.
An adjustment adds earnings or amounts to an already processed pay event. There are two options for the Adjustment Pay Transacations: Manual Calculation Method and Computer Calculation Method.
A. Manually Calculated/Computer Print Method 1.Access the Adjustment Processing Form (PHAADJT). 2.Select the Search function in the ID field and select the required employee ID from the Employee Search Form (POIIDEN). If the Banner ID is known, enter the ID, and verify you have the correct record. 3.Enter the calendar year in YYYY format in the Year field. 4.In the Payroll ID field, enter MN (Monthly). 5.Enter the number of the pay period to be run in the Payroll Number field, or click on the Search button next to the Sequence field if you need to view the Pay Event List Form (PHILIST). 6.Enter 0 in the Sequence Number field if you are adjusting an original pay event, or click on the Search button to view PHILIST if the sequence number is not known. 7.Select Adjust from the drop-down list in the Adjustment Action field. 8.Enter the date you want this transaction to be recorded for tax purposes in the History Date field. 9.Enter the date that the adjustment is to be posted to the general ledger in the Posting Override Date field. 10.Perform a Next Block function. 11.The relevant information in the Adjustment Detail block will be populated. The distribution is now 47 (Pre-Balance Update). The Event Type will be J, which defaults, based on the entry made in the Adjustment Action field. For adjusted check transactions, it is important to note the values in the Calculation Method and Print Method fields. The default value in each of these fields is Manual, indicating that the gross and net for a manual check are to be calculated and printed manually. If you want the computer to calculate these values, you must reset the value of Calculation Method to Computer. Similarly, if you want the computer to print the check, you must reset the Print Method to Computer. The print method should always be Computer.
HRIS Module Correction Payroll Processing Manual
Page | 19
12.Change the print method to Computer. 13.Enter the gross amount that has been manually calculated in “Entered Gross” field. 14.Enter the net amount that has been manually calculated in “Entered Net” field. 15.Click the Save icon. 16.Click the Job Information tab. 17.Click on the drop down arrow and choose the employee’s position/suffix. Save the record. 18.Select Earnings History (PHAHOUR) from the Options menu on this screen. Accessing PHAHOUR in any other way will not give you the same results. 19.On the Earnings History (PHAHOUR) form, enter the earn code(s), hour(s), and/or amount(s). 20.If you need to change the Labor Distribution from the default for this action, click Next Block to access the Time Distribution section of the form and manually override the appropriate FOAP fields. 21.Save the record and press Exit. This returns you to the Job Information tab. 22.Select Deductions History (PHCDEDN) from the Options menu on this screen. Accessing PDADEDN in any other way will not give you the same results. 23.Enter the necessary employer and employee paid deduction amounts and applicable gross for each. Any deductions not entered will not be deducted. 24.Save the record and press Exit. This returns you to the Job Information tab. 25.Click the Rollback icon to to access the Adjustment Action field. 26.Select Balance from the drop-down list in the Adjustment Action field. 27.Perform a Next Block function. 28.Click the Save icon. The disposition will be at 38 (Pre-Approve Update). 29.Select Approve from the drop-down list in the Adjustment Action field. 30.Perform a Next Block function. 31. Click the Save icon. The disposition is at 40 (Awaiting Document).32. Click on the Comments Tab and document the reason for the correction. 33. The Shared Service Payroll Center will perform the necessary processes to complete the correction payroll. B. Computer Calculated/Computer Print Method 1.Access the Adjustment Processing Form (PHAADJT). 2.Select the Search function in the ID field and select the required employee ID from the Employee Search Form (POIIDEN). If the Banner ID is known, enter the ID, and verify you have the correct record. 3.Enter the calendar year in YYYY format in the Year field. 4.In the Payroll ID field, enter MN (Monthly). 5.Enter the number of the pay period to be run in the Payroll Number field, or click on the Search button next to the Sequence field if you need to view the Pay Event List Form (PHILIST).
HRIS Module Correction Payroll Processing Manual
Page | 20
6.Enter 0 in the Sequence Number field if you are adjusting an original pay event, or click on the Search button to view PHILIST if the sequence number is not known. 7.Select Adjust from the drop-down list in the Adjustment Action field. 8.Enter the date you want this transaction to be recorded for tax purposes in the History Date field. 9.Enter the date that the adjustment is to be posted to the general ledger in the Posting Override Date field. 10.Perform a Next Block function. 11.The relevant information in the Adjustment Detail block will be populated. The distribution is now 47 (Pre-Balance Update). The Event Type will be J, which defaults, based on the entry made in the Adjustment Action field. For adjusted check transactions, it is important to note the values in the Calculation Method and Print Method fields. The default value in each of these fields is Manual, indicating that the gross and net for a manual check are to be calculated and printed manually. If you want the computer to calculate these values, you must reset the value of Calculation Method to Computer. Similarly, if you want the computer to print the check, you must reset the Print Method to Computer. The print method should always be Computer. 12.Change the Calculation and Print methods to Computer. Click the Save icon. The disposition changes to 27 (Pre-Balance Update). 13. Click the Job Information tab. 14. Click on the drop down arrow under “Position” and choose the employee’s position/suffix. Save the record. 15. Select Earnings History (PHAHOUR) from the Options menu on this screen. Accessing PHAHOUR in any other way will not give you the same results. 16. On the Earnings History (PHAHOUR) form, enter the earn code(s), hour(s), and/or amount(s). 17.If you need to change the Labor Distribution from the default for this action, click Next Block to access the Time Distribution section of the form and manually override the appropriate FOAP fields. 18.Save the record and press Exit. This returns you to the Job Information tab. 19.Select Deductions History (PHCDEDN) from the Options menu on this screen. Accessing PDADEDN in any other way will not give you the same results. 20.Double check the deductions. Use the Record Remove function to delete deductions not needed. 21.Save the record and press Exit. This returns you to the Job Information tab. 22.Click the Rollback icon to access the Adjustment Action list. 23.Select Balance from the drop-down list in the Adjustment Action field. 25. You will receive a warning message, “Out of balance, gross/net will be overlaid by Payroll calc”. Click OK. 26. Save the record. The disposition will be 28 (Pre-Approve Calc).
HRIS Module Correction Payroll Processing Manual
Page | 21
27.Select Approve from the drop-down list in the Adjustment Action field. 28. Perform a Next Block function. 29. Click the Save icon. 30. The disposition is now at 30 (Awaiting Calculation). 31. Perform a Next Block function. 32. Select Payroll Calculation from the Options list. 33. A screen will momentarily appear stating that the “Payroll calculation is in process. Please wait”. 34.When the calculation is complete, the disposition will be at 40 (Awaiting Document). 35. Perform a Next Block function. 36. Click on the Comments Tab and document the reason for the correction and save. 37. The Shared Service Payroll Center will perform the necessary processes to complete the correction payroll based on the monthly payroll processing starting at PHPDOCM. 4. Making Payroll Adjustments – Reissues A reissue automatically creates a void transaction on the event being adjusted and a manual transaction to replace the event being reissued. This action is most often required when an original paycheck is lost. It is also used when the financial institution returns a direct deposit due to account closed, and the original payment needs to be replaced by a paper check or another direct deposit.
You cannot reissue events that are at a disposition of less than 60, Finance Extract.
Follow these steps to complete the process.
1. Access the Adjustment Processing Form (PHAADJT). 2. Select the Search function in the ID field and select the required employee ID from
the Employee Search Form, POIIDEN. If the Banner ID is known, enter the ID, and verify you have the correct record.
3. Enter the calendar year in YYYY format in the Year field. 4. In the Payroll ID field, enter MN (Monthly). 5. Enter the number of the pay period to be run in the Payroll Number field or click on
the Search button next to the Sequence field if you need to view the Pay Event List Form (PHILIST).
6. Enter 0 in the Sequence Number field if you are adjusting an original pay event, or click on the Search button to view the PHILIST and select the desired pay event.
7. Select Reissue from the drop-down list in the Adjustment Action field. 8. Enter the date you want this transaction to be recorded for tax purposes in the History
Date field. 9. Enter the date that the adjustment is to be posted to the general ledger in the Posting
Override Date field. 10. Perform a Next Block function. 11. The relevant information in the Adjustment Detail block will be populated. 12. Click the Save icon. The disposition will change to 47 (Pre-Balance Update).
HRIS Module Correction Payroll Processing Manual
Page | 22
13. Change the print method to Computer and press the Save icon. The disposition will change to 37 (Pre-Balance Check).
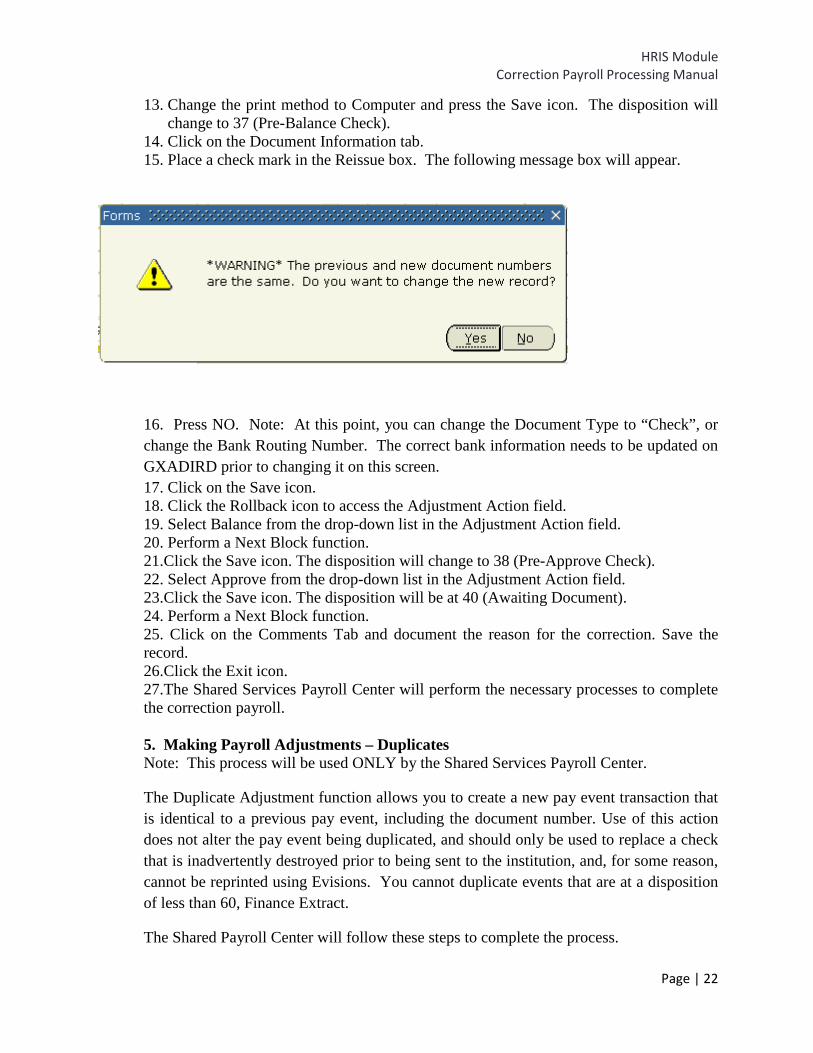
14. Click on the Document Information tab. 15. Place a check mark in the Reissue box. The following message box will appear.
16. Press NO. Note: At this point, you can change the Document Type to “Check”, or change the Bank Routing Number. The correct bank information needs to be updated on GXADIRD prior to changing it on this screen. 17. Click on the Save icon. 18. Click the Rollback icon to access the Adjustment Action field. 19. Select Balance from the drop-down list in the Adjustment Action field. 20. Perform a Next Block function. 21.Click the Save icon. The disposition will change to 38 (Pre-Approve Check). 22. Select Approve from the drop-down list in the Adjustment Action field. 23.Click the Save icon. The disposition will be at 40 (Awaiting Document). 24. Perform a Next Block function. 25. Click on the Comments Tab and document the reason for the correction. Save the record. 26.Click the Exit icon. 27.The Shared Services Payroll Center will perform the necessary processes to complete the correction payroll. 5. Making Payroll Adjustments – Duplicates Note: This process will be used ONLY by the Shared Services Payroll Center.
The Duplicate Adjustment function allows you to create a new pay event transaction that is identical to a previous pay event, including the document number. Use of this action does not alter the pay event being duplicated, and should only be used to replace a check that is inadvertently destroyed prior to being sent to the institution, and, for some reason, cannot be reprinted using Evisions. You cannot duplicate events that are at a disposition of less than 60, Finance Extract.
The Shared Payroll Center will follow these steps to complete the process.
HRIS Module Correction Payroll Processing Manual
Page | 23
1. Access the Adjustment Processing Form (PHAADJT). 2. Select the Search function in the ID field and select the required employee ID from
the Employee Search Form (POIIDEN). If the Banner ID is known, enter the ID, and verify you have the correct record.
3. Enter the calendar year in YYYY format in the Year field. 4. In the Payroll ID field, enter MN (Monthly). 5. Enter the number of the pay period to be run in the Payroll Number field or click on
the Search button next to the Sequence field if you need to view the Pay Event List Form (PHILIST).
6. Select Duplicate from the drop-down list in the Adjustment Action field. 7. The history date should be the month/day/year of the original transaction. 8. The Posting Override Date should be the same as the original transaction date in this
case. 9. Perform a Next Block function. 10. The relevant information in the Adjustment Detail block will be populated. 11. Click the Save icon. The disposition is at 47 (Pre-Balance Update). 12. For this adjustment process, always change the Calculation and Print methods to
Computer. 13. Click on the Save icon. The disposition is at 27 (Pre-Balance Calculate). 14. Click on the Document Information tab. 15. Enter the SAME Document Number and Document Date as was on the original
document. Priority should be 1. 16. Click the Save icon. 17. Click the Rollback icon to access the Adjustment Action field. 18. Select Balance from the drop-down list in the Adjustment Action field. 19. Perform a Next Block function. 20. Acknowledge the warning message referring to the gross and net amounts. 21. Click the Save icon. The disposition will be at 28 (Pre-Approve Calculate). 22. Select Approve from the drop-down list in the Adjustment Action field. 23. Perform a Next Block function. 24. Click the Save icon. The disposition is at 30 (Awaiting Calculate). 25. Perform a Next Block function. 26. Select Payroll Calculation from the Options menu. Note: A message block appears
momentarily that states the calculation is “In Process Please Wait”. 27. When the calculation is complete, the disposition will be at 40 (Awaiting Document). 28. Perform a Next Block function. 29. Click on the Comments Tab and document the reason for the correction and save. 30. The Shared Service Payroll Center will perform the necessary processes to complete
the correction payroll.
6. Erasing an Adjustment This function allows you to remove an adjustment prior to reaching a specific disposition. If you make an error in data entry during an adjustment transaction, and you determine that it would be easier to start over, you can Erase the correction.
HRIS Module Correction Payroll Processing Manual
Page | 24
NOTE: PHAADJT cannot be erased if the disposition is greater than 48, and PHAREDS cannot be erased if the disposition is at 60.
1. Access the Adjustment Processing Form (PHAADJT) form. 2. Enter the employee ID, year, pay ID, pay number and sequence number of the
adjustment you want to erase. If you don’t know what the sequence number is, you can click on the Search button to access PHILIST and select the desired number.
Note: You can also begin the Erase function at any point while entering the adjustment. Just use the Rollback function to access the Adjustment Action field.
3. Select Erase from the drop down list in the Adjustment Action field. 4. Perform a Next Block function. 5. Click the Save icon. 6. The Disposition reverts to its original disposition before the adjustment was begun
and the adjustment transaction is removed from PHILIST. 7. You are now ready to restart the adjustment if you need to. 7. Making Payroll Adjustments – General Queries After performing void, duplicate, and reissue transactions, you can view the details of the earnings and deductions for either the original or subsequent pay events.
Follow these steps to view the correction after it is completed.
1. Access the Adjustment Processing Form (PHAADJT). 2. Select the Search function in the ID field and select the required employee ID from
the Employee Search Form (POIIDEN). If the Banner ID is known, enter the ID, and verify you have the correct record.
3. Enter the calendar year in YYYY format in the Year field. 4. In the Pay ID field, enter MN (Monthly). 5. Enter the number of the pay period to be viewed in the Payroll Number field or click
on the Search button next to the Sequence button if you need to view the Pay Event List Form (PHILIST).
6. Enter 0 in the Sequence Number field (Enter 1 to view details from a void, duplicate, or reissue event).
Document Information Tab Follow these steps to complete the process.
1. Access the Document Information tab. 2. View the information populated in the Document Number, Document Date,
Document Amount, Document Type, and Priority fields. 3. Close the window and return to PHAADJT.
Job Information Tab Follow these steps to complete the process.
1. Access the Job Information tab.
HRIS Module Correction Payroll Processing Manual
Page | 25
2. All jobs for this pay event are listed in the Position field. Options – Earnings History (PHAHOUR) Follow these steps to complete the process.
1. Access Earnings History (PHAHOUR) from the Options menu. 2. View the earnings for this check. 3. If an employee had multiple jobs in this pay event, Exit the Earnings History window
and return to PHAADJT. Place the cursor on the subsequent position number and access the Earnings History option again.
Options – Deduction History Follow these steps to complete the process.
1. Access Deduction History (PHCDEDN) from the Options menu. 2. View the deductions from this pay event. 3. Click the Exit icon to return to PHAADJT. 4. Click the Exit icon.
E. Processing a Labor Redistribution Correction Payroll (PHAREDS)
The PHAREDS process allows you to change the source of funding for a transaction that has already been completed in payroll. The process allows you to move dollars and hours from one labor distribution account to another. Disposition of the event you want to change must be at least at 70.
1. This process does NOT generate a payroll document (check or direct deposit) for the employee. Nor does it change the gross or net pay.
2. This process also does NOT change earnings type or directly impact or change the FTE. It changes only dollars and hours. However, since FTE utilization is taken from hours on payroll history, FTE utilization is indirectly impacted by changes made on PHAREDS.
3. This process does NOT have any impact on NBAJOBS. If the change is to impact future payroll transactions, those changes will also need to be made on the Labor Distribution tab of NBAJOBS.
WARNING!!! PHAREDS screens will only check to see if the element you entered is a valid FOAP element. It will NOT check to see if they are valid with the other elements either entered on the ‘Search and Replace’ screen or already existing on the records and not marked for Replacement, or on the bottom section of PHAREDS where new FOAP data is entered. So, it will let you enter an erroneous combination. You will not know it is wrong until the transaction
HRIS Module Correction Payroll Processing Manual
Page | 26
suspends rather than loads into Finance. Therefore, it is imperative that you review your data in ALL fields prior to approving the transaction.
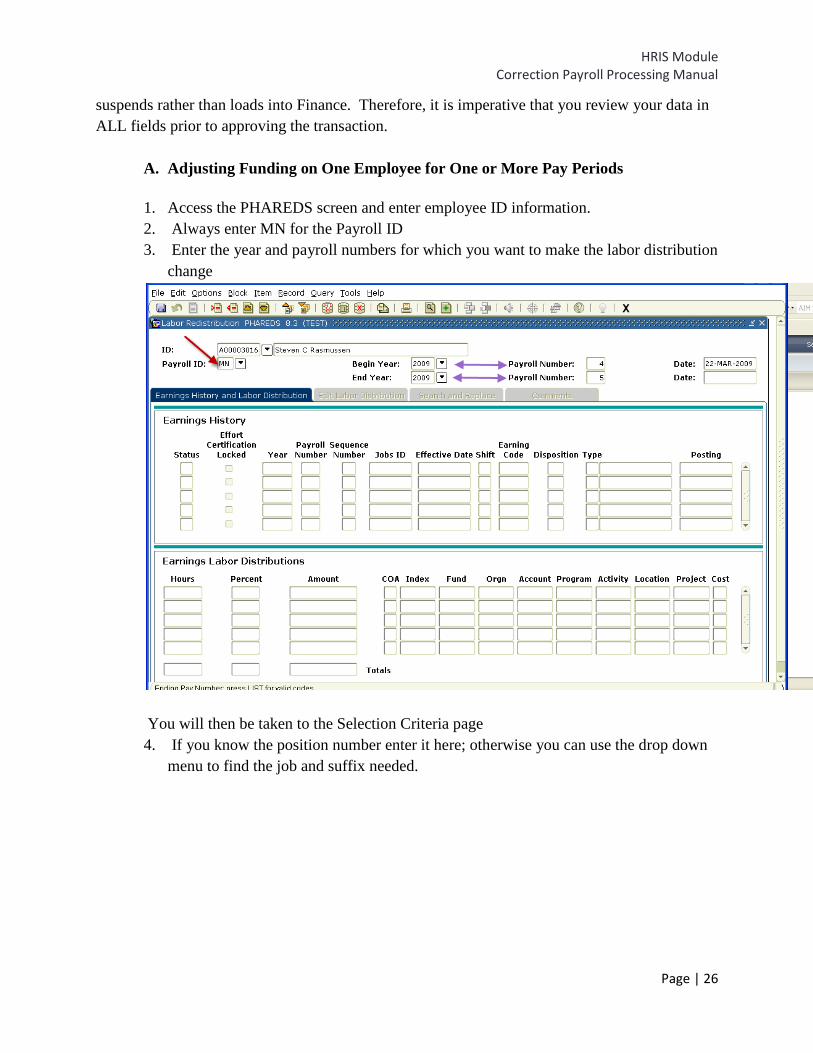
A. Adjusting Funding on One Employee for One or More Pay Periods
1. Access the PHAREDS screen and enter employee ID information. 2. Always enter MN for the Payroll ID 3. Enter the year and payroll numbers for which you want to make the labor distribution
change
You will then be taken to the Selection Criteria page 4. If you know the position number enter it here; otherwise you can use the drop down
menu to find the job and suffix needed.
HRIS Module Correction Payroll Processing Manual
Page | 27
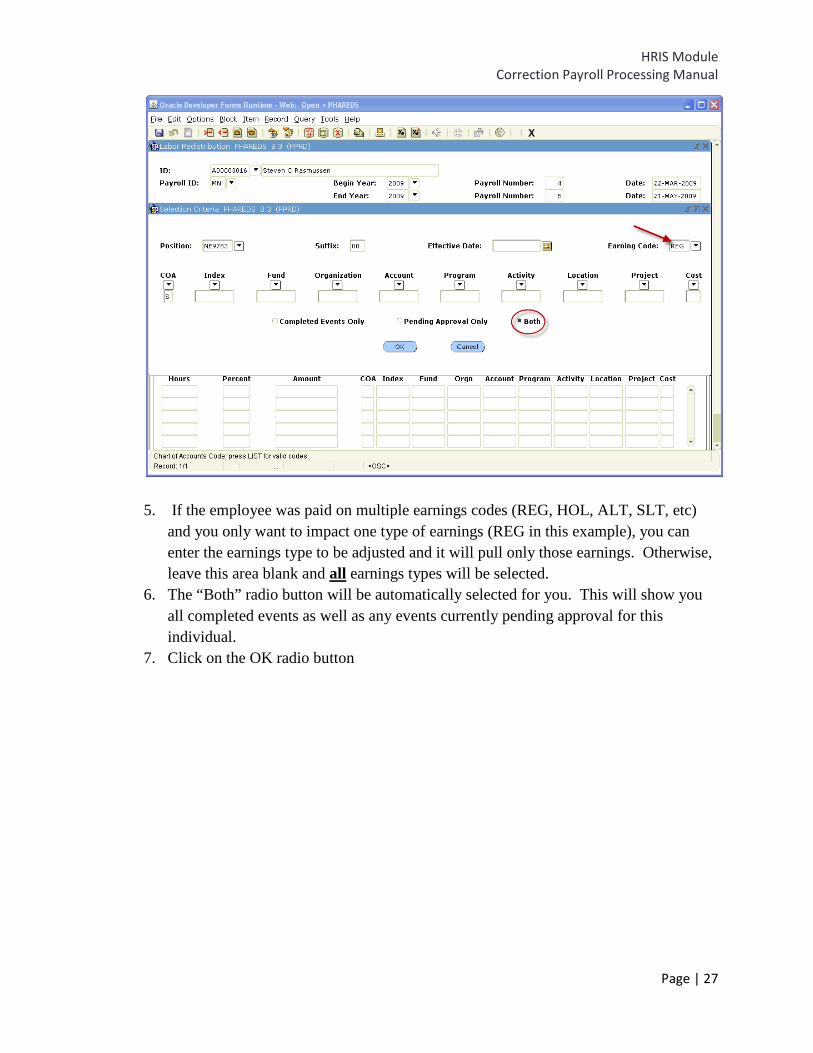
5. If the employee was paid on multiple earnings codes (REG, HOL, ALT, SLT, etc)
and you only want to impact one type of earnings (REG in this example), you can enter the earnings type to be adjusted and it will pull only those earnings. Otherwise, leave this area blank and all earnings types will be selected.
6. The “Both” radio button will be automatically selected for you. This will show you all completed events as well as any events currently pending approval for this individual.
7. Click on the OK radio button
HRIS Module Correction Payroll Processing Manual
Page | 28
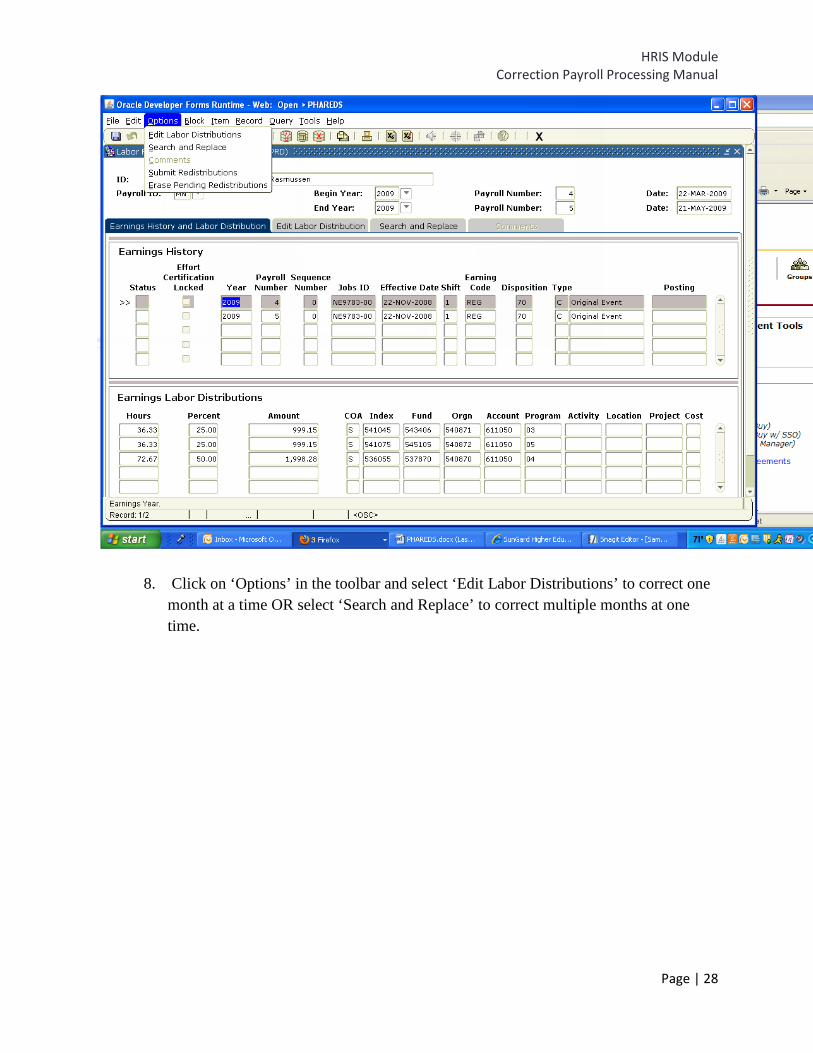
8. Click on ‘Options’ in the toolbar and select ‘Edit Labor Distributions’ to correct one month at a time OR select ‘Search and Replace’ to correct multiple months at one time.
HRIS Module Correction Payroll Processing Manual
Page | 29
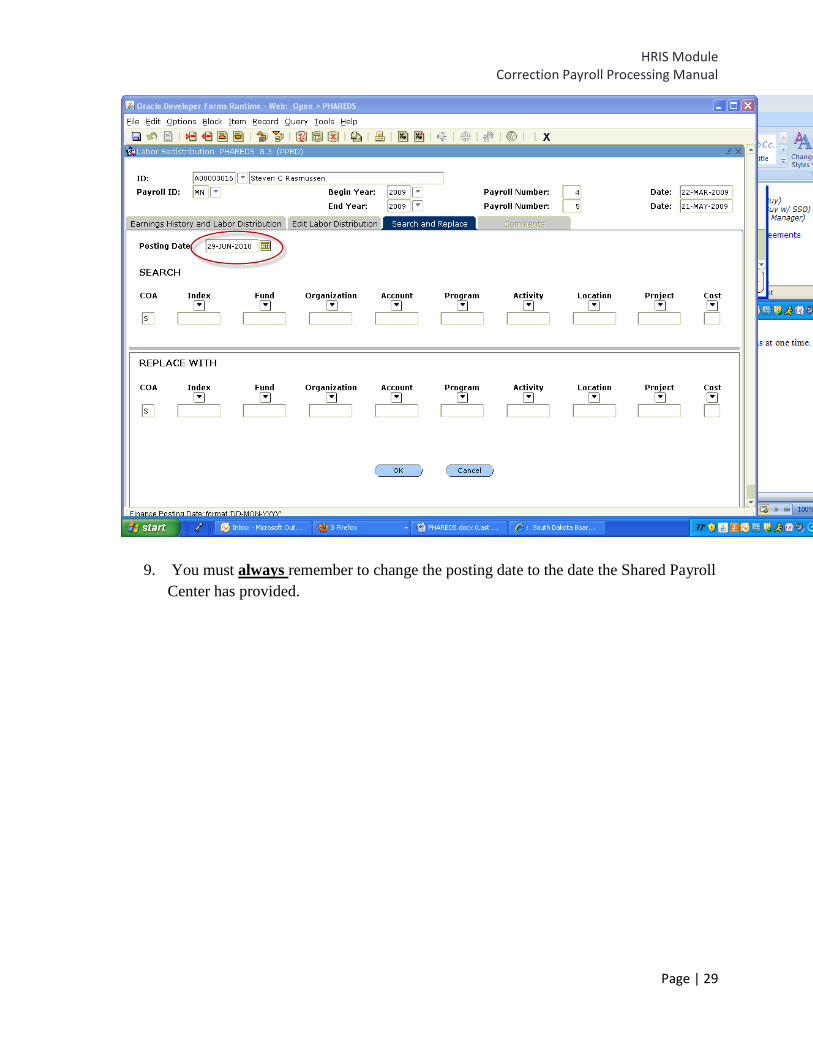
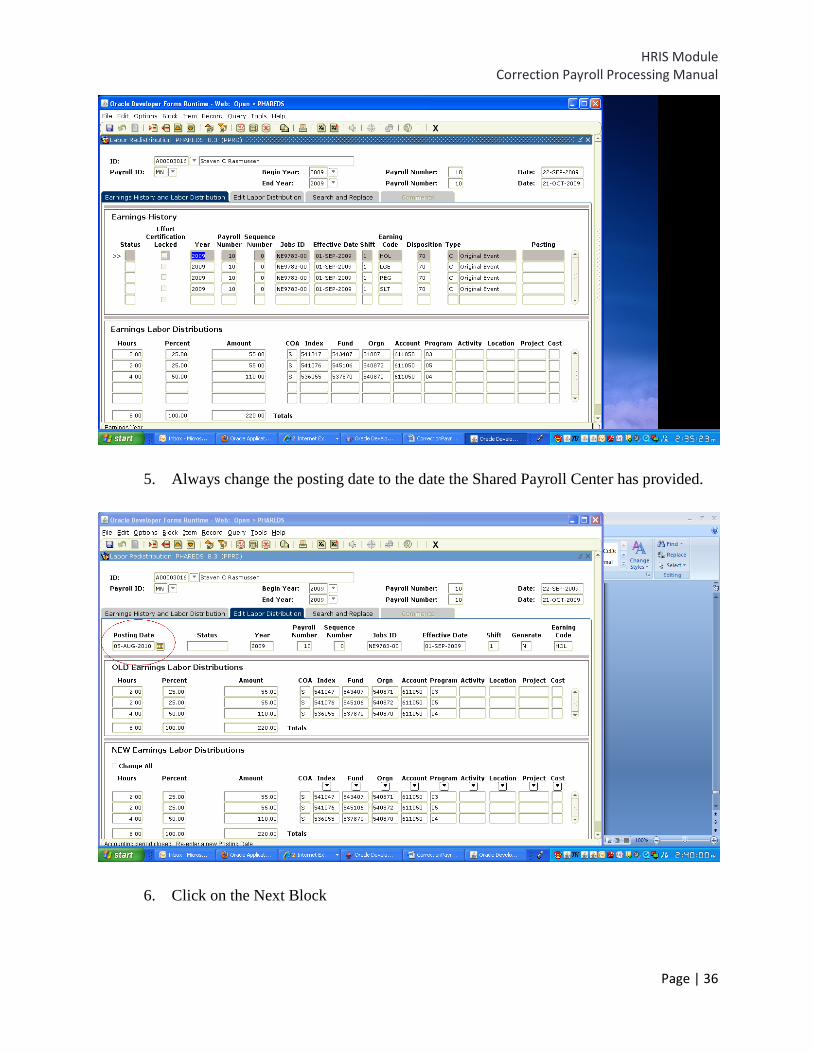
9. You must always remember to change the posting date to the date the Shared Payroll
Center has provided.
HRIS Module Correction Payroll Processing Manual
Page | 30
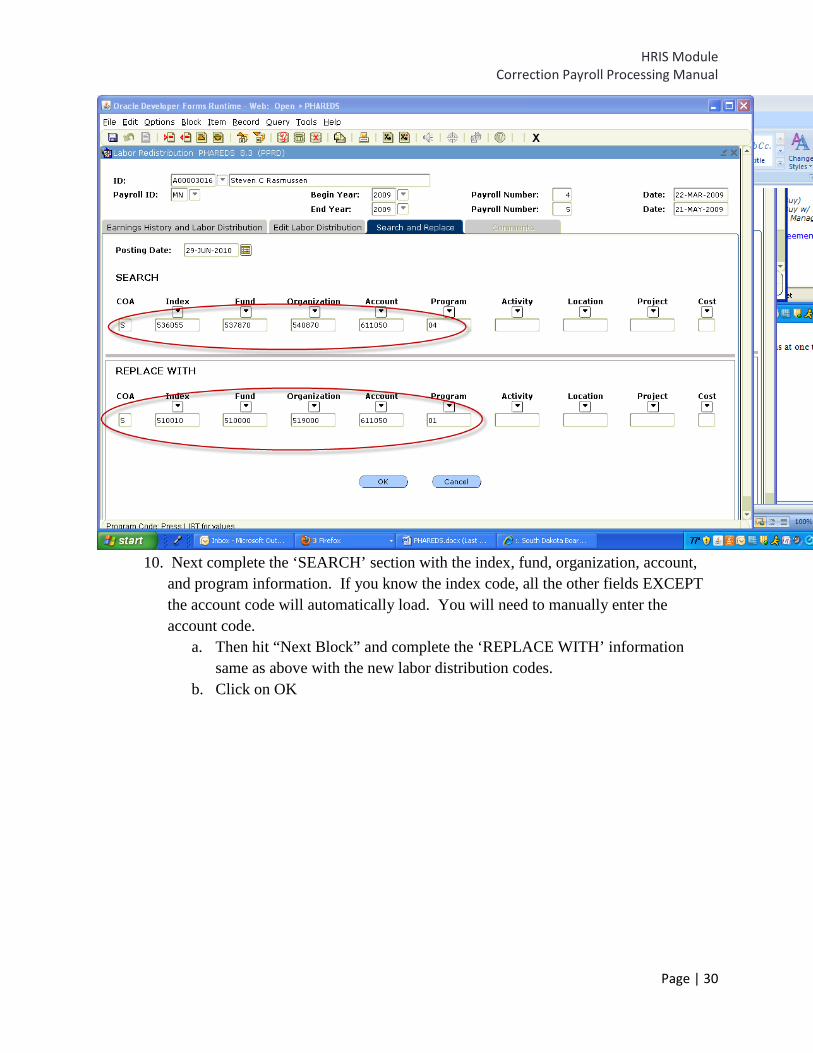
10. Next complete the ‘SEARCH’ section with the index, fund, organization, account,
and program information. If you know the index code, all the other fields EXCEPT the account code will automatically load. You will need to manually enter the account code.
a. Then hit “Next Block” and complete the ‘REPLACE WITH’ information same as above with the new labor distribution codes.
b. Click on OK
HRIS Module Correction Payroll Processing Manual
Page | 31
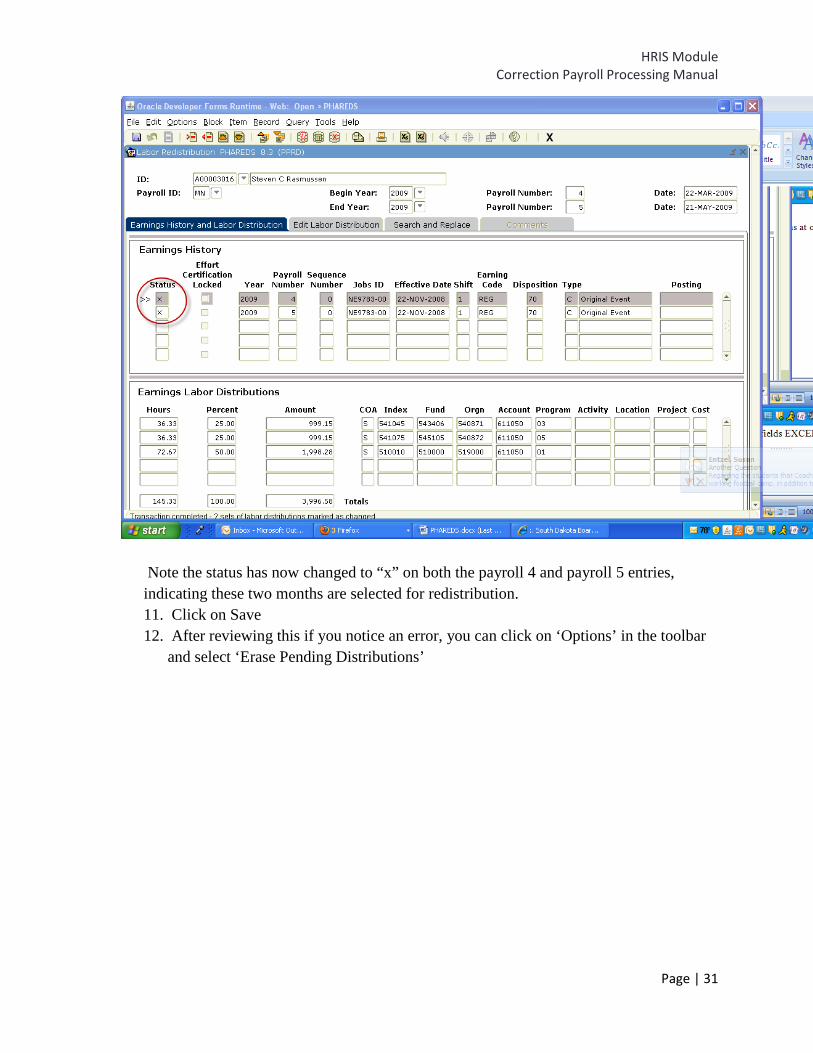
Note the status has now changed to “x” on both the payroll 4 and payroll 5 entries, indicating these two months are selected for redistribution. 11. Click on Save 12. After reviewing this if you notice an error, you can click on ‘Options’ in the toolbar
and select ‘Erase Pending Distributions’
HRIS Module Correction Payroll Processing Manual
Page | 32
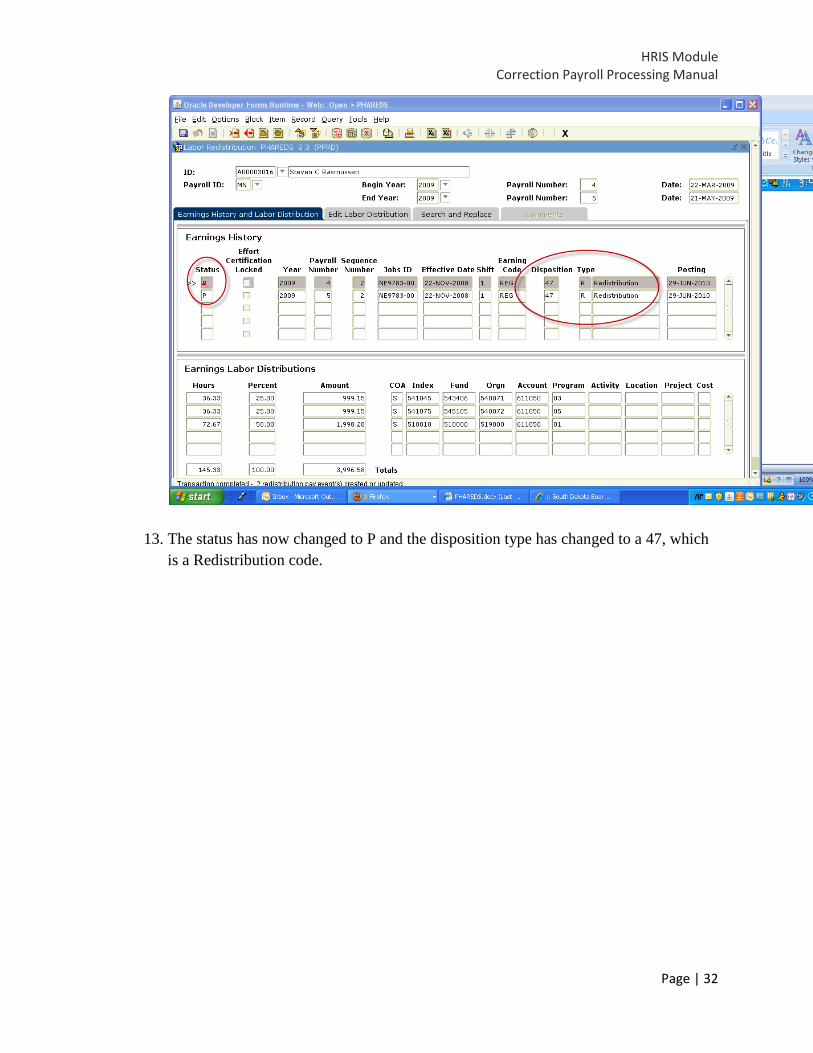
13. The status has now changed to P and the disposition type has changed to a 47, which is a Redistribution code.
HRIS Module Correction Payroll Processing Manual
Page | 33
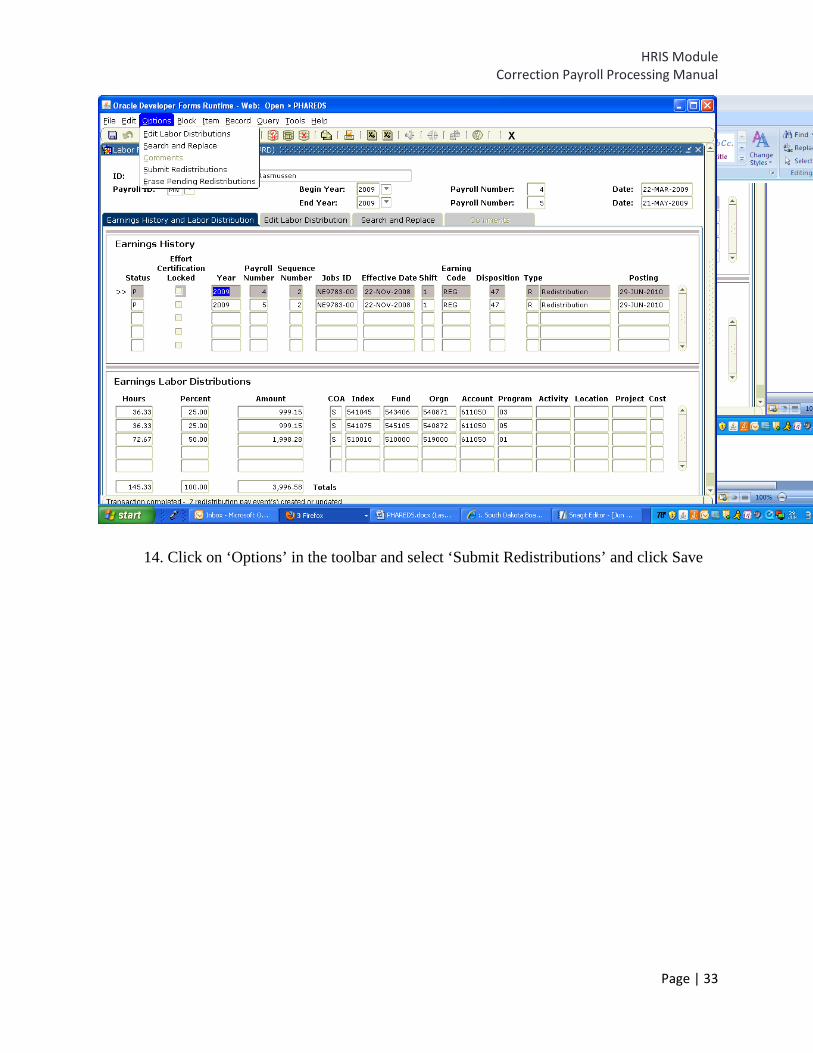
14. Click on ‘Options’ in the toolbar and select ‘Submit Redistributions’ and click Save
HRIS Module Correction Payroll Processing Manual
Page | 34
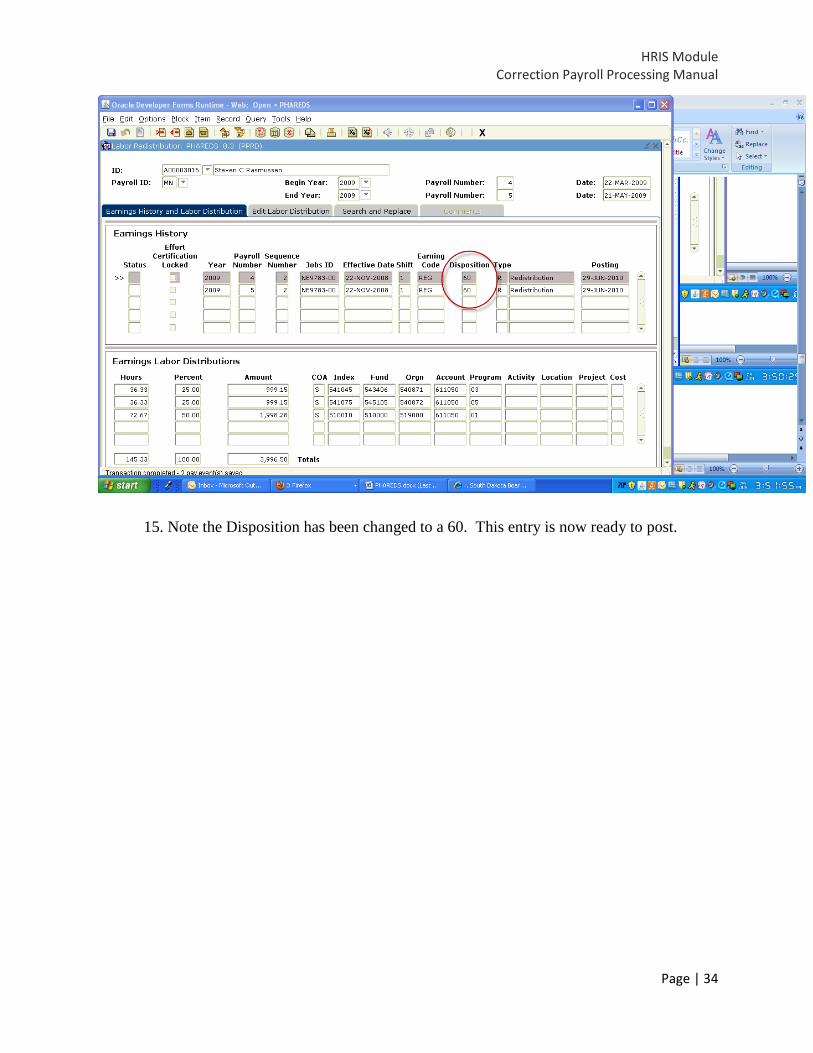
15. Note the Disposition has been changed to a 60. This entry is now ready to post.
HRIS Module Correction Payroll Processing Manual
Page | 35
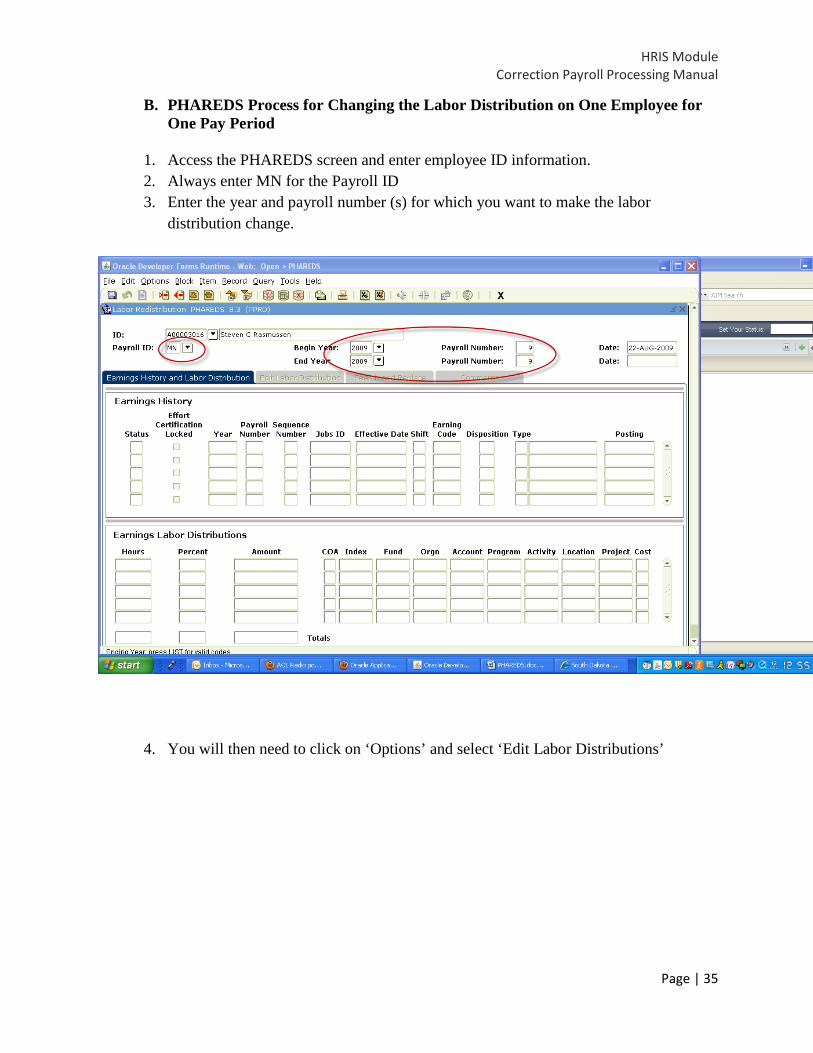
B. PHAREDS Process for Changing the Labor Distribution on One Employee for One Pay Period
1. Access the PHAREDS screen and enter employee ID information. 2. Always enter MN for the Payroll ID 3. Enter the year and payroll number (s) for which you want to make the labor
distribution change.
4. You will then need to click on ‘Options’ and select ‘Edit Labor Distributions’
HRIS Module Correction Payroll Processing Manual
Page | 36
5. Always change the posting date to the date the Shared Payroll Center has provided.
6. Click on the Next Block
HRIS Module Correction Payroll Processing Manual
Page | 37
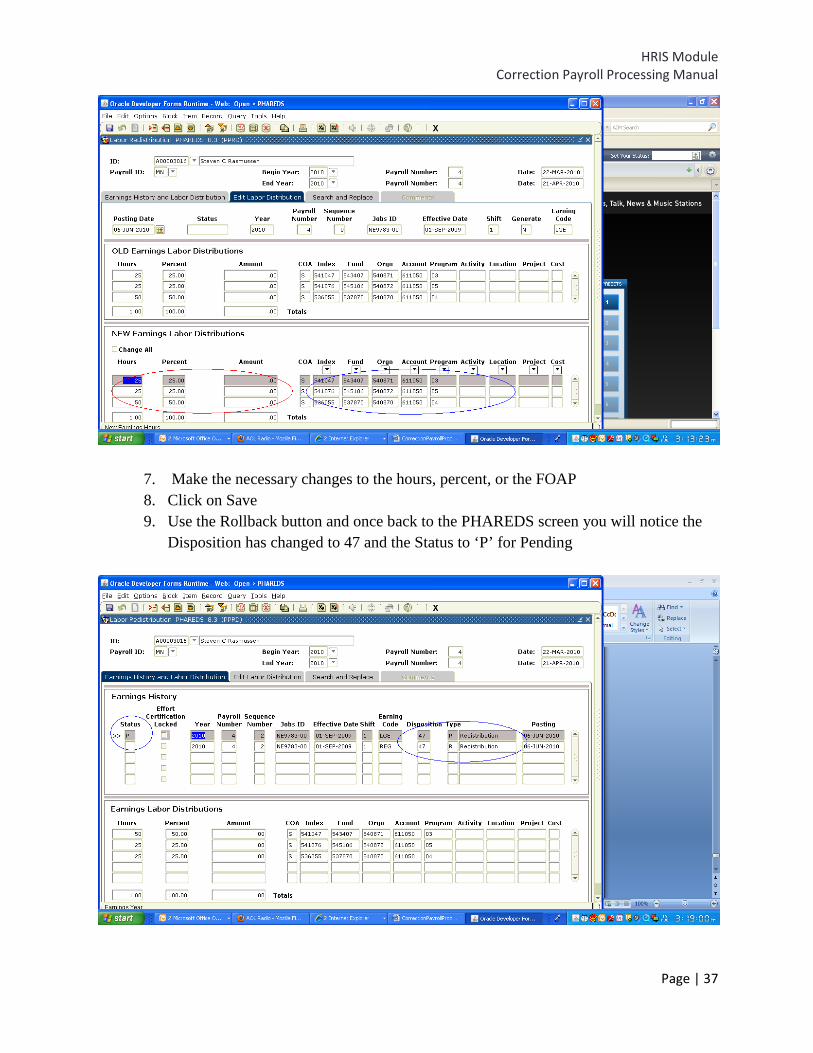
7. Make the necessary changes to the hours, percent, or the FOAP 8. Click on Save 9. Use the Rollback button and once back to the PHAREDS screen you will notice the
Disposition has changed to 47 and the Status to ‘P’ for Pending
HRIS Module Correction Payroll Processing Manual
Page | 38
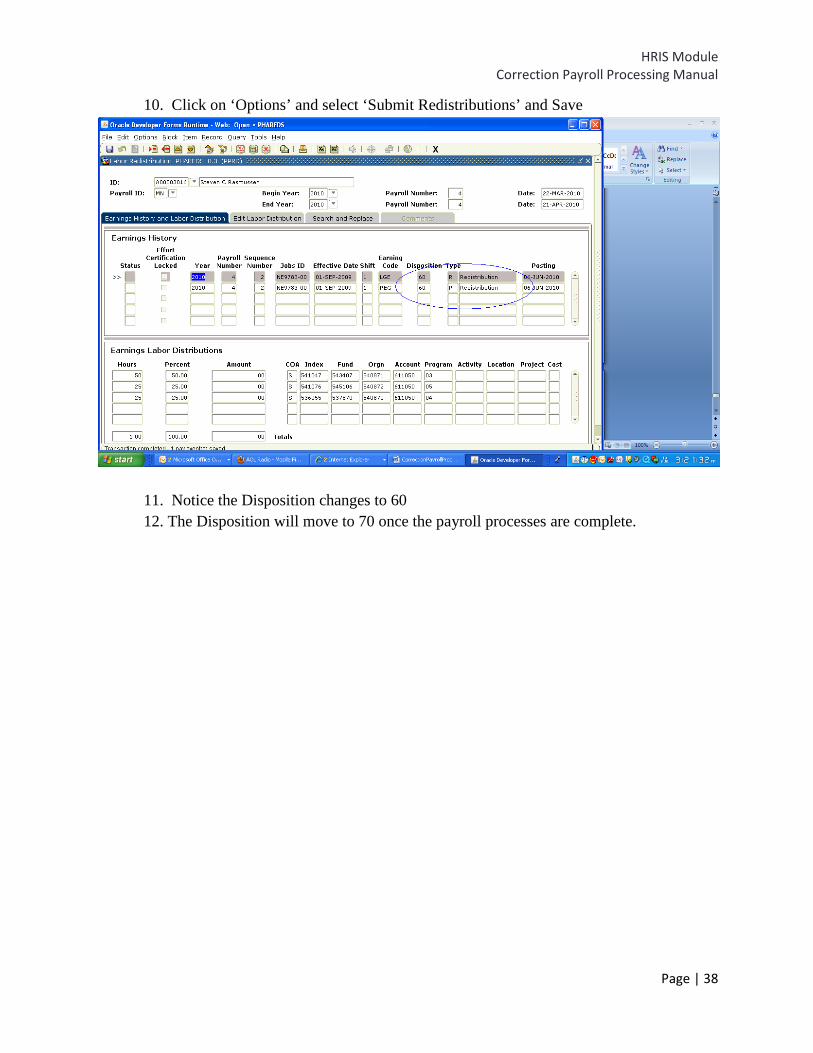
10. Click on ‘Options’ and select ‘Submit Redistributions’ and Save
11. Notice the Disposition changes to 60 12. The Disposition will move to 70 once the payroll processes are complete.
HRIS Module Correction Payroll Processing Manual
Page | 39
Queries and Reports
All whitepapers for the SDBOR System are located on http://mytraining.sdbor.edu and will cover all SD reporting needs.
HRIS Module Correction Payroll Processing Manual
Page | 40
Other Information
Rules and Validation Tables All variables are previously covered in other manuals. Benefits, Employment Administration, Biographic and Demographic Manual.
PTRCALN – System has only one Calendar (Calendar Year and Month).
PTRPICT – System has only one Pay ID (MN – Monthly).
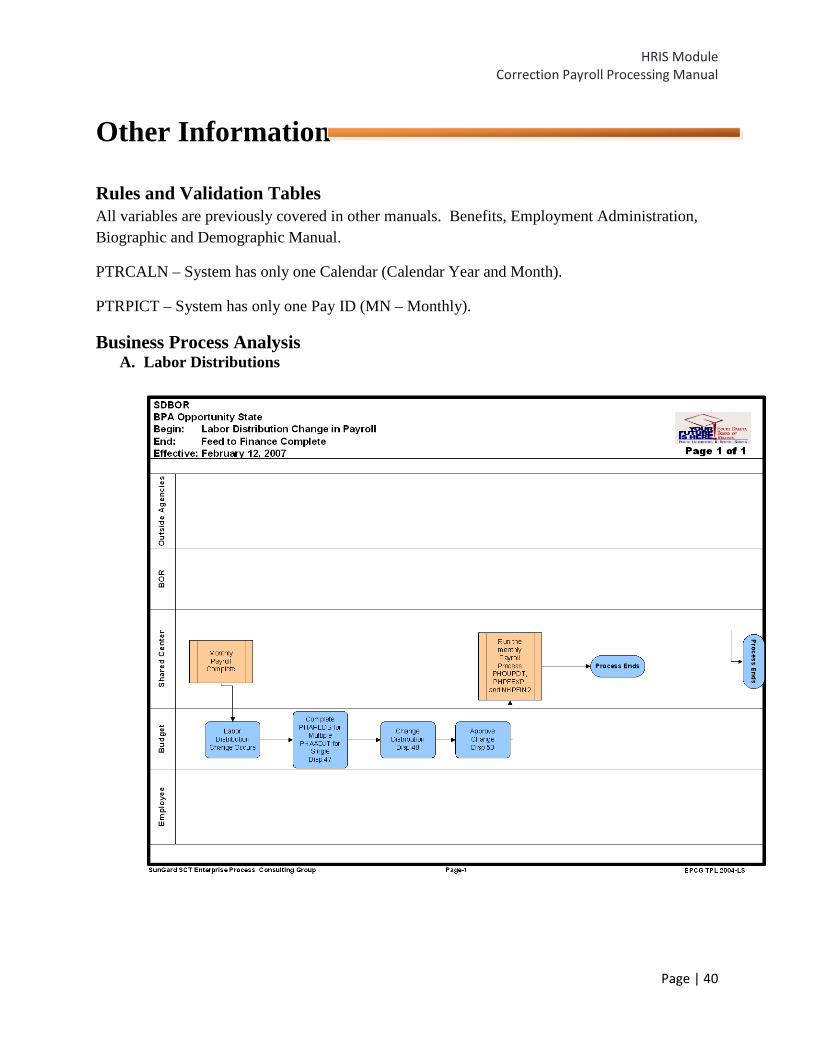
Business Process Analysis A. Labor Distributions