hp media center pc - HP® Official Siteh10032. · iii Safety Information Before you get started,...
82
i hp media center pc hardware user’s guide
-
Upload
truongcong -
Category
Documents
-
view
219 -
download
0
Transcript of hp media center pc - HP® Official Siteh10032. · iii Safety Information Before you get started,...

i
hp media center pc
hardware
user’s guide

ii
The information in this document is subject to changewithout notice.
Hewlett-Packard Company® makes no warranty of any kind withregard to this material, including, but not limited to, the impliedwarranties of merchantability and fitness for a particular purpose.
HP shall not be liable for errors contained herein or for incidentalor consequential damages in connection with the furnishing,performance, or use of this material.
HP assumes no responsibility for the use or reliability of its softwareon equipment that is not furnished by HP.
This document contains proprietary information that is protected bycopyright. All rights are reserved. No part of this document may bephotocopied, reproduced, or translated to another language withoutthe prior written consent of HP.
Hewlett-Packard CompanyHome Products DivisionP.O. Box 4010Cupertino, CA 95015-4010USA
© Hewlett-Packard Company, 2002. All rights reserved.
Hewlett-Packard is a registered trademark of Hewlett-PackardCompany in the United States of America and other countries/regions.
This product incorporates copyright protection technology thatis protected by method claims of certain U.S. patents and otherintellectual property rights owned by Macrovision Corporationand other rights owners. Use of this copyright protection technologymust be authorized by Macrovision Corporation, and is intendedfor home and other limited viewing uses only unless otherwiseauthorized by Macrovision Corporation. Reverse engineering ordisassembly is prohibited. Apparatus Claims of U.S. Patent Nos.4,631,603, 4,577,216, 4,819,098, and 4,907,093 licensed forlimited viewing uses only.
Other brand or product names are trademarks of their respectiveholders.

iii
Safety Information
Before you get started, please read thisimportant safety information about yourHP Media Center PC.
Changing the voltageselect switch to theincorrect position candamage your PC and voidany implied warranty.
Always disconnect themodem cord from thetelephone system beforeinstalling or removing yourcomputer cover.
Do not operate thecomputer with the coverremoved.
The power supply isnot user-serviceable.To prevent damage tothe power supply, havea qualified person repairor replace it. All othercomponents are user-serviceable.
This product has not been evaluated for connection toan “IT” power system (an AC distribution system with nodirect connection to earth, according to IEC 60950).
� AC Power Safety WarningsThe power supply is pre-set for the country/regionin which you purchasedthe PC. If you move toanother country/region,please make sure youcheck its voltagerequirements beforeplugging your PC intoan AC power outlet.
Install the computer nearan AC outlet. The ACpower cord is your PC’smain AC disconnectingdevice and must be easilyaccessible at all times.For your safety, the powercord provided with yoursystem has a groundedplug. Always use thepower cord with aproperly grounded wall
outlet to avoid the risk ofelectrical shock.
To reduce the possibility ofan electric shock from thetelephone network, plugyour computer into the ACoutlet before connecting itto the telephone line. Also,disconnect the telephoneline before unpluggingyour computer from theAC power outlet.
Your system is providedwith a voltage selectswitch for use in a 115 or230 VAC power system.The voltage select switchhas been pre-set to thecorrect voltage settingfor use in the particularcountry/region where itwas initially sold.
Electrostatic discharge(ESD) can damage diskdrives, add-in cards,and other components.If an ESD station is notavailable, wear a wriststrap attached to a metalpart of the computer. Placecards on a conductivefoam pad or inside thecard wrapper, if possible,but never on the cardwrapper.
The PC is heavy; be sureto use ergonomicallycorrect lifting procedureswhen moving thecomputer.

iv
0–15˚
50–70 cm(20–28 inches)0–15˚
Safety and ComfortFollow the steps in the setup poster to set up thecomputer.
After assembling but before using the computer, makesure the computer and your work area are properlyset up to maintain your comfort and productivity. Referto Working in Comfort in the Help and Support Centerfor important ergonomic information. Just click Start,Help and Support, My HP Pavilion PC, and thenclick Working in Comfort.
You can find important ergonomic information on theInternet. Just type http://www.hp.com/ergo into yourWeb browser address box, and then press Enter on thekeyboard.

v
Help and Support
HP provides many kinds of information and help foryour PC.
■ HP Utility programs in the hp pavilion pc tools folder.
■ The Help and Support Center is an onscreen Helparea where you can find information from HP andMicrosoft about using the PC and its components.
Go to the Help and Support Center when you want toread about your computer, view tutorials, run tests, orget troubleshooting help by using the Internet.
The Help and Support Center also gives you access tothe latest news and updates for your PC.
■ The HP Web site provides a place where you can getsupplemental information about HP computers andproducts and contact HP Support.
■ HP Customer Care provides HP Help over thetelephone.
Review the following pages to learn more about each ofthese types of help.
HP Utility ProgramsHP provides special utility programs in the hp pavilion pctools folder that display support information, and initiateapplication or system recovery.
To find these programs, click Start, choose AllPrograms, choose Hewlett-Packard, choose hppavilion pc tools, and select a program or folder.
Help and Support Center
1 Press Help (the ?button) on the keyboardto open Help andSupport.
Or
Click Start on thetaskbar, and then clickHelp and Support.
2 In Help and Support,click My HP PavilionPC. Click a title andread the topic. Thisarea is a library ofhelpful informationabout your PC.
3 In Help and Support,click HP InstantSupport. ClickRequest Help andfollow the onscreeninstructions to run a testor submit a problem toHP Instant Support.

vi
where to get help�When you call HPCustomer Care,you will needyour PC modelnumber andserial number.
HP Web Site and HP Support1 Connect to the Internet: Open your
Web browser, or press Connect onyour keyboard.
2 Type http://www.hp.com into your Web browseraddress box and press Enter on your keyboard.
3 Select your country/region from the drop-down list,and click the arrow to the right of the list (scroll downto see the box).
4 Click the support link.
HP Customer CareYou can get help over thetelephone from HP.
See the Support Guide,included with the computerdocumentation, for theterms of your HP warrantycoverage, for licenseinformation, and forsupport telephone numbersand addresses.

vii
Table of Contents
Welcome ..................................1How to Use This Guide ..............2Where Can I FindInformation?.............................3Inventory..................................4PC and Main Components .......................... 4Media Center Components ......................... 42.1 Speaker System Components ................ 4
Setting Up My PC ......................5Checklist ................................................... 5Front of PC ................................................ 6Back of PC ................................................ 7Connecting the Monitor .............................. 8Connecting the Printer or Scanner ............... 8Connecting to the Internet Through a
Modem/Telephone Connection ............... 9Connecting to the Internet Through a
Network Port (LAN) ............................... 9Connecting the Remote Sensor .................. 10Connecting the Signal Source ................... 11
Optional Connections ..............12Using the TV Cables ................................. 12Connecting the TV .................................... 13Connecting the TV Signal Source When
You Have an Existing Setup .................. 14Wall to Cable TV Set-top Box or Satellite Box
to VCR to TV Using Coaxial Cable ........ 15Wall to Cable TV Set-top Box or Satellite Box
to VCR and TV Using S-video Cable orComposite Video Cable Between the Boxand the VCR or TV ............................... 16
Connecting Your Speakers ......17PC Audio Connectors ............................... 172.1 Speaker System ................................. 185.1 Speaker System ................................. 19Adjusting the Volume ................................ 20Microphone ............................................. 20Headphones ............................................ 20
Starting My PC........................21Starting the PC for the First Time ................ 21Selecting an ISP ....................................... 22HP Desktop .............................................. 23Enabling TV Out Image ............................ 24Opening Media Center ............................ 25Software Programs ................................... 26Turning Off the PC ................................... 28Manual Standby Mode ............................. 29Manual Hibernation Mode ....................... 30Automatic Standby or Hibernation Mode ... 31
Using the PC Hardware ..........33Keyboard ................................................ 33Keyboard Functions .................................. 34Mouse ..................................................... 37Remote Control ........................................ 38Remote Control Buttons Overview .............. 40CD and DVD Drives ................................. 41DVD-ROM Drive ....................................... 42cd writer plus ........................................... 42dvd writer ............................................... 42dvd/cd writer plus (Combo) Drive ............. 43Opening the RecordNow program ............ 43Diskette (Floppy) Drive .............................. 436-In-1 Memory Card Reader ..................... 44
Upgrading and Servicing ........45Preparing the Computer ........................... 45Removing the Side Panels ......................... 46Replacing the Side Panels ......................... 46Locating Components in the PC Chassis ..... 47Removing the Fan Duct ............................. 48Replacing the Fan Duct ............................. 48Accessing the Optical Drives ..................... 49Removing the Optical Drive ...................... 50Installing a New Optical Drive .................. 51Replacing and Adding Drives ................... 52Adding Memory ...................................... 56Removing Add-In Cards ............................ 58Replacing Add-In Cards ............................ 58
Troubleshooting ......................59Restore and Recovery .............65Recovery System ...................................... 65Recovery CDs .......................................... 65Using Application Recovery and
System Recovery ................................. 66
Index .....................................71

viii

1
Introduction
Welcome
Thank you for purchasing the HP Media Center PC.
HP has combined the features of the HP Pavilion homePC with the Microsoft® Windows® XP Media CenterEdition operating system to create a powerfulentertainment center for you.
This PC includes an impressive sound system, aDVD+RW/+R player, a 6-In-1 memory card reader, andpowerful 3-D graphics capability. It is simple and easy touse. It allows you to assemble your music, videos, andpictures, and to enjoy them with a click of the remotecontrol.
The built-in TV capabilities include a Television ProgramGuide which gets updated over the Internet. Andwhether you are recording TV programs or sharing adigital photo album, you can do all your entertainingusing the powerful remote control.
You will find yourself quickly at ease and in full controlusing the HP Media Center PC.
PC features and contents may vary by model.

2
�A note describesimportant infor-mation you need.
�A warningdescribes infor-mation you needto avoid possiblepersonal injury ordamage to equip-ment or data.
Read and followall warnings.
How to Use This Guide
This guide will help you get started using your new PCright away.
1 Read “Safety Information” at the beginning of thisbook.
2 Identify the items included with your computer. Referto information shown in “Inventory.”
3 Follow the setup poster to connect your computer.Refer to “Setting Up My PC.”
4 Read “Starting My PC” to learn how to turn on yourPC and what to do next.
5 Read the remaining sections of this guide forinformation about using your PC.

3
Introduction
Where Can I Find Information?
Record Support information for your PC here.(To open the HP Pavilion Support Information window,press the Ctrl key, the Alt key, and the s key at the sametime.)
Product name: HP Media Center PC .
Model number: ____________________________________
Serial number: ____________________________________
Service ID: ________________________________________
Date of purchase: __________________________________
�Always try usingyour onscreenHelp, includingHP InstantSupport, beforecontacting yourreseller.
HP provides you withprinted documentation,onscreen information,troubleshooting help andtests you can run from HPInstant Support, and helpover the telephone fromHP Support. Here is whereto find information:
Setup poster, in thecomputer box, shows howto connect your computer.For additional informationand setup alternatives,refer to “Setting UpMy PC.”
Help and Supportis onscreen Help. PressHelp (the ? button) on thekeyboard, or click Starton the taskbar, and thenclick Help and Support.In Help and Support, clickMy HP Pavilion PC toread Help topics, or clickHP Instant Supportto run tests or gettroubleshooting helpby using the Internet.
Online Informationfor your PC is availableat the HP Web site.Press the HP button onyour keyboard, or typehttp://www.myhpclub.cominto your Web browseraddress box, and thenpress Enter on thekeyboard.
Microsoft WindowsXP Media Centerprogram lets you use aremote control to watchor record TV programs,view video, play musicand movies, and viewslide shows with music.Microsoft and HP provideprinted books in thecomputer box about theprogram. The MediaCenter program alsoincludes Help topics aboutusing the program.
Warranty andSupport informationis in the Support Guide.This document, includedwith the computerdocumentation, lists theterms of your PC warrantycoverage, licenseinformation, and supportcontact numbers andaddresses. You can gethelp over the telephonefrom HP.
Regulatory and Safetyinformation, includingoperating specificationsfor the PC, is in theSupport Guide.
Upgrading andServicing information,including informationabout accessing internalparts of the computerchassis, is in “Upgradingand Servicing.”
Program Help formany software programsis available within theprogram. Open theprogram and click theHelp button or select Helpfrom the menu.
Troubleshooting helpand information can helpyou solve a problem withyour PC. For help withgeneral and miscellaneousproblems, refer to“Troubleshooting.”
Problems withsoftware programsmay be caused bycorruption or damageto an individual program(application or softwaredriver) or to part of thesystem operating software.You can reinstall thesoftware; refer to “UsingApplication Recovery andSystem Recovery.”

4
2.1 Subwoofer(power cordattached)
2.1 Speakers
2.1 Speaker cables
PC
Mouse
Keyboard
Modem cable
Documentationpacket of booksand CDs
Power cord
Remote control 2-AA batteries forremote control
10' Coaxial cable
S-video tocomposite videoadapter
Composite videocable
Remote sensorcontrol cable
Remote sensor
Media Center Components
Inventory
PC and Main Components 2.1 Speaker SystemComponents(not included with all models)
�For 5.1speakersysteminstallation,refer to“ConnectingYourSpeakers.”
5
Setting Up My PC
Follow the steps in the setup poster to set up thecomputer. Connect the keyboard, mouse, speakersystem, and remote sensor to the connections on theback of the PC. Match the colors.
Your connector locations and system components mayvary.
The following pages identify the location of componentsand connectors on your PC and provide some setupalternatives.
ChecklistThe following items are not provided with your PC. Besure you have them on hand if you need them for yoursetup:
■ Monitor (required)
■ TV
■ Internet Service Provider (ISP), selected during initialsetup (required for Media Center features, such as theTV programming guide)
■ Coaxial cable splitter
■ S-video cable(s), to connect your TV if it requiress-video
■ Audio Y-cable, to connect to a stereo system
■ Connect the modemto the telephone lineand connect a networkcable (not provided)if one is needed.
■ Turn on the monitor, thePC, and then turn onthe speaker system.
■ Follow the onscreeninstructions, includingselecting an ISP usingEasy Internet Sign-up.
■ Set up the MediaCenter (see “OpeningMedia Center”).
■ Enable the (optional)TV; refer to “EnablingTV Out Image.”
■ After you’ve completedthe initial startup andregistration, connectoptional devices oneat a time, such as aprinter or scanner.
Be sure to:
■ Connect the keyboard,mouse, and remotesensor.
■ Connect the monitor(not included) andthe optional TV(not included).
■ Connect the speakers.
■ Connect the TVantenna, cable, orsatellite signal source.
Setting Up

6
TV GUIDE
SmartMedia MultiMediaCard/SD
CompactFlash I/II Memory Stick
MUSIC PICTURES VIDEOS
dvd writer
dvd cd writer plus
Front of PC
1st Optical (CD or DVD+RW/+R) drive Eject button
Front ports: IEEE 1394 (6-pin) USB 2.0
6-In-1 memory card reader
Mode buttons
2nd Optical (CD or DVD+RW/+R) drive Eject button
Diskette (floppy) drive Eject button
On button with powerindicator light
Hard disk activityindicator light

7
Back of PC
�Location andnumber of connec-tors may vary bymodel.
Voltage selector
Telephone(Line Out RJ-11)
Composite video (TV out)
Power cord connector
PS/2 Keyboard
PS/2 Mouse
Serial port
Parallel port
USB 2.0 (UniversalSerial Bus) ports(Remote Sensor
uses USB)
LAN (Ethernet)
TV Out (s-video)
VGA Monitor (DB-15)
Modem (Line In RJ-11)
IEEE 1394 (6-pin)
Line out-2
Line out-1 Line in
MicrophoneLine out-3 or
Digital out
Power LED
Leftaudio in
Rightaudio in
S-VID IN(s-video)
TV in
Setting Up

8
������������
���
�������������
���
�������������
���
�������������
���
�������������
���
�������������
���
�������������
���
�������������
���
�������������
���
� ������������������������������������������������������������������������������������������������������������
Connecting the MonitorConnect your monitor to the PC. The monitor is notincluded with the PC. Refer to the documentation thatcame with your monitor.
Connecting the Printer or ScannerConnect peripheral devices to the PC one at a time. Theprinter or scanner is not included with the PC. Refer tothe documentation that came with your device.

9
Connecting to the InternetThrough a Modem/TelephoneConnectionConnect the telephone line to the modem, which is insidethe computer.
1 Plug the modem cable (provided in the computer box)into the computer modem connector and to yourtelephone line wall jack connector.
2 Optionally, you can plug a telephone cable into thecomputer telephone connector and into a telephone.(Telephone and cable are not provided.)
�With a telephoneconnected to themodem, you canmake regular(voice) telephonecalls when youare not usingthe modem —even if the PCis turned off.
Connecting to the InternetThrough a Network Port (LAN)The network interface adapter (also called a networkinterface card, or NIC) connects to an Ethernet(10BaseT) or Fast Ethernet (100BaseT) network hub.Connect this adapter in your PC to your LAN (local areanetwork) hub or any broadband connection.
1 Plug a network cable into the Ethernet (RJ-45) port onthe back of the PC.
2 Plug the other end of the network cable into a10BaseT or 100BaseT port on the network hub.
The green LED (light-emitting diode) indicates a validconnection.
�Do not plug anetwork cableinto a telephonewall jack or atelephone cableinto a networkport. This candamage your PC.
RJ-45 port
Setting Up

10
Connecting the Remote SensorThe remote sensor is a small device that connects tothe PC and allows the remote control to work with theMedia Center program.
If you have a cable TV set-top box, satellite, or otherset-top box that controls your TV signal, connect theremote sensor control cable to the remote sensor andposition the end of it over the remote receiver on yourcable box. For information on using the control cablein an existing setup, see “Optional Connections.”
1 Plug the remote sensor cable into a USB connectoron the back of the PC.
2 Place the remote sensor so that you can easily pointat it with the remote control. (An ideal spot would beon top of the monitor or desk.)
3 If needed, plug the remote sensor control cable intothe back of the remote sensor. Position the end of thecontrol cable over the remote IR receiver window onyour cable TV set-top box. Remove the paper fromthe backing tape on the end of the cable. Press theend of the cable into place over the IR window onyour box.
Remote SensorConnect remote controlreceiver to computer
If you use a cable or satelliteset-top box, pass the signalthrough the remote sensor
Locate IR windowon set-top box.
Adhere to IR window.
Removebacking tape
Cable or satellite set-top box
Remotesensorcontrolcable

11
Connecting the Signal SourceThis section describes connecting the signal sourcefor TV.
Connect the signal source for the TV by using the TV (in)coaxial connector or the S-VID IN (s-video) connector:
■ Plug the connector of a coaxial cable from your TVantenna or from your TV cable (wall or set-top box)into the TV connector on the back of the PC, and thenturn the connector to tighten it.
Or
■ Plug a cable into the S-VID IN connector on the backof the PC: use an s-video cable (not provided) or usethe s-video to composite video adapter cable andthe composite video cable. Plug the other end of thecable into your set-top box, VCR, or other device thatis providing the signal source for the TV.
You can also plug audio cables (not provided) from yourset-top box or VCR into the Audio in right (red) connectorand the Audio in left (white) connector on the back ofthe PC.
�Select the signalsource for TV inthe Media Centerprogram settings.
TV in
S-VID IN(s-video)
Right audio in(red)
Left audio in(white)
Setting Up

12
Coaxial cable
S-video tocomposite videoadapter
Composite videocable
Connecting the TV is optional and not required to enjoyMedia Center.
Using the TV CablesYour PC comes with the following cables for the TVsignal:
■ One coaxial cable (10 feet). Use a coaxial cable fora BNC connector, such as the TV source signal.
Optional Connections
■ One s-video to composite video adapter cable(2 inches). Connect this adapter to an s-videoconnector, and then attach a composite video cableto the adapter.
■ One composite video cable (6 feet). Use this cableto connect a composite video connector on the backof the PC, such as COMP for the TV out signal, toyour TV.
You may need other or additional cables, depending onyour TV and your TV signal source. For example, whenyour TV has an s-video connector, you may want to usean s-video cable to connect the TV OUT on the PC toyour TV. An s-video cable provides separate color andblack-and-white image signals, and delivers a sharperimage than a composite video cable does.

13
S-VIDEO IN
COMPOSITE VIDEO IN
Connecting the TVTV OUT(s-video)
VGAMonitor
Compositevideo
(TV out)
1 Plug a cable into the TV OUT s-video connector or theCOMP composite video connector an the back of thePC. Choose the cable type your TV needs.
2 Plug the other end of the cable into the TV INconnector on your TV.
3 Turn on the TV and select the TV IN video source;refer to the documentation for your TV set.
4 Be sure to enable the image for the TV; see “EnablingTV Out Image.”
Connections

14
Existing setup Add the PC with a splitter
Wall
Cable
VCR In
VCR Out
TV In
Splitter In
Splitter Out
TV (in) onback of PC
Coaxialcable
Coaxialcable
Wall
Cable
VCR In
VCR Out
TV In
Coaxial cable
Connecting the TV Signal SourceWhen You Have an Existing SetupThis section describes how to connect the PC to anexisting setup for your TV signal source.
Wall to VCR to TV using coaxial cableRemove the coaxial cable at the input to the VCR, andconnect it to the input of a coaxial cable signal splitter(not included; available at electronics stores). Connecttwo coaxial cables to the splitter outputs. Connect one ofthese cables to the input of the VCR and the other one tothe TV connector on the back of the PC.

15
Existing setup Add the PC with a splitter
Wall
Cable
Coaxialcable
Set-top box/satellite Out
VCR In
VCR Out
TV In
Splitter In
Splitter Out
Remotesensor
Remote sensorcontrol cable
TV (in) onback of PC
Coaxialcable
Coaxialcable
Set-top box/satellite In
Wall
Cable
Set-top box/satellite Out
VCR In
VCR Out
TV In
Set-top box/satellite In
Coaxial cable
Wall to Cable TV Set-top Box orSatellite Box to VCR to TV UsingCoaxial CableRemove the coaxial cable at the input to the VCR, andconnect it to the input of a coaxial cable signal splitter(not included; available at electronics stores). Connecttwo coaxial cables to the splitter outputs. Connect one ofthese cables to the input of the VCR and the other one tothe TV connector on the back of the PC.
Be sure to connect the remote sensor control cableand position it on your set-top box or satellite box.This allows the PC to change the channel on the box.See “Connecting the Remote Sensor.”
Connections
16
Existing setup Add the PC with added cable
Wall
Cable
Set-top box/satellite Out
VCR In
VCR Out
TV In
Remotesensor
Remote sensorcontrol cable
S-VID IN onback of PC
S-video orcompositecable
S-video orcompositecable
Set-top box/satellite In
Wall
Cable
Set-top box/satellite Out
VCR In
VCR Out
TV In
Set-top box/satellite In
Add an s-video or composite cablewith adapter
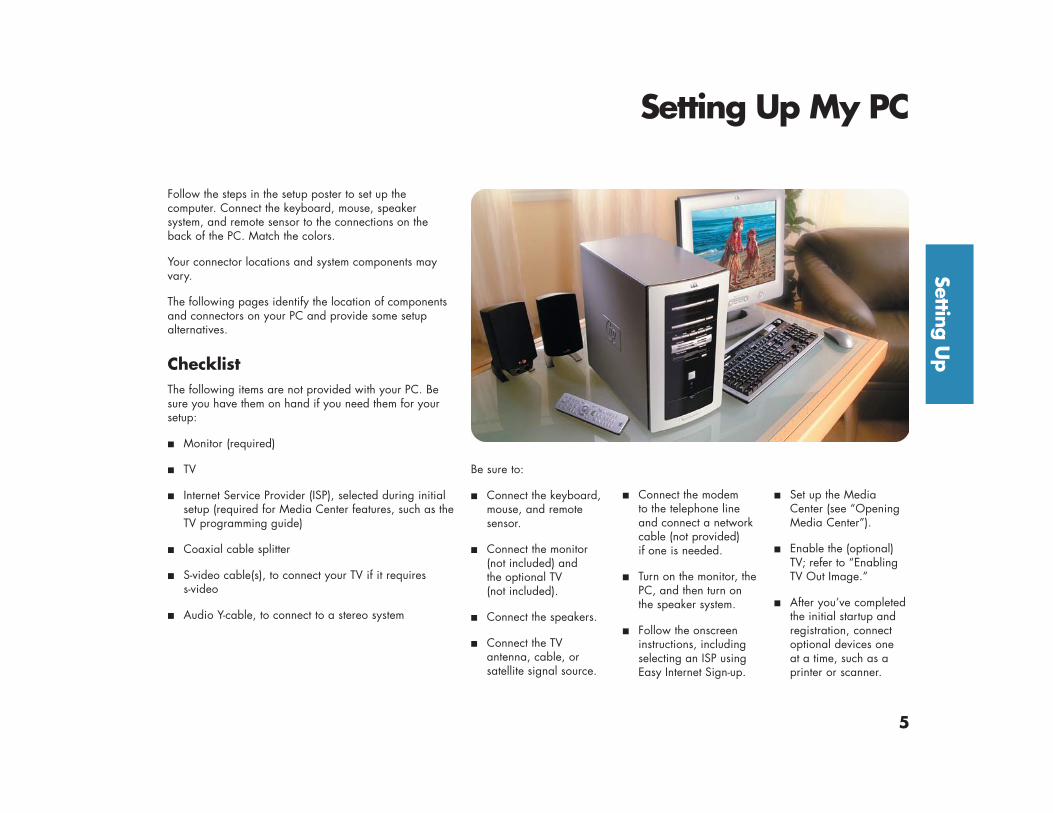
Wall to Cable TV Set-top Box orSatellite Box to VCR and TV UsingS-video Cable or Composite VideoCable Between the Box and theVCR or TV
1 Do not detach any cables from your existing setup.
2 Connect an additional cable:
Using s-video cable (not included): connect anadditional s-video cable to a second output on theset-top box or satellite box. Plug the other end ofthe cable into the S-VID IN connector on the backof the PC.
Or
Using composite video cable: connect an additionalcomposite video cable to a second output on theset-top box or satellite box. Connect the other end ofthe cable to the s-video to composite video adaptercable; connect the adapter to the S-VID IN connectoron the back of the PC.
3 When using a composite video cable, you can alsoplug audio cables (not provided) from your satelliteor set-top box or VCR into the Audio in right (red) andAudio in left (white) connectors on the back of the PC.
4 Be sure to connect the remote sensor control cableand position it on your set-top box or satellite box.This allows the PC to change the channel on the box.See “Connecting the Remote Sensor.”

17
Connecting Your Speakers
Speaker systems are not included in all PC models.Always turn on the PC before you turn on the speakersystem.
The 2.1 speaker system and the 5.1 speaker system arepowered by the sound card that has a suite of softwareapplications from Creative. Creative PlayCenter 3 is anintegrated player for multiple media formats you can useto create various audio formats. Sound Blaster Audigyallows you to set up and audition various audio devices.
To access these programs, click Start, All Programs,Creative, and then click Creative PlayCenter 3 orclick Sound Blaster Audigy. Then, to learn moreabout the programs, choose Creative PlayCenterHelp or choose User’s Guide in Sound Blaster Audigy.
PC Audio ConnectorsThe audio connectors on the back of the PC includeanalog and digital outputs as well as a microphone andan audio input.
Mic (pink) connects to a microphone.
Line in (blue) connects to an analog audio device forsound input to the PC.
Line out-1 (lime green) connects to an active stereo ormulti-channel speaker system such as the 2.1 speakersystem; refer to “2.1 Speaker System” to set up thespeakers.
Line out-1 (lime green) for front speakers, Line out-2(black) for rear speakers, and Line out-3 (orange) forcenter and subwoofer speakers connect to an activemulti-channel six speaker system such as the 5.1 speakersystem; refer to “5.1 Speaker System” for moreinformation.
Digital out (Line out-3, orange) connects to a digitaldevice such as a stereo system with digital input.
To enable Digital out:
Select digital speaker output in AudioHQ Speakersetting: Click Start, All Programs, Creative, SoundBlaster Audigy, and then click Creative AudioHQ.Double-click Speaker. The Surround Mixer windowopens. Select Digital Output Only so that a checkmark appears in the box.
�When DigitalOutput Only isselected, theanalog Line out-2and Line out-3 donot receive anysignals.
IEEE 1394 (6-pin)
Line out-2
Line out-1 Line in
MicrophoneLine out-3 or
Digital out
Spea
kers

18
Connectspeakers tosubwoofer
Place subwoofer on floor
LINE OUT Connect speakers to computer
PREAMP INPUT
**Connector may be black
2.1 Speaker System1 Put the rubber feet on the bottom of the speakers.
2 Place the two speakers on the left and right of yourmonitor or TV.
3 Place the subwoofer on the floor beneath yourcomputer desk or TV. Do not block the side or front ofthe subwoofer, and allow for ventilation to reach therear of the subwoofer. Do not place the subwoofer bythe computer monitor; to avoid interference, place thesubwoofer 10 inches or more away from the monitor.
4 Refer to the setup poster for connecting the2.1 speaker system.
5 You can test the speaker system. Click Start, AllPrograms, Creative, Sound Blaster Audigy,and then click AudioHQ. Double-click Speaker.The Surround Mixer window opens. In the Speakerbox, be sure 2 Speaker shows, or select it from thedrop-down menu. Click Test to test the speakers.
19
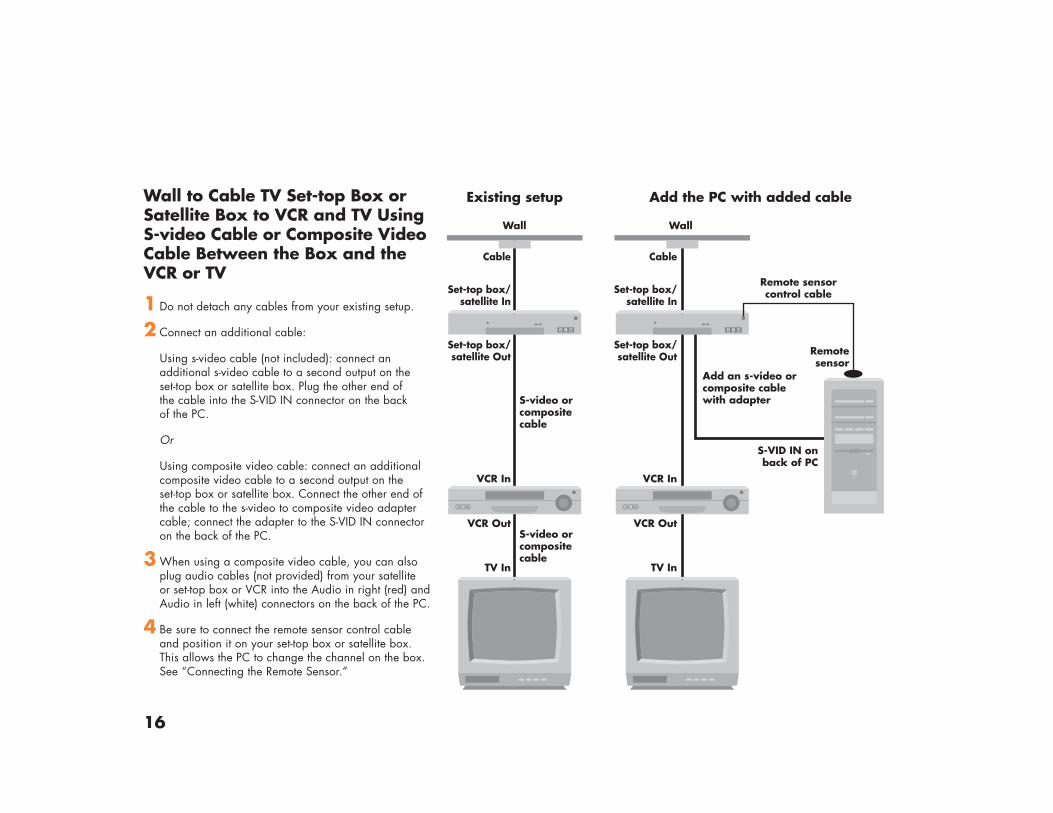
5.1 Speaker SystemBecause your 5.1 speaker system may vary, to set upyour speakers, please refer to the instruction packageincluded with the 5.1 speaker system box.
To connect the 5.1 speaker system, refer to the tablelisting connector information.
Be sure to select the 5.1 speakers by doing thefollowing:
1 Select speakers in the Windows Control Panel:Click Start on the taskbar, choose Control Panel.Click Sounds, Speech and Audio Devices, andthen click Sounds and Audio Devices. TheSounds and Audio Devices Properties window opens.Click Volume tab and under the Speaker settingsclick Advanced button. On the Speakers tab, in theSpeaker setup: box select 5.1 surround soundspeakers from the drop-down menu. Click Apply,and then click OK.
2 Select speakers for DVD Audio in the Media Center:Open Media Center (see “Opening Media Center”).Select Settings, TV/DVD, DVD, and Audio (waitfor the properties window to open). On the iviaudiotab click 6 speaker mode (5.1 channel), selectApply, and then select OK.
3 Select speakers in AudioHQ Speaker setting:Click Start, All Programs, Creative, SoundBlaster Audigy, and then click CreativeAudioHQ. Double-click Speaker. The SurroundMixer window opens. In the Speaker box, select5.1 Speakers from the drop-down menu.
You can also test the speakers; open the CreativeAudioHQ Surround Mixer window (see step 3) andclick Test.
5.1 Plug (color) Connects to back of PC (color)
Front speakers (green) Line out-1 (lime green)Rear speakers (black) Line out-2 (black)Center/subwoofer (orange) Line out-3 (orange)
Line out-2
Line out-1Line out-3 or
Digital out
Spea
kers

20
MicrophoneYour PC comes with a microphone connector on the backof the PC.
Using the microphoneThe microphone connector is pink and is labeled witha microphone icon. It is already set up to work assoon as you plug in your microphone.
HeadphonesYou can connect headphones to Line out-1 (lime green)on the back of the PC, or to the 2.1 speaker system orthe 5.1 speaker system.
For the 2.1 speaker system, look for the headphonesconnector on the right side of the main speaker. Whenheadphones are plugged in, the sound to the speakersand the subwoofer is muted.
For the 5.1 speaker system, look for the headphonesconnector on the right side of the control tower. If thecontrol tower displays HP, the headphones are enabled;the sound to the speakers and the subwoofer is muted.Push and hold the On button on the control tower forseveral seconds to enable sound from the speakers.Press the On button briefly to enable the headphones.
Adjusting the VolumeAdjust the volume for the speaker sound level any ofthese ways:
■ Turn the Volume knob on the keyboard.
■ Double-click the Volume icon on thetaskbar, and then adjust the volume.
■ Adjust the Volume Controls within a program, such asthe Volume buttons on the Media Center navigationbar or on the remote control.
■ Adjust the 2.1 speaker system Volume knobs on themain speaker.
■ Adjust the 5.1 speaker system Volume knobs on thecontrol tower.

21
Starting PC
�Register with HP:
■ Be notifiedof changes andupdates to the PC.
■ Get assistancewith your techni-cal supportneeds.
Starting My PC
Starting the PC for the First TimeAfter you’ve completed connecting the components ofyour PC by using the setup poster steps, you are readyto turn on the computer.
1 Press the Power button on the monitor.
2 Press the On button on the front of the PC.
3 Follow the onscreen instructions for the initialMicrosoft Windows setup.
4 When you see the Register with HP screen, enter yourinformation, completing all of the required boxes.Then click Next to go to the next screen.
�Read “SafetyInformation” atthe beginning ofthis book beforeyou turn on thecomputer.

22
Selecting an ISPAs part of the startup screens, you can select an InternetService Provider (ISP). Before you can connect to theInternet, you need to sign up with an ISP. You need anInternet connection to use some of the Media Centerfeatures.
Easy Internet Sign-up helps you sign up for a new Internetaccount, set up an existing account, or configure Internetaccess using a LAN (local area network), cable modem,or DSL (digital subscriber line).
Open Easy Internet Sign-up:
■ Double-click the easy Internet sign-upicon on the desktop.
Or
■ Click Start on the taskbar, choose All Programs,and click easy Internet sign-up.
The Easy Internet Sign-up screen appears. Follow theonscreen instructions.

23
Starting PCHP Desktop
The HP desktop has shortcut icons that make it easy tofind the things you need. Click the icon to find out moreinformation about its program.
The screen on your computer may not match the screenpictured here.
Click the Start button to open the Start menu. Use thismenu to:
■ Open Media Center by clicking Start on the taskbar,All Programs, Accessories, Media Center, andthen click Media Center again.
■ Select programs or documents.
■ Open the Help and Support Center.
■ Start a search.
■ Run a program.
■ Open the Control Panel to view or change settings.
■ Access the Log Off button to end your currentcomputer session and to switch between users.
■ Access the Turn Off Computer button to turn off thecomputer or to restart it.
Help and Support
Easy Internet Sign-up
Start button Taskbar System tray
Media Center

24
Enabling TV Out ImageYou must enable the TV out image in order to viewMedia Center using your TV. Skip these steps if youare not using a television.
1 Check that the TV is connected to the PC.See “Connecting the TV.” Turn on the TV.
2 If you have Media Center open, close it.
3 Right-click an empty part of the PC desktop andclick Properties.
4 Click Settings tab.
5 Click the Advanced button.
6 Click nView tab.
7 Click the Clone option.
8 Click the Detect Displays button. You will seetwo images (view windows) appear in nView.
9 Click the OK button.

25
Starting PC
TV GUIDE MUSIC PICTURES VIDEOS
Microsoft® Windows® XPMedia Center Edition
user’s guide
hp media center pc
Opening Media Center Open Media Center:
■ Press the Start button on the remote control.
Or
■ Press a Mode button on the front of the PC.
Or
■ Click the Media Center icon on thedesktop.
Or
■ Click Start on the taskbar, chooseAll Programs, Accessories, Media Center,and then click Media Center again.
To find Help in Media Center, press F1 on the keyboardor move the mouse to show the Media Center navigationbar and click Help (the ? button).
To learn more about Media Center, refer to theprinted books about Media Center, included in thecomputer box.
26
�After you’vecompletedregistering, installany softwareprograms thatmay have comeon CDs or DVDsincluded in thecomputer box.
Software ProgramsHP provides software programs and offers to help youuse and enjoy your new computer. To open a program,click its icon on the desktop (select programs) or clickStart, choose All Programs, and then click the folderor program name. Programs and offers may change.
InterVideo WinDVD lets you watch DVD movies andvideo using an interactive menu. Media Center uses thisprogram.
Windows Media Player, from Microsoft, lets youplay, save, and organize your music and audio files.Media Center uses this program. HP includes a30-day trial use of the InterVideo MP3 XPack plug-infor Windows Media Player that allows you to createMP3 format files.
RecordNow lets you write (record) audio or data filesto recordable discs.
Encyclopedia Britannica 2002 On-line is a link tothe Encyclopedia Britannica Web site and includes aone-year free subscription provided by HP.
www.myhpclub.com/sw24 is a special Web sitefor HP Pavilion home PC owners. You will find funprojects, important product notices, support updates,tips, and special offers from HP; just press the HP buttonon the keyboard or enter the address in your InternetWeb browser.
GameChannel is a Web site where you can play cool3-D games from WildTangent. It provides the best onlinegame console available today, and the games areupdated all the time.
ArcSoft ShowBiz lets you transfer and edit full-motionvideo from a variety of sources. You choose video clips,arrange them, and then add titles, scene transitions,music narration, special effects, backgrounds, and more.
HP Picture Toolkit appears within the My Picturesfolder and provides easy access to software and servicesexclusively from HP:
■ Greeting Card Creator creates cards to print andshare
■ Photo Impression edits photos
■ Funhouse combines your photo with fun backgrounds
■ HP Print Creator creates album pages of photos forprinting
■ HP Memories Disc Creator combines photos withsound to store on CD and watch on a home DVDplayer or PC
MyDVD lets you organize your own videos with menus,and by using the hp dvd writer drive (select models),create a DVD disc to watch in a home DVD player.
Detto IntelliMover is a demonstration video for thedata transfer program that moves your e-mail, files,folders, preferences, and settings between PCs. Clickthe link to the Web site http://www.detto.com/hp topurchase the data migration kit (the program and aspecial data cable).

27
Starting PC
Acrobat Reader 5.0 displays documents that are inthe Adobe Portable Document Format (PDF). You cannavigate through the document and print all or part of it.
WordPerfect Productivity Pack providesWordPerfect 10, a word processing program, andQuattro Pro 10, a spreadsheet program, along witha task manager that makes choosing templates easy.For example, you could choose fax in the task managerprogram and it would open the word processor programand present a blank fax form for you to complete.
Quicken Financial Center displays informationabout Quicken tools that are available on your PC andon the Web. You can click Start Quicken On YourComputer to use the New User Edition program that isavailable on your PC. If you have existing Quicken filesthat you want to use, purchase Quicken Deluxe from theQuicken Web site.
Symantec/NAV2002 is the Symantec NortonAntiVirus™ program that scans for viruses and protectsyour PC by removing them. Symantec offers free virusdefinition updates through your Internet connection for90 days after your PC purchase. You can purchase asubscription service for updates after your initial freeperiod expires.
@Backup is a flash demonstration video and a Web siteabout this convenient way to use the Internet to movelarge amounts of information between PCs. You canpurchase the service from the Web site.
28
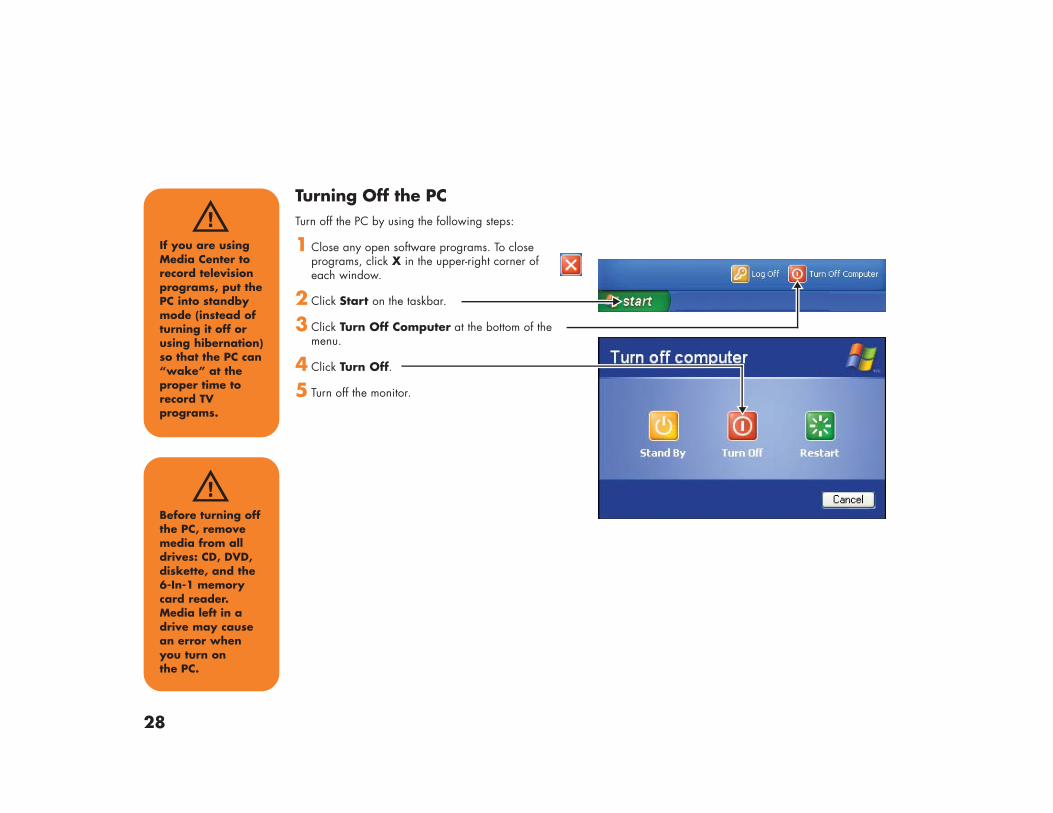
�If you are usingMedia Center torecord televisionprograms, put thePC into standbymode (instead ofturning it off orusing hibernation)so that the PC can“wake” at theproper time torecord TVprograms.
Turning Off the PCTurn off the PC by using the following steps:
1 Close any open software programs. To closeprograms, click X in the upper-right corner ofeach window.
2 Click Start on the taskbar.
3 Click Turn Off Computer at the bottom of themenu.
4 Click Turn Off.
5 Turn off the monitor.
�Before turning offthe PC, removemedia from alldrives: CD, DVD,diskette, and the6-In-1 memorycard reader.Media left in adrive may causean error whenyou turn onthe PC.

29
Starting PCManual Standby Mode
Press the Standby button on the keyboard or theStandby button on the remote control, or brieflypress the On button on the front of the PC. The screengoes dark, and the computer goes into standby mode.The On button on the front of the PC has a powerindicator light that flashes when the PC is in standby.
Or
1 Click Start on the taskbar.
2 Click Turn Off Computer at the bottom of themenu.
3 Click Stand By.
When you want to use the computer again, to make thescreen display reappear just as you left it, do one of thefollowing:
■ On the front of the PC, briefly press the On button.
■ On the keyboard, press the Esc key or the Standbybutton.
■ On the remote control, press and hold the Standbybutton for 1 or 2 seconds and then, when the screendisplay appears, press the Start button.
If the computer does not work properly when you wakeit from standby, reset the PC by pressing and holdingthe On button on the front of the PC for approximately5 seconds until the computer turns off. Then turn thecomputer back on.

30
Manual Hibernation ModeHibernation differs from standby. When the PC entersstandby, it is still active and able to respond to scheduledactivities. When the PC enters hibernation, it copieseverything currently displayed and on the desktop to thehard disk and then turns itself off.
1 Click Start on the taskbar.
2 Click Turn Off Computer at the bottom of themenu.
3 Press the Shift key on the keyboard and clickHibernate. The PC saves everything that is incomputer memory to the hard disk, turns off themonitor and the hard disk, and then turns itself off.
4 When you want to use the computer again, pressthe On button on the front of the PC. The PC returnseverything (programs, folders, and documents) to thescreen.
If the computer does not work properly when you wake itfrom hibernation, restart the PC.
�When youpress Shift, theStand By buttonchanges toHibernate. IfHibernate is notpresent, you firstneed to set upyour PC forhibernation bysetting the PowerOptions in theControl Panel.
�Do not usehibernate if youhave scheduledTV recordings inMedia Center.

31
Starting PC
To automatically put the computer into standby orhibernation mode when the PC is idle, modify the powermanagement settings:
1 Click Start on the taskbar.
2 Click Control Panel.
3 Click Performance and Maintenance,if it is present.
4 Double-click Power Options.
5 Click the Hibernate tab, select the Enablehibernation check box, and then click Apply.
6 Click the Power Schemes tab to set the timers forstandby or hibernation. In the Power Schemes box,select a power scheme from the drop-down list.Choose the timers:
■ To turn on auto-standby for the computer, clicka time (such as After 20 mins) in the Systemstandby list.
■ To turn on auto-hibernate, click a time (such asAfter 1 hour) in the System hibernates list.
7 Click OK.
Automatic Standby or Hibernation Mode
�If both standbyand hibernationtimers are set,the systemhibernates timermust be set fora longer timethan the systemstandby timer.
�Do not useauto-hibernateif you havescheduled TVrecordings inMedia Center;instead,set Systemhibernatesto Never.

32
33
Hard
ware
caps lock
l l
shift shift
A S D F G H J K L
Z X C V B N M <
,
>
.
?
/
:
;
"
'
enter
tab Q W E R T Y U I O P {
[
}
]
|
\
7
home
1
end
0
ins
4 5
9 +pageup
3 enterpagedown
.
del
8
~
`
!
1
@
2
#
3
$
4
%
5
^
6
&
7
*
8
(
9
)
0
_
-
+
=
backspace
ctrl
esc
insert home pageup
numlock
/ *
delete end pagedown
F1 F2 F3 F4 F5 F6 F7 F8 F9 F10 F11 F12 scrollock
prt scrsysrg
pausebreak
ctrlaltalt
2
6
user hp ? photo music video shopping sports finance connect search chat e-mail eject1
eject2
stop
prev next
play pause
rec
volume
+
Using the PC Hardware
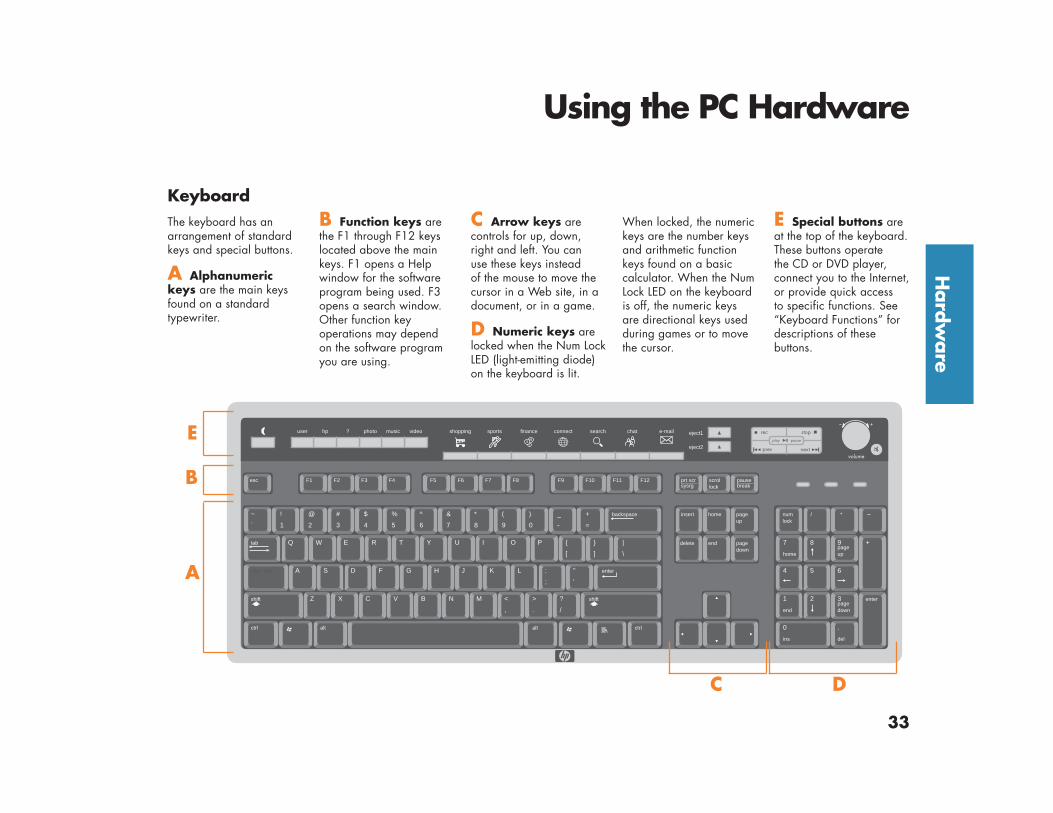
KeyboardB Function keys arethe F1 through F12 keyslocated above the mainkeys. F1 opens a Helpwindow for the softwareprogram being used. F3opens a search window.Other function keyoperations may dependon the software programyou are using.
C Arrow keys arecontrols for up, down,right and left. You canuse these keys insteadof the mouse to move thecursor in a Web site, in adocument, or in a game.
D Numeric keys arelocked when the Num LockLED (light-emitting diode)on the keyboard is lit.
When locked, the numerickeys are the number keysand arithmetic functionkeys found on a basiccalculator. When the NumLock LED on the keyboardis off, the numeric keysare directional keys usedduring games or to movethe cursor.
E Special buttons areat the top of the keyboard.These buttons operatethe CD or DVD player,connect you to the Internet,or provide quick accessto specific functions. See“Keyboard Functions” fordescriptions of thesebuttons.
The keyboard has anarrangement of standardkeys and special buttons.
A Alphanumerickeys are the main keysfound on a standardtypewriter.
A
B
E
C D

34
user hp ? photo music video
Keyboard FunctionsAccess buttons
Log off orswitch users
Put PC into or outof standby
(power saving)mode
Connect toHP Web site
OpenHP Picture
Tool Kit
OpenMy Video folder
Open Help andSupport Center
OpenMy Music folder

35
Hard
ware
Configure the keyboard buttons
shopping sports finance connect search chat e-mail
5 In the KeyboardProperties windowthat opens, click theButtons tab.
6 Double-click thebutton you want tochange. The buttonconfiguration windowopens.
1 Click Start on thetaskbar.
2 Choose ControlPanel.
3 Click Printers andOther Hardware,if it is present.
4 Double-clickKeyboard.
7 Choose the buttoncapability from thedrop-down list. Enterthe Display label andAddress information.(For a Web site,enter the completeWeb site URL in theAddress box.)
8 Click OK.
9 On the Buttons tab,click Apply.
10 Repeat steps 6through 9 for otherbuttons.
11Click OK when youare finished.
Internet buttons(back-lit display)
Open yourInternet browser
Open anHP-related Website for chatting
Search the Internet Open your e-mailGo to popular Web sites
36
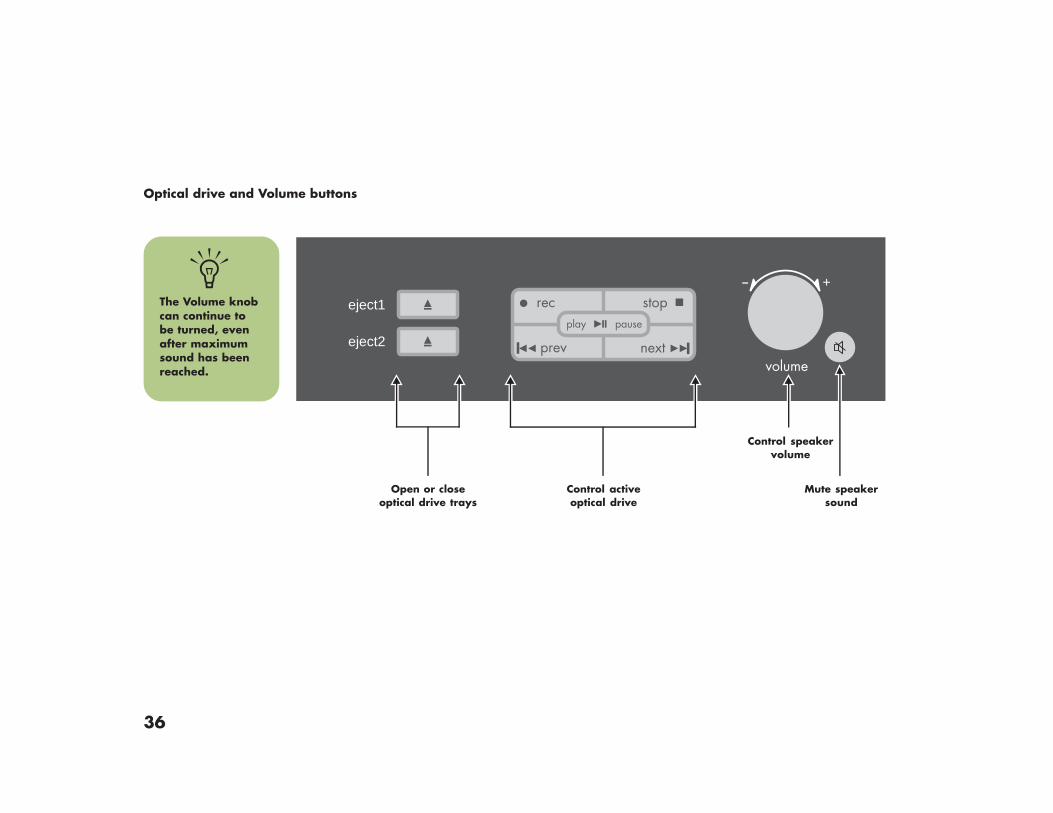
Optical drive and Volume buttons
l l
eject1
eject2
stop
prev next
play pause
rec
volume
+
Control speakervolume
Mute speakersound
�The Volume knobcan continue tobe turned, evenafter maximumsound has beenreached.
Open or closeoptical drive trays
Control activeoptical drive

37
Hard
ware
MouseYour PC includes anoptical scrolling mouse.When you move themouse, it uses light andan optical sensor, insteadof a roller ball, to sensemovement. Use the opticalmouse on an opaquesurface.
Using themouse buttonsLike an ordinary mouse,the scrolling mouse hastwo buttons on the top:the left button, called theprimary button, and theright button, called thesecondary button.
Click the left mouse buttonto position the cursor orto select an item. Clickthe right mouse buttonto display a menu ofcommands available forthe item you clicked.
Dragging anddroppingYou can click and drag anitem to move it.
�The optical mousecannot work on aglass, translucent,or reflectivesurface.
1 Left-click the item, andthen press and holddown the left mousebutton.
2 Move the mouse toposition the cursor; theitem is dragged along.
3 Release the buttonto drop the item intoplace.
If you press and holddown the right mousebutton when you click anddrag, a menu appearswhen you release thebutton to drop the item.The menu lets you move,copy, or create a shortcutfor the item.
Changing forleft-handed useYou can change theconfiguration of theprimary and secondarymouse buttons for left-handed use. Refer to“Reverse your mousebuttons” in the onscreenHelp and Support Center.
ScrollingUse the wheel button inthe middle of the mouseto scroll or select items.You can use the scrollingmouse to scroll, toautoscroll, or to pan.
To scroll:
1 Click the left mousebutton to place thecursor in a document.
2 To scroll toward thebeginning of thedocument, roll themouse wheel up(away from you).To scroll toward theend of a document,roll the wheel down(toward you).
To pan:
1 Place the cursor in thedocument. Press andhold down the mousewheel button.
2 Slowly move themouse in the directionyou want to scroll.The farther you movethe pointer from thestarting point, the fasterthe document pans.
3 To stop panning,release the wheelbutton.
To autoscroll:
1 Place the cursor in thedocument next to thetext where you wantto begin scrolling andpress the wheel buttononce. An autoscrollicon appears.
2 To begin autoscrolling,move the mouse in thedirection you want toscroll. The farther youmove the pointer fromthe starting point, thefaster the documentscrolls.
3 To stop autoscrolling,press the wheel buttonagain.
Right
Scroll
Left

38
45˚
26 feet(8m)
Remote Control Use the remote control to open the Media Centerprogram and use it to view television, record televisionprograms, play previously recorded TV programs, andplay music, movies, or video.
To use the remote control, simply point it at the remotesensor and press the Start button.
Use the remote control at a maximum distance of26 feet from the remote sensor and at a maximum of22.5 degrees (45 degrees total) off center of the remotesensor.
�Refer to theMedia Centerbooks included inthe computer boxfor informationon using MediaCenter and theremote control.
Start
39
Hard
ware
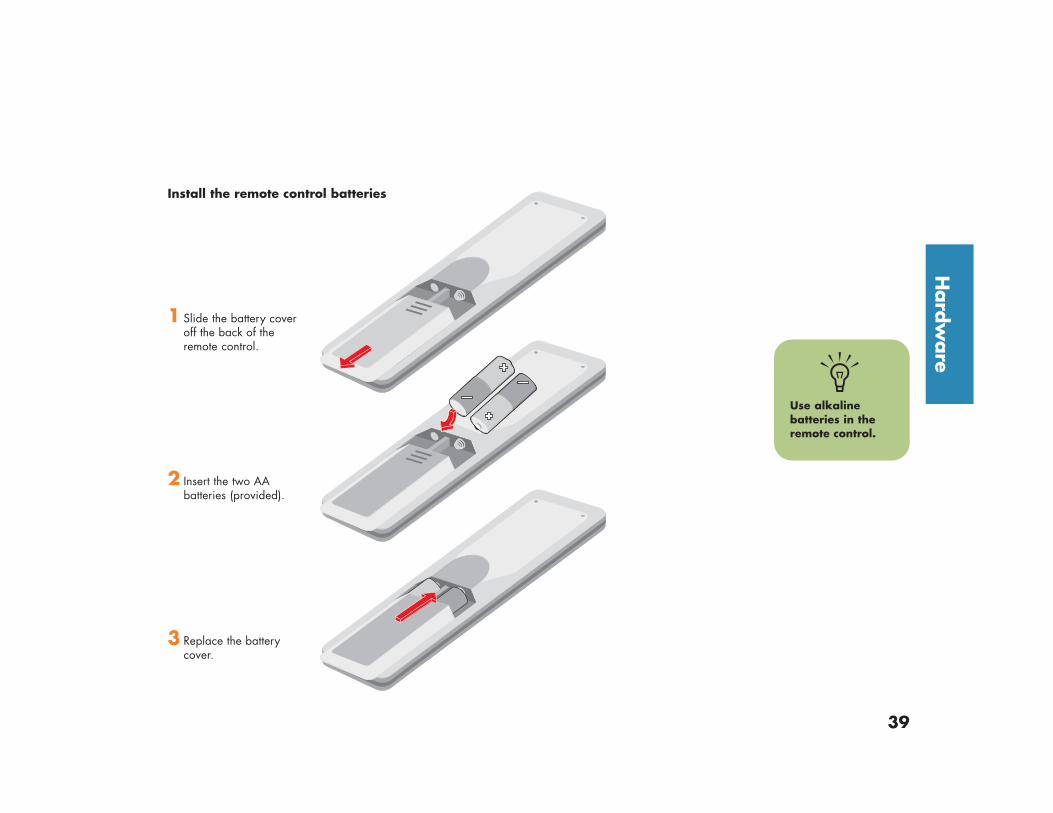
Install the remote control batteries
1 Slide the battery coveroff the back of theremote control.
2 Insert the two AAbatteries (provided).
3 Replace the batterycover.
�Use alkalinebatteries in theremote control.

40
Remote Control Buttons Overview
� Standby puts the PC into a powerreduced state called standby. An LEDlocated under the Standby button blinkswhen the remote control is transmitting asignal to the remote sensor. You must pressStandby for 1–2 seconds.
� This button has no function.
� Music opens My Music window.
� Recorded TV opens Recorded TVwindow.
� Record records selected televisionprogram and stores it on the hard disk.
� REW (Rewind) moves the mediabackward.
� Replay moves media backward, onemusic track or one DVD chapter at a time.
� Pause pauses audio or video track, orpauses live or recorded TV programs.
Back returns PC to the previous windowwithin Media Center.
Arrow buttons move cursor to navigatewithin all Media Center windows.
� Live TV is a shortcut to the full screen viewof live TV. It also moves to the current pointin live TV program after pausing live TV.
� Details displays available informationabout TV program.
Volume increases (+) and decreases (-)computer sound.
� Clear deletes selection and works as thebackspace button does on a keyboard.
� TV opens My TV window.
� Pictures opens My Pictures window.
� Video opens My Videos window.
� Play plays selected media.
� Stop stops media currently playing orrecording.
� FWD (Fast forward) moves mediaforward.
Skip moves media forward, for exampleone music track or one DVD chapter.
Guide opens Television Program Guideto display available TV channels andprograms to watch and record.
OK selects desired action or windowoption. It acts as the Enter key. If watchingTV in full screen mode, pressing OKswitches back to the previous channelwatched. Press again to toggle back. Itacts the same way as a jump button onsome TV remote controls.
DVD Menu opens main menu on a DVDmovie if DVD is already playing and if amenu is available.
Start opens Media Center to the mainStart menu.
Channel/Page up (+) and down (-)changes TV channel or moves page up anddown, depending on available options.
Mute turns computer sound off.
0 to 9 changes channels or enters text intoMedia Center search or text box.
Enter selects desired action or windowoption.

41
Hard
ware
�There can be adelay of severalseconds afterinserting a CDor DVD untilthe appropriateprogram opens.
CD and DVD Drives
■ Do not touch theunlabeled side of a CDor place the unlabeledside down on yourdesk. Doing so couldscratch the surface ofthe CD.
■ Store CDs at roomtemperature.
Inserting aCD or DVD
1 Make sure thecomputer is on. (If thePC is in standby mode,the On button lightflashes; press the Esckey on the keyboardto wake the PC.)
2 Press the Eject buttonon the drive to ejectthe tray. (Or, pressthe Eject button for thedrive on the keyboard.)
3 Holding on to thedisc edges only,gently place the discin the tray with thelabel facing up.
Your PC comes with oneor two of the followingoptical drives:
■ CD-RW
■ DVD-ROM
■ DVD+RW/+R
■ combo (DVD/CD-RW)
A CD-RW drive may belabeled cd writer plus.A DVD+RW/+R drivemay be labeled dvd writer.The combo drive may belabeled dvd/cd writerplus.
Handling aCD or DVDTo avoid damaging CDsor DVDs, follow theseguidelines:
■ Return the disc to thecase when you arefinished using it.
■ Handle the disc byits outside edges orcenter hole only.
4 Close the disc trayby gently pushing thetray into the computer.(Or, press the Ejectbutton for the driveon the keyboard.)
Eject button
Push to close

42
cd writer plusThe cd writer plus is a CD-RW drive.It can play music CDs, read data CDs,run CD-based software, create, or write,music and data CDs, and copy CDs.
Using the cd writer plusWhen you insert a disc into the drive,the computer automatically detects thetype of disc.
■ If you insert a software program ordata CD, it is available for use.
■ If you insert a music CD, a programopens so you can play the CD.
■ If you insert a blank recordable disc(CD-R or CD-RW), you can useRecordNow to copy files to yourblank CD.
dvd writerThe dvd writer is a DVD+RW/+R drive.It can play movie DVDs and music CDs, readdata CDs and DVDs, and record files toDVD+RW, DVD+R, CD-R, and CD-RW discs.
Using the dvd writerImportant: There are two types of DVDrewritable discs: DVD-RW and DVD+RW.DVD-RW discs do not work in the DVD+RWdrive.
When you insert a disc into the dvd writerdrive, the computer automatically detects thetype of disc.
■ If you insert a software program ordata CD or DVD, it is available for use.
■ If you insert a music CD, a programopens so you can play the CD.
■ If you insert a DVD movie, a programopens so you can play the DVD.
■ If you insert a blank recordable disc(DVD+RW, DVD+R, CD-R, or CD-RW),you can use the software programsprovided with the drive to copy filesto your blank disc.
DVD-ROM DriveThe DVD-ROM drive can play movie DVDsand music CDs, read data DVDs and CDs,and run CD-based and DVD-based softwareprograms.
Using the DVD-ROM driveWhen you insert a disc into the DVD-ROMdrive, the computer automatically detects thetype of disc.
■ If you insert a software program ordata CD or DVD, it is available for use.
■ If you insert a music CD, a programopens so you can play the CD.
■ If you insert a DVD movie, a programopens so you can play the DVD.

43
Hard
ware
dvd/cd writer plus(Combo) DriveThe dvd/cd writer plus is a DVD/CD-RWdrive. It can play music CDs, read dataDVDs and CDs, run CD-based andDVD-based software programs, create,or write, music and data CDs, copy CDs,and play DVD movies.
Using the combo driveWhen you insert a disc into the combodrive, the computer automatically detectsthe type of disc.
■ If you insert a software program ordata CD, it is available for use.
■ If you insert a music CD, a programopens so you can play the CD.
■ If you insert a DVD movie, a programopens so you can play the DVD.
■ If you insert a blank recordable disc(CD-R or CD-RW), you can useRecordNow to copy files to yourblank CD.
Opening theRecordNow programRecordNow is a program that copies andcreates CDs and DVDs using your cd writeror dvd writer drives.
1 Click Start on the taskbar.
2 Choose All Programs.
3 Click RecordNow.
4 Click RecordNow again.
For information about recording onto CDs,refer to the Help menu in the RecordNowprogram.
Diskette (Floppy) DriveThe diskette (floppy disk) drive can read andwrite diskettes.
Using the diskette driveInsert the diskette into the drive until it locksin place. Make sure you insert the diskettewith the round metal disk face down and thearrow on the top pointing into the drive.
You can copy files from or to the diskette.
When you are done, check that the light onthe drive is not lit, indicating that the PC isnot writing to the diskette, and then pressthe Eject button on the PC and remove thediskette.

44
6-In-1 Memory Card ReaderThe 6-In-1 memory card reader (select models) can readand write six types of memory media.
Using the 6-In-1 memory card reader
1 Insert the media into the card slot on the reader untilit stops and locks into place.
2 The light on the reader lights and the computerautomatically detects the media.
3 The computer opens a program so you can accessthe media contents. You can copy files from or to themedia.
4 When you are done, check that the light on the driveis not lit, indicating that the PC is not writing to themedia, and then remove the media.
In-use light
Memory StickCompactFlash ICompactFlash IIor Microdrive
SmartMediaMultiMediaCard orSecure Digital (SD)
�You can placemedia in oneor more of thecard readerslots and accesseach mediaindependently.Each drive has itsown drive letter.
�Do not try toinsert or removemedia when theIn-use light is lit.Doing so maycause data loss.

45
Upgra
dingUpgrading and Servicing
You can upgrade or replace several components in yourcomputer yourself. Review this chapter for the procedureson accessing and installing parts of your computer.
Preparing the ComputerRead the following items before attempting to open orservice the computer:
■ These procedures assume familiarity with the generalterminology associated with personal computers andwith the safety practices and regulatory compliancerequired for using and modifying electronicequipment.
■ HP recommends that you use an antistatic wrist strapand a conductive foam pad when working on thecomputer.
�Alwaysdisconnect themodem cord fromthe telephonesystem, and thendisconnect the PCfrom the powersource beforeremoving yourcomputer cover.Failure to do sobefore you openthe PC or doany procedurescan result inpersonal injury,or equipmentdamage.
�Read “SafetyInformation” onpage iii.

46
Removing the Side Panels1 Loosen the two thumbscrews on the right side of the
back panel. (You may need a flathead screwdriver.These screws do not detach; they’ll stay on the sidepanel loosely until you tighten them again.)
2 Pull the panel toward you until it stops. Lift the paneloff the chassis and set it aside.
3 If you are replacing an optical drive, remove theother side panel in the same manner. Note that thescrews on this panel detach and are loose from thepanel.
4 Gently lay the computer on its side. (Skip this step ifreplacing an optical drive.)
Replacing the Side Panels1 To replace the side panel, align the notches on the
panel with the holes on the chassis, slide the sidepanel forward until it locks in place, and then tightenthe thumbscrews on the side panel.
2 Repeat for the other side panel if it was removed.
3 Reconnect (in this order) the power cord, themodem/telephone cable, and then all other cables.
Thumbscrew
Thumbscrew

47
Upgra
ding
Locating Components in the PC Chassis
Fan duct
Expansion (Add-In)cards slots
1st optical drive bay
2nd optical drive bay
Memory sockets
6-In-1 memory cardreader
Drive cage with 3 drives(top to bottom):Hard disk drive
Diskette (floppy) drive
Power supply

48
Release tabs
Fan duct
Removing the Fan DuctRemove the fan duct when replacing memory, an opticaldrive, or the drive cage.
1 To disengage the fan duct, push down the two tabs.You can push with your fingers or a pen.
2 Rotate the fan duct down and out to remove it fromthe chassis.
Replacing the Fan Duct1 To replace the fan duct, hold the fan duct at a
45-degree angle, and align the bottom of the ductwith the slot on the fan holder.
2 Rotate the fan duct into position. Make sure it issecurely locked.

49
Upgra
ding
Accessing the Optical DrivesTo access the optical drives, you remove the side panels,the front panel, and the fan duct.
1 Remove both side panels. (See page 46.)
2 To release the front panel, locate the three small tabson each side of the chassis. Press each tab awayfrom the center of the chassis. Press the top pair, themiddle pair, the bottom pair, and then remove thepanel. Reverse this step to replace the front panel.
3 Remove the fan duct. (See page 48.)
Release tab(3 each side)

50
Removing the Optical DriveYour computer comes with one or two optical drives(CD, DVD, or combo) which you can replace orupgrade. These drives are located in the two fixed baysat the top of the chassis.
When you are removing the top optical drive, to havebetter access to the back of the drive, remove the twoscrews on both optical drives and push both drives partway out through the front of the computer.
1 Locate the two screws on the optical drive andremove them. Push the drive partway out through thefront of the computer.
2 Remove the cables attached to the back of the driveyou want to replace. Make note of each connectionand the plug orientation before disconnecting thecables.
3 Pull the drive out through the front of the computer.
Screw (2)

51
Upgra
ding
CS SL MA
Installing a New Optical Drive1 Make sure the jumper on the new drive is in the CS
(Cable Select) position. Slide the new optical drivethrough the front of the computer. Don’t slide the drivein all the way — you need room to attach the cables.
2 Connect the cables to the back of the drive.
3 Push the drive all the way in, align the screw holes,and insert the screws.
4 Replace the fan duct (see page 48), the front panel(see page 49), and the side panels (see page 46).
Example drive withCable Select jumperinstalled (your drivemay vary)
�A jumper is asmall plasticconnector or wirewhich electricallyconnects two pinsin order to definea configurationsetting.

52
Replacing and Adding DrivesYou can replace the drives that are located in theremovable drive cage: hard disk drive, 6-In-1 memorycard reader (select models), and diskette (floppy) drive.On PCs with no 6-In-1 memory card reader, you canadd a second hard drive by installing it into the drivecage.
Removing the drive cage
1 Remove the fan duct. (See page 48.)
2 Remove the cables from the back of the drivesthat are in the removable drive cage. Make noteof each connection and the plug orientation beforedisconnecting the cables.
3 If you do not have a 6-In-1 memory card reader, skipto step 5. If you have a 6-In-1 memory card reader,continue with step 4.
4 Remove the two screws that secure the 6-In-1 memorycard reader in the drive cage. From the front of thechassis, push the reader into the drive cage.
5 Push down on the drive cage release tab, and hold itdown as you rotate the cage up and lift it out of thechassis. Cover the front of the cage as you lift it outso that the 6-In-1 memory card reader does notslide out.
Release tab
6-In-1 memory cardreader screw (2)

53
Upgra
ding
R e p l a c i n g t h e d r i v e c a g e 1
C o v e r t h e f r o n t o f t h e c a g e a s y o u l i f t i t s o t h a t t h e6 - I n - 1 . m e m o r y c a r d r e a d e r d o e s n o t s l i d e o u t . 2H o l d t h e d r i v e c a g e a t a 4 5 - d e g r e e a n g l e a n d p l a c et h e t w o n u b s o n t h e c a g e i n t o t h e t w o g u i d e s o n t h e
c h a s s i s . 3
A l i g n t h e t r a c k o n t h e t o p o f t h e d r i v e c a g e w i t h t h e
t r a c k g u i d e ( o n b o t t o m o f o p t i c a l d r i v e b a y ) . P u s h t h ed r i v e c a g e f i r m l y t o w a r d t h e t r a c k g u i d e t o e n g a g e i t
a s y o u r o t a t e t h e d r i v e c a g e d o w n i n t o p o s i t i o n . T h er e l e a s e t a b s h o u l d l a t c h . ( I f y o u c a n r e m o v e t h e c a g e
b y p u l l i n g u p o n i t , t h e t r a c k d i d n o t p r o p e r l y e n g a g et h e t r a c k g u i d e . R e p e a t t h e s t e p s t o r e p l a c e t h e d r i v e
c a g e . ) 4
P u s h t h e 6 - I n - 1 . m e m o r y c a r d r e a d e r t o w a r d t h e f r o n t
o f t h e c h a s s i s u n t i l t h e t w o s c r e w h o l e s a l i g n w i t h t h ed r i v e c a g e . ( Y o u m a y h a v e t o p u s h d o w n t h e f r o n t
o f t h e r e a d e r a s y o u s l i d e i t o u t i n t o t h e f r o n t p a n e l . )R e p l a c e t h e t w o s c r e w s t h a t s e c u r e t h e 6 - I n - 1 . m e m o r y
c a r d r e a d e r . 5
R e a t t a c h t h e c a b l e s t o t h e b a c k o f t h e d r i v e s . 6R e i n s t a l l t h e f a n d u c t . ( S e e p a g e 4 8 . )T r a c k g u i d eN u b o nd r i v e c a g e
N u b g u i d ei n c h a s s i s ( 2 )T r a c k o n
d r i v e c a g e

54
Removing and replacing the diskette driveor the 6-In-1 memory card readerTo ensure that the drive fits properly into the chassis,be sure to purchase the replacement drive from HP.
1 Remove the drive cage. (See page 52.)
2 Remove the two screws that secure the diskette drivein the drive cage: one screw on each side of thedrive cage. (The screws for the 6-In-1 memory cardreader were removed when the drive cage wasremoved.)
3 Pull the drive out of the drive cage. Slide thereplacement drive into the drive cage.
4 For the diskette drive, attach the screws: one oneach side of the drive cage. (The screws for the6-In-1 memory card reader are replaced when thedrive cage is replaced.)
5 Replace the drive cage. (See page 53.)
Removing and replacing thepreinstalled hard driveYou must remove the hard drive from the chassis if youwant to replace it with a higher capacity drive or if youwant to safeguard your data when sending the computerout to be repaired.
1 Remove the drive cage. (See page 52.)
2 Remove the three screws that secure the hard drivein the drive cage: two screws on the latch side of thedrive cage and one screw on the opposite side.
3 Pull the hard drive out, and store the drive and screwsin a safe location.
4 To replace the hard drive, reverse these steps. Makesure the jumper on the new hard drive is in the CS(Cable Select) position. (See figure on page 51).

55
Upgra
ding
CS SL MA
SLAVE
MASTER
Installing a second hard driveIf your PC model does not have a 6-In-1 memory cardreader, the bottom slot of the drive cage is empty andcan accommodate an additional 3.5-inch hard drive.
1 Remove the drive cage. (See page 52.)
2 Make sure the jumper on the new hard drive is in theCS (Cable Select) position. Slide the new drive intothe empty slot in the drive cage until the screw holesalign.
3 Install the two screws.
4 Replace the drive cage. (See page 53.)
5 Attach the power cable to the back of the drive.
6 Attach the connector marked Master on the IDEribbon cable to the back of the preinstalled harddrive. After the preinstalled hard drive connectionis attached, twist the remaining part of the cable,marked Slave on that same IDE ribbon cable, andconnect it to the second hard drive.
7 If necessary, connect the IDE cable connector markedMotherboard or CPU board to the motherboard.
�A jumper is asmall plasticconnector or wirewhich electricallyconnects two pinsin order to definea configurationsetting.
Example drive with Cable Select jumperinstalled (your drive may vary)

56
DIMM
DDR DIMM
Adding MemoryThe motherboard contains sockets for either DIMMs(dual in-line memory modules) or DDR (double data rate)DIMMs, depending on which PC model you have.
To determine which type of memory moduleyour PC uses, go to the HP Web site by typinghttp://www.hp.com into your Web browser address boxand pressing Enter on your keyboard. Click the supportlink. Search for your PC model number, and then searchfor upgrading memory to find out your systemconfiguration and memory requirements.
The motherboard contains 168-pin DIMM sockets or184-pin DDR DIMM sockets. The exact number of socketsdepends on which model you have.
�256 MB memoryconfigurationsvary dependingon your computermodel. 256 MBand 512 MBDIMM memorymodules are notcompatible withall computermodels.
DIMMsDIMMs must be 168-pin unbuffered SDRAM(synchronous dynamic random access memory),compliant with the Intel® PC SDRAM Unbuffered DIMMSpecification. The PC comes with one or more memorymodules, but you can replace existing memory moduleswith higher capacity ones. You can install 64 MB,128 MB, 256 MB, or 512 MB memory modules inthe PC.
DDR DIMMsDDR DIMMs must be 184-pin unbuffered DDR SDRAM.The PC comes with one or more memory modules,but you can replace existing memory modules withhigher capacity ones. You can install 64 MB, 128 MB,256 MB, or 512 MB memory modules in the PC.
�Using the wrongtype of memorymodule coulddamage the PC.

57
Upgra
ding
Removing a memory module
1 Remove the fan duct. (See page 48.)
2 Locate the memory sockets on the motherboard.Move any cabling out of the way, if necessary.
3 Push down the two retaining clips on the ends ofthe socket until the memory module pops out of thesocket.
4 Holding the memory module by its top edge orside edges only, lift it away from the socket. Storeit in antistatic packaging.
�Do not pull thememory moduleout of the socket.Use the retainingclips to eject themodule.
�Avoid touchingthe memory chipsor the goldcontacts on themodule.
Installing a memory module
1 Push down the two retaining clips on the ends of thememory socket.
2 Holding the new memory module by its top edgeor side edges only, remove it from the antistaticpackaging.
3 Position the memory module in alignment with thesocket (the one or two small notches on the loweredge of the module fit into the raised bumps in thesocket). Push straight down on top of the memorymodule until it is fully seated in the socket. The socketretaining clips automatically lock it into position whenthe memory module is fully seated.
4 Replace the fan duct. (See page 48.)

58
Removing Add-In Cards1 Disconnect any external and internal cables attached
to the card.
2 Loosen the screw on the bracket of the card you arereplacing.
3 Hold the metal bracket and the far top corner of thecard. Carefully remove the card by pulling the cardstraight out of the expansion slot.
Replacing Add-In Cards1 Insert the new card into the slot and push straight
down. Make sure the card is properly seated.
2 Attach the screw to secure the card you havereplaced.
3 Connect any internal cables to the card.
�Be careful of thesharp edges onthe expansionslot cover.
�Do not overloadthe PC byinstalling add-incards that drawexcessive current.The chassis isdesigned toprovide 2 amps(average) of +5 Vpower for eachboard or card inthe chassis. Thetotal +5 V currentdraw in a fullyloaded chassis(one with alladd-in card slotsfilled) must notexceed the totalnumber of slotsmultiplied by2 amps.

59
Troubleshooting
Troubleshooting
For help on general and miscellaneous problems you may be experiencing withthe PC, refer to the following pages for possible solutions. Look up the descriptionof the problem and try the solution listed. For more detailed information, press theHelp button on your keyboard, or click Start on the taskbar and select Help andSupport.
My computer won’t turn on at all. ■ When you press the On button on the front of thecomputer, the following events should happen:
1 The keyboard indicator lights flash.
2 The light next to the diskette drive flashes.
3 The hard disk spins or the diskette drive makesa noise.
4 The computer makes one beep indicating it isoperating properly.
■ If the computer doesn’t go through the previousprocedure, check the following:
1 The power cord and all cables are securelyplugged into the computer.
2 The power cord is plugged into a grounded outlet.Check to see whether the outlet works by plugginganother item into it.
3 The monitor is connected to the computer, pluggedin, and turned on.
Problem Solution
�Your system isprovided witha voltage selectswitch for use ina 115 or 230 VACpower system.The voltage selectswitch has beenpre-set to thecorrect voltagesetting for usein the particularcountry/regionwhere it wasinitially sold.Changing thevoltage selectswitch to theincorrect positioncan damage yourPC and void anyimplied warranty.

60
Problem Solution
I installed a new printer or other device,and it won’t work.
■ Be sure that you installed the device drivers that came with the new device.
■ You may need an updated driver for Windows XP. For non-HP peripherals,contact the vendor directly. For HP peripherals, visit the HP Web site. Refer toyour Support Guide for details.
The computer (or part of it) doesn’t seem tobe working.
■ When the computer is in standby mode (the On button power indicator light isflashing), moving the mouse will not wake it. Instead, press the Standby button onthe keyboard or the Standby button on the remote control.
■ Try restarting the computer as follows:
1 Click Start on the taskbar.
2 Click Turn Off Computer.
3 Click Restart.
■ If the computer shows no response to mouse or keyboard actions, reset thecomputer:
1 Press and hold the On button until the computer turns off.
2 Wait a few seconds, and turn the computer back on.
■ A software program, software driver, or the operating system software may becorrupted, erased, or damaged. You can use application recovery or systemrecovery to reinstall the software. Refer to “Using Application Recovery andSystem Recovery.”
(continued)
�Using the Onbutton to resetthe PC is notrecommendedand should beused only as alast resort.

61
Troubleshooting
Problem Solution
The computer (or part of it) doesn’t seem tobe working. (continued)
■ It’s possible that a voltage spike, power outage, or brownout has occurred.Symptoms of voltage spikes include a flickering video display, unexpected computerstartups, and the computer not responding to your commands. A voltage spike canoccasionally corrupt or destroy files, so it is a good idea to consistently makebackup copies of your data files. Prevent voltage spikes by installing a surgesuppressor made for use with computers between the power outlet and the computerpower cord.
The computer doesn’t make any sound. ■ Press the Mute button on the keyboard to see if the Mute feature is turned on.
■ Use the keyboard controls to increase the volume.
■ Click the Volume icon on the taskbar. Increase the volume, and make sure theMute box is not checked.
■ If your speakers have a power button, check whether it is turned on and whether thepower supply is connected to the power source.
■ Check the speaker connections.
■ Remove the headphone connection.
When I push one of the special ormultimedia buttons on the keyboard,nothing happens.
Check the button configuration. To configure the button:
1 Click Start on the taskbar.
2 Click Control Panel.
3 Click Printers and Other Hardware, if it is present.
4 Double-click Keyboard.
(continued)

62
Problem Solution
When I push one of the special ormultimedia buttons on the keyboard,nothing happens. (continued)
5 In the Keyboard Properties window that opens, click the Buttons tab.
6 Double-click the button you want to change. The button configuration windowopens.
7 Choose the button capability from the drop-down list. Enter the Display label andthe Address information. (For a Web site, enter the complete Web site URL in theAddress box.)
8 Click OK.
9 On the Buttons tab, click Apply.
10 Repeat steps 6 through 9 for each button you want to configure.
11 Click OK when you are finished configuring the keyboard.
My keyboard doesn’t work even though thecomputer and monitor seem to work.
■ If the PC beeps repeatedly or if nothing happens when you press keys, it’s possiblethat the keyboard is connected improperly.
USB keyboards only: Make sure the keyboard is firmly connected to the USB porton the back or front of the computer. Try unplugging and replugging the keyboardcable.
PS/2 keyboards only: Check that the cable connector pins are straight. Make surethe keyboard is connected to the keyboard port, not to the mouse port. If you needto reconnect these two cables, turn the computer off, reconnect the cables, and thenturn the computer back on.
■ Try restarting the computer: Click Start, select Turn Off Computer, and clickRestart. If that doesn’t work, press and hold the computer On button until thecomputer turns off (approximately five seconds). Then turn the computer back on.

63
Troubleshooting
Problem Solution
■ Make sure the monitor is turned on — it has its own power button.
■ Adjust the brightness and contrast controls on the monitor.
■ Check the connection of the power cord into the monitor.
■ Check the cable connection between the monitor and the computer. The cableconnectors must be pushed in all the way.
■ Make sure the monitor power cord is plugged into a grounded outlet. Check to seewhether the outlet works by plugging another item into it. (If the light on the front ofthe monitor is lit, the monitor is getting power.)
The monitor doesn’t work, even though thecomputer appears to.
The mouse doesn’t work, even thougheverything else does.
■ If nothing happens when you move the mouse, it’s possible that the mouse isconnected improperly.
USB mouse only: Make sure the mouse is firmly connected to the USB port. Tryunplugging and replugging the mouse cable.
PS/2 mouse only: Check that the cable connector pins are straight. Make sure themouse is connected to the mouse port, not to the keyboard port. To reconnect thesetwo cables, turn the computer off, reconnect the cables, and then turn the computerback on.
(continued)

64
Problem Solution
The mouse doesn’t work, even thougheverything else does. (continued)
■ If the pointer doesn’t move on the screen when you move the mouse, clean themouse. For an optical mouse, wipe the light sensor lens on the bottom of the mousewith a lint-free cloth. For a roller ball mouse:
1 Remove the mouse ball by unscrewing the bottom of the mouse.
2 Clean the mouse ball with a damp cloth (not paper).
3 Use your finger to move the rollers in the mouse ball housing and remove lintand dust.
4 Replace the mouse ball and screw on the cover.
■ The computer might have stopped. Reset the computer by pressing and holdingthe computer On button until the computer turns off (approximately 5 seconds).Then turn the computer back on.
USB Hub Power Exceeded error. Change the USB power support under Global Preferences on the Buttons tab of theControl Panel Keyboard settings.
I cannot remove a CD or DVD. You cannot remove a CD or DVD after you have turned off the computer. Turn on thecomputer and press the Eject button to extend the tray.
I am using a TV with Media Center, butI cannot see anything.
■ Check that the TV is connected to the PC; see “Connecting the TV” on page 13.
■ Check that the TV out image is enabled; see “Enabling TV Out Image” on page 24.

65
Recovery
Restore and Recovery
Use the Restore and Recovery programs to repair yoursoftware.
Recovery SystemThe recovery process from the hard drive (eitherapplication or operating system) offers the followingadvantages:
■ Selective: Ensures that the recovery data is matchedto the particular PC model. You can easily recoveronly the application or system software you need.
■ Nondestructive: By recovering only the softwareyou need, you preserve user data and files.
■ Fast: Recovering only the necessary softwarecomponents, the recovery process is shorter andfaster from the hard drive.
Recovery CDsHP PCs with Windows XP feature a recovery partitionincluded on the hard disk drive, thus eliminating theneed for recovery CDs that may get lost or damaged.
If you have concerns completing a recovery procedurein “Using Application Recovery and System Recovery,”contact HP for help.
�To contact HPfor help withrecovery, call HPCustomer Care at208-323-2551,or go to http://www.hp.com/cposupport/
Please referto the SupportGuide, includedin the computerbox, for Supporttelephonenumbers,addresses,and Web siteinformation.

66
Using Application Recovery andSystem RecoverySystem restoreIf software on your hard drive gets erased or damaged,first use the Microsoft system restore feature in WindowsXP to restore the computer system and program settings.System restore returns the computer settings to a selectedrestore point without affecting user programs ordocument files. For more information, type SystemRestore into the Search box in Help and Support.
Freeing up space on your hard disk driveThe PC comes with a hard disk drive. Depending onyour model, the hard disk drive has 20 gigabytes (GB)to more than 160 GB of total disk space. The PC comeswith preloaded software programs and a partition withinthe hard disk drive that takes up a certain amount ofspace on the hard disk drive.
The partition:
■ Houses a backup version of the operating system andthe programs included with the PC.
■ Takes up about 5 GB of hard disk space, reducing thetotal amount of space available for your use.
■ Replaces the need for system and applicationrecovery CDs.
�Before usingthe HP SystemRecovery orApplicationRecoveryprograms, usesystem restore.
�The systemrecovery imageis in a partitionarea of the harddrive; this diskspace is notavailable foryour use.
Use the following procedures to:
■ View the amount of used and free disk space throughthe System Tools Disk Management program.
■ Uninstall unneeded programs.
■ Use the Disk Cleanup utility.
■ Reinstall programs that came with the PC.
Displaying hard disk spaceTo view the amount of space on the hard disk:
1 Click Start on the taskbar.
2 Click Control Panel.
3 Click Performance and Maintenance, if it ispresent.
4 Double-click Administrative Tools.
5 Double-click Computer Management.The Computer Management window opens.
6 Double-click Storage.
7 Double-click Disk Management (Local).
Information displays for each drive on your PC. You mayneed to scroll the window to the right to see the capacityand the free space sizes.

67
RecoveryIncreasing available hard disk space
You can free up space on the hard disk by uninstallingprograms or by using the Disk Cleanup utility to removeunneeded files.
To uninstall programs:
1 Click Start.
2 Click Control Panel.
3 Double-click Add or Remove Programs, if it ispresent.
4 Click the program, and then click the Change/Remove button.
5 Click OK when the confirmation window opens.
6 Repeat steps 4 and 5 for each program you want toremove.
7 Click Close.
To use the Disk Cleanup utility:
1 Click Start.
2 Choose All Programs.
3 Choose Accessories.
4 Choose System Tools.
5 Click Disk Cleanup. Wait for the calculations tocomplete.
6 Select the files you want to delete and click OK, andthen click Yes.

68
Application recoveryIf an individual application or software driveraccidentally gets erased or damaged, you can reinstallthe software by using the HP Application Recoveryprogram. Do not use application recovery to reinstallsoftware programs that came on CDs or DVDs includedin the computer box. Reinstall these programs directlyfrom the CDs or DVDs.
To start application recovery:
1 Close all applicationsand folders.
2 Click Start, chooseAll Programs,choose Hewlett-Packard, choosehp pavilionpc tools, and clickhp applicationrecovery. Therecovery box opens.
3 Click ApplicationInstallation orDriver Installation,and then click Next.
4 Select the driver orapplication program toinstall, and then clickInstall.
5 Follow the onscreeninstructions.
�Do not skip thelast step! Youmust restart thecomputer whenyou are finishedrecoveringapplications ordrivers.
6 Repeat steps 3 through 5 to install other drivers orapplications.
7 When you have finished recovering applicationsor drivers, close the application recovery program.Then click Start, click Turn Off Computer, andclick Restart to restart the PC.

69
RecoverySystem recovery
When other methods of repairing your system software(like system restore or application recovery) fail, youmay want to use the HP PC System Recovery programas a last resort to reinstall the software.
The system recovery program uses a special recoverypartition on the hard disk that stores an image of theoriginal operating system software and applicationsoftware. This disk space is not available for your use.
In the unlikely event that you replace the hard driveor somehow damage the data in the special recoverypartition on the hard drive, you must contact HP Supportfor help. For the HP Customer Care telephone number,see the note on page 65 or refer to the Support Guide,included in the computer box.
To start system recovery:
1 Turn off the PC. Disconnect all peripheral devicesfrom the PC except the monitor, the keyboard, andthe mouse. Turn on the PC.
2 Do one of the following:
■ If the computer responds: click Start, chooseAll Programs, choose Hewlett-Packard,choose hp pavilion pc tools, and click hp pcsystem recovery. Continue with step 3.
■ If the computer does not respond, press and holdthe On button until the computer turns off.Continue with step 5.
3 Wait until the System Recovery box appears askingDo you really want to start HP PC System Recovery?
4 Click Yes to continue the recovery process. Continuewith step 7.
5 Wait a few seconds and then press the On button toturn on the PC.
6 During the startup, do the following to enter theprogram: When the blue screen with the HP Inventlogo appears, press the F10 key on the keyboard.(You have only a few seconds to press the F10 keybefore the normal startup process continues.)
7 Follow the onscreen instructions.
8 Complete the computer startup, and finish theregistration process. Then reconnect all peripheraldevices.
�The HPMedia Center PCSystem Recoveryprogram willdelete any dataor programs thatyou installedafter purchase.Be sure to backup any data thatyou want to keeponto a removabledisc.

70
Important information aboutrecorded TV programsWhen you replace the hard disk drive, you lose anyfiles or software that you created, saved, or installed onthe PC. Because of this, you also lose a special code thatMicrosoft includes in the files of recorded TV programs.Without the code, Media Center will not play TVprograms previously recorded to disk, or copied toDVD or to other media.
�When you replacethe hard diskdrive, you canno longer playany previouslyrecorded TVprograms.

71
Index
Index
6-In-1 memory card readerlocating 6replacing or adding 52–53using 44
Aaccessing optical drives 49add-in cards
locating 47removing and replacing 58
adding memory 56adjusting volume 20application recovery, using 68applications 26–27audio cables, connecting 11audio out
analog 17digital 17
audio out connectors on PC 17autoscrolling with mouse 37
Bbatteries
installing in remotecontrol 39
type for remote control 39buttons
Eject (CD or DVD) 41Eject (diskette drive) 6Internet 35Mode 6Mute 36On 21
buttons (continued)optical drive 36remote control 40Volume 36
CCable Select jumper,
defined 51cables for TV connection 12CD
can’t remove from drive 64handling 41inserting 41recording onto 43
CD driveinstalling 51removing 50
cd writer plus driveinstalling 51using 42
computeraudio connectors 17back of PC 7box contents 4front of PC 6getting help 3getting started 2keyboard buttons not
working 61keyboard not working 62new device not working 60no sound 61not working 59, 60
computer (continued)opening chassis 46part of PC not working 60resources 3restarting from standby 60setting up ivturning off 28turning on 21using PC hardware 33won’t turn on 59working on safely 45
configure special keyboardbuttons 35
connectingaudio cables 11cables to TV 12headphones 20microphone 20monitor 8PC to TV 12printer 8remote sensor 10scanner 8set-top box 11signal source 11speakers 18to existing TV setup 14to Internet 9VCR 11
connections, optional 12connectors, location of 7Control Panel, opening 23
DDDR DIMM requirements 56desktop 23digital audio out 17digital out connector 17Disk Cleanup utility 67diskette drive
Eject button 6replacing or adding 52–53using 43
drives6-In-1 memory card
reader 44, 52cd writer plus 42, 51diskette 43, 52dvd writer 42, 50, 51DVD-ROM 42, 50, 51dvd/cd writer plus
(combo) 43, 50hard disk 52locating 47optical drives 49
DVDcan’t remove from drive 64handling 41inserting 41
DVD driveinstalling 51removing 50using 42

72
dvd writer driveinstalling 51removing 50using 42
DVD+RW/+R drive. See dvdwriter drive
dvd/cd writer plus (combo)drive
installing 51removing 50using 43
DVD/CD-RW drive, using 43
EEasy Internet Sign-up 22Eject button
CD or DVD drive 41diskette drive 6
error, USB Hub PowerExceeded 64
Ffan duct
locating 47removing and replacing 48
finding information 3floppy drive. See diskette drive:
usingfront port location 6
Hhard disk drive
displaying availablespace 66
freeing up space 66increasing available
space 67recovery partition 66replacing or adding 52–53
hardware not provided withPC 5
headphones, connecting 20Help and Support 3Help and Support icon 23help with computer 3hibernation mode
automatic 31manual 30
HP desktop 23HP Instant Support 3HP, registering computer
with 21HP software 26–27
Iinstalling
6-In-1 memory cardreader 54
CD drive 51diskette drive 54DVD drive 51
installing (continued)dvd/cd writer plus (combo)
drive 51hard disk drive 52
installing batteries in remotecontrol 39
Internet buttons 35Internet, connecting to 9Internet Service Provider,
selecting 22inventory 4
Kkeyboard
Internet buttons 35keys 33not working 62special buttons 34
keyboard buttons notworking 61
LLAN, connecting to Internet
through 9
MMedia Center
opening through Startmenu 23
opening with remotecontrol 38
Media Center Help 25
memoryadding 56determining module type 56locating 47
memory card reader, using 44memory modules, removing and
replacing 57microphone, connecting 20Mode button 6modem/telephone, connecting
to Internet through 9monitor
connecting 8not working 63
mouseautoscrolling with 37changing for left-handed
use 37not working 63optical 37panning with 37scrolling with 37using 37
Mute button 36
OOn button 21On button light flashing 41online help 3opening
computer chassis 46Media Center 25, 38

73
Index
operating system, backupversion 66
optical drive buttons 36optical drives
accessing 49removing and installing 50
Ppanning with mouse 37ports, location of 7power management settings 31printer
connecting 8not working 60
problems. See troubleshooting
Rrecording onto CDs 43RecordNow program 43registration information 21remote control
buttons 40installing batteries 39range 38using 38
remote sensor, connecting 10removing
6-In-1 memory cardreader 54
CD drive 50diskette drive 54DVD drive 50
removing (continued)dvd/cd writer plus (combo)
drive 50hard disk drive 52
removing and replacingadd-in cards 58fan duct 48side panels 46
restarting PC from standby 60
Ssafety warnings iiiscanner, connecting 8scrolling with mouse 37selecting Internet Service
Provider 22set-top box, connecting 11setting up computer ivsettings, power
management 31setup poster 3side panels, removing and
replacing 46signal source, connecting 11software 26–27solving problems.
See troubleshootingspeakers
connecting 18testing 18
standby mode 60automatic 31manual 29
Start menu 23support from HP 3system recovery, using 69system tray 23
Ttelephone line, connecting to
Internet 9television
cables to PC 12connecting PC to existing
setup 14getting reception 12
troubleshooting 59can’t remove CD/DVD from
drive 64corrupted files 60, 61error 64keyboard buttons not
working 61keyboard not working 62monitor not working 63mouse not working 63no sound 61PC won’t turn on 59unexpected startups 61
turning off computer 28turning on computer 21
UUSB Hub Power Exceeded
error 64using computer hardware 33
VVCR, connecting 11video display flickering 61volume, adjusting 20Volume buttons 36
Wwarnings
add-in cards overloadingPC 58
installing memory module 57recovering system 66removing memory module 57safety iiiusing wrong memory type 56voltage select switch 59
warranty 3

74