HP MANAGED PRINTER USER GUIDE - sheffield.ac.uk
16
HP MANAGED PRINTER USER GUIDE Loading Paper Trays Scanning Basic Copying Adding the printer queue Toner Replacement Locating Errors Standard Printing Print Release Accessibility Web print Email print Printing from phones *Please clean the printers and sanitise hands after use Need more help? Contact the IT Service Desk
Transcript of HP MANAGED PRINTER USER GUIDE - sheffield.ac.uk

HP MANAGED PRINTER USER GUIDE
Loading Paper Trays
Scanning
Basic Copying
Adding the printerqueue
Toner ReplacementLocating Errors
Standard PrintingPrint Release
Accessibility
Web printEmail printPrinting from phones
*Please clean the printers and sanitise hands after use
Need more help? Contact the IT Service Desk

Adding The New Print Queue.
If you are using a university managed Windows PC or a YOYO PC, the new printer queues will automatically be downloaded.
To use your own device you may need to set things up first.
Visit IT-Services web pages for instructions, or go to the Print Portal https://printaccount.shef.ac.uk/ and log in.
Please Note: You must be connected to the network or using a VPN if you’re accessing the Print Portal off campus.
Select your operating system from the list.
You will be directed to the correct instructions.
Follow the installation Instructions on this page.
This will install the two new print queues:
University_BWUniversity_Colour
Once completed you can print to thenew HP printers.
1
2

Submitting a print via Webprintor by E-mail
You can submit a job for printing via Webprint or by E-mail, allowing you to use the printers without installing the printer driver.
Log onto the web portal and sign in https://printaccount.shef.ac.uk/
On the left select web print from the menu.
You can also view:• Transaction history• Recent jobs• Pending jobs• Your balance
Press the green “Submit A Job Button”.
Follow the on-screen instructions to upload your document.
Release your print job at your chosen printer as usual.
To submit a print via email simply send your document as an attachment [email protected] or [email protected]
It will be sent to your secure print queue ready for release at your chosen printer
1
2
3
4

Printing from a Mobile Phone
Android Phones
Select Android from the left side.
Follow the onscreen instructions.
To print select a printer that hasthe Papercut icon next to it
The print job will be sent to yourPrint queue for release at your chosen printer.
1
2
3
iPhones/iPads
Select Apple iOS on the left-hand side.
Follow the on-screen instructions(You will need to use safari).
To print select a printer that hasthe Papercut icon next to it.
The print job will be sent to your printqueue for release at your chosen printer.
Go to the Print Portal https://printaccount.shef.ac.uk
1
2
3
4
4

1
2
3
Standard Printing
To print a document you need to select the correct queue from the driver list. The printing preferences are default to the following:
• Duplex (Double sided printing).• Black and White (Greyscale).
In order to change these settings please follow the instructions below:
Select File > Print from the MenuChoose either University-BW or University-ColourSelect Printer Properties Below the Printer name.
Select from the print properties:• Paper Size• Paper Source• Pages per Sheet• Print on both sides• Paper Type
Select Output then your required staple option.
Devices with this option can be found in the libraries.

1
2
3
Releasing print jobs
Go to any of the new HP managed printers.Swipe your card in the magnetic stripe readerto log in.
Alternatively you can sign in using your username and password by tapping Sign In.
Select the Bin Icon delete a job or Print.
When finished remember to tap Sign Out.
Select Print Release.
Select from the listed print jobs.
Select All Jobs to print all jobs listed within print queue.
4

1
2
3
Scan to My Email/Google drive
Go to any of the new HP managed printers.
Select Change Settings to amend the default scan settings.
Select Scan.
Choose from Scan to Email or Google Drive.
Select Start, documents will be automatically scanned to your Email Inbox or to your Google Drive.
4
Swipe your card in the magnetic stripereader to Log In.
1
2
3
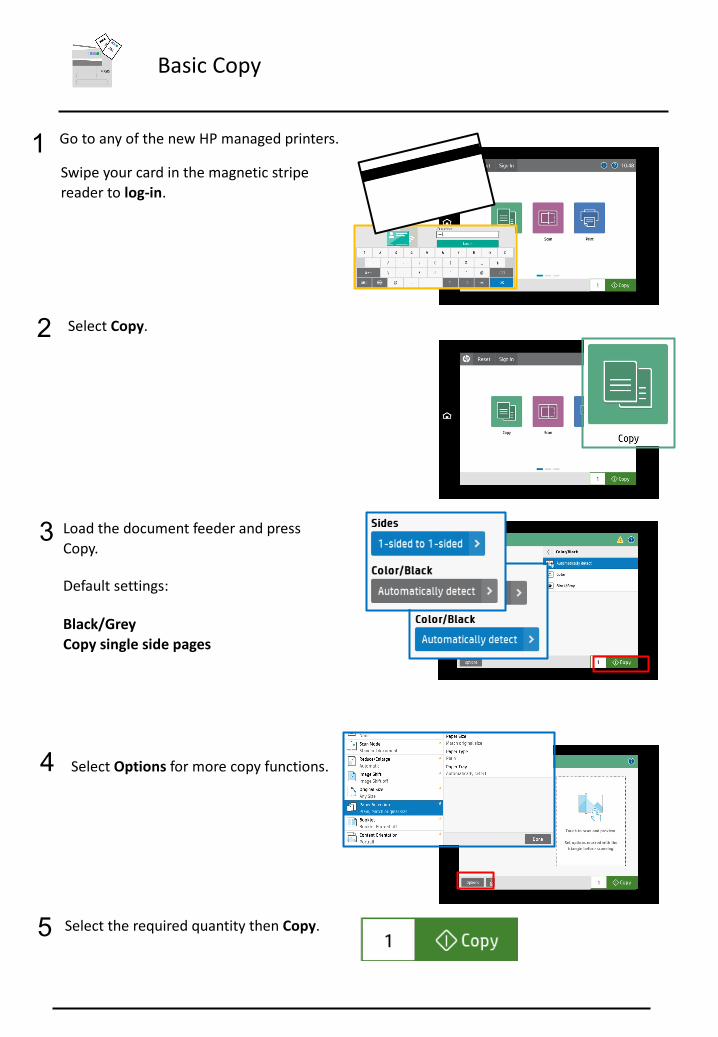
Basic Copy
Go to any of the new HP managed printers.
Select Options for more copy functions.
Select Copy.
Load the document feeder and press Copy.
Default settings:
Black/GreyCopy single side pages
4
5 Select the required quantity then Copy.
Swipe your card in the magnetic stripereader to log-in.

1
Accessibility
Select Accessibility from the Home Screen.
• High Contrast will adjust screen brightness.
• Invert Colours will adjust the colours to their opposites making it easier to read for some people.
• Screen Zoom will increase the size of the content displayed on screen.
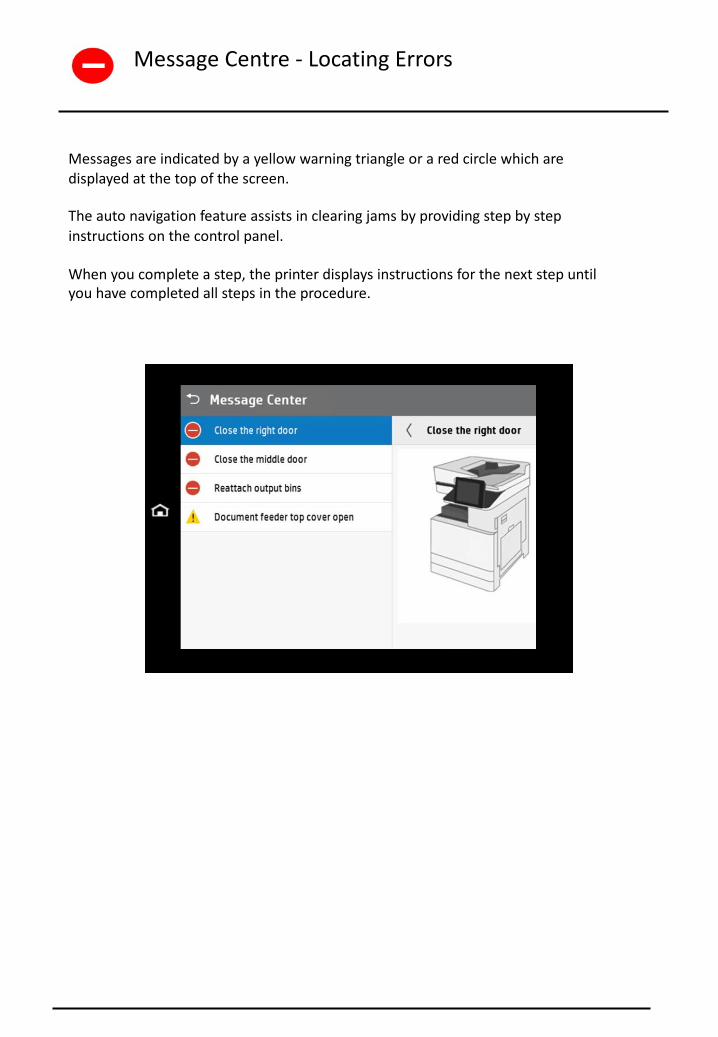
Message Centre - Locating Errors
Messages are indicated by a yellow warning triangle or a red circle which are displayed at the top of the screen.
The auto navigation feature assists in clearing jams by providing step by step instructions on the control panel.
When you complete a step, the printer displays instructions for the next step until you have completed all steps in the procedure.
3
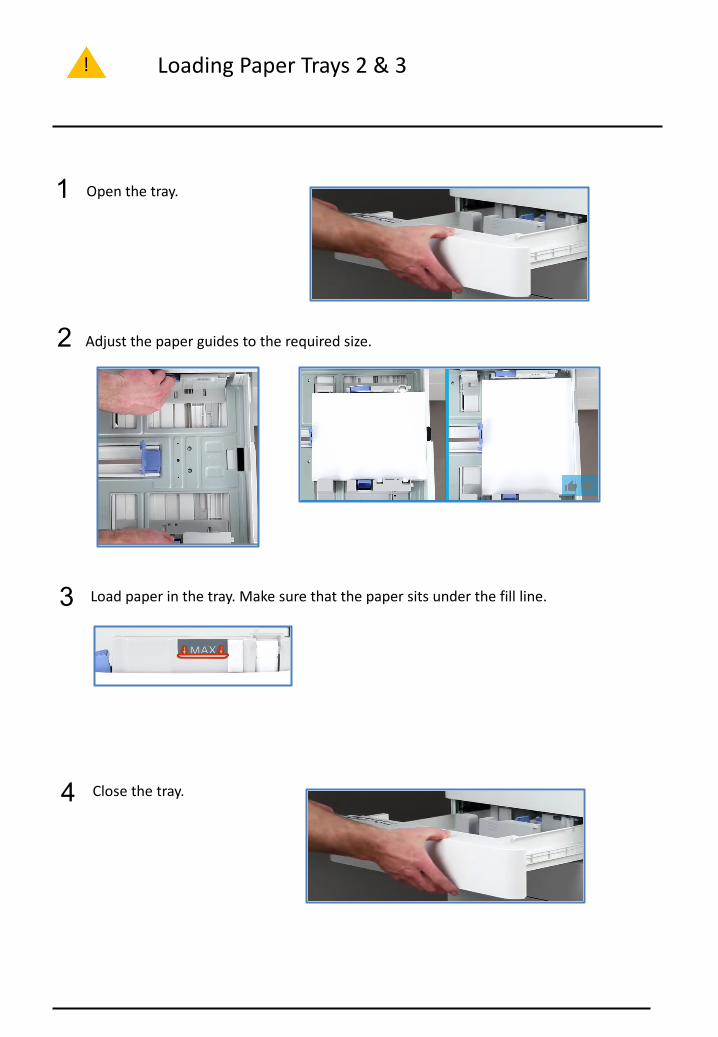
Loading Paper Trays 2 & 3
Close the tray.4
Open the tray.1
2 Adjust the paper guides to the required size.
Load paper in the tray. Make sure that the paper sits under the fill line.
3
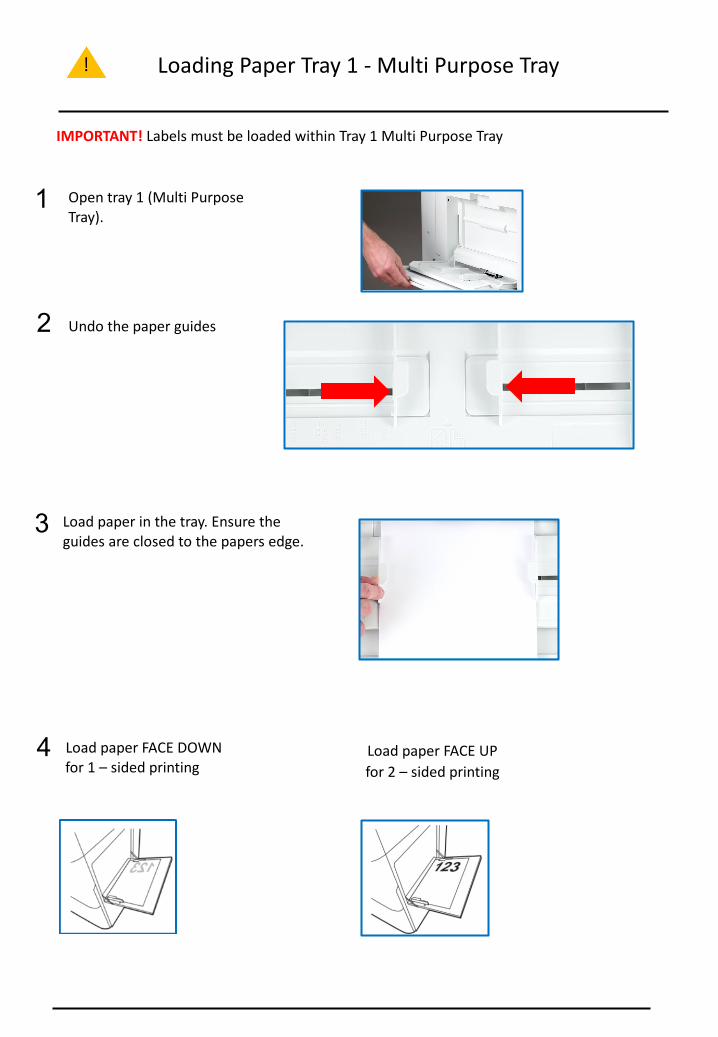
Loading Paper Tray 1 - Multi Purpose Tray
4
Open tray 1 (Multi Purpose Tray).
1
2
IMPORTANT! Labels must be loaded within Tray 1 Multi Purpose Tray
Undo the paper guides
Load paper in the tray. Ensure the guides are closed to the papers edge.
Load paper FACE DOWN for 1 – sided printing
Load paper FACE UPfor 2 – sided printing
3
4
1
2
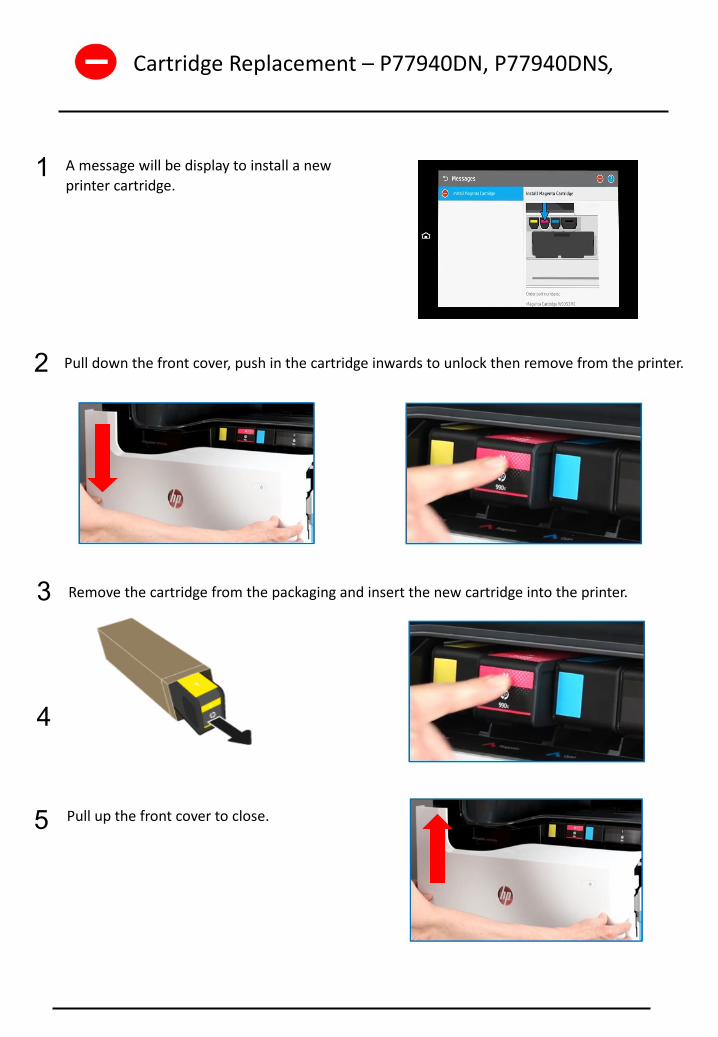
Remove the cartridge from the packaging and insert the new cartridge into the printer.
Cartridge Replacement – P77940DN, P77940DNS,
A message will be display to install a new printer cartridge.
Pull down the front cover, push in the cartridge inwards to unlock then remove from the printer.
Pull up the front cover to close.5

3
4
1
2
Recycle the old cartridge and remove the new one from the packaging. Don’t touch themedal contacts on the cartridge when inserting into the device.
Cartridge Replacement – E58650DN
A message will be display to install a new printer cartridge.
Pull down the front cover, push in the cartridge inwards to release then remove from the device.
Pull up the front cover to close.5
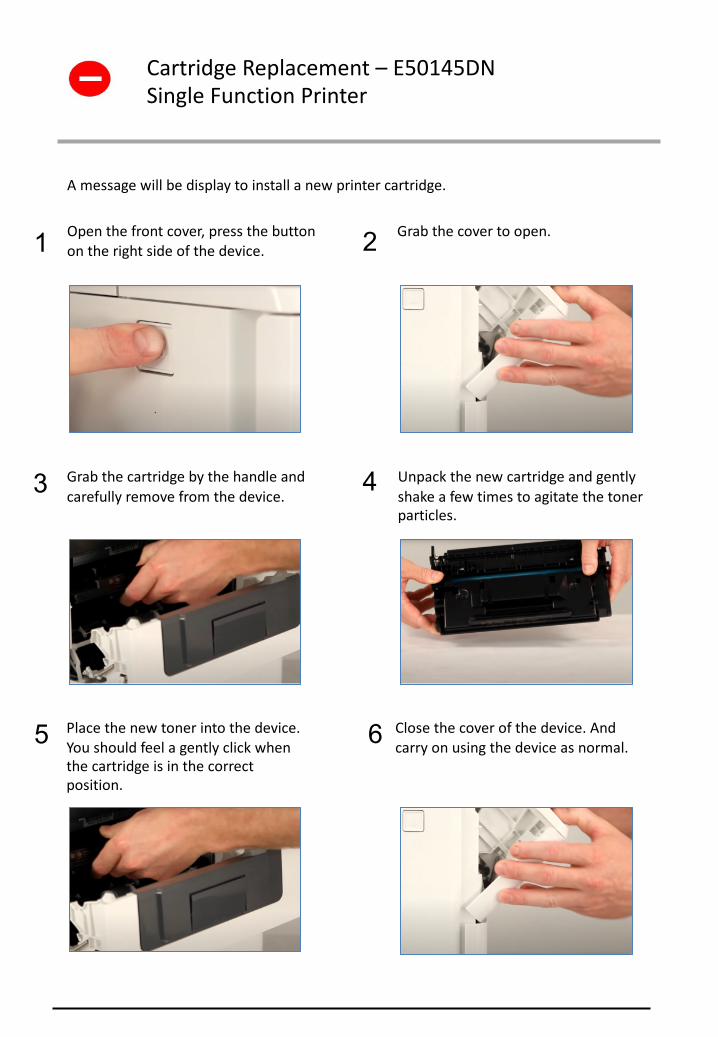
Open the front cover, press the button on the right side of the device.
Unpack the new cartridge and gently shake a few times to agitate the toner particles.
Place the new toner into the device. You should feel a gently click when the cartridge is in the correct position.
Close the cover of the device. And carry on using the device as normal.
A message will be display to install a new printer cartridge.
Cartridge Replacement – E50145DN Single Function Printer
1 2
3 4
5
Grab the cartridge by the handle and carefully remove from the device.
6
Grab the cover to open.

Need more help?
Contact the IT Service Desk (Self Service) in MUSE or call the IT Service Desk on 0114 222 1111 (Internal x.21111).
For training enquiries email:[email protected]